Download PCSX2 - Playstation 2 BIOS (PS2 BIOS)


No thanks, continue to download

How To Setup PCSX2 BIOS (The Right Way)
Home > Guides > How To Setup PCSX2 BIOS (The Right Way)

- Updated On: 04/09/2022
If you enjoy what you read and want to support an independent publication, you can join our Patreon to receive extra benefits and a physical welcome kit filled with official merchandise sent directly to your front door! View our premium benefits here . Thank you.
The Playstation 2 is still the king of best selling game consoles at over 155 million units (just barely beating out the Nintendo DS). And with nearly 2000 game titles in its library, there is no shortage of awesome content to keep you busy for a lifetime. Take a look at our list of the 50 best PS2 games for some reminders. But as we all know, game consoles become obsolete, unavailable and increasingly expensive as they age.
For retro gaming fans who do not still have the classic console in their entertainment setup… emulation might be the best option. There are a couple emulation programs available for the Playstation 2, but we gave PCSX2 our number one spot on our list of the best PS2 emulators . And for good reason… with open source applications available for Windows, Linux, and MacOS… PCSX2 has all bases covered. And while PCSX2 does make emulation extremely easy for players, it will need some tweaking to get it working perfect.
To hopefully make the process as easy and fast as possible, here is our guide for how to setup PCSX2 BIOS the right way.
Table of Contents
Step 1 – Install PCSX2

To get your copy of the PCSX2 program, all you have to do is a quick google search. For legal reasons we cannot link to this website or file. If you have ever downloaded and installed a program to your computer, this is gonna be familiar territory for you. Find your operating system on the Downloads page, grab the program, install it to your computer.
Step 2 – Install the PS2 BIOS

“In computing, BIOS (Basic Input/Output System) is firmware used to provide runtime services for operating systems and programs and to perform hardware initialization during the booting process”
For those who are not super tech savvy or do not understand big words… that basically means that certain hardware needs specialized firmware to run properly. And gaming consoles like the Playstation 2 use their own BIOS. For PCSX2 to properly know how to behave like a real Playstation 2, and interpret the games exactly as intended on the original hardware… using the Playstation 2 BIOS is a must. Don’t worry… once you install it, you will not have to think about it. Download the ZIP file and extract its contents to a folder on your computer.
You may want to place this folder within the installation folder of the PCSX2 program to keep them together, but it can be placed anywhere you wish. When you load PCSX2 for the first time, it will have you do some simple setup. It will ask about your default language settings for the Playstation , and it will also ask for the BIOS location. The BIOS location is going to be the folder of the BIOS files that you extracted. Select the folder location, and finish your initial setup of PCSX2. That should be everything necessary to get PCSX2 up and running!
Step 3 – Play some games

Your copy of PCSX2 should be ready to play some games now. You can obtain ROM files of your favorite games however you see fit (google em?). See our final notes about emulation and ROMs for our thoughts on its morality and legality if you wish. Once you have downloaded a game, you must make sure that you are loading an ISO format game file in PCSX2. If you downloaded the ROM from a website, it may have come packed within a ZIP file. All you have to do is extract the ISO file that is inside that ZIP folder, and it is ready to play. PCSX2 has a file menu at the top and to load the game ISO you navigate to “CDDVD > ISO Selector > Browse…” Selecting the browse option will open a window to locate your ISO file. Select the file wherever you have it on your computer, and it will be loaded into the emulator. Now navigate to “System > Boot ISO (fast)” and the game will begin.
We know, that all sounds quite complicated.
But once you have your emulator setup, you will not have to do it again.
And once you have learned the process of loading a game file and booting it, you will remember how to do it. It won’t feel so complicated once you have done it before. PCSX2 has additional options once you are within a game, and can even use controllers connected to your computer. So you will have to do some additional experimenting if you would like to take advantage of those features.
But we hope this guide makes the setup of PCSX2 easy, and gets you into a game as soon as possible.
About Emulation and ROMs
We recently released an article titled “ What does emulation mean? ” that covers some of the basics of emulation and ROMS. We also covered the topic of the the morality and legality of emulation in our article Are Emulators Legal? But in summation… it is our personal belief that there is no harm in the use of a ROM file to play a video game that is no longer on the market by the original developers and publishers. So download and use ROM files at your own discretion.
If you are here looking to install PCSX2, you have probably already came to the conclusion that you are okay with emulation and ROMs.
This article may contain affiliate links. If you use these links to purchase an item we may earn a commission.
Read Our Latest Posts

Nintendo World Championships Is Returning In 2024

Xbox 360 Red Ring Of Death – The History Behind Gaming’s Most Feared Fault Sign

Experts Discuss – Pokémon Leak Reveals 3 New Projects For The New Nintendo Switch Console

Like our content?
Join our Patreon Community.
- Receive A Retro Dodo Welcome Kit
- Invited To Our Yearly Meet Up
- Early Access To Video Content
- Join Our Private Discord Channel
- Support An Independent Publication
Follow Us On Socials
Navigation Menu
Search code, repositories, users, issues, pull requests..., provide feedback.
We read every piece of feedback, and take your input very seriously.
Saved searches
Use saved searches to filter your results more quickly.
To see all available qualifiers, see our documentation .
- Notifications
Releases: PCSX2/pcsx2
- Common: Missed MAP_FIXED -> MAP_FIXED_NOREPLACE
- Common: Fix Mac build
- GS: Increase sensitivity of texflush but avoid some situations
- Docs : update configuration guide
- Misc: Always enable full mipmap with ps2 trilinear by default
- Deps: Bump Qt to 6.7.1
- Fix building with gcc14
- PAD: Update to latest controller database
- GS/HW: Adjust conditions for CPU sprite renderer
- 👍 1 reaction
- GS/HW: Improve texture shuffle double direction with future draw
PCSX2 is an open-source PlayStation 2 emulator for Windows and Linux. Since 2016, it has also supported the PlayStation 2's backward compatibility mode for PlayStation games. [2]
- 2.1 Windows XP/7/8.1 Compatibility
- 3.1 Gamepad
- 5.1 Automatic game fixes
- 5.2 Major graphical glitches
- 5.3 Poor performance in software mode
- 5.4 Multi-threaded microVU
- 5.5 Crashes
- 5.6 Extreme fluctuation in emulation speed
- 5.7 Intermittent warped audio
- 5.8 Blurriness
- 5.9 Black lines
- 6.1 Pressure-sensitive buttons
- 6.2 Lightgun support
- 7 Multiplayer on PCSX2
- 8 References
- 9 External links
Download [ edit ]
Note that the stable builds are severely outdated. You should use the nightly/dev builds instead unless they contain regressions.
System requirements [ edit ]
See Computer_specifications#PCSX2 .
Windows XP/7/8.1 Compatibility [ edit ]
Despite Windows 7 and 8.1 NOT being officially supported, 1.7-dev builds (up to version v1.7.3581) of PCSX2 can work with a few workarounds . You'll need:
- 1.7.3581-wxWidgets build
- dxvk OR reshade
For starters, extract PCSX2 in a folder and then extract the 64-bit dxvk: d3d11.dll and dxgi.dll OR extract Reshade.exe: and rename "reshade64.dll" to "dxgi.dll" and then move this file next to the main PCSX2 executable. You'll also need to select Cubeb as the audio renderer. Otherwise, it'll crash with XAudio. And lastly, always pick between Vulkan, OpenGL and Software. D3D11/D3D12 can crash occasionally, and it won't function as intended anyways. Don't expect any official support if you post logs showing you're using Windows XP, 7, 8, or 8.1.
For Windows XP, use this build. You don't need workaround for this build. Note that this build does not include the Direct3D9 renderer (or any DirectX rendering). If you want to use the old D3D9 renderer, you will need to use the official build 1.4.0 which is the last to officially support Windows XP.
Latest wxWidgets build (but its not compatible with Win7, 8 and 8.1 workaround because of fast memory implementation): v1.7.3771 .
Setup [ edit ]
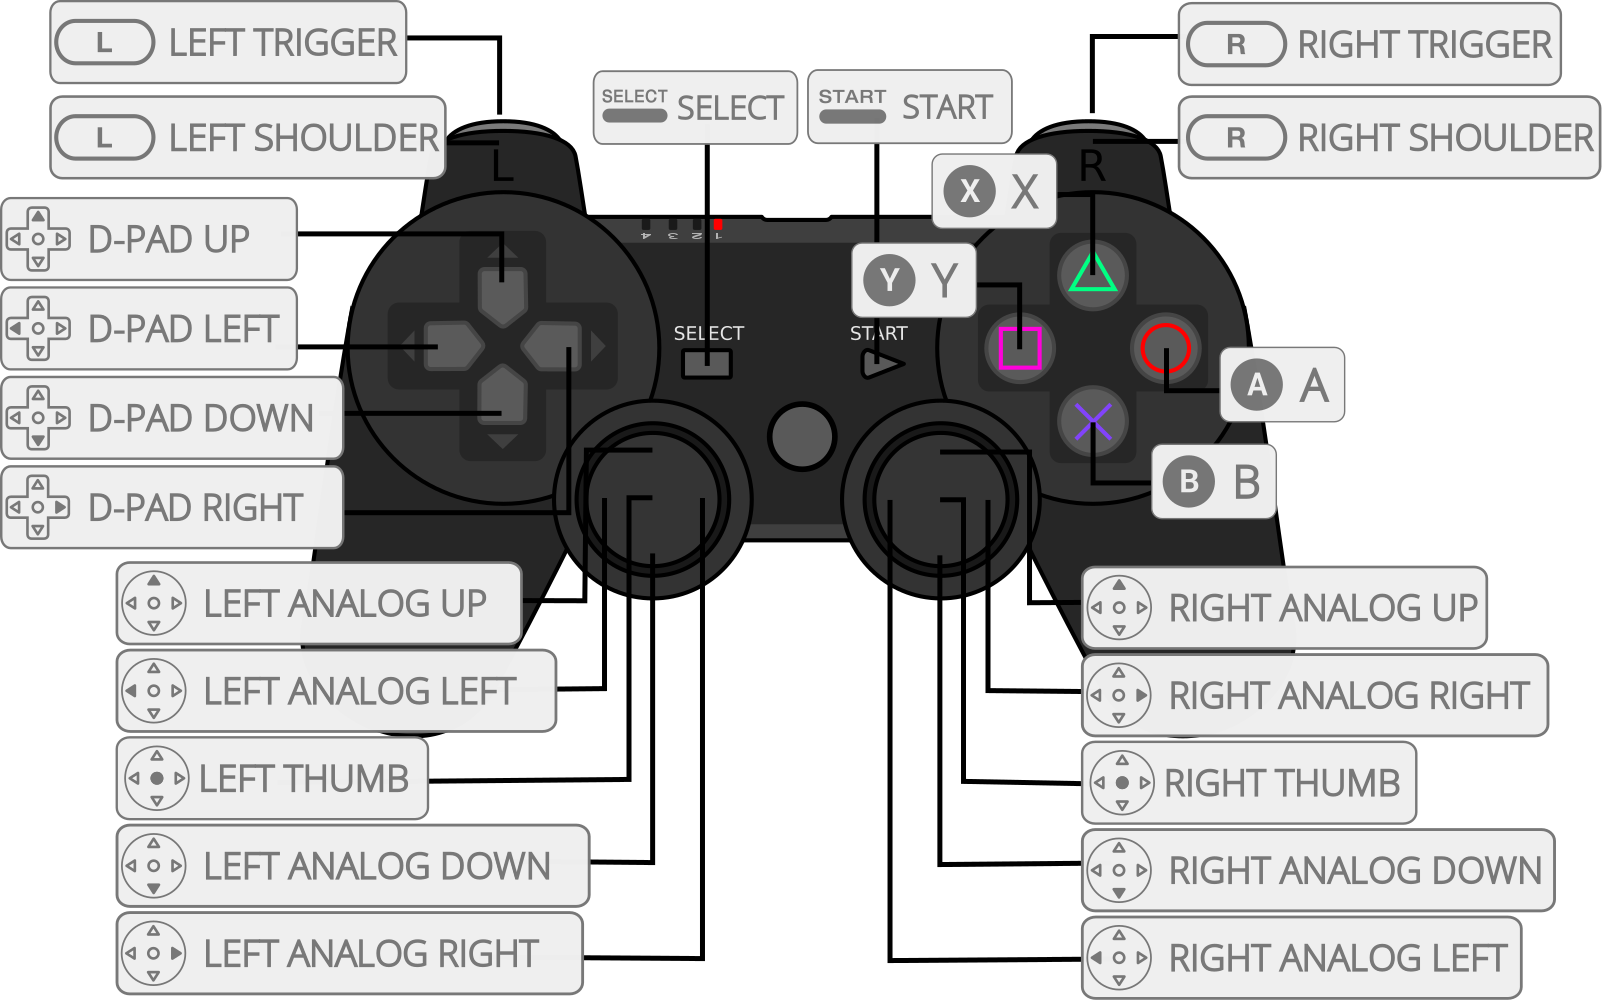
Gamepad [ edit ].
Native DS3 controls with LilyPad-SCP - Import this with the 'Load Bindings' button in LilyPad's config.
Either that, or you can use the Pokopom XInput Plugin. If you use a DualShock controller running under an XInput wrapper such as SCP Server, then this plugin is a no-brainer. It's very customizable, and you don't have to configure it beforehand. All of the buttons are bound at startup.
Video [ edit ]
Most of the video options should be straightforward, with the possible exception of interlacing modes. Many games will run fine with 'None', while others may experience artifacting or jitter. "Auto" is recommended.
- "Sawtooth" is not recommended at all. Artifacting is far too heavy to be usable.
- "Bob" has reduced artifacts, but jitter can still occur.
- "Blend" has the least amount of jitter. However, it can cause blurriness. The Blend interlacer does frame-blending. This is also known as motion blur. This means that if there is heavy jitter, the video output will be extremely blurry since the two jittering frames will blend together. Only use this interlacing method as a last resort.
You can cycle through the options with F5 to quickly test them out.
To completely eliminate the de-interlacing issue, the community has made patches/hacks for a lot of games that can be loaded through a .pnach file, like a cheat code. Those can be found in the PCSX2 wiki or forums.
Another method to get around this in older versions (custom res as an option was removed) is by running GSdx in hardware rendering, doubling the vertical resolution (if a game displays 640x480 on the emulator window, set vertical res to 960) and selecting bob-tff for interlacing. This can eliminate interlacing artifacts in most cases, although issues with upscaling, as well as using hardware emulation over software, can arise.
Overview [ edit ]
PCSX2 was originally created in 2001 by Linuzappz and Shadow as the successor to PCSX , another PlayStation emulator. Development of PCSX ceased on September 17, 2003, to focus on PCSX2. When version 0.9.8 was released in May 2011, only 55% of the PS2's library was considered supported. [3]
A significant number of quality-of-life changes have come about since the project moved to GitHub, with a renewed interest in bringing it up to par with emulators for similar-gen consoles. Until mid-2021, PCSX2 was a holdout of the plugin system, despite development of each plugin eventually consolidating into the main repository. While the stable 1.6.0 build still contains the plugin API, the nightlies no longer have it, as it was removed entirely in PR 4436 . Compatibility has also seen major improvements across the board, to the point where every game at least boots. As of January 2022, 98% of the PlayStation 2 library is considered playable, although only 26 games are marked as perfect.
A pull request adding x86_64 support was opened on June 7, 2020 , and both 32-bit and 64-bit builds for Windows, macOS, and Linux were first made available on July 4 . [4] The plan is to reduce so-called "technical debt", including game-specific hacks that cause accuracy issues and bugs in the 32-bit builds, as well as broaden support for more platforms and devices such as ARM64 chips.
A pull request removing x86 support was opened on December 9, 2021 , and the last 32-bit build and first 64-bit-only build were made available on March 19, 2022.
PCSX2 is also able to run PS1 games by emulating the original hardware's built-in backward compatibility. Unfortunately, there's some PS1 software that doesn't run correctly (if at all) on a real PS2 and therefore is unlikely to be compatible with this emulator either, so you'll still need a more straightforward PS1 emulator for those. PCSX2's PS1 support is inaccurate even compared to a real PS2, and it was largely added as a proof-of-concept and is only really useful for novelty purposes.
Issues [ edit ]
Automatic game fixes [ edit ].
Whenever you encounter any kind of bug that isn't graphical in nature, objects going through other objects, untargetable objects that should be targetable or A.I. freezing, for example, make sure that the automatic game fixes option from the system menu is activated.
Major graphical glitches [ edit ]
Graphical problems such as corrupted textures, missing effects, clipping light sources, burn-in or transparent objects being opaque can usually be solved by switching to the software renderer by pressing F9 while the game is running or via GSdx's config panel. If using the Direct3D 11 renderer, try the OpenGL renderer, as it may be more accurate. If you're using a stable build, try switching to the most recent nightly or dev build. Newer development builds of the emulator may have fixes or other features added to the hardware renderers, which remove common glitches like red or green bars appearing on the screen.
Poor performance in software mode [ edit ]
Many games will require you to switch to software mode to fix various issues, albeit at the cost of a significant performance loss. However, an easily overlooked setting in the graphical plugin configuration panel, extra rendering threads, might help lessen the performance loss if you have a quad-core or higher CPU. It is recommended to set it to the number of cores in your CPU minus one if you aren't using the MTVU speed hack or minus two if you are (ex: if you are using a quad-core CPU, you should set this number to 3 without MTVU and 2 with MTVU). The process described above is partially automated in recent development versions of PCSX2, but you might still need to tweak it to get optimal performance levels
Multi-threaded microVU [ edit ]
Multi-threaded microVU (MTVU), while generally a very useful speed hack, might sometime cause minor problems like hanging and absence of performance gain, or more severe ones like massive performance hits, save-state corruption (PCSX2 keeps a backup you can load with Shift+F3 in case any issues arise), or just plain crashing.
Crashes [ edit ]
Crashes could be the result of several things. Switching between hardware and software rendering rapidly is likely to cause the emulator to lock up. This can be easily avoided by waiting a few seconds after switching between hardware and software rendering before switching again. If your GPU drivers also crash simultaneously (or you get massive graphical corruption on your desktop and/or a BSOD while trying to run a game), this means you're either using outdated drivers, or you're trying to use an AMD card with the OGL renderer and Blending Accuracy set to none, in which case, either set it to basic or higher or use the DX11 renderer instead. in which case either set it to basic or higher or use the DX11 renderer instead. If the log warns you about TLB miss, you are either:
- Using a bad dump of a game, in which case you'll need to re-rip your disc or re-download the game you are trying to play.
- Playing the game directly from your DVD drive, in which case you should rip the game and play using the .iso instead (it's not advised to play directly from your DVD drive).
- Trying to play a game that isn't supported by the emulator, in which case you cannot do anything except trying another version of the game (PAL or NTSC-J, for example).
- Trying to play a game with a massive, or in some cases, any EE overclock applied, in which case turn it back down in the speed hack menu.
- You need to check the Wiki to see if the game requires any specific settings regarding the Clamping Mode of the EE/VU.
- Cheats used in the game's .pnach file are invalid.
If PCSX2 still crashes after doing all of the above, check that you aren't using any speed hacks and that your system is stable and not overheating. Especially if you're overclocking.
Extreme fluctuation in emulation speed [ edit ]
The large fluctuation in emulation is often caused by the games themselves and cannot be avoided, but there are a handful of cases where this is caused by specific configuration issues.
- Using a large internal resolution multiplier on a low-end GPU, even if the game runs mostly fine, can cause the emulator to suddenly need to do a lot of cumbersome operations on the VRAM. Low-end GPUs tend to have much lower VRAM bandwidth and will get crushed by that. This is especially true when using Large Framebuffer and even more so when using the OGL renderer. Obviously, the only real fix is turning the resolution down and disabling Large Framebuffer if possible
- Playing games directly from the original DVD using a disc drive, in which case you should rip the game and play using the .iso instead
- Having the Blending accuracy set too high in the OGL renderer (Full and Ultra mostly)
- Using EE overclock in some games
Intermittent warped audio [ edit ]
Due to how the synchronizing function of the audio plugin works, even when running games on a computer capable of going way above 100% speed in a stable fashion, random bits of time-stretched audio can be heard occasionally or even frequently. There are, however, a few ways to work around that issue.
- Set the audio syncing method to Async Mix (can cause A/V sync issue, not recommended with rhythm games), do not set it to None as it basically does the same thing as Async Mix but has more issues
- Unlock the PCSX2 framerate limiter and use an external one, such as MSI Afterburner
Blurriness [ edit ]
It's either interlacing or a filter in the game itself. For the former, switching the de-interlacing mode with F5 may help and cause flicker or screen shaking. For the latter, hacks are required. Either Aggressive-CRC if the game is listed there, or skipdraw (toy with the numbers 1-100) might work otherwise.
Black lines [ edit ]
Black lines are caused by scaling to a non-integer internal resolution (anything other than Yx Native), texture filtering (Try anything that isn't bilinear (Forced), improperly offset textures (TC Offset, Wild Arms Offset hacks, Half-Pixel Offset), or improperly handled texture edges (Merge Sprite hack, Sprite/Round Sprite combobox). The native resolution, for the most part, fixes these issues. However, software rendering may be required as well.
Special hardware [ edit ]
Pressure-sensitive buttons [ edit ], lightgun support [ edit ].
Lightgun support was available in the PCSX2 emulator via a third-party plugin called nuvee. [5] This is no longer relevant since the removal of the plugin system, now PCSX2 handles lightgun support by itself.
Multiplayer on PCSX2 [ edit ]
See PlayStation 2 emulators#Hardware features and accessories -> LAN or Network Adapter sections, also you can use LAN tunelling for offline multiplayer play.
References [ edit ]
- ↑ Bositman (November 24, 2021). AetherSX2 brings PCSX2 to mobile . PCSX2.net .
- ↑ https://github.com/PCSX2/pcsx2/pull/1571
- ↑ refraction (November 25, 2010). The History of PCSX2 . PCSX2.net .
- ↑ PCSX2 now has a 64-bit version . Reddit ( 2020 Jul 04 )
- ↑ https://lightgungamer.com/pcsx2
External links [ edit ]
- Official compatibility list
- Official PCSX2 setup guide
- NeoGAF guide
- PCSX2 widescreen game patches and widescreen hacks
- 60 fps codes
- Emulation64 Spotlight Interviews with original PCSX2 developers: Shadow linuzappz Refraction
- The PlayStation 2: From Emotion to Emulation - Celebrating 20 Years of Reverse Engineering
- Multi-emulators
- Console emulators
- Home console emulators
- PlayStation 2 emulators
- Windows emulation software
- Linux emulation software
- MacOS emulation software
Navigation menu
Personal tools.
- Not logged in
- Contributions
- Create account
- View history
- Recent changes
- Random page
- Help about MediaWiki
- What links here
- Related changes
- Special pages
- Printable version
- Permanent link
- Page information
Advertisements
- This page was last edited on 30 April 2024, at 20:17.
- Privacy policy
- About Emulation General Wiki
- Disclaimers
- Mobile view
- Sega Genesis Mini
- Facebook Portal
- RetroAchievements
- Softpatching ROMs
- Video Recording and Streaming
- Troubleshooting
- Generating Logs
- RetroArch Cloud Sync (Apple Devices)
- Lakka Documentation
- Other required files and directories
- Directories
- Rumble support
- Compatibility
- External Links
- Libretro PS2 cores
- Sony - PlayStation 2 (Play!)
- Sony - PlayStation Portable (PPSSPP)
- Doom (PrBoom)
- Doom 3 (Boom3)
- Dungeon Crawl Stone Soup
- Flashback (REminiscence)
- Handheld Electronic (GW)
- Jump n Bump
- Lua Engine (Lutro)
- Minecraft (Craft)
- Mr.Boom (Bomberman)
- Quake 1 (TyrQuake)
- Rick Dangerous (XRick)
- RPG Maker 2000/2003 (EasyRPG)
- The Powder Toy
- Tomb Raider (OpenLara)
- Uzebox (Uzem)
- WebAssembly (WASM-4)
- Wolfenstein 3D (ECWolf)
- Adding New Languages to RetroArch
- Helping With RetroArch Translations
Sony - PlayStation (LRPS2) 
LRPS2 is still under development. The content on this page is not the final version. Connecting a remote while any content is running may cause retroarch crashes. If you get a failed to load content warning, respectively; Check your BIOS, video driver(try to switch between drivers, use 'GL') and content. There’s a working OpenGL renderer and a Direct3D11 renderer option. Direct3D 11 renderer can be faster than OpenGL but also has less features. Pick whichever works best for you. On Xbox you will only be able to use Direct3D11 anyways. This core uses the x86_64 dynarec. It is still less compatible than the 32bit x86 dynarec in PCSX2, so keep that in mind. It’s for similar reasons that the software renderer right now won’t work (it’s not compatible yet with x86_64, not in upstream either). There’s a bug that can happen right now upon closing content or exiting RetroArch with the LRPS2 core on Windows – the RetroArch process might not completely cleanly shut itself off and you might still be able to see a 0% CPU process remaining in the Task Manager. We have not been able to figure out how to fix that yet as the PCSX2 codebase is a definite case of ‘here be dragons’, but for now when this happens, you can just bring up the Task Manager and close it manually. It shouldn’t have a real detriment on performance but it is of course far from ideal and hopefully something we can fix soon with the help of some contributors. We have found this happens the most with the Direct3D 11 renderers. Switching resolution at runtime right now can be a bit unstable, so does switching fullscreen resolution. We might just make resolution switching require a restart since this tends to be too unstable for now.
LRPS2 core has been authored by
LRPS2 core is licensed under
A summary of the licenses behind RetroArch and its cores can be found here .
Requirements 
- Supports SSE2/AVX2
- PassMark Single Thread Performance rating near or greater than 1600/2100
- Two physical cores, with hyperthreading
- Four physical cores, with or without hyperthreading
- Direct3D10/11 support
- OpenGL 3.x/4.5 support
- PassMark G3D Mark rating around 3000 (GeForce GTX 750)
- 2 GB/4 GB Video Memory
Because of the complex nature of emulation, even if you meet the recommended requirements there will be games that will NOT run at full speed due to emulation imperfection, floating point emulation differences, issues with emulator itself or other problems.
BIOS 
For compatibility reasons, it is recommended to not use a SCPH-10000 BIOS.
- No specific filename required, as long as the BIOS was properly dumped the core will be able to find it.
- The BIOS files must be extracted, the core will not be able to find them if they're zipped.
- LRPS2 does not implement region locking, so if you have a PAL BIOS you can play NTSC games, and vice versa. However, this only applies with the Fast Boot core option enabled.
LRPS2 requires a BIOS to work, the BIOS can be provided as a single 4MB .bin file or with additional files (usually .erom, .nvm, .rom1 and .rom2).
In case you're having additional files with the .bin, make sure they're sharing the same filename or they'll be ignored. So as an example let's say you have a SCPH-70004_BIOS_V12_EUR_200.BIN file with an EROM file, a ROM1 file and a ROM2 file, it should look like this:
How to set up your BIOS: 
- Go inside your RetroArch "system" folder (usually retroarch/system/ , but if you're not sure check the path in Settings > Directory > System/BIOS ).
- Create a pcsx2 folder.
- Go inside the pcsx2 folder and create a bios folder.
- Go inside the bios folder and paste your BIOS file(s) here.
For example, the default path would look like this: system\pcsx2\bios\[bios_file_name].bin
If you're on a case-sensitive OS, make sure both pcsx2 and bios folders are lowercase.
Other required files and directories 
The file structure should look like this:
- bios/ is where the BIOS files are located (see the 'BIOS' section above), this should be created by the user.
- cheats/ is where you can store cheat patches, the folder is created on the first boot automatically.
- cheats_ws/ is where you can store additional widescreen patches, the folder is created on the first boot automatically.
- memcards/ is where the "legacy" memory cards are stored. This folder is optional, see the 'Directories' section below.
Although the cheats_ws folder is empty when created, a very large number of widescreen patches are already included in the core itself.
Extensions 
Content that can be loaded by the LRPS2 core have the following file extensions:
RetroArch database(s) that are associated with the LRPS2 core:
- Sony - PlayStation 2
Features 
Frontend-level settings or features that the LRPS2 core respects.
Directories 
LRPS2's library name is 'pcsx2'
LRPS2 core saves/loads to/from these directories.
Frontend's Save directory
- Memory card - slot 1
retroarch/saves/pcsx2/Slot 1/
- Memory card - slot 2
retroarch/saves/pcsx2/Slot 2/
Frontend's System directory
- Legacy memory cards
retroarch/system/pcsx2/memcards/
The legacy memory cards folder is only used if Mcd001.ps2 and/or Mcd002.ps2 is detected in retroarch/system/pcsx2/memcards/ and the "Memory Card: Slot N" core option is set to "Legacy". This can be useful if you were using an older version of the core that didn't use the saves folder yet, or if you transferred the memcards folder directly from standalone.
Rumble support 
Rumble only works in the LRPS2 core when
- The content being ran has rumble support.
- The frontend being used has rumble support.
- The joypad device being used has rumble support.
- The corresponding user's device type is set to DualShock 2
Joypad 
Compatibility 
The current standalone development version is reported to be compatible with approximately 97.4% of 2,641 tested games as of August 2020. Compatibility means only that the game will not crash, lock up, or enter a loop; there can still be bugs, missing post-processing effects, textures, and shadows in many compatible games. This is especially the case in hardware mode; a slower software mode is available for bugs without workarounds. You can check compatibilirt list in here
External Links 
- LRPS2 Core info file
- LRPS2 Github Repository
- Report LRPS2 Core Issues Here
Libretro PS2 cores 
- PlayStation 2 (Play!)
Overscan cropping available via Core Options instead of frontend settings ↩
Retro Game Corps
PS2 and PS1 BIOS Extraction Guide

Last updated: 17FEB2023 (see Changelog for details)
In this guide I’ll show you how to safely extract your own BIOS files to use with PS2 and PS1 emulators, thanks to a new tool that works with the official Sony PS3 firmware update file. No longer do you need to rely on a hacked console (or shady websites) to acquire your BIOS files! These BIOS can then be used in many popular emulators like PCSX2, AetherSX2, DuckStation, and RetroArch.
Required software
To get started, we need three tools to extract the BIOS files. I also recommending installing 7zip if you haven’t already, since it will be helpful in extracting these files on your desktop. Note that this guide is written for Windows PCs, but it is also possible using a Linux machines by following the Linux README file found within the BIOS Claim Tool linked below.
PS BIOS Claim Tool — this is a batch file that will extract the PS2 and PS1 BIOS files from the official PS3 firmware update file. To download, find the link that says “ZIP” on the right side of the page, and download that file. This file will need to be extracted, and the files you are looking for are found within the Windows folder:
RPCS3 — this is a PS3 emulator. You will need to run this program one time on your PC and install the official PS3 firmware (more on that below). This file will come zipped in 7z format, so you will need to extract it using a tool like 7zip.
PS3 System Software Update file — Sony provides their latest PS3 system software on their website so it can be saved to a flash drive and plugged into a PS3 to update. This file can also be obtained from many PS3 retail discs. We’re going to extract our BIOS files from this update file using the two tools we downloaded above. The file will be named PS3UPDAT.PUP and you can get it from right-clicking on the blue button that says “Download PS3 Update” and selecting “Save File As…”
Extraction process
The extraction process is covered in the video above, but here is a quick summary:
- Download the three files above, then extract the PS BIOS Claim Tool and RPCS3 into their own folders.
- Run RPCS3, and go to File > Install Firmware and locate the PS3UPDAT.PUP file. The installation process will take a couple minutes — it will also compile the PPU Modules at the same time. Once this process is complete, you can close RPCS3.
- Take the two PS BIOS Claim Tool files ( firmware_bios_claim.bat and firmware_bios_claim.ps1 ) and place them inside the RPCS3 main folder. Double-click on the firmware_bios_claim.bat file and run this batch file. You may get a warning from Windows security, just select Get Info > Run Anyway. This will take a moment to run through the batch file, and you will get a notification within the terminal window that the process is complete.
- Inside the RPCS3 folder you should find your new PS2 and PS1 BIOS files! They are named as such:
RetroArch notes
The standalone emulators like PCSX2, AetherSX2, DuckStation, and ePSXe will all use these BIOS files right out of the box, but RetroArch is a little trickier. Here are some notes to help you if you want to try them in RetroArch:
- The PS2 BIOS is currently not working with RetroArch’s PCSX2 core, so you will need to use them with the standalone PCSX2 emulator (or AetherSX2 on Android).
- The SwanStation core should boot the PS1 BIOS file no problem, no further alteration is needed.
- The Beetle PSX core will boot the PS1 BIOS after you rename it to PS1_rom.bin . When first using the core, it will give you an error and say that the BIOS is not found; to fix this, go into Quick Menu > Core Options > Emulation Hacks > Override BIOS (Restart Required) > PS3 PS1 BIOS. Also make sure that the Skip BIOS option is turned OFF. Restart the game/core and it should now boot fine.
- The PCSX Re-ARMed core does not appear to detect the PS1 BIOS at this time, even if you rename it. The core can use HLE BIOS by default, and so you can still play most PS1 games on this core without a proper BIOS file.

What’s next?
Now that you have extracted your own BIOS files, you have a couple things you could do next.
First, you could take your old PS1 and PS2 discs and rip them into ISO format files. This process is very easy thanks to a tool called IMGBURN and its ability to read disc files. Here is a quick tutorial on how to extract the ISO files from your PS1 and PS2 discs.
After you have extracted your games, I recommend checking out my ROM compression guide to learn how to compress PS1 and PS2 ISO files into CHDs, which have a much smaller file size.
17FEB2023 – published guide – added What’s next section.
Spread the word:
One thought on “ ps2 and ps1 bios extraction guide ”.
Hey my load and save files and not working how can I fix this plz let me know how I can fix this I can’t save anything saved stoped working after a month
Leave a comment Cancel reply
- Already have a WordPress.com account? Log in now.
- Subscribe Subscribed
- Copy shortlink
- Report this content
- View post in Reader
- Manage subscriptions
- Collapse this bar
- Disk & Data Manager
- Partition Wizard
- Power Data Recovery
- ShadowMaker
- Media Toolkit
- uTube Downloader
- Video Converter
- Download Partition Wizard Free Edition: Download Pro Edition: Try Demo Server Edition: Try Demo
- Partition Manager
PCSX2/PS2 (PlayStation 2) BIOS: Definition, Download, and Setup
What is pcsx2 bios.
PS2 BIOS are files that enable you to run Play Station 2 Roms on your PC. It means that you can play PlayStation 2 games on your computer thanks to PCSX2 BIOS. It offers a chance for gamers who want to play PlayStation 2 games but they don’t have a PlayStation 2 console.
Further reading:
You need to know that PCSX2 BIOS has the following features.
- Add more options to control the game
- Change and optimize the game engine
- More stability when simulating the game
- Cover more games to run and simulate
- Make fundamental changes to run better games
- Optimization of the possibility of passing through the frames
To use PS2 BIOS, you should have a PCSX2 emulator installed on your computer, Linux, macOS, etc. Here comes the need of PCSX2.
PCSX2 (also called PS2), a free and open-source PS2 emulator for Windows, Android, iOS, Linux, and macOS, supports a wide range of PlayStation 2 video games. It has a high level of compatibility and functionality. It is built to emulate the PS2’s hardware using a combination of MIPS CPU Interpreters, Recompilers, and a virtual machine used for managing hardware states and PS2 system memory.
Playing PS2 games on your computer with PCSX2 brings you some extra features and benefits. They are summarized as follows.
- Custom resolutions and upscaling
- Virtual and sharable memory cards
- Save-states
- Patching system
- Internal recorder to achieve lossless quality at full speed
![Xhamstervideodownloader APK for PC/Mac/Android [Free Download]](https://images.minitool.com/partitionwizard.com/images/uploads/2022/03/xhamstervideodownloader-apk-for-win10-pc-thumbnail.jpg "new bios ps2")
What is Xhamstervideodownloader APK? How to download the Xhamstervideodownloader APK for Windows 10 PC, mac, or Android devices? Here are answers.
PCSX2 BIOS Download
Before starting the PCSX2 BIOS download process, you should download the PCSX2 emulator first. Click here to download it, and then find and double-click pcsx2-1.4.0-setup.exe in the install folder. Then follow the on-screen instructions to finish the installation operation.
To download PCSX2 BIOS, you should make sure that your computer meets the minimum system requirements as shown below. If you want to run it more smoothly, your PC needs to reach the recommended requirements.
Minimum requirements:
- System: Windows 7 (or newer), Linux, or Ubuntu 18.04/Debian or newer, Arch Linux, or other distros (32 or 64 bit)
- CPU: any support SSE2 (Pentium 4 and up, Athlon64 and up); two physical cores with hyperthreading
- GPU: Direct3D10 support, OpenGL 3.x support, and PassMark G3D Mark rating around 3000 (GeForce GTX 750)
Recommended requirements:
- System: Windows 10 (64-bit), Ubuntu 19.04/Debian or newer, Arch Linux, or other distros (64 bit)
- CPU: supports AVX2, PassMark Single Thread performance rating near or greater than 2100, four physical cores with or without hyperthreading
- GPU: Direct3D11 support, OpenGL 4.5 support, PassMark G3D Mark rating around 6000 (GeForce GTX 1050)
To get the PCSX2 BIOS download, you can refer to these steps.
Step 1: Click here to choose a version according to the versions and architectures of your PC system.
Step 2: Click the Download button to start the process.
Step 3: The PCSX2 BIOS will be downloaded automatically after you click the button. You just need to wait patiently for the finish of the process.

Do you know what CCXProcess is? Is it safe to use? To learn the answers and more information about this process, read this post now!
PCSX2 BIOS Setup
After downloading PCSX2 emulator and PCSX2 BIOS, you can start the PCSX2 BIOS setup process by following steps below now.
Step 1: Launch Emulator. If you do that for the first time, you will be prompted to choose a preferred language. Here, we choose English .
Step 2: In the next screen, you are required to choose different plugins. If you don’t have specific demand, you can follow the default settings and move on.
Step 3: Choose the BIOS if you are asked to do so.
Step 4: Uncheck the Use default setting option and click on Browse .
Step 5: Choose the folder where you extract the BIOS file. Then all the BIOS will appear on the screen and you can choose a preferred one. It is recommended to choose the latest version.

Step 6: Click Finish to complete the operation.
How to Load PS2 ISO Files on PCSX2 Emulator
To play PS2 games on computer, you need to load ISO files of PS2 games on the basis of PCSX2 BIOS setup. If these game files are not in ISO format, you need to convert them. For that, you should download and install an ISO creator like ImgBurn > choose Create image file from disc > select the Source drive and hit Read .
After that, follow these steps to load ISO files.
Step 1: Download a game on your computer, and then check if it’s a Zip file or an ISO. If it is an ISO, you can move on directly. If it is a Zip file, you need to extract it first.
Step 2: On the PCSX2 emulator window, move to the CDVD tab and choose ISO Selector > Browse .
Step 3: If you have extracted the game file, click System > Boot ISO (fast) .

Step 4: Then the game will be loaded automatically. Then you can play the game.
As you see, ISO files are useful. With the PS2 ISO, you can play PS2 games even you don’t have a PS2 console. If you have a Windows ISO file, then you can clean install a system. MiniTool Partition Wizard allows you to create an ISO file that enables you to boot into MiniTool Recovery Environment and then fix errors.
About The Author

Position: Columnist
User Comments :
RetroArch PS2 LRPS2 Core Setup Guide
RetroArch Sony PlayStation 2
In this guide, I’ll take you through the steps to help you play PS2 games with RetroArch. Before you start this guide, it is worth noting that the RetroArch PS2 core, PCSX2, has been renamed to LRPS2. The LRPS2 core is a little unorthodox because you will also be required to download the standalone PCSX2 emulator to get things working.

Requirements
Before you begin, please note the below requirements:
- Install RetroArch – Download RetroArch Here
- Have at least one PS2 game disc image ready to test – These are typically .iso or .bin files.
- Have the relevant PS2 BIOS files depending on what region games you wish to play – Search online for ‘ps2 scph bios’ to help you locate a BIOS file.
- Using a controller is recommended, ensure this is connected before launching RetroArch. If you don’t have a controller yet, then check out my RetroArch controller recommendations.
Download PCSX2
This first step is necessary to allow the RetroArch LRPS2 core to function properly, by using some of the assets from the PCSX2 standalone emulator.
- First of all, download the ‘Portable;’ version of PCSX2 here – https://pcsx2.net/downloads/ , then extract the files from the downloaded archive file into its own folder.

- Next, create a folder called ‘ pcsx2 ‘ in your RetroArch ‘ system ‘ folder. (This can be found in your RetroArch installation directory). Open this folder and leave the window open as you will need to copy some files to it in the next step.
- Go back to the folder where you extracted the portable version of PCSX2 a moment ago, run the PCSX2 application and go through the few initial setup steps, this will then create a bunch of folders in the PCSX2 portable installation directory that you will need.
- Next, select all of the files in the PCSX2 directory, then copy them to the ‘ RetroArch/system/pcsx2/ ‘ folder you just created.

PS2 BIOS File Download
The RetroArch PS2 core on RetroArch requires the use of a PS2 BIOS file so it can boot up games. The RetroArch documentation for LRPS2 core provides details on the BIOS files required:
https://docs.libretro.com/library/pcsx2/#bios
- If you do not have the BIOS files yet, you will need to search online for ‘ps2 scph bios ‘. You will then need to find a site to download PS2 BIOS files from. You can choose from either Japanese, European or USA BIOS files, but other regional BIOS files are also available.
- Once you have got your desired region PS2 BIOS, you will need to copy it to the ‘ RetroArch/system/pcsx2/bios/ ‘ folder.

LRPS2 Core Download
- Launch RetroArch and select ‘ Load Core ‘. (Note – Your RetroArch theme may differ from the one I am using, but don’t worry, the process is still the same).

- You will then need to select ‘ Download a Core ‘.
- Next, scroll down the Core Downloader menu until you get to ‘ Sony – PlayStation 2 (LRPS2) ‘. Select this, then the core will begin to download and install automatically.

- It can also be a good idea if you are using an existing installation of RetroArch and not a fresh install, to go back to the main menu, scroll down to ‘ Online Updater ‘, and select ‘ Update Core Info Files ‘ as well as ‘ Update Databases ‘.
This will ensure all the essential files and databases for RetroArch are fully updated. If you are using a fresh installation of RetroArch, this will not be necessary.
LRPS2 Controller Configuration
Next, you will want to check that your controller has been recognised and is set up for use with the LRPS2 core.
- To access the control settings, go to the main menu in RetroArch, and click on ‘ Settings -> Input -> Port 1 Controls ‘. Here you should see your controller listed in the Device Index section – I’m using an 8BitDo Pro 2, which RetroArch automatically configures.

If your controller does not automatically get configured, you can map the controls in this section as required.
Booting PS2 Game In RetroArch
This is how you boot your PS2 games in RetroArch.
- Go back to the main menu in RetroArch and select ‘Load Content’. Then navigate to where you have your PS2 games stored. Then select the game disc image that you wish to load.

Your emulated PS2 will now kick to life and the game will boot.
Depending upon which BIOS you choose and if you have already gone through the initial set-up, the PS2 BIOS may ask you to set the console region and time. If it does, just select the settings you wish to apply and proceed, and then the game will boot.

So, that is how RetroArch PS2 emulation is made possible using the LRPS2 core. Now try to work your way through that PS2 library of several thousand games!
LRPS2 Graphics Settings
If you have a well-equipped system with a powerful GPU, then you should be able to upscale your PS2 games, all the way up to 5K resolution if required!
- Whilst you are in the game, go to the RetroArch menu by pressing F1 or the button you have assigned to go back to this menu.
- Next, go to ‘ Options -> Video ‘ and here you will find a range of video-related options for LRPS2.
- To upscale the resolution of your PS2 games, select ‘ Internal Resolution ‘ and choose the resolution best suited to your display.
Experiment with these settings and see what works best with your device as performance will vary from game to game as well as how powerful your system is.

A lifelong avid gamer and computing enthusiast, Matt has decades of Retro Gaming experience. Now over 40 years old, Matt now even considers himself retro, but fortunately, nobody has developed a Matt emulator (not yet at least!).
Article Published:
May 30, 2022
Last Updated:
February 29, 2024
PCSX2 Emulator: Ultimate Setup Guide To Run PS2 Games on PC?

PCSX2 is a free and open-source PlayStation 2 (PS2) emulator. It is the most reliable PS2 emulator that can run various PS2 games with high compatibility and functionality. So in this article, we will teach you how to use the PCSX2 emulator to play PS2 games on Windows, Linux, and macOS.
The emulator recently got a huge update overhauling its user interface and a few new features. As far as games are concerned, the PCSX2 emulator supports over 98 percent of the PS2 library. You can run popular games like God of War 2, Devil May Cry, Final Fantasy X, Shadow Of The Colossus, Metal Gear Solid 3, etc.
PCSX2: PS2 BIOS
The most important thing you need before installing PCSX2 is a PS2 BIOS. The easiest way to get this is by getting it off the internet. You can easily get these files on sites like Romsmania or searching for PS2 BIOS on Google.
You can also dump the BIOS files from your PS2, but it would be rare for anyone to have that console nowadays. So your best bet would be to download it from the internet.
How to use the PCSX2 emulator?
1. Download the nightly build of the emulator from pcsx2.net
Note: Usually, we don’t recommend the nightly build as it is for developers. However, this emulator version includes some advanced features and a better UI.

2. Extract the downloaded file to a folder and name it PCSX2.
3. Download the PS2 BIOS from a trusted website and place them in the BIOS section of the PCSX2 folder.

4. Go back to the main folder and open the PCSX2 application to play PS2 games.

How do I get games for the emulator?
You can use PS2 ROMs in ISO formats to play games on the PCSX2 emulator. If you own a physical copy of the game, you can make a PS2 ROM by dumping the game files through your computer. However, you can also download it from a Torrent website . Look for a trustworthy source if you want to download it from the internet.
Note: Using a ROM is legal as long as you own the game. However, it is illegal to download or distribute ROMs of games that you do not own.
Once you get the ROMs for your PS2 games, follow these steps to run them on the PCSX2 emulator.
1. Open the PCSX2 emulator and go to Add Game Directory .

2. Navigate to where your game ROM is located.
3. Click on the folder where your ROMs are located and press Select Folder .

4. All your PS2 games will now appear on the PCSX2 emulator.

If you want to use another emulator, you can also check out our other article for the best PS2 and PS3 emulators for Android and PC.

Nalin is a tech writer who covers VR, gaming, awesome new gadgets, and the occasional trending affairs of the tech industry. He has been writing about tech and gaming since he started pursuing Journalism in college. He has also previously worked in print organizations like The Statesman and Business Standard. In his free time, he plays FPS games and explores virtual reality.
Reach out to him at @NalinRawat
Similar Posts

How To Pre-order Apple Vision Pro Headset?
The Vision Pro headset is perhaps one of the most important steps toward the spatial computing…

Raspberry Pi Headless Setup: Here’s How To Setup Raspberry Pi Without A Monitor
Starting from just $35, Raspberry Pi is one of the cheapest computers that one can own,…

How To Use Instagram Filters: From Clarendon To Nashville, Explained!
“Isn’t that photo too plain?” “That would look would superb in monochrome!” “That’s definitely not the…

Four New Windows 11 Keyboard Shortcuts You Should Learn
More keyboard shortcuts expected!

How To Clear My Browsing History In Firefox? | Easy Guide
Delete your past online activity in a few steps.

How To Check Water-Resistance Of Your Phone Using An App?
Water Resistance Tester is another great app that anyone can find on the Google play store….
How To Setup The RetroArch PS2 Core PCSX2 (LRPS2)

If you’re looking for how to set up the RetroArch PS2 core PCSX2, otherwise known as LRPS2, you’ve found the right article. We’ll be breaking down the process of how you can get up and running to play your favorite PlayStation 2 games in RetroArch in no time.
If you’ve tried downloading the RetroArch PS2 core but found that your games didn’t work, don’t worry, this is a common occurrence. It turns out that setting up PS2 emulation in RetroArch can be a bit trickier than some of the other consoles and systems available.
We recently wrote about how to set up PCSX2 cheats on the emulator, but today we’ll be covering the RetroArch PS2 core.
While the RetroArch PS2 core does show as available to download and install, the truth is that there are some extra steps necessary to get it set up and running as well. You may have also realized that in RetroArch, the PS2 core that’s shown as available isn’t named PCSX2, but rather shows as LRPS2. Don’t worry, the PCSX2 emulator has simply been renamed in RetroArch to LRPS2 so this is expected.
Without further ado, let’s jump in and break down how to set things up correctly.
How To Setup The RetroArch PS2 Core PCSX2 (LRPS2)?
Download retroarch.
- You’ll first need to go ahead and download and install the RetroArch emulator which you can grab from the official website here . If you already have RetroArch installed, make sure you are on the latest stable version which you can get here .
Get your PS2 ROM ready
- Ensure that you first have at least one PS2 ROM file that you’ll be using to test after getting setup. This ROM is the PS2 game that you’ll be playing and using to test to make sure everything is setup properly. Remember that downloading PS2 ROM files for games you don’t own and haven’t dumped yourself is illegal.
Using a controller?
- A USB or Bluetooth controller is recommended when playing your PS2 games. That being said, while a controller is a much better for playing retro games than a keyboard, you can play however you wish. If you’re in the market for a capable new controller, an 8Bitdo SN30 Pro Wireless Bluetooth controller is a great choice and will only run you about $45 on Amazon.
1. Download The Necessary PCSX2 Files
Before we can begin setting up the RetroArch PS2 core, we’ll first need to make sure we have the needed PCSX2 emulator files. The PS2 core will use some of the assets that the PCSX2 emulator uses as well. For more information on the PCSX2 emulator, check out our guide on the best PS2 emulators .
We’ll simply be copying the required files over to the RetroArch folder on our computer to allow the RetroArch PS2 core to work as intended.
- First things first, head over to the PCSX2 website and download the Portable version of the emulator from their downloads page here: https://pcsx2.net/downloads/

- After downloading the Portable version of the emulator, go ahead and extract PCSX2 from the archive onto your desktop or somewhere easy to find
- Now create a new folder named pcsx2 in your RetroArch system folder within the RetroArch emulator’s folder on your computer
- After creating the newly extracted Folder within your RetroArch directory, open up the folder of the portable version of the PCSX2 emulator that you downloaded and extracted
- Double click to start the PCSX2 emulator application and begin the process of completing the emulator’s setup
- Some additional folders will be automatically created in the PCSX2 emulator’s installation directory when you do this
- Now go ahead and select every file in the PCSX2 directory and copy them all over to the RetroArch/system/pcsx2/ folder within RetroArch that you previously created

2. Downloading the PS2 BIOS File Needed
In order for RetroArch to properly run its PS2 core, we also need to first setup a PS2 BIOS file .
- If you don’t yet have the needed BIOS file, you can easily find the BIOS file by doing a simple Google search for it using the keywords PS2 SPCH BIOS file
- One of the first results should be for the Internet Archive and you should be able to find and download the BIOS file you need
- Keep in mind that the BIOS file that you need to download and use will depend on the region for the games that you want to play, so for example if you want to play USA based PS2 games, you’ll need to download and use the USA BIOS file
- Go ahead and download the .bin file of the region’s BIOS you need
- When you have your PS2 BIOS file downloaded and ready, copy it into the RetroArch/system/pcsx2/bios/ folder
3. Finding the PS2 Core PCSX2 (LRPS2)
- Once RetroArch opens, select Load Core

- Next, choose Download a Core

Downloading the LRPS2 Core
- Remember, above we mentioned that RetroArch renamed their PS2 core as LRPS2, but it is essentially the same as the PCSX2
- Scroll all the way down until you see the Sony – PlayStation 2 (LRPS2) core and select it to download it

- If RetroArch was already installed on your device, it’s a good idea to go back to the main menu screen and scroll down to select Online Updater and then select Update Core Info Files and also select Update Databases to ensure that all of your cores info files and databases are all up to date

- After it’s done downloading, you may now press back and then select Load Core
2. How To Load Your PS2 ROM File In RetroArch
Go to load content.
With the PS2 core now all setup and installed in RetroArch, we’re ready to load up our PS2 ROM file(s).
- Head back to the main menu and select Load Content

- Locate where you saved your PS2 ROM on your computer and select it
- Your PS2 game should now launch and voila, just like that you’re all set and ready to play
- If your BIOS file asks you to set the console region and time, just select whichever settings you prefer and you should be all set
Additional PS2 Core Settings, Options, and Features
Graphics upscaling and improving visuals.
This is a completely optional additional step that isn’t necessary, but if you have a setup with a powerful graphics card, why not give it a shot? You can potentially upscale your PS2 games up to 5k if you want.
- Just go ahead and open up a PS2 game in RetroArch and once the game launches, press the F1 key (or button assigned to the menu if you have it changed)
- With the menu now open, head to Options > Video and you will be presented with all the video options for the emulator
- You’ll next want to choose Internal Resolution and then select the resolution that you want the game to to output for your monitor or display
- If you find that the first isn’t the right choice, tinker a bit and see what looks the best while still maintaining your desired level of performance
Supported PS2 Core File Extensions
The PPSSPP core supports the following file extensions:
Also, be sure to check out our PCSX2 controller setup guide here for playing with an external controller.
This article may contain affiliate links. If you use these links to purchase an item, we may earn a commission. Thank you for your support !

Jonathan Zarra
A lover of gaming and all things Nintendo, Jonathan has 20+ years of retro gaming expertise. Not only has he been playing games his whole life, but he has dedicated his life to it as well - founding multiple video game related companies. When not working on a new project, you can find him playing the Switch, tinkering around with emulation, and building out his retro game collection.
How To Setup Cemu Shader Cache Guide
The best gamecube controller adapter of 2024, leave a reply cancel reply.
Your email address will not be published. Required fields are marked *
Save my name, email, and website in this browser for the next time I comment.
- Mobile Site
- Staff Directory
- Advertise with Ars
Filter by topic
- Biz & IT
- Gaming & Culture
Front page layout
Where's Fantavision ? —
Sony listing hints at native, upscaled ps2 emulation on the ps5, download promo promises "up-rendering, rewind, quick save, and custom video filters.".
Kyle Orland - May 16, 2024 3:45 pm UTC

Further Reading
The hint at Sony's coming PS2 download plans comes via a new PlayStation Network listing for the 2002 release Star Wars: The Clone Wars , which recently appeared on tracking site PSDeals (as noticed by Gematsu ). That site draws from unpublished data from the PSN servers, such as this thumbnail image that recently appeared on the playstation.com servers, and lists a planned June 11 release for the emulated Clone Wars port.
So far, this is nothing out of the ordinary. But near the bottom of the boilerplate, the listing notes that "this title has been converted from the PlayStation 2 version to the PlayStation 4 and PlayStation 5 consoles and provides newly added features [emphasis added]." That's a marked difference from earlier "PS2 on PS4" downloadable releases , which only say that they were "converted from the original PlayStation 2 version to the PS4 system."
A new emulator for a new generation
Previous PS2 games released as PlayStation Classics could be played on the PS5 via the newer system's PS4 backward compatibility , of course. And those titles already looked relatively decent on modern displays thanks to near-HD upscaling at solid frame rates. But new "up-rendering" designed for the 4K-capable PS5 could make these aging 3D titles look even better on high-end TVs, even if low-resolution textures originally designed for 2000s-era CRTs may still look dated. And other new features like "rewind, quick save, and custom video filters" promise nice improvements over the relatively bare-bones PS2 emulation previously available on the PS4.
Those same features (and modern additions like trophies) are also currently offered on select PS1 titles that have been available in native PS5 ports in recent months. That's thanks to the work of Implicit Conversions , a retro-focused porting company that has recently been working with Sony to add PS1 support to its multi-platform Syrup Emulation Engine .
Implicit Conversions recently included the PS2 on a list of consoles supported by the Syrup Engine and said on LinkedIn that it is "working with clients to bring NES, PS1, PSP, and PS2 games to the PS4, PS5 , Nintendo Switch, and Xbox [emphasis added]." In a March interview with Time Extension , the company said it "can't deny or confirm anything about PS2 [emulation on PS5]," but the very familiar wording of this leaked Clone Wars listing certainly suggests the same company is behind this new PS2 porting effort as well.
reader comments
Channel ars technica.
TV & Film
PlayStation
To make sure you never miss out on your favourite NEW stories , we're happy to send you some reminders
Click ' OK ' then ' Allow ' to enable notifications

PlayStation 2 emulator finally coming to PS4, PS5
The days of the PS2 aren’t dead after all!
It’s been years since the PlayStation 2 was in its heyday, and while we all believe it to be one of the greats , accessing its classic games without an actual PS2 to hand hasn’t been easy.
But all that looks set to change.
Sony has been slowly introducing old-school PS1 titles to its PS Plus Premium tier, like Nintendo introducing the N64 and Gameboy Advance adventures from our childhoods.
It’s been wonderful to see. However, there’s been a distinct lack of PS2 content.
Speaking of Star Wars, how we feeling about Star Wars Outlaws ? Check out its trailer below
Yet, a listing on the PS Store for Star Wars: The Clone Wars has been spotted by Gematsu. According to Gematsu, the “first new PlayStation 2 emulated title” will be coming to both the PS4 and PS5.
Furthermore, it’s coming sooner than we think; 11 June.
Gemastu linked to the PS page in its article, however, that link doesn’t work anymore. If anything, its removal lends more credence to this being genuine.
Although we can’t see it for ourselves now, the description purportedly read, “Experience Star Wars: The Clone Wars originally released on the PlayStation 2 console, enhanced with up-rendering, rewind, quick save, and custom video filters.”
We anticipate PlayStation will outsell Xbox in even greater numbers if this PS2 emulator rumour is true; in the last few months, the PS5 has sold 5 times more than the Xbox Series X/S.
Considering all the recent Microsoft chaos and Bethesda layoffs, maybe that isn’t all too surprising...
Hopefully, with PS2 titles being teased for the not-too-distant future, we’ll start to see more beloved classics return to us.
Now we wait for the 11 June with bated breath and our fingers crossed. If the Force rewards us, we have a whole plethora of experiences about to open up to us.
Topics: PlayStation , Star Wars , Sony , PlayStation 4 , PlayStation 5
Choose your content:

The Elder Scrolls Skyrim: Apotheosis announced, coming 2025
This is looking too good to be true.
Minecraft drops free download to celebrate 15th anniversary
Happy memories incoming.
Xbox rolling out incredibly controversial new feature for consoles
Skynet is coming.

Overheating PlayStation 5 opened up, and I wish I'd never looked
This poor, poor console.
- PlayStation fans finally have the portable PS1 emulator they've been waiting for
- PlayStation 5 finally getting major feature we've been begging for since launch
- An OG PlayStation gem is finally coming back on PS4, PS5
- PlayStation 5 system update quietly removes feature everyone hated
RetroArch 9+
A frontend for emulators, daniel de matteis.
- #19 in Entertainment
- 4.6 • 519 Ratings
Screenshots
Description.
RetroArch is a free, ad-free, open source, and cross platform frontend/framework for emulators, game engines, video games, media players, and other applications. Supported systems come in the form of libretro cores. The following cores are included: * 2048 * Amstrad - CPC (CrocoDS) * Amstrad - CPC/GX4000 (Caprice32) * Arcade (FinalBurn Neo) * Atari - 2600 (Stella 2014) * Atari - 2600 (Stella) * Atari - 5200 (Atari800) * Atari - 5200 (a5200) * Atari - 7800 (ProSystem) * Atari - Lynx (Handy) * Bandai - WonderSwan/Color (Beetle Cygne) * Cave Story (NXEngine) * Commodore - Amiga (PUAE) * Commodore - C128 (VICE x128) * Commodore - C64 (VICE x64, fast) * Commodore - C64 (VICE x64sc, accurate) * Commodore - C64 SuperCPU (VICE xscpu64) * Commodore - CBM-II 5x0 (VICE xcbm5x0) * Commodore - CBM-II 6x0/7x0 (VICE xcbm2) * Commodore - PET (VICE xpet) * Commodore - PLUS/4 (VICE xplus4) * Commodore - VIC-20 (VICE xvic) * Dinothawr * Doom (PrBoom) * DOS (DOSBox-Pure) * Fairchild ChannelF (FreeChaF) * GCE - Vectrex (vecx) * Game Music Emu * Handheld Electronic (GW) * MSX/SVI/ColecoVision/SG-1000 (blueMSX) * Mattel - Intellivision (FreeIntv) * NEC - PC Engine / CD (Beetle PCE FAST) * NEC - PC Engine / SuperGrafx / CD (Beetle PCE) * NEC - PC Engine SuperGrafx (Beetle SuperGrafx) * NEC - PC-98 (Neko Project II Kai) * Nintendo - DS (DeSmuME) * Nintendo - DS (melonDS DS) * Nintendo - Game Boy / Color (Gambatte) * Nintendo - Game Boy / Color (Gearboy) * Nintendo - Game Boy / Color (SameBoy) * Nintendo - Game Boy / Color (TGB Dual) * Nintendo - Game Boy Advance (VBA Next) * Nintendo - Game Boy Advance (VBA-M) * Nintendo - Game Boy Advance (gpSP) * Nintendo - Game Boy Advance (mGBA) * Nintendo - NES / Famicom (FCEUmm) * Nintendo - NES / Famicom (Mesen) * Nintendo - NES / Famicom (Nestopia UE) * Nintendo - NES / Famicom (QuickNES) * Nintendo - Nintendo 64 (Mupen64Plus-Next) * Nintendo - Pokemon Mini (PokeMini) * Nintendo - SNES / SFC (Snes9x 2005) * Nintendo - SNES / SFC (Snes9x 2010) * Nintendo - SNES / SFC (Snes9x) * Nintendo - SNES / SFC (bsnes) * Nintendo - SNES / SFC (bsnes-hd beta) * Nintendo - SNES / SFC / Game Boy / Color (Mesen-S) * Nintendo - Virtual Boy (Beetle VB) * Palm OS (Mu) * PocketCDG * Quake (TyrQuake) * Rick Dangerous (XRick) * SNK - Neo Geo AES/MVS (Geolith) * SNK - Neo Geo CD (NeoCD) * SNK - Neo Geo Pocket / Color (Beetle NeoPop) * SNK - Neo Geo Pocket / Color (RACE) * ScummVM * Sega - MS/GG (SMS Plus GX) * Sega - MS/GG/MD/CD (Genesis Plus GX Wide) * Sega - MS/GG/MD/CD (Genesis Plus GX) * Sega - MS/GG/MD/CD/32X (PicoDrive) * Sega - MS/GG/SG-1000 (Gearsystem) * Sega - Saturn (Beetle Saturn) * Sharp - X68000 (PX68k) * Sinclair - ZX Spectrum (Fuse) * Sony - PlayStation (Beetle PSX HW) * Sony - PlayStation (Beetle PSX) * Sony - PlayStation (PCSX ReARMed) * Sony - PlayStation Portable (PPSSPP) * Texas Instruments TI-83 (Numero) * Thomson - MO/TO (Theodore) * Vircon32 * VirtualXT * WASM-4 * Watara - Supervision (Potator) RetroArch supports a broad range of features, including: * Netplay * Soft patching * RetroAchievements * Save states * MFi controller support * Key remapping per core or per game * Gyro * Cheats * Custom overlays * Shaders * Fast forward and rewind * Game artwork * AI translations * Advanced latency management **RetroArch and Libretro are in no way affiliated with Nintendo. The name "Nintendo" and all associated game console names are registered trademarks of Nintendo Co., Ltd.**
Version 1.18.2
- Fixed PSP scanning (among others) - Fixed HDR screenshots - Fixed Netplay - Report the correct version... - Fixed a crash in mupen64plus_next when playing a game the second time - More cores added! * Cave Story (NXEngine) * Doom (PrBoom) * DOS (DOSBox-Pure) * Nintendo - DS (melonDS DS) * Nintendo - Pokemon Mini (PokeMini) * Palm OS (Mu) * SNK - Neo Geo Pocket / Color (Beetle NeoPop)
Ratings and Reviews
519 Ratings
If you need help with retroarch
First, put your rom into the files of retroarch (personally, i have my own folder dedicated to roms) then import your rom using "import content" if your rom is a rom hack, you might not be able to import it (i said might because retroarch sometimes detects very popular rom hacks) instead, choose load content and then select the rom, and it will appear in your history. if a rom crashes when loading, you probably need the bios file for it! search something along the lines of "beetle saturn retroarch core" and there should be a libretro site with the core's information, scroll down and you will see the name of the bios file for the core, (you should only need the bios files that aren't optional) then you can look up the name of the bios file and find it online. (probably on internet archive) anyways, retroarch is a great emulator and ive been using lakka on my nintendo switch too! easily a game changer and beats delta!
iOS is finally an emulation platform!
No more sketchy workarounds needed. Apple finally gave emulators the green light for App Store distribution they’ve always deserved. Retroarch in all its glory is finally here, directly on the App Store. This is the ultimate video game emulation application, with amazing compatibility, speed and functionality across a slew of different retro video game systems. It supports all iOS controllers and has a ton of settings you can configure to get games playing exactly the way you want them to. There may be easier to navigate apps out there like Delta for specific game systems, but Retroarch is unmatched in scope when it comes to its capabilities and features as an emulator. If you want your retro game fix on iOS, Retroarch is the only app you’ll ever need.
I’ve got achievements, I’m happy
Personally I think this is quite a rough implementation compared to the Delta emulator that released a few weeks ago, but it otherwise plays games just as well as Delta if not better in some cases. RetroArch isn’t as pretty and isn’t integrated as well with iOS devices, with my biggest gripe being that I can’t add games from my iCloud drive into playlists, and have to sift through my files to open games. While Delta’s a bit easier to use, Retroarch offers more settings and a much wider variety of systems to emulate, so if you want to play N64, Sega, or arcade games on your phone you’ve come to the right place. Personally, the big draw for me is support for RetroAchievements, which allows you to unlock community-made achievements as you play. This will definitely be my emulator of choice for the foreseeable future, though I’d be really happy to see some quality-of-life improvements down the line.
App Privacy
The developer, Daniel De Matteis , indicated that the app’s privacy practices may include handling of data as described below. For more information, see the developer’s privacy policy .
Data Not Collected
The developer does not collect any data from this app.
Privacy practices may vary, for example, based on the features you use or your age. Learn More
Information
- Developer Website
- App Support
- Privacy Policy

Game Controllers
Play this game with your favorite compatible controller., you might also like.
Infuse • Video Player
DC UNIVERSE INFINITE
FyTube - YouTube Without Ads
Film Noir for Trakt Just Watch
Xbox Game Pass
Razer Audio
Success! Subscription added.
Success! Subscription removed.
Sorry, you must verify to complete this action. Please click the verification link in your email. You may re-send via your profile .
- Intel Community
- Product Support Forums
intel i 9 14900k crashes new bios update
- Subscribe to RSS Feed
- Mark Topic as New
- Mark Topic as Read
- Float this Topic for Current User
- Printer Friendly Page

- Mark as New
- Report Inappropriate Content
- All forum topics
- Previous topic
Link Copied

Community support is provided during standard business hours (Monday to Friday 7AM - 5PM PST). Other contact methods are available here .
Intel does not verify all solutions, including but not limited to any file transfers that may appear in this community. Accordingly, Intel disclaims all express and implied warranties, including without limitation, the implied warranties of merchantability, fitness for a particular purpose, and non-infringement, as well as any warranty arising from course of performance, course of dealing, or usage in trade.
For more complete information about compiler optimizations, see our Optimization Notice .
- ©Intel Corporation
- Terms of Use
- *Trademarks
- Supply Chain Transparency
IMAGES
VIDEO
COMMENTS
File Name: ps2_bios.zip. File Size: 12.76 MB. Rating: Downloads: 4125763. Download PCSX2 - Playstation 2 BIOS (PS2 BIOS) Download PCSX2 - Playstation 2 BIOS (PS2 BIOS) from Retrostic and emulate your favorite games for any console and platform.
BIOS Files » Sony Playstation 2. File Name: scph10000.zip File Size: 2.11 MB ... INSTALL NOW. No thanks, continue to download . You may also like these PS2 ISOs... Naruto Shippuden - Ultimate Ninja 4: Harvest Moon - A Wonderful Life - Special Edition: God Hand: Grand Theft Auto - Liberty City Stories: DragonBall Z - Budokai Tenkaichi 3:
PCSX2 is a free and open-source PlayStation 2 (PS2) emulator. Its purpose is to emulate the PS2's hardware, using a combination of MIPS CPU Interpreters, Recompilers and a Virtual Machine which manages hardware states and PS2 system memory. The project has been running for almost 20 years. Past versions could only run a few public domain game ...
PCSX2 has a file menu at the top and to load the game ISO you navigate to "CDDVD > ISO Selector > Browse…". Selecting the browse option will open a window to locate your ISO file. Select the file wherever you have it on your computer, and it will be loaded into the emulator. Now navigate to "System > Boot ISO (fast)" and the game will ...
There is a new nightly release anytime a change is made, so you are getting the latest and greatest (but sometimes buggy) experience. Latest Nightly. Show Previous Versions. The official source for the latest stable and nightly builds (aka dev builds) for PCSX2 on all supported platforms.
PCSX2. PCSX2 is a free and open-source PlayStation 2 (PS2) emulator. Its purpose is to emulate the PS2's hardware, using a combination of MIPS CPU Interpreters, Recompilers and a Virtual Machine which manages hardware states and PS2 system memory. This allows you to play PS2 games on your PC, with many additional features and benefits.
Modify the operation of your PS2 so that it can run any program. Then you can run a "BIOS dumper" utility program on your PS2 that reads its BIOS and writes it to a USB drive. There is a generally useful program, uLaunchELF, that lets you browse memory cards, DVDs, and USB drives connected to a PS2 and run programs from them.
BIOS Dumper V2. This is a tool which runs on your Playstation 2 console and extracts the needed BIOS files from it. PCSX2 will NOT work without a BIOS file so you need to do this before using it. This will not damage your console in any way. Before using it, you need to have a way of running homebrew applications on your console.
e8e84d1. Compare. v1.7.5816 Pre-release. Misc: More DuckStation backports. Assets 7. PCSX2 - The Playstation 2 Emulator. Contribute to PCSX2/pcsx2 development by creating an account on GitHub.
PCSX2 was originally created in 2001 by Linuzappz and Shadow as the successor to PCSX, another PlayStation emulator. Development of PCSX ceased on September 17, 2003, to focus on PCSX2. When version 0.9.8 was released in May 2011, only 55% of the PS2's library was considered supported. [3]
Create a pcsx2 folder. Go inside the pcsx2 folder and create a bios folder. Go inside the bios folder and paste your BIOS file (s) here. For example, the default path would look like this: system\pcsx2\bios\[bios_file_name].bin. If you're on a case-sensitive OS, make sure both pcsx2 and bios folders are lowercase.
PCSX2 is a PlayStation®2 emulator capable of running commercial games. It is a free and open-source project that runs on Windows and Linux. A Mac version ceased development in 2012, but with the introduction of Apple's M1 SoC, development of a new macOS version is now ongoing, spearheaded by developer TellowKrinkle.
PS BIOS Claim Tool — this is a batch file that will extract the PS2 and PS1 BIOS files from the official PS3 firmware update file. To download, find the link that says "ZIP" on the right side of the page, and download that file. This file will need to be extracted, and the files you are looking for are found within the Windows folder:
The PS2 Bios on the top (the mediafire link) is linked to malware. If you care enough to do a Virustotal scan, you may end up seeing that it's filled with malware. To deal with this malware, take out the hard drive (or SSD) and just buy a new one. It could possibly be a powershell virus that
PCSX2 BIOS Download. Before starting the PCSX2 BIOS download process, you should download the PCSX2 emulator first. Click here to download it, and then find and double-click pcsx2-1.4.-setup.exe in the install folder. Then follow the on-screen instructions to finish the installation operation.
Here it is in steps: 1) Download the new PCSX2 v0.9.8 HERE. 2) PCSX2 comes in 3 flavors, full installer, web installer and binary. Full installer has the DirectX web installer bundled, web installer optionally downloads it from the internet, and binary is only the program with the plugins.
Have at least one PS2 game disc image ready to test - These are typically .iso or .bin files. Have the relevant PS2 BIOS files depending on what region games you wish to play - Search online for 'ps2 scph bios' to help you locate a BIOS file. Using a controller is recommended, ensure this is connected before launching RetroArch.
Download PCSX2 - PCSX2 is a PlayStation 2 'emulator', a free program that tries to replicate the PlayStation 2 console to enable you to play PS2 games on your PC.
1. Open the PCSX2 emulator and go to Add Game Directory. 2. Navigate to where your game ROM is located. 3. Click on the folder where your ROMs are located and press Select Folder. 4. All your PS2 ...
Download the portable version of the PCSX2 emulator. Copy the file from the PCSX2 standalone Portable emulator's folder to the RetroArch/system/pcsx2 folder in RetroArch. 2. Downloading the PS2 BIOS File Needed. In order for RetroArch to properly run its PS2 core, we also need to first setup a PS2 BIOS file. 3.
The actual answer is that with a single exception it LITERALLY does not matter what BIOS you use with PCSX2. And that exception is the very first BIOS file ever used, SCPH-10000.bin, which had some major issues.
Head over to the download page and grab the latest Nightly build if you haven't done so already! Use 7-Zip to extract the .7z archive. Install 7-Zip. Right click on the archive. Find the entry for 7-Zip. Click on Extract to [folder name] option. This will extract PCSX2 to the same directory where you put the .7z file.
Quick question I'm new to retro arch alot of this kind of thing new territory for me. I can get emulations I run everything o Pretty much all emulators on my series x aparts from ps2 and ps3 for them to 2ork i need to own a ps2 to get the bio file how ever I have ps3.
Now, there are signs that certain PS2 games will be similarly available for native download on the PS5, complete with new features like "up-rendering, rewind, quick save, and custom video filters ...
Yet, a listing on the PS Store for Star Wars: The Clone Wars has been spotted by Gematsu. According to Gematsu, the "first new PlayStation 2 emulated title" will be coming to both the PS4 and PS5. Furthermore, it's coming sooner than we think; 11 June. Gemastu linked to the PS page in its article, however, that link doesn't work anymore.
RetroArch is a free, ad-free, open source, and cross platform frontend/framework for emulators, game engines, video games, media players, and other applications. Supported systems come in the form of libretro cores. The following cores are included: * 2048. * Amstrad - CPC (CrocoDS)
there is stability problem going wild for new intel 14 gen and this gigabyte motherboard is native for this processor, so they work under supervision of intel to solve this matter that's why i am asking here if anyone tested it, it solved the stability problem or not. 05-21-2024 05:21 AM. Ask gigabyte about their bios.
Overview. Here you will find various documentation related to the PCSX2 project, intended for both general user and technical audiences. If this article does not help solve your problem, reach out in the Discord channel or the forum.
Reply. Community support is provided during standard business hours (Monday to Friday 7AM - 5PM PST). Other contact methods are available here. Intel does not verify all solutions, including but not limited to any file transfers that may appear in this community. Accordingly, Intel disclaims all express and implied warranties, including without ...
Unlike previous "PlayStation 2 on PlayStation 4" title releases, Star Wars: The Clone Wars will be available in both PlayStation 5 and PlayStation 4 versions, and offers new features such as ...