
Slide Master in PowerPoint – A Complete Beginner’s Guide!
By: Author Shrot Katewa

When I first started using PowerPoint, I had no idea about the “Slide Master”. In fact, when I first learned about it, I was quite confused. I didn’t quite understand its purpose and how it worked. Furthermore, some of the changes I made to the slide master were scary at first simply because I didn’t understand how it worked!
Slide Master in PowerPoint allows you to have master control over all slides. It allows you to make changes to all slides at once. You can also use the slide master to create footers, add watermarks and slide numbers, generate custom presentation templates, edit placeholders, among other things.
Retrospectively thinking, having a “Slide Master” in PowerPoint is such an important feature! Knowing how to use the slide master properly can help you save a lot of time while creating a presentation!
So, in this article, I’ll share with you all the details you need to know about a Slide Master in PowerPoint. Without further adieu, let’s get started!
1. What is the Slide Master In PowerPoint and Why is it Used?
Slide Master is a Microsoft PowerPoint feature that allows you to easily edit all the slides at once or the individual slide layouts of a presentation.
1a. What is a Slide Master?
The slide master in Microsoft PowerPoint contains all the information on the slide layout as well as the theme of a presentation. This includes the fonts, color, effects, background, and the size and position of the placeholders.
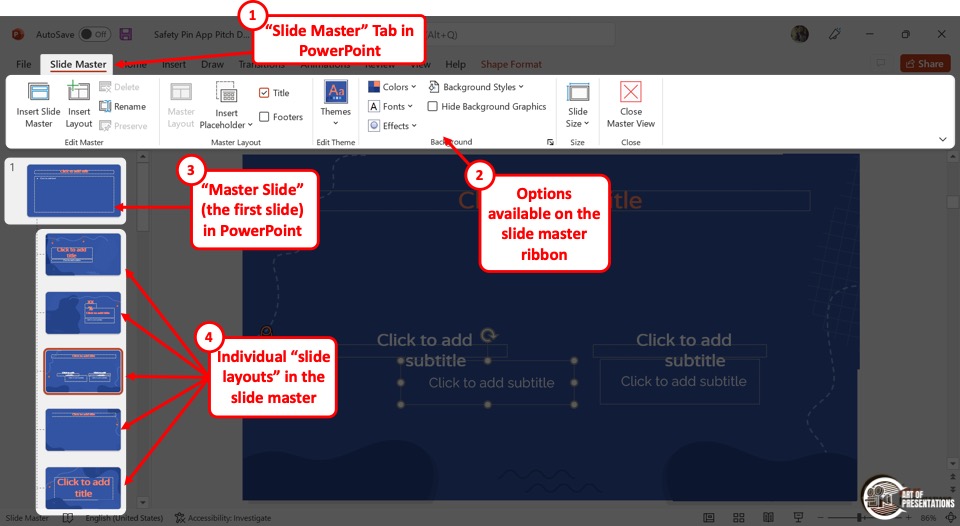
To access the slide master, first, click on the “View” tab in PowerPoint . Then, click on the “Slide Master” option. This will open the slide master view in PowerPoint.
The master slide is the top slide in a hierarchy of slides in a presentation (as shown in the image above). Changes that you make to the master slide impact all the slides in the slide master.
It is important to note that the actual design and content of the presentation must be added to the slides in the “Normal View”. Any images or content you add to the slide master will become uneditable in the normal view of the PowerPoint presentation.
The best way to use the slide master is by using “Placeholders”. I’ve written a detailed article on “Placeholders” in PowerPoint . Make sure to check out that article to learn more about them!
1b. Uses of Slide Master View in PowerPoint –
Since the slide master stores information about the theme and the layout of the slides in a PowerPoint presentation, you can use the “Slide Master” view to edit several elements in the presentation.
a. Change Slide Background
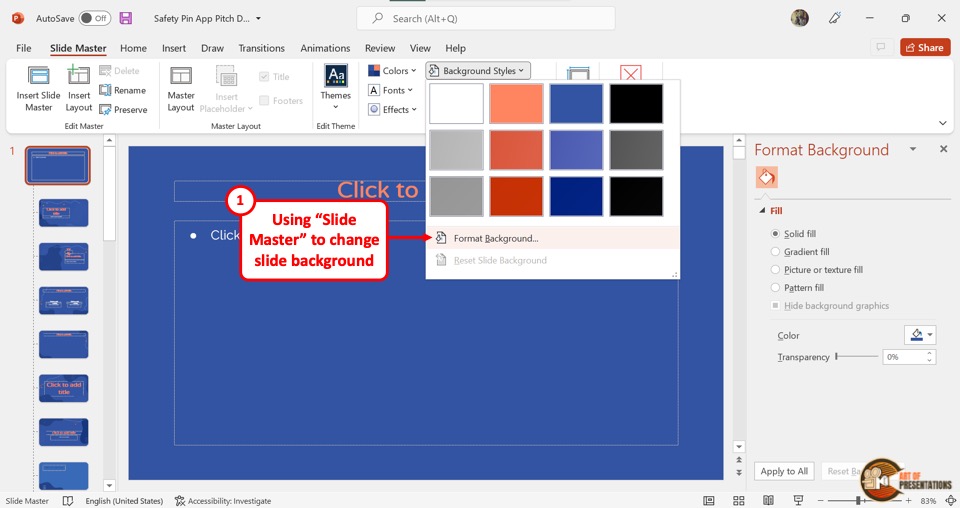
Using the “Slide Master” view, you can change the background of all the slides at once. The background editing features are available in the “Background” section of the “Slide Master” menu.
You can click on the “Colors” option to change the colors for the slides, the “Fonts” option to set a specific font for the presentation, and the “Effects” option for the background effects. Besides, you can click on the “Hide Background Graphics” option to remove all background graphics from the entire presentation.
Clicking on the “Format Background” option under the “Background Styles” button, you can access various customizable background colors and designs for the presentation.
b. Rearrange Placeholders in Slide Layout

In Microsoft PowerPoint “Slide Master” view, you can edit both the master slide and the slide layouts. By rearranging the placeholders in a slide layout, you will only create changes for the slides using that specific layout instead of the entire presentation.
To rearrange the placeholders, all you have to do is click on a placeholder and drag it to your preferred position on the slide.
c. Customize Overall Text Formatting
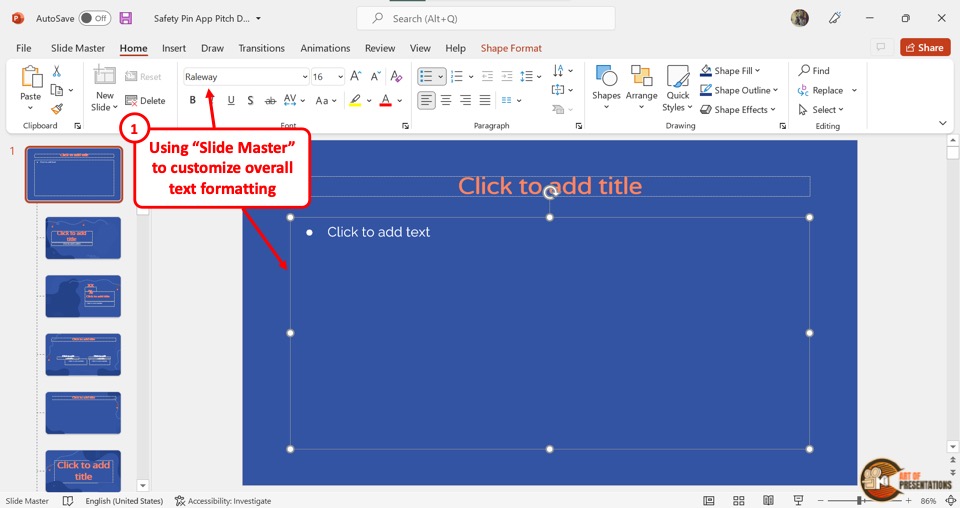
In the “Slide Master” view, you can easily change or customize the overall text formatting. You have to first click on the content placeholder in the master slide which is the top slide in the slide layout panel on the left side of the screen.
Then click on the “Home” tab from the menu ribbon. In the “Font” section of the “Home” menu, you can customize the fonts like the style, size, color, highlights, etc. This will customize the text of all the slides.
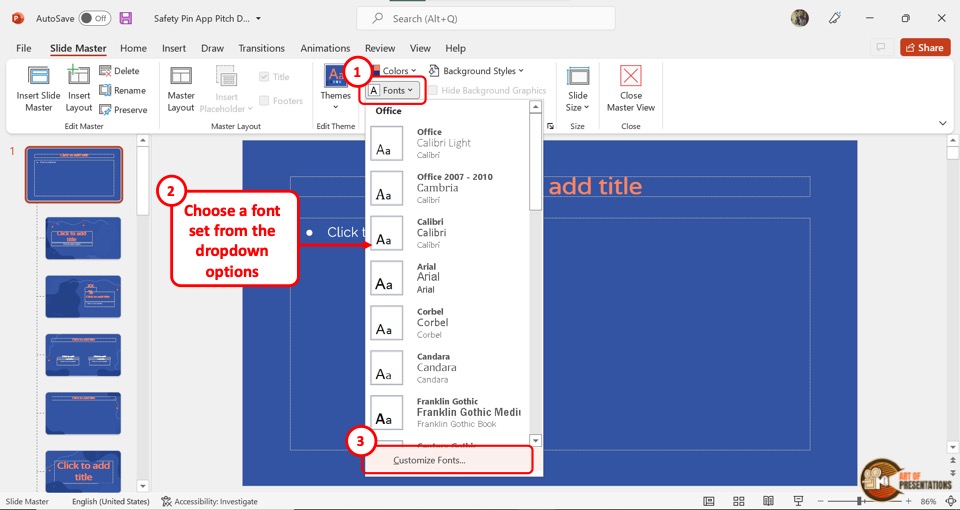
d. Customize Theme Fonts
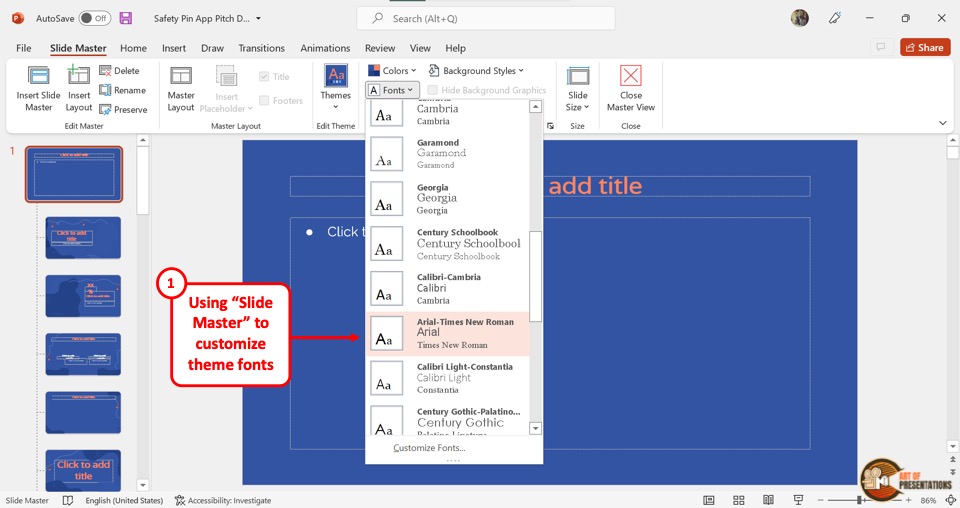
By customizing the theme fonts in the “Slide Master” , you can choose a set of fonts for various list levels of text in all the slides. To do so, click on the “Fonts” option in the “Background” section under the “Slide Master” tab. Then click on your preferred set of fonts from the dropdown menu.
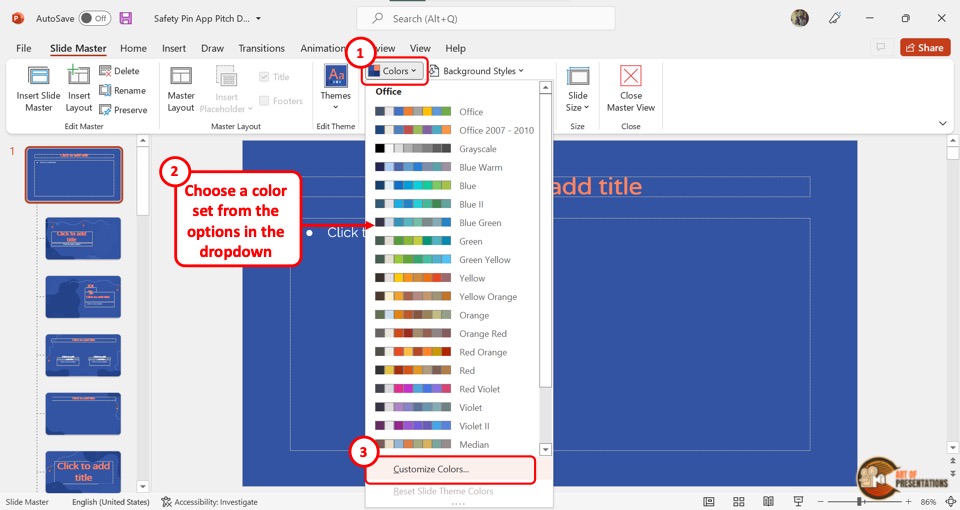
e. Customize Theme Colors
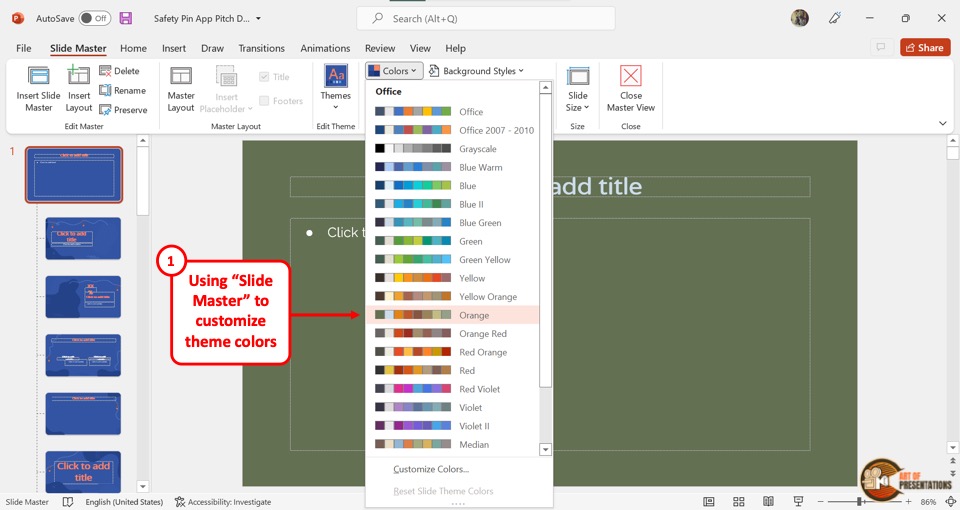
The theme color in a “Slide Master” contains a set of colors for various elements of the slides in a presentation like the background, heading, body text, etc. By customizing the theme color in “Slide Master” , you can customize the colors for the entire presentation.
All you have to do is click on the “Colors” option in the “Background” section of the “Slide Master” menu and select your preferred theme colors from the dropdown menu.
f. Create Unique Slide Layouts and Templates
Using the features in the “Slide Master” menu, you can edit any element and object in the presentation. You can change the color, font, arrangement, theme, etc. of the entire presentation.
You can also create and edit individual slide layouts. You can easily use the “Slide Master” view to create fully unique slide layouts and templates.
2. Difference Between Slide Master and a PowerPoint Template?
In Microsoft PowerPoint, a Slide Master contains information about the layout and the theme of the presentation.
A PowerPoint template, on the other hand, is a design or pattern of a slide or even a whole presentation. In short, a template is a copy of a presentation blueprint that can be edited to fit your needs, while the master slide stores the layout and theme of that template.
3. How to Access the Slide Master in PowerPoint?
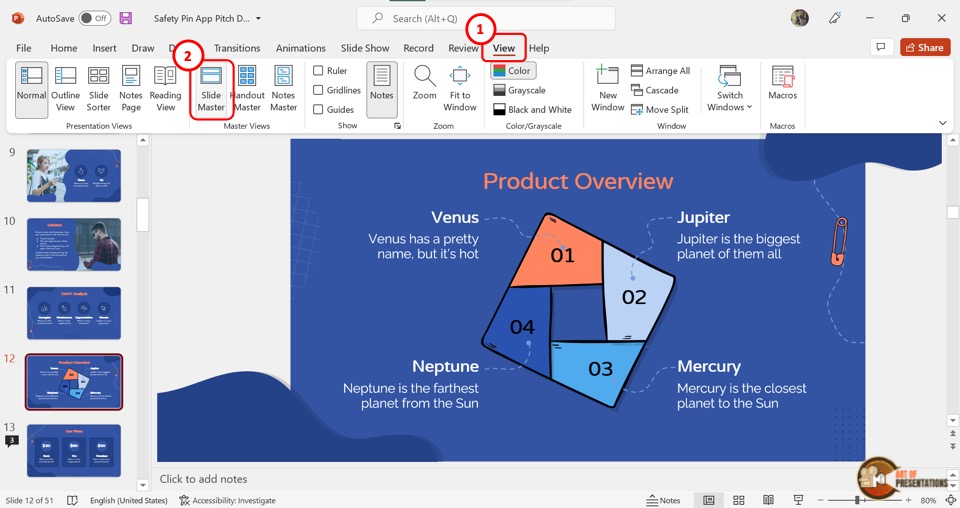
In Microsoft PowerPoint, you can access the slide master in the “View” menu. You have to first click on the “View” tab in the menu ribbon located at the top of the screen. Then click on the “Slide Master” option in the “Master Views” section of the “View” menu. This will open the “Slide Master” view where you can edit the master slide and the slide layouts.
4. How to Edit a Slide Master in PowerPoint?
Microsoft PowerPoint allows you to edit the slide master using the “Slide Master” view. You can edit the master slide itself, and also the slide layouts separately. You can even add or remove master slides and slide layouts.
4a. Using the Master Slide to Apply Changes to All Slide Layouts in PowerPoint
Since the master slide contains all the information on the theme and layouts of the entire presentation, any change in the master slide will be automatically applied to all the slide layouts under the master slide.
To apply changes in the master slide, all you have to do is click on the master slide from the slide layout panel and use the features available in all the tabs in the menu ribbon.
4b. How to Change Slide Background in the Slide Master?

In the “Slide Master” view, click on “Background Styles” and select the “Format Background” option from the dropdown menu. This will open a sidebar on the right side of the screen.
In the “Format Background” sidebar, you can change the color, gradient, or pattern of the background. You can also add an image as the background.
4c. How to Customize Fonts and Text Formatting in the Slide Master in PowerPoint?
To customize fonts and text formatting in the “Slide Master” view, you have to follow the 2 simple steps.
Step-1: Click on the “Customize Fonts” option
You have to first click on the master slide from the slide layout panel. Then click on the “Fonts” option from the “Background” section of the “Slide Master” menu. From the dropdown menu, click on the “Customize Fonts” option at the bottom.
Step-2: Click on the “Save” button

In the “Create New Theme Fonts” dialog box, click on the “Heading font” box to customize the heading and on the “Body font” box for the body text. Then click on the “Save” button at the bottom of the dialog box.
4d. How to Customize Theme Colors in Slide Master?
In the “Slide Master” view of Microsoft PowerPoint, you can customize the theme color by following the 2 easy steps.
Step-1: Click on “Customize Colors”
In the “Background” section of the “Slide Master” view, click on the “Colors” option. Then click on the “Customize Colors” option at the bottom of the dropdown menu.
Step-2: Click on “Save”
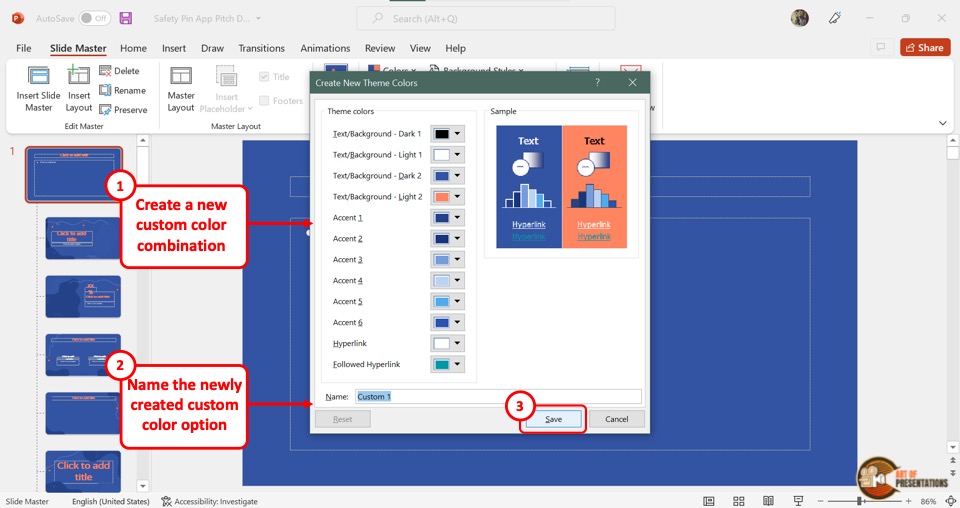
In the “Create New Theme Colors” dialog box, click on the box next to each option to select your preferred colors. Then all you have to do is click on the “Save” button at the bottom of the dialog box.
4e. How to Apply Effects in PowerPoint Slide Master?
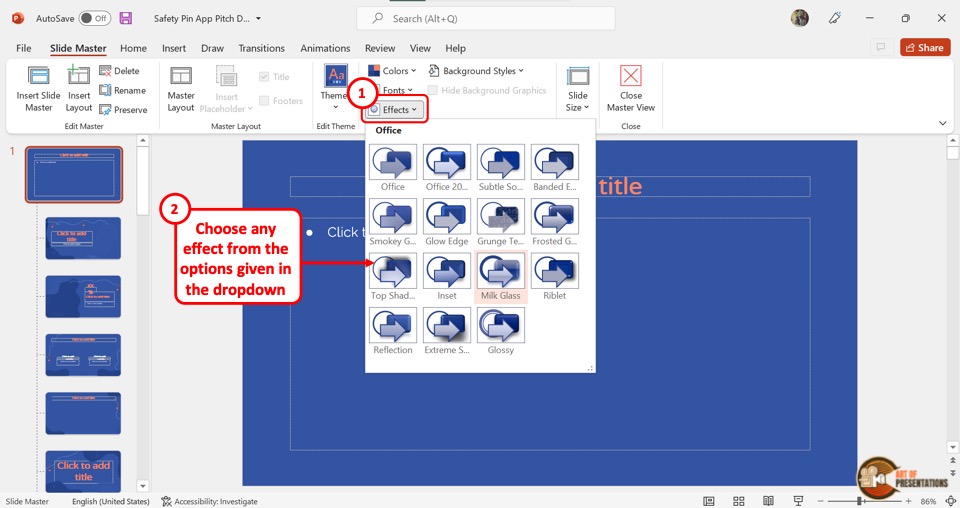
To apply effects in the “Slide Master” view of PowerPoint, click on the “Effects” option in the “Background” section. This will open a dropdown menu containing fifteen effect options to choose from. All you have to do is click on your preferred effect from the dropdown menu.
4f. How to Edit Footer in PowerPoint?
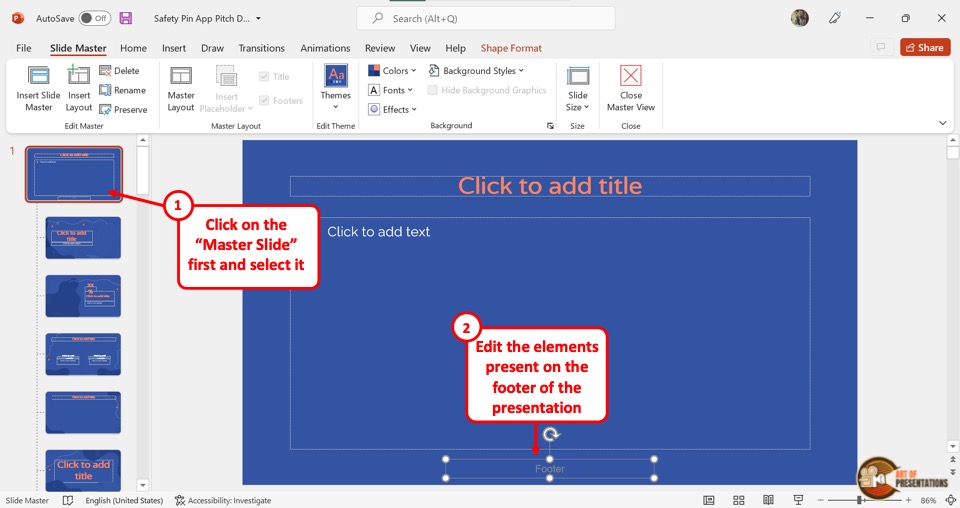
The footer in a PowerPoint presentation is a text that appears at the bottom of all slides. To edit the footer in the “Slide Master” view, all you have to do is click on the “Footer” box at the bottom of the master slide. Then type in the text you want in the footer.
Check out my other article on “How to Add a Footer in PowerPoint?” to learn more about editing, adding, and removing footers in PowerPoint.
4g. How to Add Logo to All Slides Using Slide Master in PowerPoint
Adding a logo to your Microsoft PowerPoint presentation can be a smart way of branding. It is quite easy if you know the correct steps.
In fact, I’ve written a detailed article on how to add a logo in PowerPoint . Do make sure to check out that article as well to get all the advanced tips and tricks and to know the correct way to do it!
Meanwhile, here are the key steps to add a logo to all slides using the “Slide Master” in PowerPoint –
Step-1: Click on the “Insert” tab
The first step is to click on the master slide from the slide layout panel on the left side of the screen in the “Slide Master” view. Then click on the “Insert” tab from the menu ribbon.
Step-2: Click on the “Pictures” button
The next step is to click on the “Pictures” button in the “Images” section of the “Insert” menu. Then click on the “This Device” option from the dropdown menu. This will open a dialog box.
Step-3: Click on the “Insert” option
In the “Insert Picture” dialog box, click on the logo you want to add to the presentation. Then click on the “Insert” button at the bottom of the dialog box to add the logo to the master slide. This will automatically add the logo to all the slides of the presentation.
4h. Use Slide Master to Add a Watermark in PowerPoint
A watermark is an identifying text or image that usually appears across a document and is semi-transparent. You can learn about how to add or remove watermarks in PowerPoint in my other article.
Meanwhile, I’ll share the key steps in a brief manner below –
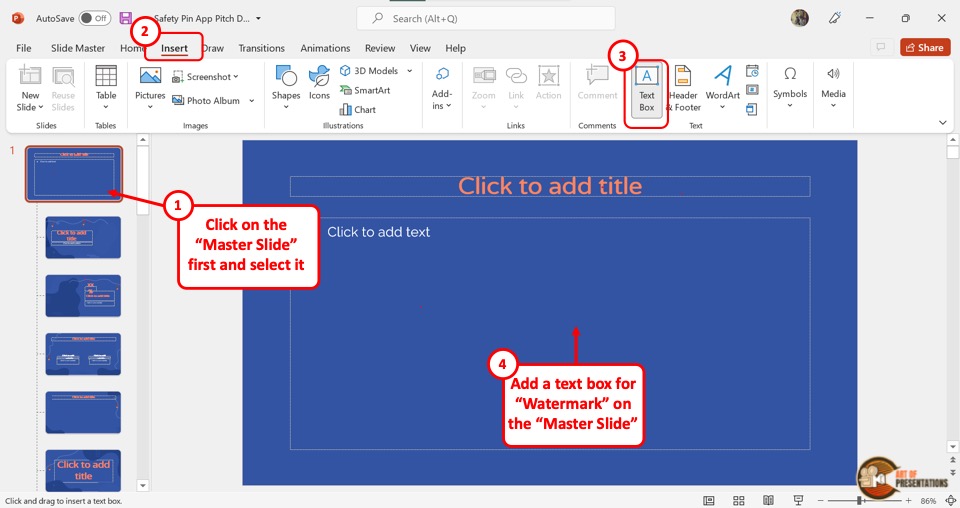
In the “Slide Master” view, click on the master slide which is the top slide in the slide layout panel. Then click on the “Insert” tab from the menu ribbon located at the top of the screen.
Step-2: Click on the “Text Box” option
In the “Insert” menu, click on the “Text Box” option from the “Text” section. Then draw the text box on the master slide. You can now type in the text you want as a watermark on all the slides.
Step-3: Click on the “Format Text Effects” option
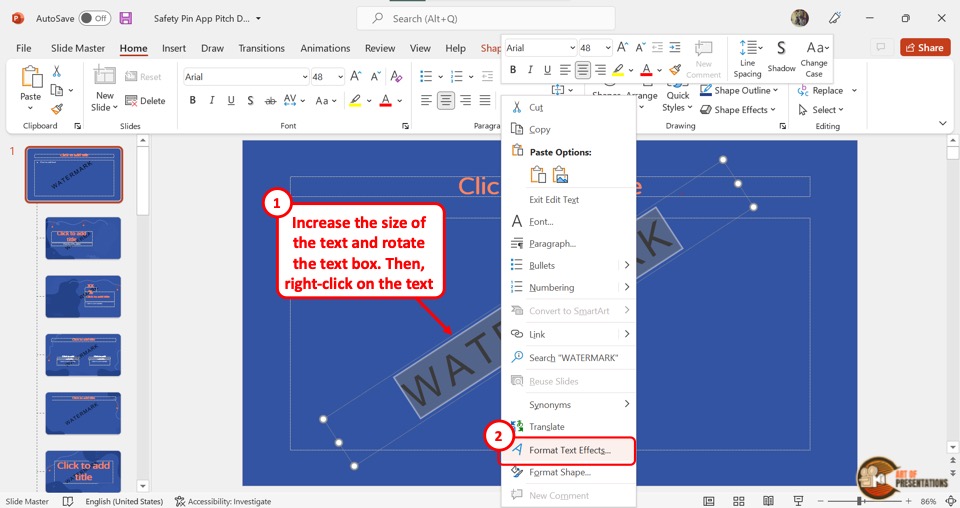
The next step is to select the text in the watermark text box. Then “Right Click” on the selected text and click on the “Format Text Effects” option. This will open the “Format Shape” sidebar on the right side of the screen.
Step-4: Increase the text transparency
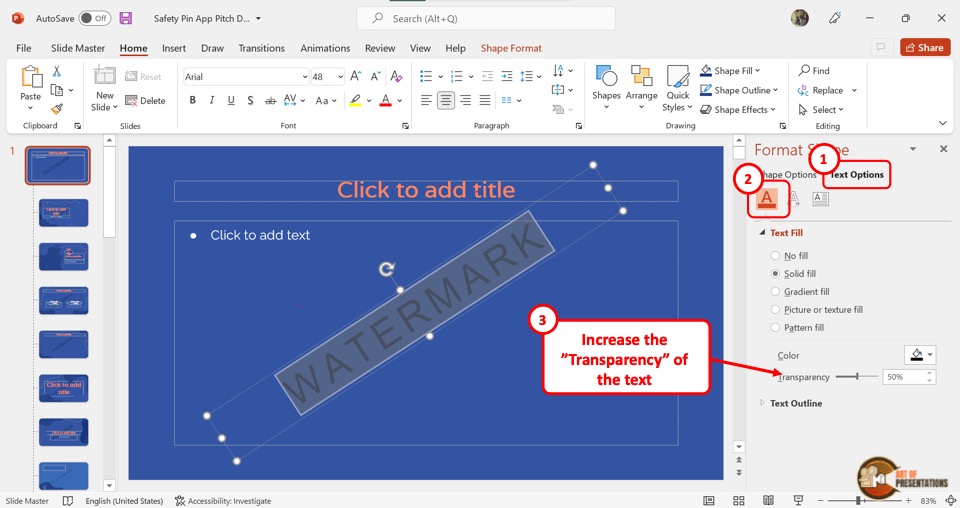
In the “Format Shape” sidebar, click on the “Text Fill and Outline” option which is the first icon. In the “Text Fill” section, click on the “Solid Fill” option. Then drag the slider next to the “Transparency” option to the right until the text reaches your preferred transparency.
5. Understanding Slide Layouts in PowerPoint Slide Master
Slide Layouts in Microsoft PowerPoint are slide designs that have pre-arranged placeholders that you can use to add your content quickly and easily. To understand the functions of slide layouts in PowerPoint and how to use them, you can read my article on slide layouts in PowerPoint .
5a. How to Know Which Slides Use What Slide Layouts
Using the “Normal” view in PowerPoint, you can see which slides are using what slide layouts. All you have to do is follow the 2 simple steps.
Step-1: Click on the “Normal View” option
In the menu ribbon located at the top of the screen, click on the “View” tab. In the “View” menu, click on the “Normal” option which is the first option in the “Presentation Views” section. This will return the screen to “Normal View” .
Step-2: Click on the “Layout” option
In the slide thumbnail panel at the left side of the screen, “Right Click” on a slide. Then click on the “Layout” option from the context menu. This will open a list of all the slide layouts available in the presentation. You will see the slide layout being used by the selected slide is highlighted in the list.
5b. How to Insert and Rename Slide Layouts
To insert or rename slide layouts, you have to first access the “Slide Master” menu from the “View” tab in the menu ribbon.
Inserting Slide Layouts
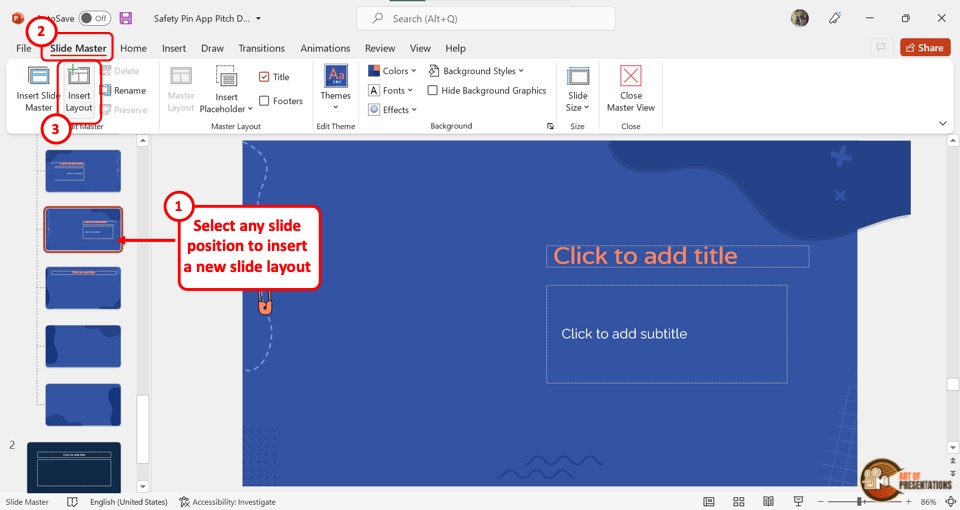
In the slide layout panel on the left side of the screen, you have to first click on the place where you want to insert a new slide layout. Then click on the “Insert Layout” button in the “Edit Master” section of the “Slide Master” menu.
Renaming Slide Layouts
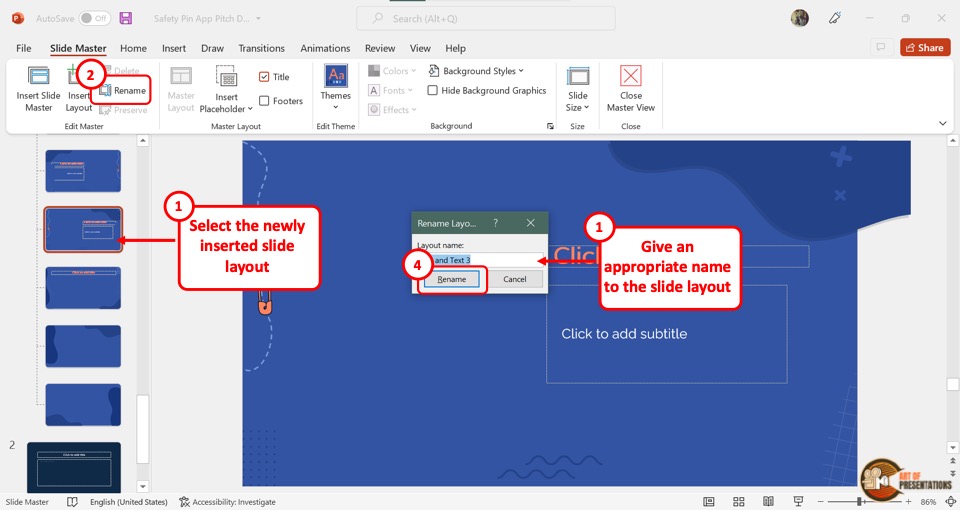
To rename a slide layout, you have to first click on the layout from the slide layout panel. Then click on the “Rename” option next to the “Insert Layout” button in the “Slide Master” menu. This will open the “Rename Layout” dialog box where you have to type in the new name for the slide layout.
Finally, you have to click on the “Rename” button in the dialog box to rename the slide layout.
6. Understanding Placeholders in Slide Master in PowerPoint
In Microsoft PowerPoint, a placeholder is a pre-formatted box on the slide where you can easily add content with a single click. You can learn more about placeholders in PowerPoint in my other article.
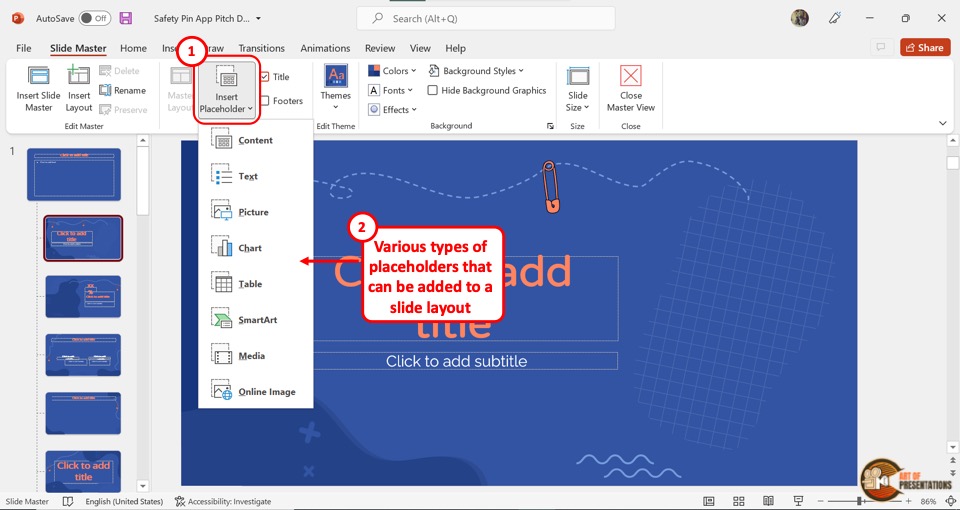
Using the “Slide Master” view, you can add, remove and edit the type and position of the placeholders in each slide layout. There are seven types of placeholders: “Text” , “Pictures” , “Chart” , “Table” , “SmartArt” , “Media” , and “Online Image” .
Besides, you can also use a “Content” placeholder which allows you to add any type of mentioned content.
7. How to Insert a Slide Master in PowerPoint?
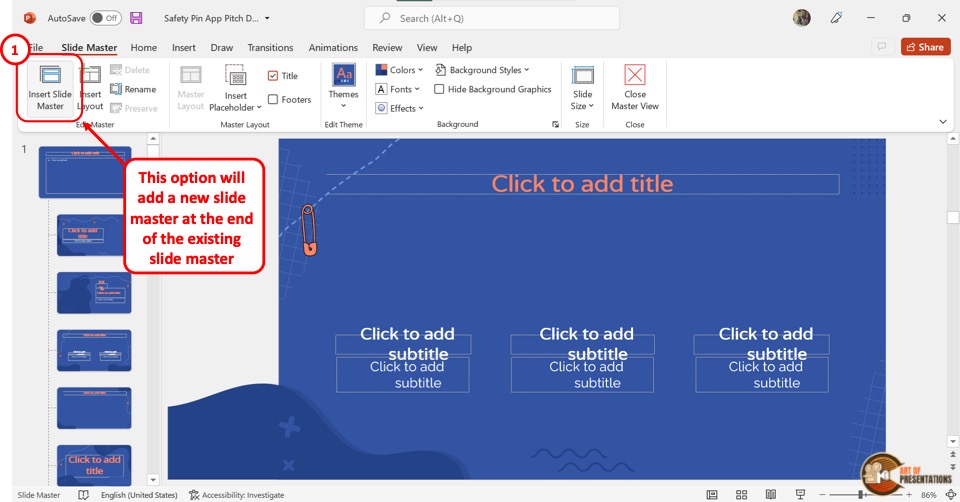
To insert a slide master in Microsoft PowerPoint, the first step is to open the “Slide Master” view from the “View” tab. In the “Slide Master” view, click on the “Insert Slide Master” button. It is the first button in the “Edit Master” section of the “Slide Master” menu.
Alternatively, you can press the “Ctrl+M” keys on your keyboard to insert a new slide master.
8. How to Delete a Slide Master in PowerPoint?
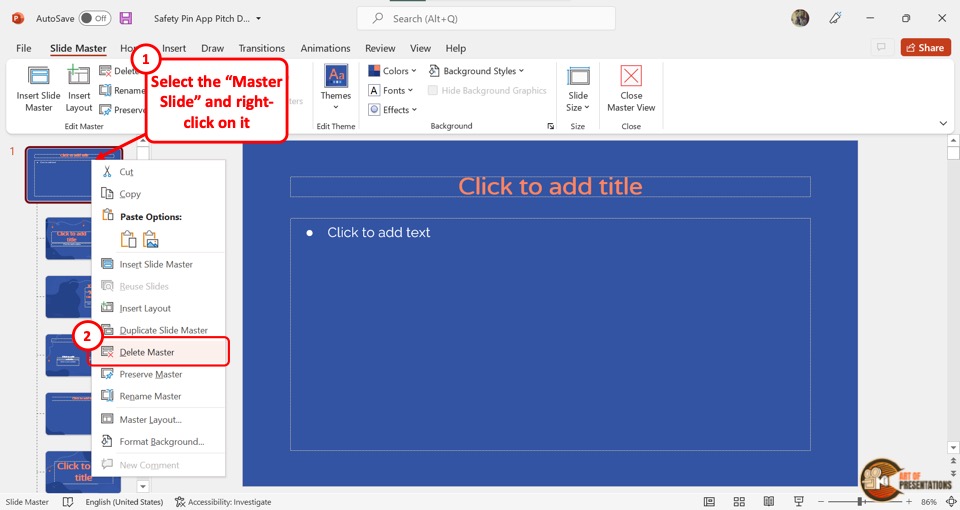
To delete an unused master slide in PowerPoint , you have to first “Right Click” on the master slide from the slide layout panel on the left side of the screen. Then click on the “Delete Master” option in the right-click menu. Alternatively, you can press the “delete” key on your keyboard.
9. How to Exit the Slide Master View in PowerPoint?
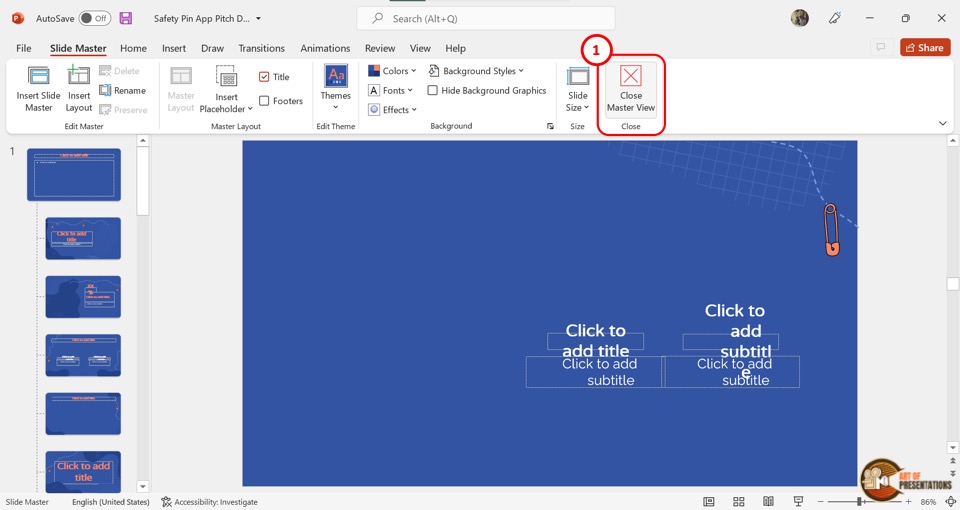
In Microsoft PowerPoint, you can exit the “Slide Master” view with one click. All you have to do is click on the “Close Master View” button. It is the last button under the “Slide Master” tab and is located in the “Close” section.
How-To Geek
How to create a slide master in microsoft powerpoint.
Keep consistency throughout your entire presentation by creating a customized slide master.
Quick Links
Creating a slide master in powerpoint, save your customized slide master.
PowerPoint’s Slide Master lets you keep consistency throughout your presentation. If you want to customize a presentation’s fonts , headings, or colors in one place so that they apply to all your slides, then you’ll need to create a Slide Master.
Open your presentation, head over to the “View” tab, and then click the “Slide Master” button.
The Slide Master will appear in the left-hand pane. The Slide Master is the top thumbnail that appears in the pane, and each sub-thumbnail represents each slide layout available in your theme. Edits you make to the text of the Slide Master will affect the text in each slide layout. Alternatively, you can select and customize each slide layout.
Edit the Slide Master Theme
If you plan to use a specific theme with your presentation, it’s best to go ahead and select it now before making any other edits, as each theme will have its own unique text and image placeholders.
To edit the theme of the Slide Master, click “Themes” on the “Slide Master” tab.
A drop-down menu will appear, showing a large library of Office themes. Select the one you want to use.
Your Slide Master will now take on the selected theme.
Fine-Tune Your Slide Master
Now it’s time to customize the font, color, and background of the presentation. In the “Background” group of the “Slide Master” tab, you’ll have all of these options available to you. However, using the options provided here will affect all of the slide layouts in the presentation, as they are predefined schemes. You can hover your mouse over the available options for a live preview.
If you don't find a scheme you like, you can create your own or customize each slide the way you want by using the tools provided in the "Home" tab.
Also, note that any objects or text you place on the slide master will appear on all your slides. So, for example, it's a great way to put a company logo or disclaimer text that you might want to appear throughout your presentation.
Create Multiple Slide Masters
You can create multiple Slide Masters in a presentation. To do this, head over to the "Slide Master" tab and click "Insert Slide Master."
The additional Slide Master will now appear in the left-hand pane.
Edit the new Slide Master. Once you're finished, select "Close Master View" in the "Close" group.
In the "Slides" group of the "Home" tab, select "Layout."
A drop-down menu will appear. You'll now see both themes with your customized slide layouts!
You can save your customized Slide Master as a PowerPoint template for future use. To do so, head over to the "File" tab and select "Save As."
Next, click the "Browse" button in the "Other locations" section.
Navigate to the location of your Custom Office Templates folder, usually found here:
C:\Users\user\Documents\Custom Office Templates
Once there, select the arrow in the "Save as type" box.
In the menu that appears, select "PowerPoint Template."
Next, click "Save" at the bottom-right of the window.
Your template with your customized Slide Master is now saved!
How to Use Slide Master in Microsoft PowerPoint to Create Impressive Presentations
With Slide Master, you can customize every aspect of your presentation, including colors, fonts, backgrounds, and effects. Here's how to use it!
No one enjoys a presentation with mismatched colors, missing logos, or unstructured content. Consistency is the key to creating an impressive slide deck. How do you ensure that the presentation is well-formatted and looks professional? You can quickly achieve this by creating a master theme and defining layouts for different types of content.
Microsoft PowerPoint is commonly used to create presentations. You can make a deck from a blank canvas or use predefined themes. Before creating a presentation, let's understand how you can set a theme and style using the Slide Master feature.
Applying a Predefined Theme to Your Presentation
There are many styles and options for creating a theme that aligns with your brand.
Having a uniform color combination, font style, or picture layout on each slide makes a presentation look professional. You can select the theme based on the company's style guide. If there is none available, you can try out different inbuilt themes by Microsoft PowerPoint.
To select a theme, follow these steps:
- Click Themes and choose the desired theme. It is immediately applied to the presentation.
- If you have downloaded a theme on your laptop from Microsoft Office, select the Browse for Themes option.
What Is the Slide Master Feature?
The Slide Master feature in Microsoft PowerPoint helps you create a template or layout for the presentation. You can select a theme, add backgrounds styles, add a company logo, or set the slide size.
Your choices on slide master define the look and feel of the presentation. One presentation can have many master slides, which means you can create one look for the first half of your presentation and another for the second half.
Each master slide can have multiple layouts, which can help you define templates for different slides. In a way, the slide master serves as a master template for the slide decks. Different teams within the company can reuse the slide master or slide layouts.
To access the slide master, open the presentation and select View > Slide Master . You can view the parent and child slides with different formatting options.
How to Use Slide Master in Microsoft PowerPoint
You can create the slide master with nested layout slides and apply a combination of texts, images, or videos on each slide. On the slide master, you can define the master layout for the presentation.
- After opening the presentation, click View > Slide Master .
- Select the master slide and click the Master Layout button on the top ribbon.
- You can select a placeholder for title, text, date, footer, or slide number. These options are automatically applied to all layouts and slides.
Related: Microsoft PowerPoint vs. Google Slides: Which One Should You Be Using?
Inserting Slide Master or Layout
The layout acts as a template for the slides. You can create different layouts for every slide type.
- To insert a new slide master or layout, click Insert Slide Master or Insert Layout on the top ribbon.
- Alternatively, you can right-click on the left panel and choose the appropriate option.
- To rename a layout, select a layout and click the Rename button on the top ribbon. Alternatively, you can right-click on a layout and select Rename . You can also delete a layout.
- Click Preserve so that the slide layout remains in the presentation even if it is not used.
Configuring the Size of the Slide
You can set up the presentation in the standard size (4:3) or widescreen (16:9), which works well for most modern projectors. If you are not happy with the default size of the slide, you can change it. The slides can also be viewed or printed in A4 size, banner, or letter paper format.
- Click Slide Size, and from the drop-down option, you can choose the Standard or Widescreen layouts.
- You can select the orientation of slides, the notes section, and the slides to which you want to apply the size.
RELATED: The Best Sites for Free Animated PowerPoint Presentation Templates
Setting the Background of the Slide
You can select the background colors, fonts and apply effects to the slides. To view the style and format options, click Slide Master in the top ribbon.
- Click the Colors option to view the color combinations. Select your preferred option, and it is applied to the deck.
- Click Fonts to apply the selected font to the text. The font is applied when you exit the Slide Master mode.
- Select the Effects option to apply a specific effect to objects such as charts or graphs.
- Select the Background Style to choose the background color for the slide.
- You can also right-click on a background style to apply the same background to all layouts in the master.
- You can get more options for background colors, including gradient fill, texture, pictures, by clicking the Background Styles > Format Background menu.
- Select the Hide Background Graphics option to remove background graphics on selected layouts.
Inserting a Placeholder on the Slide
Every slide can have text, a chart, or images. These can be added while designing the theme of the presentation. To add a placeholder, follow these steps:
- Select Insert Placeholder .
RELATED: How to Make Professional Slideshows With PowerPoint's Designer Feature
Enjoy Creating Interesting Themes for Your Presentation
Creating a presentation with different slide layouts is an excellent practice. Depending on the type of content they want to present, diverse teams can reuse these slide layouts.
At first, the layouts and slide styles can seem overwhelming. But you can access learning resources by Microsoft to gain in-depth knowledge about all the features. Don't forget to experiment and create your custom themes.
Even though Microsoft PowerPoint is commonly used to create slide decks, you can also teach skills by creating online learning modules.
- PRO Courses Guides New Tech Help Pro Expert Videos About wikiHow Pro Upgrade Sign In
- EXPLORE Tech Help Pro About Us Random Article Quizzes Request a New Article Community Dashboard This Or That Game Popular Categories Arts and Entertainment Artwork Books Movies Computers and Electronics Computers Phone Skills Technology Hacks Health Men's Health Mental Health Women's Health Relationships Dating Love Relationship Issues Hobbies and Crafts Crafts Drawing Games Education & Communication Communication Skills Personal Development Studying Personal Care and Style Fashion Hair Care Personal Hygiene Youth Personal Care School Stuff Dating All Categories Arts and Entertainment Finance and Business Home and Garden Relationship Quizzes Cars & Other Vehicles Food and Entertaining Personal Care and Style Sports and Fitness Computers and Electronics Health Pets and Animals Travel Education & Communication Hobbies and Crafts Philosophy and Religion Work World Family Life Holidays and Traditions Relationships Youth
- Browse Articles
- Learn Something New
- Quizzes Hot
- This Or That Game
- Train Your Brain
- Explore More
- Support wikiHow
- About wikiHow
- Log in / Sign up
- Computers and Electronics
- Presentation Software
- PowerPoint Presentations
How to Edit a PowerPoint Master Slide
Last Updated: May 5, 2021
This article was co-authored by wikiHow staff writer, Travis Boylls . Travis Boylls is a Technology Writer and Editor for wikiHow. Travis has experience writing technology-related articles, providing software customer service, and in graphic design. He specializes in Windows, macOS, Android, iOS, and Linux platforms. He studied graphic design at Pikes Peak Community College. This article has been viewed 44,709 times. Learn more...
This wikiHow teaches you how to edit slide masters in PowerPoint. Slide masters are used to apply the same layout, fonts, styles, images, and placeholders to multiple slides in a PowerPoint presentation. A slide master can have multiple layouts. [1] X Research source
Accessing Slide Master View

- If you have PowerPoint presentations saved on your OneDrive, click OneDrive and then click a PowerPoint presentation you wish to open.

Adding and Deleting Slide Masters and Layouts

- There must be at least one slide master in the list on the left.
- You can also use the right-click menu to rename or duplicate slide masters and layouts.
Editing Backgrounds and Themes

- If you want to create layouts with different themes, color schemes, or fonts, you need to create a new slide master.

- Applying a background style to a slide master affects all the layouts below the slide master. Applying a background style to a layout only affects that layout.

- Solid fill: This applies a single color to the background. Use the "Color" drop-down menu to select a color.
- Gradient: . This applies a fade with two or more colors as a background. To change the gradient colors, click a stop below "Color stops" and then use the "Color" drop-down menu to select a color. Select the gradient type using the "Type" drop-down menu.
- Picture or texture fill: This option allows you to use an image as your background. Click File to select an image file from your computer or use the "Texture" drop-down menu to select one of the texture images.
- Pattern fill: This option allows you to use a pattern as your background. Select a pattern in the menu below "Pattern" and then use the "Foreground" and "Background" drop-down menus to select colors for the pattern.

- If you do not click Apply to all , it will only apply your background settings to a single layout.

Editing Placeholders

- Content: Content placeholders can be filled with any type of content, such as text, images, tables, charts, videos.
- Text: Text placeholders are used to indicate where text will go. You can use a text placeholder to format your text before you even know what the text will say.
- Image: Image placeholders will eventually be filled with an image files, such as a JPEG.
- Chart: Chart placeholders are used to indicate where a chart or graph will be placed.
- Table: Table placeholders are used to indicate where a table, such as those created in Excel will be placed.
- SmartArt: SmartArt is Microsoft's editable graphics. A smartArt placeholder indicates where smartArt will eventually be placed. [3] X Research source
- Media: Media placeholders indicate where media, such as a video file will eventually be placed.
- Online Image: An online image placeholder indicates where you can choose an image from online

- To edit the position of a placeholder, click and hold a blank spot inside the placeholder bounding box. Then drag the placeholder to where you want to go.
- To rotate a placeholder, click the circular arrow icon above the placeholder bounding box and drag left or right to rotate the bounding box.
- To adjust the size of the placeholder, click and drag the small circles in the corners and sides of the placeholder bounding box.
- To Delete a placeholder, click the place holder and press Delete .

- You can also use the options in the menu to add other text effects such as bullets or a numbered list, or text effects such as shadow, glow, or 3D.
Applying a Slide Master or Layout to PowerPoint Slides

- You can also insert a new slide by click Insert in the menu bar at the top and clicking New Slide

- Text: Click the placeholder text to edit it. Highlight the text and press Delete to remove the placeholder text. Then type your own text.
- Image: Click the image icon to open a file browser. Select an image on your computer and click Open .
- Chart: Click the chart icon in the placeholder. Then select a chart type in the menu to the left of the window and click a chart style at the top and click Ok . Use the table to edit the labels and numbers for the chart.
- Table: Click the table icon in the placeholder and then type the number of columns and rows for the table and click Ok . Then click each cell and add your own text to the cell.
- SmartArt: Click the SmartArt icon in the middle of the placeholder. Then select the type or art in the menu on the left. Then select a style in the center and click Ok . Use the pop-up window to add text to the graphic or click the text boxes in the graphic and type your own text.
- Media: Click the media icon in the center of the placeholder and then use the file browser to navigate to an audio or video file on your computer. Click the audio or video file and click Insert .
- Online Image: Click the online image icon in the center of the placeholder. Then use the search bar to search for an image. Click an image you like to select it.
Expert Q&A
Wikihow video: how to edit a powerpoint master slide, you might also like.

- ↑ https://support.office.com/en-us/article/what-is-a-slide-master-b9abb2a0-7aef-4257-a14e-4329c904da54
- ↑ https://support.office.com/en-us/article/customize-a-slide-master-036d317b-3251-4237-8ddc-22f4668e2b56
- ↑ https://support.office.com/en-us/article/video-create-and-change-smartart-393bd987-c33a-4821-aaea-fd9ea71916cd
About This Article

If you want to change the layout or style of all slides in your PowerPoint presentation, you can edit your Slide Master. First, open your PowerPoint presentation and click the "View" tab. Next, click "Slide Master" on the toolbar to open the Slide Master tab. You'll see the Slide Master for your theme at the top of the left panel. The Slide Master contains formatting for elements like headers, footers, and title placeholders. The smaller slides under the Slide Master are Slide Layouts, which inherit the basics of the Slide Master but feature alternative layouts for different types of presentations. You can edit these separately in addition to making changes to your Slide Master. To resize an element, such as the body or title area on a Slide Master or Layout, click it once and then drag its sizing handle. To move an element, click its border and then drag it to the desired location. You can also customize fonts by selecting the text in an element, such as the title, and then making changes using the font options on the Home tab. To add a placeholder for a certain type of object, such as a picture or a chart, click the "Insert Placeholder" button in the toolbar and select your desired option. You can also use the "Background" panel on the toolbar to change the theme's colors and style elements. Just make sure the Slide Master is selected in the left panel and not just one of the Layouts first. Click "Colors" on the toolbar to choose a new color scheme, and then "Background Styles" to choose a new background color from the palette. Click "Fonts" to change the font throughout, and "Effects" to add effects to objects, such as drop-shadows. To add a new layout to a Slide Master, click "Insert Layout" in the toolbar. To delete any part of your Slide Master or Layout, click it once and press the "Delete" key on your keyboard. When you're finished editing your Slide Master, click "Close Master View" in the toolbar to return to regular editing mode—your changes will be applied to all slides in your presentation automatically. Did this summary help you? Yes No
- Send fan mail to authors
Is this article up to date?

Featured Articles

Trending Articles

Watch Articles

- Terms of Use
- Privacy Policy
- Do Not Sell or Share My Info
- Not Selling Info
wikiHow Tech Help Pro:
Level up your tech skills and stay ahead of the curve
- Video Tutorials
- Knowledge Base
- Group Licenses
- Why Choose Us?
- Certificates
- PowerPoint Tutorials
PowerPoint Slide Master: Full Tutorial, Video, and Sample Files
In this tutorial, you’ll learn how to use the Slide Master in PowerPoint, why it’s useful, and how to use it to create elements that appear on every slide in the presentation, such as company logos and slide numbers.
- Tutorial Summary
- Files & Resources
- Premium Course
The PowerPoint Slide Master is useful for creating templates in presentations and repeating specific elements on each slide .
For example, if you want to repeat your company logo, the date, or the client’s name in the bottom-left corner of each slide, you can do that with the Slide Master.
You can also use it to set the default colors, fonts, and other design elements and ensure that everything on your slides looks consistent.
In this tutorial (video above and written version below), you’ll learn why the Slide Master is useful, how to set it up, and how to use it to insert logos, headers, and footers in presentations.
Video Table of Contents:
0:52: Slide Master 101
11:24: Slide Master Setup
14:35: Exercise: Fix the First Layout Slide
24:31: Recap and Summary
[Click the “Files & Resources” tab to get all the PowerPoint files for this lesson.]
The PowerPoint Slide Master: Why It’s Useful
To understand the value of the Slide Master, consider several of the slides in the “Before” file here :

As shown above, these slides have common elements: the divider line next to the title at the top, the “Goldman Stanley” logo in the bottom left, and the “Project Jaguar” text in the top left.
However, we manually inserted these elements on each slide , which is not ideal.
For example, what happens if something changes in the design? What if we need to replace the logo everywhere? Or what if we swap the positions of the logo and the project name?
We would have to go through each slide and manually change the positions and formatting of these elements.
If there are only 5-10 slides, that’s not a big deal, but with 50 or 100 slides, it would be extremely time-consuming to do this.
A better solution is to open the Slide Master (Alt, W, M on PC or ⌘ + Opt + 1 on Mac) and insert these common elements on a “Layout ” (template) so they repeat across all the slides in the presentation that use this particular Layout:

When you insert a normal slide in the standard view of PowerPoint (Alt, H, I on PC), you can base the slide on one of these “Layouts”:

The PowerPoint Slide Master: Key Shortcuts
The key shortcuts are as follows:
Slide Master View: Alt, W, M (PC) / ⌘ + Opt + 1 (Mac)
Close Slide Master: Alt, M, C (PC) / ⌘ + 1 (Mac)
Normal Edit Mode: Alt, W, L (PC) / ⌘ + 1 (Mac)
Move to Next or Previous Layout: Arrow Keys (PC and Mac)
Change Slide Layout (outside of the Slide Master): Alt, H, L (PC) / N/A on Mac
Reset Slide Layout (outside of the Slide Master): Alt, H, Q (PC) / N/A on Mac
Header & Footer (outside of the Slide Master): Alt, N, H (PC) / N/A on Mac
NOTE: The “,” in these shortcuts means that you press and release each button sequentially. The “+” means that you press and hold down each button and then release them all at the end.
For example, with Alt, W, M, you press and release Alt, press and release W, and press and release M.
But with ⌘ + Opt + 1 (Mac), you press and hold ⌘, press and hold opt, and press and hold 1 and then release all 3 keys at once.
You will enter and exit the Slide Master all the time in longer presentations, so you should know at least the first few shortcuts above.
The PowerPoint Slide Master: Placeholders vs. Shapes
When you’re on a Layout in the Slide Master, you can insert shapes, lines, and textboxes .
However, if you insert these objects within the Slide Master, you will not be able to edit them on normal slides that use the Layout .
Let’s look at a simple example, where we add a rectangle shape to the default “Title and Content” Layout in the Slide Master:

If we now return to the normal slides with Alt, W, L (⌘ + 1 on Mac) and insert a new slide that uses this “Title and Content” layout, it’s impossible to select or edit the shape:

To edit this shape, we need to return to the Slide Master and insert a Placeholder on this layout, which is in the “Slide Master” tab under “Insert Placeholder”:

We can insert a “Content” Placeholder here and then format it with the same fill color, font color, and other attributes:

Then, when we return to the normal slide view and reset the Layout of the slide we just inserted, the blue shape is now editable:

In real life, you would not use Placeholders for something trivial like this – you would normally use them for slide titles or blocks of text that change on each slide:

You need to consider the Shape vs. Placeholder distinction before using the Slide Master, or your templates will not work correctly.
Finally, note that Placeholders are not allowed on “Layout #1” in the Slide Master – the one that looks like this:
")
This Layout determines the default font and paragraph styles for all the other slides and Layouts.
You can add normal shapes, lines, and textboxes to Layout #1, but not Placeholders; the option is greyed out:
")
In real life, you might add the company or client logo to Layout #1 – but it’s rare to repeat any other element in the same spot everywhere in the presentation .
A better approach is to create a few Layouts, such as 1-column and 2-column designs, and add “repeated elements” like the title/header/footer divider lines on each Layout.
The Problems with the PowerPoint Slide Master
The Slide Master is great for ensuring consistency, creating templates, and repeating common elements across the slides, but it does have some drawbacks.
First , not all formatting carries through to normal slides the way you necessarily want.
Similar to the copy/paste shape format commands, only the formats of the first line of text in a Placeholder are carried through to normal slides.
Second , many people do not know about the Slide Master or do not use it properly, and it is cumbersome to “convert” a long presentation with normal slides into one that uses Layouts consistently.
Third , an existing slide will not update even if you change the slide’s Layout within the Slide Master.
You can “reset” the slide to its base Layout using the Alt, H, Q shortcut, and this will update all the elements on the slide, including additions/deletions and edits you’ve made in the Slide Master.
However, you’ll also lose any additional formatting you have applied to the Placeholders on this normal slide.
Because of these downsides, it’s best to keep the Slide Master simple and use it for tasks like inserting logos, headers, footers, and slide numbers rather than complex layouts.
Setting Up the PowerPoint Slide Master Properly
If you’ve just created a new presentation and you want to use the Slide Master extensively, here’s what we recommend:
Step 1: First, go to the Slide Master with Alt, W, M (PC) or ⌘ + Opt + 1 (Mac) and delete the default Layouts you will not use.
We recommend keeping the “Title and Content” Layout – ignore the recommendation in the video – but everything else can go:

Step 2: We also recommend removing the Drawing Guides in the Slide Master because they’re separate from the Drawing Guides in the normal presentation, and you usually don’t need multiple sets of Guides.
To do this, enter the Slide Master and go to Layout #1 there (the “Office Theme Slide Master”).
Press Alt, W, S (PC) or ⌘ + Opt + Ctrl + G (Mac) to show the Drawing Guides, which should appear in red, and drag them off the slide to remove them.

Next, go to each Layout you plan to use and do the same thing.
These Drawing Guides will appear in orange , and by default, they’ll be single vertical and horizontal lines.
We recommend removing these unless you plan to customize them for a more complex Layout in which specific alignments would be helpful:

Step 3: Add the company logo, the slide number, and the header or footer elements that should appear on all slides on Layout #1.
The logo is straightforward: insert a normal shape or textbox, format it appropriately, and drag it to the bottom left or right corner:

To add the slide numbers, press Alt, N, H (Insert –> Header & Footer on Mac) and make sure “Slide Number” is checked:

If you want to add something else in the header or footer, such as the client’s name or the project name, you can also do that at this stage.
But in most cases, elements like lines for the header and footer areas should be added directly on the custom Layouts because you usually don’t want to show these on the title slide or “section divider” slides.
Step 4: Set the default themes, colors, fonts, and background styles.
Within the Slide Master view, click the “Slide Master” tab and go to “Edit Theme” and “Background” to set these:

If you go to the normal slides and set the fill/font color of a shape or textbox, you can access all these theme colors easily:

The main benefit of this feature is that it lets you change all the colors in the presentation from within the Slide Master .
You just need to ensure that each shape, textbox, and line uses one of the “Theme Colors” you’ve selected.
If it does, you can return to this area of the Slide Master and change the colors here, and everything that uses one of these colors will update automatically.
Many companies have their own themes and color schemes, so you should follow your internal standards when doing this.
Practice Exercise: Create a Custom Layout in the Slide Master
Your task in this practice exercise is to start with the “Before” version of the file and modify it to set up the Slide Master properly, which means:
1) Remove the unused layouts.
2) Delete the unnecessary Drawing Guides.
3) Add the “Goldman Stanley” logo and the slide numbers.
4) Set the text and bullet styles on the first Layout in the Slide Master.
To save time, remember that you can copy and paste shapes, lines, and textboxes from normal slides into Layouts within the Slide Master.
Start by pressing Alt, W, M to enter the Slide Master and delete the unnecessary Layouts:

Then, press Alt, W, S and remove the unnecessary red Drawing Guides by dragging them off the edges:

Next, go to one of the normal slides with the “Goldman Stanley” logo at the bottom, copy the logo from that normal slide, and paste it into the bottom left corner of Layout #1 in the Slide Master:

Once you’ve done this, the “Goldman Stanley” logo will repeat on each slide, but all the existing slides have “duplicate logos” – because each one also had this logo as a separate shape!
So, you should go to each slide individually and delete the logo in its bottom-left corner:

You can press Alt, N, H to add the slide numbers in the footer, and you can format them as you want.
Make sure the slide number textbox in the bottom right corner is aligned properly to the right edge of the “main content area” on each slide (demonstrated in the video using extra lines).
Finally, as we do in the sample video, you can adjust the font sizes, bullet styles, and indentations on Layout #1.
These are standard PowerPoint commands/shortcuts not specifically related to the Slide Master.
More Advanced Features in the PowerPoint Slide Master
In our full PowerPoint Pro course , you’ll set up many slides and Layouts within the Slide Master, including ones for company profiles and the Table of Contents.
You’ll also get practice “retrofitting” existing slides to use Layouts.
Finally, in the VBA and macro module of the course, you’ll learn how to use Drawing Guides in the Slide Master to align and distribute shapes, and you’ll learn how to automatically generate a Table of Contents based on Layouts for the section markers.
The PowerPoint Slide Master will not solve every problem, but it could help you create presentations more quickly with fewer errors if you use it properly.

About Brian DeChesare
Brian DeChesare is the Founder of Mergers & Inquisitions and Breaking Into Wall Street . In his spare time, he enjoys lifting weights, running, traveling, obsessively watching TV shows, and defeating Sauron.
Files And Resources
Premium Courses
Other biws courses include:.
Perfect Your PowerPoint Skills
The BIWS PowerPoint Pro course gives you everything you need to complete pitch books and presentations in half the time and move straight to the front of the "top tier bonus" line.
Home Blog PowerPoint Tutorials How to Work with Slide Master in PowerPoint
How to Work with Slide Master in PowerPoint

When editing PowerPoint templates or designing your own slides, you might need to repeat some slide elements in all slides, such as the company branding and tagline. Instead of manually adjusting each slide, such major changes can be made using the Master Slide in PowerPoint.
What is Slide Master in PowerPoint
PowerPoint Slide Master gives you control over how to display slides with uniformity based on your preferences. It is available via the View tab in PowerPoint and can be used to set logos, fonts, images, and other parts of your slides using a master view. The top slide or Master Slide in PowerPoint Slide Master is the primary slide, changes to which are reflected across the whole presentation. This is followed by other layouts available for your presentation that can also be adjusted in Slide Master.
How to Edit a Master Slide in PowerPoint
PowerPoint, by default, provides a Master Slide for every slide deck, even if you start with a blank presentation. For PowerPoint templates downloaded from the Microsoft Store or third-party sources, Master Slides are more refined than the default layout in PowerPoint. You can edit the Master Slide via View -> Slide Master .

The PowerPoint Master Slide is located at the top, and any changes made to it are reflected across all slides. For example, if you place a logo on the Master Slide, it will automatically appear on all slides in the presentation. Similarly, you can set the font style, font color, default image, and other elements for your slides by editing the Master Slide.

The below image shows how adding a logo to the Master Slide in PowerPoint reflected the changes across all slides in the PowerPoint template.

How to Create a Master Slide in PowerPoint
Creating a master slide that can be replicated across various presentations can help ensure that you can quickly apply the changes to new presentations while retaining your desired branding and theme style. To do this, you can create a PowerPoint Master Slide from scratch. To create a new Master Slide, open a blank PowerPoint presentation and go to View -> Slide Master .

From the Master Layout option in Slide Master, you can select the elements that you wish to single out for editing.

You can begin editing the master slide by adding a theme, logo, changing the font style, and adjusting other slide elements.

You can also add additional layouts and edit existing ones according to need. This is to edit not only the Master Slide but the overall design of your presentation. Once you are satisfied with the changes made to the Master Slide, click Close Master View from the Ribbon menu.

The changes you make to the Master Slide will be reflected on the presentation deck you are creating.

How to Apply Master Slides to an Already Existing PowerPoint Presentation
You can save and apply master slides to an existing PowerPoint presentation from one you might have saved earlier. To do this, you will require saving the original theme of your slides and then importing them to the presentation deck to which you intend to apply the master slides. Open the slide deck from where you wish to import the theme and go to View -> Slide Master .

From the Slide Maste r tab, go to Theme -> Save Current Theme .

Browse a location to save your theme from importing it to other PowerPoint presentations.

Open the PowerPoint presentation to import the theme style and go to View -> Slide Master .

From the Master Slide tab, go to Theme -> Browse for Themes .

Select the theme with the Master Slides to import to your PowerPoint presentation. Once the changes are applied, click Close Master View .

This will apply the changes to the existing presentation from the imported theme with your preferred Master Slide layouts.

Final Words
The Master Slide and associated layouts in Slide Master can help standardize various aspects of your slide design. Making it easier to manage branding, import slides for your preferred layouts, and help avoid manually editing slides in your presentation deck to apply specific layout changes.

Like this article? Please share
Design, PowerPoint Tools Filed under PowerPoint Tutorials
Related Articles

Filed under PowerPoint Tutorials • May 10th, 2024
How to Copy a Slide in PowerPoint
Optimize your slide deck creation process by learning how to copy a slide in PowerPoint. Detailed instructions with screenshots here.

Filed under Google Slides Tutorials • April 23rd, 2024
How to Align Objects in Google Slides
Optimize your layouts by learning how to align objects in Google Slides presentations. Step-by-step guide with screenshots.

Filed under PowerPoint Tutorials • April 16th, 2024
How to Insert an Equation in PowerPoint
Learn how to create easy-to-understand science slides by mastering how to insert an equation in PowerPoint. Step-by-step guide.
Leave a Reply
Stack Exchange Network
Stack Exchange network consists of 183 Q&A communities including Stack Overflow , the largest, most trusted online community for developers to learn, share their knowledge, and build their careers.
Q&A for work
Connect and share knowledge within a single location that is structured and easy to search.
Using an existing slide to create master slide views
Is there a way I could transfer normal slides in powerpoint to master view? As in, I want ALL my slides from a presentation to be slide views.
Explanation: the request was to just make a presentation about how the company presentations should look like, but after seeing it, they would like to make all of the slides avaliable as templates(views, some of them with predifined text and images), and the design of presentation an actual theme.
Is there a simple way of doing it or do I have to manually make the Master & Slide views? Based on my research, the answer is NO, but I would like to confirm that before I waste hours to copy and make the whole master.
Any information or advice is appreciated!
- microsoft-powerpoint
- microsoft-powerpoint-2016
This is done as follows :
- In the normal slide, type Ctrl + A to select all the items on the slide and copy them using Ctrl + C .
- Go into Master View and paste the items onto a new Master Slide.
- Convert the text into placeholder text where you want it to be editable in Normal View.
- Thanks, that will at least shorten the proces for some time. Was hoping there was a better way, but it'll have to do :) EDIT: It actually doesn't work, when I try to paste nothing happens... Any idea how to solve it? @harrymc – malimilek Nov 15, 2018 at 17:00
- I cant edit the comment again, sorry for duoble posting. That approach works only for single slides, so I will assume theres no faster way to do it for all the slides. Still thanks for the anwer. – malimilek Nov 16, 2018 at 8:23
- This is a nice trick! I was checking other ways but this seems to be the only one that works. – fedorqui Jan 10, 2019 at 17:22
- 1 This doesn't copy slide backgrounds. – Ryan Leach May 28, 2021 at 5:39
- 3 This breaks down at the 3rd step. "Convert the text into placeholder text" as AFAIK, there is no way to actually do this, except to create new placeholders and copy/paste text from the text boxes to placeholders, which can be a considerable amount of work to duplicate the size, position, font styles, etc. to be exactly the same as you want it. So this isn't really very useful. – Trashman Oct 4, 2021 at 14:54
You must log in to answer this question.
Not the answer you're looking for browse other questions tagged microsoft-powerpoint microsoft-powerpoint-2016 ..
- The Overflow Blog
- Between hyper-focus and burnout: Developing with ADHD
- Featured on Meta
- Our Partnership with OpenAI
- Imgur image URL migration: Coming soon to a Stack Exchange site near you!
Hot Network Questions
- Best way to drive multiple LED strips at distinct times with one LED driver
- Pixel Vignetting
- How can I save a dating relationship when I am promoted and she will be in my vertical reporting chain?
- A post-apocalyptic novella, where water disappears and earthquakes eventually finish mankind off. Probably originally in French
- Which formula do I use when calculating finite geometric series?
- How long does it take to add 2 oz sealant through valve?
- This might be habitual use but grammatically incorrect
- Why did SpaceX change the landing site from the Pacific (ITF-1, ITF-2) to the Indian Ocean (ITF-3 and subsequent flights)?
- Taking the inverse (not the reciprocal) of both sides of an inequality
- Meaning of gold border around Steam achievement
- Nested integration of the list of functions returns error
- Shortest battleship game, to find the ships
- What Do The New Geometry Nodes Pink Colored Rotation Sockets in 4.1 mean?
- 4 term exact sequence diagram, surjective map
- Efficient C Tokenizer/Lexer in C++
- Which cognitive psychology findings are solid, that I can use to help my students?
- Reproduce Knuth's circle and triangle examples
- Should David have killed Saul?
- Custom Arduino MEGA crashes ONLY on a specific command when plugging UART-USB converter before main power. Phantom power leaking through UARTs pins
- How did White lose all their pieces?
- Fantasy novel in which one of the main characters was a soldier in an army that would lay a large ladder over a chasm in order to attack the enemy
- How to introduce a dangerous looking character to the rest of the party?
- How to draw such a sphere with mesh
- How can the wing generate more lift than the thrust?
- Editor's Choice: Tech Gifts for Mom
- Amazon Prime Tech Deals!
How to Use PowerPoint Slide Master Layouts
Use the Slide Master to effect a uniform appearance for your presentation
- Brock University
What to Know
- Go to View > Slide Master and select the top thumbnail in the Slide pane. Use the Slide Master tab to change colors, fonts, and more.
- Use the Slides pane to choose a slide layout thumbnail and make changes to the layout master.
- When you're done making changes, select Slide Master > Close Master View to return to your presentation.
To ensure that all the slides in your PowerPoint presentation have the same look, use the Slide Master. Apply fonts and styles, add multimedia, and insert footnotes. These instructions apply to PowerPoint 2019, 2016, and 2013; PowerPoint for Microsoft 365; and PowerPoint for Mac.
Access the PowerPoint Slide Master
The PowerPoint Slide Master is like a style sheet for your presentations. Changes made to the Slide Master apply to the slides that are created after you format the Slide Master.
To access the Slide Master in a PowerPoint presentation, select View > Slide Master .
Change the Layout in the Slide Master
The Slide Master view contains all the slide layouts used in PowerPoint. The Slides pane displays thumbnail images of the slide master (the top thumbnail image) and the related slide layouts (the smaller thumbnail images located below the slide master).
Changing the font on the slide master affects the text placeholders on all slides. However, not all placeholders are affected by changes made to the slide master. You may need to make additional changes to the different slide layouts.
Make changes to the Slide Master before you create a presentation. If you change the font style or color on a slide before you edit the slide master and slide layouts, the formatting is retained on those slides.
To make changes in the Slide Master:
Select the slide master. It's the top thumbnail in the Slide pane.
Go to the Slide Master tab to change the theme, theme colors, fonts, and background for the entire presentation.
In the Slides pane, select a slide layout thumbnail and make changes to the layout master, if needed.
Close the PowerPoint Slide Master
After you've made all your changes to the slide master, select Slide Master > Close Master View to return to the presentation slides.
Each new slide you add to the presentation takes on the changes you made. You'll save time by not having to make edits to every individual slide. Your presentation will have a uniform and professional look.
Get the Latest Tech News Delivered Every Day
- How to Copy a PowerPoint Design Template to Another Presentation
- What Is a PowerPoint Placeholder?
- How to Increase PowerPoint Slide Number Size
- PowerPoint Master Slide
- Use Multiple Design Themes in the Same Powerpoint Presentation
- Slide Layouts in PowerPoint
- Replacing All the Fonts in a Presentation at One Time
- Change the Default Font in PowerPoint Text Boxes
- Add, Delete or Change the Order of PowerPoint Slides
- How to Use the Slide Sorter View in PowerPoint
- The 10 Most Common PowerPoint Terms
- How to Use Speaker Notes in PowerPoint
- Use PowerPoint Slide Finder
- An Introduction to PowerPoint
- Change Font Colors and Styles on PowerPoint Slides
- Using Design Themes in PowerPoint
- SUGGESTED TOPICS
- The Magazine
- Newsletters
- Managing Yourself
- Managing Teams
- Work-life Balance
- The Big Idea
- Data & Visuals
- Reading Lists
- Case Selections
- HBR Learning
- Topic Feeds
- Account Settings
- Email Preferences
Create an Effective Slide Deck
A great presentation depends on more than the high-quality information you’re sharing. Here are some essential principles to help you create a memorable slide deck. Choose the right fonts. Use sans serif fonts like Helvetica or Arial for a minimal look and better readability. Stick to two font styles throughout your presentation—one for headings and another […]
A great presentation depends on more than the high-quality information you’re sharing. Here are some essential principles to help you create a memorable slide deck.
Source: This tip is adapted from “How to Make a ‘Good’ Presentation ‘Great’” by Guy Kawasaki
Partner Center

A simple guide to slideshows
Learn what slideshows are, how they’re used, common features, and how to choose a slideshow maker. Get started creating your own slideshows today with Microsoft PowerPoint.
What is a slideshow?
What are slideshows used for.

Meetings and presentations
Slideshows are most frequently used to create professional presentations for business meetings, conferences, and educational purposes. A slideshow program allows people to organize content, include visuals, and enhance the overall impact of their message.

Visual storytelling
Because slideshows sequentially display engaging visuals, text, and other multimedia, they’re a strong way to tell a cohesive and compelling narrative from start to finish.

Content creation
Slideshows give content creators a versatile and efficient way to organize information, increase visual appeal, and communicate effectively across different contexts.

Photo and video sharing
Slideshow makers are popular for creating photo and video presentations, especially for events like weddings, birthdays, and vacations. People can add transitions, music, and captions to fully bring the photo-sharing experience to life.

Training and tutorials
Slideshows help break down complex information into digestible chunks with the support of visuals and text, making them ideal for instructional materials, tutorials, and training modules.

Collaborative projects
In collaborative settings, teams use slideshow makers to create joint presentations or reports. The best slideshow makers enable multiple contributors to add their content simultaneously, which helps ensure a cohesive and unified presentation.
What are the features of a slideshow creator?
Slideshow creators vary in what they offer but ideally include:
A library of templates, themes, and images.
If you’re not a designer, this feature is huge. Simply browse the options available in your slideshow maker library to create a polished, professionally designed presentation in a flash. Be sure to confirm that access to the library is free and the images are approved for unrestricted usage.
Audio and video compatibility.
Keeping your audience engaged is key to any successful slideshow presentation. To mix things up, being able to add a multimedia element—like a song or a video clip—will help people stay focused and interested.
Presentation tools.
Handy presenter tools go a long way toward making your slideshow experience seamless. For example, straightforward slide navigation, slideshow keyboard shortcuts, pen and highlighter markup, and adjustable resolution settings.
AI assistance.
With AI revolutionizing content creation, using a slideshow maker that has AI capabilities will enhance efficiency and innovation. Depending on the slideshow app you have, creating an entire slideshow could be as easy as a quick prompt, like “Make a presentation about the benefits of sustainable fashion that has 15 slides.”
Animations.
Like audio and video, animations give your audience a bit of sensory surprise that can capture their attention.
Slide transitions.
Add some pizzazz to how you change slides with visual effects like fading, wiping, and zooming.
Screen recording.
Being able to record your screen in a slideshow maker is helpful when giving an instructional talk, software demonstration, and other types of presentations that require visual aids.
A place to put speaker notes.
Having somewhere to jot a few notes down will help remind you of everything you want to cover as you present.
Different viewing options.
Looking at different views—for example, a presenter view, an audience view, and a high-level view of slide order—is useful when organizing your slideshow’s structure and understanding and preparing for what you’ll see versus what your audience will see.
How do I choose the right slideshow maker?
When choosing a slideshow maker, keep the following questions in mind to make sure you get the most for your money:
Is it scalable with your business?
As your organization grows and changes, it’s important to have flexible technology that adapts to new needs. Having certain features—such as cloud-based collaboration, compatibility with other work apps, and a mobile app—will help ensure that no matter how your business changes, the slideshow maker is up to the task. This also applies to pricing plans. Consider choosing a slideshow app that has a subscription plan (so the software is always up to date), volume-based pricing, or enterprise-level pricing.
Does it have a variety of visual elements?
It’s pretty much a given that a slideshow maker will allow you to add images, but think outside the JPEG box—what other visual elements are available to you? Features like preset themes, free templates, SmartArt, a built-in clip art library, shape tools, background styles, 3D models, and charts and graphs provide diverse ways to switch up how a slideshow looks without relying solely on adding your own images.
Is it easy to use?
You could have the most feature-rich slideshow maker on the market, but if it isn’t easy to use, you probably won’t use it. Or you will, but you’ll be frustrated, waste valuable time, and have difficulty convincing people you work with to use it. As you research slideshow makers, look for videos that show the apps’ interfaces in action to help you decide if they’re intuitive and will have a shorter learning curve.
Does it have collaboration and sharing options?
Because making a slideshow is often a collaborative effort, it’s worthwhile to find a slideshow creator that was designed with this in mind. Pick one that offers editing controls and commenting, as well as the ability to work on a slideshow at the same time as someone else. Having a cloud-based slideshow maker will be key here. You’ll not only save yourself time but also keep things simple by not having multiple versions of the same slideshow.
Explore more about slideshows and slideshow makers
Copilot in powerpoint.
Transform how you make slideshows with the versatile AI in Copilot for PowerPoint.
Improve your presenting skills
Practice presenting with an AI speaker coach to get feedback on body language, repetition, and pronunciation.
Six slideshow tips and tricks
Read up on tips about how to finesse your slideshows to give your most confident presentations.
Get free PowerPoint templates
Show your style with PowerPoint templates in more than 40 categories.
How to make a branded slideshow
Create a cohesive visual identity for your brand that goes beyond adding a logo to every slide.
Try a photo album template
Relive your favorite memories with photo album templates designed for all your unforgettable moments.
The benefits of visual aids in slideshows
Discover why using visual aids helps communicate ideas and messaging more effectively.
Slideshows that reach all learners
Explore the different ways that people learn and how to include all learning styles in your presentations.
Frequently asked questions
How do i make a good slideshow.
Making a good slideshow in PowerPoint is easy:
Plan what you’d like to include in your slideshow.
Launch your slideshow creator.
Choose the theme you’d like.
Import media.
Add text, music, and transitions.
Record, save, and share your slideshow.
Learn more about how to make a slideshow .
How do I add music to a slideshow?
To add music to a slideshow, first make sure that you’re using a slideshow maker with music compatibility. In PowerPoint, follow these steps:
Open your PowerPoint presentation and select the slide where you want to add music.
Click on the Insert tab in the ribbon menu.
Click on the Audio button and select Audio on My PC.
Browse to the folder on your computer where the audio file is located and select it.
Click on the Insert button.
How do I record a slideshow?
The steps for recording a slideshow in PowerPoint will vary depending on the version that you own. Get help with slideshow recording based on your version.
What types of files can I add to a slideshow?
File compatibility in PowerPoint includes the use of JPEGs, PNGs, TIFFs, GIFs, PDFs, MP3s, WAVs, MIDIs, MPEG-4 Videos, and Windows Media Videos.
How do I share my slideshow?
To share your PowerPoint slideshow, follow these steps:
Open your presentation and click Share at the top right of your screen.
If your presentation isn't already stored on OneDrive, select where to save your presentation to the cloud.
Choose a permission level, like Anyone with a link , or maybe just people in your company. You can also control if people can edit or just view the doc.
Select Apply.
Enter names and a message.
Select Send.
Follow Microsoft
Got any suggestions?
We want to hear from you! Send us a message and help improve Slidesgo
Top searches
Trending searches

11 templates

165 templates

computer network
73 templates

28 templates

teacher appreciation

islamic history
36 templates
Gastroenterology Master's Degree
Gastroenterology master's degree presentation, free google slides theme and powerpoint template.
Download the Gastroenterology Master's Degree presentation for PowerPoint or Google Slides. As university curricula increasingly incorporate digital tools and platforms, this template has been designed to integrate with presentation software, online learning management systems, or referencing software, enhancing the overall efficiency and effectiveness of student work. Edit this Google Slides theme and PowerPoint template to create an accessible and highly professional resource that aligns with the rigorous academic expectations at the higher education level.
Features of this template
- 100% editable and easy to modify
- Different slides to impress your audience
- Contains easy-to-edit graphics such as graphs, maps, tables, timelines and mockups
- Includes 500+ icons and Flaticon’s extension for customizing your slides
- Designed to be used in Google Slides and Microsoft PowerPoint
- Includes information about fonts, colors, and credits of the resources used
How can I use the template?
Am I free to use the templates?
How to attribute?
Attribution required If you are a free user, you must attribute Slidesgo by keeping the slide where the credits appear. How to attribute?
Related posts on our blog.

How to Add, Duplicate, Move, Delete or Hide Slides in Google Slides

How to Change Layouts in PowerPoint

How to Change the Slide Size in Google Slides
Related presentations.

Premium template
Unlock this template and gain unlimited access

Purdue Online Writing Lab Purdue OWL® College of Liberal Arts
Welcome to the Purdue Online Writing Lab

Welcome to the Purdue OWL
This page is brought to you by the OWL at Purdue University. When printing this page, you must include the entire legal notice.
Copyright ©1995-2018 by The Writing Lab & The OWL at Purdue and Purdue University. All rights reserved. This material may not be published, reproduced, broadcast, rewritten, or redistributed without permission. Use of this site constitutes acceptance of our terms and conditions of fair use.
The Online Writing Lab at Purdue University houses writing resources and instructional material, and we provide these as a free service of the Writing Lab at Purdue. Students, members of the community, and users worldwide will find information to assist with many writing projects. Teachers and trainers may use this material for in-class and out-of-class instruction.
The Purdue On-Campus Writing Lab and Purdue Online Writing Lab assist clients in their development as writers—no matter what their skill level—with on-campus consultations, online participation, and community engagement. The Purdue Writing Lab serves the Purdue, West Lafayette, campus and coordinates with local literacy initiatives. The Purdue OWL offers global support through online reference materials and services.
A Message From the Assistant Director of Content Development
The Purdue OWL® is committed to supporting students, instructors, and writers by offering a wide range of resources that are developed and revised with them in mind. To do this, the OWL team is always exploring possibilties for a better design, allowing accessibility and user experience to guide our process. As the OWL undergoes some changes, we welcome your feedback and suggestions by email at any time.
Please don't hesitate to contact us via our contact page if you have any questions or comments.
All the best,
Social Media
Facebook twitter.
- Add and delete slides Video
- Apply or change a slide layout Video
- Apply Themes to presentations Video
- Get design ideas for slides Video
- Change slide masters Video
- Change the page orientation Video
- Add a watermark to your slides Video
- Organize slides into sections Video
- Add a logo to your slides Video
Change slide masters

Use a slide master to add consistency to your colors, fonts, headings, logos, and other styles, and to help unify the form of your presentation.
Change the Slide Master
Select View > Slide Master .
Make the text, color, and alignment changes you want.
Select Close Master View .
What is a slide master?
Customize a slide master
Add color and design to my slides with themes
Use multiple themes in one presentation

Need more help?
Want more options.
Explore subscription benefits, browse training courses, learn how to secure your device, and more.

Microsoft 365 subscription benefits

Microsoft 365 training

Microsoft security

Accessibility center
Communities help you ask and answer questions, give feedback, and hear from experts with rich knowledge.

Ask the Microsoft Community

Microsoft Tech Community

Windows Insiders
Microsoft 365 Insiders
Was this information helpful?
Thank you for your feedback.
オールインワンのメディアコンバータツール。
全機能を備えたスクリーンレコーダー。
包括的なDVDリッパー。
あなたの信じられないほどのマルチメディアプレーヤー。
MP4への堅実なファイルコンバーター。
MKVファイルを変換するための最良のツール。
PowerPoint の透かし除去: プロのプレゼンテーションのための 2 つの方法をマスターする
PowerPointは多機能で広く使用されているプレゼンテーションソフトウェアで、ユーザーは魅力的なスライドショーを作成できます。プレゼンテーションを強化するための多くの機能を提供していますが、特定のファイルで作業するときに透かしが表示されることがあります。幸いなことに、 PowerPoint の透かしの削除 機能はそれらを削除するのに役立ちます。
この記事では、それを実現するための手順を段階的に説明します。さらに、写真やビデオを PowerPoint にアップロードする前に、透かしを削除するさまざまな方法を紹介します。これらの方法を見てみましょう。
パート 1. PPT の透かしを削除する方法
パート2. pptにアップロードする前に透かしを削除する方法, パート3. powerpointの透かしの削除に関するよくある質問.
このセクションでは、PowerPoint の機能を使用してスライドから透かしを簡単に削除する方法を説明します。これらの機能は、洗練されたプロフェッショナルなプレゼンテーションのための包括的なソリューションを提供します。PowerPoint で透かしを削除する方法を詳しく見ていきましょう。
ステップ1 まず、透かしを含む PowerPoint ファイルを開きます。
ステップ2 透かしのあるスライドを選択するか、透かしが複数のスライドに表示される場合は任意のスライドを選択します。
「デザイン」タブに進みます。ここでスライドの外観をコントロールします。 デザイン タブ、検索 フォーマットの背景 の中に カスタマイズ セクションをクリックして下さい。
ステップ3 に移動します 埋める タブを一度 フォーマットの背景 サイドバーが表示されます。次に、 ソリッドフィル の中に 埋める タブ。これにより、シンプルな単色の背景で作業できるようになります。
カラーパレットを使用して背景色を選択し、透かしがある領域を置き換えます。必要に応じて、透明度を変更することもできます。
ステップ4 打つ すべてに適用 すべてのスライドに透かしのない新しい背景が必要な場合。
ステップ5 スライドに戻り、選択したスライドまたはすべてのスライドから透かしが削除されていることを確認します。

2. スライドマスター
ステップ1 透かしがある PowerPoint ファイルを開きます。
ステップ2 に向かう 意見 タブをクリックします。 スライドマスター の中に マスタービュー グループ。
ステップ3 の スライドマスター ビューには、サムネイル画像のあるパネルが表示されます。削除する透かしを含む特定のスライド レイアウトを見つけてクリックします。
ノート: レイアウトが多数ある場合は、 Ctrl キーを押してそれぞれをクリックします。
ステップ4 選択したスライドレイアウト上の透かし画像またはテキストを見つけます。見つかったら、それをクリックして 消去 キーボードのキー。
ステップ5 これらの変更をプレゼンテーション全体に反映させるには、 意見 タブを選択して 普通 の中に プレゼンテーションビュー グループ。スライドから透かしが消えたことを確認します。

1. 写真の透かしを削除する
PowerPoint に素晴らしい画像を使用したのに、透かしが気になったことはありませんか? AVAideウォーターマークリムーバー は、このような状況で役立つ友人です。これは、透かしを消去して、画像の背景をきれいに保つプラットフォームです。透かしを削除するには、ブラシ、投げ縄、多角形など、さまざまなオプションがあります。印象的ですよね?
このオンライン プラットフォームは、AI を使用して透かしの周囲の色を理解して塗りつぶします。透かしを削除するのではなく、細部を修正して画像を完璧に見せます。安全性が心配ですか? このプラットフォームは、強力な 256 ビット SSL 証明書で安全性を保証しているため、ウイルス、広告、リスクはありません。手間をかけずに透かしを削除し、PowerPoint を美しく仕上げましょう。
ステップ1 AVAide Watermark Remover の公式 Web サイトにアクセスしてください。
ステップ2 を押します 写真を選択してください ボタンをクリックしてください。次に、削除したい透かしが含まれている画像をインポートします。

ステップ3 画面に新しいウィンドウが表示され、インポートした画像が表示されます。画像の透かしを削除するには、次の 3 つのオプションがあります。 みがきます , なげなわ 、 と 多角形 .
使用 みがきます 透かしのマークと削除には、 なげなわ 透かしを削除するには、 多角形 直線で正確に選択できます。不要なハイライトがある場合は、 消しゴム それらを削除します。

ステップ4 透かしが隠れたら、 削除する ボタンをクリックします。AVAide Watermark Remover がプロセスを開始し、透かしのない画像が完成します。

ステップ5 「ダウンロード」ボタンを押すと、透かしのない画像がローカル フォルダーに保存されます。

2. ビデオの透かしを削除する
透かしの入った動画があり、PowerPointにアップロードするのがためらわれる場合は、 AVAideビデオコンバーター あなたの解決策になるかもしれません。
ビデオ ウォーターマーク リムーバーが内蔵されています。プロフェッショナルでクリーンなプレゼンテーションを実現できます。選択ボックスを使用して手動でウォーターマークを削除するプロセスが簡素化されます。そのため、不要な要素や残留物なしでウォーターマークを削除できます。さらに、1 つのビデオで多数のウォーターマークを削除できます。これにより、タスクが効率的かつ手間がかかりません。AVAide ビデオ コンバーターでプレゼンテーションのレベルをアップグレードしましょう。
AVAide Video Converter を使用してビデオから透かしを削除する方法のガイドは次のとおりです。
ステップ1 AVAide Video Converter の公式 Web サイトにアクセスして、プログラムをダウンロードしてインストールします。
無料体験 Windows7以降の場合
無料体験 Mac OS X10.12以降の場合
ステップ2 プログラムを開いて、 ツールボックス タブを選択します ビデオ透かし除去ツール 提供されたツールから。

ステップ3 (+) ボタンをクリックして、透かし付きのビデオをインポートします。

ステップ4 透かしを削除するための新しいウィンドウが表示されます。+ ウォーターマーク除去領域を追加 プレビュー画面の選択ボックスをアクティブにするボタン。
選択ボックスをビデオ フレームの透かしに移動します。次に、各辺の円を使用してサイズを変更し、透かしを覆います。

ステップ5 満足したら、 輸出 ボタンをクリックして透かしの削除プロセスを開始します。完了したら、透かしのないビデオがローカル フォルダーに保存されます。

- PowerPoint で写真のサイズを簡単に変更するための完全ガイド
- PDF からウォーターマークを削除する: 理由と効果的なアプローチ
モバイル デバイス上の PowerPoint スライドから透かしを削除できますか?
編集機能が限られているため、モバイル デバイスでは難しい場合があります。AVAide Video Converter などの専用の編集プログラムを搭載したコンピューターを使用すると、より効果的です。
PowerPoint スライドから透かしを削除するとどのような利点がありますか?
透かしを削除すると、プレゼンテーションの見た目がより洗練され、プロフェッショナルなものになります。これにより、視聴者は気を散らされることなくコンテンツに集中できます。また、情報がよりアクセスしやすく、魅力的になります。
透かしを削除するとプレゼンテーションのファイル サイズは変わりますか?
プレゼンテーションのファイル サイズは変更されません。透かし入りの画像を高解像度の画像に置き換えると、ファイル サイズが大きくなる可能性があります。
誤って削除してしまった場合、透かしのない元のファイルを復元する方法はありますか?
ファイルを削除または置き換えた場合、透かしのない元のファイルに戻すのは困難です。これを回避するには、ファイルのコピーを別の場所に保存します。
透かしを削除すると、スライドの書式設定に影響しますか?
透かしを削除しても、スライドの書式設定には影響しません。透かしの入った画像を新しい画像に置き換える場合は、シームレスにフィットするように書式設定を変更する必要がある場合があります。
2つの簡単な方法を学びました PowerPoint の透かしを削除する さらに、AVAide の使いやすいツールを使用して、画像やビデオから透かしを削除する方法についても学びました。AVAide を使用すると、ワークフローを簡素化し、プレゼンテーションを強化し、コンテンツを真に自分だけのものにすることができます。何か言いたいことはありますか? コメント セクションでお気軽に共有してください。
沿って ジェーンピネダ 2024年5月10日
AVAideウォーターマークリムーバー
品質を損なうことなく、迷惑な透かしや不要なオブジェクトを写真から簡単に削除できます。

PowerPoint で画像の背景を透明にする方法

PowerPoint で背景グラフィックを編集するためのクイック ガイド

背景からオブジェクトを削除する方法 (オンラインおよび Photoshop)
著作権 © 2024 AVAide。無断転載を禁じます。
COMMENTS
Step-1: Click on the "Insert" tab. The first step is to click on the master slide from the slide layout panel on the left side of the screen in the "Slide Master" view. Then click on the "Insert" tab from the menu ribbon. Step-2: Click on the "Pictures" button.
Select any of your layouts and click the option Insert Layout in the Edit Master group. It'll create a new type of slide you can edit and customize as you see fit. Use the option Insert Placeholder to add different kinds of elements to our new layout. #3. Adding a new Slide Master if necessary.
Open your presentation, head over to the "View" tab, and then click the "Slide Master" button. The Slide Master will appear in the left-hand pane. The Slide Master is the top thumbnail that appears in the pane, and each sub-thumbnail represents each slide layout available in your theme. Edits you make to the text of the Slide Master ...
Open the slide master for editing. On the View tab, select Slide Master. In Slide Master view, the slide master is at the very top of the thumbnail pane, with related layouts beneath it. Click to select that master slide, and then select Master Layout on the Slide Master tab. To show or hide the title, text, date, slide numbers, or footer ...
Click VIEW > Slide Master. In the Edit Theme group, click Themes, and then under Built-in, select a theme that you want the additional slide master to adhere to. In the Edit Master group, click Insert Slide Master. Note that, if you use this procedure, the slide master appears without theme color and effects.
Click a location in the slide thumbnail pane where you want the new slide master to appear. On the Slide Master tab, select Insert Slide Master. Note: In the slide thumbnail pane, the slide master is the larger slide image at the top, and the associated layouts are positioned below the slide master. To create one or more custom layouts or to ...
Learn how to use Slide Master in PowerPoint to control the look and feel of your whole presentation, including colors, fonts, background, effects, and just a...
PowerPoint Slide Master Tutorial: Learn how to create master slides in any version of PowerPoint. This is a deep dive into making master slides work for you...
After opening the presentation, click View > Slide Master . Select the master slide and click the Master Layout button on the top ribbon. You can select a placeholder for title, text, date, footer, or slide number. These options are automatically applied to all layouts and slides.
Use a slide master to add consistency to your colors, fonts, headings, logos, and other styles, and to help unify the form of your Microsoft PowerPoint prese...
Open the slide master view mode. To access slide master view mode, click View and then the Slide Master icon. 2. Click Insert Slide Master. It's in the "Edit Master" section in the panel in the upper-left corner. This adds a new Slide Master to the PowerPoint layout. 3.
In the slide thumbnail pane start by clicking on each slide that you want to delete. Next, click on the Slide Master tab and then click on the Delete button. Hold down the Shift key on your keyboard to select multiple slides at once while using your mouse to select the slides. 3. Change the Slide Orientation.
The master slide is the top slide in the thumbnail pane on the left side of the window. The related layout masters appear just below the slide master (as in this picture from PowerPoint for macOS): 1 Slide master. 2 Layout masters. When you edit the slide master, all slides that are based on that master will contain those changes.
To do this, enter the Slide Master and go to Layout #1 there (the "Office Theme Slide Master"). Press Alt, W, S (PC) or ⌘ + Opt + Ctrl + G (Mac) to show the Drawing Guides, which should appear in red, and drag them off the slide to remove them. Next, go to each Layout you plan to use and do the same thing.
From the Master Slide tab, go to Theme -> Browse for Themes. Import an existing PowerPoint theme using Browse for Themes option. Select the theme with the Master Slides to import to your PowerPoint presentation. Once the changes are applied, click Close Master View. Choose and existing theme in PowerPoint.
3. This is done as follows : In the normal slide, type Ctrl + A to select all the items on the slide and copy them using Ctrl + C. Go into Master View and paste the items onto a new Master Slide. Convert the text into placeholder text where you want it to be editable in Normal View. Share.
How to Use PowerPoint Slide Master Layouts. Use the Slide Master to effect a uniform appearance for your presentation. Go to View > Slide Master and select the top thumbnail in the Slide pane. Use the Slide Master tab to change colors, fonts, and more. Use the Slides pane to choose a slide layout thumbnail and make changes to the layout master.
Why should you know how to create a master slide in PowerPoint? It's because you can place the elements common to all the slides on a master slide. The key b...
Here are some essential principles to help you create a memorable slide deck. Choose the right fonts. Use sans serif fonts like Helvetica or Arial for a minimal look and better readability. Stick ...
To add music to a slideshow, first make sure that you're using a slideshow maker with music compatibility. In PowerPoint, follow these steps: Open your PowerPoint presentation and select the slide where you want to add music. Click on the Insert tab in the ribbon menu. Click on the Audio button and select Audio on My PC.
Free Google Slides theme and PowerPoint template. Download the Gastroenterology Master's Degree presentation for PowerPoint or Google Slides. As university curricula increasingly incorporate digital tools and platforms, this template has been designed to integrate with presentation software, online learning management systems, or referencing ...
This PowerPoint Master Slides beginners tutorial will teach you how to use master slide layouts in PowerPoint to quickly update the design of your slides. Us...
The smoother your delivery, the more professional your webinar will appear. 6. Interact with Your Audience. Interaction keeps the audience engaged and makes your webinar feel more like a conversation than a lecture. Use polls, Q&A sessions, and interactive tools to encourage audience participation.
Click VIEW > Slide Master. On the SLIDE MASTER tab, do one of the following: In the Edit Theme group, click Themes, and then under Built-in, select a theme that you want the additional slide master to adhere to. In the Edit Master group, click Insert Slide Master. Note that, if you use this procedure, the slide master appears without theme ...
So the master layouts let me make design changes apart from the slide master. Also, I can create exactly the type of layout I want. In SLIDE MASTER view, I click the Insert Layout command and get a brand new layout. Then I use Insert Placeholder to choose a placeholder type and draw it on the layout.
Mission. The Purdue On-Campus Writing Lab and Purdue Online Writing Lab assist clients in their development as writers—no matter what their skill level—with on-campus consultations, online participation, and community engagement. The Purdue Writing Lab serves the Purdue, West Lafayette, campus and coordinates with local literacy initiatives.
Learn the secrets to using PowerPoint Slide Master effectively and save a ton of time and headache. This video covers basic as well as advanced Tips and Tric...
Change the Slide Master. Select View > Slide Master. Make the text, color, and alignment changes you want. Select Close Master View.
Let us dive into how to remove the watermark in PowerPoint: 1. Design Tab. ステップ1 Start by opening your PowerPoint file containing the watermark. ステップ2 Choose the slide with the watermark or any slide if the watermark appears on many slides. Head to the Design tab. It is where you control the look of your slides.
Very Easy to create Master slide in MS ppt. We have to prepare Presentation with many slide. some information to need show all slide so we have to give inf...