How to Fix a Windows Blue Screen of Death (BSOD)
Find out why you got a BSOD and how to stop it.

It makes you want to tear your hair out. You’re in the middle of working on a project, reaching a major milestone in a game or maybe just booting up your Windows 101 or Windows 10 PC and, just like that, the entire OS crashes and presents you with a Blue Screen of Death, usually for no immediately apparent reason.
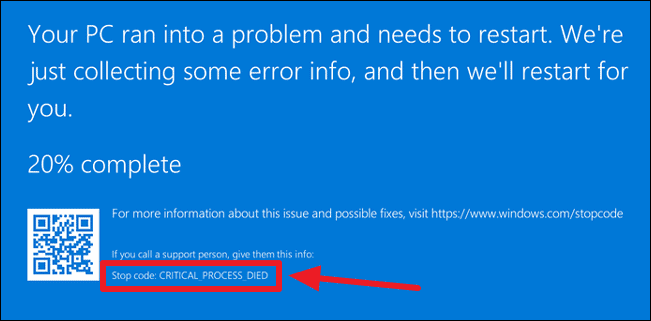
In Windows-speak, the term “Blue Screen of Death” is usually abbreviated as BSOD. It describes an error of some kind that hits the operating system hard enough that it’s forced to quit. Microsoft itself labels such errors with “stopcodes.” Thus these errors may also be generically named “stop errors.” Here’s an example that shows what a BSOD sometimes looks like:


Understanding the BSOD Screen
The screen starts with an old-fashioned unhappy face emoticon “ :( “ (a colon, followed by an open parenthesis). Next, you see a brief explanation that “Your PC ran into a problem and needs to restart.” Windows writes one or more log files when a stop error occurs, so you see language about “collecting some error info” and a counter that keeps track while it’s writing that data (shows as “25% complete) above.
Microsoft provides a scannable QR code in modern BSODs (lower left) that you can scan with a smartphone and look up that way. The message also provides a lookup URL for stopcodes , where you can enter a numeric stopcode (and where you’ll see most common stopcodes, including the one shown above). The most common stop codes include:
- CRITICAL_PROCESS_DIED
- SYSTEM_THREAD_EXCEPTION_NOT_HANDLED
- IRQL_NOT_LESS_OR_EQUAL
- VIDEO_TDR_TIMEOUT_DETECTED
- PAGE_FAULT_IN_NONPAGED_AREA
- SYSTEM_SERVICE_EXCEPTION
- DPC_WATCHDOG_VIOLATION
You can also download the Microsoft Error Lookup Tool (current version: Err_6.4.5.exe) to look up numeric error codes at a command prompt or in PowerShell, if you prefer.
BSODs Aren’t Always Blue in Windows
Before Windows 8 came along in October 2012, BSODs always appeared on dark blue screens. These were chock-full of text and instructions (see below). With Windows 8, Microsoft switched to a kinder, gentler format shown in the preceding screencap.
The company also whittled down the information that appears on screen. In fact, the background color in Windows 11 or 10 is sometimes black, green or even red. Here’s an example of an old-fashioned, pre-Windows-8 BSOD to put this information into historical context:
Stay On the Cutting Edge: Get the Tom's Hardware Newsletter
Join the experts who read Tom's Hardware for the inside track on enthusiast PC tech news — and have for over 25 years. We'll send breaking news and in-depth reviews of CPUs, GPUs, AI, maker hardware and more straight to your inbox.

Making Sense of BSOD Data
Though nobody wants to see a BSOD on a Windows PC, they do occur from time to time. In the vast majority of cases, the PC will restart itself automatically after an error log, called a crash dump or a dump file (extension .dmp) is created. By default, Windows 10 stores dump files in one of two locations.
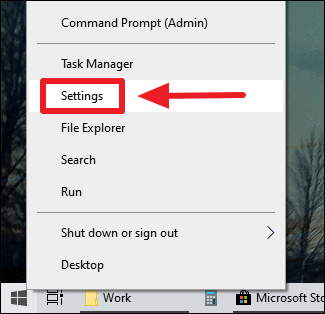
You can manage crash dumps through Advanced System Settings in Windows 11 or 10 (type “Advanced System Settings” into the search box, then click “Settings” in the Startup and Recovery pane). You can also choose to toggle “Automatic restart” to off here, if you would prefer that any future BSODs stay on the screen until you get a chance to see them and write down (or take pic of) any relevant data.

If you select “Small memory dump” as the option for saving crash dumps, such files show up as Minidump.dmp files. For all other selections, the crash dump is named Memory.dmp. Crash dumps get written to the %SystemRoot% folder, which usually expands to C:\Windows. By design, small memory dump files are limited to 256KB in size. Other memory dumps will vary in size up to the size of memory on the PC where the dump is collected. Thus, on a PC with 16GB of RAM, a Complete memory dump file will always be 16GB in size (and other dump files, except for the small memory dumps, can be as large as 16GB, but will often be smaller).
Examining a crash dump file can be helpful when troubleshooting related causes. For more details, see our story on how to use a minidump file to fix your Windows BSOD . That said, many users simply search on the stopcode and/or the numeric error code when seeking remediation advice. (Note that Microsoft calls that numeric code a “bug check code” or “bug check string.”
What To Do When Troubleshooting a BSOD
The immediate tendency following a BSOD is to get right into fix-it mode, start looking things up, and attempting repairs. Not so fast! Microsoft explains the entire troubleshooting process in its “ Troubleshoot blue screen errors ” tutorial. While you can – and probably should – read the Microsoft advice in its entirety, here’s a summary of key recommendations:
- Shut down the Windows PC that experienced the BSOD
- Disconnect all USB-attached devices except for mouse and keyboard (or wireless dongles).
- Reboot your system into safe mode from the Windows Recovery Environment (WinRE)
- If you recently installed new software, uninstall that software .
- If you recently installed a new device driver (or your BSOD info points to a driver or device), uninstall or roll back that driver (if you don’t really need the device you can disable it temporarily instead)
- Restart the PC , and see if the BSOD recurs. If not, you’ve probably isolated the cause and can start researching some kind of fix.
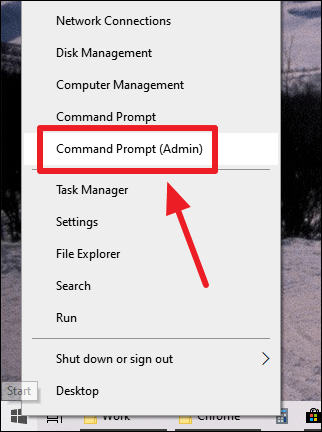
If the BSOD recurs despite the items taken out of the picture by removing, disabling or uninstalling them, whatever’s still left in the picture remains problematic. At this point you want to reboot into safe mode once again, and open an administrative command prompt or PowerShell session. From the command line, enter these commands, one at a time:
- DISM /Online /Cleanup-image /Restorehealth
- SFC /scannow
The first of these two commands finds and replaces any damaged operating system components in the side-by-side filestore (aka WinSxS). The second of these commands runs the System File Checker (SFC) and will repair any damaged files it finds.
Note that if SFC finds and fixes anything, you should run the command until it comes back with a clean bill of health (in some cases, I’ve had to run it two or three times before it came back clean). Note further that running either or both of these commands can take some time to complete, especially if one or both find items in need of fixing. Here’s what you want to see after your final SFC run:

Try NirSoft’s BlueScreenView Tool
There’s a complete BSOD handling infrastructure available from Microsoft, built around a tool called the Windows Debugger (aka WinDBG). You can download it as part of Microsoft’s free Windows Developer Kit if you really want to dig into the gory details. There are a lot of details to learn about, and minutiae to address, if you want to put this tool to work on crash dumps. For non-IT professionals or non-developers, I recommend Nir Sofer’s excellent BlueScreenView utility instead. It’s set up to automatically load the symbol tables it needs to resolve error codes, and it knows where to find crash dumps in need of analysis. It also presents crash dump data in a highly-readable form.
As an illustration, I forced one of my test laptops (a Lenovo ThinkPad X390 Yoga) to blue screen at an administrative command line. There, I entered the string taskkill /im svchost.exe /f. Warning: typing this string into an administrative command prompt or PowerShell session will crash the PC immediately. That’s because it kills a key program named svchost.exe (Service Host) that supports DLLs in the Windows runtime environment. Because most (if not all) Windows programs use one or more DLLs this basically makes Windows inoperable. Thus, it causes an immediate BSOD with the CRITICAL_PROCESS_DIED stopcode (shown in the lead-in graphic for this very story).
When I fired up BlueScreenView on that PC, it found the Memory.dmp file that this BSOD created during its post-crash cleanup phase. Here’s what the application looks like:

The top pane of the window shows all the crash dumps it finds on the target PC. Because there’s only one in this case, I shrunk it down to show as many details from the bottom pane as possible. Even so, the data in the top pane is important, with information in certain columns of special interest. Column 1 shows the name of the dump file. Column 3 shows the stopcode, which it labels “Bug Check String.” Column 3 shows the associated hexadecimal error code, 0x000000ef, which it labels “Bug Check Code.”
For most genuine BSODs (remember, I forced this one to happen) the stopcode and the error code will often help affected users zero in on causes and potential cures for their woes. In my experience, at least 90% of BSODs become fixable simply based on this information. That’s because it will often be solved by disconnecting, disabling, or uninstalling related devices, drivers , applications, or updates – just as Microsoft recommends, and I summarized in the previous section.
What About that Other Problematic 10% of BSODs?
Some BSODs won’t be amenable to quick and easy fixes. When they come up, as they sometimes will, it’s time to ask for help in getting things figured out. I can recommend two terrific sources of troubleshooting assistance available online, each with its own dedicated user forum specifically focused on solving BSOD issues. Likewise, each one stipulates certain requirements on users seeking BSOD help.
Source number one comes from TenForums.com (key disclosures: I am a VIP member of this community; I contribute input and suggestions to its members daily). The TenForums venue is in its BSOD Crashes and Debugging forum. Posting instructions are explicitly provided, along with a collection of BSOD tutorials, including those on WinDBG Basics ,and how to Install and Configure WinDBG for BSOD Analysis , Run BSOD Error Troubleshooter in Windows 10 , and Enable or Disable BSOD Automatic Restart in Windows 10 .
Source number two comes from British PC security and troubleshooting site BleepingComputer.com. They operate a user forum named Windows Crashes and Blue Screen of Death (BSOD) Help and Support. There, you’ll find pinned threads for the following topics (all of which are worth reading through):
- Sysnative Blue Screen of Death (BSOD) Academy : A series of detailed questions readers should answer to ask the experts at Sysnative for help with BSOD issues.
- BSOD Posting instructions : what information users should gather (based on downloading and running a Sysnative app) to obtain necessary dump files and content.
- BSODs but no Dump Files : instructions on how to configure a Windows PC to produce dump files whenever a BSOD occurs. Essential to know because diagnosis without dumps is nearly impossible.
Thus, you’ll have to read up a bit, download some tools, run some scripts and/or collect some logs that you’ll submit to make a semi-formal request for BSOD help. This will take one or more hours and force you to do some homework before such help becomes available. It may also involve numerous back-and-forth communications, where you’re asked to run additional diagnostic tools and collect additional logs and data to shed more light on your situation. Trust me: these guys know what they’re doing. I’ve seen only a handful of issues where users did everything asked of them where the BSOD experts couldn’t help them get things fixed.
Ultimately, where there’s enough will to get a Windows BSOD fixed, there’s a way to make that happen. Keep at it, and you’ll learn this for yourself.

Ed Tittel is a long-time IT writer, researcher and consultant, and occasional contributor to Tom’s Hardware. A Windows Insider MVP since 2018, he likes to cover OS-related driver, troubleshooting, and security topics.
Microsoft is switching RAM speed units in Task Manager — finally moving to the more technically correct MT/s
Windows 11 24H2 will enable BitLocker encryption for everyone — happens on both clean installs and reinstalls
Portable AI supercomputer comes as a carry-on suitcase with wheels — four GPUs, 246TB of storage, and a 2,500W integrated power supply
- Metal Messiah. Nice informative article ! Reply
- ginthegit I keep getting a BSOD saying the IRQL_NOT_LESS_OR_EQUAL None of the material I searched could explain its frequenct occurance. It never happened in Win8, so I gathered it was a Kernel based problem with allocating the IRQ to system. It was more of a trial and error thing, but figured out it was a Switchable Graphics problem. I though it was the Discrete problem, but turns out it was the Intel one. So once setting the Graphics to AMD for most my apps, I no longer get it. I was blaming the AMD for a long time, but Intel was the Offender with its graphics. But no thanks to Intel and Microsoft for both being useless in telling me where abouts the problem lied. I had to figure it out after 3 months of Tweaking and testing. My Linux partition never had a problem. Reply
- Jake Hall Never in my entire career have I seen an SFC scan fix a thing Reply
- nitrium All problems can be trivially fixed by purchasing a new PSU. Everyone at Tom's Hardware Forums knows this. Reply
- InvalidError I think the only times I have ever had blue screens on my nearly nine years old 3470 are from running the system without rebooting after updating display drivers: update drivers, continue running the system for a few days, crash, then runs fine for months on end until I reboot for Windows updates or update drivers and get the next one-time driver-related crash. That said, I haven't even seen the driver update crash in about two years, Nvidia must have fixed whatever code nugget was causing it. Reply
- BillyBuerger One of our users had a laptop that was getting BSODs recently. Rand a memory test and it reported a LOT of errors. This is on an "ultrabook" with soldered memory. Goodbye laptop just over one month past it's warranty. Reply
BillyBuerger said: One of our users had a laptop that was getting BSODs recently. Rand a memory test and it reported a LOT of errors. This is on an "ultrabook" with soldered memory. Goodbye laptop just over one month past it's warranty.
nitrium said: All problems can be trivially fixed by purchasing a new PSU. Everyone at Tom's Hardware Forums knows this.
Some BSODs won’t be amenable to quick and easy fixes. When they come up, as they sometimes will, it’s time to ask for help in getting things figured out. I can recommend two terrific sources of troubleshooting assistance available online, each with its own dedicated user forum specifically focused on solving BSOD issues. Likewise, each one stipulates certain requirements on users seeking BSOD help. Source number one comes from TenForums.com (key disclosures: I am a VIP member of this community; I contribute input and suggestions to its members daily). The TenForums venue is in its BSOD Crashes and Debugging forum. Posting instructions are explicitly provided, along with a collection of BSOD tutorials, including those on WinDBG Basics,and how to Install and Configure WinDBG for BSOD Analysis, Run BSOD Error Troubleshooter in Windows 10, and Enable or Disable BSOD Automatic Restart in Windows 10. Source number two comes from British PC security and troubleshooting site BleepingComputer.com. They operate a user forum named Windows Crashes and Blue Screen of Death (BSOD) Help and Support. There, you’ll find pinned threads for the following topics (all of which are worth reading through)
- View All 23 Comments
Most Popular
- Security Tips
- Social Media
- Privacy Tips
- Performance Tips
How to Fix the Blue Screen of Death (BSoD) in Windows
The blue screen of death is never good, but it can be fixed. The Windows BSDoD is typically caused by aging hardware or software incompatibilities, and you can often resolve it with the help of Windows diagnostics tools. Keep reading to find out how to fix the blue screen — then install optimization software to keep your computer running better, for longer.
Get it for Android , Mac
Get it for PC , Mac
Get it for Android , PC
Get it for PC , Android

What is the Windows BSoD?
The blue screen of death is what you see on your computer screen when the Windows operating system crashes because of a fatal system error that causes it to malfunction and shut down. Usually, the Windows blue screen is the result of hardware failure, the corruption of system files, or the termination of a critical process.
The BSoD has become notorious and is commonly believed to indicate an unfixable error with a device. But while it’s always frustrating to see the blue screen, the “fatal” system error that caused Windows to crash can usually be fixed.
In Windows 10, the blue screen comes with a Windows 10 stop code, which refers to the exact error that caused the blue screen. To find out what caused the blue screen of death — and learn how to fix it and stop it from happening again — your first step should be looking up what the Windows stop code means.
In the example below, the stop code is DRIVER_IRQL_NOT_LESS_OR_EQUAL — we’ll take a closer look at this and other common Windows stop codes further down.

As disconcerting as BSoD may be, a totally blank screen is far more troubling. Without an error code to help you, it's difficult to know where to start to fix a black screen in Windows .
What causes the blue screen of death?
The blue screen of death is usually caused by improperly installed, damaged, or aging hardware, or by buggy or incompatible software. Driver updates for your graphics card or other hardware components can also cause a blue screen of death if they fail to integrate properly with the rest of your system.
Blue screen errors may also result from overheating, especially if you’re experiencing other issues, like a loud computer fan or a Task Manager showing 100% disk usage . Overheating itself could also signal a more fundamental problem with your computer, such as an infection by spyware or another form of malware .
You’ll see the cause of your BSoD on the screen itself. The cause will show up either as text, which you can google, or a QR code that you can scan with your phone. And even if your PC’s running fine today, it’s best to keep potential BSoD causes at bay by regularly cleaning up and speeding up your computer .
Common Windows stop codes
The blue screen error in Windows 10 comes with a string of text called a Windows stop code that catalogs the issue. The stop code can help you fix the problem and stop it from happening again.
Here’s a list of some of the stop codes you’re most likely to find on the blue screen in Windows 10 or 11:
CRITICAL_PROCESS_DIED This code indicates that one of the important system files for Windows, like svchost.exe , isn’t functioning correctly. That might’ve happened because you closed it in the Task Manager. Before ending an unknown task, google the name of the process first.
SYSTEM_THREAD_EXCEPTION_NOT_HANDLED This can often happen when an update for a component isn’t interacting properly with the rest of Windows. You may need to roll back a driver update that was just recently installed.
IRQL_NOT_LESS_OR_EQUAL A system file or device driver is demanding more memory than you have available. Getting good driver update software or scanning to repair corrupted system files may help here.
VIDEO_TDR_TIMEOUT_DETECTED This means your GPU has reached its breaking point and cannot handle the volume of data it's being given. Either you were overloading it or there’s an issue with your graphics drivers.
PAGE_FAULT_IN_NONPAGED_AREA Your computer is asking for a part of your memory that doesn’t exist, either because part of the RAM has stopped working or there’s an error in the system process in question.
SYSTEM_SERVICE_EXCEPTION This blue screen will show the exact file that caused the error, but if it’s a system file and not a device driver, you may not be able to fix it without reinstalling Windows.
DPC_WATCHDOG_VIOLATION This Windows error message means that an essential file, whether related to your device or the operating system, has probably been corrupted.
NTFS_FILE_SYSTEM This error code means there’s almost certainly a problem with your hard drive. You may be able to fix and also prevent this from leading to a BSoD by running a chkdsk scan on your disk.
DATA_BUS_ERROR This means that a piece of hardware isn’t communicating properly with your computer. This could be because it wasn’t installed properly or because the component itself may be broken or faulty.
How to fix the blue screen of death on Windows
Now that you know the likely cause of the problem thanks to the Windows stop code, you can try to fix the blue screen of death by going through the following steps:
1. Shut down your computer
Use the Power button to turn off your computer.
2. Disconnect all devices
Since USB devices might be the culprit, remove all peripherals from your computer (besides the keyboard and mouse).
3. Restart your computer in Safe Mode
If your computer boots normally after a restart, you can enter Safe Mode from within Windows itself. Here’s how:
Press the Windows key , then type msconfig and hit enter.

Select the Boot tab.

Under Boot options , check Safe boot and choose the “Minimal” setting.

If the BSoD reappears, making it impossible for you to proceed, you’ll need to power down again and restart Windows in Safe Mode. Immediately as your PC boots up, press and hold the F8 key and then follow the on-screen instructions to switch to Safe Mode.
4. Uninstall recently installed programs
Now that Windows is in Safe Mode and only running essential processes, the problematic program, device driver, or system file has probably been deactivated, making it easier to uninstall. Start by removing the most recently installed programs, since these are the most likely culprits.
Here’s how to uninstall programs in Windows:
Press the Windows key . Type “add or remove programs” and hit enter.

Find the application you want to remove and select Uninstall .

If you find any strange or unfamiliar programs within your list of apps and features, you might want to uninstall them too. But make sure to Google the name first to find out what it is so that you don’t unintentionally uninstall any essential Microsoft software.
5. Rollback or disable drivers
Using the latest drivers improves the speed and security of your device. But sometimes bugs or glitches in updates can cause problems. If the blue screen error code referred to a specific driver causing the issue, simply disabling it or rolling back a recent update should fix the problem.
It can be cumbersome to check every driver and roll each of them back separately, but you may need to if nothing else works. Here’s how to disable drivers:
Press the Windows Key and type “ Device manager .” Then hit Enter .

Right-click on the relevant hardware component and choose Properties from the pop-up menu.

Click the Driver tab and select Roll Back Driver .

6. Scan your computer for malware
It’s possible that malware is responsible for the corrupt files or critical process disruption that has caused your system to crash. In that case, you’ll need to repair and secure your computer with a dedicated malware and virus removal tool that will let you scan and get rid of the malware immediately.
Install AVG AntiVirus FREE to identify and remove malicious threats to your system. AVG’s advanced threat-detection technology will quickly wipe away threats and help keep your computer from crashing.
Get it for Mac , PC , Android
Get it for Android , iOS , Mac
Get it for iOS , Android , PC
Get it for PC , Mac , iOS
7. Run an SFC Scan
To ensure all your system files are properly configured for Windows to operate normally, you should run a System File Checker (SFC) scan. Here’s how to run an SFC scan:
Press the Windows key and type “cmd.” Right-click Command Prompt and select “Run as Administrator.” Click yes to confirm if prompted.

Type “sfc /scannow” into Command Prompt and hit enter to start the scan.

8. Scan your hard drive
Running a CHKDSK scan will let you examine every bit of your hard drive, flag any errors, and correct them or index them to prevent those errors from causing performance issues or crashes such as the dreaded BSoD.
Here’s how to run a CHKDSK scan.
Press the Windows key and type “cmd.” Then, right-click Command Prompt and select “Run as Administrator.” Click yes to confirm if prompted.

Type “chkdsk” into Command Prompt and hit enter to run the scan.

9. Check your computer's RAM
If a problem with your RAM is causing blue screen errors or other performance issues, check the status of your RAM using the Windows Memory Diagnostic. Memory hardware is particularly susceptible to degradation over time, and while this diagnostic tool can’t repair it, it can prevent your computer from trying to reference the damaged memory.
Here’s how to use Windows Memory Diagnostic to check the state of your RAM:
Press the Windows key, type “Windows Memory Diagnostic,” and select it when the option pops up.

Click Restart now and check for problems (recommended) .

You’ll see the diagnostic results as soon as you boot up again. You can also go back and review them at any time in Windows Event Viewer . If you think you need more RAM, check out our guide to upgrading your RAM .
10. Restart your PC to see if the BSoD reappears
Now it’s time to exit Safe Mode and resume the activity that prompted the blue screen. If the BSoD doesn’t reappear, you’ve probably successfully isolated and resolved the problem. Now you can start carefully reinstalling external devices, programs, and drivers that you previously removed.
As well as fixing the crash, your computer should now run more smoothly, having now run all the diagnostics and maintenance tasks listed above. Make sure you keep your computer running smoothly by keeping your operating system, programs, drivers, and other software updated.
11. Last resort: reinstall Windows
If you’ve tried all the steps above and you can’t fix the blue screen, try reinstalling Windows onto a formatted hard drive. This is a big step, but it will resolve the cause of any blue screen of death, unless your hardware is defective.
Beware that unless you have a backup, reinstalling Windows will result in the loss of all your files and user data . If you didn’t back up recently, there are third-party software tools that will help you copy your drive to an external HDD or SSD .
To reinstall Windows, you’ll need to have your Windows 10 product key — thankfully, Microsoft has made that easier with the latest Windows releases.
Stop your computer from crashing
The best way to prevent blue screen errors and other performance issues is with the help of an automated optimization tool that works quietly in the background to keep your system humming.
AVG TuneUp will help you free up storage space by removing junk and bloatware, and it will perform regular maintenance tasks to keep your system clean. Plus, AVG TuneUp will let you easily hibernate background processes to ensure your system isn’t overcooked, and it will even help you update your software and drivers automatically. Start your free AVG trial today.
Stop Your Computer From Crashing
Try AVG TuneUp for free to clean up your computer and keep it running smoothly. Get better performance and fewer crashes.
Get it for Mac , Android
More helpful tips...
The latest performance articles.
- How to Clear Cache on Your Mac
- How to Transfer Files From PC to PC
- How to Delete Your Cache in Microsoft Edge and Speed Up Your Device
- How to Clean Your Phone’s Charging Port
- How to Clear Cache on Android Phones (Including App Cache)
- How to Permanently Delete Files From Windows
- What Is a PUP... and How to Remove It
- The Best Mac Cleaning Software for 2024
- How to Delete Temporary Files From Your Windows PC
- How to Fix 100% Disk Usage in Windows 10
- How to Clear Photoshop Scratch Disk on Mac
- What Are the Best Free PC Cleaners in 2024?
- How to Find and Delete Other on Mac Storage
- How to Fix Windows Modules Installer Worker — High CPU Usage
- How to Fix High CPU Usage in Windows
- How to Clean Up Your Mac
- How to Repair Corrupted Windows System Files Using SFC or DISM
- SuperFetch: What You Need to Know
- What Are Junk Files and Is It Safe to Delete Them?
- How to Fix or Remove Broken Shortcuts in Windows
- How to Physically Clean Your Computer
- Bloatware: What It Is and How to Get Rid of It
- How to Spot & Get Rid of Unnecessary Apps on Your PC
- Freeze Frame: Take a Snapshot Backup of Your PC
- 6 Great Ways to Reduce Mobile Data Usage
- Is Disk Fragmentation Still a Thing? Everything You Need to Know
- iPhone or iPad Running Slow? 16 Ways to Speed It Up
- How to Speed Up Boot Time on Your PC or Laptop
- How to Speed Up and Clean Up Your PC
- How To Boost Your Wi-Fi Signal at Home
- How to Upgrade RAM on MacBook Pro and other Macs
- How to Speed Up Your Mac
- How Powerful a Computer Do You Really Need?
- Why Does My PC Get Slower Over Time?
- How to Test Your PC for Performance and Battery Life
- Why Is My Internet so Slow and How Do I Fix It?
- Give Your Android Device More Space, Speed & Battery Life
- Performance Shootout: Windows 8.1 Versus Windows 10
- The Ultimate GTA V Guide to Boosting Your Graphics & FPS
- Best Fortnite Settings to Boost Graphics
- How to Overclock Your Graphics Card (GPU)
- How to Optimize Your Windows PC’s Gaming Performance and Boost FPS
- Ark: Survival Evolved — How to Optimize Graphics and Boost FPS
- Overclocking Your CPU: A Step-by-step Guide
- The Ultimate Dark Souls 3 Performance & Tweak Guide
- How to Use CHKDSK Commands to Scan and Repair Hard Drives in Windows
- What to Do If Your Computer Mouse Isn’t Working
- How to Update Graphics Drivers in Windows 11, 10, 8, and 7
- Why Your Android Phone Won’t Update and How to Force It
- Why Your Phone Gets Hot and How to Fix It
- Intel i5 or Intel i7: Which Intel Processor Is Right for Your Computer?
- How to Check If Your Hard Drive Is Failing
- What Is RAM and What Does It Do?
- Ultimate Guide: How to Format a Hard Drive
- How to Stress Test Your CPU
- iPhone Getting Hot? 11 Potential Causes and Solutions
- How to Check Ram Size, Speed, and Type
- SSD or HDD: Which Is Right for You?
- Why Your PC Fan Is so Loud and How to Fix It
- How to Update Sound Drivers in Windows 10 and Earlier
- How to Find and Check Your Computer Specs in Windows 10, 8, and 7
- What Is an SSD?
- How to Upgrade and Install RAM on PC
- How to Monitor Your GPU Temperature
- How to Clone a Hard Drive
- How to Check and Monitor CPU Temperature on Windows and Mac
- An Introduction to 5G
- Why Your Wi-Fi Isn’t Working and How to Fix It
- The Smart Way to Dispose of Your Phones, Laptops, and Desktops
- Should You Shut Down, Sleep or Hibernate Your PC or Mac Laptop?
- Top 10 Apps That Kill Your Android Phone’s Battery
- How to Hunt Down Drivers to Get Your PC Up-to-Date!
- PC Resurrection: 7 Ways to Revive a Dying PC
- How to Improve Laptop Battery Life in 3 Easy Steps
- 5 Smartphone Battery Myths Put to The Test
- How to Update BIOS on Your Windows PC
- How to Reset Your Mac’s PRAM, NVRAM, and SMC
- CPU vs. GPU: What's the Difference?
- How to Fix the “Driver Is Unavailable” Error on Your Printer
- How to Factory Reset Your PC, Mac, or Mobile
- What Is Firmware and How Does It Work?
- How to Fix Windows 10 and 11 Black Screen Issues Before or After Logging In
- How to Change Startup Programs in Windows 11, 10, 8 & 7
- How to Troubleshoot Windows Update Errors
- How to Stop Apps From Crashing on Android
- How to Find Your Product Key on Windows 10 and Earlier
- The Best Free Driver Update Software for Windows in 2023
- Windows Registry – What Is It and How Does It Work?
- Why Your PC Is Overheating and How to Fix It
- Why Your Mac Is Overheating and How to Fix It
- What Is Background Data and How to Restrict It
- How to Recover Deleted Files in Windows
- Find Out Which of Your Favorite Apps Cache in on Your Phone — and Which Don’t
- AVG Android App Performance Report Q4 2014
- AVG Android App Performance Report Q1 2015
- App Report 2015 Q3 - AVG’s Q3 App Report Out: Latest Top 10 Draining Apps Identified
- Top Apps Draining Your Phone – AVG App Reports
- AVG Community Powered Threat Reports 2012
How to Clear Cache on Your Mac How to Clear Cache on Your Mac

How to Transfer Files From PC to PC How to Transfer Files From PC to PC

How to Delete Your Cache in Microsoft Edge and Speed Up Your Device How to Delete Your Cache in Microsoft Edge and Speed Up Your Device
You Might Also Like...

How to Clean Your Phone’s Charging Port How to Clean Your Phone’s Charging Port
Keep your phone running smoothly with AVG Cleaner
Keep your iPhone running smoothly with AVG Mobile Security
- Media Center
Home Products
- Free Antivirus Download
- Internet Security
- Android Antivirus
- Free Mac Antivirus
- Virus Scanning & Malware Removal
- Installation Files
- Beta Downloads
- Driver Updater
Customer Area
- Register Your License
- Anti-Theft Login
- Home Product Support
- Security & Performance Tips
- Online Research
Partners & Business
- Business Antivirus Software
- Partner Support
- Business Support
Privacy | Report vulnerability | Contact security | License agreements | Modern Slavery Statement | Cookies | Accessibility Statement | Do not sell my info | | All third party trademarks are the property of their respective owners.
We use cookies and similar technologies to recognize your repeat visits and preferences, to measure the effectiveness of campaigns, and improve our websites. For settings and more information about cookies, view our Cookie Policy . By clicking “I accept” on this banner or using our site, you consent to the use of cookies.
This browser is no longer supported.
Upgrade to Microsoft Edge to take advantage of the latest features, security updates, and technical support.
Advanced troubleshooting for stop or blue screen errors
- 5 contributors
If you're not a support agent or IT professional, you'll find more helpful information about stop error ("blue screen") messages in Troubleshoot blue screen errors .
Applies to: Supported versions of Windows Server and Windows Client
What causes stop errors?
When Windows encounters a condition that compromises safe system operation, the system stops. Examples include something failing that could compromise security or lead to corruption of the operating system (OS) and/or user data. When the machine stops in order to prevent the operating system from moving forward in these conditions, it is called a bug check (or bugcheck). It is also commonly referred to as a system crash, a kernel error, a blue screen, a blue screen of death (BSOD), or a stop error. On preview releases of Windows, the screen color can be green, leading to the green screen of death (GSOD).
There's no simple explanation for the cause of stop errors. Many different factors can be involved. Our analysis of the root causes of crashes indicates that:
- 70% are caused by third-party driver code.
- 10% are caused by hardware issues.
- 5% are caused by Microsoft code.
- 15% have unknown causes, because the memory is too corrupted to analyze.
The root cause of stop errors is rarely a user-mode process. While a user-mode process (such as Notepad or Slack) may trigger a stop error, it's usually exposing the underlying issue in a driver, hardware, or operating system.
General troubleshooting steps
To troubleshoot stop error messages, follow these general steps:
Review the stop error code that you find in the event logs. Search online for the specific stop error codes to see whether there are any known issues, resolutions, or workarounds for the problem.
Make sure that you install the latest Windows updates, cumulative updates, and rollup updates. To verify the update status, refer to the appropriate update history for your system. For example:
- Windows 10, version 21H2
- Windows 10, version 21H1
- Windows 10, version 20H2
Make sure that the BIOS and firmware are up-to-date.
Run any relevant hardware and memory tests.
Run Microsoft Safety Scanner or any other virus detection program that includes checks of the MBR for infections.
Make sure that there's sufficient free space on the hard disk. The exact requirement varies, but we recommend 10-15 percent free disk space.
Contact the respective hardware or software vendor to update the drivers and applications in the following scenarios:
- The error message indicates that a specific driver is causing the problem.
- You're seeing an indication of a service that is starting or stopping before the crash occurred. In this situation, determine whether the service behavior is consistent across all instances of the crash.
- You have made any software or hardware changes.
If there are no updates available from a specific manufacturer, we recommend that you disable the related service.
For more information, see How to perform a clean boot in Windows .
You can disable a driver by following the steps in How to temporarily deactivate the kernel mode filter driver in Windows .
You may also want to consider the option of rolling back changes or reverting to the last-known working state. For more information, see Roll back a device driver to a previous version .
Memory dump collection
To configure the system for memory dump files, follow these steps:
- Select the Taskbar search box, type Advanced system settings , and then press Enter .
- On the Advanced tab on the System Properties box, select the Settings button that appears in the section Startup and Recovery .
- In the new window, select the drop-down below the option Write debugging information .
- Choose Automatic memory dump .
- Select OK .
- Restart the computer for the setting to take effect.
- If the server is virtualized, disable auto reboot after the memory dump file is created. This disablement lets you take a snapshot of the server in-state and also if the problem recurs.
The memory dump file is saved at the following locations:
You can use the Microsoft Crash Dump File Checker (DumpChk) tool to verify that the memory dump files aren't corrupted or invalid. For more information, see the following video:
For more information on how to use Dumpchk.exe to check your dump files, see the following articles:
- Using DumpChk
- Download DumpChk
Pagefile settings
For more information on pagefile settings, see the following articles:
- Introduction to page files
- How to determine the appropriate page file size for 64-bit versions of Windows
- Generate a kernel or complete crash dump
Memory dump analysis
Finding the root cause of the crash may not be easy. Hardware problems are especially difficult to diagnose because they may cause erratic and unpredictable behavior that can manifest itself in various symptoms.
When a stop error occurs, you should first isolate the problematic components, and then try to cause them to trigger the stop error again. If you can replicate the problem, you can usually determine the cause.
You can use the tools such as Windows Software Development Kit (SDK) and symbols to diagnose dump logs. The next section discusses how to use this tool.
Advanced troubleshooting steps
Advanced troubleshooting of crash dumps can be very challenging if you aren't experienced with programming and internal Windows mechanisms. We have attempted to provide a brief insight here into some of the techniques used, including some examples. However, to really be effective at troubleshooting a crash dump, you should spend time becoming familiar with advanced debugging techniques. For a video overview, Debugging kernel mode crashes and hangs . Also see the advanced references listed below.
Advanced debugging references
- Advanced Windows Debugging, first edition book
- Debugging Tools for Windows (WinDbg, KD, CDB, NTSD)
Debugging steps
Verify that the computer is set up to generate a complete memory dump file when a crash occurs. For more information, see Method 1: Memory dump .
Locate the memory.dmp file in your Windows directory on the computer that is crashing, and copy that file to another computer.
On the other computer, download the Windows 10 SDK .
Start the install and choose Debugging Tools for Windows . The WinDbg tool is installed.
Go to the File menu and select Symbol File Path to open the WinDbg tool and set the symbol path.
- If the computer is connected to the internet, enter the Microsoft public symbol server : https://msdl.microsoft.com/download/symbols and select OK . This method is recommended.
- If the computer isn't connected to the internet, specify a local symbol path .
Select Open Crash Dump , and then open the memory.dmp file that you copied.

Under Bugcheck Analysis , select !analyze -v . The command !analyze -v is entered in the prompt at the bottom of the page.
A detailed bug check analysis appears.

Scroll down to the STACK_TEXT section. There will be rows of numbers with each row followed by a colon and some text. That text should tell you what DLL is causing the crash. If applicable, it also says what service is crashing the DLL.
For more information about how to interpret the STACK_TEXT output, see Using the !analyze Extension .
There are many possible causes of a bug check and each case is unique. In the example provided above, the important lines that can be identified from the STACK_TEXT are 20, 21, and 22:
HEX data is removed here and lines are numbered for clarity.
This issue is because of the mpssvc service, which is a component of the Windows Firewall. The problem was repaired by disabling the firewall temporarily and then resetting firewall policies.
For more examples, see Debugging examples .
Video resources
The following videos illustrate various troubleshooting techniques for analyzing dump files.
- Analyze dump file
- Installing debugging tool for Windows (x64 and x86)
- Debugging kernel mode crash memory dumps
- Special pool
Advanced troubleshooting using Driver Verifier
We estimate that about 75 percent of all stop errors are caused by faulty drivers. The Driver Verifier tool provides several methods to help you troubleshoot. These include running drivers in an isolated memory pool (without sharing memory with other components), generating extreme memory pressure, and validating parameters. If the tool encounters errors in the execution of driver code, it proactively creates an exception. It can then further examine that part of the code.
Driver Verifier consumes lots of CPU and can slow down the computer significantly. You may also experience additional crashes. Verifier disables faulty drivers after a stop error occurs, and continues to do this until you can successfully restart the system and access the desktop. You can also expect to see several dump files created.
Don't try to verify all the drivers at one time. This action can degrade performance and make the system unusable. It also limits the effectiveness of the tool.
Use the following guidelines when you use Driver Verifier:
- Test any "suspicious" drivers. For example, drivers that were recently updated or that are known to be problematic.
- If you continue to experience non-analyzable crashes, try enabling verification on all third-party and unsigned drivers.
- Enable concurrent verification on groups of 10-20 drivers.
- Additionally, if the computer can't boot into the desktop because of Driver Verifier, you can disable the tool by starting in Safe mode. This solution is because the tool can't run in Safe mode.
For more information, see Driver Verifier .
Common Windows stop errors
This section doesn't contain a list of all error codes, but since many error codes have the same potential resolutions, your best bet is to follow the steps below to troubleshoot your error. For a complete list of stop error codes, see Bug Check Code Reference .
The following sections list general troubleshooting procedures for common stop error codes.
VIDEO_ENGINE_TIMEOUT_DETECTED or VIDEO_TDR_TIMEOUT_DETECTED
Stop error code 0x00000141, or 0x00000117
Contact the vendor of the listed display driver to get an appropriate update for that driver.
DRIVER_IRQL_NOT_LESS_OR_EQUAL
Stop error code 0x0000000D1
Apply the latest updates for the driver by applying the latest cumulative updates for the system through the Microsoft Update Catalog website. Update an outdated network driver. Virtualized VMware systems often run "Intel(R) PRO/1000 MT Network Connection" (e1g6032e.sys). You can download this driver from the Intel Download Drivers & Software website . Contact the hardware vendor to update the network driver for a resolution. For VMware systems, use the VMware integrated network driver instead of Intel's e1g6032e.sys. For example, use VMware types VMXNET, VMXNET2, or VMXNET3.
PAGE_FAULT_IN_NONPAGED_AREA
Stop error code 0x000000050
If a driver is identified in the stop error message, contact the manufacturer for an update. If no updates are available, disable the driver, and monitor the system for stability. Run chkdsk /f /r to detect and repair disk errors. Restart the system before the disk scan begins on a system partition. Contact the manufacturer for any diagnostic tools that they may provide for the hard disk subsystem. Try to reinstall any application or service that was recently installed or updated. It's possible that the crash was triggered while the system was starting applications and reading the registry for preference settings. Reinstalling the application can fix corrupted registry keys. If the problem persists, and you have run a recent system state backup, try to restore the registry hives from the backup.
SYSTEM_SERVICE_EXCEPTION
Stop error code c000021a {Fatal System Error} The Windows SubSystem system process terminated unexpectedly with a status of 0xc0000005. The system has been shut down.
Use the System File Checker tool to repair missing or corrupted system files. The System File Checker lets users scan for corruptions in Windows system files and restore corrupted files. For more information, see Use the System File Checker tool .
NTFS_FILE_SYSTEM
Stop error code 0x000000024
This stop error is commonly caused by corruption in the NTFS file system or bad blocks (sectors) on the hard disk. Corrupted drivers for hard disks (SATA or IDE) can also adversely affect the system's ability to read and write to disk. Run any hardware diagnostics that are provided by the manufacturer of the storage subsystem. Use the scan disk tool to verify that there are no file system errors. To do this step, right-click the drive that you want to scan, select Properties, select Tools, and then select the Check now button. Update the NTFS file system driver (Ntfs.sys). Apply the latest cumulative updates for the current operating system that's experiencing the problem.
KMODE_EXCEPTION_NOT_HANDLED
Stop error code 0x0000001E
If a driver is identified in the stop error message, disable or remove that driver. Disable or remove any drivers or services that were recently added.
If the error occurs during the startup sequence, and the system partition is formatted by using the NTFS file system, you might be able to use safe mode to disable the driver in Device Manager. To disable the driver, follow these steps:
- Go to Settings > Update & security > Recovery .
- Under Advanced startup , select Restart now .
- After your PC restarts to the Choose an option screen, select Troubleshoot > Advanced options > Startup Settings > Restart .
- After the computer restarts, you'll see a list of options. Press 4 or F4 to start the computer in safe mode. If you intend to use the internet while in safe mode, press 5 or F5 for the Safe Mode with Networking option.
DPC_WATCHDOG_VIOLATION
Stop error code 0x00000133
This stop error code is caused by a faulty driver that doesn't complete its work within the allotted time frame in certain conditions. To help mitigate this error, collect the memory dump file from the system, and then use the Windows Debugger to find the faulty driver. If a driver is identified in the stop error message, disable the driver to isolate the problem. Check with the manufacturer for driver updates. Check the system log in Event Viewer for other error messages that might help identify the device or driver that's causing stop error 0x133. Verify that any new hardware that's installed is compatible with the installed version of Windows. For example, you can get information about required hardware at Windows 10 Specifications. If Windows Debugger is installed, and you have access to public symbols, you can load the c:\windows\memory.dmp file into the debugger. Then refer to Determining the source of Bug Check 0x133 (DPC_WATCHDOG_VIOLATION) errors on Windows Server 2012 to find the problematic driver from the memory dump.
USER_MODE_HEALTH_MONITOR
Stop error code 0x0000009E
This stop error indicates that a user-mode health check failed in a way that prevents graceful shutdown. Windows restores critical services by restarting or enabling application failover to other servers. The Clustering Service incorporates a detection mechanism that may detect unresponsiveness in user-mode components.
This stop error usually occurs in a clustered environment, and the indicated faulty driver is RHS.exe. Check the event logs for any storage failures to identify the failing process. Try to update the component or process that's indicated in the event logs. You should see the following event recorded:
- Event ID: 4870
- Source: Microsoft-Windows-FailoverClustering
- Description: User mode health monitoring has detected that the system isn't being responsive. The Failover cluster virtual adapter has lost contact with the Cluster Server process with a process ID '%1', for '%2' seconds. Recovery action is taken. Review the Cluster logs to identify the process and investigate which items might cause the process to hang.
For more information, see "0x0000009E" Stop error on cluster nodes in a Windows Server-based multi-node failover cluster environment Also, see the following Microsoft video What to do if a 9E occurs .
Debugging examples
This bug check is caused by a driver hang during upgrade, resulting in a bug check D1 in NDIS.sys , which is a Microsoft driver. The IMAGE_NAME tells you the faulting driver, but since this driver is s Microsoft driver, it can't be replaced or removed. The resolution method is to disable the network device in device manager and try the upgrade again.
In this example, a non-Microsoft driver caused page fault, so we don't have symbols for this driver. However, looking at IMAGE_NAME and or MODULE_NAME indicates it's WwanUsbMP.sys that caused the issue. Disconnecting the device and retrying the upgrade is a possible solution.
Bug check code reference
Was this page helpful?
Coming soon: Throughout 2024 we will be phasing out GitHub Issues as the feedback mechanism for content and replacing it with a new feedback system. For more information see: https://aka.ms/ContentUserFeedback .
Submit and view feedback for
Additional resources

Resolving Blue Screen errors in Windows
Blue Screen errors (also sometimes called black screen errors or STOP code errors) can occur if a serious problem causes Windows to shut down or restart unexpectedly. You might see a message that says, "Windows has been shut down to prevent damage to your computer" or a similar message.

These errors can be caused by both hardware and software issues. If you added new hardware to your PC before the Blue Screen error, shut down your PC, remove the hardware, and try restarting. If you're having trouble restarting, you can start your PC in safe mode. For more info, see Start your PC in safe mode in Windows .
You can also try getting the latest updates with Windows Update, help from other sources, or restoring Windows to an earlier point in time.
If none of those steps help to resolve your Blue Screen error, please try the Blue Screen Troubleshooter in the Get Help app:
In Windows, open Get Help .
In the Get Help app, type Troubleshoot BSOD error .
Follow the guided walkthrough in the Get Help app.
Note: If you're not on a Windows device, you can run the Blue Screen Troubleshooter on your browser by going to Contact Microsoft Support and typing Troubleshoot BSOD error . Then follow the guided walkthrough under "Recommended Help".
You can find more information about your specific STOP error code at Bug Check Code Reference.

Need more help?
Want more options.
Explore subscription benefits, browse training courses, learn how to secure your device, and more.

Microsoft 365 subscription benefits

Microsoft 365 training

Microsoft security

Accessibility center
Communities help you ask and answer questions, give feedback, and hear from experts with rich knowledge.

Ask the Microsoft Community

Microsoft Tech Community

Windows Insiders
Microsoft 365 Insiders
Find solutions to common problems or get help from a support agent.

Online support
Was this information helpful?
Thank you for your feedback.
How to fix a Windows 11 BSOD: A complete guide
Is your Windows 11 PC crashing with Blue Screens of Death (BSOD)? Here are some reasons why and how you can fix your problems.
Quick Links
Common windows 11 bsod errors, unplug new and non-essential devices, fix windows 11 bsods by installing updates, uninstall updates, how to uninstall updates if your computer won't boot, uninstall updates using safe mode, uninstall or roll back drivers, uninstall apps, run dism and sfc scans, fix bsods during a system upgrade, reinstall windows.
As much as we'd like them to, computers don't always work as they should, and while it's uncommon, they can sometimes stop working altogether and crash. This is what's often called a Blue Screen of Death (formerly a Black Screen of Death), or BSOD, which is actually a mechanism in Windows 11 to help you diagnose problems with your system. A BSOD can also be referred to as a stop error or a bug check, which is when a critical process to the normal operation of Windows runs into a problem and forces the computer to restart.
There's a wide range of possibilities for what can cause a BSOD, but most of the fixes are along the same lines. Depending on what is causing the issue, fixes can be more or less complicated. You may have to update or uninstall some software, or you may need to replace something in your hardware. Either way, we'll dive into possible fixes here.
Windows 11: Everything you need to know
Narrow down the cause of the problem.
When you see a Blue Screen of Death on Windows 11, it's a good idea to act quickly to see the information displayed on it. On this screen, you'll see an error code that can help you narrow down the problem. If you missed it, you can also use the Windows Event Viewer to see the error code after the fact and find out what went awry.
Here are some examples of BSOD error codes you might see and what they mean:
- CRITICAL_PROCESS_DIED : This error means a critical Windows process was terminated for one reason or another. It can be self-inflicted, such as terminating an essential Windows process in Task Manager, but it can also indicate bigger problems with the system.
- SYSTEM_THREAD_EXCEPTION_NOT_HANDLED : This problem means there was an error that Windows' error handler wasn't able to catch, and it's often related to device drivers. If you think that's the issue, you may need to uninstall a recent driver update or install a newer update instead.
- IRQL_NOT_LESS_OR_EQUAL : This is a memory-related error that can occur when a driver or process requests access to a memory address it doesn't have the rights to access. Updating drivers or Windows itself is usually the fix for this issue.
- VIDEO_TDR_TIMEOUT_DETECTED or VIDEO_TDR_FAILURE : These errors can appear when the graphics driver on your PC fails to respond when it should, preventing the display of graphics. Updating the graphics driver can usually fix this issue.
- PAGE_FAULT_IN_NONPAGED_AREA : This error means a system process or driver has referred to a memory address that doesn't exist. It may be fixed with a driver or system update, or it may point to an error with your computer's memory. Some antivirus software can also cause this issue.
- SYSTEM_SERVICE_EXCEPTION : This somewhat generic error may not say much, but it often comes with a driver that can be blamed for the problem. These can be system-level drivers, which can't be updated in quite the same way as typical device drivers.
- DPC_WATCHDOG_VIOLATION : This error often appears due to incompatible hardware drivers. It was very prevalent during the early days of Windows 10, though most of these problems have been addressed. You may need to update your drivers to fix this issue.
- NTFS_FILE_SYSTEM : This means there's an error with the file system on your computer. A System File Check (SFC) can usually fix this issue.
- DATA_BUS_ERROR : This error generally refers to all kinds of hardware issues, though a common cause can be broken RAM. If you're seeing this error, you may need to replace a hardware component. If you installed a new piece of hardware on your PC, it's also a good idea to try to install the appropriate drivers for it.
As you can probably glean from the list above, many of these issues have similar steps for fixing them, so you shouldn't have to try to fix them individually. We'll review some of the most common fixes for these issues. This is also not an extensive list of all error codes, but again, many of the same fixes are likely to apply.
Find error codes with Event Viewer
If you missed the error codes on the Blue Screen of Death, you can try to find them later by using the Windows Event Viewer. This program logs all the errors on your system, and it can help you find more information about them. To find out more about what caused your PC to crash, you can follow these steps:
- Press Windows + X (or right-click the Start menu icon) and choose Event Viewer .
- Look for the error that happened when you saw the BSOD and click it.
How to use Event Viewer to check for errors on Windows 11
Maybe they're causing the issue.
One thing that may be causing your computer to run into a BSOD, especially if you recently changed your setup, is using a new device that isn't compatible or doesn't have proper drivers installed. Remove any non-essential devices and peripherals from your PC and try restarting it to see if it's fixed.
After this, maybe look for the appropriate drivers for those devices or install any Windows updates before plugging them back in.
Update Windows 11
A good start for fixing all kinds of Windows 11 BSODs is to update the operating system, especially if you haven't done so in a while. To update Windows 11:
- Open the Settings app.
- You may be prompted to reboot your computer to finish installing updates.
After this, try doing what you were doing before and see if you still get the same error.
Update your drivers
If you narrowed down the issue to a specific device on your computer, try updating the drivers for that device on your computer. The best way to do this is to look for drivers on the manufacturer's website to make sure you're getting the latest and greatest. Alternatively, you can use Device Manager to look for updates:
- Press Windows + X (or right-click the Start menu icon) and choose Device Manager .
- Find the device category for what's causing the issue and expand it. Devices with errors can also be highlighted in Device Manager, so you can start there.
- It's possible Windows won't find any new drivers. You can click Search for updated drivers on Windows Update to see if there's anything there.
- Click Check for updates .
- You may be prompted to reboot your computer to finish installing drivers.
Update apps
If the BSOD you're facing is happening when running a specific app, it's possible that said app is the one to blame for the issue. In this case, check for updates for the app from the manufacturer's website or within the app itself. Some apps may also be updated through the Microsoft Store. To do this:
- Open the Microsoft Store .
- Click Get updates to install updates for all your apps.
Sometimes buggy updates can be the problem
If the BSOD you're seeing happened after a recent update, it's possible that the solution you're looking for is the opposite. Instead of installing a new update, you may need to revert to an older one that didn't have the problem. Here's what you need to do if that's the case:
- Click Uninstall next to it.
For more serious problems
If the BSOD problem is so bad you can't get to any part of Windows to fix it, you can use the Windows Recovery Environment (WinRE) to do it. If your computer fails to boot three times in a row, you should see WinRE automatically, but if it isn't showing up, you can force it by using these steps:
- Turn on your computer.
- Turn on the computer again and repeat step 2.
If a recent update was causing the issue, this should be able to get you back to your PC. A good idea is to temporarily pause updates using the Settings app until a fix becomes available.
How to stop receiving updates on Windows 11
If you can't get to the Settings app or don't think the update causing the issue is the latest one, you can also use Safe Mode to uninstall specific updates. To access Safe Mode:
- Open the Start menu.
- This will take you to the Windows Recovery Environment.
- If you can't use the Windows desktop, follow steps 1 through 4 in the section above to get to the Windows Recovery Environment.
- Choose Troubleshoot and then Advanced options .
If your device or drive encryption is enabled, you'll need your BitLocker recovery key to enter Safe Mode. You can find keys linked to your Microsoft account here .
Once you're in Safe Mode, you'll need to use Command Prompt to see your list of installed updates and remove the problematic one:
- Press Windows + R to open the Run dialog.
- Enter the following command and press Enter to see your list of installed updates: wmic qfe list brief /format:table
- Click Yes and follow the on-screen instructions if necessary.
- Restart the computer to apply the changes; things should be back in working order.
New versions can be problematic
Sometimes, the problems you're having can be caused by a faulty driver update. If installing the latest version didn't fix the issue, or you already have the latest version, maybe you need to go back to a previous one. Here's how to do that:
- From your desktop, press Windows + X (or right-click the Start menu icon) and choose Device Manager .
- Find the device that seems to be causing the issue or the one that was most recently updated.
- Switch to the Driver tab.
Alternatively, you can try to uninstall the driver altogether, but this may cause some devices to stop functioning, so you'll want to download a driver beforehand so you can get things working again. To do this, you'll need to use the Uninstall device option and then check the box that says Attempt to remove the driver for this device before clicking Uninstall .
If you can't reach this option, you can check out the section above on using Safe Mode and try uninstalling problematic drivers that way. Safe Mode loads Windows with only the essential drivers, so if any of your drivers are the issue, you should be able to boot into it normally and diagnose from there.
Uninstall graphics drivers with Display Driver Uninstaller
If the issue you're having is with your GPU, you might want to uninstall the driver, too. However, graphics drivers are very complex, and just uninstalling it normally may not be enough. If you want to fully clean up any files that might be causing issues, using a program called Display Driver Uninstaller, or DDU, is a good idea. This third-party program is designed to fully remove graphics drivers and any leftover files, allowing you to then install a new version without anything that might cause conflicts. Here's how to use it:
- Start by downloading the new version of the driver you want to install so you have it ready for later.
- Download DDU from the official website and install/extract the files.
- Before using DDU, enter Safe Mode using the steps in the section above.
- Run DDU and accept the default settings.
- Under Type , choose GPU , then choose the graphics card brand you have. If you've switched GPUs, it's also a good idea to first remove the driver for your old GPU, then repeat the process for the new GPU.
- Install the new driver you downloaded in step 1.
If you were having any issues with your graphics driver before, this should help fix them.
These can cause issues, too
If you're having problems because of a specific app, then sometimes the best thing to do may be to just uninstall that app. To uninstall an app in Windows 11, follow these steps:
- Follow the steps to uninstall the app.
- Repeat for any other troublesome apps.
Uninstalling apps can also be a solution if you're facing issues when installing a Windows 11 feature update, particularly when upgrading from Windows 10 to Windows 11. Some apps may cause conflicts with new versions of Windows, so it's worth a shot.
Fix system and disk errors
Another probable cause for a Blue Screen of Death on Windows 11 is that the system files themselves may be corrupted, or there may be an issue with the disk. If so, you can fix these issues with the SFC (System File Check) and DISM (Deployment Image Service and Management) tools, which are accessible through Windows Terminal or Command Prompt. It's recommended that you use DISM first and then SFC. Here's what you need to do:
Some versions may say Windows Terminal (Admin) or even Windows PowerShell (Admin) for Windows 10.
- This process may take a while, so wait for it to finish.
This will also take some time, but once you're done, it will have fixed any issues with the system image, which should address your problems.
If the BSOD you're running into occurs when you're trying to update to a new feature update for Windows 11, it may be some kind of compatibility issue or a problem with the setup files. As mentioned above, you can try a few things, like uninstalling potentially troublesome apps and updating your drivers. However, there are a couple more specific steps that may also help.
Clean the Windows Update files
If the setup files are corrupted and causing issues during the upgrade, you may need to redownload them, which means deleting your existing ones first. Here's how to do it:
- Click Remove files at the top.
This will delete temporary Windows Update files, and it should fix issues with installing a new update. If not, you can go deeper by resetting the Windows Update components.
How to troubleshoot Windows updates stuck downloading
Use the windows 11 installation assistant.
Another potential solution that may actually be easier is using the Windows 11 Installation Assistant to download the latest version of Windows 11 and upgrade to it without using Windows Update. This is a very simple tool, so all you need to do is go to the Windows 11 download page and click Download now under the Windows 11 Installation Assistant option. Just follow the steps to download and install the latest version.
Find more information with SetupDiag
If these steps haven't worked, you can try using a tool called SetupDiag to diagnose any issues with the setup process. This tool can tell you what's going wrong and provide guidance on how to fix it.
- Head to Microsoft's SetupDiag page and download the latest version.
- In File Explorer, right-click the file you downloaded and choose Run as administrator .
- It will generate a SetupDiagResults.log file so you can open it. If there's an error, the log file will tell you what it is and provide guidance on how to fix it. You can follow the steps mentioned or look up the error message to find help online.
Push comes to shove, you may have to start fresh
If none of these solutions work for you, your last-resort option is to reinstall Windows. You can do these in a couple of ways or simply reset Windows, but we won't dive into each solution since some of these are a bit convoluted. The easiest way to do this is to use the recovery options in the latest version of Windows 11. If you have an earlier version, we'll have alternate methods linked below.
How to reset Windows 11 to its factory settings
To reinstall a clean version of Windows 11, follow these steps:
- Click System in the menu on the left.
This option is only available in Windows 11 version 23H2 and newer. If you don't have it, check the other options below.
- Click OK, and your PC will download and install a new copy of Windows from Windows Update. If you don't choose to do it automatically, you'll have to restart your PC afterward.
After this, you'll have a brand-new copy of Windows 11 that should fix any issues you've been having. Since this keeps your apps and files, it may not resolve driver-related issues, so you may need a true clean install.
How to download and install Windows 11
Bsods aren't super frequent.
These days, Microsoft has made plenty of improvements to Windows 11 that make BSODs less common than they used to be, and only very specific issues usually cause them. These steps should address those issues, so you should be good to go. If the solutions here aren't enough, you may need to look up the specific error causing the BSOD to find a possible solution. On custom PCs, a change in hardware may be causing problems, so you may need to fiddle with your components to make sure they are all installed correctly.
How to Fix Windows Blue Screen of Death Errors

The dreaded blue screen! One view of the blue screen error displayed by Windows can be enough to ruin your day. They usually occur when there has been a system instability, and Windows has to restart immediately in order to fix that instability. But many a time, Windows is unable to fix the error on its own. And learning about the error yourself may turn out to be a hair-tearing process, as blue screens don’t clearly explain the error – they just give error codes! So to help you get your computer up and running again, we present the solutions to fix that blue screen error which has been bugging you.
Find out the error code of the blue screen
Every blue screen has an error code, which helps to identify the exact issue which is causing the crash. The error code can be in the form of stop codes, but they can often be very generic.
The most common stop error codes are the following:
- CRITICAL_PROCESS_DIED
- SYSTEM_THREAD_EXCEPTION_NOT_HANDLED
- IRQL_NOT_LESS_OR_EQUAL
- VIDEO_TDR_TIMEOUT_DETECTED
- PAGE_FAULT_IN_NONPAGED_AREA
- SYSTEM_SERVICE_EXCEPTION
- DPC_WATCHDOG_VIOLATION
Perform an SFC scan
The System File Checker (SFC) is a command-line tool in Windows which checks for any damages and errors in Windows system files and then tries to fix them. Often an SFC scan can help you get rid of blue screen errors.
Right click on the ‘Start’ button and click on ‘Command Prompt (Admin)’.
In the open command prompt window, type ‘sfc /scannow’ (without quotes) and press Enter.
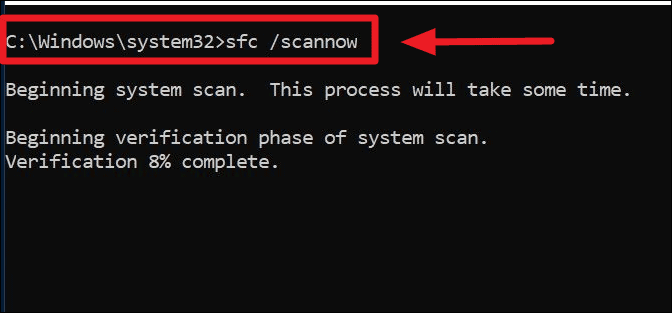
Windows will scan and fix the any erroneous files in your system.
Uninstall any programs installed just before the BSOD
Usually, faulty software installations can result in blue screen errors. So analyze the last program(s) which you had installed, and then uninstall them to see whether this alleviates the issue.
Right click on the Start button and click on ‘Settings’.
Select ‘Apps’ from main screen of Windows 10 settings.
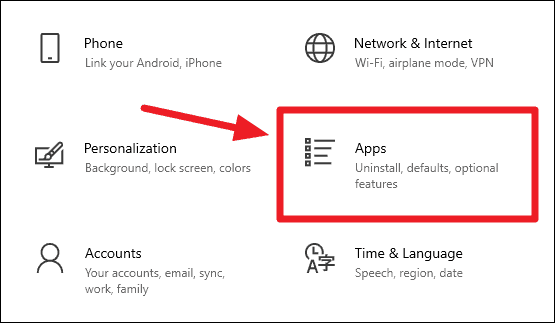
On the ‘Apps & features’ screen, sort the apps by ‘Install date’ so that you know which apps were recently installed or updated on your system.

To uninstall an app, click on it once and then select the ‘Uninstall’ button from the expanded menu.

If you see a confirmation pop-up, click on ‘Uninstall’ again, and follow the on-screen instructions of the program to successfully uninstall it.
Uninstall the most recent Windows Update
Sometimes a faulty Windows update can cause blue screen errors. Although it may seem strange, the updates which are released to fix issues may sometimes create issues themselves! So it is prudent to uninstall the most recent update. If it is indeed causing the issue, but rest assured that Microsoft will release a fixed update in a short period.
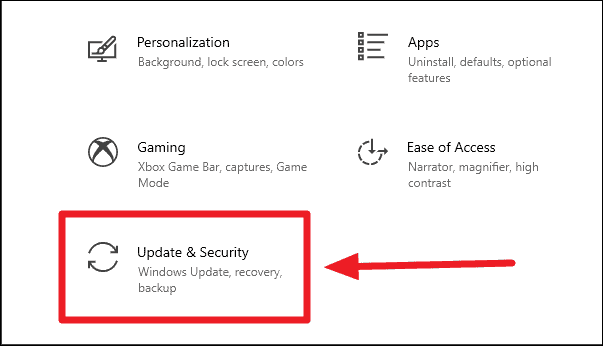
Right click on the ‘Start’ button and click on ‘Settings’.
Then select ‘Update & Security’ from the main screen of Windows 10 settings.
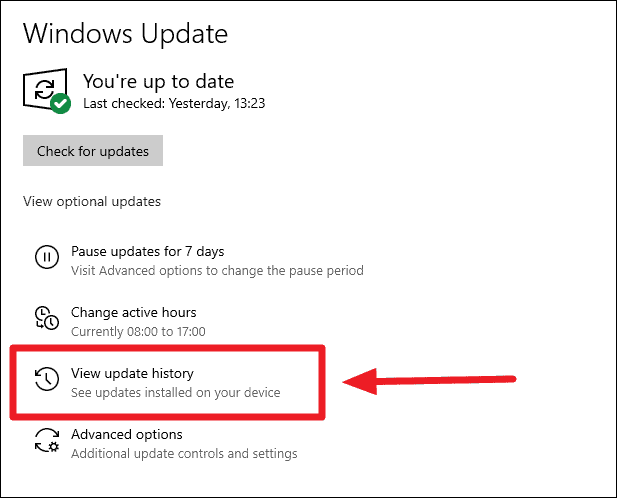
On the next screen, click on the ‘View update history’ option.
Then click the ‘Uninstall updates’ link/option at the top of the screen.
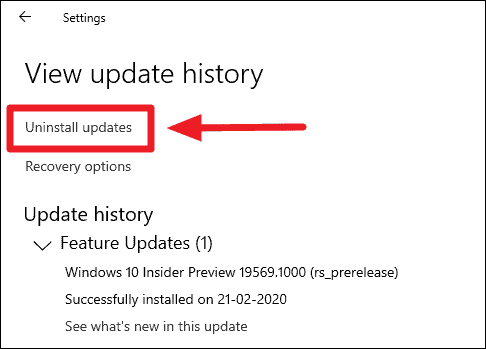
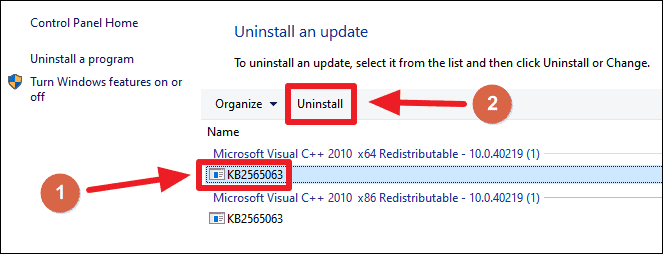
This will open the ‘Installed updates’ window inside the good ‘ol ‘Control Panel’ interface. Choose the most recent update on the system and click the ‘Uninstall’ button at the top of the updates list.
Check for driver issues
Windows recognizes and operates hardware through software known as drivers. Each hardware has a separate driver. These drivers must always be in a perfectly error-free state for the hardware, and subsequently, the operating system, to run smoothly. If there is any issue with the driver, the hardware might malfunction and cause the system to crash, leading to blue screen errors. So, it becomes absolutely necessary to check whether all the drivers are functioning properly or not.
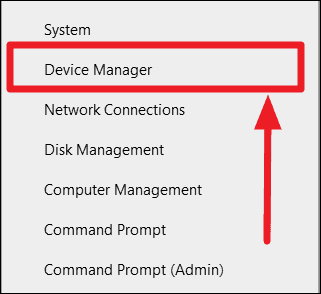
To check for driver issues, right-click on the ‘Start’ button or press Win + X and select ‘Device Manager’ from the menu.
On the Device Manager window, check whether any of the devices have a yellow warning sign attached to them. The sign means that the driver is not functioning properly. Although not all warning sign leads to malfunctions, there are times when an erroneous driver does lead to crashes. So, it is better to go through the following steps for all the drivers which are showing this sign.
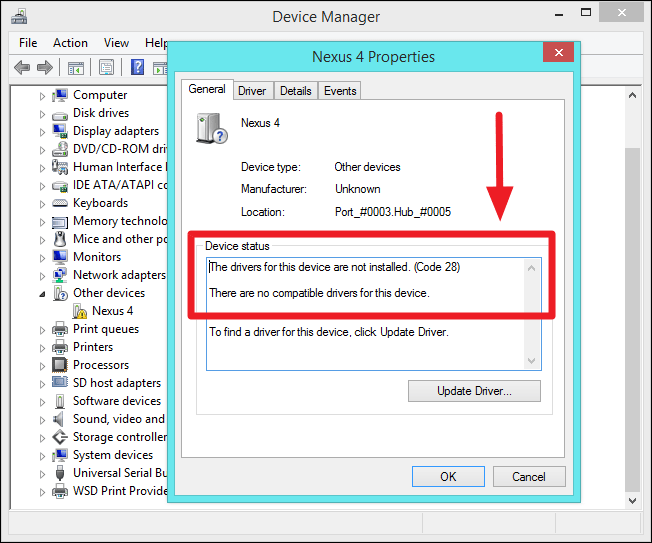
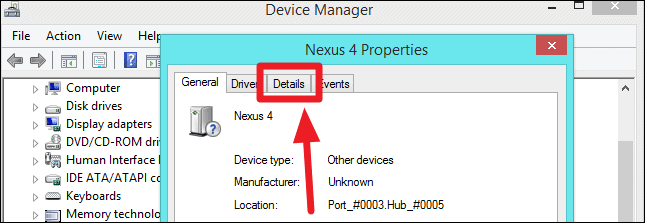
Right-click on the device which has a yellow warning sign, and select ‘Properties’ from the context menu.
On the device property screen, it will show you the exact cause of the error and also the error code associated with it.
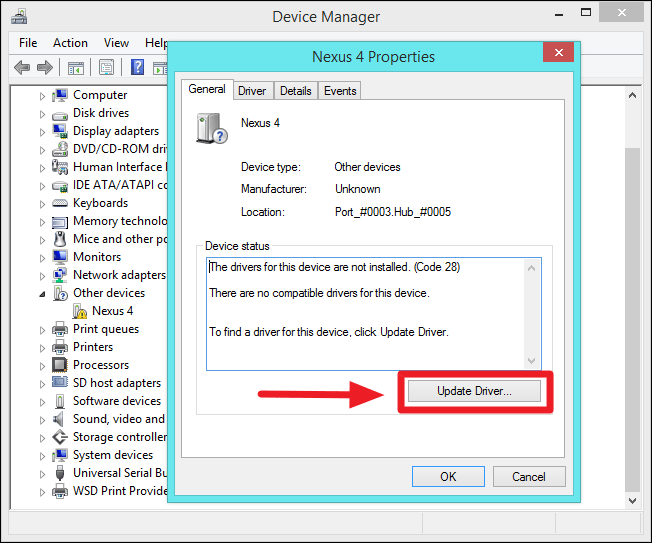
In this window itself, click on the button ‘Update Driver…’ button.
Then select ‘Search automatically for updated driver software’. This option will make Windows search for the latest compatible version of the driver online.

If no drivers are found automatically, you can also download the device drivers from the manufacturer’s website. If you don’t know the exact hardware for which you have to download the drivers, you can find it out easily.
From the driver properties window, go the to the ‘Details’ tab.
Click on the ‘Property’ drop down box, and select ‘Hardware IDs’ from the list.
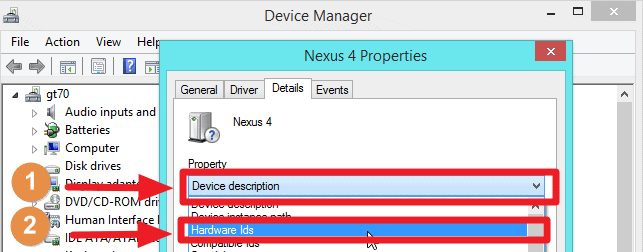
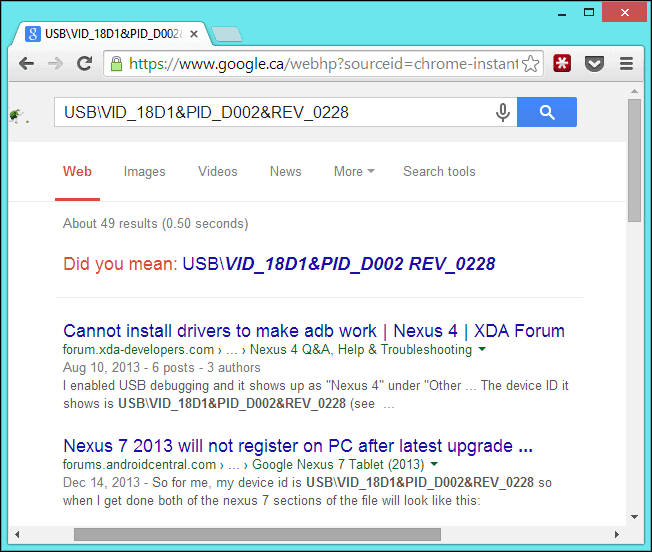
A window will open which will show a long list of random characters. But actually these are not random at all. They are the unique ids of the device. Copy or note down the top most ID.

Now head on to your preferred search engine and perform a web search on that hardware ID. The search results will show you the make and manufacturer of the device.
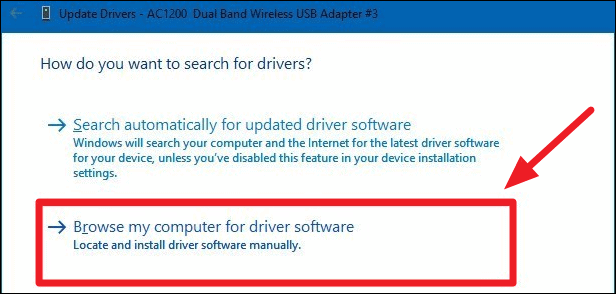
Using the information, download the relevant drivers of the device. After downloading, head back to the driver properties window and again click on the ‘Update Driver…’ button.
This time, select the second option ‘Browse my computer for driver software’.
Locate the folder where the downloaded drivers are stored, and then click the ‘Next’ button.
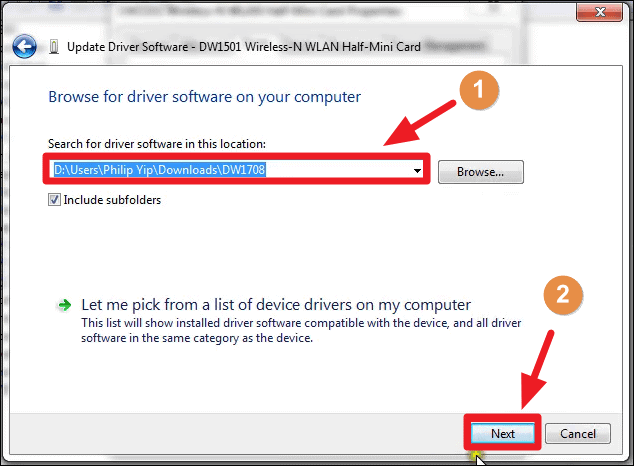
There may be chances that Windows does not find compatible software in the drivers you have downloaded. Or just that even after trying your best, you have been unable to find device drivers using the above steps.
If that is so, click the ‘Let me pick from a list of device drivers on my computer’.

If a compatible hardware driver is present, you can choose it and click on the ‘Next’ button to install the driver. Otherwise uncheck the ‘Show compatible hardware’ checkbox.
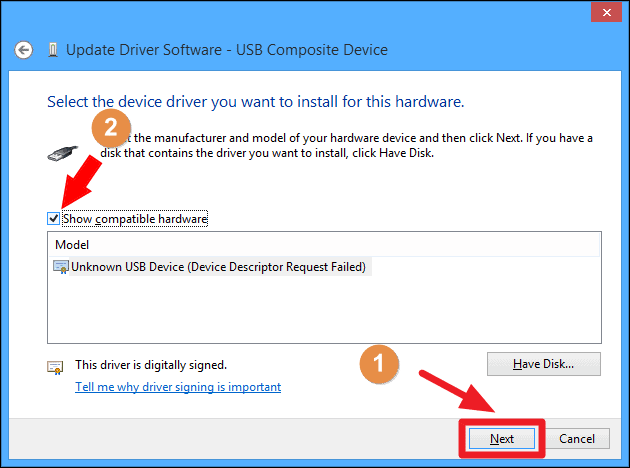
Now Windows will show a list of all the devices of which it has driver software already present in the system. Choose the appropriate manufacturer from the left column and the proper device from the right column. Then click on ‘Next’.

Windows will display a warning message box. It usually gives this warning in order to prevent users from installing the wrong drivers. Click ‘Yes’.

Let Windows install drivers. A confirmation dialog will appear when the installation is over. Until the time you do not see this dialog box, the driver has not been installed.
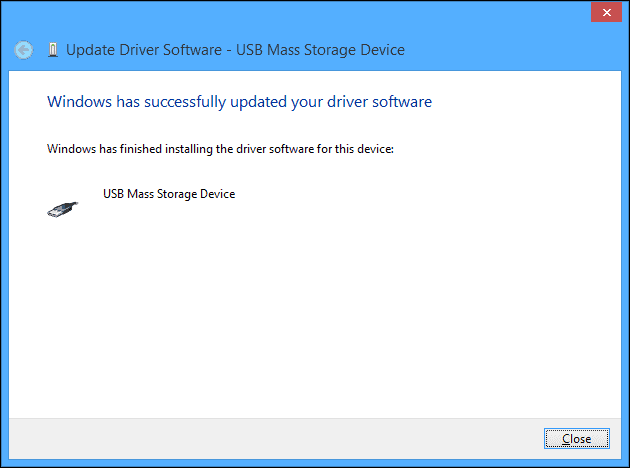
After the installation, whether automatically or manually, you can even check out the version and date of the driver.
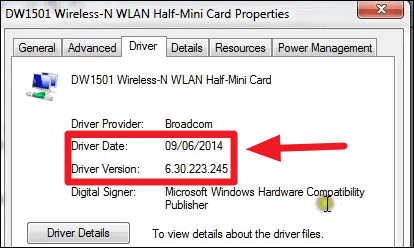
You will also notice that the yellow error sign has gone away after updating the driver.
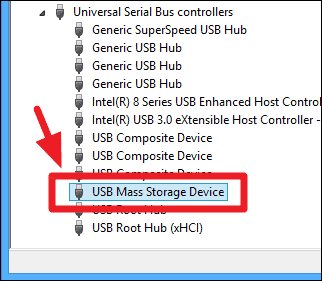
In all likelihood, solving these driver issues may make the blue screen error go away.
Restore Windows 10 to the Pre-BSOD state
System restore is a convenient tool when something goes wrong in Windows. It takes back the operating system to a pre-set point before the blue screen where it was running fine. This step requires a system restore to have already been enabled in the operating system so that new restore points can be created.
Press Win + Q , type ‘restore’ in the search box, and press Enter to launch the ‘Create a restore point’ feature on your PC.
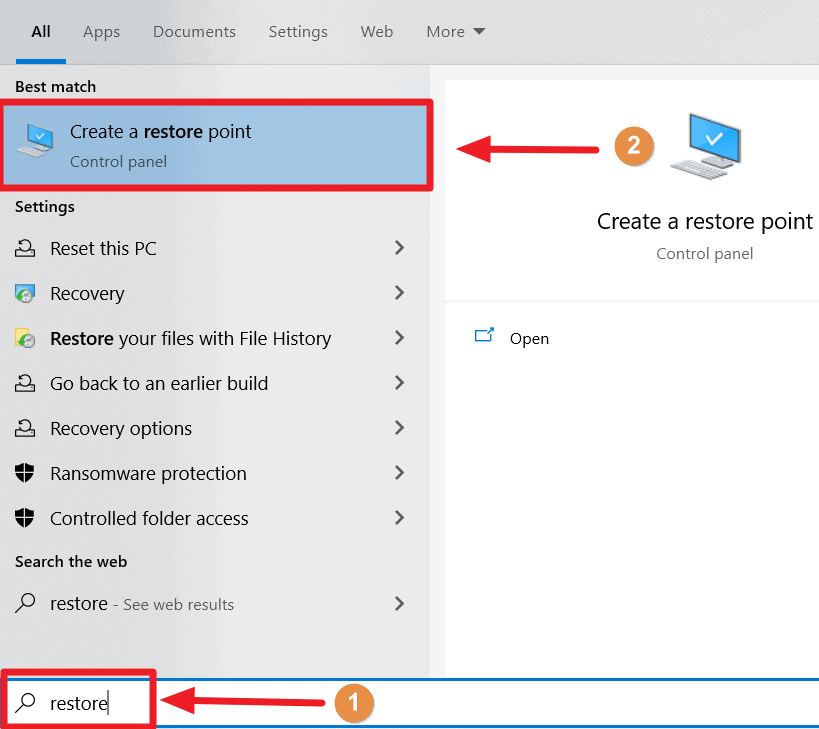
From the window that opens, go to the ‘System Protection’ tab, and click on the ‘System Restore’ button.
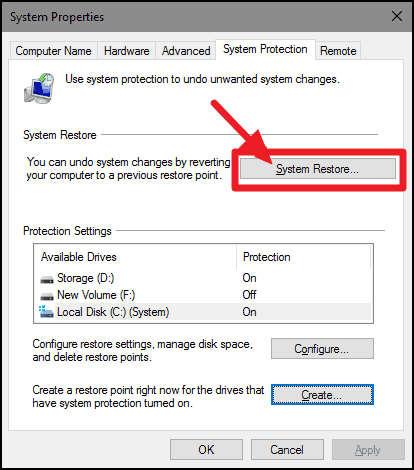
Click ‘Next’ on the System Restore window that opens.
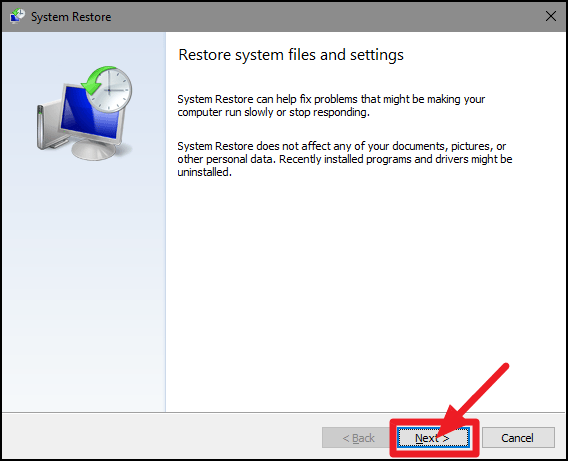
Then select a Restore point on the next screen. Windows creates automatic restore points when you make changes to your system. If you didn’t create a restore point manually in the past, use the most recent ‘Automatic Restore Point’ created by Windows, and click the ‘Next’ button.
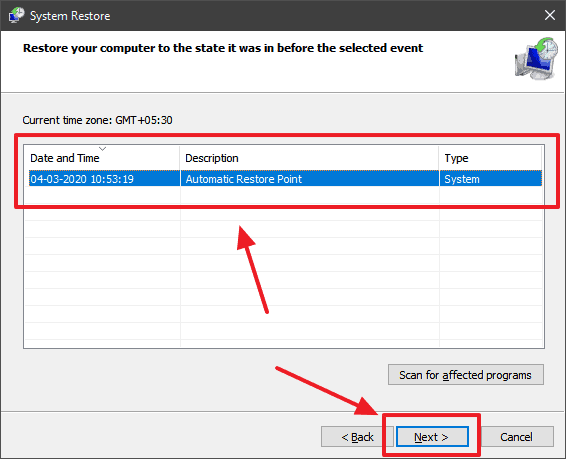
Finally, confirm your restore point by clicking the ‘Finish’ button.
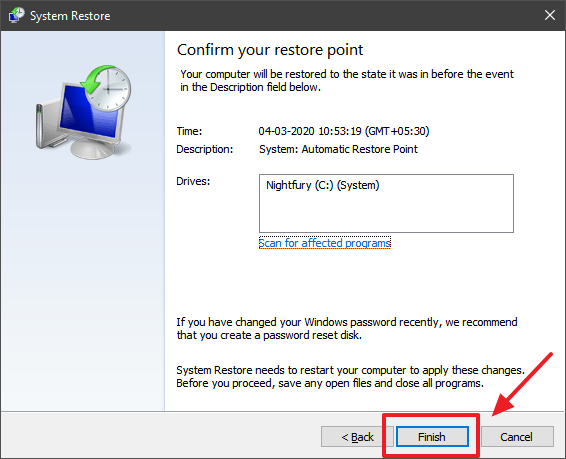
Reinstall Windows 10
If even after following all the steps, the blue screen error is not going away on your PC, then maybe it’s time to reinstall Windows 10. Don’t worry, it is not as tough as it sounds! But before you start, remember to back up your browser bookmarks if you don’t have them synced with your Microsoft or Google account in either Microsoft Edge or Chrome, as they will be removed in the reset process along with the browser.
Right click on the ‘Start’ button and select ‘Settings’.

Select ‘Update and Security’ from the main Windows 10 Settings screen.

From the menu items on the left panel, select the ‘Recovery’ option.

Under the heading ‘Reset this PC’, click the ‘Get started’ button.
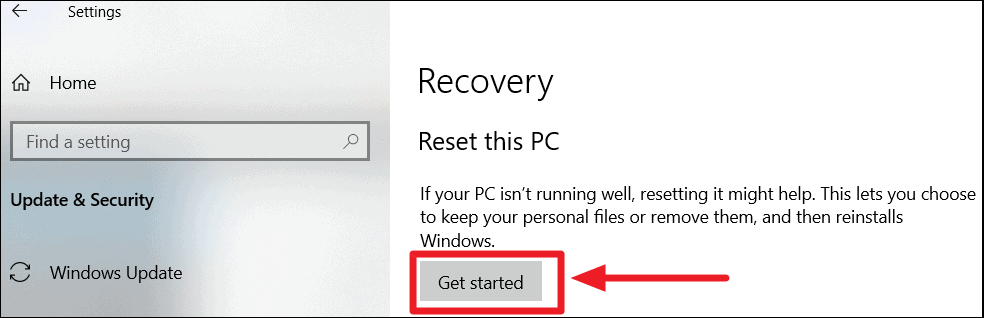
Sometimes the reset function might not start inside the operating system. But don’t worry. There is a fix for that too. Just below the ‘Reset this PC’ section lies the ‘Advanced startup’ section. Click on the button ‘Restart now’ in that section.
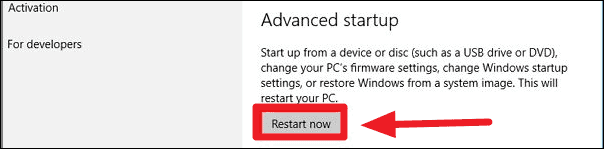
This will make Windows restart into the Windows Recovery Environment (WinRE) Mode. Click on ‘Troubleshoot’.
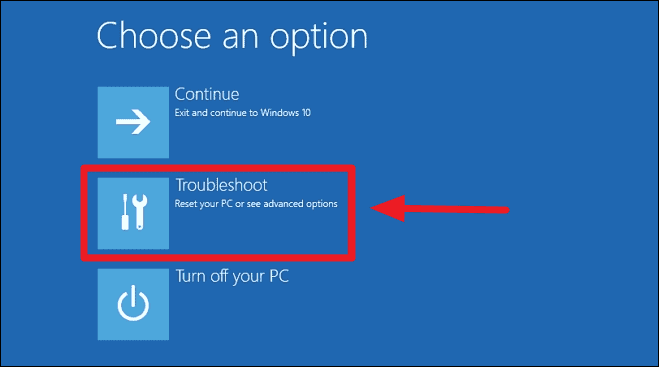
In the next window, click on ‘Reset this PC’.
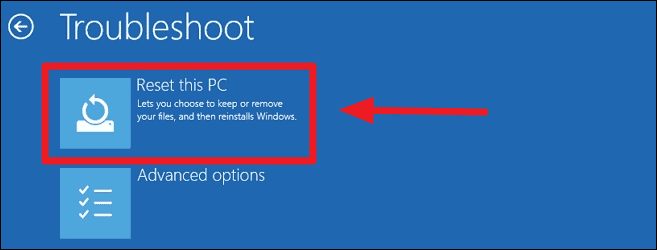
The reset system window will open up. Since you are resetting the PC out of necessity in order to remove the blue screen error, it would be prudent to click on ‘Keep my files’.
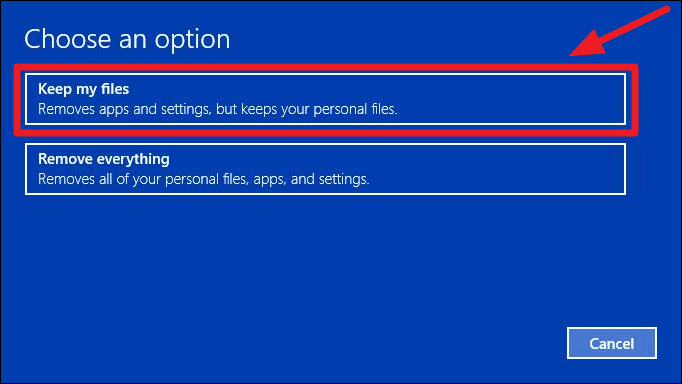
In the next step, Windows will show you a list of all the installed apps that will be removed from the PC. Apps are not seen as personal files by the operating system, hence they won’t be retained upon resetting the PC. That is what we want, since any of the apps could have been malfunctioning, causing the blue screen issue.
Acknowledge the list and move on to the next step by clicking on ‘Next’.

If you had upgraded the PC from a previous version of Windows to Windows 10, you will get a warning stating that you won’t be able to go back to the previous version of Windows. Since that is not the main concern for us here, click ‘Next’.

Now Windows will show you a final list of all the things which will happen due to the reset process. Click on ‘Reset’ to start the process.
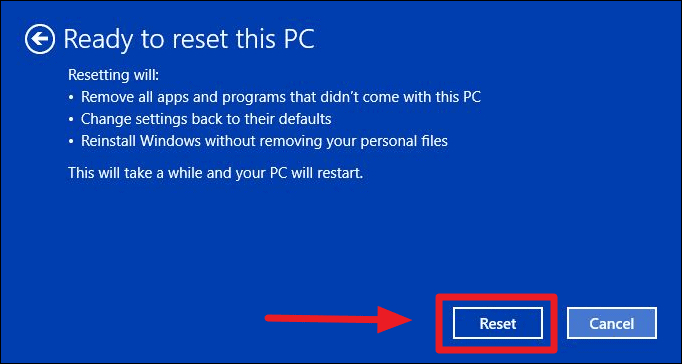
Windows will take some time to complete the resetting process. After the completion, you will get a window which prompts you to continue to your fresh Windows 10 operating system. Click on ‘Continue’.

This should fix any or all software related issues which may have been causing the blue screen error on your system.
Check faulty hardware
Usually, the above steps are enough to solve any OS or software related issues. However, sometimes the problem does not lie with the software, but with the hardware instead. Various kinds of hardware errors and malfunctions can result in the computer freezing or crashing, or eventually not even starting up at all. In these cases, the blue screen error is usually a way of protecting the hardware from damaging itself by running in its malfunctioning state.
Stress test the CPU and RAM for potential errors
If the computer is still getting the blue screen error after booting up, and you think that the CPU or the RAM might be the issue, you can use throttling tools to stress test the CPU and the RAM to ascertain whether there is any issue with the components or not. These tests can take up some time, and makes the computer nearly unresponsive during the time it runs, so you have to stop using the computer for the entire duration of the stress test.
The most reliable stress test tool for CPU is a software named Prime95 . It runs an intensive test on the CPU, which runs for around 5 to 6 hours and provides accurate results on the state of the CPU. It also runs blended tests, which test both the CPU and the RAM together. However, it will only check the reliability of an overclocked RAM, and not scan it for potential errors.
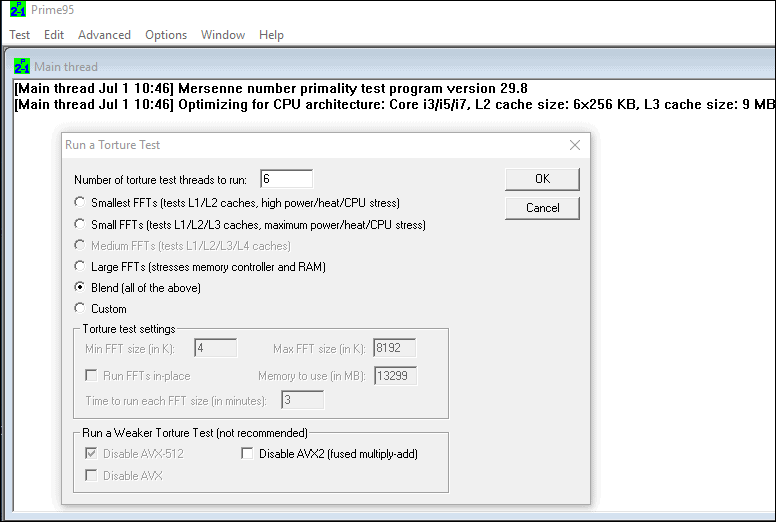
The best tool to stress test the RAM is MemTest64+ . It will run its tests on both normal and overclocked RAM, and provide the appropriate reports about the stability and the error state of the RAM. If this tool does not find any issue with your RAM, you can rest assured that the problem lies elsewhere.
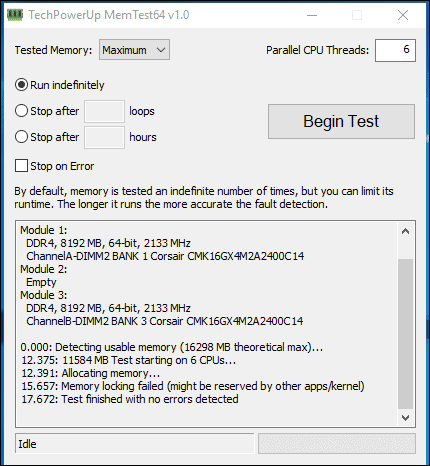
Check the RAM physically
The RAM is usually a very reliable component of a computer. Since it does not have any moving parts like a hard disk and also does not get heated like the CPU, it generally has a very long-running life. Thus, the chances of it malfunctioning are pretty low. Also, if the RAM somehow malfunctions, the computer itself won’t start in most cases. The usual problem with RAM is that sometimes static electricity is built up in the RAM stick, and that can cause the computer to display blue screen errors and then stop booting altogether.
In order to solve that issue, take out the RAM stick(s) from the computer. Use an ordinary eraser and rub it on the part of the stick which comes into contact with the RAM slot. Rub both sides with the eraser. Then remove all the dust from the RAM stick using a dry cloth. Reinsert the RAM. This should solve the issue.
Check the peripheral or accessory cards
If the blue screen errors still do not subside, it would be prudent to remove any non-essential peripherals like printers and scanners. Check whether the RAM, the graphics card, or network card are functioning properly or not.
Nowadays, computers usually don’t have discrete network cards or sound cards, as they are integrated into the motherboard itself. But if you do indeed have a discrete network or sound card, remove them as they are not necessary to run the computer. Then see if the problem is solved. If it is so, check which of the cards is faulty by plugging it in one by one and booting the computer.
If you have both integrated graphics and a discreet graphics card, it would be advisable to shift your monitor’s display connection to the integrated graphics port. Normally an integrated port can be recognized by the fact that it lies much above the graphics card port when the cabinet is standing vertically. Then take out the graphics card and turn on the computer again to see if the blue screen error has been resolved.
Clean the internals of your PC cabinet
Computers, after running for a prolonged period of time, accumulate a lot of dust on the inside. This happens because of the multiple fans running during a computer’s operation. There are CPU fans running along with the fans attached to the cabinet. This dust can clog up the CPU’s fan, resulting in the fan running at a slower speed, or not being able to provide the proper ventilation to the CPU. The RAM might also malfunction due to even tiny amounts of dust entering its slot. Thus, the insides of the computer should be thoroughly cleaned. The cleaning should preferably be done by a blower, which can help blow out all the dust from the nooks and crannies of the computer’s insides. If a blower is not present, even cleaning it gently with a dry cloth or brush ought to do the trick.
Blue screen errors can be infuriating. But hopefully, this guide must have helped you get rid of that blue screen of death.

How to Use Gemini Code Assist in VS Code

How to Code Using AI

Microsoft Copilot Pro Review: There is a lot of Unrealized Potential
Get all the latest posts delivered straight to your inbox., member discussion.

Why You Should Consider Switching to Linux After Windows 10 Support Ends

What to Do After Microsoft Ends Support for Windows 10?

How much will Windows 10 Updates Cost from Next Year?

How to Use AI Eraser in Photos App on Windows 11 and 10

How to Fix Windows 10 Update KB5034441 Error 0x80070643
How-To Geek
How to repair corrupted windows system files with the sfc and dism commands.
You should try to fix the problem before you nuke your Windows installation.
Quick Links
When you should run sfc or dism, run the sfc command to repair system files, run the dism command to repair windows, try a system restore or system reset next, key takeaways.
Open Command Prompt or PowerShell as administrator, then run "sfc /scannow" to fix corrupted Windows System Files. If SFC fails to run properly or cannot repair the files, run "DISM /Online /Cleanup-Image /RestoreHealth" to fix any remaining issues.
The System File Checker tool built into Windows can scan your Windows system files for corruption or any other changes. If a file has been modified, it will automatically replace that file with the correct version. Here's how to use it.
If Windows is experiencing blue-screen or other crashes, applications are failing, or some Windows features just aren't working properly, there are two system tools that might be able to help.
The System File Checker (SFC) tool built into Windows will scan your Windows system files for corruption or any other changes. If a file has been modified, it will automatically replace that file with the correct version. If the SFC command doesn't work, you can also try the Deployment Image Servicing and Management (DISM) command on Windows 8, 10, or 11 to repair the underlying Windows system image. On Windows 7 and earlier, Microsoft offered a downloadable "System Update Readiness Tool" instead. Let's take a look at how to use them.
Run the SFC command when troubleshooting a buggy Windows system. SFC works by scanning for and replacing system files that are corrupt, missing, or changed. Even if the SFC command doesn't repair any files, running it will at least confirm that no system files are corrupted and then you can continue to troubleshoot your system with other methods. You can use the SFC command as long as the computer itself will start. If Windows will start normally, you can run it from an administrative command prompt. If Windows won't start normally, you can try starting it in Safe Mode or in the recovery environment by booting from your installation media or recovery disc .
However you get to the Command Prompt — normally, Safe Mode, or recovery environment — you'll use the command the same way. Just remember that if you start Windows normally, you will need to open the Command Prompt or PowerShell with administrative privileges. To do this, right-click the Start button and select "Command Prompt (Admin)".
On Windows 11, you might need to select "Windows Terminal (Admin)" instead of "Command Prompt (Admin)" or "PowerShell (Admin)".
At the Command Prompt, type the following command and press Enter to run a full system scan and have SFC attempt repairs:
sfc /scannow
Leave the Command Prompt window open until the command completes, which may take some time. If everything is fine, you'll see the message "Windows Resource Protection did not find any integrity violations."
If you see a "Windows Resource Protection found corrupt files but was unable to fix some of them" message, try restarting your PC in Safe Mode and running the command again. And if that fails, you can also try booting with your installation media or recovery disc and trying the command from there.
The Deployment Image Serviving and Management (DISM) tool is used to repair Windows images. You shouldn't normally have to run the DISM command. However, if the SFC command fails to run properly or can't replace a corrupted file with the correct one, the DISM command — or System Update Readiness Tool in Windows 7 — can sometimes fix the underlying Windows system and make SFC run correctly.
The DISM command we're going to use goes online (to the same source as Windows Update), fetches fresh copies of files, and then uses those to repair corrupted Windows files and repair any other problems it finds. You'll need an active internet connection for it to work. To run the DISM command in Windows 10 or Windows 11, open Command Prompt , PowerShell , or Windows Terminal with administrative privileges , then enter:
DISM /Online /Cleanup-Image /RestoreHealth
Allow the command to finish running before closing the Command Prompt window. This may take five to ten minutes. It's normal for the progress bar to stay at 20 percent for a while, so don't worry about that.
If the results of the DISM command state that anything was changed, restart your PC and you should then be able to run the SFC command successfully.
If you're still experiencing system problems and the SFC and DISM commands don't help, you can try more drastic actions.
Running the System Restore tool will restore your Windows operating system files, settings, and applications to an earlier state. This may fix system corruption problems if the operating system wasn't also damaged at the earlier point when the restore point was created.
An if all else fails, you could always resort to performing a system reset or reinstalling Windows. On Windows 8, 10, and 11 you can perform a " Reset this PC " operation to reset Windows to its default state. You'll have the option to keep your personal files in place — though you'll have to reinstall programs — or to remove everything and do a complete reinstall. Whichever you choose, make sure you've backed up your PC first! On Windows 7 and earlier, this will require using your computer's manufacturer-provided recovery partition or reinstalling Windows from scratch.
If you encounter other errors while running any of the commands we've covered, try searching the web for the specific errors you encounter. The commands will often point you to log files with more information if they fail — check the logs for more details about specific problems. Ultimately, it may not be worth troubleshooting serious Windows corruption problems when you can just reset Windows to its default state or reinstall it. That decision will be up to you.
How to fix Blue Screen of Death errors on Windows 11
Does a blue screen error keep popping up on Windows 11? Here are some troubleshooting steps to fix this problem.

- Fix blue screen errors during an upgrade
- Fix blue screen error during startup
- Fix blue screen errors desktop
On Windows 11 , the "Blue Screen of Death" (BSoD) refers to the error on the screen when the system cannot handle a specific operation that causes the device to crash without warning.
Usually, you will see a "blue screen" (also referred to as "stop error," "system crash," or "bug check") during an upgrade, starting up the system, or "out of the blue" when you're actively working with applications. Furthermore, you will only see a blue background with a sad kaomoji and insufficient information to determine the reason for the problem.
However, the issue can usually be narrowed to a buggy update, device driver, compatibility issues with a specific app, or a piece of hardware that needs replacing.
This how-to guide will walk you through different steps to troubleshoot and resolve most problems causing blue screen errors on Windows 11.
How to resolve blue screen errors during an upgrade on Windows 11
A Blue Screen of Death is not uncommon while upgrading to Windows 11. Usually, the error may occur because of a compatibility problem with an application or security software. However, it can also happen because of corruption in the current setup or damaged files in the installation media.
If the installation wizard rolled back to the previous setup, uninstalling non-essential apps, disconnecting non-essential devices, re-downloading the setup files, or performing a clean installation can fix the problem.
Uninstall problematic apps
To uninstall an application causing a blue screen on Windows 11, use these steps:
Get the Windows Central Newsletter
All the latest news, reviews, and guides for Windows and Xbox diehards.
- Open Settings .
- Click on Apps .
- Click the "Installed apps" page on the right side.

- Under the "App list" section, click the menu (three-dotted) button and choose the Uninstall option for the incompatible app.
- Click the Uninstall button again.

- Continue with the on-screen directions (if applicable).
Once you complete the steps, you may need to repeat the instructions to uninstall other non-essential apps. After removing all the conflicting applications, you may try to continue with the installation process.
Disconnect non-essential devices
When a hardware problem is detected, you will likely see a blue screen of death. As a result of this potential issue, it's a good idea to disconnect the non-essential peripherals from your computer.
For example, you may want to disconnect external hard drives, printers, secondary monitors, phones, and other USB or Bluetooth devices.
After the installation, you can reconnect the peripherals.
It might be a compatibility issue if you continue to see the problem.
Updating the device driver to the latest version can resolve the issue. However, if the computer already has the most recent driver, the problem may be with the new version of Windows 11, or the hardware coincidently got damaged and needs to be replaced.
Microsoft lists all the known issues for the different versions of Windows on the health dashboard page .
Redownload setup files
If you try to use the upgrade option from the Windows Update settings and you see a blue screen, it may be that one or more files are damaged. In this case, you can clear out the files and try to re-download the setup files one more time.
To clear and download the Windows 11 installation files again, use these steps:
- Click on System .
- Click the Storage page on the right side.

- Click the Temporary files setting.

- Clear the default options.
- Check the "Temporary Windows installation files" option.
- Click the Remove files button.

After completing the steps, click the "Check for updates" button to re-download the installation files in the Windows Update settings.
If the problem remains, you may have to use the Installation Assistant to perform an in-place upgrade.
Check upgrade logs
Microsoft's SetupDiag is a tool for administrators that can help troubleshoot and determine why an installation failed. This information could be critical to resolving the problem.
To determine why the upgrade failed to apply to the SetupDiag tool, use these steps:
- Open the SetupDiag page .
- Click the Download SetupDiag button to save the installer on your computer.

- Right-click the "SetupDiag.exe" and select the Run as administrator option.
- Right-click the SetupDiagResults.log file and select the Open option.
Once you complete the steps, the app will open the log file for review with the default text editor.

If an error was recorded and it's a known issue, the log should include details on resolving it. If the file has no details, you may find a link with the error code that you can use to research and fix the problem.
Reinstall from Windows Update
Before going through the clean installation process, Windows 11 has an feature that allows you to reinstall the operating system without losing your files, apps, and settings.
The feature uses the "Windows Update" settings to download and reinstall the current version of the operating system with ease to resolve issues, which may also be causing the Blue Screen of Death.
To reinstall Windows 11, use these steps:
- Open Settings .
- Click on System .
- Click the Recovery page on the right side.

- Click the Reinstall now button.

- Check the "Automatically restart my PC 15 minutes after installation" option.
- Click the OK button.

After you complete the steps, the feature will reinstall the operating system, fixing the problem causing the BoSD. (This option is available after installing the Windows 11 Moment 5 update .)
Clean installation
If you want to prevent problems, such as blue screens, the best way to upgrade to a new version of Windows 11 is to perform a clean installation since this process will erase everything and set up a fresh copy of the system, which can also help to resolve other issues and improve performance.
A clean installation requires the device to start from a USB flash drive. If your computer can't start from a USB, you will have to change the boot order in the Unified Extensible Firmware Interface (UEFI) firmware.
Usually, to access your device firmware, you must use one of the function keys (F1, F2, F3, F10, or F12), the "Esc" key, or the "Delete" key during startup. However, since the settings are different per manufacturer and device model, you should check your computer manufacturer for more specific details.
While in the firmware, you must navigate to the "Boot" page and change the boot order to start from a USB flash drive. After completing these steps, you must create an installation media and use that media to continue with the clean installation.
To delete everything on the hard drive and do a clean install of Windows 11 to prevent the blue screen of death errors, use these steps:
- Start PC with installation media.
- Click the Next button on the "Windows Setup" page.
- Click the Install Now button.

- Click the "I don't have a product key" option to continue (assuming your computer was already properly activated).

- Select the edition of Windows 11 that the product key activates (if applicable).

- Click the Next button.
- Check the "I accept the license terms" option to continue.
- Click on the "Custom: Install Windows only (advanced)" option.

- Select the partition with the current installation of Windows (usually "Drive 0"), and click the Delete button to remove it.
- Quick tip: If you have multiple partitions on the primary hard drive (Drive 0), select and delete each one. The setup will recreate the required partitions automatically. You don't need to delete partitions from secondary drives.
- Select the empty drive labeled Drive 0 Unallocated Space .

Once you complete the steps, the setup will begin installing Windows 11, avoiding many blue screen errors. After the installation, you'll need to continue with the out-of-box experience (OOBE) to finish setting up the device.
How to resolve blue screen errors during startup on Windows 11
If the device has problems starting up, you can use the Windows Recovery (WinRE) environment to troubleshoot and resolve the blue screen error with System Restore, Safe Mode, or Advanced Startup settings.
Fix errors with System Restore
Windows 11 still includes the legacy System Restore tool, which enables you to undo changes to resolve problems after installing a bad driver, system update, or application. (This feature will only work if you have previously enabled it manually .)
You can access the tool through the Advanced Startup settings to use System Restore.
Access Advanced Startup from boot
To launch the Advanced startup settings to access System Restore, use these steps:
- As soon as the Windows logo appears, press and hold the power button to interrupt the boot sequence.
- Repeat steps 1 and 2 two more times.

After the third interruption, Windows 11 should open the recovery environment and continue with the steps below to access System Restore.
Access Advanced Startup from USB
Alternatively, you can use installation media to open the advanced settings with these steps:
- Start PC with USB media.
- Quick tip: If the computer isn't starting from USB, you must change your system's UEFI settings to ensure it can. You can usually access the UEFI by powering up your device and pressing one of the functions, "Delete" or "Esc" keys, but be sure to check your manufacturer's support website for more specific details.
- Click the " Repair your computer" option from the bottom-left corner.

Once you complete the steps, continue with the "Restore Point" instructions below.
Fix blue screen of death with Restore Point
To fix blue screen problems with a restore point on Windows 11, use these steps:
- Click the Advanced Startup option.
- Quick note: The "Advanced Startup" option is only available when using the Windows automatic repair feature, not when using USB media.
- Click the Troubleshoot option.
- Click on Advanced options.
- Click the System Restore option.

- Click the Windows 11 option.
- Confirm your account credentials (if applicable).
- Click the Continue button.
- Select the restore point to apply to the blue screen error.

- (Optional) Click the "Scan for affected programs" button to determine the apps that may be affected using a restore point.
- Click the Close button.
- Click the Finish button.
After completing the steps, Restore Point will apply the selected checkpoint, which will undo updates, drivers, apps, and system changes to the problem.
Fix errors with Safe Mode
On Windows 11, Safe Mode is an environment that loads only the essential services, drivers, and apps to access the desktop to troubleshoot problems.
If you don't have access to the desktop, you can boot your computer through the Windows Recovery environment.
To launch the Advanced Startup settings to access System Restore, use these steps:
After the third interruption, the system should enter the recovery environment and continue with the steps below to access the Safe Boot option.
Alternatively, you can use installation media to open the Windows Recovery environment with these steps:
- Click the Next button.
- Click the "Repair your computer" option from the bottom-left corner.
Once you complete the steps, continue with the instructions below to access the Safe Mode environment.
Fix bug check on Safe Mode
To access Safe Mode to diagnose Blue Screen of Death errors, use these steps:
- Click the Advanced Startup option
- Click the Troubleshoot option.
- Click on Advanced options .
- Click the Startup Settings option.

- Click the Restart button.
- After your computer reboots, press the F4 (or 4 ) key to select the Enable Safe Mode option.

After completing the steps, you can use the next set of instructions to uninstall updates and drivers that may prevent your computer from operating correctly.
Fix errors with WinRE
Since the Safe Mode environment loads the essential elements, you can still use Device Manager to remove drivers and Event Viewer to troubleshoot errors. However, the Settings app won't work to uninstall updates, but you can still use Command Prompt to complete the task.
Uninstall conflicting update
To uninstall a system update with Command Prompt, use these steps:
- Use the "Windows key + R" keyboard shortcut to open the Run command.
- Type cmd and click the OK button to launch Command Prompt as an administrator.
- Type the following command to view the most recent installed updates and press Enter : wmic qfe list brief /format:table
- Confirm the HotFixID and InstalledOn information to determine the update to remove.
- Type the following command to uninstall the update from your computer and press Enter : wusa /uninstall /kb:KB-NUMBER
In the command, replace KB-NUMBER for the KB number of the update to uninstall. This example removes the update KB5013889 from Windows 11: wusa /uninstall /kb:5034457

- Click the Yes button.
Once you complete the steps, you may need to restart the computer to apply the changes.
Uninstall conflicting driver
To uninstall an incompatible driver with Safe Mode, use these steps:
- Use the "Windows key + R" keyboard shortcut to open the Run command.
- Type the devmgmt.msc command and click the OK button to open the Device Manager app.
- Expand the branch with the device causing the problem.
- Right-click the device and choose the Uninstall device option.
- Click the OK button.

After you complete the steps, repeat them to remove other drivers as necessary, and then restart the device to see if the problem has been resolved.
Check Event Viewer
The Event Viewer is another tool that you can use to find out more information about the Blue Screen of Death error to diagnose the issue.
To troubleshoot blue screens with the Event Viewer on Windows 11, use these steps:
- Type the eventvwr. msc command and click the OK button to open the Event Viewer app.
- Expand the Windows Logs group.
- Right-click the "System" category and choose the "Filter Current Log" option.

- Click the Filter tab.
- Use the Logged drop-down menu and select the time range when the error occurred — for example, Last 12 hours .
- Under the "Event level" section, check the Critical and Error options.

- Click the OK button.
- Double-click to open each log to learn more details about the problem.
- Quick note: The blue screen errors may appear as "BugCheck" in the "Source" column.
- Check event log details for clues about the error.
Once you complete the steps, the "General" tab will give you some technical details you can use to diagnose and resolve the blue screen problem.
If the error doesn't provide enough information, copy the description, source, and event ID and use it to search online for a possible solution.
Fix blue screen error from Windows Recovery
If a recently installed update is causing the computer to have a blue screen, use the Advanced Startup settings in Windows Recovery to uninstall it.
To launch the Advanced Startup settings, use these steps:
After the third interruption, the system should enter the Windows Recovery Environment and continue with the steps below.
Alternatively, you can use installation media to open the Windows Recovery Environment with these steps:
- Click the "Repair your computer" option from the bottom-left corner.
Once you complete the steps, continue with the instructions below.
Uninstall quality or feature updates
To uninstall the most recent update causing the bug check error, use these steps:
- Click the Advanced Startup option.
- Click the Uninstall Updates option.

- Click the "Uninstall latest quality update" option to remove a recent update or the "Uninstall latest feature update" option to roll back to a previous version.

- Click the Uninstall quality update button.

- Click the Done button.
- Click the Continue option.
After you complete the steps, the system will remove the update, resolving the Blue Screen of Death error.
How to resolve blue screen errors during normal use on Windows 11
When the blue screen occurs after signing into your account, the problem is typically a driver, missing update, or application.
Install latest updates
If you still have access to the desktop, you may be able to fix the bug check by installing the latest system updates, drivers, and apps.
System updates
To check for updates on Windows 11, use these steps:
- Click on Windows Update .
- Click the "Check for updates" button.

- (Optional) Turn on the "Get the latest updates as soon as they're available" toggle switch to install upcoming updates that may include fixes for the current problem
Once you complete the steps, if the computer is missing an update, the system will download and install them automatically.
Driver update
To check for driver updates on Windows 11, use these steps:
- Click the Advanced options page on the right side.

- Click the Optional updates setting under the "Additional options" section.

- Select the driver update to install.
- Click the "Download & install" button.
Once you complete the steps, the most up-to-date driver should download and install automatically.
If the system cannot detect new updates, check the manufacturer's support website and follow their instructions to download a more recent driver. (If the problem is the driver, you may want to consider trying out a beta version since it may include a fix for the problem.)
If a compatibility issue causes the blue screen with an app, installing the latest version may resolve the problem.
To update apps on Windows 11, use these steps:
- Open Microsoft Store .
- Click on Library .
- Click the Get updates button.

Once you complete the steps, any available updates will download and install automatically.
If you are dealing with an app you acquired outside the Microsoft Store, check for updates in the app's settings or the software vendor support website to download the latest available version.
Uninstall problematic apps, drivers, and updates
Software and hardware companies sometimes release updates with bugs that can cause the Blue Screen of Death, among other issues.
If you have access to the desktop, you can remove these system updates, drivers, or apps to mitigate the problem until a newer version rolls out with a permanent fix.
Remove updates
To uninstall updates on Windows 11, use these steps:
- Click on Update history .

- Click the Uninstall updates option under the "Related settings" section.

- Click the Uninstall button for the update to remove.

After completing the steps, the update will be removed from the computer, hopefully fixing the bug check problem.
Remove drivers
To uninstall a device driver on Windows 11, use these steps:
- Open Start .
- Search for Device Manager and click the top result to open the app.
- Right-click the device and select the Uninstall device option.

Once you complete the steps, the driver will be removed from the computer.
If the graphics card driver causes the problem, you can use the Display Driver Uninstaller (DDU) tool to fully remove the driver since using the manufacturer tool may not get rid of all the components.
Rollback driver version
Alternatively, you can try rolling back to the previous version of the driver if a newer version is causing BSoD on Windows 11.
To rollback to a previous version of a driver, use these steps:
- Search for Device Manager and click the top result to open the console.
- Expand the category of the device with the problem.
- Right-click the device and select the Properties option.

- Click the Driver tab.
- Click the "Roll Back Driver" button (if available).

- Quick tip: If the option isn't available, the system doesn't have a backup of the previous driver.
- Select one of the available options to answer the question.
After completing the steps, the driver will roll back to the previous version to resolve the blue screen problem.
Disable drivers
If you don't want to uninstall or roll back the driver, you can disable it to confirm whether the device is causing the issue.
To disable a device driver on Windows 11, use these steps:
- Right-click the device and select the Disable device option.
- Click the Yes button.

Once you complete the steps, the device will no longer be available on Windows 11 but will remain installed.
Remove apps
If you are dealing with a compatibility problem, you will probably experience a Blue Screen of Death randomly or upon launching the app. In this case, you can try updating the app to a newer version or uninstall the app in question to overcome the problem.
To uninstall an app on Windows 11, use these steps:
- Click on Apps .
- Click the "Installed apps" page on the right side.

- Select the app, click the menu (three-dotted), and choose the Uninstall option.
- Click the Uninstall option again.

After completing the steps, the app will no longer be available on the computer, mitigating the blue screen problem. Once an update becomes available to resolve the bug check permanently, you can then reinstall the app.
On Windows 11, a Blue Screen of Death error message may appear after connecting a new piece of hardware (for example, a USB drive, graphics adapter, etc.). If this happens, you are probably facing a compatibility issue, the hardware is broken, or the system is installing the wrong driver.
If you encounter a compatibility issue, you can contact support for assistance, or you may need to replace the hardware with a compatible alternative.
If the system tries installing the wrong driver, uninstall the current one and install the correct version using the manufacturer's support instructions.
Run DISM and SFC commands
If you see a blue screen due to an installation problem, you may be able to resolve the issue using the Deployment Servicing and Management (DISM) and System File Checker (SFC) tools.
To resolve installation problems with DISM and SFC commands on Windows 11, use these steps:
- Search for Command Prompt , right-click the top result, and select the Run as administrator option.
- Type the following command to repair the Windows 10 image and press Enter : DISM /Online /Cleanup-Image /RestoreHealth
- Type the following command to repair the Windows 11 setup and press Enter : SFC /scannow

- Quick tip: If errors exist, run the command multiple times to ensure that everything has been repaired correctly.
Once you complete the steps, the DISM command will repair problems with the local system image, and the SFC command will use the files in the system image to repair damaged files in the current setup of Windows 11, hopefully fixing the Blue Screen of Death.
If you still have access to the desktop, the Event Viewer can help find out the reason the device is getting bug-check errors.
To review event longs on Windows 11, use these steps:
- Search for Event Viewer and click the top result to open the app.
- Right-click the "System" category and choose the Filter Current Log option.

- Under the "Event level" section, check the Critical and Error options.

Once you complete the steps, the "General" tab will give you some technical details that you can use to diagnose and resolve the blue screen problem on Windows 11.
If the error doesn't provide enough information, you can copy the description, source, and event ID and use it to search online for a possible solution.
Troubleshooting and fixing Blue Screen of Death errors can be difficult and time-consuming. However, typically, it's an issue with a driver or application conflicting with Windows 11 (or vice versa).
Finally, in addition to blue screens, you may also come across a black screen, which is usually related to display connection issues, graphics driver problems, or something else happening in the system.
More resources
For more helpful articles, coverage, and answers to common questions about Windows 10 and Windows 11, visit the following resources:
- Windows 11 on Windows Central — All you need to know
- Windows 10 on Windows Central — All you need to know

Mauro Huculak is technical writer for WindowsCentral.com. His primary focus is to write comprehensive how-tos to help users get the most out of Windows 10 and its many related technologies. He has an IT background with professional certifications from Microsoft, Cisco, and CompTIA, and he's a recognized member of the Microsoft MVP community.
- 2 OpenAI won't launch a Google Search competitor or GPT-5 in the next few days, but we should expect new projects that "feel like magic" to CEO Sam Altman
- 3 Reports indicate that Microsoft may lift the freeze on specific employee salaries while emphasizing 'more' accountability for top executives
- 4 Every Dark Souls game gets rare sale for huge discounts ahead of Elden Ring's Shadow of the Erdtree DLC
- 5 Days after Sony's Helldivers 2 PSN debacle, Ghosts of Tsushima's PC release gets delisted from Steam in over 170 countries
- PRO Courses Guides New Tech Help Pro Expert Videos About wikiHow Pro Upgrade Sign In
- EDIT Edit this Article
- EXPLORE Tech Help Pro About Us Random Article Quizzes Request a New Article Community Dashboard This Or That Game Popular Categories Arts and Entertainment Artwork Books Movies Computers and Electronics Computers Phone Skills Technology Hacks Health Men's Health Mental Health Women's Health Relationships Dating Love Relationship Issues Hobbies and Crafts Crafts Drawing Games Education & Communication Communication Skills Personal Development Studying Personal Care and Style Fashion Hair Care Personal Hygiene Youth Personal Care School Stuff Dating All Categories Arts and Entertainment Finance and Business Home and Garden Relationship Quizzes Cars & Other Vehicles Food and Entertaining Personal Care and Style Sports and Fitness Computers and Electronics Health Pets and Animals Travel Education & Communication Hobbies and Crafts Philosophy and Religion Work World Family Life Holidays and Traditions Relationships Youth
- Browse Articles
- Learn Something New
- Quizzes Hot
- This Or That Game
- Train Your Brain
- Explore More
- Support wikiHow
- About wikiHow
- Log in / Sign up
- Arts and Entertainment
- Fun Activities
- Pranks (Practical Jokes)
- Technology Pranks
- Computer Pranks
How to Force a Blue Screen in Windows
Last Updated: May 23, 2022
This article was reviewed by Luigi Oppido . Luigi Oppido is the Owner and Operator of Pleasure Point Computers in Santa Cruz, California. Luigi has over 25 years of experience in general computer repair, data recovery, virus removal, and upgrades. He is also the host of the Computer Man Show! broadcasted on KSQD covering central California for over two years. This article has been viewed 578,506 times.
It is extremely rare that you would ever want to force the Blue Screen of Death, or BSoD, on your PC. The Blue Screen of Death is an error screen in Windows that signifies a fatal system error and intentionally forcing your computer to bring up the BSoD can cause serious problems with your computer and even loss of data. However, there are some advantages to forcing this infamous screen when attempting to test the capabilities of a remote management and recovery tool. Before proceeding, it is very important that you save your work because the only way to unlock your screen once you have forced the BSoD will be rebooting your computer.
Editing the Registry

- You can tell whether you have a PS/2 or USB keyboard by looking at the plug that connects it to your computer. A PS/2 keyboard will have a round plug whereas a USB keyboard will have a rectangular plug.

Task Manager

- 1 Save your work. Forcing a Blue Screen on your computer will cause you to lose any unsaved changes, therefore it is very important for you to save anything you were working on before continuing.
- 2 Run PowerShell as An Administrator
- 3 Wait for it to load and type "wininit" and hit enter.

Community Q&A
- You can make a bat file with content "taskkill /f /im csrss.exe" and save it to anything.bat. Then when you want a BSoD, you must run it as administrator. Enjoy your BSoD! Thanks Helpful 2 Not Helpful 1
- Note in Windows 8.1 or up, if you terminate csrss.exe, it will not cause a BSoD, it will just hang the system, though it will still simulate a computer crash.
Tips from our Readers
- You can also use an app called "NotMyFault".

- Make sure you are editing the right path in the Registry. Editing or deleting the wrong entries may cause stability problems or even prevent you from booting in the first place. Thanks Helpful 4 Not Helpful 0
- In Windows 8 and up, doing so will prevent Fastboot from working on the next boot and make Windows to load slower. Thanks Helpful 4 Not Helpful 1
- Windows Server 2003 with Service Pack 1 with KB 244139 installed or with Service Pack 2 installed.
- Windows Vista or Server 2008 with Service Pack 1 with KB 971284 installed or with Service Pack 2 installed.
- Performing this using a USB keyboard on Windows XP will not work.
You Might Also Like

- ↑ http://www.instructables.com/id/Display-the-BSoD-with-3-keystrokes/
- ↑ https://msdn.microsoft.com/en-us/library/windows/hardware/ff545499(v=vs.85).aspx
- ↑ http://www.zdnet.com/article/how-to-create-a-blue-screen-of-death/
About This Article

1. Press Control + Alt + Del . 2. Click Task Manager . 3. Click the Details tab. 4. Select wininit.exe . 5. Click End task . 6. Follow the on-screen shutdown instructions to see the blue screen. Did this summary help you? Yes No
- Send fan mail to authors
Reader Success Stories
Vulket Humster
May 28, 2017
Did this article help you?
James Byrne
Aug 27, 2019
Oct 2, 2016
Jul 27, 2016

Featured Articles

Trending Articles

Watch Articles

- Terms of Use
- Privacy Policy
- Do Not Sell or Share My Info
- Not Selling Info
Don’t miss out! Sign up for
wikiHow’s newsletter
Contribute to the Windows forum! Click here to learn more 💡
May 10, 2024
Contribute to the Windows forum!
Click here to learn more 💡
Windows 10 Forum Top Contributors: Ramesh Srinivasan - neilpzz - Volume Z - franco d'esaro - _AW_ ✅
Windows 10 Forum Top Contributors:
Ramesh Srinivasan - neilpzz - Volume Z - franco d'esaro - _AW_ ✅
- Search the community and support articles
- Search Community member
Ask a new question
Blue screen and stop code
Stuck in this NTFS and FAT FILE SYS loop,can't access start up and the auto restart keeps failing
Any ideas guys
Running windows 10
Jeferis
Report abuse
Reported content has been submitted
Replies (3)
Hi Jeferis ,
There are a lot of factors for this matter to occur. To isolate the issue, we have some questions for you:
What activity have you done to trigger the NTFS and FAT FILE SYS loop?
were there any error messages?
What troubleshooting steps have you done so far?
It is possible that the Boot Sequence were corrupted by the previous activity which triggered the Blue Screen Error and the loop . We recommend that you perform these suggested troubleshooting and see if there are any changes:
Startup Repair.
To access the Startup Repair Screen , turn off the PC 3-4 times (force shutdown) , while on the Blue screen Error . This will route you to the Startup repair screen:
Advanced Boot Options > click Troubleshoot > Advanced options > Command Prompt
and run the following command:
Run SFC Scan:
SFC will scan and run an automatic repair to any corrupted system files that it will detect. We suggest that you perform it twice. To run an SFC scan , follow these steps:
Run Command Prompt as Administrator .
Type sfc /scannow and hit Enter.
Boot Record:
This will fix the corruptions on boot records or boot sequence . To run this command, follow these steps:
Run Command Prompt as Administrator .
Type the following command:
Bootrec /fixMBR
Bootrec /fixBoot
Bootrec /rebuildBCD
Update us on how it goes.
7 people found this reply helpful
Was this reply helpful? Yes No
Sorry this didn't help.
Great! Thanks for your feedback.
How satisfied are you with this reply?
Thanks for your feedback, it helps us improve the site.
Thanks for your feedback.
Many thanks for taking the time to help,sadly after trying your solution things remain the same
Looks like a new hard drive is needed, once again many thanks
1 person found this reply helpful
No problem. If you have any more queries, don't hesitate to create a thread here in the community and we the moderator and the community members will do our best to help you out.
Question Info
- Performance & system failures
- Norsk Bokmål
- Ελληνικά
- Русский
- עברית
- العربية
- ไทย
- 한국어
- 中文(简体)
- 中文(繁體)
- 日本語
IMAGES
VIDEO
COMMENTS
As an illustration, I forced one of my test laptops (a Lenovo ThinkPad X390 Yoga) to blue screen at an administrative command line. There, I entered the string taskkill /im svchost.exe /f.
1) In the menu, click Troubleshoot > Advanced Options > Command Prompt. 2) In the command line, type sfc /scannow and press Enter button. 3) Restart your computer when the process is finished. Fix 3 - Run CHKDSK to Repair Boot Drive. 1) Open Command Prompt using the steps in fix 2, type chkdsk /r c: and press Enter.
Method 1: Using CHKDSK in CMD. In an elevated instance of the command prompt, type the following command and press Enter: chkdsk C: /f /r /x. If you want to scan any other drive, replace 'C' with that drive letter. But if you want to repair system files, 'C' is the default drive for it.
Here's how to run an SFC scan: Press the Windows key and type "cmd.". Right-click Command Prompt and select "Run as Administrator.". Click yes to confirm if prompted. Type "sfc /scannow" into Command Prompt and hit enter to start the scan. 8. Scan your hard drive.
Select Restore Point to fix bug check. To use a Restore Point to fix blue screen problems on Windows 10, use these steps: Click the Advanced Startup option. Quick note: If accessing Advanced ...
Click the Windows logo in the bottom-left corner of the screen. The Start menu will pop up. 5. Open Command Prompt in administrator mode. Type in command prompt to search for Command Prompt, then right-click Command Prompt and click Run as administrator in the drop-down menu. 6.
Under Advanced startup, select Restart now. After your PC restarts to the Choose an option screen, select Troubleshoot > Advanced options > Startup Settings > Restart. After the computer restarts, you'll see a list of options. Press 4 or F4 to start the computer in safe mode.
These errors can be caused by both hardware and software issues. If you added new hardware to your PC before the Blue Screen error, shut down your PC, remove the hardware, and try restarting. If you're having trouble restarting, you can start your PC in safe mode. For more info, see Start your PC in safe mode in Windows.
Here's how to do that: From your desktop, press Windows + X (or right-click the Start menu icon) and choose Device Manager . Find the device that seems to be causing the issue or the one that was ...
Often an SFC scan can help you get rid of blue screen errors. Right click on the 'Start' button and click on 'Command Prompt (Admin)'. In the open command prompt window, type 'sfc /scannow' (without quotes) and press Enter. Windows will scan and fix the any erroneous files in your system.
However you get to the Command Prompt — normally, Safe Mode, or recovery environment — you'll use the command the same way. Just remember that if you start Windows normally, you will need to open the Command Prompt or PowerShell with administrative privileges. To do this, right-click the Start button and select "Command Prompt (Admin)".
Go to Start menu and choose Settings. In the Settings window go to the Update and Security menu and select Windows Update. To install the latest Windows updates click on Check for updates and wait until they are found and installed. Go to Advanced Options and choose the mode of update installation - Automatic.
To troubleshoot blue screens with the Event Viewer on Windows 11, use these steps: Use the "Windows key + R" keyboard shortcut to open the Run command. Type the eventvwr. msc command and click the ...
Windows 10 Blue Screen Fix Command Prompt [Solution]Media Creation Utility: https://www.microsoft.com/en-us/software-download/windows10Tutorial of creating b...
Choose the boot device as a UEFI device if offered, on first screen press Shift + F10 to open a Command Prompt, type the following commands, each followed by Enter key: DISKPART. LIST DISK. SEL DIS # (replace # with the disk # of the Windows disk from list in previous command) CLEAN.
Fix 2: update device drivers. Press Windows X and select Device Manager. Choose a device category and select the drivers. Right-click on the Driver and open Properties. Navigate to the Driver tab and click Update Driver. Update the driver. Restart the PC to check whether the problem is fixed.
Hit the Windows key, type cmd in the search bar, and click Run as administrator. Type the following command then hit Enter: taskkill /IM svchost.exe /f. The BSoD screen should appear. 3. By using Windows PowerShell. Hit the Windows key, type PowerShell in the search bar, and click Run as administrator.
5. Reboot your computer. Close the Registry Editor and restart your computer in order for the changes to take effect. 6. Force a Blue Screen. You can do this by holding down the furthest most right "Control" key then pressing the "Scroll Lock" key twice. Once this is completed, a blue screen should pop up.
SFC will scan and run an automatic repair to any corrupted system files that it will detect. We suggest that you perform it twice. To run an SFC scan, follow these steps: Run Command Prompt as Administrator. Type sfc /scannow and hit Enter.