- Mandalas for adults
- Mandalas for kids
- Adult Coloring Pages
- Coloring Pages for Girls
- Coloring Pages for Boys
- Car Coloring Pages
- Princess Coloring Pages
- Printable Unicorn Coloring Pages
- Printable Farm Coloring Pages
- Horse Coloring Pages
- Christmas Coloring Pages
- Farm Animal Coloring Pages – Free and Printable
- Paper Airplanes
- Dollar Bill Origami
- Napkin folding
- Paper Plate Crafts
- Sign in / Join
- About DIY-Magazine
- Best Paper Airplanes
- Cool Paper Airplanes
- Easy Paper Airplanes
- Paper Airplane Gliders
- Paper Airplanes for Kids

How to Make the Best Paper Airplane Glider – Step by Step
Introduction:
In this post, We’ll show you a very simple way to fold a long-range glider. This paper plane has extremely large wings and a fairly small center body. Thanks to its structure, this paper airplane glides slowly and far through the air. The extra-large winglets give this plane even more stability for a smooth and straight flight.
Make a Triangle at the Left Edge

Place the paper in a landscape format

Fold in crosswise in half.

Unfold the paper. You would then have a nice crease mark in the middle.

Bring the left corner to the right.
Create the Body of the Best Glider

Diagonally fold the top and bottom corner of the left side to the middle.

Bring the left corner to the right,

Fold the paper crosswise in half by folding the bottom edge to the top edge.
Make the Wings and Winglets

Valley fold a big portion of the top layer upwards. This will be one of the wings of this paper glider.

Make another wing by folding a big portion of the bottom layer of the paper to the back.

Unfold the paper airplane, and lay in front of you in portrait position.

The paper plane is almost done. The winglets of the long-distance glider are still missing. Fold outwards each of the wings at around an inch.

If both sides are now bent over, your plane is ready to take off. It is important that the winglets stick out at a 90-degree angle to the wing.
Your paper plane is done!
- Take a pair of scissors and cut two small cuts in the center of each wing, two inches apart. You have now given your glider a pair of oars. If you fold the flaps up, your paper plane will now also fly upwards. If you fold the flaps down, the plane will sink.
- It gets even cooler if you fold one flap up and the other flap down. Your plane then starts spinning in the air and rolls.
- Have fun trying out the tips and tricks and have fun flying. Under the category “paper planes” you will find various kinds of paper planes that you may like.

No posts to display
Flew 10 feet. Thats decent 🙂
mine didnt flew that far, why ??
I had to learn how to make a paper airplane for my highschool science class. This is why I question living lol
That was quick and so simple
How did you know like this? cool
Hard to fold, Good at flying about 20 feet i think, Simple me likey
its flying utulta why
LEAVE A REPLY Cancel reply
Save my name, email, and website in this browser for the next time I comment.
- Privacy Policy
1. Explore wing designs
3. form a ring, 4. test and evaluate, 5. redesign and try again, 6. investigate other variables.
Learning Space
Teachable Moments
Stay Connected

Make a Paper Glider
Airplanes of the future may look very different from those of today. One of the designs NASA has studied is the ring-wing, an aircraft with a circular wing. Build your own paper glider based on NASA's design, and work to improve your model's performance.
› Educators, explore how to turn this into a standards-aligned lesson for students

Piece of paper, 8.5 x 11 inches, OR a copy of the ring-wing glider template – Download PDF
Ruler OR tape measure
(Optional) transparent tape
(Optional) additional types or sizes of paper for experimentation
*Don’t worry if you don’t have all of the materials. Get creative and substitute materials with what you have! It’s all part of the design process.

When you think about airplanes, there’s a good chance you think of a plane with wings extending out on either side of the plane. The wings provide lift that helps the airplane fly. But airplane wings also produce drag, which the airplane has to use energy to overcome. To solve this problem, engineers who design airplanes have come up with different wing designs that aim to increase lift and reduce drag, including "box plans" and "ring wings." Try your hand at making your own ring-wing glider out of paper, and see how it flies!
About the image: This collage shows various NASA airplane designs in flight, including (top left to right) the AD-1 , Helios , X-48B Blended Wing Body , (bottom left to right) Proteus , inflatable wing aircraft , and Prandtl-d .
+ Expand image

Make a diagonal fold in the middle of the paper (along the dashed lines, if you're using the glider template) so that the corners of your paper are offset and make two peaks. Take the folded edge and fold it over half an inch more. On the template, this fold is represented by the dotted line.

Bring the ends of the paper together to make a ring with the folded edge facing the inside of the ring. Tuck one end into the fold of the other to secure your ring wing. You can also use a small piece of tape to make sure the ring doesn't come apart.
Measure and record your glider's diameter, the distance across the circular opening.
Find the "V" between the two peaks formed by the corners of the paper. Grasp the glider at the bottom of the "V" with your pointer and index fingers inside the glider and your thumb on the outside the glider. Extend your arm straight behind you and swing it upward, lightly releasing the glider when your arm is beside your ear. Measure the distance your glider flies.
Repeat this step at least three times, recording the distance of each flight and calculating the average distance.

Create a second glider with a smaller or larger diameter. Fly it at least three times, and calculate the average linear distance it flies.
Graph your data on paper, or using spreadsheet software if you can. Based on your measurements, does it appear that ring diameter influences linear distance flown?
Think about other elements of the design that could be modified, such as the weight or size of the paper or the size and number of folds. Change only one element at a time. Keep track of your changes in an engineering log. Quantify your changes by measuring the performance of your glider after you make changes to it.
Paper Airplanes HQ
How to make paper airplanes, detailed fold and fly instructions for 50 awesome designs.

Over 50 flying paper airplane designs with written and video step-by-step folding instructions. All classes of paper airplanes are represented from darts to gliders to jets to schoolyard contest winners. There are models that look really cool, or fly super far or stay aloft for extend periods of time.

How to fold a cool glider paper plane easily!
Paper models have taken a huge part in everybody’s youth and despite of the fact that you might be not even knowing when you learnt it during your childhood. Glider paper plane have always rooted into our deep memory from my fifth grade. You can learn the science behind paper airplane foldings, flaps and elevators. If you learn almost ten paper airplanes from our LND – Next time when you see someone struggling with paper airplanes you can help them. You can teach them how this aerodynamics in paper plane works. Also check out our paper airplane that flies far and straight for school kids. For now, let’s make our glider paper plane with step by step illustrated instructions for everyone!
Two minutes for Noodles! isn’t it? Three minutes for Paper planes! It’s that simple with liftndrift*
Supplies Required:
- A4 Sheet of Paper or a Foolscap Paper with 70-90 GSM
- Ruler or Flat thick object to flatten the folded edges to make a strong crease.
- Keep your A4 sheet of paper over a flat surface or over a reading table
- Bring the Top left-hand end to the right side plane and fold it as shown in Fig.1 .
- UNFOLD it once done!

- Bring the top right corner to the left side plane and fold it to make a triangle and then UNFOLD it
- Refer Fig.2 for doubts.

- Keep the paper flat on the table
- Follow the dotted line and fold down the top section along the dotted line
- UNFOLD it once done.

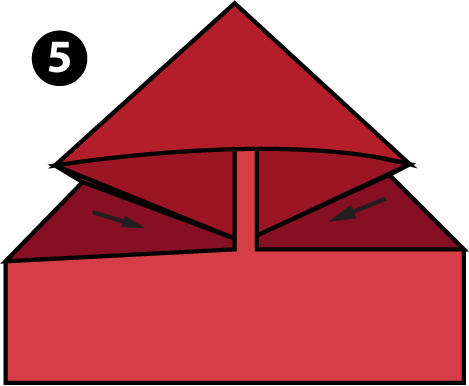
- Push and fold the top right and top left-hand corner edges inside.
- Compare Fig 4 and Fig 5 for your reference

- After pushing the sides inside, You have to flatten front face of the plane
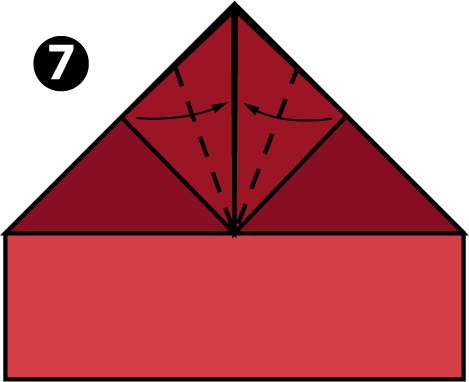
- Pull-up the frontal triangle’s bottom right and bottom left edges along the center line.

- Fold the section again to half – with the center line as the reference.
- Pull down the nose and glue it up as shown in fig.8

- Make the winglets by folding the wing edges about a centimeter (1cm) on both sides downside perpendicularly
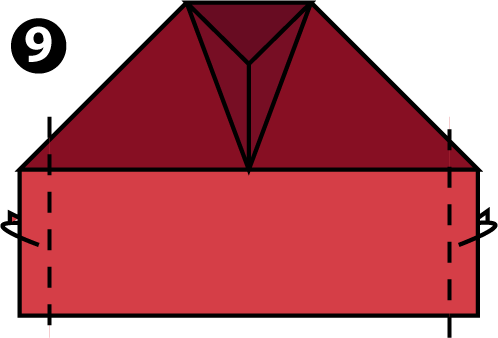
- That’s all about it, You are good to fly Glider paper plane!
- All the best for reaching the sky more and more with Liftndrift!

Glider paper plane flying technique:
- Hold the Plane behind the center of the plane’s gravity center.
- Keep your left foot slightly forward and launch it in 30 – 40 degrees angle, throw it steadily with a medium force. If it fails, tweak the tail wing slightly up and try again.
- Try different angles and forces now! Wow, That’s how one learns properly with more trying and flying. Kudos!
- For More Techniques – Go to Flight Science – Science behind paper airplanes > Flying Techniques. You will find far more than any other tricks available on the internet for How to fly Paper airplanes!
Please leave your Feedbacks / Replies / Queries in the comment section. Good day!
© LND 2020. All contents on this page are illustrated and instructed by liftndrift.com. Except for the permitted contents by the copyright law applicable to you, you may not use or communicate any of the content on this website, including files downloadable from this site, without the permission of [email protected]

Stealth Glider
Lightly throw this paper airplane into the air and watch it glide..

Try throwing it from a balcony or other high location to watch it soar for a long time.
Paper Airplane Airplane Folding Instructions

1. Fold the top right corner to the left side.
Fold the top right corner to the left side.
2. Open the sheet back up and repeat the same step with the left corner.
Open the sheet back up and repeat the same step with the left corner.

3. Open the sheet back up and accordion fold both sides in so it looks like the photo.
Open the sheet back up and accordion fold both sides in so it looks like the photo.

4. Next, fold the right side of the triangle shape to the top point.
Next, fold the right side of the triangle shape to the top point.

5. Repeat with the left side.
Repeat with the left side.

6. Now, fold in the bottom right edge of the diamond shape.
Now, fold in the bottom right edge of the diamond shape.

7. Repeat with the left side.

8. Fold down the top point and tuck in the flaps as shown.
Fold down the top point and tuck in the flaps as shown.

9. Gently fold the plane in half away from you, but don't crease it too hard. We want it to be partly open.
Gently fold the plane in half away from you, but don't crease it too hard. We want it to be partly open.

10. Finally, fold out the ends of each wing as shown.
Finally, fold out the ends of each wing as shown.

The ideal angle between the two wings is around 120 degrees, a wide V shape. This dihedral angle will be more stable.
Video Instructions
Printable Folding Instructions
These beautiful, easy to follow, paper airplane folding instructions can be downloaded and printed as many times as you want. Simply follow the printed instructions and fold along the indicated lines to make a perfect paper airplane, every time.

- Printable Folding Templates
- Downloadable Games & Activities
- Customizable Pilot's License ID Card
- Quickly Access Your Favorite Designs
More Fun Paper Airplanes

Articles and Activities

Please select your preferred language:

How to Make a Paper Glider - Teach Kids About Flight
Posted by Admin / in Physics Experiments
An experiment to teach kids about the physics of flight: Long ago, people saw the birds and wondered what it would be like to fly. It took a long time until inventors like Otto Lilienthal, Wilber Wright, and Orville Wright were able to understand the science of flying. This experiment, helps kids to understand why gliders are able to fly.
Items Needed for Experiment
- Straws (8-10)
EXPERIMENT STEPS
Step 1: Make a triangle shape airplane frame using the straws. Fold each straw end then slide it inside the adjoining straw. If the straws have the flexible ends, either cut them off or slide the adjoining straw all the way through the portion of the straw that allows bending. The only bent joint should be at the three corners of the frame.
Step 2. Lay down a full two-page sheet of newspaper.
Step 3. Wrap the newspaper around both sides of the glider frame. Make the paper frame only wrap the frame once, overlapping only if necessary. This will keep the glider's weight low.
Step 4. Using the tape, secure the newspaper around the frame. Keep the paper tight around the frame. Place enough tape at the edges to keep them from catching the air.
Step 5. Hold the front edge of the paper glider and give it a quick push forward making the paper plane fly.
SCIENCE LEARNED
The paper airplane glider is not a traditional paper airplane. The design is more like a glider. Before the Wright Brothers, the discovery of flight was advanced by the German Engineer, Otto Lilienthal. Lilienthal used a glider design to achieve a flight of over 1000 feet, using a fixed wing glider. This was a first for heavier than air flight. Most of the flying vessels at the time used hot air or types of gases lighter than air for flight. Lilienthal studied the birds, and found that the glider wings would create enough uplift force to keep himself off the ground.
The paper glider uses a straw frame for support around the edges. The edge of the glider helps create the aerofoil needed for uplift. This glider, also has a pointed nose since it is so light. The pointed nose helps the very light glider travel fast enough to create the needed uplift. Once the glider slows down, it does not fly very well.
- About the author
- Back to Experiment
Please select the social network you want to share this page with:
We like you too :)
Thanks for taking time to give us feedback!
- physics experiments
- science experiments for kids
- paper glider experiment
- learn about gliders
- teach kids about flight
- Otto Lilienthal

- previous experiment
- next experiment

Air Powered Car Experiment
in Cool Experiments
Make a car that is powered from compressed air.

Compass Experiment
in Physics Experiments
Learn how to build a simple wet compass and dry compass, then compare the two types.

How to Calculate Buoyancy Force
Experiment to determine the buoyancy forces acting on a floating and submerged object.

How to Make a Balloon Rocket
Use a balloon to propel a rocket across the sky. Teaches kids simple physics concepts.

Soil Erosion Experiment
Experiment to teach kids how soil erosion occurs and how erosion is stopped in real life.
Making a Gliding Paper Airplane

Introduction: Making a Gliding Paper Airplane

Tags: glider, gliding, paper, paper airplane, airplane, slow glider, far, far gliding
Hello and welcome to my first Instructable. I am going to show you how to fold a paper airplane, that I found glid quite well. Making this paper airplane (and testing it out) takes approximately 10 minutes. Here are the materials you will need:
A4-sized paper (office thickness)
Pencil or Pen
Scissor (optional)
You can use the thickness found in office paper, or you can use thicker paper. I found thicker paper makes step 8's 7-centimeter fold invalid, so you will have to experiment there to adjust the center of mass. The measurements given are in centimeters (cm) and inches (in). I apologise that the measurements given in inches are not so round, but I don't have a lot of experience with the imperial measurements.
Step 1: The Slow Glider: Step 1: Fold the Paper Across

Take your A4 piece of paper, and fold it crosswise (along the line in the pictures). Try to be exact on this step. What you see now is the bottom of the plane, and it will be turned around later. The line drawn here, or the fold, is the "line of symmetry", how I later call it.
Step 2: Step 2: Measure and Mark Along That Fold

Measure 8.7 cm. (3.4252 in.) along the fold, and mark with a pencil as shown.
Step 3: Step 3: Fold Corners to That Point

Fold the annotated corners which are farther away to the point you marked in step 2. Not the ones closer to the point as shown. Keep it symmetrical.
Step 4: Step 4: Measure and Mark for the Wings

Measure 4 cm (1.5748 in) from the first fold you made, like described by the picture. Do that for the opposite sides, as you are going to fold along there, and make it parallell please. You can measure for both wings, but it is not necessary.
Step 5: Step 5: Fold Along the Two Points Marked

You marked the two points now, so fold along them. Do this to both sides by folding the whole thing in half (along the line of symmetry), and adjusting the other fold to match with the previous. The line of symmetry you folded in the first step is going to be folded opposite to how I showed it in the first step, because this is the bottom side of the plane.
Step 6: Step 6: Mark and Fold the Stabilisers

Turn everything around, and mark 1 cm (0.393071 in) at the corners. These are going to be for the stabilisers. Fold them up so they will look like in the picture.
Step 7: Step 7: Mark From the Back

Viewing from the top, mark 7 cm (2.75591 in) in the middle from the back of the plane.
Step 8: Step 8: Fold the Front to the Point

Fold the front of the paper airplane back to that 7 cm (or 2.75591 in) point. In general, I though that 7 centimeters is the length you must at least fold, but to make it fly more stable, or in the case yours stalls, fold more material in the front so that less than the space you marked in step 7 (7 cm) to the back are present.
Step 9: Step 9: Fold the Front Together

Fold the front part into 1 cm segments to the front. This step will stabilise the wings through its thickness, and adjust the center of mass forwards. For optimum results, and adjusting the glide slope, (because I don't know which thickness of paper you are using) experiment with the length folded in step 8, where folding for more material will make it more front-heavy.
Step 10: Step 10: Let It Fly!
This is the type of paper airplane you just let go with some speed. If the airplane is going up and down, stalling a little, and you don't like how it looks, you might consider making it more front-heavy, as in step 9, or adjusting your throwing technique; really try to find its gliding speed. Generally, making it front-heavy will make it fly more stable. Mine flew slightly to the left, but you can adjust that be cutting some symmetrical flaps into the wings. Have fun :)
Recommendations

Puzzles and Games Contest

Make it Resilient

Pets and Animals Contest

IMAGES
VIDEO
COMMENTS
Learn how to fold an easy paper airplane that is one of the best gliders in the world!Get my book: https://www.FoldableFlight.com/shopPatreon: https://www.pa...
Unleash your inner aviator with our step-by-step tutorial on crafting a top-notch paper glider. Explore the art of constructing the best glider paper airplan...
You can use another stiff paper material like cardstock as well. 2. Cut out the body of your glider from a piece of cardboard. Use your scissors to cut out the glider body shape you drew in the cardboard. 3. Cut out the wings. Use a pencil or pen to mark two wing shapes in the piece of cardboard.
Fold the wings down by bringing the top edge of the paper to meet the bottom edge. Make sure the wings are symmetrical, and adjust as necessary. Fold the back of the glider up slightly to create the tail wing. Adjust the tail wing to achieve the desired stability during flight.
How to make a paper airplane (A4 Papierflieger falten) - origami dragon paper plane.Fold the best paper planes ️ https://www.youtube.com/c/mahircave⬇️ Pleas...
Here is where the action begins. You will need: 1 Sheet of normal 8.5 by 11 paper. 1 Ruler. Optional: 1 Pair of scissors. Anything to decorate your plane. Step 1: Fold your sheet of paper in half lengthwise and then unfold it. (In 3rd grade we called this a hot dog fold).
Learn how to build a long distance paper glider that will go further than any other airplane you've made. Step 1: Step 1 - Prefolding. Pre-fold along the lines. White is primary side. Step 2: Step 2 - Tip. Fold in two edges, flip and fold tip backward. Step 3: Step 3 - Fuselage. Fold as directed, for any paper size. ...
Step 7: Tricky part; between your two folds should be a bit of a triangle sticking downwards. Fold that triangle piece upwards and over the two corners; down the center. The picture below should show this action mid-fold; IE not a complete fold yet just for the sake of demonstrating. Your's will be all the way folded and not popping up as high ...
Make the Wings and Winglets. Valley fold a big portion of the top layer upwards. This will be one of the wings of this paper glider. Make another wing by folding a big portion of the bottom layer of the paper to the back. Unfold the paper airplane, and lay in front of you in portrait position. The paper plane is almost done.
2. Fold it. Make a diagonal fold in the middle of the paper (along the dashed lines, if you're using the glider template) so that the corners of your paper are offset and make two peaks. Take the folded edge and fold it over half an inch more. On the template, this fold is represented by the dotted line. + Expand image.
Crafting the best paper airplane glider involves mastering folds for optimal flight. Follow our detailed guide to create a glider that soars gracefully. Elev...
Glider Paper Airplanes. These paper airplane glider designs have very large wing areas for maximum lift and long flight times. They are not fast flyers but in light winds they will fly really far and stay in the air a very long time. A light and gentle toss will generally give the best results when you launch your glider.
1) Turn the glider over. 2) Take hold of the edge and fold it inward to create a wing. Crease it. Repeat the step on the other side making sure you fold it the same distance (pictures 2-3) 3) Take the top of your new fold, and fold it over on itself. Gently pull the newly created wings upward so they stand up (pictures 4-8).
How to Make a Paper Glider. To make a paper glider, start with a square piece of paper. Take the 2 opposite corners, make them meet, and fold the paper in half this way so that it looks like a triangle. Next, turn the paper so the triangle points away from you and fold the creased edge up about 1 inch. Then, fold the 2 ends of the paper toward ...
Detailed fold and fly instructions for50 Awesome designs. Over 50 flying paper airplane designs with written and video step-by-step folding instructions. All classes of paper airplanes are represented from darts to gliders to jets to schoolyard contest winners. There are models that look really cool, or fly super far or stay aloft for extend ...
Welcome to our comprehensive DIY Paper Glider Tutorial, where we'll teach you everything you need to know about crafting a remarkable Paper Glider. If you've...
Step 3: Keep the paper flat on the table. Follow the dotted line and fold down the top section along the dotted line. UNFOLD it once done. Step 4: Push and fold the top right and top left-hand corner edges inside. Compare Fig 4 and Fig 5 for your reference. Step 5: After pushing the sides inside, You have to flatten front face of the plane.
Paper Airplane Folding Instructions. 1. Fold the top right corner to the left side. 2. Open the sheet back up and repeat the same step with the left corner. 3. Open the sheet back up and accordion fold both sides in so it looks like the photo. 4. Next, fold the right side of the triangle shape to the top point.
Step 18: Holding Instructions. Do as shown. Make a Simple Paper Glider: Hi!This is my first instructable and i am going to show you how to make a simple paper glider that flies well.Sorry for the images (I did them in paint because I could not find a camera). Thanks to Aaron Hunt (aka. guessware) for letting me us….
Make a Paper Glider Airplane Easily. In this video I'll show you how to make the ultimate paper glider airplane in the best way. Paper plane can be made in v...
Make the paper frame only wrap the frame once, overlapping only if necessary. This will keep the glider's weight low. Step 4. Using the tape, secure the newspaper around the frame. Keep the paper tight around the frame. Place enough tape at the edges to keep them from catching the air. Step 5. Hold the front edge of the paper glider and give it ...
Paper Airplane Glider making video tutorial. It is a cool design paper glider airplane which can fly fast and far. In this video I'm showing how to make the ...
Step 1: The Slow Glider: Step 1: Fold the Paper Across. Take your A4 piece of paper, and fold it crosswise (along the line in the pictures). Try to be exact on this step. What you see now is the bottom of the plane, and it will be turned around later. The line drawn here, or the fold, is the "line of symmetry", how I later call it.