
How to Use Ruler in Microsoft PowerPoint? (A Step-by-Step Guide)
Creating compelling presentations in Microsoft PowerPoint often requires precise measurements and straight lines.
But how can you ensure accuracy when arranging objects and drawing lines? Enter the handy ruler tool! In this step-by-step guide, we’ll walk you through how to use the ruler in PowerPoint and how to get the most out of it.
We’ll look at how to access the ruler, measure objects, draw lines, adjust line thickness and color, and enhance slides with the ruler.
Plus, we’ll provide a few tips to help you get the most out of the ruler! Ready to master the ruler in PowerPoint? Let’s get started!
Table of Contents
Short Answer
Using a ruler in Microsoft PowerPoint is simple.
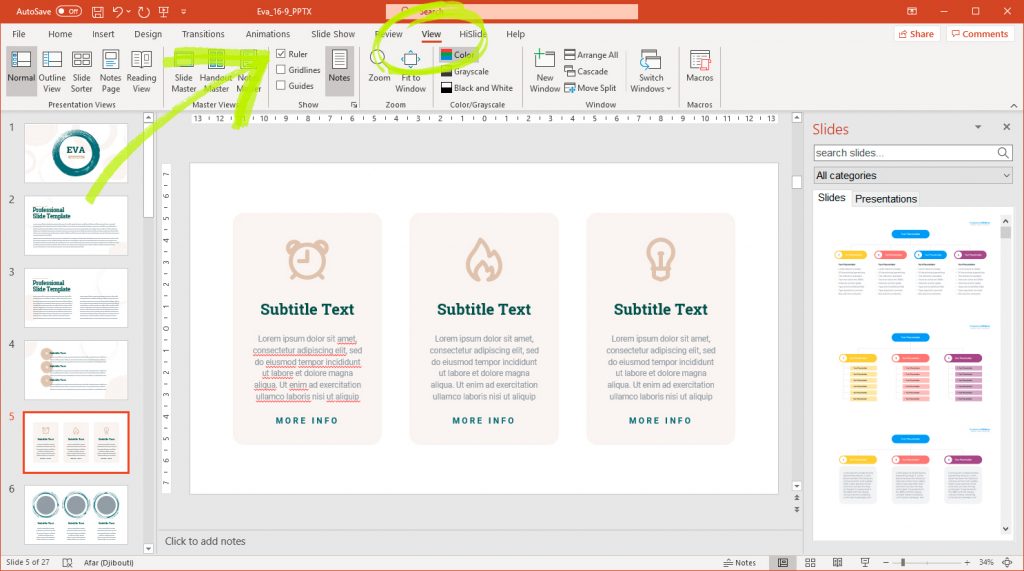
First, go to the “View” tab and click on the “Ruler” button to enable it.
Then, you can click and drag on the ruler to draw a guideline.
This guideline will be used to help you align objects in your presentation.
You can also drag the endpoints of the ruler to adjust the size of the guideline.
What is Microsoft PowerPoint?
Microsoft PowerPoint is a powerful presentation software from the Microsoft Office suite.
It allows users to create visually engaging and interactive slides for presentations.
It is a popular choice for creating slideshows for business meetings, corporate events, and educational purposes.
It has many features that make creating professional-looking slides a breeze, including the ability to add images, videos, and animation.
It also offers various formatting options such as font sizes, colors, and backgrounds.
With Microsoft PowerPoint, users can create impressive slides that will capture their audiences attention and effectively communicate their message.
The ruler in PowerPoint is one of the most useful features for precise alignment of elements on the slides.
It allows users to measure the position of objects accurately and align them to create professional-looking slides.
The ruler can be found in the View menu and easily enabled by selecting Ruler.
The ruler will appear on the left and top of the screen, allowing the user to line up objects with precision.
In addition to aligning elements, the ruler can also be used to draw horizontal and vertical lines in the slides.
To draw a line, select the Line Shape from the Insert tab and click and drag the mouse along the ruler.
The lines can be further adjusted in terms of thickness and color to create a more polished look.
With the help of the ruler, one can create amazing slides with accurate placement of elements.
Overall, Microsoft PowerPoint is a great tool for creating engaging and interactive slides.
With the ruler feature, users can create professional-looking slides with precise alignment of elements.
Knowing how to use the ruler in PowerPoint is an essential skill for all PowerPoint users.
How to Access the Ruler in PowerPoint
Accessing the ruler in Microsoft PowerPoint is easy.
To enable the ruler, simply select View and then Ruler from the top menu.
This will enable the ruler in the left and top of the screen.
The ruler is a useful tool that allows users to measure the position of objects precisely and to align them.
The ruler can also be used to draw horizontal and vertical lines in the slides.
The lines can be adjusted further in terms of thickness and color.
This makes it easy to create professional-looking slides with accurate placement of elements.
Using the ruler can be especially helpful when creating diagrams or other illustrations.
It can be used to create straight lines, curves, or angles for precise positioning of shapes or objects.
The ruler also allows users to easily adjust the size of shapes, text boxes, and other objects.
This makes it easy to create a cohesive and aesthetically pleasing layout.
Overall, the ruler in Microsoft PowerPoint is an incredibly useful tool for creating professional-looking slides.
It makes it easy to accurately measure and align objects, as well as create lines and shapes.
With the help of the ruler, one can create beautiful slides with accurate placement of elements.
Measuring Objects with the Ruler
Using a ruler in Microsoft PowerPoint is an easy and efficient way to ensure that objects on your slides are placed accurately and precisely.
To access the ruler, simply select View from the top menu bar and then Ruler.
This will enable the ruler on the left and top of the screen.
With the ruler enabled, you can measure the position of objects precisely.
You can also use the ruler to draw horizontal and vertical lines in the slides.
The lines can be further adjusted in terms of thickness and color.
Using the ruler to measure objects is especially useful when creating presentations with lots of text and images.
It can help you make sure that all of your elements are aligned properly and have the same size and spacing.
For example, if you are creating an infographic-style presentation, with lots of text, images, and diagrams, you can use the ruler to make sure that all of your elements are perfectly aligned.
This will make your presentation look professional and polished.
In addition to measuring and aligning objects, the ruler can also be used to draw straight lines in your slides.
This is especially helpful when you need to draw a grid or chart.
To draw a line, simply select the Line Shape from the Insert tab and click and drag the mouse along the ruler.
Once youve finished drawing your lines, you can then use the ruler to measure and align the elements on your grid or chart.
Using the ruler in Microsoft PowerPoint is a great way to ensure that all of your elements are placed accurately and precisely.
With the help of the ruler, you can create professional-looking slides with accurate placement of elements.
So dont forget to use the ruler when creating your slides it will make all the difference!
Drawing Lines with the Ruler
Using the ruler in Microsoft PowerPoint is a powerful tool for creating precise and professional-looking slides.
By enabling the ruler from the top menu (View > Ruler), you can access the ruler at the top and left of the screen.
With the help of the ruler, you can measure the exact position of elements on the slide, as well as draw horizontal and vertical lines.
You can then adjust the line in terms of thickness and color.
This is a great way to create neat and organized slides, as well as to create interesting visual elements.
By playing around with the ruler, you can create stunning visuals that will make your slides stand out.
Adjusting Line Thickness and Color
When it comes to creating professional-looking slides, precise alignment of elements is key.
That’s why Microsoft PowerPoint offers users the option to use a ruler in order to measure and align objects precisely.
With the help of the ruler, you can also draw horizontal and vertical lines which can be adjusted in terms of thickness and color.
To adjust the thickness of the lines, select the Line Shape from the Insert tab and click and drag the mouse along the ruler.
Once you have the line in the desired position, you can click on the Format tab at the top of the screen.
Here, you can select the Line Thickness drop-down menu and choose the desired thickness for the line.
You can also choose the Color drop-down menu to choose the desired color for the line.
Once you have adjusted the thickness and color of the line, you can click the Apply button at the bottom of the screen to apply the changes.
You can also use the ruler to measure the position of objects precisely and to align them.
Enhancing Slides with the Ruler
When using Microsoft PowerPoint, the ruler is an incredibly useful tool for creating professional-looking slides that are accurately aligned.
With the help of the ruler, you can measure the position of objects precisely and align them to create a visually appealing and organized presentation.
To use the ruler, select View > Ruler from the top menu.
It is important to note that the ruler will only be visible when the selection tool is active.
Using the ruler for precise alignment, you can create well-organized presentations with accurate placement of elements.
For example, you can use the ruler to align text boxes, images, and other objects on the slides.
You can also draw horizontal and vertical lines to divide sections of the slide and draw attention to certain elements.
Overall, the ruler is a great tool for creating professional-looking slides with accurate alignment.
With the help of the ruler, you can ensure that your presentation has a polished look that will impress your audience.
Tips for Working with the Ruler
Working with the ruler in Microsoft PowerPoint can be a great way to create professional-looking slides with precise alignment of elements. Here are some tips for using the ruler to get the most out of your presentations:
– Make sure to select View > Ruler from the top menu to enable the ruler in the left and top of the screen. This will allow you to measure the position of objects precisely and to align them.
– To draw a line, select the Line Shape from the Insert tab and click and drag the mouse along the ruler. This will give you a straight line that can be adjusted further in terms of thickness and color.
– When youre finished drawing your line, use the ruler to adjust the length and angle of the line. This will help you create a professional-looking slide with accurate placement of elements.
– If you need to measure the distance between two elements, you can use the ruler to get an exact measurement. Simply place the ruler along the two elements and youll get an accurate measurement.
– If you need to draw a curved line, you can use the ruler to draw a smooth curve. Simply click and drag the mouse along the ruler as you draw the line, and the ruler will help you create a smooth curve every time.
– Finally, dont forget to use the ruler to draw vertical and horizontal lines. This will help you create a professional-looking presentation with perfectly aligned elements.
By following these tips, youll be able to use the ruler in Microsoft PowerPoint to its fullest potential, creating engaging and professional-looking presentations.
Final Thoughts
Using the ruler in Microsoft PowerPoint is a great way to create professional-looking slides with accurate placement of elements.
Whether you are measuring objects, drawing lines, or adjusting line thickness and color, the ruler can help you create aesthetically pleasing slides.
With some practice and a few helpful tips, you can master the ruler and produce remarkable presentations.
So what are you waiting for? Get started with the ruler in PowerPoint today!
James Wilson
James Wilson has extensive knowledge in the information technology industry.His second love, besides dealing with computers, is smart home technology. He is continually updating information to better comprehend this problem and has a deep understanding of the apartment’s support system.
Recent Posts
Is Airtable a Public Company? Unveiling the Truth
No, Airtable is not a public company. As of now, Airtable is a private company that has raised funds from various investors but has not gone through an initial public offering (IPO) to be listed on...
How to Make Money with Airtable: Top Strategies and Success Stories
To make money with Airtable, you can offer consulting services to businesses looking to optimize their workflows through the platform. You can also create and sell templates or automation scripts...

- PowerPoint Tips
- Office Tips
- Privacy Policy
- Submit Guest Post
How to Show or Hide Ruler in PowerPoint
If you want the content to line up properly, then ruler is an important tool in PowerPoint. By default, it is turned off when you first open PPT presentation. So how could we turn the ruler on or hide it when not needed? In this post, I will share some simple methods.
Method 1: View Tab in the Ribbon
1. Go to the View tab, find Show group and check the box of Ruler .

2. Now the ruler has been shown in the slide as below.

3. If you want to hide the ruler, just uncheck the bod of Ruler.
Method 2: Right-Click the Slide
1. Right-click the blank space of slide, click Ruler in the pop-up window.

3. If you want to hide the ruler, just right-click the blank space of slide, and click Ruler in the pop-up window again.
Method 3: Show or Hide Vertical Ruler
1. You might find there is no vertical ruler in the slide.

2. First go to File tab and click it.

3. Click Options in the left pane.

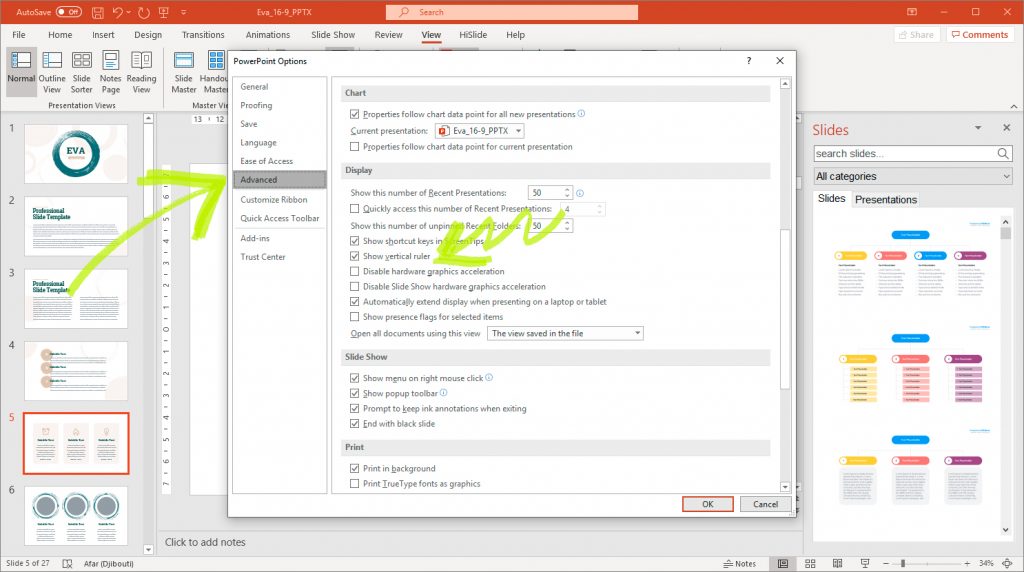
4. The PowerPoint Options dialog box will display, go to Advanced tab, find Display group and check the box of Show vertical ruler. Do not forget to click OK to save the settings.

5. Repeat those steps in Method 1 or Method 2, then the vertical ruler has been shown in the slide as below.

6. If you want to hide the vertical ruler, just go back to PowerPoint Options dialog box and uncheck the box of Show vertical ruler.
Leave a Reply Cancel reply
Your email address will not be published. Required fields are marked *
Save my name, email, and website in this browser for the next time I comment.
Copyright © 2019 My Microsoft Office Tips All Rights Reserved

Mastering Measurements: How to Use the Ruler Feature in PowerPoint
Measuring objects in PowerPoint can be tricky if you don’t know the ropes. But have no fear, mastering the ruler feature is easier than you think. With a few clicks, you can use the ruler to make sure everything on your slide is aligned just the way you want it. Let’s dive into how you can use the ruler feature in PowerPoint to measure and align objects with precision.
Step by Step Tutorial: Using the Ruler Feature in PowerPoint
Before getting into the nitty-gritty, it’s important to understand how the ruler feature in PowerPoint can help you. It’s a tool that allows for precise measurements and alignments of objects on your slides. Whether you’re creating a professional presentation or a personal project, using the ruler ensures that your work looks clean and organized.
Step 1: Open PowerPoint and go to the View tab
Start by opening your PowerPoint presentation and navigating to the View tab at the top of the screen. This tab contains various tools that can help you adjust the appearance of your slides, including the ruler feature.
Step 2: Check the Ruler box
In the Show group, you’ll see a checkbox labeled ‘Ruler’. Click on it to enable the ruler. Once enabled, a horizontal and vertical ruler will appear on the edges of your slide. These can be used to measure and align objects.
Step 3: Use the ruler to align objects
Click and drag objects on your slide and use the ruler as a guide to align them with precision. The ruler is marked with units that help you place objects at exact points on your slide. This is especially helpful when you want to ensure equal spacing or align multiple objects in a straight line.
After completing these steps, you’ll have a slide with perfectly aligned objects, giving your presentation a polished and professional look.
Tips for Mastering Measurements in PowerPoint
- Always check that the ruler units are set to your preference (inches, centimeters, etc.) by right-clicking on the ruler itself.
- Use the ‘Grid and Guides’ feature in conjunction with the ruler for even more precise alignment.
- If you need to measure diagonally, rotate the ruler by dragging one of its ends.
- For more advanced measurements, consider using the ‘Drawing Tools’ which offers additional features like the ‘Size’ panel.
- Remember that holding down the ‘Shift’ key while dragging objects can help keep them aligned horizontally or vertically.
Frequently Asked Questions
How do i change the units on the ruler.
Right-click on the ruler and choose your preferred units from the drop-down menu.
Can I use the ruler to measure angles?
The ruler itself doesn’t measure angles, but you can use the ‘Rotate’ feature in conjunction with the ruler for angular measurements.
Is the ruler visible in presentation mode?
No, the ruler is only visible in the editing mode to help you align objects during the design process.
Can I move the ruler?
Yes, you can click and drag the ruler to reposition it on the slide.
What if I can’t see the ruler option?
Make sure you are in the ‘Normal’ view mode. The ruler won’t be available in other view modes like ‘Slide Sorter’ or ‘Reading View’.
- Open PowerPoint and go to the View tab
- Check the Ruler box
- Use the ruler to align objects
Mastering the ruler feature in PowerPoint is all about getting the little details right. It’s a powerful tool that can take your presentations from good to great by ensuring that every element on your slide is precisely where it needs to be. Once you get the hang of it, you’ll wonder how you ever managed without it. So take the time to practice using the ruler; play around with alignments, spacings, and measurements until it becomes second nature. And remember, great presentations are not just about the content; they’re also about presenting that content in a visually appealing way. The ruler feature in PowerPoint is your secret weapon to achieving that professional, polished look that will impress any audience. Happy measuring!

Matt Jacobs has been working as an IT consultant for small businesses since receiving his Master’s degree in 2003. While he still does some consulting work, his primary focus now is on creating technology support content for SupportYourTech.com.
His work can be found on many websites and focuses on topics such as Microsoft Office, Apple devices, Android devices, Photoshop, and more.
Share this:
- Click to share on Twitter (Opens in new window)
- Click to share on Facebook (Opens in new window)
Related Posts
- How to Get Ruler on Word 2013: A Step-by-Step Guide
- How to Show Vertical Ruler in Google Docs
- How to Show Ruler in Excel 2016: A Step-by-Step Guide
- How to Rotate a Powerpoint Slide Presentation
- How to Show the Margin Ruler in Word 2016: A Step-by-Step Guide
- Adobe Photoshop: How to Change Ruler Units to Pixels from Inches
- How to Display Ruler in Word Office 365 Guide
- How to Download a Google Slides Presentation as a Powerpoint File
- How to End Powerpoint on Last Slide in Powerpoint 2010: A Step-by-Step Guide
- How to Delete a Slide in Powerpoint 2010: Step-by-Step Guide
- How to Hide a Slide in Powerpoint 2010: A Step-by-Step Guide
- How to Exit Slide Master View in Powerpoint 2010: A Step-by-Step Guide
- How to Change Slide Size in Powerpoint 2016
- Can You Save a Powerpoint as a Video in Powerpoint 2013? Find Out Here!
- How to Remove Slide Numbers in Powerpoint 2019: Easy Steps
- Determining the Size of a PowerPoint Slide in Pixels: A Guide
- Keeping Track of Word Counts in PowerPoint: Tips and Tricks
- How to Loop a Powerpoint Office 365 Slideshow
- How to Mirror Image in PPT Files (An Easy 6 Step Guide)
- How to Add a New Slide in Google Slides: A Step-by-Step Guide
Get Our Free Newsletter
How-to guides and tech deals
You may opt out at any time. Read our Privacy Policy

Powerpoint Assist
Tips for Powerpoint by Regina Griffin
How To Use Ruler In PowerPoint
Are you looking to take your PowerPoint presentations to the next level? One simple but often overlooked tool that can greatly enhance your design skills is the ruler.
In this tutorial by Regina Griffin, a teacher from Oregon, US, we will explore why using a ruler in PowerPoint is beneficial.
From helping with alignment and ensuring consistency to aiding in design, the ruler can be a game-changer. We will also cover how to show and use the ruler in PowerPoint, along with some tips and tricks for maximizing its potential.
Let’s dive in and elevate your PowerPoint game!
Key Takeaways:
- Use the ruler in PowerPoint to ensure alignment, consistency, and aid in design.
- Show the ruler by going to the “View” tab and clicking on “Ruler” under the “Show” section.
- Adjust ruler units, move guides, and utilize the ruler to align, size, and create grids for objects in PowerPoint.
Why Use Ruler in PowerPoint?
Utilizing a ruler in PowerPoint serves crucial purposes in enhancing your presentations. From the precise alignment of objects to ensuring consistent sizing and layout, the ruler feature gives you the power you to create professional and visually appealing slides.
The ruler tool in PowerPoint aids in maintaining symmetry across your slides, allowing you to position elements symmetrically and achieve a cohesive design. By utilizing the ruler to guide your placement of objects, you can easily create a visually harmonious composition that captivates your audience. This tool also helps in achieving uniform spacing between elements, ensuring that your design looks polished and well-organized. Consistency in design elements such as margins, text alignment, and object placement is key to creating a polished and professional presentation.
Helps with Alignment
The ruler in PowerPoint is a valuable tool that aids in the precise alignment of objects on your slides, offering both vertical and horizontal guides to ensure elements are positioned accurately.
One of the main advantages of using the ruler is the flexibility it provides in adjusting the layout of your presentation. By dragging the ruler across the slide, users can easily align objects with precision, creating a polished and professional look. The vertical ruler helps maintain consistency in the spacing and positioning of elements from top to bottom, while the horizontal ruler ensures alignment from side to side. When used effectively, these rulers significantly enhance the overall visual appeal of the presentation, making it more engaging and aesthetically pleasing.
Ensures Consistency
Consistency in PowerPoint presentations is crucial, and the ruler feature can help maintain uniformity by enabling users to align and measure objects accurately throughout the slides.
By utilizing the ruler tool in PowerPoint, users can ensure that elements such as text boxes, images, and shapes are positioned consistently across all slides. This feature acts as a visual guide, helping with the creation of a polished and professional-looking presentation. To maintain a cohesive visual style, it’s essential to pay attention to the gridlines and snap-to-grid options provided by the ruler, which aid in precise alignment. The ruler allows users to easily adjust margins and spacing, resulting in a visually appealing layout.
Aids in Design
Designing impactful PowerPoint presentations requires attention to detail, and the ruler function assists in achieving a professional look by facilitating precise alignment of objects and elements.
When working on a presentation, having a clear visual hierarchy and balanced composition is key to engaging your audience effectively. The ruler tool acts as a guiding system that helps maintain consistency in spacing, alignment, and distribution on slides. By utilizing the ruler feature, presenters can ensure that headings, text boxes, graphs, and images are harmoniously arranged, following design principles like proximity, alignment, and contrast.
How to Show Ruler in PowerPoint?
Displaying the ruler in PowerPoint is a straightforward process that can be accessed through the View tab in the PowerPoint menu. Simply navigate to the Preferences or View options and select the Ruler checkbox within the Show group.
- To access the View tab, open your PowerPoint presentation.
- Look at the top of the screen for the Ribbon toolbar and locate the View tab.
- Click on the View tab to reveal a drop-down menu with various options.
- Within the View tab, find the Show group containing different display options.
- Tick the checkbox next to Ruler to enable the ruler to display in your PowerPoint workspace.
How to Use Ruler in PowerPoint?
Utilizing the ruler in PowerPoint goes beyond mere display; it offers functionality to adjust units, measure and align objects accurately, size elements proportionally, and even create grids for structured layouts.
Adjusting ruler units in PowerPoint can be tailored to suit your specific needs. By navigating to the ‘View’ tab and selecting ‘Ruler’, you can change the measurement scale to inches, centimeters, or pixels. This flexibility ensures that you can work in the most comfortable and precise units for your project.
Regarding measuring objects, the ruler enables you to accurately gauge the size of images, shapes, and text boxes. Simply drag the ruler across the object to get an instant measurement, allowing for precise placement and alignment within your presentation.
Aligning elements is made effortless with the ruler’s assistance. You can easily snap objects into place along the ruler guides, ensuring a clean and professional look to your slides.
Adjusting Ruler Units
Customizing ruler units in PowerPoint allows users to work in their preferred measurement system, be it inches or centimeters, ensuring convenience and accuracy in sizing and aligning objects.
Adjusting ruler units in PowerPoint is a simple process that can greatly enhance the precision of your presentations. To switch between inches and centimeters, start by clicking on the ‘File’ tab at the top left corner of the application. Next, select ‘Options’ and then navigate to the ‘Advanced’ tab. Within the ‘Editing options’ section, look for the ‘Display’ category and you will find the ‘Ruler units’ dropdown menu.
Once in the ‘Ruler units’ menu, you can effortlessly choose your preferred unit system by selecting either inches or centimeters. This selection will govern how rulers and measurement units are displayed throughout your PowerPoint slides, making it easier for you to create and align objects with accuracy.
Moving Ruler Guides
Ruler guides can be easily repositioned in PowerPoint to assist in aligning objects accurately, providing visual cues for spacing, alignment, and size management within the slides.
By utilizing these ruler guides, users can ensure that objects are evenly spaced apart, creating a polished and professional look to their presentations. These guides can be dragged and dropped to any desired location on the slide, allowing for precise adjustments to be made effortlessly. Adjusting the size of objects becomes more streamlined with the help of these guides, ensuring a cohesive and visually appealing layout. Whether it’s aligning text boxes, images, or shapes, the ruler guides serve as a handy tool for maintaining consistency and order in PowerPoint presentations.
Using Ruler to Align Objects
Aligning objects in PowerPoint becomes seamless with the ruler feature , as it provides visual guides and markers to assist users in positioning elements precisely and maintaining a structured layout throughout the presentation.
When utilizing the ruler, users can easily align text boxes, images, shapes, and other elements with precision. This feature ensures that objects are evenly spaced and perfectly aligned horizontally and vertically, contributing to a professional-looking design. By offering a grid-like system, the ruler encourages consistent positioning, creating a visually appealing composition. This tool is essential for establishing a clear visual hierarchy, allowing presenters to emphasize key points effectively and keep the audience engaged. The ruler’s flexibility enables users to adapt layouts swiftly and experiment with different designs until achieving the desired aesthetic balance.
Using Ruler to Size Objects
Sizing objects accurately is essential for a visually appealing PowerPoint presentation, and the ruler feature assists users in proportionally sizing elements to maintain consistency and balance in their slide designs.
By utilizing the ruler tool in PowerPoint, users can ensure that different elements on their slides are sized appropriately, creating a harmonious overall look. This tool allows individuals to precisely adjust the dimensions of text boxes, shapes, and images, making it easier to align and arrange content with accuracy. Whether resizing a logo, adjusting text placement, or aligning shapes, the ruler feature acts as a guiding tool, promoting visual cohesion and aesthetics in the presentation.
Using Ruler to Create Grids
Grid-based layouts can enhance the visual organization of PowerPoint slides, and the ruler feature enables users to create grids for aligning objects, maintaining spatial consistency, and achieving a structured design aesthetic.
Having a grid system in place not only assists in aligning elements precisely but also aids in keeping design elements parallel, making the presentation visually appealing. By utilizing the ruler tool, presenters can ensure that text boxes, images, and shapes are evenly spaced and aligned, contributing to a harmonious overall look.
Employing grids helps guide the eye smoothly across the slide, preventing clutter and confusion among viewers. This method creates a sense of order and professionalism, imperative for conveying information effectively and leaving a lasting impact.
Tips and Tricks for Using Ruler in PowerPoint
Maximize your use of the ruler feature in PowerPoint with these advanced tips and tricks, including leveraging the Snap to Grid feature, creating custom templates with precise alignments, and combining ruler functions with alignment tools for seamless design workflows.
When working on your PowerPoint presentations, the ruler feature can be a powerful tool to ensure consistency and alignment within your slides. Utilizing the Snap to Grid feature allows you to easily snap objects and text boxes to specific points on the grid, maintaining a clean and organized layout.
Creating custom templates tailored to your design needs is essential for a professional and cohesive look. Utilize the ruler function to align elements precisely and maintain a consistent design throughout your presentation.
Integrating ruler functions with alignment tools such as guides and grids can significantly enhance your design precision and efficiency. Use the ruler to measure distances accurately and align objects with precision, ultimately improving the overall visual appeal of your slides.
Utilize Snap to Grid Feature
The Snap to Grid feature in PowerPoint enhances precision by aligning objects automatically to the nearest gridline, ensuring consistent spacing and layout alignment with ease.
By enabling Snap to Grid along with the ruler, users can swiftly position shapes, images, and text boxes accurately without the need for manual adjustments. This not only saves time but also results in a more polished and professional-looking presentation. Efficient layout design becomes effortless as elements snap into place neatly, providing a visually appealing outcome. The feature significantly minimizes the chances of objects being misaligned or poorly spaced, enhancing the overall aesthetic and cohesiveness of the slides.
Use Ruler to Create Custom Templates
Leveraging the ruler for creating custom templates in PowerPoint allows users to establish precise alignments, spacing, and object placement, ensuring a cohesive visual style across multiple slides and presentations.
By utilizing the ruler feature in PowerPoint, users can easily set consistent margins and ensure that all elements within the template are correctly aligned. This tool enables individuals to maintain a professional and polished look throughout each slide, providing a unified design that enhances the overall presentation aesthetic. With the help of the ruler, users can achieve symmetry in text, images, and shapes, leading to a harmonious layout that captivates the audience’s attention and conveys information effectively.
Combine Ruler with Alignment Tools
Pairing the ruler feature with alignment tools in PowerPoint enhances precision and efficiency in object positioning, allowing users to create visually appealing presentations with accurate alignments and consistent spacing.
By combining these two powerful features, users can easily align objects to specific measurement points on the slide, ensuring a professional and polished look. The ruler provides a visual guide for setting precise dimensions, while the alignment tools enable users to quickly snap objects into place along a grid or other objects.
This synergy not only saves time but also guarantees a cohesive design across all slides. The ability to fine-tune alignments and spacing with these combined tools results in a cleaner and more visually impactful presentation overall.
The ruler feature in Microsoft PowerPoint serves as a versatile tool that enhances the design precision and visual appeal of presentations, offering users the capability to align objects, size elements, and create structured layouts with ease.
The ruler feature acts as a guiding companion for presenters, helping them maintain a consistent spatial relationship between elements. By utilizing the ruler guides, presenters can ensure that text boxes, images, and shapes are intuitively placed within the slide, improving overall layout consistency . This function is particularly crucial in ensuring that the overall aesthetic of the presentation is visually appealing and cohesive, drawing the audience’s attention without distractions.
Frequently Asked Questions
How do i access the ruler in powerpoint.
To access the ruler in PowerPoint, go to the “View” tab and check the box next to “Ruler” under the “Show” section.
Can I change the units of measurement on the ruler?
Yes, you can change the units of measurement on the ruler by right-clicking on the ruler and selecting your preferred unit of measurement from the drop-down menu.
How do I add and adjust guides using the ruler?
To add a guide, click on the ruler and drag it onto your slide. To adjust the position of a guide, click on it and drag it to the desired location.
Can I hide the ruler in PowerPoint?
Yes, you can hide the ruler in PowerPoint by going to the “View” tab and unchecking the box next to “Ruler” under the “Show” section.
How can I use the ruler to align objects on my slide?
The ruler can be a helpful tool for aligning objects on your slide. You can use the guides on the ruler to line up objects horizontally or vertically, ensuring a professional and organized look to your presentation.
Is there a shortcut for accessing the ruler in PowerPoint?
Yes, you can quickly access the ruler by pressing the “Ctrl+R” keys on your keyboard.
Similar Posts
How to create a jeopardy game in powerpoint.
Are you looking to spice up your presentations or engage your students in a fun and interactive way? Utilize PowerPoint to create a Jeopardy game! In this tutorial by Regina Griffin, a teacher from Oregon, you will learn the basic functions of PowerPoint, why it is the perfect tool for creating a Jeopardy game, and…
How To Play Slides In PowerPoint Without Clicking
Do you want to take your PowerPoint presentations to the next level? Learning how to Play Slides In PowerPoint Without Clicking can save you time, improve the flow of your presentation, and allow you to present hands-free. In this tutorial by Regina Griffin, a teacher in Oregon, US, we will show you how to set…
How To Print Notes Pages Without Slides In PowerPoint
Looking to print note pages without slides in your PowerPoint presentation? In this step-by-step guide, teacher Regina Griffin from Oregon, US, will walk you through the process. Learn how to open your presentation, access the file menu, select the notes pages option, customize the layout, and troubleshoot common issues. Explore useful tips and tricks to…
How To Open VBA In PowerPoint
Have you ever wondered what VBA is and how you can use it in PowerPoint? In this tutorial by Regina Griffin, a teacher from Oregon, US, we will explore the basics of VBA and why it is useful in PowerPoint presentations. From opening VBA in PowerPoint to creating basic commands and utilizing tips and tricks,…
How To Add Text Under A Picture In PowerPoint
Adding text under a picture in PowerPoint can enhance your presentations and make your visuals more informative and engaging. Follow this step-by-step guide by Regina Griffin, a teacher from Oregon, US, to learn the simple process of adding text under a picture in PowerPoint. Each step, from inserting the picture to finalizing the text, is…
How To Embed A Video In PowerPoint Without Internet
In today’s digital age, incorporating multimedia elements like videos can significantly enhance PowerPoint presentations. This not only makes presentations more engaging but also helps in conveying messages effectively. In this tutorial by Regina Griffin, a teacher from Oregon, US, we will explore how To embed a video in PowerPoint without an internet connection and follow…
- Customer Help
- X (Twitter)
How to show guides & ruler in PowerPoint?
When designing a presentation, it’s essential to make sure that everything is pleasing to the viewer. For this reason, you might want to use guides to help you determine where you should be placing elements. To help you do use guides, let’s look at how you can find and apply these elements in PowerPoint.
Displaying the ruler
When you are designing a slideshow, you will often have two rulers to use to help you place elements. One ruler will be along the top of the screen, while the other will be down the side.

To make sure that the PowerPoint ruler is displayed, you will need to navigate to the View tab. Once there, you should see the control of the ruler. To show the tool, make sure that this checkbox has been selected. If you want to turn it off, you can untick the box.
In some cases, you might only want to use the horizontal ruler and get rid of the vertical one. To do this, click on the File button in the top-right section of the screen. Then, move to the Options and click on the Advanced section. This section will bring up many ways to customize the PowerPoint. Move to the Display section. There you will find an option labeled Show vertical ruler . Clicking this checkbox will disable this ruler.
Displaying the guides
For more precise positioning, you might want to turn on the guides. To do so, you will have to use the right-click option. By doing this, you will bring up a menu option. From this list, make sure to select the Grid and Guides option.

The type of PowerPoint grid that you choose to apply will depend on your needs. For example, you might want to use either a horizontal or vertical guide. You can easily select which guide by clicking on one of these options.
However, there are some cases where you might need to apply more detailed guide options. For example, you might want to use the PowerPoint snap to grid option. This choice will allow you to position things more precisely. Once selected, your choice will occur automatically, even if the grid isn’t visible. To do this, right-click and move to the Grids and Guides option. Instead of clicking on the arrow, select the button. When you’ve done this, you will see a dialog box presenting more advanced options. At the top, you will see an option labeled Snap objects to grid . Make sure that this box has been checked.

When you are designing a presentation, everything must look as good as possible. Often, this means making sure that all the elements have been aligned correctly. There are multiple options that PowerPoint provides to make it easier for you to do this. We discussed the two most popular methods, rulers and guides. So, the next time you are creating a presentation, you can use these options to make sure that everything is in the right place.
You must be logged in to post a comment.
- Business articles (22)
- Google Slides (57)
- Keynote (27)
- PowerPoint (83)
- Support (2)
How to Display Ruler in PowerPoint

If you want to create professional and polished PowerPoint presentations, it’s important to utilize all of the features available to you. One such feature that can be incredibly helpful for aligning objects and creating consistent layouts is the ruler. In this article, we’ll explore everything you need to know about displaying and customizing the ruler in PowerPoint.
Table of Contents
Why Displaying a Ruler in PowerPoint is Important
When designing a PowerPoint presentation, you want to make sure that each slide is visually balanced and aesthetically appealing. Utilizing a ruler can help you achieve this goal by allowing you to easily align objects, text boxes, and images. The ruler also provides measurements for your design elements, ensuring that they are uniform and consistent throughout your presentation.
In addition to helping with alignment and consistency, displaying a ruler in PowerPoint can also assist with precision. By using the ruler to measure the size and placement of your design elements, you can ensure that they are exactly where you want them to be. This can be especially helpful when creating charts or graphs, where accuracy is key.
Another benefit of using a ruler in PowerPoint is that it can save you time. Instead of eyeballing the placement of objects and text boxes, you can quickly and easily snap them into place using the ruler. This can help you work more efficiently and effectively, allowing you to focus on other aspects of your presentation.
The Step-By-Step Guide to Displaying a Ruler in PowerPoint
Displaying the ruler in PowerPoint is a simple process that only takes a few clicks. Here’s what you need to do:
- Open PowerPoint and navigate to the View tab
- Select the Ruler checkbox in the Show group
Once you’ve completed these steps, you should see the ruler appear at the top and left of your slide.
Using the ruler in PowerPoint can be incredibly helpful when it comes to aligning objects and text on your slides. You can use the ruler to measure the distance between objects, as well as to ensure that objects are evenly spaced.
It’s important to note that the ruler may not be visible in all views. For example, if you’re in the Slide Sorter view, you won’t be able to see the ruler. However, you can easily switch to the Normal view to access the ruler.
Different Ways to Display a Ruler in PowerPoint
While the above steps are the most common way to display the ruler in PowerPoint, there are some other options available to you. For example, you can choose to display only the horizontal or vertical ruler if you prefer. However, PowerPoint does not allow you to drag the ruler to change its orientation.
Another way to display a ruler in PowerPoint is by using the Gridlines feature. This feature allows you to display a grid of horizontal and vertical lines that can help you align objects on your slide. To turn on the Gridlines, go to the View tab, click on the Gridlines checkbox, and select the type of grid you want to display.
Finally, if you want to customize the ruler to your specific needs, you can do so by going to the File tab, selecting Options, and then clicking on Advanced. From there, you can adjust the units of measurement, the ruler origin, and the ruler increments to fit your preferences.
How to Adjust the Ruler Settings in PowerPoint
Customizing the ruler to fit your specific needs is also possible in PowerPoint. You can change the units of measurement (inches, centimeters, or points), adjust the starting point of the ruler. To access these settings, right-click on the ruler and select the desired option.
Additionally, you can also show or hide the ruler in PowerPoint. To do this, go to the “View” tab and check or uncheck the “Ruler” box in the “Show” section. This can be helpful if you need more space on your slide or if you find the ruler distracting.
Tips for Using the Ruler Effectively in PowerPoint Presentations
While using a ruler in PowerPoint can be incredibly helpful, it’s important to use it effectively to get the most out of the feature. Here are a few tips to keep in mind:
- Make sure to snap objects to the ruler to ensure perfect alignment
- Use the ruler to evenly space out design elements on your slide
- Consider using the ruler in conjunction with PowerPoint’s gridlines for added precision
Another useful tip for using the ruler in PowerPoint is to adjust the ruler’s measurement units to match your design needs. By default, the ruler is set to measure in inches, but you can change it to centimeters or pixels depending on your preference.
Additionally, the ruler can be used to create custom guides for your slide. Simply click and drag from the ruler to create a guide that can be used to align objects or design elements. This can be especially helpful when working with complex layouts or designs.
How to Use the Ruler to Align Objects and Text Boxes in PowerPoint
The ruler is especially helpful when it comes to aligning objects and text boxes in PowerPoint. To use the ruler for this purpose, simply select the objects you want to align and then drag them to the desired position. As you move the objects, the ruler measurements will appear to help you align them precisely.
Additionally, the ruler can also be used to adjust the margins and indents of text boxes. By clicking and dragging the markers on the ruler, you can easily adjust the spacing of your text within the text box. This can be particularly useful when creating slides with multiple text boxes, as it allows you to ensure that all of your text is properly aligned and spaced.
Customizing Your Ruler: Changing Units and Measurements in PowerPoint
To change the units or measurements displayed on the ruler, simply right-click on the ruler and select the desired option. You can choose from inches, centimeters, or points, depending on your needs. You can also adjust the starting point of the ruler by dragging it to the desired position.
It’s important to note that changing the units or measurements on the ruler will affect all of the slides in your PowerPoint presentation. So, if you have multiple slides with different measurement requirements, you will need to adjust the ruler accordingly for each slide. Additionally, if you need to make precise measurements, you can use the gridlines feature in PowerPoint to help align your objects and text.
Troubleshooting Common Issues with Displaying the Ruler in PowerPoint
If you’re having trouble displaying the ruler in PowerPoint, there are a few things you can try:
- Make sure that the ruler is enabled in the View tab
- Check that your version of PowerPoint supports the ruler feature
- Try restarting PowerPoint to see if that resolves the issue
If none of these solutions work, you may need to repair or reinstall your PowerPoint software. This can be done through the Control Panel on a Windows computer or through the Applications folder on a Mac. If you’re still having trouble after trying these steps, it may be helpful to reach out to Microsoft support for further assistance.
Best Practices for Utilizing the Ruler Feature in Your PowerPoint Presentations
To get the most out of the ruler feature in PowerPoint, it’s important to use it consistently and effectively throughout your presentation. Here are a few best practices to keep in mind:
- Use the ruler to align all of your design elements for a polished and professional look
- Customize the ruler to fit your specific needs and preferences
- Remember to snap objects to the ruler to ensure perfect alignment
Another important tip for utilizing the ruler feature in PowerPoint is to use it to create consistent spacing between your design elements. This can help to create a more organized and visually appealing presentation. Additionally, you can use the ruler to measure the size of your design elements and ensure that they are all the same size.
It’s also important to note that the ruler feature can be used in conjunction with other PowerPoint tools, such as the gridlines and guides. By using these tools together, you can create a more precise and professional-looking presentation. Just be sure to adjust the settings to fit your specific needs and preferences.
The Benefits of Using a Ruler for Professional-Looking Presentations
By using a ruler in your PowerPoint presentations, you can achieve a more polished and professional look. The ruler allows you to align objects, text boxes, and images with precision, ensuring that your slides are visually balanced and aesthetically appealing. It’s a small feature that can make a big difference in the overall quality of your presentation.
In addition to improving the visual appeal of your presentation, using a ruler can also help you save time. With the help of a ruler, you can quickly and easily align objects on your slides, without having to manually adjust their positions. This can be especially useful when working with complex layouts or when you need to make last-minute changes to your presentation. By using a ruler, you can streamline your workflow and create more effective presentations in less time.
How to Create Consistency and Accuracy with a Ruler in PowerPoint
Creating consistency and accuracy in your PowerPoint presentations is key to making a lasting impression on your audience. The ruler can help you achieve this goal by providing measurements and ensuring that all design elements are aligned properly. By using the ruler consistently throughout your presentation, you can create a cohesive and professional-looking slide deck.
One important tip when using the ruler in PowerPoint is to make sure that you have the correct units of measurement selected. Depending on your location and preferences, you may need to switch between inches, centimeters, or pixels. This can be done by going to the “View” tab and selecting “Ruler” from the “Show” section. From there, you can right-click on the ruler and choose your preferred unit of measurement.
Another way to ensure consistency and accuracy in your PowerPoint presentations is to use gridlines in conjunction with the ruler. Gridlines can help you align objects and text boxes precisely, and can be turned on by going to the “View” tab and selecting “Gridlines” from the “Show” section. You can also adjust the spacing and color of the gridlines to suit your needs.
The Impact of Incorporating a Ruler into Your Design Process
Overall, incorporating a ruler into your design process in PowerPoint can have a significant impact on the quality of your presentations. By using the ruler to align objects, text boxes, and images with precision, you can create a more polished and professional look. Additionally, the ruler can help you create consistency and accuracy in your design elements, ensuring that your slides are visually appealing and easy to read.
By humans, for humans - Best rated articles:
Excel report templates: build better reports faster, top 9 power bi dashboard examples, excel waterfall charts: how to create one that doesn't suck, beyond ai - discover our handpicked bi resources.
Explore Zebra BI's expert-selected resources combining technology and insight for practical, in-depth BI strategies.

We’ve been experimenting with AI-generated content, and sometimes it gets carried away. Give us a feedback and help us learn and improve! 🤍
Note: This is an experimental AI-generated article. Your help is welcome. Share your feedback with us and help us improve.


How to Show and Use the Ruler in PowerPoint
Although images and visuals get a lot of attention, text still plays an important role in PowerPoint. Presenters need to remember that it is text that gives meaning to the slides especially in case of business presentations. That being said, presenters don’t need to pay attention to all the text in the presentation, only important keywords and phrases. Text can look pretty awful of the spacing isn’t correct. One tool that can prove indispensable to editing text is the ruler. Today, we will talk about how to make it appear and how to use it in PowerPoint.
How To Show The Ruler?
In old versions of PowerPoint, we used to be able to see the ruler all the time. But, in recent versions of PowerPoint, you have to make it appear from the View tab on the Ribbon Toolbar. Click the View tab, and check the box labeled Ruler as shown below.

( Click Here to download the Template used in this example.)
How to Use The Ruler in PowerPoint?
Using the ruler isn’t all that different across different versions of PowerPoint. The grey area on the right is beyond the margin. To move an object or text, select it. Then, click and drag the upper indent marker to move the starting point of the text. You can use the lower indent marker to move the ending point of the text.

(This example is from PowerPoint 2013)
In Case of a Paragraph
Click and drag the upper indent marker to move the first line of a paragraph. Click and drag the lower indent marker to change the left margin of the paragraph. You can move both the first line of the paragraph and the left margin by dragging the block on the ruler.
In Case of a Bullet Point
If text in a bullet point list is too close or too far from where it should be, then you can use the ruler to fix this.

Select the lines in the bullet point list and drag the upper indent marker to move the lines. You can use the lower indent marker to move both the lines and the bullet point formatting at the same time.

Topics How to see the ruler in PowerPoint 2013 How to show the ruler in PowerPoint 2007 How to show the ruler in PowerPoint 2010 How to show the ruler in PowerPoint 2013 How to show the ruler in PowerPoint 2016 How to use the Ruler in PowerPoint How to use the Ruler in PowerPoint 2013 Ruler
Category Productivity Tools

Written by Ahmad
Ahmad is a technology blogger and a Computational Physicist. He breaks down the science of delivering presentations, and shows how to make use of a presentation in business, productivity, and much more
Leave a Reply Cancel reply
Your email address will not be published. Required fields are marked *
Save my name, email, and website in this browser for the next time I comment.
Best PowerPoint Templates
PPT Diagrams & Slide Designs
Microsoft PowerPoint Backgrounds
Privacy Policy
Advertising
Home Blog PowerPoint Tutorials How To Show Guides & Ruler in PowerPoint 2016
How To Show Guides & Ruler in PowerPoint 2016
PowerPoint 2016 introduced in the market as a Preview release available for Mac users. The UI is pretty close to the flat version featured in PowerPoint 2013 for Windows and most of the features available in the Windows version seems are now available for Mac users as well. In this article, we will show you how to enable the guides & ruler in PowerPoint. These tools offer you a better control to align objects accurately over the slide.

While the ruler let you measure distances between objects on the screen, guides are a very powerful tool that helps to align objects within the slide either vertically or horizontally, plus you can configure the snap to grid or shape properties to add a better control of these objects on the screen. You can configure vertical and horizontal guides (by default there is one of each type but you can add as many guides you want).
Displaying guides in PowerPoint 2016 is very easy. You just need to go to the View menu and then click Guides checkbox or you can right-click over the slide and look for the Guides option.

The Guides submenu in the contextual menu will show different options available, including Add Vertical Guide, Add Horizontal Guide or other options such as Dynamic Guides or Static Guides. You can also check here if you want to Snap objects to Grid or to a Shape.
What is the difference between Static & Dynamic guides? While Static Guides are the guides that you configure in the slide manually to any specific position, Dynamic Guides appear on the screen while you drag or align objects. These guides are very useful if you need to align objects by dragging them in the slide.

In the View menu, there are two checkboxes available that let you control whether or not to display the Ruler & Static Guides on the screen. To enable the Ruler & Static Guides make sure the checkboxes highlighted like in the figure above are checked.
To illustrate this article we have used the infographics PowerPoint template that is available in our content catalog. You are welcome to download it if you want to make creative infographics in PowerPoint with colorful objects.
What happened to gridlines in PowerPoint 2016? The new version of PowerPoint 2016 do not have the gridlines features (at least in the Mac version).

Like this article? Please share
Align, Aligning Objects, Dynamic Guides, Horizontal Guide, Ruler, Shapes, Snap to Grid, Snap to Shape, Static Guides, Vertical Guide Filed under PowerPoint Tutorials
Related Articles
Filed under PowerPoint Tutorials • October 5th, 2023
How To Make Curved Arrows in PowerPoint
There are several methods by which you can make curved arrows for your presentations. In this article, we explain three different ways to draw arrows in PowerPoint.
Filed under PowerPoint Tutorials • October 8th, 2021
How To Use PowerPoint Icons to Boost your Presentation Visuals
In this post, we are going to show some tips for presenters willing to improve their presentation look and feel by adding PowerPoint Icons. The advice is valid for updating existing presentations or designing new presentations from scratch. We want to start with the distinction between what is considered a PowerPoint Icon and its difference from […]

• October 17th, 2014
Working with PowerPoint Shapes to Make Editable Slides
PowerPoint shapes are very powerful while creating PowerPoint presentations and templates. By working with PowerPoint shapes you have the opportunity to use objects that are very easy to edit. In this article we will explain how to create a very basic shape from a picture and make it editable so we can easily change the shape properties like color, shadows, 3D styles, etc. A […]
Leave a Reply

How to Change the Measurement System Units in PowerPoint (from Inch to Cm and Vice Versa)

Change PowerPoint's Measurement System from Inches to Cms or Vice Versa by Changing Your Control Panel Settings
by Avantix Learning Team | Updated April 6, 2021
Applies to: Microsoft ® PowerPoint ® 2013, 2016, 2019 and 365 (Windows)
When you're working on your slide decks in PowerPoint, the Ruler and various dialog boxes or task panes (such as picture or object size) display in inches or centimetres (cm). If you want to change your measurement system from inches to centimetres or vice versa, you'll need to change your control panel settings for your device. Unfortunately, unlike Microsoft Word, you can't change the measurement system directly in PowerPoint.
Below is the Control Panel in Windows 10:

Recommended article: How to Quickly Remove All Animations in PowerPoint Presentations
Do you want to learn more about PowerPoint? Check out our virtual classroom or live classroom PowerPoint courses >
Changing PowerPoint's Measurement System in Windows 10
To change PowerPoint's measurement system in Windows 10:
- Close PowerPoint.
- Click Start on the bottom left, type Control Panel in the search box and press Enter. The Control Panel displays in Windows 10.
- In the Control Panel, click Clock, Language and Region. A dialog box appears.
- Click Region. A dialog box appears.
- Click Additional settings. The Customize Format dialog box appears.
- Under Measurement system, select Metric if you want your measurements in centimetres or U.S. if you want your measurements in inches.
- Click OK twice.
- Start PowerPoint. The Ruler, dialog boxes and task panes will now display measurements in the system you chose.
Below is the Customize Format dialog box in the Control Panel:

Subscribe to get more articles like this one
Did you find this article helpful? If you would like to receive new articles, join our email list.
More resources
How to Turn Off Automatic Text Resizing in PowerPoint
10 Ways to Compress PowerPoint Presentations to Reduce File Size
How to Quickly Remove All Speaker Notes in a PowerPoint Presentation
How to Crop an Image into a Circle in PowerPoint (Crop to Shape Method)
How to Change the Background of PowerPoint Slides to a Color, Gradient or Picture
Related courses
Microsoft PowerPoint: Intermediate / Advanced
Microsoft PowerPoint: Design for Non-Designers
Microsoft PowerPoint: Animations Bootcamp
Microsoft Excel: Intermediate / Advanced
VIEW MORE COURSES >
Our instructor-led courses are delivered in virtual classroom format or at our downtown Toronto location at 18 King Street East, Suite 1400, Toronto, Ontario, Canada (some in-person classroom courses may also be delivered at an alternate downtown Toronto location). Contact us at [email protected] if you'd like to arrange custom instructor-led virtual classroom or onsite training on a date that's convenient for you.
Copyright 2024 Avantix ® Learning
You may also like

How to Insert or Type I with an Accent Mark in Word (Í, í, Ì, ì, Î, î, Ï, or ï)
You can insert or type i with an accent mark in Word using built-in tools or keyboard shortcuts (including Alt code shortcuts). The letter i can be inserted with an accent in both upper or lower case. The following are common accents in upper or lower case – Í, í, Ì, ì, Î, î, Ï, or ï.

How to Insert or Type A with an Accent Mark in Word (À, Á, Â, Ä, à, á, â, or ä)
You can insert or type a with an accent mark in Word using built-in tools or keyboard shortcuts (including Alt code shortcuts). The letter a can be inserted with an accent in both upper or lower case. The following are common accents in upper or lower case – À, Á, Â, Ä, à, á, â, or ä.

10 Word Shortcuts to Select Text Using a Keyboard
You can use several shortcuts in Word to select text in your documents using only your keyboard. When you select text, it will typically be highlighted in grey. After you select text, you can cut, copy, or delete the selected text or apply character or paragraph formatting.
Microsoft, the Microsoft logo, Microsoft Office and related Microsoft applications and logos are registered trademarks of Microsoft Corporation in Canada, US and other countries. All other trademarks are the property of the registered owners.
Avantix Learning |18 King Street East, Suite 1400, Toronto, Ontario, Canada M5C 1C4 | Contact us at [email protected]
Our Courses
Avantix Learning courses are offered online in virtual classroom format or as in-person classroom training. Our hands-on, instructor-led courses are available both as public scheduled courses or on demand as a custom training solution.
All Avantix Learning courses include a comprehensive course manual including tips, tricks and shortcuts as well as sample and exercise files.
VIEW COURSES >
Contact us at [email protected] for more information about any of our courses or to arrange custom training.
Privacy Overview
Pin it on pinterest.
- Print Friendly
How-To Geek
6 ways to create more interactive powerpoint presentations.
Engage your audience with cool, actionable features.
Quick Links
- Add a QR code
- Embed Microsoft Forms (Education or Business Only)
- Embed a Live Web Page
- Add Links and Menus
- Add Clickable Images to Give More Info
- Add a Countdown Timer
We've all been to a presentation where the speaker bores you to death with a mundane PowerPoint presentation. Actually, the speaker could have kept you much more engaged by adding some interactive features to their slideshow. Let's look into some of these options.
1. Add a QR code
Adding a QR code can be particularly useful if you want to direct your audience to an online form, website, or video.
Some websites have in-built ways to create a QR code. For example, on Microsoft Forms , when you click "Collect Responses," you'll see the QR code option via the icon highlighted in the screenshot below. You can either right-click the QR code to copy and paste it into your presentation, or click "Download" to add it to your device gallery to insert the QR code as a picture.
In fact, you can easily add a QR code to take your viewer to any website. On Microsoft Edge, right-click anywhere on a web page where there isn't already a link, and left-click "Create QR Code For This Page."
You can also create QR codes in other browsers, such as Chrome.
You can then copy or download the QR code to use wherever you like in your presentation.
2. Embed Microsoft Forms (Education or Business Only)
If you plan to send your PPT presentation to others—for example, if you're a trainer sending step-by-step instruction presentation, a teacher sending an independent learning task to your students, or a campaigner for your local councilor sending a persuasive PPT to constituents—you might want to embed a quiz, questionnaire, pole, or feedback survey in your presentation.
In PowerPoint, open the "Insert" tab on the ribbon, and in the Forms group, click "Forms". If you cannot see this option, you can add new buttons to the ribbon .
As at April 2024, this feature is only available for those using their work or school account. We're using a Microsoft 365 Personal account in the screenshot below, which is why the Forms icon is grayed out.
Then, a sidebar will appear on the right-hand side of your screen, where you can either choose a form you have already created or opt to craft a new form.
Now, you can share your PPT presentation with others , who can click the fields and submit their responses when they view the presentation.
3. Embed a Live Web Page
You could always screenshot a web page and paste that into your PPT, but that's not a very interactive addition to your presentation. Instead, you can embed a live web page into your PPT so that people with access to your presentation can interact actively with its contents.
To do this, we will need to add an add-in to our PPT account .
Add-ins are not always reliable or secure. Before installing an add-in to your Microsoft account, check that the author is a reputable company, and type the add-in's name into a search engine to read reviews and other users' experiences.
To embed a web page, add the Web Viewer add-in ( this is an add-in created by Microsoft ).
Go to the relevant slide and open the Web Viewer add-in. Then, copy and paste the secure URL into the field box, and remove https:// from the start of the address. In our example, we will add a selector wheel to our slide. Click "Preview" to see a sample of the web page's appearance in your presentation.
This is how ours will look.
When you or someone with access to your presentation views the slideshow, this web page will be live and interactive.
4. Add Links and Menus
As well as moving from one slide to the next through a keyboard action or mouse click, you can create links within your presentation to direct the audience to specific locations.
To create a link, right-click the outline of the clickable object, and click "Link."
In the Insert Hyperlink dialog box, click "Place In This Document," choose the landing destination, and click "OK."
What's more, to make it clear that an object is clickable, you can use action buttons. Open the "Insert" tab on the ribbon, click "Shape," and then choose an appropriate action button. Usefully, PPT will automatically prompt you to add a link to these shapes.
You might also want a menu that displays on every slide. Once you have created the menu, add the links using the method outlined above. Then, select all the items, press Ctrl+C (copy), and then use Ctrl+V to paste them in your other slides.
5. Add Clickable Images to Give More Info
Through PowerPoint's animations, you can give your viewer the power to choose what they see and when they see it. This works nicely whether you're planning to send your presentation to others to run through independently or whether you're presenting in front of a group and want your audience to decide which action they want to take.
Start by creating the objects that will be clickable (trigger) and the items that will appear (pop-up).
Then, select all the pop-ups together. When you click "Animations" on the ribbon and choose an appropriate animation for the effect you want to achieve, this will be applied to all objects you have selected.
The next step is to rename the triggers in your presentation. To do this, open the "Home" tab, and in the Editing group, click "Select", and then "Selection Pane."
With the Selection Pane open, select each trigger on your slide individually, and rename them in the Selection Pane, so that they can be easily linked to in the next step.
Finally, go back to the first pop-up. Open the "Animations" tab, and in the Advanced Animation group, click the "Trigger" drop-down arrow. Then, you can set the item to appear when a trigger is clicked in your presentation.
If you want your item to disappear when the trigger is clicked again, select the pop-up, click "Add Animation" in the Advanced Animation group, choose an Exit animation, and follow the same step to link that animation to the trigger button.
6. Add a Countdown Timer
A great way to get your audience to engage with your PPT presentation is to keep them on edge by adding a countdown timer. Whether you're leading a presentation and want to let your audience stop to discuss a topic, or running an online quiz with time-limit questions, having a countdown timer means your audience will keep their eye on your slide throughout.
To do this, you need to animate text boxes or shapes containing your countdown numbers. Choose and format a shape and type the highest number that your countdown clock will need. In our case, we're creating a 10-second timer.
Now, with your shape selected, open the "Animations" tab on the ribbon and click the animation drop-down arrow. Then, in the Exit menu, click "Disappear."
Open the Animation Pane, and click the drop-down arrow next to the animation you've just added. From there, choose "Timing."
Make sure "On Click" is selected in the Start menu, and change the Delay option to "1 second," before clicking "OK."
Then, with this shape still selected, press Ctrl+C (copy), and then Ctrl+V (paste). In the second box, type 9 . With the Animation Pane still open and this second shape selected, click the drop-down arrow and choose "Timing" again. Change the Start option to "After Previous," and make sure the Delay option is 1 second. Then, click "OK."
We can now use this second shape as our template, as when we copy and paste it again, the animations will also duplicate. With this second shape selected, press Ctrl+C and Ctrl+V, type 8 into the box, and continue to do the same until you get to 0 .
Next, remove the animations from the "0" box, as you don't want this to disappear. To do this, click the shape, and in the Animation Pane drop-down, click "Remove."
You now need to layer them in order. Right-click the box containing number 1, and click "Bring To Front." You will now see that box on the top. Do the same with the other numbers in ascending order.
Finally, you need to align the objects together. Click anywhere on your slide and press Ctrl+A. Then, in the Home tab on the ribbon, click "Arrange." First click "Align Center," and then bring the menu up again, so that you can click "Align Middle."
Press Ctrl+A again to select your timer, and you can then move your timer or copy and paste it elsewhere.
Press F5 to see the presentation in action, and when you get to the slide containing the timer, click anywhere on the slide to see your countdown timer in action!
Now that your PPT presentation is more interactive, make sure you've avoided these eight common presentational mistakes before you present your slides.

Change the measurement units from inches to centimeters
In desktop versions of PowerPoint, you don’t have to use the measurement units PowerPoint comes with. A few clicks, as described below, change PowerPoint units, for example, from inches to centimeters.
PowerPoint displays the measurement system your computer uses, so to change from inches to metric (or vice versa), you make the change in Control Panel in Windows rather than in PowerPoint.
Close PowerPoint.
Go to Control Panel by doing one of the following:
In Windows 10, click Start and type Control Panel .
In Windows 8, swipe in from the right edge of the screen, and then tap Search . (If you're using a mouse, point to the upper-right corner of the screen, move the mouse pointer down, and then click Search .) Enter Control Panel in the search box, tap or click Apps , and then tap or click Control Panel .
Select the app that has Region in its name. (The exact name varies depending on which version of Windows you’re using.) The exact options that appear are different for various versions of Windows:
If you’re using Windows 10, Windows 8 or Windows 7, in the Region or Clock, Language and Region dialog box, click the Change Date, Time or Number Formats tab, and then click Additional settings . Select Metric from the Measurement system list, and click OK .
If you’re using Windows Vista or Windows XP, click the Regional Options tab, and then click Customize . On the Numbers tab, in the Measurement system list, click Metric . Apply the changes.
If you’re using another version of Windows, look for a Numbers option that includes a Measurements setting, and then change the value to Metric . Apply the changes.
Start PowerPoint.
The ruler (and dialog boxes that show units of measure) now display measurements in the system you've chosen.
Tip: To change back from centimeters to inches, repeat the steps above and select U.S. instead of Metric in step 3.
On the Apple menu, select System Preferences .
Click Language & Region .
Click Advanced .
On the General tab, click the arrow next to Measurement units , and select a unit of measure from the list. You can choose Metric , US , or U
PowerPoint for the web only shows measurements in inches.
Show or hide the ruler

Need more help?
Want more options.
Explore subscription benefits, browse training courses, learn how to secure your device, and more.

Microsoft 365 subscription benefits

Microsoft 365 training

Microsoft security

Accessibility center
Communities help you ask and answer questions, give feedback, and hear from experts with rich knowledge.

Ask the Microsoft Community

Microsoft Tech Community

Windows Insiders
Microsoft 365 Insiders
Was this information helpful?
Thank you for your feedback.
IMAGES
VIDEO
COMMENTS
To show the ruler, click View, and in the Show group, check Ruler. To hide the ruler, click View, and in the Show group, clear the Ruler box. To permanently hide the vertical ruler, click File > Options > Advanced, scroll down to the Display section, and clear the Show vertical ruler box. Tip: The ruler is not available in all views, such as ...
Short Answer. Using a ruler in Microsoft PowerPoint is simple. First, go to the "View" tab and click on the "Ruler" button to enable it. Then, you can click and drag on the ruler to draw a guideline. This guideline will be used to help you align objects in your presentation. You can also drag the endpoints of the ruler to adjust the ...
Method 2: Right-Click the Slide. 1. Right-click the blank space of slide, click Ruler in the pop-up window. 2. Now the ruler has been shown in the slide as below. 3. If you want to hide the ruler, just right-click the blank space of slide, and click Ruler in the pop-up window again.
To properly display the ruler on a PPT file, open PowerPoint and switch to the View tab in the Ribbon area. In there, locate a box that says Ruler . Check that box and the ruler will become available from now on in all PowerPoint documents. There's an alternative method, in case you work with legacy versions or, by some bug, the ruler ...
Microsoft PowerPoint: How To Show Or Hide The Ruler In PowerPoint | 365 | 👍This is a video tutorial on how to show or hide the Ruler in Microsoft PowerPoint...
Rulers let you set indents and returns. You can also use the rulers to determine the dimensions of the publication elements, such as the margins, text boxes, columns, and so on. 1. Rulers (horizontal and vertical) 2. Horizontal ruler guide. Show or hide the rulers. Click View > Show to show or hide the rulers.
Step 3: Use the ruler to align objects. Click and drag objects on your slide and use the ruler as a guide to align them with precision. The ruler is marked with units that help you place objects at exact points on your slide. This is especially helpful when you want to ensure equal spacing or align multiple objects in a straight line.
To access the View tab, open your PowerPoint presentation. Look at the top of the screen for the Ribbon toolbar and locate the View tab. Click on the View tab to reveal a drop-down menu with various options. Within the View tab, find the Show group containing different display options. Tick the checkbox next to Ruler to enable the ruler to ...
Microsoft PowerPoint 2016 or PowerPoint 365 - When working with Shapes it really helps to have visual alignment guides turned on! This video is from Lesson 6...
By default, the Ruler is visible in PowerPoint. However, if you cannot see it, don't worry - it's easy to enable. To access the Ruler in PowerPoint, click on the "View" tab at the top of the screen. Next, click on the "Ruler" checkbox to activate the Ruler. When you have enabled the Ruler, you should see it on your PowerPoint ...
To do this, click on the File button in the top-right section of the screen. Then, move to the Options and click on the Advanced section. This section will bring up many ways to customize the PowerPoint. Move to the Display section. There you will find an option labeled Show vertical ruler. Clicking this checkbox will disable this ruler.
Open PowerPoint and navigate to the View tab. Select the Ruler checkbox in the Show group. Once you've completed these steps, you should see the ruler appear at the top and left of your slide. Using the ruler in PowerPoint can be incredibly helpful when it comes to aligning objects and text on your slides.
Display Rulers. To display rulers, start by clicking the "View" tab on the Ribbon in PowerPoint. The Ribbon is located along the top of PowerPoint and it is comprised of a series of tabs. The View tab is located on the right end of the Ribbon. Place a check mark in the "Ruler" check box to display the vertical and horizontal rulers.
How To Display The Ruler In Powerpoint 2016. This quick and easy tutorial will show you how to show the ruler in microsoft powerpoint! Drop a LIKE and nice l...
If text in a bullet point list is too close or too far from where it should be, then you can use the ruler to fix this. Select the lines in the bullet point list and drag the upper indent marker to move the lines. You can use the lower indent marker to move both the lines and the bullet point formatting at the same time.
Displaying guides in PowerPoint 2016 is very easy. You just need to go to the View menu and then click Guides checkbox or you can right-click over the slide and look for the Guides option. The Guides submenu in the contextual menu will show different options available, including Add Vertical Guide, Add Horizontal Guide or other options such as ...
If you want to display the horizontal ruler but not the vertical ruler in PowerPoint, this step-by-step guide is for you. You can show or hide the Vertical R...
Click View, and then click the check boxes next to Boundaries and Guides. Note: If the Snap to command is on (Click Page Design, and then click the check boxes next to Guides and Objects ), objects will continue to snap to guides and other objects even when the guides are hidden.
Click Additional settings. The Customize Format dialog box appears. Under Measurement system, select Metric if you want your measurements in centimetres or U.S. if you want your measurements in inches. Click OK twice. Start PowerPoint. The Ruler, dialog boxes and task panes will now display measurements in the system you chose.
Engage your audience with cool, actionable features. 2. Embed Microsoft Forms (Education or Business Only) If you plan to send your PPT presentation to others—for example, if you're a trainer sending step-by-step instruction presentation, a teacher sending an independent learning task to your students, or a campaigner for your local councilor sending a persuasive PPT to constituents—you ...
Learn the secret to Move or Rotate the Ruler feature in PowerPoint and Draw Parallel Lines*Ramgopals PowerPoint Mastery TRAINING Program*https://shop.present...
Apply the changes. Start PowerPoint. The ruler (and dialog boxes that show units of measure) now display measurements in the system you've chosen. Tip: To change back from centimeters to inches, repeat the steps above and select U.S. instead of Metric in step 3.