How to Diagnose Connection Problems With Internet Explorer

Internet connection and network errors can be frustrating and confusing to a casual computer user. However, Internet Explorer provides a diagnostics tool to help identify and even repair the most common network issues. This tool is simple to use, organized in steps, and can help get a computer back up and running quickly.
Advertisement
Open Internet Explorer and click on the "Tools" button in the control bar at the top of the window. From the "Tools" menu, select "Diagnose Connection Problems." A window will appear, displaying the start page of the diagnostics tool.
Video of the Day
Follow the instructions to determine the cause of the connection error. The diagnostics tool will ask a series of multiple-choice questions about the connection problem you are experiencing.
Close all programs and restart the computer. If you continue to receive an error when attempting to connect to the Internet, check that all cables and power-supply cords for the computer, modem and/or router are properly connected. Then, run the diagnostic tool again.
Call your Internet service provider's technical support phone number if you cannot resolve the error with the diagnostics tool. The Internet Explorer diagnostics tool cannot repair or reset malfunctioning or failing hardware like modems and routers.
- Microsoft.com: Using the network diagnostics tool
- Internet Explorer Solution Center

SOLVED: Internet Explorer cannot display the webpage
They are still a large number of users using Internet Explorer, and many of them have reported getting the error Internet Explorer cannot display the webpage . when they try to access a website on IE. This error stops Internet Explorer from accessing any websites. Since the error doesn’t tell why it is not able to open the site, we’ll have to make some assumptions and proceed forward with it’s troubleshooting. The issue behind this error can be a software issue isolated to the internet explorer or a connectivity issue therefore affecting your whole system.
Before you go ahead with the methods below, make sure that your Internet Connection is WORKING , and there are no VPNs running on your system, also it would be best to disable any antivirus or firewall software you are running until the issue is fixed. The methods listed in this guide are in the most worked order to save you time and energies. If the issue is fixed at by any Method, then you don’t need to go ahead with the other methods.
Method 1: Reset Internet Explorer
This will reset all settings and custom options set in Internet Explorer. Your bookmarks will not be deleted.
Hold the Windows Key and Press R . In the Run Dialog, type inetcpl.cpl and Click OK.

Click on the Advanced tab. Click on the Reset button below. Place a check next to Delete Personal Settings and click Reset . Internet Explorer will now be reset to its default settings.

After the Internet Explorer has been resetted, re-open it and test. To restore Bookmarks Bar, hold the CTRL + SHIFT + B keys.
Method 2: Verify Proxy Settings
Invalid proxy settings can cause internet explorer to deviate from the right path, thus giving this error. To verify the settings. Close Internet Explorer.
Go to the Connections tab. Once on the tab, click on the LAN settings button.
Make sure there is a check next to Automatically detect settings and the other two checkboxes are unchecked.Click OK and close all windows. Restart Internet Explorer.

Method 3: Check IP Address
IP Address conflicts and incorrect settings can restrict access to the Internet, which can also trigger the “cannot display webpage” error. To fix it,
Hold the Windows Key and press R . In the run dialog type ncpa.cpl and Click OK.

Right click on Local Area Connection if you are using Wired Connection or Right click on Wireless Network Connection if you are using Wi-Fi. Click on Properties in the drop down menu.

Double click on Internet Protocol Version 4 (TCP/IPv4) . Select Obtain an IP address automatically . Select Obtain DNS server address automatically . Click OK > OK and close all windows. Restart your system. If the problem still persists, move on to the next solution.

Method 4: Reboot Router/Modem
You router may have a glitch with establishing a connection with your ISP. However, if your other devices such as smart-phones, tablets and other computers etc are connected to internet via Wi-Fi or Ethernet to this router, then the router is getting the internet. A reboot of the router is still preferred.
To do this, Turn off your router and unplug it from the power adapter.
After 30 seconds , plug the adapter back into your router and turn it on .
Now test and see if the issue is fixed.
Method 5: Reset Windows Socket TCP/IP Stack
Windows socket is the program responsible for handling all the network incoming and outgoing requests by program like Internet Explorer. If there is an issue with it, resetting it can fix it easily.
To do so, press Windows key and type cmd, right click cmd and choose Run as administrator.
In the black command prompt window , type the following commands and press Enter after each:
ipconfig /flushdns nbtstat -R nbtstat -RR netsh int reset all netsh int ip reset netsh winsock reset
Reboot your system for changes to take effect.
Method 6: Disable Enhanced Protected Mode (For Windows 8)
In Windows 8, Enhance Protected mode was added to Internet explorer 10 which increases security but is known to cause such kind of browsing issues.
Hold the Windows Key and Press R . In the Run Dialog, type inetcpl.cpl and Click OK. Go to the Advanced Tab. Locate Enable Enhanced Protected Mode under Settings and uncheck it. Click OK. Restart Internet explorer and check if the issue resolved.

Kevin Arrows
- Network Engineer (LAN/WAN) |
- Troubleshooting Guides
- Common Errors
- Tech Tutorials
- Apps & Programs
- About our team & mission
Internet Explorer Not Connecting to Internet: Fixed
Switch to IE Mode on Edge
updated on April 12, 2024
Share this article
Improve this guide
Read our disclosure page to find out how can you help Windows Report sustain the editorial team Read more
- If Internet Explorer is not connecting to the Internet, checking your network is the first logical step.
- But what if IE is the only one that refuses to connect while other browsers do? Clearly, connectivity is not the issue.
- Don’t worry, we have no less than 3 simple ways to make Internet Explorer connect to the Internet again.
- Check them out below and get plenty more out of this guide to browse like a pro.

- Optimize resource usage
- AI and user-friendly
- Built-in Ad Blocker
- ⇒ Get Opera One
While you can still find Internet Explorer 11 on Windows 10, there is no way to use the old Internet Explorer as a standalone browser in Windows 11.
With that out of the way, we promise the most confusing part of this guide is done, and from now on, things will only get a lot easier.
So, Windows 11 comes with Edge pre-installed as the default browser, which is also why you will notice that Internet Explorer opens Edge instead.
You can still use the IE compatibility mode in Win 11 to open legacy sites and apps, but not the IE 11 itself as an autonomous desktop app.
That’s why conventional manipulations such as resetting IE settings, reinstalling, disabling add-ons, clearing cookies, and other similar techniques you’d apply to fix IE crashes in Windows 10 don’t really work as they simply no longer apply.
Don’t worry, we have a few tricks you can try. Here are 3 simple ways to make Internet Explorer connect to the Internet again, plus a little something on top.
So, let’s not waste any more time and get straight to it, shall we?
Why is Internet Explorer not connecting to the Internet?
There are a bunch of reasons why Internet Explorer is not connecting to the Internet. It could be the misconfigured browser settings or the network settings on your computer to blame.
Also, the installed add-ons have been found to affect the browser’s abilities if Internet Explorer 11 won’t load pages but Chrome will, though that’s a rare scenario. In which case, disabling these is the only way forward.
Besides, if you have a proxy set up or are using VPN software, it could be responsible for Internet Explorer not connecting to the Internet.
Will Internet Explorer still work after June 2022?
Though Internet Explorer will work for a while after the June 2022 deadline, it will start redirecting users to Edge, Microsoft’s recommended browser. Also, Edge offers an IE mode to access websites that have been developed for Internet Explorer and haven’t yet made the transition to the new browsers.
When you open Internet Explorer initially after the June 2022 deadline, it will display a prompt asking you to switch to Edge. This will continue for a while before Internet Explorer completely stops working on your computer.
If Internet Explorer is not connecting to the Internet, but Chrome does, the issue is clearly not related to any connectivity flaws, and resetting your network will have no impact.
Adding to the fact IE’s days are counted (and we mean that in a literal way, as the old browser will be officially retired in June 2022), it may be the right time to start looking for a new one.
Thus, switching to Opera One makes perfect sense. It’s a modern browsing instrument with enhanced rendering capabilities, serious performance optimizations, tons of customization options, and all the privacy and security features you could dream of.
Moreover, you can import all your preferences, passwords, settings, and so on and sync them across all your devices seamlessly. Also, it comes with built-in AI, VPN, Ad blocker.

How do I fix Internet Explorer not connecting to the internet?
1. reenable internet explorer mode on windows 11.
- Press the Windows key + I on your keyboard to quickly open Settings .
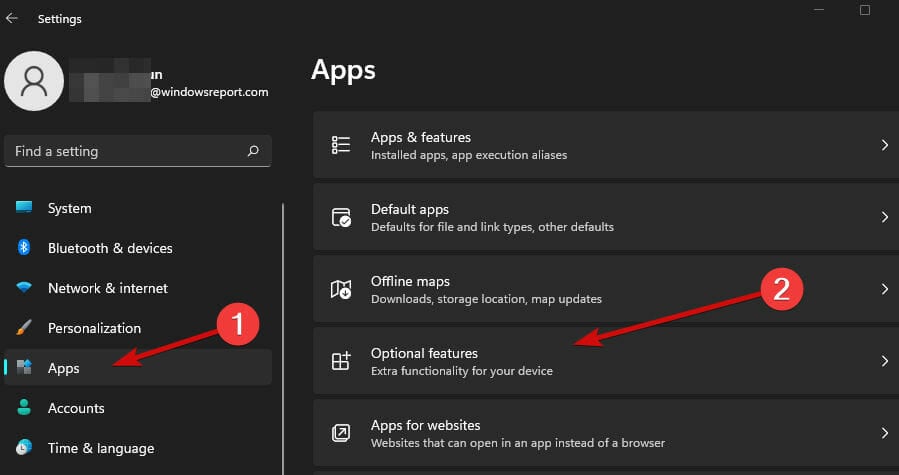
- Use the search field under Installed features to locate the Internet Explorer mode .
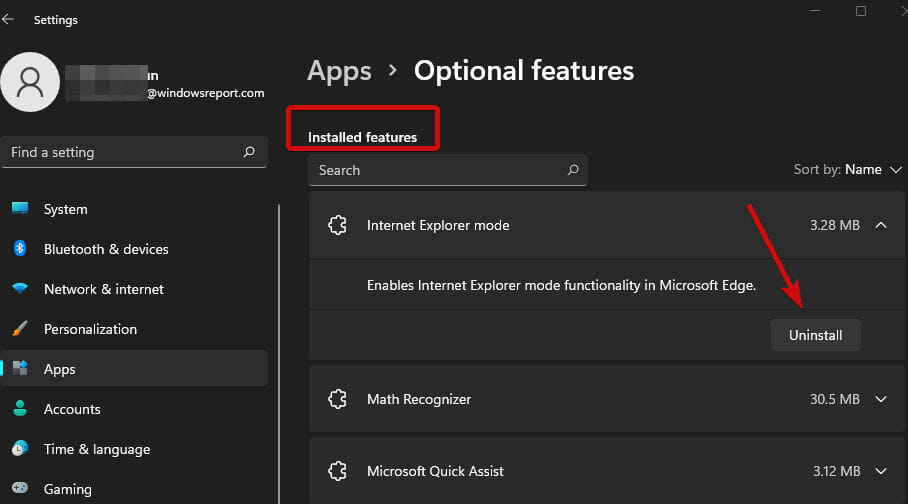
- To reinstall the IE mode, simply return to the Optional features screen.
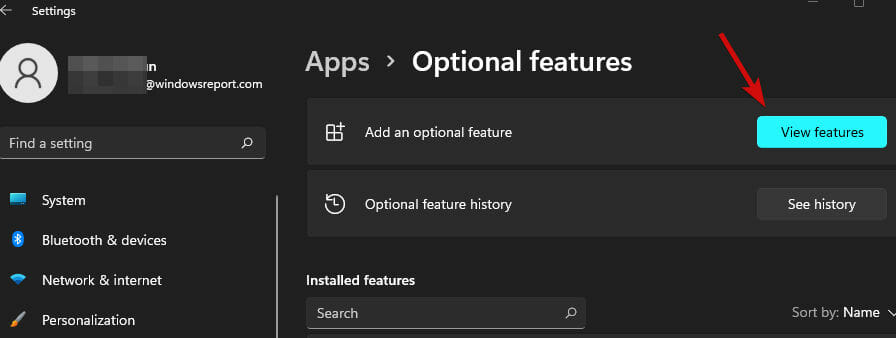
- Search for Internet Explorer mode and choose Install .
If you see This page cannot be displayed but are connected to the Internet, this method will help fix the error.
2. Troubleshoot and reset your network
- Open the Settings once again and remain on the System tab.
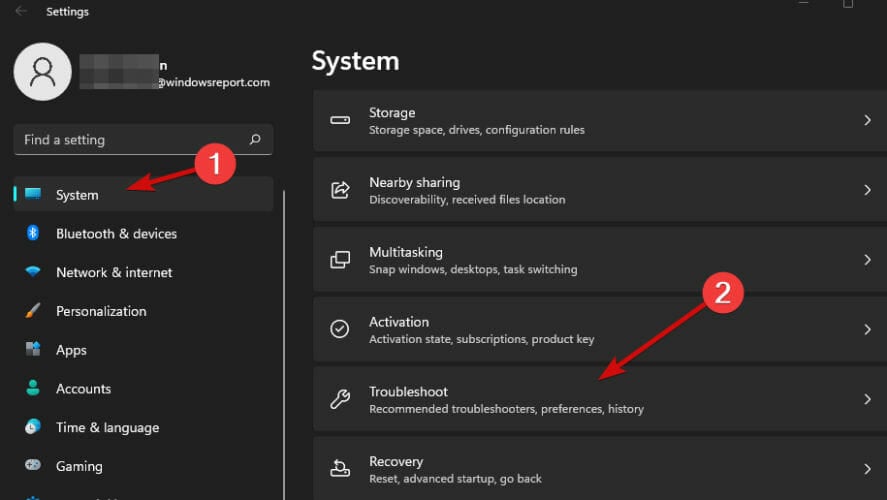
- If there is no recommended fix, resetting your network can set the records straight.
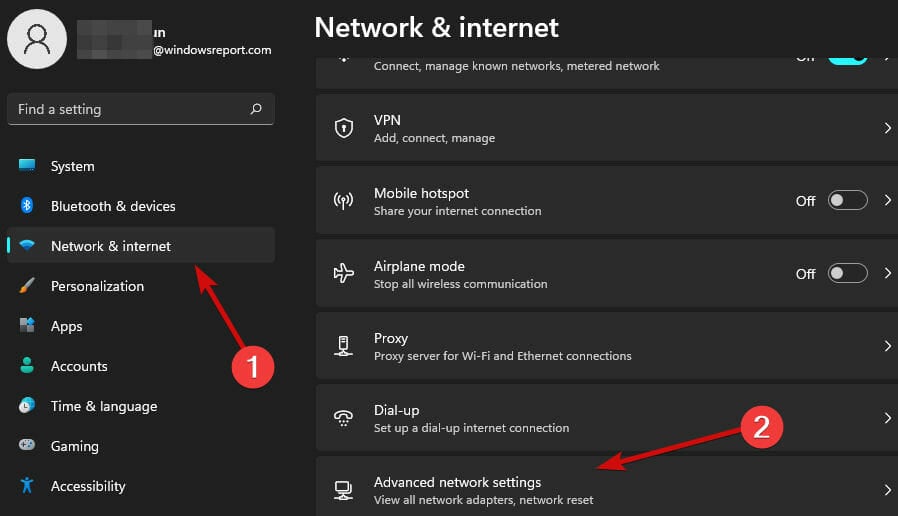
- Return to the main Settings screen and this time, select Network & internet from the left pane.
If Internet Explorer cannot display the webpage in Windows 10, it could be the network settings to blame, and things should be up and running after the reset.
3. Tweak the Internet Properties
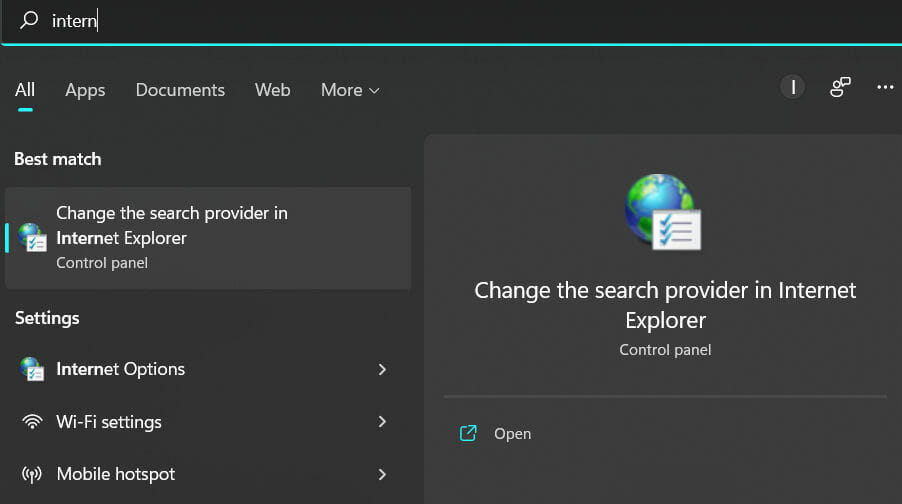
- Use the search field on your taskbar and type in internet .
- Press OK and restart your device.
In case you cannot access some websites in Internet Explorer 11, reconfiguring the Internet Properties might work.
If Internet Explorer is still not connecting to the Internet, you might be dealing with interferences caused by overzealous security software. Check the following solution for that.
4. Check your security software
Antivirus, firewall, and VPN – this is the holy trinity of cybersecurity and despite the obvious advantages, each of these apps can cause interferences and end up blocking legitimate programs while trying to keep you safe.
Permanently eliminating them is not recommended. However, you can determine if any of them are at the source of the problem and take further appropriate measures.
To temporarily disable the Microsoft Defender firewall, follow the steps below:
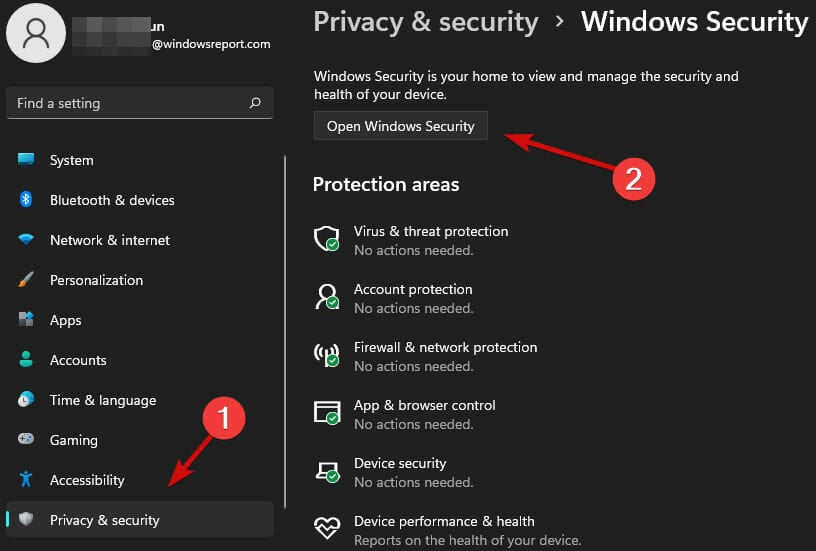
- Open the Settings and select Privacy & security in the left pane.
- Head to Public network and switch the Microsoft Defender Firewall off.
To temporarily turn off your VPN, follow the steps below:
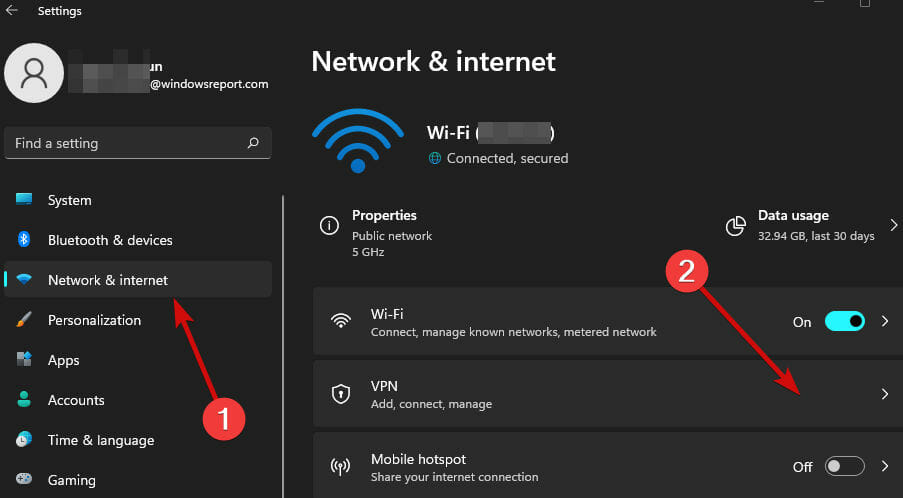
- Open the Settings and select Network & internet in the left pane.
- Finally, locate the VPN connection and select Remove from the menu.
If your VPN turns out to be the culprit, you can further prevent Internet Explorer not connecting to the Internet problems by switching to a more versatile privacy program.
Private Internet Security boats impenetrable confidentiality and uncompromised encryption for your data, online activity, and traffic. And it does so without getting in your way or interfering with other apps (as long as they are trustworthy and authentic, of course).

What about antivirus? Can I prevent IE from connecting?
Finally, the same goes for your antivirus solution. You don’t need to delete it, simply disable it for the time being and check if Internet Explorer is able to load web pages.
If so, use a specialized uninstaller tool to make sure no software leftovers remain to plague your system and proceed with the removal of your current security program.

Of course, leaving your system exposed to vermin, bugs, or hacking attacks is not the answer. Instead, you can download and install ESET HOME Security Essential .
This tolerant and lightweight software boats a modular architecture that allows you to seamlessly collaborate with other security programs without messing up your settings or complicating your life in any way. What’s not to like?
What is replacing Internet Explorer?
Microsoft Edge will be replacing Internet Explorer after the latter is discontinued. Microsoft officially ended support for IE on June 15, 2022.
Edge is a user-oriented browser with a bunch of great features for the best browsing experience. Also, the browser is not as resource-hungry as Chrome, so the computer’s performance won’t be affected. Besides, you may read a detailed review of Edge listing all the latest features .
That’s all there’s to the Internet Explorer not connecting to the Internet problem and about the browser being discontinued for good.
Also, find out what to do if Internet Explorer opens Microsoft Edge every time you launch the browser.
Tell us which fix worked for you in the comments section below.
More about the topics: internet connection errors , Internet Explorer Issues

Sonia is a tech enthusiast that fell in love with Windows after having experienced working on a different OS. Being above all, a down-to-earth kind of person, she deeply appreciated the ease of learning and usage associated with Windows products and made it her personal mission to guide her peers in discovering the same beauty of simplicity through writing. When she does not preach about computer-related topics, she enjoys cooking extravagant food with intricate names and peculiar aromas which are usually not appreciated by the crowds.

Was this page helpful?
Let us know if you managed to solve your tech problem reading this article.
We’re happy to hear that!
You can subscribe to our newsletter to stay up to date with the latest news and best deals!
Do you have a suggestion?
We know how frustrating could be to look for an universal solution.
If you have an error which is not present in the article, or if you know a better solution , please help us to improve this guide.
- Compare Providers
- Review Providers
No Internet Connection? How to Troubleshoot Internet Issues

It’s incredibly frustrating when your internet isn’t working. Whether you’re hooked up to Wi-Fi but without internet access or you’re having trouble with a wired Ethernet connection, we’ll show you the quickest methods to identify the problem and get back online.
When it comes to internet troubleshooting, you can either methodically work your way through the troubleshooting steps or just start trying fixes until something works. While methodical troubleshooting is better for getting to the bottom of an issue once and for all, sometimes you just need to get back online ASAP. We’ll start with our top five internet quick fixes and then walk you through a more thorough troubleshooting process if you’re still having issues.
Top 5 quick fixes for internet issues
- Is it your internet signal or your Wi-Fi?
- Connected to Wi-Fi but no internet access
Wi-Fi troubleshooting
Advanced troubleshooting.
- Complete list of internet fixes
1. Restart your modem and router or internet gateway (modem/router combo) An equipment restart is the golden rule of internet troubleshooting. This should always be your first step; it’s simple, easy, and incredibly effective. See instructions.
2. Check your wires and cables Loose or damaged cables can cause a wide range of internet issues. Sometimes the fix is as simple as tightening a connection, other times you may need to replace a cable or require the help of a broadband technician. See instructions.
3. Move your router to a better spot If you’re using the internet over Wi-Fi, router placement is crucial. Sometimes moving your router just a few feet or changing the angle of the antennae can make a world of difference. See instructions.
4. Test a different website or online activity The problem may be with the app, service, or website you’re trying to access. If only one website or service is acting up, your connection is probably fine.
5. Check for an outage If the problem is on your internet provider’s end, you can’t do anything to fix it. Make sure to check for outages before getting too deep into your troubleshooting efforts. See instructions.
Internet still down?
It’s time to dig a bit deeper with our troubleshooting guide.
First, we’ll help you diagnose whether you have an internet signal issue or a problem with your Wi-Fi . Once you’ve discovered which type of problem you have, continue to either the internet signal troubleshooting section or the Wi-Fi troubleshooting section . If you’re still stumped, use our advanced troubleshooting section for particularly tricky circumstances.
Lastly, you can jump straight to our complete list of internet fixes and try each one until you’re back online.
Is the problem with your internet signal or your Wi-Fi?
Internet signal issues have different fixes than Wi-Fi issues—so, it’s important to find out which you’re dealing with. Examples of internet signal issues include problems with the signal coming from your ISP, modem issues, and issues with the wiring in and around your home. Wi-Fi issues are problems with your router’s wireless signal, such as interference from obstructions, too much distance between the router and devices, or interference from other networks and electronics.
You can tell an internet signal issue from a Wi-Fi issue with a few key troubleshooting steps.
Check the lights on your equipment
Nearly all modems, routers, and internet gateways have LED status lights. Your equipment may also have just one led light, in which case, the light’s behavior or color is often used to signal different statuses. ISPs usually provide a guide to interpreting the behavior of their rental equipment. If you purchased your own equipment, consult the manual.
Either way, the LED status lights on your equipment are very helpful for quickly diagnosing network problems.
Check the internet signal light
The light for an internet connection is on your modem and is usually labeled WAN, Internet, or with a globe icon, and you can tell the internet is on if the light (usually white or green) is solid.
If the light is red or not on at all, you have an internet signal problem as your modem isn’t successfully connecting to the internet. If this is you, skip ahead to our internet signal troubleshooting section .
Check the Wi-Fi light
The WiFi light(s) will be on your router or somewhere below the internet connection light if you have a modem/router combo unit. Labels for Wi-Fi lights vary but usually will read “2.4G” and “5G,” “WLAN,” or “Wireless.” These lights should be on and are usually blinking. If the Wi-Fi light(s) are off or red, your router isn’t broadcasting a signal. Skip to the Wi-Fi troubleshooting section to begin troubleshooting.
If the equipment lights aren’t revealing your internet issue, read on for the next steps.
A lot of internet issues can be remedied quickly by simply restarting your modem and router. It’s an easy fix that’s always worth a shot.
To restart your modem and router, unplug the power cable for 10 seconds and plug it back in. The equipment will take a few minutes to reboot.
Try using an Ethernet cable to test your connection
If you’re on Wi-Fi, try plugging your computer directly into your router with an Ethernet cable. This is the tried and true way to differentiate signal issues from Wi-Fi issues. Connect the Ethernet cable to the port on your computer, and plug the other end into one of the LAN ports on your router (these are usually yellow). Connecting the computer directly to the single port on a modem bypasses essential security measures built into the router. You need to connect to a router or modem/router combo unit to remain protected online.
If your internet comes back when you use a wired Ethernet connection, then you have a Wi-Fi problem; continue to our Wi-Fi troubleshooting section . If you still don’t have internet, the problem is likely bigger than your Wi-Fi, but it might still just be your device. Try accessing the web on a different device. If you still can’t get online, move on to our internet signal troubleshooting section to solve the problem.
Check for an internet outage
It could be that you’re not the only one whose internet is down. You can find information about internet outages on the website Down Detector , or you can contact your internet service provider (ISP) to investigate.
The site or service you’re trying to access could also be down. Try a few different websites. If they load properly, the original website you went to could be down for all visitors. (You can confirm this by typing in the URL at downforeveryoneorjustme.com .)
If the internet is down in your area, you may be able to use your cell phone as a mobile Wi-Fi hotspot to get online. You can also go outside in search of a public Wi-Fi hotspot to connect to. Take a look at our Wi-Fi hotspot guide for more details.
Wi-Fi connected but no internet?
If you’re connected to your Wi-Fi but still don’t have internet access, there’s probably something wrong with your internet signal. The same is true if you’re unable to access the internet using a wired connection. Try these fixes first.
Restart your modem, router, and device
Restarting your modem and router should be the first thing you do when encountering an internet signal issue. Don’t skip this step! This is almost always what tech support will ask you to try first, as it often solves the problem.
To restart your equipment, unplug the power cable for 60 seconds and plug it back in. The equipment will take a few minutes to reboot. It’s also a good idea to restart the device you’re using.
Check your cables and wires
Wires and cables often become loose or damaged from repeated stress. The cable feeding the internet to your modem is either a coaxial cable (the same used for cable TV), an Ethernet cable, or a phone cable. The best way to troubleshoot cables is to swap them all out, if you have extras.
Otherwise, make sure to connect these cables to both the modem and your wall outlet. Ethernet and phone cables should click when they are fully inserted into a socket. Coaxial cables should be screwed on snugly.
Also, check for damage. See if the cable looks torn or perhaps chewed by a pet. Ethernet and phone cables are especially prone to damage, as the copper wires inside are very thin.
Ethernet cables aren’t all the same, and it’s important to get the right type of Ethernet cable for the job. See our Ethernet cable article to make sure you have the right one.
When should you contact your provider?
It’s a good idea to try some basic troubleshooting before contacting your provider. Restarting your modem and checking wires will likely be the first things tech support asks you to do anyway. But if you can’t solve the problem on your own, it’s time to contact your provider for a little help.
If your ISP isn’t experiencing an outage, it can run a diagnostic on your modem to see if it’s properly communicating with the network. They may discover many possible issues, including a low signal level, device registration issues, obsolete equipment (even if you rent it from the ISP), or a glitch in the system. You may have just forgotten to pay your internet bill.
Most large ISPs also have online/chat support options through their websites and apps, if you’d rather not sit on the phone.
If you’re still having issues after trying these common fixes, move on to our advanced troubleshooting section further down the page.
Fed up with internet problems? Check out your other options.
Enter your zip code below to see all the internet providers available in your area.
You’ve figured out something’s wrong with your Wi-Fi. Wi-Fi gets tricky. It’s radio waves being broadcast by your router and a number of things can interfere with those waves. Try these common fixes first.
Restart your router
This fix works so often that it’s always worth trying first. The process is the same as restarting a modem: unplug the router or gateway, wait 60 seconds, and plug it back in. It will take several minutes to reboot.
Switch Wi-Fi bands (2.4 GHz and 5 GHz)
Your router likely transmits Wi-Fi over two frequency bands: 2.4 GHz and 5 GHz. Try switching from the frequency band you’re on to the other. This helps you avoid temporary interference while also resetting the connection between your device and router. It’s a common convention for the 5 GHz network to have a “5G” label following the network name (i.e., “Jane’s Wi-Fi [5G]). The 2.4 GHz band is commonly labeled with your network name (i.e. “Jane’s Wi-Fi) without a frequency label.
Each frequency band has its strengths and weaknesses. Basically, 5 GHz Wi-Fi is faster but doesn’t travel as far. 2.4 GHz Wi-Fi travels farther but is slower than 5 GHz and more susceptible to radio interference. So, if you’re far from the router try the 2.4 GHz, and if you need more speed and are within range, give the 5 GHz a try.
Test your Wi-Fi on different devices
If you’re on your laptop, use your phone or tablet to see if you can get online over the same Wi-Fi connection. If it connects on one device but not the other, then you know that your internet Wi-Fi is fine and it’s the disconnected device that’s having the problem.
Try a different Ethernet cable
If you have a spare Ethernet cable, swap it out with the one currently plugged into your modem and router and see if it makes a difference. Cables don’t last forever, and it could be that your current Ethernet cable has kicked the bucket and needs to be replaced.
Need a recommendation on a good replacement cable? This Cat-6 Ethernet cable is fast, sturdy, and affordable. You could also check out our article on the best Ethernet cables to learn more.
Amazon.com Price (as of 10/21/2021 10:15 MST). See full disclaimer .
Improve the position of your device and/or router
For router placement, the key factors to consider are distance, elevation, and obstructions. So, when picking a spot for your router, choose somewhere central and elevated relative to your devices. Furthermore, do your best to avoid placing the router near any electronic devices (especially microwaves) or any disruptive surfaces.
Wi-Fi radio waves get weaker the farther they travel. You want to have your device well within your router’s broadcast range. The Wi-Fi signal meter on your device helps you judge the strength of the current Wi-Fi signal.
It’s also important to place the router as high as possible. The router’s signal broadcast isn’t a straight line to your device. The signal shines out like light from a bulb, creating a dome of Wi-Fi. A higher router means a wider broadcast and better coverage of your home.
Certain obstructions and devices can also interfere with Wi-Fi signals. Wi-Fi can easily pass through wood and drywall, but tile, metal, concrete, and especially water are known to interfere with Wi-Fi signals. Microwaves, baby monitors, and cordless phones are also Wi-Fi killers when they’re running.
See our article on where to place your router to learn more about finding that perfect spot for your Wi-Fi machine.
If none of those quick fixes did the trick, there’s still plenty of things to try. Keep in mind that your problem may have more than one cause. That’s why we recommend going through the above steps first, as they are the most common fixes for internet issues.
Below are some of the rarer internet issues. These can be tough to diagnose, so it’s best to just try each one out until something works.
Run the internet troubleshooter (for Windows)
If you’re on Windows, run the built-in troubleshooter program to see if your computer can fix the issue for you. For Windows 10, click to Start > Settings > Update & Security > Troubleshoot, and then select the troubleshooter for Internet Connections.
Run Apple Diagnostics or Apple Hardware Test (for macOS)
Most Mac computers have a built-in diagnostic program that will scan your computer for issues, including problems with Wi-Fi. It’s called Apple Diagnostics on models from 2013 and later and Apple Hardware Test on models from 2012 with at least OS X 10.8.4.
To run Apple Diagnostics, disconnect any Ethernet cables and external drives, hit restart, and hold down the D key as the computer reboots. Pick a language, and then the diagnostic will launch automatically.
You can launch the Apple Hardware Test in a similar way. The only difference is that you should press Return or the right arrow button when the screen for the test appears as your computer is restarting and you’re given the prompt to choose a language.
Clear your DNS cache
The DNS cache is a digital log your browser uses as a shortcut to quickly load web pages you’ve visited before. But your cache can create technical issues if there’s a glitch or online malware has inserted uninvited URLs into your cache.
Here’s how to clear your cache on different devices:
Go to the Command Prompt by doing one of these things:
Option 1: Type “cmd” into the search bar
Option 2: Find the Command Prompt shortcut in the Windows System folder
Option 3: Type “cmd” into the Run window.
Once you’re in the Command Prompt, type in “ipconfig /flushdns.” Hit Enter to flush the cache.
Run the Terminal app. You can find it one of these ways:
Option 1: Open Terminal in the Utilities folder.
Option 2: Search “Terminal” using the Spotlight function.
In the Terminal app, enter the command to flush your cache. The command you’ll type can be slightly different depending on your Mac operating system (OS):
Yosemite and after: sudo killall -HUP mDNSResponder
Yosemite 10.10–10.10.3: sudo discoveryutil mdnsflushcache
Mavericks, Mountain Lion, Lion: sudo killall -HUP mDNSResponder
Snow Leopard: sudo dscacheutil -flushcache
You’ll be prompted to enter in the administrator password for your account. Then your cache is flushed—and hopefully any glitches with it.
Smartphones
On an iPhone or Apple device, there are two easy ways to clear your DNS cache:
Option 1: Switch on and then switch off Airplane Mode.
Option 2: Restart your device.
For Android devices, here’s how you clear your DNS cache:
Step 1: Type “chrome://net-internals/#dns” into the URL bar in Chrome.
Step 2: Tap the DNS menu.
Step 3: Click Clear Host Cache.
After you’ve cleared your cache, test your connection to see if it’s back online.
Is your connection as fast as you need?
You can always download our speed test app to see if your internet speeds match those offered on your monthly internet plan.

You can always take our speed test to see if your internet speeds match those offered on your monthly internet plan.

Scan for viruses and malware
Run a scan to see if malware or a virus is on your computer. Malicious programs can use up a lot of your bandwidth or block your internet connection entirely. McAfee , Norton , and Bitdefender all make quality antivirus software.
Switch off your antivirus software
We definitely recommend keeping antivirus software activated on your computer. However, misconfigured antivirus protections can sometimes interfere with your internet connection, so try turning off your antivirus software or firewall to see if the internet comes back.
Use a different Wi-Fi channel
This is especially important for those living in apartments and other living situations where there are multiple routers in the same area. Routers automatically select a frequency channel on which to broadcast your Wi-Fi. If there are other devices and routers nearby, these channels can become overcrowded.
To assess the best channel for your home, you’ll need to use a Wi-Fi channel analyzer. There are many free Android apps (iOS doesn’t allow it, unfortunately) that can do this. The channel analyzer will tell you what channels are being heavily used. Once you find a relatively open channel, change the channel in your router’s settings. See our article on how to log in to your router if you need some help with this.
See what’s on your Wi-Fi network
There may be a device on your Wi-Fi network that’s hogging the bandwidth or creating other connectivity problems. Your router might also limit how many devices can be connected at once, and it could be kicking devices off the network as a result.
To find out what’s on your network, log in to your router’s interface (use your cell phone if you can’t get Wi-Fi on your computer or connect via Ethernet) and look for a list labeled with a term like “DHCP clients,” “connected devices,” or “attached devices.” Usually, the name of the devices being used are included on the list (example: “Peter’s iPhone,” “Rebecca’s Macbook,” or “Computer 1”).
You can then figure out who’s using the Wi-Fi and ask everyone in your household if they’re doing anything that’s taking up too much internet speed.
Many routers let you kick devices off the Wi-Fi, so go ahead and give a user the boot if you don’t know them or they’re causing problems. You can also change the Wi-Fi password so they can’t get back on.
Internet running slow?
If you’re experiencing repeated slowdowns and outages, you may have an internet plan that’s too slow. Take our “How much speed do I need?” test to see if you’re paying for enough internet bandwidth to deliver the goods.

Make sure you have a working IP address
There’s a chance your computer is having trouble configuring a valid IP address. Your computer needs a unique IP to get on the internet, but you won’t be able to get online if multiple devices are assigned the same IP or if something has prevented your computer from assigning one. It’s not a particularly common issue, but it can happen—especially if you have multiple routers on the same home network.
To ensure you have a valid IP address, use the instructions in our article on how to find your IP address .
Force open the network’s login page (for public Wi-Fi)
Hotels, airports, and cafes often provide free internet—usually, all you have to do is open your browser and sign on to the public Wi-Fi network through a login screen. But what if that login page refuses to load?
You can force open the login page by typing one of these codes into your browser’s address bar:
- 192.168.1.1
- http://localhost
Get fiber internet
Fiber internet is by far the fastest and most reliable internet you can get. So if you can get a fiber internet package for your home, we highly recommend you go for it, since it will vastly reduce the chance of annoying slowdowns and service outages that are more common on other internet connection types.
You can get speeds of anywhere from 100 Mbps to 1,000 Mbps on a fiber connection, giving you ample bandwidth to cover a range of activities and tasks while also supporting many other users on your Wi-Fi. Prices range from $35 per month to $100 per month.
Fiber isn’t available everywhere, unfortunately. But if you frequently have problems with your connection, it could be worth looking into some kind of upgrade or switching providers.
Enter your zip code to see what other internet options are in your area. It may be worth switching internet providers if you experience frequent technical glitches.
Upgrade your equipment
You may experience connection issues if you have outdated equipment that doesn’t match the latest wireless standards: 802.11ac (Wi-Fi 5) or 802.11ax (Wi-Fi 6). You’ll also want to ensure that your modem supports DOCSIS 3.0 protocol or newer (for cable internet).
You may have issues with an older router, computer, or other Wi-Fi device that doesn’t adhere to recent wireless standards. In that case, you may want to invest in a new router. Or your computer may need a new wireless adapter (a device that lets you connect to a Wi-Fi network).
Here’s how to check the wireless standard of your computer:
Step 1: Hold down Option while clicking on the Apple menu in the top left of the screen, then select System Information.
Step 2: Scroll down to Network, click Wi-Fi in the drop-down menu, and look for the readout for Supported PHY Modes. This will tell you what wireless standard your computer is outfitted for.
Step 1: Right-click on the Start menu button and then click the command for Device Manager. (Or type “Device Manager” into the search bar in the Start menu—either way works.)
Step 2: Once you’re in Device Manager, click on the menu titled Network adapters and look for the listing of your wireless adapter and the wireless standard it’s set to.
Reset your equipment to factory settings
If you’ve tried everything else to no avail, it may be time to reset your router or gateway to its factory settings. This is a pretty big step because it will restore the router/gateway to the way it was when you first pulled it out of the box, wiping the slate clean.
Resetting your router will erase your password and issue a default one (which you will then want to change for security reasons). It will also erase any memory of custom features or guest networks you’ve set up through the router, and it will kick off all the devices that were signed onto the network.
Getting everything back up and running again will take a chunk of time out of your day, so this is worth trying only if you have no other options.
Anyway, here’s how you do it. Use a safety pin or paperclip to push the button hidden in the tiny hole at the back of the router. Hold it down for a few moments until the status lights go out and begin to reset.
Even if your internet is working fine, there are always ways to make your Wi-Fi connection even better. Take a look at our tips on how to improve your Wi-Fi bandwidth .
Reset your computer’s network settings (a.k.a. the nuclear option)
If all else fails, it’s time to reset your computer’s network entirely. This changes everything back to default settings. It’s not the most convenient option, but it could be the fix you need to start from scratch and erase the Wi-Fi bugs once and for all.
Keep in mind that this isn’t like turning off the computer and turning it back on. In the same way that resetting your router restores that equipment to factory settings, restoring your network totally wipes out your computer’s Wi-Fi settings, bringing it back to how it was when you were just setting it up for the first time.
Your computer will forget your network settings, including your Wi-Fi network’s name, passwords, and VPN settings. Do this only as a last resort. Make sure you save your passwords and other necessary info before doing the reset.
OK, then. Ready? Alright, here’s how to do it:
How to reset your Wi-Fi network on Mac
Step 1: Click Apple menu > System Preferences > Network.
Step 2: Click on Wi-Fi in the drop-down menu on the left of the screen
Step 3: Hit the minus (-) button to remove it. Then add it again by clicking the plus button (+) and selecting Wi-Fi in the Interface options.
Step 4: Hit Apply and close out of the Network settings.
How to reset your Wi-Fi network on Windows
Step 1: Click to Windows Settings > Network & Internet > Status.
Step 2: Hit the Network reset button.
Step 3: Hit Reset now to confirm.
Step 4: Hit Yes to confirm once again. (This is just for Windows 10. For previous Windows operating systems, see Microsoft’s Support page .)
Step 5: Restart your computer and follow the prompts for Windows to guide you through setting up your new home network. Good luck!
Complete list of fixes if your internet is not working
If you’d rather skip the troubleshooting and just start trying things, have at it. Here are all our internet fixes in a simple list.
1. Restart your equipment
To restart your modem and router or gateway, unplug the power cable and wait 60 seconds before plugging it back in. It will take a few minutes to reboot. Restart your device as well.
2. Connect with an Ethernet cable
Connecting via Ethernet will rule out issues with your Wi-Fi network. If you can get online via Ethernet, there’s something interfering with your Wi-Fi. This fix gets you back online right away, and then you can use our Wi-Fi troubleshooting section to fix the issue.
3. Check for an internet outage
The internet may be down in your area. You can use a site like downdetector.com to see if anyone else is having connection issues in your area. Many ISPs also have outage alerts via their websites and apps. Of course, you could always just call your ISP to find out if there’s an outage.
4. Try using a different device
See if you can get a connection on a different device. The device you’re using might not be connected properly to your router.
5. Check your wires and cables
Your cables and wires could be loose or damaged. Coaxial cables should be screwed on snugly and phone and Ethernet cables should be fully inserted into the sockets. While you’re at it, look for signs of damage in the form of kinks, hard twisting, excessive tension, even chew marks from pets.
You could also try just swapping out cables if you have extras. Start with the Ethernet cable that connects your modem to your router. The copper lines inside the cable or in the connectors could have become severed without any obvious visible signs of damage. The springy clip on the connector could also have worn out, in which case the slightest nudge of the cable could cause your internet to go in and out.
6. Run your computer’s internet troubleshooter
Something may be amiss within your computer’s operating system. Both Mac and PC computers have troubleshooters built into their OS that can solve the problem for you. If you need help, see our instructions on using your computer’s troubleshooter .
7. Reposition your router/gateway
Your router’s placement can make or break your home’s Wi-Fi coverage. The key things to remember when choosing a location are elevation, distance, and obstructions. Elevate your router to provide a wider coverage area. Choose a central location to cover your home as completely as possible. Lastly, be mindful of obstructions like metal, tile, concrete, and water that can hamper Wi-Fi signals.
Alternatively, you could try moving your device closer to your router—somewhere with a clear line of sight to avoid obstructions. See our article on router placement for more information.
8. Update everything
Obviously, you’ll need internet access to update your OS, system firmware, and network software. To do so, you may need to use your mobile phone as a Wi-Fi hotspot, seek out a public Wi-Fi hotspot, or hop on a friend or family member’s internet connection.
It’s important to keep the OS and applications on your devices updated. Be especially mindful of OS updates, firmware updates (particularly network and wireless adapter updates), and antivirus application updates.
9. Ensure your equipment isn’t obsolete
You may be using an obsolete modem, router, or gateway—even if you rent your equipment from your ISP. The provider will usually notify you if you’re renting obsolete equipment, but it’s easy to overlook this alert.
Ensure your modem supports the DOCSIS 3.0 protocol or newer (for cable internet). Your router and device should support the Wi-Fi 5 wireless standard or newer.
The firmware on your equipment is usually updated automatically by the ISP.
10. Check your modem’s signal level
The signal from your ISP to your modem needs to be above a certain strength threshold to function properly. Low signal to the modem could easily result in a slow or completely dead internet connection.
It used to be that only a broadband technician with an expensive meter could tell your signal strength, but now, many routers and even some ISP apps will give you a signal reading. You can also call your ISP to run a diagnostic on your modem. If you have low signal strength to your modem, you probably need a technician to come out and repair the problem.
11. Contact your ISP
Your ISP can help you diagnose connection problems by running a diagnostic on your equipment. Customer service can find and solve all kinds of problems over the phone or through chat support. It’s certainly worth a try. If your issue can’t be solved over the phone, you can set up an appointment with a technician just in case you can’t fix the issue yourself.
12. Turn off your antivirus software
This isn’t something we recommend lightly, but it could do the trick. Turning off your antivirus software makes your system more vulnerable to malicious software and cyber attacks. Still, your antivirus software is a major link between your device and the internet. The possibility of an issue here is often worth exploring after exhausting the likely causes.
If you are able to get online after deactivating your antivirus software, we recommend you either turn it back on and get in touch with your antivirus software’s technical support team or replace the software immediately before browsing the web unprotected.
13. Reset your equipment to factory settings
Resetting your modem and router or gateway reverts all settings to the factory defaults. The most important thing to remember here is that your passwords and networks will all be erased. You’ll have to reset your network name and password and reconnect all your devices.
Additionally, the login credentials used to access and change your equipment’s settings will also switch back to the default username and password (usually printed on a sticker attached to the equipment). This is different from your Wi-Fi name and password. If you don’t know your equipment’s default login credentials, you should call your equipment’s manufacturer or ISP (for rented equipment) before attempting this step. You could end up completely locked out otherwise.
See our instructions above to learn how to reset your equipment.
14. Make sure you have a working IP address
There’s a chance that your computer is having trouble configuring a valid IP address. Your computer needs a unique IP to get on the internet, but you won’t be able to get online if multiple devices are assigned the same IP or if something has prevented your computer from assigning one. It’s not a particularly common issue, but it can happen—especially if you have multiple routers on the same home network.
See our instructions above to learn how to check for a valid IP address on Windows and Mac.
15. Reset your computer’s network settings
Resetting your network settings is similar to resetting your equipment. Your computer’s network settings will revert to their factory defaults, and you’ll need to re-enter your network information again.
See our instructions above to learn how to reset your computer’s network settings.
Still can’t get good Wi-Fi? It may be time to switch internet providers. Type in your zip code to see if you can find a more reliable ISP in your area.
Product prices and availability are accurate as of the date/time indicated and are subject to change. Any price and availability information displayed on Amazon.com at the time of purchase will apply to the purchase of this product. HighSpeedInternet.com utilizes paid Amazon links.
CERTAIN CONTENT THAT APPEARS ON THIS SITE COMES FROM AMAZON. THIS CONTENT IS PROVIDED ‘AS IS’ AND IS SUBJECT TO CHANGE OR REMOVAL AT ANY TIME.
Read page in Spanish
Author - Austin Aguirre
Austin worked as a broadband technician installing and troubleshooting countless home internet networks for some of the largest ISPs in the U.S. He became a freelance writer in 2020 specializing in software guides. After graduating with a BS in technical communication from Arizona State University, he joined the team at HighSpeedInternet.com where he focuses on home network improvement and troubleshooting.
Editor - Rebecca Lee Armstrong
Rebecca Lee Armstrong has more than six years of experience writing about tech and the internet, with a specialty in hands-on testing. She started writing tech product and service reviews while finishing her BFA in creative writing at the University of Evansville and has found her niche writing about home networking, routers, and internet access at HighSpeedInternet.com. Her work has also been featured on Top Ten Reviews, MacSources, Windows Central, Android Central, Best Company, TechnoFAQ, and iMore.
Related Posts

The Tech Edvocate
- Advertisement
- Home Page Five (No Sidebar)
- Home Page Four
- Home Page Three
- Home Page Two
- Icons [No Sidebar]
- Left Sidbear Page
- Lynch Educational Consulting
- My Speaking Page
- Newsletter Sign Up Confirmation
- Newsletter Unsubscription
- Page Example
- Privacy Policy
- Protected Content
- Request a Product Review
- Shortcodes Examples
- Terms and Conditions
- The Edvocate
- The Tech Edvocate Product Guide
- Write For Us
- Dr. Lynch’s Personal Website
- The Edvocate Podcast
- Assistive Technology
- Child Development Tech
- Early Childhood & K-12 EdTech
- EdTech Futures
- EdTech News
- EdTech Policy & Reform
- EdTech Startups & Businesses
- Higher Education EdTech
- Online Learning & eLearning
- Parent & Family Tech
- Personalized Learning
- Product Reviews
- Tech Edvocate Awards
- School Ratings
Writing and Differentiated Instruction: Everything You Need to Know
Improving language proficiency and scientific literacy in learners, how to teach spelling: everything you need to know, product review of ticktalk 5, product review of the grid duffle backpack, product review of naturopathica’s active body bundle, the benefits of differentiated instruction: everything you need to know, teaching children inferential thinking: everything you need to know, why choose sharepoint learning management system, good readers and reading strategies: everything you need to know, how to diagnose connection problems with internet explorer.
As we become increasingly reliant on the internet to carry out many crucial tasks, issues with internet connectivity can cause significant disruption in our daily lives. One of the most widely used web browsers, Internet Explorer, is no exception to this. Connection problems with Internet Explorer are quite common and can arise due to various reasons. In this article, we discuss a few methods to diagnose and resolve connection problems with Internet Explorer.
Step 1: Check your internet connectivity
The first action to take when diagnosing connection problems with Internet Explorer is to check your internet connection. Sometimes the connection may drop, and you may not be aware of it. Try reconnecting your router or modem by unplugging and replugging them. Also, make sure that your Wi-Fi router is not in a far-off location or obstructed by a wall that can interfere with the signal.
Step 2: Disable Add-ons
Internet Explorer Add-ons can potentially cause connection issues. Therefore, you should disable add-ons when trying to diagnose connectivity issues. To do this, click on the “Tools” option from the toolbar and then select “Internet Options.” Next, head to the “Programs” tab and click on “Manage Add-ons.” This will display all installed and active add-ons. Disable all add-ons and restart the browser to see if the connectivity issue is resolved.
Step 3: Clear Browser Cache and History
Clearing the browser cache and history can help resolve IE connectivity issues. This step deletes any temporary files that may be causing connectivity problems. To do this, click on “Tools” from the browser toolbar and then click on “Internet Options.” Go to the “General” tab and under “Browsing History,” click “Delete.” This will open a new dialog box where you can choose the data types you wish to delete. Select “Temporary Internet Files” and “History” and then click on “Delete” to clear it.
Step 4: Disable Security Layers
Sometimes, stringent security layers installed on a computer can cause problems in connecting to the internet. Therefore, you should disable all security layers temporarily to see if the connectivity problem is due to security. Go to the Control Panel, select “Security,” and then select “Security Center.” Here, turn off the firewall and other security layers and then try connecting to the internet again.
Step 5: Check for Malware
Malware often causes connectivity issues with Internet Explorer. Therefore, you should conduct a thorough virus scan on your computer to check for any malicious software that may be disrupting your connection. You can use your computer’s installed antivirus or download one online to perform the scan.
Connection issues with Internet Explorer can cause significant disruption in one’s work, but with the above troubleshooting steps, you can quickly resolve the issue. Remember, connection issues can sometimes be arising from a more severe problem than simple connectivity, for instance, NIC cards, network switches or other network equipment. If problems persist, contacting an IT consultant can help identify an underlying issue.
How to Delete Downloads on an Android ...
How to disable cortana in windows 11.

Matthew Lynch
Related articles more from author.

How to Make an Enchantment Table in Minecraft

Ways to Learn About Cryptocurrencies

Android Phone Not Receiving Calls? Here Are Fixes to Try

Adobe Photoshop Menu Bar Options
Best Screenshot Apps and Tools for Windows
How to Fix Common Xbox 360 Wireless Networking Problems
8 Most Common Internet Explorer Issues (And Easy Ways to Fix Them)

Your changes have been saved
Email Is sent
Please verify your email address.
You’ve reached your account maximum for followed topics.
When Does Facebook Messenger Notify Others About Screenshots?
You can replace all your chargers with this small plastic box, run your office smoother and faster with the upgraded onlyoffice docs 8.1.
After being the subject of jokes and hated for years, Internet Explorer has largely moved into obscurity now. Microsoft still includes Internet Explorer 11 (the final version) with Windows 10, but it's more for compatibility reasons than anything else.
However, you might sometimes find yourself in situations where you have to use Internet Explorer. Let's look at quick fixes for common Internet Explorer issues so your time with the aging browser isn't a hassle.
1. Internet Explorer Is Not in Active Development
Before we address specific Internet Explorer problems and fixes, we have to cover the obvious. While Microsoft maintains it on supported versions of Windows, Internet Explorer is an old browser that the company no longer actively develops. Due to a lack of modern features and an aging configuration, Internet Explorer 11 is increasingly insufficient for today's web.
Because of this, we don't recommend that you use Internet Explorer unless you absolutely have to. It's mainly included with Windows 10 as a backward compatibility tool, as many internal business websites require Internet Explorer to work properly. Unless you come across such a site, you'll be much better off using Chrome, Firefox, Opera, Microsoft's revamped Edge, or even an open source browser .
Below, we'll cover a few common problems with Internet Explorer. If you can't solve any of them easily, don't waste your time---just use something else.
2. Basic Internet Explorer Troubleshooting: Updates Not Installed

As mentioned, Internet Explorer doesn't receive updates often. However, on the off chance that Microsoft fixed a known problem with Internet Explorer recently, you should check for updates before you start more focused troubleshooting.
On Windows 10, the browser receives updates through Windows Update, since it's a component of the OS. Head to Settings > Update & Security > Windows Update to check for the latest updates, and apply any that appear here.
3. Can't Find Internet Explorer
Internet Explorer comes with Windows 10 by default. To open it, just search for Internet Explorer on the Start menu. If it doesn't appear there, press Win + R to open the Run box and type iexplore.exe .
Should you see an error message or have Internet Explorer fail to load, it's likely that you (or another administrator on your computer) disabled it. Perhaps they didn't want anyone using the old browser unnecessarily.
To activate Internet Explorer again, type Windows features into the Start menu and select Turn Windows features on or off . In the list that appears, scroll down and check Internet Explorer 11 if it's not already. Click OK , wait for the process to complete, then restart your PC. It should then be available.

4. Error 404 in Internet Explorer
Error 404 means that the page you're trying to visit doesn't exist. Usually, this happens because you mistyped a URL or clicked on a link that leads to a dead page; it's rarely a problem with IE.
When this happens, press F5 to refresh the page and make sure it's not a temporary issue. If you manually typed the URL, double-check to confirm you didn't make any mistakes. After checking those, try searching for the page using Google.
If it doesn't appear from searching, chances are that the page no longer exists. Try accessing it from another browser, or a different device like your phone. If that works, try clearing your browser cache in IE.
5. Internet Explorer Crashes, Freezes, or Hangs
A lot of Internet Explorer troubleshooting revolves around poor performance. To address these problems, you should first run the Internet Explorer Performance troubleshooter.
To access this, search for control panel in the Start menu to open it. If you see Category in the top-right, click this to change it to Small icons . Next, select Troubleshooting , followed by View all at the top-left.
In the resulting menu, double-click on Internet Explorer Performance . Before you start, click the Advanced link and choose Run as administrator for best results.

Once the troubleshooter completes, it shows you any completed actions that it took. Hopefully, these will resolve your Internet Explorer problem.
Toggling hardware acceleration can also help with these issues. This option uses your PC's graphics card (instead of the CPU) to handle graphics-extensive tasks, such as streaming video. Most of the time it's better to keep it enabled, but you can try toggling it to see if it makes a difference.
To change this, click the gear icon at the top-right of Internet Explorer (which represents the Tools menu), followed by Internet options . Select the Advanced tab at the top, then check the box for Use software rendering instead of GPU rendering . Click OK , then you'll need to restart your PC for the change to take effect.

Further Performance Troubleshooting
Browser add-ons can often interfere with performance. Click the gear icon and choose Manage add-ons to review the ones you have enabled and try turning off any that you don't need. As another troubleshooting step, you can also run Internet Explorer without any add-ons and see if that improves anything.
To do this, close all Internet Explorer windows first. Then press Win + R to open the Run dialog, enter iexplore.exe -extoff , and hit Enter . See if IE performs better with no extensions running.

If all else fails, you should try a complete reset of Internet Explorer. This sets everything back to its default state so you can start from a clean slate. Before proceeding, we recommend saving anything you want to keep from Internet Explorer, such as backing up your bookmarks .
To reset IE, go to Tools > Internet options > Advanced and click the Reset button at the bottom. You'll see a warning letting you know what this process will do. It resets all your settings, but won't remove personal content like your homepage, history, and saved form data.
Check the Delete personal settings box if you want to erase this content as well.
After you click Reset , you'll need to restart your computer for the changes to take effect.
6. Internet Explorer Display Issues
If a website doesn't look like you expect, such as appearing blank, images not displaying, broken or jumbled text, or misplaced menus, there could be some compatibility issues between IE and the website.
This can often occur due to Compatibility View, a feature designed to help display websites built for ancient versions of IE. To check, click Compatibility View settings from the Tools menu. The current website will show in the Add this website box; click Add to display it using Compatibility View.
On the flip side, if the site looks wrong and it's on the Compatibility View list, click it and choose Remove . You should never need to use Compatibility View Unless a website was specifically built for IE 8 or older, which is rare these days.

Internet Explorer's Tracking Protection feature, which reduces website tracking for your privacy, can also interfere with content. To turn off Tracking Protection, select Manage add-ons from the Tools menu. Choose Tracking Protection from the left sidebar, then right-click on each item in the list and choose Disable .
You can also try clearing your browser cache, as mentioned in section #4 above. Head to Tools > Internet options > General and click Delete under Browsing history .
Display issues can also be caused by hardware acceleration, as mentioned above. Try toggling that setting if you haven't already.
7. Videos Won't Play in Internet Explorer
If you can't get a video to play in IE, try using another browser. Most video uses HTML5 these days, which works in every modern browser. When a specific video won't play, it probably relies on a feature that IE lacks.
If you really need to watch it in IE, check your add-ons to check for conflicts, as described above.
8. Can't See Any Pictures in Internet Explorer
You can try all the previously mentioned solutions for this problem, such as Compatibility View, turning off Tracking Protection, and clearing temporary internet files. However, there's actually a setting that disables all pictures in Internet Explorer. It's a simple fix if you've run into this issue.
Browse to Tools > Internet options > Advanced . Scroll down to the Multimedia header and make sure that Show pictures is checked.

If this is checked, you may want to reset Internet Explorer's security settings. While in Internet options, click the Security tab and you'll see several "zones" at the top (most sites fall into the Internet zone). Simply click Reset all zones to default level and restart your PC to put everything back to normal.
Should this all fail, reset IE to its default settings as explained above.
IE Is Old, So Issues Aren't Surprising
Now you know how to respond when Internet Explorer isn't working properly. Hopefully, you almost never have to use it and thus don't run into many problems. Again, since the browser is far from modern, these problems can definitely occur. We urge you to use another browser when at all possible.
In case you're stuck with IE for a while longer, check out our Internet Explorer FAQ for more help .
- Internet Explorer
The Tech Edvocate
- Advertisement
- Home Page Five (No Sidebar)
- Home Page Four
- Home Page Three
- Home Page Two
- Icons [No Sidebar]
- Left Sidbear Page
- Lynch Educational Consulting
- My Speaking Page
- Newsletter Sign Up Confirmation
- Newsletter Unsubscription
- Page Example
- Privacy Policy
- Protected Content
- Request a Product Review
- Shortcodes Examples
- Terms and Conditions
- The Edvocate
- The Tech Edvocate Product Guide
- Write For Us
- Dr. Lynch’s Personal Website
- The Edvocate Podcast
- Assistive Technology
- Child Development Tech
- Early Childhood & K-12 EdTech
- EdTech Futures
- EdTech News
- EdTech Policy & Reform
- EdTech Startups & Businesses
- Higher Education EdTech
- Online Learning & eLearning
- Parent & Family Tech
- Personalized Learning
- Product Reviews
- Tech Edvocate Awards
- School Ratings
10 Questions To Get Acquainted With Your Online Students
Best books for your children, public universities are failing the public, institutions must change how they handle sexual assaults, indications that your university is on the verge of shutting down, an age-by-age approach to disciplining your children, common elements of instructional systems design, great education leaders solicit feedback, great education leaders are instructional leaders, great education leaders are accomplished mediators and negotiators, how to diagnose connection problems with internet explorer.
As we become increasingly reliant on the internet to carry out many crucial tasks, issues with internet connectivity can cause significant disruption in our daily lives. One of the most widely used web browsers, Internet Explorer, is no exception to this. Connection problems with Internet Explorer are quite common and can arise due to various reasons. In this article, we discuss a few methods to diagnose and resolve connection problems with Internet Explorer.
Step 1: Check your internet connectivity
The first action to take when diagnosing connection problems with Internet Explorer is to check your internet connection. Sometimes the connection may drop, and you may not be aware of it. Try reconnecting your router or modem by unplugging and replugging them. Also, make sure that your Wi-Fi router is not in a far-off location or obstructed by a wall that can interfere with the signal.
Step 2: Disable Add-ons
Internet Explorer Add-ons can potentially cause connection issues. Therefore, you should disable add-ons when trying to diagnose connectivity issues. To do this, click on the “Tools” option from the toolbar and then select “Internet Options.” Next, head to the “Programs” tab and click on “Manage Add-ons.” This will display all installed and active add-ons. Disable all add-ons and restart the browser to see if the connectivity issue is resolved.
Step 3: Clear Browser Cache and History
Clearing the browser cache and history can help resolve IE connectivity issues. This step deletes any temporary files that may be causing connectivity problems. To do this, click on “Tools” from the browser toolbar and then click on “Internet Options.” Go to the “General” tab and under “Browsing History,” click “Delete.” This will open a new dialog box where you can choose the data types you wish to delete. Select “Temporary Internet Files” and “History” and then click on “Delete” to clear it.
Step 4: Disable Security Layers
Sometimes, stringent security layers installed on a computer can cause problems in connecting to the internet. Therefore, you should disable all security layers temporarily to see if the connectivity problem is due to security. Go to the Control Panel, select “Security,” and then select “Security Center.” Here, turn off the firewall and other security layers and then try connecting to the internet again.
Step 5: Check for Malware
Malware often causes connectivity issues with Internet Explorer. Therefore, you should conduct a thorough virus scan on your computer to check for any malicious software that may be disrupting your connection. You can use your computer’s installed antivirus or download one online to perform the scan.
Connection issues with Internet Explorer can cause significant disruption in one’s work, but with the above troubleshooting steps, you can quickly resolve the issue. Remember, connection issues can sometimes be arising from a more severe problem than simple connectivity, for instance, NIC cards, network switches or other network equipment. If problems persist, contacting an IT consultant can help identify an underlying issue.
How to Delete Downloads on an Android ...
How to disable cortana in windows 11.
Matthew Lynch
Related articles more from author.

What is a Facsimile (Fax)?

Depth Effect Not Working in iOS 16 Lock Screen? Try These Fixes

How Audio File Formats Differ and What This Means for Listeners

Best Websites Where You Can Watch Anime Online for Free
Laptop Plugged In but Not Charging? Tips to Solve Your Issue
Everything to Know About the Apple iPhone X
This browser is no longer supported.
Upgrade to Microsoft Edge to take advantage of the latest features, security updates, and technical support.
How to reinstall or repair Internet Explorer in Windows
- 4 contributors
The retired, out-of-support Internet Explorer 11 desktop application has been permanently disabled through a Microsoft Edge update on certain versions of Windows 10. For more information, see Internet Explorer 11 desktop app retirement FAQ .
If you experience a recurring problem when you use Internet Explorer in Windows, you may try to repair or reinstall the program to fix the problem. Although this may sound intimidating, this article offers the most direct, trouble-free methods to perform this task.
Original product version: Internet Explorer 11, Internet Explorer 10, Internet Explorer 9 Original KB number: 318378
Repair Internet Explorer in Windows
You can reset the program settings to repair your Internet Explorer. To do this, use the following procedure:
- Exit all programs, including Internet Explorer.
- Press the Windows logo key+R to open the Run box.
- Type inetcpl.cpl and select OK .
- The Internet Options dialog box appears.
- Select the Advanced tab.
- Under Reset Internet Explorer settings, select Reset . Then select Reset again.
- Select the Delete personal settings check box if you also want to remove browsing history, search providers, Accelerators, home pages, Tracking Protection, and ActiveX Filtering data.
- When Internet Explorer finishes resetting the settings, select Close in the Reset Internet Explorer Settings dialog box.
- Start Internet Explorer again.
For more information about how to reset settings in Internet Explorer, see the following video.
Disable and enable Internet Explorer
To disable and enable Internet Explorer 11, see Disable and enable Internet Explorer on Windows .
Reinstall Internet Explorer in Windows
Windows 8.1 and windows 10.
You can use the System File Checker tool to repair missing or corrupted system files to validate the corresponding system files.
Windows 7, Windows Server 2008 R2, Windows Vista, and Windows Server 2008 SP2
Step 1: Download Internet Explorer that can be installed on your Operating system using the following table as guidance.
| Windows version | Internet Explorer version that can be installed |
|---|---|
| Windows 7, Windows Server 2008 R2 | |
| Windows Vista, Windows Server 2008 SP2 | - Windows Internet Explorer 9 (64 Bit) - Windows Internet Explorer 9 (32 Bit) |
Step 2: Uninstall the version of Internet Explorer that you may have installed on top of Internet Explorer 8.0 (For Windows Vista it is Internet Explorer 7.0) that natively ships with and installed as part of the operating system.
Internet Explorer 8.0 (or Internet Explorer 7.0 on Vista) will continue to exist even after you uninstall newer versions.
Use the following procedure to remove Internet Explorer:
On the Start page, choose Control Panel , and then choose Programs and Features .
Under Programs and Features , select View installed updates on left pane.
Under Uninstall an update list, select applicable Internet Explorer version from the list (Internet Explorer 11 or Windows Internet Explorer 9) and select Yes to confirm uninstallation and restart your system to complete the process.
Step 3: Install the version of Internet Explorer that you downloaded in Step 1 and restart the system after installation.
After you reinstall Internet Explorer, run Windows Update to apply any available updates for Internet Explorer.
- How to disable Internet Explorer on Windows
- Which version of Internet Explorer am I using?
If you still can't access some websites, get help from the Microsoft Community online .
Was this page helpful?
Coming soon: Throughout 2024 we will be phasing out GitHub Issues as the feedback mechanism for content and replacing it with a new feedback system. For more information see: https://aka.ms/ContentUserFeedback .
Submit and view feedback for
Additional resources
- PRO Courses Guides New Tech Help Pro Expert Videos About wikiHow Pro Upgrade Sign In
- EDIT Edit this Article
- EXPLORE Tech Help Pro About Us Random Article Quizzes Request a New Article Community Dashboard This Or That Game Popular Categories Arts and Entertainment Artwork Books Movies Computers and Electronics Computers Phone Skills Technology Hacks Health Men's Health Mental Health Women's Health Relationships Dating Love Relationship Issues Hobbies and Crafts Crafts Drawing Games Education & Communication Communication Skills Personal Development Studying Personal Care and Style Fashion Hair Care Personal Hygiene Youth Personal Care School Stuff Dating All Categories Arts and Entertainment Finance and Business Home and Garden Relationship Quizzes Cars & Other Vehicles Food and Entertaining Personal Care and Style Sports and Fitness Computers and Electronics Health Pets and Animals Travel Education & Communication Hobbies and Crafts Philosophy and Religion Work World Family Life Holidays and Traditions Relationships Youth
- Browse Articles
- Learn Something New
- Quizzes Hot
- This Or That Game
- Train Your Brain
- Explore More
- Support wikiHow
- About wikiHow
- Log in / Sign up
- Computers and Electronics
- Internet Browsers
- Internet Explorer
How to Fix Windows Internet Explorer Not Responding
Last Updated: February 2, 2021 Tested
This article was co-authored by wikiHow staff writer, Jack Lloyd . Jack Lloyd is a Technology Writer and Editor for wikiHow. He has over two years of experience writing and editing technology-related articles. He is technology enthusiast and an English teacher. The wikiHow Tech Team also followed the article's instructions and verified that they work. This article has been viewed 562,157 times. Learn more...
This wikiHow teaches you how to fix your Internet Explorer web browser when it stops responding. There are a few things that may be causing Internet Explorer to crash, including too many toolbars, corrupt settings, and out-of-date software.
Closing an Unresponsive Internet Explorer

- If the window won't close, you'll need to force-quit Internet Explorer.

- If you see a window that says "Windows is attempting to fix this problem" pop up, click Cancel .
Deleting Toolbars

- If Internet Explorer won't even run without crashing constantly, skip this method and reset Internet Explorer .

- You can repeat this process for each toolbar you want to remove.

- Use Microsoft Edge or a third-party browser (e.g., Chrome) to go to this site if Internet Explorer isn't working.

- Windows 7 SP1 32-Bit - For a 32-bit computer with Windows 7, 8, or 10 on it.
- Windows 7 SP1 64-Bit - For a 64-bit computer with Windows 7, 8, or 10 on it.
- Windows Server 2008 R2 SP1 64-bit - For a computer running Windows Server 2008 R2.
- If you don't know whether your computer is 32-bit or 64-bit, check your computer's bit number first.

Community Q&A
- Microsoft Edge is the current successor to Internet Explorer on Windows 10 computers. Thanks Helpful 0 Not Helpful 0

- Internet Explorer is no longer supported by Microsoft. You're better off using Edge or a third-party browser if at all possible. Thanks Helpful 0 Not Helpful 0
You Might Also Like

About This Article
- Send fan mail to authors
Is this article up to date?

Featured Articles

Trending Articles

Watch Articles

- Terms of Use
- Privacy Policy
- Do Not Sell or Share My Info
- Not Selling Info
wikiHow Tech Help Pro:
Level up your tech skills and stay ahead of the curve

Fix network connection issues in Windows
Try these things to troubleshoot network connection issues in Windows 11.
Make sure Wi-Fi is on. Select Start > Settings > Network & internet , then turn on Wi-Fi . Next, select More options ( > ) next to Wi-Fi, then select Show available networks . If a network you expect to see appears in the list, select it, then select Connect . Open Wi-Fi settings
See if you can use the Wi-Fi network to get to websites from a different device. If you can’t, restart your modem, router, and device, and re-connect to the Wi-Fi.
Try turning Wi-Fi on and off. This can solve issues by restarting your connection.
If your Surface still isn't connecting, try the steps on Surface can't find my wireless network .
Get more help fixing network connection issues
Try these things to troubleshoot network connection issues in Windows 10.
Use the Network troubleshooter. Select Start > Settings > Network & Internet > Status . Under Change your network settings , select Network troubleshooter . Open Status settings
Make sure Wi-Fi is on. Select Start > Settings > Network & Internet > Wi-Fi . Next, select Show available networks , and if a network you expect to see appears in the list, select it, then select Connect . Open Wi-Fi settings
See if you can use the Wi-Fi to get to websites from a different device. If you can’t, restart your modem, router, and device, and re-connect to the Wi-Fi.

Need more help?
Want more options.
Explore subscription benefits, browse training courses, learn how to secure your device, and more.

Microsoft 365 subscription benefits

Microsoft 365 training

Microsoft security

Accessibility center
Communities help you ask and answer questions, give feedback, and hear from experts with rich knowledge.

Ask the Microsoft Community

Microsoft Tech Community

Windows Insiders
Microsoft 365 Insiders
Was this information helpful?
Thank you for your feedback.
8 Easy-to-Do Ways to Troubleshoot Network Connection
You'll be up and running in no time
A faulty Wi-Fi connection doesn’t have to ruin your day. There are plenty of ways you can restore a lost internet connection. Follow these network troubleshooting tips and you’ll be up and running in no time.
1. Check Your Settings
First, check your Wi-Fi settings. Go to Settings > Network & Internet > Wi-Fi . Switch Wi-Fi to the On position.

Phones and tablets also have settings that turn Wi-Fi on and off. Make sure that it is turned on so you can connect to the network.

You also want to check if Airplane Mode is turned on.
2. Check Your Access Points
Check your WAN (wide area network) and LAN (local area network) connections. In layman’s terms, these are the Ethernet cables that go to and from your router.

If you suspect that the cables are the culprit, try swapping them out with new ones.
3. Go Around Obstacles
Walls, furniture, and other obstructions can be the reason why you’re unable to go online. Moving closer to the router can re-establish the connection. If moving closer to the router does not solve the issue, then at least we can remove it from the list of suspects.
4. Restart the Router
Sometimes restarting the router can help fix connectivity issues. This is even truer in cases where the router has not been turned off in a while. A quick restart can jolt the router back into working like it used to.
If that doesn’t work, you might also consider resetting the router. But only do so if you’re okay with it being restored to its factory settings. You will have to reconfigure everything including the SSID and password.
5. Check the Wi-Fi Name and Password
Check the network name (otherwise known as SSID) and password of the network connection. If you’re used to connecting automatically when in range of a router but are no longer able to, changes may have been made to the network while you’re away.

It could be as simple as administrators updating the password or the SSID could have been changed to a different one.
6. Check DHCP Settings
Routers are usually set up as DHCP servers. This setting lets computers join a network automatically. With DHCP turned on, users will no longer have to mess with IP Address and DNS Server settings manually.
To edit your DHCP settings, go to Windows Settings > Network & Internet > Wi-Fi . Under Wi-Fi , click Manage Known Networks . Select a network and click Properties .

Under IP Settings , click Edit . From the drop-down menu, select Automatic (DHCP) .

Note: Selecting Manual will let you set your DNS Server Address and IP Address settings manually.
7. Update Windows
Your network problems could be caused by your system. If that is the case, Windows could have possibly released a fix. Try updating your Windows machine to the latest release.

Go to Windows Settings > Update & Security > Windows Update . Click Check for Updates . If there are updates available, Windows will download and install them.
8. Open Windows Network Diagnostics
Windows has a tool called Windows Network Diagnostics that lets users troubleshoot connection issues.
Go to Windows Settings > Network & Internet > Status . Under Change Your Network Settings , click Network Troubleshooter .

Windows Network Diagnostics will run a couple of tests to see what’s possibly causing your Wi-Fi issues.

Windows will let you know if it does not find any issue. Otherwise, you will be given a list of possible actions to take to resolve the problem.
This tool, or a version of it, should be available in Windows 7 to Windows 10.

Christopher Jan Benitez is a freelance writer for hire who provides actionable and useful web content to small businesses and startups. In his spare time, he religiously watches professional wrestling and finds solace in listening to '80s speed metal. Read Christopher's Full Bio
Read More Posts:

Leave a Reply
Your email address will not be published. Required fields are marked *
IMAGES
VIDEO
COMMENTS
Step 1. Open Internet Explorer and click on the "Tools" button in the control bar at the top of the window. From the "Tools" menu, select "Diagnose Connection Problems." A window will appear, displaying the start page of the diagnostics tool. Video of the Day.
In This Video You Will Find How To Fix Diagnose Connection Problems Error in Internet Explorer on Windows 7 ️. ️ ️ ️ 𝐌𝐎𝐑𝐄 ...
To reset Internet Explorer to the default settings, follow these steps: Start Internet Explorer, and then on the Tools menu, click Internet Options. Click the Advanced tab, and then click Reset. (The screenshot for this step is listed below). In the Internet Explorer Default Settings dialog box, click Reset.
Method 1: Reset Internet Explorer. This will reset all settings and custom options set in Internet Explorer. Your bookmarks will not be deleted. Hold the Windows Key and Press R. In the Run Dialog, type inetcpl.cpl and Click OK. Click on the Advanced tab. Click on the Reset button below. Place a check next to Delete Personal Settings and click ...
Try this: Open Internet Explorer and select Tools > Internet options. Select the Advanced tab, and then select Reset. In the Reset Internet Explorer settings dialog box, select Reset. When Internet Explorer finishes applying the default settings, select Close > OK. Restart your PC to apply the changes.
3. Check Proxy and DNS settings. Press the Windows key on your keyboard. Click on the Start menu, type Internet Options, and then click on it. Go to the Connections tab, and then tap the LAN settings. Select Automatically detect settings and then click OK. Restart Internet Explorer to see if the issue is resolved.
Hit the Run button next to Internet Connections. In the new window, select Troubleshoot my connection to the Internet. If there is no recommended fix, resetting your network can set the records straight. Return to the main Settings screen and this time, select Network & internet from the left pane.
4. Test a different website or online activity. The problem may be with the app, service, or website you're trying to access. If only one website or service is acting up, your connection is probably fine. 5. Check for an outage. If the problem is on your internet provider's end, you can't do anything to fix it.
To do this, click on the "Tools" option from the toolbar and then select "Internet Options.". Next, head to the "Programs" tab and click on "Manage Add-ons.". This will display all installed and active add-ons. Disable all add-ons and restart the browser to see if the connectivity issue is resolved. Step 3: Clear Browser Cache ...
If that works, try clearing your browser cache in IE. 5. Internet Explorer Crashes, Freezes, or Hangs. A lot of Internet Explorer troubleshooting revolves around poor performance. To address these problems, you should first run the Internet Explorer Performance troubleshooter.
Click "Start" and type "CMD" in the search box. Press the "Ctrl," "Shift" and "Enter" keys simultaneously. This action opens a Windows Command Prompt with administrative privileges. Click "Yes" on the permission dialog screen and the Windows Command Prompt opens. You should also see "Administrator" at the top of the window.
Guidance about how to troubleshoot and help fix problems where branding changes aren't distributed or where you're experiencing proxy server setup problems. User interface problems with Internet Explorer 11. Guidance about changes to the IE Customization Wizard, security zones, Favorites, Command, and Status bars, and the search box. Group ...
Spread the loveAs we become increasingly reliant on the internet to carry out many crucial tasks, issues with internet connectivity can cause significant disruption in our daily lives. One of the most widely used web browsers, Internet Explorer, is no exception to this. Connection problems with Internet Explorer are quite common and can arise due to various reasons. In this article, we discuss ...
Report abuse. If you couldn't connect to internet , once you open the Internet Explorer, it gives you an option to run Diagnose Connection Problem , you could run it and follow steps to resolve your problem. Sometimes , the issue related to hardware , modem or ISP and in that case it recommend you to check those things.
This tutorial is about how to fix internet explorer cannot display the webpage windows 7 diagnose connection problems.This 2023 released solution also works ...
To do this, use the following procedure: Exit all programs, including Internet Explorer. Press the Windows logo key+R to open the Run box. Type inetcpl.cpl and select OK. The Internet Options dialog box appears. Select the Advanced tab. Under Reset Internet Explorer settings, select Reset. Then select Reset again.
Internet Explorer cannot display the webpage . diagnose connection problem.diagnose connection problems internet explorer.internet diagnose connection proble...
Typically, slow performance and slow browsing issues occur when any one of the following is true: You have to perform maintenance on Internet Explorer by using built-in tools. Internet Explorer has conflicting or incorrect settings. A third-party program does not work with Internet Explorer. One of the .dll files that is related to Internet ...
Click the Windows logo in the bottom-left corner of the screen. 3. Type task manager into Start. This will search your computer for the Task Manager program. 4. Click Task Manager. It's at the top of the Start window. This will open the Task Manager program, from which you can force Internet Explorer to close. 5.
Select Start > Settings > Network & internet, then turn on Wi-Fi. Next, select More options ( >) next to Wi-Fi, then select Show available networks. If a network you expect to see appears in the list, select it, then select Connect . Open Wi-Fi settings. See if you can use the Wi-Fi network to get to websites from a different device.
Go to Windows Settings > Update & Security > Windows Update. Click Check for Updates. If there are updates available, Windows will download and install them. 8. Open Windows Network Diagnostics. Windows has a tool called Windows Network Diagnostics that lets users troubleshoot connection issues.
Internet explorer cannot display the webpageWhat you can try in computer problem window 7
diagnose connection problem internet explorer | how to fix diagnose connection problem in windows 7Hello friendsWelcome back to my channelInsta I'd- https://...