

Change the size of your slides
Basic steps.
To change the slide size:
Select the Design tab of the toolbar ribbon.

Select Standard (4:3 aspect ratio) or Widescreen (16:9) or Custom Slide Size .

For more about the predefined sizes (including formats like Overhead, A3, A4, Banner, B4, and B5) or your own custom sizing, click a heading below to expand it and see the details .
Detailed steps
Choose the standard or widescreen slide size.
On the Design tab of the Ribbon, locate Slide Size in the Customize group, near the far right end of the toolbar.

Select Slide Size , and then select either Standard (4:3) or Widescreen (16:9) .

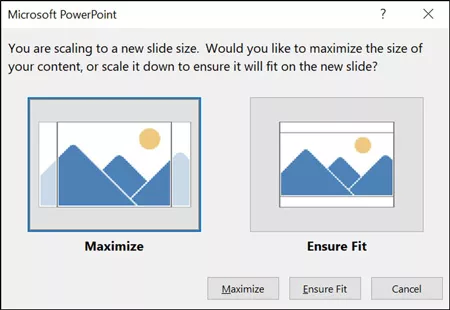
When PowerPoint is unable to automatically scale your content, it prompts you with two options:
Maximize : Select this option to increase the size of your slide content when you are scaling to a larger slide size. Choosing this option could result in your content not fitting on the slide.
Ensure Fit : Select this option to decrease the size of your content when scaling to a smaller slide size. This could make your content appear smaller, but you’ll be able to see all content on your slide.

The 16:9 widescreen setting is the default value for new presentations you create. When you change the slide size for a presentation, the size you choose only applies to that presentation. However, you can make it easy to create a new 4:3 presentation for yourself whenever you want—by defining a custom theme that uses the 4:3 aspect ratio. See the section below named "Make a default size to start from when creating new presentations."
Choose another size, such as A3, B4, or Overhead
Select Slide Size , and then select Custom Slide Size .

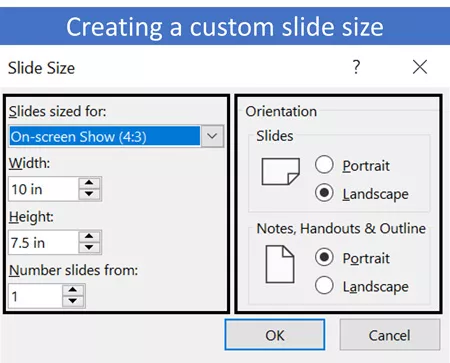
In the Slide Size box, click the down arrow next to Slides sized for and select an option. Their dimensions are listed below:
| Name | Width | Height |
|---|---|---|
| On-screen Show (4:3) | 10 in / 25.4 cm | 7.5 in / 19.05 cm |
| Letter Paper (8.5x11 in) | 10 in / 25.4 cm | 7.5 in / 19.05 cm |
| Ledger Paper (11x17 in) | 13.319 in / 33.831 cm | 9.99 in / 25.374 cm |
| A3 Paper (297x420 mm) | 14 in / 35.56 cm | 10.5 in / 26.67 cm |
| A4 Paper (210x297 mm) | 10.833 in / 27.517 cm | 7.5 in / 19.05 cm |
| B4 (ISO) Paper (250x353mm) | 11.84 in / 30.074 cm | 8.88 in / 22.556 cm |
| B5 (ISO) Paper (176x250mm) | 7.84 in / 19.914 cm | 5.88 in / 14.936 cm |
| 35 mm Slides | 11.25 in / 28.575 cm | 7.5 in / 19.05 cm |
| Overhead | 10 in / 25.4 cm | 7.5 in / 19.05 cm |
| Banner | 8 in / 20.32 cm | 1 in / 2.54 cm |
| On-screen Show (16:9) | 10 in / 25.4 cm | 5.625 in / 14.288 cm |
| On-screen Show (16:10) | 10 in / 25.4 cm | 6.25 in / 15.875 cm |
| Widescreen | 13.333 in / 33.867 cm | 7.5 in / 19.05 cm |
Overhead provides an aspect ratio very close to the standard 4:3 slide size.
There are two options for 16:9 aspect ratios:
On-screen Show (16:9) sets the slide dimensions to 10 in x 5.625 in.
Widescreen sets it to 13.333 in x 7.5 in.
Both of these options are the same aspect ratio so they will look the same in Normal View , since PowerPoint automatically adjusts the zoom level. Widescreen (13.333 in x 7.5 in.) provides more slide surface area for the content, so that is the best choice for presentations. Widescreen won’t fit on an 8.5" x 11" sheet of paper without you having to scale it down.

Select OK to accept the dimensions and close the Slide Size dialog box.
Choose custom dimensions (in inches, centimeters, or pixels)
The Slide Size dialog box opens.
In the Slide Size dialog box, ensure the orientation is set the way you want it.
In the Height and Width boxes, PowerPoint accepts measurements in inches , centimeters , or pixels . Type a number followed by a space and then the appropriate abbreviation: in , cm , or px .
| Width or Height | |
|---|---|
|
| 1 in 2.54 cm 120 px |
|
| 56 in 142.24 cm 720 px |
PowerPoint then converts measurements, if necessary, to the type of unit your operating system uses.
You can change the unit of measure that is shown in PowerPoint dialog boxes if you like.
Make a default size to start from when creating new presentations
This version of PowerPoint has a default size of 16:9 for new presentation, but you can create a different default for yourself.
Start PowerPoint.
On the File tab of the toolbar ribbon, select New . Then double-click the Blank Presentation to create a new, empty presentation.
Then on the Design tab, click Slide Size and choose the size you want for a default.
(If you want a different default slide size than what's listed there, select Custom Slide Size and then choose your size in the Slide Size dialog box, and then click OK .)

Select Save Current Theme .
Give your theme a name that you'll remember easily and click Save . Don't change the folder that the new theme is to be saved in.
On the Design tab, click the More arrow again in the bottom-right corner of the Themes group. You'll see your newly saved theme under a Custom heading.
Right-click that new custom theme under the Custom heading, and then select Set as Default Theme :

Close PowerPoint. Don't save any files if it prompts you.
Open PowerPoint again. On the File tab of the toolbar ribbon, select New .
The custom theme that you just saved is listed at the top left corner, named Default Theme . The thumbnail image looks like a widescreen slide, but in reality, when you create a new presentation based on that theme, the presentation has the aspect ratio that you've defined for this default theme.
The next time you open PowerPoint, you'll see your default theme in the upper-left of the theme gallery. When you select it, all the slides will be the custom size you chose by default.
Sizing applies to all slides in a presentation
PowerPoint isn't able to resize one slide within a presentation. All slides in a presentation are the same size.
If this is a feature you’d like to request, please send us your feedback to help us prioritize new features in future updates. See How do I give feedback on Microsoft 365 for more information.
Orientation applies to all slides in a presentation
PowerPoint isn't able to change the page orientation of certain slides. All slides in a presentation have the same page orientation.
Change the page orientation in PowerPoint between landscape and portrait
Use portrait and landscape slide orientation in the same presentation
Reduce the file size of a picture
On the File menu, select Page Setup .
In the Page Setup dialog box, under Slides sized for , select the predefined size you want, or choose Custom and specify the dimensions you want.

Select Slide Size .

Select Standard (4:3) or Widescreen (16:9) .

PowerPoint may prompt you about scaling your content. Choose one of the following options:
Scale: Select this option to decrease or increase the size of your slide content. When scaling to a smaller slide size, this could make your content appear smaller, but you’ll be able to see all content on your slide.
Don't Scale: Select this option to maintain the size of your slide content. Choosing this option could result in your content not fitting on the slide.

Choose Page Setup from the menu that appears.
Page Setup gives you an assortment of predefined slide/page size options. The options and their dimensions are listed below:
In the Slide Size box, click the down arrow next to Slides sized for and select an option.
Widescreen sets the dimensions to 13.333 in x 7.5 in.

Choose custom dimensions (in inches, centimers, or pixels)
Select Slide Size , and then click Page Setup .

The Page Setup dialog box opens.
In the Width and Height boxes, PowerPoint accepts measurements in inches , centimeters , or pixels . Type a number followed by a space and then the appropriate abbreviation: in (inches) or cm (centimeters) or px (pixels).
PowerPoint then converts the measurements, if necessary, to the unit of measurement your operating system uses.
Make a new slide size the default for new presentations
Select Slide Size , and then select Page Setup .
Follow the steps in the prior section to choose the slide size you want.
On the Design tab, click the More arrow below the standard themes.

Click Save Current Theme at the bottom of the window.

Give your theme a name that you'll remember easily and click Save .
On the Design tab, click the More arrow below the standard themes again. You'll see your newly saved theme under Custom .

Right-click your new custom theme, and then click Set as Default Theme .

The next time you open PowerPoint, you'll see your default theme in the upper-left of the theme gallery. When you select it, all the slides will be the size you chose for your default theme.
Some folks have asked about resizing one slide within a presentation. PowerPoint isn't able to do that. All slides in a presentation are the same size.
Some folks have also asked about changing the page orientation of certain slides. PowerPoint isn't able to do that. All slides in a presentation have the same page orientation.
On the Design tab of the toolbar ribbon, click Slide Size in the Customize group.

Click Standard (4:3) or Widescreen (16:9) .
When PowerPoint for the web is unable to automatically scale your content, it prompts you with two options:

The 16:9 widescreen setting is the default value for new presentations you create. When you change the slide size for a presentation, the size you choose only applies to that presentation.
You can also change the orientation of all the slides in your presentation. See Change the page orientation for instructions.

Choose custom dimensions
In the Width and Height boxes, type a measurement in inches . PowerPoint doesn't accept measurements outside the minimum and maximum shown below:
| Width or Height | |
|---|---|
|
| 1 inch (One inch is equal to 2.54 cm.) |
|
| 56 inches (Fifty-six inches is equal to 142.24 cm.) |

Need more help?
Want more options.
Explore subscription benefits, browse training courses, learn how to secure your device, and more.

Microsoft 365 subscription benefits

Microsoft 365 training

Microsoft security

Accessibility center
Communities help you ask and answer questions, give feedback, and hear from experts with rich knowledge.

Ask the Microsoft Community

Microsoft Tech Community

Windows Insiders
Microsoft 365 Insiders
Was this information helpful?
Thank you for your feedback.
Critical PowerPoint Shortcuts – Claim Your FREE Training Module and Get Your Time Back!
How to Change Your PowerPoint Slide Size (16:9 vs. 4:3)
- PowerPoint Tutorials
- March 10, 2019
In this tutorial, you’ll learn how to change your slide size in PowerPoint.
That way you can create slides for any situation including on-screen presentations, printed documents, posters, postcards, handouts, etc.
First off, the two most used PowerPoint slide sizes are:
- 16:9 ratio for onscreen presentations and new overhead projectors. This is the default setting for the latest versions of PowerPoint.
- 4:3 ratio for printing slides on standard 8.5 x 11 pieces of paper as handouts.
When starting with a blank PowerPoint presentation, changing your slide size is super easy and straightforward. If not, there are a few issues you’ll need to deal with, each covered below.
That’s why it’s worth figuring out what slide size you need BEFORE you build your presentation. If you later convert your presentation to a different size, it can be painful!
It’s just like the old carpenter saying, “measure twice and cut once.” In PowerPoint, you’ll want to “ask twice (to double confirm the required size) and build once.”
Changing your PowerPoint slide size does not make your PowerPoint presentation larger or smaller. To reduce your PowerPoint file size, you need to learn how to compress a PowerPoint presentation .
Table of Contents
How to change your powerpoint slide size.
By default, new PowerPoint presentations start in the 16:9 slide size format.
This is the NEW standard for most modern overhead projects and monitors and is recommended for most presentations. That said, you can easily change your slide size to something else.

To change your slide size in PowerPoint, simply:
- Navigate to the Design tab
- Open the Slide Size drop down menu
- Select 4:3 , 16:9 or Custom Slide Size (see options below)
When starting with a blank presentation, you are now good to go. You will not have to worry about any of the conversion issues discussed below.
Notice too, how much wider the 16:9 slide size is versus the 4:3 slide size in the picture below. The new size gives you more room for the content on your slides.

When you are converting an existing presentation to a new slide size, you will additionally be given the following prompt:
“You are scaling to a new slide size. Would you like to maximize the size of your content, or scale it down to ensure it will fit on the new slide?
Maximize leaves all your content as is on your slide, even if it no longer fits on the new slide size that you selected.
Ensure Fit scales down your content in proportion to the new slide size you have selected. You will only see this option when moving from a larger slide size to a smaller one.
Custom PowerPoint slide sizes
Choosing Custom for your slide size gives you additional options to work with. Inside the dialog box you can choose your size on the left and your orientation on the right.
On top of that, you can also input your own custom slide size. However, I recommend using one of the preset PowerPoint dimension options.
- On-screen show (4:3)
- Letter Paper (8.5×11 in)
- A3 Paper (297×420 mm)
- B4 (ISO) Paper (250×353 mm)
- B5 (ISO) Paper (176×250 mm)
- 35mm Slides
- On-screen Show (16:9)
- On-screen show (16:10)
For your orientation options on the right-hand side of the dialog box, you can choose between Landscape and Portrait .
In most situations, you will want one of the default settings. Best practice is Landscape for your presentation slides and Portrait for your printed notes, handouts and outlines.

Issues when converting 4:3 to the 16:9 slide size in PowerPoint
When converting an existing 4:3 presentation with content into the 16:9 format, you are not given any conversion options. Instead, PowerPoint simply does the conversion for you, which can create several problems.
There are two issues you will face in the new 16:9 slide size.

The first issue is that all the images on your slide master (including company logos) will be stretched to fit the new, larger slide size.
To fix the stretched images, you will need to fix those images (or reinsert them) on your slide master, as if you were creating a PowerPoint template from scratch.
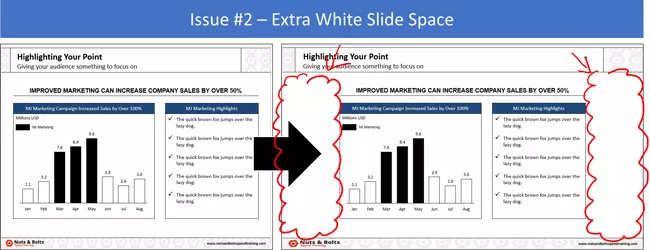
The second issue you will face in the larger 16:9 slide size is that you will have a lot of extra white space on your slides.
While you can leave the space blank, doing so will make your content look weird. Ideally you don’t want a lot of white empty space like that on your slides. Especially since all your font sizes will be so small.
That’s why if you have the time, I recommend resizing your content to fill in the white space. You can do this by either increasing the font size of your content, or adding additional visuals that support your message.
Issues when converting 16:9 to the 4:3 slide size in PowerPoint
When converting an existing 16:9 presentation to the 4:3 slide size, you are given the option to either Maximize or Ensure Fit (both covered below).
1. The Maximize option
This option means that the content on your slides will not be resized to fit the 4:3 slide size. The same is true if you move to any smaller slide size.

Maximize Issue #1: All the images on your slide master (including your company logo) will be distorted.
You might also have issues with other content placeholders, slide backgrounds or anything else that was built on your slide master. For these issues, you’ll first need to navigate to your Slide Master. Once you are there, you either adjust (or rebuild) your PowerPoint template so that everything fits properly.
Maximize Issue #2: Your content will not be scaled down to the smaller slide size. Instead, you’ll have overhanging content as pictured above.
For these kinds of spacing issues, you will need to work through your slides to adjust your content.
One recommendation as you move from the larger 16:9 slide size to 4:3, is to break up your slides. Take the contents from one larger slide and break it into two (or even three) separate slides.
Breaking up your content is preferable to just cramming more content on the smaller slide space. Doing so will make your content easier to read when presented on an overhead projector.
2. The Ensure Fit option
This option means that PowerPoint will scale down your content to fit the smaller slide size based on the size you selected.

Ensure Fit Issue #1: Distorted images, slide backgrounds and anything else that PowerPoint had to automatically resize on your slide master.
To fix these issues, you’ll need to navigate to your slide master and adjust (or rebuild) your template to make everything fit.
Ensure Fit Issue #2: Your content will be scaled down to fit your new slide size, leaving you with a lot of white space. In addition, all your font sizes will be smaller, making them hard to read.
For small content like this, you’ll need to work through your slides and resize your content accordingly. Keep in mind the people at the back of the room too when choosing a new font style and size.
Saving your custom slide size as a PowerPoint theme
If want to use your own custom slide size for all your future PowerPoint presentations, you can save and set it as a PowerPoint theme.
This is a two-step process as discussed below.
1. Save your custom slide size as a theme

To save your custom slide size (and settings) as your own custom PowerPoint theme, simply:
- Open the M ore options
- Click Save Current Theme
- Name your Theme (and don’t change the file location it saves to)
- Click Save
2. Set your custom theme as the default

To set a custom PowerPoint theme as the default for all your future presentations, simply:
- Open the More options
- Right-click your custom theme
- Select Set as Default Presentation
- Close out of PowerPoint (and do not save any presentations if it prompts you)
Once you’ve set your own custom theme as the Default Presentation, it will open every time you start PowerPoint. This saves you from always having to switch your slide sizes.
So that’s how you can change your PowerPoint slide size, either before or after you create your presentation.
And although you are given a lot of flexibility in the slide sizes you can choose from, I recommend using the default slide sizes as used by most people.
It’s also important to remember that switching slide sizes after you have built your presentation can be a total pain. So, to the extent possible, figure out your PowerPoint slide size first before you build out your presentation.
If you enjoyed the depth of this article, you’ll love our PowerPoint training courses and other free resources that you can learn more about here .
🔒 Unlock the PowerPoint Shortcuts Trusted by Industry Leaders KKR, American Express, HSBC, and More!
Join over 114,880 professionals from diverse fields including consulting, investment banking, advertising, marketing, sales, and business development who have supercharged their PowerPoint game with our proven methods.
✅ Customize compelling presentations effortlessly.
✅ Master time-saving techniques for faster deck creation.
✅ Boost your career prospects with top-notch PowerPoint skills.
Get FREE access to the Critical PowerPoint Shortcuts module of our premium training course by entering your name and email below.
DISCLAIMER: PC Users Only!
We respect your privacy and will keep your info safe and confidential.
Related Articles
About the author.

Popular Tutorials
- How to Strikethrough Text (l̶i̶k̶e̶ ̶t̶h̶i̶s̶) in Word, Excel & PowerPoint
- How to Make Animated Fireworks in PowerPoint (Step-by-Step)
- Strikethrough Shortcut (l̶i̶k̶e̶ ̶t̶h̶i̶s̶) for Word, Excel & PowerPoint
- How to Create a Flash Card Memory Game in PowerPoint (Like Jeopardy)
- Keyboard Shortcuts Not Working: Solved
PowerPoint Tutorial Categories
- Strategies & Opinions
- Shortcuts & Hacks
- Presentation Design
- Pictures, Icons, Videos, Etc.
- New Features
- Miscellaneous
- Charts & Data Viz
We help busy professionals save hours and gain peace of mind, with corporate workshops, self-paced courses and tutorials for PowerPoint and Word.
Work With Us
- Corporate Training
- Presentation & Template Design
- Courses & Downloads
- PowerPoint Articles
- Word Articles
- Productivity Resources
Find a Tutorial
- Free Training
- For Businesses
We help busy office workers save hours and gain peace of mind, with tips, training and tutorials for Microsoft PowerPoint and Word.
Master Critical PowerPoint Shortcuts – Secure Your FREE Training Module and Save Valuable Time!
⌛ Master time-saving expert techniques.
🔥 Create powerful presentations.
🚀 Propel your career to new heights.
We value your privacy – we keep your info safe.
Discover PowerPoint Hacks Loved by Industry Giants - KKR, AmEx, HSBC!
Over 114,880 professionals in finance, marketing and sales have revolutionized their PPT skills with our proven methods.
Gain FREE access to a full module of our premium PowerPoint training program – Get started today!
We hate spam too and promise to keep your information safe.
You are currently viewing a placeholder content from Facebook . To access the actual content, click the button below. Please note that doing so will share data with third-party providers.
How to change the PowerPoint Slide Size: All you need to know

It’s always a good idea to know how to change Slide Size in PowerPoint, as you might have to adapt your presentation to different devices. Did you know that the default size of a PowerPoint slide depends on the version of the program you’re using? That’s another reason why the same content can look different on various devices, so it doesn’t hurt to be prepared for surprises and learn to scale your presentation properly in Microsoft PowerPoint. This tutorial illustrates how to change the PowerPoint Slide Size to match the screen of any device, using Windows 10, your iPhone, or Mac:
Skip to chapter
First things first: about powerpoint slide dimensions, how to change the powerpoint slide size in windows 10, how to change slide size in powerpoint on your mac, how to change slide size in powerpoint on your iphone, which powerpoint slide size did you end up using.
NOTE: This guide applies to Microsoft PowerPoint 2016 and 2019. If you’re not sure about your PowerPoint version, read What version of PowerPoint do I have? . You can download PowerPoint straight from Microsoft , but you must own the Microsoft Office suite or have an Office 365 subscription to use it. This tutorial covers only Windows 10, iOS, and macOS, because the option to change the PowerPoint Slide Size is not available on Android.
You’ve done your research, practiced your speech, and spent time adding visual aids for your audience. However, it can all be ruined if you created a presentation in Microsoft PowerPoint 2019, whose default slide size is Widescreen (16:9) , and you now have to use an old projector with the Standard (4:3) size. Your slides look different from what you originally intended and need to be adjusted to fit the screen you’re currently using.
To avoid any mismatches that might result in your pages being cut off on the edges or framed by black bars in Microsoft PowerPoint, change Slide Size as soon as you know where and how you’ll deliver your presentation. Unfortunately, not everyone knows which PowerPoint Slide Size is best in each situation. If you’re in doubt, you can always rely on the two most common PowerPoint slide dimensions:
- Standard (4:3) – the default PPT Slide Size in PowerPoint 2010 and previous versions. Works best on older screens with low resolutions, old projectors, online presentation sharing platforms like SlideShare , and iPads.
- Widescreen (16:9) – the default in Microsoft PowerPoint 2013 and newer. Works best on new screens with a wide aspect ratio (HDTVs, Smart TVs, LCDs, 4K monitors), new or HD projectors, Microsoft Surface devices, and online platforms like YouTube or Vimeo. Most laptops use a 16:9 aspect ratio, with the exception of MacBook’s 16:10 aspect ratio.

Common PPT Slide Size options
These are the only two settings available on iPhones. However, Microsoft PowerPoint offers you more Slide Size options in Windows 10 and macOS, such as Letter Paper or A4 Paper , which are better suited for printing your presentation. On top of that, if you want to optimize everything as much as possible, you can input a custom PPT Slide Size in inches, centimeters, or pixels, as you’re about to see in this guide.
IMPORTANT: It’s best to change Slide Size in PowerPoint before designing your presentation, to create a perfect canvas for your ideas. If you change the size of a PowerPoint slide after adding content to it, the elements and images you included might appear distorted and need further adjustments, so the sooner you find out the aspect ratio or resolution of the device you’re using for your presentation, the better.
Open the Microsoft PowerPoint presentation you want to work with or start a new project. To change the PowerPoint slide dimensions, first access the Design tab on the app’s ribbon. Then, you can find the Slide Size button in the Customize section on the right.

Change size of PowerPoint slide from the Design tab
Depending on your screen and the size of the PowerPoint window, the option might be hidden. If you can’t see the button, press Customize to reveal it, and then click or tap on Slide Size .

Press the PowerPoint Slide Size button
This opens a dropdown menu with three available options:

In PowerPoint, change Slide Size using one of these three options
- Standard (4:3) - click or tap on this option to get slides of 10 x 7.5 inches or 25.4 x 19.05 cm.
- Widescreen (16:9) - press to get slides of 13.33 x 7.5 inches or 33.867 x 19.05 cm.
- Custom Slide Size - access this option if you are looking for something different than the two commonly used settings we discussed.
Choosing the last option opens the Slide Size pop-up window, where you can select a custom size to work with or change other slide aspects, like their orientation.

The PowerPoint Slide Size pop-up in Windows 10
While you can use the options on the right of the window to tweak the Orientation options, the settings related to the size of a PowerPoint slide are on the left side of the Slide Size pop-up. Click or tap the “Slides sized for:” field to access a dropdown menu with other presets you can use for your PowerPoint slide dimensions.

Change size of PowerPoint slide with one of the preset options
To modify the Width and Height fields, use the arrow buttons next to them or write the specific values you prefer into each box. When you change slide size in PowerPoint, you can use pixels, inches, or centimeters by typing px , in , or cm accordingly, next to the value you want.

Enter a custom value to change the PowerPoint slide size
Once you are done choosing the slide size, click OK in the Slide Size window. In Microsoft PowerPoint 2016 and newer, you get a pop-up window and can choose how to change the slide size. This only happens when scaling down to a smaller Slide Size - e.g., from Widescreen to Standard . There are two available options:

Decide what happens with the content when you change Slide Size in PowerPoint
- Maximize - click or tap on either of the two Maximize buttons to leave the contents of your slides as they are, without resizing them. If there is a lot of information on a slide, some elements might not fit anymore and bleed out.
- Ensure Fit - reduces the size of your texts or images to fit the smaller slide size. While your content is not cut out, it does scale down in proportion to the new selected size.
The new slide size is immediately applied to your PowerPoint presentation.
TIP: If you are going to hold your presentation on a Windows device, read our tutorial listing 7 ways to find out your screen resolution to find the right size for your slides.
The options to change PowerPoint Slide Size on your Mac are similar to the ones in Windows. Access the Design tab and click on the Slide Size option on the right.

Click the PowerPoint Slide Size button on the macOS Catalina version
You also get a dropdown menu with three available options on the macOS version of PowerPoint:

Change the size of a PowerPoint slide by choosing one of the three options available on your Mac
- Standard (4:3) – click on this option if you want slides of 10 x 7.5 inches or 25.4 x 19.05 cm.
- Widescreen (16:9) – clicking on this setting gets you slides of 13.33 x 7.5 inches or 33.867 x 19.05 cm.
- Page Setup – lets you define a custom size (preset or custom) if the previous common sizes are not what you want for your presentation. Clicking on it opens the Page Setup pop-up seen below.

Change the PPT Slide Size from the Page Setup pop-up on macOS Catalina
The size options in the Page Setup pop-up are identical to the ones found in Windows. Scroll up to the previous chapter to learn more about the preset values in the “Slide(s) sized for” dropdown menu or the custom ones you can insert in the Width and Height fields using inches ( in ), centimeters ( cm ), or pixels ( px ).
When you are done, click OK, and you get a different pop-up, asking you how to handle your content. If you choose to Scale , PowerPoint tries to fit everything into the new scale size, reducing your content size if needed. Clicking the Don’t Scale button keeps elements at their original sizes, even if they no longer fit correctly.

Decide to scale or keep your original content when resizing your PowerPoint slides
The new Slide Size is immediately applied to the presentation, with slide content being resized or cut if needed, according to your preferences.
On your iPhone’s slightly more basic version of PowerPoint, change slide size by accessing the Design options, which house the setting on iOS as well. The steps you need to follow are, however, not as straightforward on these devices. First, tap on the More button in the lower-right corner. Its icon looks like three horizontal dots.

Press on the three horizontal dots icon in the bottom-right corner of your screen on iPhone
You can now see and edit the PowerPoint tab you’re in. Tap on the Home button to see other available options.

Press Home to change the PowerPoint tabs on your iPhone
This opens a dropdown menu, where you can finally find the Design tab. Press on it.

Tap the PowerPoint Design tab on your iPhone
Tap on the Slide Size button listed in the Design screen.

Press the PowerPoint Slide Size button shown on the iPhone
There are only two options available, and we covered them at length in the first chapter of this guide. Tap on the Slide Size you want, and it is immediately applied.

Choose a PowerPoint Slide Size from the two options available on your iPhone
TIP: If you need to know the aspect ratio of an iOS device, read our tutorial listing 3 ways to find the screen resolution of your iPhone or iPad .
If you must regularly create and send PowerPoint presentations at work, it may not be possible to choose the perfect size, as you can’t control the devices your audience is using. The best you can do is use our guidelines to ensure the content is optimized for most viewers. If you show a PPT or PPTX project to a larger audience, make sure to review your slides, test your file in advance on the exact device you plan to use, and leave time for any adjustments.
We tend to stick with the common PowerPoint slide sizes, which are good enough for most devices we come across. What about you? Which PowerPoint Slide Size did you select? Did you find it necessary to create a custom one, or did you end up using the preset ones? Tell us your story in the comments.
- Subscribe to newsletter.
Receive our daily newsletter. You may unsubscribe at any time. For details read the Privacy policy.
Check this box if you agree to receive our emails.
You are subscribed to www.digitalcitizen.life .
Receive our weekly newsletter. You can unsubscribe at any time. For details, read our Privacy policy.
Related articles

How to embed MP3 and other audio files into PowerPoint presentations

4 ways to align text in Microsoft Word
How to embed videos into your powerpoint presentations, how to change the orientation of all the pages in a microsoft word document.
How to change the size of slides in Microsoft PowerPoint
The actual size(s) of the slide is less important than the aspect ratio. By default, slides in presentations that you create from the Blank Presentation template are set to Widescreen size.
To change the size of your presentation slides, on the Design tab, in the Customize group, click the Slide Size button and then:
Notes : The Standard slide size:
- 1600 x 1200
- 2048 x 1536
- 2560 x 1920
- Matches the aspect ratio of standard tablet screens
- Exactly fills the screen in the Slide pane and when printed on a tablet.
Notes : The Widescreen slide size:
- 1920 x 1080
- 2048 x 1152
- 2560 x 1440
- Does not match the aspect ratio of standard tablet screens
- Has empty space above and below when printed on a 4:3 screen.
- Click Custom Slide Size... :

In the Slide Size dialog box:

- Choose the slide orientation in the Orientation group.
After choosing the necessary options, click OK . The Microsoft PowerPoint dialog box will show two options on how to scale the existing slides to a new slide size:

Maximize the content size or scale it down to Ensure Fit it on the new slide.
Note : It is impossible to change the size or orientation just for some slides.
Please, disable AdBlock and reload the page to continue
Today, 30% of our visitors use Ad-Block to block ads.We understand your pain with ads, but without ads, we won't be able to provide you with free content soon. If you need our content for work or study, please support our efforts and disable AdBlock for our site. As you will see, we have a lot of helpful information to share.

Equations in PowerPoint

How to Change Slide Size or Dimensions in PowerPoint

Change PowerPoint Slide Size (Widescreen, Standard or Custom)
by Avantix Learning Team | Updated September 7, 2023
Applies to: Microsoft ® PowerPoint ® 2016, 2019, 2021 and 365 (Windows)
You can change the slide size or aspect ratio of a PowerPoint presentation in all versions. The default slide size or dimensions in 2013, 2016, 2019, 2021 or 365 is widescreen (16:9 aspect ratio). You can also enter a custom slide size if you prefer (including entering slide size in pixels). The best time to set slide size is when you first set up your PowerPoint presentation before you add any content. If you change the size later in the process, you may have to deal with distorted pictures and you may also need to adjust the position and size of various objects on slides in Normal View and in the slide master(s) and layouts in Slide Master View.
The most common slide sizes or aspect ratios are typically used as follows:
- Widescreen or 16:9 aspect ratio is frequently used for onscreen presentations using a projector, monitor or a widescreen TV. Older projectors used the standard aspect ratio but most new projectors are designed for widescreen.
- Standard or 4:3 aspect ratio is often used if slides are intended to be printed on letter size paper.
Slide size changes affect the entire presentation. You cannot change slide size for single slides.
You should never change slide size just before running a presentation as you may not be satisfied with the results. If you already have a presentation with images and other content, it's also a good idea to change slide size on a copy of the presentation so you can keep the original deck and slide size.
Note: Some Ribbon tabs may appear with slightly different names if you are working with PowerPoint 365 and have a smaller screen or different display settings. Buttons on the Ribbon may appear as icons only and are also affected by screen size and display settings.
Recommended article: How to Reduce the Size of PowerPoint Presentations (10 Ways to Compress Your PowerPoint Decks)
Do you want to learn more about PowerPoint? Check out our virtual classroom or live classroom PowerPoint courses >
Regardless of the version of PowerPoint you use, you should go through your slides after you change slide size to be sure you are satisfied with the results. Be sure to check the slide master(s) and layouts in Slide Master View as well.
Change slide size to widescreen or standard
To change slide size to widescreen or standard size:
- In Normal View, click the Design tab in the Ribbon.
- Click Slide Size in the Customize group. A drop-down menu appears.
- Select Widescreen, Standard or another option from the drop-down menu. A dialog box appears with options to maximize content or scale to fit (this dialog appears only if you are moving from a larger to a smaller slide size).
- Select the desired option.
Slide Size appears on the Design tab in the Ribbon:

The following dialog box appears in PowerPoint to maximize content or scale to fit only when you change slide size to a smaller size (such as widescreen to standard):

If you select Maximize, the slide content will not be resized when you change to the smaller slide size.
If you select Ensure Fit, PowerPoint will scale your content to fit the smaller slide size.
Change slide size to a custom size
You can use custom slide sizes. Simply choose options from the Slides sized for drop-down menu in the dialog box (such as A4 paper size) or enter custom dimensions.
To change slide size to a custom size:
- Choose Custom Slide Size from the drop-down menu. A dialog box appears.
- Select an option from the Slides sized for drop-down menu or enter the desired slide size in the Height and Width boxes.
- A dialog box appears with options to maximize content or scale to fit (this dialog appears only if you are moving from a larger to a smaller slide size).
Note that the measurement system in PowerPoint dialog boxes is based on your system settings. If you would like to change the measurement system, check out our article on How to Change the Measurement System in PowerPoint.
The following dialog box appears when you select Slide Size and then Custom Slide Size:

You can create posters in PowerPoint by entering a custom slide size such as 36 inches wide by 56 inches high or 91.44 cm wide by 142.24 cm high. The maximum slide size in PowerPoint is 56 inches or 142.24 cm. As a best practice, set the slide size before adding content to the poster.
Many PowerPoint users are not aware that you can enter slide size in pixels (simply enter the measurement with px beside the number). This is useful in a number of situations such as using PowerPoint to create social media posts. If you enter slide size in pixels (such as 200px), when you tab to another box or close the dialog box, PowerPoint changes the pixels to the equivalent in the current measurement system.
Deal with issues when changing slide size
When changing slide size in existing presentations with content, 4 common issues occur:
- Pictures may be distorted as PowerPoint tries to adjust images to fit slide size. Images on slides in Normal View will be affected as well as images on the slide master(s) and layouts. If pictures are distorted, you will need to either manually resize each image or delete them and insert them again.
- Objects such as placeholders and shapes that have been created in PowerPoint are not in the position you'd like. You may need to move objects or reset one or more slides (on the Home tab in the Ribbon, click Reset in the Slides group).
- Extra space is created if you change to a larger slide size. You may need to move or resize objects and adjust the slide master(s) or layouts in Slide Master View.
- If you have changed to a smaller slide size, you may need to increase font size for placeholders and text boxes.
Dimension differences between different slide sizes
In PowerPoint 2013 and later versions, widescreen (16:9) format measurements are different and are set to 13.33 inches wide by 7.5 inches high or 33.867 cm wide by 19.05 cm high. This matches the height of the 4:3 format.
Avoid issues when changing slide size
To avoid issues in PowerPoint related to slide size, you should:
- Try to set slide size as a first step after you create a presentation and before you have entered any content. In 2013 and later versions, the default is widescreen (16:9 aspect ratio).
- If you have changed slide size in a presentation with content, review your slides to be sure you are satisfied with the results. You should also check the slide master(s) and layouts in Slide Master View.
- Never change slide size just before running a presentation as you may not be pleased with the results and you won't have time to fix your slide deck.
- If you have created a presentation with content, make a copy of the presentation first and change slide size on the copy.
Keep in mind that widescreen is normally used for on screen presentations and standard is often used for printed presentations.
This article was first published on October 6, 2019 and has been updated for clarity and content.
Subscribe to get more articles like this one
Did you find this article helpful? If you would like to receive new articles, JOIN our email list.
More resources
How to Blur Text on a PowerPoint Slide
How to Get Slide Design Ideas Using PowerPoint Designer
How to Change Picture Brightness or Contrast in PowerPoint
How to Insert Slide Numbers in PowerPoint Presentations (Step-by-Step)
Where to Find Free Images for Your PowerPoint Presentations (10 Great Stock Photo Sites)
Related courses
Microsoft PowerPoint: Intermediate / Advanced
Microsoft PowerPoint: Design for Non-Designers
Microsoft PowerPoint: Animations Bootcamp
Microsoft Excel: Intermediate / Advanced
VIEW MORE COURSES >
Our instructor-led courses are delivered in virtual classroom format or at our downtown Toronto location at 18 King Street East, Suite 1400, Toronto, Ontario, Canada (some in-person classroom courses may also be delivered at an alternate downtown Toronto location). Contact us at [email protected] if you'd like to arrange custom instructor-led virtual classroom or onsite training on a date that's convenient for you.
Copyright 2024 Avantix ® Learning
You may also like

10 Keyboard Shortcuts in PowerPoint's Outline View
The outline has been an integral part of Microsoft PowerPoint for many years. It is dynamically linked to slide placeholders and is organized in a hierarchical way.

How to Change the Thumbnail for a Video in PowerPoint (using the Poster Frame Tool)
If you have inserted a video on a PowerPoint slide, you can display a custom thumbnail (or Poster Frame) for the video during a slide show. The thumbnail will display when you run a PowerPoint slide show and disappears when you start the video. For most videos, the thumbnail that displays is the first frame of the video clip. You can use the Poster Frame command to display a different frame in the video clip or a picture from another source as a thumbnail. A picture thumbnail could be either an image or an icon.

How to Use the Built-in Laser Pointer in PowerPoint (with Shortcuts)
During a PowerPoint slide show, you can change your mouse into a laser pointer to focus attention on a specific area on your slide. You can show or hide the built-in laser pointer using keyboard shortcuts or by using the context menu.
Microsoft, the Microsoft logo, Microsoft Office and related Microsoft applications and logos are registered trademarks of Microsoft Corporation in Canada, US and other countries. All other trademarks are the property of the registered owners.
Avantix Learning |18 King Street East, Suite 1400, Toronto, Ontario, Canada M5C 1C4 | Contact us at [email protected]
Our Courses
Avantix Learning courses are offered online in virtual classroom format or as in-person classroom training. Our hands-on, instructor-led courses are available both as public scheduled courses or on demand as a custom training solution.
All Avantix Learning courses include a comprehensive course manual including tips, tricks and shortcuts as well as sample and exercise files.
VIEW COURSES >
Contact us at [email protected] for more information about any of our courses or to arrange custom training.
Privacy Overview
Pin it on pinterest.
- Print Friendly
How to Change the Slide Size in PowerPoint for Better Presentations
Makes them much easier to read
Powerpoint presentations are supposed to be engaging. But that’s another story if the audience can’t see what’s in front of them. So, in this article, we’ll discuss how to change the default slide size in Powerpoint.
This will come in handy so you can maximize your slides to the size of the projector or monitor you’ll be using and deliver a better presentation.

Choose One Slide Size First
PowerPoint allows you to change the slide size anytime you like, but it’s a good idea to pick the right size before you start creating your presentation.
If you decide to change the size later, PowerPoint will do its best to give you options on how to shift items around, but it will more than likely result in having to totally redesign your slides.
This is especially true if you move from a widescreen format slide to a smaller 4:3 standard sized slide.

If you choose to scale it down, PowerPoint will try to fit everything as best it can into the smaller slide. If you choose Don’t Scale , the items that are outside the standard size will simply be out of the window. You’ll then have to decide whether to delete those items or move them back into the slide.
Change Slide Size in PowerPoint
Once you know what size will be ideal for your output device, you can adjust the slide size in PowerPoint.
First, go ahead and open PowerPoint and select a slide.

This guide works will work for most modern versions of PowerPoint that have the ribbon interface, including the version in Office 365.
Next, go to the Design tab. It’s where you can find the options that let you tweak your presentation’s design.

There, head over to the far right end — to where you can find the Customize section. Next, choose Slide Size .

Clicking on this option will reveal a menu. It lets you pick the size of the slide that you want. Your choices are Standard , Widescreen , and Custom Slide Size .

Let’s walk through each of the choices. This way, you will have a better understanding of your options. This will also help you adjust your slide’s size as needed – a size that works best for your projector or TV.
If you go with the Standard size, you’ll be going with a 4:3 aspect ratio. This is a safe choice because it works for familiar devices such as older screens with low resolutions.
A Standard slide size is a suggested choice for old school presenters. This means those who will be working with old projectors and SlideShare or other old online presentation platforms .

If you choose Widescreen , you’ll be going with an aspect ratio of 16:9. This is the ideal choice for you if you’re dealing with newer devices and online presentation platforms.
Got a Microsoft Surface device or HD projector? Going with a Widescreen option is the better way to go. The same is true if you’ll be presenting on a HDTV or 4K TV/monitor.

If Standard and Widescreen slide sizes are not for you, you can also go with the Custom Slide Size…

If you select this option, a pop-up window will appear.
Here, you can select from plenty of choices regarding the slide size you want. If you’re about to deliver your Powerpoint presentation on an unfamiliar projector, it’s good to go with this option.
It’s flexible. It can also accommodate your preferred slide dimensions.
Plus this way, you can select the Orientation for your slides and notes. This lets you have control over the Width and Height of your slides, too.

You can also try expanding the Slides sized for menu option. Doing so reveals preset sizes that go beyond the Standard and Widescreen size options.
As you can see, this option allows you to adjust your slide to fit the size of a Letter Paper, 35mm slide, a banner, 16:10 aspect ratio and more.

Christopher Jan Benitez is a freelance writer for hire who provides actionable and useful web content to small businesses and startups. In his spare time, he religiously watches professional wrestling and finds solace in listening to '80s speed metal. Read Christopher's Full Bio
Read More Posts:

How to Change the Size of Slides in Microsoft PowerPoint

If you’re creating a specific type of slideshow or using the application for a different purpose, you can change the PowerPoint slide size.
One size doesn’t always fit all. So if you need a different size for your PowerPoint slides, you have several options. You might use PowerPoint to create a banner for your website, need 35mm slides, or want a widescreen show to maximize your display.
We’ll show you how to change the size of the slides in your PowerPoint presentation to fit your particular needs.
How to Quickly Change the Slide Size in PowerPoint
You can select a quick option for changing the size of the slides in PowerPoint. This gives you a fast way to switch between standard and widescreen.
- Go to the Design tab.
- Click Slide Size in the Customize section of the ribbon.
- Choose between Standard (4:3) and Widescreen (16:9) .

How to Choose a Different Slide Size in PowerPoint
In addition to Standard and Widescreen, PowerPoint offers more than 10 additional slide sizes. So you’re sure to find one that you need.
- Choose Custom Slide Size on Windows or PowerPoint on the web or Page Setup on Mac.

- Decide how you want to adjust the content to fit the new slide size. On Windows or PowerPoint online, pick Maximize or Ensure Fit . On Mac, pick Scale or Don’t Scale . While labeled differently, you need to choose if you want to maximize the size of your content or scale it down to make sure it fits the new slide size.

You’ll then see your newly sized slides in your PowerPoint presentation.
How to Customize a Slide Size in PowerPoint
You can use custom measurements if you need an exact size for your slides and none of the options provided fit.
- Use the Slides sized for a drop-down box to select a size closest to the measurements you need, or select Custom to input your own.
- Adjust the sizes in the Width and Height boxes to your exact measurements. You can type in the sizes or use the arrows for slight adjustments up or down.
- On Windows or PowerPoint online, pick Maximize or Ensure Fit . On Mac, pick Scale or Don’t Scale .

And there you go! You’ll see your new custom slide size.
Your Show, Your Slides, Your Size
Whatever you use PowerPoint for, whether a business presentation or overhead show, you can change the size of your slides to meet your needs. Remember this tip for your next slideshow!
Did you know that you can also change the orientation for your slides in PowerPoint ? Please take a look at our tutorial.
Your email address will not be published. Required fields are marked *
Save my name and email and send me emails as new comments are made to this post.
Recommended for you

How to change the size of slides in Microsoft PowerPoint to match your customized presentation style or screen size
- You can change the size of a slide in your PowerPoint presentation through the "Design" menu.
- Microsoft PowerPoint allows you to change slide sizes on the Windows PC, Apple MacOS, and web-based apps.
- Visit Business Insider's Tech Reference library for more stories .
When it comes to designing your visual presentation, one size does not fit all.
That's doubly true for PowerPoint presentations, which may be viewed on several platforms and devices. Sometimes PowerPoint's default slide isn't the best option for your project, and the program has a built-in fix for that.
When you create a presentation in Microsoft PowerPoint, you can customize your slides' size and dimension. This allows you to choose a perfect canvass for your content.
Microsoft offers the ability to change the size of your slides on the Windows, Mac, and web-based apps. Here's how to do it.
Check out the products mentioned in this article:
Microsoft office (from $149.99 at best buy), apple macbook pro (from $1,299.00 at apple), acer chromebook 15 (from $179.99 at walmart), how to change slide size in powerpoint for pc.
1. Open an existing PowerPoint file, or start a new presentation.
2. Select "Design" from the top menu bar.
3. Toward the right, click "Slide Size."
4. In the drop-down menu, select Standard, Widescreen, or "Custom Slide Size…"
5. When you're done, click "OK."
How to change slide size in PowerPoint for Mac
1. Create a new presentation, or launch an existing file.
2. Click "Design" from the top-line row of options.
3. Toward the right, you'll see "Slide Size." Click it for a drop-down menu of options.
4. Select the included Standard or Widescreen options, or click "Page Setup…" for a custom size.
5. Choose "OK" when you're done.
How to change slide size in PowerPoint for web
1. Navigate to powerpoint.office.com and sign in to your Microsoft account.
2. Open a new or existing PowerPoint.
3. Select "Design" from the top row of options.
4. Click "Slide Size."
5. Select between Widescreen and Standard, or create custom dimensions with "Custom Slide Size…"
6. If selecting custom, enter the dimensions and then choose whether you want it in landscape or portrait mode.
7. Choose between maximizing your slide size or scaling it to fit the new dimensions.
8. Click "OK."
Related coverage from Tech Reference :
How to download and access microsoft powerpoint on your mac computer, how to add a border to slides in powerpoint, and give your slideshow a sleek design, how to change and format the background of your powerpoint slides to custom designs, how to change your language settings in microsoft powerpoint in 3 different ways, how to copy or duplicate a powerpoint slide and put it anywhere in your slideshow.
Insider Inc. receives a commission when you buy through our links.
Watch: We toured a $7 million NYC apartment that has a slide and zip line, and it's a kid's paradise
- Main content
How to change slide size in PowerPoint
- Written by: Harriet Jones
- Categories: PowerPoint design

Why would anyone want to change the slide size in PowerPoint? You open a file, it’s the perfect 16:9 (no 4:3 fans here!), and you get stuck in, right? Well, it depends what you’re using PowerPoint for…
Presentations are a powerful tool for communicating with your audience. But if you’re making presentations, the chances are you’re also looking for other ways to get your message out there. Perhaps you want to share news on your social media feeds, present a poster at a conference, have downloadable brochures on your website, or create business cards to hand out to unsuspecting members of the public.
You might be thinking, that sounds great, but I don’t have the tools to do all that! Would you believe me if I told you can do all this and more in good-old-PowerPoint?
PowerPoint is easy-to-use, quick to edit, and is super versatile. The feature that makes creating all these different materials possible is the ability to change the size of PowerPoint slides to your desired dimensions. ‘But how?’ I hear you cry. Well, cry no more! In this blog post I’ll teach you how to change slide size in PowerPoint.
If you’re a Google Slides user who’s wandered into the wrong blog post – this one on changing slide size in Google Slides might be what you’re looking for.
Quick guide:
- In the Design tab choose Slide Size . The highlighted box shows the current dimensions of your slides.
- In the Slide Size drop down, select Custom Slide Size .
- Select the slide size you want to use.
Step-by-step:
To know what to change, you need to know where you’re starting. When you open a brand new PowerPoint file, the standard slide dimension is widescreen (16:9). This is ideal for presentations because it matches the size and proportions of most modern screens.

To check your slide dimensions head to the Design tab then choose Slide Size . The highlighted box shows you the current dimensions of your slides.
To change your slide size, under the Slide Size drop down, select Custom Slide Size .

A pop-up box appears, and you can customise the slide size to suit your needs.
What’s helpful is that PowerPoint already has options built in for standard formats, such as Letter paper and A4, so you don’t have to spend time searching the web for the dimensions you need.

Not every combination of width and height is available in this drop down (including the dimensions for popular social media sites). So if you need a truly custom slide size, you can directly input your measurements. Select Custom from the drop-down list and type in the Width and Height you need.

PowerPoint will ask you if you want to ensure fit or maximize fit. Typically you would choose to maximise when increasing the size of your slides, and ensure fit when decreasing slide size.

Maximise will increase the size of any existing content on the slide, but as a result, all the content might not fit on the slide. Ensure fit scales down the size of existing content making it appear smaller but ensuring all the content fits on the slide. This is why it’s best to set the slide size right at the beginning and then you don’t need to worry about this.
After you’ve made your selection, select OK , and hey presto, you’ve done it.
For this example, we’ve chosen the size of a regular square Instagram post.

Converting aspect ratio to dimensions
Just a side note on working out what slide size you need for creating social media posts. When you look up dimensions for an Instagram post, the most popular Google results tell us it’s 1080px by 1080px, but as you can see in the screenshots above, it looks like PowerPoint wants us to input our dimensions as cm. This can be a little confusing, especially for us non-designers out there who don’t know our pixels (px) from our points (pts). There are lots of websites online that can help you convert your measurements, like here – www.unitconverters.net . However, it’s a little know fact that you can enter dimensions in cm, inches or pixels and PowerPoint will convert it for you! Just type the numbers, then a space and then the unit abbreviations (cm, in, px). For a comprehensive guide on all social media image sizes check out this article by Brandwatch .
A regular Instagram post is a square, so that’s easy as the ratio is 1:1, meaning the width is the same as the height. With rectangles, the ratio of width to height will differ. A LinkedIn post for example, can either be portrait 1080 x 1350 or landscape view at 1280 x 720. So for the portrait the ratio is 4:5 and landscape is approximately 16:9. Don’t let this intimidate you. If you divide both sides (width and height) by the same amount you guarantee the ratio will stay the same.
If you’re entering slide size details as centimetres make sure you consider the overall slide size in cm as this will affect the size of an image export, which in turn can affect the quality of your exported image. Put simply an Instagram post made on a 2cm by 2cm slide will be poorer quality than one made on a 10cm by 10cm one. We have a helpful blog post that goes into much more detail on Picture size and resolution in PowerPoint .
Now that you’re a pro on how to change PowerPoint slide size, let’s go through some examples of the awesome things you can do with this new knowledge. But before we do that just a note – there are dedicated software to create a bunch of the things we’ve mentioned in this article. If you have access to it, that’s amazing! Use it! But for many of us, PowerPoint is one of our only design tools and purchasing a handful of other programs isn’t on the cards, so we need to get the most out of PowerPoint that we can.
Academic posters
For researchers and students alike, creating academic posters can be one of the more gruelling tasks on your to-do list. For most people that’s because they struggle to make posters look beautiful and engaging meaning people miss out on reading your incredible work! With your new knowledge of how to change slide size in PowerPoint, you can start making A4 and A3 posters in PowerPoint.
Some things to remember…
A poster should never be an impenetrable wall of text but a visual summary of your work. It should be concise with plenty of white space, accessible, with a clear and logical layout. A great poster is a conversation starter that drives the audience to learn more.

We have a whole blog post on to how to create beautiful and effective academic posters in PowerPoint , so make sure you give that a read for more tips and tricks and a couple of cheeky freebies!
Social media posts
Once you know how to change slide size in PowerPoint you can create graphics for all your social media channels. Whether it’s for Instagram, LinkedIn, Facebook or Twitter… sorry X, we’ve got you covered. Check out this blog post on how to create social media posts in PowerPoint , from colours to image manipulation to animation! In the rapidly changing world of social media, you need to strike a balance between compelling visuals and concise messaging, to get your audience to stop scrolling, pay attention and remember your message.

If you have mind-blowing stats to share, but struggle with data visualisation, spend a little time working on your data vis skills before getting started. Start here .
And, thanks to the wonders of PowerPoint animation, you’re not just limited to static social media materials when creating in PowerPoint. Dynamic GIFs are a cool way to captivate your audience and are easier to make than you might think. When creating your GIF, remember to keep it short to capture and keep attention, and focus on smooth transitions for a polished, professional result.
Honourable mentions
Here’s a few more handy blog posts to check out for extra tips and tricks on creating anything BUT presentations in PowerPoint!
How to get the most out of PowerPoint and PDFs
How to make an infographic in PowerPoint
How to make a PowerPoint memory game
You’ve made it – now you know how to change slide size in PowerPoint and hopefully are inspired to use PowerPoint to create more than just presentations.

Harriet Jones
Communication consultant, related articles, mastering high-impact conference presentations.
- PowerPoint design / Visual communication
Conference presentations are really hard to get right compared to day-to-day presentations. How do you tackle bigger stages, bigger rooms, bigger audiences and higher stakes?

Insights from a presentation templates expert
- PowerPoint design / Industry insights
A PowerPoint template is the foundation on which polished and professional presentations are built. We interview BrightCarbon’s new Templates Lead, Gemma Leamy, and pick her brains on the ideal process for creating robust PowerPoint templates.

115 PowerPoint Christmas cards to download and share!
- PowerPoint design
- Comments: 45
It's Christmas! After a late night with too much eggnog and brandy snaps we set ourselves a challenge to see who could come up with the wildest PowerPoint Christmas card! So it's the day after the night before, and through blurry eyes we can reveal our efforts...

Leave a Reply Cancel reply
Save my name and email in this browser for the next time I comment.
Join the BrightCarbon mailing list for monthly invites and resources
First of all the deck looks great, once again you guys have done an outstanding job. Second, I’d like to comment on the quality of the training provided by your colleagues - quite simply it was exceptional. I have spoken to the whole team and that view is unanimous. Please pass this on. James Bagan MyLife Digital

- All-Access Subscriptions
- Business Licensing
- Lightroom Classic
- Photoshop Elements
- Crystal Reports
- Interview Skills
- Resume Skills
- Excel for Lawyers
- Outlook for Lawyers
- QuickBooks for Lawyers
- Word for Lawyers
- Microsoft Office Suite
- Outlook on the Web
- Microsoft Project
- Microsoft Teams
- QuickBooks Online
- QuickBooks Pro
- Video Course Options
- SUBSCRIPTIONS
- Photoshop Elements 2024
- Photoshop Elements 2023
- Photoshop Elements 2022
- Photoshop Elements 2021
- Photoshop Elements 2020
- Photoshop Elements 2019
- Photoshop Elements 2018
- Photoshop Elements 15
- Google Classroom for Teachers
- Google Docs
- Google Drive
- Google Forms
- Google Sheets
- Google Slides
- Mac OS Keyboard Shortcuts
- Excel Formulas and Functions
- Excel Keyboard Shortcuts
- Excel Tables PivotTables and Charts
- Access for Microsoft 365
- Excel for Microsoft 365
- Microsoft Office 365
- Outlook for Microsoft 365
- PowerPoint for Microsoft 365
- Publisher for Microsoft 365
- Word for Microsoft 365
- Access 2021
- Microsoft Office 2021
- Outlook 2021
- PowerPoint 2021
- Publisher 2021
- Access 2019
- Microsoft Office 2019
- Outlook 2019
- PowerPoint 2019
- Publisher 2019
- Access 2016
- Microsoft Office 2016
- OneNote 2016
- Outlook 2016
- PowerPoint 2016
- Publisher 2016
- Microsoft Office 2013
- OneNote 2013
- Outlook 2013
- PowerPoint 2013
- Microsoft Office for iPad
- Word Keyboard Shortcuts
- QuickBooks Pro 2024
- QuickBooks Pro 2023
- QuickBooks Pro 2022
- QuickBooks Pro 2021
- QuickBooks Pro 2020
- QuickBooks Pro 2019
- QuickBooks Pro 2018
- QuickBooks Pro 2017
- QuickBooks Pro 2016
- QuickBooks Pro 2015
- QuickBooks Pro 2014
- Sage 50 Accounting
- Windows 11 and 10 Keyboard Shortcuts
- Chrome OS for Chromebooks
- Word and Excel (Mac) 2022
- Word and Excel (PC/Windows) 2021-2016 and 365
- QuickBooks Desktop (PC/Windows) 2024
- QuickBooks Desktop (PC/Windows) 2023
- QuickBooks Desktop (PC/Windows) 2022-2015
- Windows 11 and 10
- Our History
- Customer Service
- Testimonials
- Lost Password
- Register a Product
- Manage My Account
- Member Login
Try the Complete PowerPoint Course for Free!
Change the size of slides in powerpoint – instructions, how to change the size of slides in powerpoint: video.
This video lesson, titled “ Learn How to Change Slide Size in Microsoft PowerPoint 2019 & 365: A Training Tutorial ,” shows you how to change the size of slides in PowerPoint. This video lesson is from our complete PowerPoint tutorial , titled “ Mastering PowerPoint Made Easy v.2019 and 365 .”
Change the Size of Slides in PowerPoint: Overview
You can easily change the size of slides in PowerPoint. To change the size of slides in PowerPoint, click the “Design” tab in the Ribbon. Then click the “Slide Size” drop-down button in the “Customize” button group. To change the slide size aspect ratio, select either “Standard (4:3)” or “Widescreen (16:9)” from the button’s drop-down menu. Alternatively, to use slides of a custom size or change other slide size properties, select the “Custom Slide Size…” command from the button’s drop-down menu to open the “Slide Size” dialog box.
To select a preset slide size, use the “Slides sized for:” drop-down in the “Slide Size” dialog box to select a preset slide size from the drop-down menu. Alternatively, to manually set the slide width and height, enter your own custom measurements into the “Width:” and “Height:” spinner boxes. To change the starting number for slide numbering, enter the starting number to use into the “Number slides from:” spinner box.

A picture showing how to change the size of slides in PowerPoint by using the “Slide Size” dialog box.
To set the slide orientation, select either the “Portrait” or “Landscape” option button in the “Orientation” section of the “Slide Size” dialog box. To set the orientation of notes, handouts, and the outline view, select either the “Portrait” or “Landscape” option button in the “Notes, Handouts & Outline” section. To apply your desired slide size settings in the “Slide Size” dialog box, click the “OK” button at the bottom of the dialog box.
Instructions on How to Change the Size of Slides in PowerPoint:
- To change the size of slides in PowerPoint , click the “Design” tab in the Ribbon.
- Then click the “Slide Size” drop-down button in the “Customize” button group.
- To change the slide size aspect ratio , select either “Standard (4:3)” or “Widescreen (16:9)” from the button’s drop-down menu.
- Alternatively, to use slides of a custom size or change other slide size properties , select the “Custom Slide Size…” command from the button’s drop-down menu to open the “Slide Size” dialog box.
- To select a preset slide size , use the “Slides sized for:” drop-down in the “Slide Size” dialog box to select a preset slide size from the drop-down menu.
- Alternatively, to manually set the slide width and height , enter your own custom measurements into the “Width:” and “Height:” spinner boxes.
- To change the starting number for slide numbering , enter the starting number to use into the “Number slides from:” spinner box.
- To set the slide orientation , select either the “Portrait” or “Landscape” option button in the “Orientation” section of the “Slide Size” dialog box.
- To set the orientation of notes, handouts, and the outline view , select either the “Portrait” or “Landscape” option button in the “Notes, Handouts & Outline” section.
- To apply your desired slide size settings in the “Slide Size” dialog box , click the “OK” button at the bottom of the dialog box.

About Joseph Brownell

- Slide Library
- Slide Library for PowerPoint
- Downloadable slides and shapes
- Slide Library search
- Search Library via shortcut keys
- Slide Library update alerts
- Rename or delete objects
- Share Slide Library
- Save slides or shapes to Slide Library
- Save presentation to Slide Library
- Manage Templates
- View all templates and set default
- Agenda Wizard
- Create Agenda Slides
- Update Agenda Slides
- Agenda Slide Numbering
- Navigate via Agenda
- Table of Contents
- Import Agenda Items
- Save Agenda Format
- Manage Colors
- Color Palette Toolbar
- Customize Color Toolbar
- Apply fill with outline color
- Recolor Charts
- View RGB color values & names
- Theme Color Tints and Shades
- Share Color Palette with team
- Insert Shapes
- Standard PowerPoint shapes
- Callouts / Speech Bubbles
- Hand Drawn Circles
- Harvey Balls
- Create Mini Slides
- Move to Multiple Slides
- Right Facing Centered Triangle
- Status Indicators
- Arrange and Align Shapes
- Select same color or size
- Select shapes by attribute
- Align shapes
- Align to first selected shape
- Choose Align anchor point
- Align using shortcut keys
- Copy paste position multiple shapes
- Straighten Lines
- Swap positions
- Distribute evenly
- Set Horizontal Gaps
- Set Vertical Gaps
- Squeeze or expand gaps
- Remove gaps
- Group Objects by Row
- Group Objects by Column
- Send to back, bring to front
- Send backward, bring forward
- Flip or rotate
- Group, ungroup and regroup
- Edit Shapes
- Same height, same width
- Copy paste position, size
- Resize shapes
- Slice shapes
- Multiply shapes
- Stretch shapes and fill gaps
- Toggle line weight and style
- Change margins toggle
- Chevrons same angle
- Paragraph Styles
- Save Paragraph Styles
- Apply Paragraph Styles
- Use PowerPoint Indent Increase/ Decrease to apply bullet styles
- Reset Paragraph Styles
- Ticks and Crosses bullets
- Paint Formatting
- Advanced Format Painter
- Position & Size Painter
- Table Format Painter
- Style Painter
- Text Format Painter
- Change Shape Painter
- Chart Format Painter
- Angles & Curves Painter
- Animation Painter
- Cycle Accent Colors
- Format Text
- Fit text to textboxes
- Wrap Text Toggle
- Merge Textboxes
- Split Textboxes
- Increase/ Decrease Font size
- Change Text Case
- Color Bold Text
- Delete Text or Replace
- Insert Superscript text
- Format Tables
- Create table from text boxes
- Convert table to text boxes
- Convert text to table
- Insert columns and rows
- Paste Excel data without source formatting
- Paste Excel data into text box tables
- Export Table or Box Table Data to Excel
- Set cell margins
- Express Table layout
- Table stripes
- Autofit columns
- Evenly space columns
- Align shapes over tables
- Harvey Balls for Tables
- Status Indicators for Tables
- Customizable PowerPoint Shortcut Keys
- Extra PowerPoint shortcuts
- Add PowerPoint shortcuts
- Search shortcut keys
- Reassign PowerPoint shortcuts
- Reset PowerPoint shortcuts
- McKinsey PowerPoint shortcuts
- F4 or Ctrl+Y redo or repeat
- Printable PowerPoint Shortcuts PDF
- How to Print a Custom Shortcuts list
- Search Shortcut Keys
- Searchable PowerPoint Shortcuts list
- Format Toolbar Overview
- Format Toolbar Layout Options
- Lock or Unlock Objects
- Lock objects
- Lock objects to the Slide Master
- Unlock objects
- Proofing Tools
- Fix Lines & Outlines
- Fix Layout, Transitions, Animations
- Fix Punctuation & Spacing
- Fix Margins, Bullets, Indents
- Check for Confidential items
- Reduce File Size
- Check Slide Master
- Set Proofing Language
- Change set language for PowerPoint presentations
- Flip PowerPoint Slides
- Flip Slides for Translation
- Slide Numbering
- Manage Slide Numbering
- Slide Numbers with totals
- Add words to Slide Numbers
- Change Starting Slide Number
- Skip Slide Numbers on Hidden Slides
- Slide Navigator
- Footers & Footnotes
- Filename Footer
- Enlarge Footnotes
- Refine Slides
- Add summary slide
- Format slide title
- Display No Fly Zone
- Send slide to appendix
- Camouflage mode
- Format Painter
- Set Grayscale
- Format Images
- Compress file size
- Format Charts
- Charts Toolbar
- Config Options
- Customize Settings
- Dark Mode Display
- Review Slides
- Customizable Status Stamps
- Sticky Notes
- Tag slides with filename and page number
- Share Slides
- Email selected slides in PPT or PDF format
- Print selected slides
- Save selected slides
- Slide Library for Teams
- Team Slide Library
- Create multiple Team Slide Libraries
- Synchronize Team Slide Libraries
- Synchronize Team Slide Library to your company Dropbox/ Box/ OneDrive folder
- Updating your Team Slide Library
- Import entire presentation to the Slide Library
- Share Slide Library with a colleague
- Share Custom Settings
- Share Custom Settings with Team
- Getting Started
- Getting started with PPT Productivity add-in for PowerPoint
- Downloadable PowerPoint Elements for Slide Library
- Tutorial - How to Create Custom Paragraph Styles for PowerPoint
- Can I use PPT Productivity on a Mac?
- PPT Productivity Basic Tools Tutorial
- PPT Productivity Plus Tools Tutorial
- New Features
- August 2023 update: Color Toolbar enhancement, new icons and more
- February 2023 update: New Slide Libraries available to download!
- January 2023 Update: Agenda Wizard, Format Painters + More
- How to copy and paste formatting in PowerPoint
- PowerPoint How To
- What are the most popular PowerPoint shortcuts?
- Where are PPT templates stored? Finding templates in PowerPoint
- Pasting data into a PowerPoint table without source formatting?
- Consulting Toolkit
- How to create effective consulting slides using Minto Principles
- Missing the McKinsey PowerPoint Shortcuts?
- Missing the Accenture QPT for PowerPoint?
- Missing the BCG PowerPoint Tools?
- Missing the Bain Toolbox for PowerPoint?
- How to add Stamps or Stickers to PowerPoint slides?
- Looking for a Consulting PowerPoint Toolbar?
- Top 10 PowerPoint Hacks / Shortcuts used by strategy consultants
- PowerPoint Tips
How to change slide size in PowerPoint
- March 25, 2021
Trying to change slide size in PowerPoint presentations? PowerPoint lets you choose between a couple of standard slide sizes, plus a custom size option. In this hints and tips blog post we provide a guide to:
- The different slide sizes in PowerPoint 16:9, 4:3 and custom sizes
- How to change a PowerPoint slide size
- How to change the orientation of PowerPoint slides from landscape to portrait
- A workaround to change selected slides to portrait for printing
Where to change slide size in PowerPoint?
From the PowerPoint Design tab on the ribbon, select the Slide Size feature button. You can find the slide size feature button on the far right end of the ribbon - refer to the screenshot below.

The three slide size options of standard, widescreen and custom will display, as shown in the screenshot below.

What are the PowerPoint slide size options?
PowerPoint offers three different slide sizes. What's the difference 4:3 vs 16:9 PowerPoint slide sizes? The Standard 4:3 and Widescreen 16:9 both have the same slide width , but have different slide heights:
- PowerPoint Standard (4:3) Slide Size: This is the original PowerPoint slide size. The standard screen size is easy to print and works well on older style pull down projector screens (when the screen shape is closer to a square than the newer widescreen layout). Powerpoint 4:3 dimensions are 10 in x 7.5 in (which is 33.867 cm x 19.05 cm). Standard PowerPoint slide size pixels = 1024 px x 768px
- PowerPoint Widescreen (16:9) Slide Size: The PowerPoint 16:9 widescreen option was a later addition but is now the default value in PowerPoint for new presentations. Widescreen is more commonly used now because the size is well suited for presenting on digital screens (typically shaped like elongated rectangles similar to a current TV screen). Powerpoint 16:9 dimensions are 10 in x 5.625 in (33.867 cm x 14.288 cm). Widescreen size 16:9 size ppt dimensions pixels = 1920 px x 1080 px
- On-screen show (4:3)
- Letter Paper (8.5x11in)
- Ledger Paper (11x17in)
- A3 Paper (297x420mm)
- A4 Paper (210x297mm)
- B4 (ISO) Paper (250x353mm)
- B5 (ISO) Paper (176x250mm)
- 35mm slides
- On-screen Show (16:9)
- On-screen show (16:10)

You can either select from one of the many options in the drop down list, or you can directly key in your preferred Width and Height for your PowerPoint presentation. As soon as you key in width and/ or height values, the drop down menu will update to show the Custom option.
Note that when you are entering a custom slide size, you have the option to specify your PowerPoint size in pixels (e.g. specify pixels for width and height). You can do this by typing in your preferred height and width in pixels using px at the end. The minimum width or height in pixels for PowerPoint slides is 120 px and the maximum width or height is 720 px. When you specify pixel size of PowerPoint slides, PowerPoint will convert the pixels automatically to your default unit of measurement (e.g. either cm or in).
You can then select the Orientation of PowerPoint slides. You have the option of Portrait or Landscape orientation - by default PowerPoint displays in Landscape format. You can select the orientation separately for the slides and the Notes, Handouts & Outline.
What PowerPoint slide size should I use?
Before the popularity of larger monitors, the 4:3 slide size in PowerPoint was the more commonly used option. 4:3 slide size is smaller and better suited to older PC monitors and older pull down projection screens.
However large monitors have now become commonplace both for use in offices and for presentation in meeting rooms. As a result - 16:9 PowerPoint slide size would now be considered the default. The 16:9 slide size is wider than the 4:3, which gives you a bit more space to work with when creating slides, especially consulting style layouts with charts or images beside text.
If you are presenting to a large audience, and/or if you are submitting slides that are being consolidated into a larger presentation, it's worth checking with the coordinator or location AV team for any guidance (for example some theatres may have screen setups which benefit from custom presentation sizes).
Can I resize selected slides in a PowerPoint presentation?
No - the PowerPoint resize option is applied to all slides in your presentation. You cannot change size of selected slides in your PowerPoint presentation.
Does PowerPoint auto resize content if slide size changes?
If you select to change the slide size for an existing presentation, PowerPoint will display a slide scaling popup menu. The menu will give you the following options for scaling your slides:
- Maximise : The maximize size scaling option in PowerPoint will make the content larger, but it may spill over the edges of your slide.
- Ensure Fit: The ensure fit scaling option in PowerPoint ensures that all content remains visible on the slide, however the content may shrink to ensure that it fits.

It's a good idea to review your content after completing the change of PowerPoint slide sizes - even if you select the ensure fit option you may need to adjust the content on some slides.
Can I change orientation of PowerPoint slides from Portrait to Landscape?
Trying to work out how to change PowerPoint to portrait layout? You can change the orientation of your PowerPoint slides from Landscape to Portrait for the entire presentation, (you cannot change only selected slides in a presentation). To change orientation of PowerPoint slides:
As per the steps above, from the PowerPoint Design tab on the ribbon, select the Slide Size feature button (on the far right end of the ribbon).
The three slide size options will display, as shown in the screenshot below. Irrespective of what size layout you want this time, you need to select the Custom Slide Size option from the PowerPoint ribbon.
From the Slide Size popup menu on the PowerPoint ribbon, you have the option to select Portrait or Landscape mode. You can select the orientation display without modifying your slide size if you already have the correct slide size selected.
You can change the orientation for both your PowerPoint slides and handouts. Note that changing the orientation e.g. from Landscape to Portrait does not automatically adjust your PowerPoint template (your logos will likely appear distorted and the title page of your presentation will look squished). You need to adjust your PowerPoint template separately. If you are changing orientation only for a single PowerPoint presentation, you can do this via your presentation's Slide Master. Or if you plan on creating multiple presentations in the new orientation, its worth spending the extra time to create a new .potx template file, suited to the new orientation.
Can you have different orientation slides in a PowerPoint? presentation?
Trying to add a vertical slide in PowerPoint, but keep the rest of the presentation horizontal? Unfortunately it's not possible to have a combination of Portrait and landscape slide orientations in a single PowerPoint presentation. But there is a workaround if you are printing rather than online presenting your PowerPoint presentation.
If you are preparing a PowerPoint presentation that will be printed, a workaround to include different orientation pages in PowerPoint is to create a slide master layout with the orientation on its side. This is a way to rotate PowerPoint slides to Portrait without changing all slides. Refer to the screenshot below for an example.

This How to Guide was brought to you by the PPT Productivity team.

See our tools at work
Book a personal demo with our PPT professionals

Start 30 Day Free Trial
Start your 30 day free trial - Microsoft Office for Windows
Download and Install
Existing customers download to install on a new computer
Related productivity tips

How to print PowerPoint with notes?
Trying to work out how to print PowerPoint with notes? There is a separate option in the PowerPoint ...

How to hide slide numbers on PowerPoint Title Slide?
Want to hide the page or slide number on your PowerPoint Title slide, but display slide numbers on ...

Can I change PowerPoint starting slide number?
Do you want to start your PowerPoint Slide number / page numbers at zero or another number? By ...

A better way to change your slide sizes in PowerPoint without breaking it.
- October 6, 2021
- Tips and Ticks
An easy way to change slide sizes in PowerPoint presentations to 4:3 (Standard) or 16:9 (Widescreen) formats without breaking your theme and template or stretching your logos and images.

As with most things related to technology, there is more than one way to skin the cat – or in our case to resize PowerPoint presentations. We are going to discuss both the standard way ( as well as why we don’t recommend it ) and the right way, using our FREE PowerPoint resizing tool.
If you ever changed a presentation to Standard or Widescreen sizes in PowerPoint and thought you would likely agree that the outcome was unpredictable and undesirable.
TLDR: If you want to skip the details and go straight to the instructions on how to use our FREE PowerPoint presentation resizing tool to change slide sizes without breaking your slide content then Click Here .
Why the standard solution does not work:
In short, the standard way to resize your PowerPoint changes and breaks your fonts . Using the PowerPoint resize tool also stretches images , graphics, and logos on your slide and Slide Master Layouts.
The best way to explain what is wrong with this method – is to show you. With your presentation open go to the Design Ribbon and click on the Slide Size drop-down menu and select either the Standard(4:3) or Widescreen(16:9) aspect ratios.
You can pick either ‘Maximize’ – which will cause your content to flow over the edges of the screen or ‘Ensure Fit’ which will create empty gaps on either side of your presentation.
Whichever of the two options you select the result is not going to be what you want. Your slide content probably looks broken, logos might be stretched, the theme’s font has changed to Calibri, your corporate colors might have disappeared and your Master Layout’s placeholders are resized disproportionally.

METHOD 1: The standard way, how to change PowerPoint Slide Sizes in Windows 10 or Mac:
Part 1: before you change your powerpoint slide size.
Step 1: Make sure your presentation is in its original working format.
Step 2: Save your Theme color scheme.
1) Click on the View Ribbon, 2) then the Slide Master button

3) Click on the Colors drop-down menu and then on the 4) Customize Colors… button at the bottom of the list.

At the bottom of the Colors dialog box give your color scheme a name in the Name field – and call it whatever you want but remember the name because we are going to use that after we resize our template. Click on Save.

Step 3: Save your Theme fonts
1) While still on the Slide Master Ribbon click on the Fonts drop-down menu and then on the Customize Fonts… button at the bottom of the list.

2) In the Name field give your Theme Fonts a name that you will use and click on the Save button. 3) Close the Slide Master Ribbon by clicking on the “Close Master View” button.

Part 2: After you change your slide size
Step 4: Resize your PowerPoint presentation
After you close the Slide Master Ribbon the Design Ribbon should be visible again. Click on the Slide Size drop-down menu and select either the Standard(4:3) or Widescreen(16:9) aspect ratios and select the ‘Ensure Fit’ option ( it is easier to move items around than to also have to resize them especially when converting to a larger slide size ).

Step 5: Reselect your Theme color and Theme font
With the Design Ribbon still active click the Variants drop-down menu, then color and select the Color Theme you saved earlier, and then do the same for your fonts.

Step 6a: Fix stretched images – Method 1
Here is a quick hack to fix stretched graphics and images.
1) Right-Click on the stretched image and select “Size and Position” to open the Size and Position Task Pane. You will notice the Scale Height and the Scale Width are different, for example; Scale Height might be 99% and Scale Width might be 74%.
2) All you need to do to fix your image is press the up or down arrow on either the Width or Height and voila, your image is no longer stretched. If that doesn’t work then make sure Lock Aspect Ratio is checked.

Step 6b: Fix stretched images – Method 2
Another way to resize your images is to reset your images. To do this you simply select your image and then from the Picture Format Ribbon select the Reset Picture drop-down menu and select Reset Picture & Size button.

Step 7: Move placeholders, content, and images into their new position.
The last thing to do is move items such as placeholders and images around on your presentation to make them fit better.
METHOD 2: The better way, to change your slide dimensions:
Step 1: Go to our FREE resize tool Go to our FREE PowerPoint resize tool and Upload your PowerPoint file: www.knockoutprezo.com/resize-powerpoint
Step 2: Select a file location and select your PowerPoint document
Step3: Select whether you want to resize to Standard or Widescreen sizes. Once you make your selection the file will upload, convert the PPTX and then then the download will start automatically.
- PowerPoint won’t stretch your images and graphics
- No more missing colors
- Your theme fonts stay as it was ( Header and Body fonts )
- Your layouts stay in their original location which is a lot more predictable and easier to work with.

Step 3: Move placeholders, content, and images into their new position.
More PowerPoint Fixes
If you are interested, we also have two other PowerPoint Fixing tools, they are:
- Replace and fix my PowerPoint fonts – ( Find Out More )
- Change and fix my PowerPoint authoring language across all slides and Master Layouts – ( Find out more )

The DinoFire Wireless Presentation Pointer is top of its class
- Built in Volume Control
- Hyperlink Button
- Switch Windows

Want to learn more about typography and why you should use which fonts?
A clear and focused guidance on how letters, words, and paragraphs should be aligned, spaced, ordered, and shaped.
Full Disclosure: As an Amazon Associate, Knockout Prezo earns from qualifying Amazon purchases.

Mega Epic PowerPoint Template

Meta Modern PowerPoint Presentation

Easy UX Wireframes PowerPoint Theme

Keep It Simple PowerPoint Pitch Deck

Just My Type (Audiobook)
A delightfully inquisitive tour that explores the rich history and the subtle powers of fonts.
Full Disclosure: As an Amazon Associate, Knockout Prezo earns from qualifying Amazon purchases.
2 Responses
Unfortunately, the resizing tool did not work for my use case. It simply overlayed a different slide deck formatting, but didn’t change any configurations, which made the deck useless. I like the thought for this tool though, as reformatting slides is a huge pain and time drain.
Do you mind me asking about your feedback about our resize tool. I didn’t quite understand your feedback.
Essentially what the tool does is that it resizes the deck without breaking, stretching etc the presentation assets, HOWEVER the user still needs to adjust the elements of the presentation. Did you go from 16×9 to standard or the other way around? There isn’t a way for the software to tell if you want an element aligning to the left, middle or right of the slide for example.
Leave a Reply Cancel reply
Your email address will not be published. Required fields are marked *
Save my name, email, and website in this browser for the next time I comment.
What our clients have to say
© Copyright Knockout Productions (Pty) Ltd 2019 – 2023
Unsupported browser
This site was designed for modern browsers and tested with Internet Explorer version 10 and later.
It may not look or work correctly on your browser.
- Presentations
What Are the Right Dimensions (Size) for Your PowerPoint PPT Slides? (+ Video)
- Bahasa Indonesia
How important are PowerPoint slide dimensions? Consider the following. Ever plugged your laptop in, and your slides didn't look quite right? Were they cut off on the edges, or boxed in on the screen, like this? Changing PowerPoint slide size can avoid this.

You've spent time doing research, crafting your message and creating visuals. Now you're ready to give a PowerPoint presentation. In PowerPoint, changing slide size ensures that you maximize your screen space.
Knowing your PowerPoint slide dimensions helps your presentation look right on the screen. In this tutorial, I'll teach you how to choose the right PowerPoint dimensions. I'll also share some top PowerPoint slide designs from Envato Elements. These have slide designs and dimensions already set for you!
Learn More About Presentations
Before you dig into this tutorial, be sure to download our free eBook: The Complete Guide to Making Great Presentations . It'll help you master the complete presentation process.

What Are the Right Dimensions (Size) for Your PowerPoint Slides? (Video)
Are you unsure of how to set up PowerPoint dimensions? The wrong dimensions can have a very real impact on the success of your presentation. Before you connect to a big screen monitor or projector to share your hard work, check the size and aspect ratio of your presentation.
Watch the video below for a quick walk-through on how to set up PPT slide size:

Continue reading to learn even more about PowerPoint size. Discover which sizes to use for which screens, and more.
Jump to content in this section:
What's the Right Size for Your PowerPoint?
- How to Change the Size of Your PowerPoint
Top PowerPoint Templates (With Ready-Made Slide Dimensions)
5 quick powerpoint presentation format tips, find more great powerpoint templates: 5 top designs, more powerpoint slide size templates (for 2023 slide designs), learn more about using microsoft powerpoint, make great presentations (free ebook download).
Choosing PowerPoint slide size is a key part of your presentation setup. It ensures that your content looks its best in the way that you want to share it.
You might present PowerPoint presentations on a variety of screens, such as:
- laptop screens
- conference room projectors
- iPads and tablets
- widescreen, large format displays
Each of these displays has a different shape or aspect ratio. The aspect ratio is a measure that describes the width versus height of a screen. The same PowerPoint slides will appear differently on each device. That's because the aspect ratio can vary.

This brings us to the first step. Begin by choosing a size for PPT slide layouts by deciding what device your slides are most likely to appear on. This drives the slide size in PPT that you’ll want to use for best results.
The specific setting depends on the device you'll use. Here are rules of thumb for which one to choose:
| Laptops | 16:9 (MacBooks are 16:10) |
| Projectors | 4:3 or 16:9 |
| Large-screen displays | 16:9 |
| Tablets | 4:3 |
These aren't the only options, of course. PowerPoint slide size change features like Letter Paper or Ledger Paper are also available. These are meant for printed slides, so that they fit perfectly on different sizes of paper.
The key is to choose the size that works for your audience. It's how to change slide size in PPT in a way that works best for you and your work.
How to Change the Size of Your PowerPoint
We've learned the basic rules for slide size in PPT. Now, let's put this knowledge to work. Read on to learn how PowerPoint slide size change works. We'll work through it step-by-step. In moments, you'll know how to change slide size in PPT.
1. How to Change the Size of PowerPoint Slides
You've chosen the screen you'll present on. And you've chosen the right size for your PowerPoint presentation. Now, it's time to change your PowerPoint file to match.
Click on the Design tab on PowerPoint's ribbon. The available options will change on the ribbon. Find the Customize section on the ribbon and click on the Slide Size icon.
A drop-down menu opens with several options. Click on Custom Slide Size to open the Slide size menu and change your presentation's dimensions.
The Slide Size menu opens, and now we can change the PPT slide size using the dropdown options.

It may not always be possible to choose the perfect size for your presentation. If you send and share your presentation, then you can't control the device that your audience will open your presentation on.
You can optimize the presentation for most viewers. Let’s look at the process for PowerPoint changing slide size.
2. Setting Slide Size in PPT (Quickly and Easily)
Let's see how to PPT change slide size. Start by clicking on the drop-down box under the Slides sized for: option. The slide size in PPT you choose should be based upon the screen it'll appear on.
There are several choices on this drop-down menu. The most common choices that I use are On-screen Show (4:3) , On-screen Show (16:9) , and On-screen Show (16:10). Think of these as the choices for PPT size of slides.

I use each of these settings often. That's because they match the most common devices PowerPoint presentations are shown on. Refer to our handy table earlier in the tutorial to decide which to use.
After you select a slide size in PPT, press OK on this menu. PowerPoint will show a new menu that gives you a choice of how to change slide size in PPT. Let's take a closer look at which PPT change slide size option will be right for you.
PowerPoint Slide Settings: "Maximize" Versus "Ensure Fit"
When we size for PPT slides, PowerPoint presents us with two unique options. These are drastically differing options for changing PowerPoint slide size. We already have content on our slide, so it makes sense that we need to think about how to handle changing the slide.
The menu shows two options for PPT change slide size:
- Ensure Fit
Choose one of these PPT size of slide options. They've got different approaches for PowerPoint slide size changes.

- Choosing Maximize zooms in on the slide so that the content fills the slide. The downside to this approach is that some content may be clipped off if you've got elements on the slides' edge.
- Ensure fit makes sure that everything stays on the slide after you adjust the slide size in PPT. But it might leave horizontal bars above and below your content.
When you use a PowerPoint slide size change, give your presentation a thorough look. This is to make sure the content hasn't been altered after the PPT change slide size.
I typically choose to Maximize Slides . But it might take some re-working of the slides to fit properly. Learning how to change slide size in PPT requires reviewing your deck after this adjustment.
When to Use Special Case Sizes
The Slide Size options window can change your presentation size for practically any situation.
Imagine that presentation will be viewed on a portrait orientation device. Portrait orientation implies that a screen is taller than it's wide. Maybe the viewer is viewing it on a tablet in portrait mode, or on a monitor that's rotated in portrait mode.

To change a PowerPoint presentation to Portrait orientation, change the Slides option to Portrait as shown above.
You may not use these options often but remember that they exist. PowerPoint truly accommodates.
3. Remember to Test
The success of a presentation comes down to the preparation behind it. Giving a presentation to an audience is daunting. But doing a " dry run " (practice presentation) reduces surprises.
This is especially key when you've changed PowerPoint slide size. The PowerPoint slide size may make unexpected adjustments. They're easy to correct, but you can't fix them until you find them! You never want to first see issues in the real production.
Doing a dry run of your presentation will ensure two things:
- That you've got all the cables and connections you need to display your presentation.
- It's a great time to compare the dimensions of your file to the screen you'll use. That way, you can re-work your slides dimensions as needed. You can also rearrange content in case you find something out of place.
Don't forget to include testing your PowerPoint file on the display you'll use for your pitch. It's another variable you can control for while preparing. This helps reduce the uncertainty of your presentation.
What if you didn't have to worry about the dimensions of your PowerPoint slide? You know how to change slide size in PPT, but you can avoid the adjustment altogether. Instead of guessing at the PowerPoint slide size , you can use a pre-built template from Envato Elements.
Not only does it feature templates with the perfect PowerPoint slide sizes, but it also does so with excellent designs. Many of the templates contain more than one PowerPoint slide size so that you always have what you need.

What's even better is that Envato Elements helps you keep costs low. That's thanks to an unlimited download model. With one subscription, you unlock everything. Not only does that include perfectly sized PowerPoint slides, but stock photos, graphics, and more.

Many Envato Elements PowerPoint slide size templates have many aspect ratios built in. So, you can work with great slide designs at the common sizes you're likely to need for your presentation. They make it even easier to use PPT change size slide options.
Other presentation designs are made at Full HD (16:9) aspect ratio, which is a popular display size. Or they come with extra dimensions supported. Discover more in our curated selection of the best below, and then continue with this tutorial:

No matter your skill level in PowerPoint, it always helps to have a few extra tips. Let's check out five more top tips for PowerPoint slide sizes, including PowerPoint dimensions.
1. Edit the PowerPoint Dimensions First
Earlier in this tutorial, you worked with PowerPoint slide dimensions. But the most important part of doing so is the order of your steps.
Make sure your first step is Design > Slide Size. When you set the size of your PPT as soon as you open the presentation, you won't clip or stretch your slides.

This is the best way to avoid re-work while working with PowerPoint slide sizes. Set your PowerPoint dimensions first!
2. Use the PowerPoint Rulers
Many presenters (myself included) use PowerPoint to create printed, products too. And the size of your PowerPoint slide really matters when you're trying to fit them to a printed page.
That's why it helps to check your PPT slide size with rulers (in inches.) To view them, go to the View > Ruler menu option.

Of course, you can scale the PowerPoint slide size while you're printing to match the paper. Check out our guide to printing, no matter the size of your PowerPoint slides.

3. Edit the Slide Master
Slide masters control several slide designs at the same time. Instead of setting layouts and PPT dimensions on each slide, consider editing the slide. Set the PPT slide size and dimension on the master on the View > Slide Master menu.
Learn more about editing slide masters and presentation slide sizes in the tutorial below:

4. Simulate a Preview
Earlier in this tutorial, I recommended checking your presentation as a rehearsal. Ideally, you check your PowerPoint slide size on the exact display you'll use for the real thing.
Unfortunately, you won't always have the option to rehearse in the presentation room. But you can check it on your computer screen. You can preview your PowerPoint presentation and see how it uses the screen real estate.
Go to the Slide Show > From Beginning menu option to preview your presentation. Then, review if you can see any bars or lines on your screen.

Most computer screens are 16:9 or 16:10. If you know your final screen has the same dimensions, this is a good check for PowerPoint dimensions.
5. Use Slide Layouts
You shouldn't have to set the PowerPoint slide size on each slide. You can set the dimensions of your PowerPoint presentation, but the presentation slide size matters too. Set the PowerPoint slide size with layouts that position elements perfectly.
In a template like The X Note , every slide layout carefully considers the size of the PPT. Use a layout for the size of PowerPoint slides on the Home > Layout menu.

Use the Layout drop-down to select the dimensions of your PowerPoint slide.
Here's an even better way to nail your PowerPoint dimensions . Start with a template. Most PowerPoint templates from Envato Elements have several versions of PowerPoint dimensions.
These are five of the best PowerPoint templates on Elements. Check them out to create a presentation with perfect PowerPoint dimensions:
1. Style Multipurpose PowerPoint Template

This template is packaged with two colors and one PowerPoint slide size, but I find it easily adjustable in my testing. It features the 16:9 aspect ratio that's the classic PowerPoint slide size. Use the 100 unique designs, each with perfect PPT slide sizes.

Agio is a clean and minimal PowerPoint template. You'll find that the 16:9 PPT slide sizes are perfect for most screens. Not only are the presentation slide sizes set nicely, but the designs are also simply stunning. Fill out these slide blueprints for a professional presentation.
3. Ever PowerPoint Template

When you open this presentation, you'll find two PowerPoint dimension options: 4:3 and 16:9. It's these two PPT size options that give this template extra value. There are beautiful slide designs for both PowerPoint slide sizes. Use the hand-designed infographics for business-friendly illustrations.
4. Sprint PowerPoint Template

Life might be a marathon instead of a sprint but designing a presentation shouldn't be. The aptly named Sprint presentation is a 4:3 design with a bright orange color scheme. Choose this if your PPT slide size should be in the more traditional 4:3 size.

Rounding out our options, MaxMax is a 16:9 PowerPoint dimension template. With 234 unique slide designs, there are options for practically every design you could need. The size of your PPT is already set and you can use the free icons for a bit of extra flair.
Need the perfect PPT size of slide? Premium templates from Envato Elements are perfect for you. Here are several collections of the very best available now:

In this tutorial, we learned how to set the right size for PowerPoint files. It all comes down to how and where your recipient will view the presentation.
You may not be able to perfectly format your PowerPoint for every screen. But sticking to the PowerPoint standard sizes will work most of the time. You can also save time by working with a great PowerPoint template that's already set up with the PPT slide dimensions you need.
At Envato Tuts+, we've put together a deep resource of PowerPoint tutorials. Make sure to check out our guide, How to Use PowerPoint (Ultimate Tutorial Guide.) This single resource is comprehensive to learn the app, including PowerPoint sizes.
To keep learning more PowerPoint, check the helpful tutorials below:

For another helpful resource, be sure to grab this helpful eBook:

We've got the perfect complement to this tutorial. It'll walk you through the complete presentation process.
Download our eBook: The Complete Guide to Making Great Presentations . It's available for free with a subscription to the Tuts+ Business Newsletter.
Learn how to write your presentation, design it like a pro, and prepare it to present powerfully.
Design a Presentation With Perfect PowerPoint Slide Size Today
This tutorial showed you how to set your PowerPoint slide size. With the proper dimensions for your PowerPoint slide, your slides will look stunning as they fill the screen. Set your slide size before you start designing to avoid costly re-work.
Also, don't forget that you can save hours of design work. Envato Elements features unlimited downloads with the perfect PowerPoint slide size .
With these tips in mind, design confidently today! You now know how to set the dimensions of a PowerPoint slide to make the best use of the screen space.
Editorial Note : This post was originally published in June of 2017. It's been comprehensively revised to make current, accurate, and up-to-date by our staff—with special help and a video from Andrew Childress .

- Ad Creative Eye-catching designs that perform
- Social Media Creative Engaging assets for all platforms
- Email Design Templates & designs to grab attention
- Web Design Growth-driving designs for web
- Presentation Design Custom slide decks that stand out
- Packaging & Merch Design Head-turning apparel & merch
- eBook & Digital Report Design Your digital content supercharged
- Print Design Beautiful designs for all things printed
- Illustration Design Visual storytelling for your brand
- Brand Identity Design Expertise & custom design services
- Concept Creation Ideas that will captivate your audience
- Video Production Effortless video production at scale
- AR/3D Design New creative dimensions that perform
- AI-Enhanced Creative Human expertise at AI scale

What is the Size of a PowerPoint Slide in Pixels?
By: Author Shrot Katewa

When creating a PowerPoint presentation, it is essential to determine the appropriate size for your slides. Understanding the size of a PowerPoint slide in pixels is crucial to ensure that your presentation looks great on all devices, from desktops to mobile devices.
The standard size of a PowerPoint slide is 1024×768 pixels and the widescreen PowerPoint slide is “1920×1080” pixels. It can also be adjusted based on your preferences or the requirements of the platform on which you plan to present your slides.
In this article, we will discuss the standard size of a PowerPoint slide in pixels or inches as well as how to adjust it to fit your needs. Let’s get started!
1. What is the Size of a PowerPoint Slide in Pixels?
In Microsoft PowerPoint, there are multiple preset slide sizes available. You can also customize the size of the slide using the “Custom Slide Size” feature available in the application. Depending on the slide size you select, the size of the slide in pixels will vary.
1.1 What is the Size of a PowerPoint Standard Slide in Pixels?
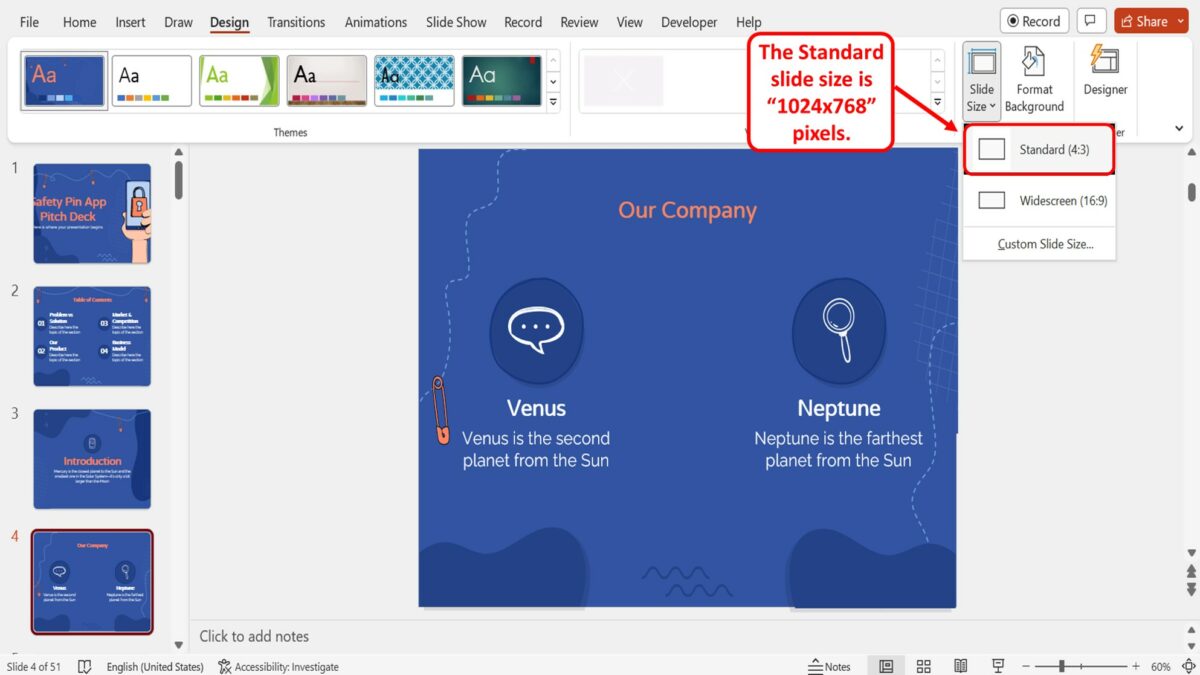
The “Standard (4:3)” option in Microsoft PowerPoint used to be the only size option in the beginning since most screens from 2010 and before were that size. The standard slide size in PowerPoint is “1024×768” pixels.
1.2 What is the Size of a PowerPoint Widescreen Slide in Pixels?
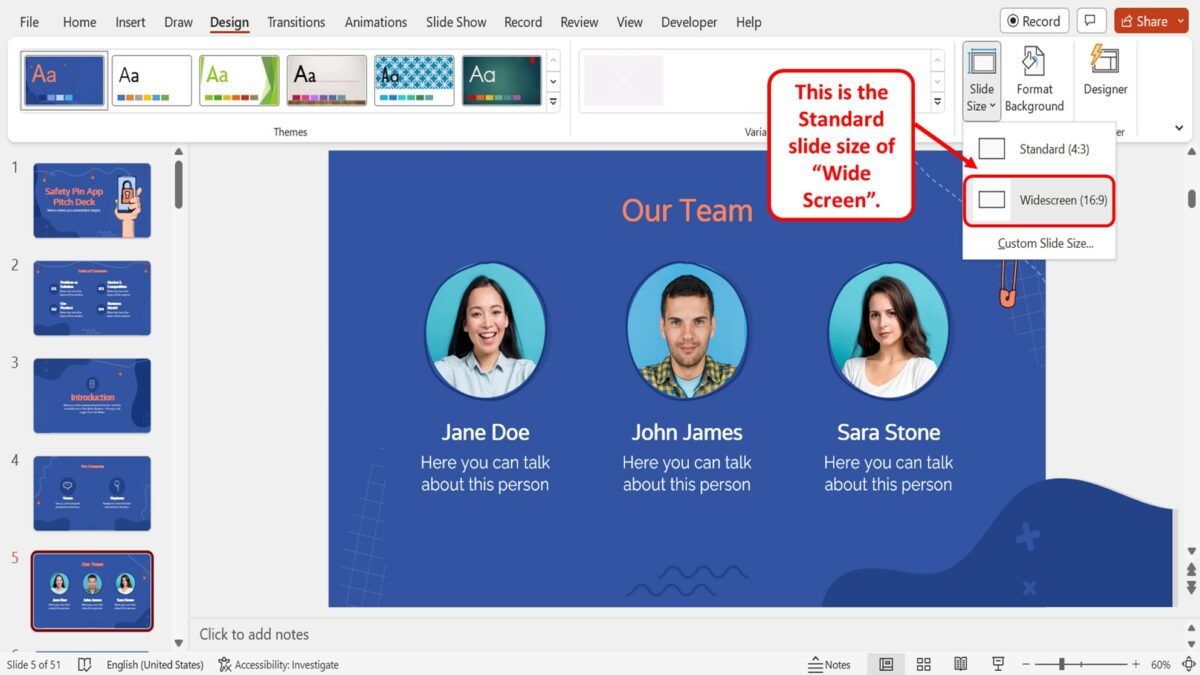
In Microsoft PowerPoint, the default size of the slides is the “Widescreen (16:9)” option. The widescreen PowerPoint slide is “1920×1080” pixels.
2. What is the Size of a PowerPoint On-Screen Show Slide in Inches?
In Microsoft PowerPoint, the size of the slides is mostly measured in inches. Using the “Slide Size” dialog box, you can check the dimension of a slide in inches. Depending on the type of the selected slide, the slide size varies. There are three different “On-Screen Show” slide sizes available in Microsoft PowerPoint.
2a On-Screen Show (4:3)
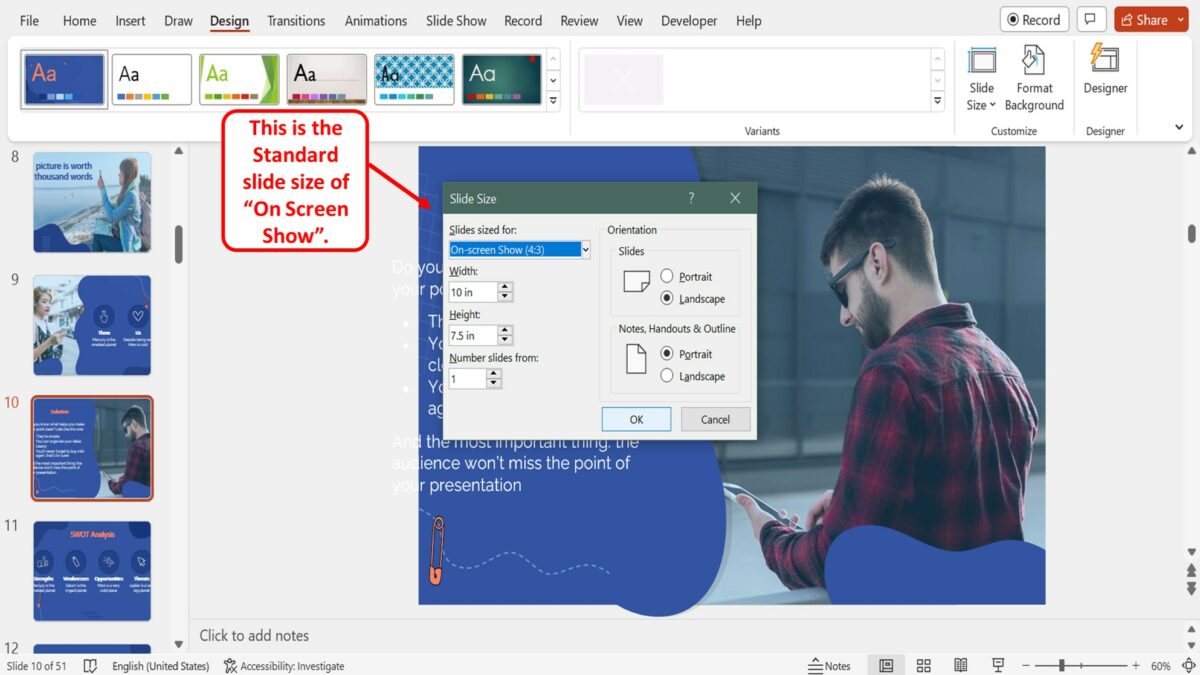
The “On-Screen Show (4:3)” slides are “10×7.5” inches in size. This is the “Standard” slide size.
2b On-Screen Show (16:9)
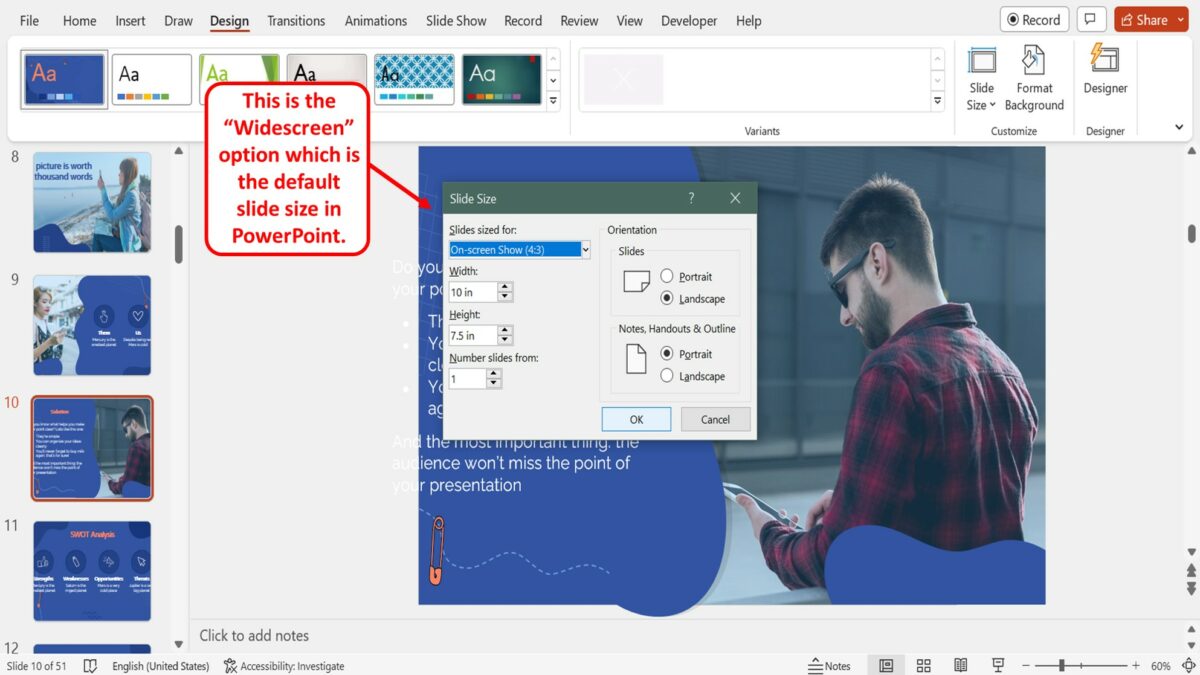
The “On-Screen Show (16:9)” slide size is “10 x 5.625” inches in dimension. This is the “Widescreen” option which is the default slide size in PowerPoint.
2c On-Screen Show (16:10)
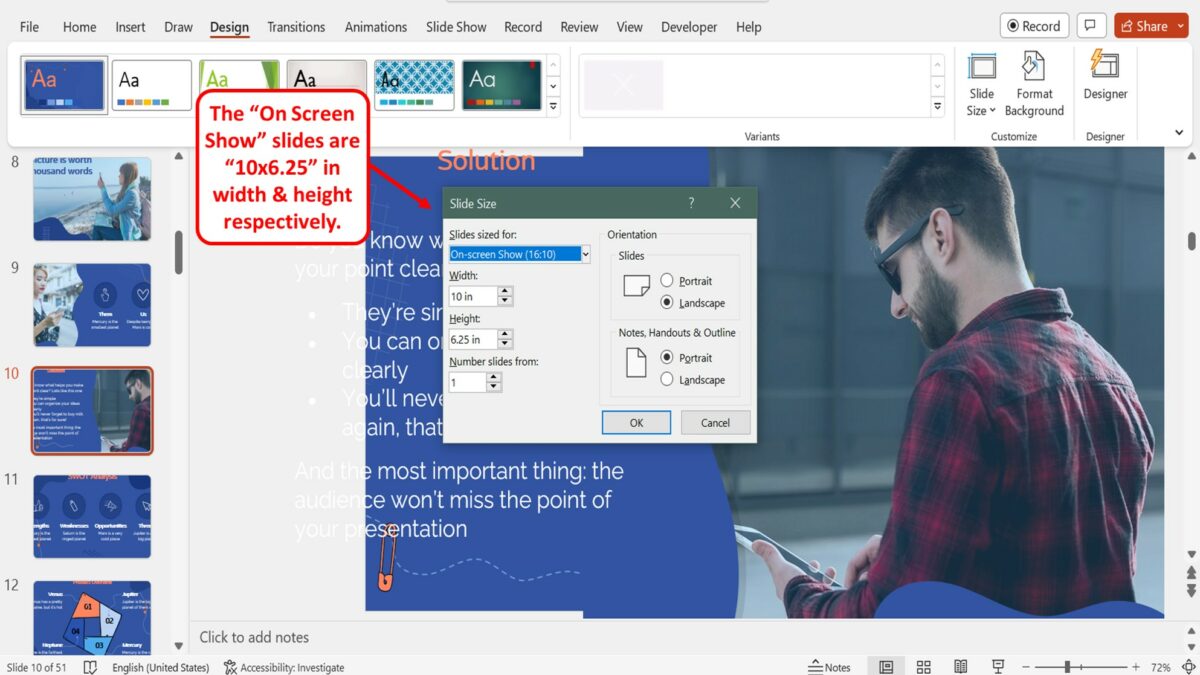
The “On-Screen Show (16:10)” slides are “10 x 6.25” inches in width and height respectively.
3. How to Find the Size of the Slide in Inches?
Using the “Slide Size” dialog box in Microsoft PowerPoint, you can find the size of the slides in your presentation in inches. To do so, follow the 3 quick steps.
Step-1: Click on the “Design” tab
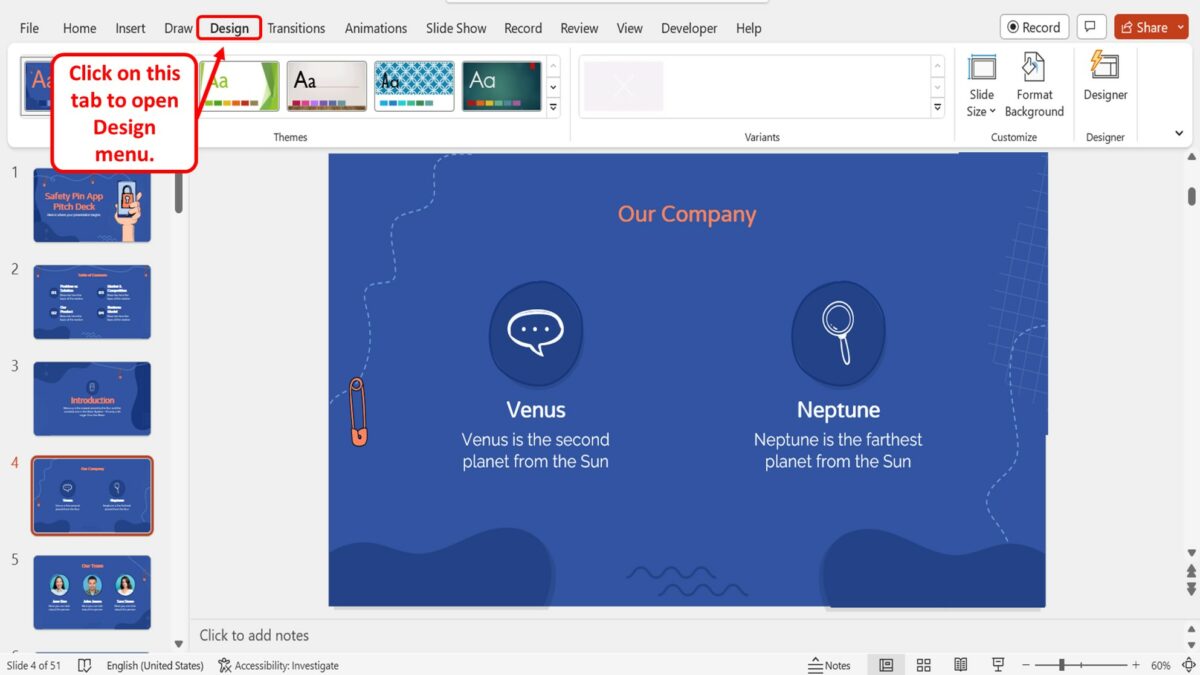
In the menu ribbon located at the top of the screen, click on the “Design” tab. This will open the “Design” menu.
Step-2: Click on the “Slide Size” option
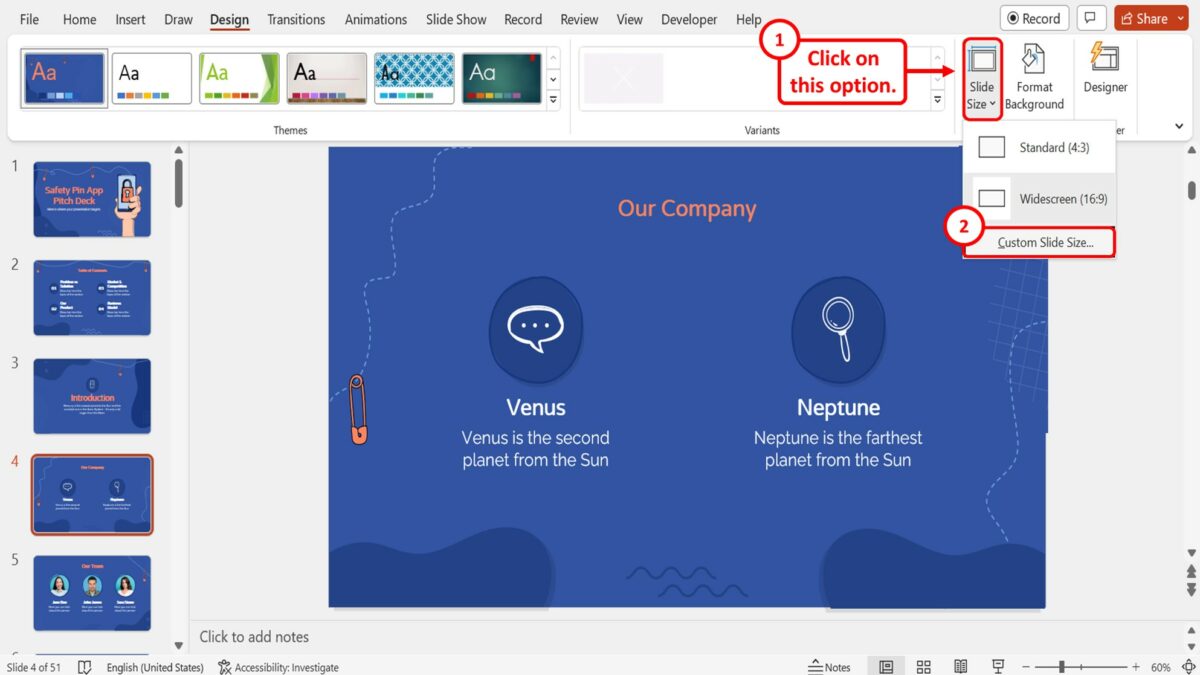
In the “Customize” group of the “Design” menu, click on the “Slide Size” option. Then click on the “Custom Slide Size” option in the dropdown menu under the “Slide Size” option. This will open a dialog box.
Step-3: Click on the “OK” button
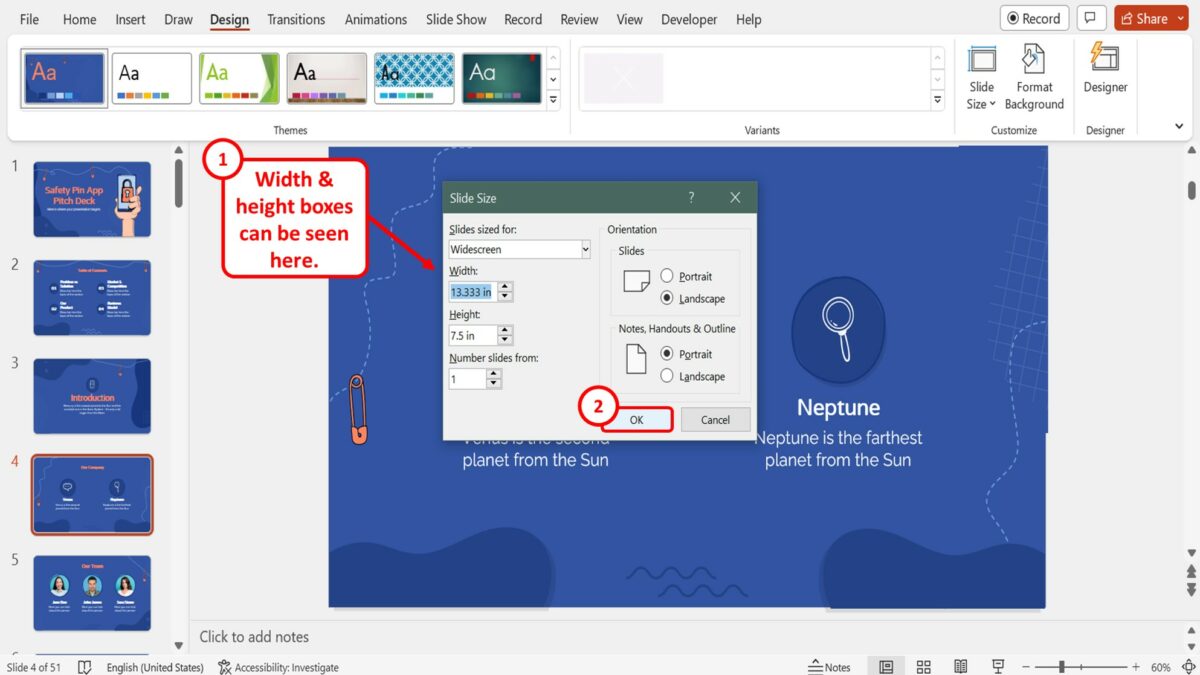
In the “Slide Size” dialog box, you can now see the size of the slide in inches in the “Width” and “Height” boxes. Then click on the “OK” button at the bottom of the dialog box to close it.
4. How to Change the Size of a PowerPoint Slide?
In Microsoft PowerPoint, you can change the side of the slides using the “Design” menu. However, you can only change the size of all the slides in a presentation at once. To change the size of the slide in PowerPoint, follow the 3 simple steps.
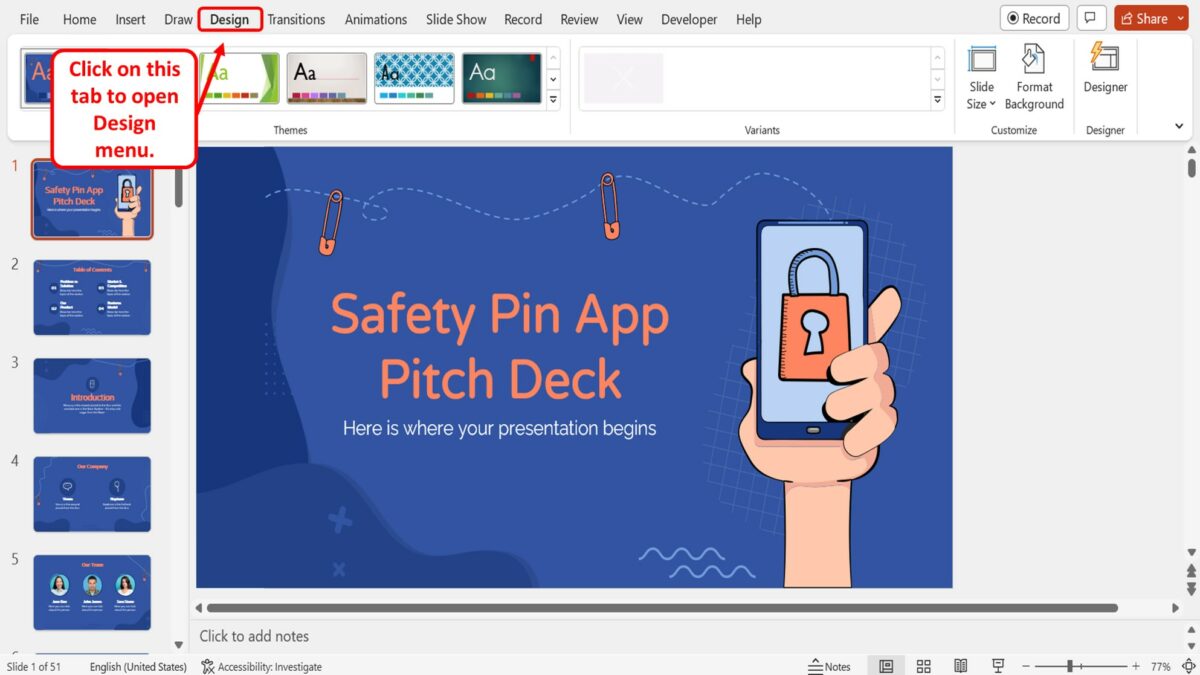
The first step is to open the “Design” menu. To do so, click on the “Design” tab in the menu ribbon located at the top of the screen.
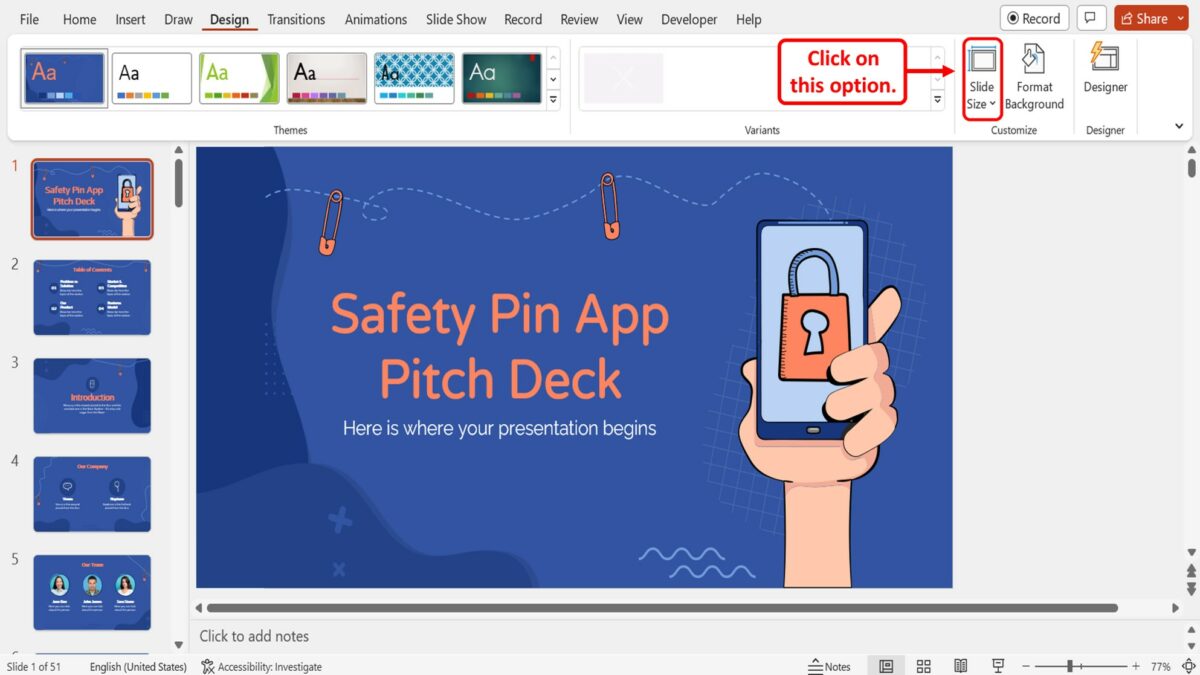
In the “Customize” group of the “Design” menu, you have to now click on the “Slide Size” option. This will open a dropdown menu containing the preset slide size options available in PowerPoint.
Step-3: Click on your preferred slide size
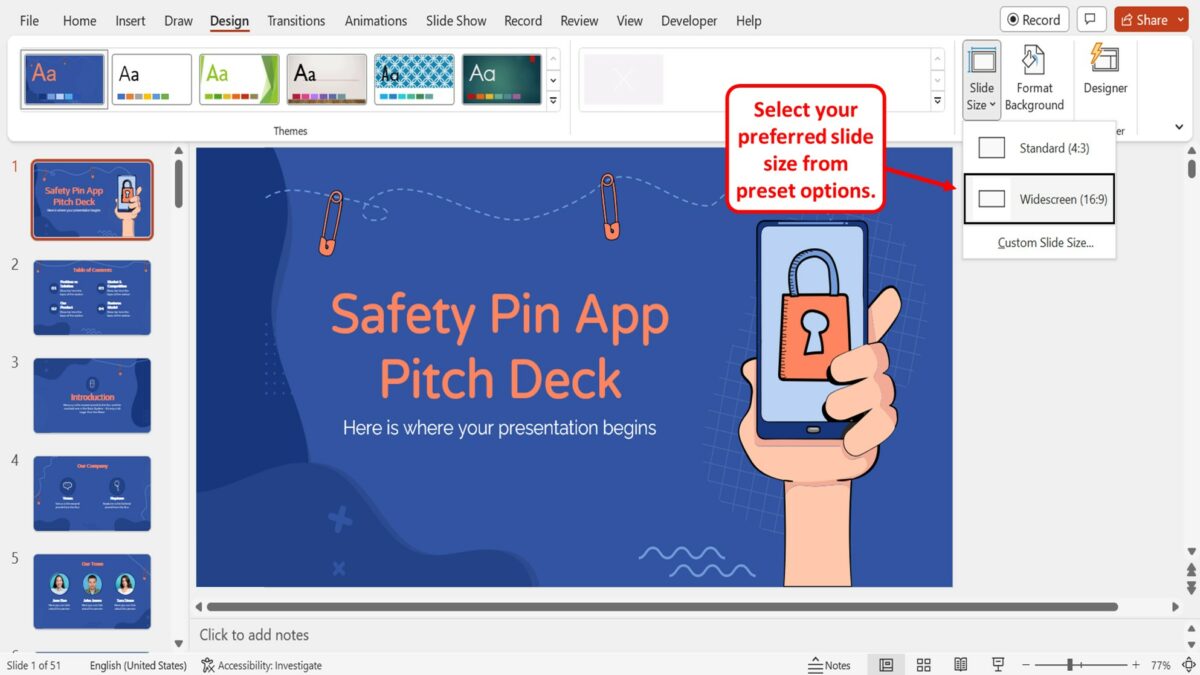
Finally, all you have to do is click on your preferred slide size option from the preset options available in the dropdown menu under the “Slide Size” option. The available slide sizes are “Standard” and “Widescreen” .
4.1 How to Customize the Size of a PowerPoint Slide?
The “Custom Slide Size” feature in Microsoft PowerPoint allows you to customize the size of all the slides in a presentation. Using the feature, you can set any dimension to the slides in your presentation. To customize the size of the slides in a presentation, follow the 7 easy steps.
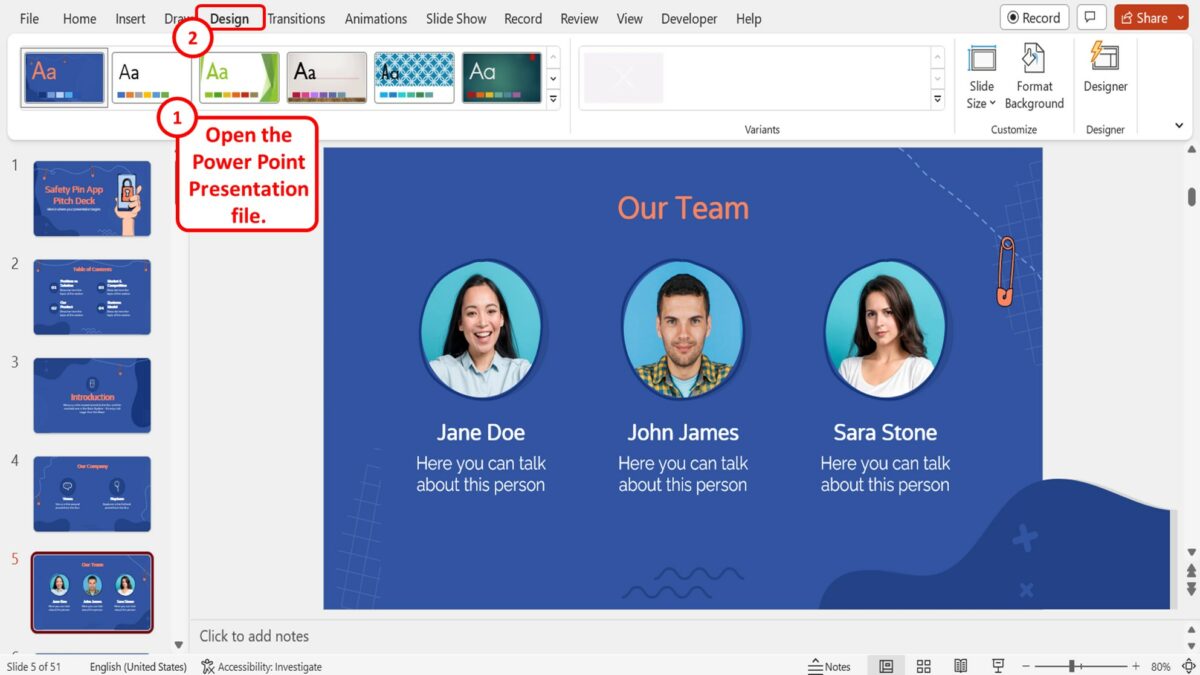
The first step is to open the PowerPoint presentation file where you want to customize the size of the presentation slides. Then click on the “Design” tab in the menu ribbon located at the top of the screen to open the “Design” menu.
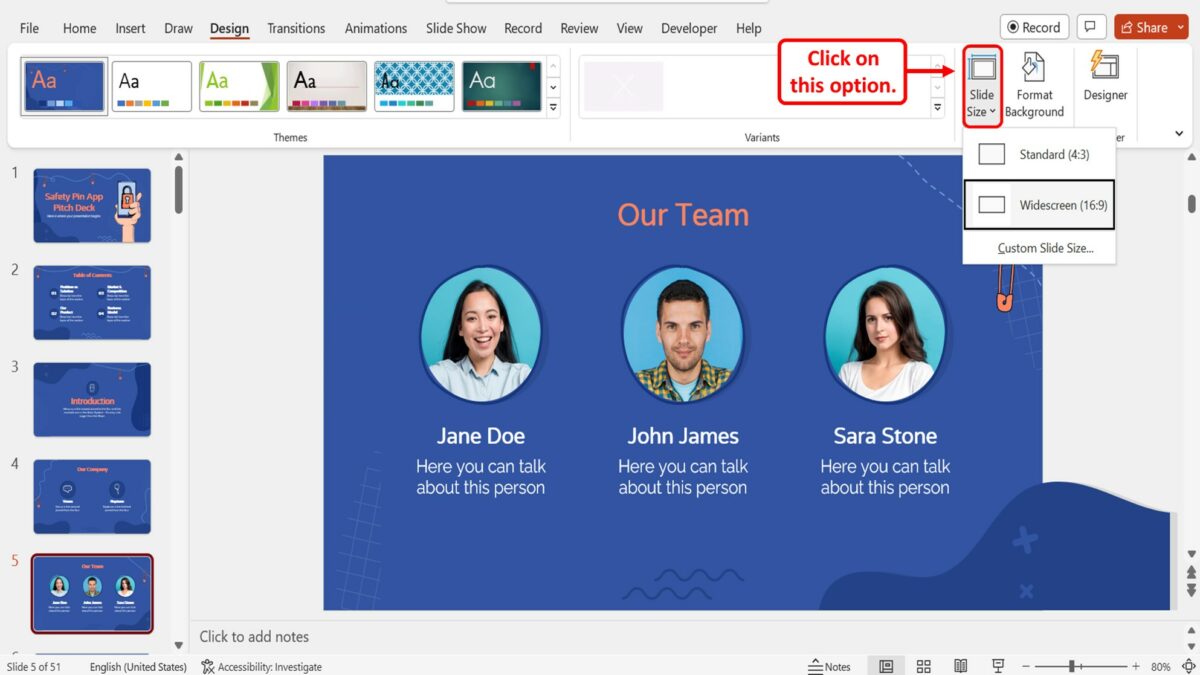
The next step is to click on the “Slide Size” option in the “Customize” group of the “Design” menu. In the dropdown menu, the default slide size is the “Widescreen (16:9)” option.
Step-3: Click on the “Custom Slide Size” option
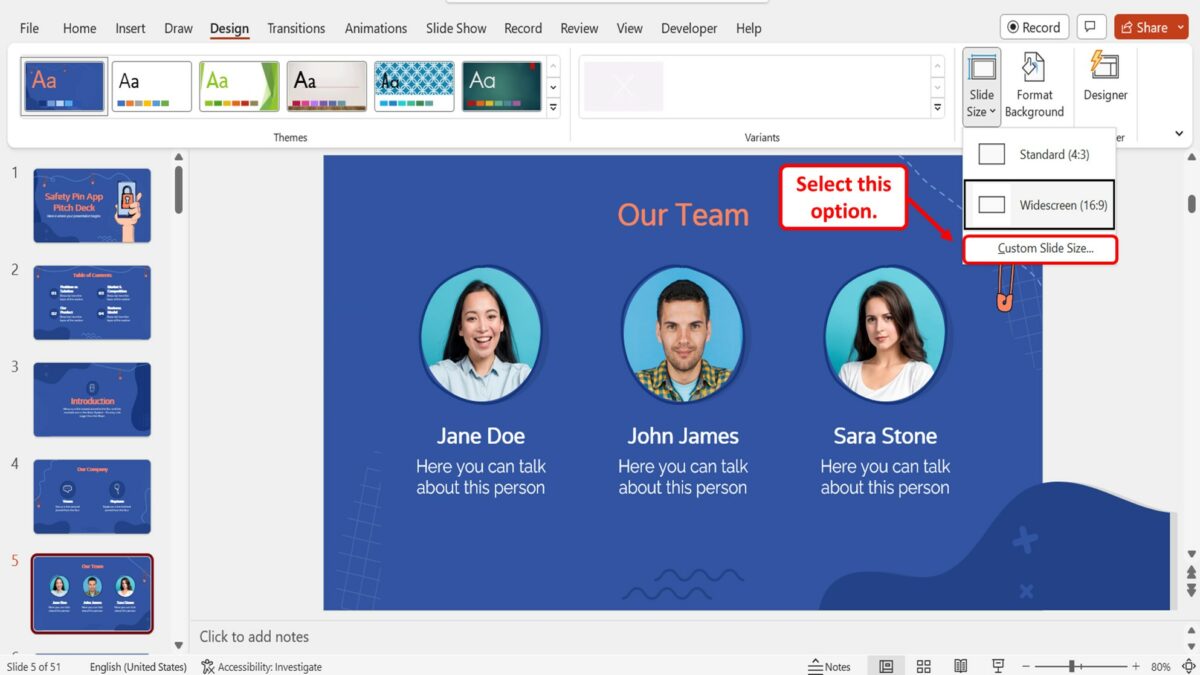
Now all you have to do is click on the “Custom Slide Size” option at the bottom of the dropdown menu under the “Slide Size” option in the “Design” menu. This will open a dialog box.
Step-4: Click on the “Slide sized for” option
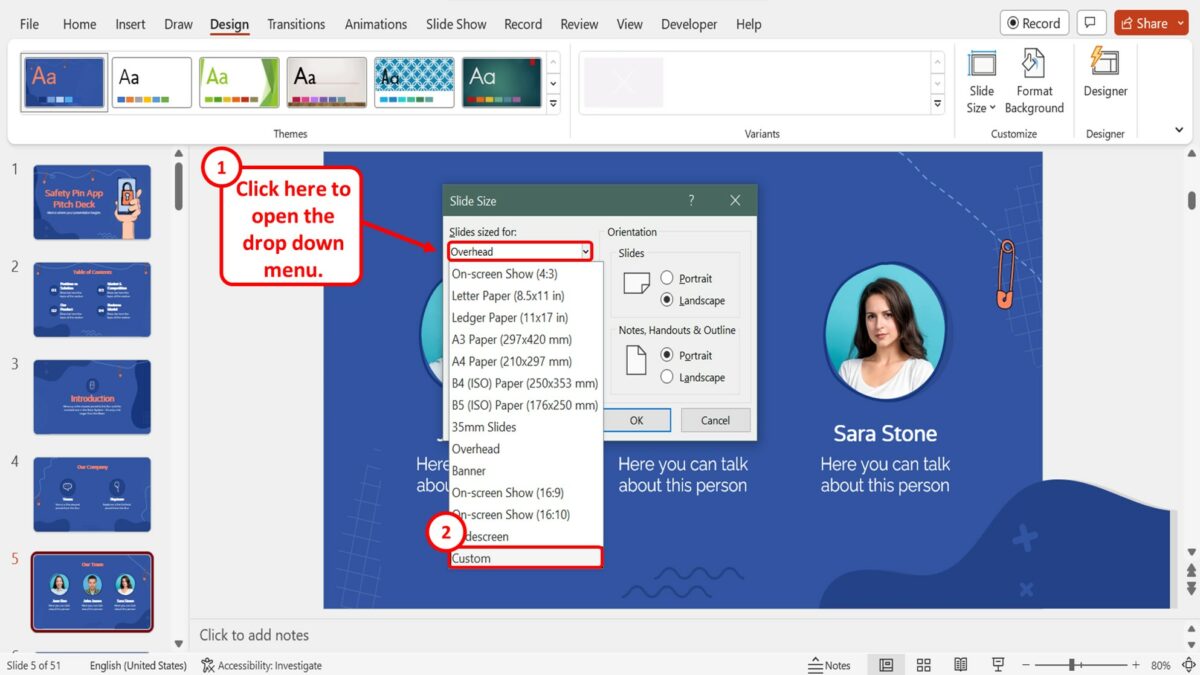
In the “Slide Size” dialog box, click on the “Slides sized for” option. Then click on the “Custom” option at the bottom of the dropdown menu under the “Slides sized for” box.
Step-5: Click on the “Width” box

In the “Slide Size” dialog box, the next step is to click on the “Width” box. Now you can type in your preferred width of the slides in inches. You can also use the up and down arrows in the “Width” box to increase or decrease the width of the slide respectively.
Step-6: Click on the “Height” box
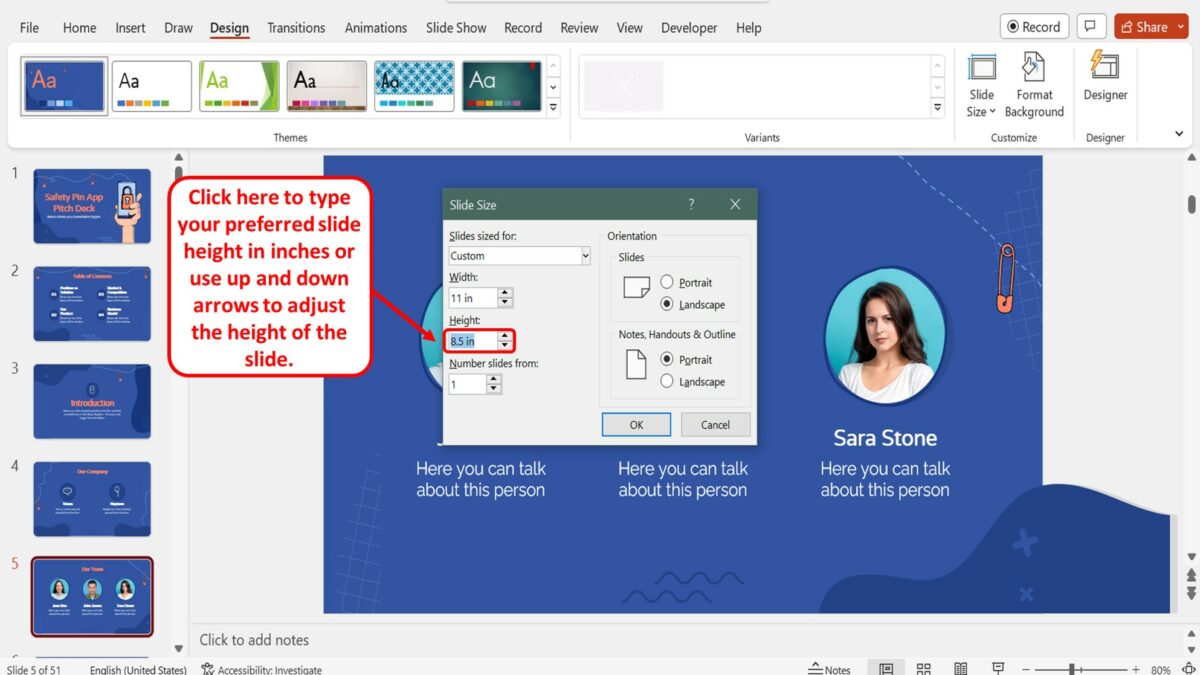
The next step is to customize the height of the slides. To do so, click on the “Height” box in the “Slide Size” dialog box and type in your preferred slide height in inches. You can also click on the up or down arrows in the “Height” box to adjust the height of the slides to your preference.
Step-7: Click on the “OK” button
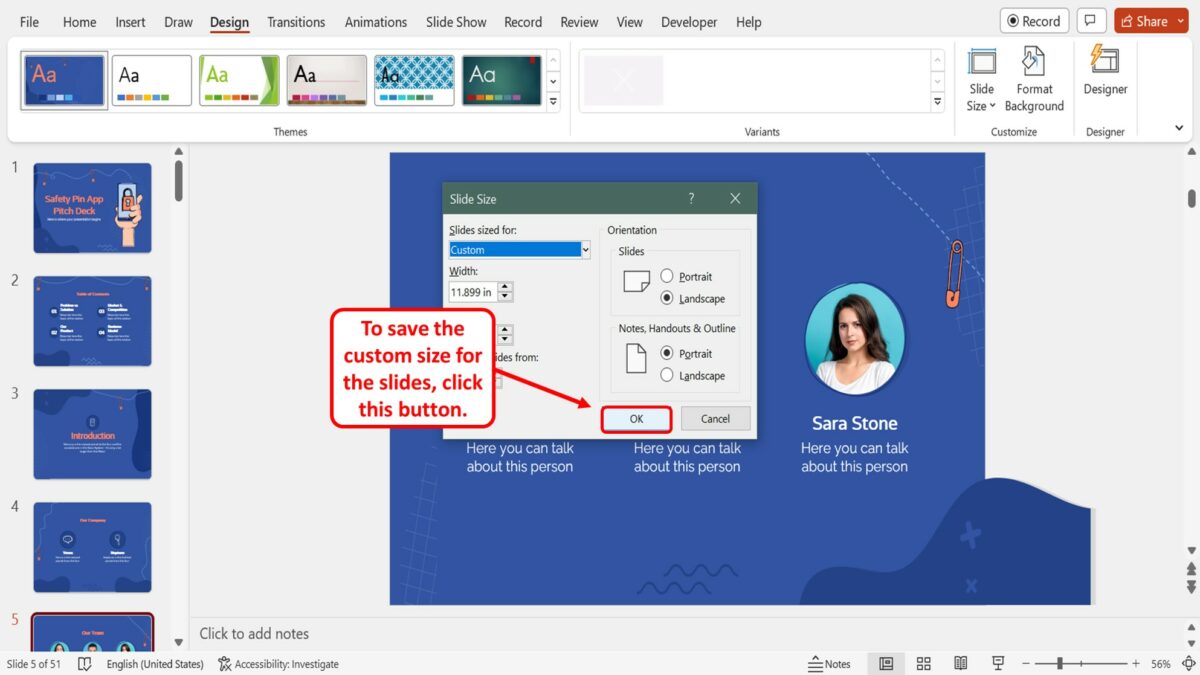
Finally, all you have to do is click on the “OK” button at the bottom of the “Slide Size” dialog box to save the custom size for the slides in the presentation file.
Stack Exchange Network
Stack Exchange network consists of 183 Q&A communities including Stack Overflow , the largest, most trusted online community for developers to learn, share their knowledge, and build their careers.
Q&A for work
Connect and share knowledge within a single location that is structured and easy to search.
How to create a square grid in the PowerPoint?
I want to create a sudoku-like square grid in the PowerPoint, but I can't find a simple way to do it.
I can't precisely adjust the cell size with the table tool, and it is hard to align other graphs with the cells.
Is any plugin or some other softwares able to quickly create a square grid?
- microsoft-powerpoint
2 Answers 2
I don't know about other versions of PowerPoint but you can do this out of the box in PowerPoint 2007.
Create your table, select all the cells, pick the Layout tab on the ribbon and cell your desired cell size there.

- Thanks for your reply, but I can't put other graphs (ex: a circle) into the table. I just tried to draw a lot of squares and align them together, which works better. – AngelLeliel Commented Nov 15, 2010 at 13:21
- 1 In PowerPoint 2010 this is done by using insert>>Table – James Mertz Commented Nov 15, 2010 at 13:29
Tip: You can convert a table into perfectly aligned individual square shapes in 2010 by saving the table as a .emf, and re-inserting the picture. Use "Edit Picture" to have PowerPoint convert it to shapes. Use the selection pane to quickly remove unneeded elements (the conversion will create extra shapes for the borders of the cells etc, which you probably do not want)
You must log in to answer this question.
Not the answer you're looking for browse other questions tagged microsoft-powerpoint ..
- Featured on Meta
- Upcoming initiatives on Stack Overflow and across the Stack Exchange network...
- We spent a sprint addressing your requests — here’s how it went
Hot Network Questions
- Did any other European leader praise China for its peace initiatives since the outbreak of the Ukraine war?
- A model suffering from omitted variable bias can be said to be unidentified?
- Keyboard Ping Pong
- My result is accepted in a journal as an errata, but the editors want to change the authorship
- Is an employment Conflict of Interest necessary when redundant with my Affiliation?
- I cannot get Pgfplots to display all my axis labels
- Table overflow with tabular
- Confusion regarding "since" vs "for"
- Power pedals on a fully MTB (riding flat roads), later on road/gravel bike
- Are hot-air balloons regulated similar to jet aircraft?
- Are narrow propellers more efficient than wider ones?
- Arms, hands and posture at the piano
- Coping with consequences of a dog bite before buying a puppy
- How should I deal with curves in new deck boards during installation?
- Confusion about the probability of a continuous random variable at a given point
- Of "ils" and "elles", which pronoun is, grammatically speaking, used to refer to a group with an overwhelming female majority?
- Where do we go if we gain knowledge of the absolute truth?
- Is it appropriate to report mistakes in an engineering paper which makes unsupported claims?
- Is "double-lowercase-L" a ligature (Computer Modern Italic)?
- Vilna Gaon - Torah can bring you up or bring you down
- Two-period two-good optimal consumption problem
- Why do cubic equations always have at least one real root, and why was it needed to introduce complex numbers?
- A Ring of Cubes
- Which are the civil aircraft that use fly-by-wire only?
How-To Geek
How to resize powerpoint templates.

Your changes have been saved
Email Is sent
Please verify your email address.
You’ve reached your account maximum for followed topics.
TVs Sound Worse Than Ever, But You Have Options
How i stream music all over my house with home assistant, google begins testing 50 gig fiber internet, quick links, resizing powerpoint templates.
By default, PowerPoint slides use a widescreen format in a 16:9 ratio. If you’d like to change it to the standard format (4:3 ratio), or even create a custom size, PowerPoint provides a quick and painless way to make this happen.
Resizing the slides in PowerPoint will affect the way they appear during the actual presentation and how they appear on the handouts. Go ahead and open up the presentation that we will be resizing and select the “Design” tab.

Next, click the “Slide Size” button.

A menu will appear, allowing you to choose between the “Standard” format (4:3) or the “Widescreen” format (16:9). If you're switching over to the standard format without any other changes, you can select it from the menu, and the changes will take effect. If you want to do a little custom tweaking to tailor the size to your specific needs, then select “Custom Slide Size.”

In the Slide Size window that appears, clicking the box under “Slides sized for” (1) will open a menu with several different options. Choose the one that best matches your needs. Alternatively, you can customize the dimensions of the slides by entering the slide size in the “Width” and “Height” boxes (2). Finally, you can choose the orientation of your slides and handouts by selecting “Portrait” or “Landscape” (4) in the respective section.
Once you’re happy with your setup, click “OK.”

If this is the size you’d like to use for future presentations, then save this theme and select it for your next presentation. Back on the “Design” tab, select the “more” arrow, which you can find at the bottom-right of the “Themes” group.
At the bottom of the menu that appears, select “Save Current Theme.”

Windows Explorer will now appear, prompting you to name and save your theme. Go ahead and rename it, but don’t change the location where it will be saved. Themes saved to this default location are available with a click of your mouse button on PowerPoint's splash screen. Once finished, click “Save.”

Let’s make sure it saved. Go ahead and close out of your current PowerPoint presentation and reopen PowerPoint---this time as a blank presentation. Select “New” in the left pane.

Near the top of the window, select “Custom.”

If saved properly, your theme will appear here.

Selecting your custom theme will open a new presentation with all of your settings saved.
- Microsoft Office
- Office 2016
- Microsoft PowerPoint
How to create squares in PowerPoint
In PowerPoint you can create perfect squares and circles using shapes. This tutorial will show you how you can create perfect square shapes in PowerPoint as well as true circles. The secret is to use the SHIFT key.
Here we will show you.
First, start a new presentation or open your PowerPoint template where you want the square to appear.

Of course you can use this tip to draw perfect shapes for example if you need to draw a perfect star or true diamond.
The final slide will look like this below. Despite the title says Perfect Squares, it is clear that the left shape is a square while the right shape is a perfect circle in PowerPoint.

If you need PowerPoint templates with squares we encourage you to download our free squares PowerPoint templates . You can learn more about PowerPoint and find nice tutorials like this one in our free PowerPoint tutorial 2010 section.
We will send you our curated collections to your email weekly. No spam, promise!
Microsoft 365 Life Hacks > Presentations > How many slides does your presentation need?
How many slides does your presentation need?
When you’re creating a presentation, it’s important to consider the amount of information you’re sharing with your audience. You don’t want to overwhelm them, but you also want to be comprehensive and ensure that you’re covering all your bases. Whether you’re giving a 10, 15, or 30-minute presentation, see how many slides your presentation needs to get your point across.

Rules and guidance for PowerPoint presentations
PowerPoint is a powerful visual aid for introducing data, statistics, and new concepts to any audience. In PowerPoint, you can create as many slides as you want—which might sound tempting at first. But length doesn’t always guarantee a successful presentation . Most presentations last around 10-15 minutes, and anything longer than that (such as a 30-minute presentation) may have additional visual aids or speakers to enhance your message.
A handy rule to keep in mind is to spend about 1-2 minutes on each slide. This will give you ample time to convey your message, let data sink in, and allow you to memorize your presentation . When you limit each slide to this length of time, you also need to be selective about how much information you put on each slide and avoid overloading your audience.
For 10-minute presentations
Ten minutes is usually considered the shortest amount of time you need for a successful presentation. For a shorter 10-minute presentation, you’ll need to be selective with your content. Limit your slide count to approximately 7 to 10 slides.
For 15-minute presentations
When preparing for a 15-minute presentation, concise and focused content is key. Aim for around 10 to 15 slides to maintain a good pace, which will fit with the 1-2 minute per slide rule.
For 30-minute presentations
A longer presentation gives you more room to delve deeper into your topic. But to maintain audience engagement, you’ll need to add interactivity , audience participation, and elements like animations . Aim for around 20 to 30 slides, allowing for a balanced distribution of content without overwhelming your audience.

Tell your story with captivating presentations
Powerpoint empowers you to develop well-designed content across all your devices
Using the 10-20-30 rule
The 10-20-30 rule is an effective way to structure your presentation. It calls for no more than 10 slides and no longer than 20 minutes (as well as a 30-point font).
Tips for crafting an effective presentation
No matter how long a presentation is, there are guidelines for crafting one to enhance understanding and retention. Keep these tips in mind when creating your PowerPoint masterpiece:
- Avoid overload: Ensure that each slide communicates a single idea clearly, avoiding cluttered layouts or excessive text.
- Pay attention to structure: Think of slides as bullet points with introductions, endings, and deep dives within each subject.
- Add visual appeal: Incorporate images, charts, and graphics to convey information without using too many words to make your audience read.
- Engage with your audience: Encourage interaction through questions, polls, or storytelling techniques to keep your audience actively involved.
- Put in the practice: Familiarize yourself with your slides and practice your delivery to refine your timing and confidence.
Ultimately, the ideal number of slides for your presentation depends on the allocated time frame and how detailed your content is. By striking a balance between informative content and engaging delivery, you can create a compelling presentation that can teach your audience something new.
Get started with Microsoft 365
It’s the Office you know, plus the tools to help you work better together, so you can get more done—anytime, anywhere.
Topics in this article
More articles like this one.

How to introduce yourself in a presentation
Gain your audience’s attention at the onset of a presentation. Craft an impressionable introduction to establish tone, presentation topic, and more.

How to add citations to your presentation
Conduct research and appropriately credit work for your presentation. Understand the importance of citing sources and how to add them to your presentation.

How to work on a group presentation
Group presentations can go smoothly with these essential tips on how to deliver a compelling one.

How to create a sales presentation
Engage your audience and get them interested in your product with this guide to creating a sales presentation.
Everything you need to achieve more in less time
Get powerful productivity and security apps with Microsoft 365

Explore Other Categories
IMAGES
VIDEO
COMMENTS
Orientation applies to all slides in a presentation PowerPoint isn't able to change the page orientation of certain slides. All slides in a presentation have the same page orientation. If this is a feature you'd like to request, please send us your feedback to help us prioritize new features in future updates.
PowerPoint allows you to format and present the content of your slides in different ways. If you want to print out or display your PowerPoint slides in a bigger or smaller-than-average size, you can change the slide sizes to match.
Learn how to change your PowerPoint Slide size and see the challenges you'll face when converting between the 4:3 and 16:9 slide sizes.
How to change the size of PPT slides in Microsoft PowerPoint? How to set the slide dimensions, and use a custom size, like A4?
The actual size (s) of the slide is less important than the aspect ratio. By default, slides in presentations that you create from the Blank Presentation template are set to Widescreen size.
You can use custom slide sizes. Simply choose options from the Slides sized for drop-down menu in the dialog box (such as A4 paper size) or enter custom dimensions. To change slide size to a custom size: In Normal View, click the Design tab in the Ribbon. Click Slide Size in the Customize group.
Change Slide Size in PowerPoint Once you know what size will be ideal for your output device, you can adjust the slide size in PowerPoint. First, go ahead and open PowerPoint and select a slide. This guide works will work for most modern versions of PowerPoint that have the ribbon interface, including the version in Office 365.
To change the slide size in PowerPoint, click on the "Design" tab. Then, click on "Slide Size". From the dropdown, choose "Standard" or "Widescreen". You can also click on "Custom Slide Size" to change the size of the slides in PowerPoint to A3, A4 or a completely custom size.
Learn how to adjust the PowerPoint slide size for different purposes and formats. Follow the easy steps and tips in this groovyPost guide.
You can change the size of a slide in your PowerPoint presentation through the "Design" menu on the Windows PC, Apple MacOS, and web-based apps.
Need to change slide sizes in PPT? In this beginner PowerPoint tutorial, we cover the Page Setup and how to change slide size and orientation in PowerPoint.M...
Learning how to change slide size in PowerPoint opens a whole new world of creativity, taking your stories from slides to social media.
Change the Size of Slides in PowerPoint: A video, overview, and instructions about how to change slide sizes in PowerPoint.
To change orientation of PowerPoint slides: As per the steps above, from the PowerPoint Design tab on the ribbon, select the Slide Size feature button (on the far right end of the ribbon). PowerPoint Design tab showing the slide size selection button. The three slide size options will display, as shown in the screenshot below.
Learn how to change the default slide sizes or dimensions in PowerPoint so that your presentation looks right on different screens. Here's my entire playlist...
An easy way to change slide sizes in PowerPoint presentations to 4:3 (Standard) or 16:9 (Widescreen) formats without breaking your theme and template or stretching your logos and images.
Learn all about PowerPoint slide dimensions, so you can use the best presentation slide size in PowerPoint. Make your PPT look great on any PowerPoint screen size.
A quick tutorial on how to change PowerPoint slide sizes along with tips and tricks on using the right size for your presentation slides.
When creating a PowerPoint presentation, it is essential to determine the appropriate size for your slides. Understanding the size of a PowerPoint slide in pixels is crucial to ensure that your presentation looks great on all devices, from desktops to mobile devices.
Tip: You can convert a table into perfectly aligned individual square shapes in 2010 by saving the table as a .emf, and re-inserting the picture. Use "Edit Picture" to have PowerPoint convert it to shapes. Use the selection pane to quickly remove unneeded elements (the conversion will create extra shapes for the borders of the cells etc, which ...
By default, PowerPoint slides use a widescreen format in a 16:9 ratio. If you'd like to change it to the standard format (4:3 ratio), or even create a custom size, PowerPoint provides a quick and painless way to make this happen.
In PowerPoint you can create perfect squares and circles using shapes. This tutorial will show you how you can create perfect square shapes in PowerPoint as well as true circles.
Powerpoint Printing Actual Size How can i print my slide's graphics in actual size? If i draw a square 5 inch x 5 inch, it comes out smaller in print. I have adjusted the slide size to match the paper size, turned off the scale function and yet, the printed output doesn't match the actual size i have indicated for the shape.
Understand the optimal PowerPoint presentation length to engage your audience effectively. Find out the perfect number of slides for the length of your presentation.