By using this site you agree to our use of cookies. Please refer to our privacy policy for more information. Close

7 Powerful Problem-Solving Root Cause Analysis Tools
The first step to solving a problem is to define the problem precisely. It is the heart of problem-solving.
Root cause analysis is the second important element of problem-solving in quality management. The reason is if you don't know what the problem is, you can never solve the exact problem that is hurting the quality.

Manufacturers have a variety of problem-solving tools at hand. However, they need to know when to use which tool in a manner that is appropriate for the situation. In this article, we discuss 7 tools including:
- The Ishikawa Fishbone Diagram (IFD)
- Pareto Chart
- Failure Mode and Effects Analysis (FMEA)
- Scatter Diagram
- Affinity Diagram
- Fault Tree Analysis (FTA)
1. The Ishikawa Fishbone Diagram IFD

The model introduced by Ishikawa (also known as the fishbone diagram) is considered one of the most robust methods for conducting root cause analysis. This model uses the assessment of the 6Ms as a methodology for identifying the true or most probable root cause to determine corrective and preventive actions. The 6Ms include:
- Measurement,
- Mother Nature- i.e., Environment
Related Training: Fishbone Diagramming
2. Pareto Chart

The Pareto Chart is a series of bars whose heights reflect the frequency or impact of problems. On the Chart, bars are arranged in descending order of height from left to right, which means the categories represented by the tall bars on the left are relatively more frequent than those on the right.
Related Training: EFFECTIVE INVESTIGATIONS AND CORRECTIVE ACTIONS (CAPA) Establishing and resolving the root causes of deviations, problems and failures
This model uses the 5 Why by asking why 5 times to find the root cause of the problem. It generally takes five iterations of the questioning process to arrive at the root cause of the problem and that's why this model got its name as 5 Whys. But it is perfectly fine for a facilitator to ask less or more questions depending on the needs.

Related training: Accident/Incident Investigation and Root Cause Analysis
4. Failure Mode and Effects Analysis (FMEA)
FMEA is a technique used to identify process and product problems before they occur. It focuses on how and when a system will fail, not if it will fail. In this model, each failure mode is assessed for:
- Severity (S)
- Occurrence (O)
- Detection (D)
A combination of the three scores produces a risk priority number (RPN). The RPN is then provided a ranking system to prioritize which problem must gain more attention first.
Related Training: Failure Mode Effects Analysis
5. Scatter Diagram

A scatter diagram also known as a scatter plot is a graph in which the values of two variables are plotted along two axes, the pattern of the resulting points revealing any correlation present.
To use scatter plots in root cause analysis, an independent variable or suspected cause is plotted on the x-axis and the dependent variable (the effect) is plotted on the y-axis. If the pattern reflects a clear curve or line, it means they are correlated. If required, more sophisticated correlation analyses can be continued.
Related Training: Excel Charting Basics - Produce Professional-Looking Excel Charts
6. Affinity Diagram
Also known as KJ Diagram, this model is used to represent the structure of big and complex factors that impact a problem or a situation. It divides these factors into small classifications according to their similarity to assist in identifying the major causes of the problem.

7. Fault Tree Analysis (FTA)
The Fault Tree Analysis uses Boolean logic to arrive at the cause of a problem. It begins with a defined problem and works backward to identify what factors contributed to the problem using a graphical representation called the Fault Tree. It takes a top-down approach starting with the problem and evaluating the factors that caused the problem.

Finding the root cause isn't an easy because there is not always one root cause. You may have to repeat your experiment several times to arrive at it to eliminate the encountered problem. Using a scientific approach to solving problem works. So, its important to learn the several problem-solving tools and techniques at your fingertips so you can use the ones appropriate for different situations.
ComplianceOnline Trainings on Root Cause Analysis
P&PC, SPC/6Sigma, Failure Investigation, Root Cause Analysis, PDCA, DMAIC, A3 This webinar will define what are the US FDA's expectation for Production and Process Control / Product Realization, the use of statistical tehniques, 6 sigma, SPC, for establishing, controlling , and verifying the acceptability of process capability and product characteristics, product acceptance or validation and other studies. Non-conformance, OOS, deviations Failure Investigations, and Root Cause Analysis, PDCA, DMAIC, and similar project drivers to improvement, A# and similar dash boards.
Accident/Incident Investigation and Root Cause Analysis If a major workplace injury or illness occurred, what would you do? How would you properly investigate it? What could be done to prevent it from happening again? A properly executed accident/incident investigation drives to the root causes of the workplace accident to prevent a repeat occurrence. A good accident/incident investigation process includes identifying the investigation team, establishing/reviewing written procedures, identifying root causes and tracking of all safety hazards found to completion.
Root Cause Analysis - The Heart of Corrective Action This presentation will explain the importance of root cause analysis and how it fits into an effective corrective and preventive action system. It will cover where else in your quality management system root cause analysis can be used and will give examples of some of the techniques for doing an effective root cause analysis. Attendees will learn how root cause analysis can be used in process control.
Addressing Non-Conformances using Root Cause Analysis (RCA) RCA assumes that systems and events are interrelated. An action in one area triggers an action in another, and another, and so on. By tracing back these actions, you can discover where the issue started and how it grew into the problem you're now facing.
Introduction to Root Cause Investigation for CAPA If you have reoccurring problems showing up in your quality systems, your CAPA system is not effective and you have not performed an in-depth root cause analysis to be able to detect through proper problem solving tools and quality data sources, the true root cause of your problem. Unless you can get to the true root cause of a failure, nonconformity, defect or other undesirable situation, your CAPA system will not be successful.
Root Cause Analysis and CAPA Controls for a Compliant Quality System In this CAPA webinar, learn various regulations governing Corrective and Preventive Actions (CAPA) and how organization should collect information, analyze information, identify, investigate product and quality problems, and take appropriate and effective corrective and/or preventive action to prevent their recurrence.
Root Cause Analysis for CAPA Management (Shutting Down the Alligator Farm) Emphasis will be placed on realizing system interactions and cultural environment that often lies at the root of the problem and prevents true root cause analysis. This webinar will benefit any organization that wants to improve the effectiveness of their CAPA and failure investigation processes.
Root Cause Analysis for Corrective and Preventive Action (CAPA) The Quality Systems Regulation (21 CFR 820) and the Quality Management Standard for Medical Devices (ISO 13485:2003), require medical device companies to establish and maintain procedures for implementing corrective and preventive action (CAPA) as an integral part of the quality system.
Strategies for an Effective Root Cause Analysis and CAPA Program This webinar will provide valuable assistance to all regulated companies, a CAPA program is a requirement across the Medical Device, Diagnostic, Pharmaceutical, and Biologics fields. This session will discuss the importance, requirements, and elements of a root cause-based CAPA program, as well as detailing the most effective ways to determine root cause and describing the uses of CAPA data.
Legal Disclaimer
This piece of content and any of its enclosures, attachments or appendices, references are created to provide solely for information purpose. ComplianceOnline has made all effort to provide accurate information concerning the subject matter covered. This content is created from interpretation, and understanding of relevant and applicable information and it is not all inclusive. It can be best used in conjunction with your professional judgment and discretion.
However, this piece of content and any other ancillary items disseminated in connection with same are not necessarily prepared by a person licensed to practice law in a particular jurisdiction. This piece of content is not a substitute for the advice of an attorney. If you require legal or other expert advice, you should seek the services of a competent attorney or other professional.
ComplianceOnline necessarily is not, cannot and will not be liable for any claims, damages, or regulatory legal proceedings initiated as a consequence of you using whole or any part of the content present in this document. If any action, claim for damages, or regulatory proceedings is commenced against ComplianceOnline as a consequence of your use of this document, then and in that event, you agree to indemnify ComplianceOnline for such claims, and for any attorney's fees expended by ComplianceOnline in connection with defense of same.
Scatter Plot
Scatter Plots are described as one of the most useful inventions in statistical graphs. Originally, the scatter plot was presented by an English Scientist, John Frederick W. Herschel, in the year 1833. Herschel used it in the study of the orbit of the double stars. He plotted the positional angle of the double star in relation to the year of measurement. The scatter plot was used to understand the fundamental relationship between the two measurements. Even though bar charts and line plots are frequently used, the scatter plot still dominates the scientific and business world. It is very easy for people to look at points on a scale and understand their relationship.
Let us explore this topic to understand more about scatter plots.
What Is a Scatter Plot?
A scatter plot is a means to represent data in a graphical format. A simple scatter plot makes use of the Coordinate axes to plot the points, based on their values. The following scatter plot excel data for age (of the child in years) and height (of the child in feet) can be represented as a scatter plot.

Scatter Plot Application
Here let us look at real-life application represented by scatter plot.
Example: Days of the week and the sales

How to Construct a Scatter Plot?
There are three simple steps to plot a scatter plot.
- STEP I: Identify the x-axis and y-axis for the scatter plot.
- STEP II: Define the scale for each of the axes.
- STEP III: Plot the points based on their values.

Types of Scatter Plot
A scatter plot helps find the relationship between two variables. This relationship is referred to as a correlation. Based on the correlation, scatter plots can be classified as follows.
Scatter Plot for Positive Correlation
Scatter plot for negative correlation, scatter plot for null correlation.
A scatter plot with increasing values of both variables can be said to have a positive correlation. The scatter plot for the relationship between the time spent studying for an examination and the marks scored can be referred to as having a positive correlation.

A scatter plot with an increasing value of one variable and a decreasing value for another variable can be said to have a negative correlation. Observe the below image of negative scatter plot depicting the amount of production of wheat against the respective price of wheat.

A scatter plot with no clear increasing or decreasing trend in the values of the variables is said to have no correlation. Here the points are distributed randomly across the graph. For example, the data for the number of birds on a tree at different times of the day does not show any correlation. Observe the below scatter plot showing the number of birds on a tree versus time of the day.

What is Scatter Plot Analysis?
Analysis of a scatter plot helps us understand the following aspects of the data.
- The different levels of correlation among the data points are useful to understand the relationship within the data.
- A line of best fit can be drawn for the given data and used to further predict new data values.
- The data points lying outside the given set of data can be easily identified to find the outliers.
- The grouping of data points in a scatter plot can be identified as different clusters within the data.
Scatter Plot Examples
Example 1: Laurell had visited a zoo recently and had collected the following data. How can Laurell use a scatter plot to represent this data?
The aim is to present the above data in a scatter plot.
- Step 1: Mark the points on the x-axis and write the names of the animals beside each of the markings.
- Step 2: Marks the points as 10, 20, 30, 40, 50, 60 on the y-axis to represent the number of animals.
- Step 3: Identify the animals marked on the x-axis and mark a point above is based on the number given in the table. Refer to the y-axis to measure and mark the points.

Therefore the points representing the number of animals have been plotted on the scatter plot.
Example 2: The meteorological department has collected the following data about the temperature and humidity in their town. Refer to the table given below and indicate the method to find the humidity at a temperature of 60 degrees Fahrenheit.
The collected data of the temperature and humidity can be presented in the form of a scatter plot.

Temperature is marked on the x-axis and humidity is on the y-axis.
To calculate the humidity at a temperature of 60 degrees Fahrenheit, we need to first draw a line of best fit.
A line of "Best Fit" is a straight line drawn to pass through most of these data points.
Now draw a vertical line from the mark of 60 degrees Fahrenheit on the x-axis, so that it cuts the line of "Best Fit".
At the point where this line cuts the line of "Best Fit", the corresponding marking on the y-axis represents the humidity at 60 degrees Fahrenheit.
Therefore, the humidity at a temperature of 60 degrees Fahrenheit is 50%.
Example 3: In a school, a teacher has prepared a scatter plot on her computer to show the marks of 8 students and the time spent in preparation for the examination. How can we help the teacher find the outlier?

The data in the scatter plot shows a positive correlation; the marks increase with an increase in time spent on preparation. But the data point referring to the student who has to spend 2.5 hours of time for preparation and has secured 40% of marks is distinct from the correlation and can thus be identified as an outlier.
Therefore, the data point of the student with 40% marks and time of 2.5 hours is the outlier.
go to slide go to slide go to slide

Book a Free Trial Class
Practice Questions on Scatter Plot
go to slide go to slide
FAQs on Scatter Plot
What is scatter plot in data.
In data, a scatter (XY) plot is a vertical use to show the relationship between two sets of data. It is a graphical representation of data represented using a set of points plotted in a two-dimensional or three-dimensional plane.
What is Scatter Plot Used For?
Scatter plots are used to observe and plot relationships between two numeric variables graphically with the help of dots. The dots in a scatter plot shows the values of individual data points.
What are Interpolation and Extrapolation in a Scatter Plot?
Interpolation or extrapolation helps in predicting the values of the new data using scatter plots.
- Interpolation helps to predict the new values for data points, within the range of the given set of data.
- Extrapolation helps to predict the new values for the data points, which are beyond the given set of data.
What are the Three Types of Scatter Plot?
The relationship between the different variables in data is referred to as a correlation. Scatter plots help find the correlation within the data. There are three types of correlation:
- Positive Correlation
- Negative Correlation
- No Correlation (None)
When Should You Use Scatter Plot?
You can use a scatter plot when you have at least two variables that can be paired well together. Plotting the variables on a scatter diagram is a systematic way to view the relationship between the variables and see if it's a positive or negative correlation.
How Can You Differentiate Between a Positive and Negative Correlation on a Scatter Plot?
In a positive correlation, both the variables increase or decrease in a similar manner. The line of best fit for the data points with a positive correlation would have a positive slope . Further, in a negative correlation, one variable increases, and another variable value would decrease. The line of best fit for the data with negative correlation would have a negative slope.
What is a Linear Scatter Plot?
A scatter plot when falls along a line it is termed a linear scatter plot while nonlinear patterns seem to follow along some curve.
One to one maths interventions built for KS4 success
Weekly online one to one GCSE maths revision lessons now available
In order to access this I need to be confident with:
This topic is relevant for:

Scatter Graphs
Here we will learn about scatter graphs, including how to plot scatter graphs, describe correlation, draw an estimated line of best fit and interpolate and extrapolate data.
There are also scatter graph worksheets based on Edexcel, AQA and OCR exam questions, along with further guidance on where to go next if you’re still stuck.
What are scatter graphs?
Scatter graphs are a statistical diagram which gives a visual representation of bivariate data (two variables) and can be used to identify a possible relationship between the data. A scatter graph can also be referred to as a scatter diagram or scatter plot.
Here is a set of bivariate data showing the height and weight of ten students and the corresponding scatter graph.

The graph helps us to see if there is a relationship between height and weight. For this data the relationship can be described as the taller a student is, the heavier a student is and vice versa.
If there is a relationship for a set of bivariate data, it is referred to as a correlation. This graph shows a positive correlation.

Scatter diagrams and outliers
An outlier is a piece of data which does not fit with the rest of the data set. It can be recognised as a point by itself.
For example, here is a scatter diagram with an outlier.
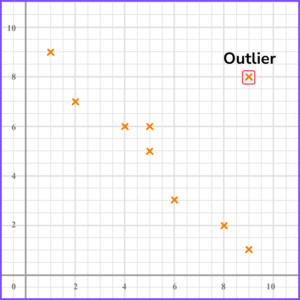
Outliers can occur for different reasons so it is important to look at the context of the graph to determine possible reasons for them.
Scatter diagram and correlation
Correlation is a relationship in bivariate data. Scatter graphs visually show the correlation between two variables.

Correlation can vary in strength. Sometimes there is a strong relationship between data and other times the relationship is weak. You can see this visually on a scatter graph by observing how close the plots are together in forming a line.

What is correlation?

The line of best fit
A line of best fit is a straight line drawn through a scatter graph which shows correlation. It is referred to as an estimated line of best fit because it is drawn by hand following some guidelines. There is a small range of acceptable answers.
The aim is to draw a straight line in the direction of the correlation shown, with points distributed either side of the line as equally as possible along its length. Your line may also pass directly through a number of points.
A line of best fit can also be referred to as a trend line.

What is line of best fit?

Interpolation
An estimated line of best fit can be used to estimate the value of one variable given a value of the other within the range of the highest and lowest data values. This is called interpolation.
Here, the line of best fit has been used to estimate the height of a student given that their weight is 56kg.

This line of best fit estimates that someone weighing 56kg will be approximately 147cm tall.
If there is a strong correlation, then the line of best fit can provide relatively reliable estimates within the data set. If there is a weak correlation, then estimates will be less reliable.
Extrapolation
Here the line of best fit has been extended so that it stretches beyond the data set (it is no longer surrounded by plotted points). If this section of the line is used to estimate the value of a variable given a value of the other, then this is known as extrapolation.

This line of best fit estimates that someone who is 161cm tall will weigh approximately 64kg. This is extrapolation and therefore this estimate comes with potential problems.
It is unknown whether the data will continue with the same trend beyond the recorded values. Therefore, extrapolated values should be treated with caution and are generally viewed as unreliable estimates.
How to plot scatter graphs
In order to plot scatter graphs:
Identify that you have a set of bivariate data.
Draw suitable axes and label them.
- Plot each pair of coordinates.
Explain how to plot scatter graphs

Scatter graphs worksheet
Get your free scatter graphs worksheet of 20+ questions and answers. Includes reasoning and applied questions.
Related lessons on representing data
Scatter graphs is part of our series of lessons to support revision on representing data . You may find it helpful to start with the main representing data lesson for a summary of what to expect, or use the step by step guides below for further detail on individual topics. Other lessons in this series include:
- Representing data
- Frequency polygon
- Two way tables
- Frequency diagram
- Frequency graph
- x and y axis
- Time series graph
- Tally chart
- Stem and leaf diagram
Scatter graphs examples
Example 1: plotting a scatter graph.
A garage sells second-hand cars. One week the garage sells ten cars. The table below shows the age and the selling price of each car.

Represent this data on a scatter graph.
Bivariate data is a set of data which has two pieces of information for each subject. In this question the subjects are the ten cars. Two pieces of data have been recorded for each car, age and selling price.
Therefore, this is bivariate data.
2 Draw suitable axes and label them.
Each axis should have one of the variables and the scale should be appropriate for the given values.
One axis will show the age of the car. This variable has the lowest value of 2 and highest of 10. A sensible scale would be 0 to 10 going up in unit steps.
The other axis will show the selling price of the car. This variable has the lowest value of 850 and highest value of 2200. A sensible scale would be 800 to 2200 in steps of 100. This will require drawing a break in the scale from the origin to 800.

3 Plot each pair of coordinates.
Plot each car as a cross on the graph one at a time. Make sure you read the scale carefully. Make sure you give your graph a suitable title.
To plot the coordinate for Car 1, we locate 5 on the horizontal axis (Age = 5 ), and then travel vertically along that line until we locate £1200 on the vertical axis (Selling price = £1200 ). Place an x at this point (5,1200).
Continuing this method, we get the following scatter graph:

Example 2: plotting a scatter graph
A gardener is researching a crop of sunflowers. He selects 6 sunflowers at random and measures their height and the number of leaves. The table below shows the results.

Represent this data using a scatter graph.
We have two variables for this data, Height (cm) and Number of leaves. This means we have bivariate data.
The range of heights is 154-181cm and so we can draw the horizontal axis from 150-190cm in 5cm steps.
The range of the number of leaves is 8-14 , so we can label the axis from 0-16 in steps of 2.
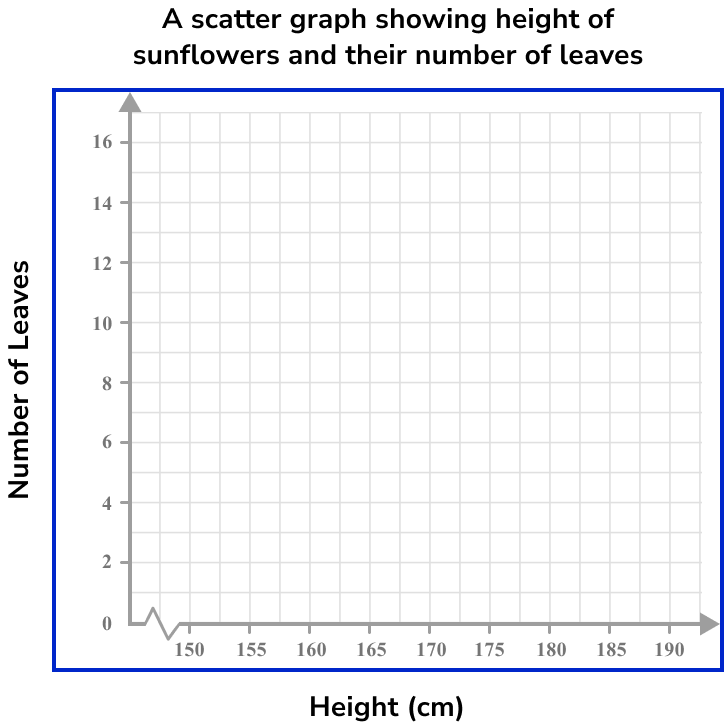
Plot each pair of coordinates.

Example 3: plotting a scatter graph
An energy company was researching the monthly bills of a street of homes in December. The results were recorded in a table, alongside the number of hours the heating was on in each house.

As we are looking at the relationship between two variables (the number of hours of heating and the monthly energy bill), we have bivariate data.
The range of values for the number of hours of heating is 30-54 with no decimal values, so we can label the horizontal axis from 0 to 60 and mark every 5 hours on the axis.
The range of values for the energy bill cost is from £65.50-£87.78 and so if we draw a break and start the axis from 60, we can mark each £5 up to £90 on the vertical axis, giving us a reasonable amount of detail in the plot.

How to read values from a scatter graph
In order to read a value from a scatter graph:
Draw a line of best fit.
Locate the given value on one of the two axes.
Draw a vertical/horizontal line from the value to the line of best fit.
Draw a vertical/horizontal line from the point on the line of best fit to the other axis.
- Read the value on the other axis.
Explain how to read values from a scatter graph

Reading values from scatter graphs examples
Example 4: reading a value from the vertical axis.
Below is a scatter graph that represents the number of hours of sleep per night of 10 students and the score they achieved in a spelling test.

What spelling test score would you predict for a student who has an average of 6 hours of sleep per night?
Here, the line of best fit is approximately

As we know that the student has an average of 6 hours of sleep, we label this value on the horizontal axis.

We need to draw a vertical line to get to the line of best fit.

We now draw a horizontal line from the line of best fit to the other axis.

Read the value on the other axis.
Here, the spelling test score is 13.

Example 5: reading a value from the horizontal axis
Below is a scatter graph that represents the number of ice cream sales against the outside temperature at midday during the month of July in the UK.

Use the graph to determine an estimate for the temperature for 30 ice cream sales
Drawing a line of best fit, we have:

As we want the temperature for 30 ice cream sales, we need to locate 30 on the vertical axis.

The temperature that can be expected for 30 ice cream sales is 26.6^{\circ}C.
Example 6: reading a value from outside the data set
The scatter graph below represents the age of people and the number of hours they work per week.

How many hours of work would you predict for a person who is 64 years old?

As we are looking for a person who is 64 years old, we need to locate 64 on the horizontal axis.

The estimated number of hours worked per week by a person aged 64 is 8 hours.
Common misconceptions
- Correlation and causation
When interpreting scatter graphs, it is important to know that correlation does not indicate causation. In other words, a relationship between two variables does not indicate that one variable causes another. For example, you may find a positive correlation between temperature and the number of ice-creams sold. You can describe the relationship as the hotter the temperature, the greater the number of ice-creams sold. It might then be tempting to say that this indicates that hot weather causes higher ice cream sales. However, there is not sufficient evidence for you to make this assumption both scientifically and statistically. In the same way you cannot say that higher ice cream sales cause hotter temperatures.
- Bivariate data
Sometimes bivariate data can appear to have 3 variables and not just two. For example, the table below shows information from a small independent electronics shop. They have recorded the year, the number of TVs sold, and the amount of money spent on advertising. As the table has 3 rows of data it may appear to have 3 variables.

However, you must remember that bivariate data has a subject and two variables are recorded for each subject. In this case the subject is the year. For each year the number of TV sales and money spent on advertising has been recorded. On a graph one axis will be labelled as ‘number of TVs sold’, and the other as ‘amount of money spent on advertising’ and then each cross will indicate each year. It is good to remember that the points on scatter graphs represent subjects. The number of points on the graph tells us the number of subjects.
Practice scatter graphs questions
1. A student recorded how many glasses of water they drank and how many packets of crisps they ate each day for 3 days.

Which diagram shows this data correctly plotted on a scatter graph?

Step 1: This is bivariate data. For each subject (each day), two pieces of information have been recorded (number of glasses of water and number of packets of crisps).
Step 2: The axes should be labelled with the two variables (number of glasses of water and number of packets of crisps). The scale should be appropriate for the values.
Step 3: When plotting the coordinates make sure to get them the correct way round. Each day is represented by a cross.
2. Which scatter graph shows a negative correlation?

A negative correlation is shown on a scatter graph by the points forming a linear pattern in a downward trend. As one variable increases, the other variable decreases.
3. Which scatter graph shows a weak positive correlation?

A positive correlation is shown on a scatter graph by the points forming a linear pattern in an upward trend. When a correlation is strong, the points lie closely to the line of best fit.
4. Which scatter graph has the best estimated line of best fit?

The line of best fit must go through as many points as possible, with the same number of points on either side of the line.
5. This scatter graph compares the number of hours of sleep 10 adults had the previous night, and the length of time taken to solve a puzzle. The line of best fit has also been drawn.
Use the line of best fit to predict the length of time it would take an adult to solve the puzzle if they had 7 hours sleep.

Drawing a vertical line from 7 on the horizontal axis to the line of best fit, and then across to the other axis, we would expect that a person who has 7 hours of sleep should solve the puzzle in 4 minutes.

6. This scatter graph compares the number of hours of revision for an upcoming exam, and the score on the exam, as a percentage. The exam is out of 80. A line of best fit has been drawn on the scatter graph.
Use the line of best fit to predict the exam mark percentage of a student who revised for 25 hours for the exam.

As the student did 25 hours of revision, we locate 25 hours on the horizontal axis. Drawing a vertical line up to the line of best fit, and then across to the vertical axis, we get a percentage of 56\%.

Scatter graphs GCSE questions
1. What type of correlation is shown on this scatter graph?

Negative correlation
2. A shop sells 14 different magazines. The shop manager decides to record the cost of each magazine and the number of pages it has. The manager then displays this information on a scatter graph.

(a) Describe the relationship shown on the scatter graph.
(b) Estimate the cost of a magazine with 45 pages.
(c) Comment on the reliability of your answer to part (b).
The greater the number of pages in a magazine, the higher the price.
Positive correlation
Weak positive correlation

Estimated line of best fit is a straight line in an upwards direction positioned so that the plotted points are equally distributed along its length (see below).

A magazine with 45 pages is estimated to cost approximately 475p or £4.75. NB: Your answer will be judged as correct based on your estimated line of best fit (see below).
As the scatter graph shows a weak correlation between the number of pages in a magazine and its cost, the answer to part (b) is not very reliable and should only be considered a rough estimate.
3. Simon is studying GCSE music. He finds that he gets bored listening to long pieces of music and prefers listening to short pieces. He decides to conduct an experiment to see if his friend Rajveen shares his views.
He plays Rajveen 8 pieces of music of varying lengths and asks her to rate them out of ten. He hypothesised that “The longer a piece of music, the lower its score out of ten”.
Here is the data Simon collected.

(a) Draw a scatter graph to represent this data.
(b) Does the data support Simon’s hypothesis? Explain your answer.

Axes are drawn with appropriate scales for the given data.
Axes are labelled and the graph has been given an appropriate title.
Coordinates have all been plotted correctly.
No, and no correlation.
Learning checklist
You have now learnt how to:
- Use and interpret scatter graphs of bivariate data
- Recognise correlation and know that it does not indicate causation
- Draw estimated lines of best fit and make predictions
- Interpolate and extrapolate apparent trends whilst knowing the dangers of so doing
The next lessons are
- Mean, median, mode
- Frequency table
- Cumulative frequency
Still stuck?
Prepare your KS4 students for maths GCSEs success with Third Space Learning. Weekly online one to one GCSE maths revision lessons delivered by expert maths tutors.

Find out more about our GCSE maths tuition programme.
Privacy Overview
If you're seeing this message, it means we're having trouble loading external resources on our website.
If you're behind a web filter, please make sure that the domains *.kastatic.org and *.kasandbox.org are unblocked.
To log in and use all the features of Khan Academy, please enable JavaScript in your browser.
Digital SAT Math
Course: digital sat math > unit 3.
- Scatterplots | Lesson
Scatterplots — Basic example
- Scatterplots — Harder example
- Scatterplots: foundations
Want to join the conversation?
- Upvote Button navigates to signup page
- Downvote Button navigates to signup page
- Flag Button navigates to signup page

Video transcript
QMS, Quality and Lean Tools
Learn about all these tools

What is a scatter diagram in quality control?
What is a scatter diagram.
A scatter diagram is a graphic presentation of the relationship between two variables. In quality improvement, scatter diagrams are usually used to explore the cause-effect relationships in the problem-solving process.
The diagnostic process in quality improvement is actually a fact-based search for cause-effect relationships. It starts with a symptom of a problem – the measurable effect. After that by use of the cause and effect diagram , we point out the possible causes. Then we collect data and search for those possible causes which have the strongest influence on the effect.
Then the problem can be solved easily by taking the required action on the causes. A scatter diagram is a good tool to display data when a quality improvement team has to evaluate a cause-and-effect relationship.
How to solve problems with a scatter diagram?
Following are the main steps about the relationship between variables and the use of a scatter diagram in problem-solving.
Step 1: Finding an actual cause-and-effect relationship is the key to effective problem-solving.
Step 2: Cause and effect relationships usually show variation.
Step 3: It is easier to check the relationship in a scatter diagram than in a simple number table.
A scatter diagram only shows the relationship between two variables. It does not prove that one variable causes the other. So one must have a logical practical explanation to establish a cause-and-effect relationship.
How to analyze a scatter diagram?
① Develop a reasonable and relevant theory about the suspected relationship between two variables of interest.
② Collect proper both types of data and construct a scatter diagram.
③ Identify and classify the pattern of correlation.
④ Question your original theory and consider other aspects of the observed pattern of correlation.
Typical Pattern of correlation :
What are the Types of scatter diagrams ?
Strong, Positive Correlation: The value of Y clearly increases as the value of X increases.
Strong, Negative Correlation: The value of Y clearly decreases as the value of X increases.
Weak, Positive Correlation: The value of Y increases somewhat as the value of X increases.
Weak, Negative Correlation: The value of Y decreases somewhat as the value of X increases.
Complex Correlation: The value of Y appears to be related to the value of X, but the relationship is not smooth.
No Correlation: For any value of X, Y can have both large and small values. It does not appear to be any particular relationship between X and Y.

What is the use of a scatter diagram in quality control?

1 . Testing theories and identifying root causes : Scatter diagrams are primarily used to examine theories about cause-effect relationships as a team searches for the root cause of the problem under investigation. Construction of a scatter diagram is a natural next step after a team develops a cause-and-effect diagram.
2. Designing solutions and holding the gains: A Scatter diagram can also be useful in helping a team design a control system to hold the gains from a quality improvement effort.
How to construct the scatter diagram?
Following are the steps for making a scatter diagram,
Step 1: Obtain the table of raw data and determine the high and low values of each variable.
Step 2: Decide which variable will be plotted on the horizontal axis.
Step 3: Draw and label the horizontal and vertical axes. • Make the axes roughly the same length, creating a square plotting area. • Label the axes in about six convenient multiples of one, two or five. Make the lowest label slightly greater than the high value for the variable. • Label increasing value from bottom to top on the vertical axis and left to right on the horizontal axis. • Provide a caption to describe the measurement and its units.
Step 4: Plot the paired data. • Use concentric circles to indicate identical paired data points. • Use filled and unfilled symbols to show the strata.
Step 5: Title the chart and provide other appropriate notations.
Step 6: Identify and classify the pattern of correlation.
Step 7: Check for potential pitfalls in your analysis.
Leave a Comment Cancel reply
Save my name, email, and website in this browser for the next time I comment.
Scatter Diagram
Harnessing data insights with scatter diagrams: when and how to use them.
In data analysis and quality improvement, a scatter diagram is a powerful visual tool that aids in understanding relationships between two variables. Also known as a scatter plot or scatter graph, this simple yet effective chart provides valuable insights into data patterns. In this article, we’ll explore what a scatter diagram is, when it’s used, and how to leverage it to uncover important relationships in your data.
What is a Scatter Diagram?
A scatter diagram is a graphical representation of data points on a two-dimensional plane. It involves plotting individual data pairs, typically with one variable on the x-axis (horizontal) and the other on the y-axis (vertical). The resulting pattern of data points reveals the relationship, if any, between the two variables.
When and How is a Scatter Diagram Used?
- Positive Correlation : When data points generally trend upwards from left to right, it indicates a positive correlation . This means that as one variable increases, the other also tends to increase.
- Negative Correlation : If data points predominantly trend downwards from left to right, it signifies a negative correlation . This suggests that as one variable increases, the other tends to decrease.
- No Correlation : When data points appear randomly scattered with no clear trend, it implies no correlation or a weak relationship between the variables.
- Quality Improvement : Scatter diagrams are frequently used in quality improvement projects, such as Six Sigma initiatives, to investigate the relationship between process variables and defects or variations. By analyzing the data points, practitioners can identify which variables are most influential in affecting product or process outcomes.
- Root Cause Analysis : In problem-solving efforts, scatter diagrams help identify potential root causes by examining their relationships with the observed issues. This aids in pinpointing areas for improvement and directing corrective actions.
- Decision-Making : Scatter diagrams assist in data-driven decision-making. They visually represent data trends, making it easier for stakeholders to understand complex relationships and make informed choices.
The Scatter Diagrams Role in Lean Six Sigma.
In a Lean Six Sigma project, scatter diagrams serve as a critical analytical tool to explore relationships between process variables and their impact on key performance metrics. By plotting data points on a scatter diagram, Lean Six Sigma practitioners can visually assess whether there is a correlation between process factors and variations in outcomes, helping identify critical-to-quality (CTQ) variables.
This insight aids in making informed decisions about process optimization, pinpointing root causes of defects, and strategically allocating resources to achieve both efficiency and quality improvement objectives, which are central to Lean Six Sigma’s core principles.
Whether it’s uncovering the influence of process parameters on defects or understanding how cycle times affect customer satisfaction, scatter diagrams play a pivotal role in guiding data-driven actions and ensuring the success of Lean Six Sigma projects.
How to Create and Interpret a Scatter Diagram:
Creating a scatter diagram is a straightforward process:
- Collect Data : Gather data on the two variables of interest. Ensure that the data pairs are appropriately matched and collected under consistent conditions.
- Choose Axes : Decide which variable goes on the x-axis and which on the y-axis. This choice should reflect the hypothesis or question you want to investigate.
- Plot Data Points : For each data pair, plot a point on the graph where the x-value corresponds to one variable, and the y-value corresponds to the other.
- Analyze the Pattern : Examine the resulting scatter plot to identify any discernible pattern. Determine whether the data points exhibit a correlation, and if so, its nature (positive, negative, or none).
- Interpret Findings : Use the scatter diagram to draw conclusions about the relationship between the two variables. This may inform decisions, guide further analysis, or drive process improvements.
Scatter diagrams are invaluable tools in data analysis, quality improvement, and problem-solving. By visually representing the relationships between two variables, they empower individuals and organizations to make data-driven decisions, identify root causes, and drive process enhancements. Whether you’re seeking to improve product quality, optimize processes, or simply gain insights from your data, the scatter diagram is a versatile and accessible tool that should be in every data analyst’s toolkit.
- All Certifications
- Accessibility
Connect With Us
Copyright © 2022 MSI. All Rights Reserved.
- Math Article
Scatter Plot
Scatter plots are the graphs that present the relationship between two variables in a data-set. It represents data points on a two-dimensional plane or on a Cartesian system . The independent variable or attribute is plotted on the X-axis, while the dependent variable is plotted on the Y-axis . These plots are often called scatter graphs or scatter diagrams .
Scatter plot Graph
A scatter plot is also called a scatter chart, scattergram, or scatter plot, XY graph. The scatter diagram graphs numerical data pairs, with one variable on each axis, show their relationship. Now the question comes for everyone: when to use a scatter plot ?
Scatter plots are used in either of the following situations.
- When we have paired numerical data
- When there are multiple values of the dependent variable for a unique value of an independent variable
- In determining the relationship between variables in some scenarios, such as identifying potential root causes of problems, checking whether two products that appear to be related both occur with the exact cause and so on.
Scatter Plot Uses and Examples
Scatter plots instantly report a large volume of data. It is beneficial in the following situations –
- For a large set of data points given
- Each set comprises a pair of values
- The given data is in numeric form

The line drawn in a scatter plot, which is near to almost all the points in the plot is known as “ line of best fit ” or “ trend line “. See the graph below for an example.

Scatter plot Correlation
We know that the correlation is a statistical measure of the relationship between the two variables’ relative movements. If the variables are correlated, the points will fall along a line or curve. The better the correlation, the closer the points will touch the line. This cause examination tool is considered as one of the seven essential quality tools.
Types of correlation
The scatter plot explains the correlation between two attributes or variables. It represents how closely the two variables are connected. There can be three such situations to see the relation between the two variables –
Positive Correlation
Negative correlation, no correlation.
When the points in the graph are rising, moving from left to right, then the scatter plot shows a positive correlation. It means the values of one variable are increasing with respect to another. Now positive correlation can further be classified into three categories:
- Perfect Positive – Which represents a perfectly straight line
- High Positive – All points are nearby
- Low Positive – When all the points are scattered

When the points in the scatter graph fall while moving left to right, then it is called a negative correlation. It means the values of one variable are decreasing with respect to another. These are also of three types:
- Perfect Negative – Which form almost a straight line
- High Negative – When points are near to one another
- Low Negative – When points are in scattered form

When the points are scattered all over the graph and it is difficult to conclude whether the values are increasing or decreasing, then there is no correlation between the variables.

Scatter plot Example
Let us understand how to construct a scatter plot with the help of the below example.
Draw a scatter plot for the given data that shows the number of games played and scores obtained in each instance.
X-axis or horizontal axis: Number of games
Y-axis or vertical axis: Scores
Now, the scatter graph will be:

Note: We can also combine scatter plots in multiple plots per sheet to read and understand the higher-level formation in data sets containing multivariable, notably more than two variables.
Scatter plot Matrix
For data variables such as x 1 , x 2 , x 3 , and x n , the scatter plot matrix presents all the pairwise scatter plots of the variables on a single illustration with various scatterplots in a matrix format. For the n number of variables, the scatterplot matrix will contain n rows and n columns. A plot of variables x i vs x j will be located at the ith row and jth column intersection. We can say that each row and column is one dimension, whereas each cell plots a scatter plot of two dimensions.
- Share Share
Register with BYJU'S & Download Free PDFs
Register with byju's & watch live videos.

Root Cause Analysis Guide for Efficient Business Problem-Solving
Updated on: 5 January 2023
Sometimes things go wrong. Well-planned projects fail, processes break down and employees lose their productivity.
To understand what happened, you need to get to the bottom of things.
Many organizations use the root cause analysis when a problem or something unplanned happens that will interrupt their business processes. It helps dig deeper and find effective solutions.
In this post, we will look at what is root cause analysis, the root cause analysis steps, and root cause analysis tools.
What is Root Cause Analysis
Root cause analysis is a method that helps understand the primary cause of a problem or why a problem occurred in the first place.
It helps you to dig into the underlying causes of the situation, thus allowing you to find appropriate solutions for it.
There are several root cause analysis tools and techniques that can be used in the investigation of a problem. But before we get to that, let’s understand how to conduct a root cause analysis first.
Root Cause Analysis Steps
A root cause analysis may take several hours of your time.
It would be easier for you if you involve a team of relevant people; for example, if you are investigating bottlenecks in a process, it would help to have the process owner and other experts for the analysis.
Follow the steps below to conduct a successful root cause analysis.
Step 1: Define the problem
Define the problem your organization is facing and gather data and evidence relevant to it and necessary to understand the current situation.
Create a problem statement which should include information about the problem like the actual impact, potential impact, the focal point, etc. However keep the statement concise.
Step 2: Determine the factors that caused the problem.
Gather a team of people directly involved in the execution of the process and corrective actions, and experts whose input can help find solutions faster.
Together with the team, brainstorm the possible factors for the problem by asking ‘why?’. You can use a 5 whys diagram or a fishbone diagram here.
Step 3: Identify the root cause.
Dig deeper by continuing to ask why after the first layer of causal factors. Keep at it until finally you have discovered the fundamental cause for the problem at hand.
Step 4: Decide the corrective actions
Decide the corrective actions you need to take to eliminate the problem and prevent it from recurring. Make sure that you clearly communicate them to the people who will be involved.
Step 5: Review and evaluate
Review and evaluate the impact of the corrective actions. Make improvements as necessary.
Root Cause Analysis Tools
Many root cause analysis tools are out there. Following we have listed some that are widely used and more effective in problem-solving.
5 Whys Analysis
To carry out a 5 whys analysis, you need to gather a team of people who are affected by the problem.
As the name suggests, in the 5 whys analysis the question ‘why?’ is asked five times in the course of finding the root cause of a problem.
You can use a 5 whys template like the one below to facilitate the brainstorming session.
Once you have asked ‘why’ five times and figured out the root cause, come up with improvement measure you need to apply. Assign everyone the corrective actions that need to be taken.

Cause and Effect Analysis
Once you have identified the problem, you can use the cause and effect analysis to explore the causes of a problem and its effects.
For the analysis, you can use a cause and effect diagram, which is also known as a fishbone diagram or the Ishikawa diagram.
Just as it helps explore the factors that are preventing an outcome, it can also be used to identify the factors needed to generate the desired outcome.

Here’s how to use the cause and effect analysis to solve business problems . You can also refer to our guide on fishbone diagrams to learn how to use the tool in more detail.
Pareto Chart
Pareto chart is a combination of a bar chart and a line graph. While the length of the bars represent the frequency or cost of faults, they are arranged in such a way that highlights the most frequent to least frequent. The chart helps prioritize your issues based on the cumulative effect they have on a system.
The Pareto chart is based on the theory that 80% of the total problems that occur are caused by 20% of problem causes. This means if you have solutions to your major problems, you can also solve a majority of your other smaller problems.
Learn how to create a Pareto chart step-by-step here .

Scatter Diagram
Scatter diagrams or scatter plot diagrams can be used to visualize the relationship between two variables. Once you have created a cause and effect diagram and identified potential causes to your problem, you can use the scatter diagram to determine which causes are responsible for the variation.
While the independent variable is plotted along the horizontal axis, the vertical axis is for the dependent axis. Learn more here .

Fault Tree Analysis
Fault tree analysis is a deductive analysis to that visually represent the failure path. You can use the fault tree analysis to determine the possible causes of a problem or an event. The fault tree starts with the event at the top and the possible causes are placed below.

Anymore Root Cause Analysis Tools?
What other root cause analysis tools do you use? Have you got any more tips on accelerating the root cause analysis steps we have discussed above? Do share them with us in the comments below.
Join over thousands of organizations that use Creately to brainstorm, plan, analyze, and execute their projects successfully.

More Related Articles

Leave a comment Cancel reply
Please enter an answer in digits: 5 + 15 =
Download our all-new eBook for tips on 50 powerful Business Diagrams for Strategic Planning.
What Is a Scatter Diagram and How to Read It?
Scatter diagram is a graphical representation of a set of data in which the values of pairs of variables are plotted on a coordinate system. The tool is widely used in statistics and other fields of science and engineering to represent data relationships.
- What Is Lean Management?
- The 5 Principles of Lean
- What Is Shared Leadership?
- What Is Lean Manufacturing?
- What Is Value in Lean?
- 7 Wastes of Lean
- What Is Mura?
- What Is Muri?
- What Is 5S?
- What Is the Cost of Delay?
- What Is Value Stream Mapping?
- What Is a Pull System?
- What Is a Bottleneck?
- Just-in-Time Manufacturing
- Implementing a Kanban Pull System
- Pull System on the Portfolio Level
- What Is Kaizen?
- What Is Continuous Improvement?
- Built-In Quality Management
- What Is the Poka-Yoke Technique?
- What Is the PDCA (Plan Do Check Act) Cycle?
- 5 Whys: The Ultimate Root Cause Analysis Tool
- Gemba Walk: Where the Real Work Happens
- A3 Problem-Solving: Fight the Root Cause
- How To Perform Root Cause Analysis?
- Root Cause Analysis Tools
What Is a Pareto Chart?
- What Is a Scatter Diagram?
What Is a Fishbone Diagram?
- What Is Hoshin Kanri?
- What Is Hoshin Kanri Catchball?
- Demystifying the Hoshin Kanri X Matrix
- The Lean Transformation Model Explained
- Lean Transformation Roadmap - 8 Comprehensive Steps
- What Is Cycle Time?
- What Is Little's Law?
- What Is Takt Time?
- What Is Heijunka?
- What Is Jidoka?
- What Is Andon?
- Lean Six Sigma Principles
- Lean Six Sigma Tools
- Lean Six Sigma Implementation
- What Is Six Sigma?
- What Is DMADV?
- What Is DMAIC?
- Lean Project Management
The scatter diagram is also called a scatter plot chart, XY chart, and correlation chart. A scatter diagram is a two-dimensional graphical representation of a set of data. The scatter diagram graphs pairs numerical data with one variable on each axis to look for a relationship between them. If the variables are correlated, the points will fall along the line or curve. The better the correlation, the tighter the points will hug the line. The scatter diagram is one of the seven basic quality tools used in root cause analysis.
Scatter diagrams are used and applied in several ways, where the most important benefit is showing the correlation between two variables. The scatter diagram will visualize in an easy to observe way if the data points are positively correlated, negatively correlated, or there is no correlation between the two variables.
There are two common challenges that come with the use of scatter diagrams – the interpretation of causation as correlation and overplotting. The most important thing to remember when we talk about correlation is that it doesn’t mean that the changes observed in one variable are responsible for the changes observed in another variable. Overplotting exists when too many data points have been plotted. This results in the different data points overlapping, making it challenging to identify the relationship between variables.
What Are Scatter Diagrams Used for?
Scatter diagrams are used when you want to demonstrate the relationship between two variables or when you have to identify data patterns. The scatter diagram is used in many sectors such as in Lean management to determine root cause analysis, in Economics to illustrate relationships between two economic phenomena, such as employment and output, in Management to visualize how product inventories affect costs or delivery times, in Market Research to illustrate, for example, the relationship between advertising methods and sales.
Can You Use a Scatterplot Chart to Forecast Cycle Time on a Kanban Board?
Yes, you can use a scatterplot chart to forecast cycle time on a Kanban board. In Kanban, it is called cycle time scatterplot. The cycle time scatterplot is an adapted version of the scatterplot chart. It is revered in the Lean management world because it provides a very detailed picture of one of the key metrics in Lean – cycle time. Cycle time represents how long it takes to get things done for individual items on your Kanban boards. The goal of the cycle time scatterplot is to visualize the cycle time of your team’s assignments within a predefined time frame.
The structure of this chart is very similar to that of a typical scatterplot. The horizontal axis of the chart visualizes a selected time frame by dates. The vertical one represents the cycle time of the completed tasks during this period calculated in days. Each dot that you see scattered across the chart is a marker representing a task within a card on your Kanban board. The dots’ positions are determined by the completion date and how long it is required for the Kanban card to reach the "Done" column.
What Are the Types of Scatter Plots?
You can classify a scatter plot in many ways; the most popular one is based on correlation and is extensively used in project management. According to the correlation, scatter plots are divided into the following three categories.
- Positive Correlation
- Negative Correlation
- No Correlation
1. Positive Correlation
The scatter plot with a positive correlation is also known as a "Scatter Diagram with Positive Slant." In this case, as the value of X increases, the value of Y will increase too, which means that the correlation between the two variables is positive. If you draw a straight line along the data points, the slope of the line will go up. For example, if the weather gets colder, hot drink sales will go up.
2. Negative Correlation
The scatter plot with a negative correlation is also known as a "Scatter Diagram with a Negative Slant." In this case, as the value of X increases, the value of Y will decrease. If you draw a straight line along the data points, the slope of the line will go down. For example, if the cycle time of a workflow goes up, the number of tasks completed will go down.
3. No Correlation
The scatter plot with no correlation is also known as the "Scatter Diagram with Zero Degree of Correlation." In this case, the data point spreads so randomly that you can’t draw a line through the data points. You can conclude that these two variables have no correlation or zero degrees of correlation. For example, if the weather gets hotter, we can’t conclude that the sales of wooden chairs will go up or down because there is no correlation between the two variables.
What Are the Benefits of Using a Scatter Diagram?
The following benefits can define the importance of a scatter diagram.
- A scatter diagram visualizes the relationship between two variables.
- A scatter diagram is one of the best tools to show a non-linear pattern.
- A scatter diagram provides the data to confirm a hypothesis that two variables are related.
- A scatter diagram determines the range of data flow, for example, the maximum and minimum values.
- A scatter diagram visualizes patterns that are easy to observe.
- Plotting a scatter diagram is very simple.
- A scatter diagram establishes a relationship between two sets of numerical data.
- A scatter diagram can track patterns and trends of different measures.
What Are Common Issues When Using Scatter Plots?
There are two common challenges that come with the use of scatter diagrams – the interpretation of causation as correlation and overplotting.
1. Overplotting exists when too many data points have been plotted. This results in the different data points overlapping, and it makes it challenging to identify the relationship between variables.
2. Interpreting Correlation as Causation is the second challenge of using Scatter Plots. The most important thing to remember when we talk about correlation is that it doesn’t mean that the changes observed in one variable are responsible for the changes observed in another variable. Causation is observed when an event occurring has an impact on a given outcome. Be careful not to interpret correlation as causation.
How to Make a Scatter Diagram?
There are multiple ways to create a scatter diagram. If you want to create a simple scatter diagram with one click, then the best way to do so is by using an online scatter diagram maker, which is usually free to use. You will usually have to fill in predefined fields such as the chart’s name, the Y and Y values, series value, color, and trendline. Click on the draw button, and your scatter diagram should be ready. If you need more agility and you have to create a more complex scatter diagram, you can use Excel and PowerPoint.
In order to make a scatter diagram, you will need to have some upfront data. First, collect pairs of data where you suspect a relationship. Input your data, where the x-axis information goes in the top row, and the y-axis data will go in the bottom row. Label your x and y-axes so you know what they represent. If you have the option to use color codes for each of your dependent variable’s points, choose a color for your axes, your values, and your chart title.
Can You Create a Scatter Diagram by Using a Scatter Diagram Maker?
Yes, you can create a scatter diagram by using a scatter diagram maker. A scatter diagram maker is an online tool to help you make a scatter diagram very quickly. Many of these tools are available for free, such as Alcula, MathCracker, and RapidTables. The benefit of using a scatter diagram maker is that by filling several set fields, you can quickly create a beautiful scatter diagram.
To create a scatter diagram, enter the graph’s title for the Y and X-axis, enter the minimum axis value, maximal axis value, and axis label. There are also simple scatter diagram calculators, where the only thing you need is to fill in the values for X and Y. The main disadvantage of using an online scatter diagram maker is that it lacks flexibility. You need to work with what’s offered by the tools.
What Is Correlation in a Scatter Diagram?
Scatter diagrams have one very specific purpose; they show how one variable is affected by another. The relationship between the two variables is called correlation.
If the value of X increases and the value of Y increases too, this means that the correlation between the two variables is positive. If you draw a straight line along the data points, the slope of the line will go up. If the value of X increases and the value of Y decreases, this means that the correlation between the two variables is negative. If you draw a straight line along the data points, the slope of the line will go down. If the data point spreads so randomly that you can’t draw a line through the data points, this means that the correlation between the two variables is negative.
The correlation can be quantified by strength – whether the correlation between the two variables is weak or strong. It is important to understand that the correlation provides evidence of association, not causation. When describing the relationship between two variables, correlations are just one piece of the puzzle. This information is necessary but not sufficient. Other analyses should also be conducted to provide more information.
What Are the Scatter Diagram Correlation Patterns?
- A strong positive correlation pattern is when the value of Y increases as the X value increases.
- A strong negative correlation pattern is when the value of Y decreases as the X value increases.
- A weak positive correlation pattern is when the value of Y increases slightly as the X value increases.
- A weak negative correlation pattern is when the value of Y decreases slightly as the X value increases.
- A complex correlation pattern is when the value of Y looks like it is related to the value of X, but their relationship can’t be easily determined.
- A no-correlation pattern is when there is no connection between the two variables.
How to Read a Scatter Diagram?
The data on a scatter diagram should be read from left to right, and you should be looking for trends. If you see an uphill pattern as you move from left to right, this means a positive relationship between the two variables X and Y. If X-values increase, the Y-values increase too. As you move from left to right and you see a downhill pattern, this means that we have a negative relationship between the two variables X and Y. When the X-values increase, the Y-values decrease. If the data points don’t have any kind of pattern, then this indicates that no relationship exists between the variables X and Y.
What Is the Strength of a Scatter Diagram?
The strength of a scatter diagram is quantified as weak, moderate, or strong. When the data points are spread out, the relationship between the two variables is weak. If the data points are clustered, or follow a straight line or a curve, the relationship between the two variables is considered strong.
What Are the Examples of a Scatter Diagram?
We will take a look at one example of a scatter diagram to forecast cycle time. One of the greatest benefits of using a cycle time scatterplot for Lean management is that it gives you the ability to forecast the outcome of future tasks. Although it may look confusing at first sight, the chart can give you probabilistic forecasts about future performance. For this to happen, you need to draw horizontal lines across the chart, depending on the number of finished tasks within a specific time frame.

For example, let’s say that you’ve got 100 tasks that were completed in 30 days. If 25 of them were finished in 5 days or less, while all the others took longer, you’ve got a 25 percent chance to finish any future task within this time frame. Draw a horizontal line at the height of the 10th day on your cycle time scatterplot.
Let’s say that 50 more tasks were completed within 10 days. The second horizontal line should mark 75 percent and should be at the height of the 10th day. The higher the percentile, the higher the chance to complete a future task within this time frame.
Whenever you commit to a deadline, you need to look at the percentile lines on your scatterplot and say that you’ve got a certain percent chance to be ready in X days/weeks/months.
How to Use Scatter Plot in Six Sigma?
A scatter plot is a two-dimensional graphical representation of a set of data. Its ability to show nonlinear relationships between variables is widely used in Six Sigma. Scatter plots are widely used as a tool for analyzing problems in Six Sigma .
Scatter plots show how the variables relate to each other. This relationship is called correlation, and there are three types of correlation: positive, negative, and no correlation. In Six Sigma, a scatter plot will visually display the correlation between a problem and a cause, whether there is a positive, negative, or no correlation. This helps quality teams to evaluate which hypothetical cause has the greatest impact on a problem and which should be solved first.
What Is the History of Scatter Diagrams?
The modern scatter diagram appeared for the first time in 1833 in a study on the orbits of double stars. The study was conducted by John Frederick W. Herschel, an English scientist. It is believed that the visualization is the first published example of data points plotted on a Cartesian plan. In 1886, the usage of the scatter diagram in the scientific community was popularized by Francis Galton, an English Victorian-era polymath. Galton is one of the creators of the statistical concept of correlation. Before 1906, the scatterplot was commonly referred to as a scatter diagram; however, Karl Pearson, an English mathematician and biostatistician, is credited with naming the visualization as a scatterplot. In the 1980s, the chart was further popularized by the statisticians William Cleveland and Robert McGill. They conducted research to understand which charts people perceive information most quickly and accurately. The scatter diagram was the big winner as people are extremely experienced at looking at many points on a chart and understanding their relationship.
We offer the most flexible software platform
for outcome-driven enterprise agility.
A scatter diagram is a correlation chart that visually depicts the relationship between two variables. It provides insights into how two variables affect each other when they are plotted over a graph. Some of the benefits of scatter diagrams include:
- Visualization of the relationship between two variables.
- Visualization of patterns and trends that are easy to observe.
- Easy-to-use plotting mechanism.

Nikolay Tsonev
Product Marketing | PMI Agile | SAFe Agilist certified
Nick is passionate about product marketing and business development and is a subject matter expert at Businessmap. With expertise in OKRs, strategy execution, Agile, and Kanban, he continues to drive his interest in continuous improvement. Nick is a PMI Agile and SAFe Agilist certified practitioner.

Start your free trial now and get access to all features.
During the 14-day trial period you can invite your team and test the application in a production-like enviroment.
- Scatter Diagram
Scatter Diagrams are convenient mathematical tools to study the correlation between two random variables. As the name suggests, they are a form of a sheet of paper upon which the data points corresponding to the variables of interest, are scattered. Judging by the shape of the pattern that the data points form on this sheet of paper, we can determine the association between the two variables, and can further apply the best suitable correlation analysis technique.
Suggested Videos
Interpretation of scatter diagrams.
The Scatter Diagrams between two random variables feature the variables as their x and y-axes. We can take any variable as the independent variable in such a case (the other variable being the dependent one), and correspondingly plot every data point on the graph (x i ,y i ). The totality of all the plotted points forms the scatter diagram.
Based on the different shapes the scatter plot may assume, we can draw different inferences. We can calculate a coefficient of correlation for the given data. It is a quantitative measure of the association of the random variables. Its value is always less than 1, and it may be positive or negative.
In the case of a positive correlation, the plotted points are distributed from lower left corner to upper right corner (in the general pattern of being evenly spread about a straight line with a positive slope), and in the case of a negative correlation, the plotted points are spread out about a straight line of a negative slope) from upper left to lower right.
If the points are randomly distributed in space, or almost equally distributed at every location without depicting any particular pattern, it is the case of a very small correlation , tending to 0.
Browse more Topics under Correlation And Regression
- Karl Pearson’s Coefficient of Correlation
- Rank Correlation
- Probable Error and Probable Limits
- Regression Lines, Regression Equations and Regression Coefficient
Types of Patterns
Now, look at the different possible scenarios of the patterns formed in the scatter diagrams, with their corresponding coefficients of correlation values mentioned with them, below and try to make sense of them.
It is clear that the case of r = 0 may occur in many forms. Some such factors include the symmetry of the pattern around a particular point, the general randomness of the points etc. Note that the scatter diagram by itself doesn’t assign quantitative values as measures of correlation for the plots. It simply gives an idea of what association to expect between the random variables of interest.
Now go through the solved example below, to understand how to make your own scatter plots and analyze them.
Solved Examples on Scatter Diagram
Question: Draw the scatter diagram for the given pair of variables and understand the type of correlation between them.
Here, we take the two variables for consideration as:
M: The marks obtained out of 100 S: Number of students
Since the values of M is in the form of bins, we can use the centre point of each class in the scatter diagram instead. So let us first choose the axes of our diagram.
X-axis – Marks obtained out of 100 Y-axis – Number of Students
The data points that we need to plot according to the given dataset are –
(45,12), (55,10), (65,8), (75,7), (85,5), (95,2)
Here’s how the plot will look like –

From the shape of the curve, clearly, only a fewer number of students get high marks. This implies a negative correlation between the two variables we have considered here; which is a bit obvious for example you can look at your own class.
Customize your course in 30 seconds
Which class are you in.

Correlation and Regression
- Regression Lines, Regression Equations and Regression Coefficients
- Karl Pearson’s Coefficient of Correlation
Leave a Reply Cancel reply
Your email address will not be published. Required fields are marked *
Download the App

5 Root Cause Analysis Tools for More Effective Problem-Solving

Next to defining a problem accurately, root cause analysis is one of the most important elements of problem-solving in quality management. That’s because if you’re not aiming at the right target, you’ll never be able to eliminate the real problem that’s hurting quality.
So which type of root cause analysis tool is the best one to use? Manufacturers have a range of methods at their fingertips, each of which is appropriate for different situations. Below we discuss five common root cause analysis tools, including:
- Pareto Chart
- Fishbone Diagram
- Scatter Diagram
- Failure Mode and Effects Analysis (FMEA)
Download our free Root Cause Analysis 101 Guidebook Read 14 quality metrics every executive should know
1. Pareto Chart
A Pareto chart is a histogram or bar chart combined with a line graph that groups the frequency or cost of different problems to show their relative significance. The bars show frequency in descending order, while the line shows cumulative percentage or total as you move from left to right.

The Pareto chart example above is a report from layered process audit software that groups together the top seven categories of failed audit questions for a given facility. Layered process audits (LPAs) allow you to check high-risk processes daily to verify conformance to standards. LPAs identify process variations that cause defects, making Pareto charts a powerful reporting tool for analyzing LPA findings.
Pareto charts are one of the seven basic tools of quality described by quality pioneer Joseph Juran. Pareto charts are based on Pareto’s law, also called the 80/20 rule, which says that 20% of inputs drive 80% of results.
Learn how to create Pareto charts in this post or download the Pareto Chart Tip Sheet and Sample Excel File
The 5 Whys is a method that uses a series of questions to drill down into successive layers of a problem. The basic idea is that each time you ask why, the answer becomes the basis of the next why. It’s a simple tool useful for problems where you don’t need advanced statistics, so you don’t necessarily want to use it for complex problems.
One application of this technique is to more deeply analyze the results of a Pareto analysis. Here’s an example of how to use the 5 Whys:
Problem: Final assembly time exceeds target
- Why is downtime in final assembly higher than our goal? According to the Pareto chart, the biggest factor is operators needing to constantly adjust Machine A
- Why do operators need to constantly adjust Machine A? Because it keeps having alignment problems
- Why does Machine A keep having alignment problems? Because the seals are worn
- Why are Machine A’s seals worn? Because they aren’t being replaced as part of our preventive maintenance program
- Why aren’t they being replaced as part of our preventive maintenance program? Because seal replacement wasn’t captured in the needs assessment
Of course, it may take asking why more than five times to solve the problem—the point is to peel away surface-level issues to get to the root cause.
Learn more about the 5 Whys method in this blog post or download our free 5 Whys worksheet
3. Fishbone Diagram
A fishbone diagram sorts possible causes into various categories that branch off from the original problem. Also called a cause-and-effect or Ishakawa diagram, a fishbone diagram may have multiple sub-causes branching off of each identified category.

Learn more about how to use a fishbone diagram in this blog post and download our free set of fishbone diagram templates
4. Scatter Plot Diagram
A scatter plot or scatter diagram uses pairs of data points to help uncover relationships between variables. A scatter plot is a quantitative method for determining whether two variables are correlated, such as testing potential causes identified in your fishbone diagram.
Making a scatter diagram is as simple as plotting your independent variable (or suspected cause) on the x-axis, and your dependent variable (the effect) on the y-axis. If the pattern shows a clear line or curve, you know the variables are correlated and you can proceed to regression or correlation analysis.
Download a free tip sheet to start creating your own scatter diagrams today!
5. Failure Mode and Effects Analysis (FMEA)
Failure mode and effects analysis (FMEA) is a method used during product or process design to explore potential defects or failures. An FMEA chart outlines:
- Potential failures, consequences and causes
- Current controls to prevent each type of failure
- Severity (S), occurrence (O) and detection (D) ratings that allow you to calculate a risk priority number (RPN) for determining further action
When applied to process analysis, this method is called process failure mode and effects analysis (PFMEA). Many manufacturers use PFMEA findings to inform questions for process audits , using this problem-solving tool to reduce risk at the source.
No matter which tool you use, root cause analysis is just the beginning of the problem-solving process. Once you know the cause, the next step is implementing a solution and conducting regular checks to ensure you’re holding the gain and achieving sustainable continuous improvement.
Download our free Root Cause Analysis 101 Guidebook

Related articles
- Scatter Plots
- Learn Lean Sigma
- Data Analysis
Within Lean Six Sigma projects we have a range of data analysis tools we can use to analyse and interpret data to understand what is happening in the services, products or processes we have observed. These data analysis tools include Pareto analysis, Histograms and Box plots among others. Within this article, we are going to explore the basics of Scatter Plots or also known as Scatter Diagrams.
What is a Scatter Diagram?
Scatter Diagrams, also known as Scatter Plots, Scatter Charts or Scatter Graphs, are a type of graphical analysis displaying values of two variables for a set of data and being able to make predictions based on the data. As can be seen in the example below it has an X-axis (horizontal axis) and a Y-axis (vertical axis). The graph is then completed with dots, with each dot representing a measurement of both the X and y-axis. It can then show the relationships between the data points and show trends or correlations which we will go into more detail about below.
When to use a Scatter Plot
There are three reasons you might use a Scatter plot when analysing and interpreting data for your lean six sigma project.
Identifying Patterns and correlations in data
A good use for Scatter plots is to identify patterns in data, data points can be grouped together based on how close their value is, which makes it easy to identify any outlier points or when there are any data gaps. Seeing data graphed up as scatter plots can aid in the identification of correlations between variables and the kind of correlations can also be estimated based on confidence levels.
- Data that is neither positively nor negatively correlated is considered uncorrelated (Null hypothesis).
Demonstration of the relationship between two variables
The most common reason to use a scatter plot to display and interpret data is to display the relationship between two variables and observe the kind of relationship between the variables. The relationships can be observed as either positive or negative, linear or non-linear and strong or weak. Each data point on the scatter plot represents each individual value of those data points and allows for pattern identification when looking at data holistically.
Identification of correlational relationships
Another common use for scatter plots is that they are useful in enabling the identification of correlational relationships between variables. Scatter plots tend to have independent variables on the horizontal axis and the vertical axis. It allows the observer to know or get an idea of what value the variable will produce with data input from only one axis for a data point. Meaning that a set of data points can give further clarity of future data point results without the need to test and verify them further based on previous correlation evidence. In the example below there are no data points between 14 and 24 on the horizontal axis but with other data points and the line of the best fit, we can easily estimate the results of the variables.
Line of best fit
As can be seen in the examples about the line of best fit cut the data points exactly in half as the variables have a perfect correlation, this is not likely to always be the case as with the example below. Data points can often be above and below the line taking the line of best fit between the data points.
Scatter Plot Template
Download the free Scatter Plot excel template to use on the data analysis of your lean six sigma projects. All you need to do is input your data and the formulas will automatically display the data in the Scatter plot with the line of best fit for you to analyse and interpret. It will also calculate the Correlation value of your data
In conclusion, scatter plots are very useful to understand the relationships between two variables and identify positive and negative correlations in our data when doing experiments in our Lean Six Sigma projects.
What’s next
Now that you have an understanding of some of the basic types of data analysis that can be done in Lean Six Sigma projects time to explore Root causes analysis to help identify the root causes of the problems to ensure our projects don’t address the symptoms. Find out more about Root Causes analysis
Daniel Croft
Daniel Croft is a seasoned continuous improvement manager with a Black Belt in Lean Six Sigma. With over 10 years of real-world application experience across diverse sectors, Daniel has a passion for optimizing processes and fostering a culture of efficiency. He's not just a practitioner but also an avid learner, constantly seeking to expand his knowledge. Outside of his professional life, Daniel has a keen Investing, statistics and knowledge-sharing, which led him to create the website learnleansigma.com, a platform dedicated to Lean Six Sigma and process improvement insights.
COPQ vs. COGQ: The True Costs of Quality
Root cause analysis (rca), free lean six sigma templates.
Improve your Lean Six Sigma projects with our free templates. They're designed to make implementation and management easier, helping you achieve better results.
5S Floor Marking Best Practices
In lean manufacturing, the 5S System is a foundational tool, involving the steps: Sort, Set…
How to Measure the ROI of Continuous Improvement Initiatives
When it comes to business, knowing the value you’re getting for your money is crucial,…
8D Problem-Solving: Common Mistakes to Avoid
In today’s competitive business landscape, effective problem-solving is the cornerstone of organizational success. The 8D…
The Evolution of 8D Problem-Solving: From Basics to Excellence
In a world where efficiency and effectiveness are more than just buzzwords, the need for…
8D: Tools and Techniques
Are you grappling with recurring problems in your organization and searching for a structured way…
How to Select the Right Lean Six Sigma Projects: A Comprehensive Guide
Going on a Lean Six Sigma journey is an invigorating experience filled with opportunities for…

Learn | Understand | Apply
Scatter Diagram: How To Utilize It For Data Analysis?

Have you ever found yourself struggling to identify patterns or relationships between data? If yes then you need a scatter diagram, a simple but effective data visualization tool that illustrates the correction between variables.
Whether you are examining cause-and-effect relationships, identifying patterns, or uncovering outliers, the scatter diagram guides you through the maze of data complexity. It systematically helps you extract meaningful insights from the data.
In this article, I will discuss the effective data visualization tool scatter diagram in detail including its components, types of relationships between data it shows, benefits and limitations of this tool along with common pitfalls to avoid.
The Most Important I will discuss is how to create this diagram and interpret it during problem-solving. So are you ready to master one more data visualization tool from the toolkit? Then let’s get started…
Table of Contents
Role of Data Analysis in Lean Six Sigma
Before understanding the Scatter diagram , it is important to know the role of data analysis in Lean Six Sigma . Let’s say you are driving a car with a blindfold on your eyes.
See you might move forward but you are likely to encounter obstacles, take wrong turns, and ultimately not reach your destination efficiently.
In the same context, Data analysis in Lean Six Sigma is like taking off that blindfold and acting as GPS, it provides clarity, and direction and helps you make informed decisions to reach your process improvement goal effectively.
Data analysis helps identify areas within a process where improvements can be made. By analyzing historical data, trends, and patterns, you can pinpoint inefficiencies, bottlenecks, and sources of defects that impact quality, cost, or delivery.
Data analysis allows you to understand the different types of variation within a process, whether it’s common cause variation or special cause variation. By differentiating between the two you can determine whether process adjustments are needed or not.
When a problem arises in the process, data analysis tools like Pareto analysis , Fishbone diagram, Scatter diagram , and Regression analysis help you dig deep to understand the underlying factors contributing to issues.
By addressing root causes rather than symptoms, you can implement sustainable solutions that prevent problems from recurring. One of the important things data analysis provides is quantitative insights into process performance.
KPIs like cycle time, defect rate, and process capability are analyzed to assess the current state and track progress over time. This data-driven approach helps organization sets targets, monitor improvement efforts, and ensure alignment with strategic objectives.
Before implementing process improvement changes, you need to validate their effectiveness. For that, data analysis allows you to compare performance before and after interventions and ensure that improvements are indeed delivering the desired outcomes.
Hope now you understand the importance of data analysis in Lean Six Sigma. See, there are many data analysis tools you need during process improvement projects like Histogram, Bar graph, Box-plot, RCA , etc.
But for this article, my focus is on the Scatter diagram , now let’s discuss this data analysis tool in detail along with its applications during process improvement projects.
What is a Scatter Diagram?
The Scatter diagram also known as a scatter plot or scatter graph, is one of the most powerful data visualization/analysis tools used specifically for analyzing the relationship between two variables.
It allows you to observe how changes in one variable affect another, and with that, you can identify patterns, trends, and correlations within the data.
It is effectively used for identifying the cause-and-effect relationships between factors that influence the overall process or process outputs. Let’s see the 4 important components of this tool:
- X-axis and Y-axis : The X-axis represents one variable (the independent variable), while the Y-axis represents the other variable (the dependent variable). These axes provide a framework for plotting data points and visualizing their relationships.
- Data points : Each data point on the scatter diagram represents the specific combination of values for the two variables being analyzed. These points are plotted at the intersection of their respective values on the X and Y axis.
- Patterns : Patterns with the diagram reveal the nature of the relationship between two variables. These patterns include clusters of points, trends, or the absence of any patterns.
- Trend line : A trend line is added to the diagram to visually represent the overall direction or trend of the data points. This line helps you understand the patterns of data points plotting on the diagram.
In the above image, you can see all the patterns of the scatter diagram and what that pattern means. 1st pattern shows no correlation between two variables which means changes in one factor or variable do not have a consistent impact on the other variable.
2nd pattern shows a positive correlation between two variables which means the value of one variable increases, then the value of the other variable also tends to increase. It is showing an upward trend (Direct proportion).
3rd pattern shows a negative correlation between two variables which means the value of one variable increases then the value of the other variable tends to decrease. It shows a downward trend (Indirect proportion).
4th pattern shows a curvilinear correlation which means what goes up, must come down after some time. Two variables initially show positive correction but sometimes with more data values, they show negative correction and vice versa also happens.
Let me break down this data analysis tool with a simple example:
Let’s say you are a manager at a manufacturing plant aiming to improve production efficiency. You decide to analyze the relationship between the number of workers on the production line (X-axis) and the number of units produced per hour (Y-axis).
You collect data over several days, recording the number of workers present and the corresponding units produced per hour. After compiling data you create a scatter diagram to visualize the relationship.
Upon plotting the data points, you noticed a trend: As the number of workers increases, there is an increase in the number of units produced per hour. It’s a directly proportional relationship or you can say a positive correction between two variables.
(Check 2nd pattern from the above image) From this insight , you can make informed decisions to optimize production efficiency. Things you can do like : You may adjust the staffing levels during peak hours to maximize output while minimizing labor costs.
Also, you may investigate other factors contributing to fluctuations in production and address them accordingly. With this example, I am sure you understand how effective this data analysis tool is.
My point here is a scatter diagram not only gives you a visual representation of the relationship between two variables but also gives you direction to make informed decisions and guides you to take value-added actions for improvements.
Practical Steps To Create And Interpret Scatter Diagram
Let me share with you the general practical steps that you can follow while creating a scatter diagram. You can use these steps to determine the relationship between any type of variables. Let’s see the steps one by one:
Step1: Data collection and preparation
Before diving into creating a diagram initially, you need to gather the relevant data and ensure its accuracy. Here you need to identify the variables that you want to analyze and collect data points for each variable.
Make sure your data is reliable, complete, and representative of the process or phenomenon you are studying. Clean the data by removing outliers or errors that could skew your analysis.
You can organize data in a format that is easy to work with such as a spreadsheet and ensure consistency in units and measurements. You can do this manually or use software like Excel or Minitab.
Step2: Choosing appropriate variables
Selecting the right variables is crucial for creating a meaningful scatter diagram. Identify the two variables you want to explore for any potential relationship or correlation. These variables should be measurable and relevant to your analysis.
For example, if you are studying the relationship between employee training hours and productivity, your variable might be training hours and productivity. Choose variables that you suspect might be related or ones that you want to investigate further.
Step3: Plotting data points
With your chosen variables in hand, it’s time to plot your data points on a graph. Label one variable on the X-axis (Horizontal), and the other on the Y-axis (Vertical). Each data point represents the values of both variables for a single observation or data set.
Plot the data points accurately, and ensure they are spaced evenly and proportionally. Use clear and concise labels for both axes to make your scatter diagram easy to interpret.
Step 4: Analyzing patterns and relationships
Once your data points are plotted, examine the pattern or trend they form on the scatter plot. Look for any observable relationship between the two variables. Patterns may include a positive correlation (as one variable increases, the other also increases).
If the data points form a diagonal line sloping upwards from left to right, it suggests a positive correction. On the other hand. if the line slopes downwards, it indicates a negative correlation, (which means as one variable increases, the other decreases).
The pattern also shows no correlation (it is a random distribution of data points). Use visual inspection to identify any clusters, trends, or outliers that could indicate a relationship between the variables.
If most of the data points are clustered around a straight line, it suggests a strong correction between the variables. If they are scattered randomly, it indicates little to no correlation.
Step 5: Drawing conclusions and insights
Based on your analysis of the scatter plot, draw a conclusion about the relationship between the variables. Consider the strength and direction of correction as well as any factors that may influence the relationship.
To quantify the strength of the relationship between the variables, you can calculate the correlation coefficient . The correlation coefficient ranges from -1 to +1, where +1 means strong positive correlation, -1 means strong negative correlation and 0 indicates no correlation.
Use your findings to generate insights and make informed decisions. For example, if you observe a strong positive correlation between employee training hours and productivity, you may conclude that investing more in employee training could lead to increased productivity.
Conversely, if there is no discernible relationship, you may need to explore other factors affecting the outcome. That’s how you can create a scatter diagram and interpret it at the end.
Benefits of Scatter Diagram
- One of the goals of using scatter diagrams is to facilitate data-driven decision-making . By providing a clear, intuitive visualization of the relationship between variables, it empowers decision-makers to make informed choices based on empirical evidence.
- It helps you identify outliers or anomalies within the data set. These outliers may represent errors in the data collection, unusual events, or genuine exceptions to the norm.
- By visually pinpointing outliers, you can investigate the causes behind these deviations and determine whether they require further correction.
- It reveals patterns and trends in the data. This insight is important for understanding how changes in one variable impact another and for predicting future behavior based on historical data.
- A scatter diagram visual representation between two variables helps you understand the nature and strength of the relation between two variables such as Strong positive or Weak positive correlation, Strong negative or Weak negative correlation.
- Beyond visualizing the relationship between variables, a scatter diagram allows you to quantify the strength and direction of the correction between two variables .
- By calculating the correlation coefficient using this diagram you can measure the degree of association between two variables.
Limitations of Scatter Diagram
- The effectiveness of a scatter diagram depends on the quality of the data. Inaccurate or incomplete data can lead to misleading conclusions and undermine the reliability of the analysis.
- A scatter diagram provides a visual representation of data but it may not facilitate detailed quantitative analysis. For that, advanced analysis tools like Regression analysis are needed to quantify the strength of the relationship between variables.
- Scatter diagrams assume a linear relationship between variables , but in reality, the relationship can be non-linear. In such cases, the diagram may not accurately represent the true nature of the relationship.
- A scatter diagram can only display the relationship between two variables at a time, but it does not indicate causation . Just because two variables are correlated does not mean that one causes the other.
- A scatter diagram can only display the relationship between 2 variables at a time. This limitation restricts their ability to capture more complex relationships involving multiple factors.
Real-world Applications of this tool
In quality improvement initiatives , identifying the root causes of defects is important. This diagram helps visualize the relationship between process variables and quality metrics.
By plotting data points representing these variables, the quality team can discern patterns and correlations. For example, in the Manufacturing setting, this diagram can help you reveal if there is a relationship between machine setting and product defects.
This insight enables targeted interventions to address root causes leading to improved quality and reduced defects. In process optimization , understanding how process variables impact performance metrics is crucial.
This diagram facilitates the analysis by visually depicting correlations between inputs and outputs. For example, in a call center environment plotting call duration against customer satisfaction scores can reveal if longer calls correlate with lower satisfaction.
With this knowledge, organizations can optimize processes by adjusting variables to achieve desired outcomes. In product development , meeting customer preferences is essential.
Here the scatter diagram aids in understanding these preferences by mapping product attributes against customer satisfaction or market demand.
For example, in the automotive industry plotting car prices against customer satisfaction levels can unveil if there is a correction between price and perceived value.
This information guides product development efforts, ensuring offerings align with customer needs and market trends. In risk management , identifying and mitigating risks is essential for any organization.
This diagram helps assess the relationship between risk factors and their impact on outcomes. For example, in financial risk management plotting interest rates against default rates can reveal if there is a correlation between two variables.
This understanding enables proactive risk mitigation strategies, minimizing adverse effects on organizational objectives. In predictive analysis, this diagram helps forecast future outcomes based on historical data.
For example, in retail, you can use a scatter diagram to analyze the relationship between promotional spending and sales revenue.
By identifying a strong positive correlation between the two, retailers can make informed decisions about future promotional strategies to maximize revenue.
If you want to learn data analysis tools for problem-solving and get certified in Lean Six Sigma then I would like to recommend the best practical live training program check out – Lean Six Sigma with Minitab live training program and certification.
By properly collecting and plotting data points on a scatter diagram, you can gain visual clarity on the interplay between variables. You can identify the relationship between variables that helps you make informed decisions and targeted process improvement.
Whether it’s identifying cause and effect relationships, optimizing production processes, or enhancing customer satisfaction, the insights derived from scatter diagram analysis empower you to implement data-driven solutions that drive measurable results.
I can confidently say that a scatter diagram is not just a data visualization tool, it is one of the most important parts of the continuous improvement toolkit that drives organizational excellence.
If you found this article useful then please share it in your network and subscribe to get more such articles every week.
Related Posts:

Leave a Comment Cancel Reply
Your email address will not be published. Required fields are marked *
Save my name, email, and website in this browser for the next time I comment.
- 800 -274-2874
- [email protected]
Scatter Diagrams
Home » Scatter Diagrams
Need a scatter diagram to show a relationship between two variables:
- Overtime and amount of work
- Temperature and steam usage in a plant
- Speed and miles per gallon
- Density and purity of a product

Watch a Quick Video Highlighting Scatter Diagrams in SPC for Excel
Join the 100,000+ who are using spc for excel to understand their cause and effect relationships., scatter diagrams and spc for excel.
Our SPC software, SPC for Excel, easily creates scatter diagrams. A scatter diagram gives a visual picture of the relationship between two variables. One variable is plotted on the x axis and one on the y axis. The paired results can show a positive correlation, a negative correlation or no correlation. The p value for the best fit line helps determine if the correlation is significant.
Scatter Diagram Features
- Include best fit line
- Add labels to each point
- Update easily when new data is entered
- Add dates of data collection
SPC Knowledgebase Newsletter and Videos
IMAGES
VIDEO
COMMENTS
The first step to solving a problem is to define the problem precisely. It is the heart of problem-solving. Root cause analysis is the second important element of problem-solving in quality management. The reason is if you don't know what the problem is, you can never solve the exact problem that is hurting the quality. ... Scatter Diagram ...
We often see patterns or relationships in scatterplots. When the y variable tends to increase as the x variable increases, we say there is a positive correlation between the variables. Positive correlation. When the y variable tends to decrease as the x variable increases, we say there is a negative correlation between the variables.
Quality Glossary Definition: Scatter diagram. Also called: scatter plot, X-Y graph. The scatter diagram graphs pairs of numerical data, with one variable on each axis, to look for a relationship between them. If the variables are correlated, the points will fall along a line or curve. The better the correlation, the tighter the points will hug ...
Describing trends in scatter plots Get 3 of 4 questions to level up! Correlation coefficient intuition Get 3 of 4 questions to level up! Quiz 1. Level up on the above skills and collect up to 400 Mastery points Start quiz. Estimating with trend lines. Learn. Estimating the line of best fit exercise
A scatter diagram can help you with problem-solving in several ways. First, it can help you define the problem more clearly by showing you the actual data and the relationship between the variables.
The scatter plot was used to understand the fundamental relationship between the two measurements. Login. ... Become a problem-solving champ using logic, not rules. ... Plotting the variables on a scatter diagram is a systematic way to view the relationship between the variables and see if it's a positive or negative correlation.
Use scatterplots to show relationships between pairs of continuous variables. These graphs display symbols at the X, Y coordinates of the data points for the paired variables. Scatterplots are also known as scattergrams and scatter charts. The pattern of dots on a scatterplot allows you to determine whether a relationship or correlation exists ...
What are scatter graphs? Scatter graphs are a statistical diagram which gives a visual representation of bivariate data (two variables) and can be used to identify a possible relationship between the data. A scatter graph can also be referred to as a scatter diagram or scatter plot. E.g. Here is a set of bivariate data showing the height and weight of ten students and the corresponding scatter ...
The y- coordinates were 45 and 55 and those are in percent, remember. To calculate the slope, (55-45)% is the amount the vertical height changed and the length of time in years was 9 - 1 = 8 years. So the slope of the line is 10/8 percent per year which is 5/4 % per year or about 1.25% per year.
6. Here's what else to consider. Analytical skills are essential for problem solving in teams, especially when you need to explore the relationship between two variables. One of the simplest and ...
See why the scatter diagram is an effective quality tool when you want to study the correlation between two variables. Learn to plot data, interpret data patterns, and prove or disprove suspected relationships. Watch and work with a quality improvement team as they build a scatter diagram for a problem they are investigating.
How to solve problems with a scatter diagram? Following are the main steps about the relationship between variables and the use of a scatter diagram in problem-solving. Step 1: Finding an actual cause-and-effect relationship is the key to effective problem-solving. Step 2: Cause and effect relationships usually show variation.
Scatter diagrams are invaluable tools in data analysis, quality improvement, and problem-solving. By visually representing the relationships between two variables, they empower individuals and organizations to make data-driven decisions, identify root causes, and drive process enhancements.
Solution: X-axis or horizontal axis: Number of games. Y-axis or vertical axis: Scores. Now, the scatter graph will be: Note: We can also combine scatter plots in multiple plots per sheet to read and understand the higher-level formation in data sets containing multivariable, notably more than two variables. Scatter plot Matrix. For data variables such as x 1, x 2, x 3, and x n, the scatter ...
Enhances problem-solving by systematically identifying and organizing possible causes, allowing teams to address root causes rather than symptoms. How to use the cause and effect diagram. ... The scatter diagram (scatter charts, scatter plots, scattergrams, scatter graphs) is a chart that helps you identify how two variables are related. ...
Following we have listed some that are widely used and more effective in problem-solving. 5 Whys Analysis . To carry out a 5 whys analysis, you need to gather a team of people who are affected by the problem. ... Scatter Diagram. Scatter diagrams or scatter plot diagrams can be used to visualize the relationship between two variables.
Looking at a problem from many different angles is the key to solving those problems—and developing permanent fixes that prevent defects from the start. In case you missed it before: We developed a very simple and easy to follow tip sheet so you can create your own scatter plot diagrams and start analyzing your results quickly! Download it here.
A scatter diagram is a two-dimensional graphical representation of a set of data. The scatter diagram graphs pairs numerical data with one variable on each axis to look for a relationship between them. If the variables are correlated, the points will fall along the line or curve. The better the correlation, the tighter the points will hug the line.
The Scatter Diagrams between two random variables feature the variables as their x and y-axes. We can take any variable as the independent variable in such a case (the other variable being the dependent one), and correspondingly plot every data point on the graph (x i ,y i ). The totality of all the plotted points forms the scatter diagram.
Below we discuss five common root cause analysis tools, including: Pareto Chart. The 5 Whys. Fishbone Diagram. Scatter Diagram. Failure Mode and Effects Analysis (FMEA) Download our free Root Cause Analysis 101 Guidebook. Read 14 quality metrics every executive should know. 1.
What is a Scatter Diagram? Scatter Diagrams, also known as Scatter Plots, Scatter Charts or Scatter Graphs, are a type of graphical analysis displaying values of two variables for a set of data and being able to make predictions based on the data. As can be seen in the example below it has an X-axis (horizontal axis) and a Y-axis (vertical axis).
In this article, I will discuss the effective data visualization tool scatter diagram in detail including its components, types of relationships between data it shows, benefits and limitations of this tool along with common pitfalls to avoid. The Most Important I will discuss is how to create this diagram and interpret it during problem-solving.
Scatter Diagrams and SPC for Excel. Our SPC software, SPC for Excel, easily creates scatter diagrams. A scatter diagram gives a visual picture of the relationship between two variables. One variable is plotted on the x axis and one on the y axis. The paired results can show a positive correlation, a negative correlation or no correlation.