📒 FREE FOCUS ASSESSMENT : All-New → Get Started!
Capture Your Ideas : Learn Ulysses → Brand New Course!
💌 NEW: Calm Inbox : Less Email, More Focus → Get Access
📒 NEW: 2023 Digital Planner : Made for iPad → Yes, Please!
FREE! Plan Your Ideal Week : Bonus Workshop + Planner → Get the Workshop
NEW! All the Things : Productivity Course → Check it Out
Productivity Workshop : The 4-Part Flywheel → GET ACCESS!
Bundle Up and Save : 25% discount on all app courses → Learn More
Simplify Your Time Management : New Course → Finally!
🧠 To Obsidian and Beyond : All-New Course → GET ACCESS

A Beginner’s Guide to PowerPoint on the iPad

This is the third in our series of articles about Microsoft Office for the iPad, and the results so far have been decidedly mixed. We found Word to be surprisingly powerful and a good alternative to the desktop version for all but the most hardcore word processors out there. Excel was more of a let down with lots more functionality missing, including many elements that would be notable to even light spreadsheet users. We’re happy to report that PowerPoint is much closer to Word than Excel, and even more than either of those apps, you could use PowerPoint perfectly well on your iPad and never touch the desktop version. In fact, some of the design decisions Microsoft have made might even make you put together better presentations than if you had the complete desktop app at your disposal.

Our Must-Have, Most Used Productivity Apps
We spend an inordinate amount of time sorting through hundreds of apps to find the very best. We put together a short list of our must-have, most-used apps for increasing productivity.
PowerPoint for iOS is free from the App Store and allows you to view PowerPoint files from anywhere. If you want to edit or create presentations from the iPad though, you’re going to need to subscribe to Office 365 , which runs $6.99/month or $70/year for individuals on up to 5 devices. An Office 365 subscription comes with the full Microsoft Office suite of apps as well was 1TB of OneDrive storage, so there is quite a bit of value there.
Whether this is a fair price is a matter we can only leave to you, but the software package on offer, and especially the 1TB of cloud storage that works across iOS, Android, macOS, Windows, and Linux, makes this a pretty compelling subscription in our eyes.
Of note, Microsoft only requires iPads over 10.1” to pay up to get editing functionality. If you have a 9.7” iPad, iPad Mini, or even an iPhone, then you can use the full version of PowerPoint (and all other Office apps) without an Office 365 subscription. Apparently productivity starts at 10.1” in Microsoft’s world — not that we’re complaining.
Out of the Box Experience
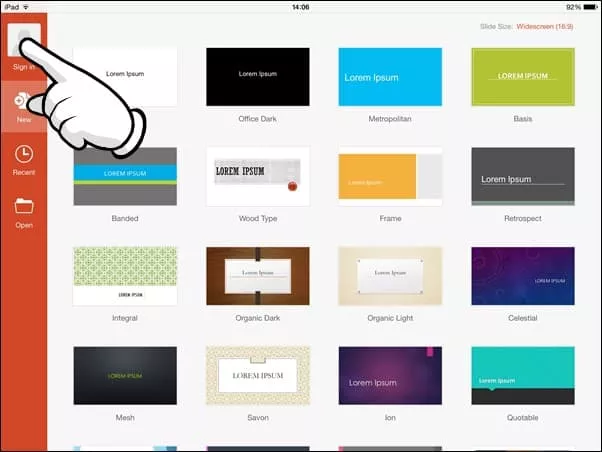
If you start with PowerPoint on the iPad and want to begin building presentations from scratch, the iPad version gives you everything you need to start creating right away.

There are 25 built-in templates you can start with. While not all of them are great, ones like Parcel, Celestial, Ion, and Mesh are all really nice templates that you can use to create professional-looking presentations. Some of them are more fun and offer a more distinct look, but for many people, simplicity is king and the options here are more than capable of making you look good at your next speaking gig.
As you would expect, each of these 25 templates have an assortment of slide types so you can move between titles, lists, and giant images with a consistent experience for your audience.
And if you were worried about getting your content into these slides, fear not because PowerPoint for iPad has tons of tools around adding animations to elements on your slides, transitions between slides, drawing on and marking up content, and adding things like tables, images, icons, and videos into your slides.
Basically, if you work entirely from the iPad, you’ll have more than enough control over everything to put together a presentation that you can be proud of.
Adding Some Flair
PowerPoint has quite a few tools for customizing the feel of your presentations, and while I’d contend that adding too many effects and transitions to a slide deck can be detrimental, these can of course be used well and the fact that so much is here should allow most people to create exactly what they want.

There are 35 ways you can have items on a slide appear or disappear and 17 different ways you can emphasize specific elements on a slide. And if you like transitions, there are a sweeping 49 options for how you move from one slide to another. Should you use all of these? God no. Does this level of flexibility enable a bunch of cool one-off effects? Oh yes!
And then there are a bunch of different drawing tools you can use to add a little panache. Similar to most markup apps you know and love , there are several drawing tools like pencils, markers, and highlighters, as well as a cool cosmic pen that is just fun. You can make this animate into the slide so you can have custom-looking animations that call out something specific on your slides.
Another thing I really like is a feature called Design Ideas. This is found under the Design tab and you can use it on any slide in your presentation. PowerPoint will look at the content of the slide and give you a few suggestions for alternative styling. For example, I had a basic bulleted list and it suggested this nicer layout for a short list:

One of the things I love about how this is set up in the PowerPoint UI is that none of these effects are visible from the main tabs you’ll use when creating your slides. This breaks up the workflow between content and style. You’ll likely find yourself putting together all your content together across however many slides you need and then going back through it all to add whatever animations and transitions you think you need. Again, since the content of a slide deck is far more important than the flair on top of it, this behavioral encouragement is spot on.
Collaboration
As with Microsoft’s other Office apps, the collaboration features from the desktop and web versions are here and they work great. You can work in real time with anyone else whom you’ve shared the document. You can see their edits in real time and they’ll see yours, no matter the platform they are on.
Comments are supported as well, and you or others can leave comments on certain points of the presentation, and there is even version control so you can go back to potentially dozens of versions of the presentation and restore them (or save them as a new copy).
Giving Your Presentation
The presentation itself is the whole reason for making a slide deck — that experience is rock solid — but might be limited compared to what you have on the desktop.
First off, you can present a presentation you created on the iPad on any device that runs PowerPoint, but if you want to present from an iPad, the easiest way to do so is to plug into the screen you are going to be using via a DisplayPort/HDMI/DVI cable that uses Lightning or USB-C (depending on your iPad). After you’re connected to an external display, you’ll see your slides in all their glory on the external display and the presenter view will appear on the iPad itself.
If you happen to be somewhere that has an AirPlay compatible screen (most likely through an Apple TV), then you can also mirror your screen to the AirPlay device and you’ll get the same effect where the slides show on the AirPlay receiver and the presenter view shows on the iPad.

Whether using wired or wireless connections for the presentation, you can always tap and hold on your iPad screen to bring up a virtual laser pointer to point out whatever you want to highlight on a particular slide. It’s actually pretty slick and more useful than I expected it to be.
PowerPoint as a Good iOS Citizen

Unlike some other companies who take forever to support iOS’s latest and greatest features, Microsoft has done a pretty decent job of keeping up with the times. Using PowerPoint in late 2019 feels like using an app built to use most of iOS’s (and iPadOS’s) latest features.
Pretty much all the main contenders are here: drag and drop works well and lets you drag in your own media straight from things like Files, Photos, or even Safari and drop them into your slides with ease. The UI for this is rather limited, and you don’t quite know what will happen when you drop something like a photo onto a slide, but you can of course resize and reorient objects once they’re on the slide.
PowerPoint also supports split screen, which is very useful for this sort of app as it allows you to have your research on one side of the iPad and your presentation on the other. I constantly find myself bouncing back and forth when putting together a PowerPoint presentation, and this would be a near deal-breaker for me personally.
The one major iPadOS feature this doesn’t currently support is multi-window. iPadOS 13 enabled apps to have multiple documents open at once and PowerPoint does not support this at all. This is a less egregious omission since most people tend to work on one presentation at a time, but sometimes you might want to reference another presentation that you’ve created or are comparing your slides to ones someone else made.
Overall, PowerPoint strikes a good balance of being unmistakably Microsoft without feeling like a Windows app on the iPad.
Apple Keynote and Google Slides

While PowerPoint is the undisputed standard for presentations, the options from Apple and Google are also compelling and have the distinct advantage of each being completely free. Without getting too much into the weeds here, the short overviews of each of these competitors are:
Apple Keynote lets you more easily create great-looking slides with modern, elegant templates. The app also feels more finely tuned to iPadOS’s UI is a very smooth experience from start to finish. Collaboration is a big issue though if you are not working with others on iPads or Macs. And even if you are, the collaborative editing capabilities are far less robust than what Microsoft has in PowerPoint.
Google Slides is a very minimal presentation tool, but it gets the job done. If your needs are very basic and you value a cloud-based solution with great real-time collaborate editing, then Slides can serve your needs very well. But if you want to have a little more style in your deck, then you’re going to be left wanting here. It’s not the end of the world, but it’s certainly not the best in class.
In short, if you value compatibility and collaboration, PowerPoint is the clear winner. If you value great design in your slides and a delightful iPadOS experience, Keynote is king. And if you just want what is on the web and included in your Google account, then Slides will be okay for you, but you’re probably not going to fall in love with it.
Ultimately, many of us don’t have a choice in the apps we use to give presentations. These usually happen at work and the company has some standard in place for creating presentations, so the choice has been made for you already. If you have any say at all in what presentation software to use, then we think PowerPoint is a great way to make them on the iPad.

With a rich set of tools to make everything from basic to wild and flashy presentations possible, it’s bolstered by a robust set of collaboration features as well as the simple fact that it’s the de-facto standard across most of the business world. You’ll probably have little-to-no friction in making this work for you and your business.
If you are working solo or there really isn’t any need to use one app or another, then Keynote is a very compelling alternative, and is the feather in iWork’s cap. it’s an excellent app that makes is dead simple to create professional-looking presentations with very little effort. Oh yeah, and it’s completely free! Not everyone will love this, but it’s definitely something to consider using if you’re not totally sold on PowerPoint.
Critical PowerPoint Shortcuts – Claim Your FREE Training Module and Get Your Time Back!
PowerPoint for iPad: A Visual Guide
- PowerPoint Tutorials
- Miscellaneous
- October 29, 2017
In this first ever visual guide for the iPad version of Microsoft PowerPoint (iPad PPT), we show you step-by-step how to use the app, as well as all of the nitty gritty details behind it that you likely don’t know.
We highlight those “little hiccups” that will drive you up the wall (it’s still not the same experience as your desktop version), and we’ve done our best to show you the workarounds, if and when they exist.
Make sure to note the orange boxes we’ve sprinkled through the guide with pro tips and tricks based on years of experience building PowerPoint presentations…ignore them at your own peril
We will do our best to keep this guide up to date with each new Microsoft update. If you see something that we’ve missed, PLEASE let us know and we’ll do our best to update this guide ASAP.
Don’t have the PowerPoint app on your iPad yet? Download it by clicking here .
Things that go well with your iPad
Here are some useful resources for working with PowerPoint for the iPad:
Microsoft apps for the iPad
If you want to edit or display your Microsoft documents in their native environments on your iPad or iPhone, you’ll need to download the Microsoft PowerPoint, Word, Excel, OneNote, and OneDrive apps on your iPad and iPhone through the iTunes store. Find them here .
Microsoft Office 365
Get automatic upgrades and unlimited storage by signing up for the Microsoft 365 subscription model. Check out the latest of version of Microsoft Office here .
Lightning to VGA adapter
If you’re giving presentations with your iPad, don’t assume the meeting room will have the right adapters for you. So make sure you always bring one with you. I like apple’s adapters as they’re sleek and are 100% compatible with your device.
Bluetooth speaker
Again, if you’re giving a presentation in a meeting room and need to play music/video, be aware that your ipad’s speakers will probably not be strong enough to fill the whole room. This super compact wireless speaker hooks up incredibly easily to your ipad or iphone with no software or app necessary, and provides really high quality sound for the price.
iPhone/iPad stand
Although the iphone and ipad are designed to be light and portable, carrying them around throughout a presentation, especially if you’re moving around a room, can be a bit cumbersome. Keep your device upright and in front of you with this no-frills stand. It will fit just about any device.
Disclosure: please note that some of the links below are affiliate links, and at no additional cost to you, we will earn a commission if you decide to make a purchase. Please understand that we have experience with all of these companies, and we recommend them because they are helpful and useful, not because of the small commissions we make if you decide to buy something. Please do not spend any money on these products unless you feel you need them or that they will help you achieve your goals.
FINALLY…PowerPoint on our tablet! Down with the laptop and the desktop! Not so fast…
Although it is EXCITING to finally have PowerPoint on the iPad….there are MANY more versions to come before it can replace the desktop PowerPoint environment.
Until then, PowerPoint on your iPad is best thought of as an “extension” of the desktop experience, not as a replacement.
Yes, with each new PowerPoint for iPad update, you do get some new features, but the vast majority of REAL work that you do in PowerPoint (in our humble opinion) should still be done on your desktop.
Why? Because it’s just plain faster!
Yes, we are biased…we live, die and breath shortcuts on our keyboard AND we use LOTS of tips and tricks that haven’t come onto the iPad (yet)….so it’s okay to disagree with us.
With all that said, this is a GREAT step forward and we are PSYCHED for all the future updates and the new Office 2015.
We hope this guides helps make PowerPoint on your iPad a little bit, if not A LOT, easier for you to figure out.
This guide is organized according to the different Views in the app, and then according to each element within those Views. You can access all of these pieces using the tables of contents bar on the left.
If you want a fast way to find a command, simply hit Ctrl + F on your keyboard to search this page.
Account Settings
In this section, we look at the different things you can do in the Account Settings, such as signing out, signing in, and how to add multiple OneDrive accounts. To do any of these, you’ll have to go into the File View. In the top left hand corner, you have your Account Settings icon (with or without your account picture).

Signing out

Pro Tip: Instead of signing out of your account, you can add multiple OneDrive services to the same account so that you can access your business and personal files.
If you accidentally get signed out, here’s a step-by-step guide for how to sign back into your account. To sign into your account, follow these 4 steps (click to open gallery & instructions):
Microsoft Account: Sign in with the account you use for OneDrive, Xbox, LIVE, Outlook.com or other Microsoft services.
Organizational Account: Sign in with the account provided by your work, school or university.
Adding a service
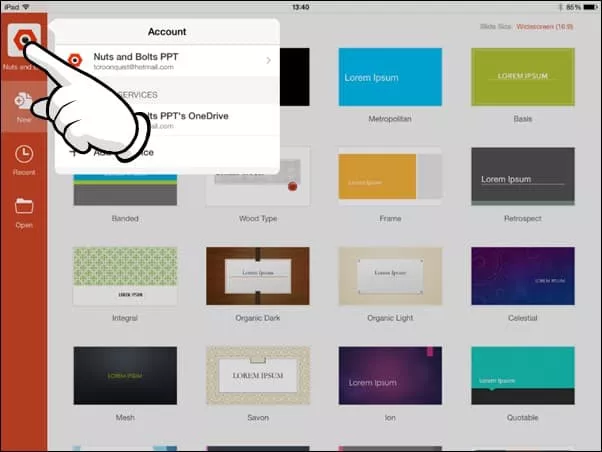
Pro Tip: Your Office 365 account starts with a OneDrive service attached to it (whether or not you have anything in it). If you have multiple OneDrive accounts, you can add them to your account (home or office accounts), allowing you to access those files directly on your iPad.
Note: Only Microsoft OneDrive, SharePoint, and Dropbox are currently supported on Office for iPad.
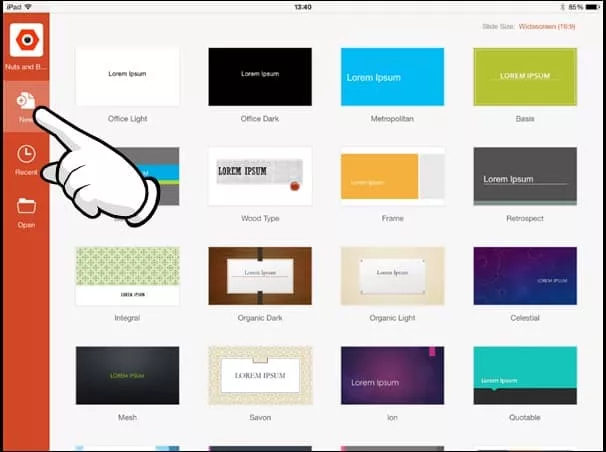
In this section, you will learn how to create a new file/presentation, from scratch, as well as some key tips to keep in mind. To create a new presentation, follow these 2 steps (click to open gallery & instructions):

Recent files
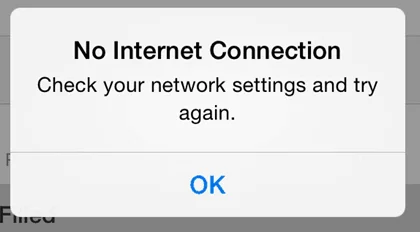
- If you have an internet connection, the most recent version of the file will be downloaded from your OneDrive and will open on your iPad.
- If you do not have an internet connection BUT have previously opened the document on your iPad before, the document will open, but it will not reflect any recent changes made to the version on your OneDrive (if you’ve made any changes from your desktop).
- If you do not have an internet connection and have never opened the document before on your iPad. You will receive a ‘No Internet Connection’ dialog box (below).
- Email as Link: Creates a “View Only” link or a “View and Edit” link of your file and launches the Mail App.
- Email as Attachment: Attaches the presentation to an email, the recipient can open and edit the document natively.
- Copy Link: Creates a “View Only” link or a “View and Edit” link of your file that you can paste into other documents or emails.
Move to Cloud: Allows you to move a presentation stored locally on your iPad onto your OneDrive. This option is only available when working with a file that is stored locally on your iPad.
Remove from Recent: Removes a file from this Recent menu here on your iPad AND on your desktop. This is not the same as deleting a file, it merely removes it from the Recent files list. To delete a file, you’ll have to go into Properties in the Open menu.
Discard Changes: Still not really clear what this does. If you figure it out, let us know.
Properties: Shows you additional properties about your file including filename, location, type, size, author, created, last modified, modified by and company.
Note: You can only create links for files stored on your OneDrive. If you have a locally stored file that you want to share a link to, you first need to move it to your OneDrive before you can create and share a link.
Note: You cannot edit any of these properties from your iPad, you must do so from your desktop version of PowerPoint. However, there are work arounds that will allow you to change the file name from your iPad. To see how that works, check out the section on renaming and duplicating your files.
Sharing: Below the file name, you can see if the document is being shared with anyone else.
Reloading Your Files: If you don’t see a file that you have recently saved to the OneDrive, push and drag down with your finger to reload the file menu. Sometimes there is some lag time depending on the speed of your internet connection.
- To Pin a file: Simply select a non-colored pin
- To Unpin a file: Simply reselect the colored pin

Pro Tip: Keep in mind that pinned documents’ names do not update in this recent list if you change their file name. If you try and open a pinned file that has been renamed, you will receive an error message. So if you pin files and rename them, you will need to do some pin-maintenance either on your iPad or desktop version of PowerPoint.
The ‘Open’ area of the File View is where you will find all of the documents on your OneDrive services, as well as those saved on your iPad. So in this section, we’ll cover how to go about opening your files, as well as some EXTREMELY handy Pro Tips about sharing your documents and editing their properties.

- Email as Link: Creates a “View Only” link or a “View and Edit” link of your file and launches the Mail App.
- Email as Attachment: Attaches the presentation to an email, the recipient can open and edit the document natively.
- Copy Link: Creates a “View Only” link or a “View and Edit” link of your file that you can paste into other documents or emails.
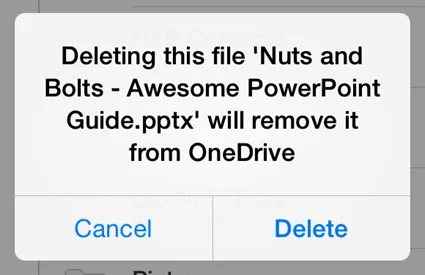
Delete: This is the only place where you can delete files from your different OneDrive accounts or from your iPad.
Properties: Shows you additional properties about your file, including: filename, location, type, size, author, created, last modified, modified by and company.
The Normal View

Navigation buttons

1. Back Button

The undo and redo commands are the iPad keyboard of the CTRL + Z and CTRL + Y keyboard shortcuts on the desktop version of PowerPoint. Similar to the desktop version, you are given 15 commands in both directions, you can undo undo up to 15 actions, or redo 15 actions.
Note: The Navigation Bar is fixed as is. You currently cannot add other commands to it like you can on a Windows based version of PowerPoint with the Quick Access Toolbar. We hope to see this updated in a later version!
4. Autosave
The AutoSave command controls whether or not changes to your presentation are automatically saved and synced with OneDrive. By default, PowerPoint for your iPad is set to AutoSave, which occurs:
- Periodically as you are working within your presentation
- Immediately when you hit the back button to return to the file menu view
Don’t make the same mistake I made – save your presentation!

This might sound obvious, but before closing PowerPoint on your iPad, hit the Back Button to return to the file menu view to ensure that the latest edits to your presentation are saved.
If you close the PowerPoint app by double-clicking the Apple button and swiping up (thus closing the app), you can lose the latest changes to your presentation…not fun!
So to ensure you save your latest changes, hit the button BEFORE closing the PowerPoint app.

If you choose this mode, to save your presentation, you need to either:
- Open the file menu and hit the green save button
- Hit the back button to return to file menu view to launch the Save dialog box
The Name command allows you to edit the name of a newly created AND unsaved PowerPoint presentation. As 90% of the presentations you work on your iPad will not be newly created or unsaved, this option will likely always be greyed out.
For example, if you create a new presentation on your iPad and have not saved it, the name command option is available. That said, as soon as you save the file with a name, this option becomes greyed out (forever).
How do you rename a file on your iPad?
To rename a presentation (or other office file) on your iPad, you either have to:
#1: Duplicate the presentation and save it with a new name. This will create a brand new document, so if you don’t want the older document, you will need to navigate to where it is saved on your iPad, or on your OneDrive and delete it. Painful, I know!
#2: Use the OneDrive app to rename your document (see our blog post on how to rename files in your OneDrive app).
6. Duplicate
The duplicate command creates a new copy of your current presentation and takes you to the File Menu View to rename your presentation (the same is true for the other Microsoft Office apps on your iPad). This is the Save As equivalent, or F12 keyboard shortcut on your desktop version of PowerPoint.
Note: Duplicating a presentation will not overwrite the original presentation, it will only create a new presentation with the new name you give it.
How to move my Presentation from OneDrive to my iPad:
To move a file from OneDrive to your iPad, you need to open the file, duplicate it and then select your iPad as the storage device. There is currently not a “move to iPad” command like there is a “move to cloud” command.
Note: Files stored on your iPad open faster than their OneDrive equivalents as they do not need to download the latest version.

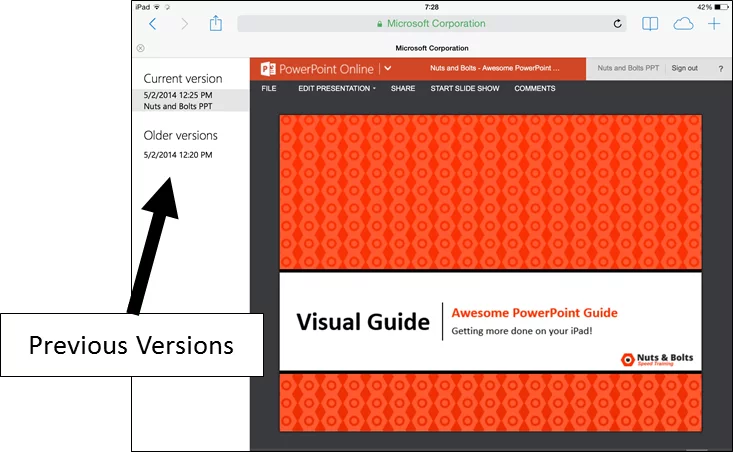
The restore command gives you a options for reverting back to an earlier version of your PowerPoint presentation.
You can either:
- Back to the original you started with: Revert back to when it was last opened (PowerPoint will give you the specific time that it was opened). Doing so you get a warning indicating at what time the file was opened, so you get a sense of how far back you are going. Note: If this option is greyed out, it means there is currently nothing to revert back to.
- Back to an online saved version of your presentation: Can revert back to an online saved version of your presentation. This option assumes that the file is saved on OneDrive and that you have an internet connection. Selecting this option launches safari and takes you to OneDrive. Log in with your Microsoft account and you will see all of the previous versions of your file by date on the left (assuming you have some) and allows you to revert back to that specific date.
9. Properties
Shows you the properties of your PowerPoint presentation including:
- Last modified
- Modified by
Note: File Properties (other than Name) are only editable on the desktop version of PowerPoint. To modify a presentation’s name, you can duplicate the presentation and save it as a new name, or use the OneDrive app for PowerPoint to edit the presentation’s name on your OneDrive. To learn more about this, check out our article on using the OneDrive App .
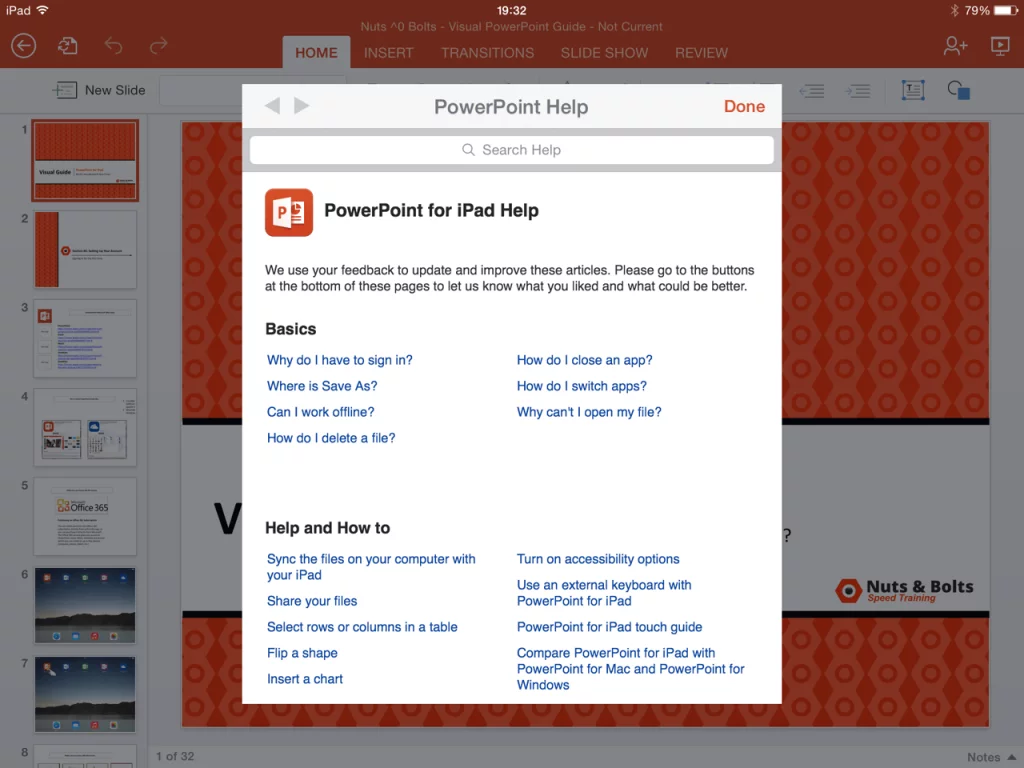
The Help and Support button launches basic help, support and tutorials for PowerPoint on your iPad. This menu is not extensive, but does offer solutions to simple questions you might have.
Note: You do need an internet connection to launch this dialog box.
The Home tab
1. New slide

This opens the PowerPoint slide gallery and allows you to pick from the available layouts within your presentation.
The five slide layouts shown in the picture are the standard layouts we use at Nuts & Bolts Speed Training for 99% of all of our PowerPoint presentations, you might have more or less slides layouts depending on your setup.
The Price of iPad Portability
Limited to Inserting Slides Only: You are limited to inserting slides layouts on your iPad. The Slide Master View is currently unavailable for PowerPoint on your iPad.
Changing a Slide’s Layout: You are limited to inserting new slides on your iPad, you cannot push a layout onto an existing slide.
To move an existing slide onto an new layout, you either need to wait until you are on your desktop version of PowerPoint, or insert a new slide layout, and copy and paste the different objects onto the new slide layout….kind of sucks, but that’s the price of portability.
2. Font styles
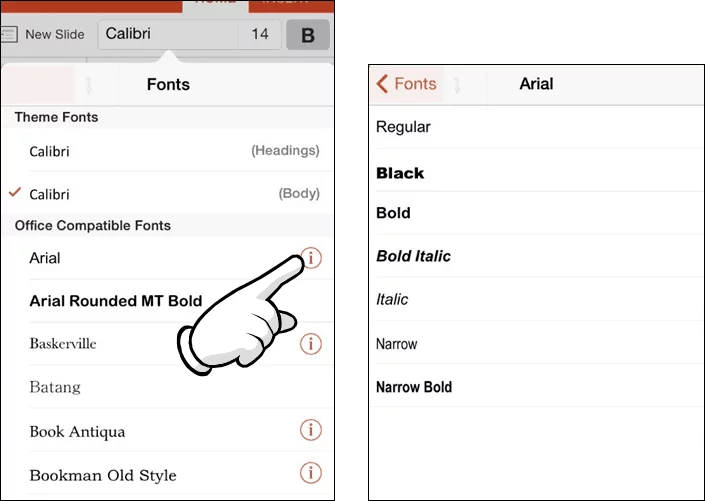
Copying and Pasting Style: If you are simply trying to match the font style of an object, it is often faster to copy and paste the font style you are trying to match, rather than identifying the font style, and then changing the font elsewhere
Microsoft Account: Sign in with the account you use for OneDrive, Xbox, LIVE, Outlook.com or other Microsoft services.
3. Font size

The font size dropdown in PowerPoint for iPad gives you three different ways to change the font size of your text:
#1 Pre-set Sizes: Select a preset size in the dropdown menu
#2 Clicker: You can use the plus and minus signs to select a font size
#3 Manually: You can double-tab the number between the plus sign and minus sign, and manually type in your desired font size
4. Bold / italics / underline
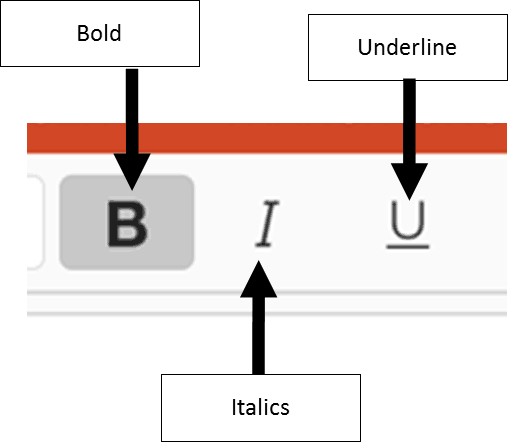
- Bold: Creates bold text for highlighting information, often used in titles.
- Italics: Creates italicized text for highlighting information, often used in subtitles and quotes.
- Underline : Creates an underline text for highlight information, often used in titles and subtitles.
Note: There is no way to make a double underline in PowerPoint for your iPad. Pro Tip: Don’t overdo it
If everything is important, nothing is important. Use text highlighting sparingly to better emphasize your points.
5. Formatting

- Strikethrough: Creates a strikethrough effect to emphasize that something should be removed
- Subscript & Superscript : Creates the -25% offset subscript and +30% offset superscript formatting. These are typically used in formulas, mathematical expressions and specifications for chemicals and isotopes

Includes the basic theme colors for your PowerPoint presentation, and their resulting gradients (which you cannot manually set).
Automatic: The automatic color is determined by the “Windows Text” color set in Control Panel Display Appearance. Changing this color will affect text color in all Windows applications.
Editing Your Presentation’s Theme: Currently you are not allowed to change or edit your PowerPoint presentation’s theme on your iPad. All theme editing or updating must be done on your desktop version of PowerPoint.
Setting Your Presentation’s Defaults on Your Desktop: You can set the default formatting for your objects on your desktop version of PowerPoint and those defaults will carry over into PowerPoint for your iPad.
6b. More colors

#1 More Colors: Selecting more colors gives you a dialog box with standard colors to choose from.
#2 Recent Colors: If you use the Custom Color option to create your own colors within your presentation, this second row of recent colors populates.
#3 Custom Color: Allows you to select your own color from a color grid (which is not very useful as you cannot get a precise color).
Advanced Color Formatting: Currently there are no options to input RGB or HSL codes to create specific custom colors or apply transparencies in PowerPoint for your iPad. The eyedropper tool is also not available.
To copy a custom color style (font color, shape fill or shape outline) into your recent colors to reuse somewhere else, see our blog post on using custom colors in PowerPoint on your iPad. 7. Text styles

Includes standard WordArt styles you can apply to highlight your message.
Style Note: WordArt is often distracting and hard to read and should be used sparingly if at all. See the example of Aqua, Accent 1, Reflection below the font styles gallery I created.
Note: You do not have the Text Fill, Text Outline and Text Effect options that you have on your desktop version of PowerPoint. You are currently limited to these 20 styles.
Left / Center / Right / Justify: Dictates the horizontal text alignment for text within a given PowerPoint object.
Top / Middle / Bottom: Dictates vertical text alignment for text within a given PowerPoint object.
Horizontal / Rotate Clockwise / Rotate Counterclockwise / Stacked: Dictates the rotation of your text within a given PowerPoint object. See next page for examples of each.
Columns: Controls how many columns of text are within an object. This is often used for objects with lots of text to visually break up the text.
Note: Notice that the alignment drop down stays open so that you can make multiple selections at the same time while working in your presentation…very handy!

Allows you to select bullet and numbers options for your lists in PowerPoint, but there are number of limitations that you should be aware of:
Limitation #1 : The Ruler – As you cannot access the ruler in PowerPoint for your iPad, you are stuck with the default bullet and numbering tab spacing
Limitation #2: Custom Bullets – You cannot create custom bullets like you can on your desktop version. That said, custom bullets and numbering created on the desktop version of PowerPoint does carry over into PowerPoint for your iPad, but you are not allowed to use it outside of the shape that it is currently set in.
Limitation #3: Numbers Start at 1 – All numbers on the iPad start at 1. You cannot adjust the starting number.
10. List level increase / list level decrease

Decrease List Level: SHIFT + TAB equivalent on the desktop version of PowerPoint. Moves a bullet or numbering backwards one indent level
Increase List Level: TAB equivalent on the desktop version of PowerPoint. Moves a bullet or numbering forward one indent level.
11. Text box
Inserts a text box into the middle of your PowerPoint slide.
Note: All inserted objects always start in the middle of your slide. There is currently no setting to manually place/draw your objects in after you have selected them.
12. Shapes gallery

Opens the shapes gallery and allows you to pick a shape to insert into the middle of your PowerPoint slide.
Shapes Always Default to the Center of Your Slide: Whenever you insert an object, it always defaults to the center of your slide.
You will need to manually drag it around and position it. To make sure your shapes are the same size, either copy and paste an existing shape on your slide, or line it up next to your shape, and resize it using your SmartGuides.
The Insert tab
Inserting a table immediately gives you a default 3 by 3 table in the center of your PowerPoint slide and opens the Table Tab on the Ribbon. See Table Tab for Table Options.
3. Pictures

Selecting pictures opens the Photo Gallery. Currently, you are only allowed to insert pictures that are stored locally on your iPad (in your Camera Roll, Photo Streams, etc.).
If you have company pictures on your computer that you want to access on your iPad, you can share those pictures wireless through the iCloud service so that you can access them in PowerPoint on your iPad.
Check out Apple’s step-by-step walk-through of the iCloud service .

Opens the shapes gallery and adds the Shape Tab on the Ribbon.
Default Your Shapes on Your Desktop: To avoid clumsy formatting in PowerPoint for your iPad, I highly recommend setting default formatting on the desktop version of PowerPoint for your specific decks as it carries over onto your iPad.
To set the default formatting on your desktop version of PowerPoint, simply right-click the shape you want to default the formatting for, and in the right-click menu, select set as default shape (line or text box, depending on what you are defaulting).
5. Text boxes

Inserts a text box into the middle of your PowerPoint slide and opens the Shapes tab on the Ribbon.
Pro Tip: Insert rectangles instead of text boxes to avoid the default “resize shape to fit text” setting. All text boxes start with this default setting and there is no way to un-select or change this formatting option in PowerPoint for your iPad.
The Transitions tab
1. Transition effect
Represents the 39 different types of transitions you can apply to your PowerPoint slides on your iPad.

32 of the 39 transition effects have effect options associated with them which changes the direction of the transition. These variations are often from left to right, or from top to bottom. For the style effects to be active, a transition with effects has to first be applied to a slide.
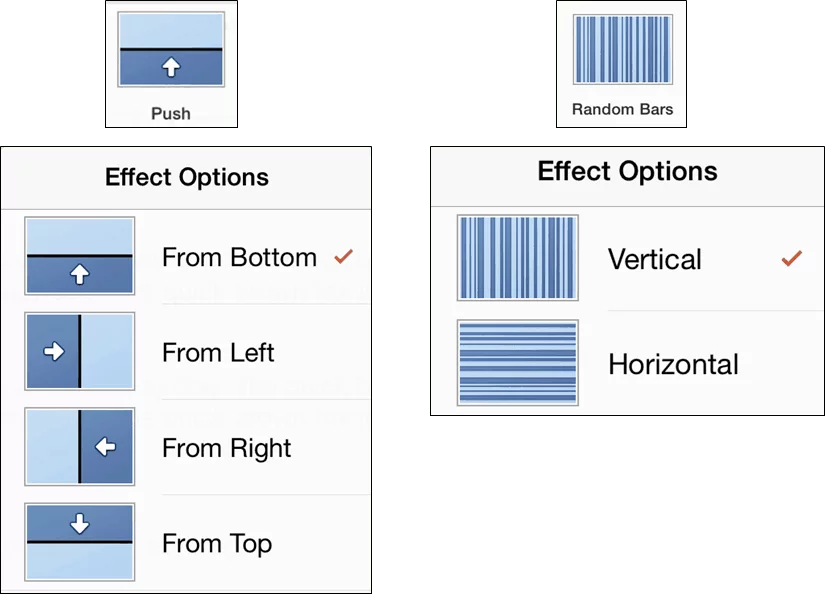
To change the effect options, simply select the alternative transition effect you would like for your slide.
Style Note: As transitions are often distracting when giving a presentation, I highly recommend using them sparingly (if at all) within your presentations.

Previewing a Transition: To preview your transition, hit the “from current” icon in the upper right hand corner of your screen to start the presentation form the current slide. Once in presentation mode, swipe right once to move to the previous slide, and then swipe left to preview the transition you just set for your slide.
Transitions without effects:
- The Flash, Curtains

3. Apply to all styles

The Review tab
1. Show comments

Allows you to turn comments on or off in your PowerPoint presentation. Comments appear either in the upper left hand corner of the slide, or on the specific objects they have been added to.
Note: Comments can be only be viewed on the iPad, there is currently no support for editing, adding or removing comments from a presentation.

2. Previous

Cycles backwards to the previous com ment within your presentation, starting from your current slide

The Picture tab
1. Picture styles
Represents the 28 different preset picture styles you can apply to your pictures in PowerPoint.

2. Picture shadows
Represents the 23 different preset picture shadows you can apply to your pictures in PowerPoint.

4. Re-order
All objects on a PowerPoint slide exist in a stacking or layering order based on when they were inserted onto the slide.

- Bring Forward: Brings an object forward, one layer.
- Bring to Front: Brings an object to the front layer of all the other objects on the slide
- Send Backward: Sends an object backwards one layer.
- Send to Back: Sends an object all the way to the back layer behind all the other objects on the slide.
Pro Tip 2: The Bring to Front and Send to Back commands are the fastest and easiest commands to use, as you know exactly where your objects will go. Best practice is to use these first, and then readjust any other objects that you want behind or in front of your other objects.
Note: More than one object has to be present on the slide for this command to be active.
The Shapes tab

1. Text Styles

The Text Styles gallery includes the 20 standard WordArt text styles that you can use to bring emphasis to or highlight the text within your presentation.
Are text styles worth using? Typically not, but it really depends on what you are trying to accomplish.
For example, for corporate presentations, WordArt is distracting and hard to read and should be used sparingly, if at all. That said, if you are using PowerPoint as a medium for creating a poster or a graphic for a website, the WordArt text styles could be useful.
Missing Text Styles Options: In PowerPoint for your iPad, the Text Fill, Text Outline and Text Effect formatting options are not available, you can currently only play with these options on your desktop version of PowerPoint.
2. Shape Styles

The Shapes Styles represent the 42 different default shape formatting styles you can apply to your shapes in PowerPoint. Now although these are tempting to use, keep in mind that anyone who has PowerPoint has access to these shape styles, so simply using these default formatting styles will result in a very default looking PowerPoint presentation.
Can I change the default shapes styles in the gallery? Yes, the shape styles are dictated by your PowerPoint theme settings, so manipulating or building a corporate theme will change these default formatting styles.
3. Shape fill
Allows you to change the shape outline color in PowerPoint.

- Bring Forward: Brings an object forward, one layer
- Bring to Front: Brings an object to the front layer of all the other objects on the slide
- Send Backward: Sends an object backwards one layer
- Send to Back: Sends an object all the way to the back layer behind all the other objects on the slide

The Table tab
- Single tap a table: Get the standard object edit menu.
- Double tap a cell within a table: Get the table specific edit menu.
- Cut: Cuts the text out of the selected cell.
- Copy: Copies the text in the selected cell.
- Paste: Pastes in your last copied text or object. Note that you cannot copy and paste formatting between tables.
- Clear: Clears the contents of the cell.
- Delete: Opens an additional menu allowing you to either delete the column or row you are currently in.
- Insert: Allows you to insert a column to the left of the current cell, or a row above your current cell.
- AutoFit: Collapses the column width to fit the text within it.

- Header Row: Formats the first row in your table as a header row
- Total Row: Formats the last row in your table as a total
- Banded Row: Adds a rotating fill color to the horizontal rows of your table
- First Column: Highlights the first column in a table
- Last Column: Highlights the last column in a table
- Banded Columns: Adds a rotating fill color to the vertical columns of your table

Note: As you make table selections, the style gallery will populate with a live preview of those options for the different table styles.
2. Table styles

From a formatting perspective, I highly recommend starting with a pre-formatted table style that gets you closest to your end result, and then manually tweaking the table from there.
Lists the different default table styles you can apply to your tables in PowerPoint.
Note: The Styles Options (discussed above) that you have selected, will be shown within the Table Styles Gallery making it easier to pick the default style that get you closest to your end goal.
Style Note: Use the formatting / highlighting sparing to increase the effectiveness of your table.
Tapping the fill colors opens the theme colors drop down, which you can use to manually override any of the Table Styles you have already applied to your table.

Pro Tip: To reverse the banding of your rows or columns, first, manually format the first row or column with a fill color, and then toggle on or off the header row option or the first column option.
Note: You are not able to change the outline weights or colors of a table or cells within a table in PowerPoint on your iPad. All table border formatting will have to wait until you are on your desktop of PowerPoint.
Gives you options to insert rows above or below the current cell you have selected within your table, or columns to the left or right of the current cell you have selected.

How can I insert multiple rows or columns at the same time? To insert multiple rows or columns within your table, first select multiple rows or columns within your table. With multiple rows or columns selected, when you click insert, the same number of rows or columns will be added to your table.
Deletes the row, column or table that you currently have selected.

How do I AutoFit multiple columns at the same time? First select the individual columns (or the entire table) before selecting AutoFit.
7. Alignment

The Text Alignment command changes the horizontal text alignment (Left, Center, Right) or the vertical text alignment (Top, Middle, Bottom) of a cell within the selected cell in your table (similar to using the Text Alignment tool on your shapes or other PowerPoint objects).
The Reorder command allows you to change the layering of the objects on your PowerPoint Slide. All objects on your slide exist in a stacking or layering order (one on top of the other) based on when they were inserted on to the slide.
- Bring Forward: Brings an object forward, one layer
- Bring to Front: Brings an object to the front layer of all the other objects on the slide
- Send Backward: Sends an object backward one layer
- Send to Back: Sends an object all the way to the back layer behind all the other objects on the slide

Pro Tip: When using the reorder command on a busy PowerPoint slide with lots of objects, the Bring to Front and Send to Back commands are the fastest and easiest to use, as you know exactly where your objects will end up.
Why is the reorder command grayed out? More than one PowerPoint object has to be present on your slide for the Reorder command to be active.
The Notes pane
1. Opening the Notes pane To open the Notes Pane, tap in the lower right-hand corner of your screen where it says ‘Notes’.

How do I best use the Notes pane on your iPad? I find the notes pane useful for quickly reviewing notes prior to your presentation, as the automatic full screen mode makes it easy to both review the notes for a particulate slide, and see the thumbnail of that particular slide, outlined in orange on the left side of the screen. The notes pane will also conveniently stay open on your iPad until you manually close it.
2. Closing the Notes pane
To close the Notes Pane in PowerPoint on your iPad, simply click the notes icon in in the upper right-hand corner of the slide, and you will return to the Normal View of your presentation.

Share & Slide Show View
These are the options for sharing your documents:
- Email as Link: Creates a “View Only” link or a “View and Edit” link of your file and launches the Mail App.
- Email as Attachment: Attaches the presentation to an email, the recipient can open and edit the document natively.
- Copy Link: Creates a “View Only” link or a “View and Edit” link of your file that you can paste into other documents or emails.
The Slide Show icon starts your presentation in slide show mode starting form the current slide. Besides running your presentation, this is great for spot checking your content and for reviewing any transitions you have applied as there is no “live preview” for them on your iPad.
The Slide Show icon is the equivalent of hitting the F5 keyboard shortcut on your desktop version of PowerPoint.
Help us keep this article updated
We hope you’ve found this PowerPoint for iPad guide helpful.
If you’ve see something that we’ve missed, PLEASE let us know and we’ll do our best to update this guide ASAP.
Oh, and we hope you’ve paid special attention to the pro tips and tricks we’ve sprinkled through the guide to help you avoid major errors, or to help you troubleshoot issues.
What’s next?
Related articles.
- What is a broken link chart in PowerPoint (and how to fix it)?
- Bar chart trick: Right aligning categories (PPT, Word, and Excel)
- PowerPoint settings: program level vs. presentation level
- What is a linked Excel chart in PowerPoint?
- Set Up Slide Show: Customize how your PPT presentations run
About The Author

Popular Tutorials
- How to Strikethrough Text (l̶i̶k̶e̶ ̶t̶h̶i̶s̶) in Word, Excel & PowerPoint
- How to Make Animated Fireworks in PowerPoint (Step-by-Step)
- Strikethrough Shortcut (l̶i̶k̶e̶ ̶t̶h̶i̶s̶) for Word, Excel & PowerPoint
- How to Create a Flash Card Memory Game in PowerPoint (Like Jeopardy)
- Keyboard Shortcuts Not Working: Solved
PowerPoint Tutorial Categories
- Strategies & Opinions
- Shortcuts & Hacks
- Presentation Design
- Pictures, Icons, Videos, Etc.
- New Features
- Charts & Data Viz
We help busy professionals save hours and gain peace of mind, with corporate workshops, self-paced courses and tutorials for PowerPoint and Word.
Work With Us
- Corporate Training
- Presentation & Template Design
- Courses & Downloads
- PowerPoint Articles
- Word Articles
- Productivity Resources
Find a Tutorial
- Free Training
- For Businesses
We help busy office workers save hours and gain peace of mind, with tips, training and tutorials for Microsoft PowerPoint and Word.
Master Critical PowerPoint Shortcuts – Secure Your FREE Training Module and Save Valuable Time!
⌛ Master time-saving expert techniques.
🔥 Create powerful presentations.
🚀 Propel your career to new heights.
We value your privacy – we keep your info safe.
Discover PowerPoint Hacks Loved by Industry Giants - KKR, AmEx, HSBC!
Over 114,880 professionals in finance, marketing and sales have revolutionized their PPT skills with our proven methods.
Gain FREE access to a full module of our premium PowerPoint training program – Get started today!
We hate spam too and promise to keep your information safe.
You are currently viewing a placeholder content from Facebook . To access the actual content, click the button below. Please note that doing so will share data with third-party providers.
Can I do a PowerPoint presentation using an iPad?
By: Author Shrot Katewa

I love my iPad, and If you are like me, you would want to carry it wherever you go. It is compact, light and allows me to get things done that can’t be done using my phone due to its small size! In fact, it is so convenient that it makes me wonder if I could replace my laptop with an iPad even for my client meetings?
But, can I create a PowerPoint presentation using an iPad? Yes, you can create a PowerPoint presentation using an iPad. In fact, iPad has a bunch of different apps that allow you to run PowerPoint presentations on it. iPad’s built-in Keynote presentation software also allows you to view the PPT files. You can also install Microsoft PowerPoint to run, edit and create a PowerPoint presentations from scratch on iPad just as you run it on a laptop!
Running a PowerPoint presentation on your iPad is actually a lot easier than you think. There are, however, a few things you should be aware of. Let’s get into the details of the workings of a PowerPoint presentation on an iPad.
How to put a PowerPoint presentation on an iPad?
Sometimes, you may already have a PPT file that was shared by your colleague or a client. However, many a times, it is you who has to create a PowerPoint presentation that dazzles your audience! Creating a presentation that holds our audiences’ attention is hard. We wrote a post that covers the steps that you should be taking while creating a PowerPoint presentation. We’ve broken it down to a step-by-step process that is designed to help you with creating a presentation. (Link – www.owlscape.in/what-are-the-steps-to-create-a-powerpoint-presentation )
If you have already created a presentation using a laptop or any other computer, you’ll first need to transfer it to your iPad. There are multiple ways you could do this. I would like to share my top 3 favourite method as they are free, doesn’t take too much time, and are easy to carry out as it doesn’t require any technical expertise.
1. Transfer the PPT file to your iPad using your email
This is probably the easiest of all the three options. In all likelihood, you may already have received a PPT file from your colleagues through an email. In this case, all you need to do is simply open your email account on your iPad, click on the email that contains the PowerPoint file, and download it.
2. Transfer the PPT file to your iPad using a cloud storage service
Another quick and easy option is using a cloud storage services. There are plenty of cloud storage services such as Google Drive, Dropbox, and even iCloud. Most of these services offer at least a few GBs of free data storage. Simply upload your PPT file from your computer. Then, login to your cloud storage service on your iPad and download the PPT file on your iPad.
3. Transfer the PPT file to your iPad using WhatsApp
https://www.youtube.com/watch?v=kHShrP6cR88
Video on how to login to WhatsApp on your iPad
Another great way to download the file directly to your iPad is by using WhatsApp. While WhatsApp is a great way to stay in touch with you friends, it is also great to share files. You can ask your colleague to send the file to you over WhatsApp. All you need to do is simply log in to your WhatsApp account on your iPad, open your colleague’s chat message, and download the file.
What is the best app for PowerPoint presentation on iPad?
In our experience, Microsoft PowerPoint is by far one of the best apps to work with PPT presentations on iPad. You can easily download and use, and if you have an Office365 subscription, it allows you access to additional functionalities which come in handy especially if you plan to edit files on-the-go on your iPad. PowerPoint presentation has been the brainchild of Microsoft, and it has been the leader by a long stretch when it comes to the presentation software.
With Microsoft PowerPoint, not only do you resolve the compatibility issues of the PPT files with software, you also get an interface you are familiar with. You can be absolutely sure that PPT file will look exactly as it is intended to when using Microsoft PowerPoint on iPad.
You can download the Microsoft PowerPoint app for your iPad from the App Store.
Is Microsoft PowerPoint app FREE for iPad?

Microsoft PowerPoint app is FREE to download and use on an iPad. Microsoft realise that the future of technology is more towards smartphones and tablets. Thus, they have a strong focus on providing access to user files on-the-go. Although you can edit PowerPoint presentations on-the-go, if you wish to get advanced functionalities, you may want to get an Office365 subscription. Having said that, most of your basic editing needs are covered in the base version of the app.
Are there any other apps for PowerPoint presentation on iPad?
Absolutely! There are several other applications that you can use to open and edit a PowerPoint presentation on iPad. All the other applications have their pros and cons. We have listed down the top 3 alternatives to Microsoft PowerPoint on iPad. They are in no order to preference.
Keynote is the native software that offers an office suite on Mac and iOS devices including iPad. It has been built from the ground up for iPad and iPhone devices. Needless to say, it is one of the most powerful software when working with presentations.
While Keynote allows you to view, open and edit a PowerPoint file, the overall functionalities are different. We’ve also seen that the look and feel of the PPT file does change when using it on Keynote. However, the changes are not major and if you are only planning to view the major contents of the PPT file on your iPad, Keynote is effective.
2. Google Slides
The best part about Google Slides is that it allows real-time collaboration on projects with its online office suite. This is great especially when your team is not based in the same location as you are.
Google Slides is also compatible with PPT files. It allows you or open, view and edit PowerPoint files on your iPad. Google Slides is FREE . All you need is a Google account to start using it.
3. WPS Office

Image credit – Mr. Phone
WPS stands for Writer (W), Presentation (P), Spreadsheets (S). It is our favourite alternative to Microsoft Office suite. It has been designed with Microsoft Office users in mind. Thus, the look and feel of WPS Office has striking similarities to that of MIcrosoft Office. For all the Microsoft Office users, WPS Office makes you surprisingly feel just at home.
If you are looking to a cheaper/free alternative to Microsoft Office suite that looks and feels just like MS Office, in our experience WPS Office by far the best option for you. It was designed with Microsoft Office users in mind. It was originally launched for Windows, however, WPS Office suite 2019 version has been expanded to both Linux and Mac users as well.
WPS Office is now also available for Mac and iOS users. You can download WPS Office directly from the App Store or visit the download section on their website . WPS Office is FREE to use although simply signing up for an account with them gives you access to premium feature for 1 year.
What equipment will I need to do a PowerPoint presentation using an iPad?
What makes the iPad really powerful is that it allows you to connect to a projector and project the presentation on a bigger screen. This comes in really handy as this negates the need to carry any laptop. Alternatively, if you consider laptop to be your first choice, instead of carrying an additional spare laptop, you can keep an iPad device as a backup just in case your laptop fails to work.
https://www.youtube.com/watch?v=y0Z6VGNlxbc
Video on how you can connect your iPad to a projector
There are multiple ways to connect your iPad to a Projector. Two of the most common ways are –
- HDMI connection
- VGA connection
For both the connections, you will need to buy an additional connector cable that allows you to connect the two devices.
Our personal preference is to use the VGA connector. Main reason for this is the fact that a VGA connector allows the sound to be played from the iPad itself as opposed to a HDMI connector. In an HDMI connection for an iPad, the sound is played through your projector. Another reason for preference of a VGA connector over an HDMI connector is that it is more widely available as a default connection option to the projector in most corporate offices. However, connector preference comes down to a personal choice.
So, is it worth it???
We started this article wondering whether we could do a PowerPoint presentation using an iPad, and whether we could carry an iPad to our meetings instead of a laptop. With the availability of Microsoft PowerPoint application for iPad and several other alternatives to open a PPT file on iPad, as well as the possibility to connect the iPad to a projector, we can safely conclude that an iPad can be used as a replacement to a laptop while meeting clients!
Psst… please share!
If you enjoyed reading the article, please leave us a comment below and share this with you network. This acts as a great motivation for us to keep creating useful content for your folks!
Can You Create a PowerPoint on an iPad? Here’s How!
Creating a PowerPoint on an iPad is simple! All you need is to download the PowerPoint app from the App Store, sign in with your Microsoft account, and you can start creating your presentation right away. It’s an efficient way to work on your slides whether you’re on the go or don’t have access to a computer.
After you complete your PowerPoint, you can easily present it directly from your iPad, share it with others, or transfer it to your computer for further editing.
Introduction
In the world of presentations, PowerPoint has been a long-standing favorite. Its user-friendly interface and robust features make it the go-to choice for professionals, educators, and students alike. But what if you don’t have access to a computer? Can you still whip up a compelling presentation? Absolutely! Thanks to the technological advancements of tablets like the iPad, creating a PowerPoint presentation is not only possible but also incredibly convenient.
The iPad, with its portability and intuitive touch screen, offers a unique way to create and edit presentations. This is particularly relevant for those who are always on the move or simply prefer the tactile interaction that tablets provide. In this article, we’ll explore how to create a PowerPoint presentation on an iPad, why it’s a useful skill, and who stands to benefit from this knowledge. Whether you’re a student preparing for a class project, a business professional crafting a pitch, or a teacher planning your next lesson, mastering PowerPoint on the iPad will elevate your presentation game.
Step by Step Tutorial: Creating a PowerPoint on an iPad
Before we dive into the steps, let’s clarify what we’ll achieve. By following these instructions, you’ll be able to create a fully-functional PowerPoint presentation on your iPad, complete with text, images, and various slide designs.
Step 1: Download the PowerPoint App
First things first, download the PowerPoint app from the App Store.
Once you’ve downloaded and installed the PowerPoint app, you’re ready to get started. The app is free, but for full functionality, you might need an Office 365 subscription.
Step 2: Sign in to Your Microsoft Account
Open the app and sign in with your Microsoft account.
Signing in allows you to access your saved presentations and utilize the full range of PowerPoint’s features. If you don’t have an account, you can create one easily within the app.
Step 3: Create a New Presentation
Select ‘New Presentation’ to start creating your slides.
Here, you’ll choose from a variety of templates or start with a blank slide. Templates can give you a head start with pre-designed layouts and color schemes.
Step 4: Add Content to Your Slides
Tap on the slide to add text, insert images, or create shapes.
Using the toolbar at the top, you can customize your fonts, add bullet points, and more. Playing around with these features will help you create a more visually engaging presentation.
Step 5: Save and Share Your Presentation
Once you’re satisfied, save your presentation and share it as needed.
You can save your presentation to the iPad, to OneDrive, or to another cloud service. Sharing options include email, a link, or exporting it in a format like PDF.
Additional Information
Creating a PowerPoint on an iPad is a breeze once you get the hang of it. But there are a couple of tips that can make your experience even smoother. For instance, pairing your iPad with a keyboard can speed up your typing and make editing text less fiddly. Also, practicing with different gestures can help you discover shortcuts for a more efficient workflow.
Remember, while the iPad version of PowerPoint is robust, it might not have every single feature that the desktop version has. But for most users, the convenience and mobility it offers can outweigh those minor limitations. And guess what? If you’re presenting directly from your iPad, you can also use your device as a remote control, swiping through slides with a mere touch or click. This can be a game-changer for a seamless presentation experience.
- Download the PowerPoint app from the App Store.
- Sign in with your Microsoft account.
- Create a new presentation.
- Add content to your slides.
- Save and share your presentation.
Frequently Asked Questions
Can i edit a powerpoint on an ipad.
Yes, you can edit PowerPoint presentations on an iPad using the PowerPoint app.
Do I need a Microsoft subscription to use PowerPoint on an iPad?
You can use the PowerPoint app for free, but for full functionality, a subscription might be necessary.
Can I print my PowerPoint from an iPad?
Absolutely, as long as you have a compatible printer.
Will my PowerPoint look the same on an iPad as on a computer?
Mostly yes, although there may be some minor differences due to the app’s features.
Can I use Presenter View on an iPad?
Yes, Presenter View is available on the PowerPoint iPad app.
A PowerPoint presentation can make or break your pitch, project, or lesson. And being able to create one on an iPad not only adds convenience to your process but also ensures you’re never caught off guard without your slides at hand. With just a few taps and swipes, you can craft a professional and engaging presentation from wherever you are.
So next time you’re away from your computer but need to prep for that big meeting or class, remember that your iPad is more than up to the task. Happy presenting!

Matthew Burleigh has been writing tech tutorials since 2008. His writing has appeared on dozens of different websites and been read over 50 million times.
After receiving his Bachelor’s and Master’s degrees in Computer Science he spent several years working in IT management for small businesses. However, he now works full time writing content online and creating websites.
His main writing topics include iPhones, Microsoft Office, Google Apps, Android, and Photoshop, but he has also written about many other tech topics as well.
Read his full bio here.
Share this:
Join our free newsletter.
Featured guides and deals
You may opt out at any time. Read our Privacy Policy
Related posts:
- Can I Convert My Powerpoint to Google Slides?
- How to Save Powerpoint as PDF with Notes
- How to Make a Powerpoint Slide Vertical in Powerpoint 2013
- How to Set Time for Slides in Powerpoint
- How to Insert Slides from Another Presentation in Powerpoint 2010
- What Are Benefits of PowerPoint? A Comprehensive Guide
- How to Check Word Count on Powerpoint 2010
- How to Change Hyperlink Color in Powerpoint 2010 (An Easy 5 Step Guide)
- How to Loop a Slideshow on Powerpoint 2013
- How to Unhide a Slide in Powerpoint 2013
- How to Convert a PowerPoint to Word and Edit with Ease
- How to: Effortlessly Create PowerPoint Looping Presentations
- How to Change the Font on All Slides in Google Slides
- How to Copy a PowerPoint to a New PowerPoint: A Step-by-Step Guide
- How to Delete Email Account on iPhone
- How to Start PowerPoint: A Step-by-Step Guide for Beginners
- How to Change Line Spacing in Powerpoint for Every Slide at Once
- How to Download a Google Slides Presentation as a Powerpoint File
- How to Show Speaker Notes in Google Slides
- How to Insert Check Mark in Powerpoint for Office 365
You’re using an older browser version. Update to the latest version of Google Chrome , Safari , Mozilla Firefox , or Microsoft Edge for the best site experience.
- eLearning Blog
- eLearning Basics
- Instructional Design
- Corporate Training
- Course Selling
- Manufacturing
- Products iSpring Suite iSpring Learn
- Use Cases Onboarding Compliance Training Induction Training Product Training Channel Partner Training Sales Training Microlearning Mobile Learning
- Company About Us Case Studies Customers Partnership Course Development Contact Us
- Knowledge Hub Knowledge Hub Academy Webinars Articles Guides Experts on iSpring
- Language EN English Français Deutsch Español Italiano Nederlands Português Polski 中文 日本語 العربية Indonesia
- Shopping Cart
How to play a PowerPoint presentation on iPad

Would you like to play your PowerPoint presentations on iPads? It’s well known that Microsoft PowerPoint presentations are not supported on iPads or other Apple devices. However, you can still make your PowerPoint projects available on these devices. Your clients, colleagues, students and all other Apple users will certainly appreciate it! In this article we will demonstrate how to view PowerPoint presentations on iPad.
1. Convert PowerPoint to HTML5
The majority of mobile devices, including iPads, can seamlessly play HTML5 presentations. You can convert PowerPoint presentations to HTML5 using a third-party tool, for example iSpring Converter Pro . iSpring Converter is PowerPoint to HTML5 converter that preserves all PowerPoint functionality and appearance.
- Crystal-clear images and text: iSpring takes care of adapting hi-res images for the best performance on retina displays. Text is saved in a vector format which keeps the edges razor-sharp even if you magnify.
- Support of all PowerPoint features: Converted to HTML5 with iSpring, presentations still keep all animations and transition effects, embedded audio, video and interactivity. You can see an example below.
- Sharing PowerPoint content via mobile devices and iPads: Presentations in HTML5 can be easily placed on a webpage and delivered to a wider audience via iPads and other iOS and Android mobile devices.
- Normally, HTML5 files offer a low level of content protection, as viewers can access the project’s source code in their browsers. In response to this, HTML5 files generated with iSpring have built-in protection options which effectively prevent content from unauthorized copying.
Download fully functional iSpring Converter Pro free trial
2. Convert PowerPoint to video to play it on iPads
With iSpring Converter Pro, you also can convert PowerPoint to MP4 video and play it on any device. It’s good for simple linear presentations that don’t have any interactivity and that might be shared on YouTube.
- PowerPoint-like playback: Converted into a video file, your presentation will keep the animation effects and slide transitions. However, on-click animations will be played automatically because the video format doesn’t support PowerPoint’s interactivity.
- Easy sharing: You can upload your video file to YouTube to make it available for viewing on iPads anytime.
- A Presentation’s interactivity is not supported: After the conversion to video, all animations of your presentation will play on the slide all right, while all trigger animations and hyperlinks will be lost.
- Loss of custom navigation scenarios: Video performance is only suitable for simple linear presentations. If you use PowerPoint custom shows or hyperlinks to advance slides in regard to viewers’ choices or feedback, all these sophisticated features will be lost when converted to video.
- Increased file size: Video format usually takes up more memory than a .ppt file, so be prepared for your presentation to be a larger size after it’s converted to video.
- Lower resolution: While attempting to reduce the size of a video, screen-capturing software tends to “downgrade” the quality of your slides.
Download iSpring Converter Pro free trial
3. Turn your slides into pictures
The most popular presentation service SlideShare converts your PPT presentations into set of pictures. iPads can easily display images. This set up is great if your presentation is mostly charts, tables, or photos.
- Slides that are crystal clear: You get perfect quality of the graphics of your slides.
- Control slideshow pace: You can control your slideshow flow by pausing at the important slides and moving through others faster.
- No animation, no hyperlinks, no audio, no video: Your presentation is turned into a set of static pictures of your slides. It shouldn’t be a problem if you’re only concerned about the graphic content in your presentation.
- Many separate files: Instead of having all of your slides as a single .ppt file, you will have a bunch of separate images as per the number of slides in your presentation.
- The presentation can be navigated only slide by slide in a fixed sequence. Custom navigation scenarios are not supported.
4. Create a .PDF file
iPad supports .pdf format just fine. Again, if you only care about the graphic content of your presentation, it can be a great way to view your PPT on iPad.
To convert your presentation to .pdf, you can use special software, available in both free and paid versions. You can even use PowerPoint in the latest versions (PPT 2007 with SP2, PPT 2010, PPT 2013) to create a .pdf copy of your slides.
Depending on your requirements, you can choose any of the above methods. However, when comparing all methods, conversion to HTML5 is the best option to view PowerPoint on iPads while keeping its interactivity and original look. Besides, it’s an excellent option for professional PowerPoint authoring enhanced with extra features like a responsive player, built-in audio narrations, direct-to-YouTube publishing, and more.
Useful Resources on PowerPoint
Are you a PowerPoint lover? If so, here are some other helpful articles for you:
- How to Share a PowerPoint Presentation Online
- How to Protect PowerPoint Presentations
- How to Add Narration to a PowerPoint Presentation
- How to Add YouTube Video Into PPT Presentation
- How to Structure a PowerPoint Presentation
- How to Convert PowerPoint Presentation to an eLearning Module
Fast PowerPoint to HTML5 Converter
Convert presentations to HTML5 with all effects and transitions preserved

Content creator:
Paulina Fox
Passionate about design and tech, Paulina crafts content that helps customers delve deeper into iSpring products.
Subscribe to our blog
Stay tuned to get our latest eLearning tips and tricks!
By clicking “Subscribe”, you agree to our Privacy Policy . All emails include an unsubscribe link, so that you can opt-out at any time.
We use cookies to give you the best possible experience on our website and also for analytics and marketing purposes. You can enable or disable optional cookies as desired. See our Cookie Policy for more details.
Manage your cookies
Essential cookies are always on. You can turn off other cookies if you wish.
Essential cookies
Analytics cookies
Social media cookies
Annotate Your PowerPoint With Apple Pencil
Microsoft PowerPoint
Design Slideshow Presentations
Looking to annotate your slides in Microsoft PowerPoint ? Your Apple Pencil is the easiest way. It’ll smooth the process whether you need to scribble on class notes, update a sales pitch, or fix your boss’s spelling. To try it out, connect your Apple Pencil to your compatible iPad or iPad Pro and tap on PowerPoint ’s Draw tab. That’s where you’ll find tools to write, draw, edit, highlight, and doodle. Of course, you can also use your Apple Pencil to select objects and text boxes. Read on to learn three cool ways to use your Apple Pencil with PowerPoint . And if you don’t have an Apple Pencil, just pretend this entire article is talking about your finger.
Master the basics ‣ The Draw tab is home to a number of features that’ll probably look familiar, including a variety of markers, pencils, and highlighters. Tap one to select it, then tap again to reveal a menu that lets you adjust color and thickness. To undo a note or a sketch you made, just tap the eraser, which makes your last change go away.
Dramatically improve your handwriting ‣ If you were born in the post-cursive age, there’s a good chance your handwriting is a hot mess. But that’s OK! PowerPoint has your back. Write directly on a slide using your Apple Pencil, then tap the Ink to Text button in the top right corner. Select your scribble using the Lasso Select tool and the app will automatically convert your writing to readable type (or suggest a few options for doing so).
Get in perfect shape ‣ If you believe in yourself, nothing in life is impossible. Except drawing a geometrically perfect circle freehand. PowerPoint and Apple Pencil can help here too. Draw something approximating a circle (or square, triangle, or rhombus, theoretically, although we can’t imagine why you’d need a rhombus) and tap Ink to Shape in the top right corner. Now select on your amorphous shape using the lasso tool and PowerPoint will convert it into a perfectly proportioned form that would make your geometry teacher weep with joy.
Can You Make a Powerpoint on iPad? Here’s How To Do It
Are you familiar with Microsoft PowerPoint on your laptop or desktop computer, but don’t know how to use it on your iPad? You’re not alone.
With the popularity of tablets and iPads, many people are looking to make the switch and take advantage of the portability of their device.
In this article, we’ll guide you through the steps to create a presentation on your iPad.
We’ll cover topics such as what Microsoft PowerPoint for iPad is, how to add text, images, charts, and other elements, and how to navigate between slides.
With this knowledge, you’ll be able to create a presentation on your iPad with ease.
So let’s get started!
Table of Contents
Short Answer
Yes, you can make a PowerPoint on an iPad.
You can use the Microsoft PowerPoint app for iOS, which is available on the App Store.
You can also create and edit presentations online with PowerPoint for the web.
If you have an Office 365 subscription, you can also use the desktop version of PowerPoint on an iPad with the Office app.
What is Microsoft PowerPoint for iPad?
Microsoft PowerPoint for iPad is an app designed by Microsoft to allow users to create and present their PowerPoint presentations on an Apple iPad.
It is a powerful and easy-to-use tool that allows users to create professional-looking presentations with the help of the iPads touchscreen and Apple Pencil.
The app also offers a wide range of features that make it easy to create engaging and visually appealing presentations.
With the Microsoft PowerPoint for iPad app, users can easily create a new presentation, add text, images, charts, and other elements to their slides.
The app also allows users to use the iPads touchscreen to navigate between slides and add shapes, arrows, and other elements to their presentation.
Additionally, the app allows users to use the Apple Pencil to draw directly on the slides.
The app also offers other features such as the ability to share presentations with others, or present them on a larger screen with AirPlay.
Additionally, the iPads portability and HD display make it the perfect device for creating and sharing presentations with ease.
With its powerful features and easy-to-use interface, Microsoft PowerPoint for iPad is the perfect tool for creating professional-looking presentations on the go.
How to Create a Presentation on iPad
Creating a presentation on an iPad is an easy and convenient way to share information with others.
With the help of Microsoft PowerPoint for iPad apps, you can create a presentation, add text, images, charts, and more to create a professional-looking presentation.
With the iPad’s portability and HD display, you can create and share presentations with ease.
The first step in creating a presentation on an iPad is to download the Microsoft PowerPoint app.
Once you have downloaded the app, you can open it and begin creating your presentation.
You can add text, images, charts, and more to create a professional-looking presentation.
Additionally, you can use the Apple Pencil to draw directly on the slides, as well as use the iPads touchscreen to navigate between slides and add shapes, arrows, and other elements to your presentation.
Once you have added all of the necessary elements to your presentation, you can preview it on your iPad before sharing it with others.
You can also use the iPads AirDrop feature to quickly and easily share your presentation with others.
Additionally, you can use the PowerPoint app to collaborate with others on the presentation remotely.
Finally, you can export your presentation to a variety of formats, such as PDF, PowerPoint, and more.
This allows you to share your presentation with a variety of audiences, from colleagues to clients.
With the iPads portability and HD display, you can create and share presentations with ease.
In conclusion, creating a presentation on an iPad is easy and convenient.
With the help of Microsoft PowerPoint for iPad apps, you can create a professional-looking presentation with ease.
Additionally, you can use the iPads AirDrop feature to quickly and easily share your presentation with others, as well as export it to a variety of formats.
Adding Text, Images, and Charts to the Presentation
Adding text, images, and charts to your PowerPoint presentation on an iPad is a great way to make it look professional and engaging.
With the Microsoft PowerPoint for iPad apps, you can easily add text to your slides by simply tapping on the slide and typing in the text you want to include.
You can also use the iPads built-in dictation feature to quickly add text to your slides, or you can use the iPads on-screen keyboard to type out your text.
In addition to text, you can also add images and charts to your presentation.
You can upload images from your iPads photo library or from an online source, such as Google Images, to add to your presentation.
Similarly, you can also add charts to your presentation by using the chart feature in the PowerPoint app.
This feature allows you to quickly create bar, line, and pie charts from data you enter, as well as customize the chart to fit your presentation.
Finally, if you have an Apple Pencil, you can use it to draw directly on the slides.
This allows you to add arrows, shapes, and other elements to your presentation that would be difficult to add with the mouse or touchscreen.
With the Apple Pencil, you can quickly add any elements you need to make your presentation look professional and engaging.
Using the Apple Pencil to Draw on the Slides
Using the Apple Pencil to draw on PowerPoint slides is a great way to add a personal touch and creative flair to presentations.
With the Apple Pencil, users can draw directly onto slides with precision and detail, as well as directly write text and add shapes.
The Apple Pencil is also pressure-sensitive, meaning that it can be used to draw lightly or heavily depending on the desired effect.
It is also possible to use the Apple Pencil to erase, adjust, and move objects on the slides, allowing for easy editing of the presentation.
Additionally, the Apple Pencil can be used to easily add diagrams and other graphical elements, such as arrows and circles, to the slides.
With the Apple Pencil, slides can be quickly and easily designed to look professional and eye-catching.
Navigating Between Slides on the iPad
Navigating between slides on an iPad is made easy with its multitouch display and intuitive interface.
With a few taps, you can quickly move between slides in your presentation.
To navigate between slides, simply tap the left and right arrows in the bottom left corner of the PowerPoint for iPad app.
This will move you through the presentation slides sequentially, making it easy to review and edit your slides.
Additionally, you can select a specific slide from the Slide Navigator, which can be accessed by tapping the three dots icon in the bottom left corner of the PowerPoint app.
This will open up a list of all your slides, allowing you to quickly jump to a specific slide with just a tap.
Additionally, you can use the Apple Pencil to draw directly on the slides, as well as use the iPads touchscreen to quickly move between slides.
With the iPad’s portability and HD display, you can create and share presentations with ease, making it a great tool for creating professional presentations.
Adding Shapes, Arrows, and Other Elements
Adding shapes, arrows, and other elements to a PowerPoint presentation on an iPad is very easy to do.
With the iPads touchscreen, you can quickly and easily add a variety of shapes, arrows, lines, and other elements to your presentation.
You can use the Apple pencil to draw directly on the slides, allowing you to add intricate details to the presentation quickly and easily.
Additionally, you can use the iPads built-in shape tools to add rectangles, circles, and other shapes to the presentation.
Sharing the Presentation on iPad
Sharing a presentation on iPad is a breeze.
With the help of Microsoft PowerPoint for iPad apps, you can easily share your presentation with others from anywhere in the world.
You can share presentations in a variety of formats, including PDF, PowerPoint, and HTML.
Additionally, you can share your presentation as a read-only or a full-editable version, which allows others to make changes to the presentation if necessary.
The PowerPoint for iPad app allows you to easily send your presentation in an email, post it on social media, or even share it with a link.
If you have an Office 365 subscription, you can save your presentation to OneDrive and access it from any device with an internet connection.
You can also share your presentation with others directly from the iPad, with the ability to add notes and comments while the presentation is being shared.
The iPad also has a variety of other features that can help you share your presentation.
You can use AirPlay to mirror the contents of your iPad onto a larger display, such as a television or projector.
This feature allows you to present your presentation to a large group of people without having to carry a laptop with you.
Additionally, you can use an HDMI or VGA adapter to connect your iPad directly to a projector or monitor.
Finally, you can also share your presentation with others using a variety of cloud-based services, such as Dropbox, Google Drive, and iCloud.
With these cloud services, you can easily store and share your presentation without having to worry about copying it onto a USB drive or sending it through email.
These services also make it easy to collaborate on a presentation, as multiple users can access the same presentation and make changes and additions to it.
By leveraging the power of the iPad and the features of the Microsoft PowerPoint for iPad apps, you can easily create and share a presentation with ease.
Whether you’re giving a presentation to a large group of people or collaborating on a project with colleagues, the iPad provides an easy and efficient way to create and share presentations.
Final Thoughts
Making a PowerPoint presentation on an iPad is now easier than ever with Microsoft PowerPoint for iPad.
With its portability and HD display, you can create professional-looking presentations on the go and share them with ease.
Now that you know how to make a PowerPoint on iPad, why not give it a try? You’ll be surprised at what your creative mind can come up with.
James Wilson
James Wilson has extensive knowledge in the information technology industry.His second love, besides dealing with computers, is smart home technology. He is continually updating information to better comprehend this problem and has a deep understanding of the apartment’s support system.
Recent Posts
Is Airtable a Public Company? Unveiling the Truth
No, Airtable is not a public company. As of now, Airtable is a private company that has raised funds from various investors but has not gone through an initial public offering (IPO) to be listed on...
How to Make Money with Airtable: Top Strategies and Success Stories
To make money with Airtable, you can offer consulting services to businesses looking to optimize their workflows through the platform. You can also create and sell templates or automation scripts...
- Skip to primary navigation
- Skip to main content

8 Things I’ve Learned Using an iPad for Presentations
I love using my iPad for travel to conferences, and not just because it’s so lightweight and its battery lasts all day. For one thing, with the LTE version I’m not beholden to conference Wi-Fi; while some conferences have good connectivity, I never want to count on it. With the iPad I can nearly always get online.
But the iPad isn’t convenient only for attending conferences. It’s a good tool for presentations, too-or at least an excellent backup for a dedicated computer. I can easily be ready to present if I have a last-minute computer replacement.
Still, I had some things to learn the hard way about using an iPad for presentations. Perhaps I can save you a few steps.
The Basics of Getting Started
Learn the differences between “desktop” keynote and the ipad version.
While I present nearly exclusively from an iPad, I usually build my initial presentation on a Mac. I build all of my presentations in Keynote, and store them in iCloud. I can (and do) make tweaks to a presentation on-site via the iPad version of Keynote, but it always feels as though I’m slightly fighting with the software.
Keynote supports a customizable presenter display in both versions. On the Mac desktop version, you can pick three ways to give yourself that during-the-talk cheat sheet, instructing it to show you the current slide, next slide, and presenter notes. On the iPad, the presenter display options only give you a “two out of three” option, between current slide, next slide, and presenter notes. I begrudgingly pick Next Slide and Presenter Notes, and then I hope the venue has a confidence monitor that shows me what’s on the projector behind me.
Some folks prefer to use Powerpoint or Google Slides. This distills down to religion, and I can confidently state that those people are wrong. Both tools offer iPad versions as well, but I’m not well versed in them. Deckset doesn’t offer an iPad version, and I’ve not had much patience for the swath of custom JavaScript-based presentation tools that render Markdown inside of browsers. I want to like them, but I can’t quite get there yet. As a result, use Keynote; you’ll be happier. As an added bonus, the presentations live in iCloud; with a bit of notice you can grab a copy on someone’s Mac, iPhone, or iPad and be back in business should calamity befall your iPad.
Do be aware that this means that if your presentation requires a demo in a terminal or a web browser, you either get to do some awkward transitions—or accept that presenting from an iPad isn’t right for this talk. I still haven’t found a good way to give my “Terrible Ideas in Git” talk from an iPad due to its live demos…
Invest in a presentation remote
A presentation remote is a necessity, unless you enjoy being trapped behind the podium. I treated myself to a little luxury with the Logitech Spotlight .
This device does it all. It speaks its own wireless protocol via a USB-A dongle that plugs into most laptops, but the Spotlight also speaks Bluetooth with a great range. Its battery charges using a built-in USB-C port that hides behind the dongle, and a single charge lasts for months.
I freely accept that most folks find the idea of paying $129 for a single-purpose device a bit nutty. Those folks generally don’t give double-digit numbers of presentations a year. A word of caution: Don’t leave it behind at the podium after your talk. It’s expensive enough to buy the first time. Please don’t ask me how I know.
Pay attention to fonts and typefaces
I have a condition I jokingly refer to as “typeface blindness.” I can’t tell the difference between most fonts unless I stare at them and actively work out what I’m seeing. I’m told this is atypical, and whenever I forget this fact I get reminded on Twitter. “Well, that’s the fifth talk so far today that uses Helvetica (the system default)” always makes me facepalm. As a result, I make it a point to not use system default fonts.
Contrary to what many folks believe, you can use custom fonts on iOS, but the process is a bit arcane. Do yourself a favor and drop the $2 for AnyFont . This magic app streamlines an otherwise incredibly painful process.
Lessons I’ve Learned
I’m conservative here; while you can save money by buying third party adapters, I find that minimizing the risk of screwing up a presentation in front of 400 people is worth the extortionate rate that Apple charges for first party adapters. You’ll want both HDMI and VGA adapters. Both of these are available in Lightning and USB-C flavors, depending upon which generation of iPad you’re using. Note that this is less of a concern with USB-C than it is with Lightning adapters—just make certain you test all of your adapters before you leave home.
Save time; don’t bother looking for DVI adapters. The iPad officially doesn’t support it, Apple doesn’t sell them for Lightning, and I’ve only ever encountered it on the speaking circuit once. Your test a few hours before your talk will validate that you’ll be okay.
You can never be too rich, too thin, or have a big enough battery pack
Grab a beefy battery pack, and you can go days without finding a power outlet. You don’t want to discover that the podium power strip is full, the extension cord is a trip hazard, or that you don’t have the right adapter for the country you’re in when it’s time to give a talk. Having a battery pack that can borderline jump-start a car means you’re fine so long as your iPad battery level is anywhere about roughly 3%. (Too much lower and the tablet won’t boot at all.)
I like Anker products for this, but your mileage may vary. I soundly endorse finding reputable brands. Saving a few bucks on chargers, cables, or batteries that (a) plug into a very expensive electronic device and (b) have a propensity to include “sets the building on fire” in their list of failure modes just never seemed worth the trade-off to me.
Note: If you need to give away something at a booth, don’t use branded USB battery packs or chargers, as swag. At best, they’re cheap and feel flimsy. At worst, something with your logo on it started a fire.
Spend extra for an LTE connection
You can tether your iPad to a mobile device or ride on conference Wi-Fi. However, if you’re presenting frequently it’s worth the extra money to get an iPad version that can speak to the cell networks. Suddenly you no longer care what the conference Wi-Fi password is, whether you remembered to charge your phone, or if the captive portal login page is going to expire and pop up again mid-presentation.
Speaking of which…
Before the presentation, turn on both “Do Not Disturb” and “Airplane Mode”
In presentation mode, Keynote swears that it blocks pop-ups, reminders, incoming calls, and other distractions. To its credit, I’ve never seen it do otherwise.
That said, I always enable Do Not Disturb on my iPad. I put the device in airplane mode. And only then do I plug in the projector. Perhaps I’m paranoid, but you’re also not seeing horrible screenshots from my talks that feature embarrassing notifications, either.
Update nothing before your presentation
If a new iOS version or a Keynote update comes out the same week as your presentation, fine. But resist the upgrade. It can wait a day.
There have been enough regressions in software over the years that I’m extremely hesitant to trust that everything will “just work” an hour before I go on stage.
These are the sometimes-hard-won lessons I’ve learned after spending a year giving talks solely from an iPad.

Corey is the Chief Cloud Economist at The Duckbill Group, where he specializes in helping companies improve their AWS bills by making them smaller and less horrifying. He also hosts the "Screaming in the Cloud" and "AWS Morning Brief" podcasts; and curates "Last Week in AWS," a weekly newsletter summarizing the latest in AWS news, blogs, and tools, sprinkled with snark and thoughtful analysis in roughly equal measure.
More Posts from Corey

Changing of the Guard: “AWS Appoints Matt Garman as CEO”
This morning’s announcement that Adam Selipsky would be stepping down as AWS CEO, with longtime Amazonian Matt Garman stepping into the role, feels like a natural correction. Garman has long been seen as the heir apparent to AWS’s leadership. When Selipsky was named CEO in the last succession, my initial reaction was a baffled, “I’m sorry, who?”

AWS’s (de)Generative AI Blunder
AWS has been very publicly insecure about the perception that it’s lagging behind in the Generative AI space for the past year. Unfortunately, rather than setting those perceptions to rest, AWS’s GenAI extravaganza at re:Invent 2023 seemed to prove them true. Of the 22 GenAI-related announcements, half of them are still in preview. Many were […]

Generative AI Builds a re:Invent Scavenger Hunt
Let’s begin with the tl;dr: At this year’s re:Invent, I’m hosting a photo scavenger hunt with significant prizes for “most items found” and “most creative entry.” Sign up through my webapp at findme.lastweekinaws.com. The rest of this post details how I built this app.
Get the newsletter!
Stay up to date on the latest AWS news, opinions, and tools, all lovingly sprinkled with a bit of snark.
How to Write on PowerPoint Slides on an iPad
In this blog article, we‘ll explain how you can write on PowerPoint slides on your iPad instead of having to print them out.
No matter if you’re at school, university or at the office, PowerPoint presentations are ubiquitous.
Students, in particular, will receive lecture slides in form of PowerPoint presentations from their professors, often uploaded to a shared cloud storage or available for download through an intranet. If you want to take notes on PowerPoint slides, there used to be two options:
- Printing out hundreds of pages and having to deal with the downsides of managing analog paper, or
- Saving the PowerPoint file as PDF and using comment fields to add notes, which is highly inflexible and makes it almost impossible to review them later.
Now, with the iPad and Apple Pencil, you have far more options.
With GoodNotes , annotating PowerPoint presentations right on the iPad is fast and convenient. You can highlight key points, write directly on top of slides, and even insert other images or diagrams.
What’s more, importing slides into GoodNotes is as easy as pie. Here’s how you can do it.
Sending PowerPoint presentations to GoodNotes from other apps
- Start by opening the PowerPoint presentation you want to annotate on your iPad in another app or in your browser.

2. Next, look for the Share Icon and tap on it
3. In the list of apps, you should see a button with the GoodNotes app icon. reading “Copy to GoodNotes” or “Open in GoodNotes”.

4. If you tap that button, GoodNotes should then open automatically!

Now, you can freely highlight, annotate, and write all over your PowerPoint slides.
Hint: If you already opened an existing document in GoodNotes, you can choose to add the presentation before or after the open page – or even append it to the end. This works great for keeping all your notes on a particular subject together in a single notebook.
Read more: Check out our guide to Digital Planner stickers .
Importing PowerPoint presentations from within GoodNotes
Tap the New … icon (large plus icon) in the Documents tab and choose Import, then tap a file to start the import!
The Files app conveniently keeps all cloud storages (like Google Drive, Dropbox, OneDrive, Box, and more) in one interface, and you can always add another cloud storage to Files.
Hint: Adding a PowerPoint slide to an existing notebook also works from within GoodNotes. Tap the + button in the toolbar and choose “Import”.
As you can see, it is easy and fast to annotate PowerPoint slides on the iPad. We hope that this tip helps you to be better organized and to keep your important information in a single place.
Get GoodNotes to Annotate your PowerPoint slides
GoodNotes is one of the most popular note-taking apps for handwritten notes on the iPad, and functions as a PDF reader and PowerPoint slide annotator as well! With GoodNotes you can:
- Take handwritten notes and search them afterwards
- Annotate your PDF or PowerPoint lecture slides or articles
- Easily organize your notes into notebooks, folders, and keep everything synced across your iPad, Mac, and iPhone
Get GoodNotes today, and start taking more effective notes .
- Skip to primary navigation
- Skip to main content
- Skip to primary sidebar
Technology Simplified.
How to Transfer PowerPoint Presentations to iPad or iPhone
By: Waseem Patwegar | Filed Under: iOS
To view PowerPoint presentations on iPad, you will have to transfer PowerPoint files in PPT format from PC to iPad. You will find below the steps to transfer PowerPoint Presentations to iPad or iPhone.

Transfer PowerPoint Presentations to iPad or iPhone
All that is required to transfer PowerPoint Presentations from PC to iPad or iPhone is to connect your iOS device to computer and make use of iTunes and Documents App or PowerPoint App to transfer PPT Files to iPhone.
iTunes needs to be installed on your computer and the Documents App or PowerPoint App needs to be installed on your iOS device.
As far as the computer is concerned, it can either be a Mac or PC as the procedure to transfer PPT files to iPhone is more or less the same on both Mac and Windows PC.
Transfer PowerPoint Files from PC to iPhone or iPad
Download and install the Documents App on your iPhone/iPad and follow the steps below to transfer PowerPoint Presentation files from PC to iPhone or iPad.
1. Connect iPhone to the USB Port of your computer.
2. Open iTunes on your computer and click on the Phone icon as it appears in the top menu bar in iTunes.
3. Next, click on the File Sharing option in side menu > select Documents or Keynote App and click on Add File button.

4. On the next screen, navigate to location of the PowerPoint file on your computer > select the PPT File that you want to transfer to iPhone and click on Open .

5. Next, make sure that Presentation File is selected and click on Done .

Once you click on Done, the selected PowerPoint File in PPT Format will be transferred to your iOS device (iPhone or iPad).
How to View PowerPoint Presentations on iPad or iPhone
Once the PowerPoint File is transferred to your iOS device, you can follow the steps below to open and View the PowerPoint Presentations on your iPad or iPhone.
1. Open the Documents App on your iPhone.

2. Once the App is open, tap on iTunes Files .

3. On the next screen, tap on your Presentation File .

Once the PPT file opens in Documents App, you will be able to view your PowerPoint Presentation on iPad or iPhone, just like you do on your PC.
- How to Transfer PDF Files to iPhone From Computer
- How to Transfer WhatsApp Photos From iPhone to Mac or PC

Microsoft Learn Q&A needs your feedback! Learn More
May 20, 2024
Microsoft Learn Q&A needs your feedback!
Want to earn $25 for telling us how you feel about the current Microsoft Learn Q&A thread experience? Help our research team understand how to make Q&A great for you.
Find out more!
Contribute to the Microsoft 365 and Office forum! Click here to learn more 💡
April 9, 2024
Contribute to the Microsoft 365 and Office forum!
Click here to learn more 💡
PowerPoint Forum Top Contributors: Steve Rindsberg - John Korchok - Bob Jones AKA: CyberTaz ✅
May 10, 2024
PowerPoint Forum Top Contributors:
Steve Rindsberg - John Korchok - Bob Jones AKA: CyberTaz ✅
- Search the community and support articles
- Microsoft 365 and Office
- Search Community member
Ask a new question
Wireless Presenter Option for Powerpoint for iPad
I have had several of our instructors ask about using iPad's and Powerpoint..can't seem to find any options for a wireless presenter like the Kensington models that most use with their PC..any thoughts on this..
Several do not have an iPhone..so that option is not available..did try the Windows Phone remote with regular laptops and that works great.
Report abuse
Reported content has been submitted
Replies (6)
- Article Author |
- Volunteer Moderator
If you want to control PowerPoint running on a PC/Mac using an app on an iPad/iPhone, Google will help if you tell it this:
control powerpoint with ipad
But if you're looking for a way to remote-control a copy of PowerPoint that's *running* on an iPad, I'm not sure there's anything like that. A google search on:
remote control for ipad
brings up lots of hits, but it's obvious that most of them are not relevant or require an iPhone.
1 person found this reply helpful
Was this reply helpful? Yes No
Sorry this didn't help.
Great! Thanks for your feedback.
How satisfied are you with this reply?
Thanks for your feedback, it helps us improve the site.
Thanks for your feedback.
I know..thanks for replying..was trying to see if there was anything in the pipeline as many want to use it this way..but have continued to purchase new laptops..
3 people found this reply helpful
2 people found this reply helpful
- Volunteer Moderator |
- Article Author
I did try finding some other options .. but I did find this and so far no one wants to spend the $ on it to test.
http://www.amazon.com/Satechi%C2%AE-Bluetooth-Pointer-Presenter-Control/dp/B00A3WRM5G
It may do the trick.
Thanks to everyone who has posted here.
Question Info
- Norsk Bokmål
- Ελληνικά
- Русский
- עברית
- العربية
- ไทย
- 한국어
- 中文(简体)
- 中文(繁體)
- 日本語
How-To Geek
6 ways to create more interactive powerpoint presentations.
Engage your audience with cool, actionable features.
Quick Links
- Add a QR code
- Embed Microsoft Forms (Education or Business Only)
- Embed a Live Web Page
- Add Links and Menus
- Add Clickable Images to Give More Info
- Add a Countdown Timer
We've all been to a presentation where the speaker bores you to death with a mundane PowerPoint presentation. Actually, the speaker could have kept you much more engaged by adding some interactive features to their slideshow. Let's look into some of these options.
1. Add a QR code
Adding a QR code can be particularly useful if you want to direct your audience to an online form, website, or video.
Some websites have in-built ways to create a QR code. For example, on Microsoft Forms , when you click "Collect Responses," you'll see the QR code option via the icon highlighted in the screenshot below. You can either right-click the QR code to copy and paste it into your presentation, or click "Download" to add it to your device gallery to insert the QR code as a picture.
In fact, you can easily add a QR code to take your viewer to any website. On Microsoft Edge, right-click anywhere on a web page where there isn't already a link, and left-click "Create QR Code For This Page."
You can also create QR codes in other browsers, such as Chrome.
You can then copy or download the QR code to use wherever you like in your presentation.
2. Embed Microsoft Forms (Education or Business Only)
If you plan to send your PPT presentation to others—for example, if you're a trainer sending step-by-step instruction presentation, a teacher sending an independent learning task to your students, or a campaigner for your local councilor sending a persuasive PPT to constituents—you might want to embed a quiz, questionnaire, pole, or feedback survey in your presentation.
In PowerPoint, open the "Insert" tab on the ribbon, and in the Forms group, click "Forms". If you cannot see this option, you can add new buttons to the ribbon .
As at April 2024, this feature is only available for those using their work or school account. We're using a Microsoft 365 Personal account in the screenshot below, which is why the Forms icon is grayed out.
Then, a sidebar will appear on the right-hand side of your screen, where you can either choose a form you have already created or opt to craft a new form.
Now, you can share your PPT presentation with others , who can click the fields and submit their responses when they view the presentation.
3. Embed a Live Web Page
You could always screenshot a web page and paste that into your PPT, but that's not a very interactive addition to your presentation. Instead, you can embed a live web page into your PPT so that people with access to your presentation can interact actively with its contents.
To do this, we will need to add an add-in to our PPT account .
Add-ins are not always reliable or secure. Before installing an add-in to your Microsoft account, check that the author is a reputable company, and type the add-in's name into a search engine to read reviews and other users' experiences.
To embed a web page, add the Web Viewer add-in ( this is an add-in created by Microsoft ).
Go to the relevant slide and open the Web Viewer add-in. Then, copy and paste the secure URL into the field box, and remove https:// from the start of the address. In our example, we will add a selector wheel to our slide. Click "Preview" to see a sample of the web page's appearance in your presentation.
This is how ours will look.
When you or someone with access to your presentation views the slideshow, this web page will be live and interactive.
4. Add Links and Menus
As well as moving from one slide to the next through a keyboard action or mouse click, you can create links within your presentation to direct the audience to specific locations.
To create a link, right-click the outline of the clickable object, and click "Link."
In the Insert Hyperlink dialog box, click "Place In This Document," choose the landing destination, and click "OK."
What's more, to make it clear that an object is clickable, you can use action buttons. Open the "Insert" tab on the ribbon, click "Shape," and then choose an appropriate action button. Usefully, PPT will automatically prompt you to add a link to these shapes.
You might also want a menu that displays on every slide. Once you have created the menu, add the links using the method outlined above. Then, select all the items, press Ctrl+C (copy), and then use Ctrl+V to paste them in your other slides.
5. Add Clickable Images to Give More Info
Through PowerPoint's animations, you can give your viewer the power to choose what they see and when they see it. This works nicely whether you're planning to send your presentation to others to run through independently or whether you're presenting in front of a group and want your audience to decide which action they want to take.
Start by creating the objects that will be clickable (trigger) and the items that will appear (pop-up).
Then, select all the pop-ups together. When you click "Animations" on the ribbon and choose an appropriate animation for the effect you want to achieve, this will be applied to all objects you have selected.
The next step is to rename the triggers in your presentation. To do this, open the "Home" tab, and in the Editing group, click "Select", and then "Selection Pane."
With the Selection Pane open, select each trigger on your slide individually, and rename them in the Selection Pane, so that they can be easily linked to in the next step.
Finally, go back to the first pop-up. Open the "Animations" tab, and in the Advanced Animation group, click the "Trigger" drop-down arrow. Then, you can set the item to appear when a trigger is clicked in your presentation.
If you want your item to disappear when the trigger is clicked again, select the pop-up, click "Add Animation" in the Advanced Animation group, choose an Exit animation, and follow the same step to link that animation to the trigger button.
6. Add a Countdown Timer
A great way to get your audience to engage with your PPT presentation is to keep them on edge by adding a countdown timer. Whether you're leading a presentation and want to let your audience stop to discuss a topic, or running an online quiz with time-limit questions, having a countdown timer means your audience will keep their eye on your slide throughout.
To do this, you need to animate text boxes or shapes containing your countdown numbers. Choose and format a shape and type the highest number that your countdown clock will need. In our case, we're creating a 10-second timer.
Now, with your shape selected, open the "Animations" tab on the ribbon and click the animation drop-down arrow. Then, in the Exit menu, click "Disappear."
Open the Animation Pane, and click the drop-down arrow next to the animation you've just added. From there, choose "Timing."
Make sure "On Click" is selected in the Start menu, and change the Delay option to "1 second," before clicking "OK."
Then, with this shape still selected, press Ctrl+C (copy), and then Ctrl+V (paste). In the second box, type 9 . With the Animation Pane still open and this second shape selected, click the drop-down arrow and choose "Timing" again. Change the Start option to "After Previous," and make sure the Delay option is 1 second. Then, click "OK."
We can now use this second shape as our template, as when we copy and paste it again, the animations will also duplicate. With this second shape selected, press Ctrl+C and Ctrl+V, type 8 into the box, and continue to do the same until you get to 0 .
Next, remove the animations from the "0" box, as you don't want this to disappear. To do this, click the shape, and in the Animation Pane drop-down, click "Remove."
You now need to layer them in order. Right-click the box containing number 1, and click "Bring To Front." You will now see that box on the top. Do the same with the other numbers in ascending order.
Finally, you need to align the objects together. Click anywhere on your slide and press Ctrl+A. Then, in the Home tab on the ribbon, click "Arrange." First click "Align Center," and then bring the menu up again, so that you can click "Align Middle."
Press Ctrl+A again to select your timer, and you can then move your timer or copy and paste it elsewhere.
Press F5 to see the presentation in action, and when you get to the slide containing the timer, click anywhere on the slide to see your countdown timer in action!
Now that your PPT presentation is more interactive, make sure you've avoided these eight common presentational mistakes before you present your slides.
iPad Air 13-inch (M2) - Tech Specs
Year introduced: 2024
Size and Weight 2
Wi-Fi models
Width: 8.46 inches (214.9 mm)
Height: 11.04 inches (280.6 mm)
Depth: 0.24 inch (6.1 mm)
Weight: 1.36 pounds (617 grams)
Wi-Fi + Cellular models
Weight: 1.36 pounds (618 grams)
Buttons and Connectors
Smart Connector
Volume buttons
Magnetic connector
USB‑C connector
Top button/Touch ID sensor
USB‑C Charge Cable (1 meter)
20W USB‑C Power Adapter
Liquid Retina display
LED backlit Multi‑Touch display with IPS technology
2732-by-2048-pixel resolution at 264 ppi
Wide color (P3)
Fingerprint-resistant oleophobic coating
Fully laminated
Antireflective coating
600 nits brightness
Supports Apple Pencil Pro
Supports Apple Pencil (USB‑C)
Apple Pencil hover
The 13‑inch iPad Air display has rounded corners that follow a beautiful curved design, and these corners are within a standard rectangle. When measured diagonally as a rectangle, the 13‑inch iPad Air is 12.9 inches. Actual viewable area is less.
Apple M2 chip
8-core CPU with 4 performance cores and 4 efficiency cores
10-core GPU
16-core Neural Engine
Media Engine
Hardware-accelerated H.264 and HEVC
Video decode engine
Video encode engine
12MP Wide camera, ƒ/1.8 aperture
Digital zoom up to 5x
Five-element lens
Autofocus with Focus Pixels
Panorama (up to 63MP)
Smart HDR 4
Wide color capture for photos and Live Photos
Photo geotagging
Auto image stabilization
Image formats captured: HEIF and JPEG
Video Recording
4K video recording at 24 fps, 25 fps, 30 fps, or 60 fps
1080p HD video recording at 25 fps, 30 fps, or 60 fps
720p HD video recording at 30 fps
Slo‑mo video support for 1080p at 120 fps or 240 fps
Time‑lapse video with stabilization
Extended dynamic range for video up to 30 fps
Cinematic video stabilization (4K, 1080p, and 720p)
Continuous autofocus video
Playback zoom
Video formats captured: HEVC and H.264
Front Camera
Landscape 12MP Ultra Wide front camera
ƒ/2.4 aperture
Cinematic video stabilization (1080p and 720p)
Lens correction
Retina Flash with True Tone
Video Calling 3
FaceTime video
Center Stage
iPad to any FaceTime‑enabled device over Wi-Fi or cellular
Share experiences like movies, TV, music, and other apps in a FaceTime call with SharePlay
Screen sharing
Portrait mode in FaceTime video
Spatial Audio
Voice Isolation and Wide Spectrum microphone modes
Audio Calling 3
FaceTime audio
Landscape stereo speakers
Microphones
Dual microphones for calls, video recording, and audio recording
Cellular and Wireless
Wi-Fi 6E (802.11ax) with 2x2 MIMO 4
Simultaneous dual band
Bluetooth 5.3
5G (sub‑6 GHz) with 4x4 MIMO
Gigabit LTE with 4x4 MIMO
Model A2899 and A2903:
5G NR (Bands n1, n2, n3, n5, n7, n8, n12, n14, n20, n25, n26, n28, n29, n30, n38, n40, n41, n48, n66, n70, n71, n75, n76, n77, n78, n79) 4
FDD-LTE (Bands 1, 2, 3, 4, 5, 7, 8, 11, 12, 13, 14, 17, 18, 19, 20, 21, 25, 26, 28, 29, 30, 32, 66, 71)
TD-LTE (Bands 34, 38, 39, 40, 41, 42, 48)
UMTS/HSPA/HSPA+/DC‑HSDPA (850, 900, 1700/2100, 1900, 2100 MHz)
Data only 5
Wi-Fi calling 4
Learn more about cellular
For details on 5G and LTE support, contact your carrier and see https://www.apple.com/ipad/cellular/networks/
iPad Air uses eSIM technology and is not compatible with physical SIM cards.
Digital compass
iBeacon microlocation
Three‐axis gyro
Accelerometer
Ambient light sensor
Unlock iPad
Secure personal data within apps
Make purchases from the iTunes Store, App Store, and Apple Books
Pay with your iPad using Touch ID within apps and on the web
Send and receive money in Messages
Learn more about Apple Pay
Use your voice to send messages, set reminders, and more
Get proactive suggestions
Use hands-free
Listen and identify songs
Learn more about Siri
Charging and Expansion
USB-C port with support for:
DisplayPort
USB 3 (up to 10Gb/s)
Display Support
Supports full native resolution on the built-in display at millions of colors
Supports one external display with up to 6K resolution at 60Hz
Digital video output
Native DisplayPort output over USB‑C
VGA, HDMI, and DVI output supported using adapters (sold separately)
Video mirroring
Up to 4K AirPlay for mirroring, photos, and video out to Apple TV (2nd generation or later) or AirPlay‑enabled smart TV
Video mirroring and video out support through USB-C Digital AV Multiport Adapter and USB-C VGA Multiport Adapter (adapters sold separately)
Power and Battery 8
Built‐in 36.59‐watt‐hour rechargeable lithium‑polymer battery
Up to 10 hours of surfing the web on Wi‐Fi or watching video
Charging via power adapter or USB‑C to computer system
Up to 9 hours of surfing the web using cellular data network
Operating System
iPadOS comes with powerful features and built-in apps designed to take advantage of the unique capabilities of iPad.
Learn more about iPadOS
Accessibility
Built-in accessibility features supporting vision, mobility, hearing, and cognitive disabilities help you get the most out of your iPad.
Learn more about Accessibility
Features include:
Spoken Content
Voice Control
Switch Control
AssistiveTouch
Siri and Dictation
Type to Siri
Real-Time Text
Audio Descriptions
Subtitles and Closed Captioning
Live Captions
Built-in Apps
iTunes Store
Photo Booth
Voice Memos
Free Apps from Apple
Pages, Numbers, Keynote, iMovie, GarageBand, Clips, and Apple Store app are preinstalled on iPad.
Apple Store
Swift Playgrounds
System Requirements
Apple ID (required for some features)
Internet access 9
Syncing to a Mac or PC requires:
macOS Catalina 10.15 or later using the Finder
macOS High Sierra 10.13 through macOS Mojave 10.14.6 using iTunes 12.9 or later
Windows 10 or later using iTunes 12.12.10 or later (free download from apple.com/itunes/download )
Language support
Arabic, Bulgarian, Catalan, Chinese (Simplified, Traditional, Traditional – Hong Kong), Croatian, Czech, Danish, Dutch, English (Australia, India, UK, U.S.), Finnish, French (Canada, France), German, Greek, Hebrew, Hindi, Hungarian, Indonesian, Italian, Japanese, Kazakh, Korean, Malay, Norwegian, Polish, Portuguese (Brazil, Portugal), Romanian, Russian, Slovak, Spanish (Latin America, Spain, U.S.), Swedish, Thai, Turkish, Ukrainian, Vietnamese
QuickType keyboard support
Ainu, Akan, Albanian, Amharic, Apache (Western), Arabic, Arabic (Najdi), Armenian, Assamese, Assyrian, Azerbaijani, Bangla (Standard, Transliteration), Belarusian, Bodo, Bulgarian, Burmese, Cantonese – Traditional (Cangjie, Handwriting, Phonetic, Stroke, Sucheng), Catalan, Cherokee, Chickasaw, Chinese – Simplified (Handwriting, Pinyin – QWERTY, Pinyin – 10-Key, Shuangpin, Stroke), Chinese – Traditional (Cangjie, Handwriting, Pinyin – QWERTY, Pinyin – 10-Key, Shuangpin, Stroke, Sucheng, Zhuyin), Choctaw, Chuvash, Croatian, Czech, Danish, Dhivehi, Dogri, Dutch (Belgium, Netherlands), Dzongkha, Emoji, English (Australia, Canada, India, Japan, New Zealand, Singapore, South Africa, UK, U.S.), Estonian, Faroese, Filipino, Finnish, Flemish, French (Belgium, Canada, France, Switzerland), Fula (Adlam), Georgian, German (Austria, Germany, Switzerland), Greek, Gujarati (Standard, Transliteration), Hausa, Hawaiian, Hebrew, Hindi (Devanagari, Latin, Transliteration), Hmong (Pahawh), Hungarian, Icelandic, Igbo, Indonesian, Ingush, Irish Gaelic, Italian, Japanese (Handwriting, Kana, Romaji), Kabyle, Kannada (Standard, Transliteration), Kashmiri (Arabic, Devanagari), Kazakh, Khmer, Konkani (Devanagari), Korean (2-Set, 10-Key), Kurdish (Arabic, Latin), Kyrgyz, Lao, Latvian, Liangshan Yi, Lithuanian, Macedonian, Maithili, Malay (Arabic, Latin), Malayalam (Standard, Transliteration), Maltese, Mandaic, Manipuri (Bengali, Meetei Mayek), Māori, Marathi (Devanagari, Transliteration), Mi’kmaw, Mongolian, Navajo, Nepali, N’Ko, Norwegian (Bokmål, Nynorsk), Odia, Osage, Pashto, Persian, Persian (Afghanistan), Polish, Portuguese (Brazil, Portugal), Punjabi (Gurmukhi – QWERTY, Gurmukhi – Standard, Transliteration), Rejang, Rohingya, Romanian, Russian, Samoan, Sanskrit, Santali (Devanagari, Ol Chiki), Serbian (Cyrillic, Latin), Sindhi (Arabic, Devanagari), Sinhala, Slovak, Slovenian, Spanish (Latin America, Mexico, Spain), Swahili, Swedish, Tajik, Tamazight (Standard Moroccan), Tamil (Anjal, Tamil 99, Transliteration), Telugu (Standard, Transliteration), Thai, Tibetan, Tongan, Turkish, Turkmen, Ukrainian, Urdu (Standard, Transliteration), Uyghur, Uzbek (Arabic, Cyrillic, Latin), Vietnamese (Telex, VIQR, VNI), Wancho, Welsh, Wolastoqey, Yiddish, Yoruba
QuickType keyboard support with autocorrection
Arabic, Arabic (Najdi), Bangla, Bulgarian, Catalan, Cherokee, Chinese – Simplified (Pinyin – QWERTY), Chinese – Traditional (Pinyin – QWERTY), Chinese – Traditional (Zhuyin), Croatian, Czech, Danish, Dutch (Belgium, Netherlands), English (Australia, Canada, India, Japan, New Zealand, Singapore, South Africa, UK, U.S.), Estonian, Filipino, Finnish, French (Belgium), French (Canada), French (France), French (Switzerland), German (Austria), German (Germany), German (Switzerland), Greek, Gujarati, Hawaiian, Hebrew, Hindi (Devanagari, Latin, Transliteration), Hungarian, Icelandic, Indonesian, Irish Gaelic, Italian, Japanese (Kana), Japanese (Romaji), Korean (2-Set, 10-Key), Latvian, Lithuanian, Macedonian, Malay, Marathi, Norwegian (Bokmål), Norwegian (Nynorsk), Persian, Persian (Afghanistan), Polish, Portuguese (Brazil), Portuguese (Portugal), Punjabi, Romanian, Russian, Serbian (Cyrillic), Serbian (Latin), Slovak, Slovenian, Spanish (Latin America), Spanish (Mexico), Spanish (Spain), Swedish, Tamil (Anjal), Tamil (Tamil 99), Telugu, Thai, Turkish, Ukrainian, Urdu, Vietnamese (Telex)
QuickType keyboard support with predictive typing
Arabic, Arabic (Najdi), Cantonese (Traditional), Chinese (Simplified, Traditional), Dutch (Belgium, Netherlands), English (Australia, Canada, India, Japan, New Zealand, Singapore, South Africa, UK, U.S.), French (Belgium, Canada, France, Switzerland), German (Austria, Germany, Switzerland), Hebrew, Hindi (Devanagari, Latin), Italian, Japanese, Korean, Polish, Portuguese (Brazil, Portugal), Romanian, Russian, Spanish (Latin America, Mexico, Spain), Swedish, Thai, Turkish, Vietnamese
QuickType keyboard support with multilingual typing
Chinese (Simplified – Pinyin, Traditional – Pinyin), Dutch (Belgium, Netherlands), English (Australia, Canada, India, Japan, New Zealand, Singapore, South Africa, UK, U.S.), French (Belgium, Canada, France, Switzerland), German (Austria, Germany, Switzerland), Hebrew, Hindi (Latin), Italian, Japanese (Romaji), Polish, Portuguese (Brazil, Portugal), Romanian, Spanish (Latin America, Mexico, Spain), Turkish, Vietnamese
QuickType keyboard support with contextual suggestions
Arabic, Arabic (Najdi), Chinese (Simplified), Dutch (Belgium, Netherlands), English (Australia, Canada, India, Japan, New Zealand, Singapore, South Africa, UK, U.S.), French (Belgium, Canada, France, Switzerland), German (Austria, Germany, Switzerland), Hindi (Devanagari, Latin), Italian, Portuguese (Brazil), Russian, Spanish (Latin America, Mexico, Spain), Swedish, Turkish, Vietnamese
QuickPath keyboard support
Arabic, Chinese (Simplified – Pinyin – QWERTY, Traditional – Pinyin – QWERTY), Dutch (Belgium, Netherlands), English (Australia, Canada, India, Japan, New Zealand, Singapore, South Africa, UK, U.S.), French (Belgium, Canada, France, Switzerland), German (Austria, Germany, Switzerland), Hebrew, Italian, Korean, Polish, Portuguese (Brazil, Portugal), Romanian, Spanish (Latin America, Mexico, Spain), Swedish, Vietnamese
Siri languages
Arabic (Saudi Arabia, United Arab Emirates), Cantonese (China mainland, Hong Kong), Danish (Denmark), Dutch (Belgium, Netherlands), English (Australia, Canada, India, Ireland, New Zealand, Singapore, South Africa, UK, U.S.), Finnish (Finland), French (Belgium, Canada, France, Switzerland), German (Austria, Germany, Switzerland), Hebrew (Israel), Italian (Italy, Switzerland), Japanese (Japan), Korean (Republic of Korea), Malay (Malaysia), Mandarin Chinese (China mainland, Taiwan), Norwegian (Norway), Portuguese (Brazil), Russian (Russia), Spanish (Chile, Mexico, Spain, U.S.), Swedish (Sweden), Thai (Thailand), Turkish (Türkiye)
Dictation languages
Arabic (Kuwait, Qatar, Saudi Arabia, United Arab Emirates), Cantonese (China mainland, Hong Kong), Mandarin Chinese (China mainland, Taiwan), Catalan, Croatian, Czech, Danish, Dutch (Belgium, Netherlands), English (Australia, Canada, India, Ireland, Malaysia, New Zealand, Philippines, Saudi Arabia, Singapore, South Africa, United Arab Emirates, UK, U.S.), Finnish, French (Belgium, Canada, France, Luxembourg, Switzerland), German (Austria, Germany, Switzerland), Greek, Hebrew, Hindi, Hungarian, Indonesian, Italian (Italy, Switzerland), Japanese, Korean, Malay, Norwegian (Bokmål), Polish, Portuguese (Brazil, Portugal), Romanian, Russian, Shanghainese (China mainland), Slovak, Spanish (Latin America, Mexico, Spain, U.S.), Swedish, Turkish, Thai, Ukrainian, Vietnamese
Monolingual dictionary support
Bulgarian, Catalan, Chinese (Simplified, Traditional, Traditional – Hong Kong), Danish, Dutch, English (UK, U.S.), French, German, Greek, Hebrew, Hindi, Italian, Japanese, Korean, Malay, Norwegian, Polish, Portuguese, Punjabi, Romanian, Russian, Spanish, Swedish, Thai, Turkish
Idiom dictionary support
Cantonese – English, Chinese (Simplified) – English, Chinese (Traditional) – English
Bilingual dictionary support
Arabic – English, Bangla – English, Chinese (Simplified) – English, Chinese (Traditional) – English, Chinese (Simplified) – Japanese, Czech – English, Dutch – English, Finnish – English, French – English, French – German, German – English, Greek – English, Gujarati – English, Hindi – English, Hungarian – English, Indonesian – English, Italian – English, Japanese – English, Korean – English, Malay – English, Polish – English, Portuguese – English, Russian – English, Spanish – English, Swedish – English, Tamil – English, Telugu – English, Thai – English, Urdu – English, Vietnamese – English
Chinese (Simplified), English (UK, U.S.)
Spell check
Arabic, Arabic (Najdi), Bulgarian, Czech, Danish, Dutch (Belgium, Netherlands), English (Australia, Canada, India, Japan, New Zealand, Singapore, South Africa, UK, U.S.), French (Belgium, Canada, France, Switzerland), German (Austria, Germany, Switzerland), Greek, Finnish, Hindi (Devanagari), Hungarian, Irish Gaelic, Italian, Norwegian (Bokmål, Nynorsk), Polish, Portuguese (Brazil, Portugal), Punjabi, Romanian, Russian, Spanish (Latin America, Mexico, Spain), Swedish, Telugu, Turkish, Vietnamese
Apple Pay supported regions
Argentina, Armenia, Australia, Austria, Azerbaijan, Bahrain, Belarus, Belgium, Brazil, Bulgaria, Canada, China mainland, 10 Colombia, Costa Rica, Croatia, Cyprus, Czech Republic, Denmark, El Salvador, Estonia, Faroe Islands, Finland, France, Georgia, Germany, Greece, Greenland, Guatemala, Guernsey, Honduras, Hong Kong, Hungary, Iceland, Ireland, Isle of Man, Israel, Italy, Japan, Jersey, Jordan, Kazakhstan, Kuwait, Latvia, Liechtenstein, Lithuania, Luxembourg, Macao, Malaysia, Malta, Mexico, Moldova, Monaco, Montenegro, Morocco, Netherlands, New Zealand, Norway, Palestine, Panama, Peru, Poland, Portugal, Qatar, Romania, San Marino, Saudi Arabia, Serbia, Singapore, Slovakia, Slovenia, South Africa, South Korea, Spain, Sweden, Switzerland, Taiwan, UK, Ukraine, United Arab Emirates, U.S., Vatican City, Vietnam
Video Playback
Supported formats include HEVC, H.264, and ProRes
Supports Dolby Vision and HDR10 content
Audio Playback
Supported formats include AAC, MP3, Apple Lossless, FLAC, Dolby Digital, Dolby Digital Plus, and Dolby Atmos
Spatial Audio playback
User-configurable maximum volume limit
Mail Attachment Support
Viewable document types
.jpg, .tiff, .gif (images); .doc and .docx (Microsoft Word); .htm and .html (web pages); .key (Keynote); .numbers (Numbers); .pages (Pages); .pdf (Preview and Adobe Acrobat); .ppt and .pptx (Microsoft PowerPoint); .txt (text); .rtf (rich text format); .vcf (contact information); .xls and .xlsx (Microsoft Excel); .zip; .ics; .usdz; .pkpass (Wallet)
Environmental Requirements
Operating ambient temperature:
32° to 95° F (0° to 35° C)
Nonoperating temperature:
−4° to 113° F (−20° to 45° C)
Relative humidity:
5% to 95% noncondensing
Operating altitude:
tested up to 10,000 feet (3000 m)
iPad Air and the Environment
iPad Air is designed to reduce environmental impact: 11
See the iPad Air Product Environmental Report (PDF)
Progress toward Apple 2030
More than 20% recycled or renewable content 12
Over 30% of manufacturing electricity sourced from clean electricity 13
40% emissions reduction against baseline 14
See Apple’s commitment
100% recycled aluminum in the enclosure
100% recycled rare earth elements in all magnets, representing 99% of the rare earth elements in the device
100% recycled tin in the solder of multiple printed circuit boards
100% recycled gold in the plating of multiple printed circuit boards
100% recycled copper foil in multiple printed circuit boards
35% or more recycled plastic in multiple components
ENERGY STAR® certified 15
100% fiber-based packaging 16
40% recycled content in fiber packaging
No established final assembly sites generate waste sent to landfill as part of Apple’s Zero Waste Program
Smarter chemistry 17
Arsenic-free display glass
Mercury-, BFR-, and PVC-free
Available space is less and varies due to many factors. Storage capacity subject to change based on software version, settings, and iPad model. 1GB = 1 billion bytes; 1TB = 1 trillion bytes. Actual formatted capacity less.
Size and weight vary by configuration and manufacturing process.
FaceTime calling requires a FaceTime-enabled device for the caller and recipient and a Wi-Fi connection. Availability over a cellular network depends on carrier policies; data charges may apply.
Wi‑Fi 6E available in countries and regions where supported. Data plan required. 5G, Gigabit LTE, and Wi-Fi calling are available in select markets and through select carriers. Speeds are based on theoretical throughput and vary based on site conditions and carrier. For details on 5G and LTE support, contact your carrier and see apple.com/ipad/cellular .
Cellular data plan is sold separately. The model you purchase is configured to work with a particular cellular network technology. Check with your carrier for compatibility and cellular data plan availability.
Not all carriers support eSIM. See your carrier for more details. For Model A2900 and A2904, contact China Unicom for more details.
Siri may not be available in all languages or in all areas, and features may vary by area. Internet access required. Cellular data charges may apply.
Testing conducted by Apple in March and April 2024 using preproduction iPad Air 11‑inch (M2) and iPad Air 13‑inch (M2) units. Testing consisted of full battery discharge while performing each of the following tasks: video playback and internet browsing using Wi‑Fi or cellular data network (cellular models subscribed to LTE and 5G carrier networks). Video content was a repeated 2‑hour 23‑minute movie purchased from the iTunes Store. Internet over Wi‑Fi and cellular data network tests were conducted using dedicated web servers, browsing snapshot versions of 20 popular web pages. All settings were default except: Wi‑Fi was associated with a network (except for internet browsing over cellular data network); the Wi‑Fi feature Ask to Join Networks and Auto-Brightness were turned off; Brightness was set to 50%; and WPA2 encryption was enabled. Battery life depends on device settings, usage, network, and many other factors. Battery tests are conducted using specific iPad units; actual results may vary.
Wireless broadband recommended; fees may apply.
In China mainland, you can use Apple Pay on the web in Safari only on compatible iPhone and iPad models using iOS 11.2 or later.
Data accurate as of product launch.
Product recycled or renewable content is the mass of certified recycled material relative to the overall mass of the device, not including packaging or in‑box accessories.
We estimate the percentage of electricity-related emissions in our manufacturing that is sourced from clean electricity by attributing to our carbon model clean energy procured by our suppliers in the prior fiscal year, based on the supplier manufacturing allocations at time of product launch. Included in this number is only clean electricity that Apple or its suppliers have procured as part of Apple’s Supplier Clean Energy Program.
Carbon reductions are calculated against a baseline scenario: 1) No use of clean electricity for manufacturing or product use, beyond what is already available on the latest modeled grid (based on regional emissions factors). 2) Apple’s carbon intensity of key materials as of 2015 (our baseline year for our 2030 product carbon neutrality goal). Carbon intensity of materials reflects use of recycled content and production technology. 3) Apple’s average mix of transportation modes (air, rail, ocean, ground) by product line across three years (fiscal years 2017 to 2019) to best capture the baseline transportation emissions of our products.
ENERGY STAR and the ENERGY STAR mark are registered trademarks owned by the U.S. Environmental Protection Agency.
Based on retail packaging as shipped by Apple. Breakdown of U.S. retail packaging by weight. Adhesives, inks, and coatings are excluded from our calculations of plastic content and packaging weight.
Apple’s Regulated Substances Specification describes Apple’s restrictions on the use of certain chemical substances in materials in Apple products, accessories, manufacturing processes, and packaging used for shipping products to Apple’s end-customers. Restrictions are derived from international laws or directives, regulatory agencies, eco-label requirements, environmental standards, and Apple policies. Every Apple product is free of PVC and phthalates except for AC power cords in India, Thailand (for two-prong AC power cords), and South Korea, where we continue to seek government approval for our PVC and phthalates replacement. Apple products comply with the European Union Directive 2011/65/EU and its amendments, including exemptions for the use of lead such as high-temperature solder. Apple is working to phase out the use of these exempted substances for new products where technically possible.
Some features may not be available for all countries or all areas. View complete list .
- Apple Watch
- Accessories
- Digital Magazine – Subscribe
- Digital Magazine – Info
- Smart Answers
- 11th-gen iPad
- New AirPods
- Best Mac antivirus
- Best Mac VPN
When you purchase through links in our articles, we may earn a small commission. This doesn't affect our editorial independence .
Microsoft Office’s apps like Word, Excel, and PowerPoint are now less than $25

Whether you’re a student, professional, or just a casual user, you’ve likely heard of Microsoft Office. Why? Because it’s the world’s leading productivity suite.
If you’re looking to invest in lifelong tools or want to update an older device, this deal for Microsoft Office 2019 may interest you. Through May 22, lifetime subscriptions for Mac and Windows are less than $25.
Although you won’t be getting the latest version of Microsoft Office, the 2019 edition may be sufficient for your needs, especially if you have an older or refurbished laptop or computer.
Upon your one-time purchase, you’ll get the following apps: the 2019 editions of Word, Excel, PowerPoint, Outlook, and OneNote. Create home or professional budgeting sheets with Excel , crisp slide decks with PowerPoint, or stay on top of email correspondence with OneNote.
There are additional apps you’ll get depending on your device. For instance, Mac users will get Teams Classic 2019, an app designed to support virtual collaboration via video calls. Meanwhile, Windows users will gain the 2019 iterations of Access and Publisher.
Just be sure that your device meets the system requirements for smooth installation.
You have until May 22 at 11:59 PM Pacific to grab:
- Lifetime access to Microsoft Office Home and Business 2019 for Mac for just $24.97.
- Lifetime access to Microsoft Office Professional Plus 2019 for Windows for just $24.97.
Microsoft Office 2019 for Mac and Windows
Only $24.97 at Macworld
StackSocial prices subject to change.
Twórz kreatywne slajdy w programie WPS Presentation
Wps presentation to darmowy edytor plików powerpointa umożliwiający łatwe tworzenie, edytowanie, zapisywanie i udostępnianie slajdów. bezproblemowo obsługuje prezentacje powerpointa na wielu platformach przy pełnej kompatybilności z pakietem microsoft office. dostępny na urządzeniach z systemem windows, mac, linux, android i ios..

Zobacz, jak łatwo to zrobić za pomocą programu WPS Presentation
Opowiadaj najlepsze historie za pomocą profesjonalnych szablonów, odkryj obszerną kolekcję ponad 100 000 profesjonalnych i pięknych szablonów w wps office., ulepsz swoje możliwości w zakresie dostarczania fascynujących prezentacji, które zrobią wrażenie i zainspirują odbiorców. wejdź na scenę pewnym krokiem i spraw, aby wszyscy zobaczyli twój przekaz.

Przyjazny interfejs użytkownika, bezpłatna alternatywa dla Microsoft PowerPoint
Rozpocznij płynną i intuicyjną prezentację dzięki przyjaznemu dla użytkownika interfejsowi wps presentation, starannie zaprojektowanemu na wzór programu powerpoint., odkryj wygodę i prostotę nawigacji, dzięki którym możesz bez wysiłku tworzyć, edytować i formatować slajdy z całkowitą pewnością..

Kompatybilny z plikami .PPT, .PPTX
Program wps presentation jest zgodny z 20 formatami plików, w tym .ppt, .pptx, .pps, .pot, .pptm, .potx, .potm i innymi., dzięki programowi wps presentation z łatwością zachowasz integralność slajdów, animacji, formatowania, wykresów i innych elementów, zapewniając bezproblemową zgodność plików w trakcie całej pracy..

Zarządzanie plikami i udostępnianie w dowolnym miejscu
Wps presentation płynnie synchronizuje pliki programu powerpoint na różnych urządzeniach: windows, mac, linux, android, iphone, ipad i wiele platform chmurowych., możesz udostępniać pliki powerpointa innym osobom i współpracować w czasie rzeczywistym oraz śledzić zmiany, wersje i współautorów, aby zapewnić płynną pracę zespołową podczas prezentacji..

Popularne funkcje programu WPS Presentation

Narzędzia do prezentacji WPS Office oferują zbiorcze ustawienia czcionek, niestandardowe formaty tekstu i łatwe wstawianie obrazów do wielu slajdów. Twórz oszałamiające i wciągające prezentacje bez wysiłku dzięki tym zaawansowanym funkcjom
Zobacz, co mają do powiedzenia nasi użytkownicy

Uznany za wiodący produkt

Ocena redakcji: Doskonały

Google Play
Wybór redakcji i najlepszy deweloper

Program WPS Presentation działa bez żadnych problemów! Jest równie dobry jak Microsoft PowerPoint, a zmiany w dokumencie są szybko widoczne.

WPS Office to solidny pakiet biurowy, który stanowi dobrą alternatywę dla pakietu Microsoft Office przy zerowych kosztach!

Przygotowuję prezentacje tak jak chcę i łatwo je konwertuję do formatu pdf. Polecam również moim uczniom korzystanie z WPS — wszyscy wydają się być bardzo zadowoleni.
Bezpłatny, kompleksowy pakiet biurowy
Wps office oferuje więcej niż tylko program presentation do bezpłatnej edycji slajdów programu powerpoint. posiada także zaawansowane narzędzia do dokumentów tekstowych worda, arkuszy kalkulacyjnych excela, prezentacji powerpointa i dokumentów pdf, umożliwiając bezproblemową obsługę szerokiej gamy formatów plików na urządzeniach z systemem windows, mac, linux, android i ios..

Co jeszcze mamy ciekawego
- Często zadawane pytania:
- Tak, korzystanie z programu WPS Presentation jest bezpłatne. Bezpłatna wersja WPS Presentation obejmuje większość funkcji i zapewnia bezpłatne szablony odpowiednie do codziennych potrzeb związanych z prezentacjami.
- Jednak aby uzyskać dostęp do szablonów premium i zaawansowanych funkcji, takich jak OCR (optyczne rozpoznawanie znaków), wymagana jest subskrypcja premium. Subskrypcja premium oferuje dodatkową funkcjonalność i narzędzia poprawiające jakość tworzenia prezentacji.
- Tak, program WPS Presentation został zaprojektowany tak, aby był przyjazny dla użytkownika i łatwy w dostosowaniu. Jego interfejs bardzo przypomina program Microsoft PowerPoint, umożliwiając bezproblemową edycję istniejących prezentacji lub tworzenie nowych. Intuicyjne narzędzia i znajomy układ zapewniają płynną i prostą obsługę programu WPS Presentation przez użytkownika.
- Tak, możesz zapisywać prezentacje i inne pliki z WPS Presentation bezpośrednio na Dysku Google. WPS Presentation zapewnia bezproblemową integrację z Dyskiem Google, umożliwiając wygodne zapisywanie i synchronizację plików z usługą przechowywania w chmurze. Funkcja ta umożliwia dostęp do prezentacji z dowolnego urządzenia i efektywną współpracę z innymi osobami.
- Podstawowe różnice między programami WPS Presentation a Microsoft PowerPoint to koszt i dostępność. Program WPS Presentation jest dostępny bezpłatnie, natomiast program Microsoft PowerPoint często wymaga kosztownej subskrypcji lub zakupu.
- WPS Presentation zapewnia bezproblemową integrację w chmurze z usługami takimi jak Dysk Google, ułatwiając wygodne przechowywanie prezentacji, synchronizację i współpracę.
- Co więcej, WPS Presentation nie tylko działa na urządzeniach z systemami Windows, Mac, Android i iOS, tak samo jak Microsoft PowerPoint, ale także jest kompatybilny z systemem Linux, którego Microsoft PowerPoint nie wspiera.
- Gorące tematy:
Rozpocznij pracę z programem WPS Presentation, aby edytować PowerPoint za darmo!

We are using cookies to give you the best experience on our website. You can view our Privacy Policy and information regarding our use of cookies here for more information about cookies .

Apple iPad Air 11" MUWC3LL/A (Mid 2024) - Space Gray 11" Liquid Retina Display; Apple M2 8-Core CPU; 128GB Storage; 10-Core GPU

Key Features
- Apple M2 8-Core CPU
- 11" 2360 x 1640 Liquid Retina Display
- 128GB Storage
- WiFi Only, WiFI 6 (802.11ax), Bluetooth 5.3
Color: Space Gray
Blue Space Gray
Storage: 128GB
128GB 256GB
Protect and Support Info about service plan
Free 60 Day Tech Support
We offer a wide variety of solutions and services to support your new tech:
- All products come with 60 days of Complimentary Tech Support
- For new PowerSpec Computers, Complimentary Tech Support extends to 1 Year from purchase
- For additional coverage and peace of mind, consider our service and replacement plans
- For help getting set up, or if future issues arise, visit our Knowledge Bar technicians in store or contact our remote Tech Support services.
- Our professional technicians can help find the right solution for you backed by our Service Guarantee.
Original price $599.99 Save $60.00
Limit 1 per household
PICK UP IN 18 MINUTES
- CA - Tustin (in stock)
- CO - Denver (out of stock)
- GA - Duluth (out of stock)
- GA - Marietta (out of stock)
- IL - Chicago (in stock)
- IL - Westmont (out of stock)
- IN - Indianapolis (in stock)
- KS - Overland Park (in stock)
- MA - Cambridge (out of stock)
- MD - Rockville (out of stock)
- MD - Parkville (out of stock)
- MI - Madison Heights (out of stock)
- MN - St. Louis Park (out of stock)
- MO - Brentwood (out of stock)
- NC - Charlotte (out of stock)
- NJ - North Jersey (out of stock)
- NY - Westbury (in stock)
- NY - Brooklyn (out of stock)
- NY - Flushing (out of stock)
- NY - Yonkers (in stock)
- OH - Columbus (in stock)
- OH - Mayfield Heights (out of stock)
- OH - Sharonville (in stock)
- PA - St. Davids (out of stock)
- TX - Houston (out of stock)
- TX - Dallas (out of stock)
- VA - Fairfax (out of stock)
Frequently Bought Together

Endust Screen & Electronics Cleaning Wipes - 70 Wipes
Todays price $6.99

Logitech Combo Touch for iPad Air (4th Gen) - Oxford Gray
Original price $199.99
Todays price $169.99

Apple Pencil (2nd Generation)
Original price $129.99
Todays price $99.99

Anker 322 USB-C to USB-C Cable (6ft Braided)
Todays price $14.99

Anker 326 Power Bank
Todays price $39.99

- 11" Liquid Retina Display
- 10-Core GPU
- Bluetooth 5.3
The redesigned 11-inch iPad Air is supercharged by the incredibly fast Apple M2 chip. It features a stunning Liquid Retina display, a new landscape camera perfect for FaceTime and video calls, and superfast Wi-Fi 6E. And it works with the new Apple Pencil Pro and Magic Keyboard, so you can multitask, study, work, play, and create from anywhere. The gorgeous Liquid Retina display features advanced technologies like P3 wide color, True Tone, and ultralow reflectivity, which make everything look stunning. The M2 chip lets you multitask smoothly between powerful apps and play graphics-intensive games. And with all-day battery life, you can keep working and playing wherever you go. Choose up to 1TB of storage depending on the room you need for apps, music, movies, and more. iPadOS makes iPad more productive, intuitive, and versatile. With iPadOS, run multiple apps at once, use Apple Pencil to write in any text field with Scribble, and edit and share photos. Stage Manager makes multitasking easy with resizable, overlapping apps and external display support. iPad Air comes with essential apps like Safari, Messages, and Keynote, with over a million more apps available on the App Store. Apple Pencil Pro transforms iPad Air into an immersive drawing canvas and the worlds best note-taking device. Apple Pencil (USB-C) is also compatible with iPad Air. Magic Keyboard features a great typing experience and a built-in trackpad, while doubling as a protective cover for iPad. Accessories sold separately. iPad Air features a landscape 12MP Ultra Wide front camera that supports Center Stage for videoconferencing or epic Portrait mode selfies. The 12MP Wide back camera with True Tone flash is perfect for capturing photos and 4K videos. And get great sound with dual studio-quality mics and landscape stereo speakers. Wi-Fi 6E gives you fast wireless connections. Work from almost anywhere with quick transfers of photos, documents, and large video files. Connect to external displays and more with the USB-C connector. Touch ID is built into the top button, so you can use your fingerprint to unlock your iPad Air, sign in to apps, and make payments securely with Apple Pay.
Questions & Answers
Customers also viewed.

Apple iPad 10.2" 9th Generation MK2K3LL/A (Late 2021) - Space Gray; 10.2" Retina Display with True Tone;...
Original price $329.99
Todays price $296.99

Apple iPad Pro 11" MVV83LL/A (Mid 2024) - Space Black; 11" Ultra Retina XDR Display; Apple M4 9-Core CPU;...
Original price $999.99
Todays price $899.99

Apple iPad Pro 13" MVX23LL/A (Mid 2024) - Space Black; 13" Ultra Retina XDR Display; Apple M4 9-Core CPU;...
Original price $1,299.99
Todays price $1,169.99

Apple iPad 10.9" 10th Generation MPQ13LL/A (Late 2022) - Blue; 10.9" Liquid Retina Display with True...
Original price $349.99
Todays price $314.99

Apple iPad 9.7" 6th Generation (Refurbished) MR7F2LL/A (Early 2018) - Space Gray; 9.7" Retina Display;...
Original price $179.99
Todays price $129.99

Apple iPad Pro 13" MVX43LL/A (Mid 2024) - Space Black; 13" Ultra Retina XDR Display; Apple M4 9-Core CPU;...
Original price $1,499.99
Todays price $1,349.99

Apple iPad 10.9" 10th Generation MPQ23LL/A (Late 2022) - Yellow; 10.9" Liquid Retina Display with True...

Apple iPad 10.9" 10th Generation MPQ83LL/A (Late 2022) - Silver; 10.9" Liquid Retina Display with True...
Original price $499.99
Todays price $449.99

Apple iPad Air 13" MV273LL/A (Mid 2024) - Space Gray; 13" Liquid Retina Display; Apple M2 8-Core CPU;...
Original price $799.99
Todays price $719.99

Apple iPad Air 11" MUWC3LL/A (Mid 2024) - Space Gray; 11" Liquid Retina Display; Apple M2 8-Core CPU;...
Original price $599.99
Todays price $539.99

Apple iPad Pro 11" MVVC3LL/A (Mid 2024) - Space Black; 11" Ultra Retina XDR Display; Apple M4 9-Core CPU;...
Original price $1,199.99
Todays price $1,079.99

Apple iPad 10.9" 10th Generation MPQ03LL/A (Late 2022) - Silver; 10.9" Liquid Retina Display with True...

Apple iPad 10.2" 9th Generation MK2L3LL/A (Late 2021) - Silver; 10.2" Retina Display with True Tone; A13...

Apple iPad Air 10.9" 5th Generation MM9E3LL/A (Early 2022) - Blue; 10.9" Liquid Retina Display with True...
Todays price $499.99

Apple iPad Air 11" MUWD3LL/A (Mid 2024) - Blue; 11" Liquid Retina Display; Apple M2 8-Core CPU; 128GB...

Apple iPad mini 8.3" 6th Generation MK7R3LL/A (Late 2021) - Purple; 8.3" Liquid Retina Display with True...

Apple iPad Pro 12.9" 5th Generation MHNT3LL/A (Mid 2021) - Silver; 12.9" Liquid Retina XDR Display with...
Todays price $779.99

Apple iPad 10.2" 9th Generation MK663LL/A (Late 2021) - Space Gray; 10.2" Retina Display with True Tone;...
Original price $459.99
Todays price $379.99

Apple iPad Air 10.9" 5th Generation MM9C3LL/A (Early 2022) - Space Gray; 10.9" Liquid Retina Display with...

Apple iPad Air 13" MV283LL/A (Mid 2024) - Blue; 13" Liquid Retina Display; Apple M2 8-Core CPU; 128GB...

Apple iPad 10.9" 10th Generation MPQ93LL/A (Late 2022) - Blue; 10.9" Liquid Retina Display with True...
Warranty & Support
Vendor warranty:.
- Parts: 1 Year Limited
- Labor: 1 Year Limited
Vendor Support:
- Main Website: http://www.apple.com/
- Support Website: http://www.apple.com/support/
- Support Phone #: 800-275-2273
Micro Center 15 Day Return Policy
We guarantee your satisfaction on every product we sell with a full refund - and you won't even need a receipt.* We want you to be satisfied with your Micro Center purchase. However, if you need help or need to return an item, we're here for you!
If an item you have purchased from us is not working as expected, please visit one of our in-store Knowledge Experts for free help, where they can solve your problem or even exchange the item for a product that better suits your needs.
If you need to return an item, simply bring it back to any Micro Center store for a full refund or exchange.
*If you are a Micro Center Insider or if you have provided us with validated contact information (name, address, email address), you won't even need your receipt.
Accelerate Your Returns with Micro Center's Online Return Check-in!
Desktop / Notebook Computers, Tablets, Processors, Motherboards, Digital Cameras, Projectors, Cell Phones, 3D Printers, 3D Scanners, drones, and specific Branded Game Simulator Accessories may be returned within 15 days of purchase. All other products may be returned within 30 days of purchase. Merchandise must be in new condition, with original carton/UPC, and all packaging/accessories/materials. If you need to return software, a game or a movie, remember that you may not retain any copies - it's not legal, and it's not nice.
VR headsets and Headphones (including AirPods, earbuds, and over-the-ear products) are only eligible for return if deemed defective.
Aerial Drones Micro Center is happy to honor its customary 15-day return policy for Aerial Drone returns due to product defect or customer dissatisfaction. Unfortunately, we cannot accept returns with damage due to pilot error. So let’s be careful out there!
As of December 21, 2015 all drones, regardless of purchase date, between 0.55 lb (8.82 oz, 250 g, 0.25 kg) and 55 lb take-off weight are required by the FAA to be registered for outdoor use. Details regarding registration can be found at: https://www.faa.gov/uas/getting_started/
Micro Center Support:
Walk-in tech support.
As a service to our customers, Micro Center offers in store technical support. Stop in any of our store locations during regular business hours, and our expert staff will answer your computer questions or help you with things like:

- Hardware troubleshooting
- Wireless and wired networking
- Software configuration
- Tips and tricks
Support for Micro Center purchases
If you need help with products purchased from Micro Center, please contact one of our knowledgeable tech support reps using the online chat button below, or visit our Tech Support page for additional options and helpful information.
Chat with Tech Support

Tech Support Hours
- Monday - Friday 9 am to 12 midnight
- Saturday 10 am to 12 midnight
- Sunday 11 am to 9 pm
- Eastern Time
- * excluding posted holiday hours
Free assistance is available for the first 60 days on new purchases, excluding internal hardware installations or networking support. For new PowerSpec computers, this free assistance is extended to one year from the date of purchase. Your invoice reference number will be required for free assistance.
Ask your Support Technician about additional options available through our exclusive Priority Care Program .
Tech Support accepts the following credit cards: VISA; MasterCard; Discover
Support Resources
- 800-275-2273
Micro Center Community
- Technical Support Q & A
Available for In-Store Pickup Only.
Sign in for the best experience
Access helpful features and personalize your experience - Sign in or create an account now
- Draft and add content
- Rewrite text
- Chat with Copilot
- Create a summary
- Copilot in Word on mobile devices
- Frequently asked questions
- Create a new presentation
- Add a slide or image
- Summarize your presentation
- Organize your presentation
- Use your organization's branding
- Copilot in PowerPoint for mobile devices
- Draft an Outlook email message
- Summarize an email thread
- Suggested drafts in Outlook
- Email coaching
- Get started with Copilot in Excel
- Identify insights
- Highlight, sort, and filter your data
- Generate formula columns
- Summarize your OneNote notes
- Create a to-do list and tasks
- Create project plans in OneNote
Create a new presentation with Copilot in PowerPoint
Note: This feature is available to customers with a Copilot for Microsoft 365 license or Copilot Pro license.
Create a new presentation in PowerPoint.

Select Send . Copilot will draft a presentation for you!
Edit the presentation to suit your needs, ask Copilot to add a slide , or start over with a new presentation and refine your prompt to include more specifics. For example, "Create a presentation about hybrid meeting best practices that includes examples for team building.”
Create a presentation with a template
Note: This feature is only available to customers with a Copilot for Microsoft 365 (work) license. It is not currently available to customers with a Copilot Pro (home) license.
Copilot can use your existing themes and templates to create a presentation. Learn more about making your presentations look great with Copilot in PowerPoint .

Enter your prompt or select Create presentation from file to create a first draft of your presentation using your theme or template.

Edit the presentation to suit your needs, ask Copilot to add a slide , organize your presentation, or add images.
Create a presentation from a file with Copilot
Note: This feature is only available to customers with a Copilot for Microsoft 365 (work) license. It is not currently available to customers with a Copilot Pro (home) license.

With Copilot in PowerPoint, you can create a presentation from an existing Word document. Point Copilot in PowerPoint to your Word document, and it will generate slides, apply layouts, create speaker notes, and choose a theme for you.

Select the Word document you want from the picker that appears. If you don't see the document you want, start typing any part of the filename to search for it.
Note: If the file picker doesn't appear type a front slash (/) to cause it to pop up.
Best practices when creating a presentation from a Word document
Leverage word styles to help copilot understand the structure of your document.
By using Styles in Word to organize your document, Copilot will better understand your document structure and how to break it up into slides of a presentation. Structure your content under Titles and Headers when appropriate and Copilot will do its best to generate a presentation for you.
Include images that are relevant to your presentation
When creating a presentation, Copilot will try to incorporate the images in your Word document. If you have images that you would like to be brought over to your presentation, be sure to include them in your Word document.
Start with your organization’s template
If your organization uses a standard template, start with this file before creating a presentation with Copilot. Starting with a template will let Copilot know that you would like to retain the presentation’s theme and design. Copilot will use existing layouts to build a presentation for you. Learn more about Making your presentations look great with Copilot in PowerPoint .
Tip: Copilot works best with Word documents that are less than 24 MB.
Welcome to Copilot in PowerPoint
Frequently Asked Questions about Copilot in PowerPoint
Where can I get Microsoft Copilot?
Copilot Lab - Start your Copilot journey

Need more help?
Want more options.
Explore subscription benefits, browse training courses, learn how to secure your device, and more.

Microsoft 365 subscription benefits

Microsoft 365 training

Microsoft security

Accessibility center
Communities help you ask and answer questions, give feedback, and hear from experts with rich knowledge.

Ask the Microsoft Community

Microsoft Tech Community

Windows Insiders
Microsoft 365 Insiders
Find solutions to common problems or get help from a support agent.

Online support
Was this information helpful?
Thank you for your feedback.
IMAGES
VIDEO
COMMENTS
Step by Step Tutorial on How to Play a PowerPoint Presentation on an iPad. Playing a PowerPoint presentation on an iPad involves a few simple steps that will get your slides up and ready for viewing. Let's dive in! Step 1: Download the PowerPoint app. First thing's first - download the PowerPoint app from the Apple App Store.
Design and edit slides. Create professional slide layouts with PowerPoint Designer. Add pictures or videos. Video and audio file formats supported in PowerPoint. Add animation effects to your presentation. Delete a slide. Apply a slide layout.
Pricing. PowerPoint for iOS is free from the App Store and allows you to view PowerPoint files from anywhere. If you want to edit or create presentations from the iPad though, you're going to need to subscribe to Office 365, which runs $6.99/month or $70/year for individuals on up to 5 devices. An Office 365 subscription comes with the full ...
Download Microsoft PowerPoint now and get the best way to create, edit and share slideshows and presentations from your iPhone or iPad. To create or edit documents, sign in with a free Microsoft account on devices with a screen size smaller than 10.1 inches. Unlock the full Microsoft Office experience with a qualifying Microsoft 365 ...
You tap the File button to print in PowerPoint for iPad. Watch this video to learn how. At this time, you can only print to an AirPrint compatible printer. Run a slideshow in PowerPoint for iPad. (You are here!) There are some special finger gestures you can use to advance, go back, and end a slideshow. You can even use a laser pointer and ink ...
PowerPoint for iPad: A Visual Guide. October 29, 2017. In this first ever visual guide for the iPad version of Microsoft PowerPoint (iPad PPT), we show you step-by-step how to use the app, as well as all of the nitty gritty details behind it that you likely don't know. We highlight those "little hiccups" that will drive you up the wall ...
This video is a tutorial for Microsoft PowerPoint for the iPad. The iOS version of PowerPoint is surprisingly powerful with many desktop features found in th...
Download Microsoft PowerPoint now and get the best way to create, edit and share slideshows and presentations from your iPhone or iPad. To create or edit documents, sign in with a free Microsoft account on devices with a screen size smaller than 10.1 inches. Unlock the full Microsoft Office experience with a qualifying Microsoft 365 ...
In this case, all you need to do is simply open your email account on your iPad, click on the email that contains the PowerPoint file, and download it. 2. Transfer the PPT file to your iPad using a cloud storage service. Another quick and easy option is using a cloud storage services. There are plenty of cloud storage services such as Google ...
Double-tap on the text box. With the onscreen keyboard activated, tap anywhere in the text box to position the cursor. Tap the Keyboard key. Double-tap the word. This also activates the Edit menu. Triple-tap within the paragraph. Double-tap the first word and drag the selection handle right to the last word you want to select.
Step by Step Tutorial: Creating a PowerPoint on an iPad. Before we dive into the steps, let's clarify what we'll achieve. By following these instructions, you'll be able to create a fully-functional PowerPoint presentation on your iPad, complete with text, images, and various slide designs. Step 1: Download the PowerPoint App
Download fully functional iSpring Converter Pro free trial. 2. Convert PowerPoint to video to play it on iPads. With iSpring Converter Pro, you also can convert PowerPoint to MP4 video and play it on any device. It's good for simple linear presentations that don't have any interactivity and that might be shared on YouTube.
Your Apple Pencil is the easiest way. It'll smooth the process whether you need to scribble on class notes, update a sales pitch, or fix your boss's spelling. To try it out, connect your Apple Pencil to your compatible iPad or iPad Pro and tap on PowerPoint's Draw tab. That's where you'll find tools to write, draw, edit, highlight ...
With the iPad's portability and HD display, you can create and share presentations with ease, making it a great tool for creating professional presentations. Adding Shapes, Arrows, and Other Elements. Adding shapes, arrows, and other elements to a PowerPoint presentation on an iPad is very easy to do.
8 Things I've Learned Using an iPad for Presentations. I spent a year giving talks from an iPad instead of a laptop. Here are the lessons I learned along the way. I love using my iPad for travel to conferences, and not just because it's so lightweight and its battery lasts all day. For one thing, with the LTE version I'm not beholden to ...
Get PaperLike: http://paperlike.com/nandoprince93What is going on everyone! So I got my hands on all the Microsoft Office Apps in their Beta form. They fina...
How to print in PowerPoint for iPad (:27) You tap the File button to print in PowerPoint for iPad. Watch this video to learn how. At this time, you can only print to an AirPrint compatible printer. Watch online. Run a slideshow in PowerPoint for iPad (2:22) There are some special finger gestures you can use to advance, go back, and end a slideshow.
We used "Quite Possibly The World's Worst PowerPoint Presentation Ever" to demonstrate this. [2] 2. Next, look for the Share Icon and tap on it. 3. In the list of apps, you should see a button with the GoodNotes app icon. reading "Copy to GoodNotes" or "Open in GoodNotes".
Download and install the Documents App on your iPhone/iPad and follow the steps below to transfer PowerPoint Presentation files from PC to iPhone or iPad. 1. Connect iPhone to the USB Port of your computer. 2. Open iTunes on your computer and click on the Phone icon as it appears in the top menu bar in iTunes. 3.
If you want to control PowerPoint running on a PC/Mac using an app on an iPad/iPhone, Google will help if you tell it this: control powerpoint with ipad. But if you're looking for a way to remote-control a copy of PowerPoint that's *running* on an iPad, I'm not sure there's anything like that. A google search on: remote control for ipad
Use the following steps to set up your iPhone or iPad to record your slideshow. Background recording: iPad Screen Recording with PowerPoint. In PowerPoint, go to the slide you wish to begin presenting. Tap the Play button. From the top right of the screen, slide your finger down. The Control Center appears.
Click anywhere on your slide and press Ctrl+A. Then, in the Home tab on the ribbon, click "Arrange." First click "Align Center," and then bring the menu up again, so that you can click "Align Middle." Press Ctrl+A again to select your timer, and you can then move your timer or copy and paste it elsewhere.
600 nits brightness. Supports Apple Pencil Pro. Supports Apple Pencil (USB‑C) Apple Pencil hover. The 13‑inch iPad Air display has rounded corners that follow a beautiful curved design, and these corners are within a standard rectangle. When measured diagonally as a rectangle, the 13‑inch iPad Air is 12.9 inches. Actual viewable area is less.
Lifetime access to Microsoft Office Professional Plus 2019 for Windows for just $24.97. Microsoft Office 2019 for Mac and Windows. Only $24.97 at Macworld. StackSocial prices subject to change ...
Remember to bring your technology (e.g., computer, iPad) to all conference sessions. ... (PPT) Day 3: Closing Remarks. Wednesday, May 22, 4:00 - 4:30 EDT. Heather Denny from U.S. ED and Lynn Bauer from NDTAC will close the conference out with a series of calls for action, next steps as the conference comes to an end, and conference evaluations ...
Rozpocznij pracę z programem WPS Presentation, aby edytować PowerPoint za darmo! Bezpłatne pobieranie. Pobierz bezpłatny program WPS Office Presentation, aby tworzyć profesjonalne i piękne slajdy programu Powerpoint. Najlepsza darmowa alternatywa dla Microsoft Powerpoint na urządzenia PC, Windows, Mac, Linux, Android i iOS.
You tap the File button to print in PowerPoint for iPad. Watch this video to learn how. At this time, you can only print to an AirPrint compatible printer. Run a slideshow in PowerPoint for iPad. (You are here!) There are some special finger gestures you can use to advance, go back, and end a slideshow. You can even use a laser pointer and ink ...
The redesigned 11-inch iPad Air is supercharged by the incredibly fast Apple M2 chip. It features a stunning Liquid Retina display, a new landscape camera perfect for FaceTime and video calls, and superfast Wi-Fi 6E. ... .ppt .pptx .txt .rtf .vcf .xls .xlsx .zip.ics.usdz.pkpass. Accessibility. VoiceOver screen reader Switch control Assistive ...
Open the PowerPoint app and select a presentation that has been shared with you. Select Copilot from the top of the app. In the Copilot pane, tap Show Suggested Q&A to view suggested questions and answers. You can also enter in your own questions for Copilot to answer in the Copilot compose box. You can also tap the microphone in the compose ...
Select the Copilot button in the Home tab of the ribbon. Enter your prompt or select Create presentation from file to create a first draft of your presentation using your theme or template. Copilot will replace your current presentation with a new one. If needed, save a copy first and rerun the steps above. If you already have a copy, confirm ...