How to add live total labels to graphs and charts in Excel and PowerPoint
- Written by: Shay O’Donnell
- Categories: PowerPoint design
- Comments: 2

PowerPoint has a wealth of options for graphs and charts. It offers great ways to display your data visually. For example, a stacked column chart is a way of showing a part-to-whole relationship in the data it represents, whilst also indicating total values of each category. However, if you want the data you are sharing to be both easily understood and editable, you need to know how to add different types of labels to your charts.
As PowerPoint leverages the functionality of Excel, if you know how to add labels to an Excel graph, you can do it in PowerPoint and vice versa. Though most people can easily create the chart they need, how to add live total labels remains a mystery for many. Lucky for you, we have a great hack to share!

What labels are available?
In PowerPoint and Excel you can add a range of data labels, as well as axis labels, to a chart. These can help your audience easily interpret your data. If you create a stacked column chart in PowerPoint, each segment of the chart will be labelled automatically. To add labels in Excel, click the add Chart Elements icon and select the elements you want to add.
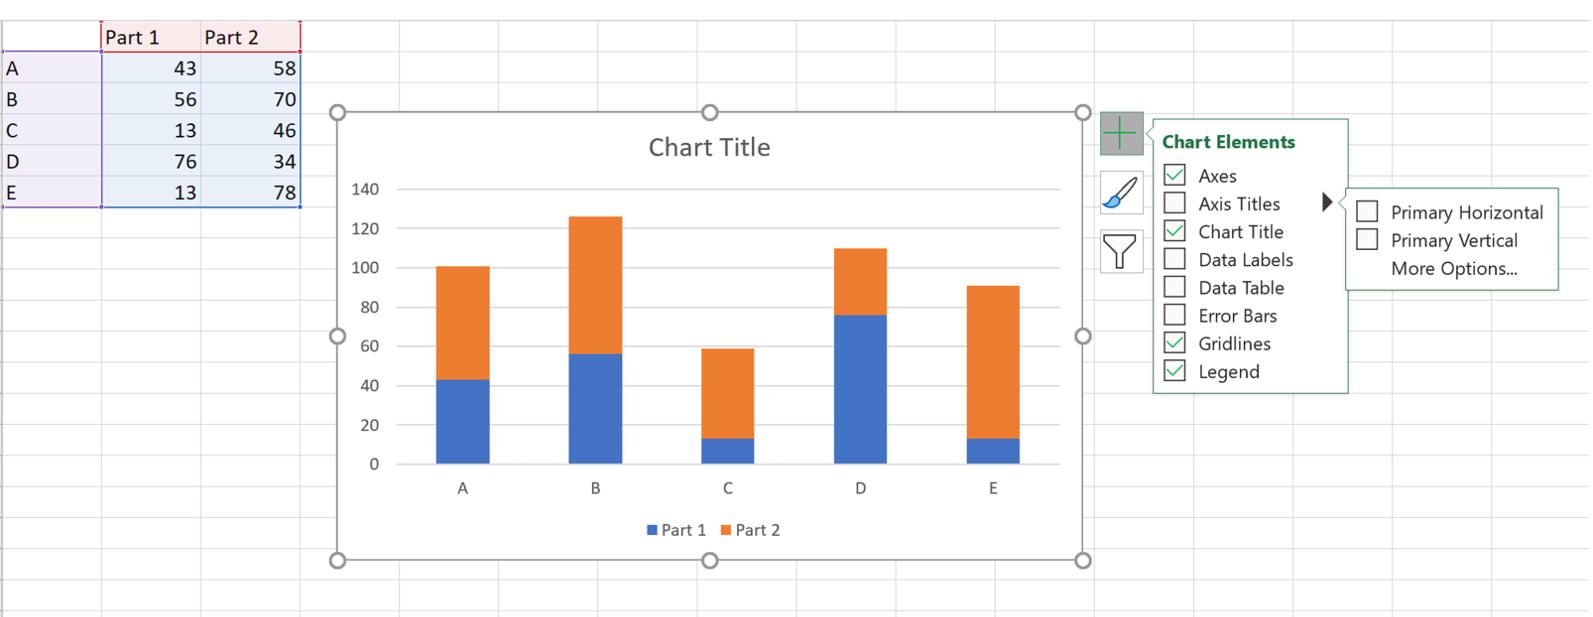
When adding axis labels, you need to consider text size – what size screen will the chart be displayed on, will your audience be able to see the labels clearly? Similarly, you should consider the orientation of your labels; though y-axis labels are vertical by default, horizontal labels are easier to read. To change the orientation of a label right click on the label, select Format Axis Title , then Text Options , then Text Box , then chose the Text Direction .
Now you have axis labels and some data labels, but if you want the totals at the top you have to manually add text boxes and format them by hand. The downside is that when you need to update the data, you have to go back and reformat all of those labels so that they are still aligned properly.
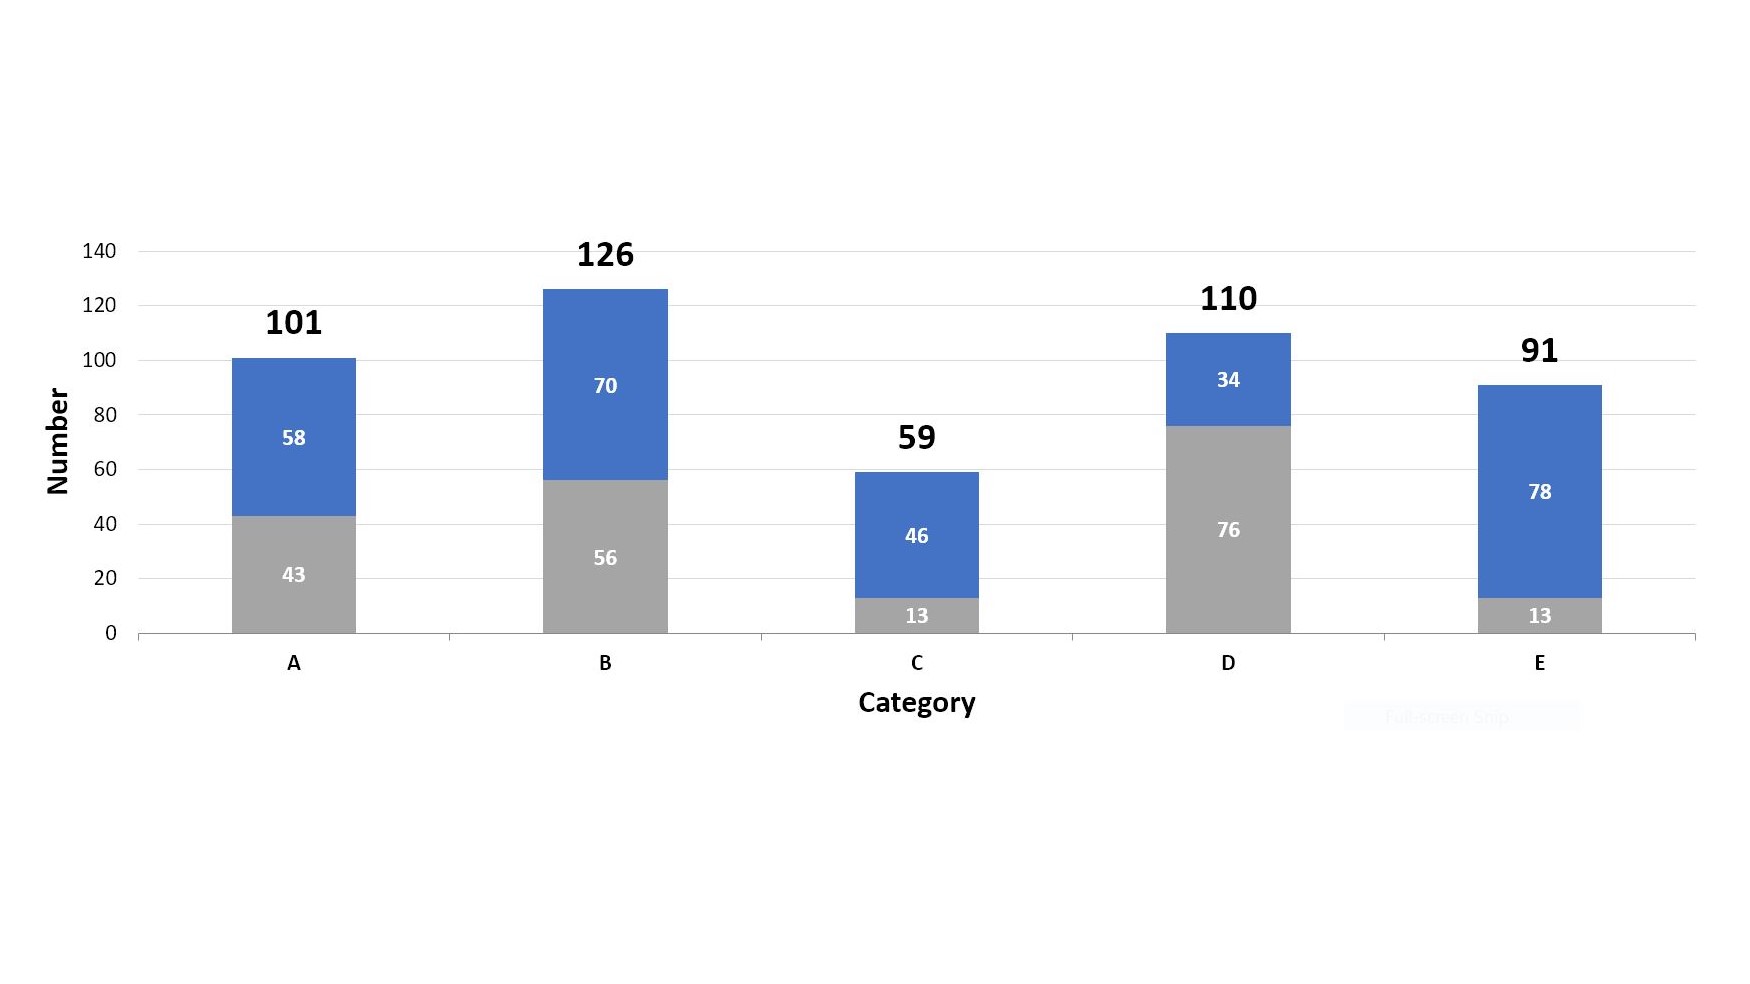
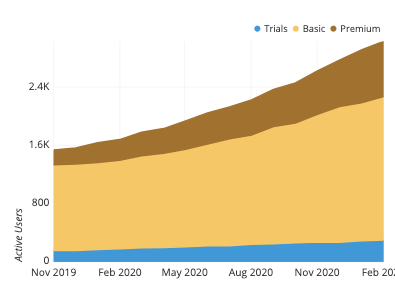
However, if you want to produce something like this where every data point label is live, with a little bit of up-front finagling, there is a way to generate total values automatically using the Combination Chart option.
Step 1: Edit your data
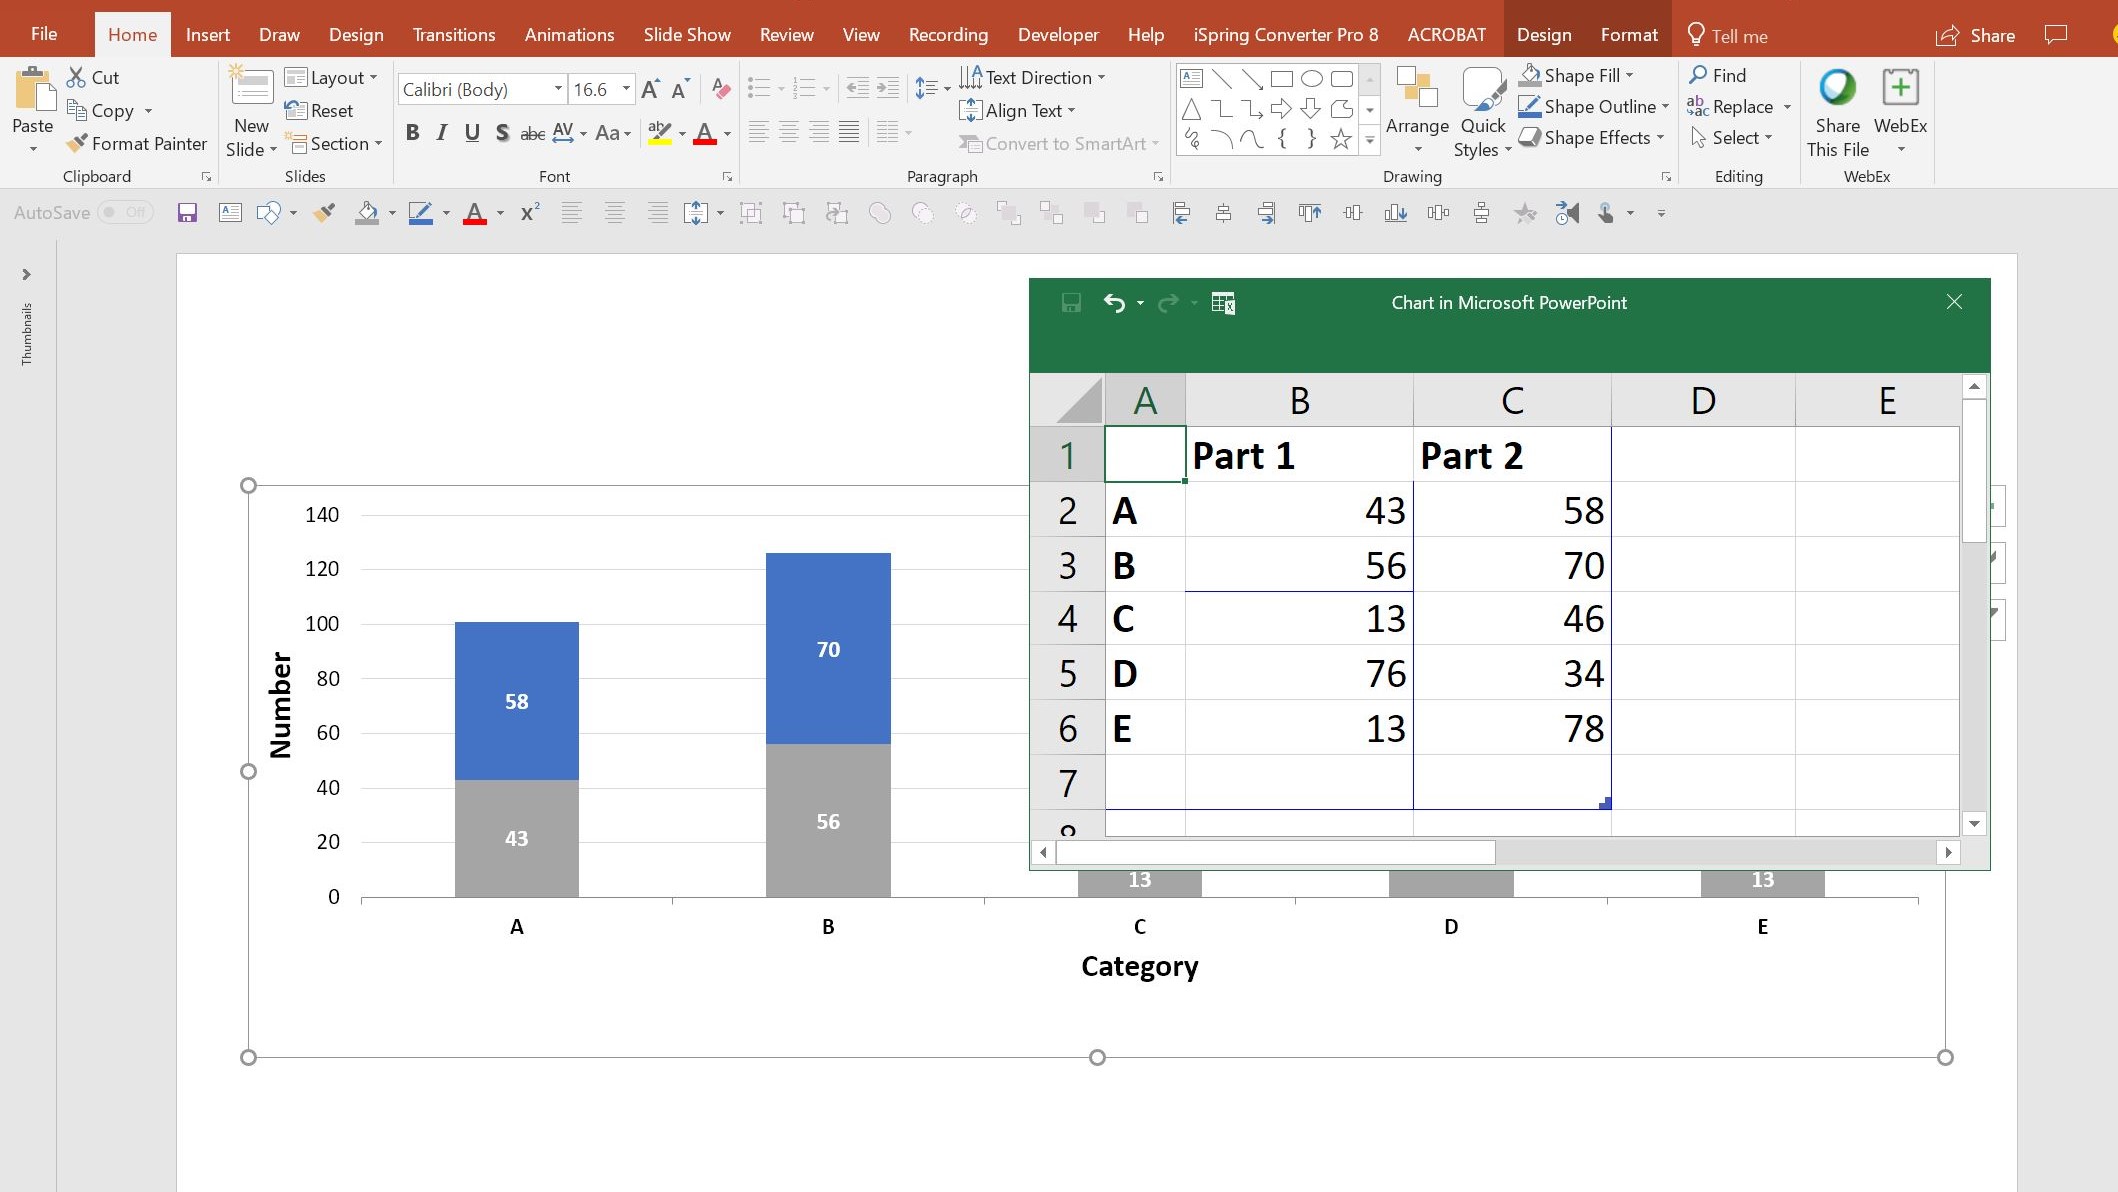
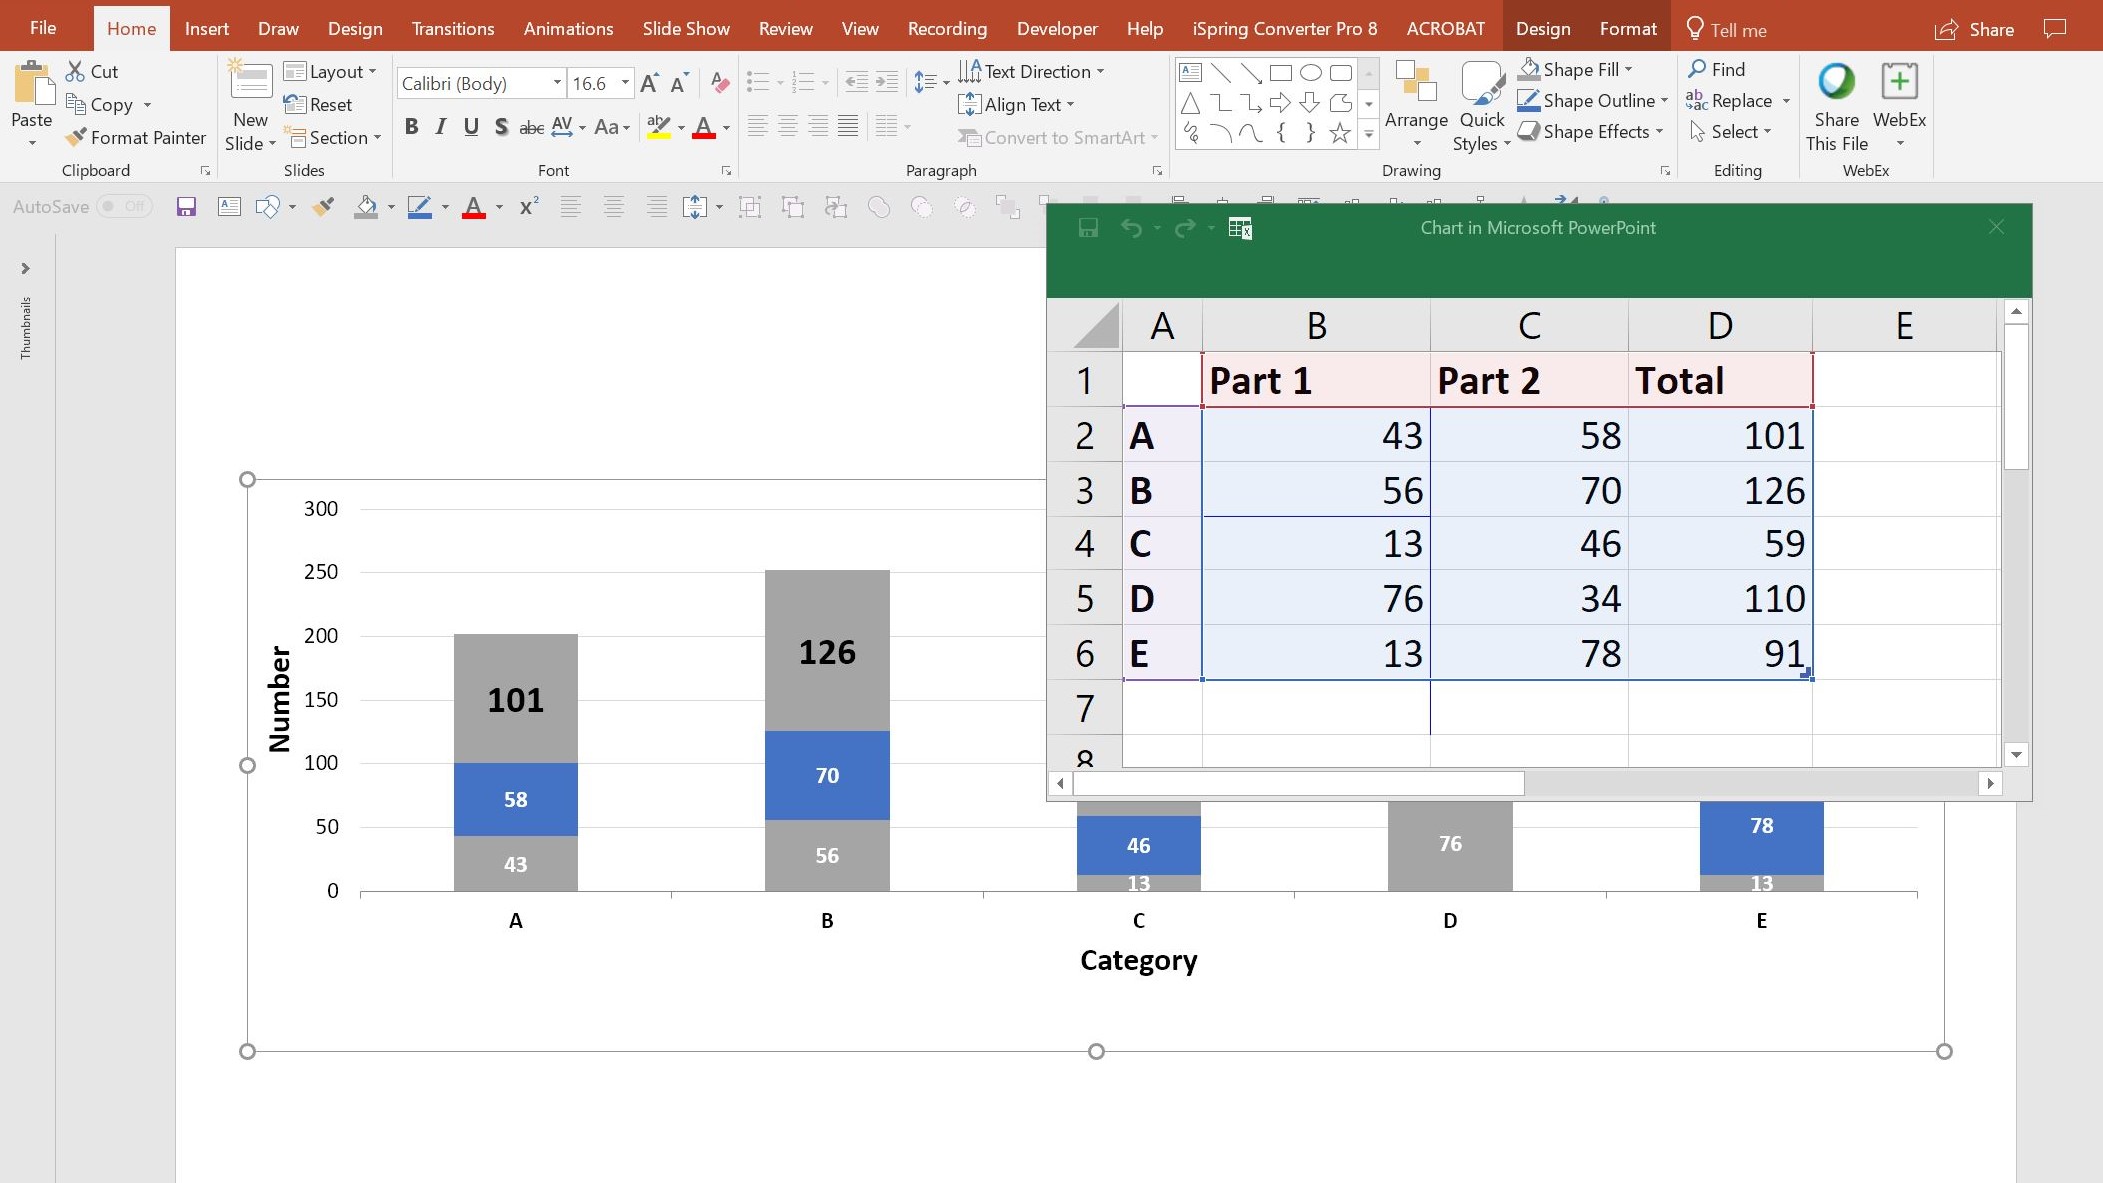
In PowerPoint, get your stacked column chart and right click to Edit Data . This will open up a spreadsheet with your data in it. Each row is a category, and each column is a subcategory.
You need to create a new column for the totals: name it Total for simplicity. Then, write a short piece of script to generate an automatic sum of the values in that row: =sum(first cell:lastcell) . For the first row this looks like: = sum(b2:c2) .
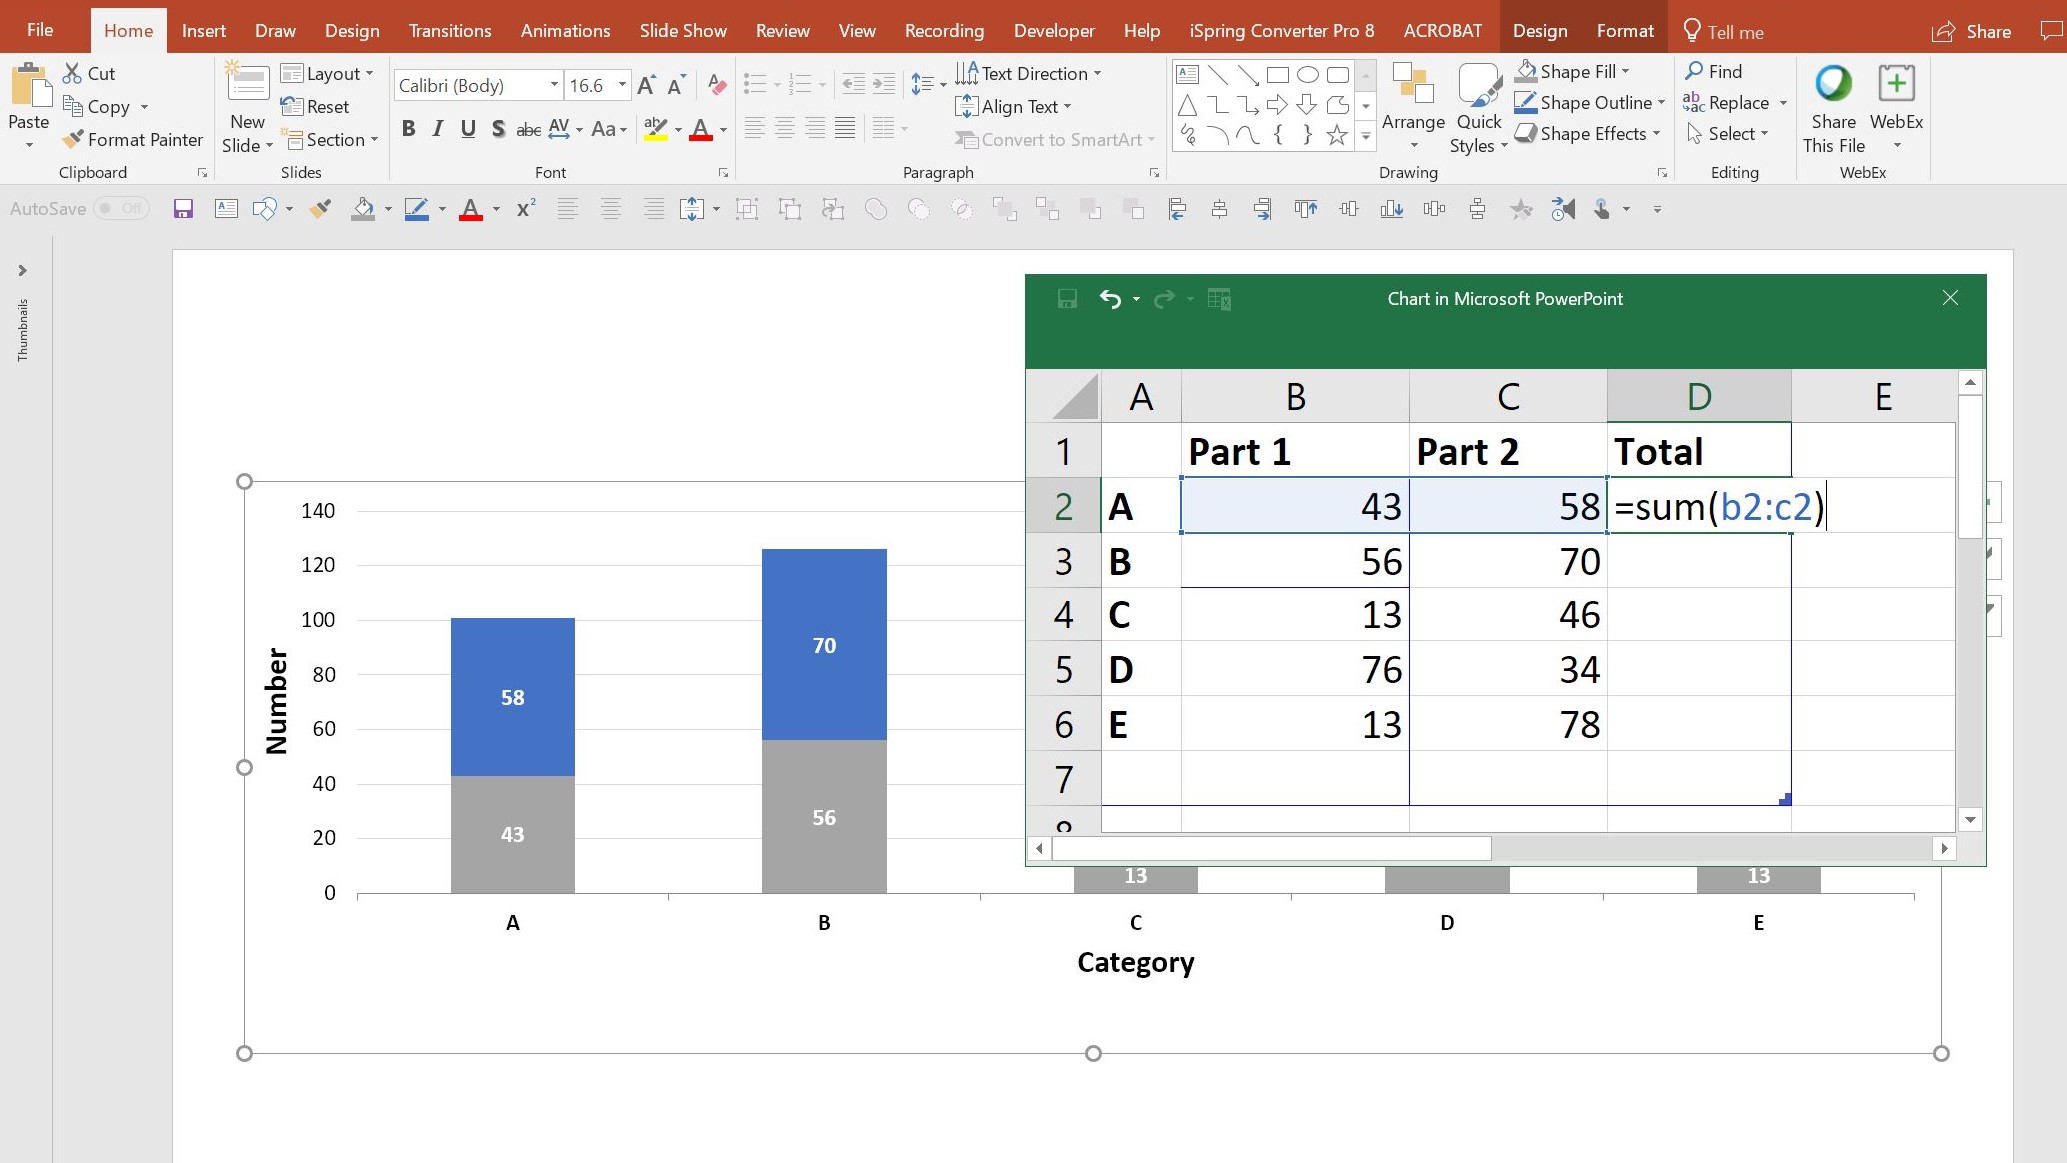
Do the same on each row, then drag the bottom corner of the blue box so that the Total column is included in the data selection, then close the data editor.
Step 2: Update your chart type
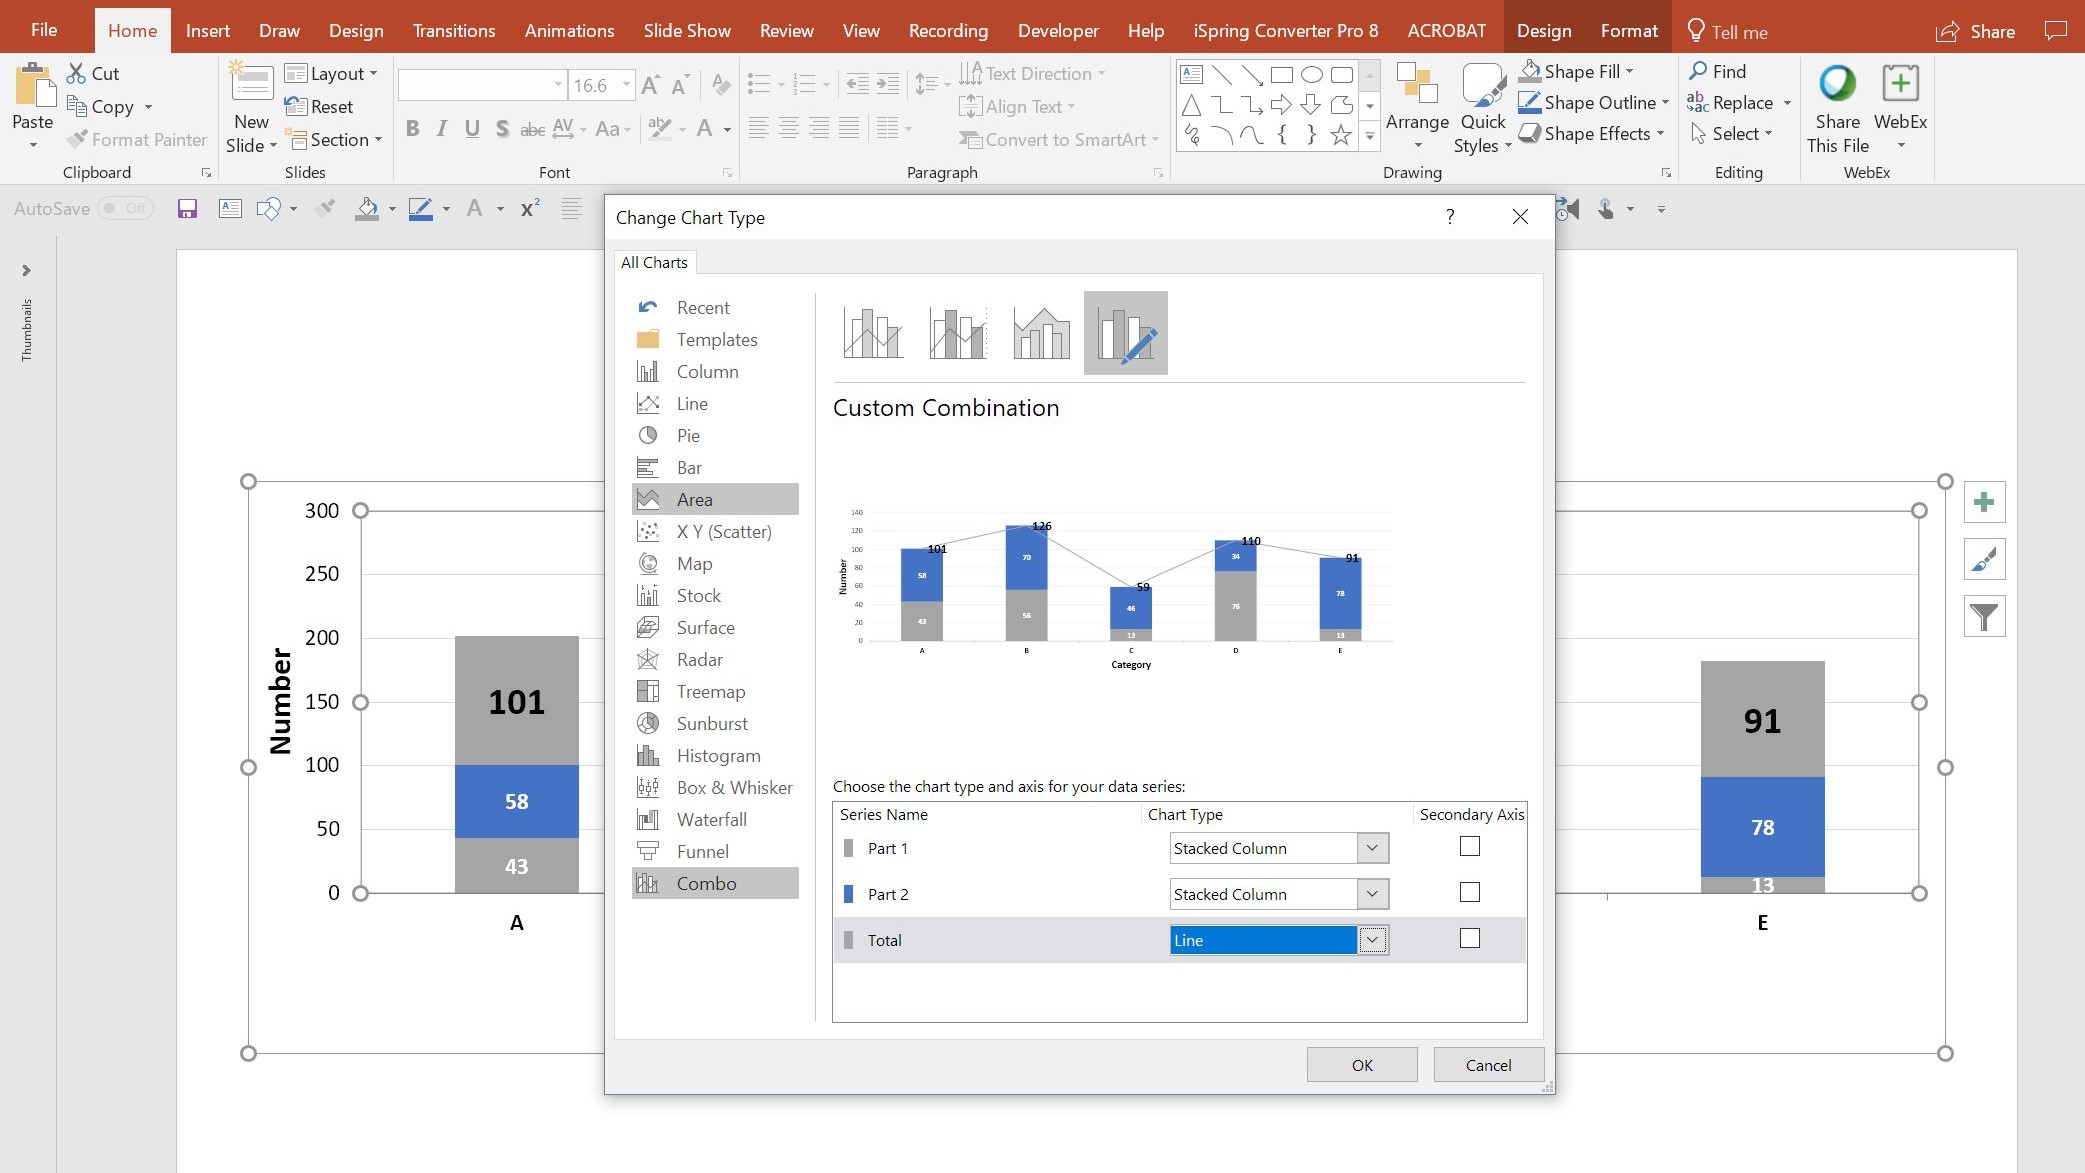
Exit the data editor, or click away from your table in Excel, and right click on your chart again. Select Change Chart Type and select Combo from the very bottom of the list. Change the “Total” series from a Stacked Column to a Line chart. Press OK.
Step 3: Format your totals
Now all the totals are represented on a line. To make it appear as if these totals are just connected to the top of each column, first select the line and change the colour to No outline . Then select all the total labels and right click to select Format Data Label . Change the label position to Above . You can follow the same steps in both Excel and PowerPoint.
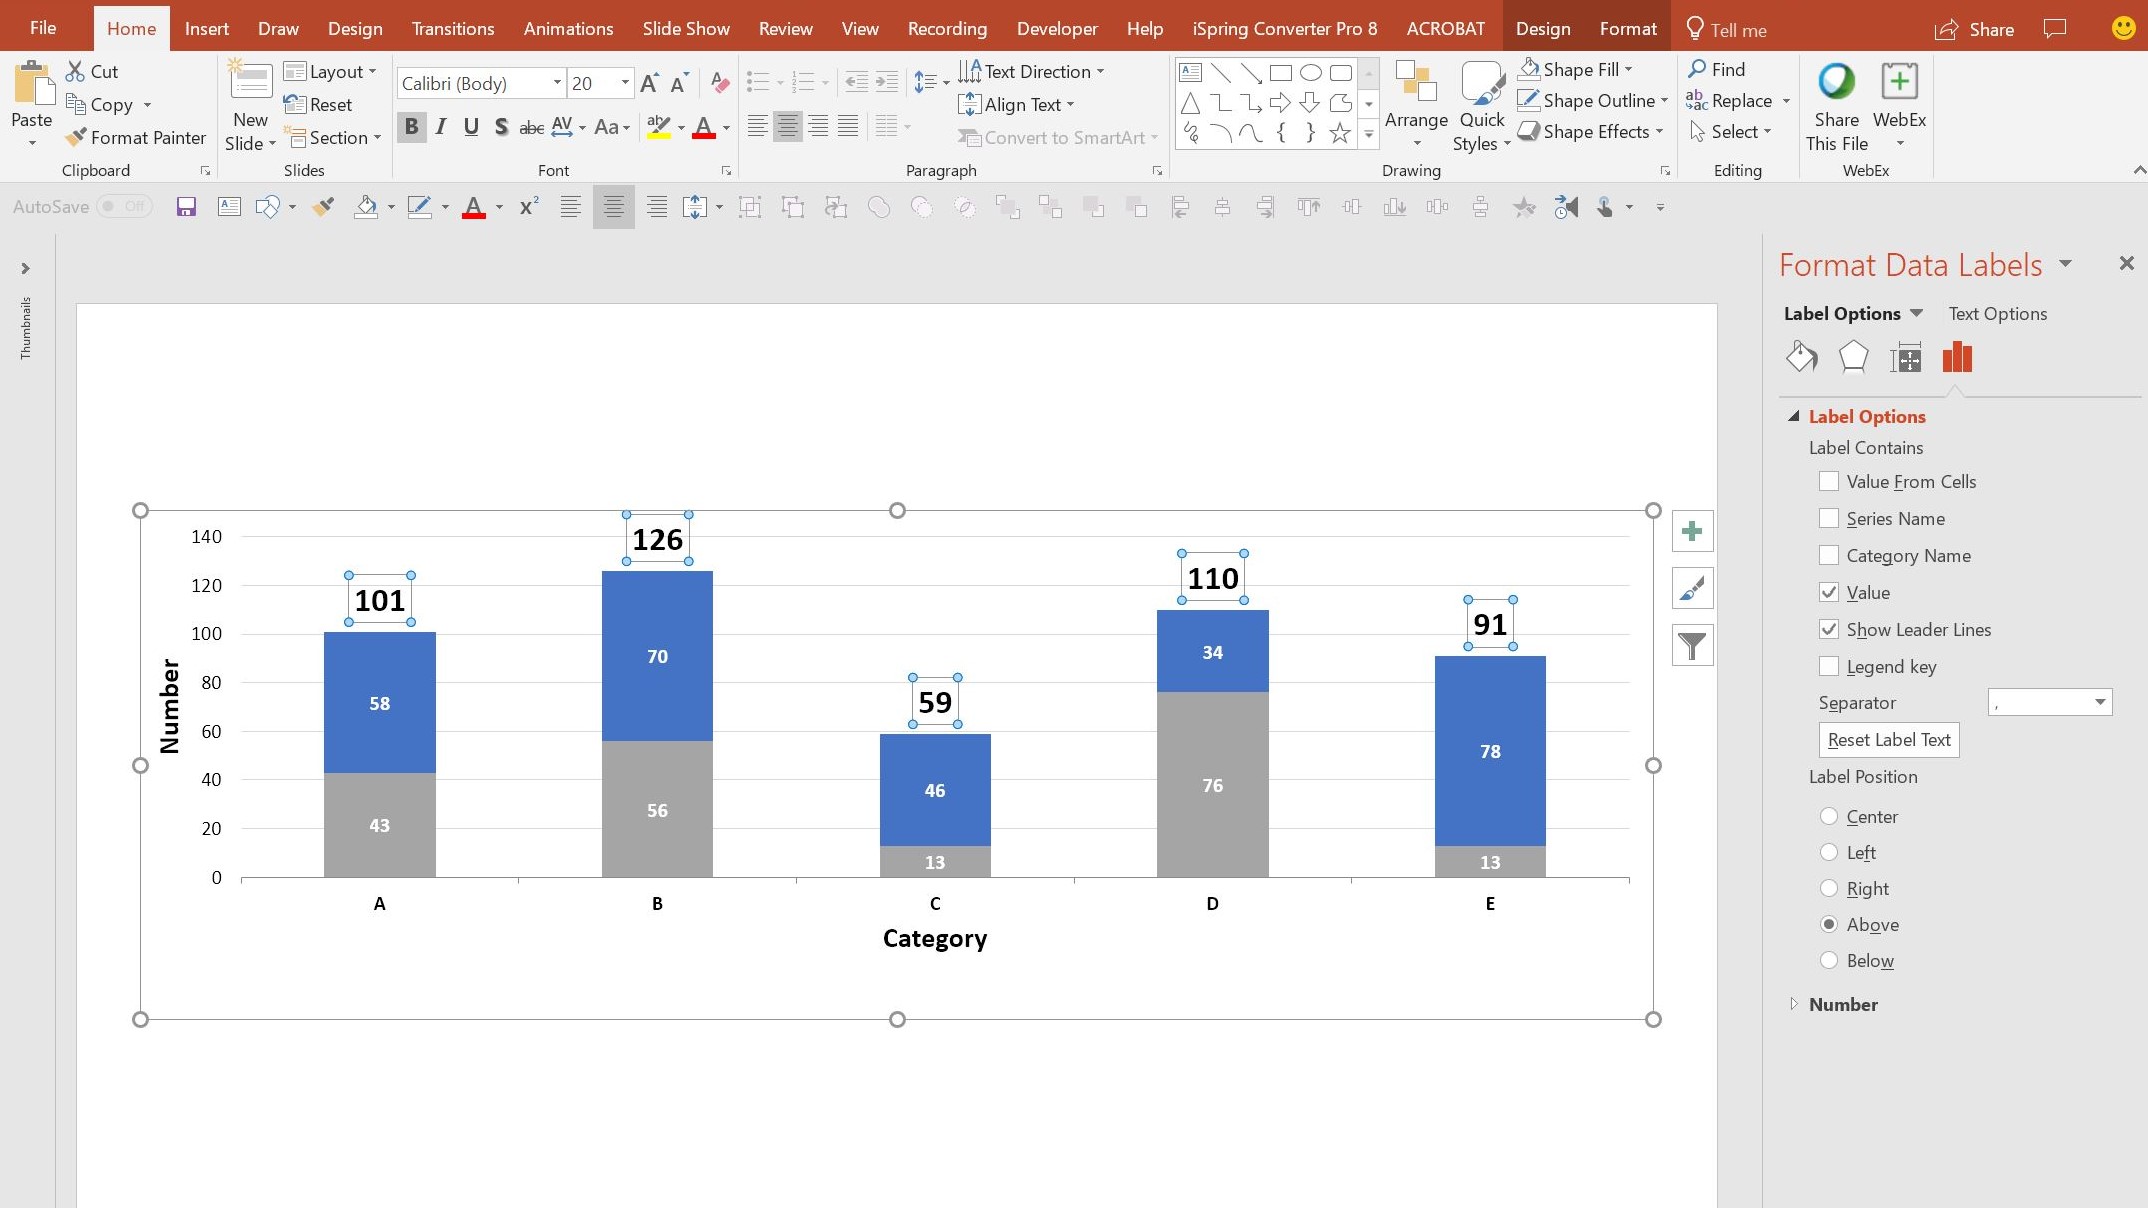
Done and dusted! When you need to update the data in the stacked columns, the total labels will automatically update in both the spreadsheet view and in the live chart view, and automatically move to the correct position. You can use this technique on other chart and graph types, such as a grouped bar chart instead of a stacked column.
Now you know how to add labels in an Excel graph, check out our video resource on PowerPoint graphs and charts and our blog post on how to tell a data story through animation . And keep an eye on our Events page for our regular masterclass on the topic!

Shay O’Donnell
Managing design consultant, related articles, 3 powerpoint valentine’s day cards to download and share.
- PowerPoint design
- Comments: 5
February 14th is around the corner, so the BrightCarbon team have crafted three bespoke Valentine's day cards: all built in PowerPoint!

Updating graphics easily using Slide Zooms in PowerPoint
- PowerPoint design / PowerPoint productivity
- Comments: 3
Some presentations require the exact same chart, graphic, or image on multiple slides. A new feature of PowerPoint 2016 is zoom links. With this feature, you can work around the issues of having multiple versions of a graphic throughout a presentation: PowerPoint will do the updating legwork for you! Read on to find how to make the most of this new feature.

Three PowerPoint plug-ins to try today
- PowerPoint design / Presentation technology
I often find myself thinking about PowerPoint, and there's nothing I like more than finding out about a feature that helps me improve my PowerPoint productivity, or helps me to make something really cool. I've had a quick nosey around the Office Store and I've found three pretty nifty PowerPoint plug-ins that claim to do just that: Shutterstock Images, Mentimeter, and Symbols and Characters. I’ve given them a test drive so you don’t have to! Let the testing begin!

Very clever, thank you so much
i cant follow im sorry do have a ready file of this that i can download and edit the data only
Leave a Reply Cancel reply
Save my name and email in this browser for the next time I comment.
Join the BrightCarbon mailing list for monthly invites and resources
Great work combined with amazing service, gracias Team BrightCarbon! Mila Johnson InComm

Stacked Bar Chart in PowerPoint
How to create a stacked bar chart in powerpoint.
Creating a stacked bar chart in PowerPoint can be an effective way to visually represent data. This type of chart is useful when you want to show how different categories contribute to a total value. In this article, we will guide you through the steps to create a stacked bar chart in PowerPoint.
Step 1: Gather your data
Before creating a stacked bar chart, you need to have your data ready. Make sure that you have all the necessary information and that it is organized in a clear and concise manner. You can use Excel or any other spreadsheet software to organize your data.
Step 2: Open PowerPoint and select the slide where you want to insert the chart
Once you have your data ready, open PowerPoint and select the slide where you want to insert the chart. Click on the Insert tab and select Chart from the Illustrations group.
Step 3: Choose the Stacked Bar Chart option
In the Insert Chart dialog box, choose the Stacked Bar Chart option from the list of available chart types. You can preview each chart type by hovering over it with your mouse.
Step 4: Enter your data into the chart
After selecting the Stacked Bar Chart option, a blank chart will appear on your slide. You can now enter your data into the chart. To do this, click on the Edit Data button located on the right side of the chart.
A new window will appear where you can enter your data. You can either type in your data manually or copy and paste it from Excel or another spreadsheet software.
Step 5: Customize your chart
Once you have entered your data, you can customize your chart to make it more visually appealing. You can change the colors of the bars, add labels, and adjust the font size and style.
To customize your chart, click on the Design tab located at the top of the screen. From here, you can choose different chart styles, change the color scheme, and add chart elements such as a legend or data labels.
Step 6: Save your chart
After you have customized your chart, it is important to save it. To do this, click on the File tab located at the top left corner of the screen. From here, select Save As and choose a location where you want to save your file.
Creating a stacked bar chart in PowerPoint can be a useful way to visually represent data. By following these simple steps, you can create a professional-looking chart that effectively communicates your message. Remember to gather your data, choose the Stacked Bar Chart option, enter your data into the chart, customize your chart, and save your work. With these tips, you can create a powerful visual aid that will help you convey your message with clarity and impact.
5 Creative Ways to Use Stacked Bar Charts in Your Presentations
Stacked bar charts are a powerful tool for visualizing data in presentations. They allow you to compare multiple categories at once, making it easy to see patterns and trends in your data. But did you know that there are many creative ways to use stacked bar charts in your presentations? In this article, we’ll explore five of these ways.
1. Show the breakdown of a total
One of the most common uses of stacked bar charts is to show the breakdown of a total. For example, if you’re presenting sales data, you might use a stacked bar chart to show how much revenue was generated by each product line. This allows your audience to see which products are the most profitable and which ones may need more attention.
2. Compare two or more groups
Another way to use stacked bar charts is to compare two or more groups. For example, if you’re presenting survey results, you might use a stacked bar chart to show how different age groups responded to each question. This can help you identify any significant differences between the groups and tailor your messaging accordingly.
3. Highlight changes over time
Stacked bar charts can also be used to highlight changes over time. For example, if you’re presenting financial data, you might use a stacked bar chart to show how revenue and expenses have changed over the past year. This can help you identify any areas where you need to make adjustments to improve your bottom line.
4. Show the distribution of a variable
Another creative way to use stacked bar charts is to show the distribution of a variable. For example, if you’re presenting demographic data, you might use a stacked bar chart to show the percentage of people in each age group, gender, or ethnicity. This can help you identify any patterns or trends in your data and tailor your messaging accordingly.
5. Compare performance against a benchmark
Finally, stacked bar charts can be used to compare performance against a benchmark. For example, if you’re presenting sales data, you might use a stacked bar chart to show how your company’s sales compare to the industry average. This can help you identify any areas where you need to improve and set goals for future performance.
In conclusion, stacked bar charts are a versatile tool that can be used in many creative ways in your presentations. Whether you’re showing the breakdown of a total, comparing two or more groups, highlighting changes over time, showing the distribution of a variable, or comparing performance against a benchmark, stacked bar charts can help you visualize your data in a way that is easy to understand and engaging for your audience. So next time you’re creating a presentation, consider using a stacked bar chart to bring your data to life.
The Pros and Cons of Using Stacked Bar Charts in Data Visualization
Data visualization is an essential tool for businesses and organizations to understand complex data sets. One of the most popular types of charts used in data visualization is the stacked bar chart. Stacked bar charts are a great way to display multiple variables in one chart, but they also have their drawbacks. In this article, we will explore the pros and cons of using stacked bar charts in data visualization.
1. Easy to read: Stacked bar charts are easy to read and understand. They allow you to compare different categories and see how they contribute to the whole. The bars are stacked on top of each other, making it easy to see the total value of each category.
2. Space-saving: Stacked bar charts are space-saving because they allow you to display multiple variables in one chart. This makes it easier to compare different categories without having to create multiple charts.
3. Good for showing trends: Stacked bar charts are good for showing trends over time. You can easily see how each category changes over time and how they contribute to the overall trend.
4. Customizable: Stacked bar charts are customizable, which means you can change the colors, labels, and other elements to make them more visually appealing and informative.
1. Can be misleading: Stacked bar charts can be misleading if the categories are not properly labeled or if the scale is not consistent. It can be difficult to compare categories if they are not aligned properly.
2. Limited use: Stacked bar charts are limited in their use because they only work well with a small number of categories. If you have too many categories, the chart can become cluttered and difficult to read.
3. Not suitable for precise comparisons: Stacked bar charts are not suitable for precise comparisons because the bars are stacked on top of each other. It can be difficult to see the exact value of each category.
4. Difficult to interpret: Stacked bar charts can be difficult to interpret if the categories are not properly labeled or if the scale is not consistent. It can be challenging to understand the data if the chart is not well-designed.
Conclusion:
Stacked bar charts are a popular type of chart used in data visualization because they are easy to read, space-saving, good for showing trends, and customizable. However, they also have their drawbacks, including being misleading, limited in use, not suitable for precise comparisons, and difficult to interpret. When using stacked bar charts, it is important to label the categories properly, ensure the scale is consistent, and limit the number of categories to avoid cluttering the chart. Overall, stacked bar charts can be a useful tool in data visualization, but they should be used with caution and careful consideration.
10 Tips for Designing Effective Stacked Bar Charts in PowerPoint
Stacked bar charts are a popular way to display data in PowerPoint presentations. They allow you to compare multiple categories at once and show how each category contributes to the total. However, designing an effective stacked bar chart can be challenging. In this article, we will provide 10 tips for designing effective stacked bar charts in PowerPoint.
1. Choose the right type of chart
Before creating a stacked bar chart, consider whether it is the best type of chart for your data. Stacked bar charts work well when you want to compare the contribution of different categories to a whole. If you want to compare values across categories, a clustered bar chart may be more appropriate.
2. Keep it simple
Avoid cluttering your stacked bar chart with too much information. Stick to a few key categories and use colors sparingly. Too many colors can make the chart difficult to read and distract from the main message.
3. Use consistent colors
If you do use colors, make sure they are consistent throughout the chart. Use the same color for each category in every bar to avoid confusion.
4. Label the bars
Label each bar with the value it represents. This makes it easier for the audience to understand the data and compare the values across categories.
5. Add a legend
If you use colors in your chart, include a legend that explains what each color represents. This helps the audience understand the data and avoids confusion.
6. Order the categories
Order the categories in a logical way that makes sense for your data. For example, if you are comparing sales by region, order the regions from highest to lowest sales.
7. Use horizontal or vertical orientation
Decide whether to use a horizontal or vertical orientation for your chart. Horizontal charts work well when you have long category labels, while vertical charts are better for showing changes over time.
8. Avoid 3D effects
Avoid using 3D effects in your stacked bar chart. They can make the chart difficult to read and distort the data.
9. Use a consistent scale
Make sure the scale is consistent across all bars in the chart. This makes it easier for the audience to compare values across categories.
10. Test your chart
Before presenting your stacked bar chart, test it with a sample audience to ensure that it is easy to understand and effectively communicates your message.
In conclusion, designing an effective stacked bar chart in PowerPoint requires careful consideration of the type of chart, colors, labels, orientation, and scale. By following these 10 tips, you can create a clear and concise stacked bar chart that effectively communicates your data to your audience.

- Previous Data from Excel into Smartsheet
- Next Baseball Stat Sheet Template

Vconnection To The Server On The Default Ports Timed Out
The Basics of Taming in Ark Survival Evolved Xbox One
Why Are My Deleted Emails Not Going To Trash Gmail
Your email address will not be published. Required fields are marked *
- About JOE TECH
- Privacy Policy
Add Total Value Labels to Stacked Bar Chart in Excel (Easy)
 1")
Stacked Bar Charts Missing Total Labels In Excel
Unfortunately, Microsoft Excel cannot insert data labels at the top of vertical or horizontal stacked bar charts. Interestingly, Microsoft decided not to incorporate this capability as it is a seemingly basic charting need while using stacked bar charts.
While resolving this missing feature has been asked of Microsoft (please upvote!) by the customer base, there does not appear to be any momentum yet to add it to Microsoft Excel by the developers.
Luckily, we can use some creativity to add a "totaling" chart series and make it look like the chart has labels indicating the net value of the stacked bar.
 3")
In this article, I’m going to show you how to build total labels for your stacked bar charts similar to the image above. Let’s walk through the steps to do this in Excel.
Example Data
Before we go further, I just wanted to show you the raw chart data being used in this Stacked Bar Chart example. The data breaks up the company’s revenue into three categories with an overall total at the very bottom.
I do provide a download link at the end of this article with the exact Excel spreadsheet file I created for this tutorial. Feel free to download the file and follow along if that helps you learn.
 5")
Add Data Series For Total Label
To get the appearance of total labels for our chart, we are actually going to create an invisible chart series. We want the values of this chart series to be very small in relation to your actual chart data so the vertical height of your bars does not get impacted (reduced in size).
Since my data is in whole numbers, I’m going to use a 0.1 value for each month.
 7")
After you have set up the data for your chart series, you want to link the data up to your chart.
Right-click on your chart and in the menu, select the Select Data menu item.
 9")
In the Select Data Source dialog box , click the Add button to create a new chart series.
 11")
Once you see the Edit Series range selector appear, select the data for your label series.
 13")
I would also recommend naming your chart series “ Total Label ” so you know the purpose of the additional chart series.
You’ll also want to ensure that the chart series is the very last series in the Legend Entries list box . This means it will be the last data point to be charted and will reside at the top of the bars.
 15")
Hit the OK button and you should see the new chart series appear at the top of the bars.
Link And Format The Total Data Labels
For the Total Labels series , we want to override the values of the data labels.
To do this, you will need to go into the Format Data Labels Pane by right-clicking one of the chart data labels associated with the Total Labels series and selecting Format Data Labels from the menu.
First, we will reposition the labels by changing the Label Position to Inside Base .
 17")
Next, uncheck all the Label Contains options except for Value From Cells .
Click the Select Range button and select the cell range that contains the total values for your stacked bar chart.
 19")
After you have confirmed your selection, you should see the label values change to the total bar values in the Excel chart.
Format Changes To Your Stacked Bar Chart
Remove the chart series fill color.
You want to make the Total Label chart series appear invisible as it really isn’t holding data that should be charted.
To do this, click on the chart series and ensure the fill color is set to No Fill . You may need to zoom in on your Excel spreadsheet to select it due to its small size.
 21")
Remove The Legend Item
If you have a legend displayed for your chart, you will want to ensure the legend item for your Total Label series does not appear. To remove it, simply select the individual legend item and hit the Delete key on your keyboard.
 23")
My Chart Formatting Recommendations
- De-emphasize Labels - Your stacked bar data labels should be a gray or white color depending on the color of each bar in your chart. I also like to ensure the labels are not bold and italicize them. Utilizing a thinner/skinner version of the same font you are using is also something you could incorporate.
- Emphasize Total Labels - Your total labels should be black or dark grey and also bolded. I like to ensure my total labels are at least 3 points larger than the other data labels.
- Bar Width - Make sure your bars are not skinner than the width of your data labels.
Control Vertical Spacing Of The Total Labels
If you want to increase the separation between your total labels and the stacked bars, you can modify your chart by adding a Label Spacer chart series before the Total Label series .
 25")
You’ll notice from the above graphic, that the Label Spacer chart series sits right below the Total Label series and is also invisible (no fill color).
You might be thinking, why not just increase the Total Label series value and skip the creation of an extra chart series? Well, I originally tried that and it ended up compressing the chart quite a bit due to how the labels are positioned within each bar segment.
Creating a separate chart series, allows you to nudge the labels up further without compressing the chart bars within the Chart Area boundary.
 27")
Be sure to also remove the legend item associated with the Label Spacer chart series if you choose to add this feature to your chart.
Download Example Excel File
If you would like to get a copy of the Excel file I used throughout this article, feel free to directly download the spreadsheet by clicking the download button below.
Learn my best Excel chart design hacks. These will turn your ugly charts into professionally crafted graphics, leaving your boss speechless!!!

Keep Learning
![Add Vertical Lines To Excel Charts [Best Way!]](https://www.thespreadsheetguru.com/wp-content/uploads/2022/05/AddVerticalLineToExcelBarorLineChart.png "powerpoint show total on stacked bar chart")
Add Vertical Lines To Excel Charts [Best Way!]
There are a few creative ways to add a vertical line to your chart bouncing around the internet. If you...

Dynamic Array Formula Spill Ranges With Charts
Linking Dynamic Array Formulas into Chart Series With the introduction of Dynamic Array functions in Excel, your spreadsheets can now...

Create A Bar Chart With Separate Positive And Negative Colors
Our goal as analysts is to tell a story with our data and it is a well-known fact that data...

Chris Newman
Chris is a finance professional and Excel MVP recognized by Microsoft since 2016. With his expertise, he founded TheSpreadsheetGuru blog to help fellow Excel users, where he shares his vast creative solutions & expertise. In addition, he has developed over 7 widely-used Excel Add-ins that have been embraced by individuals and companies worldwide.
- Skip to primary navigation
- Skip to main content
- Skip to primary sidebar
Peltier Tech
Peltier Technical Services - Excel Charts and Programming
Label Totals on Stacked Column Charts
Thursday, October 29, 2009 by Jon Peltier 55 Comments
A common question is “How can I label the total stack values in a stacked column chart?” When you add data labels to the chart, you can’t get any labels showing the totals.
Let’s use some simple data to illustrate.

Here is a standard stacked column chart.

When we apply data labels to the chart, we get a label for each column segment in the stack, but no labels for the total of each stack.

We only need to add a series to the chart that encodes the totals. Column E has the totals for each stack.

Construct the chart as a stacked column chart, with the Totals column stacked on top.

Change the Totals column series to a line chart type series.

Add data labels to the Totals series.

Move the labels to the Above position (right click on the labels and choose “Format” to open the format dialog).

Hide the Totals series by formatting it to show no lines and no markers. And don’t forget to delete the unwanted legend entry: click once to select the legend, click again on ‘totals’, then click the Delete key.

Nicely done, without being too sneaky: just one hidden series.
Share this:
- Click to share on Twitter (Opens in new window)
- Click to share on Facebook (Opens in new window)
- Click to share on LinkedIn (Opens in new window)
- Click to share on Tumblr (Opens in new window)
- Click to share on Pinterest (Opens in new window)
- Click to share on Reddit (Opens in new window)
- Click to print (Opens in new window)
- Click to email a link to a friend (Opens in new window)
Posted: Thursday, October 29th, 2009 under Data Labels . Tags: Data Labels , Stacked Charts . Comments: 55

Reader Interactions
Robert says
Thursday, October 29, 2009 at 7:32 am
Helpful post thanks. Is it possible to achieve this on a horizontal stacked bar chart too?
Jon Peltier says
Thursday, October 29, 2009 at 7:36 am
Robert –
I’ts possible to get this effect in a stacked bar chart, but it’s not as easy. You can’t use a line chart series for the labels. You could use an XY series, and you’d have to mess around with the primary and secondary axis scales (see Bar-Line Combination Chart ). Or you could add another bar series onto the stack, with values of zero and custom labels. Good topic for a follow up.
Thursday, October 29, 2009 at 12:35 pm
Jon, I do these slightly differently and it works for bar charts (per Robert’s request) the same as for column charts and has I think fewer steps.
Same methodology up through where the totals are added. Instead of converting to a line chart:
1. Open the formatting for that series, change it to Secondary Axis. Now it’s sitting in front of the stacked bars I really want to see.
2. Add data labels to that series. (They go in the right spot at the top of the bar).
3. Format the area pattern as None and the border as None.
The bar disappears, leaving the data labels and the underlying stacked bars or columns.
This is another one of the things that Harvard Graphics for DOS used to do automatically! Silly that you have to trick the program to add these.
Thursday, October 29, 2009 at 12:49 pm
Thanks, Chip. I was going to write this up as a follow-up, but you’ve done it for me. I suppose I could make a illustrated version….
Thursday, October 29, 2009 at 12:13 pm
I like that you have the x-axis as being a category versus time because we all know that a stacked column chart is bad for showing data series’ over time, right? Good tip!
Robert F says
Friday, October 30, 2009 at 2:48 pm
You can also use the right menu to change the total part of the stack to area and border= none. Then select total data labels adn change the alignment label position = inside base.
Tuesday, February 23, 2010 at 12:56 am
This information was most helpful. Thanks.
Doug Keith says
Monday, April 26, 2010 at 3:03 pm
Thanks for the great tips! Worked like a charm.
Kirvin K says
Monday, July 26, 2010 at 11:33 am
Thanks Jon, very useful tips. Can you think of way to show Pivot Chart Totals or should I just give up and create a regular chart? I would really like to have the pivot filter capability while displaying the totals over my stacked bars.
Monday, July 26, 2010 at 3:12 pm
A regular chart will do this easily. You probably can’t do it with a pivot chart unless you have created a custom field to capture the totals.
Neil Jimack says
Thursday, August 5, 2010 at 6:30 am
I’ve been asked to produce something very similar, but I also need to apply labels to each series showing their percentage of the total.
I tried creating several dummy series’ which calculate the percentage, using a secondary axis, but can’t get the labels to line up with the values.
Thursday, August 5, 2010 at 8:18 am
Neil –
Calculate the percentages in the worksheet, and use Rob Bovey’s Chart Labeler to apply these custom labels to the stacked column series.
Thursday, August 5, 2010 at 9:13 am
Thanks Jon. Unfortunately I can’t download that onto my work computer, so I’ve had to resort to manually linking each label to a cell.
Ishtar says
Thursday, September 23, 2010 at 4:01 pm
Almost embarassed to ask …..
How do you change a singel column (“total” in this case) without changing them all.
Everything else worked GREAT!!
Thursday, September 23, 2010 at 6:54 pm
Ishtar –
You mean, how do you change the Totals series from column to line? Right click on the series, choose Change Chart Type (Chart Type in 2003 and earlier), and select a line style.
Friday, September 24, 2010 at 6:27 am
Thanks Jon – yes, that is what I meant to say.
I’m in 2007 and it wanted to change the entire chart even tho I selected only the Total series. So, I refomatted the series with no fill/no line and followed your advice on the data labels. Next, I adjusted the value axis and I’m cooking with gas!
BTW … Lots of GREAT stuff here. Thanks again!
Monday, March 28, 2011 at 7:29 am
This is exactly, what I needed.
hmatlock says
Saturday, April 23, 2011 at 2:52 pm
I am soooo glad I found this. Thanks for posting it!
Jordania says
Monday, August 29, 2011 at 2:18 pm
Wonderful! Thank you so much!
graham says
Tuesday, September 6, 2011 at 3:44 pm
Jon, Thanks for all the help. I have a similar question as Neil… I have a stacked column showing 4 series from 1 set of values to another. I want to show the % change from 1 to another. Using several dummy series I have the labels but they never fit where they should. I’m not able to use the add-in here at work – and although it sounds like it would work it’s not viable for us.
I cannot seem to find any other instructions online documenting how to do this. Any thoughts on writing the instructions?
Tuesday, September 6, 2011 at 4:32 pm
Graham –
If you can’t use the tool, then add any type of data labels to the points (I usually pick the series name). Select each label in turn (to select a lable you have to single click twice, first to select the series of labels, then to select the specific label), click in the formula bar, type =, then click in the cell with the label you want to apply.
Thursday, September 8, 2011 at 11:17 am
Jon, Thanks for the tip – I can use that as a shortcut in some other charts I do. Unfortunately I don’t think that will update or adjust the positioning of the data labels to match the appropriate series. I have a picture of the graph to share…
Friday, September 9, 2011 at 7:20 am
The position of the labeled points, and the label values, are set by the formula that calculates the sum of the particular stacked column. Why would this not update?
Tuesday, November 29, 2011 at 1:22 pm
THANK YOU! I knew there had to be a better way to do this than mess with stupid text boxes all day. Whohoo!
Sinclair says
Thursday, August 16, 2012 at 10:37 am
Spot on. Updates automatically as YTD figures change. Thanks, Jon.
Guillermo Alzuru says
Wednesday, August 29, 2012 at 7:59 am
Hi Jon, I’m not an expert and need help. I followed the procedure and all looks fine, but get stuck when I get to the step: “Change the Totals column series to a line chart type series” How do you do that? This may be basic but I just could not figure it out. Thanks,
Wednesday, August 29, 2012 at 8:22 am
Nevr mind, I figure it out. Thanks, though.
Tuesday, September 18, 2012 at 9:27 am
Very helpful! Thanks Jon! …I had almost given up. :)
Friday, November 9, 2012 at 2:33 pm
Totally saved me today. Thanks.
Wednesday, January 23, 2013 at 5:19 am
You made my day! Thanks a lot!
Ananth says
Thursday, February 7, 2013 at 2:29 am
This tip has been simple and very useful. Thanks a lot !!
Monday, February 25, 2013 at 4:11 pm
Saced me from asking Bossman another ‘simple’ question. Thanks!
Thursday, March 21, 2013 at 10:57 pm
Thanks for this… such a practical solution for a problem!!!!
Aleesha says
Thursday, April 4, 2013 at 4:34 pm
I feel like a moron but I’m not able to convert the total series to a line chart in Excel 2010… it converts everything to line.. any help is greatly appreciated.
Thursday, April 4, 2013 at 9:14 pm
Aleesha – Make sure you select just the one series, then change the chart type.
Saturday, April 6, 2013 at 3:25 am
Thank you so much for your time.. I select only re total series but it still changes everything to line :( Does it make a difference if I have office 2010 professional?
Saturday, April 6, 2013 at 10:28 am
All versions of Excel from ’97 through 2013 do this the same way, regardless of adjectives like “Professional”, “Ultimate”, “Pro Plus”, “Student”, or whatever. All I can suggest is try again with a fresh chart, and select the Totals series carefully.
Damian says
Monday, May 20, 2013 at 10:06 am
Jon, I can’t tell you how awesome your site is! This is yet another clear and to-the-point how-to that is a perfect example of how your site is hands down better than any other Excel site! Thank you!
Thursday, May 30, 2013 at 4:04 pm
How do I do this in a stacked cylinder column chart?
Thursday, May 30, 2013 at 4:53 pm
The stacked cylinder chart is a 3D chart. Among their cognitive deficiencies, 3D charts also cannot combine one chart type with another. This means you can’t add a line chart series to apply the labels. So convert the chart to a flat 2D column chart, add the line series with the totals, and apply labels to this series.
Brandon says
Tuesday, July 16, 2013 at 3:40 pm
To add totals to a horizontal stacked bar chart with a pivot table you need to use the above process (Thanks Jon), after using Jon’s process to convert a pivot table to a regular chart. But instead of converting your “total” series to a line chart you need to leave it as a stacked bar. You then just change the color of the bars in that series to match your chart background (usually white) or make transparency 100%. Also do the same thing with the border. Go to format data labels for that series and adjust label position to inside base. You will also need to adjust your x axis label maximum value down to an appropriate size to fit your graph. Thanks again Jon.
Steven says
Friday, July 19, 2013 at 12:11 pm
This would be useful if you actually took the time to explain how to HIDE the total series. FAIL
Friday, July 19, 2013 at 3:04 pm
Steven – It says “Hide the Totals series by formatting it to show no lines and no markers.” So right click on the series, choose Format Series, choose No Line for the line and No Markers for the marker type.
Wednesday, August 7, 2013 at 2:30 am
Thanks alot! very useful :)
Danielle says
Monday, March 10, 2014 at 3:27 pm
So glad I found this tutorial, I’ve been trying to figure out a workaround for this for ages! I saw plenty of guides that had different ways to do this, but you had to overlay two charts on top of each other which is way more work (and a pain in the butt to edit). I’m working on a big excel dashboard to help us report website analytics to our clients and this will help it be WAY more user friendly.
Wednesday, March 26, 2014 at 6:43 pm
THANK YOU! Worked like a charm.
Saturday, May 24, 2014 at 2:06 am
Thank you Jon, it was helpful… Saved my day
Lynlyn says
Tuesday, August 26, 2014 at 10:00 pm
thanks for this post. really helpful. will try this one in my pivot chart. :)
Wednesday, September 17, 2014 at 5:44 am
If you’re still monitoring this…. is there a way to add labels to the LAST column in the series only? ie if I have a series of stacked columns representing data over time, and I want to specifically show only the latest set of values…?
Neil Young says
Wednesday, February 4, 2015 at 11:38 pm
Thanks, clear instructions
Tuesday, September 15, 2015 at 4:59 pm
Awesome – thanks! Nice clean work around, really slick.
Bryan Reid says
Wednesday, January 4, 2017 at 3:13 pm
Very helpful, seven years later. Thanks for the blog post!
[…] As you can see, everything is pretty simple here. I want to make a stacked column chart out of these, displaying the totals not as another layer but as mere totals. To do this, I apply the ‘hack’ found here […]
[…] years ago on this blog, in Label Totals on Stacked Column Charts, I answered the common question, “How can I label the totals in a stacked column […]
[…] Label Totals on Stacked Column Charts I showed how to add data labels with totals to a stacked vertical column chart. That technique was […]
Leave a Reply
Your email address will not be published. Required fields are marked *
Notify me of follow-up comments by email.
Notify me of new posts by email.
This site uses Akismet to reduce spam. Learn how your comment data is processed .
How to create a Stacked Column Chart in PowerPoint

Creating a stacked column chart in PowerPoint can be a valuable tool to help you communicate complex data in a visually appealing way. Whether you are presenting a report or trying to make sense of a large data set, a stacked column chart can make it easier for your audience to understand the information you are presenting.
Table of Contents
Understanding the basics of Stacked Column Charts
Before we dive into creating a stacked column chart, it’s important to understand what it is and how it works. A stacked column chart is a type of visual representation of data that is used to display quantitative information. It is made up of a series of columns that are stacked on top of each other to represent different categories or data points. The height of each column represents the value of the data point it represents. The columns are grouped together to create the overall chart.
Stacked column charts are useful when you want to compare the total size of a data set, as well as the contribution of individual components to that total. They can be used to show trends over time, compare different categories, or present other types of data.
It is important to note that stacked column charts may not be appropriate for all types of data. Some types of data, such as percentages or ratios, may be better represented by different chart types. It is also important to make sure that you are presenting accurate data, and that the chart is not misleading or unclear.
One of the advantages of stacked column charts is that they allow for easy comparison between different categories or data points. By stacking the columns, it becomes clear which categories are larger or smaller than others. Additionally, the use of color can further enhance the visual representation of the data, making it easier to understand at a glance.
However, it is important to be mindful of the potential limitations of stacked column charts. For example, if there are too many categories or data points, the chart can become cluttered and difficult to read. In these cases, it may be better to use a different type of chart or to group the data differently.
Choosing the right data for a Stacked Column Chart
When creating a stacked column chart, it is important to choose the right data to include. The data should be relevant to your message and easy to understand for your audience. You should also make sure that you have enough data to create a meaningful chart, but not so much that it becomes cluttered or confusing.
The data you choose will depend on your specific goals and the message you want to convey. For example, if you want to show the revenue of different departments within a company, you would use data such as sales figures or profit margins.
You should also consider the format in which your data is presented. It may be necessary to rearrange or transform your data before creating a stacked column chart. This could include formatting data as percentages, calculating totals, or combining categories.
Another important factor to consider when choosing data for a stacked column chart is the level of detail. You should decide whether you want to show data at a high level, such as overall revenue for the company, or at a more granular level, such as revenue by product line or region. The level of detail you choose will depend on the complexity of your message and the amount of information you want to convey.
Preparing your data for a Stacked Column Chart in PowerPoint
Once you have chosen the right data, it’s time to organize it in a way that can be used to create a stacked column chart in PowerPoint. This may involve formatting your data in a spreadsheet or other program before importing it into PowerPoint.
When preparing your data, it is important to ensure that it is consistent and accurate. This means making sure that data is correctly labeled, that units of measurement are consistent, and that any anomalies are identified and addressed.
Depending on the size and complexity of your data set, preparing your data may take some time. However, it is an essential step in creating a stacked column chart that is easy to understand and visually appealing.
Step-by-step guide to creating a Stacked Column Chart in PowerPoint
Now that you have prepared your data, you are ready to create a stacked column chart in PowerPoint. Follow these steps:
- Open PowerPoint and select the slide where you want to insert your chart.
- Click on the ‘Insert’ tab and select the ‘Chart’ option from the ‘Illustrations’ group.
- Select ‘Column’ from the list of chart types and choose the ‘Stacked Column’ option.
- Import your data into the chart by selecting the appropriate range in the ‘Excel sheet’ of the chart.
- Customize your chart by adding titles, labels, and legend items. You can also change the colors or fonts used in the chart.
- Review your chart to ensure that it accurately represents your data and that all elements are easy to read.
The process of creating a stacked column chart in PowerPoint may vary slightly depending on which version of PowerPoint you are using. However, the basic steps are the same.
Customizing the appearance of your Stacked Column Chart in PowerPoint
While the default appearance of the stacked column chart may meet your needs, you may want to customize it further. PowerPoint offers a range of options for customizing the appearance of your stacked column chart.
You can change the colors, fonts, and style of your chart to match your branding or design preferences. You can also adjust the size and position of the chart on your slide to ensure that it fits seamlessly with the rest of your content.
It is important to remember that customization should not compromise the clarity or accuracy of the chart. It is also important to maintain a consistent design throughout your presentation to ensure that your message is communicated clearly and effectively.
Adding labels and legends to your Stacked Column Chart in PowerPoint
In addition to customizing the appearance of your stacked column chart, you may also want to add information such as labels and legends to help your audience understand the data you are presenting.
You can add labels to the columns themselves, as well as to the axes of the chart. You can also include a legend to help your audience understand the meaning of different colors or categories on the chart.
It is important to keep the labels and legends clear and concise, and to avoid using jargon or technical terms that may be confusing for your audience.
Creating multiple Stacked Column Charts on one slide in PowerPoint
In some cases, you may want to include multiple stacked column charts on one slide in PowerPoint. This can help you to compare different data sets side-by-side or to show trends over time.
To create multiple stacked column charts on one slide, simply repeat the process for creating a stacked column chart for each data set you want to include. You can then arrange the charts on the slide in a way that makes sense for your message.
It is important to ensure that each chart is clearly labeled and easy to understand, even when presented alongside other charts.
Tips for presenting Stacked Column Charts effectively in PowerPoint
When presenting a stacked column chart in PowerPoint, there are a few tips that can help you to communicate your message more effectively:
- Limit the number of categories or data points to avoid overwhelming your audience.
- Ensure that the labels and legends are clearly visible and easy to read.
- Use colors and design elements sparingly to avoid distracting from the data.
- Focus on the main message of the chart and use the chart as a visual aid to support your presentation.
Troubleshooting common issues when creating Stacked Column Charts in PowerPoint
Creating a stacked column chart in PowerPoint can be straightforward, but there are some common issues that you may encounter. These can include issues with importing data, formatting the chart, or ensuring its accuracy. Some of the most common issues include:
- Misaligned or mislabeled data.
- Data that is not in the correct format or is missing critical information.
- Charts that are too cluttered or complex.
- Charts that are difficult to read or understand.
If you encounter any of these issues, it may be necessary to go back and revise your data or chart. You may also want to seek help from colleagues or experts in data visualization to ensure that your chart is accurate and effective.
Comparing Stacked Column Charts to other chart types in PowerPoint
While stacked column charts are a useful tool for visualizing data, there are other chart types that may be more appropriate for certain types of data or messages. Some other chart types you may want to consider include:
- Line charts, which are useful for showing trends over time.
- Pie charts, which are useful for showing proportions or percentages.
- Bar charts, which are similar to stacked column charts but display data horizontally.
When choosing a chart type, it is important to consider the nature of your data and the message you want to convey. You may also want to experiment with different chart types to see which one works best for your specific needs.
Using animations and transitions with Stacked Column Charts in PowerPoint
Animations and transitions can be a useful tool for drawing your audience’s attention to different aspects of your stacked column chart. However, it is important to use them sparingly and in a way that does not detract from the clarity or accuracy of the chart.
You can use animations to reveal different parts of the chart, to highlight specific data points, or to create a dynamic effect. Transitions can be used to move between charts or to create a seamless flow between slides.
Best practices for designing professional-looking Stacked Column Charts in PowerPoint
Designing a professional-looking stacked column chart in PowerPoint requires attention to detail and careful consideration of the audience and message. Some best practices to follow include:
- Keep the design simple and consistent throughout your presentation.
- Choose colors and fonts that are easy to read and complement your branding or message.
- Make sure the chart is accurately labeled and that the information is easy to read.
- Avoid cluttering the chart with too much information or unnecessary elements.
- Consider seeking feedback from colleagues or experts to ensure that the chart is effective and clear.
By following these best practices and using the steps outlined in this article, you can create a professional-looking stacked column chart in PowerPoint that effectively communicates your message and data.
By humans, for humans - Best rated articles:
Excel report templates: build better reports faster, top 9 power bi dashboard examples, excel waterfall charts: how to create one that doesn't suck, beyond ai - discover our handpicked bi resources.
Explore Zebra BI's expert-selected resources combining technology and insight for practical, in-depth BI strategies.

We’ve been experimenting with AI-generated content, and sometimes it gets carried away. Give us a feedback and help us learn and improve! 🤍
Note: This is an experimental AI-generated article. Your help is welcome. Share your feedback with us and help us improve.


Statistics Made Easy
How to Add Total Values to Stacked Bar Chart in Excel
Occasionally you may want to add a total value at the top of each bar in a stacked bar chart in Excel.
This tutorial provides a step-by-step example of how to create the following stacked bar chart with a total value at the top of each bar:

Let’s jump in!
Step 1: Enter the Data
First, let’s create the following dataset that shows the total sales of three different products during each month in a year:

Step 2: Calculate the Total Values
Next, we’ll use the following formula to calculate the total sales per month:
We can type this formula into cell E2 and then copy and paste it to every remaining cell in column E:

Step 3: Create Stacked Bar Chart
Next, highlight the cell range A1:E13 , then click the Insert tab along the top ribbon, then click Stacked Column within the Charts group.
The following chart will be created:

Next, right click anywhere on the chart and then click Change Chart Type :

In the new window that appears, click Combo and then choose Stacked Column for each of the products and choose Line for the Total, then click OK :

Step 4: Add Total Values
Next, right click on the yellow line and click Add Data Labels .
The following labels will appear:

Next, double click on any of the labels.
In the new panel that appears, check the button next to Above for the Label Position :

Next, double click on the yellow line in the chart.
In the new panel that appears, check the button next to No line :

The line will be removed from the chart, but the total values will remain:

Step 5: Customize the Chart (Optional)
Feel free to add a title, customize the colors, and adjust the width of the bars to make the plot more aesthetically pleasing:
Additional Resources
The following tutorials explain how to perform other common tasks in Excel:
How to Fit a Curve in Excel How to Make a Frequency Polygon in Excel How to Add a Horizontal Line to Scatterplot in Excel
Featured Posts

Hey there. My name is Zach Bobbitt. I have a Masters of Science degree in Applied Statistics and I’ve worked on machine learning algorithms for professional businesses in both healthcare and retail. I’m passionate about statistics, machine learning, and data visualization and I created Statology to be a resource for both students and teachers alike. My goal with this site is to help you learn statistics through using simple terms, plenty of real-world examples, and helpful illustrations.
One Reply to “How to Add Total Values to Stacked Bar Chart in Excel”
How do you remove the “Total” from the legend bar in your last graph?
Leave a Reply Cancel reply
Your email address will not be published. Required fields are marked *
Join the Statology Community
Sign up to receive Statology's exclusive study resource: 100 practice problems with step-by-step solutions. Plus, get our latest insights, tutorials, and data analysis tips straight to your inbox!
By subscribing you accept Statology's Privacy Policy.
Stack Exchange Network
Stack Exchange network consists of 183 Q&A communities including Stack Overflow , the largest, most trusted online community for developers to learn, share their knowledge, and build their careers.
Q&A for work
Connect and share knowledge within a single location that is structured and easy to search.
Add a trendline to a stacked bar chart
In Excel I have a stacked bar chart like this:

for which I want to add a trendline for the total (ie the full vertical bar).
The instructions I have found are for old Excel versions. One problem (apart from the different menu options) is that, if I add a total column, Add Trendline remains greyed out.
How can I add a trendline to a stacked bar chart with modern Excel?
- microsoft-excel
- microsoft-excel-365
add a column with the totals in it
Insert a combo chart, using "stacked column" for all the data and "line" for the totals
On the chart, click on the totals line and insert the trendline you want
Once the trendline is inserted, re-select the totals line and change the format to "No line"
You must log in to answer this question.
Not the answer you're looking for browse other questions tagged microsoft-excel charts microsoft-excel-365 ..
- The Overflow Blog
- Between hyper-focus and burnout: Developing with ADHD
- Why do only a small percentage of GenAI projects actually make it into...
- Featured on Meta
- Our Partnership with OpenAI
- Imgur image URL migration: Coming soon to a Stack Exchange site near you!
Hot Network Questions
- What are the meaning of CCR, CCB, and SSK on a Fujifilm camera?
- In what kinds of situations do you use "holder" and "owner"?
- What's the minimum survivable mid-air collision altitude in a glider?
- Could Android go on PC?
- As 'beiseiteschieben' did not officially exist before 2006, why do we treat this (official) new form as primary and call it a "separable" verb?
- Changing output impedance of a logic gate to 50 ohm
- meaning of "work itself out"
- How does a low-accuracy, high-damage action work in World of Darkness's dice system?
- How far can you push Object Oriented Programming?
- Freeness of a quotient module over a regular local ring
- Did Poincaré ever made mistakes in the books or papers he published?
- How to read/write word from DECtape on SIMH?
- Does the rear derailleur hanger need lubrication
- “Out of the mouths of babes”: Is this idiom strictly used to refer to children?
- How are `vti` and `xfrm` iproute2 interfaces supposed to be configured and used with xfrm states and policies?
- Creating list of adjacent polygons in QGIS
- Could a Thri-Kreen use its secondary arms to operate two-handed ranged weapons?
- What is the purpose of the top tube on bicycles?
- What would one use a theory of quantum gravity for?
- 43 cookies are randomly given to 10 children. What's the probability each child receives at least 2 cookies?
- Bounds for Dirichlet L-functions
- Can you draw these figures?
- Can you share you got a Major Revision on LinkedIn?
- In search of: The Lexicon of Exekias/Ezekias
Excel Tactics
Learn how to use excel with tutorials, tips and tricks on functions, formulas, and features., how to add totals to stacked charts for readability.
![Chart Totals Above Stacked Bar Chart [IMAGE]](https://exceltactics.com/wp-content/uploads/2013/08/ChartTotalsLead.png "powerpoint show total on stacked bar chart")
The secret to adding totals to your bar charts is simple – include a total line in your original data series! Select the rows and columns you want for your chart and select one of the stacked chart options from the Insert menu:

If the X and Y axis seem wrong, don’t forget to try the Switch Row/Column trick to fix the orientation. You’ll end up with a chart that looks similar to the one below. It’s going to have a big ugly total bar at the top, but don’t worry. That’s what we want!

Make sure the chart is selected and add Center Data Labels from the Layout menu in Chart Tools .

Now there are labels for all the bars in the chart, but the big total bars are still in our way. Select only the total bars in the chart. Then, go to the Format menu from the Chart Tools group. Click the Shape Fill drop-down and select No Fill .

We’re getting closer! The total bar is now invisible, but chart is still distorted… Select only the data labels for the total bars. Right-Click one of the labels and select Format Data Labels.

From the dialog box that pops up, choose Inside Base in the Label Position category, and then Close the dialog box.

Starting to look good! But now there’s a ton of white space above the bars in the chart. This is because Excel is still automatically scaling the vertical axis to fit the invisible total bars. To fix this, double-click the vertical axis.

From the dialog box that appears, look under the Axis Options category for Maximum and change it to Fixed . Change the vertical axis maximum to a number that will still show all the visible bars and your total number. It will usually be exactly half of the default input. In this example, I changed it from the default 600 to 300.

Finally, we just need to remove the little Total line in the chart’s legend. Click on the total twice to select it and press Delete on the keyboard.

That’s it! You can play with the rest of the chart formatting to make it look how you like. I made the data labels bold and colored the interior labels white for readability. I also made the bars wider to fill up the white space. When you’re done, you’ll have a chart that looks far more professional than the defaults!

8 thoughts on “ How to Add Totals to Stacked Charts for Readability ”
Nice trick …how come i did not think of that!
Another way to do it (if you don’t have too many columns) is as follows: !. Click on the graph 2. Go to the Chart Tools/Layout tab and click on Text Box. 3. Click on the graph where you want the text box to be. 4. Then click in the formula bar and type your cell reference in there. Don’t type it directly in the text box. For your cell reference, you have to include the tab name, even if the cell is on the same tab as the graph. For example, =’ABC Company Q2 Sales’!$D$5 5.
Andrew, another way to display total without changing maximum for vertical axis. For series with totals you may just change type of chart from bar to line, and the scale is automatically adjusts.
have a nice day! A
Also, if you just click on bar with the totals you don’t have display totals for every color….just the total all the colors
Thank you so much! This was such a quick fix and the chart looks so much better!
This is great.. I don’t quite understand why *lowering* the axis maximum resizes the stack upwards, but it works, that’s the main thing.
Only thing to alert users to is that hovering over the stack will still show a total value for the element that’s ghosted-out, but this seems a minor compromise.
How do you do this to horizontally stacked bar charts?
Thanks. Very straightforward and amazing technique
Leave a Reply Cancel reply
Your email address will not be published. Required fields are marked *
A Complete Guide to Stacked Bar Charts
Posted by: mike yi, what is a stacked bar chart.
The stacked bar chart (aka stacked bar graph) extends the standard bar chart from looking at numeric values across one categorical variable to two. Each bar in a standard bar chart is divided into a number of sub-bars stacked end to end, each one corresponding to a level of the second categorical variable.
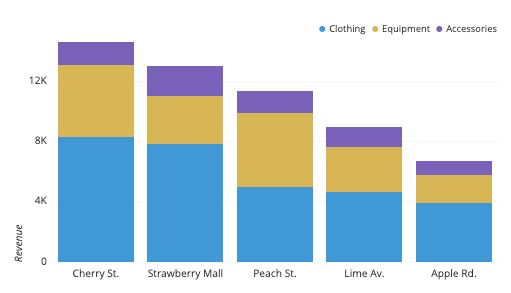
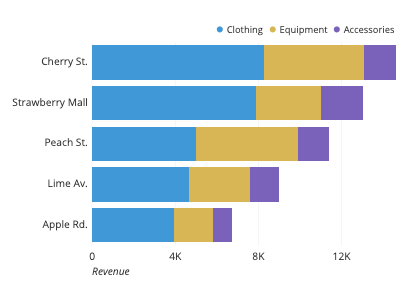
The stacked bar chart above depicts revenue from a fictional fitness retailer for a particular period of time, across two categorical variables: store location and department. The primary categorical variable is store location: we can see from the sorted overall bar heights that the Cherry St. location has the highest revenue and Apple Rd. lowest. Each bar is subdivided based on levels of the second categorical variable, department. We can see that for most locations, clothing is quite a bit larger in sales than equipment, which in turn is larger than accessories. The Strawberry Mall location appears to have a lower proportion of revenue attributed to equipment, while equipment has a larger share for Peach St.
When you should use a stacked bar chart
The main objective of a standard bar chart is to compare numeric values between levels of a categorical variable. One bar is plotted for each level of the categorical variable, each bar’s length indicating numeric value. A stacked bar chart also achieves this objective, but also targets a second goal.
We want to move to a stacked bar chart when we care about the relative decomposition of each primary bar based on the levels of a second categorical variable. Each bar is now comprised of a number of sub-bars, each one corresponding with a level of a secondary categorical variable. The total length of each stacked bar is the same as before, but now we can see how the secondary groups contributed to that total.
Order of categorical variables
One important consideration in building a stacked bar chart is to decide which of the two categorical variables will be the primary variable (dictating major axis positions and overall bar lengths) and which will be the secondary (dictating how each primary bar will be subdivided). The most ‘important’ variable should be the primary; use domain knowledge and the specific type of categorical variables to make a decision on how to assign your categorical variables.
For example, if one categorical variable depicts temporal data (e.g. monthly summaries 20XX-Jan, 20XX-Feb, 20XX-Mar, etc.) then that will usually be a clear choice for the primary categorical. Next in the general hierarchy are other ordered or numeric variables, like age ranges (18-24, 25-34, 35-44, etc.) or ranked scores (agreement on scale from 1-7). Purely label-style categorical variables (e.g. gender, department, geographical region) usually don’t have as strong a weight for being considered as primary. As another consideration, variables with more levels are generally better as primary variables; we want to limit the number of secondary levels to a fairly small amount to make the stack breakdowns easier to read.
Ultimately, these rules of thumb are only general guides. Domain knowledge, visualization objectives, and experimentation will show you the best hierarchy for the categorical variables for each case. For example, if we’re interested in seeing an age breakdown by product department, this is a good reason to set the purely categorical variable (department) as the primary.
Example of data structure
Data for a stacked bar chart is typically formatted into a table with three or more columns. Values down the first column indicate levels of the primary categorical variable. Each column after the first will then correspond with one level of the secondary categorical variable. The main cell values indicate the length of each sub-bar in the plot. Bars are built across rows: when the stacked bar chart is generated, each primary bar will have a total length be the sum across its corresponding row.
For certain tools, an intermediate step for creating a stacked bar chart may require computing cumulative sums across each row. The right-most column will contain the lengths of the primary bars. Sub-bars are defined by the differences in values between consecutive columns. For tools that require this kind of data table structure, beware of negative values since this can cause overlaps or gaps between bars that misrepresent the data.
Best practices for using a stacked bar chart
Stacked bar charts, by their nature, suggest following the same best practices as the standard bar charts they are built up from. However, the addition of a second categorical variable brings additional considerations for creating an effective stacked bar chart.
Maintain a zero-baseline
When a standard bar chart encounters a negative value, the corresponding bar just gets plotted below or to the left of the baseline (depending on if the bars are vertically or horizontally oriented, respectively). In a stacked bar chart, a similar representation can be performed, just stacking bars in the negative direction.
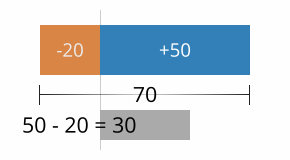
However, when positive bars and negative bars are combined, it is no longer the case that the overall length of the bar corresponds to the bar’s total value. When this occurs, it is a good idea to plot an additional line or series of points on top of the bars to show the true total: the difference between the lengths of the positive bars and negative bars.
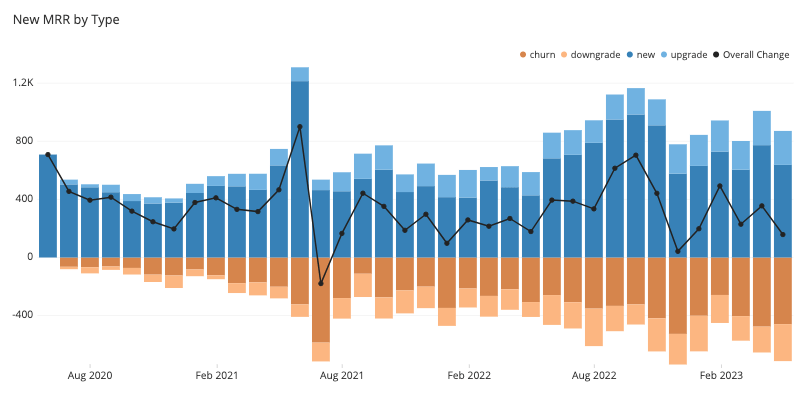
When the secondary values are consistently positive or negative for each subgroup, it is easy to maintain a consistent ordering of sub-bars within each primary bar. However, if multiple subgroups switch between positive and negative at different times, a nice ordering will not be possible as bars switch between being above and below the baseline. In cases like this, it might be best to consider a different chart type for the data. A line chart or grouped bar chart can provide a more consistent display of individual groups, although they lose the ability to see the primary totals. If seeing a total is truly important, that can always be shown in an additional plot – don’t feel as though you need to show everything in a single plot.
Ordering of category levels
With a stacked bar chart, you will need to consider the order of category levels for both categorical variables to be plotted. The rule of thumb for standard bar charts can be applied in both variables: order the bars from largest to smallest unless there is an intrinsic order of levels.
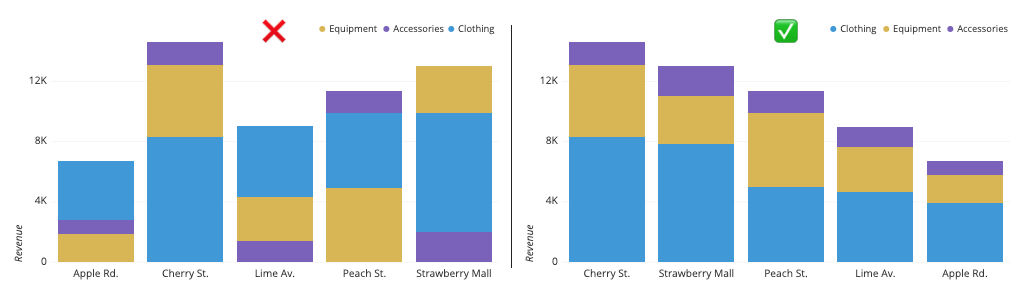
To clarify this rule for the secondary categorical variable, this decision should be based on the overall size of each categorical level. It’s a good idea for each primary bar to be stacked in exactly the same order. Maintaining this consistency makes it easier to associate sub-bars to secondary category levels. This consistency also means that the group that is plotted first always sits on the baseline, making their sizes easy to read. Thus, if tracking exact values is important for a particular secondary variable level, then its sub-bars should be placed on the baseline instead.
Choosing effective colors
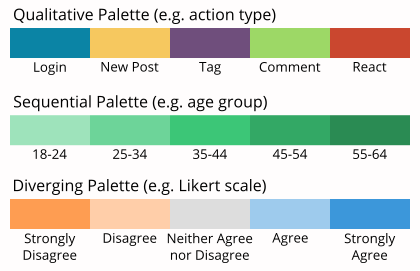
While the general recommendation is to stick with a single color in a standard bar chart, use of color to distinguish secondary variable levels is an inevitability for a stacked bar chart. The important point is to make sure that the choice of color palette to assign to each categorical level matches the variable type: a qualitative palette for purely categorical variables, and sequential, or diverging for variables with a meaningful order.
Common misuses
Interpreting values on individual groups in a stacked area chart.
While it is straightforward to compare the total numeric values across the levels of the primary categorical variable, it is less straightforward to gauge other divisions or comparisons using the secondary categorical variable. If we want to see the change in a secondary level across the primary categorical variable, this can only be easily done for the level plotted against the baseline. For all other secondary levels, their baseline will experience shifts, making it more difficult to judge how the sub-bar lengths change across primary bars. In the below example, it can be difficult to tell that the central yellow group is actually decreasing slightly over time.
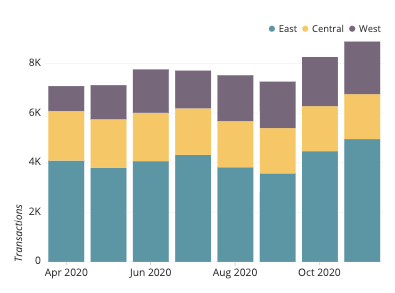
Even trying to compare sub-bars within each primary bar can be difficult. Even when following a guideline to sort secondary category levels by overall size, this presents no guarantee that they will be sorted by size within a particular primary bar. In the same image above, it can be hard to tell where the purple “West” group overtakes the yellow “Central” group in size.
Keep in mind that one of the standard goals of a stacked bar chart is to make relative judgements about the secondary categorical variable, and that making precise judgments are not as important. If comparing the sub-groups is important, then a different chart type like the line chart or grouped bar chart is warranted.
Common stacked bar chart options
Horizontal stacked bar chart.
Just like the standard bar chart, the bars in a stacked bar chart can be oriented horizontally (with primary categories on the vertical axis) as well as vertically (with primary categories on the horizontal axis). The horizontal orientation serves the same benefits as before, allowing for the easy display of long category levels without rotation or truncation.
Percentage stacked bar chart
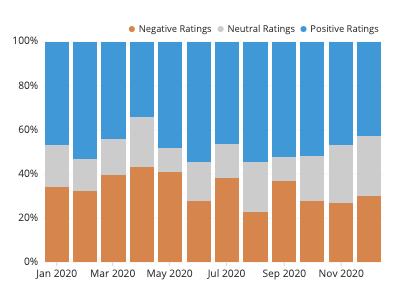
Another common option for stacked bar charts is the percentage, or relative frequency, stacked bar chart. Here, each primary bar is scaled to have the same height, so that each sub-bar becomes a percentage contribution to the whole at each primary category level. This removes our ability to compare the primary category levels’ totals, but allows us to perform a better analysis of the secondary groups’ relative distributions. The fixing of the heights of each primary bar to be the same also creates another baseline at the top of the chart where a second subgroup can be tracked across primary bars.
Value annotations
One way of alleviating the issue of comparing sub-bar sizes from their lengths is to add annotations to each bar indicating its size. This adds a bit more visual clutter, however, so be careful about whether or not it is used. Make sure that the stacked bar chart is in alignment with your primary goals for the visualization, or otherwise choose a different chart type.

Related plots
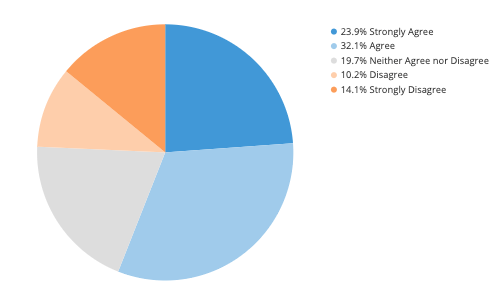
When there is only one bar to be plotted, a pie chart might be considered as an alternative to the stacked bar chart. However, you should try not to use a pie chart when you want to compare two or more primary groups, as is normally the case with a stacked bar chart. Since pie charts generally do not have any tick markings, it can be more difficult to gauge accurate proportions both within and between pies. Pie charts are also limited to relative or percentage comparisons, rather than absolute values. In addition, multiple stacked bar charts will tend to take up less space than multiple pie charts, allowing for an easier view of the full data.
When the primary categorical variable is derived from a continuous feature, such as periods of time, we have the option of using a stacked area chart rather than stacked bars. Stacked areas tend to emphasize changes and trends rather than exact numbers, and it is much cleaner to read when there would otherwise be a lot of bars to plot. In addition, an area chart’s connected nature helps to emphasize the continuous nature of the primary variable.
Grouped bar chart
If we unstack each of the primary bars and instead place the sub-bars in groups on the baseline, then we get a grouped bar chart , also known as a clustered bar chart. With a grouped bar chart, we trade out our ability to observe the totals within each primary category level and gain a more precise understanding of how secondary categories rank within each primary category level.

Marimekko chart
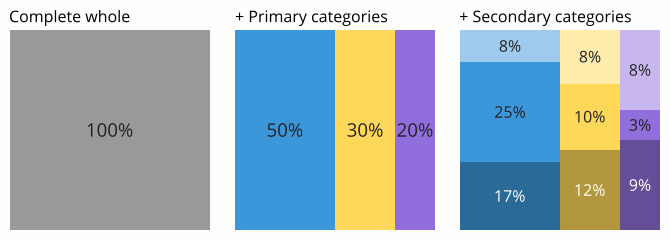
When our numeric variable represents some kind of overall whole that has been divided into parts across two categorical variables, then a more obscure chart type we could choose is the Marimekko chart (aka Mekko chart, mosaic plot, matrix plot). A Marimekko chart is essentially a square or rectangle that has been split into a stacked bar chart in two sequential directions. Compared to the standard absolute value stacked bar chart, each of the primary bars will now have the same length but different widths. Note that this makes interpretation of sub-bars even more difficult in a marimekko chart compared to a stacked bar chart since we cannot just look at bar lengths, but instead need to look at box areas.
Visualization tools
Stacked bar charts are a common chart type for visualization tools, as they are built upon the ubiquitous standard bar chart. Depending on the tool used, the stacked bar chart might simply be part of the basic bar chart type, created automatically from the presence of multiple value columns in the data table. Tools may also put the stacked bar chart and grouped bar chart together, with an option to choose between them.
When a stacked bar chart is not a built-in chart type for a tool, it may be possible to create one by generating multiple bar charts on top of one another. This is where computation of cumulative totals or addition of logic to handle negative values will be necessary.
The stacked bar chart is one of many different chart types that can be used for visualizing data. Learn more from our articles on essential chart types, how to choose a type of data visualization , or by browsing the full collection of articles in the charts category .

- Tips & Tricks
- PowerPoint Templates
- Training Programs
- Free E-Courses
Bar Chart in PowerPoint – Formatting Tips
Home > PowerPoint Tutorials > Bar Chart in PowerPoint
Unlock the potential of your data slides by discovering useful formatting tips for bar charts in PowerPoint. Make your data more visually appealing and communicate your message more effectively with these easy-to-follow tips.
New: 3 Tips You Didn’t Know About Improving Bar Charts
Know more about Visual PowerPoint Graphs Pack
Tip 1: Adjust gap width for your bar chart in PowerPoint:
At times, you may wish to adjust the gap width of your bar or column charts in a data presentation to add visual interest. For example, take a look at this bar chart template, where we have employed this technique:

Source: Step Chart Templates from Visual Graphs Pack
You may want to present your data in a new and exciting way, such as with this quilt chart template. This template provides a visually appealing way to display your data, allowing you to easily compare and contrast different elements. With this template, you can quickly and effectively communicate your data to your audience.

Source: Performance Comparison Across Products
To vary the gap width of your charts, follow these simple steps: 1. Select the chart you wish to modify. 2. Right-click on the chart and select "Format Data Series" from the menu. 3. In the "Format Data Series" window, select the "Options" tab. 4. Adjust the "Gap Width" slider to the desired width. 5. Click "OK" to save your changes. Varying the gap width of your charts is a simple process that can help you create more visually appealing and informative visuals. With just a few clicks, you can customize your charts to better communicate your data.
Steps to follow with Screenshots:
First, add a basic bar chart in PowerPoint.

Next, right click on the Chart-> go to Format Data Series -> Series Options -> Gap width.

When you move the handle to the left, the columns widen. Here is what it will look like:

You can use this simple formatting tip to create your own variations like the examples you saw in the article.
Related: Formatting tips for Charts in PowerPoint
Tip 2: Overlap data series:
Another useful tool for formatting bar charts is the 'Series Overlap' function. This function can be used to add visual interest to your charts, as demonstrated in the following column template:

Source: Chart Templates from Visual Graphs Pack
You can create advanced chart templates with the 'Series Overlap' function as follows:

On the basic Bar chart in PowerPoint, Right click on a series ->go to Format Data Series -> Series options -> Series Overlap.

When you move the handle to the right the bars overlap. The result will be as follows:

You can use both these tips for column charts as well.
The two tips in this article will help you format your charts better.
Related: Create a Data Driven PowerPoint Thermometer
Smart option for business presenters:
If you're a busy presenter who needs a smarter way to create professional data presentations without wasting too much time, then our 'Visual PowerPoint Graphs Pack' is the perfect solution for you. With over 320 business-relevant diagram templates, you'll be able to quickly and easily create stunning presentations. All the chart templates you saw in this article are taken from the pack. Editing the charts is surprisingly simple. Just right-click on any of the chart templates and select 'Edit data'. A worksheet will open up, allowing you to replace the sample data with your own. Plus, the chart will update itself automatically with new values, so you don't even have to type in the numbers. You can even copy and paste data from your own Excel file.

Why spend time constructing your data charts from scratch when you have such a high-quality solution available? Click here to learn more about the pack and start creating professional presentations with ease!
Related: PowerPoint Pie charts – 3 Issues and Solution
Return to Top of Bar Chart in PowerPoint Page
Share these tips & tutorials
Get 25 creative powerpoint ideas mini course & members-only tips & offers. sign up for free below:.
- Insert a bar chart Video
- Customize a bar chart Video
- Insert a linked Excel bar chart Video

Insert a bar chart

Quickly add a bar chart to your presentation, and see how to arrange the data to get the result you want. Customize chart elements, apply a chart style and colors, and insert a linked Excel chart.
Add a bar chart to a presentation in PowerPoint
Use a bar chart to illustrate comparisons over a period of time. When you need a bar chart in a presentation, use PowerPoint to create it, if the data is relatively simple and won’t need frequent updates (otherwise, see Copy an Excel chart below in this summary). Here’s how:
Click INSERT > Chart .
Click the chart type and then double-click the chart you want. For help deciding which chart is best for your data, see Available chart types .
In the spreadsheet that appears, replace the default data with your own information.
When you have finished, close the spreadsheet.
Change the format of data labels in a chart
Copy an Excel chart to another Office program
Use a bar chart to illustrate comparisons over a period of time.
In this chart, showing Annual Expenses, we are comparing Actual expenses against Projected ones, shown by horizontal bars.
The values for the bars are displayed along the horizontal axis.
The units of time, Annual Quarters, are listed along the vertical axis.
With its horizontal orientation, a bar chart works especially well with the landscape orientation of a slide.
When you need a bar chart in a presentation, use PowerPoint to create it, if the data is relatively simple and won’t need frequent updates.
By contrast, if your data is more complex or you plan to update it frequently, create the chart in Excel, and copy it into PowerPoint.
We cover this in Movie 3: Insert a linked Excel bar chart.
To create a bar chart in PowerPoint, on the HOME tab, click the arrow next to New Slide and select Blank to insert a blank slide.
Then click INSERT , Chart , and choose Bar .
The default chart is a Clustered Bar type. I’ll point to it for a larger preview.
The compared values are shown in bars, clustered next to each other.
That’s what I want for my data, so I’ll click OK .
The chart is inserted, and a small window, with the placeholder data, appears. We’ll type our data here.
We’ll start with the categories, where we’ll type in a heading for each quarter.
Now, for bar charts, the categories appear in the reverse order of what you might expect.
Category 1, on the top row of the data window, appears at the bottom in the chart.
So, I’ll start with Quarter 4. I click the cell, type: QTR4, QTR3, QTR2, and QTR1, and press Enter.
The headings appear in the chart, and their order starts with QTR1.
For the series, we’ll first type headings for the data: Projected expenses and Actual ones.
We don’t have a third series to compare, so I’ll point to the D column and click to select it, right-click, and press Delete.
Now I’ll type in the data: For Projected expenses, I click the cell, and type the first number, which is 120.
When I click the next cell, the bars in the chart update to show the new value.
I have typed in the Projected expenses, and now, I’ll type in the Actual expenses.
We have typed in our data, so I’ll click X to close the data window.
And I’ll Zoom In a little to see the chart better.
The series headings, Actual and Projected, appear in the legend, and the bars reflect our data amounts.
The value increments were automatically calculated and show along the horizontal axis.
Up next: Customize a bar chart .

Need more help?
Want more options.
Explore subscription benefits, browse training courses, learn how to secure your device, and more.

Microsoft 365 subscription benefits

Microsoft 365 training

Microsoft security

Accessibility center
Communities help you ask and answer questions, give feedback, and hear from experts with rich knowledge.

Ask the Microsoft Community

Microsoft Tech Community

Windows Insiders
Microsoft 365 Insiders
Was this information helpful?
Thank you for your feedback.
- Power BI forums
- News & Announcements
- Get Help with Power BI
- Report Server
- Power Query
- Mobile Apps
- DAX Commands and Tips
- Custom Visuals Development Discussion
- Health and Life Sciences
- Power BI Spanish forums
- Translated Spanish Desktop
- Power Platform Integration - Better Together!
- Power Platform Integrations (Read-only)
- Power Platform and Dynamics 365 Integrations (Read-only)
- Training and Consulting
- Instructor Led Training
- Dashboard in a Day for Women, by Women
- Community Connections & How-To Videos
- COVID-19 Data Stories Gallery
- Themes Gallery
- Data Stories Gallery
- R Script Showcase
- Webinars and Video Gallery
- Quick Measures Gallery
- 2021 MSBizAppsSummit Gallery
- 2020 MSBizAppsSummit Gallery
- 2019 MSBizAppsSummit Gallery
- Custom Visuals Ideas
- Upcoming Events
- Community Blog
- Power BI Community Blog
- Custom Visuals Community Blog
- Community Support
- Community Accounts & Registration
- Using the Community
- Community Feedback
Earn a 50% discount on the DP-600 certification exam by completing the Fabric 30 Days to Learn It challenge .
How do I create this chart?
- Subscribe to RSS Feed
- Mark Topic as New
- Mark Topic as Read
- Float this Topic for Current User
- Printer Friendly Page
- All forum topics
- Previous Topic

- Mark as New
- Report Inappropriate Content

Solved! Go to Solution.
- Show and Tell

View solution in original post

Helpful resources

Power BI Monthly Update - April 2024
Check out the April 2024 Power BI update to learn about new features.

Fabric Community Update - April 2024
Find out what's new and trending in the Fabric Community.
How to Get Your Question Answered Quickly

Please enter your information to subscribe to the Microsoft Fabric Blog.
Microsoft fabric updates blog.
Microsoft Fabric April 2024 Update
- Monthly Update
Welcome to the April 2024 update!
This month, you’ll find many great new updates, previews, and improvements. From Shortcuts to Google Cloud Storage and S3 compatible data sources in preview, Optimistic Job Admission for Fabric Spark, and New KQL Queryset Command Bar, that’s just a glimpse into this month’s update.
There’s much more to explore! Read on and let us know what update you’re most excited about and what you found the most helpful.
Fabric Conference Day 1 Keynote is now available!
Did you miss it, or want to hear it again? We are excited to release the FabCon Day 1 Keynote to the Microsoft Fabric YouTube Channel !
If you aren’t already, be sure to subscribe to the Microsoft Fabric Channel! Check out the amazing announcements & demos from Arun, Amir, Wangui, and other awesome presenters. The Day 3 keynotes will be released later this month, and more content will be released regularly moving forward.
Make sure you check out the blog post from Arun, that highlights the announcements from FabCon you can find that here: Announcements from the Microsoft Fabric Community Conference
Earn a free Microsoft Fabric certification exam!
We are thrilled to announce the general availability of Exam DP-600 , which leads to the Microsoft Certified: Fabric Analytics Engineer Associate certification.
Microsoft Fabric’s common analytics platform is built on the instantly familiar Power BI experience , making your transition to Fabric Analytics Engineer easier. With Fabric, you can build on your prior knowledge – whether that is Power BI, SQL, or Python – and master how to enrich data for analytics in the era of AI.
To help you learn quickly and get certified, we created the Fabric Career Hub. We have curated the best free on-demand and live training, exam crams, practice tests and more .
And because the best way to learn is live, we had free live learning sessions led by the best Microsoft Fabric experts from Apr 16 to May 8, in English and Spanish. Register now at the Learn Together page.
Also, become eligible for a free certification exam by completing the Fabric AI Skills Challenge . But hurry, the challenge only runs from March 19 – April 19 and free certs are first-come, first-served! (limit one per participant, terms and conditions apply).
New Visual – 100% Stacked Area Chart
Line enhancements, enhance q&a with copilot-generated linguistic relationships, snowflake (connector update), storytelling in powerpoint – improved image mode in the power bi add-in for powerpoint, storytelling in powerpoint – continuous slide show auto refresh, storytelling in powerpoint – auto populating the slide title, introducing the fabric metadata scanning sample app, dynamic subscriptions for power bi and paginated reports, supporting folders in workspace, new “clear barcode” action in the report footer, open power bi items in full screen mode, new visuals in appsource kpi matrix growth rate chart by djeeni v1.4 aimplan comment visual.
- Financial Reporting Matrix by Profitbase
Horizon Chart by Powerviz
Drill down scatter pro by zoomcharts, image gallery, horizontal bar chart, multi-pane card 1.1.
- Introducing Copilot pane in Power BI Desktop (preview)
- Shortcuts to Google Cloud Storage and S3 compatible data sources (preview)
- OneLake data access roles – public preview
Tenant level Private Link
Managed private endpoints for microsoft fabric.
- Trusted Workspace Access for OneLake Shortcuts
- Git Integration
Partition elimination performance improvement for tables with a large number of files
Mirroring (public preview) .
- Optimistic Job Admission for Fabric Spark
- Single Node Support for Starter Pools
- Container Image for Synapse VS Code
- Git Integration with Spark Job Definition
- New Revamped Object Explorer experience in the notebook
- %run your scripts in Notebook
- Semantic Link is now GA!
Capacity level delegation for AI and Copilot
Eu customers can use ai and copilot without cross-geo setting .
- New KQL Queryset Command Bar
- New Update Command Public Preview
- Introducing Pause and Resume Feature in Eventstream
- Fabric Real-Time Analytics Integrates with Newly Announced Database Watcher for Azure SQL (preview)
- Fast copy
Service Principal Name authentication kind support for On-Premises and VNET data gateways
- Certified connector updates
Updated Fabric data pipeline homepage
- Pipeline support for CI/CD in public preview
- Data Factory Data Pipelines APIs
- Increase in Pipeline activity limit
- Fabric Warehouse in ADF copy activity
- Edit column type to destination table support added to Fabric Warehouse and other SQL data stores
- SFTP: performance improvements when writing data to SFTP
Introducing the new 100% Stacked Area Chart, now available in our core visuals gallery. These visuals display the relative percentage of multiple data series in stacked areas, where the total always equals 100%. It’s perfect for showing the proportion of individual series to the whole and how they change over time. Find it in the visual gallery, on-object dialog, or format pane, right next to the Stacked Area Chart. Give it a try and share your feedback with us!

For more detailed information about this new visual, and the new line enhancements you can read our article: PBI Core Visuals
Take your line charts to the next level with our new line control features.
- Adjust line color transparency under Lines > Colors > Transparency.
- Control the color and transparency of each series by selecting them in the ‘Apply settings to’ dropdown.
- Use Monotone and the new Cardinal smooth type for full control of smooth lines.
- Choose from before, center, and after step lines to align your visual with your story.
Try out these new features and enhance your line charts.

These new line enhancements are just the beginning, there is more to come. Try them out and stay ahead of the curve. We would love to hear about your experience and the amazing things you can achieve with these new features.
Improving your linguistic schema is an important step in making sure that the Q&A visual can understand the wide range of questions people might ask about their data. This is why, back in September , we added a new section into the Q&A setup menu to help you add linguistic relationships to teach Q&A about words which qualify or relate your data.
But we also know that coming up with all the different words people might be using to refer to your data can take time and effort, and we’ve been working on ways to make that process easier for you! In November , we introduced a way for you to quickly generate new synonyms for the names of tables and columns in your model; this month, we’ve introduced the same functionality for linguistic relationships!
When you open a report with a Q&A visual, if you have Copilot enabled and you’ve already added synonyms, you’ll now see a banner prompting you to get relationships with Copilot as well.

Unlike with synonyms, Copilot generated relationships will not be used to understand natural language inputs until you have approved them, so make sure you accept the ones which work for your model!
Allow Copilot to help interpret Q&A questions.
You can also now use Copilot to improve the Q&A engine’s term recognition when you ask questions! This new feature will trigger when you ask Q&A a question which uses words or phrases which Q&A doesn’t recognize, but which it detects might be referring to data entities like tables or columns. Then, Copilot will also check those unknown words or phrases to see if there is any reasonable match and if so, return the answer as a visual as though a suggested synonym had been applied.

This feature is not a replacement for synonyms! In fact, adding synonyms for the entities in your semantic model is even more important to create good matches, as they increase the surface area to check for similarities. It will widen the range of inputs Q&A will recognize, but like a multiplier, it will improve recognition for well modeled data much better than it will for poorly modeled data.
This feature will be automatically enabled when you choose to get synonyms with Copilot, but you can also turn it on or off manually in the suggestion settings menu in the Synonyms tab in Q&A setup.

Data Connectivity
The Snowflake connector has been updated to support the use of Snowflake dynamic tables .
We’ve made saving Power BI content as an image more simple and more powerful.
First, we’ve added a new dropdown menu to the add-in’s footer. In that menu, you can choose whether you want to see live data or a snapshot. So now it is much easier to find where to switch between live data and a static image.
Second, for snapshots, you now have two options:
Public snapshot: Anyone who can view the presentation can view the image.
Snapshot: Only those who have permission to view the report in Power BI will be able to see the snapshot.
Third, we’ve disabled the default snapshot, so that the slide thumbnail doesn’t show the image by default (this also applies when you copy & paste the slide into an email for example), but only after the add-in is loaded and the required permissions have been checked.
And lastly, we honor this setting when you open the presentation in PowerPoint for the web. You still cannot change a live view into a snapshot in PowerPoint for the web, but if you or someone else has changed the view to snapshot in the PowerPoint desktop app, this will be respected, and you will see the snapshot also in PowerPoint for the web.

PowerPoint allows you to continuously playback a presentation. This is especially useful when you want to present information in public displays without any human interaction.
If a presentation that is running continuously has slides that include the Power BI add-in, the data in the add-in might become outdated, since the add-in gets the data from Power BI when the slide is loaded, or when the user manually refreshes the data being presented.
With the new automatic refresh in slide show feature, you can set the add-in to automatically pull fresh data from Power BI while the presentation is in slide show mode, ensuring that the presentation will always show the most recent data.

To enable automatic refresh, go to the add-in footer, select Add-in options, choose Slide show settings, check Automatic refresh in slide show and set the desired frequency.
Note that auto refresh only happens in slide show mode and not while you’re editing the presentation.
When you add the Power BI add-in to an empty slide that doesn’t have a title yet, the Power BI add-in is here to help. It offers you suggestions for the slide title based on the content of you add-in. The title can be the report name, the page/visual name, or both. Just select the desired option and hit Add title.

We’re delighted to announce the availability of the new Fabric metadata scanning app. This sample application builds upon the metadata scanning capabilities of Fabric’s set of Admin REST APIs collectively known as the scanner APIs. This new app can be used as a reference for admins interested in utilizing the Scanner API to catalog and report on all the metadata of their organization’s Fabric items.
The Fabric metadata scanning sample app handles all the steps for calling the scanner API including authentication, parallelism, throttling, and incremental scanning. In addition, it provides a central configuration file which can be easily modified to suit the specific needs of the caller. Currently authentication is supported both by using a service principal and a delegated token.
The app is available as a Microsoft open-source project, and is open for suggestions and improvements here: Fabric Metadata Scanning
We’re pleased to announce that you can now send dynamic per recipient subscriptions to up to 1000 recipients instead of the earlier limit of 50 recipients from the data in the Power BI semantic model. For existing subscriptions, we will automatically send subscriptions up to 1000 recipients if your Power BI semantic model contains that many rows of data. You need to edit the subscription if you don’t want to automatically send subscriptions. Learn more about creating dynamic per recipient subscriptions for Power BI Reports and paginated reports .

This feature will be available in some regions as soon as today, however depending on the geography in which your Power BI tenant is located, it may take up to two weeks to appear.
The Power BI Mobile apps support folders in workspace. So, you can access items that are organized in folders inside of your workspace directly from the mobile app.

Workspace and folders are Fabric entities, which means that you can add items that are not necessarily Power BI items to a workspace. But the Power BI Mobile apps only support a subset of Power BI items. Therefore, only the Power BI item will be accessible when you are browsing the folder content from the app. If a folder contains only non-Power BI items, it will appear empty in the mobile app.
When a field in your model is marked as a barcode, you can use your mobile device camera to scan the barcodes of real objects to filter reports that are built on this model. This feature is extremely useful for retail, where you can scan the barcode on a piece of merchandise to get a report showing data about the item directly in your mobile app (for example, inventory information, product selling data, etc.).
To make it easier and more intuitive to use barcodes and based on feedback we’ve gotten from our users in stores, we’ve added a new button to the report footer that makes it a one-click action to clear any previously scanned barcode from the report’s filter.
Learn more about scanning barcode from the mobile app

We continue to simplify the experience of using the Power BI Mobile apps, always keeping in mind the frontline workers who need quick access to their content. In this monthly update we’ve made it possible to open Power BI items in full screen, so users can view their data at its max.
Opening an item in full screen is supported both for launch items and when using a universal link.
A launch item is a Power BI item (report, page, app, etc.) that the user has selected to automatically open when they open the app. Now, you can also tell the Power BI Mobile app to open this item in full screen mode.
To set a launch item to open in full screen mode, go to:
Settings > Launch item and enable the Open in full screen toggle.
Using an MDM tool that supports an AppConfig file, mobile device administrators can also configure a launch item to be opened in full screen mode for their users.
You can also add the query parameter? fullscreen=1 to a Power BI item’s link. When you use a link with this parameter on your mobile device, the mobile app will open the item in full screen mode.

Visualizations
Financial reporting matrix by profitbase.
Making financial statements with a proper layout has just become easier with the latest version of the Financial Reporting Matrix.
Users are now able to specify which rows should be classified as cost-rows, which will make it easier to get the conditional formatting of variances correctly:

Selecting a row, and ticking “is cost” will tag the row as cost. This can be used in conditional formatting to make sure that positive variances on expenses are a bad for the result, while a positive variance on an income row is good for the result.
The new version also includes more flexibility in measuring placement and column subtotals.
Measures can be placed either:
Default (below column headers)
Above column headers

If you have multiple fields showing on your column headers, you can now decide which of these fields you want a column subtotal for.
This is in addition to the already existing features of the Financial Reporting Matrix:
Adding custom rows
Applying company/customer specific themes
Expand/collapse columns
Conditionally hide columns
+ much more
Highlighted new features:
New Format Pane design
Measure placement – In rows
Select Column Subtotals
Row Options
*Get the visual from AppSource (fix link) and find more videos here !
A Horizon Chart is an advanced visual, for time-series data, revealing trends and anomalies. It displays stacked data layers, allowing users to compare multiple categories while maintaining data clarity. Horizon Charts are particularly useful to monitor and analyze complex data over time, making this a valuable visual for data analysis and decision-making.
Key Features:
Horizon Styles: Choose Natural, Linear, or Step with adjustable scaling.
Layer: Layer data by range or custom criteria. Display positive and negative values together or separately on top.
Reference Line: Highlight patterns with X-axis lines and labels.
Colors: Apply 30+ color palettes and use FX rules for dynamic coloring.
Ranking: Filter Top/Bottom N values, with “Others”.
Gridline: Add gridlines to the X and Y axis.
Custom Tooltip: Add highest, lowest, mean, and median points without additional DAX.
Themes: Save designs and share seamlessly with JSON files.
Other features included are ranking, annotation, grid view, show condition, and accessibility support.
Business Use Cases: Time-Series Data Comparison, Environmental Monitoring, Anomaly Detection
🔗 Try Horizon Chart for FREE from AppSource
📊 Check out all features of the visual: Demo file
📃 Step-by-step instructions: Documentation
💡 YouTube Video: Video Link
📍 Learn more about visuals: https://powerviz.ai/
✅ Follow Powerviz: https://lnkd.in/gN_9Sa6U

ZoomCharts has just launched the latest addition to their suite of user-friendly custom visuals – Drill Down Scatter PRO. It provides all the features you would expect from a great scatter chart visual, but what sets Scatter PRO apart is the ability to easily drill down. Simply click on a data point and see all the values underneath it.
This way, you can quickly find your answers while also gaining a full understanding of where they come from. Furthermore, the visual’s UI is designed to be smooth and user-friendly for PCs and touch devices, and with cross-chart filtering you can use Scatter PRO to build incredible reports for immersive data exploration.
Main features:
Drill Down: Create a multi-level hierarchy and drill down with just a click.
Dynamic formatting: Apply custom marker colors, shapes, or images to each data point directly from data.
Trendlines: Show a linear or polynomial regression line on the chart.
Thresholds: Display up to 4 line or area thresholds on each axis.
Area Shading: Highlight up to 8 custom areas with rectangles or ellipses.
🌐 Learn more about Drill Down Scatter PRO
Documentation | ZoomCharts Website | Follow ZoomCharts on LinkedIn

The Image Gallery is the first visual to be certified by Microsoft that allows for the display of high-quality images and their exportation along with other report content. There is no need to upload images to the Cloud, a CDN, or use any datasets. Simply import your images directly into the visual and share them instantly with your colleagues.
This visual boasts several impressive capabilities:
Microsoft certification ensures that the visual doesn’t interact with external services, ensuring that your images are securely stored and encrypted within the report, consistent with your report’s sensitivity settings.
Automatically saves your selected image in preview mode, allowing your colleagues to view the exact image you have highlighted.
Images can be uploaded or removed exclusively in Edit Mode. Users in View Mode can only view the images.
The visual is compatible with Power BI’s export functionality to PDF and PowerPoint.

Image Gallery Link
A space-saving horizontal bar chart designed with category labels placed inside the bars for clarity.
This horizontal bar chart serves as an efficient filter to navigate through your data more effectively, optimizing space by placing the category labels within the bars themselves.
Adjustable Bar Thickness and Spacing: Offers the flexibility to adjust the thickness of the bars and the spacing between them. This allows for optimal use of space and improves readability, especially when dealing with large datasets.
Tooltip Details on Hover: Displays detailed information about each category when the user hovers over a bar. This feature provides additional context and insights without cluttering the visual.
Data-Driven Category Labels: Automatically updates category labels based on the data source. This ensures that the chart remains accurate and up to date, reflecting any changes in the underlying data.
Support for Hierarchical Data: Allows users to drill down into hierarchical categories within the chart. This functionality enables a more detailed data analysis without leaving the context of the initial visual.
Export Options: Offers the ability to export the chart as an image or PDF, facilitating easy sharing and reporting outside of Power BI.

HorizontalBarChart Link
Introducing the “ Trends ” visual for Power BI – your gateway to leveraging Google Trends data for strategic business analysis. This innovative visual tool allows you to compare brand popularity, monitor market trends, and gain insights into consumer search behaviors directly within your Power BI environment.
With Trends visual, you can:
Analyze the ebb and flow of brand interest over time to identify market opportunities and competitive threats.
Compare the popularity of products to inform marketing strategies and product development decisions.
Understand seasonal trends to optimize your marketing campaigns and inventory planning.
Securely integrated and easy to use, “Trends” transforms your Power BI reports into a dynamic analysis tool, offering a comprehensive view of the market landscape. Dive into data-driven decision-making with “Trends” and stay one step ahead in the competitive business environment.

New visual: Multi-pane Card can be used to group and show data in multiple collapsible panes in Power BI reports. It is an alternative to multi-row card visual, but it can combine columns into a few groups and put each group’s data in each pane. It is suitable to show data in detail with a reduced number of report pages.
Screenshot 1 (Show data in 3 groups: Area and Population, GDP and Foreign Exchange Reserves for countries)

Data can be sorted by a specified column and numbers can be converted to a human readable string. You can also set up how many rows that you want to show on the card. Using these features, it will be very easy to show “Top 10 best performing stores” or “Top 10 worst performing stores” for retail businesses.
Screenshot2 (Combined with drilldown choropleth map to show the top 10 richest countries by GDP per capita for each continent and subregion)

You can go to Microsoft AppSource: Multi-pane Card , to download and try it.
To learn more on how to use it, please read tutorials ( https://www.mylocs.ca/tutorials.html#multi-pane-card ).
Introducing Copilot pane in Power BI Desktop (preview)
Earlier this year, we announced preview of Copilot for all customers with Premium/Fabric capacity in Power BI web . We’re thrilled to share that the same Copilot experience for report creation is now available for preview in Power BI Desktop. With our current preview, users can create reports faster and easier in the Power BI Desktop experience. You can now open the Copilot pane in report view and ask Copilot to:
Create a report page – Copilot will create an entire report page for you by identifying the tables, fields, measures, and charts that would help you get started.
Summarize a semantic model – Copilot will help you understand your Power BI semantic model by summarizing the data in your model.
Suggest a topic – Copilot will suggest topics for your report pages.
Click here to learn more about how to get started.
OneLake
Shortcuts to google cloud storage and s3 compatible data sources (preview) .
We are excited to announce that you can now create OneLake shortcuts to your Google Cloud Storage (GCS) buckets and S3 compatible data sources!
With the addition of GCS, you can now utilize cross-cloud shortcuts to analyze your data across all three major cloud platforms. Shortcuts in OneLake allow you to connect to your existing data through a single unified name space without having to copy or move data. Just open Lakehouse in Fabric, create a shortcut to GCS, AWS S3 or ADLS Gen2 and immediately start analyzing your data through Spark, SQL and Power BI.
OneLake is also adding connectivity to data sources that offer an Amazon S3 compatible API, a widely supported API offered by many distributed file systems and services that offer object storage. With this new feature, it’s quick and easy to create a shortcut that references your cloud based S3 compatible data sources. The data source endpoint simply needs to offer S3 compatible APIs, be publicly hosted and accessible, and accept the key/secret credentials you provide during shortcut creation. Once you set up your shortcut, you can access and use your data with the many Fabric engines or other services using OneLake’s open APIs .

Learn more in our recent blog posts for S3 compatible shortcuts and GCS shortcuts !
OneLake data access roles (preview)
OneLake data access roles for folders are a new feature that enables you to apply role-based access control (RBAC) to your data stored in OneLake. You can define security roles that grant read access to specific folders within a Fabric item and assign them to users or groups. The access permissions determine what folders users see when accessing the lake view of the data, either through the lakehouse UX, Spark notebooks, or OneLake APIs.
OneLake previously managed data access at the Fabric item level. Access to the OneLake data behind a Fabric item could be granted or removed for users or groups. Data access roles now allow for defining security roles that can grant access to individual OneLake folders within a Fabric item. The granted access inherits to any newly added sub-folders in a transparent manner. Role permissions and user/group assignments can be easily updated through a new folder security UX or through API calls. The security also extends to 3rd party access requests made through the OneLake APIs.
Check out the full announcement blog or jump right into the getting started guide!
Admin
Organizations today rely on cloud platforms for storage and analysis of data at scale and need to keep up with the accelerating volume of data while protecting sensitive information. While enterprises in Banking, Healthcare, and similar domains require strict data security standards by default, securing business-critical data is the highest priority for all enterprises. We are excited to announce the public preview of an enhanced networking feature, Azure Private Link for Microsoft Fabric, for securing access to your sensitive data in Microsoft Fabric by providing network isolation and applying required controls on your inbound network traffic.
Private Links enable secure connectivity to Fabric by restricting access to your Fabric tenant from an Azure VNet of your choice and blocking all public access. This ensures that only network traffic from that VNet is allowed to access Fabric experiences like Notebooks, Lakehouses, Warehouses in your tenant.

With Azure Private Link, you can:
- Restrict traffic from the internet to Fabric and route it through the Microsoft backbone network.
- Ensure only authorized client machines can access Fabric.
- Comply with regulatory and compliance requirements that mandate private access to your data and analytics services.
While Azure private links were supported in Power BI at a tenant level, we are now extending this feature to other Fabric workloads with this release. For example, connecting to your data in Onelake using the OneLake Explorer can be protected through Private Links. Similarly, you can access Warehouses and Lakehouse SQL endpoints in SQL Managed Studio via Private Links. A list of supported scenarios and limitations can be found at Use private link to access Fabric. for detailed instructions, please refer to How to set up private endpoints to access Fabric .
We are excited to announce the public preview of Managed Private Endpoints for Microsoft Fabric. This feature allows secure connections to data sources that are behind a firewall or not accessible from the public internet. Managed Private Endpoints enable Fabric Data Engineering items to access data sources securely without exposing them to the public network or requiring complex network configurations. These private endpoints provide a secure way to connect and access data from sources like Azure SQL DB or Storage account blocked from public access from your Fabric Spark Notebooks or Spark Job Definitions.

Workspaces with managed private endpoints have network isolation through a dedicated managed virtual network. These managed virtual networks (Managed VNETs) separate the Spark compute clusters from the shared virtual network and enable network security features such as private links and managed private endpoints. Microsoft Fabric takes care of the provisioning and management of the virtual networks and private endpoints, so users do not have to create or manage these network infrastructure resources themselves.
By just providing connection details, your managed private endpoint is instantly provisioned in the Managed VNET and a request for private endpoint access is submitted to the data source administrator for approval.
Users can track the status and approval process of the managed private endpoints from the Network security section of the Workspace settings.
Managed Private Endpoints support various data sources, including Azure Storage, Azure SQL Database, Azure Synapse Analytics, Azure Cosmos DB, Application gateway, Azure Key Vault, and many more.
Learn more about the data sources supported, please refer to our documentation Create and use managed private endpoints in Microsoft Fabric (preview) – Microsoft Fabric | Microsoft Learn
Note: Managed private endpoints are only supported for Fabric Trial capacity and Fabric capacities F64 or higher SKUs.
To learn more about the benefits, detailed steps of setup and limitations of managed private endpoints in Microsoft Fabric, please refer to our documentation Overview of managed private endpoints in Fabric.
To learn more about network isolation offered by managed virtual networks, please refer to Overview of managed virtual networks in Fabric .
Trusted Workspace Access for OneLake Shortcuts
Trusted workspace access allows you to securely access firewall-enabled Storage accounts. With Trusted workspace access, you can create OneLake shortcuts to Storage accounts, and then use the shortcuts in various Fabric items, such as Spark notebooks, SQL analytics endpoints, semantic models, reports, data pipelines, and dataflows Gen2.
Trusted workspace access is designed to help you securely and easily access data stored in Storage accounts from Fabric workspaces, without compromising on performance or functionality. You can leverage the power and flexibility of Fabric and OneLake to work with data in place without compromising on security.
How does Trusted workspace access work?
Trusted workspace access is based on the concept of workspace identity, which is a unique identity that can be associated with workspaces that are in Fabric capacities. When you create a workspace identity, Fabric creates a service principal in Microsoft Entra ID to represent the identity.
Workspace identity enables OneLake shortcuts in Fabric to access Storage accounts that have resource instance rules configured. Resource instance rules are a way to grant access to specific resources based on the workspace identity or managed identity. You can create resource instance rules by deploying an ARM template with the resource instance rule details.
To leverage Trusted workspace access in Fabric workspaces, you can create a OneLake shortcut in a Lakehouse, and provide the URL of the Storage account that has been configured with a resource instance rule. While creating the shortcut, you need to select organizational account or service principle for authentication and ensure that the principle used for authenticating to Storage has the appropriate Azure RBAC roles on the Storage account. Once the shortcut is created, you can use it in various Fabric items.
How to get started with Trusted workspace access?
Trusted workspace access is available for workspaces in Fabric capacities (F64 or higher). To get started with Trusted workspace access, you need to do the following steps:
- Create a workspace identity for your Fabric workspace if you don’t have one already. If you face issues with creation of the workspace identity, follow the troubleshooting guidelines provided here .

Create a workspace identity.
2. Configure resource instance rules for the Storage account that you want to access from your Fabric workspace. Follow the guidelines for configuring resource instance rules for Fabric workspaces here .

Resource instance rules in a Storage account
- Create a OneLake shortcut to the Storage account in a Lakehouse and select the organizational account or service principal option for authentication.

Create an ADLS g2 shortcut in a Lakehouse.
4. Use the OneLake shortcut in various Fabric items, such as Spark notebooks, SQL analytics endpoints, semantic models, reports, data pipelines, and dataflows Gen2.

Access data stored in firewall-enabled Storage accounts through OneLake shortcuts.
For more details and guidance on how to use Trusted workspace access, please refer to the documentation links below.
- Trusted workspace access in Fabric
- Workspace identity in Fabric
Synapse
Data warehouse , git integration .
We are excited to announce the Git integration for the Warehouse! This feature allows you to check in the changes of your Warehouse into an Azure DevOps Git repository as a SQL database project. Git integration enables source control capabilities for developers to integrate their development processes, tools, and best practices directly into the Fabric platform.
Some scenarios that are enabled by Git:
- Backup and version development work
- Revert to previous stages
- Collaborate with others or work alone using Git branches
- Apply the capabilities of familiar source control tools to manage your Warehouse
- Commit changes
- Sync changes from Git
- Manage conflict resolutions
- …and many more!
The SQL analytics endpoint of a Lakehouse uses partition elimination to read data from only those partitions that are relevant to the query. Recent improvements have boosted performance even more when queries are aimed at a few partitions in a table that has many files.
We are thrilled to announce Mirroring in Fabric for Azure SQLDB, CosmosDB and Snowflake is in Public Preview!
Mirroring in Fabric allows users to enjoy a highly integrated, end-to-end, and easy-to-use product that is designed to simplify your analytics needs. Built for openness and collaboration between Microsoft, and technology solutions that can read the open-source Delta Lake table format, Mirroring is a low-cost and low-latency turnkey solution that allows you to create a replica of your Azure SQL DB, Snowflake or CosmosDB data in OneLake which can be used for all your analytical needs. Learn more
Data Engineering
Optimistic job admission for fabric spark.
We are excited to announce a new feature for Fabric Spark: Optimistic Job Admission. This feature aims to reduce the frequency of throttling errors (HTTP 430: Spark Capacity Limit Exceeded Response) and improve the job admission experience for our customers, especially during peak usage hours.
Throttling errors on Spark workload occur when the Spark usage exceeds the Fabric capacity limits. In the current job admission policy, Fabric Spark reserves the maximum number of cores that a job may need during its execution, based on the maximum number of nodes that the job can scale up to. This ensures that the job will always have enough resources to run, but it also limits the number of concurrent jobs that can be admitted in the cluster.
With Optimistic Job Admission, Fabric Spark only reserves the minimum number of cores that a job needs to start, based on the minimum number of nodes that the job can scale down to. This allows more jobs to be admitted if there are enough resources to meet the minimum requirements. If a job needs to scale up later, the scale up requests are approved or rejected based on the available cores in capacity.
Optimistic Job Admission can significantly increase the max number of concurrent jobs for our customers, especially for those who use large SKUs. For example, if a customer is using F32 SKU, which has 64 Spark VCores (Based on 1 CU = 2 Spark VCores) and 192 Max Burst Cores for concurrency (based on the 3X burst multiplier), they can only run 3 jobs concurrently in the current job admission policy, assuming they have the default starter pool configuration.

Now with Optimistic Job Admission, they can run up to 24 jobs concurrently with the same configuration. This is an 8x improvement!

We hope that this feature will help you run more jobs faster and more efficiently on Fabric Spark.
Single Node Support for Starter Pools
Do you hate waiting for your Spark sessions to start in starter pools with single node configuration? If yes, you will love the update on single node starter pool support. This feature lets you set your starter pool to max one node and get super-fast session start times for your Spark sessions. With this new support that’s been introduced, the system allocates the driver and executor with 4 cores each and 56 GB in memory, so that they fit within a single medium node configuration for Starter Pools. This improves session start times to 5 seconds in single node starter pool configurations.
How can you use it?
To use this feature, follow these steps:
- Go to your Fabric workspace and choose the Workspace settings.
- Select the Data Engineering/Science option to expand the menu.

- Select the StarterPool option from the Pool selection and click on Edit.

- Set the maximum node configuration for your starter pools to 1.

- Save your changes and enjoy super-fast session start times for your Spark sessions.
Container Image for Synapse VS Code
To simplify the development process for Synapse VS Code extension, we have released a container image that contains all the necessary dependencies for the extension ( Microsoft Artifact Registry) . This image is available in Microsoft artifact repository and can be pulled with a single command. By using this image, you do not need to install Java, Miniconda, or any other tools on your local machine. You can work on your Synapse projects inside the container environment, which is isolated and consistent.
We have also integrated the container image with VS Code dev container feature, which allows you to open a folder or a repository inside a container and use the VS Code editor and extensions as usual. To use this feature, you need to install the Remote – Containers extension and create a devcontainer.json file in your project folder. We have provided a sample devcontainer.json file that you can use as a template or customize according to your needs ( SynapseVSCode/samples/.devcontainer at main · microsoft/SynapseVSCode (github.com) ). The dev container feature will automatically pull the container image, mount your project folder, and launch the VS Code editor inside the container. You can then enjoy the full functionality of the Synapse VS Code extension without any hassle.

Git Integration with Spark Job Definition
We are excited to announce the Git integration for Spark Job Definition artifacts. This feature allows you to check in the changes of your Spark Job Definitions into a Git repository, which will include the source code of the Spark jobs and other artifact properties. By using Git as a version control system, you can track the history of your Spark Job Definitions, collaborate with other developers, and implement CI/CD workflows for your Spark projects.
The Git integration for Spark Job Definition artifacts is designed to enhance your development experience and enable CI/CD scenarios for your Spark projects. We hope you find this feature useful, and we welcome your feedback and suggestions.

When a new Spark Job Definition is made with a PySpark script as the main definition file, the Git status shows that this is an unsaved change that needs to be committed.

Once the change is finalized mich

The structure of the linked git repository and the file containing the source code that was submitted.
New Revamped Object Explorer experience in the notebook
We are excited to announce the release of a revamped object explorer experience. The new experience is designed to improve flexibility and discoverability of data sources in the explorer and improve the discoverability of Resource folders.

Try it out and add new Data sources clicking on the +Data sources button and upload new modules or create folders by clicking on the Resources folder and let us know what you think.

%Run your scripts in Notebook
Now you can use %run magic command to run your Python scripts and SQL scripts in Notebook resources folder, just like Jupyter notebook %run command. By this way you can easily reuse common modules that developed from your local IDE and use them in your Fabric Notebooks conveniently. We also introduced different command parameters to make sure complex cases such as reference run and high concurrency mode can be covered without friction, stay tuned for the best practice example for the usage!

Data Science
Semantic link is now ga .
Semantic links are now generally available! The package comes with our default VHD, you can now use Semantic link in Fabric right away without any pip installation. Check it out .
We introduced a new feature in December 2023 that allows tenant admins to enable AI and Copilot in Fabric for certain security groups in addition to the entire organization. Today, we are excited to announce that you can enable AI and Copilot for a specific Capacity. You can test Copilot at a certain capacity without impacting other workloads. This allows you to adapt Copilot to meet the needs of different groups in your organization and manage your capacity more effectively.
AI and Copilot in Fabric are powered by large language models that are only available in limited datacenters. Previously, users who were not in US and France had to turn on the cross-geo setting to use AI and Copilot. Since mid-March, we updated the cross-geographic mapping logic, EU customers can use AI and Copilot without turning on the cross-geo setting, and their AI and Copilot requests will be processed within EUDB. Check it out !
Real-time Analytics
New kql queryset command bar.
Finding the commands for the actions you are trying to perform just got easier with our latest update to the KQL Queryset. Now, it’s easy to distinguish between actions applicable at the Queryset level and the single query level.
Introducing a secondary command bar within the query editor dedicated to hosting query-level actions. Enjoy smoother navigation and streamlined functionality for a more efficient querying experience.

New Update Command Public Preview
The new update command is now in public preview!
This allows you to update existing records in a Kusto Table. This can be useful to fix ad hoc data issues or be integrated into a data loading pipeline. The command has a “what if” mode to try a command before running it on your data.
.update table Employees on Id <|
MyStagingTable
| where true
Introducing Pause and Resume Feature in Eventstream
We’re excited to introduce a powerful new feature in Fabric Eventstream: The Pause and Resume Feature. This powerful capability empowers you with unprecedented control over your data streams, enabling you to pause data streaming from various sources and destinations within Eventstream. You can then resume data streaming seamlessly from the paused time or a customized time, ensuring no data loss.
Key Features:
- Activate/Deactivate All : You can quickly pause and resume all data traffic flowing in and out of Eventstream with the Activate All and Deactivate All options on the menu bar.
- Toggle Switch Button : Each node has a convenient toggle switch button, allowing you to activate or deactivate any data source from streaming in or out of Eventstream with ease.

With the Pause and Resume feature in Fabric Eventstream, you can pause traffic from specific sources and destinations whenever needed. Whether it’s for troubleshooting purposes, building proof-of-concepts with test data, or minimizing unnecessary data processing costs, this feature offers unparalleled control over your data streams and leads to more efficient resource allocation.
Fabric Real-Time Analytics Integrates with Newly Announced Database Watcher for Azure SQL (preview)
Azure SQL family users can now take advantage of an enhanced monitoring solution for their databases and leverage Microsoft Fabric integration. With the introduction of the new Database Watcher for Azure SQL (preview), users gain access to advanced monitoring capabilities. Through integration with Microsoft Fabric, they can effortlessly stream, store, and analyze monitoring data in real-time using an Eventhouse database in Fabric Real-Time Analytics. This integration enables users to stay informed about their database performance and make timely, informed decisions.
Database watcher is a new managed monitoring solution for database services in the Azure SQL family. It supports Azure SQL Database and Azure SQL Managed Instance.
Database watchers collect in-depth workload monitoring data to give you a detailed view of database performance, configuration, and health. Monitoring data from the databases, elastic pools, and SQL managed instances you select is collected in near real time into a central data store. To store and analyze SQL monitoring data, database watcher uses an Eventhouse database in Fabric Real-Time Analytics (as a complement option, Azure Data Explorer is also supported).
Dashboards in Azure portal provide a single-pane-of-glass view of your Azure SQL estate and a detailed view of each database, elastic pool, and SQL managed instance.

A conceptual diagram of a database watcher deployment, showing the flow of monitoring data from Azure SQL resources to a database watcher. The monitoring data is stored in Fabric Real-Time Analytics . Dashboards in the Azure portal show you a single-pane-of-glass view across your Azure SQL estate, and a detailed view of each database, elastic pool, and managed instance.
You can query data in your Eventhouse database in Real-Time Analytics using KQL or T-SQL , analyze and model your data using Real-Time Analytics Querysets or Fabric Notebooks , build custom visualizations using KQL built-in visualizations or Power BI .

To analyze collected monitoring data, the recommended method is to use KQL. KQL is optimal for querying telemetry, metrics, and logs. It provides extensive support for text search and parsing, time-series operators and functions, analytics and aggregation, and many other language constructs that facilitate data analysis. You can find examples of analyzing database watcher monitoring data with KQL in the documentation .
Summary
The dashboards, complemented by KQL queries, enable you to delve deep into the performance and configuration of your databases. This means you can detect, investigate, and troubleshoot a wide variety of database performance and health issues.
Whether you’re tackling resource bottlenecks or fine-tuning your Azure SQL resources for the best balance of cost and performance, Database Watcher equips you with the insights needed to make informed decisions. It’s your pathway to optimizing your Azure SQL setup for peak efficiency and cost-effectiveness.
Next steps
One effective approach to grasp the potential and the power of Database Watcher is to give it a try yourself. Set up your Azure SQL resources with Database Watcher, explore the dashboards, and start running some queries with KQL. To read more about Database Watcher, check out the documentation .
Data Factory
Dataflows gen2 , fast copy .
Dataflows help with ingesting and transforming data. With the introduction of dataflow scale out with the SQL DW compute, we are able to transform your data at scale. However, to do this on a scale, your data needs to be ingested first.
With the introduction of fast copy, you can ingest Terabytes of data with the easy experience of dataflows, but with the scalable back end of Pipeline’s Copy Activity.

We released support for Azure Service Principals (SPN) as an authentication kind last year. Now we’ve added support for this new authentication kind for on-premises data gateways and VNET data gateways.
Azure service principal is a security identity that is application based and can be assigned permissions to access your data sources. Service principals are used to safely connect to data, without a user identity. Learn more about service principals.
You can learn how to leverage the service principal authentication kind from the documentation available and leverage this in multiple connectors such as Azure Data Lake Storage, Dataverse, Azure SQL database, Web connector and more.
Certified connector updates
We’re pleased to announce the new and updated connectors in this release:
- [New] Topcon Aptix Insights
- [Update] BitSight Security Ratings
- [New] Zendesk Data
- [Update] Planview OKR
- [Update] BQE Core
- [New] LinkedIn Learning
- [New] LEAP
- [New] Samsara
- [Update] Celonis EMS
- [New] Supermetrics
- [New] Exact Online Premium
Are you interested in creating your own connector and publishing it for your customers? Learn more about the Power Query SDK and the Connector Certification program .
Data pipelines
The Data pipeline homepage is now updated with an all-new look! You’ll now find new guidance cards to help you find what you’re looking for more quickly.

Pipeline support for CI/CD in public preview
When developing workflows with Data Factory’s pipelines it is very important for developers to be able to save their work in a Git repository for versioning, source control, and CI/CD. We are happy to announce the public preview of CI/CD support for Data Factory pipelines! Now, you can connect your Azure DevOps (ADO) projects to your Fabric workspace and commit, merge, and branch your pipelines using Fabric’s Git integration. Additionally, you can now use the built-in Deployment Pipelines inside Fabric to assign workspaces to different environments (dev, test, prod) and promote your changes easily without using ADO!

Data Factory Data Pipelines APIs
You can now use our public APIs to create, execute, and monitor data pipelines in Fabric Data Factory.
Increase in Pipeline activity limit
As a cloud service for analytics workflows, the Data Factory team has had a limit of 40 activities per pipeline since the early days of Azure Data Factory. The same orchestration engine drives Fabric Data Factory data pipelines and we’ve reacted to your feedback that many times you need more than 40 activities in a pipeline to perform complex workflows that require error checks, branching, and other control flow capabilities. We’ve now updated the limits for the Data Factory pipeline service in both Fabric and Azure (Azure Data Factory & Synapse pipelines) to now allow up to 80 activities per pipeline.
Fabric Warehouse in ADF copy activity
We’re excited to announce that you can now connect to your Fabric Warehouse from Azure Data Factory/Synapse pipeline. You can find this new connector when creating a new source or sink destination in your copy activity.
This connector is also supported in the Lookup activity, Stored Procedure activity, Script activity, and Get Metadata activity.

Edit column type to destination table support added to Fabric Warehouse and other SQL data stores
When moving data from any supported data sources into Fabric Warehouse or other SQL data stores (SQL Server, Azure SQL Database, Azure SQL Managed Instance; Azure Synapse Analytics) via data pipelines, users can now specify the data type for each column under the destination table, as well as customize the precision and scale to certain data types such as decimal, numeric, etc.
SFTP: performance improvements when writing data to SFTP
SFTP connector has been improved to offer better performance when writing to SFTP as destination.
Related blog posts
Microsoft fabric march 2024 update.
Welcome to the March 2024 update. We have a lot of great features this month including OneLake File Explorer, Autotune Query Tuning, Test Framework for Power Query SDK in VS Code, and many more! Earn a free Microsoft Fabric certification exam! We are thrilled to announce the general availability of Exam DP-600, which leads to … Continue reading “Microsoft Fabric March 2024 Update”
Microsoft Fabric February 2024 Update
Welcome to the February 2024 update. We have a lot of great features this month including Fabric Git Integration REST APIs, Fabric notebook status bar upgrade, Copilot in Dataflow Gen2, and many more! Fabric Community Conference Join us at the Microsoft Fabric Community Conference the ultimate Microsoft Data & AI learning event, on March 26-28, … Continue reading “Microsoft Fabric February 2024 Update”
Contribute to the Microsoft 365 and Office forum! Click here to learn more 💡
April 9, 2024
Contribute to the Microsoft 365 and Office forum!
Click here to learn more 💡
Excel Forum Top Contributors: HansV MVP - Ashish Mathur - Andreas Killer - Jim_ Gordon - Riny_van_Eekelen ✅
May 10, 2024
Excel Forum Top Contributors:
HansV MVP - Ashish Mathur - Andreas Killer - Jim_ Gordon - Riny_van_Eekelen ✅
- Search the community and support articles
- Microsoft 365 and Office
- Search Community member
Ask a new question
Percentage in a Stacked BAR Chart
I have seen many youtubes and in googels showing how to add % in a stacked COLUMN chart but not many on the stacked BAR Chart.
I find it a little different doing this in the stacked BAR charts.
My 1st problem:
converting the stacked column chars into bar charts and then hiding the total bar just to show the total value is ok.
I created a reference of percentage and use the "value from cells" to be able to view percentage but my problem 1 is that % is coming first then the value, ex: 60%, 1,400. I want it be to 1,400, 60%
) that use line for the total. This is ok for COLUMN chart, when she try to chart the total bar to a line, the axis is not changing to secondarry axis.
But when i try this on a stacked BAR chart, the total bar chart when i change to any line chart it is automatically changing into SECONDARy, so this is my issue.
Report abuse
Reported content has been submitted
- Microsoft Agent |
As your requirement is shown the percentage and value on the bar of the chart and I have tried at my end where I can encounter the similar behavior as you stated in your problem 1 i.e. percentage at the beginning and value after it. As you want to have the value at the beginning and percentage at the end, I came with a workaround that satisfies your requirement. So, workaround is to add an additional data that combine both value and percentage as per our requirement. I have recorded a video of the workaround which makes you better understand it, you can click on this link (for better view download the video) to check it.
Here is the sample chart how it looks at end:

Note: I have used the sample data as shown in YouTube video.
Please give a try and let us know.
Best Regards, Chitrahaas
Was this reply helpful? Yes No
Sorry this didn't help.
Great! Thanks for your feedback.
How satisfied are you with this reply?
Thanks for your feedback, it helps us improve the site.
Thanks for your feedback.
Replies (3)
Question info.
- For business
- Norsk Bokmål
- Ελληνικά
- Русский
- עברית
- العربية
- ไทย
- 한국어
- 中文(简体)
- 中文(繁體)
- 日本語
IMAGES
VIDEO
COMMENTS
The method used to add the totals to the top of each column is to add an extra data series with the totals as the values. Change the graph type of this series to a line graph. Set the line to no ...
PPT Design Tip - Stacked Bar Chart Totals Based on Real Data: Michael from eSlide walks you through tips and tricks on how to add totals to a stacked bar cha...
Best. Unfortunately, there's no automatic way to do this. However, you can ease the pain slightly by opening the Excel data sheet that accompanies the chart. In Excel, add a =sum formula below each column of data. Now that you have the totals, transcribe those numbers to manually-created data labels that sit above each column.
In Label Totals on Stacked Column Charts I showed how to add data labels with totals to a stacked vertical column chart. That technique was pretty easy, but using a horizontal bar chart makes it a bit more complicated. In Add Totals to Stacked Column Chart I discussed the problem further, and provided an Excel add-in that will apply totals labels to stacked column, bar, or area charts.
In this PowerPoint tutorial we show you how to create total values in stacked column charts.
Add a total series to your stacked bar chart. Right-click the total series | Change Series Chart Type. Select Line option | OK. Right-click the total series | Add Data Labels. Right-click the total series | Format Data Series. Select Line Color | None. Manually move each of the total labels. For increased ease and functionality, consider ...
In this video, we will show you How to Calculate Total Values for Stacked Charts in PowerPoint - The Stacked Graph Totals can be calculated in PowerPoint eas...
Step 2: Update your chart type. Exit the data editor, or click away from your table in Excel, and right click on your chart again. Select Change Chart Type and select Combo from the very bottom of the list. Change the "Total" series from a Stacked Column to a Line chart. Press OK.
10 Tips for Designing Effective Stacked Bar Charts in PowerPoint. Stacked bar charts are a popular way to display data in PowerPoint presentations. They allow you to compare multiple categories at once and show how each category contributes to the total. However, designing an effective stacked bar chart can be challenging.
Click on the Chart icon to open the Chart dialog box. From the list of chart types on the left, select the Stacked Bar option. Click on the OK button to create your chart. This will open the Chart in the PowerPoint editor. Click on the Chart Elements button to add or remove elements from your chart, such as data labels or a chart title.
Right-click on your chart and in the menu, select the Select Data menu item. In the Select Data Source dialog box, click the Add button to create a new chart series. Once you see the Edit Series range selector appear, select the data for your label series. I would also recommend naming your chart series " Total Label " so you know the ...
Add data labels to the Totals series. Move the labels to the Above position (right click on the labels and choose "Format" to open the format dialog). Hide the Totals series by formatting it to show no lines and no markers. And don't forget to delete the unwanted legend entry: click once to select the legend, click again on 'totals ...
Open PowerPoint and select the slide where you want to insert your chart. Click on the 'Insert' tab and select the 'Chart' option from the 'Illustrations' group. Select 'Column' from the list of chart types and choose the 'Stacked Column' option. Import your data into the chart by selecting the appropriate range in the ...
Step 4: Add Total Values. Next, right click on the yellow line and click Add Data Labels. The following labels will appear: Next, double click on any of the labels. In the new panel that appears, check the button next to Above for the Label Position: Next, double click on the yellow line in the chart. In the new panel that appears, check the ...
7. add a column with the totals in it. Insert a combo chart, using "stacked column" for all the data and "line" for the totals. On the chart, click on the totals line and insert the trendline you want. Once the trendline is inserted, re-select the totals line and change the format to "No line". Share.
Make sure the chart is selected and add Center Data Labels from the Layout menu in Chart Tools. Now there are labels for all the bars in the chart, but the big total bars are still in our way. Select only the total bars in the chart. Then, go to the Format menu from the Chart Tools group. Click the Shape Fill drop-down and select No Fill.
The stacked bar chart (aka stacked bar graph) extends the standard bar chart from looking at numeric values across one categorical variable to two. Each bar in a standard bar chart is divided into a number of sub-bars stacked end to end, each one corresponding to a level of the second categorical variable. The stacked bar chart above depicts ...
Right-click on the chart and select "Format Data Series" from the menu. 3. In the "Format Data Series" window, select the "Options" tab. 4. Adjust the "Gap Width" slider to the desired width. 5. Click "OK" to save your changes. Varying the gap width of your charts is a simple process that can help you create more visually appealing and ...
Add a bar chart to a presentation in PowerPoint. Use a bar chart to illustrate comparisons over a period of time. When you need a bar chart in a presentation, use PowerPoint to create it, if the data is relatively simple and won't need frequent updates (otherwise, see Copy an Excel chart below in this summary). Here's how: Click INSERT > Chart.
I have a stacked bar chart that shows a total for each category in a column. I would like to show, as a tooltip, the % of each category (task name) of the column total. I'm new to Power BI so I'm struggling with the creating the measure. X-axis - TimesheetOwner. Y-axis - ActualBillableWork. Legend - Task Name. Any help would be appreciated ...
In this chart makeover walk through you'll learn how to take a default 100% stacked bar chart and learn the things you might want to consider fixing. You can...
Add data labels containing the value for each section, your chart should now have normal data labels. Double-click on one of the data labels and then close the resulting Format Data Label window, click in the Formula Bar and type the following formula: =Sheet1!B2 (or whichever cell contains the appropriate value and percentage for that section).
delta_from_100% = 1-[% from total] Then put 2 last measures in the stacked graph: Next steps are dealing with format. 1. Switch off the legend and the X axis : 2. Modify bars' colors: 3. customize labels , put the absolute sum instead of percents : From this point on, you have a little bit left to improve the design.
These visuals display the relative percentage of multiple data series in stacked areas, where the total always equals 100%. It's perfect for showing the proportion of individual series to the whole and how they change over time. Find it in the visual gallery, on-object dialog, or format pane, right next to the Stacked Area Chart. Give it a ...
My 1st problem: converting the stacked column chars into bar charts and then hiding the total bar just to show the total value is ok. I created a reference of percentage and use the "value from cells" to be able to view percentage but my problem 1 is that % is coming first then the value, ex: 60%, 1,400. I want it be to 1,400, 60%.
Thanks for contributing an answer to Stack Overflow! Please be sure to answer the question.Provide details and share your research! But avoid …. Asking for help, clarification, or responding to other answers.