Home Blog PowerPoint Tutorials How To Set Time Duration To Switch Slides in PowerPoint

How To Set Time Duration To Switch Slides in PowerPoint
Usually, presenters use mouse clicks, keys from a keyboard or a remote to switch slides in PowerPoint . However, if you have your presentation well-timed or have to account for every second in a presentation due to time constraints, you might want to make sure that your slides are well-timed. To do this, you can add a time duration to switch your slides. In this tutorial we will show you how to set time duration to switch slides in PowerPoint. For the purpose of this post, we will be using the Financial PowerPoint Template .
Select Your Slides from Slides Pane
In the first step, click the slide preview for the slide you wish to set time for. In case you want all your slides to switch according to a set time limit (e.g. 10 seconds), select one slide and hit CTRL+A to select all slides.
In case you want to set a different time for each slide, you will have to select each slide one by one and follow the steps shown below.

Select a Time Duration for Your Slides from the Transitions Tab
From the Transitions tab, go to ‘After’ and add a time duration after which you wish to switch your slide(s). Also make sure that ‘ On Mouse Click’ is unchecked.
The process for switching slides is similar in various versions across PowerPoint and while we are demonstrating this method using PowerPoint 2013, you will find similar options in older versions (e.g. PowerPoint 2010).

For a Single slide: For a single slide, select the respective slide from the Preview pane and add a time duration for switching the slide.

For Multiple Slides: To apply the same time duration to multiple slides, select the slides from the Preview pane using CTRL+Mouse Click, go to the Transitions tab and set a time to switch them. As mentioned earlier, you can also select all slides by clicking a single slide preview, followed by CTRL+A.
In case you have applied slide transitions, you can also set the length of the transitions using the ‘Duration’ option from the same section.

Once you have followed the aforementioned steps, switch to Slide Show mode and your slides will switch according to the set time duration.

While having well-timed slides might help in good time management, you nevertheless need good presentation slides to make an impression on your audience. Slide Model provides High-Quality PowerPoint Templates with editable slide elements which have been designed by expert professionals to give you the imagery that can be attention grabbing and visually appealing. For more details, see our plans and pricing.

Like this article? Please share
PowerPoint 2013, PowerPoint Tips, Presentation, Presentation Tips, Time, Time Management, View Presentation Filed under PowerPoint Tutorials
Related Articles

Filed under PowerPoint Tutorials • June 21st, 2024
How to Make PowerPoint Full Screen
Experience your presentation design as in the day of the event. Learn how to make a PowerPoint go Full Screen with this tutorial.

Filed under PowerPoint Tutorials • June 11th, 2024
How to Flip an Image in PowerPoint
Sometimes our slide designs require us to learn how to flip an image in PowerPoint. If that’s the case, stay tuned to this step-by-step guide.

How to Work with SVG in PowerPoint
Upgrade your graphics quality by mastering SVG graphics in PowerPoint. A detailed guide on how to create and import them.
Leave a Reply
How-To Geek
How to time your powerpoint slides for more effective presentations.

Your changes have been saved
Email Is sent
Please verify your email address.
You’ve reached your account maximum for followed topics.
Today's NYT Connections Hints and Answer for June 30 (#385)
Top tips for creating quality meeting minutes in word, your computer bios is full of settings, but which should you actually change.
Delivering a presentation is not just about giving good slides, it is also about making sure that our presentation finishes by the time our audience wants to have their tea break---so practicing how long to speak for each slide is essential for a proper presentation.
Rehearsing our Slides
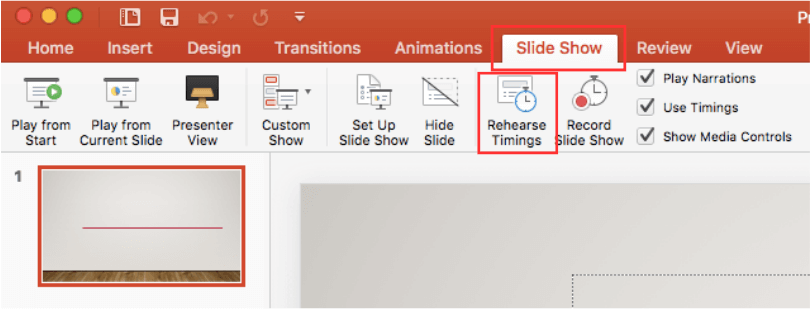
Before we rehearse, make sure that we select our first slide. Now open the 'Slide Show' tab and click the 'Rehearse Timings' button.

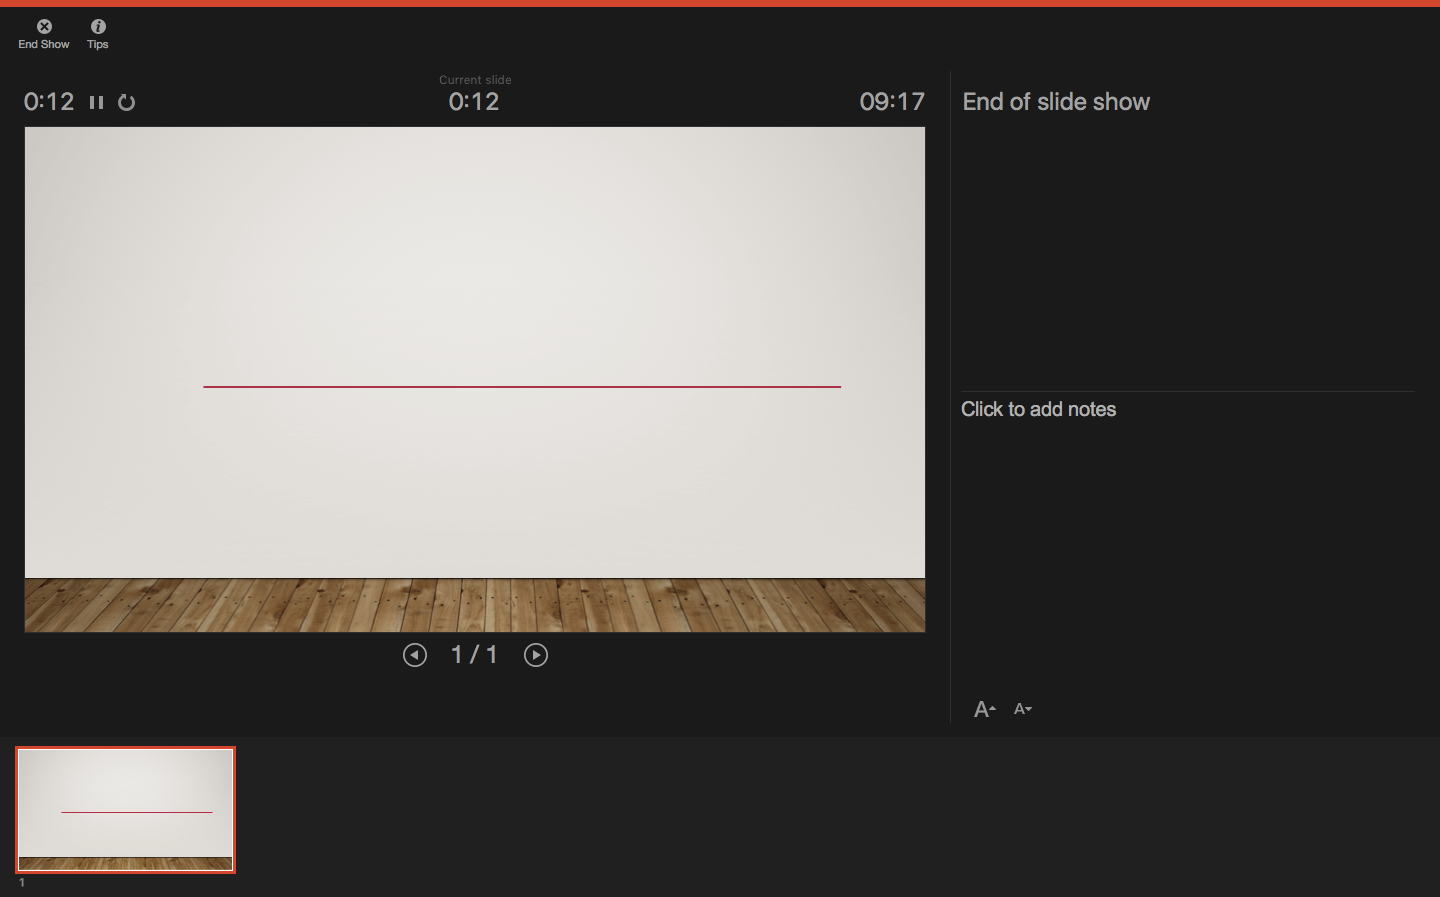
Powerpoint will start the usual presentation mode with a timer panel. The clock on the panel will start ticking once we enter the presentation mode.

Click on the arrow button to move on the next slide and Microsoft Powerpoint will record each timing as you progress from one slide to the next one. You can also click on the pause button just in case you need to answer the phone or turn off the oven while you're rehearsing your slides.

You will see a summary on how much time you have spent on each slide at the end of the rehearsal.

Create a Self-Running Presentation
You can even set a self-running power point slides and let it run according to these timing, relieving us from the need to manually navigate the slides. Bear in mind that we can run into a situation where Powerpoint changes the slides before we finish, so make sure that you can deliver each slide based on your rehearsal timing.
Click on the setup slide show button.

Select the 'Browsed at a kiosk (full screen)' option to setup a self-running Powerpoint presentation. Press the 'esc' key to stop the self-running presentation.

You can re-adjust the presentation timing by recording back from the beginning or from the current slide.

If we're still not happy with the timing, we can clear all the slides timing and redo our presentation rehearsal.

Delivering a good presentation is not an easy task and requires a lot of practice. There are tons of great things that we can do with Powerpoint to add punch to our presentation, for example:
- Adding live web pages to our presentation
- Animating text and objects
- Putting video from the web in our presentation
- Using your mouse as a laser pointer in PowerPoint 2010
What other tips do you have for giving an effective presentation?
- Microsoft PowerPoint
How to Play PowerPoint Slides Automatically

The PowerPoint autoplay feature is an amazing tool for creating slideshows that advance automatically . Self-running PowerPoint presentations are great for leaving in kiosks or publicity booths. You can even show them with recordings or voiceovers to make sure your audience gets the most out of it.
Forget worrying about clicking from slide to slide, today we will teach you how to play PowerPoint slides automatically!

We’ll cover the following topics:
Why should you use the automatic slideshow PowerPoint feature?
- How to Play PowerPoint Slides Automatically without Clicking - Option 1
- How to play slideshow in PowerPoint automatically - Option 2
How to make PowerPoint slides advance automatically with audio
- How to loop slides in PowerPoint
- Check out some experts’ best practices for Automatic slideshows in PowerPoint
How to automatically play PowerPoint presentations across devices
How to play powerpoint slides automatically without clicking on mac, elevate your presentation with professional designs: try 24slides today.
Using the automatic slideshow feature has many benefits . The main one is its practicality; it is a tool you can set up in advance so that you eliminate the need for ongoing attention and your presentation flow is better.
And that’s not all, you can even add voiceovers, recordings, and even laser pointer gestures to make sure your audience gets the most out of your presentation.
It becomes particularly beneficial in the following scenarios:
- Business presentations: An automatically progressing presentation can help you focus on your content without worrying about going slide by slide, which can often be distracting and disrupt your rhythm.
- Publicity: Self-running presentations can be great if you use them for publicity. For example, if you have a kiosk or booth, a self-running PowerPoint slideshow can help you reach more people without them having to speak one-on-one with a salesperson.
- E-Learning: In e-learning modules or training presentations, autoplay can help learners progress through the material while listening to your lecture. However, they can also pause and rewind to go to the specific section they wish to revisit.
- Photo or Video Slideshows: Autoplay is commonly used in photo or video slideshows for events such as weddings or birthdays. It can serve as a background loop, or you can present it at a special moment along with music or narration to enhance the experience.
How to Play PowerPoint Slides Automatically without Clicking: Option 1
There are a couple of different ways to make your slides run automatically, and we'll go over both options. This first option is for when you need a really customized presentation: personalized timing for each slide, voiceovers, or laser pointer gestures .
If this is your case, go ahead with this section, but if you’d like something a bit simpler, proceed to Option 2.
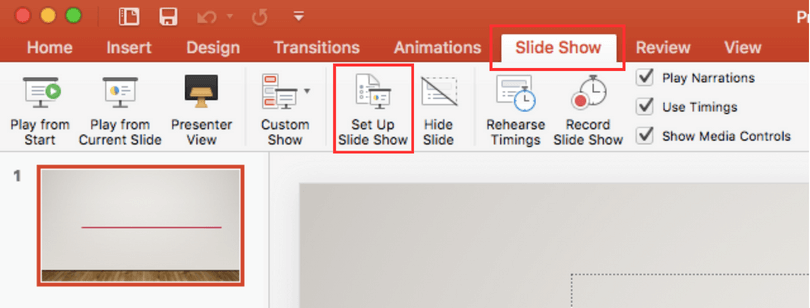
- The first step is to go to the Slide Show Tab. On the Set Up group, you’ll find the Set Up Slide Show option to start customizing your self-running presentation.

- Once the Set Up Show Window opens, deselect the Presented by a speaker option, as it refers to manually advancing your slides, either by clicking or using keys. Next, consider several options for the automatic slideshow:
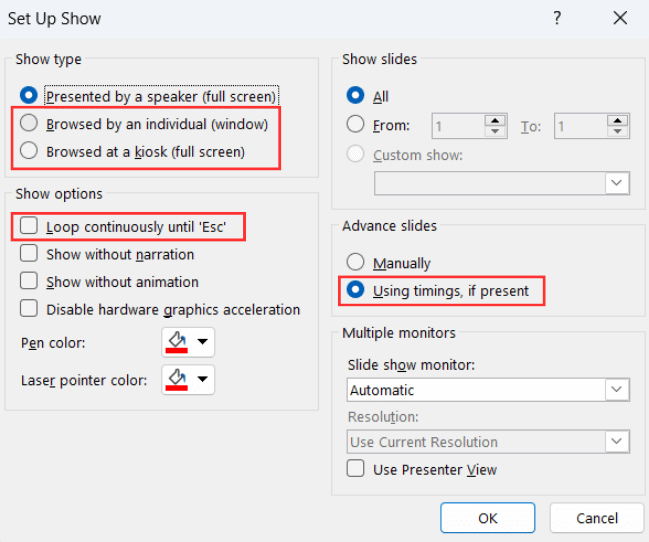
- Browsed by an individual is one choice for creating a self-running PowerPoint presentation. This option permits you to deliver your slides within a window, as opposed to the typical full-screen mode. Ensure that the Use timings, if present option is enabled for this feature to function correctly.
- Another option is the Browsed at a kiosk , which allows you to run a full-screen, continuous slideshow automatically. This option locks in both the looping and timing settings, ensuring that your slideshow will continue until you press the ESC key.
If you’re not sure what option is the best for you, remember you can always select manually the loop and timings option . Try different options with these and try out how your presentation will look like with the different settings.
- The next step is to set your timings. This means defining how much time you want your PowerPoint slideshow to spend on each slide before automatically advancing to the next one.
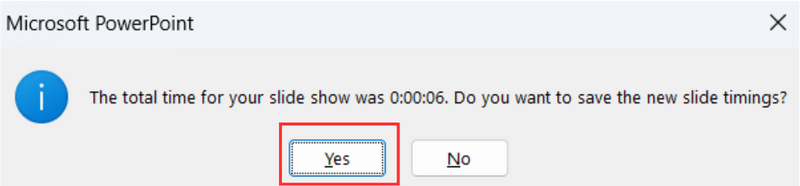
To set your timings, click on Rehearse Timings , which will allow you to go through your presentation slide by slide, and it’ll record how much time you spend on each one.

After you finish going through all your slides, a message will pop up to save your timings. Click yes so you can save the time spent on each slide.
How to play slideshow in PowerPoint automatically: Option 2
Let’s take a look at a different way of using the PowerPoint autoplay feature. This option is great if you’re looking for something simple and just want your slides to advance automatically at regular intervals.
- First, open the Transitions Tab and locate the Timing Group.

- Go to the After option and manually add how much time you want to spend on each of your slides.

Select the Apply To All option so all your slides have the same timing.
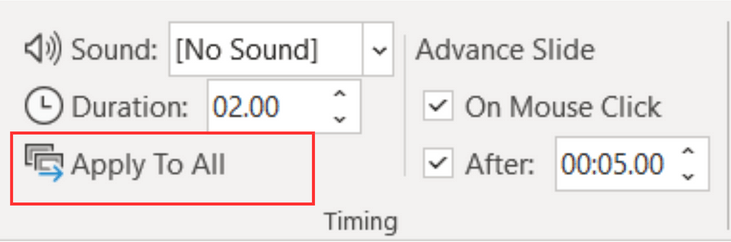
You can also deselect the On Mouse Click option, depending on whether you want to be able to advance your slides by clicking or not.
Adding audio to your automatic PowerPoint is a fantastic feature to enhance your professional image and communicate your content without needing to be present. Let’s take a look at how to do it:
- Go to the Slide Show Tab and select Record Slide Show . Choose Record From Beginning to start with the first slide.
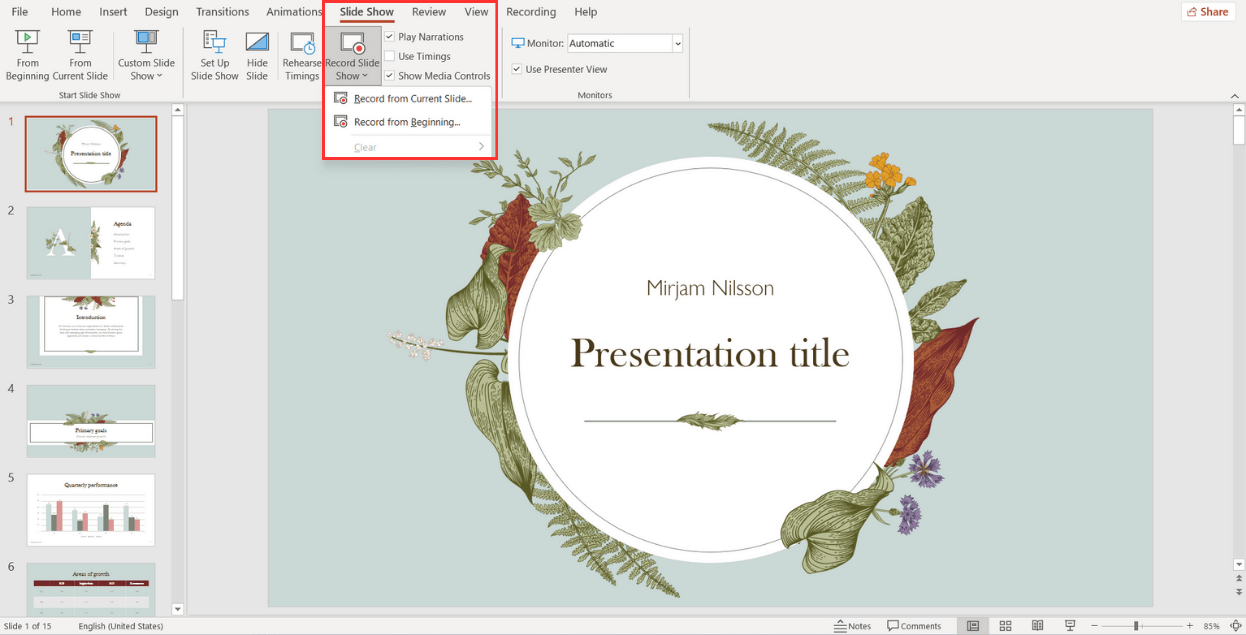
When the fullscreen opens, you will be able to see your first slide along with several options:
- Start in Settings (1) and select the tools you will be using. You have the option to use a microphone, or you can record yourself talking on camera. Choose your microphone and/or camera for recording.
- Next (2) , decide whether you want to have the microphone or camera you selected turned on. You can also choose to have a video preview.
- When you're ready to start recording, go to the top left corner (3) and click Record to start, Stop to pause, and Replay to review how it went.
- Once you finish with a slide, click on the right arrow (4) to move to the next slide.
- If you have Speaker notes in your slides, you can view them in (5) while you record.
- In the Pens and Markers section (6) , you can draw on the screen and make any annotations you want.
- Finally, the Clear option (7) allows you to clear existing recordings on the current slide or on all slides if you are unsatisfied and want to redo your recording.
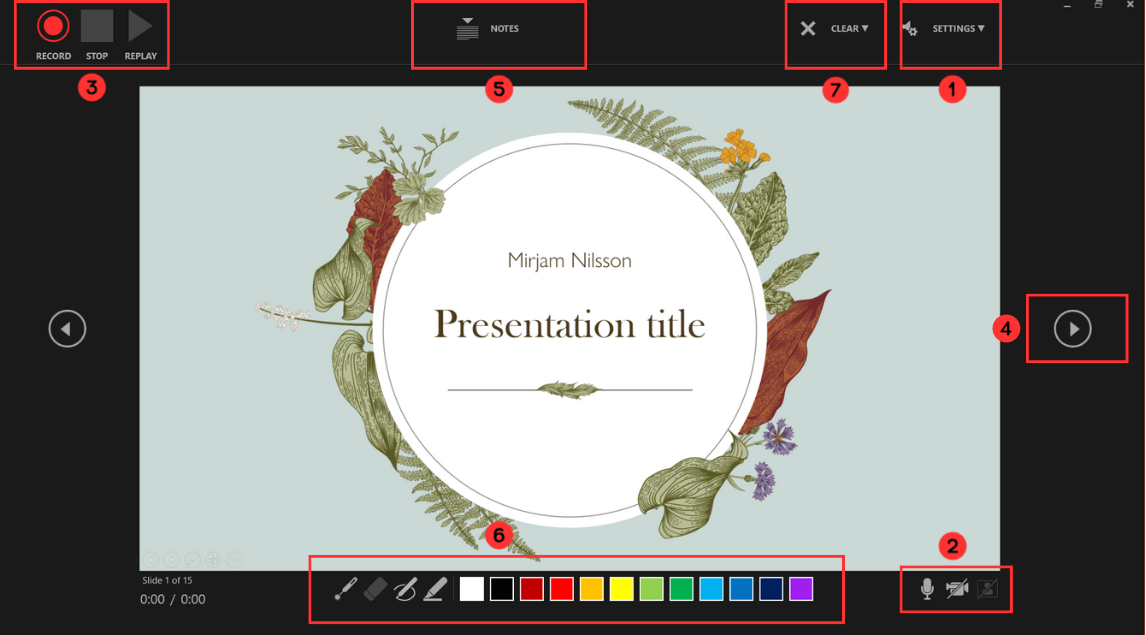
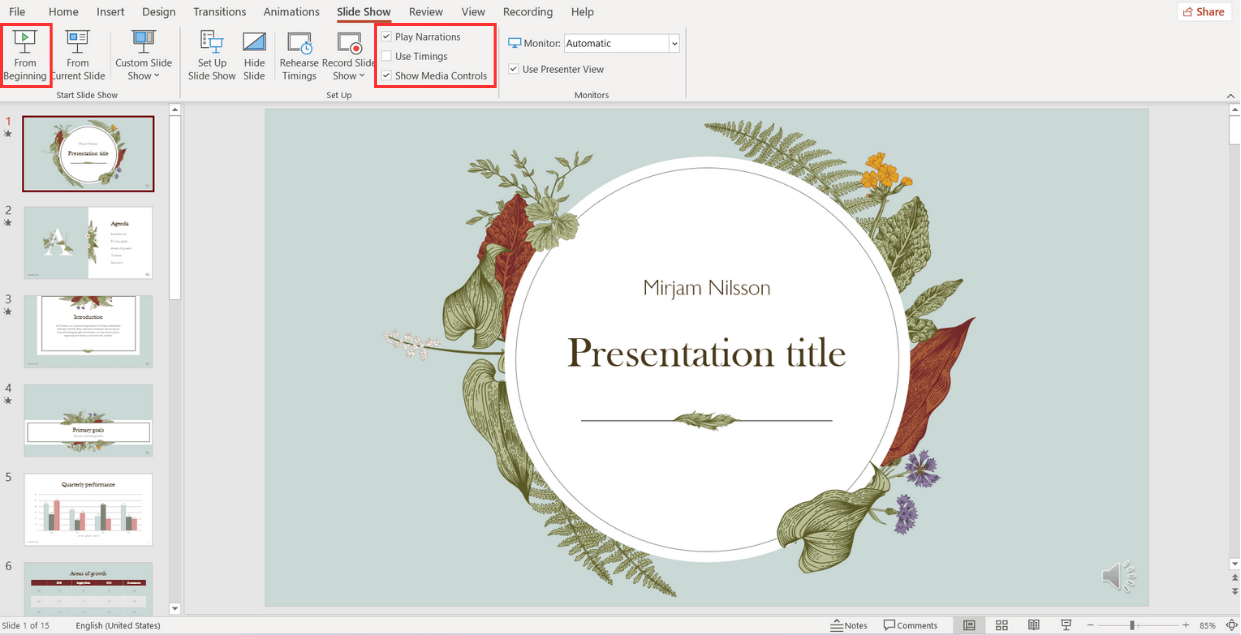
- Now, to review what you've recorded, go to Set Up and make sure Play Narrations and Use Timings are checked. Then, click on From Beginning to start the presentation.
How to loop slides in PowerPoint
If you want to learn how to loop your slides in PowerPoint, follow these steps:
- Go to the Slide Show tab and select Set Up Slide Show .

- When the Set Up Show window appears, go to the Show options group and tick the Loop continuously until ‘Esc’ option. Don’t forget to click OK to apply the new setup!
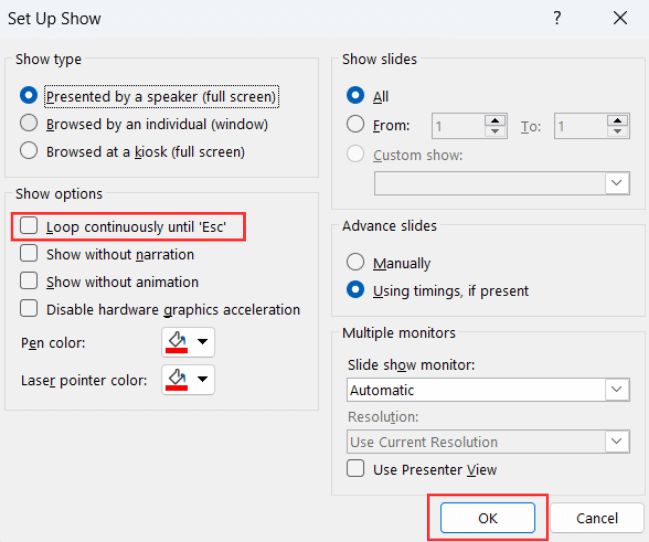
And all done! Now, your presentation will loop until you select ‘Esc’.
Check out some expert best practices for Automatic slideshows in PowerPoint
Now that you've learned how to make a PowerPoint slideshow run automatically, we'll give you the secrets to make your presentation stand out . Let's take a look at some insights from our expert designers .
Avoid too much text
Remember that your time per slide is limited , so it is important not to put too much text since your audience will not have time to read it. Try to express your message in the shortest possible text, and if necessary, revise and rewrite it as many times as necessary to synthesize it.
Limit interactive elements
Limit or avoid interactive elements such as hyperlinks that rely on user interaction since they may not function in PowerPoint autoplay mode.
However, if you want your audience or potential clients to take a specific action, consider using a QR code. Only make sure to leave the slide displayed for enough time for them to use it.
Practice, practice, practice
Keep in mind that your speech needs to fit perfectly with your timings for each slide. So, practicing your presentation multiple times is crucial to ensure a seamless and synchronized delivery.
First, go to the Slide Show Tab and select Set Up Slide Show .
- When the Set Up Show Window opens, deselect the Presented by a speaker option and consider the following options to set up your automatic slideshow:
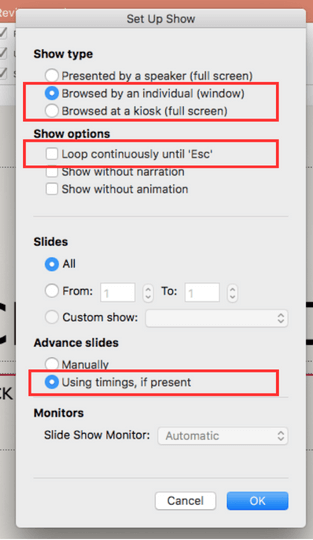
- Browsed by an individual : With this option, you can show your slides within a window instead of the typical full-screen mode. Make sure that the Use timings, if present option is selected.
- Another option is the Browsed at a kiosk : This option locks in both the looping and timing settings, ensuring that your slideshow will continue until you press the ESC key.
- Next, you need to set your timings. This involves determining the duration for each slide so that it advances automatically to the next one when you have finished presenting it.
To set your timings, go to the Slide Show Tab and click on Rehearse Timings.
A window will open, allowing you to go through your presentation slide by slide, and it will record how much time you spend on each one . As you progress through each slide, it will confirm the time spent, and you can either agree or choose to re-record.
After you finish going through all your slides, a message will pop up to save your timings . Click yes so you can save the time spent on each slide.
If you’re looking to create a presentation that truly wows your audience, you might want to consider professional design assistance for your PowerPoint. Lucky for you, we’re here to help. Check out the fantastic designs 24Slides can help you create today!

You might also like
- How to Add a Timer to Your Powerpoint Presentations
- 11 Time-Saving PowerPoint Hacks For Creating Quick Presentations
- How To Loop a PowerPoint Presentation
- Add a PowerPoint Real-Time Clock to Your Presentations
Create professional presentations online
Other people also read

Tutorial: Save your PowerPoint as a Video
How To Convert Google Slides To PowerPoint and Vice Versa

How To Add Animations To PowerPoint
How to Set Time for Slides in Powerpoint
When you are giving a presentation you have a lot of things that you need to manage.
You need to make sure that you are proving all of your information, that you are speaking clearly and slowly enough, and you need to make sure that you have the correct slides showing.
Powerpoint has an option that can help with this last point, as you are able to set predefined amounts of time that a slide should stay on the screen.
Our guide on how to time slides on Powerpoint will show you how to set this up.
How to Set Time Between Slides in Powerpoint 2010
- Open the presentation.
- Select all of the slides in the left column.
Choose the Transitions tab.
- Remove the On Mouse Click checkmark.
- Check the After box and enter a time.
Our tutorial continues below with additional information on setting the time for slides in Powerpoint, including pictures of these steps.
Microsoft Powerpoint has an “Advance Slide” section on its ribbon that allows you to configure a slide time after which the presentation will advance automatically to the next slide.
This includes a duration box where you set the transition time for one slide in the presentation. This can also be applied to every slide in a slideshow rather than a specific slide, and you can even use the same amount of time for each slide.
When you are making a presentation in Powerpoint 2010 that you will be presenting to an audience, you need to be aware of more than just the contents of the slide.
Your ability to present the slides will also factor into how well it is received and, as such, you will need to rehearse and prepare the presentation so that it goes as smoothly as possible.
One way that you can fully prepare to give your presentation is by determining how long you will spend per slide, then setting your presentation to only display each slide for that amount of time. This will help serve to automate the presentation and give you one less factor that you need to consider.
Adding different objects and symbols to your slides can make them look more professional. You can read our check mark symbol Powerpoint article and learn more about it.
How to Specify Slide Transition Duration in Powerpoint 2010 (Guide with Pictures)
Using this method is also a good way to set a slideshow for images that you want to show casually to friends or family.
While there are other ways to create an image slideshow in Windows 7, a Powerpoint presentation is very customizable and portable, which makes it an ideal option for such an activity.
These steps will show you how to time slides on Powerpoint.
Step 1: Open the Powerpoint 2010 presentation for which you want to specify the amount of time between slides.
Open your slideshow.
Step 2: Click inside the column at the left side of the window showing your slide previews, then press Ctrl + A on your keyboard to select all of them.

Select a slide, then choose Ctrl + A to select all of them.
Step 3: Click the Transitions tab at the top of the window.

Step 4: Click inside the box to the left of On Mouse Click , in the Timing section of the window, to clear the check mark.
Clear the On Mouse Click check box.
Step 5: Check the box to the left of After to check the box, then specify the amount of time for which you would like each slide to be displayed.

Check the After box and select a slide duration.
Note that, in the sample image above, I have set the slideshow to display each slide for 3 seconds.
Now that you know how to time slides on Powerpoint you can start to incorporate this setting into the presentations that you create and give yourself one less thing to worry about.
Our article continues below with additional information on working with slide transitions for your slide show, so that you advance each slide automatically.
How to Play the Slideshow from the Slide Show Tab
Once you have properly created all the slides in your presentation and modified the mouse click check box so that each slide advance time is properly specified, you are ready to view the Powerpoint slide show.
Click the Slide Show tab at the top of the window, then click the From Beginning button.
If you set the transition speed for each slide to be the same speed, then the transition timing of each slide should be equal to the time that you selected.
You can click the Advance Slide button if you want to manually advance a slide. If you are only advancing slides then the slide advanced will continue based on your timing. However, if you go back to a previous slide the automatic transitions will stop, and won’t resume until the slide advances.
More Information on How to Set Time for Slides in Powerpoint 2010
You can then preview the slideshow to confirm that the amount of time between slides is correct.
You can also individually set the amount of time per slide by skipping step 2, then repeating steps 3-5 for each individual slide.
Learning how to time slides on Powerpoint gives you another way to create slideshows in Microsoft Powerpoint. Traditionally a slideshow is created then shown, and you need to click the mouse button to advance to the next slide, or use the controls that appear on the screen. Using the steps in the guide above lets you determine a Powerpoint time per slide so that the presentation will advance to the next slide after a defined amount of time.
There is no one time per slide that is going to be ideal, and the appropriate amount of time is going to vary depending on how quickly you talk, how much information is on a slide, and how much time you want to give your audience to read or look at what you have created.
While it can take a little longer to set the amount of time for each slide individually, there’s a strong possibility that it will be the better option. It’s not uncommon to have slides with varying amounts of information, and you may have slides that only need to be on the screen for a couple seconds, while others might need to stay visible for a couple of minutes.
Note that you can also help your presentation efforts by creating and printing speaker notes for your presentation. Read this article to learn how to print the notes so that you will have something to read from while you are giving your presentation.
Frequently Asked Questions About How to Time Slides on Powerpoint
Is there a way to configure slide and animation timings for my powerpoint slides.
Yes, you can use the steps above that involve the slide time box if you want to set all of your slides to show for the same amount of time.
However, if they are going to be different, then you may want to try out the recorded slide show timings option instead.
You can select the Record tab at the top of the window, then click the From Beginning option to start the record slide timings process.
As the recording progresses you will be able to pause it or stop it as needed.
If you aren’t ready to record timings or create the final version you can select the Side Show tab, then click the Rehearse with Coach button or click Rehearse Timings .
When you choose a rehearsal option, the Rehearsal toolbar appears and the slideshow goes to full screen so you can gain a lot of information about your timing options and use timings that you manually set or learn about from the rehearsal.
is there a way to have a self running presentation in Powerpoint?
Occasionally you might need to have a Powerpoint presentation that runs on its own loop.
For example, if you’ve gone to a trade show and browsed at a kiosk, it’s very likely that someone has configured their presentation to automatically advance on its own and restart when the presentation ended.
You can do this by selecting the Slide Show tab at the top of the window, then clicking the Set Up Slide Show button.
This opens a Set Up Show dialog box, where you can check the circle to the left of Browsed at a kiosk .
Note that there are a lot of other options on this menu as well, such as an Advance slides section where you can elect to have your slides appear based on their timings, you can check the Loop continuously box so that it just keeps playing, and you can even specify a custom range of slides to show if you don’t want to show everything.
Can I set a different duration of time that each slide appears on the screen?
Yes, you can adjust the amount of time that the current slide is on the screen by selecting the slide at the left side of the window, choosing the Transitions tab, then adjusting the settings in the Timing group.
You can cause the next slide to appear either after you click your mouse, or set the exact length of time that you want it to be on the screen.

Matthew Burleigh has been writing tech tutorials since 2008. His writing has appeared on dozens of different websites and been read over 50 million times.
After receiving his Bachelor’s and Master’s degrees in Computer Science he spent several years working in IT management for small businesses. However, he now works full time writing content online and creating websites.
His main writing topics include iPhones, Microsoft Office, Google Apps, Android, and Photoshop, but he has also written about many other tech topics as well.
Read his full bio here.
Share this:
Join our free newsletter.
Featured guides and deals
You may opt out at any time. Read our Privacy Policy
Related posts:
- How to Save Powerpoint as PDF with Notes
- How to Loop a Slideshow on Powerpoint 2013
- Can I Convert My Powerpoint to Google Slides?
- How to Add Page Numbers in Powerpoint 2010
- How to Delete a Slide in Powerpoint 2010
- How to Unhide a Slide in Powerpoint 2013
- How to Hide a Slide in Powerpoint 2010
- How to Make a Powerpoint Slide Vertical in Powerpoint 2013
- How to Insert Slides from Another Presentation in Powerpoint 2010
- How to End Powerpoint on Last Slide in Powerpoint 2010
- How to Change the Font on All Slides in Google Slides
- How to Delete Multiple Slides in Google Slides
- How to Change Hyperlink Color in Powerpoint 2010 (An Easy 5 Step Guide)
- How to Change Line Spacing in Powerpoint for Every Slide at Once
- How to Insert Check Mark in Powerpoint for Office 365
- How to Duplicate a Slide in Powerpoint 2010
- How to Check Word Count on Powerpoint 2010
- How to Print an Outline of the Presentation in Powerpoint
- Can You Save a Powerpoint as a Video in Powerpoint 2013?
- How to Hide Background Graphics in Powerpoint 2013
Setting All PowerPoint Slides to Switch After 10 Seconds
- Small Business
- Managing Employees
- Other Managing Employees
- ')" data-event="social share" data-info="Pinterest" aria-label="Share on Pinterest">
- ')" data-event="social share" data-info="Reddit" aria-label="Share on Reddit">
- ')" data-event="social share" data-info="Flipboard" aria-label="Share on Flipboard">
How to Conduct an Effective PowerPoint Presentation
Can i use an iphone to control a keynote on an ipad, how to rearrange powerpoint slides for a mac.
- How to Prepare for a Business Meeting
- Good Visual Aids During a Business Presentation
PowerPoint has long been a presence in a company's software arsenal and is behind many of the presentations made over years. PowerPoint includes dozens of animation and transition features and allows the presenter to determine the duration of time each slide appears during a presentation. PowerPoint slideshow timing is easy to customize for any slide. The timing options are suited to a variety of common presentation scenarios including automated settings on a timer, manual controls for verbal and in-person presentations, and manual options for users who read and view the presentation at their own pace.
Adjusting the automatic transition times between slides is easy, and you can set a specified time to maintain the desired pace throughout the presentation. The auto feature is frequently used to ensure the presentation is completed within a specific time frame. The settings available to a speaker giving a live presentation are the same as those on an automatic or kiosk-style show.
The presentation style intended for individual browsing has no timing settings and is entirely paced by the viewer. It also does not function in a full-screen view.
PowerPoint Slide Timing Options
Before choosing to set a dedicated 10-second transition, consider the purpose of your decision. A manual control ensures each slide is thoroughly covered for speaking engagements, and you can rehearse the presentation to maintain a comfortable pace.
The manual preset operates in a full-screen view, and you control the projector change from your computer. You can also buy a clicker for PowerPoint transition timing between slides using a remote control. Simply press the forward or back buttons to gain control over the content.
Setting a preset timer is a good option for pacing or running a self-serve style presentation in which you press Play and it delivers each slide on the timer. When no talking is associated with the presentation, the timer is a great function.
Experiment with the timing and read through each slide to ensure the 10-second window offers ample viewing time on each slide. You can easily add or subtract a few seconds to ensure the slides are running at the perfect interval for your audience.
Setting a 10-Second Transition
To set the PowerPoint slide timing to 10-second transition across all slides, select the Slide Show tab in the PowerPoint toolbar and click or tap Set up slide show . Choose the Browsed at a kiosk option and click or tap OK to save the setting. Return to the toolbar and click the Rehearse Timings option.
You can customize the timing of every aspect of the presentation if desired. You can time the entrance of text to a specific slide or simply run each slide on a full 10-second window. Type 10 seconds into the timing box to set the transition time here. It will display as 10-seconds on the slide time and the total presentation time. Click Next to set the next slide transition time.
A shortcut also exists to set all slides to a 10-second advance. Click the Transitions tab and set the duration to 10-seconds. Click Apply to All to move through every slide on a 10-second advance. This works on both Mac and PC PowerPoint presentations and allows you to set the 10-second window for all slides in a matter of seconds.
Custom Timing for Each Slide
You might have a few content-heavy slides in the presentation. The 10-second window is inadequate for those, and a few extra seconds gives your audience time to view and consume the entire slide.
To change the timing on an individual slide, go to the content-heavy slide and select the Rehearse Timings option from the toolbar. Set a longer time frame for that specific slide and save the settings.
This works under both the Kiosk -style slideshow and the Presented by speaker slideshow. Both are full-screen presentations. Before finalizing the presentation, run a rehearsal with a fresh set of eyes. You know the content and can read through the presentation much quicker than someone who has never seen the slideshow.
Recruit a friend or coworker to watch the entire slide show and ask them to make a note when one slide transitions before they are finished viewing it. Add a few seconds to the noted slides, and your presentation is ready for delivery.
- Microsoft Office: Set the Timing and Speed of a Transition
- Microsoft Office: Record and Add Narration and Timing to a Slide Show
- Microsoft Office Support: Create a Self-Running Presentation
Zach Lazzari is a freelance writer with extensive experience in startups and digital advertising. He has a diverse background with a strong presence in the digital marketing world. Zach has developed and sold multiple successful web properties and manages marketing for multiple clients in the outdoor industry. He has published business content in Angling Trade Magazine and writes white papers and case studies for multiple corporate partners.
Related Articles
How to run powerpoint in kiosk mode, how to fill screen in powerpoint, how to embed html in a powerpoint kiosk, powerpoint 2007 slides won't automatically advance, how to create a master slide in powerpoint, how to convert powerpoint presentations to an html format, how to do repeat on a powerpoint slideshow, how to view two powerpoint 2007 presentations in sync, how to do a powerpoint without ms office, most popular.
- 1 How to Run Powerpoint in Kiosk Mode
- 2 How to Fill Screen in Powerpoint
- 3 How to Embed HTML in a PowerPoint Kiosk
- 4 PowerPoint 2007 Slides Won't Automatically Advance
How to Set up Timings in PowerPoint

If you want to create a professional PowerPoint presentation, setting up timings is a crucial aspect to consider. By synchronizing slides, transitions, audio, and video elements, your presentation can flow seamlessly and effectively convey your message to your audience. In this article, we’ll take a comprehensive look at everything you need to know about setting up timings in PowerPoint.
Table of Contents
Introduction to Timings in PowerPoint
In simple terms, timings in PowerPoint refer to the duration of time each slide remains visible on the screen. By setting slide timings, you can control how long viewers will see each slide before transitioning to the next one. Additionally, timings can be set for slide transitions, audio and video elements, and animations, which can further enhance your presentation and create a more engaging experience for your audience.
It is important to note that timings can also be adjusted during a presentation. This means that if you need to spend more time on a particular slide, you can easily extend the duration of that slide without disrupting the flow of your presentation. Similarly, if you need to shorten the duration of a slide, you can do so without having to manually skip ahead to the next slide. By mastering the use of timings in PowerPoint, you can create a seamless and professional presentation that effectively communicates your message to your audience.
Understanding the Importance of Timings in PowerPoint Presentations
Setting up timings in your PowerPoint presentation is critical as it has a significant impact on the effectiveness of your message. By controlling the amount of time viewers see each slide, you can ensure that your message is conveyed clearly and effectively without losing your audience’s attention. Moreover, timing your presentation appropriately allows you to communicate your ideas in an organized and logical manner, making it easier for your viewers to follow your message from start to finish.
Another important aspect of timing in PowerPoint presentations is the ability to pace yourself and stay on track. By setting up timings for each slide, you can ensure that you are not spending too much time on one particular point, and that you are able to cover all the necessary information within the allotted time frame. This can be especially important when presenting to a large audience or in a time-sensitive situation. Additionally, timing your presentation can help you to rehearse and refine your message, ensuring that you are delivering the most impactful and effective presentation possible.
Types of Timings Available in PowerPoint
There are several types of timings that you can set up in PowerPoint, depending on the type of content you have on your slides. Some of the most common timings include slide timings, transition timings, and audio and video timings.
Slide timings are used to control the amount of time a slide is displayed on the screen before moving on to the next slide. This is useful when you want to give your audience enough time to read and understand the content on a slide before moving on to the next one.
Transition timings, on the other hand, control the speed and style of the transition between slides. You can choose from a variety of transition effects, such as fade, dissolve, and slide, and set the duration of each effect to create a more engaging and dynamic presentation.
Setting Up Slide Timings in PowerPoint
To set up slide timings in PowerPoint, navigate to the “Transitions” tab and click on “Timing.” This will bring up a menu where you can adjust the duration of time each slide remains on the screen. You can also set up automatic timings for each slide and adjust the duration of any animations (if included).
It is important to note that setting up slide timings can greatly enhance the flow and professionalism of your presentation. By ensuring that each slide is displayed for an appropriate amount of time, you can keep your audience engaged and prevent them from becoming bored or distracted. Additionally, automatic timings can be especially useful if you are presenting to a large group and need to keep the presentation on schedule.
Setting Up Slide Transitions in PowerPoint
In addition to slide timings, you can also set up slide transitions, which refer to the movement between each slide. To set up slide transitions, navigate to the “Transitions” tab and choose one from the available options. You can choose to have a transition for all slides or select specific slides for each transition. In addition, you can adjust the timing of each transition.
It is important to note that while slide transitions can add visual interest to your presentation, they should be used sparingly and appropriately. Too many transitions or overly flashy transitions can be distracting and take away from the content of your presentation. When choosing a transition, consider the tone and purpose of your presentation and choose a transition that complements it.
Adding Audio and Video Timings in PowerPoint
If you have audio or video elements in your presentation, you can also set up timings for them. To set up timings for audio or video elements, navigate to the “Playback” tab and select “Play Across Slides.” This will allow you to have the audio or video play synchronously across all slides, and you can adjust the duration accordingly.
It is important to note that when adding audio or video timings, you should also consider the file size of the media. Large media files can slow down your presentation and cause it to lag or freeze. To avoid this, you can compress the media files before adding them to your presentation. This can be done by selecting the media file, navigating to the “Format” tab, and selecting “Compress Media.”
Another useful feature when adding audio or video elements to your presentation is the ability to trim the media. This allows you to remove any unwanted sections of the media file, and only include the relevant parts in your presentation. To trim a media file, select the media file, navigate to the “Playback” tab, and select “Trim Audio” or “Trim Video.” From there, you can adjust the start and end points of the media file to include only the desired section.
Tips and Tricks for Setting Up Timings in PowerPoint
Here are some tips and tricks to keep in mind when setting up timings in PowerPoint:
- Practice your presentation several times to get a feel for the timing
- Don’t overcrowd your slides and keep your text minimal
- Use visual aids and graphics to enhance your message
- Make sure your timings are appropriate and not too short or too long
Another important tip to keep in mind when setting up timings in PowerPoint is to consider your audience. If you are presenting to a group of experts in your field, you may be able to move through your slides more quickly. However, if you are presenting to a group of beginners, you may need to slow down and provide more detailed explanations. It’s important to keep your audience in mind when setting up your timings to ensure that they are engaged and able to follow along with your presentation.
How to Edit and Adjust Timings in PowerPoint
If you need to edit or adjust timings in your presentation, you can do so by going back to the “Transitions” tab and selecting “Timing.” From here, you can make adjustments to the duration of slide timings, transition timings, and audio and video timings.
It is important to note that when adjusting timings, you should consider the pace of your presentation and the amount of information on each slide. If you have a lot of content on a slide, you may want to increase the duration of the slide timing to give your audience enough time to read and absorb the information.
Additionally, if you have audio or video in your presentation, you may want to adjust the timings to ensure that they are synchronized with your slides. This can help to create a more seamless and professional presentation.
How to Rehearse Your Presentation with Timings
To rehearse your presentation with timings, click on the “Rehearse Timings” button under the “Slideshow” tab. This will allow you to practice your presentation while recording the timing between each slide. You can then review the timing information and make any necessary adjustments before the final presentation.
It is important to rehearse your presentation with timings to ensure that you stay within the allotted time frame and keep your audience engaged. By practicing with timings, you can also identify any areas where you may need to adjust your pace or add additional content. Additionally, rehearsing with timings can help you feel more confident and prepared for the actual presentation.
Troubleshooting Common Issues with Timings in PowerPoint
Some common issues that you may face when setting up timings in PowerPoint include slides displaying too quickly or too slowly, transitions not working correctly, and audio or video elements not playing correctly. If you encounter any of these issues, double-check your settings and make adjustments as necessary. You can also reach out to Microsoft support for further assistance if needed.
Another common issue that may arise when working with timings in PowerPoint is the timing of animations. If you have animations set up on your slides, they may not play at the correct time or may not play at all. To troubleshoot this issue, make sure that the animations are set to start after the previous animation has finished and that they are set to play automatically. You can also try adjusting the duration of the animations to ensure that they fit within the timing of the slide.
Best Practices for Using Timings in Your PowerPoint Presentations
When using timings in your PowerPoint presentation, here are some best practices to follow:
- Keep your timings organized and logical
- Practice your presentation several times to ensure the timing is correct
- Consider your audience and their preferences when setting up timings
Conclusion: Enhancing Your Presentations with Effective Timing Techniques
By setting up timings in your PowerPoint presentation, you can enhance the effectiveness of your message and create a more engaging experience for your audience. From setting up slide timings to adjusting the durations of audio and video elements, PowerPoint provides numerous options to make your presentation more engaging and effective. By following the tips and best practices outlined in this article, you can ensure that your audience remains engaged and interested in your message throughout the presentation.
By humans, for humans - Best rated articles:
Excel report templates: build better reports faster, top 9 power bi dashboard examples, excel waterfall charts: how to create one that doesn't suck, beyond ai - discover our handpicked bi resources.
Explore Zebra BI's expert-selected resources combining technology and insight for practical, in-depth BI strategies.

We’ve been experimenting with AI-generated content, and sometimes it gets carried away. Give us a feedback and help us learn and improve! 🤍
Note: This is an experimental AI-generated article. Your help is welcome. Share your feedback with us and help us improve.

Stack Exchange Network
Stack Exchange network consists of 183 Q&A communities including Stack Overflow , the largest, most trusted online community for developers to learn, share their knowledge, and build their careers.
Q&A for work
Connect and share knowledge within a single location that is structured and easy to search.
PowerPoint - Set a time for each slide and display total presentation time?
I know that the transition tabs you can set a time per slide, but this is when you're using it to automatically transition each slide.
What I would like is to have on each slide a time property that I can set. Then, as the presenter, it would display counting down so that I can see if I am going over/under time on any particular slide when doing my presentation.
In addition, this would be great to be able to determine the total time of the presentation. So at the bottom tool bar there would be an item for Slide Time = 01:30 and another for Slide Show Time = 05:45
I fear that this is not available, and I think it would be so very very useful to have.
The key point here is that I still want to be in control of the presentation, so I do not want to use the Automatic slide transition. But I would like to be able to use a value like the slide transition time (and an aggregate of all of those) in order to better prepare and present my shows.
Edit: I found that I can turn off "Use Timings" in the Slide Show->Set Up area, and this will stop the automatic advancing after each slide while still displaying the time of each slide on the slide show page. But this doesn't provide me with a slide timer during the presentation, or somewhere to see the aggregate time of the presentation (and if you have 30-45 slides, adding up the time for each slide would be annoying).
- microsoft-powerpoint
- microsoft-powerpoint-2013
5 Answers 5
There's an Add-in you can download that will give you what you want. Seeing that you have the first part setup, you can use this Add-in to display the elapsed time on top of the current slide.
There are installation instructions on the website I have linked to, but for convenience I will include them here.
Download the executable and let it install the add-in to the default location. I've scanned the executable and the installed Add-in files for viruses and I can confirm that they are clean.
Once the Add-in has been installed, open PowerPoint and do the following:
File -> Options -> Add-ins -> (From the Manage drop-down at the bottom) select PowerPoint Add-ins and Go
- On the resulting dialog do the following:
Add New -> select TM PowerPoint Timer (Ribbon UI) -> OK
The above will add a TM tab to the PowerPoint ribbon. On the configuration window for the Timer you'll be able to set a timer to show the Elapsed time. There's also an Update Display entry on the first tab, so make sure you set that to 1 second (the default is 10 seconds).
- Thank you, it's close but not what I was hoping for. This add-on has a 30-day trial and costs $29.95. More importantly, since the presentation will be given on a computer I don't own, I'm likely not able to install it. – Bye Commented Sep 24, 2013 at 18:54
- Hmmmm, that's unfortunate. As far as I know, there's no option to view the elapsed time on powerpoint by default. Someone else may have a better solution for you. – Yass Commented Sep 24, 2013 at 19:13
Answering my own question: I found this, which can provide a total time for the slide show. It is based on the time set for the automatic transition of the slide (Transitions->Advance Slide->After:). In the Slide Show ribbon, you can disable "Use Timings" so that you'll have control over advancing the slides while presenting.
This won't provide a slide countdown on the presenter's view, but I suppose I can live without that and just enter the expected time I should be at on the top of my notes. The add-in above would seem to provide a countdown on the presenter's view, but I won't be able to use it at my venue, so it's not an options.
I based this macro from here, The PowerPoint FAQ. I have modified it a little bit so to show the times in "00:00" format, and the total time at the bottom instead of separate pop-up. To use it, just create a go to View->Macros, and create a new macro "Total Time". Copy and paste the code below:
The original code also includes a section to write to a text file, which I cut out since it didn't meet my needs.
I am so very very surprised MS doesn't have this info available within PowerPoint. It seems like a rather intuitive bit of information that they would include by default.
- Nice. It's perfectly fine to answer your own question. – Yass Commented Sep 24, 2013 at 19:53
There are more elegant ways of doing this via an add-in but how about this ... it assumes you're using presenter view, where you can see the notes, but you could add the text to the slide or whatever instead.
Add a shape to the first slide and assign it an Action Setting of Run Macro: StartTimer Add a shape to the next slide, assign it an Action Setting of Run Macro: ElapsedTime Copy and paste the shape from slide 2 to the other slides in the presentation.
I found a solution on this page: link . The author creates a count-down timer in memory, and adds its progress text to the last shape inserted in every slide.
I modified it a bit to not affect the first slide, and to update the shape before last inserted; I always remove the date and slide number from the footer and then add them when the presentation is final.
To set the number of minutes to count-down from, find TargetDateTime = DateAdd("n", 6, Now) and modify the 6 .
Here's my modified code:
I wanted to add a comment on the macro pulled from the The PowerPoint FAQ above. It is very useful, but not quite adequate. I used the original version to try to work out why slides did not synchronise correctly with some music tracks.
After removing (most of) the schoolboy errors it became clear what was missing. Each slide had a 1 second transition to the next. For tracks with few slides the extra time was 'lost' but for longer tracks these extra seconds became noticable.
There was another problem. On some of the slides the total duration of the animations was longer than slide advance time, which added to the delays (that was the overlooked schoolboy error). So at least one extra line is required in the macro:
to add an extra column to the table showing the duration of the transition, and an amendment to show to include the duration in the total time: lngTotalTime = lngTotalTime + oSld.SlideShowTransition.AdvanceTime + oSld.SlideShowTransition.Duration Perhaps however you would prefer to see the totals of these two elements separately.
I have not addressed the animation durations greater than the total advancetime on a slide, but it does occur to me that it would be useful to include in the message the total time of each animation, including their delay times in the report, for any excess over the advance time will increase the length of the slide show, but is also likely to have been unintended.
You must log in to answer this question.
Not the answer you're looking for browse other questions tagged microsoft-powerpoint microsoft-powerpoint-2013 ..
- Featured on Meta
- Upcoming sign-up experiments related to tags
Hot Network Questions
- Can front gear be replaced on a Retrospec Judd folding bicycle?
- Why can't LaTeX (seem to?) Support Arbitrary Text Sizes?
- Why potential energy is not considered in the internal energy of diatomic molecules?
- Is it unfair to retroactively excuse a student for absences?
- Where does someone go with Tzara'as if they are dwelling in a Ir Miklat?
- Can you arrange 25 whole numbers (not necessarily all different) so that the sum of any three successive terms is even but the sum of all 25 is odd?
- Con permiso to enter your own house?
- How would I say the exclamation "What a [blank]" in Latin?
- How to bid a very strong hand with values in only 2 suits?
- How do guitarists remember what note each string represents when fretting?
- A 90s (maybe) made-for-TV movie (maybe) about a group of trainees on a spaceship. There is some kind of emergency and all experienced officers die
- Have there been any scholarly attempts and/or consensus as regards the missing lines of "The Ruin"?
- No simple group or order 756 : Burnside's proof
- Do known physical systems all have a unique time evolution?
- Are Dementors found all over the world, or do they only reside in or near Britain?
- Can I tell a MILP solver to prefer solutions with fewer fractions?
- Does Matthew 7:13-14 contradict Luke 13:22-29?
- Are there examples of triple entendres in English?
- Determine the voltages Va and V1 for the circuit
- Remove assignment of [super] key from showing "activities" in Ubuntu 22.04
- Is Légal’s reported “psychological trick” considered fair play or unacceptable conduct under FIDE rules?
- Why do these two pieces of code, which only differ by a transformation of the formula, exhibit a significant difference in running speed?
- Folk stories and notions in mathematics that are likely false, inaccurate, apocryphal, or poorly founded?
- What is the term for when a hyperlink maliciously opens different URL from URL displayed when hovered over?

Microsoft 365 Life Hacks > Presentations > How many slides does your presentation need?
How many slides does your presentation need?
When you’re creating a presentation, it’s important to consider the amount of information you’re sharing with your audience. You don’t want to overwhelm them, but you also want to be comprehensive and ensure that you’re covering all your bases. Whether you’re giving a 10, 15, or 30-minute presentation, see how many slides your presentation needs to get your point across.

Rules and guidance for PowerPoint presentations
PowerPoint is a powerful visual aid for introducing data, statistics, and new concepts to any audience. In PowerPoint, you can create as many slides as you want—which might sound tempting at first. But length doesn’t always guarantee a successful presentation . Most presentations last around 10-15 minutes, and anything longer than that (such as a 30-minute presentation) may have additional visual aids or speakers to enhance your message.
A handy rule to keep in mind is to spend about 1-2 minutes on each slide. This will give you ample time to convey your message, let data sink in, and allow you to memorize your presentation . When you limit each slide to this length of time, you also need to be selective about how much information you put on each slide and avoid overloading your audience.
For 10-minute presentations
Ten minutes is usually considered the shortest amount of time you need for a successful presentation. For a shorter 10-minute presentation, you’ll need to be selective with your content. Limit your slide count to approximately 7 to 10 slides.
For 15-minute presentations
When preparing for a 15-minute presentation, concise and focused content is key. Aim for around 10 to 15 slides to maintain a good pace, which will fit with the 1-2 minute per slide rule.
For 30-minute presentations
A longer presentation gives you more room to delve deeper into your topic. But to maintain audience engagement, you’ll need to add interactivity , audience participation, and elements like animations . Aim for around 20 to 30 slides, allowing for a balanced distribution of content without overwhelming your audience.

Tell your story with captivating presentations
Powerpoint empowers you to develop well-designed content across all your devices
Using the 10-20-30 rule
The 10-20-30 rule is an effective way to structure your presentation. It calls for no more than 10 slides and no longer than 20 minutes (as well as a 30-point font).
Tips for crafting an effective presentation
No matter how long a presentation is, there are guidelines for crafting one to enhance understanding and retention. Keep these tips in mind when creating your PowerPoint masterpiece:
- Avoid overload: Ensure that each slide communicates a single idea clearly, avoiding cluttered layouts or excessive text.
- Pay attention to structure: Think of slides as bullet points with introductions, endings, and deep dives within each subject.
- Add visual appeal: Incorporate images, charts, and graphics to convey information without using too many words to make your audience read.
- Engage with your audience: Encourage interaction through questions, polls, or storytelling techniques to keep your audience actively involved.
- Put in the practice: Familiarize yourself with your slides and practice your delivery to refine your timing and confidence.
Ultimately, the ideal number of slides for your presentation depends on the allocated time frame and how detailed your content is. By striking a balance between informative content and engaging delivery, you can create a compelling presentation that can teach your audience something new.
Get started with Microsoft 365
It’s the Office you know, plus the tools to help you work better together, so you can get more done—anytime, anywhere.
Topics in this article
More articles like this one.

How to introduce yourself in a presentation
Gain your audience’s attention at the onset of a presentation. Craft an impressionable introduction to establish tone, presentation topic, and more.

How to add citations to your presentation
Conduct research and appropriately credit work for your presentation. Understand the importance of citing sources and how to add them to your presentation.

How to work on a group presentation
Group presentations can go smoothly with these essential tips on how to deliver a compelling one.

How to create a sales presentation
Engage your audience and get them interested in your product with this guide to creating a sales presentation.
Everything you need to achieve more in less time
Get powerful productivity and security apps with Microsoft 365

Explore Other Categories
Set the start time and speed of an animation effect
In PowerPoint, you can control when an animation effect starts and the speed at which it happens. You can even repeat or rewind the effect to get just the right look and feel for your presentation. This article shows you a few ways to fine-tune the animations in your presentations.
Set the start time of an animation effect
You can set an animation effect to start when you click the mouse, or in coordination with other animation effects on the slide.
On the slide, click the text or object that contains the animation effect that you want to set the start timing for.
Select the Animations tab, then select the Start down arrow, and pick one of the following:

To start the animation when you click the slide, select On Click .
To start the animation at the same time as the previous effect in the list (where one click executes multiple animation effects), select With Previous .
To start the animation effect immediately after the previous effect in the list finishes, select After Previous .
Set the speed of an effect
To run your animation effect at a faster or slower pace, change the Duration setting.
On the slide, select the text or object that contains the animation effect that you want to set the speed for.
Select the Animations tab, and in the Duration box, enter the number of seconds that you want the effect to run.

Tip: Smaller numbers mean the effect will run faster and will finish sooner, and larger numbers means the effect will run slower and take longer to finish.
Delay the start time
If you want to delay the start time or pause in between animation effects on a slide, you can set a delay on one or more effects.
On the slide, click the text or object that contains the animation effect that you want to set a delay for or another timing option.
Select the Animations tab, and in the Delay box, enter in the number of seconds that you want the effect to pause before running.

Tip: The start of an effect’s delay period is controlled by its Start setting. For example, if an effect is set to start After Previous with a delay of 1.5 seconds, its delay of 1.5 seconds begins when the previous effect ends.
Repeat or rewind an effect
Normally, when an animated object has run its course, it stays at its endpoint and appears in its final form. You can set an animation effect (or sequence of effects) to return to its original state, or repeat.

Click the Timing tab, and do one or both of the following:
To play an animation effect more than once, select an option in the Repeat list.
To automatically return an animation effect to its original state and location on the slide after it plays, select the Rewind when done playing option.

For more information about using PowerPoint animation effects, see:
Trigger an animation effect to play
Change the playing order of your animation effects
Apply multiple animation effects to one object
Animate a set of objects as a group
With the slide selected, select the Animations tab, then select Animations Pane and choose the animation you want to set the start timing for.
In the pane, under Timing , select Start dropdown list, then pick one of the following:

With the slide selected, selected the Animations tab, then select Animations Pane and choose the animation you want to set the duration for.
In the Duration box, enter the number of seconds that you want the effect to run.

With the slide selected, select the Animations tab, then select Animations Pane and choose the animation that you want to set a delay for or another timing option.
Under Timing , in the Delay box, enter in the number of seconds that you want the effect to pause before running.

Tip: The start of an effect's delay period is controlled by its Start setting. For example, if an effect is set to start After Previous with a delay of 1.5 seconds, its delay of 1.5 seconds begins when the previous effect ends.
On the Animations pane, expand the Timing section, then do one or both of the following:
To automatically return an animation effect to its original state and location on the slide after it plays, check the Rewind when done playing box.

On the slide, select the text or object that contains the animation effect that you want to set the start timing for.

Select the Animations tab, and in the Duration box, enter the number of seconds that you want the effect to run. (Or use the up and down arrows on the right side of the Duration box to incrementally adjust the timing.)

On the slide, select the text or object that contains the animation effect that you want to set a delay for or another timing option.
Select the Animations tab, and in the Delay box, enter in the number of seconds that you want the effect to pause before running. (Or use the up and down arrows on the right side of the Delay box to incrementally adjust the timing.)

Need more help?
Want more options.
Explore subscription benefits, browse training courses, learn how to secure your device, and more.

Microsoft 365 subscription benefits

Microsoft 365 training

Microsoft security

Accessibility center
Communities help you ask and answer questions, give feedback, and hear from experts with rich knowledge.

Ask the Microsoft Community

Microsoft Tech Community

Windows Insiders
Microsoft 365 Insiders
Was this information helpful?
Thank you for your feedback.
IMAGES
VIDEO
COMMENTS
Select Your Slides from Slides Pane. In the first step, click the slide preview for the slide you wish to set time for. In case you want all your slides to switch according to a set time limit (e.g. 10 seconds), select one slide and hit CTRL+A to select all slides. In case you want to set a different time for each slide, you will have to select ...
I See, to edit the timing of the specific slide (e.g. slide 5) Click on slide 4 > go to transition tab > timing > advance slide. Check on the minutes in the after (e.g. 00:02:36) Let say after 5 minutes slide 5 will appear.. Select slide 5 > go to advance slide > set after to 00:07:36. Please also check on mouse.
Rehearse and time the delivery of a presentation. Set the speed and timing of transitions. Record a slide show with narration and slide timings. Training: If you've recorded slide timings and find that there are a couple of timings you want to tweak, you don't need to re-record the whole show.
Set the timing and speed of a transition. PowerPoint for Microsoft 365 PowerPoint for Microsoft 365 for Mac More... Windows macOS. You can modify the duration of a transition, modify the transition effect, and even specify a sound to play during a transition. Also, you can specify the time to spend on a slide before advancing to the next.
In this Microsoft PowerPoint 2019 tutorial you are going to learn how to set the time duration between PowerPoint Slides ( Set a different timings on each Po...
Step 4: Apply to all slides. Click on "Apply To All" to set all slides to switch after 10 seconds. By doing this, you don't have to repeat the timing process for each individual slide—it's a great time-saver!
PowerPoint: How To Set The Time Duration For Slides This is a video tutorial on how to set the time duration on slides in a PowerPoint presentation.1. Open ...
Now open the 'Slide Show' tab and click the 'Rehearse Timings' button. Powerpoint will start the usual presentation mode with a timer panel. The clock on the panel will start ticking once we enter the presentation mode. Click on the arrow button to move on the next slide and Microsoft Powerpoint will record each timing as you progress from one ...
In this video, you will learn how to time out your slides in PowerPoint.0:06-0:12 Open the...
Timing PowerPoint Slides. With PowerPoint, you can easily adjust your recorded slide timings. We have broken down the process into these easy steps: 1: Open your presentation. 2: You will find all the slides on the left-hand side of your screen. Click on that area and press Ctrl + A to select them.
Start in Settings (1) and select the tools you will be using. You have the option to use a microphone, or you can record yourself talking on camera. Choose your microphone and/or camera for recording. Next (2), decide whether you want to have the microphone or camera you selected turned on.
How to Set Time Between Slides in Powerpoint 2010. Open the presentation. Select all of the slides in the left column. Choose the Transitions tab. Remove the On Mouse Click checkmark. Check the After box and enter a time. Our tutorial continues below with additional information on setting the time for slides in Powerpoint, including pictures of ...
Type 10 seconds into the timing box to set the transition time here. It will display as 10-seconds on the slide time and the total presentation time. Click Next to set the next slide transition ...
Rehearse and time the delivery of a presentation. Set the speed and timing of transitions. Record a slide show with narration and slide timings. Training: If you've recorded slide timings and find that there are a couple of timings you want to tweak, you don't need to re-record the whole show.
Select the slide you want to add narration to. Click the "Transitions" tab in the PowerPoint ribbon. Click "Audio" and select "Audio from File". Select the audio file you recorded. Customize the timing of the slide to match up with the audio narration.
Setting Up Slide Timings in PowerPoint. To set up slide timings in PowerPoint, navigate to the "Transitions" tab and click on "Timing.". This will bring up a menu where you can adjust the duration of time each slide remains on the screen. You can also set up automatic timings for each slide and adjust the duration of any animations (if ...
The duration time of Transitions controls the speed of playing transitions and the time of Advance Slide controls the time from one slide to the next slide. You can set both on one slide and they are independent. If you are talking about the following settings, you can set the time on them and play the slides to see the result.
On the Slide Show tab, in the Set Up group, click the arrow on the Record Slide Show button. In the Record Slide Show dialog box, select the Narrations and laser pointer check box, and if appropriate, select or deselect the Slide and animation timings check box. Click Start Recording.
3. Check the slide show settings: Make sure that the slide show settings are not overriding the transition duration. To do this, go to the Slide Show tab and click on "Set Up Slide Show." In the "Set Up Show" dialog box, check the "Advance slides" section and make sure that the "Use timings, if present" option is selected. 4.
Rehearse the presentation. Select Slide Show > Rehearse Timings. Select Next, click the mouse or press the Right Arrow key to go to the next slide. The time for the current slide is shown to the right of the Pause icon. The time to the right of that is the time for the whole presentation. Select Pause to pause the recording.
Powerpoint chooses (defaults to) the correct minimum time (2.0) for a wind effect - keeping wind effect at the expense of your own 00.01 'duration' setting. To see this clearly go to the 'Transition' settings and set your duration to 00.01 as you have mentioned. Now watch the 'duration' time change as you select different transition types.
File -> Options -> Add-ins -> (From the Manage drop-down at the bottom) select PowerPoint Add-ins and Go. On the resulting dialog do the following: Add New -> select TM PowerPoint Timer (Ribbon UI) -> OK. The above will add a TM tab to the PowerPoint ribbon. On the configuration window for the Timer you'll be able to set a timer to show the ...
Rules and guidance for PowerPoint presentations. PowerPoint is a powerful visual aid for introducing data, statistics, and new concepts to any audience. In PowerPoint, you can create as many slides as you want—which might sound tempting at first. But length doesn't always guarantee a successful presentation.
On the slide, click the text or object that contains the animation effect that you want to set the start timing for. Select the Animations tab, then select the Start down arrow, and pick one of the following: To start the animation when you click the slide, select On Click. To start the animation at the same time as the previous effect in the ...