Unsupported browser
This site was designed for modern browsers and tested with Internet Explorer version 10 and later.
It may not look or work correctly on your browser.
- Presentations

30 PowerPoint Presentation Tips to Make Good PPT Slides in 2024 (+ 6 Expert Tips)
- Bahasa Indonesia
Here are 30 quick PowerPoint presentation tips to help you improve your presentations.

Plus, get PowerPoint tips on changing your slide design to make your content shine. We've even called on six presentation experts for their best tips.
How to Make a Good PowerPoint Presentation (Watch & Learn)
This screencast is a speed round of my very favorite PowerPoint tricks. It's a great resource to learn how to make a presentable PowerPoint. I'll walk you through ten of my favorite PowerPoint tips and tricks to create a better presentation.

Keep reading for an illustrated version of these good PPT tips (and more) that you can use to improve your PowerPoint presentations. You'll see 30 of our favorite PowerPoint presentation tips and tricks, including techniques to update slide master PowerPoint 2024 designs.
Jump to content in this section:
- How Do You Give a Memorable PPT Presentation?
- Practice Makes Perfect
- Adapt Your Presentation to the Audience
- Use a Custom Font
- Use Contrast
- Avoid Too Many Animations
- Use the Rule of Three
- Use a Custom PPT Theme Design
- Make Use of Charts and Graphs
- Use the Built-in Slide Layouts
- Align Text Consistently
- Make Your Exports User-Friendly
- Try a Different Color Scheme
- Edit Slide Masters for Consistency
- Use the Alignment Feature
- Use Stock Assets
- Reduce Your Content
- Rethink Your Slide Order
- Use PowerPoint Animations
- Invite Collaborators
- Add Supporting Video Clips
- Use Infographic Templates
- Use Impactful Closing Techniques
- Include Data in the Appendix
- Alternate Between Solid Color and White Slides
- Present Information With Maps
- Keep the Design Best Practices in Mind
- Set a Time Limit
- Test Your Content Everywhere
30 Tips: How to Make Good PowerPoint Presentation Designs Fast in 2024
A few tried and true tips can help you speed up your PowerPoint presentation design. Check out 30 of my favorite PowerPoint tips to do just that. Each of these give you PowerPoint slideshow help to create good PowerPoint slides:
1. How Do You Give a Memorable PPT Presentation?
If you're learning the top PowerPoint presentation tips and tricks, you're probably asking yourself: how do I give a presentation that won't be forgotten?
We all want to be remembered. The best PowerPoint slideshow help to make a mark on the audience. There are tried-and-true ways to do just that, and expert Neil Tomlinson shares expertise on being remembered:
Get your main point into the presentation as early as possible (this avoids any risk of audience fatigue or attention span waning), then substantiate your point with facts, figures etc and then reiterate your point at the end in a ‘Summary’.
2. Practice Makes Perfect
Also, don’t forget to practice your presentation. Go through your slide deck a few times to make sure you know it like the back of your hand when the big day arrives. Doing so helps you feel more confident. It'll reduce any anxiety and nervousness you might feel as the presentation day approaches.
What's the best way to rehears for a good PowerPoint? Here's one of the top PowerPoint presentation tips from expert presenter Sandra Zimmer :
Once slides are ready, practice one slide at a time aloud until you feel like you know it and like the flow of speech. Be willing to change anything that does not feel in flow. At the end of learning all your slides, practice the whole talk.
If you want even more great PowerPoint presentation tips and tricks, check out the following post:

3. Adapt Your Presentation to the Audience
Let's say that you're a seasoned presenter with a pretty standard set of presentation topics. Maybe you're an expert in your field, and you're asked to give a PPT presentation frequently on similar topics.
That's the value of being an expert. You might have a standard spiel that you give your audiences, and your content won't totally change from one presentation to another. That's why it helps to make only slight tweaks to adapt your presentation to each audience.
Leading presentation expert Suzannah Baum offered up this advice:
Different audiences will have different needs and different challenges, which requires me to re-sequence the slides, or create new ones. I tend to do a lot of research on my audiences – via surveys, interviews, and conversations with the hiring manager – to help me better understand what information would be most relevant to them.
How do you adapt to your audience? Here are a few more tips:
- Learn about them. If you're asked to speak, talk to the curator of the presentation to learn more about the audience and their background.
- Ask about them! With contact details, send out a survey or a response link to ask for feedback and preparation info. Ask leading questions like "what do you want to learn?"
- Consider the environment. If you're presenting via Zoom, your style will differ from presenting in person. The key is to acknowledge the difference and adapt to your environment.

Learn everything you can about your audience. Learning how to make a presentable PowerPoint is all about thinking of the recipient, not the presenter!
4. Use a Custom Font
A PowerPoint presentation tip that'll make your slideshow more interesting and more engaging is to use a custom font.
Fonts set the tone for your presentation. So, when you use a premium font, you’re opting for a high-quality font while also adding a personal or creative touch.
When choosing a font, remember that you want everyone to read your text easily.
5. Use Contrast

One PowerPoint trick is to use contrast to make some of your text stand out or make it easier to read.
If you’re putting text over an image on our PowerPoint slide, you may need to use a white box with black text in it to make your text easier to read. You can also use contrasting colors to highlight important text.
6. Avoid Too Many Animations
Another PowerPoint tip is to avoid having too many animations or transitions.
When you've got too many animations, it can be distracting to the audience. It’s not only distracting, but it's unprofessional.
It’s best to stick to one or two animations throughout your presentation. Also, if you've got any animations in your presentation, make sure to test them to see if they work before presenting.

7. Add Audio
Include audio on a slide on PowerPoint to increase audience engagement. Audio can be anything from fun sound effects to interview clips. You can even add an audio clip of your voice.
Audio gives you a break from speaking while also engaging the audience. Envato Elements has hundreds of premium audio clips if you want to add some.

8. Use the Rule of Three
One PowerPoint tip and trick is to follow the rules of PowerPoint.
One of those rules is the rule of three. It's where you start by dividing your presentation into thirds. Everything should come in thirds, so if you use bullet points, you should only have three. If you use icons, you should only have three.
When things come in threes, it's easier to remember them. For more information, read this informative article:

9. Use a Custom PPT Theme Design
Above all, consistently use custom PowerPoint themes. Microsoft has built-in themes that you can use for free, sure. But the premium themes that are on Envato Elements are a major step-up from PowerPoint's built-in themes.

When you subscribe to Envato Elements, you'll have access to unlimited downloads of all the PowerPoint themes. Right now, Envato Elements has almost 4,000 PowerPoint themes and that number is always growing. You'll learn tips for a good PowerPoint presentation by using the best templates.

10. Make Use of Charts and Graphs
Illustrate your data with the use of charts and graphs. Not only will you be able to make your presentation more visually appealing, but you'll also help your audience remember the information better.

Many PowerPoint templates already include chart and graph elements. Easily customize them to make your data and stats more interesting and easier to understand.
Want to learn more about how to use data? Turn to expert Adrienne J ohnston , a presentation professional:
When it comes to visualizing data in presentations, we have to remember that our audience does not need all the fine details of the data - they need the main takeaway and we need to make sure that's evident to them when looking at the slide.
11. Use the Built-in Slide Layouts
Inside of PowerPoint themes, you'll find layouts , which are custom slide designs.
Most themes include a selection of content layouts that you can use as a starting point for your own slide designs. You can leverage slide master PowerPoint 2024 designs with the help of layouts.

Layouts are like a starting point for your PowerPoint presentation slides. They contain combinations of placeholders for text boxes, images, and more.
Instead of clicking and drawing individual objects onto the slide, use one of these layouts to start your slide off. It's one of the top PowerPoint presentation tips and tricks to save time.
12. Align Text Consistently
When you're working with text on your slide, it helps to ensure that it aligns consistently. Keeping your text aligned in the same orientation really makes a slide look clean.
In the example below, I've basically got three text boxes:
- list of bulleted points
Notice that all this text is aligned left.

Aligning text was the " aha " moment that I learned when I started studying slide design. It's one of those steps that makes a slide look much neater and professional, so keep it in mind when designing.
13. Make Your Exports User-Friendly
No matter how great your PowerPoint presentation slides look, you need to think about how your user will use the presentation file.
Any of these are likely scenarios if you're regularly sending presentations to other users:
- The viewer may not have PowerPoint installed on their computer.
- The recipient may be using a version of PowerPoint that renders the presentation differently.
- Maybe you don't want the user to be able to make any edits or see your notes in the presentation file.

In this case, my favorite tip is to export the presentation as a PDF. To do that, go to File > Export > Create PDF , and then save your presentation as a PDF.
This is sure to help most of your users see the presentation just the way you intended.
14. Try a Different Color Scheme
Many PowerPoint themes have more than one color scheme that you can apply to your presentation. On the Design tab, click on the drop-down next to Themes to try out a different color scheme.

Typically, these will restyle your entire presentation. Premium themes that you might get from Envato Elements, for example, may have many versions inside the original presentation zip file.
15. Edit Slide Masters for Consistency
The slide master controls the design for your PowerPoint slide. Instead of making the same change to each slide, apply a change to a slide master. It'll affect all the PowerPoint presentation slides that use the same master.

It's ideal to apply a logo to the slide master itself, for example. This keeps the logo the same size and in the same position on each slide.
To do that, go to View > Slide Master. On the right side, you're likely to see a variety of slide masters that control designs for many slides. Drop the elements that you want to remain consistent onto one of the slide masters.
16. Use the Alignment Feature
PowerPoint presentation slides look better when the objects on them are in line with one another. There's a certain visual rhythm that occurs when objects line up in the center or along certain boundary lines.

When you start dragging objects on your slide, you'll see guiding lines that pop up. These are very intuitive, and you'll likely notice that they help you line up your objects. You might seem them pop up when you've got a box that's equidistant between two other objects on the slide, for example.
This is one of the best tricks for improving the look of your PowerPoint slide. Spend some time making sure that your key elements line up cohesively.
17. Use Stock Assets
Earlier, I mentioned using Envato Elements to grab PowerPoint themes. But there's more that comes with an Envato Elements subscription for presentations.
That includes a wide variety of stock photos, graphics, and custom designed fonts that you can use in your presentation. Instead of reusing the same stock photo or clip art, Envato Elements has everything you need to supplement a presentation.
Again, Envato Elements is the perfect subscription if you build presentations. It's a one-stop-shop that you can use to fill content.
18. Reduce Your Content
There's nothing that makes an audience tune out faster than being overloaded with slide content. Sometimes we try to make so many points that the audience misses all of them due to information overload.
Less is truly more. When you cut the weaker points of your presentation, the audience's attention will follow your key points accordingly.
It seems like cheating, but one of the best steps that you can take for your slide is to simply reduce the number of items that are on it. Convert some of your typed points to things you'll speak verbally.
19. Rethink Your Slide Order
Sometimes, I find that my presentations are out of order. I might spend too much time explaining my decision before I get to the conclusion.
In these cases, I like to use Slide Sorter View to re-sequence the slides in my presentation. To access this view, go to View > Slide Sorter on PowerPoint's ribbon.

From Slide Sorter view, you've got a top-down view of all the slides in your presentation deck. It sometimes becomes obvious that the slides can be reordered into a better sequence from this view.
20. Use PowerPoint Animations
One of my favorite PowerPoint presentation tips is to complement your major points with a bit of animation. Using animation can bring a key point onto your slide with style!
Check out ten of the best PowerPoint tips for how to use animation from expert Sven Lenaerts below:
21. Invite Collaborators
Building a presentation often benefits from a second set of eyes. That's why it helps so much to invite a collaborator to work with you side-by-side in Microsoft PowerPoint.
Pushing your presentation up to OneDrive and inviting collaborators is easy. Thanks to the cloud-based approach, more than one user can edit a slide deck in real time. Learn how to do that in the tutorial below:

22. Add Supporting Video Clips
Building impactful presentations is all about adding other perspectives and angles to the content. One of my favorite ways to do that is to add a video clip. Maybe that's a production that you built on your own or found on sites like YouTube.
Either way, learn how to add and auto play a video clip in the quick tip below:
23. Use Infographic Templates
More presentations than ever will feature visuals that tell stories with data. But it's easy for an audience become overwhelmed with data.
That's where infographics come into play. Learn to use them in PowerPoint in the tutorial below:
24. Use Impactful Closing Techniques
I've sat through many presentations in my life. I can only remember a few that really stick out, thanks to techniques that highlighted key points. You need PowerPoint tips and tricks that help leave your audience with an impact.
To do just that, make sure you use some of the techniques highlighted in the article below:

To do that, just drag and drop the thumbnails into the order you want. When you return to Normal view, the PowerPoint presentation slides will be in the resequenced order you set here.
25. Include Data in the Appendix
Many PowerPoint presentations include data in the form of charts and graphs. That means that you'll condense specifics into a few easy-to-follow charts.
But what if your audience wants more of the backing details? Maybe they want to validate and review the detail for themselves. In that case, a set of appendix slides with extra data is sure to help.

Appendix slides are included at the end of a presentation deck for backup purposes. You might not present them, but your audience is certain to appreciate that you included them. That helps your presentation continue to be useful even after you leave the room.
Here's a great tip from: pro presenter Graeme Thomas of Johnny F Designs:
If (my clients) are sending the deck straight to clients however, I would then put all the information on the slides but will often use more slides so that they aren't too cluttered. In cases where there is a lot of content, like financial statements, I would use appendix slides.
Including an appendix helps your audience understand data without overwhelming them with that data. Follow these tips so that you get the best of both worlds.
26. Alternate Between Solid Color and White Slides
Alternating between solid color and slides with a white background can produce an interesting visual effect and engage your audience. You can use the solid-colored slides to signify a new section in your presentation.

Not to mention, solid-colored slides are the perfect way to re-enforce your brand colors and build your brand recognition.
27. Present Information With Maps
If you’re trying to make a case for a global expansion or need to report on how other branches are performing, consider using a map to help your audience visualize the data.
There's no shortage of quality PowerPoint templates with maps built in so be sure to take advantage of them.
28. Keep the Design Best Practices in Mind
The design of your presentation matters just as much as the content of your presentation. That’s why you need to devote an equal amount of time to making sure the design of your presentation is on point as you do to the actual content.
Familiarize yourself with best design practices and keep them in mind as you go about customizing your template.
29. Set a Time Limit
How many slides is the right number for you? Well, it all depends on the time limit you set for your presentation.
Believe it or not, setting a time limit is helpful to create good PowerPoint slides. If you want to learn how to make a presentable PowerPoint, it's a must to lock in the time limit and ensure that your slides support that timeframe.
Expert presenter Stephanie Ottavan offers one of our top tips for a good PowerPoint presentation based on time limits:
A presenter is usually limited to a specific time frame and you want to adhere to that as closely as you can. If you have animations and transitions in your deck, these take added time so make sure to rehearse in “show mode” of PowerPoint or Keynote and time yourself.
Believe it or not, setting a time frame is one of the most important part of creating a PPT presentation. It helps you influence how many good PowerPoint slides you should design.
30. Test Your Content Everywhere
PowerPoint in 2024 could take place anywhere. Maybe you present, online, in-person, or beam it to mobile devices. It's important to remember that the content will appear differently on each device.
PowerPoint Online is a different medium than many other apps. Make sure that your presentation design appears the same by testing it with the help of this tutorial. It shows you how your PPT presentation appears even in a browser:

Discover Great Premium PowerPoint Templates With Google Slides (For 2024)
Creating a great presentation starts with a great template. And a great PowerPoint slide design use the best presentation practices, for example:
- Use high-quality photos and graphics to help tell the story.
- Keep text to a minimum.
- Stick to one idea per slide.
Designing a great template doesn’t mean you've got to start from scratch, though. Take a look at some of the best PowerPoint templates we've got on Envato Elements.
1. Neo PowerPoint Template

The Neo PowerPoint template features a modern and bold design and includes five color variations to get you started. Along with this, you'll also get 10 master slides and 30 individual slides for all your presentation needs.
2. Vexana PowerPoint Template

The Vexana template is a great choice for brands that need a touch of elegance. This template works with PowerPoint and Google Slides and comes with a grand total of 150 slides. It also has five color variations and includes infographic elements and photo placeholders.
3. Sprint PowerPoint Template

The Sprint PowerPoint template features a professional and modern design. The template is easy to customize. You'll find 20 masters in the standard 4:3 size, allowing you to choose the best layout for your information.
4. Travelicious PowerPoint Template

For any presentation that deals with the topic of travel, check out the Travelicious template. This template is compatible with both PowerPoint and Google Slides. It includes three premade color variations as well as 30 unique slides.
As you can see from the examples above, there's no shortage of beautiful and professional PowerPoint slide designs on Envato Elements . What’s more, Envato Elements allows you to download as many PowerPoint templates as you want. Plus, get thousands of other design assets such as fonts, photos, and icons—all for one low monthly price.
Want to see even more great PowerPoint template examples? Be sure to check out our related roundup:
Need Help? Grab Our Making Great Presentations eBook (Free)
We've got the perfect complement to this tutorial. You can find more information in our eBook on making great presentations . Download this PDF eBook now for FREE with your subscription to the Tuts+ Business Newsletter.
It'll help you master the presentation process from initial creative ideas through to writing, design, and delivering with impact.

PowerPoint Frequently Asked Questions (FAQ)
Now that you’ve read about PowerPoint tips and tricks, if you want to learn more about PowerPoint, here are some FAQs:
1. What Is a Placeholder?
Placeholders in your slide on PowerPoint help you easily add text or images to your slide without changing your design.
In a template, sometimes the placeholders have prompts such as “Click to insert a picture” or “Click to add text.” These prompts let you know what kind of placeholder it is. To learn more about placeholders, read this article:

2. How Can I Automatically Play a Video?
A PowerPoint tip is to insert an automatically played video in your presentation. When you've got a video that'll play automatically, it saves you the trouble of starting your video manually.
Videos can illustrate topics or specific points. They're also a great way to keep your audience engaged. If you want to learn how to play a video automatically, read this tutorial:
3. How Can I Add a Map to my Slide?
Another PowerPoint trick is to add a map to your slide. If you're discussing a specific location, then a map can help your audience visualize the location you're presenting. To learn how to add a map to your PowerPoint slide, read this tutorial:
4. How Do I Add a GIF to My Presentation?
Adding a GIF to your slide on PowerPoint is one way you can grab your audience's attention. To add a GIF to your slide, you’ll need to download a GIF.
Once you download it, upload it into PowerPoint and use it on your slide. For more information about how to add a GIF to your slide on PowerPoint, read this article:

5. Can I Recover My Unsaved Presentation?
Another PowerPoint trick is to learn how to recover unsaved PowerPoint files so that you can be prepared in case of an emergency. If you want to learn more, read this tutorial:
Learn More About How to Make Presentable PowerPoints
These quick PowerPoint Presentation tips are some of my favorite ways to rapidly improve a presentation. Keeping them in mind while you build a presentation can help you build a deck that you'll be confident about presenting.
Check out these tutorials to keep learning more about PowerPoint. These tutorials will give you more ideas for fixing up your PowerPoint presentation slides efficiently:

Find More Templates
Didn't see a template you like? Here are some more:

Use These PPT Presentation Tips on Your Next Presentation
Now that you've studied some of our best PowerPoint tips, it's time to put them to use. Download one of our top-notch PowerPoint themes from Envato Elements to get started. These PowerPoint presentation tips and tricks give you confidence to make you a skilled presenter.
Editorial Note : This post was first published in February of 2019. Our staff updates this post regularly — adding new, exciting PowerPoint tips and templates (with special help from Brenda Barron , Andrew Childress and Sarah Joy ).

How-To Geek
8 tips to make the best powerpoint presentations.

Your changes have been saved
Email Is sent
Please verify your email address.
You’ve reached your account maximum for followed topics.
How to Use Your Apple Watch for Sleep Tracking
How to get more free chatgpt 4o access, dolphin emulator gets its first new version number in 8 years, quick links, table of contents, start with a goal, less is more, consider your typeface, make bullet points count, limit the use of transitions, skip text where possible, think in color, take a look from the top down, bonus: start with templates.
Slideshows are an intuitive way to share complex ideas with an audience, although they're dull and frustrating when poorly executed. Here are some tips to make your Microsoft PowerPoint presentations sing while avoiding common pitfalls.

It all starts with identifying what we're trying to achieve with the presentation. Is it informative, a showcase of data in an easy-to-understand medium? Or is it more of a pitch, something meant to persuade and convince an audience and lead them to a particular outcome?
It's here where the majority of these presentations go wrong with the inability to identify the talking points that best support our goal. Always start with a goal in mind: to entertain, to inform, or to share data in a way that's easy to understand. Use facts, figures, and images to support your conclusion while keeping structure in mind (Where are we now and where are we going?).
I've found that it's helpful to start with the ending. Once I know how to end a presentation, I know how best to get to that point. I start by identifying the takeaway---that one nugget that I want to implant before thanking everyone for their time---and I work in reverse to figure out how best to get there.
Your mileage, of course, may vary. But it's always going to be a good idea to put in the time in the beginning stages so that you aren't reworking large portions of the presentation later. And that starts with a defined goal.

A slideshow isn't supposed to include everything. It's an introduction to a topic, one that we can elaborate on with speech. Anything unnecessary is a distraction. It makes the presentation less visually appealing and less interesting, and it makes you look bad as a presenter.
This goes for text as well as images. There's nothing worse, in fact, than a series of slides where the presenter just reads them as they appear. Your audience is capable of reading, and chances are they'll be done with the slide, and browsing Reddit, long before you finish. Avoid putting the literal text on the screen, and your audience will thank you.
Related: How to Burn Your PowerPoint to DVD

Right off the bat, we're just going to come out and say that Papyrus and Comic Sans should be banned from all PowerPoint presentations, permanently. Beyond that, it's worth considering the typeface you're using and what it's saying about you, the presenter, and the presentation itself.
Consider choosing readability over aesthetics, and avoid fancy fonts that could prove to be more of a distraction than anything else. A good presentation needs two fonts: a serif and sans-serif. Use one for the headlines and one for body text, lists, and the like. Keep it simple. Veranda, Helvetica, Arial, and even Times New Roman are safe choices. Stick with the classics and it's hard to botch this one too badly.

There reaches a point where bullet points become less of a visual aid and more of a visual examination.
Bullet points should support the speaker, not overwhelm his audience. The best slides have little or no text at all, in fact. As a presenter, it's our job to talk through complex issues, but that doesn't mean that we need to highlight every talking point.
Instead, think about how you can break up large lists into three or four bullet points. Carefully consider whether you need to use more bullet points, or if you can combine multiple topics into a single point instead. And if you can't, remember that there's no one limiting the number of slides you can have in a presentation. It's always possible to break a list of 12 points down into three pages of four points each.

Animation, when used correctly, is a good idea. It breaks up slow-moving parts of a presentation and adds action to elements that require it. But it should be used judiciously.
Adding a transition that wipes left to right between every slide or that animates each bullet point in a list, for example, starts to grow taxing on those forced to endure the presentation. Viewers get bored quickly, and animations that are meant to highlight specific elements quickly become taxing.
That's not to say that you can't use animations and transitions, just that you need to pick your spots. Aim for no more than a handful of these transitions for each presentation. And use them in spots where they'll add to the demonstration, not detract from it.

Sometimes images tell a better story than text can. And as a presenter, your goal is to describe points in detail without making users do a lot of reading. In these cases, a well-designed visual, like a chart, might better convey the information you're trying to share.
The right image adds visual appeal and serves to break up longer, text-heavy sections of the presentation---but only if you're using the right images. A single high-quality image can make all the difference between a success and a dud when you're driving a specific point home.
When considering text, don't think solely in terms of bullet points and paragraphs. Tables, for example, are often unnecessary. Ask yourself whether you could present the same data in a bar or line chart instead.

Color is interesting. It evokes certain feelings and adds visual appeal to your presentation as a whole. Studies show that color also improves interest, comprehension, and retention. It should be a careful consideration, not an afterthought.
You don't have to be a graphic designer to use color well in a presentation. What I do is look for palettes I like, and then find ways to use them in the presentation. There are a number of tools for this, like Adobe Color , Coolors , and ColorHunt , just to name a few. After finding a palette you enjoy, consider how it works with the presentation you're about to give. Pastels, for example, evoke feelings of freedom and light, so they probably aren't the best choice when you're presenting quarterly earnings that missed the mark.
It's also worth mentioning that you don't need to use every color in the palette. Often, you can get by with just two or three, though you should really think through how they all work together and how readable they'll be when layered. A simple rule of thumb here is that contrast is your friend. Dark colors work well on light backgrounds, and light colors work best on dark backgrounds.

Spend some time in the Slide Sorter before you finish your presentation. By clicking the four squares at the bottom left of the presentation, you can take a look at multiple slides at once and consider how each works together. Alternatively, you can click "View" on the ribbon and select "Slide Sorter."
Are you presenting too much text at once? Move an image in. Could a series of slides benefit from a chart or summary before you move on to another point?
It's here that we have the opportunity to view the presentation from beyond the single-slide viewpoint and think in terms of how each slide fits, or if it fits at all. From this view, you can rearrange slides, add additional ones, or delete them entirely if you find that they don't advance the presentation.
The difference between a good presentation and a bad one is really all about preparation and execution. Those that respect the process and plan carefully---not only the presentation as a whole, but each slide within it---are the ones who will succeed.
This brings me to my last (half) point: When in doubt, just buy a template and use it. You can find these all over the web, though Creative Market and GraphicRiver are probably the two most popular marketplaces for this kind of thing. Not all of us are blessed with the skills needed to design and deliver an effective presentation. And while a pre-made PowerPoint template isn't going to make you a better presenter, it will ease the anxiety of creating a visually appealing slide deck.
- Microsoft Office
Click to copy
Email copied!
How to make the best Powerpoint presentation + real examples!
July 1, 2023

Ever sat through a PowerPoint presentation and thought, "Wow, that was mind-blowing"? Yeah, us either. But, let's face it, we've all been there—either on the giving or receiving end of a less-than-stellar presentation. It's high time we changed that narrative. Creating your best PowerPoint presentation isn't just about throwing together a bunch of slides – it's an art. It’s about telling a story that captivates, informs, and even entertains your audience.
A new age is upon us, and it’s time to explore the ins and outs of what makes a PowerPoint presentation not just good, but great. From nailing your content and story flow to the nuances of design and delivery, we've got you covered. So, whether you're gearing up for that crucial sales pitch or prepping for an all-important investor meeting, buckle up! Your presentation skills are about to go from mundane to magnificent.
Your Presentation Should Tell a Story
When it comes to creating a killer PowerPoint presentation, it all starts with the story. You heard that right! Not the fancy animations or the snazzy graphics (though they do have their place), but the story. It’s the backbone, the foundation, the heartbeat of your presentation.
Think about how you feel when you watch your favorite TV show or read a book you can’t put down. Good storytelling takes us to another place, where the rest of the world slips away and the story steps into the forefront. Great presentations can do the same thing if the presenter can harness the power of storytelling.
There are also plenty of science-backed reasons to prioritize good storytelling. One article by Lani Peterson for Harvard Business Corporate Learning says, “Scientists are discovering that chemicals like cortisol and dopamine are released in the brain when we’re told a story. Why does that matter? If we are trying to make a point stick, cortisol assists with our formulating memories. Dopamine, which helps regulate our emotional responses, keeps us engaged.“ More engagement; more impactful presentations.
So, how do you nail down a storytelling strategy that sticks? Let’s break it down.
Craft Your Narrative
First, identify your core message. What’s the one thing you want your audience to remember when they walk out of the room? This is your North Star, guiding every aspect of your presentation. If you’re having trouble with this step, ask yourself, “Why am I giving this presentation?”
Understand Your Audience
Who is your audience? Tailor your story to resonate with them. Are they tech-savvy millennials or industry veterans? Your story should speak their language. Presentations that skip this step will miss out on a crucial opportunity to connect with the audience. And if you can’t connect with them, then what’s the point? One solution is to focus on understanding the needs, challenges, and aspirations of your audience. That way, you’ll be able to address their specific pain points and interests.
Create a Structured Flow
Like any good story, your presentation needs a beginning, middle, and end. Start with an introduction that hooks, follow with content that informs and engages, and conclude with a memorable takeaway. If you need ideas on how to start your presentation, see this guide with 12 ideas for hooking your audience from the very start .
Find Inspiration
Look to the pros! Ever read an article by Andy Raskin or April Dunford ? These folks know their stuff when it comes to strategic narratives. Dive into their work for some inspiration on how to weave a compelling story in your presentation. Just like we’ve all been through our fair share of boring presentations, most likely you’ve experienced a presentation that left an impression. Ask yourself why it was so impactful–you might be able to draw from their expertise!
Change the Narrative
Say you’re working on a sales deck. Instead of going with the typical problem-solution story structure, Andy Raskin has a different take on it:
Start with a big, relevant shift in the world. “We are living in a new era” type of statement. This will grab the attention, but also create some urgency for the prospect.
Then you move on to show that there will be winners and losers in this new era. The ones who act on this shift will have more probability of winning. In other words, “what I am about to offer you is crucial for winning in this new era.”
Now that you have set the stage, you can “tease the promise land” as Andy calls it. This is not where you show your product features. This is simply a teaser about this new future state and what to expect if you react to this shift in the market.
Then, you highlight the “Old world vs New world” to show the contrast, and how old methods do not work in this new era.
And finally, you provide real-life stories to support your claims. These could client case studies, article snippets, industry updates - anything that adds credibility to everything you just said.
Voilà, you’ve got yourself a story arc! This is a simple and straightforward way to craft a story that connects.
Nail Your Story First
Remember, at the end of the day, your presentation is more than just a collection of slides, but rather a vessel for storytelling. It’s not just about what you say, but how you say it. A well-crafted story can transform your presentation from a mere transfer of information to an impactful, memorable experience. So, take the time to nail your story, and you’re already halfway to creating your best PowerPoint presentation. Your audience will thank you!

Embracing Professional Design for Impactful Presentations
When you've nailed your narrative, the next crucial step in crafting your best PowerPoint presentation is design. This stage is where your story gets visually translated, elevating it from a mere script to an engaging, compelling experience.
The Role of a Presentation Agency
Not everyone possesses an innate talent for design, and that's perfectly fine. This is where a presentation design agency can become an invaluable asset. These presentation experts act as the alchemists of your PowerPoint, transforming basic slides into visually stunning and strategically aligned pieces of art. However, be selective when you choose who to work with. There is a big difference between a "meh" designer vs a “wow” designer when it comes to preparing well-crafted presentations.
Simplifying Complexity
One of the critical talents of a presentation design agency is their ability to distill complex concepts into simple, digestible visuals. An overcrowded slide can quickly lose your audience's attention, but a well-designed one can convey your message succinctly and effectively. Not only that, presentation experts can remove the complexity of creating great slides by designing the best presentation templates for your needs, making the process easier for you in the end.
"We have been using SLIDES™ services for our corporate PowerPoint template, and the PPT template is so well done and easy to use that we all feel like we now have PowerPoint superpowers creating new presentations in no time with stunning look!"
Jérôme neuvéglise, product owner qoqa, creating visual harmony.
Consistency in your presentation’s visual elements - such as color schemes, typography, and imagery - is essential. A presentation design agency ensures that these elements work in harmony, creating a unified and professional look that enhances your overall narrative. The best presentation layouts are those created by experts who know how to make your brand stand out.
Visualizing Ideas Effectively
Presentation agencies excel in translating your ideas into impactful visuals. They ensure that your graphics, charts, and images aren't just visually appealing but also contribute significantly to the telling of your story. After all, why spend so much time honing your story if your visuals fall flat?

When to Opt for Professional Presentation Design
We know that deciding to outsource is a tough call, and you want to make sure your resources are well spent. Here are a few things to consider before seeking out help from a presentation agency:
High-Stakes Presentations
For presentations that can have a significant impact on your business - such as those in sales, partnerships, or investment pitches - professional design isn't just a luxury, but a necessity. These are the scenarios where the expertise of a presentation design agency can make a substantial difference.
Stripe’s CEO Patrick Collison said in a recent podcast:
“My intuition is that more of Stripe's success than one would think is down to the fact that people like beautiful things and for rational reasons. Because, what does a beautiful thing tell you? It tells you the person who made it really cared, and you can observe some superficial details, but probably they didn’t only care about those and did everything else in a slapdash way. So, if you care about the infrastructure being holistically good, indexing on the superficial characteristics is not an irrational thing to do.“
Oftentimes in presentations, we ignore how we are making people feel with our slides. Think about this quote next time you’re preparing your slides.
Overcoming Skill and Time Constraints
If you're not well-versed in design or if time constraints are tight, opting for professional help is a wise decision. This not only ensures quality but also frees you up to concentrate on refining and rehearsing your presentation. This guide shows 18 of the most common presentation mistakes people make, and gives tips on how to avoid them.
In essence, professional design is about giving your presentation the visual edge it needs to not just capture but also maintain your audience's attention. By considering the services of a presentation design agency, you're ensuring that your presentation is not just seen, but also remembered and appreciated.
Mastering the Art of Delivery
Alright, you’ve got a gripping story and a set of stunning slides. But wait! There’s still a crucial piece of the puzzle left – your delivery. This is where the rubber meets the road. Remember, no matter how dazzling your slides are, they can’t rescue a lackluster delivery.

More Than Just Slides
First things first, let’s get one thing straight: people aren’t just buying into your PowerPoint. They’re buying into you – your ideas, your enthusiasm, your conviction. Your slides are merely a tool to complement your narrative, not the other way around. Your slides are never the star of the show. It's you. It sure is harder to improve your delivery compared to your slides. But it will be the best investment of your life.
The Human Connection
At its core, a great presentation is about making a connection with your audience. It’s about storytelling, not just through words on a slide, but through the way you present them. Your tone, your body language, your ability to engage – all these elements combine to create a compelling delivery.
Know Your Story Inside Out
Your first step should be to know your story like the back of your hand. This doesn’t mean memorizing your script word for word but being familiar enough with your content to speak confidently and fluidly about it.
Rehearse, Then Rehearse Some More
Practice might not always make perfect, but it sure does make confidence. Rehearse your presentation multiple times. This will help you iron out any kinks in your delivery and help you manage those pesky nerves.
When our founder Damon gave his first keynote presentation, he experienced some technical issues that would throw off any professional speaker. But since he had rehearsed his speech so well, he knew it inside out. And he could handle the mishap with calm, make some jokes about it, and then get back to his talk when the tech decided to work again.
Engage With Your Audience
Remember, a presentation is a two-way street. Engage with your audience, ask questions, and encourage participation. This interaction makes your presentation more memorable and impactful. The former product manager at Netflix , Gibson Biddle, shared this great example:
“In a virtual setting you need to double-down on engagement tactics. Today, I use Google Slides plus Slido to do real-time polling, word clouds and to answer questions. It makes the experience incredibly interactive to the extent that I now have an equal NPS for virtual and in-person presentations.”
Body Language Matters
Your body language speaks volumes. Maintain eye contact, use gestures to emphasize points, and move around if possible. This non-verbal communication can significantly enhance the impact of your delivery.
In today’s increasingly digital world, we also have to think about virtual presentations and how to put our best foot forward through a screen. An awkward camera angle or a weird background can be a distraction to your audience, so shift your focus to a flattering camera angle, solid camera quality, and a neutral background.

Authenticity is Key
Be yourself. Your audience can tell when you’re putting on a façade. Authenticity breeds trust and connection, which in turn makes your message more persuasive.
Investing in Yourself
Finally, investing in your delivery skills is investing in yourself. Whether it’s through public speaking courses, professional coaching, or simply seeking feedback from peers, improving your delivery skills is invaluable. Remember, a great delivery can elevate a good presentation to a great one. So, give your delivery the attention it deserves, and watch as you transform from a presenter to a storyteller, captivating your audience one slide at a time.
Final Thoughts
So, there you have it – the roadmap to creating a PowerPoint presentation that’s not just good, but outstanding. It all starts with crafting a compelling story, enhanced by visually striking and well-thought-out design, and brought to life through engaging and authentic delivery. Remember, your best PowerPoint presentation will feel like more than just a collection of slides to your audience. This is a powerful storytelling tool, and you are the storyteller.
The key takeaway? Invest time and effort into each aspect of your presentation. Understand your narrative, collaborate with design professionals if needed, and hone your delivery skills. It’s this combination of content, design, and delivery that transforms a standard presentation into an unforgettable experience.
In the end, what sets a great PowerPoint presentation apart is the ability to not just share information but to tell a story that resonates, inspires, and persuades. Whether you’re pitching to potential clients, investors, or sharing insights with your team, remember that the most impactful presentations are those that connect with the audience on a deeper level. So go ahead, create, deliver, and captivate.
Your audience is waiting.
Recent articles
View all articles

Figma Slides: A new presentation tool taking on PowerPoint and co
Presentation tools

Our founder Damon is speaking at Present to Succeed 2024 in Bulgaria
Critical PowerPoint Shortcuts – Claim Your FREE Training Module and Get Your Time Back!
How to Present a PowerPoint Slideshow (w/ Shortcuts)
- PowerPoint Tutorials
- Shortcuts & Hacks
- May 11, 2019
There are a variety of ways to start a PowerPoint presention, depending on:
- Where you start your presentation (from beginning or from current)
- Which PowerPoint view you prefer to present in (Slide Show view or Presenter view)
- How comfortable you are with keyboard shortcuts
Why would Microsoft include so many ways to present a presentation? My guess is that everyone learns PowerPoint differently, and has personal presentation styles. The more options you have, the easier your life will be as there will always be a way to start your presentation the way you want to (or jump back into it when you need to).
See all the options below and find the method that works best for you and let the slide show begin !
NOTE: If you are running two presentations side-by-side, each presentation needs to be started as it’s own slide show. To see how to set up two PowerPoint presentations to run side-by-side like this before you start your slide show, read my guide here .
Table of Contents
Start slide show from beginning.

To start a slideshow from the beginning of your presentation using the ribbon, simply.
- Navigate to the Slide Show tab
- Select From Beginning
Selecting From Beginning starts your presentation from the very first non-hidden slide in your presentation, regardless of which slide you are currently inside of your deck.
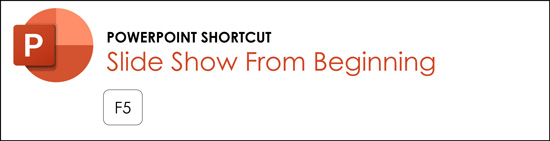
You can also start your slide from the beginning of your presentation by hitting the Slideshow From Beginning keyboard shortcut, F5 .
Regardless of which method you use, this is the classic way to start your presentation in full screen from your first title slide (regardless of where you are in your slide deck).
Let the slide show begin!
NOTE: To expand your knowledge and learn how to use PowerPoint’s FREE and HIDDEN built-in laser pointer to point things out during your presentation, read my guide here .
Take your PPT skills to the next level
Start slide show from current.

To begin your slide show from the slide you are currently on using the ribbon, simply
- Navigate to the Slide Show tab
- Select From Current Slide
Selecting From Current Slide starts your slide show from whatever slide you are currently on, even if the slide is hidden.
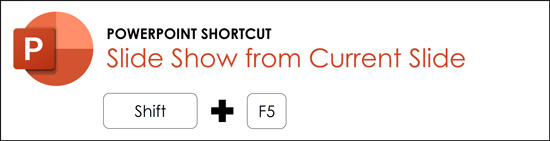
You can also start your slide from the current slide you are on by hitting the Shift+F5 keyboard shortcut.
Because it’s often easiest to catch errors when building your slides in this full screen mode, I highly recommend learning the Shift+F5 shortcut and using it frequently as you build your slides to spot them for errors.
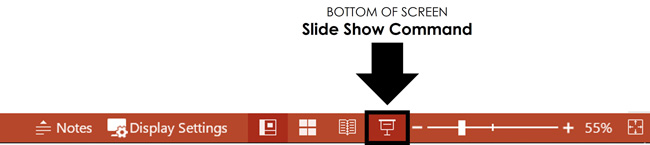
If you don’t want to bother learning the From Current Slide shortcut, you can also start your slideshow by clicking the Slide Show icon at the bottom of your screen.
This is a fantastic way to spot check your slides as you are building them. On top of that, it’s a fast and uncomplicated way to re-start your presentation from where you left off after demoing something on screen.
Start a mini-slide show in PowerPoint
You can also use the following hidden PowerPoint shortcut to run a mini slide show over the top of your current deck.
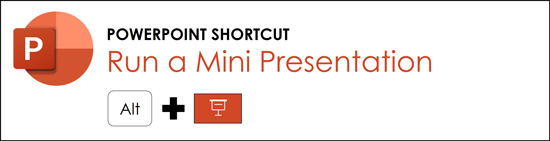
To run a mini slide show, simply:
- Hold down the Alt key on your keyboard
- With your mouse, click the Slide Show icon
Doing so starts a small slide show of your presentation that you can see below, from the current slide you are on.

Presenter View
The Presenter View is an alternate way to run your presentation in PowerPoint. In this view, your slides are projected on screen, and the details of your presentation are displayed on your computer as pictured below.

The presenter view includes your next (non-hidden) slides that is coming up, your current slide projected on screen, how long you’ve been talking and your speaker notes.

To launch the Presenter View from the beginning of your presentation using your Ribbon, simply:
- Navigate to the Slide Show tab
- Hold down the Alt key on your keyboard
- Click From Beginning
Holding down the Alt key and clicking From Beginning , the Presenter View will launch from the very first (non-hidden) slide in your presentation.
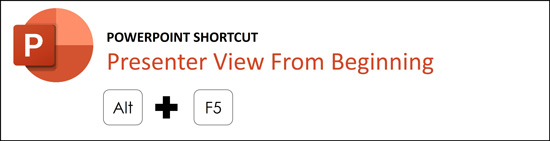
You can also launch the presenter view from the beginning of your presentation at any time by clicking Alt + F5 on your keyboard.
Start Presenter View in PowerPoint From Current Slide

Did you know that you can access different views in PowerPoint by adding keys as you click commands in the PowerPoint ribbon?
To start the Presenter view from your current slide using your Ribbon, simply:
- Hold down the Alt key on your keyboard
- Click From Current Slide
Holding the Alt key and clicking From Current Slide launches the Presenter View from your current slide. So, this is another way you can quickly practice your presentation, see your speaker notes and see what’s coming up next.
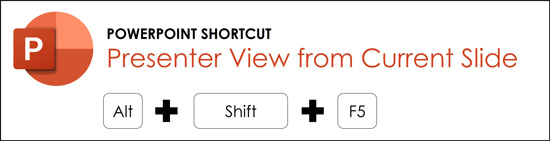
You can also launch the Presenter View from the beginning of your presentation at any time by hitting Alt+F5 on your keyboard.
Showing and Hiding Presenter View
Regardless of which view you start your PowerPoint slide show; you can switch between the two different slide show views without exiting presentation.

To switch between the two slideshow views (while giving your presentation), simply:
- Right-click your slide in whichever presentation view you are currently in
- Select either Show Presenter View or Hide Presenter View
When would you use a feature like this during a presentation? One example is if you want to view your notes without leaving the slide show mode.
NOTE: The letter r for both Show Presenter View and Hide Presenter View is underlined. This means that it is a keyboard shortcut. So, if you want to quickly flip between these two presentation views, you can simply right-click your slide and hit the letter r on your keyboard. Doing so automatically switches the view you are in.
Controlling how your presentation runs
Another way to control how your presentation runs (including the default laser pointer and pen color), is the Set Up Slide Show dialog box.

To open the Set Up Slide Show dialog box, simply:
- Select the Set Up Slide Show command
Doing so, opens all your PowerPoint slide show settings and options as pictured below.
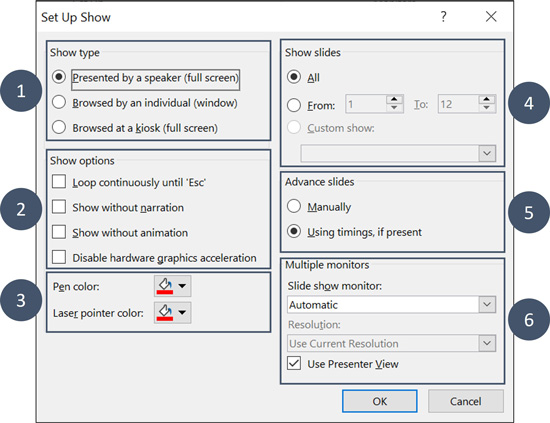
Inside the slide show settings dialog box, you can select:
- How your presentation runs (full screen, window or in kiosk mode).
- Your default pen and laser pointer color options ( see our laser pointer article here ).
- Which slide you want start from, or which slides you want to show. You can also setup a custom show here.
- How your slides progress (manually or using slide timings).
- Which of your computer monitors (or screens) your slide show runs on.
The Set Up Slide Show dialog box is also the secret to running multiple presentations at the same time in PowerPoint. To expand your knowledge and learn how to set this up, read our guide here .
Setup Slide Show SECRET Shortcut

To use the SECRET shortcut to open the Set Up Slide Show dialog box, simply:
- Hold down the Shift key on your keyboard
- With your mouse, click the Reading View icon at the bottom of your screen
This is useful when you need to quickly cycle through lots of PowerPoint presentations and change how those presentations run. Instead of wasting time clicking through the Ribbon, simply hold the Shift key and click the Reading View icon. This is also a friendly conversation starter with a fellow PowerPoint enthusiast at Happy Hour.
NOTE: The color of your Reading View icon might be different than in the picture above, as it is dependent on the Office Theme you selected for PowerPoint.
How to exit a PowerPoint presentation early?

Regardless of how you start your full screen presentation, you can end your presentation at any time by hitting the Esc key on your keyboard.
Hitting Esc immediately takes you out of the PowerPoint presentation mode and back to the normal editing view of your slides, on whatever slide you were last presenting.
Here is how you can use a combination of all the different keyboard shortcuts to spot check and practice your presentation in full screen before you finalize your presentation.
- Hit F5 on your keyboard to start your presentation in full screen from the very first slide in your presentation. You can then use your arrow keys to advance, spot checking your slides for errors.
- When you find an error, simply hit Esc key to return to the normal PowerPoint editing view to fix your slide.
- When you are done, hit Shift + F5 to return the full screen presentation mode from the slide you just updated. You can then continue spot checking your presentation (without having to start over from the beginning).
In this way you can quickly work your way through your slides and practice your presentation, fixing and adjusting your content as you go.
Understanding how to run your presentations is CRITICAL to the success of your presentation. Not only in presenting them live, but also in knowing how to spot check your slides as you build them.
I personally find it easiest to spot check your slides and quickly fix errors by running your presentation in slide show mode (or full screen). The last place you want to discover an error is during your presentation.
Using the commands and shortcuts above, you can quickly start, exit and step back into your slide show. Once you have these commands and features down, you will also look like a whiz during your presentations.
If you enjoyed the depth of this article, you will love our other PowerPoint training courses and free resources. To learn more, visit us here .
🔒 Unlock the PowerPoint Shortcuts Trusted by Industry Leaders KKR, American Express, HSBC, and More!
Join over 114,880 professionals from diverse fields including consulting, investment banking, advertising, marketing, sales, and business development who have supercharged their PowerPoint game with our proven methods.
✅ Customize compelling presentations effortlessly.
✅ Master time-saving techniques for faster deck creation.
✅ Boost your career prospects with top-notch PowerPoint skills.
Get FREE access to the Critical PowerPoint Shortcuts module of our premium training course by entering your name and email below.
DISCLAIMER: PC Users Only!
We respect your privacy and will keep your info safe and confidential.
Related Articles
About the author.

Popular Tutorials
- How to Strikethrough Text (l̶i̶k̶e̶ ̶t̶h̶i̶s̶) in Word, Excel & PowerPoint
- How to Make Animated Fireworks in PowerPoint (Step-by-Step)
- Strikethrough Shortcut (l̶i̶k̶e̶ ̶t̶h̶i̶s̶) for Word, Excel & PowerPoint
- How to Create a Flash Card Memory Game in PowerPoint (Like Jeopardy)
- Keyboard Shortcuts Not Working: Solved
PowerPoint Tutorial Categories
- Strategies & Opinions
- Presentation Design
- Pictures, Icons, Videos, Etc.
- New Features
- Miscellaneous
- Charts & Data Viz
We help busy professionals save hours and gain peace of mind, with corporate workshops, self-paced courses and tutorials for PowerPoint and Word.
Work With Us
- Corporate Training
- Presentation & Template Design
- Courses & Downloads
- PowerPoint Articles
- Word Articles
- Productivity Resources
Find a Tutorial
- Free Training
- For Businesses
We help busy office workers save hours and gain peace of mind, with tips, training and tutorials for Microsoft PowerPoint and Word.
Master Critical PowerPoint Shortcuts – Secure Your FREE Training Module and Save Valuable Time!
⌛ Master time-saving expert techniques.
🔥 Create powerful presentations.
🚀 Propel your career to new heights.
We value your privacy – we keep your info safe.
Discover PowerPoint Hacks Loved by Industry Giants - KKR, AmEx, HSBC!
Over 114,880 professionals in finance, marketing and sales have revolutionized their PPT skills with our proven methods.
Gain FREE access to a full module of our premium PowerPoint training program – Get started today!
We hate spam too and promise to keep your information safe.
You are currently viewing a placeholder content from Facebook . To access the actual content, click the button below. Please note that doing so will share data with third-party providers.
- SUGGESTED TOPICS
- The Magazine
- Newsletters
- Managing Yourself
- Managing Teams
- Work-life Balance
- The Big Idea
- Data & Visuals
- Reading Lists
- Case Selections
- HBR Learning
- Topic Feeds
- Account Settings
- Email Preferences
What It Takes to Give a Great Presentation
- Carmine Gallo

Five tips to set yourself apart.
Never underestimate the power of great communication. It can help you land the job of your dreams, attract investors to back your idea, or elevate your stature within your organization. But while there are plenty of good speakers in the world, you can set yourself apart out by being the person who can deliver something great over and over. Here are a few tips for business professionals who want to move from being good speakers to great ones: be concise (the fewer words, the better); never use bullet points (photos and images paired together are more memorable); don’t underestimate the power of your voice (raise and lower it for emphasis); give your audience something extra (unexpected moments will grab their attention); rehearse (the best speakers are the best because they practice — a lot).
I was sitting across the table from a Silicon Valley CEO who had pioneered a technology that touches many of our lives — the flash memory that stores data on smartphones, digital cameras, and computers. He was a frequent guest on CNBC and had been delivering business presentations for at least 20 years before we met. And yet, the CEO wanted to sharpen his public speaking skills.
- Carmine Gallo is a Harvard University instructor, keynote speaker, and author of 10 books translated into 40 languages. Gallo is the author of The Bezos Blueprint: Communication Secrets of the World’s Greatest Salesman (St. Martin’s Press).
Partner Center
- PRO Courses Guides New Tech Help Pro Expert Videos About wikiHow Pro Upgrade Sign In
- EDIT Edit this Article
- EXPLORE Tech Help Pro About Us Random Article Quizzes Request a New Article Community Dashboard This Or That Game Popular Categories Arts and Entertainment Artwork Books Movies Computers and Electronics Computers Phone Skills Technology Hacks Health Men's Health Mental Health Women's Health Relationships Dating Love Relationship Issues Hobbies and Crafts Crafts Drawing Games Education & Communication Communication Skills Personal Development Studying Personal Care and Style Fashion Hair Care Personal Hygiene Youth Personal Care School Stuff Dating All Categories Arts and Entertainment Finance and Business Home and Garden Relationship Quizzes Cars & Other Vehicles Food and Entertaining Personal Care and Style Sports and Fitness Computers and Electronics Health Pets and Animals Travel Education & Communication Hobbies and Crafts Philosophy and Religion Work World Family Life Holidays and Traditions Relationships Youth
- Browse Articles
- Learn Something New
- Quizzes Hot
- This Or That Game
- Train Your Brain
- Explore More
- Support wikiHow
- About wikiHow
- Log in / Sign up
- Computers and Electronics
- Presentation Software
- PowerPoint Presentations
Simple Steps to Make a PowerPoint Presentation
Last Updated: April 28, 2024 Fact Checked
Creating a New PowerPoint
Creating the title slide, adding a new slide, adding content to slides, adding transitions, testing and saving your presentation.
This article was co-authored by wikiHow staff writer, Darlene Antonelli, MA . Darlene Antonelli is a Technology Writer and Editor for wikiHow. Darlene has experience teaching college courses, writing technology-related articles, and working hands-on in the technology field. She earned an MA in Writing from Rowan University in 2012 and wrote her thesis on online communities and the personalities curated in such communities. This article has been fact-checked, ensuring the accuracy of any cited facts and confirming the authority of its sources. This article has been viewed 4,332,209 times. Learn more...
Do you want to have your data in a slide show? If you have Microsoft 365, you can use PowerPoint! PowerPoint is a program that's part of the Microsoft Office suite (which you have to pay for) and is available for both Windows and Mac computers. This wikiHow teaches you how to create your own Microsoft PowerPoint presentation on a computer.
How to Make a PowerPoint Presentation
- Open the PowerPoint app, select a template and theme, then like “Create.”
- Click the text box to add your title and subtitle to create your title slide.
- Click the “Insert” tab, then “New Slide” to add another slide.
- Choose the type of slide you want to add, then add text and pictures.
- Rearrange slides by dragging them up or down in the preview box.
Things You Should Know
- Templates make it easy to create vibrant presentations no matter your skill level.
- When adding photos, you can adjust their sizes by clicking and dragging in or out from their corners.
- You can add animated transitions between slides or to individual elements like bullet points and blocks of text.

- If you don't have a Microsoft Office 365 subscription, you can use the website instead of the desktop app. Go to https://powerpoint.office.com/ to use the website version.
- You can also use the mobile app to make presentations, though it's easier to do this on a computer, which has a larger screen, a mouse, and a keyboard.

- If you don't want to use a template, just click the Blank option in the upper-left side of the page and skip to the next part.

- Skip this step if your selected template has no themes available.

- If you're creating a PowerPoint presentation for which an elaborate title slide has been requested, ignore this step.

- You can change the font and size of text used from the Home tab that's in the orange ribbon at the top of the window.

- You can also just leave this box blank if you like.

- You can also click and drag in or out one of a text box's corners to shrink or enlarge the text box.

- On a Mac, you'll click the Home tab instead. [1] X Research source

- Clicking the white slide-shaped box above this option will result in a new text slide being inserted.

- Title Slide
- Title and Content
- Section Header
- Two Content
- Content with Caption
- Picture with Caption

- Naturally, the title slide should be the first slide in your presentation, meaning that it should be the top slide in the left-hand column.

- Skip this step and the next two steps if your selected slide uses a template that doesn't have text boxes in it.

- Text boxes in PowerPoint will automatically format the bulk of your text for you (e.g., adding bullet points) based on the context of the content itself.
- You can add notes that the Presentation will not include (but you'll still be able to see them on your screen) by clicking Notes at the bottom of the slide.

- You can change the font of the selected text by clicking the current font's name and then clicking your preferred font.
- If you want to change the size of the text, click the numbered drop-down box and then click a larger or smaller number based on whether you want to enlarge or shrink the text.
- You can also change the color, bolding, italicization, underlining, and so on from here.

- Photos in particular can be enlarged or shrunk by clicking and dragging out or in one of their corners.

- Remember to keep slides uncluttered and relatively free of distractions. It's best to keep the amount of text per slide to around 33 words or less. [2] X Research source

- Slide content will animate in the order in which you assign transitions. For example, if you animate a photo on the slide and then animate the title, the photo will appear before the title.
- Make your slideshow progress automatically by setting the speed of every transition to align with your speech as well as setting each slide to Advance . [3] X Trustworthy Source Microsoft Support Technical support and product information from Microsoft. Go to source

- If you need to exit the presentation, press Esc .

- Windows - Click File , click Save , double-click This PC , select a save location, enter a name for your presentation, and click Save .
- Mac - Click File , click Save As... , enter the presentation's name in the "Save As" field, select a save location by clicking the "Where" box and clicking a folder, and click Save .
Community Q&A
- If you save your PowerPoint presentation in .pps format instead of the default .ppt format, double-clicking your PowerPoint presentation file will prompt the presentation to open directly into the slideshow view. Thanks Helpful 5 Not Helpful 0
- If you don't have Microsoft Office, you can still use Apple's Keynote program or Google Slides to create a PowerPoint presentation. Thanks Helpful 0 Not Helpful 0

- Your PowerPoint presentation (or some features in it) may not open in significantly older versions of PowerPoint. Thanks Helpful 1 Not Helpful 2
- Great PowerPoint presentations avoid placing too much text on one slide. Thanks Helpful 0 Not Helpful 0
You Might Also Like

- ↑ https://onedrive.live.com/view.aspx?resid=DBDCE00C929AA5D8!252&ithint=file%2cpptx&app=PowerPoint&authkey=!AH4O9NxcbehqzIg
- ↑ https://www.virtualsalt.com/powerpoint.htm
- ↑ https://support.microsoft.com/en-us/office/set-the-timing-and-speed-of-a-transition-c3c3c66f-4cca-4821-b8b9-7de0f3f6ead1#:~:text=To%20make%20the%20slide%20advance,effect%20on%20the%20slide%20finishes .
About This Article

- Send fan mail to authors
Reader Success Stories
Artis Holland
Sep 22, 2016
Is this article up to date?
Oct 18, 2016
Jul 23, 2016
Margery Niyi
Sep 25, 2017
Jul 21, 2016

Featured Articles

Trending Articles

Watch Articles

- Terms of Use
- Privacy Policy
- Do Not Sell or Share My Info
- Not Selling Info
wikiHow Tech Help Pro:
Level up your tech skills and stay ahead of the curve
20 Great Examples of PowerPoint Presentation Design [+ Templates]
Published: January 17, 2024
When it comes to PowerPoint presentation design, there's no shortage of avenues you can take.

While all that choice — colors, formats, visuals, fonts — can feel liberating, it‘s important that you’re careful in your selection as not all design combinations add up to success.
![→ Free Download: 10 PowerPoint Presentation Templates [Access Now]](https://no-cache.hubspot.com/cta/default/53/2d0b5298-2daa-4812-b2d4-fa65cd354a8e.png "present a powerpoint presentation")
In this blog post, I’m sharing some of my favorite PowerPoint tips and templates to help you nail your next presentation.
Table of Contents
What makes a good PowerPoint presentation?
Powerpoint design ideas, best powerpoint presentation slides, good examples of powerpoint presentation design.
In my opinion, a great PowerPoint presentation gets the point across succinctly while using a design that doesn't detract from it.
Here are some of the elements I like to keep in mind when I’m building my own.
1. Minimal Animations and Transitions
Believe it or not, animations and transitions can take away from your PowerPoint presentation. Why? Well, they distract from the content you worked so hard on.
A good PowerPoint presentation keeps the focus on your argument by keeping animations and transitions to a minimum. I suggest using them tastefully and sparingly to emphasize a point or bring attention to a certain part of an image.
2. Cohesive Color Palette
I like to refresh my memory on color theory when creating a new PowerPoint presentation.
A cohesive color palette uses complementary and analogous colors to draw the audience’s attention and help emphasize certain aspects at the right time.

10 Free PowerPoint Templates
Download ten free PowerPoint templates for a better presentation.
- Creative templates.
- Data-driven templates.
- Professional templates.
Download Free
All fields are required.
You're all set!
Click this link to access this resource at any time.
Tell us a little about yourself below to gain access today:
It‘s impossible for me to tell you the specific design ideas you should go after in your next PowerPoint, because, well, I don’t know what the goal of your presentation is.
Luckily, new versions of PowerPoint actually suggest ideas for you based on the content you're presenting. This can help you keep up with the latest trends in presentation design .
PowerPoint is filled with interesting boilerplate designs you can start with. To find these suggestions, open PowerPoint and click the “Design” tab in your top navigation bar. Then, on the far right side, you'll see the following choices:

This simplistic presentation example employs several different colors and font weights, but instead of coming off as disconnected, the varied colors work with one another to create contrast and call out specific concepts.
What I like: The big, bold numbers help set the reader's expectations, as they clearly signify how far along the viewer is in the list of tips.
10. “Pixar's 22 Rules to Phenomenal Storytelling,” Gavin McMahon
This presentation by Gavin McMahon features color in all the right places. While each of the background images boasts a bright, spotlight-like design, all the characters are intentionally blacked out.
What I like: This helps keep the focus on the tips, while still incorporating visuals. Not to mention, it's still easy for me to identify each character without the details. (I found you on slide eight, Nemo.)
11. “Facebook Engagement and Activity Report,” We Are Social
Here's another great example of data visualization in the wild.
What I like: Rather than displaying numbers and statistics straight up, this presentation calls upon interesting, colorful graphs, and charts to present the information in a way that just makes sense.
12. “The GaryVee Content Model,” Gary Vaynerchuk
This wouldn‘t be a true Gary Vaynerchuk presentation if it wasn’t a little loud, am I right?
What I like: Aside from the fact that I love the eye-catching, bright yellow background, Vaynerchuk does a great job of incorporating screenshots on each slide to create a visual tutorial that coincides with the tips. He also does a great job including a visual table of contents that shows your progress as you go .
13. “20 Tweetable Quotes to Inspire Marketing & Design Creative Genius,” IMPACT Branding & Design
We‘ve all seen our fair share of quote-chronicling presentations but that isn’t to say they were all done well. Often the background images are poor quality, the text is too small, or there isn't enough contrast.
Well, this professional presentation from IMPACT Branding & Design suffers from none of said challenges.
What I like: The colorful filters over each background image create just enough contrast for the quotes to stand out.
14. “The Great State of Design,” Stacy Kvernmo
This presentation offers up a lot of information in a way that doesn't feel overwhelming.
What I like: The contrasting colors create visual interest and “pop,” and the comic images (slides 6 through 12) are used to make the information seem less buttoned-up and overwhelming.
15. “Clickbait: A Guide To Writing Un-Ignorable Headlines,” Ethos3
Not going to lie, it was the title that convinced me to click through to this presentation but the awesome design kept me there once I arrived.
What I like: This simple design adheres to a consistent color pattern and leverages bullet points and varied fonts to break up the text nicely.
16. “Digital Transformation in 50 Soundbites,” Julie Dodd
This design highlights a great alternative to the “text-over-image” display we've grown used to seeing.
What I like: By leveraging a split-screen approach to each presentation slide, Julie Dodd was able to serve up a clean, legible quote without sacrificing the power of a strong visual.
17. “Fix Your Really Bad PowerPoint,” Slide Comet
When you‘re creating a PowerPoint about how everyone’s PowerPoints stink, yours had better be terrific. The one above, based on the ebook by Seth Godin, keeps it simple without boring its audience.
What I like: Its clever combinations of fonts, together with consistent color across each slide, ensure you're neither overwhelmed nor unengaged.
18. “How Google Works,” Eric Schmidt
Simple, clever doodles tell the story of Google in a fun and creative way. This presentation reads almost like a storybook, making it easy to move from one slide to the next.
What I like: This uncluttered approach provides viewers with an easy-to-understand explanation of a complicated topic.
19. “What Really Differentiates the Best Content Marketers From The Rest,” Ross Simmonds
Let‘s be honest: These graphics are hard not to love. I especially appreciate the author’s cartoonified self-portrait that closes out the presentation. Well played, Ross Simmonds.
What I like: Rather than employing the same old stock photos, this unique design serves as a refreshing way to present information that's both valuable and fun.
20. “Be A Great Product Leader,” Adam Nash
This presentation by Adam Nash immediately draws attention by putting the company's logo first — a great move if your company is well known.
What I like: He uses popular images, such as ones of Megatron and Pinocchio, to drive his points home. In the same way, you can take advantage of popular images and media to keep your audience engaged.
PowerPoint Presentation Examples for the Best Slide Presentation
Mastering a PowerPoint presentation begins with the design itself.
Get inspired by my ideas above to create a presentation that engages your audience, builds upon your point, and helps you generate leads for your brand.
Editor's note: This post was originally published in March 2013 and has been updated for comprehensiveness. This article was written by a human, but our team uses AI in our editorial process. Check out our full disclosure to learn more about how we use AI.
![Blog - Beautiful PowerPoint Presentation Template [List-Based]](https://no-cache.hubspot.com/cta/default/53/013286c0-2cc2-45f8-a6db-c71dad0835b8.png "present a powerpoint presentation")
Don't forget to share this post!
Related articles.
![How to Create the Best PowerPoint Presentations [Examples & Templates]](https://knowledge.hubspot.com/hubfs/powerpoint.webp "present a powerpoint presentation")
How to Create the Best PowerPoint Presentations [Examples & Templates]
![17 PowerPoint Presentation Tips From Pro Presenters [+ Templates]](https://www.hubspot.com/hubfs/powerpoint-design-tricks_7.webp "present a powerpoint presentation")
17 PowerPoint Presentation Tips From Pro Presenters [+ Templates]
![How to Write an Ecommerce Business Plan [Examples & Template]](https://www.hubspot.com/hubfs/ecommerce%20business%20plan.png "present a powerpoint presentation")
How to Write an Ecommerce Business Plan [Examples & Template]
![How to Create an Infographic in Under an Hour — the 2024 Guide [+ Free Templates]](https://www.hubspot.com/hubfs/Make-infographic-hero%20%28598%20%C3%97%20398%20px%29.jpg "present a powerpoint presentation")
How to Create an Infographic in Under an Hour — the 2024 Guide [+ Free Templates]

Get Buyers to Do What You Want: The Power of Temptation Bundling in Sales

How to Create an Engaging 5-Minute Presentation
![How to Start a Presentation [+ Examples]](https://www.hubspot.com/hubfs/how-to-start-presenting.webp "present a powerpoint presentation")
How to Start a Presentation [+ Examples]

120 Presentation Topic Ideas Help You Hook Your Audience

The Presenter's Guide to Nailing Your Next PowerPoint
![How to Create a Stunning Presentation Cover Page [+ Examples]](https://www.hubspot.com/hubfs/presentation-cover-page_3.webp "present a powerpoint presentation")
How to Create a Stunning Presentation Cover Page [+ Examples]
Marketing software that helps you drive revenue, save time and resources, and measure and optimize your investments — all on one easy-to-use platform
Find the perfect PowerPoint presentation template
Bring your next presentation to life with customizable powerpoint design templates. whether you're wowing with stats via charts and graphs or putting your latest and greatest ideas on display, you'll find a powerpoint presentation template to make your ideas pop., presentations.
Help your data, insights, and recommendations make a statement with beautiful and easily customizable presentation templates.

Certificates
Celebrate accomplishments big and small with customizable certificate templates. From gift certificates to awards for finishing a course or training, find a template that highlights their accolades.
Boost visibility for your show, project, or business with easily customizable poster templates. Find templates for all your promotion needs and make them uniquely yours in a flash.
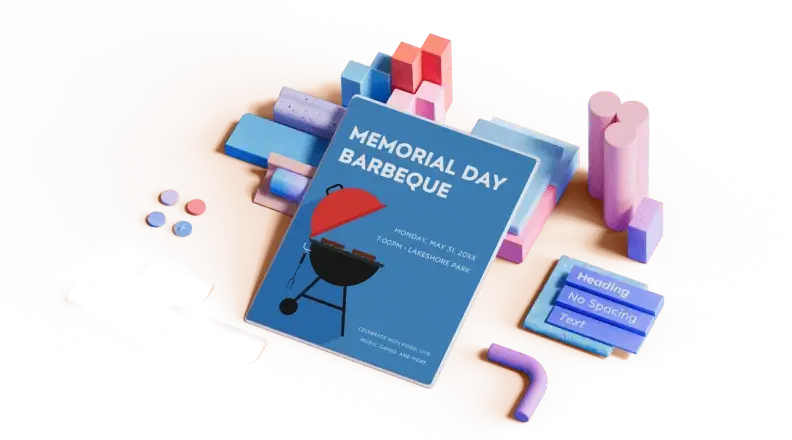
Keep track of whatever you need to in style. From personal planning to promotional calendars, find templates for every kind of project and aesthetic.

Infographics
Say more with less using helpful and easily customizable infographic templates. Add clarity to business presentations, school projects, and more with these helpful templates.
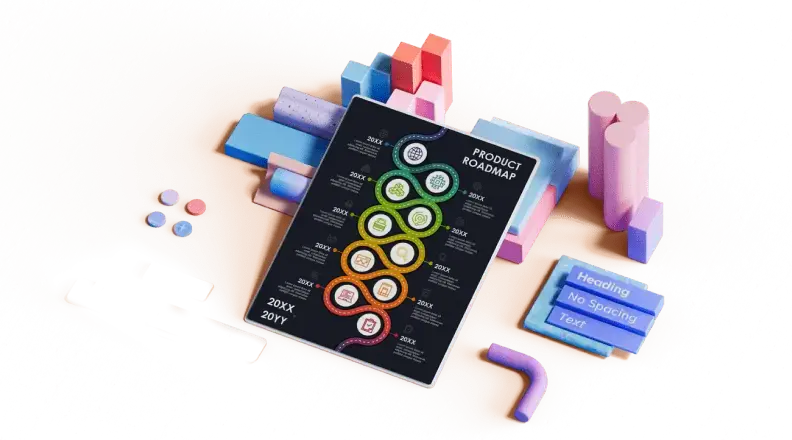
Start with the best PowerPoint templates

Elevate your storytelling
Tips, tricks, and insider advice from our business and design experts
A quick way to create beautiful, powerful PowerPoint presentations
Create captivating, informative content for PowerPoint in just a few minutes—no graphic design experience needed. Here's how:
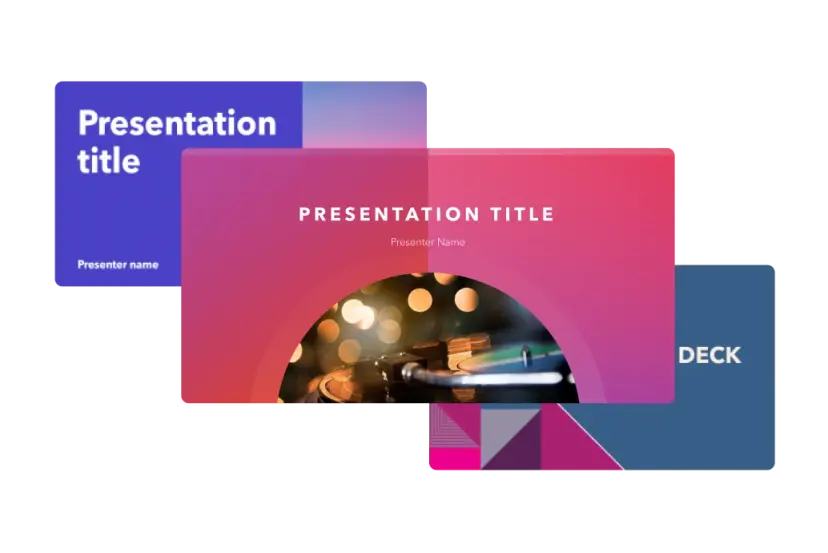
1. Find the perfect PowerPoint template
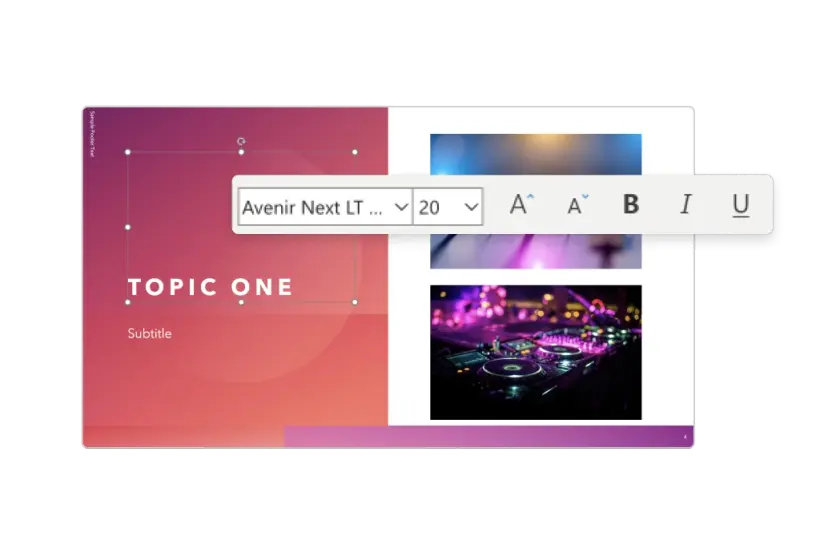
2. Customize your creation
3. Show it off
Let's create a powerpoint design, frequently asked questions, where can i find slide templates and themes that i can customize.
To find customizable slide templates and themes, you can explore the business presentations templates or search by PowerPoint templates . Once you find a template that resonates with you, customize it by changing its color scheme, add in your own photos, and swap out the font.
How do I use pre-made PowerPoint templates?
After you've chosen a PowerPoint template to use, customize it. Explore [design tips] on how to customize a deck that resonates with your brand while putting emphasis on the topic at hand. Play with other design elements, like photo shapes, to make each slide unique.
How can I make or edit my own custom PowerPoint templates?
Start from scratch by creating your own PowerPoint template . Follow tips for designs and business presentations so that your unique template is cohesive and relevant to your brand. Incorporate your brand's color scheme and graphics so that all your slides aren't text only.
What kinds templates can I get online for PowerPoint?
You can get PowerPoint templates that have modern designs, animated ones, or even hand-drawn art in each slide. The color schemes range from bold to subtle. Each template's slides are also organized based on what you may want to include in your presentation . You can use the template as a starting point and customize its specific details from theme.
Popular categories

- Presentations
- Most Recent
- Infographics
- Data Visualizations
- Forms and Surveys
- Video & Animation
- Case Studies
- Design for Business
- Digital Marketing
- Design Inspiration
- Visual Thinking
- Product Updates
- Visme Webinars
- Artificial Intelligence
105+ Creative Presentation Ideas to Engage Your Audience

Written by: Orana Velarde
With most people tuning out of a PowerPoint presentation within the first 10 minutes , developing engaging slide show presentation ideas that keep your audience hooked till the end can be a challenge.
This is why we've created this post with 105+ creative presentation ideas to help you put together exciting presentations that don't put your audience to sleep. You can use these presentation ideas for business meetings, webinars, classrooms, online courses, pitch decks and more.
Here are some of the ideas we’re covering:
- Use neon colors and duotones
- Unify transitions horizontally
- Use a monochrome palette
- Tell a personal story
- Use isometric illustrations
In this article, you'll find unique slide examples, templates, designs and more. Put these slide show presentation ideas to practice using our presentation maker and create your own presentation in minutes.
Here's a short selection of 8 easy-to-edit Presentation templates you can edit, share and download with Visme. View more below:

- Add bright and bold colors to make your presentation stand out and grab your audience's attention. Create a vibrant and dynamic look by using neon colors and duotones.
- Instead of using different transitions for each slide, use the same transition horizontally throughout your presentation. This creates a cohesive and visually pleasing flow.
- To create a sophisticated, minimalist look, limit your color choices to shades of a single color.
- Connect with your audience and make your message more relatable by incorporating personal anecdotes or stories into your presentation.
- Add depth and dimension to your presentation with isometric illustrations, which can be a fun and engaging way to present complex information.
- Sign up for Visme’s presentation software to start applying these creative presentation ideas.
105+ Creative Presentation Ideas
The ideas we've shared cut across various design concepts, industries and use cases. We've also sprinkled presentation design ideas from Visme's template library. If you're running out of creative steam, you can use these templates to jumpstart your designs.
And if you're running out of time, consider using Visme's AI presentation maker to bring these 100 creative presentation ideas to life. It's a user-friendly tool that effortlessly transforms your ideas into visually stunning presentations.
Now, let's jump into the creative presentation design ideas.
1 Use Neon Colors
Neon colors will give your presentation enough color kick to keep the viewer’s attention. Use neon colors either as the background, as specific elements or as details inside the slides. The trick with neon is to not go overboard with the contrasts. Instead of using a neon rainbow, think more along the lines of neon accents.

2 Be Minimal
Using a minimal design composition is one of the unique presentation ideas. The trick is to have just enough information and visual details for the viewer to feel comfortable seeing the slides. A minimal design can instill calm and awe in your audience when done right. The trick with minimalism is to know when enough is enough, you wouldn’t want to be boring instead of minimal.

RELATED: 20+ Examples of Minimalist Design to Inspire Your Own Creations
3 Use all caps
Another creative presentation idea is using all caps when you feel like the topic of your presentation can be delivered with few words. Using all capitals in your slides will give the message importance. This design might not be suited for a text-heavy presentation but maybe one with an audio narrative that goes along with it or bullet points.
Also, this kind of presentation design is suitable for captivating introduction slide ideas.

Image Source
4 Go vertical
Rectangular presentations are definitely the norm, but with the rise of Instagram Stories, this might be starting to change. This shift introduces a unique opportunity for those looking for ideas for presentation styles that stand out. Now that we can put archived stories into Highlights, why not publish vertical presentations there? Going vertical is just one idea. Along with that, you can add any other design technique.

5 Use duotones
Duotone doesn’t exactly mean “two colors,” it actually means “two tones.” The idea behind this design angle is to use two contrasting tonalities which can have different shades. The difference between duotone and two colors is that it has a more edgy look. Depending on what two tonalities you choose, it can be subtle or very powerful. The photos used in the design also need to be customized to the duotone color you chose.

6 Add a video in different shapes or snippets
Videos can be a powerful tool in your arsenal for engaging your audience during a presentation. Not only do they help to break up the monotony of a lecture-style presentation, but they can also help to explain complex concepts, add visual interest, and evoke emotions.
One way to make your videos stand out is by using different shapes or snippets. Rather than presenting a standard rectangular video, consider incorporating shapes such as circles, triangles or diamonds. These shapes can add a unique and visually appealing element to your presentation.
Another way to incorporate video snippets is by breaking up a longer video into smaller, bite-sized pieces. This can be particularly useful if you have a lengthy video that you want to show but don't want to lose your audience's attention. By breaking it up into smaller segments, you can keep your audience engaged and prevent them from losing interest.
Don’t worry about the design complexity. If you create your presentation in Visme, you can resize your videos instantly and turn them into any shape you want.
Hey marketers! Need to create scroll-stopping visual content fast?
- Transform your visual content with Visme’s easy-to-use content creation platform
- Produce beautiful, effective marketing content quickly even without an extensive design skillset
- Inspire your sales team to create their own content with branded templates for easy customization
Sign up. It’s free.

7 Unify transitions horizontally
Unifying the transitions between slides is always a great idea, but doing it horizontally is especially effective. By keeping all the movements going in one direction, it's both easy to follow and will look great. You don’t need to just apply horizontal transitions to the switch between slides, you can also apply animation to the titles and images. As long as they all go in the same direction, you are gold.
Create a slide deck like this in minutes.
- Search for the exact slides you need from a library of 900+ layouts
- Choose a classic or modern style
- Create automatically animated presentations
8 Black and white + spot of bright color
This presentation design idea is highly effective if you're looking for a creative way to present information.
Adding a bright color to a black and white scheme can add just the right amount of attention-grabbing detail to your presentation. Try choosing a powerful color so that it’s really noticeable and pops visually. You can use the color in small amounts or in large sections. Up to you, just remember to maintain a balance throughout.
9 Use a color theme
A cohesive color theme throughout your presentation can engage your audience and create a more visually appealing experience.
To start, consider the overall tone of your presentation and what emotions you want to evoke in your audience. Are you presenting on a serious topic, such as healthcare or finance, where a more subdued color palette may be appropriate?
Or are you presenting on a more lighthearted topic, such as creativity or innovation, where bright and bold colors can help to capture your audience's attention?
Once you have a general idea of your color palette, try to use it consistently throughout your slides. This means using the same background, font and accent colors for headings and graphics– like the presentation template below.

Visme's presentation templates offer a wide range of professionally designed themes with 300+ slides in 20+ different categories, making it the best choice for exploring creative presentation ideas without PowerPoint. You can create visually stunning slides with our carefully curated color schemes and stylish designs.
Read this article about 25 free presentation themes in Visme and find the perfect one.
Visme's presentation maker and branded presentation templates have been helping businesses create impactful presentations while saving them time and money. That's why many businesses choose Visme over other tools.
But don't just take it for word. Here's what one of our satisfied customers has to say about Visme.
"Previously we were using PowerPoint, which is fine, but the interactivity you can get with Visme is so much more robust that we've all steered away from PowerPoint."
"PowerPoint templates are plain and boring, and we want to create more fun and engaging content. Visme has multiple slide templates to choose from, which makes this so much easier."
"I just made a deck recently and it took me about 15-20 minutes. I found a template I really liked and tweaked it and put it in our brand colors. In PowerPoint, it would take anywhere from an hour to an hour and a half."
- Kendra Bradley, Graphic Content Developer at WOW!
10 Add full-screen videos
The use of full-screen video in your slides can have a big impact on your storytelling. There’s a catch though. The wrong video will be detrimental to your message, be mindful of the videos you chose to grace the background of your slides. The video should either tell your story without words or be a complement that won’t interfere. The wrong video will confuse your viewers and it will be hard to get their undivided attention back.
If you’re looking for quick idea inspiration, check out our YouTube video where Mike shares 30 of our favorite presentation ideas at a glance.

11 Use an 80’s visual style
If looking for a unique design style, why not try an 80’s style for a change. Neon graffiti writing, disco balls, and brightly colored shapes might go well with your presentation’s topic. You can use 80’s visuals as small complementary elements or as the entirety of the presentation style. Nevertheless, if your presentation is about something quite serious then maybe you should try another style.

All you have to do is provide a text prompt, choose your preferred template style and the tool will generate text, images and icons and prepare a ready-to-use presentation within seconds.
The flexibility to customize these presentations in the Visme editor adds the perfect finishing touches to your visual storytelling journey.
12 Go vintage
Another creative presentation idea is the vintage look. This could work really well with a history-themed presentation or anything to do with recuperating old traditions. When we say “vintage” we mean sepia-toned photos, intricate picture frames, bold fonts which look like they came out of old posters.

A vintage color palette is usually pastel turquoise green, ochre yellow and washed out blue and orange. You could consider using vintage mockup sets to create scenes for your slides, or use vintage style fonts, and old photographs as backgrounds.

13 Use a monochrome palette
A monochrome palette is one that maintains a single tonality in different strengths. For example, you can create a presentation in shades of blue, or in shades of orange. Use the palest shade for the background and a stronger shade for the titles and decorative shapes. Try doing it the opposite way as well. You can even use photos with a bit of a filter effect in the chosen color by adding a color filter.

14 Tell a personal story
Telling stories from your own life—whether those stories are deeply moving, humorous tales, or just little snippets that allow someone to look into your history—can be a great way to make a presentation more meaningful.
Colin Stokes uses this to his advantage in his TED talk. He begins by talking about the movies he watches with his daughter and what she likes, and then moving into watching a movie with his son, and wondering how it has affected him, allowing him to move seamlessly into his actual points.
Watch the video below to learn how Colin Stokes did it

Choose a relevant story from your past, and tell it with all the honesty that you can. Your audience will feel that, sympathize, and therefore connect more with your message.
15 Creative photo crops
The photos in your presentations can be cropped hundreds of different ways. From simple circles or rectangles to more elaborate triangles, polygons, letter shapes or even a brushstroke. Analyze the message of your presentation to know which shape to use for the cropping of your photos. You can also create a collage with the shapes as long as they don’t distract from the information being presented.

16 Add fun illustrations
Adding fun illustrations is a great idea to engage your audience during a presentation. They can help break up text-heavy slides, make your presentation more visually attractive and reinforce your message, making it one of the best fun presentation ideas.
Hand-drawn doodles, icons and graphics and animated GIFs are all illustrations you can use. To maximize the visual impact of your illustrations, you can use them in 3D.
With Visme, you can enhance your presentation by adding 3D objects that allow you to customize their colors, size and alignment. Additionally, you can add 3D animated graphics to take things to the next level.
When using illustrations, it's important to remember to use them sparingly to avoid overwhelming your audience. Less is more when it comes to adding graphics to your slides. Remember to match the illustrations with your theme and color scheme to keep things consistent.

17 Thick and bold fonts
Huge chunky fonts are a great way to call attention to titles on slides. You could even try making the letters bleed over the edges or place the words vertical along the side. The best thick and bold fonts are the ones with minimal decorations. Try using fonts that have strong corners or the opposite, extreme rounded terminals. It will also work best if the title is short and sweet.

18 Go with nature
Freshen up your presentation with some natural elements around the edges or as a background. You could use full-screen background photos of leaves or palm fronds coming in from the sides of the slides.
Another presentation idea would be to use nature-related photography along with other design ideas like interesting photo crops. This technique could be used for presentations that relate to nature or natural topics, but also for a home decor proposal or creative direction pitch for a TV ad.
Integrating nature into your slides is a beautiful presentation example of how to connect with your audience on a different level. This technique could be used for presentations about environmental topics or even about home decoration.

19 Use circles
Circles represent wholeness and a natural sense of completion. They can signify eternity and constant movement. They can also make your presentation more friendly and emotionally accessible. You can try using circles as decorative elements or as the shape for cropping images and as backgrounds for illustrations.

20 Add some sparkle (glitter backgrounds)
Give your presentations a little bit of a festive feel with some glittery details. This PowerPoint idea can work great if you are presenting a creative proposal for a fashion label or clothing catalog. It can even work really well for holiday-themed pitches or products. There are different types of glittery graphics you can use, like a glitter texture, a glittering rain or even just a dash of glitter. You can find some great glitter backgrounds and textures over at Freepik .

21 Get crafty (ripped paper details)
Sometimes to tell a story, visual details can really help get a mood across. Ripped paper shapes and edges can give a presentation a special feel, almost as if it was done by hand. This visual technique works for any type of presentation except maybe in a corporate setting. Ripped paper can be found on creative graphics resource sites or you can do it yourself and take a photo.

22 Cut-out paper illustrations
Another crafty idea to design your slides is by using cut paper illustrations. This technique could look really crafty or quite elegant if done well. Cut paper can be used as an elaborate background, as the letters in titles or as decorative elements. There are some great cut paper bundles online to use as PNG files which can be uploaded to the Visme editor.

23 Pathway transitions
Create interesting transitions by designing scenes or pathways instead of just sliding them in one unified direction. By doing this, you can use a storytelling technique that will keep the audience’s attention throughout the presentation and information relay. You can find out how to do it in our free guide to creating captivating presentations .
Create an automatically animated presentation in minutes.
24 use isometric illustrations.
If you are looking for a different way to illustrate your slides, why not consider using isometric illustrations? This style of illustration is great for explaining things that can be separated into parts. The parts can be animated as well. An isometric illustration can work for any kind of presentation, from technology to corporate. It will give your presentation a modern edge and a professional look.

25 Use motion graphics
Motion graphics are a great way to illustrate an idea with animated objects . They don’t tell stories on their own, they support the context and illustrate the content.
For example, if your presentation is about travel, you could have flying airplanes across the slides or bags on a luggage conveyor belt. For something more abstract, you can use moving shapes and add effects to the titles. Your Visme editor has a variety of design tools to help you create all sorts of content with motion graphics.
Here’s what one of Visme’s satisfied customers Jessica L. | Small-Business Owner, has to say about Visme’s presentation tool:
"No need to go back to PowerPoint. Visme makes project presentations easy and fast. Lots of useful templates and excellent graphics. I enjoy the features they continue to add and update often. They make project work easy".
26 Add GIFs to your slides
GIFs can be fun, entertaining and humorous. They can also be informational. GIFs be sourced from sites like Giphy , where you can also create your own! Choosing to include a GIF in your presentation slide or a few different GIFs will depend on what message you want to send with your story. The theme and topic of your presentation will help you decide if you need a clip from a blockbuster movie or a quick representation of the process of your systems.
RELATED: Everything You Need to Know About Using Cool GIFs in Your Marketing
27 Use quotes between slides
Quotes can be good breathers between a bunch of informative slides. You can either use them to separate ideas inside your presentation or to start new sections of information. It’s important that your quotes represent the topic of your presentation so that they make sense and not confuse the viewer.

28 Start with “once upon a time”
One of the most effective and engaging ways to present a presentation is by incorporating creative storytelling techniques.
If a presentation can be created as a story, then why not go all the way and start the presentation with a classic story opening? Using the “once upon a time” phrase will instantly grab the viewer’s attention because it will be out of the ordinary. Make a slide especially for it with a visual that matches the topic of your presentation.

29 Turn the slides into a scrolling infographic instead of a presentation
To showcase your content in a unique and engaging way, consider using creative slide ideas that break away from the traditional slide-by-slide approach. For instance, you can arrange your slides vertically to create a scrolling infographic instead of a classic slide-by-slide transition presentation.
This innovative format expands the types of presentations you can create, offering a fresh perspective on information delivery.
An added bonus to this presentation style is to add parallax scrolling or interaction animation. As the viewer scrolls down, the information fills each slide progressively. It doesn’t continue until the viewer scrolls again. This technique is best for displaying online slide show presentation ideas.
Create a scrolling presentation in minutes.
30 engage your audience.
What’s one of the best ways to make your presentations more interesting? Make the audience a part of them.
Regardless if you’re presenting in person to a room full of people or via Zoom to viewers around the world, there are a number of techniques to engage your audience with both your content and yourself. The trick is to make them feel connected somehow, like they can relate. You can achieve this with humor, storytelling, asking questions and inviting them to leave comments in the webinar chat window.
Take this speech by Donovan Livingston. He delivers a commencement speech in spoken word poetry, and specifically encourages the audience to take part, saying they should clap, throw their hands in the air, or otherwise participate if they feel so moved. While not seen, several people are heard cheering and clapping throughout the video.
Participation can also be accomplished through things such as games, posing questions or something as simple as asking participants to raise their hands.
31 Use a scrunched paper background
Give your presentation a laid-back and grunge feel by designing it with a scrunched paper background. It can be any kind of paper really, depending on your topic. It could be notebook paper, or printer paper, it could even be recycled paper. Try a few different types of paper until you find the one that suits your story.

32 Add interactive pop-ups
Adding interactive pop-ups is a game-changer when it comes to creative ways of presenting. These pop-ups allow you to go beyond the traditional approach, giving your audience a more dynamic and engaging experience.
Interactive pop-ups can take many forms, from quizzes and polls to clickable infographics and interactive timelines. With Visme, you can access various interactive features that can help you create engaging and effective presentations.
For example, you can create clickable icons or buttons that allow your audience to explore additional information or resources. You can also create interactive timelines that enable your audience to explore different events or milestones.
One of the most powerful interactive features of Visme is the ability to create quizzes and polls. You can make interactive questions and answer options that allow your audience to engage with your presentation on a deeper level.
You can also use this feature to gather feedback from your audience, allowing you to tailor your presentation to their needs and interests.
Watch the video below or read this article to learn how to create an interactive presentation .

33 Use a back-to-school theme
A back-to-school theme can make your presentation look like a lot of fun. This is a great technique for teachers and educators welcoming their students back to a new school year. The background can be a sheet of notebook paper, an open notebook, or a blackboard. The edges could be decorated with pencils and paperclips, maybe an eraser or sharpener. The back-to-school theme has lots of possibilities.

34 Use a billboard-inspired theme
Use billboard mockups to create slides which look like billboards. This could look interesting and quite unique. You could use the same billboard for all the slides, or different ones for a more varied approach. This technique would work great with a pitch for an election or a local spot in a government office.

35 Use black-and-white photography
Black and white photography is a classic design technique. They import elegance and sophistication to any design by providing a minimalistic approach to the visuals. The photos can either be desaturated from color photos or given an artistic flair with extra contrast and fewer grey tones.

36 Explain your reasons
What people really want to know is why you’re giving the presentation you’re giving. This is especially true if you’re pitching to investors or potential new clients. When you share your why with the audience using storytelling and body language, you make meaningful connections and lasting relationships
Simon Sinek explains quite well why this is so important—the greatest leaders, the ones who inspire the most people, understand why they do the things they do, rather than just what or how.
When it comes to explaining your reasons, one tool that can significantly improve your presentations is Visme's AI writer . This advanced feature helps you write your presentation copy, break down complex ideas and edit or improve your existing words. With Visme's AI writer, you can make sure your "why" is clear and easy to understand alongside your visuals.
37 Add an audio narrative
Your presentation doesn’t need to be silent, especially if you won’t be standing by it to tell the story yourself. Adding an audio narrative can turn a viewable presentation into an experience. You can either set it up as a video that runs on its own and the viewer looks and listens, or it can be triggered by arrows that are clicked on.
RELATED: How to Create a Narrated Presentation With Voice Over Using Visme
38 Follow a space theme with photography
Most of the photos from Nasa are labeled as public domain. Meaning that you can give your presentation a space theme quite easily. Choose images of astronauts in space or more abstract and colorful images like distant galaxies and nebulas. The latter can make great backgrounds behind content without the topic necessarily being about space.

39 Do a space theme with illustration
An illustrated space theme can be either colorful and whimsical or sober and elegant. By choosing the style of illustration you use, you can either use this technique for presentations related to children or scientists. Cartoon astronauts can be lots of fun, line illustration planets can be educational and data-driven drawings can be informational.

40 Include music
Sometimes, when listening to someone talk for long periods of time, it helps to have something else to draw your attention. While images are great, including music can really help stimulate an audience and set the mood.
Dean Burnett talks about why this happens: “[Music] provides non-invasive noise and pleasurable feelings, to effectively neutralize the unconscious attention system’s ability to distract us.” Essentially, music is entertaining enough that, when in the background, can keep us focused on otherwise un-entertaining things.
Take, for example, this valedictorian’s speech. While peppered with humor and stories of his time through high school, he uses background music to help keep people’s attention—in fact, this is specifically stated to be his reason for including music, humorously quipping about giving the audience something to listen to while they “zone out” of his speech.
Whether incorporated into individual slides, in a video, done live, or with a music-playing device nearby, this creative presentation idea can be a great way to enhance the quality of your speech or talk.
41 Graffiti photography backgrounds and details
Using colorful backgrounds like photos of urban graffiti can give your presentation a bit of an edge. There are lots of free photographs of graffiti on sites like Unsplash which you can use straight away. Apart from graffiti murals, you can also incorporate graffiti letterings in your titles and quotes. You can find graffiti style fonts online quite easily.

42 Stop-motion
The stop-motion technique can take time but it can also make your presentation unforgettable. There are lots of ways to use stop-motion, either with characters doing actions or objects that move around and create a scene. Stop-motion can also be used to create titles that move into place. What the title is written with can be anything, from toys to plants. The theme and topic of your presentation will ultimately be the driving point to what kind of stop-motion can be used. But be sure that it works from educational to promotional to corporate.
43 Claymation
Very similar to stop-motion, claymation is the animation of things created with clay or play-doh. Anything can be created with clay, so the possibilities really are endless about what can be achieved. This technique really does take a lot of time, you can source it out to a professional or buy some already created footage. The claymation can be just a decorative element in the background or it could also be the center of the presentation.
44 Color blocking
The color blocking technique is another creative presentation idea that entails using color in large sections and in contrasting tones. The idea is that the color blocks will be strong and colorful. The color blocks can either be the shapes that determine where the information goes or just a way to separate the slides in specific sections.
Any type of presentation can benefit from color blocking. Just make sure you use colors that go together and don’t clash. Explore this technique for different presentation slide ideas, especially when aiming for a bold and visually striking effect.

45 Get surreal
Surrealism is an avant-garde movement from the 20th century which was meant to tap into subconscious creativity. This might not be the kind of design technique for any sort of presentation but it can work for one that is about art, or literature or other creative outlets. There are plenty of surrealist artworks in the public domain sector or the Metropolitan Museum of Art. These can be used as subtle backgrounds or visual complements to the text.

Designing a presentation for an organization requires input from different stakeholders. However, when collaborating with others on a presentation design, keeping track of all the moving parts can be difficult.
That's where Visme's workflow management feature comes in. It helps organize roles, tasks, progress, deadlines and corrections all in one place to make your presentation design process efficient and smooth.
46 Polaroids
Polaroids, often a photography favorite, can inspire creative photography presentation ideas. The original Polaroids from the 70’s could be used as vintage polaroids that have been kept in a box for years. The newest Instamatic photographs, which are the new kind of polaroids, can be used for a fun way to show photos and visuals in presentation slides. You could either use one polaroid per slide or a collection of polaroids on a table or corkboard.
There are many topics that can work with Polaroid photography backgrounds and details in your slide show presentation ideas.

47 Use a Handwriting Font
Fonts come in all shapes and sizes, including lots of handwriting fonts. Handwritten fonts can be used for any type of presentation as long as the style matches the topic of the information. There are kid-style handwriting, calligraphy style handwriting, hand lettering, and novelty fonts as well. The options are wide and varied for this design technique. Creative Bloq has a great collection of handwritten fonts.

48 Use a geometric background
A geometric background can look really nice on any presentation. Geometric backgrounds can be tiled polygons or more abstract compositions of different size polygons. The decision to choose between tiled shapes and more creative compositions will depend on your creative angle and disposition. You can use these types of designs with any colors, so you can match the theme or your brand.

49 Coffee style design
Using a coffee-style design can work for any PowerPoint presentation idea, from office-related topics to digital nomads to anything or anyone who loves coffee. If the background is subtle, it can fit a more serious topic or data report. It can make a boring presentation just a bit more visually entertaining than the rest. Of course, it can also be perfect for a small coffee brewer pitching their company to investors.

50 Include memes
You’ve seen them everywhere by this point. You might be pretty sick of them. However, that doesn’t mean memes can’t be useful—in fact, using a couple strategically can surprise the audience and make them laugh.
The presentation " Memes, Memes Everywhere" focuses on, unsurprisingly, memes, and explains their purpose while using examples on every slide, which help support their points and add some humor to a very text-heavy presentation.
Choosing relevant memes and using them sparingly can really help add some personality to your presentation, without distracting from the work.
RELATED: 85+ Best Free Presentation Templates
51 Polka dots
Using a polka-dot background is suitable for various types of presentations. It can give your presentation a whimsical look or simply give it a subtle texture. The polka dots could be small and soft or big and punchy. A strong polka-dot background can work great in a creative setting or even boring data analysis. The style of polka dots will depend on the general topic of your presentation. You can use the polka-dot design as a full background or as a decorative section on the slide.

52 Metaphors
Visual metaphors can be useful in a similar manner; they can spice up your presentation, illustrate your point, and make your work far more entertaining. James Geary speaks about just how important metaphors are.
His presentation provides several examples of metaphors--such as the phrase “some jobs are jails”--and explains just how hard it is to ignore the lasting power of a well-used metaphor. Because of the connotations a metaphor can bring to the table, their use is an excellent way to imbue added meaning to your words.
53 Use timelines in your slides
Timelines can be used in lots of different ways inside a PowerPoint presentation, and the ideas are limitless. A timeline can either be inside one slide, or it can be connected between various slides. You can make a timeline with icons, connected shapes, or an inclined line. The timeline can be a visual way of explaining a chronological event or a plan of action that needs to be taken care of. Make sure the timeline fits the rest of the theme.

54 Use a comic book style
Comic books are a source of inspiration for many people. The visual aspect of a comic style composition can really make your presentation shine. There are a few ways you can use this technique. You could set up the slides as if they were snippets of a comic book, place the text in speech and thought bubbles and apply a background with a pointillist texture. If using characters, make sure the characters fit the theme of your presentation. For a perfect fit, hire a designer to create a comic book presentation just for your company.

55 Use a manga style
Looking for creative PowerPoint slide ideas that stand out? Consider taking inspiration from the Japanese art of Manga. Manga can give your presentation a distinct and eye-catching look, much like comic books.
It isn’t as versatile as a comic book because it has a more specific look, so it might not work for all topics. It can work for more creative outlets like fashion, art, and photography. Manga has a specific style for the atmosphere around the unique characters as well. They are more common in black and white and look very photographic.

56 Use psychedelic visuals
Psychedelia was a big part of the design world in the 60’s and 70’s. Music and creative event posters were so intricate and colorful that they took an important place in the design history books. This design style can be used for a unique visual approach in your presentations. Just like many other techniques we have mentioned, they can be used as a background in slides or as decorative elements. The swirly shapes and contrasting colors can call attention to the viewer in a positive way.

Create professional and engaging presentations online!
- Choose from hundreds of fully designed templates
- Align colors, fonts and images with your brand
- Add custom charts, timelines, icons, animations and more
57 Use neon lights
Neon lights are a great way to give your presentation some life when it’s otherwise visually bland. There are plenty of neon light fonts available online to choose from, from classic style neon tubing on a wall to a neon style given to a font to make it look like neon. Presentations of any topic can be given an additional visual with a bit of neon brightness.

58 Cinemagraph backgrounds
A cinemagraph is like a GIF loaded with elegance. The idea behind a cinemagraph is a photo with a moving section which makes it look cinematic. This kind of background can keep your viewers happily hypnotized while listening to your audio narrative or keep them on the slide longer to truly grasp the information being given. There are cinemagraphs available for all sorts of themes and topics. You can definitely find one that suits your needs.
59 Full-screen video backgrounds
A full-screen background can be really appealing. But just like other design ideas, the video you choose needs to match the theme and topic of your presentation. Your best bet is to have a video which is directly related to what your presentation is about. Videos can be created especially for your purpose, sourced with permission from YouTube or bought from a stock video site.
60 Visualize data
Staring at a large amount of numbers on screen can be overwhelming for most people, even if the realities of those numbers enforce your point. What’s the best way to avoid scaring your crowd? Put the data into easily understandable visualizations.
If you want to take this a step further, you can use illustrations or create infographics to make these data visualizations even more engaging.

61 Use a wild west theme
The wild west is not a very versatile theme but can work for a history project or a proposal for a wild west themed party or event. What entails a wild west theme? Brown sandy tones, horses, cowboys, and tumbleweeds. If the full-on wild west theme is too much, you can also take a cue from the era and be inspired by the color scheme. Another approach would be to use photography from the actual west of the United States, mountains and deserts and so on.

62 Use mind maps
Mind maps are great visual tools for explaining concepts easily. By including mind maps in your slides, you can relay complicated information visually and creatively. There are eight types of mind maps, the most common being bubble maps, the tree map, and flow map. Each one has a different purpose and you can learn all about this in our guide about mind maps in the Visual Learning Center.

63 Use interactive geographic maps
The difference between a static map and an interactive map will define how much attention your slides get. Regions can switch colors according to a change in data over time, making the map more into a chart. With Visme, you can make your maps interactive with live data . All you need to do is sync your data from a Google Sheets file and when your presentation is published online, your map will always be synchronized to that data.
Want to create your own interactive map?
- Create a color-coded map to visualize geographical data
- Choose either the entire world map, a continent or a country
- Enable feature to have data values appear on hover
64 Color contrasts
Using contrasting colors in your slides will make the information pop out of the screen in a positive way. The trick to using contrasting colors is to know how colors match together. Contrasting doesn’t mean they need to clash. Try using a color palette generator like Adobe Color to find great palettes that will make this technique your new best friend. You can learn more about how color works in our guide about color perception in the Visme Learning Center.

65 Live data graphs
Adding live data to a presentation can turn your slides into evergreen content in a flash. You can use any type of chart and populate it with live data such as bar graphs, line graphs, pie graphs, and more. You can add live data graphs to one or two slides in your presentation or have a series of them. Creating a live data graph is easy with the Visme editor.
66 Color fade transitions
Transitions come in lots of different styles. We have mentioned horizontal transitions, animated transitions, and pathway transitions. This particular technique involves color as the ruling factor.
A color-fade transition makes each slide connected to each other through color. This can be achieved with gradients, color blocks, or colored photo filters. Make your PowerPoint presentation ideas stand out with color fade transitions.
67 “Grow” your presentation so it looks like one animated slide
This creative PowerPoint idea is quite interesting as it really only uses one slide that grows upon itself. The practical way to do this is to create the final slide with all the parts and information set up like a finished puzzle. Once you have the completed slide, duplicate it as many times as you need and systematically take off a bit of information until you’ve reached the first title slide. Once you have all the slides, make sure they are in order before downloading the entire thing.
RELATED: A Non-Designer’s Guide to Creating Memorable Visual Presentations [Free E-Book]
68 Use humor
Want a great way to connect with your audience and make a memorable, more engaging presentation? Be funny. When used strategically, this is a great way to capture attention. In fact, infusing humor into your talk is one of the most effective fun presentation ideas you can use.
Morgan Spurlock makes wonderful use of this in his TED talk. For example, in one of his earliest statements, he offered individuals the opportunity to buy the rights to name his TED talk—which he refers to again at the end, where he reveals the title. He peppers the entire presentation with humorous commentary that nonetheless supports his point.
Create relevant jokes or find a way to bring out the humor in your subject, and your audience will be much more engaged and more likely to remember your words.
69 Tree diagram transitions
A tree diagram is one of the eight thinking maps which help visualize idea and concepts. The purpose of a tree diagram is to classify and organize information. This map can help build a presentation by making sure each slide is a continuation of the one before. They might need to be grouped into sections so that all the information is relayed easily.

Want to create your own tree diagram?
- Get a head start with pre-made flowchart blocks
- Easily snap lines and objects together
- Dozens of shapes and lines styles to choose from
70 Journal style (with hand-drawn illustrations on the margins)
One creative presentation idea is to make your talk just a little bit different than the rest is to use a journal style. The general visual idea for this technique is to make your slides look like the pages of a journal. The style of the journal will depend on what your presentation topic is. It can be a whimsical bullet journal or an intricate botany journal. You could even consider handwriting on paper as a background.

71 Ink splatters
Use ink splatters to decorate your slides any way you like. They can be big and impressive behind the content, or they can be small and subtle like drops from a pen. An ink splatter can give your presentation a bit of an artistic flair and if done right, can make your slides look elegant and clean. Any style of presentation can benefit from some ink splatters as a decorative element.
If you're looking for fresh presentation slide ideas, why not experiment with ink splatters and see how they can enhance your next presentation?

72 Passport with stamps
Using travel stamps as a decorative element can work for a presentation with a travel-theme or a creative design proposal for a department store or airport mall. The stamps can be used as a background on a passport page or on their own around the content. A photo of a real passport page can be used for this technique but there are plenty of graphics available in this style on sites like Freepik .

73 Express your emotions
We can sometimes be afraid of expressing how we feel, even to those we’re close to, much less in front of a crowd. However, showing them makes your words more authentic and can generate compassion or excitement in your audience.
Take this TED talk by Thordis Elva and Tom Stranger , for example. While the two talk about their experiences, their voices break and crack. The emotional turmoil they went through is clearly heard, and viewers can clearly understand their pain.
This can take some getting used to, and some courage. However, the results are well worth the effort.
74 Use a video game theme
Video games come in all shapes and sizes. From kids' games to arcade games to car games. Each one has their own style, just like presentations do. If you think a video game visual style is good for your project, consider all the different kinds until you find the one that fits best. You can use game screenshots as backgrounds or infuse the entire design of the presentation with the video game style you chose.

75 Use postcards
One of the least-used creative presentation ideas is to turn your content inside slides into postcards which have been sent from around the world. They can be new postcards which could be used from either front or back sides. The back part would make a great text block for the content you need to display, the photo side can be on the sides or as a background. This design technique can work for presentations about literature, family connections, history or travel. There are postcard templates available on sites like Creative Market .

76 Incorporate robots in the design
Using robots in your slides can be a creative approach to visually elevate your presentation. There are different styles of robots you can add to your presentation design; realistic photography of anamorphic robots, cute illustrated robots, or robotic parts from factories. These visuals might only apply for technology-themed presentations or about robots themselves. Cute illustrations of robots can be great backgrounds for whimsical topics or other styles of storytelling presentations.

77 Chalk on blackboard
Looking for creative slides presentation ideas? Consider using a chalkboard design to add a unique and nostalgic touch to your presentation.
Writing on a chalkboard is not limited to a school setting or a bar menu. These two might be the most common yet they are not the only possibilities for using chalk on a blackboard. A good handwriting font is the best companion to a chalkboard design. Some of these fonts are already available with a chalky texture and others might need some professional tweaking to get the right texture.

78 Get inspired by a specific location
Even if the PowerPoint presentation ideas you are designing are not about a specific place in the world, you can be inspired by one to set up the color scheme and feel of the slides. For example, if you get inspired by Greece, you can use white and light blue hues or even photos of Greek islands. If you get inspired by Brazil, you can use photos of the beach, the texture of the boardwalk tiles or green, blue, and yellow color schemes.

79 Use props
Using props can quickly turn a run-of-the-mill presentation into a unique, interactive experience. Kenny Nguyen demonstrates this well. In his talk he often refers to the “sword of yes” and “shield of no.” Naturally he picks up a sword and shield from the table to help demonstrate his points.
Choosing similar props can help you really illustrate your points—and make it that much more entertaining, too.
80 Use hashtags as titles
In the age of social media, hashtags are used every day. They appear regularly on social media, in spoken and written conversations, and of course in content marketing. Why not include some hashtags as titles? This technique will work great in a presentation for a social media content management pitch, or an in an influencer marketing strategy. On another note, hashtag titles can even be used for any type of presentation geared at the digital generation.

81 Black background, white letters, and color accents
When you use a black background, the colors that you place on top will usually look brighter than if they were on a white background. When creating this kind of color palette, make sure the colors you use don’t clash with each other or with the black. Along with the bright colors, make sure you use white to make the composition pop! Neon colors or pastel tones are what will work best.

82 Vintage film edges
Even though we are used to taking photos with our phones, the classic nostalgia of film is still prevalent in the world of visuals and design. The graphic representation of a film negative is as recognizable as an envelope representing an email. Use a vintage film edge along the horizontal edges of your slides to give your visuals a cinematic feel. Even better if you make the edges animated so that it looks like it’s rolling along on a projector.

83 Adult coloring book inspired design
Using a coloring book design can be really creative. Practically anything can be turned into a coloring book style illustration. A great way to use this technique is to have the first slide with the un-colored illustration and then progressively color in the illustration as the slides progress. Furthermore, if the illustration is depictive of the information, the visuals can be even more engaging.

84 Stripes
A stripes design is as classic as it gets. From pinstripes to artistic colorful lines, you can use them as a subtle background or a powerful striped theme intertwined with text boxes. Stripes are the kind of design technique that can work for any type of presentation, from corporate to educational.

85 Make each slide look like a social media post
Just like postcards and polaroids, you could try a creative approach and use social media templates to put the content in. The most notorious social media visual channel is Instagram. It has been known to inspire offline events as well. Make your slides look like social media posts or social media pages. For this technique, you can either use screenshots or templates.

86 Ink in water
Dropping ink in water creates beautiful colorful bubbly designs which can be photographed at high speed. These images can be used as backgrounds for any type of creative theme presentations. Choose the color and thickness of the ink design to match the theme of your presentation. There are also animated versions of this effect which can be bought like video stock.

87 Lego bricks
Use lego bricks as inspiration to fill your presentation slides with color and fun. Use the bricks to create slide frames, letters or even charts. The best approach to a lego inspired presentation is to be creative. There are lots of things you can do with lego, you could go as far as using the legos to write the titles of the slides. Don’t use the Lego logo though unless you are specifically designing a presentation about lego.

88 Use classic storytelling techniques
A presentation is, in a way, like a story—you’re talking about your chosen subject and leading viewers on a journey to discover what that subject means. Moreover, stories hold an intrinsic interest for us. Therefore, you can easily use several storytelling techniques to help improve your presentation.
Alex Blinkoff goes into this in great detail, examining things such as “The Hero’s Journey” and provides several examples of ways to use storytelling techniques in your presentations. Check them out, and decide what might work best for your subject.

Click on image to view interactive slide show created with Visme
89 Jigsaw puzzles
Pieces of a jigsaw puzzle can be used to make charts, infographic diagrams, or interlocking frames. The idea behind puzzle pieces is that things come together to form a whole and this concept can be used for any slide and any kind of presentation. Make sure to use a suitable color palette that matches your theme and the rest of the presentation.

90 Headlines coming in animated on boats/trains/airplane
Headlines or titles can be given a life of their own inside the slides. One interesting and creative approach would be to make the titles enter the slide on top of some kind of vehicle. The vehicle could be anything, from a train to a boat, to an airplane. Depending on the type of vehicle, this animated technique can be used for child-themed topics, transportation themes, travel ideas, or even about a corporate sales report.
91 Use a camouflage design
Camo doesn’t necessarily need to convey a sense of military, although it does carry a strong connection. Thankfully, camouflage comes in different styles, from jungle greens to desert browns. Other out of the box camouflage styles are the ones where the colors are completely off the charts, like pinks and blues. Camouflage designs are better used as backgrounds or small subtle sections.

92 Use unique novelty fonts for headers
There are so many novelty fonts to choose from out there these days! Using a unique novelty font for the titles and headers is a great way to add some visual pizzazz to your slides. Try looking for some really special fonts that carry personality. Once you have selected the font, add some color and texture to make it look even better.

93 Use a city skyline
Using a background of a city skyline can work great for a presentation related to business or corporate topics. It can also be perfect for an urban travel related theme or educational presentation. You can choose to use photography as a background or with the buildings cut out from the sky. Another choice is to find an illustrated city skyline and use it as a border on the slides.

94 Use a connected dots background
One of the design trends of the last few years is the connected dots visual. It’s used on websites and on printed flyers. It’s so versatile that it can be added to any kind of presentation in a heartbeat. The lines can be short or long between the dots and the composition can be tight or spread out. You can find connected dot visuals easily on sites like Freepik, in lots of different colors. If you can manage vector graphics , you can also change the composition of the dots quite easily yourself.

95 Use a bokeh background
Bokeh is a photography and light technique which turns dots of light into bright shiny spheres. With a bit of creativity, the lights can be turned into shapes, like hearts or stars. This design style is great for backgrounds since it’s mostly abstract. It works best as a complement to the content instead of an important visual aspect. You can find bokeh backgrounds in stock photo sites or make it yourself.

96 Use watercolor designs
The use of watercolor designs is an easy way of infusing some lively color into a presentation. Watercolors can be a splash on the background, shapes around the content, or colorful strokes intertwined with text boxes. Depending on the color of the paint used, the watercolor technique can be used for any type of presentation. A soft watercolor brushed background can work for a feminine theme and a deep intense splash can add visual creativity to an otherwise boring corporate presentation.

Just like watercolor graphics, paint can add a dose of creativity to any presentation. Different to watercolors though, paint is more intense. Paint based graphics come in all shapes and sizes, from thick brush strokes to paint drips. Digital paint compositions can also make great backgrounds for colorful and creative presentations.

98 Use bright fun colors
Why create a bland presentation when you can make it fun and colorful instead? Creative color palettes can include up to six different colors which look great together. Use shapes, cut-outs, color blocks, swashes, anything your heart desires. This technique is for letting go and being creatively free with color. Just make sure the colors go together by trying out some palettes first.

99 Use arrow graphics
Arrows symbolize direction. They can be a great addition to your charts, infographic visuals and slide sections. You could even do the entire presentation using arrows. According to their size, color, and thickness, they have different temperaments. Look for different styles of arrows and see if they fit your topic and theme. Freepik has some great arrow visuals and the Visme editor also has arrow icons and infographic visuals.
100 Use electronic visuals
Another great idea for a background visual is the inside of a computer system. The intricate details of a motherboard or a close up of a memory chip can make a great visual impact. Apart from using an electronic background image, little pieces of electronic devices can be placed around the slide as decoration. This technique is generally limited to electronic or computer theme topics.

101 Metaphors
Visual metaphors can be useful in a similar manner. They can spice up your presentation, illustrate your point, and make your work far more entertaining. James Geary speaks about just how important metaphors are.
102 Keep it feminine
A feminine style design can work for your presentation if your company makes products for women or if your targeted audience is women. By feminine design, we mean light and soft colors, subtle shapes and a general airy feeling to the composition. Feminine design can be minimal but it can also be decadent and full of style. Whichever you chose, make sure it fits with your audience.

103 Go futuristic
A futuristic style can fit any theme as long as the concept of the future depicted, fits the topic of the presentation. Futuristic design can be of many different styles; from spaceship driving controls to cosmos related atmospheres, to flying cars, and artificial intelligence. Even color palettes can look futuristic if you add some metallic tones.

104 Add a music background
A music soundtrack can be added to any presentation that doesn’t have any other sort of audio already. The best music for a presentation is one without lyrics, in other words, an instrumental track. A good track will accompany the content in a positive way and not interfere with the message. You can find audio tracks easily online.
105 Communicate with images
A picture can speak a thousand words. Naturally, they can be used to communicate concepts that, for the sake of space or time, you might not be able to include in the presentation itself. This slide deck uses this strategy to its advantage.
The presentation includes many images as backgrounds and minimal text. The images used always either enhance what’s being said or, in some cases, provide the answer for viewers. For example, the second slide states “The Landscape Today,” and includes a bleak background with a broken, tilted picture frame, emphasizing the idea that the following slides (which describe the landscape) offer some pretty disheartening information.
Using images in a related fashion can help express your views and emphasize your message.
Harness the power of Visme's AI image edit tools in your toolkit. These advanced yet easy-to-use tools let you effortlessly edit, touch up, unblur and upscale your images using simple prompts. It's an incredibly convenient way to add extra polish and clarity to your pictures to make your presentations more impactful.
106 Include artsy data visualization
Data visualization is a way of showing data and information in a way that is visually expressive. Creative data analysts can make some really beautiful creations and you can hire them to make them for you. If you haven’t seen any creative data visualizations, take a look at our collection of the best of 2018 and get inspired. You can either make the whole presentation into a data viz or add them to some of the slides.
By Beyond Words Studio
RELATED: The 25 Best Data Visualizations of 2018
107 Stay branded
This creative tip is a simple yet effective way to spark good presentation ideas. When creating your presentation, do your best to stay on brand. This, of course, will work only if you are creating a presentation for your own brand. If creating one for a client, then you should stay on brand with their own brand style guide. This means only use the brand colors and fonts, use photos, textures, and shapes that match the brand.

Use Visme's brand design tool to ensure your presentations perfectly reflect your brand personality. Just copy and paste your website URL, and the tool will automatically extract your branding assets, such as brand colors, brand fonts and company logo.
108 Ask questions
A great tip to make your PowerPoint presentations ideas more interactive is to ask questions from your audience. Like the example below, you can display only your question on the slide. Once the audience has pitched in their opinions and answers, you can click to reveal the actual answer. You can enable this type of interactivity on click when making a presentation in Visme .

109 Replace boring bullet points with visuals
While adding bullet points in your slides might be better than adding walls of text, they're still not the most effective way to get your message across and engage your audience. Take things up a notch and replace boring bullets with visuals, such as photos and even icons. Here's an example of how you can use icons to add a creative twist to the plain ol' bullet points.

110 Share your slide deck
Downloading your slide deck and presenting in front of an audience is not the only way to use your presentation. Make the most of your slides by sharing your presentation online.
Add interactive elements, such as clickable buttons, links, hover effects, popups, embedded videos and more so your audience can view and engage with your slides on their own.
If you've created your presentation in Visme, you can share your presentation publicly or privately using a link, or embed it anywhere you like.
Start Using These Creative Presentation Ideas
Ready to start creating your own presentation after over 100 pieces of inspiration? Choose your favorite creative presentation ideas and incorporate them into your own presentation.
You can add interactivity, animation, visuals and all kinds of creative elements to your presentations when you design them in Visme's online presentation maker. With our Dynamic Field feature , you can automatically update key information in real-time across all your slides or multiple projects. Customize existing dynamic fields or create new ones and format them to maintain design consistency.
Create a free account with Visme to start building a presentation your audience will love.
Design a beautiful and engaging presentation with Visme

Trusted by leading brands
Recommended content for you:
![15 Best AI Presentation Makers in 2024 [Free & Paid]](https://visme.co/blog/wp-content/uploads/2023/11/Best-AI-Presentation-Makers-in-2024-Thumbnail-500x280.jpg "present a powerpoint presentation")
Create Stunning Content!
Design visual brand experiences for your business whether you are a seasoned designer or a total novice.
About the Author
Orana is a multi-faceted creative. She is a content writer, artist, and designer. She travels the world with her family and is currently in Istanbul. Find out more about her work at oranavelarde.com

Microsoft 365 Life Hacks > Presentations > 7 tips for creating and presenting a webinar
7 tips for creating and presenting a webinar
Creating a webinar presentation requires a blend of technical and content creation skills. A well-crafted webinar should educate your audience and keep them engaged throughout your presentation’s runtime.

If you’re nervous about an upcoming webinar presentation or just looking to hone your craft, use these seven tips to create a webinar that captivates and communicates effectively.
1. Plan your content meticulously
The foundation of a good webinar presentation lies in its planning. Start by defining the purpose of your webinar and thinking about your target audience . What key message do you want your audience to take away from your presentation? Once you have a clear objective, outline your content to build a coherent narrative. Ensure that each slide progresses logically to help your audience understand and retain the information. Here’s how to get started on the content planning phase:
- Identify your main message.
- Outline the structure.
- Create engaging and relevant content.

Tell your story with captivating presentations
Powerpoint empowers you to develop well-designed content across all your devices
2. Design for clarity and engagement
Visuals play an important role in webinar presentations. Use high-quality graphics, readable fonts, and a cohesive color scheme to make your slides aesthetically pleasing and easy to digest. Interactive elements like polls, quizzes, and question-and-answer sessions can also enhance engagement and make your webinar more interactive. Design an engaging webinar with these tips:
- Use clear, concise visuals.
- Incorporate multimedia elements.
- Engage with interactive tools.
3. Master the technical aspects
Technical glitches can disrupt even the best webinar presentation. Before you present the real deal, rehearse your webinar to get comfortable with the tools and platform you’ll be using beforehand. Have a backup plan for technical failures to maintain professionalism should anything go wrong. Follow these tips to master the technical aspects of your webinar:
- Test your equipment.
- Rehearse using the webinar platform.
- Prepare for technical issues.
4. Deliver with confidence and clarity
Learning how to give a webinar involves finding the correct speaking voice and cadence for your presentation. Nail your webinar delivery with these tips:
- Practice your speech.
- Use pauses effectively.
- Pay attention to your inflection and tone.
5. Engage your audience throughout
To keep your audience interested, interact with them throughout the webinar. Ask questions, encourage participants to chat, and address comments or questions as they arise. This interaction not only makes the session livelier but also helps gauge audience understanding and interest. Promote audience participation during your webinar with these tips:
- Encourage questions.
- Use live polls.
- Address audience feedback directly.
6. Follow up after the webinar
The end of your webinar shouldn’t be the end of your engagement. Follow up with attendees via email with a thank you note, additional resources, or a survey to collect feedback. Here are some different ways you can follow up with your audience:
- Send thank you emails.
- Provide additional materials.
- Collect feedback through surveys.
7. Continuously improve
Use the feedback you received and your own observations to improve the way you deliver future webinars. Use these tips to refine your webinars going forward:
- Review feedback.
- Adjust content and delivery.
- Practice continuously.
By following these guidelines, you can create a webinar presentation that not only delivers your message effectively but also keeps your audience engaged and responsive. Think of each webinar as an opportunity to improve your skills and c onnect with your audience over a shared interest and you’ll make a lasting impression.
Get started with Microsoft 365
It’s the Office you know, plus the tools to help you work better together, so you can get more done—anytime, anywhere.
Topics in this article
More articles like this one.

How to introduce yourself in a presentation
Gain your audience’s attention at the onset of a presentation. Craft an impressionable introduction to establish tone, presentation topic, and more.

How to add citations to your presentation
Conduct research and appropriately credit work for your presentation. Understand the importance of citing sources and how to add them to your presentation.

How to work on a group presentation
Group presentations can go smoothly with these essential tips on how to deliver a compelling one.

How to create a sales presentation
Engage your audience and get them interested in your product with this guide to creating a sales presentation.
Everything you need to achieve more in less time
Get powerful productivity and security apps with Microsoft 365

Explore Other Categories
July special: Financial Reporting PPT Templates. Save with bundles 30%
How to Present OpEx Analysis with Visual Impact in PowerPoint
- July 4, 2024
- Data Charts for PowerPoint , Financial presentations , Other
Need to present an operating expenses analysis outcomes?
Check out our examples of OpEx analysis slides for inspiration. Discover how to showcase your organization’s OpEx financial data to improve readability and engagement.
For first the OpEx analyzing presentation can have an agenda. Below are three different meeting agenda proposals tailored for various types of businesses.
1. Tech Startup Operational Costs presentation example structure
- Overview of funding, spending, and market
- Variance Analysis
- End with Future Projections of OpEx costs and startup financial performance
2. Manufacturing Firm example of OpEx presentation
- Executive Summary of company financial status
- Raw Materials costs
- Labor costs
- Maintenance expenses
- Plants efficiency improvements
- Finish with Cost-Saving Initiatives
3. Healthcare Provider OpEx presentation topics example
- Financial status and market overview
- Cost Management Strategies
- Impact on Healthcare Service Quality
4. Generic OpEx analysis presentation agenda
A more universal agenda for presenting the status of operational expenses could look like this
- definition of OpEx term
- categorization of expenses with ratios
- main cost drivers
- comparison to budget & last year
- outlier and trend analysis
- expenses dashboard
- expenses outlook
- cost control strategy and cost reduction initiatives
Let’s see how you can visually present such OpEx topics to create an impactful presentation.

Get all the graphics presented here – click on the slide pictures to see and download the source illustration. Check the full OpEx Costs Analysis Financial Report
What is OpEx – defining the term visually
If your presentation audience includes also people who are not familiar with financial terms, you may want to add an OpEx explanation.
To define the term “OpEx” consider creating an attractive visual slide. This approach can capture attention and make the information more memorable for your audience.
You could write it only as a pure text, presenting what OpEx stands for:
OpEx, or Operating Expenses, refers to the ongoing costs that a business incurs as part of its day-to-day operations to generate revenue. These expenses are not directly associated with the production of goods or services.
If you want a more attractive visual way to present this term, look at the example below.

As designers, we suggest presenting the term by using simple shapes to highlight the most important key points. For illustration purposes of OpEx, we used the icon referring to the ongoing costs. Additionally, we ensured a good balance between text and graphics to keep the slide engaging. On the right side, we added the image. It is not a necessary element, but it’s a good way to find harmony in the composition.
Show a breakdown of company operational costs with a data chart
To better present OpEx costs not as numbers in the table but as something more engaging, use data chars. If you want to show only a generic distribution of costs, a pie chart can work for you.
Illustrate typical expenses categories, for example:
- personnel with a symbol representing people’s costs
- office or building rental costs
- expenses for electricity, water, gas, and other utilities
- business travel, such as flights, accommodation, and meals
- marketing and promotional activities
- legal services and consultations
- software, journals, and other subscription-based services
You can see below how we illustrated such a data chart.

In the middle, we decided to place a pie chart. Thanks to this we got a good flow of design. Each category is a separate label. Remember to use a consistent color scheme to differentiate categories and maintain a cohesive look. If you want to add some descriptions of each category, and there are more long texts, ensure the text size is legible.
This is a strength of a custom PowerPoint design. You would not be able to do it, using only standard Excel chart legend.
On the other way, if you want to show a more precise comparison of operational cost values, use a column chart. Notice another way to use icons to show cost categories.
There is also a place for a summary of the data. That is an important element, especially if you are sending such a presentation as a report to be read without the narration.

Presenting Costs Outlier Graph
If you want to present a data ratio of real operational expenses versus budget, to highlight the outliers, we can show you a custom way to make data more digestible.
Notice an idea, how to show the area where CC – cost center values are above or below 90% – 110% percentile. We created a negative whitespace, to show a window of costs within the limit range.
See an elegant way how you can mark those cost centers that are within the limit. Similarly, you could use the color of bars or show with X sign CCs that are outliers.

In this sample, we added custom layers to highlight the status of the budget. As you can see it’s a more creative way to show your data and analysis of them. Moreover, above some bars, we used checkmarks for better visualization which costs are good. This helps in quick identification and makes the slide more engaging.
Additionally, we included a summary of key points at the right of the slide to highlight major variances or areas of concern.
Show Year-to-Date Operational Costs Overview on one slide
If you need to put more data charts or tables on one slide together it requires extra focus on consistency and alignment.
Notice how we use color coding to show cost categories
- planned costs – by turquoise but you can also use your major brand colors
- actual costs – by green or your brand colors, just make sure it’s different than the planned
- difference – by outstanding orange

Above we present the proposal of slide layout with more data. Following basic good design tips such as colors consistency, you can create a PowerPoint slide that effectively presents also bigger amount of financial data in a clear and engaging way. Focus on the most important data points and insights. Avoid overcrowding the slide with too much information. Use bold or color highlights to emphasize summary of data. Ensure all charts have clear legends and labels for easy interpretation.
Present OpEx outlook of remaining months
When you present a monthly report, you may want to show also a table comparing YTD actuals with the financial year (FY) budget.
To present more detailed data, you probably will show it in a table. But even a table does not need to look like an ordinary Excel sheet.
See how you can customize such a table exported from Excel to PowerPoint file. We adapted colors, kept them consistent, and made sure values were readable by setting proper cell margins.

We highlighted the total line main data in bold text and color. The headers stand out by using a different background color.
Such an OpEx outlook table is an effective format for displaying comparative data. Using PowerPoint slides with a data table you can create a clear, concise, and engaging table for your audience.
Show a Gross Margin to EBITDA link with Waterfall Chart
To show such a breakdown bridge link between GM (Gross Margin) data and final EBITDA (Earnings before interest, taxes, depreciation, and amortization) you can use a waterfall data chart.
Make it clean. Again, you can illustrate key categories of costs with a specific symbol such as
- salaries costs – with an icon of a people
- marketing expenses – with a loudspeaker icon, for example
- rents & utilities – with a symbol representing the costs of offices and en energy
To make such slides more interesting you can create your own legend using shapes instead of using the default Excel chart legend. This way you can control its looks, and add more details with the default chart legend which would not be possible.
The consistent layout across slides ensures a professional look and easy navigation. We created a visual hierarchy to emphasize critical data. It’s recommended also to simplify charts by removing unnecessary elements like gridlines and using clear labels. Additionally, we used icons for each category. It provides additional context.
Finish OpEx presentation with actionable plan of cost reduction initiatives
At the end of your presentation don’t forget about the discussion of the next steps. You presented the state of the operational expenses and it is time to talk what are the outcomes and actions to be done.
To present such a plan in a structured way, you can use a table, where you explain objectives, action plan, desired results, and responsible person.
To do it in a transparent way that is also eye-catching, you can customize table design with additional visuals.

Notice how the table with enough whitespace inside the cells is easy to read. To create a lighter table look you can use dashed and colored lines to improve the table’s overall design.
In this sample, we add an image in the background to create an integrated look of the slide.
What to Remember about Visual Presenting of OpEx Analysis
If you want to present an OpEx analysis on the slide, remember a few simple rules:
- use a highlight color to emphasize key points and headlines,
- adjust and customize tables and data charts for clear structure and readability,
- keep the layout simple and clean,
- remember about white space,
- enrich your data with icons – properly chosen icons can nicely reflect the meaning of your content.
I’m sure that with these basic design rules, you can make a stunning presentation and overall impression.
Resource: OpEx Costs Analysis Financial Report PowerPoint Template
The slide examples above are from one of our financial PowerPoint templates. The full presentation is available in the infoDiagram collection of PPT graphics:
So if you want to create your balanced scorecard presentation quickly and visually appealing you can use this template. Simply add your pictures into predefined placeholders, replace texts, and enjoy a beautifully craft deck.
Subscribe to the newsletter and follow our YouTube channel to get more design tips and slide inspiration.
If you are in financial reporting, you can extend your data presentation with other topics…
See discounted bundles here https://blog.infodiagram.com/financial-reporting-ppt-template-bundles

Related Posts

Best Practices for Financial Excellence of a Company
- June 28, 2024

How to Present Balanced Scorecard Framework: PowerPoint Design Tips
- June 10, 2024

Presenting Monthly Business Report with Charts and Tables in PowerPoint
- May 26, 2024
39 Best Infographic PowerPoint Presentation Templates for 2024 (Giant List)
Find the best infographic slide templates to use for your PowerPoint presentations, and get some useful tips on how to use them.

Do you need to add lots of information to create a great infographic template for PowerPoint? Are you wondering how to make an infographic-rich presentation to capture your audience?
Make the first step in the right direction. It begins with getting quality data presentation templates to work with. Don’t worry—we’ve got you covered with some of the best for 2024.
5 Best Infographic PowerPoint Templates (Video Overview)
Here’s a video preview of some of our best infographic presentation templates. Use it for a closer look at top infographic PowerPoints.
For more information on PowerPoint infographic template PPTs, keep reading the article below for some helpful templates and tips.
Best New Infographic PowerPoint Presentation Templates From Envato for 2024
These are some of the best PowerPoint infographic templates trending now on Envato Elements.
1. Infographic PowerPoint PPT Presentation Template

This infographic PPT presentation template set has 170 professional slide designs. It also comes with creative PowerPoint infographics. The custom vector icons and visual slide designs are ready for you to edit.
2. PPTx Infographics PowerPoint Slides

This modern PowerPoint graphics presentation template set has beautiful slides. Make the most of creative PPT charts, timelines, and icons. Scale and recolor the vector graphics and customize the slide setup.
3. Tech Multipurpose PowerPoint Presentation Deck

With 100 dynamic slides and handmade PPT infographics, this template is ready to rock. It’s made with Slide Master, which makes customization easy. Change colors, edit graphics, or quickly drag and drop your images with just one click.
If you’ve got a presentation soon, grab a PPT template that has everything you need.
4. Sante Infographic Template PowerPoint

If you have no time to learn how to make an infographic in PowerPoint, here’s one of the best PPTs to help you turn ideas into persuasive presentations. This creative infographic template for PowerPoint comes with:
- easy to edit icons
- slide transition animation
- company profile slides
- portfolio slides
5. Eargo Infographic Template PowerPoint

You’ll have all the PowerPoint graphics every startup and business planner needs. Present to investors, key employees, and other stakeholders with confidence thanks to Eargo. This infographic template for PowerPoint comes with:
- over 250 slides
- 30 color themes
- 2000 vector icons
- light and dark backgrounds
Take your business to the next level with this PowerPoint graphics template.
6. Quantum Education Infographic PPT

This infographic template for PPT is fun and easy on the eye. It packs 30 unique slides and loads of useful graphics. You’ll get charts, maps, and device mockups in this infographics PowerPoint template.
You can resize and customize every infographic slide.
7. Infonova Infographic PowerPoint Template

The best PowerPoint presentation templates offer you creative control. This option is no exception. You’ll get a host of customizable infographic slide designs with this download.
This infographic template for PowerPoint is ideal for creative agencies and creators. It comes with free web fonts and it’s based on Master Slides. Just drag and drop your images, it’s that simple!
8. Water Infographic in PowerPoint

Here’s a leading choice for presentation graphics that works for some topics. It comes with minimal white backgrounds and blue, editable charts and graphs. There are 20 infographic slide designs you can customize to suit your presentation.
This infographic template for PowerPoint also has free fonts and so much more.
9. Gets Travel Infographic Template for PowerPoint

This infographic slide template for PowerPoint is great for travel-related presentations. It features stunning graphics with editable colors.
Each of the 50 unique slides in this creative infographic PPT theme is fully editable. Moreover, it comes in both light and dark backgrounds.
10. Foodism Infographics PowerPoint Template

Pitching an idea for a new restaurant? This infographic PowerPoint template is your go-to choice. There are many PPT graphics in this download.
Find 35 infographic slide designs inside. This infographic in PowerPoint also includes two versions with light and dark backgrounds. Few free presentation graphics can say the same.
11. 3D Finance Infographic Template PPT

Deliver dynamic presentations with these great-looking 3D infographics for PowerPoint. This modern template has many PowerPoint infographic examples for financial pitches. Enjoy 35 unique slides in both dark and light versions.
12. Portfolio Infographic Template for PowerPoint

Use this infographic template for PowerPoint to design your next portfolio. It contains 34 well-made, unique infographic slide options. It also features:
- 20+ color themes
- over 4,000 infographics for PowerPoint
- fully editable elements
- drag & drop picture placeholders
- help file and free support service
Play with it and make it your own!
13. Headline PowerPoint Infographic Template

This flat infographic style PPT theme is set up for multi-purpose business presentations. Each infographic slide includes over 4,000 customizable icons. Choose from more than 20 color themes with free fonts used.
14. A New Infographics PowerPoint Template

A New is a great choice if you need an infographic template for PowerPoint. There are over 30 infographic slide designs to put to use. Scroll through the charts and icons, and see what your slideshow needs.
Each of the PowerPoint graphics is customizable and resizable. Instead of free presentation graphics, try out A New.
15. Project Management Infographic PowerPoint Template

PowerPoint infographic templates like this are designed for project managers. Your audience is sure to appreciate your use of infographic slide designs. This set of PowerPoint graphics offers:
- editable graphics
- drag and drop image placeholders
- a help file
16. Pitch-Deck Infographic Template for PowerPoint

Infographic slide designs can help bring ideas to life. PowerPoint infographic templates like this are tools to deliver professional pitches. Change the colors to match your brand and use:
- and so much more!
With a layout based on master slides, this template is easy to edit. You can change the photos by easily drag-and-dropping. Few free presentation graphics for PowerPoint can do that.
17. Business Plan Infographic PowerPoint Template

PowerPoint infographic templates like this help you pitch a business plan. Use this fully customizable, well-organized PPT to show what keeps your team moving. It has loads of features, including:
- 665+ unique layouts
- 4,000+ vector icons
- over 60 premade color themes
- drag and drop image placeholder
- smart object layout & texts
Moreover, it’s regularly updated so you can use it many times and for different purposes!
18. Flanify Infographics PowerPoint Template

Flanify is one of the best new PowerPoint infographic templates available today. It’s got a minimalist design that helps you emphasize your content. There are three dozen unique slides featuring all types of graphics.
You’ll find charts, device mockups, and other icons. This infographic PPT is based on master slides, so it’s super easy to edit.
19. Kopikoe Foodie Infographic Template PPT

This infographic template for PowerPoint has everything you’ll need for a foodie PPT. Audiences react well to infographics because they make advanced concepts easy to understand. This pack includes 30 infographic slide designs for your next project.
With loads of vector icons, you have virtually unlimited creative options. Unlike some free presentation graphics found online, these are professionally designed.
20. Imperial Multipurpose Infographics for PowerPoint

These PowerPoint infographic examples revolve around the health industry. This template includes a full collection of infographics and 30 slides. It features free fronts, a help file, and many other useful tools. You can fully and easily customize every vector icon and image.
21. Juici Foodie Infographic Template PPT

When searching for an infographic template for PowerPoint, aim for high-quality elements. This infographic template PPT gives you that. You’ll also get:
- 100% resizable and editable icons
- drag and drop picture placeholders
- device mockups
If you want a template to pitch about food and drinks, look no further!
22. Inventive Infographic Template for PowerPoint

Premium tech layouts like this go beyond any free presentation graphics online. This creative infographic template PPT bundle includes 35 infographic slide designs. Customize every icon and use the master slides – which help you make bulk edits across the deck in a flash.
23. Osprey Education Infographic PowerPoint Template

Get amazing PowerPoint infographics for your creative business presentation. PowerPoint infographic templates like this give you an array of functional icons. With 30 clean master slide-based layouts, easily edit this PPT as much as you’d like.
24. Edulacti Multipurpose Infographic PPT

This is a creative PowerPoint template for multipurpose business presentation or personal use. This PowerPoint includes 30 infographic slide designs and several icons, such as:
- flow chart infographics
All the included PowerPoint infographic examples are fully editable.
25. Gatzruts Infographics PowerPoint Template

This minimalistic PPT theme is ready to use for many types of presentations. It features a ton of creative, clean infographic slide designs. All these business graphics PowerPoint elements are editable.
As it’s based on master slides, it’s easy to quickly adapt to your needs. Try out this premium choice instead of free presentation graphics for PowerPoint.
26. Mental Concept PowerPoint Infographic Templates

Check out these PowerPoint infographic templates to give a powerful mental concept pitch. These are designed by creative pros with you in mind. It’ll stand out from free infographic templates for PowerPoint.
Make sure to use the various features, including:
- 204 total slides, with 17 unique mental concept slides
- 12 color variations
- 280 fully editable vector icons
- master slides for easy editing
27. Realth Business Infographic PowerPoint Template

It’s important to make a solid first impression right out of the gate. An infographic template for PPT like Realth helps you do just that. In fact, it’s got 30 multipurpose slides built in.
From these, pick and choose to suit your message. The PowerPoint infographic examples help you present:
- growth stats
- pricing packages
- app layouts
- team members
- and so much more
All the graphics are editable, and the used fonts are free.
28. Maps: Set of Infographics for PowerPoint

These PowerPoint infographic templates have a wide variety of clean map designs. Use them to pitch about locations, migration plans, growth stats per region, and so much more. Find 25 unique slides inside, picture placeholders, and over 90 color themes.
29. Puckup Brand Guidelines Infographic PPT

Not sure how to make a branded presentation? Don’t worry, because the PUCKUP infographic template PPT is surprisingly easy to use. All elements are editable with a couple of clicks.
This infographic template for PowerPoint is great for presenting your brand. Easily add your logo, your company’s color palette and typography, and voila! It’s way better than free presentation graphics.
30. Brand Guidelines Infographic PowerPoint Template

Here’s an elegant choice for presenting your brand. Not all infographic PPT options have to be bright in order to be eye-catching. This template is the go-to download for 2024.
This infographic PowerPoint has everything you need to crush your branding proposal:
- 34 unique slides
- picture placeholders
Free presentation graphics may fall short for your brand needs. Choose this one instead!
31. Funnel Infographic Template for PowerPoint

Logistics rule the world in 2024. Are you trying to show the strength of your business’s processes? An infographic template PPT like this is a top choice.
Use each of the professional infographic slide designs to explain things like:
- case studies
- business and marketing plans
32. Nursing PowerPoint Infographic Template

This colorful, creative presentation theme showcases your information and crafts a visual story. It’s an impressive tool for presenting medical-related topics. Unlike most free presentation graphics, it has many unique slides and color schemes.
This infographic in PowerPoint offers:
- light and dark background options
- editable elements
- an icons pack file
33. Mental Health PowerPoint Infographic Templates

This template has several color scheme options and PowerPoint infographic examples. Present with clarity, show your process and progress, and more.
There are easy-to-customize layout options, in both light and dark backgrounds. It also features tons of icons and picture placeholders.
34. Market Research Infographic PowerPoint Template

In need of top PowerPoint presentation graphics for your market research pitch? This one will do. It’s a great pack that includes:
- 15 unique infographic slide designs
- drag-and-drop image placeholders
- easy to change colors
- shapes and other elements
This doesn’t include the images, but everything else is right there. Try this one instead of free infographic templates for PowerPoint.
35. Hot Pitch Deck Infographic PPT

Next up is this stylish and modern infographic slide design. There are over 100 fully animated slides. Moreover, you’ll find:
- 2,000+ vector icons
- 100+ device mockups
- 50+ theme files
- and lifetime updates!
Use the master slides to quickly add a personal touch to this infographic template PPT.
36. Environment Infographic PowerPoint Examples

This infographic PowerPoint template comes with everything you need to create an environmental impact presentation. It comes packed with premium features like:
- 20 education and science slide designs
- .PPT and PPTX. files
- Fully editable and easy to use
- Documentation
37. PowerPoint Infographics Solutions

Work with a PowerPoint infographic template that offers everything you need right out of the box. These infographic PowerPoint examples feature:
- 50 ready-to-use slides
- Over 200 icons (PSD+EPS+AI+JPG+PNG+SVG+PPTX Vector)
- Color themes
- Objects are organized and grouped
38. ECO Infographic Template for PowerPoint

These infographic PowerPoint examples are great for putting together a sustainability infographic presentation. Use the high-quality illustrations and other great features:
- 33 unique slides
- Includes opening and closing slides
- 11 color variations
- Simple line vector icons
- Handmade infographics
39. Infographic PowerPoint Examples

No need to learn how to make an infographic in PowerPoint when you have access to this clean PowerPoint infographics template. Take advantage of its amazing features:
- 80+ unique slides
- 80+ fully animated infographics
- Resizable and editable graphics
- 16:9 widescreen ratio
5 Popular PowerPoint Infographic Slide Design Types
We’ve already established that infographics in PowerPoint are powerful storytelling tools. But let’s go one step further and look at specific examples of the best infographics. We’ll also see how to use them to explain concepts.
1. The Brain Infographic
Some dedicate their whole lives to studying the human mind, and yet there’s always something to learn! The value of a brain infographic is that it’s an intuitive way to show thoughts and ideas and how they connect.
Use an infographic and this tutorial to create a brain graphic that shows the pieces of a thought.
2. The SWOT Infographic
Strengths, weaknesses, opportunities, and threats: every business situation has them. You need a way to show them in your presentation. That’s where the classic SWOT infographic makes its impact.
When you lay out all four components, you’re likely to find insight while creating a strategy.

3. The Puzzle Piece Infographic
You’re probably familiar with putting together puzzle pieces in the real world. Don’t miss out on using this concept as an infographic! As a PowerPoint visual, puzzle pieces can show how the parts of an idea join into a cohesive whole.
Use this article to see how to use puzzle pieces. The best graphic PPTs often use them to tell a story of how everything fits together.
4. The Gantt Infographic
When you’re running a project, you need a way to show that many tasks are running side-by-side. That’s the purpose of a Gantt chart. It’s a special infographic that’s beloved by the best project managers.

Use our tutorial to see Gantt infographics in action . You’ll learn how to use them to plan a project and the resources you need to succeed.
5. The Funnel Infographic
A funnel is yet another infographic you can leverage in PowerPoint to explain a concept. Funnels show inputs, how they progress, and what they ultimately lead to.
Funnel infographics are common in explaining sales processes. They’re easy to build in PowerPoint with templates. Make sure to check out our tutorial on how you can use PowerPoint funnel infographics .
How to Customize an Infographic PowerPoint Template (Fast!)
So far, we’ve looked at powerful PowerPoint infographic templates. But you might be wondering how to use them to design infographic slides of your own.
Let’s learn how to customize three separate slides to build excellent infographics. We’ll use the PPTx Infographics template to rapidly build our infographic slides.
Let’s look at five example slides. These show how easy it is to customize a PowerPoint infographic:
1. Performance Gears

The best PowerPoint templates include abstract designs to build infographics for PPT. Use a little imagination, and there it is! These infographic PowerPoint slides might be perfect for expressing your idea.
Take this turning gear icon slide. In the updated version below, I’ve shifted the elements to show how teams at my company work together.
Simple drag-and-drop actions and grabbing icons from other slides brought this slide to life. Then, I updated the text to match my intent in this infographic template for PowerPoint.

2. Hierarchy Charts

If you work in a corporate environment, I’m certain that you’ve seen org charts before. These exist to show off the company’s reporting structure.
In this case, it’s as simple as typing in the placeholder boxes to update the names and titles. I’ve also added a photo in my example to really “put a face with a name” in my organization. This chart uses SmartArt, a built-in PowerPoint feature that’ll adjust the graphic as you adjust the text.

Learn more about SmartArt PPT infographics .
3. Brain Infographic

Brain charts are infographics that you’ll find in the best PowerPoint templates. They can show how you divide your thinking and showcase the “parts of the whole” that make up your strategy.
In the example below, I’ve left the same basic structure intact. I just updated the descriptions and some of the colors and icons. It’s a simple tweak that shows what my creative agency spends its time on.

Brain infographics are very popular, so we created a resource to teach you how to customize them. Check out our screencast to learn more.
4. Sales Report

PowerPoint infographic templates help you tell stories with your data. Slide 15 in our template is a great choice for creating a data-focused slide.
To edit a PowerPoint chart, edit the data that feeds it. Right-click on the chart and choose Edit Data. You’ll see an embedded version of Excel, Microsoft’s data powerhouse. Just type over the data placeholders, and your chart will update in real time.

Learn more about working with data in this PowerPoint tutorial .
5. The Conclusion Slide

It’s a mistake to think that the last slide is the end of your presentation. Instead, it helps to see it as the start of a conversation with your audience.
You know what’s the best part of PowerPoint infographic templates? Yes, that they include other useful slides. Slide 50, the conclusion slide, is perfect for every presentation. That’s because it can help you continue the conversation by sharing your details.
To update this slide, type over the placeholders. That adapts the slide to your brand-specific details.

For even more ideas and to learn how to create a conclusion side, don’t miss out on our tutorial .
Common PowerPoint Template Questions Answered (FAQ)
You’ve already seen infographic templates for PowerPoint. But you might still have questions about how to use PowerPoint to your advantage.
PowerPoint is an advanced app. It’s easy to use, but there are many professional-grade features. Let’s look at five common questions you might have as you level up your presentation skills:
1. Does PowerPoint Support Custom Fonts?
Every graphic designer is trying to gain an audience’s attention when presenting. It helps to use custom design options in PowerPoint. That sets the presentation apart from those who only use the built-in, standard fonts.
Try out custom fonts with the help of this tutorial .
2. What Size Should I Choose for My Infographic Slide?
The goal for your PowerPoint presentation is to use the full-screen space. You’ve got to set your infographic template PPT to the proper dimensions. Don’t waste any pixels!
Using pre-built PowerPoint infographic templates gives you several size options.
3. How Much Does PowerPoint Cost?
Microsoft has pivoted its business models in recent years. Once upon a time, businesses and power users would buy a license for the latest version of the app every few years. Now, it’s all about subscriptions.
Many users choose Office 365, a monthly subscription package to keep apps up to date. Another option is the free, browser-based version of the app.
4. Can You Create PowerPoint Infographics From Scratch?
Infographic templates for PowerPoint are perfect for creating interactive visuals. But you can also create PowerPoint graphics with the help of a feature called SmartArt.
5. What’s the Best Way to Present Data in PowerPoint?
Presentation graphics can include data. It’s far better to use a chart than to show data in a table or a wall of numbers that are hard to interpret. With the help of presentation graphics and charts, it’s much easier to explain trends and data.
Grab a Fresh PowerPoint Template With Great Infographic Slide Designs
Any of the best PowerPoint presentation templates from Envato Elements will help make your points clear. Choose the best format for your info. Put together just the right PowerPoint infographic slides that tell your compelling story.
Related Articles

More From Forbes
The only good reason to add busy, cluttered slides to your presentation.
- Share to Facebook
- Share to Twitter
- Share to Linkedin
The 2022 Apple Worldwide Developers Conference at the Apple Park in Cupertino, California. (Photo by ... [+] Wu Xiaoling/Xinhua via Getty Images)
We’ve all seen cringe-worthy PowerPoint slides so cluttered with information that they’re nearly impossible to read. You know the ones. The text is reduced to 9-point or 12-point font to squeeze everything in.
Busy slides frustrate the audience because of a concept called ‘cognitive load.’ Too much text, too many numbers, and too many graphs overwhelm our ability to process and retain information.
Effective presenters avoid text-heavy slides. Instead, they favor clean, minimalist designs that are attractive and easy to read. However, there is one reason—and one reason only—to include a busy slide in a persuasive presentation:
Add a busy slide to a presentation only when you intend to overwhelm your audience.
In other words, a slide could contain a mountain of information because it is not meant to be read, consumed, and digested. It’s there to stress a point.
For example, in March, the National Association of Realtors agreed to a massive $418 million settlement over commissions that home buyers and sellers pay to real estate agents in the U.S. Since the settlement might convince prospective home buyers to negotiate lower commissions, real estate agents have had to turn up their persuasive skills to articulate the value they provide.
Recently, Realtor.com launched a digital and print campaign to demonstrate the value agents bring to the transaction. One ad fills the entire length of a standard newspaper. The headline reads:
So, you’re ready to buy a home. Here’s the next 111 to-dos.
Best High-Yield Savings Accounts Of 2024
Best 5% interest savings accounts of 2024.
Realtor.com advertisement
Good luck reading the remaining text (on left). It is purposely written in tiny font to squeeze in the dizzying number of details that buyer’s agents navigate to facilitate a home buying transaction
The point of the ad is that home buyers need support. The implication is that you can try to accomplish all the tasks yourself—researching, preparing financial documents, making offers, and considering legal protections. Or you can make just one decision: find a buyer’s agent.
Realtors making presentations to win over clients would be well served to include such a slide—one that's so dense it's almost illegible without a magnifying glass.
There are times when the intentional use of busy slides supports the argument.
Take Apple, for example. The company’s product launches are notable for minimalist and visually appealing slides that contain more photos and images than text.
However, in June, when Apple unveiled new products, features and plans to put artificial intelligence in every corner of its iPhone, the company's speakers intentionally broke the mold by including strategically cluttered slides.
For example, after one speaker highlighted notable updates in macOS Sonoma, the Mac's latest operating system, he projected a slide filled with boxes highlighting dozens of other features: updates to Apple’s browser, Safari, new gaming titles, iPhone mirroring on the desktop, and much more.
The slide only stayed up for 20 seconds. It was far too little time to read everything, but that’s the point—it was intentionally cluttered to put an exclamation point on the product announcement.
The intentional use of clutter is as much of an art as the deliberate use of white space. So get busy, but only when the time is right.

- Editorial Standards
- Reprints & Permissions
Join The Conversation
One Community. Many Voices. Create a free account to share your thoughts.
Forbes Community Guidelines
Our community is about connecting people through open and thoughtful conversations. We want our readers to share their views and exchange ideas and facts in a safe space.
In order to do so, please follow the posting rules in our site's Terms of Service. We've summarized some of those key rules below. Simply put, keep it civil.
Your post will be rejected if we notice that it seems to contain:
- False or intentionally out-of-context or misleading information
- Insults, profanity, incoherent, obscene or inflammatory language or threats of any kind
- Attacks on the identity of other commenters or the article's author
- Content that otherwise violates our site's terms.
User accounts will be blocked if we notice or believe that users are engaged in:
- Continuous attempts to re-post comments that have been previously moderated/rejected
- Racist, sexist, homophobic or other discriminatory comments
- Attempts or tactics that put the site security at risk
- Actions that otherwise violate our site's terms.
So, how can you be a power user?
- Stay on topic and share your insights
- Feel free to be clear and thoughtful to get your point across
- ‘Like’ or ‘Dislike’ to show your point of view.
- Protect your community.
- Use the report tool to alert us when someone breaks the rules.
Thanks for reading our community guidelines. Please read the full list of posting rules found in our site's Terms of Service.
- Computer Vision
- Federated Learning
- Reinforcement Learning
- Natural Language Processing
- New Releases
- Advisory Board Members
- 🐝 Partnership and Promotion
- Recognize Your Audience : Understand who your audience is, as that will help you customize your content to meet their needs and preferences.
- Define Your Purpose : Clearly state the purpose and aim of your presentation. Knowing your exact goal can help you create material that will educate, convince, or entertain.
Brainstorming Ideas with ChatGPT
ChatGPT is excellent for generating ideas. Here’s how to get the best out of it:
- Prompt Examples : Use prompts like “What are some innovative ideas for a presentation on Artificial intelligence (AI)?” or “How can I make a presentation on Machine Learning (ML) engaging?”
- Topic Refinement : Ask ChatGPT to narrow down broad topics. For example, “What are the key points I should cover in a presentation about Machine Learning for beginners?”
Structuring Your Presentation
A well-structured presentation is crucial for maintaining audience engagement. Use ChatGPT to outline your presentation:
- Beginning : Request ChatGPT to write an engaging opening paragraph. For instance: “How can I effectively introduce the topic of Machine Learning (ML)?”
- Main Content : Divide your text into manageable chunks. Use prompts such as “List the main points for a section on the benefits of Machine Learning in education.”
- Conclusion : Conclude with a powerful statement. For instance: “How can I summarize the key takeaways of my presentation on Machine Learning?”

Creating Slide Content
Once you have the structure, it’s time to fill in the details. ChatGPT can help you prepare the content for each slide:
- Text Content : Use writing exercises like “Write a brief sentence discussing how Machine Learning has affected modern businesses.”

- Bullet Points : Highlight important details in bullet points. For example: “Convert this paragraph into bullet points.”
- Visual Suggestions : Ask ChatGPT for suggestions on images. For example: “Create some images or charts that I should include in the presentation about the benefits of Machine Learning in day-to-day life?”
Designing the Presentation
While ChatGPT can’t design slides directly, it can offer valuable advice:
- Slide Layouts : Request advice on how to organize your slides. For instance: “What is the best layout for the main body of this presentation?”
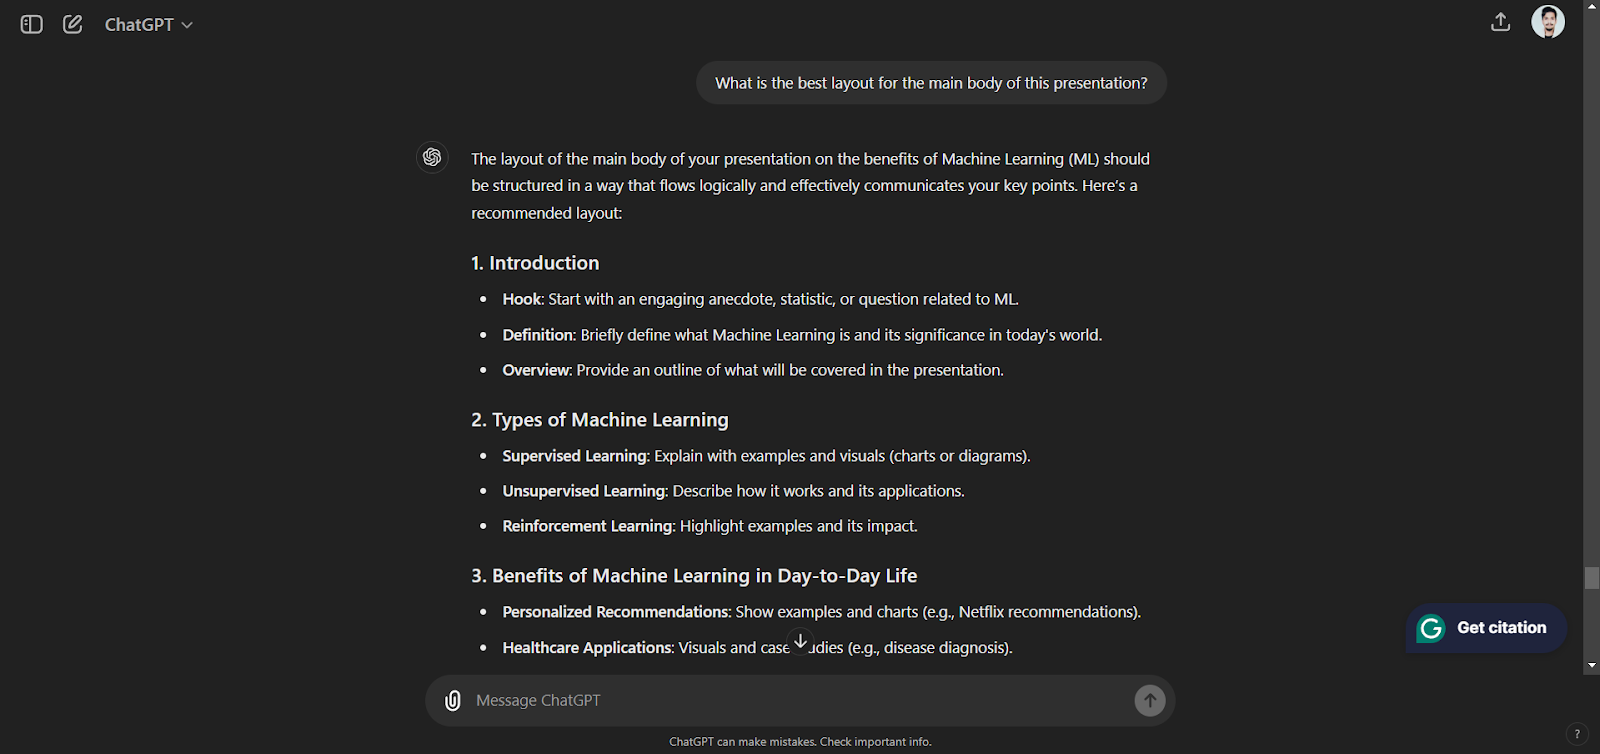
- Color Schemes : Find color schemes that work well for your subject. For instance: “Show me the color scheme I should use for a Machine Learning and Generative AI presentation?”

- Font Choices : You should always select a readable font. For instance, “What fonts are best for a technical professional business presentation?”
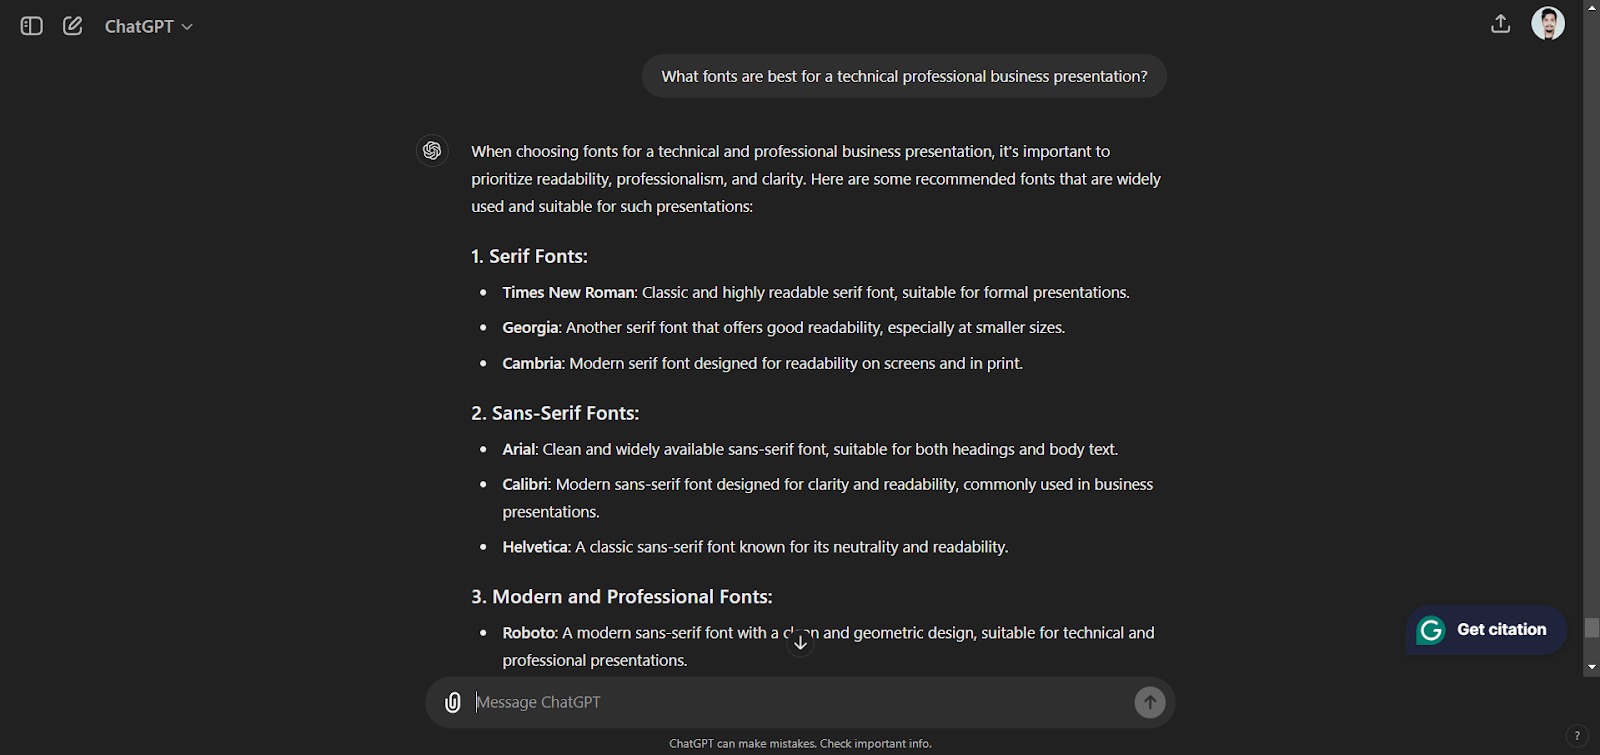
Practicing Your Presentation
ChatGPT can even help you practice your delivery:
- Q&A Preparation : Prepare for audience questions during the Q&A period. For example: “What questions might be asked after a presentation on Machine Learning?”

- Feedback and Enhancement : To improve your content, simulate feedback from the audience with ChatGPT. For example: “How can I improve my slide on Machine Learning?”
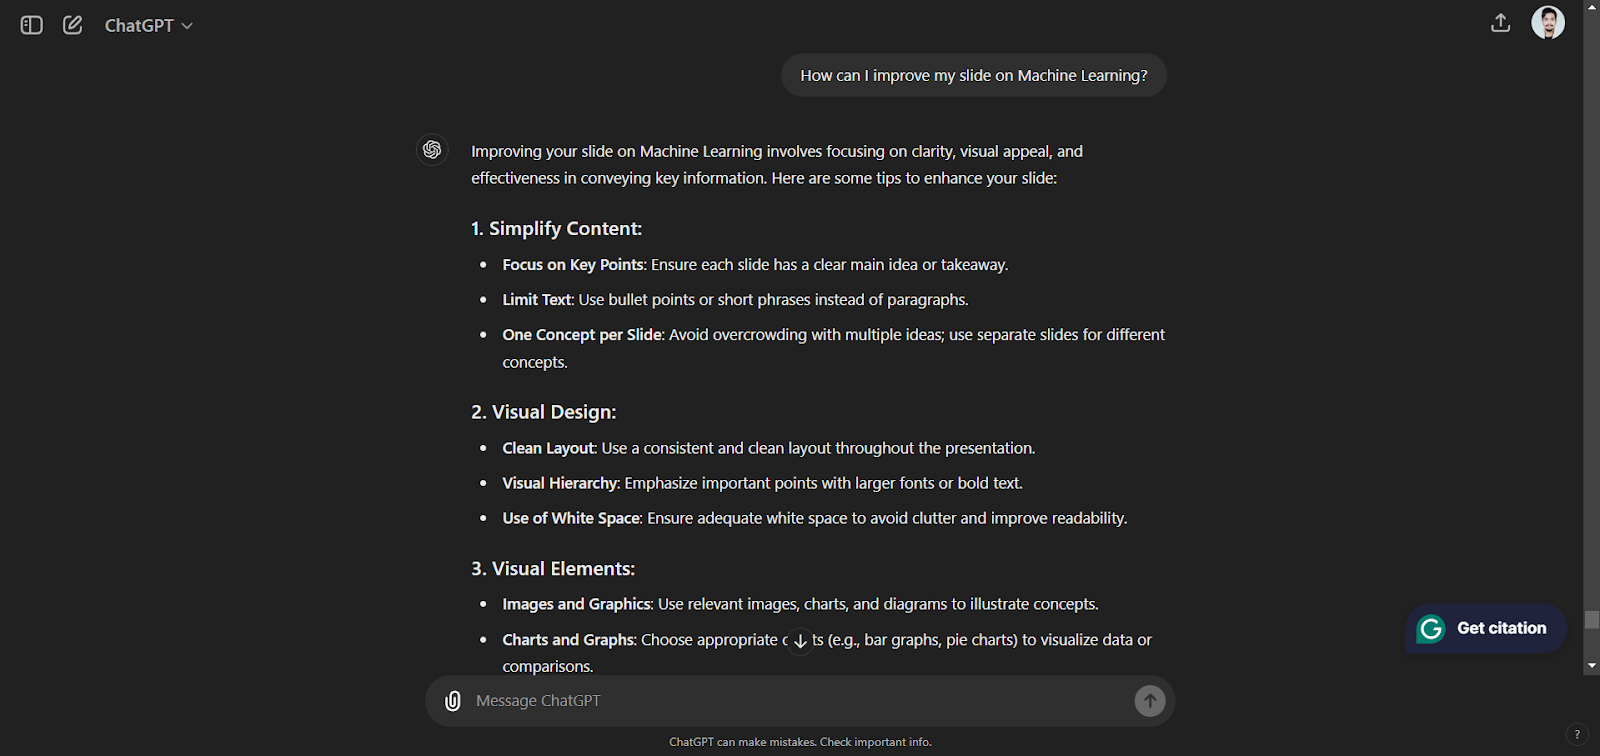
In Conclusion:
Using ChatGPT to create PowerPoint presentations can greatly improve your content, design, and way of delivery. You can take advantage of its capabilities to create engaging and polished presentations that grab your audience’s attention. Whether you’re presenting in a business meeting, academic setting, or public event, ChatGPT can be your valuable assistant in creating outstanding presentations.

Nishant, the Product Growth Manager at Marktechpost, is interested in learning about artificial intelligence (AI), what it can do, and its development. His passion for trying something new and giving it a creative twist helps him intersect marketing with tech. He is assisting the company in leading toward growth and market recognition.
- 10 GPTs for Software Developers
- Boost Your Data Analysis with Google Gemini's Advanced 1.5 Pro's New Spreadsheet Upload Feature
- Excited about GPT-4o? Now Check out Google AI's New Project 'Astra': The Multimodal Answer to the New ChatGPT
- OpenAI Launches ChatGPT Desktop App: Enhancing Productivity for Mac Users
RELATED ARTICLES MORE FROM AUTHOR
Rethinking qa dataset design: how popular knowledge enhances llm accuracy, cmu researchers propose xeus: a cross-lingual encoder for universal speech trained in 4000+ languages, microsoft ai reveals skeleton key: a new type of generative ai jailbreak technique, top 5 effective design patterns for llm agents in real-world applications, the next big trends in large language model (llm) research, meet automorphic: an ai startup that enables developers to build and improve custom fine-tuned artificial intelligence models rapidly.
- AI Magazine
- Privacy & TC
- Cookie Policy
🐝 🐝 Join the Fastest Growing AI Research Newsletter...
Thank You 🙌
Privacy Overview
Copilot tutorial: Create a presentation with a prompt

Note: This feature is available to customers with a Copilot for Microsoft 365 (work) license.
Duration: 1 minute 14 seconds
Discover how Copilot in PowerPoint effortlessly creates captivating presentations in just a few prompts and access the full power of Microsoft Designer to bring your ideas to life with professional graphics.
Try in PowerPoint
See more videos

Kickstart a presentation

Create a branded presentation from a file

Summarize a presentation
Browse all Copilot videos

Need more help?
Want more options.
Explore subscription benefits, browse training courses, learn how to secure your device, and more.

Microsoft 365 subscription benefits

Microsoft 365 training

Microsoft security

Accessibility center
Communities help you ask and answer questions, give feedback, and hear from experts with rich knowledge.

Ask the Microsoft Community

Microsoft Tech Community

Windows Insiders
Microsoft 365 Insiders
Was this information helpful?
Thank you for your feedback.
IMAGES
VIDEO
COMMENTS
You can show your presentation to an audience with PowerPoint Mobile. Start presenting. On the Slide Show tab, in the Start Slide Show group, select From Beginning or From Current Slide.. Presenter View. If you have a two-screen setup in which you are projecting from your device to a large screen, you can see Presenter View visible on your device while your audience sees the slide show on the ...
In this video, you'll learn the basics of presenting your slide show in PowerPoint 2019, PowerPoint 2016, and Office 365. Visit https://edu.gcfglobal.org/en/...
Keep reading to find out more about using Presenter View in PowerPoint and the best features to try out.. Turn On PowerPoint Presenter View. In PowerPoint for macOS, simply click on Presenter View on the Slide Show tab to kick off the presentation in Presenter view. Turn on Presenter View by clicking on Presenter View on the Slide Show tab.. You'll see the Presenter View interface on one screen.
A great PowerPoint presentation is: Prepared to Win. Research, plan, and prepare your presentation professionally. It helps you deliver an effective message to your target audience. Designed Correctly. Your visual points should stand out without overwhelming your audience. A good PowerPoint visual shouldn't complicate your message.
These PowerPoint presentation tips and tricks give you confidence to make you a skilled presenter. Editorial Note: This post was first published in February of 2019. Our staff updates this post regularly— adding new, exciting PowerPoint tips and templates (with special help from Brenda Barron, Andrew Childress and Sarah Joy).
1. Open PowerPoint and click 'New.'. A page with templates will usually open automatically, but if not, go to the top left pane of your screen and click New. If you've already created a presentation, select Open and then double-click the icon to open the existing file. Image Source.
Tips for creating an effective presentation. Tip. Details. Choose a font style that your audience can read from a distance. Choosing a simple font style, such as Arial or Calibri, helps to get your message across. Avoid very thin or decorative fonts that might impair readability, especially at small sizes. Choose a font size that your audience ...
Start presenting. On the Slide Show tab, in the Start Slide Show group, select From Beginning. Now, if you are working with PowerPoint on a single monitor and you want to display Presenter view, in Slide Show view, on the control bar at the bottom left, select , and then Show Presenter View.
One person. Sharing and real-time collaboration. PowerPoint for the web and PowerPoint desktop app for offline use. Premium templates, fonts, icons, and stickers with thousands of options to choose from. Dictation, voice commands, and transcription. Advanced spelling and grammar, in-app learning tips, use in 20+ languages, and more.
A good presentation needs two fonts: a serif and sans-serif. Use one for the headlines and one for body text, lists, and the like. Keep it simple. Veranda, Helvetica, Arial, and even Times New Roman are safe choices. Stick with the classics and it's hard to botch this one too badly.
The first thing you'll need to do is to open PowerPoint. When you do, you are shown the Start Menu, with the Home tab open. This is where you can choose either a blank theme (1) or a pre-built theme (2). You can also choose to open an existing presentation (3).
That way, you'll be able to address their specific pain points and interests. Create a Structured Flow. Like any good story, your presentation needs a beginning, middle, and end. Start with an introduction that hooks, follow with content that informs and engages, and conclude with a memorable takeaway.
Click From Beginning. Holding down the Alt key and clicking From Beginning, the Presenter View will launch from the very first (non-hidden) slide in your presentation. You can also launch the presenter view from the beginning of your presentation at any time by clicking Alt + F5 on your keyboard.
Read more on Business communication or related topics Power and influence, Presentation skills and Public speaking Carmine Gallo is a Harvard University instructor, keynote speaker, and author of ...
Open the PowerPoint app, select a template and theme, then like "Create.". Click the text box to add your title and subtitle to create your title slide. Click the "Insert" tab, then "New Slide" to add another slide. Choose the type of slide you want to add, then add text and pictures. Rearrange slides by dragging them up or down in ...
10 Tips for Effective PowerPoint Presentations. Tip #1: Choose an Interesting Topic. Tip #2: Do Some Deep Research. Tip #3: Use an Amazing Presentation Tool. Tip #4: Pick Out a Presentation Template. Tip #5: Keep Your Audience in Mind. Tip #6: Add Eye-Catching Headings and Text. Tip #7: Keep it Engaging With Animations.
Create a presentation. Open PowerPoint. In the left pane, select New. Select an option: To create a presentation from scratch, select Blank Presentation. To use a prepared design, select one of the templates. To see tips for using PowerPoint, select Take a Tour, and then select Create, . Add a slide.
6. "Blitzscaling: Book Trailer," Reid Hoffman. If you're going to go the minimalistic route, I'd take note of this PowerPoint presentation example from Reid Hoffman. This clean design adheres to a simple, consistent color scheme with clean graphics peppered throughout to make the slides more visually interesting.
Six steps for creating a slide show. 1. Plan your slide show. Before getting too deep into your slide show project, it's a good idea to select and save the photos and videos you want to use. This helps you create a slide show more efficiently and purposefully, ensuring a better outcome. 4.
Find the perfect PowerPoint presentation template Bring your next presentation to life with customizable PowerPoint design templates. Whether you're wowing with stats via charts and graphs or putting your latest and greatest ideas on display, you'll find a PowerPoint presentation template to make your ideas pop.
2 Be Minimal. Using a minimal design composition is one of the unique presentation ideas. The trick is to have just enough information and visual details for the viewer to feel comfortable seeing the slides. A minimal design can instill calm and awe in your audience when done right.
Tell your story with captivating presentations. Powerpoint empowers you to develop well-designed content across all your devices. Learn More. 2. Design for clarity and engagement. ... Technical glitches can disrupt even the best webinar presentation. Before you present the real deal, rehearse your webinar to get comfortable with the tools and ...
Select the Use Presenter View checkbox. Select which monitor to display Presenter View on. Select From Beginning or press F5. In Presenter View, you can: See your current slide, next slide, and speaker notes. Select the arrows next to the slide number to go between slides. Select the pause button or reset button to pause or reset the slide ...
When you present a monthly report, you may want to show also a table comparing YTD actuals with the financial year (FY) budget. To present more detailed data, you probably will show it in a table. But even a table does not need to look like an ordinary Excel sheet. See how you can customize such a table exported from Excel to PowerPoint file.
Get amazing PowerPoint infographics for your creative business presentation. PowerPoint infographic templates like this give you an array of functional icons. With 30 clean master slide-based layouts, easily edit this PPT as much as you'd like.
We've all seen cringe-worthy PowerPoint slides so cluttered with information that they're nearly impossible to read. You know the ones. The text is reduced to 9-point or 12-point font to ...
Select the text. Under Drawing Tools, choose Format. Do one of the following: To change the color of your text, choose Text Fill, and then choose a color. To change the outline color of your text, choose Text Outline, and then choose a color. To apply a shadow, reflection, glow, bevel, 3-D rotation, a transform, choose Text Effects, and then ...
Click on "Blank presentation" to create your presentation from scratch, or pick your preferred free PowerPoint template from the options at the top (there's also a host of editable templates you ...
Making an engaging PowerPoint presentation is a talent that may set you apart from your colleagues at work and classmates at school or university. You can be a working professional, student, or business owner; learning the art of presenting can open up new opportunities. Yes! Both the creation of a presentation and learning how to present it are a form of art. The more engaging you are, the ...
Duration: 1 minute 14 seconds. Discover how Copilot in PowerPoint effortlessly creates captivating presentations in just a few prompts and access the full power of Microsoft Designer to bring your ideas to life with professional graphics.