
How To Delete Microsoft PowerPoint (An Easy Step-By-Step Guide)
Are you looking for an easy and straightforward way to delete a Microsoft PowerPoint presentation? If so, youve come to the right place.
In this article, youll learn how to delete a PowerPoint presentation, no matter what version of Microsoft PowerPoint you have.
Well cover what Microsoft PowerPoint is, why you might want to delete a presentation, and then the step-by-step instructions for deleting a PowerPoint presentation.
With this guide, youll be able to delete your presentation quickly and easily.
Lets get started!
Table of Contents
Short Answer
To delete Microsoft PowerPoint, open the Start menu and type in Add or Remove Programs.
Select Add or Remove Programs from the list of options that appear.
Scroll through the list of programs and select Microsoft PowerPoint.
Click the Remove button and follow the instructions given.
When the process is complete, Microsoft PowerPoint will be deleted from your computer.
What is Microsoft PowerPoint?
Microsoft PowerPoint is a powerful presentation software used by millions of people around the world.
It is a versatile and easy to use program that allows users to easily create professional-looking presentations.
Microsoft PowerPoint can be used to create a variety of presentation types, from simple slideshows to complex multimedia presentations.
It offers users a variety of features, including the ability to create text, images, charts, animations, and videos.
PowerPoint is commonly used in business and educational settings to help people communicate ideas effectively and efficiently.
Additionally, PowerPoint allows users to share their presentations with others over the Internet or via email.
Why Delete a PowerPoint Presentation?
When it comes to presentations, Microsoft PowerPoint is a powerful and versatile software used by millions of people across the world.
It can be used to create stunning slideshows, powerful visual aids, and detailed diagrams.
However, sometimes, a presentation may need to be deleted for a variety of reasons.
Perhaps you created a presentation for a project that has since been cancelled.
Maybe youve used a presentation to practice for an upcoming event, and now no longer need it.
Or, maybe youve created a presentation that you dont feel confident enough to present, and have decided to delete it.
Whatever the reason, deleting a PowerPoint presentation is a simple and straightforward process.
In this blog post, well look at how to delete a PowerPoint presentation in a few easy steps.
Well explore why its important to delete presentations you no longer need and review some of the benefits of deleting presentations.
Finally, well look at some best practices for deleting PowerPoint presentations.
Opening the PowerPoint Presentation
Opening a PowerPoint presentation is an important first step in deleting it.
To begin, open the presentation that you wish to delete by double-clicking on the file’s icon in your computer’s file explorer or clicking on the file from the list of recently opened presentations in the PowerPoint menu.
Depending on the version of PowerPoint you have, you may also be able to open a presentation from the File menu, or by dragging and dropping the file into the PowerPoint window.
Once the presentation is open, you can begin the process of deleting it.
Accessing the File Menu
To delete a Microsoft PowerPoint presentation, the first step is to open the presentation you wish to delete.
Once the presentation has been opened, the next step is to access the File menu.
To access the File menu, you must click the File tab at the top of the window.
This will open the File menu, where you can then select the Info option.
The Info section of the File menu gives you the option to delete the presentation.
To delete the presentation, click the Delete Presentation button.
This will open a confirmation window, which will ask you to confirm that you want to delete the presentation.
Clicking Yes will delete the presentation.
It is important to note that this process is irreversible, so be sure that you are sure you want to delete the presentation before moving forward.
Selecting Info
Deleting a PowerPoint presentation is easy, and can be done quickly and efficiently.
To delete a PowerPoint presentation, start by opening the presentation you wish to delete.
Then, click the File tab at the top of the window.
From the File menu, select Info.
When you select the Info option, you will be taken to a page that contains several options related to the PowerPoint presentation you have open.
Here, you will find options to share your presentation with others, print your presentation, and check for issues or compatibility with other versions of PowerPoint.
At the bottom of the Info page, you will see the Delete Presentation button.
Clicking the Delete Presentation button will open a confirmation box, asking if you are sure you want to delete the presentation.
If you are sure, click Yes to confirm the deletion.
Once you have confirmed the deletion, the PowerPoint presentation will be permanently deleted.
It is important to note that, once you have deleted a PowerPoint presentation, it cannot be recovered.
Therefore, it is wise to make sure you have a backup of the presentation before deleting it.
Additionally, if you delete a presentation that has been shared with others, it will be removed from their shared folder as well.
Clicking the Delete Presentation Button
When you have opened the presentation that you wish to delete, the next step is to click the File tab at the top of the window.
This will open the File menu, where you will find the Info option.
Upon selecting Info, the Delete Presentation button will appear.
This button is typically located in the upper-right corner of the window.
Clicking the Delete Presentation button will bring up a confirmation window, which will prompt you to confirm the deletion of the PowerPoint presentation.
Clicking the Yes button will delete the presentation, while clicking No will cancel the deletion process.
It is important to note that deleting a PowerPoint presentation is permanent.
Once the presentation is deleted, it cannot be recovered, so it is best to make sure that you really do wish to delete the presentation before you click the Delete Presentation button.
If you are ever in doubt, you can always save a copy of the presentation before deleting it.
Confirming the Deletion
Confirming the deletion of a PowerPoint presentation is an essential step to ensure that all of the information contained within the presentation is not only removed from your device, but also removed from the Microsoft Office cloud storage.
To confirm your deletion, you must click the Yes button that appears after you have selected the Delete Presentation button from the File menu.
Once the Yes button is clicked, the PowerPoint presentation will be deleted from the device and removed from the Microsoft Office cloud storage.
This will ensure that the presentation can no longer be accessed from any other device or shared with other users.
Additionally, once deleted, the presentation cannot be recovered, so it is important to make sure that you do not delete a presentation that you wish to keep.
It is also important to note that when deleting a presentation, any changes that you made to the presentation will not be saved.
This means that if you made any edits or added any new content to the presentation, those changes will be lost when the presentation is deleted.
Therefore, it is important to save any content that you wish to keep before deleting the presentation.
By following these steps, you can easily and efficiently delete a PowerPoint presentation.
This will ensure that the presentation is no longer accessible to any other users and that any changes that you made to the presentation are not lost.
Final Thoughts
Now that you know how to delete a Microsoft PowerPoint presentation, you’re one step closer to managing your presentation files with ease.
Why wait any longer? Follow this easy step-by-step guide and delete your PowerPoint presentation today!
James Wilson
James Wilson has extensive knowledge in the information technology industry.His second love, besides dealing with computers, is smart home technology. He is continually updating information to better comprehend this problem and has a deep understanding of the apartment’s support system.
Recent Posts
Is Airtable a Public Company? Unveiling the Truth
No, Airtable is not a public company. As of now, Airtable is a private company that has raised funds from various investors but has not gone through an initial public offering (IPO) to be listed on...
How to Make Money with Airtable: Top Strategies and Success Stories
To make money with Airtable, you can offer consulting services to businesses looking to optimize their workflows through the platform. You can also create and sell templates or automation scripts...
- PRO Courses Guides New Tech Help Pro Expert Videos About wikiHow Pro Upgrade Sign In
- EDIT Edit this Article
- EXPLORE Tech Help Pro About Us Random Article Quizzes Request a New Article Community Dashboard This Or That Game Popular Categories Arts and Entertainment Artwork Books Movies Computers and Electronics Computers Phone Skills Technology Hacks Health Men's Health Mental Health Women's Health Relationships Dating Love Relationship Issues Hobbies and Crafts Crafts Drawing Games Education & Communication Communication Skills Personal Development Studying Personal Care and Style Fashion Hair Care Personal Hygiene Youth Personal Care School Stuff Dating All Categories Arts and Entertainment Finance and Business Home and Garden Relationship Quizzes Cars & Other Vehicles Food and Entertaining Personal Care and Style Sports and Fitness Computers and Electronics Health Pets and Animals Travel Education & Communication Hobbies and Crafts Philosophy and Religion Work World Family Life Holidays and Traditions Relationships Youth
- Browse Articles
- Learn Something New
- Quizzes Hot
- This Or That Game
- Train Your Brain
- Explore More
- Support wikiHow
- About wikiHow
- Log in / Sign up
- Computers and Electronics
- Presentation Software
- PowerPoint Presentations
2 Simple Ways to Move or Delete a Slide in PowerPoint
Last Updated: April 13, 2024 Fact Checked
Using Desktop
Using mobile.
This article was co-authored by wikiHow staff writer, Rain Kengly . Rain Kengly is a wikiHow Technology Writer. As a storytelling enthusiast with a penchant for technology, they hope to create long-lasting connections with readers from all around the globe. Rain graduated from San Francisco State University with a BA in Cinema. This article has been fact-checked, ensuring the accuracy of any cited facts and confirming the authority of its sources. This article has been viewed 153,347 times. Learn more...
If you don't want a slide in your Microsoft PowerPoint presentation, you can easily take it out with your mouse or a keyboard shortcut. Here's how to delete a slide in PowerPoint using Windows, Mac, iPhone, iPad, or Android.
Removing One or Multiple PowerPoint Slides
- Open a PowerPoint presentation.
- Click a slide you want to delete, or hold Ctrl to select multiple slides.
- Right-click the slides.
- Click Delete Slide .

- PowerPoint is available to download on Windows and Mac. You can also use PowerPoint at https://www.office.com/ .

- To select multiple slides next to each other, click the first slide. Hold Shift , and then click the last side of the sequence. [1] X Trustworthy Source Microsoft Support Technical support and product information from Microsoft. Go to source
- To select multiple slides spread out, hold Ctrl and click each slide.

- The selected slide(s) will be deleted.
- You can also press Del or Backspace on your keyboard to delete slides.
- To undo this action, press Ctrl + Z (Windows) or Cmd + Z (Mac).

- You must have a Office 365 subscription to use PowerPoint. Make sure you're logged into your Microsoft account.
- If you don't already have a project open, tap one now.

- A pop-up menu will open.

- If you don't see Delete , tap the right arrow to scroll through more options.
Community Q&A
wikiHow Video: How to Delete a Slide in PowerPoint
You might also like.

- ↑ https://support.microsoft.com/en-us/office/add-and-delete-slides-in-powerpoint-8bf2b58d-df6c-4e5f-90e3-ade289a2d64d
About This Article

1. Open the presentation in PowerPoint. 2. Right-click the slide in the left column. 3. Click Delete Slide . Did this summary help you? Yes No
- Send fan mail to authors
Is this article up to date?

Featured Articles

Trending Articles

Watch Articles

- Terms of Use
- Privacy Policy
- Do Not Sell or Share My Info
- Not Selling Info
wikiHow Tech Help Pro:
Level up your tech skills and stay ahead of the curve
- Slidesgo School
- PowerPoint Tutorials
How to Add, Duplicate, Move, Delete or Hide Slides in PowerPoint

When working on a presentation in Microsoft PowerPoint, you will most likely perform actions such as creating new slides, changing their order, arranging them by theme, deleting unnecessary slides or even temporarily hiding slides. In this tutorial, you’ll learn how to do all of this to turn any of our templates into your own presentation.
How to add a new slide in PowerPoint
How to duplicate a slide in powerpoint, how to delete a slide in powerpoint, how to move slides in powerpoint, how to hide slides in powerpoint.
First, let’s see how to create a new slide . There are several ways to do this:
- Select any slide and press Ctrl + M in Windows, or Cmd + M in Mac. A new slide will be created with the same design as the selected slide.

- Go to the Slides section of the Home tab and click on New Slide (if you click on the little arrow, you’ll also be able to choose the design for this new slide).
Creating a new slide might not be always the best option for you. You might want to keep a certain clipped image or part of a text from a previous slide in a new one. In this case, it’s best if you duplicate a slide.
To duplicate a slide , select it, right-click on it and choose Duplicate Slide.

You might also need to delete a slide from your presentation because you do no longer want it. To delete a slide , select it, right-click on it and choose Delete Slide. You can also select it and just press the Delete or Backspace key. Remember that you can select multiple slides by holding the Ctrl key (Cmd in Mac) while clicking on them. This might be useful if you want to remove several slides at the same time.

You can also rearrange the slides , that is, moving them from one position to another. To do that, select the ones you want to move and drag them to the desired position. As I mentioned before, to select multiple slides, hold the Ctrl key (Cmd in Mac) while clicking on them.

To do this, select the slide or slides that you want to hide, right-click on them and choose Hide Slide . They will no longer be visible in your presentation. Any hidden slide will have its number crossed out, so you can identify them easily.

We’ve reached the end of the tutorial. If you want to keep learning about PowerPoint, stay tuned for more Slidesgo School content. We also have tutorials on how to work with presentations in Google Slides, so check them out too. Learn with us and use our templates to create awesome presentations!
Do you find this article useful?
Related tutorials.

New feature available: edit our templates with Canva
Whenever you need to create, Slidesgo is there. We’re continually enhancing your presentation design process with templates that are primed to impress for any occasion. And in order to let your ideas flow best, comfort is key. How could Slidesgo help you with this? By making you feel right at home with our resources, no matter your preferred platform.You spoke, and we listened. Now, your favorite slides can be accessed on a new platform: Canva! This new format adds to our existing options (PowerPoint and Google Slides), expanding your ways to utilize our first-rate presentation content. We’ve started with a selection of Canva-ready...

How to print PowerPoint notes
Crafting an impactful PowerPoint slideshow and delivering a captivating presentation are distinct skills. The first focuses on designing appealing visuals to convey a clear message, while the second involves employing effective presentation techniques to ensure the audience grasps the idea. The content of this article will help you with the latter part of this process, guiding future presenters on how to print PowerPoint with speaker notes to enhance your presentations success and effectiveness.

Discover Our Online Presentation Software for Free
We have great news for you today! If you’ve been a Slidesgo fan for years (or months, or weeks, or days, or mere hours, we welcome everyone!), you’ll probably know for now that our templates are available mostly in two formats: for use in Google Slides and PowerPoint.Google Slides is a free tool, since you only need a Google account in order to use it. PowerPoint, on the other hand, is part of the Microsoft Office suite, so it’s not a free program, but that didn’t stop it from being one of the most popular options in the world!What if we...

Webinar: Presentation Audit
With more than 15,000 templates released on Slidesgo and a user base composed of millions of people, we estimate that the total number of presentations created adds up to… um, a lot! Our team of professional designers work very hard to provide you with editable slides so that the only thing you need to do is, well, customize the elements to your liking. Starting from any given template, the results may vary a lot depending on the person who edited the contents.Have you ever wondered “Is my presentation good enough?” and wished that an expert on presentations looked at your template...
- The Lowdown on Meta AI
- What's the Difference? PS5 Slim vs. PS5
Add, Delete or Change the Order of PowerPoint Slides
- Brock University
PowerPoint presentations are not always set in stone. When information changes or you want to improve your slideshow , update your presentation. Quickly modify an existing PowerPoint presentation by adding, removing, or reordering slides in the slideshow.
Instructions in this article apply to PowerPoint 2019, PowerPoint 2016, PowerPoint 2013, PowerPoint 2010, PowerPoint 2019 for Mac, PowerPoint for Mac 2011, PowerPoint for Microsoft 365, and PowerPoint Online .
Add a New Slide in PowerPoint
When you want to add more information to your PowerPoint presentation, add a new slide . Select an appropriate slide layout for the new slide and enter your information.
To add a new slide to a presentation:
Go to the slide you want a new slide to follow.
Select Home .
Select the New Slide down arrow to display a list of slide layouts.
Choose the layout you want for the new slide.
Delete a Slide
Sometimes information in a presentation isn't needed any longer. When you don't need a slide, delete it.
To delete a slide in a presentation:
Right-click on a slide in the Slide pane and choose Delete Slide .
To delete multiple slides, hold the Ctrl key ( Cmd key in Mac), select each slide you want to delete, release the Ctrl or Cmd key, right-click and select Delete Slides .
Move Slides in the Slides Pane
If you need to quickly rearrange a couple of slides in your presentation, use the Slides pane.
To move a slide in the Slides pane:
Select the slide you want to move.
Drag the slide to the new location.
A horizontal line appears as you drag the slide. When the horizontal line is in the correct location, release the slide. The slide is now in the new location.
Move Slides in Slide Sorter View
Sometimes a presentation needs a major make-over. Use Slide Sorter view to reorganize the slides in a presentation.
To use Slide Sorter view to move slides:
Select View .
Select Slide Sorter .
Select the slide you wish to move.
A vertical line appears as you drag the slide. When the vertical line is in the correct location, release the slide. The slide is now in the new location.
You can also delete slides in Slide Sorter view.
Get the Latest Tech News Delivered Every Day
- Slide Layouts in PowerPoint
- The 10 Most Common PowerPoint Terms
- How to Use Copilot in Powerpoint
- How to Use the Slide Sorter View in PowerPoint
- Different Ways to View Slides in PowerPoint
- How to Use PowerPoint Slide Master Layouts
- How to Select More Than One Slide in PowerPoint
- How to Make a PowerPoint Presentation
- How to Hide and Unhide a Slide in PowerPoint
- How to Print PowerPoint Slides
- Use PowerPoint Slide Finder
- Change the Default Font in PowerPoint Text Boxes
- Copy Slides to Another PowerPoint Presentation
- How to Use Speaker Notes in PowerPoint
- PowerPoint Master Slide
- Change Order of Animations for PowerPoint Slides
How to Delete Slides in PowerPoint? A Beginner’s Guide!
By: Author Shrot Katewa

When you start using Microsoft PowerPoint, most of your effort will be spent trying to learn the various features and in creating slides for your presentation. But, what happens when you don’t like a slide design and you want to delete it? How do you delete slides in PowerPoint?
To delete a slide in PowerPoint, simply select the slide from slide preview on the left part of your screen. Then, from the options, click “Delete Slide”. You can also press the “Delete” key on your keyboard after selecting the slide from the slide navigation pane.
In this article, I will share with you not just how to delete your slides, but also how to recover slides that you may have accidentally deleted! Plus, you’ll also get to understand everything in a step-by-step manner so that you can implement this in your presentation.
So, let’s get started!
[ Please note – in this article, I will be using one of the presentation templates from Envato Elements . With Envato Elements, you get access to thousands of presentation designs with unlimited downloads so you never run out of options again. Plus, you get free previews so you know exactly what you’re getting before buying! Check out their pricing here ]
1. How to Delete a Slide in PowerPoint?
Let’s understand how to delete a in your PowerPoint presentation. This can be achieved in the following 2 easy steps mentioned below –
Step-1: “Right-click” and Select the Slide
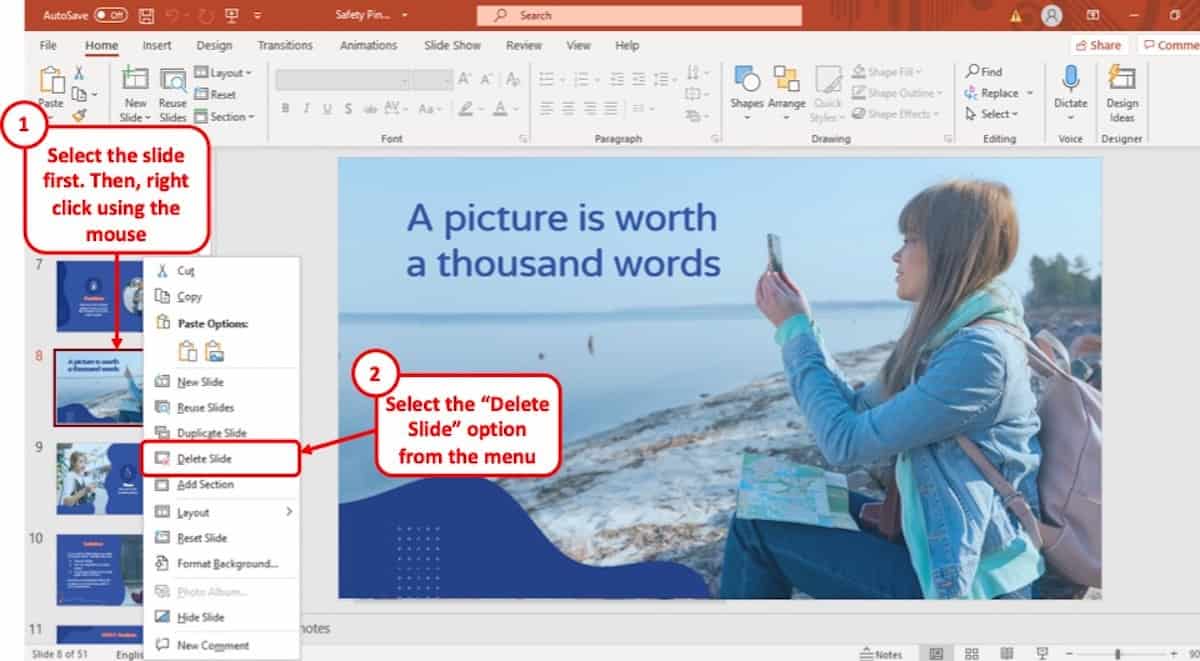
The first step to deleting a slide on your PowerPoint presentation is to move your cursor on the slide which you want to remove and “ Right-click ” on it using the mouse of your computer.
Step-2: Click the “Delete Slide” Option
After “ Right clicking ” on the slide, click on the “ Delete Slide ” option from the drop-down menu. It is located in the middle of the menu with an icon of a square with a red ‘x’ mark on it.
1a. How to Delete Slides in PowerPoint on Mac?
Deleting a slide from a PowerPoint presentation is the same on Mac as it is on Windows. Simply follow the two steps described above from your Mac device and you will be able to delete any slide in your PowerPoint presentation.
1b. How to Delete a Slide in PowerPoint without Right-click?
Sometimes, when you have too many slides to delete from time to time, you don’t want to end up using the right-click option as this does take a bit of time. So, to delete a slide in PowerPoint without “ Right-clicking ” the mouse on your computer, you have to use the keyboard instead.
Below is a step-by-step guide of the whole process.
Step-1: Select the slide you want to delete
At first, you have to select the slide you want to delete from the “ Slide Navigation ” bar at the left of your screen. (just the way it is shown in the previous section above)
Step-2: Press the “Delete” button on your keyboard.
Keeping the slide selected in the “ Slide Navigation ” bar, hit the “ Delete ” button on the keyboard of your computer. It is located at the upper right corner of the keyboard right above the “ Backspace ” key.
Alternatively, you can press the “ Backspace ” key on your keyboard which will also delete the slide from your presentation. Furthermore, for Mac users, simply press the “Delete” key since there is no backspace key on Mac.
2. How to Delete Multiple Slides in PowerPoint?
To delete multiple slides in your PowerPoint presentation, you have to use the ‘ Ctrl ” key on your keyboard to select multiple slides at the same time.
Here’s the detailed process to delete multiple slides in PowerPoint –
Step-1: Hold the “Ctrl” key and select all the slides you want to delete.
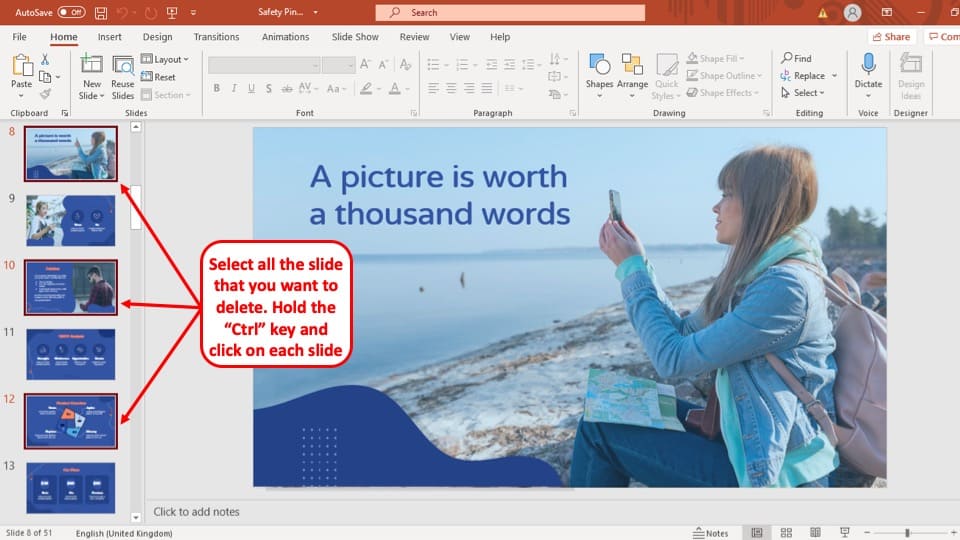
To delete multiple slides on your PowerPoint presentation, first, hold the “ Ctrl ” key on your keyboard and simply “ Left-click ” on the slides you want to delete to select them together.
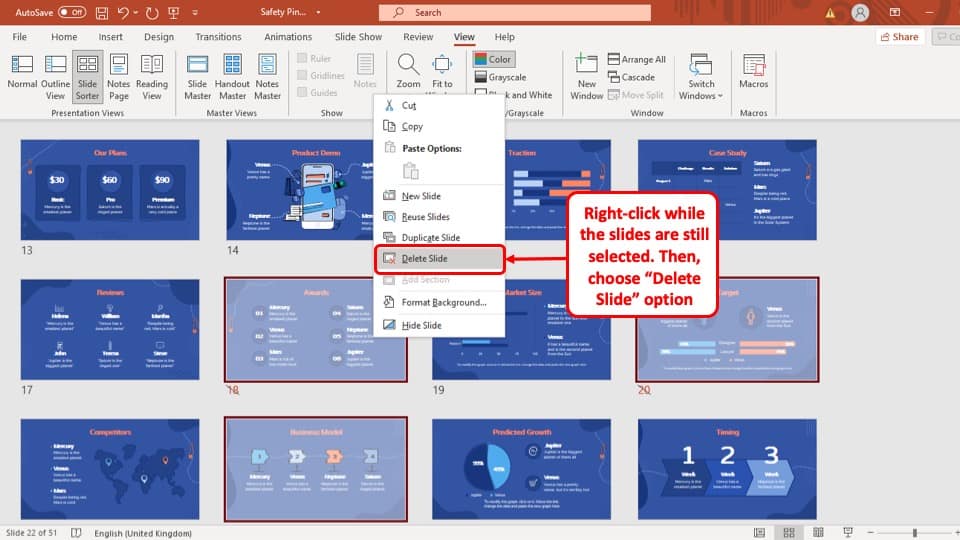
Step-2: “Right-click” on one of the slides and press the “Delete Slides” option.
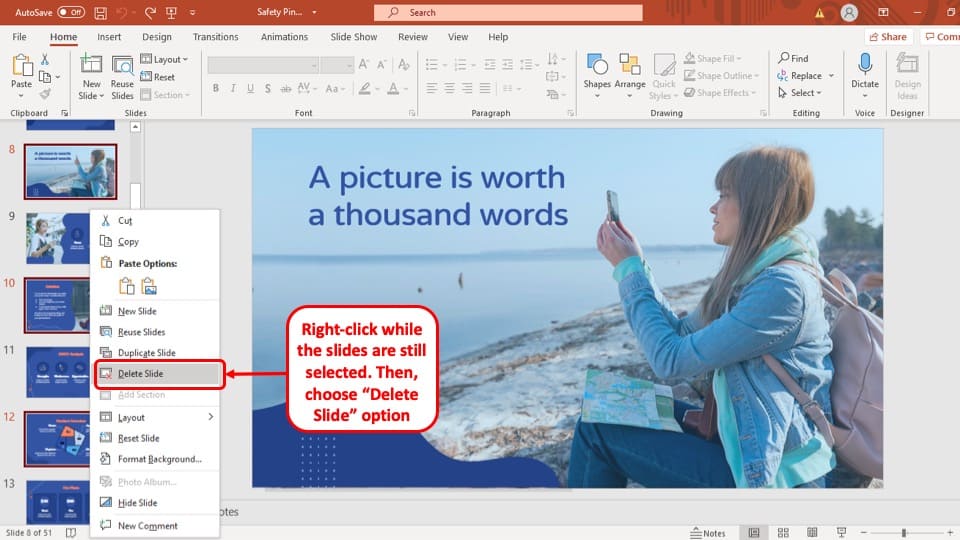
Once you have selected the slides that you want to remove from your PowerPoint presentation, “ Right-click ” on it using the mouse of your computer to open the drop-down menu and click on the “ Delete Slides ” option. However, make sure that the slides remain selected when you right-click (you will see a red border around the selected slides in the slide navigation pane)
Alternatively, you can also press the “Delete” button on your keyboard while. All the selected slides will be deleted instantly.
3. How to Delete Hidden Slides in PowerPoint?
The easiest way delete hidden slides in your PowerPoint presentation is to use the “ Slide Sorter ”. A step-by-step description of the process is given below.
Step-1: Go to the “View” tab on the ribbon.
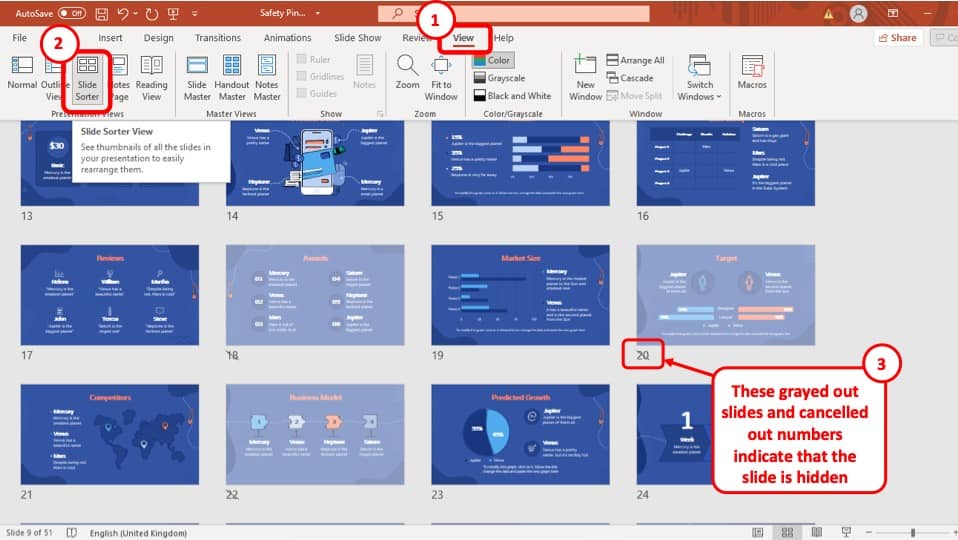
To access the “ Slide Sorter ” you have to first go to the “ View ” tab on the ribbon of your PowerPoint window. It is the second to last tab on the ribbon.
Step-2: Click on the “Slide Sorter” button
The next step to deleting hidden slides is to click on the “ Slide Sorter ” button which is the third button from the left at the “ Presentation View ” section.
Step-3: Select the hidden slides using the control key
After opening the “ Slide Sorter ” view, select the slide or multiple hidden slides that you want to delete and
Step-4: Right-click and Press the “Delete Slide” option
After you have selected all the hidden slides, simply “ Right-click ” on one of them using the mouse. Then, from the drop-down menu, simply press the “ Delete Slides ” option and all the hidden slides will be deleted from your PowerPoint presentation.
4. How to Delete Unused Master Slides in PowerPoint?
Deleting an unused master slide is quite helpful to reduce the size of you PowerPoint file if it becomes too large. Below is a step-by-step guide on how to delete unused master slides in your PowerPoint presentation:
Step-1: Go to the “View” tab in the ribbon
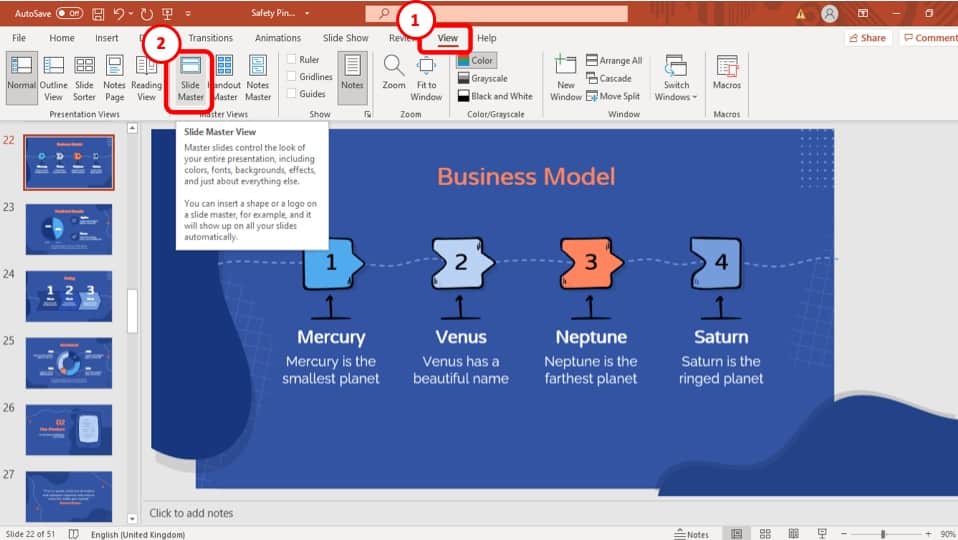
To access the “ Slide Master Navigation ” bar, at first you have to click on the “ Slide Master ” option located at the “ Master Views ” section in the “ View ” tab of the ribbon.
Step-2: Hover over the slides to see which ones are unused
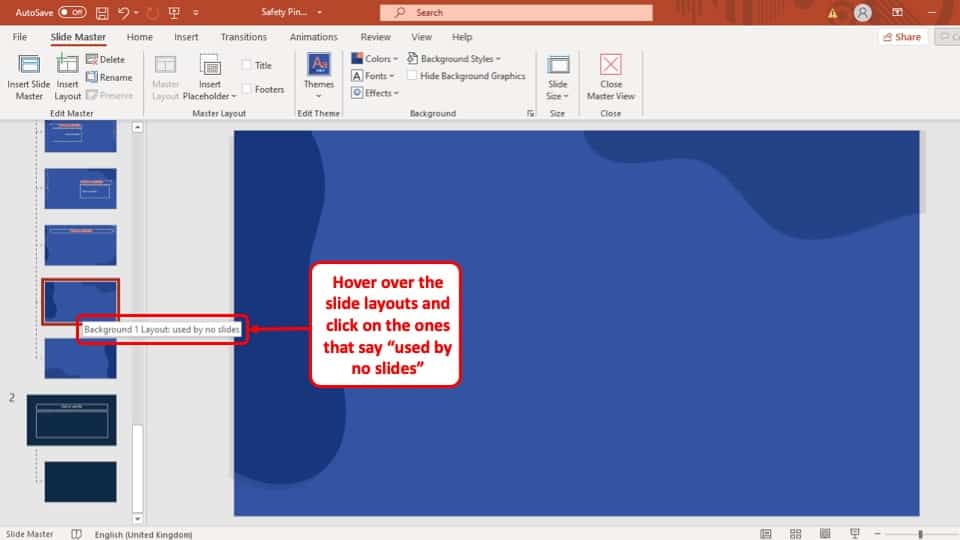
To see which master slides are unused, hover your cursor over the slides to see which ones have not been used.
Step-3: Select the slide and delete it
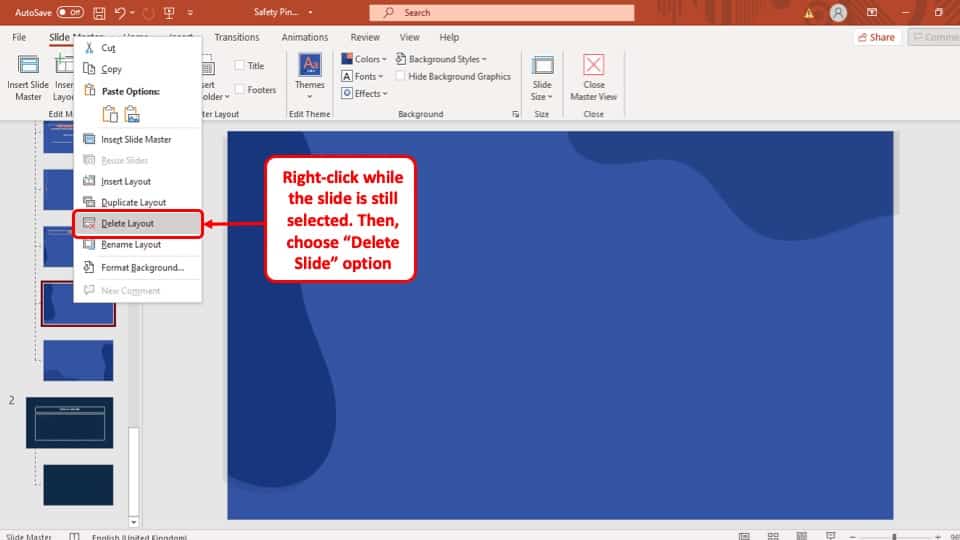
Once you have found the master slides that you want to delete, simply “ Right-click ” on one of them and press the “ Delete ” button.
5. How to Recover Deleted Slides in PowerPoint?
To recover deleted slides in PowerPoint, you have to use the “ Undo ” button. Once you have mistakenly deleted a slide in your presentation., click on the icon that looks like a curved arrow directing to the left, which is the “ Undo ” button.
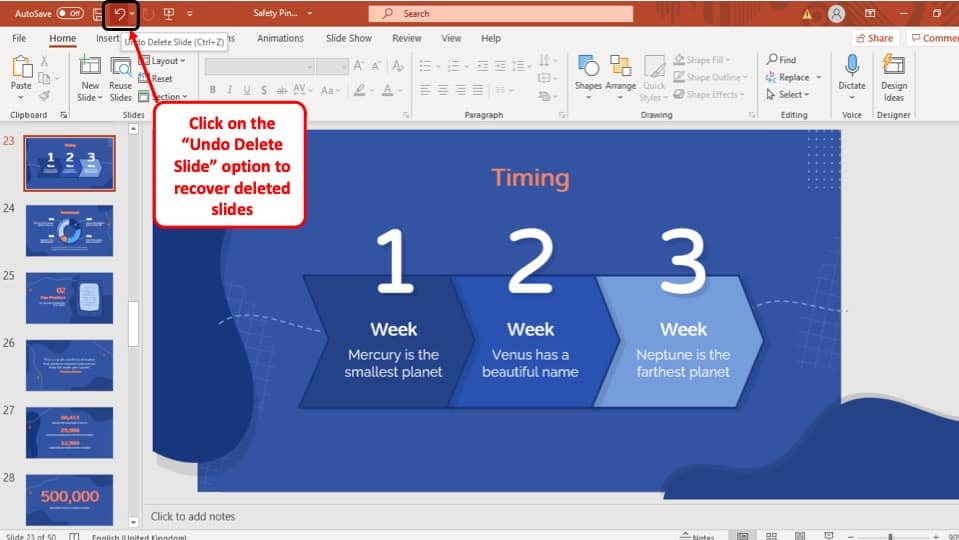
It is located at the top left corner of your PowerPoint software window. By clicking on it, your deleted PowerPoint slide will be recovered. Alternatively, you can press “ Ctrl + Z ” on your keyboard.
Another way of recovering deleted slides is to close the Microsoft PowerPoint application without saving the changes. You can do that by clicking on the ‘ x ’ icon at the top right corner of your screen and selecting the ‘Don’t Save’ option.
Now when you open your PowerPoint file again, you will find that the deleted slide is back to its place!
6. How to Delete a Slide Layout in PowerPoint?
Deleting a slide layout in PowerPoint is just the same as deleting unused master slides. So, you can follow the exact steps mentioned in the section 4 of this article.
However, one thing that you do need to remember is that a slide layout that is being used in one of your PowerPoint presentation slides cannot be deleted.
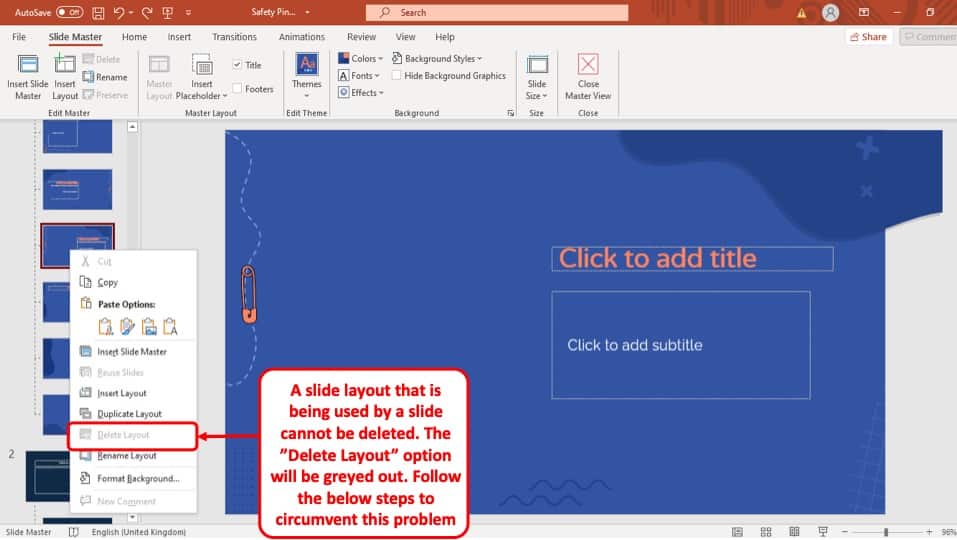
If you try to delete a layout that is being used the “ Delete Layout ” option will be greyed out indicating that it cannot be deleted (as shown in the image above).
To get around this issue, follow the 5 easy steps given below.
Step-1: Identify the slide using the layout
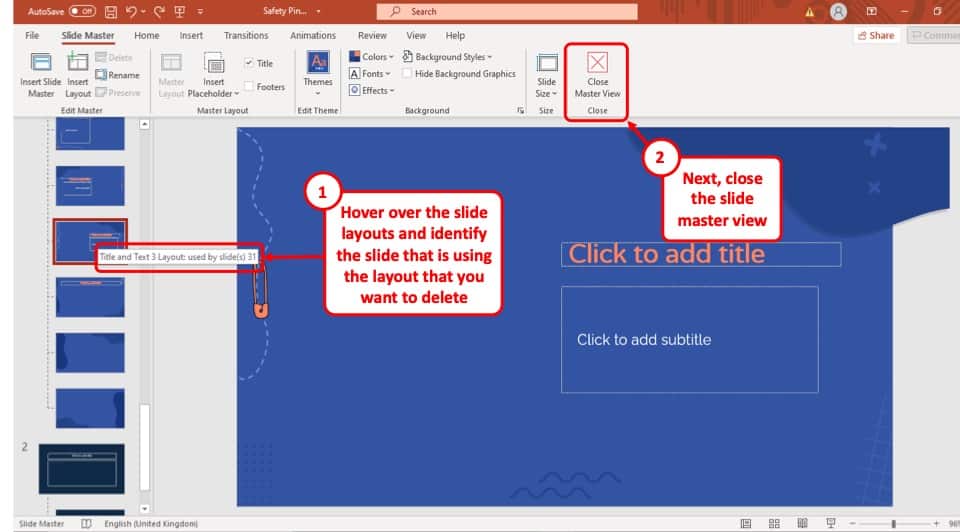
At first go to the “ Slide Master ” and hover your cursor over the layout that you want to delete. This will show you which of the slides in your PowerPoint presentation are using that layout.
Step-2: Exit Slide Master and go to the specific slide
After finding out which slide is using the layout you want to delete, you have to go back to the “ Slide Navigation ” bar and “ Right-click ” on the slide to open the drop-down menu.
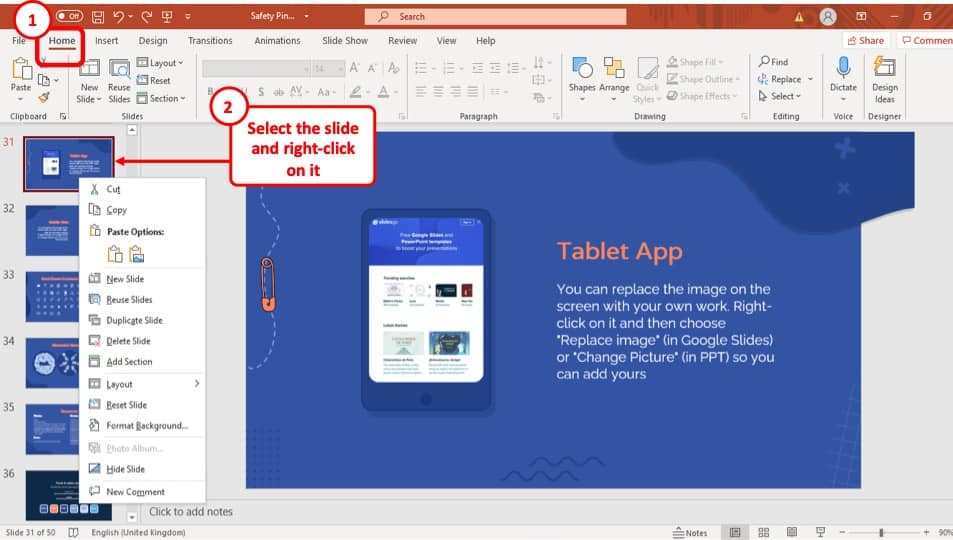
Step-3: Change the layout of the slide
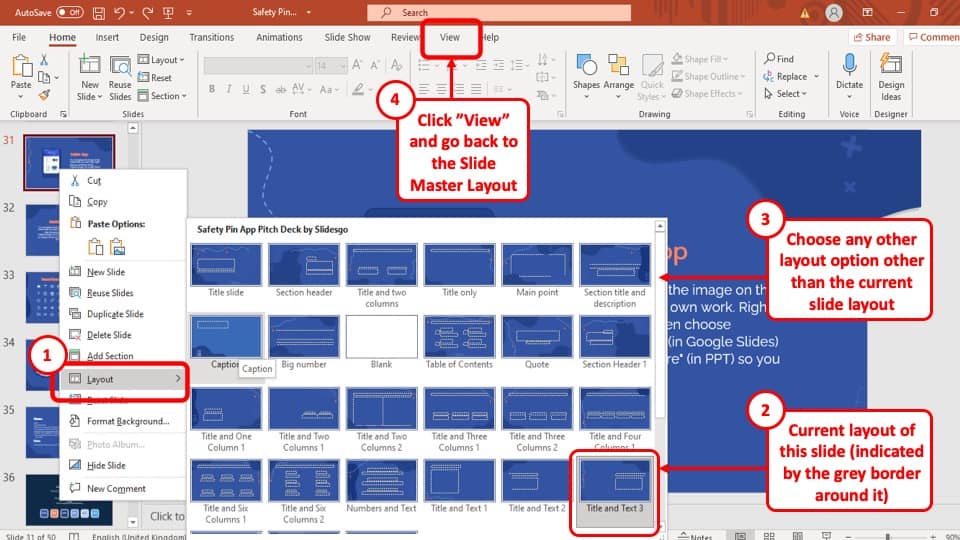
Once you have opened the drop-down menu, go to the “ Layout ” option, and change the layout of the slide to a different style. This will allow you to delete the layout that this slide was previously using.
Step-4: Go back to “Slide Master”
Once you have changed the layout of the slide that was using the layout you want to delete, go back to the “ Slide Master ” option, and “ Right-click ” on the layout. Now you will see that the “ Delete Layout ” button is no longer greyed out.
Step-5: Delete the layout
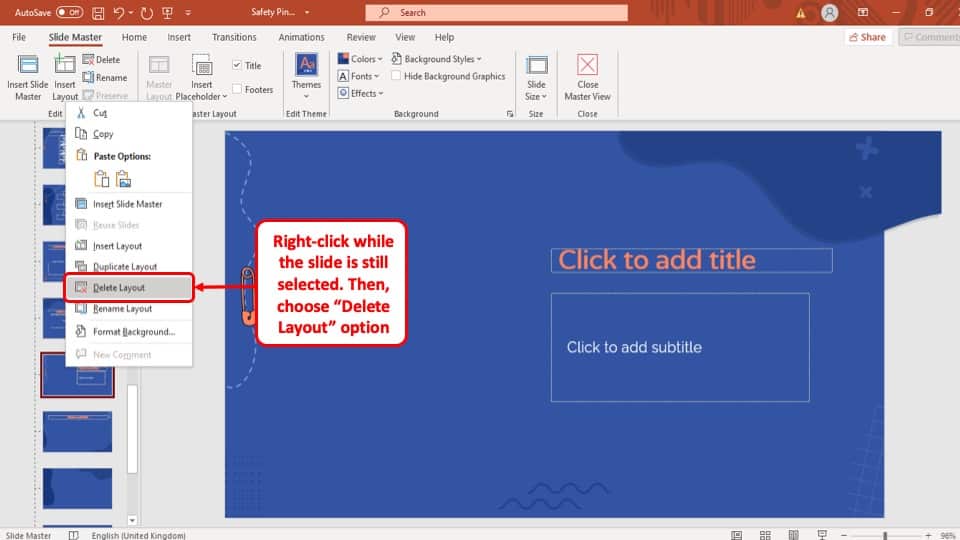
Finally, select the “ Delete Layout ” option and the layout will be removed from your PowerPoint Presentation.
7. Why Can’t I Delete Slides in PowerPoint?
On some occasions, you may not be able to delete slides. This is an extremely rare occurrence, but it can happen!
The main reason why you may not be able to delete a slide in PowerPoint is that your PowerPoint may have faulty macros in it. Perhaps you may have added a macro command that has bugs. This may create such an issue or prevent you from deleting slides even when the slide is blank with no data in it.
If you have indeed added a macro in your PowerPoint Presentation, it will be saved with a “.pptm” extension instead of a “.pptx” extension.
To solve this issue, all you have to do is save the presentation back as a ‘.pptx’ file, which will essentially kill all the macro commands. Once it is saved as a ‘ .pptx’ , opening it will allow you to delete any slide you want!
Another culprit could perhaps be an add-on that you may have recently added to your PowerPoint application. If so, try disabling or deleting the add-on, restart PowerPoint and try once again to see if you are able to delete the slide.
More PowerPoint Related Topics
- How to Crop a Picture in PowerPoint? [Complete Step-by-Step Tutorial!]
- How to Give a Presentation on Zoom? A Helpful Resource!
- How to Convert a PowerPoint to PDF? [A Simple Guide!]
- PowerPoint vs Google Slides: Which is Better? [ULTIMATE Test!]
- How to Change Bullet Style in PowerPoint? A Complete Guide
Credit to Lookstudio for the featured image (designed by Freepik) of this article
- INSIDER REVIEWS
- TECH BUYING GUIDES
How to delete a slide in your PowerPoint presentation or delete an entire section of slides at once
Melanie weir .

- You can delete a slide in PowerPoint simply by right-clicking on it.
- Every version of PowerPoint lets you individual slides or multiple slides at once.
It's pretty common to have to delete a slide in PowerPoint . Maybe your presentation is going on a bit too long and you need to cut content. Or maybe you were keeping a slide for notes that you don't want to appear in your presentation.
Regardless of the reason, there's good news: PowerPoint makes it very easy to delete slides, no matter what version of it you have.
In fact, the solution is so intuitive, you may have missed it altogether while looking for a delete button or a trash bin somewhere in the application.
If you need to delete a PowerPoint slide, here's how you do it, using any version of PowerPoint on your Mac or PC.
Check out the products mentioned in this article:
Apple macbook pro (from $1,299.00 at apple), acer chromebook 15 (from $179.99 at walmart), how to delete a slide in powerpoint.
1. Open your PowerPoint presentation and right-click (or hold Control as you click) any slide you want to delete in the left sidebar.
2. From the drop-down list that appears, select "Delete" or "Delete Slide."
Even better, PowerPoint will actually allow you to delete multiple slides at once — in case you need to delete a whole section or trim a few extras here and there.
To delete a section of slides that are right next to each other, just hold shift and select the first and last slides in the section. This will select those slides, as well as every slide between them. Once they're selected, just delete them the same way you did above.
To delete multiple slides that aren't next to each other, hold down the Ctrl or Command key and click on each slide you want to delete. Once selected, right-click any of them and select the "Delete" option.
Related coverage from Tech Reference :
How to add a border to slides in powerpoint, and give your slideshow a sleek design, how to embed a youtube video into your microsoft powerpoint presentations using a mac or pc, how to change your language settings in microsoft powerpoint in 3 different ways, how to change and format the background of your powerpoint slides to custom designs, how to copy or duplicate a powerpoint slide and put it anywhere in your slideshow, read more articles on.
- Tech Insider
- Tech Reference
- Software Apps Reference
- Tech How To
- Presentations
- Laptops Tablets Reference
- Microsoft Powerpoint
Advertisement
How to delete a slide in your PowerPoint presentation or delete an entire section of slides at once
- You can delete a slide in PowerPoint simply by right-clicking on it.
- Every version of PowerPoint lets you individual slides or multiple slides at once.
- Visit Business Insider's Tech Reference library for more stories .
It's pretty common to have to delete a slide in PowerPoint . Maybe your presentation is going on a bit too long and you need to cut content. Or maybe you were keeping a slide for notes that you don't want to appear in your presentation.
Regardless of the reason, there's good news: PowerPoint makes it very easy to delete slides, no matter what version of it you have.
In fact, the solution is so intuitive, you may have missed it altogether while looking for a delete button or a trash bin somewhere in the application.
If you need to delete a PowerPoint slide, here's how you do it, using any version of PowerPoint on your Mac or PC.
Check out the products mentioned in this article:
Apple macbook pro (from $1,299.00 at apple), acer chromebook 15 (from $179.99 at walmart), how to delete a slide in powerpoint.
1. Open your PowerPoint presentation and right-click (or hold Control as you click) any slide you want to delete in the left sidebar.
2. From the drop-down list that appears, select "Delete" or "Delete Slide."
Even better, PowerPoint will actually allow you to delete multiple slides at once — in case you need to delete a whole section or trim a few extras here and there.
To delete a section of slides that are right next to each other, just hold shift and select the first and last slides in the section. This will select those slides, as well as every slide between them. Once they're selected, just delete them the same way you did above.
To delete multiple slides that aren't next to each other, hold down the Ctrl or Command key and click on each slide you want to delete. Once selected, right-click any of them and select the "Delete" option.
Related coverage from Tech Reference :
How to add a border to slides in powerpoint, and give your slideshow a sleek design, how to embed a youtube video into your microsoft powerpoint presentations using a mac or pc, how to change your language settings in microsoft powerpoint in 3 different ways, how to change and format the background of your powerpoint slides to custom designs, how to copy or duplicate a powerpoint slide and put it anywhere in your slideshow.
Insider Inc. receives a commission when you buy through our links.
Watch: We compared the $1,200 MacBook Air with the $500 Surface Go, and the results were a mess
- Main content
Home » Microsoft Powerpoint » How to delete a slide in PowerPoint
How to delete a slide in PowerPoint
You may have to delete a slide or two when managing your presentation.
There are two ways you can delete a slide:
- Use the Delete Slide function
- Cut the slide to the clipboard
We will show you in simple, step-wise instructions how to use both methods.
Let us begin.
Method #1: Use the Delete Slide function
Step #1: open your presentation..
Open the PowerPoint presentation from where you would like to delete a slide.
Step #2: Change to Normal View
Click on the View tab on the top menu bar to change the ribbon.

Under Presentation Views, click on the Normal icon.
This opens thumbnails of all slides in the left-side pane.
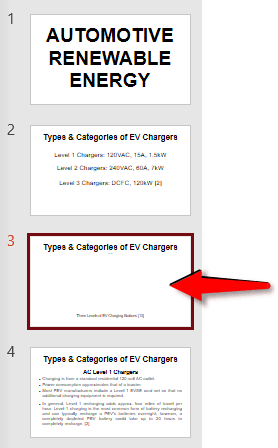
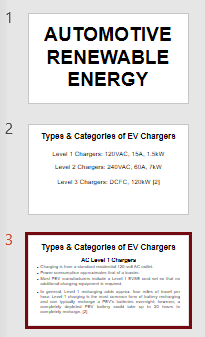
Step #3: Delete the slide
Click on and select the thumbnail slide you want to delete.

Right-click on the selected slide to open a menu,

Click on Delete Slide to delete the selected slide.
PowerPoint will remove the selected slide from the thumbnails.

Method #2: Cut the slide to the clipboard

Step #3: Cut the slide to the clipboard
Click on the Home tab in the top menu bar to change the ribbon.

Under section Clipboard, click on the Cut icon.
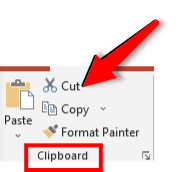
PowerPoint removes the selected slide from the thumbnails to the clipboard.
You can paste the cut slide from the clipboard to anywhere else in your presentation.
We have shown you two methods of removing a slide from a PowerPoint presentation. Use the method most suitable to you.
Leave a Comment Cancel reply
Save my name, email, and website in this browser for the next time I comment.
How-To Geek
How to delete all presentation notes at once in microsoft powerpoint.
You don’t have to waste time deleting individual speaker notes in PowerPoint.
Quick Links
How to remove powerpoint presenter notes.
With Microsoft PowerPoint speaker notes , you have your talking points handy during your presentation. But if you decide to remove those notes, it can be a tedious task. We'll show you how to remove the presentation notes all at once.
As a reminder, you can delete individual speaker notes easily. Open the presentation notes using the Notes button in the PowerPoint status bar or by clicking "Notes" in the ribbon on the View tab.
Go to the slide with the notes that you want to delete, click in the Notes area, and remove the text. You can do this quickly by selecting all of the text and hitting your Delete key.
While this is fine for deleting notes on a handful of slides, it can be time-consuming if you have dozens of slides. Here's how to remove them all in one fell swoop.
Click File > Info. Under Inspect Presentation, you'll see that your slideshow contains presentation notes.
Click the "Check for Issues" drop-down box in that section, and then select "Inspect Document."
You'll see many items that you can inspect your document for, so remember this convenient tool for those types of things later.
For this task, you'll only check the box for "Presentation Notes" at the bottom, and uncheck the rest. When you're ready, click "Inspect."
After a moment, you'll see the results letting you know that the presentation notes were found during the inspection. Click "Remove All."
And just like that, your presentation notes will be gone! You can hit "Close" if you're finished with the Inspect Document tool.
Click the arrow on the top left to return to your slideshow, and you should no longer have speaker notes on your slides.
If you want a copy of those notes before you remove them, you can always save a copy of your presentation beforehand. Or, you can print just the speaker notes for a Microsoft PowerPoint slideshow .

How to Quickly Remove All Animations from PowerPoint Presentations

Remove Animations on One Slide or Turn Off Animations for an Entire PowerPoint Presentation
by Avantix Learning Team | Updated September 12, 2023
Applies to: Microsoft ® PowerPoint ® 2010, 2013, 2016, 2019, 2021 and 365 (Windows)
You can quickly remove or delete PowerPoint animations on an individual slide or turn off all animations for an entire presentation. This can be particularly helpful for specific audiences. In this article, we'll use two methods to remove animations. The first method permanently removes animations on a slide and the second simply disables animations during a presentation. Animations can be enabled again later.
Recommended article: How to Add Animation in PowerPoint (Animate Images, Text and Other Objects)
Do you want to learn more about PowerPoint? Check out our virtual classroom or in-person PowerPoint courses >
Remove animations on one or more slides
Since you can't restore animation if you use the following method, you may want to work on a copy of the presentation (or slide) and retain the original with animations.
To remove animations on a single slide:
- In Normal View, display the slide with the animations you want to remove. You can also display a layout or master in Slide Master View.
- Click an object on the slide. If you are selecting a placeholder, click its edge.
- Press Ctrl + A to select all objects on the slide.
- Click the Animations tab in the Ribbon.
- If necessary, click the More down arrow in the Animations gallery in the Animation group.
- Click None. Repeat for other slides.

Note: If the animation has been created in Slide Master View, you'll need to remove it from the Slide Master or layout (submaster) in Slide Master View.
Turn off animations for an entire presentation
If you want to disable all animations in a presentation for a specific audience or because a presentation is "overanimated", you can use the following technique.
To turn off all animations in a PowerPoint presentation:
- In Normal View, click the Slide Show tab in the Ribbon.
- Click Set up Show.
- Check the Show without animation check box.
- Click OK. When you run a slide show, no animations should appear.

Be sure to run a slide show to check the results. If some objects are on top of others, you may need to make further changes in the presentation.
Turn on animations for an entire presentation
If you used the above method to disable animations, you can enable animations again at any time.
To enable animations in a PowerPoint presentation:
- Uncheck the Show without animation check box.
- Click OK. When you run the slide show, the animations should appear.
Subscribe to get more articles like this one
Did you find this article helpful? If you would like to receive new articles, JOIN our email list.
More resources
How to Blur an Image in PowerPoint
How to Convert PowerPoint to Google Slides (5 Ways)
How to Change Picture Brightness or Contrast in PowerPoint
How to Use Morph in PowerPoint to Design Engaging Presentations
10 Ways to Compress PowerPoint Presentations to Reduce File Size
Related courses
Microsoft PowerPoint: Intermediate / Advanced
Microsoft PowerPoint: Design Techniques for Non-Designer s
Microsoft PowerPoint: Animations Bootcamp
VIEW MORE COURSES >
Our instructor-led courses are delivered in virtual classroom format or at our downtown Toronto location at 18 King Street East, Suite 1400, Toronto, Ontario, Canada (some in-person classroom courses may also be delivered at an alternate downtown Toronto location). Contact us at [email protected] if you'd like to arrange custom instructor-led virtual classroom or onsite training on a date that's convenient for you.
Copyright 2024 Avantix ® Learning
You may also like

10 Keyboard Shortcuts in PowerPoint's Outline View
The outline has been an integral part of Microsoft PowerPoint for many years. It is dynamically linked to slide placeholders and is organized in a hierarchical way.

How to Change the Thumbnail for a Video in PowerPoint (using the Poster Frame Tool)
If you have inserted a video on a PowerPoint slide, you can display a custom thumbnail (or Poster Frame) for the video during a slide show. The thumbnail will display when you run a PowerPoint slide show and disappears when you start the video. For most videos, the thumbnail that displays is the first frame of the video clip. You can use the Poster Frame command to display a different frame in the video clip or a picture from another source as a thumbnail. A picture thumbnail could be either an image or an icon.

How to Use the Built-in Laser Pointer in PowerPoint (with Shortcuts)
During a PowerPoint slide show, you can change your mouse into a laser pointer to focus attention on a specific area on your slide. You can show or hide the built-in laser pointer using keyboard shortcuts or by using the context menu.
Microsoft, the Microsoft logo, Microsoft Office and related Microsoft applications and logos are registered trademarks of Microsoft Corporation in Canada, US and other countries. All other trademarks are the property of the registered owners.
Avantix Learning |18 King Street East, Suite 1400, Toronto, Ontario, Canada M5C 1C4 | Contact us at [email protected]
Our Courses
Avantix Learning courses are offered online in virtual classroom format or as in-person classroom training. Our hands-on, instructor-led courses are available both as public scheduled courses or on demand as a custom training solution.
All Avantix Learning courses include a comprehensive course manual including tips, tricks and shortcuts as well as sample and exercise files.
VIEW COURSES >
Contact us at [email protected] for more information about any of our courses or to arrange custom training.
Privacy Overview
Pin it on pinterest.
- Print Friendly
May 29, 2024
How to convert YouTube to PowerPoint
Have a video that would make the perfect presentation? We’ll show you how to convert YouTube video content to PowerPoint a couple different ways using Plus AI.

If you’ve found the perfect YouTube video for a presentation, you don’t have to take screenshots or capture clips. We’ll show you two easy ways to convert a YouTube video into a PowerPoint presentation.
Using Plus AI , you can convert the video content using two different methods, so you can use whichever is fastest or easiest for you. You can then edit your slideshow with the help of artificial intelligence to add or update the content along with make changes to the appearance.
If you’re ready, you can head to the video on YouTube so that you can follow along below!
Method 1: Use the Plus AI online YouTube to PPT converter
Using an online converter is the quickest and easiest way to transform a YouTube video into a PowerPoint presentation.
Plus AI offers a free converter that’s not only super simple to use but gives you a completed slideshow in just minutes.
- Visit the Plus AI YouTube to PPT converter on the web.
- Enter your email address and select the template you want to use.
- Paste or type the URL for the YouTube video. (Note: You can copy the YouTube URL by selecting it, right-clicking, and picking Copy .)
- Click Get my presentation .

- Within minutes, you’ll receive an email with a link to your presentation in Google Slides.

- Once you open the slideshow, you’ll content from the YouTube video along with various slide layouts to accommodate the content and helpful tips from Plus AI.

- Download the slideshow to edit it in PowerPoint by selecting File > Download > Microsoft PowerPoint .

- Save a copy of the slideshow if you want to hold onto the original in Google Slides by selecting File > Make a Copy > Entire presentation . Keep in mind that the original is only available for 30 days.

Tip : You can also check out Plus AI’s other free tools for converting Canva, Microsoft Word, or a URL to PowerPoint.
Method 2: Obtain the YouTube transcript to create the slideshow
If you prefer to use just the text from the YouTube video, another option is to obtain the transcript and create your slideshow from it.
With Plus AI, you can paste the text or upload a file with the transcript to automatically generate the presentation.
Obtain the YouTube transcript
- Head to the video on YouTube , move down to the description, and choose More to expand it.
- Select Show transcript .

- You’ll see the transcript appear on the top right.
- If you see the timestamps, click the three dots and pick Toggle timestamps to turn those off.

- Select the entire transcript, right-click, and pick Copy .

You can then paste the transcript into a document and save it or simply paste it directly into Plus AI. Follow along below for how to do both.
Use the transcript to generate the slideshow
- Visit Google Slides and create a Blank presentation.
- Select Extensions > Plus AI > New presentation with Plus AI .

- Confirm that New presentation is displayed on the left and optionally pick a template on the right.

- Select Choose file to upload the document with the transcript.
- Select Paste in text , right-click, and pick Paste .

- Click Generate Presentation .

You can then download your slideshow as a PowerPoint presentation by selecting File > Download > Microsoft PowerPoint as described earlier.
Edit presentations with Plus AI
After you create a slideshow from a video, you can use Plus AI to edit it in Google Slides before you download it as a PowerPoint presentation. This allows you to adjust the current text, add more content, or insert new slides.
With your slideshow open in Google Slides, select Extensions > Plus AI > Edit with Plus AI . Then, use the tools in the sidebar that appears to make your changes.

This helps you to make adjustments using artificial intelligence before you export the final product to PowerPoint. Ask Plus AI to jazz up your text, summarize the current content, or add a slide with additional details. You can even choose a different slide layout if you want to change the appearance .
All the tools you need appear in the Plus AI sidebar. Simply choose a tab at the top of the sidebar for the type of edits you’d like to make and watch as Plus AI delivers!

By creating a PowerPoint slideshow from a YouTube video, you can build a presentation in just minutes. This is a great way to get the correct terms and phrases along with appropriate images for instructional, educational, or charitable organization presentations.
And remember, once you build the slideshow, you can edit it easily with the help of Plus AI!
Can I download a YouTube video and put it in PowerPoint?
You can actually insert a video in PowerPoint without downloading it, but if you’ve already saved the video to your device, you can insert it just as easily.
Place your cursor on the slide where you want the video. Go to the Insert tab and open the Video menu in the Media section. Choose This Device to insert a downloaded video or Online Videos to enter the URL from YouTube. Then, follow the subsequent prompts to add the video to your slide.
How do I insert a YouTube video into Slides?
Adding a video to Google Slides takes only a few clicks. Head to the slide where you want the video and select Insert > Video in the menu. Enter a search term to find a video or pop in the URL, select the video, and pick Insert .
How do I embed a YouTube video?
If you want to embed a YouTube video on a web page or other location where you need the code, it’s easy to get. Go to the video on YouTube and open the Share menu below the clip. Select Embed in the first pop-up window and then Copy in the second. You’ll then have the embed code on your clipboard to paste where needed.

Latest posts
Latest post.

20 Best Pitch Deck Examples for Startups (And Why They Work)
If the thought of creating a pitch deck makes you nervous, you’re not alone. In this article, I’ll share 20 examples of early pitch decks from successful startups that have raised billions of dollars.

How to use ChatGPT to create PowerPoint presentations
Step-by-step guide to using AI tools to create presentations. Looking for ChatGPT for PowerPoint? Here's a guide to using AI in PowerPoint and Google Slides
Five lessons for building AI apps
Five things we've learned the hard way about building AI-powered apps
More resources

How to insert a timer into Google Slides
Learn how to insert a timer into Google Slides for a break time countdown or timed audience task. We’ll show you two easy ways to add a timer in minutes.

How to delete a slide in Google Slides
Learn how to delete a slide or delete multiple slides in Google Slides, as well as how to use Plus AI to remix your slide content instead of removing it.
Best GIFs for Presentations: Keep Your Viewers Engaged (or Awake)
Find the best GIFs for any situation to liven up your next presentation
How to Recover Deleted PowerPoint Slides – Step by Step Guide
Meta-description for "What Is Search Intent? A Complete Guide": read more

#ez_toc_widget_sticky--1 .ez-toc-widget-sticky-container ul.ez-toc-widget-sticky-list li.active{ background-color: #ededed; } Steps To Follow
Get Trainings
Advance your Microsoft Excel & Office Skills with the MyExcelOnline Academy!

The Importance of Your Slides
When you pour your heart and soul into a PowerPoint presentation, each slide represents not just information but also hours of research, design, and planning. Losing even a single slide can mean logistical troubles and potentially diminished presentation quality. That’s why knowing how to recover deleted PowerPoint slides can save you from extra work and stress, helping you maintain the integrity and impact of your final presentation.
Download our 101 Advanced Excel Formulas & Functions Examples !
Key Takeaways
- Utilize specialized recovery software like PowerPoint Recovery Tool which allows users to detect, preview, and save repaired or recovered PowerPoint slides, even if they are corrupted or damaged.
- Ensure that the AutoRecover feature in MS PowerPoint is enabled, which frequently saves backup copies that can be retrieved from the AutoRecover folder following the specific directory path provided in the PowerPoint settings.
- For users with a OneDrive account, there is a possibility to recover deleted slides through the platform’s version history or backup features, which can serve as an additional safety net for lost files.
Common Scenarios for Slide Deletion
It’s not uncommon to face situations where you might accidentally delete a slide or two. Maybe you’re trimming down a lengthy presentation and unintentionally remove something important. Or perhaps in the midst of a team collaboration, slides get lost or overwritten by mistake. Power outages, hardware malfunctions, or software crashes can also lead to lost work, and sometimes, it’s just a matter of an unintended click or pressing the wrong key that can result in deletion.
Table of Contents
Essential Steps to Retrieve Deleted PowerPoint Slides
Utilizing the recycle bin.

Harnessing AutoRecovery Features

Advanced Recovery Solutions
Navigating temporary files and autosave locations.
Should you need to dig deeper to find your lost slides, temporary files and AutoSave locations are your next go-to spots. For Windows users, you can navigate to the folder specified by the AutoRecover file location in your PowerPoint options, often found under “C:\Users\[YourUsername]\AppData\Roaming\Microsoft\PowerPoint\”. On a Mac, you’ll look in “/Users/[YourUsername]/Library/Containers/Microsoft PowerPoint/Data/Library/Preferences/AutoRecovery”.
AutoSave, a feature available to Microsoft 365 subscribers, saves your files to OneDrive or SharePoint Online automatically. Hence, if you were working on a file sync’d with one of these services, check the file history or the online recycle bin – the previous versions of your file might just be there, waiting to be reclaimed.
To manually retrieve an AutoRecover file, try opening PowerPoint and it should present you with recovered files if there are any. If not, you can manually navigate to the AutoRecover directory and look for files with the “.tmp” extension which might be your unsaved slides.
Exploring Cloud Storage and Version History
Leveraging cloud storage solutions like OneDrive , Google Drive , and Dropbox adds an extra layer of protection for your PowerPoint slides. These services offer their version history feature, allowing you to view and restore to earlier versions of your file. You might find the previous iteration you’re longing for, or you may be able to recover a version before the deletion occurred.

Preventative Measures to Avoid Slide Loss
Best practices for saving your work.
To save your sanity along with your slides, adhere to these best practices for saving your PowerPoint work: first and foremost, make a habit of hitting [Ctrl] + [S] frequently to save your changes. It’s a quick action that can prevent a lot of grief. Additionally, get into a routine of creating backups for your files by saving them in multiple locations, such as on your local drive and in the cloud.
Consider setting reminders to save your work if you tend to get caught up in the flow and forget. Another good practice is to use versioning with your file names (e.g., presentation_v1, presentation_v2) so you can easily track changes and revert to earlier versions if necessary.
Implementing an automatic backup system on your computer, external hard drive , or cloud service is also a strong preventive measure. Your future self will thank you for the time and effort you put into keeping your work safe.
Leveraging PowerPoint’s Built-In Tools for Data Protection

Tips for Managing and Organizing PowerPoint Slides
Deleting slides without losing information.
Thinking about trimming your PowerPoint presentation? Keep in mind that you can delete slides without permanently losing the content. Before hitting that delete button, consider transferring content to an appendix section at the end of the presentation or saving the slides in a separate backup file. That way, you retain access to all your original information which could come in handy for future presentations or reference.

Understanding the Impact on Slide Numbering and Presentations
When you delete slides, be mindful of their impact on the overall flow and numbering of your presentation. In PowerPoint, slide numbers typically auto-update to reflect the current sequence after deletion, which keeps your presentation tidy and sequential. But this can also disrupt your narration or references made to slide numbers in speech or handouts.
To stay on top of things, check the numbering for consistency post-deletion, especially if you’ve specifically referred to slide numbers within your talk or in accompanying materials. Revisit your notes and edit any numerical references that no longer correlate with the updated slide order.
Additionally, consider the narrative sequence post-deletion. Make sure the removal doesn’t create gaps in information that would confuse your audience. If a slide with critical transition content is removed, you may need to update surrounding slides to maintain a coherent story flow.
Professional Tools and Software Aids for Recovery
Powerpoint recovery with specialized software.
Should all else fail, specialized PowerPoint recovery software can be your knight in shining digital armor. Programs like Easy PowerPoint Recovery are crafted to scour your storage for traces of lost or deleted presentations. They boast impressive algorithms that, more often than not, can piece together your precious work, preserving formatting, slide order, and media intact.
The beauty of these tools lies in their capacity to recover slides even from damaged, formatted, or inaccessible drives. With a full preview feature, these programs let you peek at the recoverable content before you commit to the actual recovery process, ensuring you know exactly what you’re restoring.
Always opt for reputable software solutions that prioritize the integrity of your data. And remember, the sooner you act after a file loss, the better the chances of full recovery.
When to Choose a Recovery Service Provider
If you’re struggling with complex data loss scenarios, or if the DIY recovery methods have hit a wall, it might be time to call in the pros. A recovery service provider steps in when the stakes are high: perhaps the presentation carries significant business value or contains irreplaceable research data. These services leverage advanced tools and techniques, often in a laboratory setting, to resurrect files that standard software can’t touch.
Consider a service provider when you’ve exhausted all other options, if the drive is physically damaged, or if the data loss situation is too intricate for consumer software. It’s a higher-priced route but one that maximizes your chances of recovery for truly critical data.
Before you decide, vet the service provider thoroughly for credibility and success rates, and ensure they provide a clear and transparent pricing structure.
Can I recover a slide that was not saved before deletion?
Yes, it’s possible to recover unsaved slides if PowerPoint’s AutoRecovery feature was enabled or if you’re using AutoSave in Microsoft 365. Otherwise, you might find a temporary version in the PowerPoint autosave folder or through your cloud storage’s version history feature.
How do I restore a previous slide?
To restore a previous slide, navigate to the ‘File’ menu in PowerPoint, select ‘Info’, then ‘Version history’. Choose an earlier version that contains the slide you want to recover. If your file is saved on OneDrive, right-click on it, select ‘Version History’ and restore the desired version.
How can I prevent future loss of PowerPoint slides?
To prevent future slide loss, save your work frequently and enable AutoSave in PowerPoint if you have Microsoft 365. Use the AutoRecover feature, maintain regular backups on different devices, and consider cloud storage services for real-time syncing. Investing in reliable antivirus software and ensuring your system’s software is up-to-date are also key preventative measures.
John Michaloudis
John Michaloudis is a former accountant and finance analyst at General Electric, a Microsoft MVP since 2020, an Amazon #1 bestselling author of 4 Microsoft Excel books and teacher of Microsoft Excel & Office over at his flagship Academy Online Course .
Related Articles
How to Delete Text Boxes Fast in PowerPoint
The Ultimate Guide to Keyboard Outlook Shortcuts
How to Print PowerPoint Outlines for Handouts
Get Video Training
Dramatically Reduce Repetition, Stress, and Overtime! Exponentially Increase Your Chances of a Promotion, Pay Raise or New Job! Learn in as little as 5 minutes a day or on your schedule.
Delete Recordings on PowerPoint: A Step-by-Step Guide
- Recent Posts
- How to Add Bullet Points in PowerPoint: A Step-by-Step Guide - May 25, 2024
- Where is Slide Master in PowerPoint: A Comprehensive Guide for Beginners - May 25, 2024
- How to Use Copilot in PowerPoint: A Step-by-Step Guide - May 25, 2024
Have you ever recorded audio for a PowerPoint presentation, only to realize later that you need to remove it? Don’t worry, deleting recording on PowerPoint is a simple process. As someone who has had to remove audio from a presentation before, I can attest to the ease of the process. In this article, I will share with you the steps to delete recording on PowerPoint.

To start, let’s clarify what we mean by “recording.” Recording refers to any audio or video that you have added to your presentation, either through the Record Audio or Record Video features in PowerPoint. This could include a voiceover, background music, or any other audio or video content that you have added to your presentation.
Deleting recording on PowerPoint can be done in a few simple steps. Whether you want to remove all audio from your presentation or just delete audio from a specific slide, PowerPoint makes it easy to do so. In the following sections, I will guide you through the steps to delete recording on PowerPoint and provide tips for making the process as smooth as possible.
JUMP TO TOPIC
Preparing Slides and Transitions
Configuring audio and video settings, using the record slide show feature, incorporating narration and timing, adding annotations and gestures, inserting interactive elements, reviewing and editing your recording, exporting and distributing online, setting up your presentation.

Before recording a presentation, it is essential to prepare the slides and transitions, configure audio and video settings, and ensure that everything runs smoothly. In this section, I will guide you through the necessary steps to set up your presentation for recording.
First, you need to create your presentation. To do this, open PowerPoint and create a new file or open an existing one. Once you have your presentation ready, you can start preparing your slides and transitions.
To add a new slide, click on the “New Slide” button on the ribbon. You can choose from a variety of slide layouts to suit your needs. You can also add animations and transitions to your slides to make them more engaging. To do this, go to the “Animations” tab and select the animation or transition you want to add.
Next, you need to configure your audio and video settings. To do this, go to the “Slide Show” tab and click on “Set Up Slide Show.” Under “Show Type,” select “Browsed by an individual (window),” and under “Show Options,” select “Show without narration.” This will ensure that your presentation plays without any narration.
If you want to record your narration, go to the “Record” tab and select “Record Slide Show.” You can choose to record the narration for the current slide or the entire presentation. To start recording, click on the “Record” button and speak into your microphone. You can use the arrow keys on your keyboard to move between slides and animations.
Finally, make sure that your audio and video settings are configured correctly. To do this, go to the “Transitions” tab and select the transition you want to use. You can also adjust the duration of the transition and add sound effects.
In conclusion, setting up your presentation for recording requires careful planning and attention to detail. By following these steps, you can ensure that your presentation is engaging and professional.
Recording Your Slide Show
As a presenter, you may want to record your presentation in PowerPoint for future reference or sharing with others. PowerPoint offers a built-in feature called “Record Slide Show” that allows you to record your presentation with or without narration and timings. In this section, I will guide you through the process of recording your slide show in PowerPoint.
To start recording your slide show, you need to have your presentation open in PowerPoint. Then, follow these steps:
- Click on the “Slide Show” tab in the ribbon at the top of the PowerPoint window.
- Click on the “Record Slide Show” button in the “Start Slide Show” group.
- In the “Record Slide Show” dialog box, choose whether you want to start recording from the beginning or from the current slide.
- Check the boxes next to “Narrations” and “Timings” if you want to include them in your recording.
- Click on “Start Recording” to begin.
Once you start recording, PowerPoint will automatically advance to the next slide after a set amount of time, depending on your timing settings. You can also manually advance to the next slide by clicking your mouse or pressing the arrow keys on your keyboard.
If you choose to include narration and timings in your recording, PowerPoint will record your voiceover and the time you spend on each slide. To record your narration, you will need a microphone connected to your computer. Here’s how to incorporate narration and timing into your recording:
- In the “Record Slide Show” dialog box, check the boxes next to “Narrations” and “Timings.”
- When you’re ready to start recording, click on the “Record” button in the recording toolbar.
- Speak into your microphone to record your narration.
- When you’re finished with the slide, advance to the next slide by clicking your mouse or pressing the arrow keys on your keyboard.
- Repeat steps 4-6 for each slide in your presentation.
PowerPoint will automatically save your recording as a separate file, which you can play back at any time. If you want to edit your recording, you can do so by clicking on the “Playback” tab in the ribbon and selecting “Edit Recording.”
In conclusion, recording your slide show in PowerPoint is a great way to create a reusable presentation that you can share with others. With the “Record Slide Show” feature, you can easily incorporate narration and timing into your recording to create a professional and polished presentation.
Enhancing Your Presentation
When it comes to presentations, the goal is to convey your message in a clear and engaging way. Adding annotations and gestures can help you emphasize important points and keep your audience engaged. Additionally, inserting interactive elements can make your presentation more memorable and impactful.
One way to enhance your presentation is by adding annotations and gestures. This can be done using tools such as the pen, ink, highlighter, eraser, and laser pointer. These tools can help you emphasize key points and draw attention to specific areas of your slide.
For example, you can use the pen or ink tool to draw attention to important text or images. The highlighter tool can be used to emphasize key phrases or concepts. The eraser tool can be used to remove annotations or mistakes. The laser pointer tool can be used to highlight specific areas of your slide during a presentation.
In addition to these tools, PowerPoint also allows you to use ink gestures. Ink gestures are predefined shapes that you can draw on your slide to perform specific actions. For example, you can draw a circle around an object to highlight it, or draw an arrow to point to a specific area of your slide.
Another way to enhance your presentation is by inserting interactive elements. This can include things like quizzes, polls, and interactive diagrams. These elements can help you engage your audience and make your presentation more memorable.
For example, you can use PowerPoint’s trigger feature to create interactive diagrams. Triggers allow you to link objects on your slide to specific actions, such as displaying additional information or playing a video. This can be a great way to create interactive diagrams that allow your audience to explore different concepts and ideas.
You can also use PowerPoint’s animation feature to animate text and other objects on your slide. Animating text can help you emphasize key points and keep your audience engaged. Additionally, you can use animations to reveal information gradually, which can help build suspense and keep your audience interested.
In conclusion, adding annotations, gestures, and interactive elements can help you enhance your PowerPoint presentation and make it more engaging and memorable. By using these tools effectively, you can create a presentation that effectively conveys your message and keeps your audience interested.
Finalizing and Sharing
Once you have recorded and edited your PowerPoint presentation, it’s time to finalize and share it. In this section, I’ll go over the steps you need to take to review and edit your recording, as well as how to export and distribute your presentation online.
Before you finalize your recording, it’s important to review it to ensure that everything is as you want it. To do this, you can preview your recording by playing it back within PowerPoint. You can also trim your recording to remove any unwanted sections or clear the narration altogether.
To preview your recording, simply click on the “Preview” button in the “Recording” tab. This will allow you to play the recording back from the beginning or from a specific slide. If you need to trim your recording, click on the “Trim Audio” button in the same tab. This will open up the “Audio Tools” tab, where you can select the section you want to remove and delete it.
If you want to clear the narration altogether, you can do this by going to the “Slide Show” tab and selecting “Set Up Slide Show.” Under the “Show Options” section, select “Show without narration” and click “OK.” This will remove the narration from your presentation.
Once you’re happy with your recording, it’s time to export and distribute it online. To do this, you can save your presentation as a video file or publish it to Microsoft Stream for live streaming.
To save your presentation as a video file, go to the “File” tab and select “Export.” Under the “Create a Video” section, choose the quality and size of the video you want to create, and click “Create Video.” This will save your presentation as a video file that you can upload to any video sharing platform.
If you want to publish your presentation to Microsoft Stream, you can do this by going to the “File” tab and selecting “Share.” Under the “Publish to Stream” section, select the channel you want to publish to and click “Publish.” This will make your presentation available for live streaming on Microsoft Stream.
Overall, finalizing and sharing your PowerPoint presentation is a straightforward process that can be done in just a few clicks. Whether you want to export your presentation as a video or live stream it on Microsoft Stream, these steps will help you get your presentation in front of your audience.
Leave a Comment Cancel reply
Save my name, email, and website in this browser for the next time I comment.
Removemania
How To Easily Remove Unwanted Items: Tips & Tricks

Easily Remove Animation in PowerPoint
Table of Contents
Disable Animation on Selected Slides
When creating a presentation, incorporating animations can add flair and interactivity to your slides. However, there are times when you may want to disable animations on selected slides to maintain a more professional or streamlined look. Disabling animations on specific slides can help you deliver your message more effectively and ensure that the audience focuses on the content rather than the transitions.
To disable animation on selected slides in presentation software like PowerPoint or Google Slides, you can follow a few simple steps. First, navigate to the slide where you want to remove animations. Then, access the animation panel or menu. Depending on the software you are using, you may be able to select individual objects on the slide and remove their animations using the provided options. By selectively disabling animations on certain slides, you can tailor the visual experience and control the flow of information during your presentation.
Disabling animation on specific slides can be particularly useful when you want to create a smooth transition between different sections of your presentation. By removing distractions caused by flashy effects or transitions on certain slides, you can maintain a cohesive design and ensure that the audience remains engaged with the content. This can be especially helpful when presenting complex information that requires the audience’s full attention without any unnecessary visual disruptions.
In addition to enhancing the overall look and feel of your presentation, disabling animations on selected slides can also help improve accessibility for viewers with sensitivity to motion or visual effects. By providing a more static and predictable viewing experience on certain slides, you can ensure that all audience members can comfortably engage with your presentation without experiencing any discomfort or distractions. This inclusive approach can make your content more accessible and appealing to a broader range of viewers.
Delete Individual Animation Effects
When working on animations for your website, you might find yourself in a situation where you need to delete individual animation effects. Whether it’s to refine the user experience, improve loading times, or simply experiment with different styles, having the ability to remove specific animations is crucial.
One effective way to delete individual animation effects is by accessing the CSS or JavaScript code where the animations are defined. By pinpointing the specific code related to the animation you want to remove, you can simply delete or comment out that section to eliminate the effect. This method provides a high level of control and precision, allowing you to fine-tune the visual aspects of your website.
Another approach to deleting individual animation effects is by using browser developer tools. Most modern browsers come equipped with developer tools that allow you to inspect elements on a webpage, including animations. By identifying the elements associated with the animation you wish to delete, you can manipulate or disable them directly within the browser, providing a real-time view of the changes.
As you delete individual animation effects, be sure to test your website thoroughly to ensure that the desired outcome is achieved. Removing animations can impact the overall look and feel of your site, so it’s important to review how the changes affect user interaction and engagement. By carefully managing and deleting animations, you can optimize your website for performance and user experience.
Remove All Animations at Once
Animations can be distracting and can sometimes slow down the loading speed of a webpage. If you’re looking to declutter your browsing experience, you might want to remove all animations at once for a smoother and more streamlined view.
To achieve this, you can disable animations using your browser’s developer tools. Simply right-click on the page, select “Inspect” to open the developer tools panel. Then navigate to the “Styles” tab, locate the CSS property for animations (e.g., transition, animation), and disable them by unchecking the checkboxes or setting the values to “none”. This method allows you to quickly turn off animations without affecting the functionality of the website.
Another way to remove all animations at once is by using browser extensions specifically designed for this purpose. Extensions like “Disable HTML5 Autoplay” or “Disable HTML5 Autoplay Reloaded” allow you to block autoplay videos, GIFs, and animations on websites, providing you with a distraction-free browsing experience.
If you prefer a more permanent solution, consider customizing your browser settings to disable animations by default. In popular browsers such as Chrome or Firefox, you can access the settings menu, navigate to the advanced options, and disable animations under the accessibility or performance section. This way, all animations will be turned off automatically whenever you browse the web.
Use the Morph Transition
When it comes to creating engaging and dynamic presentations, utilizing the morph transition feature can take your slides to the next level. This seamless transition effect in presentation software allows for smooth and visually appealing animations between slides. By incorporating the morph transition, you can captivate your audience and maintain their attention throughout your presentation.
One effective way to use the morph transition is to create visual storytelling in your slides. Instead of simply switching from one slide to the next, consider using the morph transition to animate objects or text across slides. This technique can help emphasize connections between ideas or concepts, making your presentation more coherent and engaging. By adding movement to your slides, you can enhance the overall visual appeal and make your content more memorable.
Another benefit of using the morph transition is its ability to eliminate abrupt changes between slides. Instead of jarring cuts or fades, the morph transition provides a smooth and fluid movement from one slide to another. This can create a more professional and polished look to your presentation, making it more visually appealing to your audience. The seamless transitions help maintain the flow of your content and keep viewers focused on your message.
Additionally, the morph transition can be a useful tool for highlighting key points or elements in your presentation. By animating specific objects or text using this feature, you can draw attention to important information and guide your audience’s focus. Whether you want to emphasize data points, key takeaways, or specific visuals, the morph transition can be a powerful way to make these elements stand out and leave a lasting impression on your audience.
Save as PDF
When you need to preserve the content of a webpage for future reference or offline reading, saving it as a PDF is the way to go. Converting a webpage to a PDF file ensures that the layout, formatting, and images are retained, regardless of the device or platform you view it on. This can be particularly useful when you want to share the content with others or store it for archival purposes.
To save a webpage as a PDF, most web browsers offer built-in functionality that allows you to easily convert the page. Simply navigate to the webpage you want to save, access the browser’s print feature, and choose the option to save as a PDF. You can then customize the settings, such as adjusting the page layout, including headers and footers, or selecting the paper size. This flexibility allows you to tailor the PDF to meet your specific needs.
Saving a webpage as a PDF is not only convenient for individual use but can also be beneficial in a professional setting. Whether you need to save online receipts, articles, research papers, or any other web content, having the ability to convert it to a PDF can help you organize and store information efficiently. PDF files are widely compatible and can be easily shared via email or cloud storage services.
Leave a Reply Cancel reply
Your email address will not be published. Required fields are marked *
- Add, change, hide, or delete comments in a presentation Article
- Share your PowerPoint presentation with others Article
- Save a presentation as a video Article
- Inspect a presentation Article
- Save PowerPoint presentations as PDF files Article

Add, change, hide, or delete comments in a presentation
Use comments when you want people to review and provide feedback on a presentation that you created, or when colleagues ask for your feedback on a presentation. A comment is a note that you can attach to a letter or word on a slide, or to an entire slide.

Add a comment
Select the object or slide you want to comment on. Select Review > New Comment . Or select New if the Comments pane is open. You can also add a comment by selecting Insert > Comment .
In the Comments pane, type your message in the box and select Post or press Ctrl+Enter.
Tag someone in a comment
When you comment on a document or presentation and use the @-sign with someone's name, the person you mention receives mail with a link to your comment. For more details, see Use @mention in comments to tag someone .
Show or hide comments
On the View tab, click Normal .
On the Review tab, click Show Comments .
View and reply to comments
Select the comment in the Comments pane.
Select Reply to respond to a comment.
Edit comments
In the navigation pane, in Normal view, click the slide you want to comment on.
In the Comments pane, click the comment you want to edit, and then click the pencil icon to make changes.
Note: Keep in mind that it's possible for others to edit your comments. Comments in an Office document are stored in the file, so anyone with edit access to your file can edit your comment.
Delete a comment
In the Comments pane, select the comment you want to delete, select More thread actions ( ... ) and select Delete thread .
In the Comments pane, type your message in the box and select Post .
This feature requires PowerPoint for Microsoft 365 for Mac version 16.24.

Add a comment to a slide
Select the slide you want to comment on. Tap the Comment button at the bottom of the screen.

Type your message in the box and tap the Send button .
Add a comment to an object
Select the object you want to comment on. Tap the New Comment option from the toolbar.
This feature requires PowerPoint for Android version 16.0.11231.
Tap Comments above the slide sorter. The Comments pane appears.
Use the buttons on the Ribbon to navigate backward and forward through comments.
Type in the Reply box to respond a comment.
Edit a comment
Tap the comment and tap Edit.
Edit your comment and tap Save .
Tap the comment to edit and tap the three dots to display the menu.
Tap Delete thread to remove the comment.
This feature requires PowerPoint for iOS version 2.21.

Modern comments in PowerPoint

Need more help?
Want more options.
Explore subscription benefits, browse training courses, learn how to secure your device, and more.

Microsoft 365 subscription benefits

Microsoft 365 training

Microsoft security

Accessibility center
Communities help you ask and answer questions, give feedback, and hear from experts with rich knowledge.

Ask the Microsoft Community

Microsoft Tech Community

Windows Insiders
Microsoft 365 Insiders
Was this information helpful?
Thank you for your feedback.
How to change color for the table borders in PowerPoint
In PowerPoint for Microsoft 365, you just need two simple steps:
1. Select color and style for the border.
2. Draw or select the border.
Draw borders
To do that, select table or any (several) cells in the table and follow the next steps:
1. On the Table Design tab, in the Draw Borders group:

2. Do one of the following:
2.1. Draw the border where you want:
- After selecting border style or color, the Draw Table button is automatically checked,
- or if all that you want is selected already, just click the Draw Table button by yourself:

Now, draw the border where you need it. For example:

2.2. Choose the border style for the selected cells (or one cell or the table) - on the Table Design tab, in the Table Styles group, select the border:

Remove borders

Then remove borders you need.
Then on the Table Design tab, in the Table Styles group, on the Borders menu, click No Border :

See also this tip in French: Comment changer la couleur des bordures de la table dans PowerPoint .
Please, disable AdBlock and reload the page to continue
Today, 30% of our visitors use Ad-Block to block ads.We understand your pain with ads, but without ads, we won't be able to provide you with free content soon. If you need our content for work or study, please support our efforts and disable AdBlock for our site. As you will see, we have a lot of helpful information to share.

Modify table structure

Google Slides: How to delete a text box
G oogle Slides is Google's version of Microsoft Office. It gives you tools to create effective presentations and collaborate with others in minutes. Google Slides works across a variety of devices, including contemporary Android tablets , and it's free. Sometimes, the creative process can go awry, and a redundant text box could ruin your thought process. This guide explains how to remove a text box in Google Slides.
Delete a Google Slides text box
Deleting a text box in Google Slides is straightforward. However, the process differs slightly depending on the device you use. Below are the steps for deleting a text box on the web and the Android app.
Delete a Google Slides text box on the web
On your web browser, go to Google.com and follow the steps below.
- Click Go to Slides .
- Go to the upper-left corner and choose Blank presentation .
- Choose a slide with a text box in it.
- Right-click the text box you want to delete.
- Choose Delete from the menu that appears. The slide is now gone.
- Left-click the Undo button at the top of the screen to revert your changes.
Alternatively, when you open Google Slides:
- Right-click the slide that you want to delete.
- Choose Edit from the menu in the upper-left corner.
- Select Delete from the menu that appears.
Delete a Google Slides text box using the mobile app for Android or iOS
We've used an Android for this part of the tutorial, but iPhone users should be able to follow along easily.
Google Slides is also available on the App Store and Google Play Store, so you can create or edit your presentation from your phone or tablet Deleting a text box in Google Slides in the mobile app is a bit different, though just as simple.
- Open the Google Slides app and open your presentation. Close
- Tap the slide and tap Edit slide . Close
- Tap the desired text box. A menu appears at the top.
- Tap Delete to remove the text box from your slide.
Alternatively:
- Tap and hold the text box. Close
- Tap the trash bin in the upper-right corner of the screen.
Regardless of the option you use, the text box disappears.
The best Google Slides templates for work, school, and home
Everyone loves a presentation with less text and more pictures.
Adding text to your Google Slides is a great way to make your presentation more informative. Adding too much can distract from its purpose. Removing a text box takes no more than a click. You can also improve your presentation with Google Slides templates and themes .

Contribute to the Microsoft 365 and Office forum! Click here to learn more 💡
April 9, 2024
Contribute to the Microsoft 365 and Office forum!
Click here to learn more 💡
- Search the community and support articles
- Microsoft 365 and Office
- Search Community member
Ask a new question
MacBook Air M1 using PowerPoint Pop up error
Follow the PowerPoint add-in procedure to avoid launching PowerPoint with the print screen error, but I tried for over four times with the same steps, and also delete the PowerPoint app and related files in ~Library/Container....., how can I solve this problem? Please give a proper solution on that, thanks!

- Subscribe to RSS feed
Report abuse
Reported content has been submitted
Replies (5)
- Microsoft Agent |
Hi,Ada 6831
Thanks for visiting Microsoft Community.
I wish I could handle your problem, however, it seems to be with Adobe plug-ins and you need to get professional technical support from the Adobe team, we suggest you consider asking your question to Adobe Community , where users who have encountered problems in this area like you will ask questions and share ideas, and where experts will provide you with more specialized solutions for Adobe plug-ins.
Disclaime r: Microsoft provides no assurances and/or warranties, implied or otherwise, and is not responsible for the information you receive from the third-party linked sites or any support related to technology.
Hope the above information can help you.
Hannah.Z- MSFT |Microsoft Community Support Specialist
Was this reply helpful? Yes No
Sorry this didn't help.
Great! Thanks for your feedback.
How satisfied are you with this reply?
Thanks for your feedback, it helps us improve the site.
Thanks for your feedback.
hi Hannah, Good evening, thank you for your advise.
Hi, Ada 6831.
Thank you very much for your reply!
Please feel free to share it if you make any progress.
Best Regards,
hi Hannah, good afternoon, I had send request to Adobe Community and still waiting for their advise, hope will solve this issue with a proper solution.
Very happy to receive your reply. Know that you have successfully submitted your question to Adobe Community and are already waiting for a response. I hope your problem will be solved soon with the help of Adobe professional team.
Question Info
- Out of scope
- Norsk Bokmål
- Ελληνικά
- Русский
- עברית
- العربية
- ไทย
- 한국어
- 中文(简体)
- 中文(繁體)
- 日本語
COMMENTS
But try PowerPoint | Preferences and either remove the check next to Track recently opened documents or change Display XX documents to a lower number. Or if it's set to, say, 10, open some other presentation, save and close it.
Short Answer. To delete Microsoft PowerPoint, open the Start menu and type in Add or Remove Programs. Select Add or Remove Programs from the list of options that appear. Scroll through the list of programs and select Microsoft PowerPoint. Click the Remove button and follow the instructions given.
This quick tutorial will help you eliminate those unwanted PowerPoint slides to clean up your slide deck. Find out a time-saving trick to delete multiple sli...
3. Right-click the slide (s) and click Delete Slide. This is in the pop-up menu, underneath Duplicate Slide. On Mac, use a control-click . The selected slide (s) will be deleted. You can also press Del or Backspace on your keyboard to delete slides. To undo this action, press Ctrl + Z (Windows) or Cmd + Z (Mac).
Deleting a slide is just as easy. In the Slide Preview pane, right-click the slide you want to delete and then click "Delete Slide.". Alternatively, you could select the desired slide to be deleted and press "delete" on your keyboard. Finally, to rearrange the order of the slides, click and drag the slide to the desired position.
Select any slide and press Ctrl + M in Windows, or Cmd + M in Mac. A new slide will be created with the same design as the selected slide. Right-click on any slide and choose New Slide. A new slide will be created below the selected slide. Go to the Slides section of the Home tab and click on New Slide (if you click on the little arrow, you ...
Using PowerPoint 2010 - Delete a Presentation. Using PowerPoint 2010 - Delete a Presentation.
Select View . Select Slide Sorter . Select the slide you wish to move. Drag the slide to the new location. A vertical line appears as you drag the slide. When the vertical line is in the correct location, release the slide. The slide is now in the new location. You can also delete slides in Slide Sorter view.
Step-1: Hold the "Ctrl" key and select all the slides you want to delete. To delete multiple slides on your PowerPoint presentation, first, hold the " Ctrl " key on your keyboard and simply " Left-click " on the slides you want to delete to select them together. Step-2: "Right-click" on one of the slides and press the "Delete ...
1. Open your PowerPoint presentation and right-click (or hold Control as you click) any slide you want to delete in the left sidebar. 2. From the drop-down list that appears, select "Delete" or ...
1. Open your PowerPoint presentation and right-click (or hold Control as you click) any slide you want to delete in the left sidebar. 2. From the drop-down list that appears, select "Delete" or ...
Watch How to delete a slide in PowerPoint presentation. Press CTRL and then click on multiple slides to select them, then press delete button on keyboard to ...
Method #1: Use the Delete Slide function Step #1: Open your presentation. Open the PowerPoint presentation from where you would like to delete a slide. Step #2: Change to Normal View. Click on the View tab on the top menu bar to change the ribbon. Under Presentation Views, click on the Normal icon.
As a reminder, you can delete individual speaker notes easily. Open the presentation notes using the Notes button in the PowerPoint status bar or by clicking "Notes" in the ribbon on the View tab. Go to the slide with the notes that you want to delete, click in the Notes area, and remove the text. You can do this quickly by selecting all of the ...
In Normal View, display the slide with the animations you want to remove. You can also display a layout or master in Slide Master View. Click an object on the slide. If you are selecting a placeholder, click its edge. Press Ctrl + A to select all objects on the slide. Click the Animations tab in the Ribbon.
Place your cursor on the slide where you want the video. Go to the Insert tab and open the Video menu in the Media section. Choose This Device to insert a downloaded video or Online Videos to enter the URL from YouTube. Then, follow the subsequent prompts to add the video to your slide.
Hi Chadri, Thank you for posting your question in this community. Generally, for the image/photo you inserted in your PowerPoint slides, you can use the built-in crop feature to crop the image/photo. For your information: Crop a picture in Office. For the Shapes that you inserted in your slide, you can use Merge Shapes (Subtract) to cut the ...
To restore a previous slide, navigate to the 'File' menu in PowerPoint, select 'Info', then 'Version history'. Choose an earlier version that contains the slide you want to recover. If your file is saved on OneDrive, right-click on it, select 'Version History' and restore the desired version.
How To Delete A Slide In Microsoft PowerPoint Presentation.When creating your presentation, you'll typically add new slides, move your slides around, and del...
Then, follow these steps: Click on the "Slide Show" tab in the ribbon at the top of the PowerPoint window. Click on the "Record Slide Show" button in the "Start Slide Show" group. In the "Record Slide Show" dialog box, choose whether you want to start recording from the beginning or from the current slide.
To disable animation on selected slides in presentation software like PowerPoint or Google Slides, you can follow a few simple steps. First, navigate to the slide where you want to remove animations. Then, access the animation panel or menu. Depending on the software you are using, you may be able to select individual objects on the slide and ...
Add a comment. Select the object or slide you want to comment on. Select Review > New Comment. Or select New if the Comments pane is open. You can also add a comment by selecting Insert > Comment. In the Comments pane, type your message in the box and select Post or press Ctrl+Enter.
To do that, select table or any (several) cells in the table and follow the next steps: 1. On the Table Design tab, in the Draw Borders group: Select the Border style : Select the Border weight : Select the Border color : 2. Do one of the following: 2.1.
Delete a Google Slides text box on the web. On your web browser, go to Google.com and follow the steps below. Click Go to Slides. Go to the upper-left corner and choose Blank presentation. Choose ...
Ex_Files_Powerpoint_Silicon_Valley_Presentation_Secrets.zip Exercise File: Subscribe to access. Glossary_PowerPoint_Silicon_Valley_Presentation_Secrets.zip
Last updated May 28, 2024 Views 30 Applies to: Microsoft 365 and Office. /. Other. /. Unknown. /. Out of scope. Follow the PowerPoint add-in procedure to avoid launching PowerPoint with the print screen error, but I tried for over four times with the same steps, and also delete the PowerPoint app and related.