macOS Big Sur
How to create a bootable macos big sur usb install drive [video].
Making a bootable macOS Big Sur USB drive is a quick and clean way to install a fresh copy of macOS on your Mac. This hands-on tutorial is valid for both the public and developer beta versions of macOS Big Sur , and will also work with the final version of Big Sur upon its release later this year. Simply follow our step-by-step guide for the full details.

USB Flash drive
Before you begin, you’ll need to acquire a USB flash drive. Because every modern Mac supports USB-C, and some Macs only feature USB-C, I recommend purchasing a USB drive with a USB-C connector.
The second thing to keep in mind is that you’ll want to get a USB drive with at least16GB of storage space. Of course, having more storage won’t hurt. I still recommend this SanDisk Ultra Dual Drive USB Type-C Flash Drive . Not only is it super-affordable, but it comes both USB-A and USB-C connections, which allows the drive to connect to any Mac with ease.
Make sure that there’s nothing important that you need on the drive, because the full contents will be deleted. I recommend checking the contents, and then formatting the drive as macOS Extended Journaled (HFS+) via Disk Utility. Keep in mind that APFS-formatted drives cannot be used to create the macOS Big Sur USB installer.
macOS Big Sur USB installer video tutorial
Subscribe to 9to5Mac on YouTube for more videos
How to create a bootable macOS Big Sur USB install drive
Step 1: Download macOS Big Sur. After Big Sur launches later this year, you’ll be able to download it directly from the Mac App Store. Until then, you can download the macOS Big Sur developer beta from Apple’s developer portal , or download the macOS Big Sur public beta via Apple’s public beta website .
Step 2: After downloading macOS Big Sur, the installer will automatically launch. Close the installer.

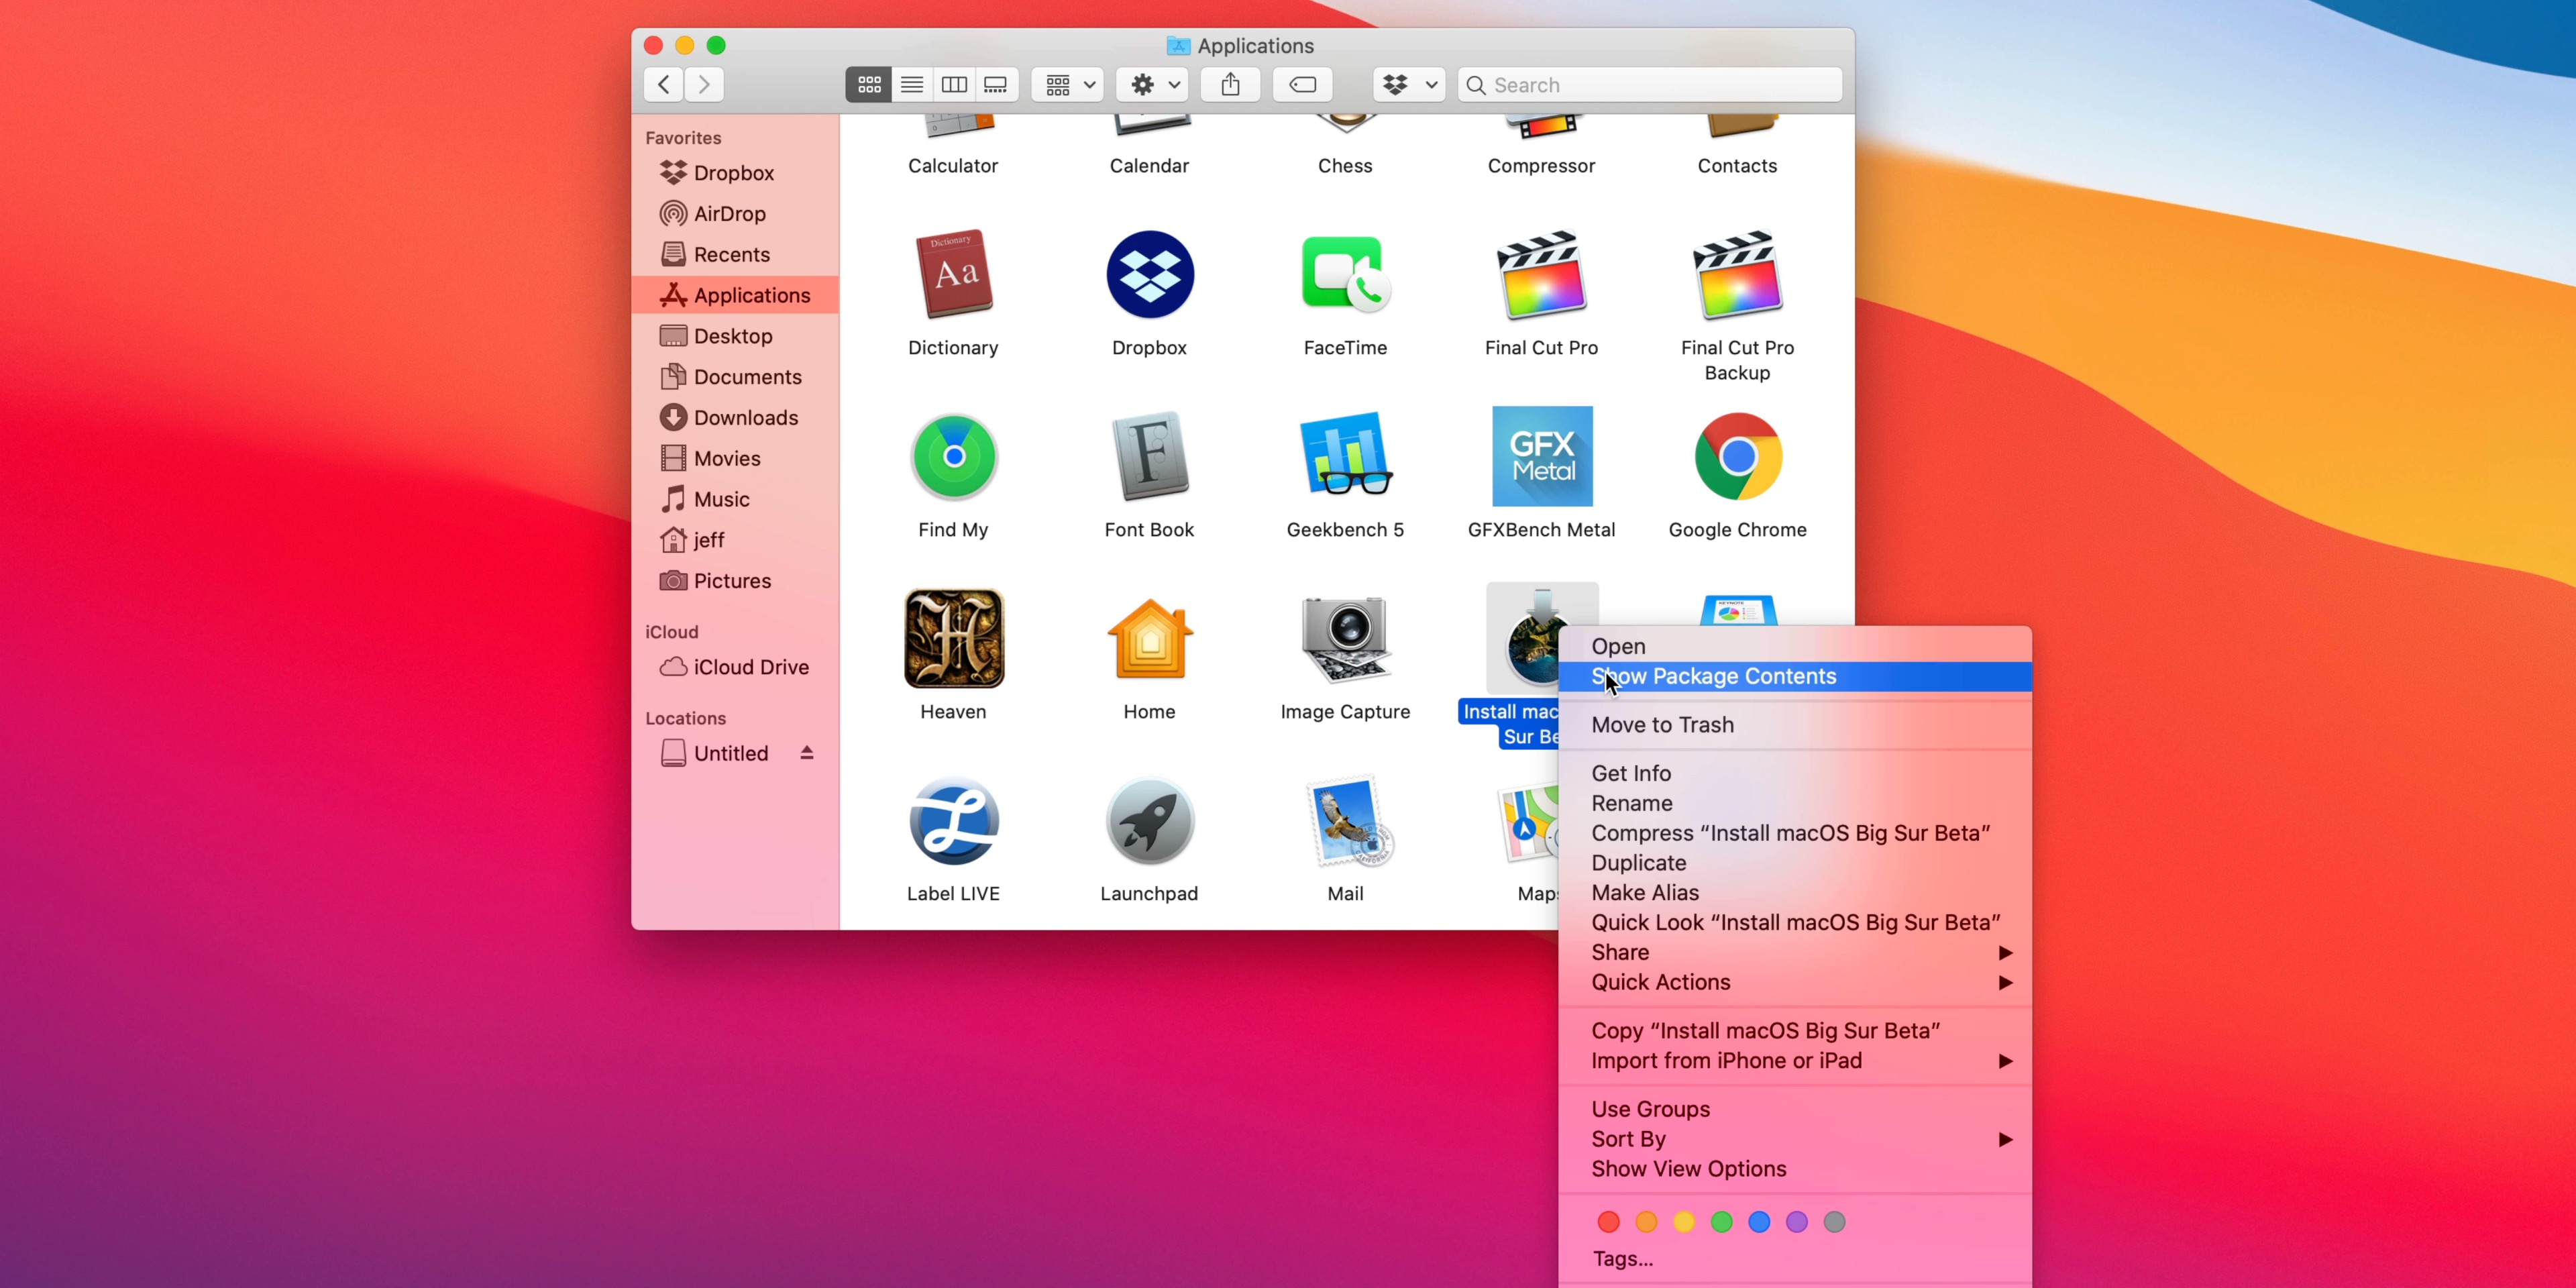
Step 3: Open Finder → Applications. Right-click on Install macOS Big Sur → Show Package Contents .
Step 4: Open Contents → Resources.
Step 5: Launch a new Terminal window by going to Applications → Utilities → Terminal.
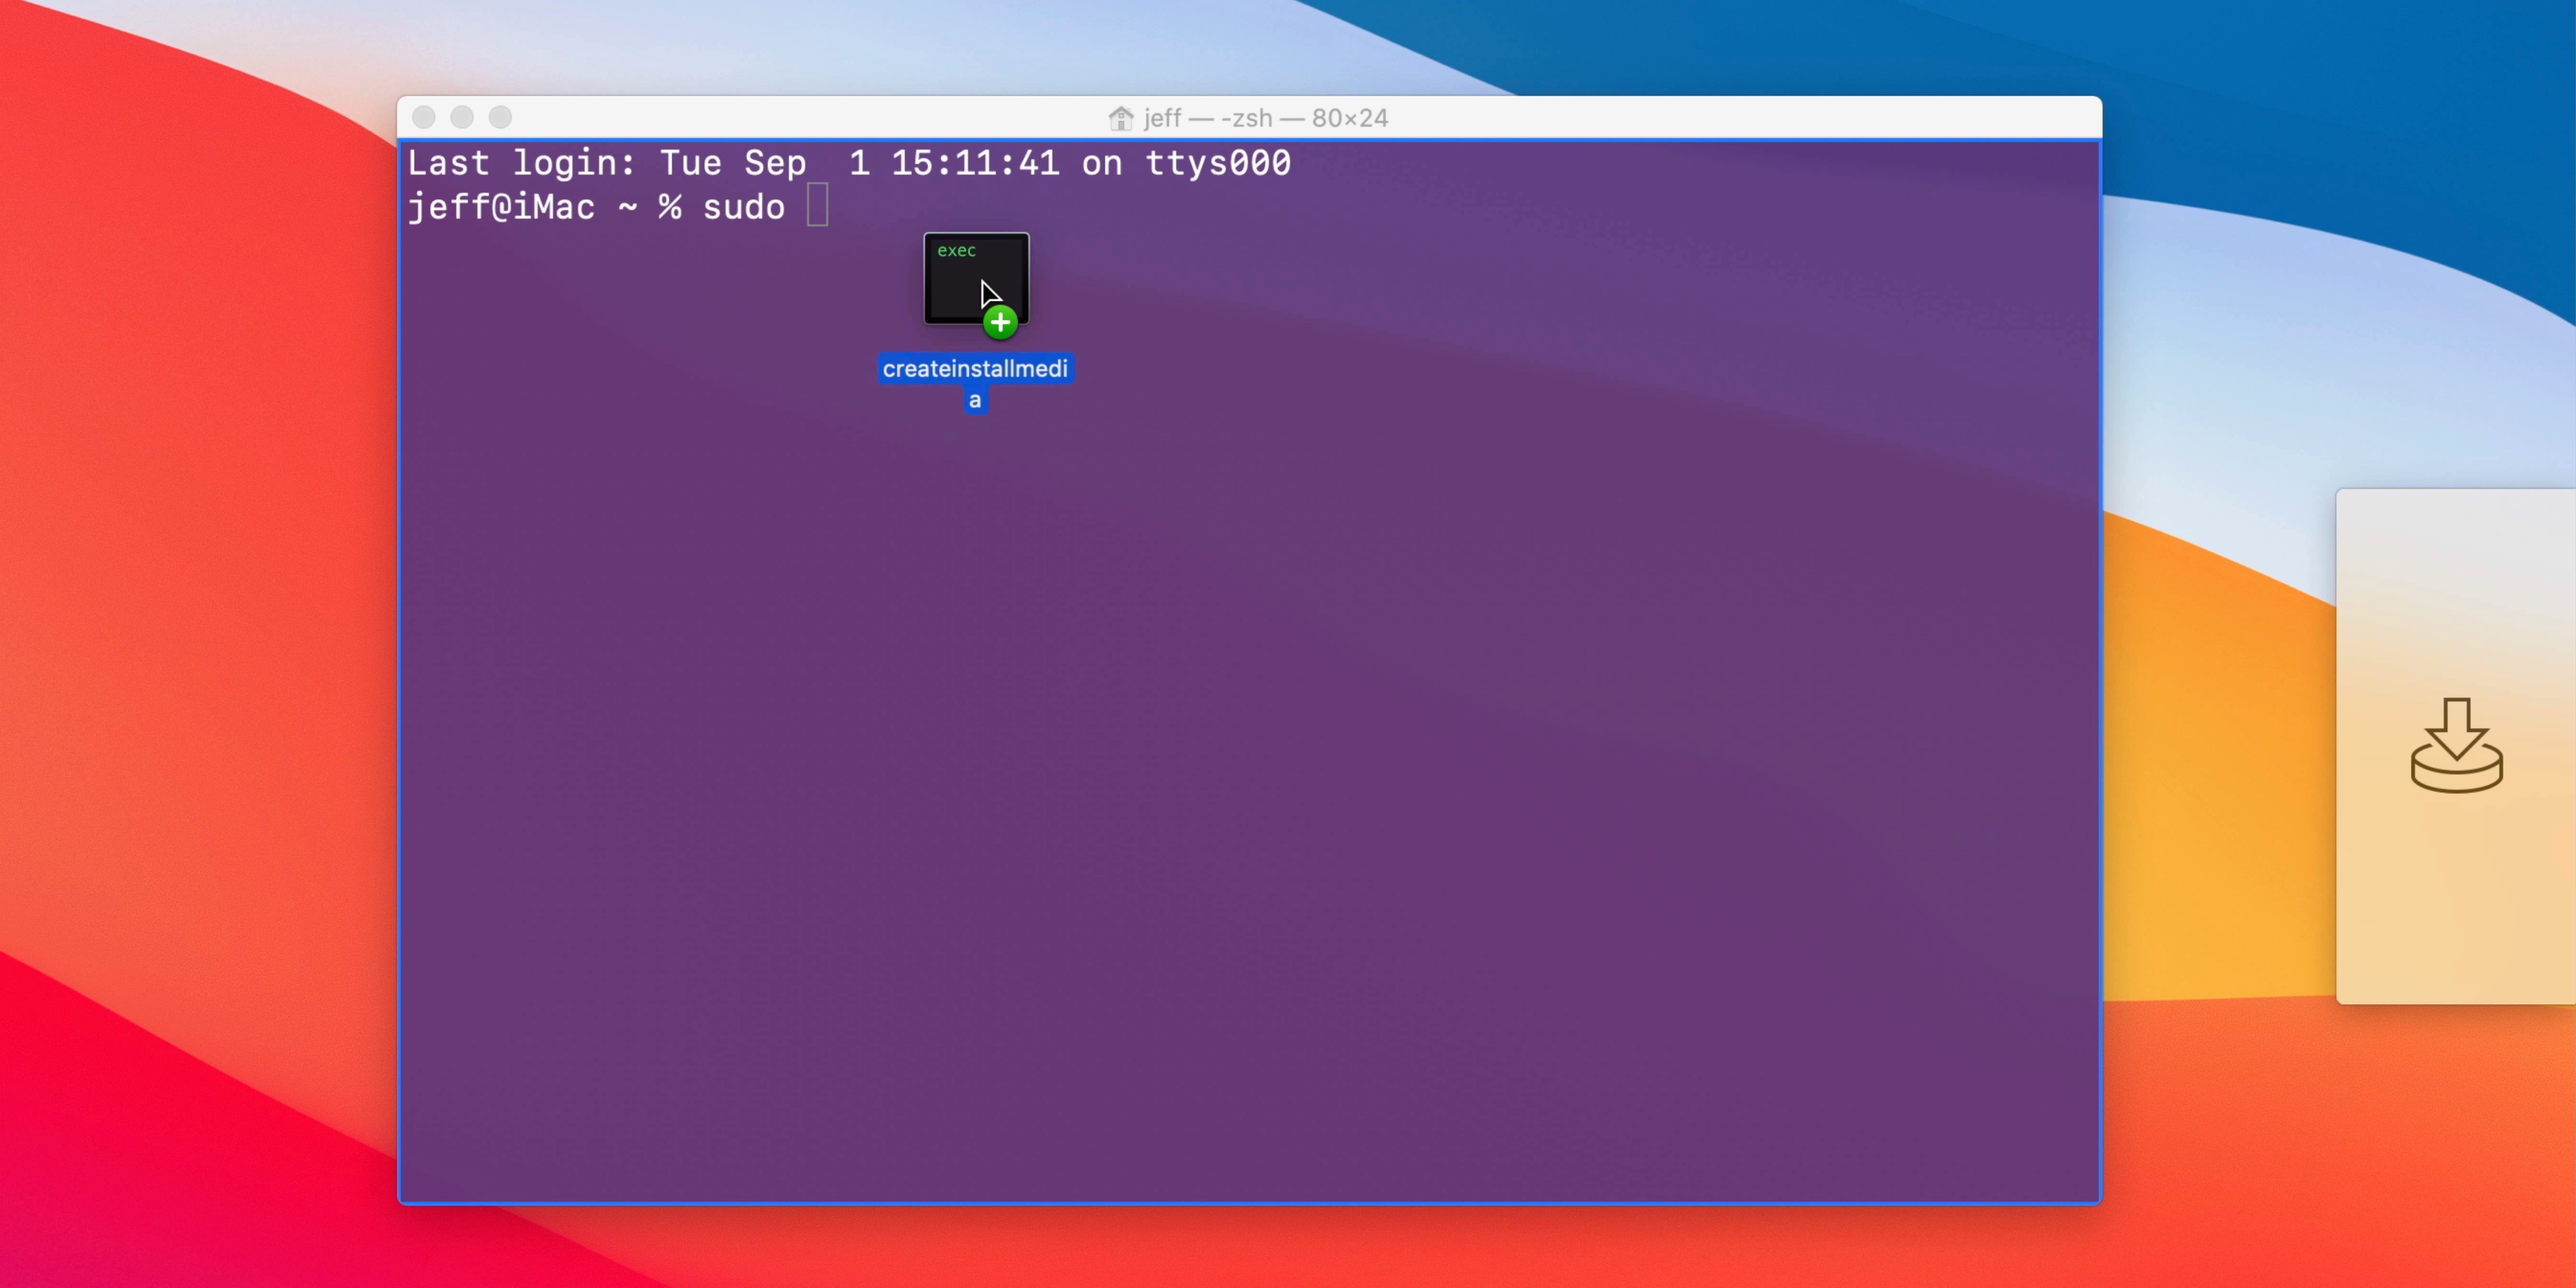
Step 6: Type sudo followed by a space in the Terminal window.
Step 7: Drag createinstallmedia to the Terminal window from the Resources folder noted in Step 4.
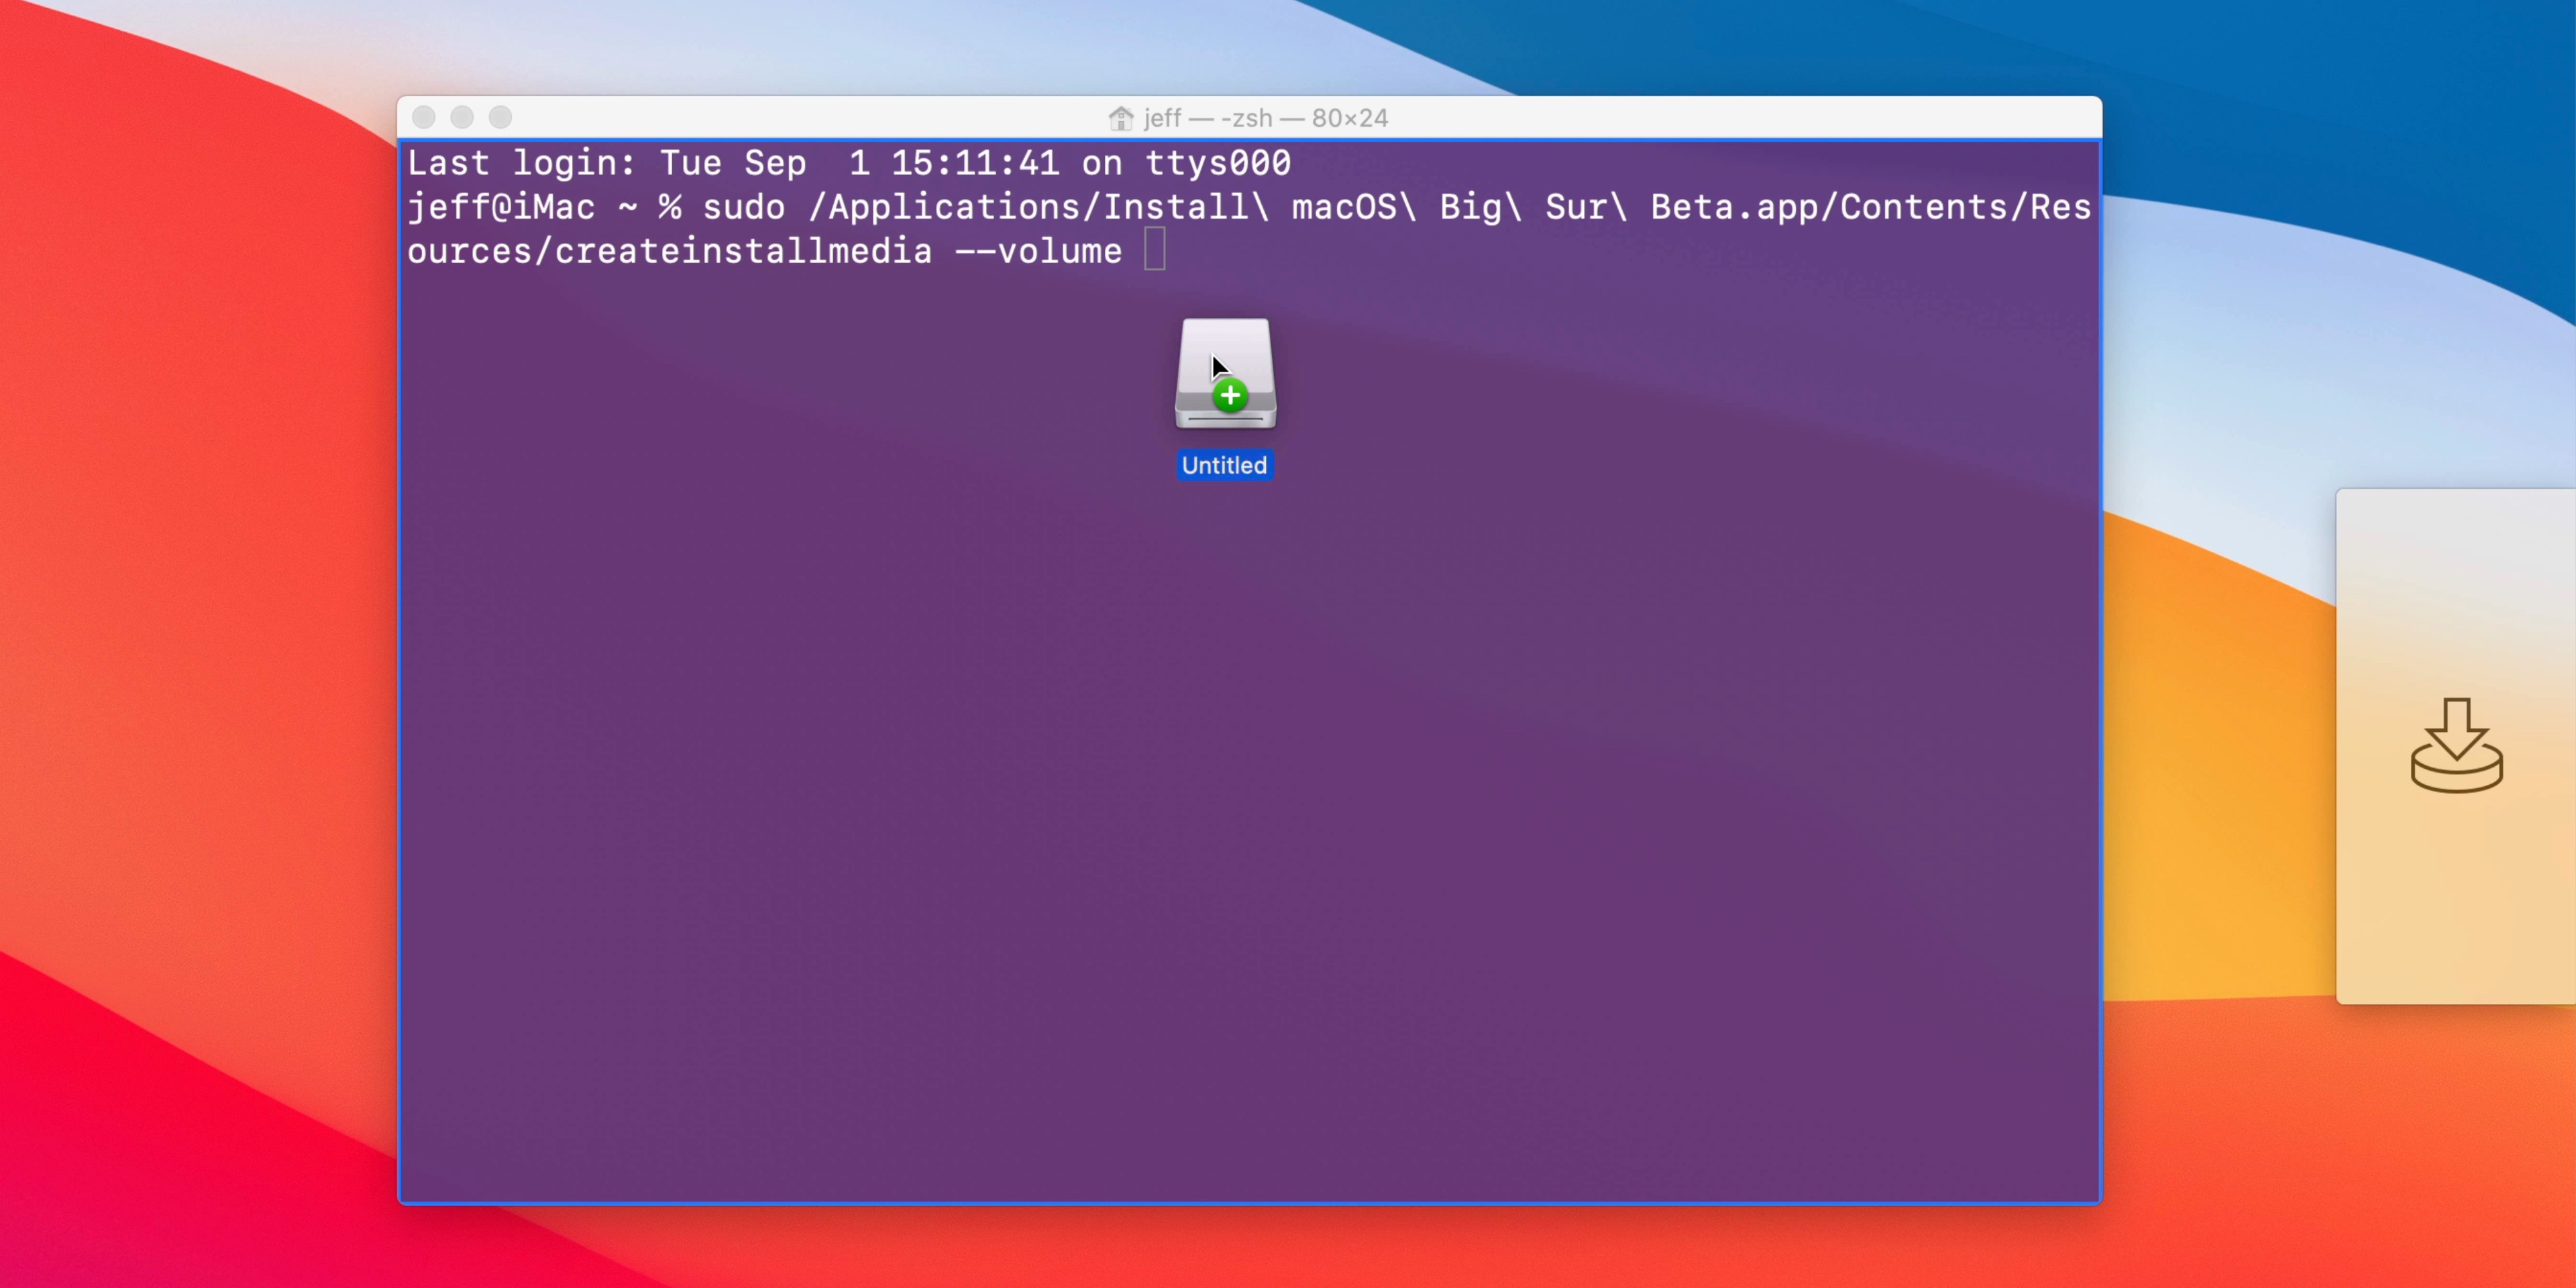
Step 8: Type --volume followed by a space.
Step 9: Open Finder → Go → Go To Folder…
Step 10: In the ‘ Go to the folder’ box type /Volumes and click the Go button.
Step 11: Connect a USB flash drive to your Mac; it should appear in the Finder window.
Step 12: Drag the USB flash drive volume into the Terminal window.
Step 13: Press the Return key on the keyboard to submit the full Terminal command and when prompted, enter your password.
Step 14: When prompted type a “y,” and press the Return key on the keyboard to submit.
Terminal may ask for access to files on the removable volume.
Step 15: The install process will begin by purging the contents of the connected USB drive. Afterward, the installer files will be copied to the drive. Because this process takes a few minutes to complete, you’ll need to exercise patience throughout the install process.
Using the macOS Big Sur USB installer
Creating the USB installer drive is easy, but actually using it can be challenging for users running Macs with Apple T2 Security chips. The aforementioned steps walk you through the basic process of creating the installer, but the video walkthrough goes even more in depth.
Details on how to enable booting from external/removable media via Recovery Mode are explained, along with direction on secure boot settings that I found helpful. Be sure to watch the full video for step-by-step details on how to utilize the USB installer drive once you’ve created it using the steps outlined above.
When installing macOS Big Sur, you’ll have several options at your disposal.
- You can choose to upgrade your existing macOS installation, going from macOS Catalina or previous versions of macOS to Big Sur.
- You can erase your existing installation and start from scratch.
- You can create a separate APFS volume and install macOS Big Sur there if you’d like to keep macOS Catalina around. Read and watch our tutorial about creating separate APFS volumes for macOS Big Sur for more details.
9to5Mac’s Take
Although there are Internet Recovery options available for reinstalling macOS, I like the idea of keeping a macOS USB installer around. It makes it easy to install macOS Big Sur on any compatible Mac, even if you haven’t downloaded the macOS Big Sur installer on that computer. It’s especially nice if you manage multiple Macs at home.
Do you make it a habit of creating bootable macOS USB install drives? Sound off in the comments with your thoughts on the matter.
FTC: We use income earning auto affiliate links. More.

Check out 9to5Mac on YouTube for more Apple news:

Apple’s Mac lineup consists of MacBook, MacBoo…
macOS Big Sur was announced on June 22nd at Appl…

Jeff is the head of video content production for 9to5. He initially joined 9to5Mac in 2016, producing videos, walkthroughs, how-tos, written tutorials, and reviews. He takes pride in explaining things simply, clearly, and concisely. Jeff’s videos have been watched hundreds of millions of times by people seeking to learn more about today’s tech. Subscribe to 9to5Mac on YouTube to catch Jeff’s latest videos.
Jeff Benjamin's favorite gear

AirPods Pro 2
The wireless headphones that I use everyday. Love the ANC and Transparency features.

15-inch MacBook Air
A spectacular balance of size and power.

Manage push notifications
- Apple Watch
- Accessories
- Digital Magazine – Subscribe
- Digital Magazine – Info
- Smart Answers
- 11th-gen iPad
- New AirPods
- Best Mac antivirus
- Best Mac VPN
When you purchase through links in our articles, we may earn a small commission. This doesn't affect our editorial independence .
How to create a bootable USB macOS installer

In this article, we’ll run through the steps necessary to create a bootable installer of the Mac operating system, whether it’s so you can install the latest version of the macOS on multiple Macs, install the latest macOS beta , perform a clean install of macOS , or just to be prepared with an emergency disk if your Mac experiences problems and you don’t want to connect to the internet in Recovery mode (or you can’t access Recovery mode ).
If you want to find out how to make a bootable install of the latest macOS beta, macOS Sonoma, macOS Ventura, macOS Monterey, Big Sur, Catalina, Mojave, or an older version of Mac OS X or macOS, you’ve come to the right place.
You can also use your bootable installer to install macOS on a separate volume of your hard drive (or on a partition if you are running an older version of the Mac OS). It’s also a hassle-free way to go back to an older version of macOS and a great option if you found downloading the installer took a long time and you don’t fancy spending the next few days downloading it multiple times on multiple Macs. Once is quite enough!
Luckily, making a bootable installation of the Mac operating system became a whole lot easier when Apple launched OS X Mavericks back in 2013. With that version of Mac OS X, and all versions since, it’s been possible to use the Terminal command createinstallmedia to create a bootable installer of the macOS, in this article we’ll show you how.
We will run through the following steps to create a bootable USB for Mac:
- Get the macOS installer files
- Create a bootable installer for macOS
- Choose the correct createinstallmedia command
If you want to run macOS on an external drive , which is slightly different, we have a separate article.

What you need to make a bootable USB for Mac
There are two main things you’ll need to make your bootable install drive: a USB stick (or a Thunderbolt drive) and the installation files. Once you have those two things the process shouldn’t take very long.
A 15GB Flash Drive (at least!)
We recommend a 15GB (or more) drive – in fact more would be advisable: the installer for Monterey was 12GB while Big Sur’s installer was 13GB.
We recommend a Flash memory stick, rather than a standard hard drive, as it will be quicker. You’ll also benefit from USB 3, or USB Type C – this may be your only choice if you have a newer Mac (otherwise you will need an adapter). If you have an M1 Mac you might actually be better off with a Thunderbolt drive because there have been some issues with using USB drives with the M1 Mac . Read our round-up of the best SSD drives for Mac where we recommend the LaCie Portable SSD , but you could use any cheap USB thumb drive.
Note: If you have data on the drive that you plan to use you will need to transfer it to another drive, or get a new drive, as it will be completely formatted and erased.
The installation files
Depending on which version of macOS you are running, and the version you want to to install, you will either be able to get the installation files from Software Update in System Preferences, the Mac App Store, or you will have to obtain them from elsewhere.
The Mac App Store is probably the easier option, but there can still be difficulties depending on which version of macOS your machine is running, and if you were hoping to grab older installation files that can be tricky – we have another article discussing how to get older versions of macOS .
It goes without saying that you will need an internet connection to download the software and you may need it while installing the version of macOS if it needs to check for firmware or confirm your iCloud credentials.
Step 1: Get macOS installer files
As we said already, how you get the installation files will depend on the version of macOS you are running currently and the version you want the installer for. Below we’ll look at how to get various macOS installers – including how to get older versions of the macOS or even Mac OS X. We do have a dedicated article about How to download old Mac OS X and macOS versions .
How to get macOS Sonoma installer
macOS Sonoma can be found on the Mac App Store or downloaded via Software Update if you haven’t yet installed it.
Download the installation files, but make sure you stop before the actual installation starts. When the installation starts the files will be disposed of, so you need to step in beforehand!
Once the installation files for Sonoma are downloaded you will be able to find them in the Applications folder via the Finder. It will look something like this:

You need to use these installation file to make the bootable installer on your USB stick. Instructions for that are below.
How to get a macOS beta installer
If you want to try out the latest beta you’ll need to sign up for the beta program, you will then be able to download the installer files.
We explain how to get and install the macOS beta here . We also have included the createinstallmedia code you’ll need for installing the latest beta via a USB below .
How to get Ventura, Monterey, Big Sur or older installer
To get the installer for macOS Ventura, Monterey or Big Sur follow these steps:
- macOS Ventura
- macOS Monterey
- macOS Big Sur
- macOS Catalina
- macOS Mojave
- macOS High Sierra
- Click on Get and the installation files will start to download.
- You may see a warning asking for confirmation that you want to download the software if you are already running it.
- Once the installer is downloaded DO NOT click on install as you need the installation file for the next stage of this tutorial.
Getting old versions of macOS is a little more difficult if you don’t know where to look, but Apple provides dmg files of these older macOS versions(you need to download them in Safari). A disk image named InstallOS.dmg will download and once it does you need to locate the pkg installer inside the disk image.
- macOS Sierra
- Mac OS X El Capitan
- Mac OS X Yosemite
Step 2: Create a bootable installer for macOS
Now you have the installation files, we can move on to the process of making the bootable installer.
Note, the createinstallmedia method described here doesn’t work under OS X 10.6 Snow Leopard or earlier – it requires OS X 10.7 Lion or later. Also, the processes have changed slightly since Mavericks so if your looking to create an installation of one of the ‘Cat’ versions of Mac OS X you should read this older article instead .
Since Mavericks, creating a bootable installation of macOS requires a single command in Terminal. The createinstallmedia command makes it possible to create a bootable copy of an installer on any drive that’s connected to your Mac. You’ll find all the createinstallmedia commands below , including the Monterey createinstallmedia command.
Note that the createinstallmedia command erases anything on your external disk though, so make sure there’s nothing on it that you need.
These are the instructions to follow to create your bootable USB – note there will be tiny adjustments depending on the installer you require:
- Plug in an external drive with at least 15GB space as that’s how much the installer will require.
- Launch Disk Utility (press Command + spacebar and start to type Disk Utility).
- Before this next step, note: if you are running High Sierra or later you will need to click on the View dropdown below the close minimize buttons. Choose Show All Devices from the options. Now you will see the external root drive in addition to the volume below it.
- Select the root drive in the sidebar (the next step won’t work if you only select the volume).
- Click on Erase.
- Choose Mac OS Extended (Journaled) as the Format.
- Choose GUID Partition Map as the Scheme.
- Your drive will probably be called ‘Untitled’ by default, you could give your drive a name such as ‘macOS’ or ‘USB’. (Note you will need to replace the term ‘MyVolume’ in the createinstallmedia command below with whatever name you give your drive).
- Wait while Disk Utility creates the partition and sets up the drive (this can take a few minutes).
- Then click Done.
- Now you are ready to make your bootable installer: open Terminal (the easiest way is to press Command + spacebar and then start typing Terminal. Otherwise you’ll find it in the Utilities folder).
- Copy the text that corresponds to the version of macOS you are installing into Terminal – you’ll find the text in the section below. Make sure that you use the name you have given your drive – e.g. change Untitled to MyVolume.
- Click Enter/Return.
- Terminal will ask for a password. This is your user password. Note you won’t see characters appear as you type it in, that’s fine. After typing in your password, press Enter.
- Terminal may also ask for permission to access the removable drive. Click ok.

- Now Terminal will spend a few minutes copying the installer file to your drive. “Copying installer files to disk… Copy complete” and so on will appear in the Terminal window.
- When Terminal has finished copying the installer you will see the words Copy complete and Done appear.
Step 3: Use the USB installer to update your Mac
Now you have the installer on the external drive you can use that to install copies of macOS on multiple Macs (as long as the Macs are supported by that version).
- Plug the external drive into the Mac that you want to install the macOS on.
- Start up the Mac. If you have an Intel-powered Mac hold down the Option/Alt key while it is booting up. If it’s an M1 Mac then you just press and hold the on switch until you see various options.
- Your Mac will eventually display the Startup Manager, click on your external drive to select that as the startup disk. Your Mac will now start up in Recovery Mode.
- Click on Install macOS and then click on Continue. The version of macOS on the bootable drive should start to install on your Mac now. (If you want to do a clean install, which means wiping your Mac first, follow the instructions here: How to do a clean install on a Mac.
- Eventually, the Mac should restart. Wait while the update takes place and then enjoy your newly updated operating system.

You can also run the Mac operating system directly from an external drive rather than your built-in startup disk, this is handy if you are testing new versions of the Mac OS. The process is different to the one described above though, and we cover it here: Read about How to run macOS on an external hard drive here .
Note that older versions of macOS used “applicationpath” while newer ones don’t – if you use the command you will get an error (we have the code for the all versions of macOS and Mac OS X below).
createinstallmedia commands
The createinstallmedia command will be slightly different depending on which version of macOS you are wanting to use.
Note MyVolume may have a different name for you, for example it might be USB or Untitled . Check in Disk Utilities, it’s the name of the external disk you are using.
Beware that we have heard of people copying and pasting in the -- only for them to change to a – in Terminal, so be careful of that. There should be two dashes!
sudo /Applications/Install\ macOS\ Sonoma.app/Contents/Resources/createinstallmedia --volume /Volumes/MyVolume
Sonoma beta
sudo /Applications/Install\ macOS\ Sonoma\ beta.app/Contents/Resources/createinstallmedia --volume /Volumes/MyVolume --nointeraction
sudo /Applications/Install\ macOS\ Ventura.app/Contents/Resources/createinstallmedia --volume /Volumes/MyVolume
sudo /Applications/Install\ macOS\ Monterey.app/Contents/Resources/createinstallmedia --volume /Volumes/MyVolume
sudo /Applications/Install\ macOS\ Big\ Sur.app/Contents/Resources/createinstallmedia --volume /Volumes/MyVolume
sudo /Applications/Install\ macOS\ Catalina.app/Contents/Resources/createinstallmedia --volume /Volumes/MyVolume
sudo /Applications/Install\ macOS\ Mojave.app/Contents/Resources/createinstallmedia --volume /Volumes/MyVolume
High Sierra
sudo /Applications/Install\ macOS\ High\ Sierra.app/Contents/Resources/createinstallmedia --volume /Volumes/MyVolume
sudo /Applications/Install\ macOS\ Sierra.app/Contents/Resources/createinstallmedia --volume /Volumes/MyVolume --applicationpath /Applications/Install/ macOS/ Sierra.app
sudo /Applications/Install\ OS\ X\ El\ Capitan.app/Contents/Resources/createinstallmedia --volume /Volumes/MyVolume --applicationpath /Applications/Install\ OS\ X\ El\ Capitan.app
sudo /Applications/Install OS X Yosemite.app/Contents/Resources/createinstallmedia --volume /Volumes/MyVolume --applicationpath /Applications/Install OS X Yosemite.app
For more advice read: How to start up your M1 or M2 Mac from an external drive
Author: Karen Haslam , Managing Editor

Karen has worked on both sides of the Apple divide, clocking up a number of years at Apple's PR agency prior to joining Macworld more than two decades ago. Karen's career highlights include interviewing Apple's Steve Wozniak and discussing Steve Jobs’ legacy on the BBC. Having edited the U.K. print and online editions of Macworld for many years, more recently her focus has been on SEO and evergreen content as well product recommendations and buying advice on Macworld.com.
- Dragon’s Dogma 2
- Genshin Impact
- Honkai Star Rail
- Lego Fortnite
- Stardew Valley
- NYT Strands
- NYT Connections
- Apple Watch
- Crunchyroll
- Prime Video
- Jujutsu Kaisen
- Demon Slayer
- Chainsaw Man
- Solo Leveling
- Beebom Gadgets
How to Create a Bootable macOS Big Sur USB Install Drive
How to Create a Bootable macOS Big Sur USB Install Drive (2021)

Download macOS Big Sur Installer Software
Another essential requirement is the macOS Big Sur installer software that you can download from the Mac App Store.
- Launch the Mac App Store and search for macOS Big Sur.

Use Terminal to Make a Bootable macOS Big Sur Drive

2. Now, select and copy the following command:

5. Now, an alert may appear saying, “Terminal would like to access files on a removable volume.” Click on “ OK ” in the pop-up window.

How to Boot macOS Big Sur from the USB Installer Drive
- Make sure the external drive is plugged in your Mac. Then, restart your Mac and hold down the Option/alt key. You need to press down the key when the Apple logo first appears on the screen and until the Startup Manager opens up.

2. When the Startup Manager appears, select your external drive. Now, your Mac will boot into Recovery mode , and a window with four options will appear.

Update the macOS Installer Drive
At times, you may need to update the installer drive to use it to clean install macOS Big Sur on your Mac machine.
- Connect your external drive and then restart your Mac and hold down the Option key while the Mac boots (when you see the Apple logo on the screen).

Change Mac Security Setting to Use an External Startup Disk

Create and Use a Bootable macOS USB Install Drive
Well, that’s all there is to it! So, that’s how you can create and use a bootable macOS Big Sur USB install drive. The same process works for older-gen macOS versions as well. With a bootable USB install drive at your disposal, it becomes effortless to clean install macOS on your Mac machine. If you have to perform updates or clean install OS more often than not, this has to be the preferred way to go.

Rajesh Mishra
An old school bibliophile who turned a tech nerd out of obsession. When he is not digging into hacks and tracking down stories that are breaking the internet, you may find him reciting poems.
correct line: sudo /Applications/Install\ macOS\ Big\ Sur.app/Contents/Resources/createinstallmedia –volume /Volumes/MyVolume
Worked for me – as written and with just the drive name change to reference teh real name of the USB stick. Thanks! I’d be trying to figure this out for a bit and had given up.
does not work. maybe start over
sudo /Applications/Install\ macOS\ Big\ Sur.app/Contents/Resources/createinstallmedia –volume /Volumes/MyVolume
Should read:
sudo /Applications/Install\ macOS\ Big\ Sur.app/Contents/Resources/createinstallmedia –volume /Volumes/Drive — /Applications/Install macOS Big Sur.app
Add new comment

- Press Releases
- Industry News
- Product Spotlight
- Fresh from Apple
- Video Production
- Installation Videos
- Explainer Videos
- Testing Lab
- Networking & Security
- Special OWC Deals
- The Other World
- Powered by OWC
- Space & Beyond
- Random Thoughts & Topics
- OWC Unplugged
- Article Archives
- Make a Suggestion
Send us a Topic or Tip
Have a suggestion for the blog? Perhaps a topic you'd like us to write about? If so, we'd love to hear from you! Fancy yourself a writer and have a tech tip, handy computer trick, or "how to" to share? Let us know what you'd like to contribute!

How to Create a Bootable USB Installer Disk for macOS Big Sur

Over the years, we’ve recommended using DiskMaker X as a quick and easy way to create a bootable install disk for various versions of macOS. Guillaume Gète, the developer of DiskMaker X , has decided to call it quits with the venerable utility. In explanation, Gète said:
I had a few hopes that thing would look a bit easier for macOS Big Sur, but they sure don’t look better at all. Though using the createinstallmedia command works fine from the Terminal, managing to embed it in a meaningful and easy-to-use way seems impossible for me now. Besides, I’ve been working on a lot of other projects in the last years, my own company needs me a lot more, and I feel I went from a fun project for something that seemed to be a life-changer (ok, maybe not that big, but still quite big) tool for many of you, and I’m really, really happy for this.
Mac users wishing to create a bootable install disk for Big Sur now need to use the createinstallmedia command in Terminal, and here’s how to do it. These instructions work to create a bootable install disk for all versions of macOS from macOS 11 Big Sur back to OS X El Capitan 10.11.
What’s needed to create a bootable install disk
- A USB flash drive or other secondary volume formatted as Mac OS Extended, with at least 14GB of available storage
- A downloaded installer for macOS Big Sur, Catalina, Mojave, High Sierra, or El Capitan

Download macOS from Apple
To ensure that you’re getting a valid, un-hacked, and legal version of macOS, you need to download it directly from Apple. For macOS Big Sur , macOS Catalina , macOS Mojave or macOS High Sierra , the links download an installer directly into your app folder. The installer has the name “Install macOS [version name]”.
For Mac OS X El Capitan, the link downloads a disk image file named InstallMacOSX.dmg. When the file is downloaded, double-click it to install an app named “Install OS X El Capitan” into your Applications folder.
Using “createinstallmedia” in Terminal
Let’s get down to business.
- Plug in the USB flash drive or formatted volume you’re using for the bootable install disk. For this article, I used a 2TB USB hard disk drive erased and formatted as Mac OS Extended and given the name Installer.
- Find the Terminal app in the Utilities folder of your Applications folder. Launch the app.
- At the Terminal prompt, type or copy and paste (easier and more accurate) one of the following commands. These commands are dependent on the installer being in your Applications folder. In each command, replace the name MyVolume with the name of your volume. For my example, I replaced it with Installer .
High Sierra:*
El capitan:.
NOTE (*): If your Mac is using macOS Sierra or earlier, include the “–applicationpath” argument and installer path, as shown in the command for El Capitan.
- Once the command has been entered, press Return.
- You’ll be prompted to type your administrator password and press Return again. Note that for security, Terminal doesn’t display characters as you type your password.
- When you’re asked, type Y to confirm that you want to erase your bootable installer volume, then press Return. Terminal displays the progress of the erasure.

- Once the volume is erased, an alert may appear stating that Terminal would like to access files on a removable volume. If you see this, click OK to allow the copy to move ahead.
- Once Terminal shows that the process is complete, the volume has the same name as the installer you downloaded, such as Install macOS Big Sur. You can now quit Terminal. Eject the volume by dragging it to the Trash or right-clicking and selecting “Eject” from the menu.

Using the Bootable Install Disk
Do you have a Mac with Apple silicon? If so, there’s a slightly different process. To see if your Mac uses Apple silicon, select About This Mac from the Apple () menu. If it shows Apple M1 or another Apple chip, then follow the Apple silicon instructions. Otherwise, use the instructions for an Intel processor.
For Apple Silicon Macs
- Plug your bootable installer into a Mac that has an Internet connection and that is compatible with the version of macOS you’re about to install.
- Turn on the Mac and continue to hold down the power button until you see the startup options window. It displays all bootable volumes (which should be your installer and the internal drive on your Mac), and a gear icon labeled “Options”.
- Select the volume with the bootable installer, then click Continue.
- The macOS installer opens. Follow the onscreen instructions.
For Intel Processor Macs
- Restart or turn on your Mac, then immediately press and hold the Option (Alt or ⌥) key.
- Release the Option key when a dark screen appears displaying your bootable volumes.
- Select the volume with the bootable installer, then click the Up arrow or press Return. If you’re unable to start up from the bootable installer, then you’ll need to use these instructions from Apple to allow booting from external media .
- If prompted, select your language.
- Select Install macOS (or Install OS X) from the Utilities window. Click Continue, then follow the onscreen instructions.
It’s a great idea to have a bootable install disk available for those rare emergencies when you might need to re-install your Mac operating system and Recovery Mode isn’t working. With OWC external drives available for as little as $79.75 , it’s inexpensive insurance.
Related Links
- How to Create a Bootable macOS Catalina Installer
- OS X El Capitan: Download and Installation Quick Guide
- Video shows how to Add more Memory to the October 2009 MacBook
- Friday Five: Great New Features in OS X El Capitan
- Revisiting WWDC: A Detailed Look at OS X, iOS, watchOS Announcements
Other Topics You Might Like:

Leave a Reply Cancel reply
Save my name, email, and website in this browser for the next time I comment.
Notify me of follow-up comments by email.
Notify me of new posts by email.
12 Comments
Is there a way to make a USB stick with the latest Big Sur installer on it? I don’t need a bootable drive as I have a computer with Big Sur already on it and just want to do the latest update. Basic problem is that the computer is located in a very remote area with only DSL internet which is totally unsuited to handling such a big download. I’d like to make the stick at home and then bring it up and just plug it in and install. As this is not a “full” new install will my plan work?
I have followed these steps several time and all seems to go well. I end up with a USB drive with the installer as the only file on the disc. But the disc never appears as a bootable disc when I plug it into another Mac.
Richard, you’re wanting to end up with files inside the installer bundle getting copied to the drive. There has to be a System folder with appropriate contents that would be discovered as bootable.
Have you tried using Diskmaker or Install Disk Creator?
Problem solved… simply too aggressive settings in Little Snitch (app-level firewall). Been using these settings for a LONG time, not sure yet exactly why this problem showed up here, but… just Murphy’s Law at work.
I have been trying for some time to find a legit copy of the High Sierra installer, and was hoping your download links given above would work for me. Unfortunately, they do not. I have tried repeatedly with every combination of browser, logged in/out App Store status, App Store running or not when invoked, etc. that I can think of. All return a “Cannot Connect” dialog, retires allowed but useless. What a I missing? Thanks for any help.
Instead of the actual installer, from the link for High Sierra I’m getting a ‘stub’ that apparently then downloads the real installer during the installation process.
Anyway, when I try to make the USB stick standalone, I get “/Applications/Install macOS High Sierra.app does not appear to be a valid OS installer application.”
This is INCREDIBLY frustrating, I’m trying to build an installer for a friend who does not have reliable internet and can’t download a 5gb installer to his own machine.
What about Install Disk Creator. https://macdaddy.io/install-disk-creator/
How exactly do those installers download? When I click on one of those links my System Preferences/Software Update window opens as if I’m replacing my existing OS with what I’ve clicked. Am I missing something or am I not understanding the mechanics here?
Not missing anything. The Software Update pane has been handling the download process of macOS installers since Mojave. System Preferences doesn’t itself run major macOS upgrades. It only downloads the standalone installer bundles that run separately.
Thanks. Could it be done using this simply 1-2-3 procedure?
Format target drive as GUID Partition Map and either HFS+ or APFS. Download the macOS full installer from Apple App Store. Open the installer and install into the formatted target drive.
No command-line interface. No extra application required. Easy and intuitive. The Mac way!
You are not trying to install the OS on the USB drive. This is to setup the USB drive to boot up and install the OS on the internal HD from the USB key.
Say, not on this topic exactly – but perhaps doing a story on the new Big Sur 11.3 upgrade potentially causing some real problems might be worth a story…
You Might Also Like
Apple Unveils New iPad Pro, Its Thinnest Product Ever with “World’s Most Advanced” OLED Display
M4 is Here: Apple’s Latest Chip Adds Dedicated Display Engine
Apple Adds External Drive Editing, Multicam Production in Final Cut Pro for iPad 2
How To Share Passwords With Others in macOS Sonoma Using iCloud Keychain
Email Address
- Brand Assets
8 Galaxy Way Woodstock, IL 60098 1-800-275-4576 +1-815-338-8685 (Int)
All Rights Reserved, Copyright 2020, OWC – Since 1988 | Terms of Use | Privacy Policy
We use cookies to provide you with a full shopping experience, including personalized content, and to help us improve your experience. To learn more, click here .
By continuing to use our site, you accept our use of Cookies, Privacy Policy and Terms of Use .

How to Create a Bootable macOS Big Sur USB Flash Drive
This tutorial shows you how to create a bootable macOS Big Sur Flash Drive so you can upgrade a Mac that doesn’t have a DVD drive.
Table of Contents
Before we begin
You will need a USB Flash drive big enough to store the macOS Big Sur installer (13.57 GB). The USB Flash Drive will need to be wiped so don’t use a drive with existing data because you will lose it.
If you don’t have a spare USB Flash Drive, I recommend getting a 16 GB SanDisk Ultra Fit from Amazon * because they are fast, reliable and have a micro form factor. If you’re using a Mac that doesn’t contain USB ports, you might also need an Apple USB-C to USB Adapter *.
You will also need to download the macOS Big Sur installer app to your Applications folder. You can do this using the command line by following the instructions in this tutorial .
Now that you’ve got your hands on a USB Flash Drive and a USB-C to USB Adapter, let’s copy the macOS installer to the drive and make it bootable by following the steps below.
Instructions
- Connect the USB Flash Drive to your Mac, open the Disk Utility app, right click on the SanDisk USB Flash Drive then click Erase…
- Give the disk a name of SanDisk , select MacOS Extended (Journaled) , GUID Partition Map then click Erase .
- When the Erase is complete, click Done .
- Click on the new SanDisk volume and you will see it has a mount point of /Volumes/SanDisk . Make a note of the mount point because we’ll use it in the command to create the installation media.
- Open the Terminal app and change into the directory containing the createinstallmedia utility.
- Run the createinstallmedia utility. Replace the volume with the mount point of your erased disk.
- When asked to erase the volume, press y then return.
- Wait for the installer to be copied and the disk to be made bootable.
You now have a bootable macOS Big Sur USB Flash drive that you can use to upgrade your Mac or do a fresh install.
David Miller is a seasoned tech aficionado with a profound expertise in NGINX and Ubuntu. With a career spanning over a decade, David has honed his skills in optimizing web servers and enhancing server performance to perfection. His deep-rooted passion for open-source technologies has led him to become a go-to resource in the field. Whether it’s crafting intricate NGINX configurations or troubleshooting complex Ubuntu server issues, David’s problem-solving prowess shines through.
Create a bootable installer for macOS
You can use a USB flash drive or other secondary volume as a startup disk from which to install the Mac operating system.
These advanced steps are primarily for system administrators and other experienced users who are familiar with entering commands in Terminal.
You don’t need a bootable installer to upgrade macOS or reinstall macOS , but it can be useful if you want to install macOS on multiple computers without downloading the installer each time, or if you can’t install a compatible macOS from the Finder or macOS Recovery.
Download a full macOS installer from Apple
Connect a usb flash drive to your mac, use terminal to create the bootable installer, use the bootable installer.
To get a full macOS installer:
Download macOS from the App Store or your web browser using the links provided in How to download and install macOS .
Download from a Mac that is using the latest version of OS X El Capitan or later and is compatible with the macOS you’re downloading. Find out which macOS your Mac is using .
Enterprise administrators: download from Apple, not a locally hosted update server.
After you have the installer:
Make sure the installer is in the Applications folder of your startup disk. This is the folder that opens when you choose Go > Applications from the menu bar in the Finder.
Make sure the installer is named Install [Version Name], such as Install macOS Sonoma. It should be an app, not a disk image (.dmg) or package (.pkg) that contains the installer.
Connect a USB flash drive or other secondary volume to your Mac.
When you create the bootable installer, this volume will automatically be erased.
A 32 GB USB flash drive has more than enough storage space for any macOS installer, and 16 GB is enough for most earlier versions of macOS. If more space is needed, Terminal will let you know.

Connect the USB flash drive directly to your Mac.
Open Terminal, which is in the Utilities folder of your Applications folder.
Type or paste one of the commands below Each command assumes that the installer is in your Applications folder and MyVolume is the name of the USB flash drive. If it has a different name, rename it or replace MyVolume in the command as needed.
When prompted, type your administrator password. Terminal doesn't show any characters as you type. Then press Return.
When prompted, type Y to confirm that you want to erase the volume, then press Return. Terminal displays the progress as the volume is being erased. If Terminal can’t erase successfully, use Disk Utility to erase the volume using Mac OS Extended (Journalled) format, then start again from the beginning.
After the volume is erased, you may see an alert stating that Terminal would like to access files on a removable volume. Click OK to allow the copy to proceed.
When Terminal says that the install media is now available, the volume will have the same name as the installer, such as Install macOS Sonoma. You can now quit Terminal and eject the volume.
Commands to use in Terminal
Depending on which macOS you downloaded, enter one of the following commands in Terminal as instructed above. Replace MyVolume in the command with the name of your volume, if different.
If the Mac you’re using to create the bootable installer is using macOS Sierra or earlier, append --applicationpath to your command, followed by the appropriate installer path, similar to what is shown in the command below for El Capitan.
sudo /Applications/Install\ macOS\ Sonoma.app/Contents/Resources/createinstallmedia --volume /Volumes/MyVolume
sudo /Applications/Install\ macOS\ Ventura.app/Contents/Resources/createinstallmedia --volume /Volumes/MyVolume
sudo /Applications/Install\ macOS\ Monterey.app/Contents/Resources/createinstallmedia --volume /Volumes/MyVolume
sudo /Applications/Install\ macOS\ Big\ Sur.app/Contents/Resources/createinstallmedia --volume /Volumes/MyVolume
sudo /Applications/Install\ macOS\ Catalina.app/Contents/Resources/createinstallmedia --volume /Volumes/MyVolume
sudo /Applications/Install\ macOS\ Mojave.app/Contents/Resources/createinstallmedia --volume /Volumes/MyVolume
High Sierra:
sudo /Applications/Install\ macOS\ High\ Sierra.app/Contents/Resources/createinstallmedia --volume /Volumes/MyVolume
El Capitan:
sudo /Applications/Install\ OS\ X\ El\ Capitan.app/Contents/Resources/createinstallmedia --volume /Volumes/MyVolume --applicationpath /Applications/Install\ OS\ X\ El\ Capitan.app
Follow the appropriate steps based on whether the Mac receiving the macOS installation is a Mac with Apple silicon .
Mac with Apple silicon
Shut down or turn off the Mac.
Connect the bootable installer to the Mac.
This Mac must be compatible with the macOS that you’re installing. If it isn’t, it may start up to a circle with a line through it .
This Mac must be able connect to the Internet. A bootable installer doesn’t download macOS, but it does need an Internet connection to get firmware and other information for this Mac model.
Turn on the Mac and continue to hold the power button until you see the startup options window , which shows your bootable volumes, including the bootable installer.
Select the bootable installer, then click Continue.
When the macOS installer opens, follow the onscreen installation instructions.
Any other Mac
This Mac must be able to connect to the Internet. A bootable installer doesn’t download macOS, but it does need an Internet connection to get firmware and other information for this Mac model.
Turn on the Mac, then immediately press and hold the Option (Alt) key.
Release the Option key when you see a dark screen showing your bootable volumes, including the bootable installer.
Select the bootable installer. Then, click the onscreen arrow or press Return.
If you’re using a Mac with the Apple T2 Security Chip and you can’t start up from the bootable installer, make sure Startup Security Utility is set to allow booting from external or removable media.
Choose your language, if prompted.
Select Install macOS (or Install OS X) from the Utilities window, then click Continue and follow the onscreen instructions.
Find out more
For more information about the createinstallmedia command and the arguments you can use with it, make sure the macOS installer is in your Applications folder, then enter the following in Terminal, replacing InstallerName with the name of the installer:
"/Applications/InstallerName.app/Contents/Resources/createinstallmedia"
Example : "/Applications/Install macOS Sonoma.app/Contents/Resources/createinstallmedia"
How to create a bootable installer for macOS Big Sur

Before you start
If you're thinking about installing macOS Big Sur , the first thing to consider is whether you want to install it directly onto your Mac or create a bootable drive. You can use a bootable drive on a hard drive partition for dual-software installation, to install on multiple Macs in your home, or as a bootable drive if you can't use the Internet Recovery partition.
Note: These instructions require the use of Terminal. If you don't feel comfortable making changes to your Mac with Terminal, you can create a bootable disk using the DiskMaker X program .
Before you get started, make sure you have a thumb drive with at least 15GB of storage , or a spare external hard drive (the one you aren't planning to use for anything else). You'll also need to download macOS Big Sur and ensure that it's sitting in your Applications folder.
Note: After macOS Big Sur has downloaded, it will automatically launch the installer to begin the installation process. Quit the installer when this happens.
And please: Don't forget to back up your Mac before you do anything.
How to format your external drive for macOS Big Sur
You'll need to start with a clean thumb drive or external hard drive to make it a bootable drive.
- Plug the thumb drive or cable for your hard drive into the appropriate port on your Mac.
- Click on Finder in your Dock to open a Finder window.
- Select Applications from the list on the left side of the window.

- Scroll down and double-click on Utilities .
- Scroll down and double-click on Disk Utility .

- Select your thumb drive or external drive under External .
- Click on the Erase tab at the top of the window.

- Note the name of your external hard drive (probably "Untitled") because you will need it when you create a bootable drive . If you have more than one external drive with the same name, you will need to rename the drive you are using as a bootable installer now.
- Select Mac OS Extended from the format list. Do not use the (Case sensitive) option.
- If Scheme is available, select GUID Partition Map .
- Choose Erase .
- Click Done when the process is complete.
- Close the Disk Utility window.
Your thumb drive or external hard drive is now ready.
Master your iPhone in minutes
iMore offers spot-on advice and guidance from our team of experts, with decades of Apple device experience to lean on. Learn more with iMore!
How to put macOS Big Sur onto your external drive
Important: You will need to use an administrator account on your Mac to run the Terminal commands to create a boot drive. You'll also need to ensure that macOS Big Sur is in your Applications folder , and you'll need to know the name of the external drive.
- Scroll down and double click on Terminal .

- Recall the name of your formatted external drive when entering the following text into Terminal. If it is not named "MyVolume," you will need to change the command syntax for the pathname where it says: Volumes/MyVolume . The name of the drive can't have any spaces, and it is case sensitive.
- Enter the following text into Terminal ( Don't forget to change the name "MyVolume" in the text below to the actual name of your external drive. Names are case sensitive and shouldn't have space. ):sudo /Applications/Install\ macOS\ Big\ Sur.app/Contents/Resources/createinstallmedia --volume /Volumes/MyVolume
- Hit the enter/return key.
- Enter your administrator account password. This is the password you use to make changes on your Mac or log in. No text will appear in Terminal when you enter the password.
The process could take a very long time, depending on the drive. When it is done, the Terminal window will report "Done." Your external hard drive will now be named "Install macOS Big Sur." Safely eject the drive from your Mac.
How to install macOS Big Sur with a bootable installer drive
Once macOS Big Sur is installed on your external drive, you can install it on any Mac with the drive plugged into it. You can use this installer to upgrade your operating system easily on multiple Macs or to help downgrade if you decide you want to go back to an earlier version of macOS.
If you're downgrading from macOS Big Sur, please check out this guide instead.
How to downgrade from macOS Big Sur
If you're upgrading to macOS Big Sur, follow the steps below.
- Turn off the Mac you want to install macOS Big Sur with the bootable installer drive.
- Connect the external drive to your Mac via the USB port.
- Turn on your Mac.
- Hold down the Option key when it starts up.
- Select the external drive with macOS Big Sur on it from the systems' list to start up your computer.
- Follow the installation process when prompted.
Looking for a new machine?
If you're in the market for a new computer, be sure to check out our list of the current Macs . You'll be happy you did!
Do you have any questions about how to create a bootable drive for the macOS Big Sur installer? Let us know in the comments.
Updated November 2020: Updated for macOS Big.
○ macOS Big Sur Review ○ macOS Big Sur FAQ ○ Updating macOS: The ultimate guide ○ macOS Big Sur Help Forum

Lory is a renaissance woman, writing news, reviews, and how-to guides for iMore. She also fancies herself a bit of a rock star in her town and spends too much time reading comic books. If she's not typing away at her keyboard, you can probably find her at Disneyland or watching Star Wars (or both).
Why I found a fresh install of macOS the solution to (almost) all my problems
macOS 15 set to get a revamped and smarter Calculator app that looks like the one on iOS
OpenAI might have just given us our best look yet at an AI-powered Siri
Most Popular
- 2 iOS 17.5 introduces Apple and Google's anti-stalking tech for Bluetooth trackers
- 3 This Lego radio speaker doesn't actually get the radio, but your iPhone can make it play music
- 4 AirPods Max $100 off at Amazon — but act fast, the deal ends soon
- 5 iOS 17.5 released to all users after public beta, alongside iPadOS 17.5
Create macOS Big Sur 11 / 11.0.1 Installer USB Drive [Tutorial]

Here is how you can create the macOS Big Sur 11 / 11.0.1 installer USB drive for clean install on your Mac, MacBook and more.
You can Create a macOS Big Sur USB Installer Drive in a Few Steps, Use it Later for Clean Install or Share it with Someone Else Who Needs One
It's here, it's out now. Big Sur is available for download. But which route should you take to install it? Should you just perform an update over the air or do a clean install? There are pros and cons to both.
Related Story Apple’s Next iPad Air To Jump To TSMC’s 3nm Chip, As Company Creates An Even Wider Gap With The ‘Pro’ Models
If you are going for an over the air installation, it's plain and simple. But, you might run into performance issues. Clean installation is the way to go if you want to experience a new OS at its maximum potential. The downside? It will wipe your drive clean, meaning you have to backup everything before you go ahead with it. That's not all, you have to go through other things as well, such as creating a USB installer for macOS Big Sur. Don't worry, that's why you are here and we will guide you through it all.
Prerequisites
But first, a few important things:
- Backup everything to iCloud or use an external drive to do so
- Grab hold of a USB-A / USB-C flash drive with at least 32GB of onboard storage
- Connect the flash drive to your Mac and erase it using Disk Utility
- Make sure you have downloaded the macOS Big Sur installer and place it inside the Downloads folder. Read this post on how to do that: Download macOS Big Sur 11 / 11.0.1 Final Installer, Available for All Compatible Macs
Step 1. Connect your USB drive into your Mac's USB port
Step 2. Make sure the macOS Big Sur image file is in your Downloads folder. Go to the /Applications folder and drag it to /Downloads
Step 3. Launch Terminal and type in:
Step 4. Now, go to the /Downloads folder, right-click on the Big Sur image file and then click on Show Package Contents
Step 5. Find a file labeled createinstallmedia in Contents > Resources then drag and drop it into the Terminal window in which you typed in the sudo command in step 3
Step 6. Now, add the following command after the command string:
Note: add the above command after hitting the space bar once and that there is a double dash before volume.
Step 7: The entire command string should now look something like this
sudo [macOS Big Sur string] --volume
Step 8. Launch Finder
Step 9. You should see your flash drive listed in the left hand side pane. Click and hold on the USB drive's listing and drag it to the Terminal window
Step 10. Press the Return key on your keyboard and enter your Mac's password to begin the process
Step 11. Once complete, you can use the drive to clean install Big Sur, the steps for which are outlined below:
- How to Clean Install macOS Big Sur [Tutorial]
Want to learn about the new features in macOS Big Sur? Read more below:
- macOS Big Sur Official – New Dock Designs, Updated Widgets, Fresh Control Center and an Aesthetically Upgraded UI for Apps
Further Reading

OpenAI’s New GPT-4o Model Is “Much Faster,” Enhances Text, Visual, And Audio Capabilities – Dedicated ChatGPT App Available For Mac

Apple’s Latest M4 iPad Pro Models Have Worse Battery Life Than The M1 mini-LED Version In Early Runtime Tests, Despite Switching To OLED Technology

Apple Could Likely Lose Against Epic Games In Court Battle, As US Judge Criticized Apple’s Response

Download: Apple Has Finally Released iOS 17.5 For The iPhone [Changelog]
Trending stories, bill gates predicted 19 years ago today that apple cannot sustain the success of the ipod thanks to the inevitable entry of smartphones, openai’s chief scientist ilya sutskever – who had backed the coup against sam altman – quits to work on a “personally meaningful” project, it’s the end of road for intel’s ponte vecchio gpu, company now focused on falcon shores development, resident evil remake powered by re engine is in the works; leon kennedy will be in resident evil 9 – rumor, popular discussions, nvidia to unveil geforce rtx 5090 & rtx 5080 at the same time, availability a few weeks apart, amd’s fastest multi-threaded cpu, the ryzen 9 7950x, is now available for $464, 7950x3d price drops to $544, nvidia’s aib partner, manli, rejects rma request for “melted” geforce rtx 4090 gpu, says its “user error”, amd ryzen & intel core cpus available in crazy good deals at microcenter, fantastic bundle deals too, amd rdna 5 to be a completely new gpu architecture from the ground up, rdna 4 mostly fixes rdna 3 issues & improves ray tracing.
Make a Bootable USB macOS Installer Download the update for Big Sur compatibility
What’s needed for a clean install on a mac.
- A backup of the disk before it’s erased. Two options are to use Duplicate (a free utility which can copy and paste an entire bootable volume), or Mac Backup Guru (a paid, fully featured backup utility with unique incremental backups capability) for that. Here is a detailed guide for the process.
A Mac operating system installer. MacOS Big Sur can be downloaded by clicking here.
Uninstallation:
All of the apps on MacDaddy are fully self contained and easy to uninstall. Just drag and drop the application to the trash in the Finder.
If you need to recover deleted files take a look at Mac Data Recovery Guru on our sister-site dedicated to data recovery.
Paypal / credit card donations: click here Bitcoin donations: 1MbwUFSbQvMrd826DTpup7PpTTNrrJjaJ8
Total downloads: 1,678,418 Total donated: $33.99
Enter your email address to receive very occasional updates
Email Address
Mac Backup Guru Backup with space saving tech. Flagship product
File Extractor Extract the files that are within files
(Free) Style App Like Prisma on your Mac or PC
(Free) Install Disk Creator Make a bootable macOS install disk
(Free) Duplicate Copy and paste anything, even a bootable disk
Mac Data Recovery Guru Recovers deleted files
(Free) Battery Guru Display the current battery drain in your menu bar
Photo Recovery Guru Recover deleted files from cameras
Tips & Tricks
Troubleshooting, how to create macos big sur beta bootable usb install drive.

Advanced Mac users often want to make a boot disk installer for macOS Big Sur beta, allowing for something like a USB flash drive to be used to boot and install macOS Big Sur onto any compatible Mac.
Bootable MacOS installer USB drives provide for the ability to clean install macOS Big Sur, update to macOS Big Sur, install macOS Big Sur beta onto multiple Macs without redownloading the installer, as well as the ability to use Disk Utility to partition and erase a machine, perform Time Machine restorations, and more.
If you’re interested in creating a macOS Big Sur bootable USB install drive, this tutorial will walk through that process.
Requirements for making a boot macOS Big Sur USB Install Drive
To make a bootable macOS Big Sur beta installer drive, you will need the following:
- A USB flash drive (16GB or larger) that will be formatted to become the USB installer drive for macOS Big Sur beta
- A complete “Install macOS Big Sur.app” installer application in the /Applications/ folder ( downloaded from the public beta or developer beta)
- A MacOS Big Sur compatible Mac
- Comfort with the command line
If you haven’t already downloaded the macOS Big Sur beta installer application, you will need to do that before beginning the process, meaning you will also need an internet connection.
The rest of the process of creating a macOS Big Sur (macOS 11 aka macOS 10.16) USB installer drive involves the terminal. This means that this process is most appropriate for advanced users with understanding of the command line. Improper usage of the command line in this process may result in permanent data loss by erasing the wrong disk. If you’re not thoroughly certain of your capabilities, backup your Mac before beginning.
How to Make a Bootable macOS Big Sur Beta USB Installer Drive
Be sure to use precise syntax at the command line, failure to do so may result in permanent data loss. Proceed at your own risk.
- Connect the USB flash drive to the Mac that you wish to turn into the bootable macOS Big Sur installer, naming the drive “UNTITLED” *
- Open the “Terminal” application via Spotlight by hitting Command + Spacebar and typing Terminal and hitting the return key, through Launchpad, or via the Utilities folder in the Finder
- Enter the command at the Terminal command line corresponding to the version of macOS Big Sur you have (versions have different application installer names), assuming “UNTITLED” is the name of the USB flash drive to convert into a bootable macOS Big Sur install drive:
MacOS Big Sur final sudo /Applications/Install\ macOS\ Big\ Sur.app/Contents/Resources/createinstallmedia --volume /Volumes/UNTITLED --nointeraction
MacOS Big Sur public beta sudo /Applications/Install\ macOS\ Big\ Sur\ Beta.app/Contents/Resources/createinstallmedia --volume /Volumes/UNTITLED --nointeraction
MacOS Big Sur Beta 2 and later sudo /Applications/Install\ macOS\ 11\ Beta.app/Contents/Resources/createinstallmedia --volume /Volumes/UNTITLED --nointeraction
MacOS Big Sur Developer Beta 1 sudo /Applications/Install\ macOS\ Beta.app/Contents/Resources/createinstallmedia --volume /Volumes/UNTITLED
- Double-check that the syntax is correct and the volume is specified properly, then hit the return / enter key and enter the admin password to start the boot installer creation process **
Let the process complete, it can take a while depending on the speed of the Mac, the speed of the USB flash drive being used, and other variables. When completed, the terminal will report a “Done” message.
Once the macOS Big Sur 11.0 USB bootable installer drive has been created successfully, it will be mounted automatically on the Mac and ready to use.
At this point you can use the macOS Big Sur beta bootable install drive just like any other boot disk or installation drive on any other macOS Big Sur compatible Mac.
* You can name the USB flash drive something else, but the syntax as written is intended or a drive named UNTITLED (which is the default for a recently formatted drive through Disk Utility).
** If a “command not found” error message appears at the command line, it’s likely due to a syntax error, or because the “Install macOS Beta.app” is not found in the Applications folder as expected. Double-check the syntax for typos and make sure the macOS Big Sur beta installer is found in the /Applications directory.
How to Boot a Mac with the macOS Big Sur USB Install Drive
Booting a Mac with a boot disk is pretty straight forward in most cases ***:
- Connect the macOS Big Sur beta install drive to the Mac
- Restart the Mac if it’s already started up, otherwise boot it up as usual
- Immediately hold down the OPTION key upon Mac boot, continuing to hold OPTION / ALT until you see the Mac boot menu
- Select the macOS Big Sur installer volume to start the Mac from
What if the Mac won’t boot from the macOS Big Sur USB bootable install drive?
*** Note that on some newer Macs with the security chip you may need to manually enable the ability to start the Mac from an external boot disk. Do this by:
- Reboot the Mac holding down Command + R to go into Recovery Mode
- Select “Startup Security Utility” from the Utilities menu and authenticate with admin
- Choose to “Allow booting from external media”
This will allow the Mac to boot from the Big Sur boot install disk as usual with the directions above.
Regardless, once the Mac is booted from the macOS Big Sur beta installer drive, you can format the Mac, partition it, modify and create APFS volumes, restore from Time Machine, clean install, upgrade Macs to MacOS Big Sur, and much more.
Did you make a macOS Big Sur beta bootable installer drive successfully with the command line approach detailed here? Did you use another method to create a Big Sur boot disk? Share your thoughts and experiences in the comments below.
Enjoy this tip? Subscribe to our newsletter!
Get more of our great Apple tips, tricks, and important news delivered to your inbox with the OSXDaily newsletter.
You have successfully joined our subscriber list.
Related articles:
- Get the macOS Big Sur Default Wallpapers
- How to Install macOS Big Sur in VirtualBox on Windows
- How to Install MacOS Big Sur Public Beta
- Fix & Troubleshoot macOS Big Sur Problems & Issues
» Comments RSS Feed
I used the Terminal steps modified for the 11. full installer to put the installer onto a USB thumb drive and was able to successfully install 11.1 over my 10.15.7 iMac.
How ever when I booted from the USB drive the controlling Recovery App did not recognize my Apple bluetooth touch pad and there is no alternative to connecting a USB mouse (which I had to go out and buy). Recovery did work with my Apple Magic bluetooth keyboard however.
N.B. that the USB thumb drive cannot be APFS formatted. HFS+ only required.
Thanks for the tutorial, however I have tried a number of times and continually get a message that Apfs discs cannot be used, I have formatted as Mac Extended Journaled. What am I doing wrong? thanks
Have made the bootable disc and gone through the process you mentioned. When I try to install to Macintosh HD it is telling me the process could not be completed. Permission Denied…. Can you suggest how to deal with this?
I want to install Big Sur on an external SSD to have a bootable external drive.
Please help.
Thanks for this very comprehensive tutorial! I was a bit stumped because I couldn’t find the “Install macOS Big Sur.app” or download it from anywhere (it’s not always obvious how to get it). Your instructions certainly helped me to figure out a way, and now — finally! — I’ve got an alternate boot drive in case anything goes seriously wrong…
Not that I’m expecting it, of course — I’ve been using the Beta since last summer, with rather good results!
Leave a Reply
Name (required)
Mail (will not be published) (required)
Subscribe to OSXDaily
- - How to View Instagram Without an Account
- - How to Listen to Voicemail from Apple Watch
- - 3 Great Photo App Tips for iPhone, iPad, & Mac That You May Have Overlooked
- - How to Fix the Apple Watch Squiggly Line Screen
- - How to Enable Screen Sharing in MacOS Sonoma & Ventura
- - iOS 17.5 & iPadOS 17.5 Updates Released with Bug Fixes
- - MacOS Sonoma 14.5 Update Released with Security Fixes
- - Release Candidate of iOS 17.5 & iPadOS 17.5 Available for Testing
- - New M4 iPad Pro, M2 iPad Air, Apple Pencil Pro, & Magic Keyboard Released by Apple
- - The Apple Pirate Flag – A Fun Story from Apple History, and a Free Wallpaper
iPhone / iPad
- - How to Find Your Phone Number on iPhone
- - How to Convert Photos to Videos on iPhone & iPad
- - How to Hide iPhone Keyboard When It’s Covering Buttons & Won’t Go Away
- - Beta 4 of macOS Sonoma 14.5, iOS 17.5, iPadOS 17.5, Available for Testing
- - How to Customize the Finder Sidebar on Mac
- - What Does the Number Badge Mean on Microsoft Edge Icon?
- - What’s a PXM File & How Do You Open It?
- - Fixing Apple Watch False Touch & Ghost Touch Issues

About OSXDaily | Contact Us | Privacy Policy | Sitemap
This website is unrelated to Apple Inc
All trademarks and copyrights on this website are property of their respective owners.
© 2024 OS X Daily. All Rights Reserved. Reproduction without explicit permission is prohibited.

How To Create macOS Big Sur Bootable USB on Windows: 4 Easy Steps (+Video Tutorial)
Table of Contents
In our previous post, we shared an easy method to How To Create macOS Catalina Bootable USB on Windows: 4 Easy Steps (+Video Tutorial) . We also shared a method on How to Create a Bootable Disk of MacOS X: 2 Easy Steps using a MAC system. Today, we will dive into a much deeper method on How To Create macOS Big Sur Bootable USB on Windows !

macOS 11 Big Sur has just been released. The update brings several important improvements to the operating system relative to the best Macs while offering additional stability.
You can also read: How to Speed Up macOS Big Sur? 7 Easy Methods
We also noted a change in the appearance of native macOS applications. Apple introduced the changes with Messages, Mail, Photos, Calendar, and even Finder, all in a new, much more compact, optimized design. We’ll also finally get improvements that are more in line with iOS updates with macOS Big Sur, including the widget feature that came with iOS 14 and iPad 14, which makes the entire Apple product experience more harmonious and solid.
macOS 11 Big Sur: System Requirements
If you want to download and install macOS 11, you’ll have to make sure your Mac can run it. And unfortunately, the system requirements of macOS have grown with the update. We went ahead and listed the Big Sur-compatible Macs below.
- Apple MacBook 12 (2015 and newer);
- Apple MacBook Air (2013 and newer);
- Apple MacBook Pro (2013 and newer);
- Apple Mac Mini (2014 and newer);
- Apple iMac (2014 and newer);
- Apple iMac Pro (all models);
- Apple Mac Pro (2013 and newer);
macOS 11 Big Sur: Features
Safari is an underrated macOS hero. The improvements that come with the new update make the browser faster – now, according to Apple, it’s 50% faster than Chrome – along with simultaneously improved privacy and optimized energy consumption. But that’s not all. Presumably, this is the most significant update Apple has received since its first release.
The new version of Safari promises a host of new features, including intelligent tracking that provides you with a privacy report for every site you visit, saves passwords from tracking them for hacking attempts, supports extensions for WebExtensions API, and gets a selection of new extensions in the App Store, along with a built-in translation feature.
There’s one interesting feature here: the browser homepage has become highly customizable, so you’ll be able to change the background image and add/edit sections.
This service’s capabilities have been inferior to their iOS analog for some time, but now you’ll be able to use Pinned Messages, Notes, and Updated Groups that will come with iOS 14, which is nice. Basically, all updates share the iOS 14 features, which is nice to see. The update will also offer a better search, a redesigned sample of photos, and new effects in messages.
AirPods Update
Besides the exciting support for Spatial Audio for AirPods Pro, we expect significant improvements in AirPods support in macOS. Instead of messing with Bluetooth settings, whenever you want to use headphones with your Mac, they automatically switch to a Mac when you start using your computer. AirPods will now easily and intuitively switch between devices without any additional action.
Sidebar in Mail and Photos
Apple Mail and Photos apps are long out of date, so Apple has introduced a new design for most of its apps, among which the new sidebars in Mail and Photos are the most visible. The Photos app will look the same as the iOS 14 version.
MAC Control Center
One of the best things about iOS is the very convenient Control Center, which allows you to change many settings on the go. macOS Big Sur will transfer this functionality to Macs, providing easy access to them from the menu, so you can easily change the most popular settings without going to a separate Settings app.
Widgets in Notification
As with iOS 14, macOS 10.16 Big Sur has widgets for the notification menu, making it easier to access important information with a user-friendly interface. These widgets can be customized to suit your needs and preferences.
MAC Catalyst
An essential addition to macOS Mojave has been integrating some popular iOS apps. But with Mac Catalyst, new APIs and tools for app developers promise to move even more iOS apps into the Mac operating system. With these tools, you get features such as changing window size, and keyboard tools that allow you to transform your app into a Mac environment, breaking away from the problems of ported apps with the iPhone.
Create macOS Big Sur Bootable USB on Windows: Required Files
- macOS Big Sur DMG file for a clean installation. (Download links have been provided below)
- The DMG file is around 12 GB, so you need a good internet connection to download the macOS Big Sur DMG file. So, here is a tool that you can use to speed up the download process. Internet Download Manager tool that will help you enhance your downloading speed. You can download the full version below.
- A USB Drive (Pen-Drive or External Disk). Your USB device must be of sufficient memory for the installation.
- TransMac tool from Acute Systems. This Windows application tool may replicate and manage folders and files around Apple drives and apparatus, such as Mac-formatted hard drives, flash drives, and other memory devices, to open and burn disk imaged .dmg along with .sparseimage documents.
How To Create macOS Big Sur Bootable USB on Windows: Step by Step
This is a 4 step simple process. I have also shared a complete video tutorial on How To Create macOS Big Sur Bootable USB on Windows , you can find the video at the end of this post.
NOTE: Kindly do not skip any step; the process will fail, and you might corrupt your USB device. I crashed mine once!
Step 1: Downloading necessary files to Create macOS Big Sur Bootable USB on Windows
- macOS Big Sur DMG by techrechard (Google Drive + MediaFire)
- TransMac tool from Acute Systems- This file is password-protected, and the password is www.techrechard.com. You can extract this file using WinRAR download free and support: WinRAR (win-rar.com).
- IDM 6.27 Build 2 Registered (32bit + 64bit Patch) [Techrechard.com] – This file is password-protected, and the password is www.techrechard.com . You can extract this file using WinRAR download free and support: WinRAR (win-rar.com) .
Step 2: Install TransMac Tool on your Windows
After downloading the TransMac tool from the above links, proceed with the installation. The process is very similar to installing any other tool on your Windows. Once you have downloaded and extracted the contents from the RAR file, you will see the following contents:

Open the TransMac Techrechard.com folder, and click SETUP .
And click, Next .

Accept the terms and conditions .

Choose the directory for installation . You can keep it default.

Leave the default ticks and click Next .

And you see that within no time the setup is complete.

Step 3: Open TransMac Tool
Once the installation is over, the transmac tool will open itself. And you will see the following message.

Since we are running the trial version of TransMac , you need to wait for 10 seconds, and it will open up automatically. After 10 seconds, you can click, Run .

Now insert your pendrive , usb drive or any external disk.

And click Tools , followed by Refresh drive list .

Once you click refresh drive list , you will see your USD device attached.

Step 4: Complete the installation
Now, right click your USB and click Restore with Disk Image.

Now, you will be prompted an error that you need to run TransMac using administrator access . So you simply click YES .

Now, wait again for 10 seconds.

Now, right-click on your USB device and click Restore from Disk Image again. You will be prompted with a warning, and you can click Yes .

Now you select the Big Sur DMG file that you have downloaded and upload it.

Now click OK ,

Now you will get your last warning that the USD device will be formatted. You can click YES .

The restoration process will begin, and it will take around 20-30 minutes, depending upon your USB device’s speed. For me, it took around 17 minutes.

Once complete, you will see the following snapshot.

Now the Restore process is complete, and you can use this USB as macOS Big Sur Bootable USB. To check the contents of this USB, you will need a MAC system. If you do not have a spare MAC, no need to worry. I will show you the contents of this USB created.
NOTE: This USB will not work on Windows anymore. If you plug it again on your desktop, it will ask you to format the drive. So do not worry. The contents of this USB will be visible only on a MAC system.

As you can see the contents of the USB device. Now, you can use this as a macOS Big Sur Bootable USB .
After this process is complete, you can use this USB to install macOS Big Sur on your MAC system using the BIOS mode. You simply need to boot your MAC using this USB device at startup.
Here are some other posts that you might be interested in-
How to Fix macOS Big Sur Screen Resolution on VirtualBox: 5 Step Guide How to Install macOS Big Sur on VMware on Windows? 8 Step Guide How to Install macOS Big Sur on VirtualBox on Windows? 8 Step Guide How to Create macOS Big Sur Bootable Installer for Clean Installation: 2 Easy Steps Download macOS Big Sur DMG File 11.1 {Updated 4 Jan 2020} Download macOS Big Sur VMDK (Virtual Machine Disk) File Download macOS Big Sur VMware & VirtualBox Image – Latest Version
How To Create macOS Big Sur Bootable USB on Windows: Final Words
I hope you have enjoyed this article and have successfully created macOS Big Sur Bootable USB on Windows . If you find any issues, you can leave your comments below. I have also created a complete video tutorial that you use and learn How To Create macOS Big Sur Bootable USB on Windows below .

Ruby has been a writer and author for a while, and her content appears all across the tech world, from within ReadWrite, BusinessMagazine, ThriveGlobal, etc.
Related Posts

Install macOS Mojave on VirtualBox on Windows PC: 8 Easy Steps

How to Install macOS Catalina on Unsupported Mac: 9 Easy Steps

Download macOS Catalina VMDK for VMware & VirtualBox

How to install macOS X EL Capitan on VMware on Windows PC: 5 Easy Steps
Write a comment cancel reply.
Save my name, email, and website in this browser for the next time I comment.
GibmacOS- Create Bootable USB of macOS Big Sur Final (Clean Installation)
macOS 11.0.1 Big Sur is yet the best operating system apple has ever offered. This operating system is available with Apple M1 chip for macBook Pro, Air and Mac mini. However Macbooks after the mid 2013 has the ability to upgrade to this operating system. But the other users can use patcher to install macOS Big Sur on their unsupported macbooks .
Window users can test in on Virtual machine ( VMware and VirtualBox ). Those who are trying to perform a clean installation, they can follow the open core guideline .
How to get macOS Big Sur with GibmacOS?
Note: GibmacOS is a small script which is developed using the Python 2 and 3. It can download the macOS High Sierra upto the latest version of the macOS, called macOS big Sur. However it’s full potential can’t be used inside windows, but you use it to download macOS but for combination you need to have a macOS Running.
What do I mean by combination?
Well, the macOS which you are using the macOS it is downloaded in separate files. For combing them, a simple command is made which can only be run inside mac. Look at the downloaded macOS High Sierra using the GibmacOS.

I downloaded macOS Big Sur and macOS high Sierra using the GibmacOS but I combined them inside the VMware with macOS on it.
I recommend you to download it inside a mac, if you don’t have, download it on your Windows machine. Then Install macOS big Sur on VMware and combine their files their.
Step 1. Download GibmacOS and Extract it
Visit Github, search on Google or you may click on the below link to download the GibmacOS.
https://github.com/corpnewt/gibMacOS
Click on the code and choose download it, I prefer to download it with Zip.

If you downloaded a zip file, you need to extract it.

Step 2. Download macOS Big Sur Latest Version
In order to download the macOS Big Sur latest version, open the extracted folder and open the GibmacOS.bat on Windows and GibmacOS.command on macOS.
The first thing it will download is the mountainlion-lion snowleopard-leopard.merged. I don’t know what it is but I can guess that will list the macOS versions which GibmacOS can support to download.
Here is that link: https://swscan.apple.com/content/catalogs/others/index-10.15-10.14-10.13-10.12-10.11-10.10-10.9-mountainlion-lion-snowleopard-leopard.merged-1.sucatalog
Now you have to Choose a version of the macOS which you want to download. I will go with the macOS Big Sur latest version.

Now you have to wait until the file is downloaded, it will take some time.

Upon the completion it looks like this.

The same steps are inside the mac, here are the photos as a slideshow.

Step 3. Build macOS Installer
As I said before, you need to combine the downloaded files and make it an Installer. To do that, open GibmacOS inside the mac and run the BuildmacOSInstallApp.command.

Once the App is opened drag the folder which contains the downloaded macOS. The line which is highlighted is the location of macOS High Sierra.

Now have a look that the those files are combined, open the directory which you specified, their will be the installer.

Info about GibmacOS:
If you are looking for the recovery images of the macOS, you run the gibMacOS.command on mac and gibMacOS.bat on Windows. On the main menu press r, it will re-scan, then it will list just the recovery images.

Create Bootable USB of macOS Big Sur
To Create bootable USB of the macOS big Sur, you need to drag the created Installer inside the Application directory.

Once it is their attach the USB {at least 16 GB USB flash drive} and open disk Utility. you can hold the Windows or command + space to open spotlight, search for Disk Utility.

Choose Show all devices, choose the USB Flash drive and then press erase and clean the USB with following settings.

Open Terminal and paste the following command, and instead of USB Name type the USB name.
macOS Big Sur
macOS Catalina
macOS Mojave
macOS High Sierra
mac OS X El Capitan

Ending Point
There other ways to download macOS Big Sur beside GigmacOS, like the App store. Other resources like telegram, infect we are providing download links directly in telegram. Because of Apple’s recent policy we can’t provide here, so join our telegram channel .
5 thoughts on “GibmacOS- Create Bootable USB of macOS Big Sur Final (Clean Installation)”
Using this tool the downloaded files are different now: Downloaded 6 of 6 Succeeded: InstallAssistant.pkg BuildManifest.plist Info.plist MajorOSInfo.pkg UpdateBrain.zip InstallInfo.plist Any recommendation?
It doesn’t matter, the important part is that the “BuildmacOSInstallApp.command” script is available. Move all the files into a mac operating system and then run that command.
can i convert the pkg to an iso file?
Hi, Unforrunelty, you can’t convert PKG directly to ISO Image. I have tried several lines of codes and applications, in appearance it converts but when you try to install it, it won’t work. So, here is my suggestion to you. First, download the macOS through the GibmacOS. Install the PKG and you will get the macOS Installer. Convert the macOS Installer to macOS.dmg Then Convert the macOS.dmg to macOS.iso The theory is a bit long, but when you execute all of them, it will take around 30 minutes. Here is the post which can help you accomplish this goal. Create macOS ISO Image Note: You have to perform all of these steps in a Mac Operating System. In Windows, you can only download the macOS image.
Best of Luck
- Pingback: How to Create macOS Ventura VMDK Image Installer? - wikigain
Comments are closed.
© | 2024 | INTOZOOM
Create a Bootable macOS Big Sur USB on Windows 10 PC [2021 Updates]

By Petty Madison | Last Updated: Jul. 12, 2021
macOS Big Sur is coming in the fall of 2020, so this is a good time to learn how to create a macOS Big Sur bootable USB so you can install it on multiple Macs. This article shows you how to create the macOS installer on Windows 10 using UUByte DMG Editor, which is a professional and cross-platform disk authoring tool.
Table of Contents:
Big sur compatible macs.
- Download macOS DMG File
- Create a macOS Big Sur Bootable USB on Windows 10
Start Installing macOS Big Sur on Target Mac
- Troubleshooting Tips
Big Sur is now the most up-to-date macOS and it requires more advanced hardware to run it. Hence, no all Mac models are eligible to install macOS Big Sur on it. According to Apple official document, only the following list of Mac computers support Big Sur:
- MacBook: 2015 or later.
- MacBook Air: 2013 and later.
- MacBook Pro: Late 2013 or after.
- iMac: 2014 and later.
- Mac Pro: 2013 and later.
- iMac Pro: 2017 and later.
Although there are some tricks to install macOS Big Sur on unsupported Macs , it is not recommended doing so as it may brick your Mac. Please take your own risk to do that.
How to Download macOS Big Sur DMG File
Let's briefly look at how to download macOS Big Sur DMG file . Of course, there are several third-party sources that are now offering the macOS Big Sur beta version as DMG but not all of them are trustworthy. For that reason, we recommend that you sign up for the Apple Beta Software Program here and proceed to register an Apple device so you can get access to download the OS profile and Big Sur Install app. Obviously, you can't register your Windows 10 computer so you will need a Mac computer to acquire the app.
If you don't have a Mac at hand, then you can directly download macOS Big DMG file via ( link 1 or link2 ). The download might be a little slow as it is hosted on a third-party website. It could be much faster if it were hosted on Apple server or Google Drive.

Create a macOS Big Sur Bootable USB on Windows 10 PC
After downloading macOS Big Sur DMG file, you have to burn macOS dmg file to an USB . For this stage of the process, we will use UUByte DMG Editor , a professional disk authoring and disk image management tool. It is one of the simplest yet most powerful tools for managing DMG and other disk image file formats and is available for both Windows and Mac.
The interface and functions are easy to understand and even first-time users with no experience working with DMG files can easily get up to speed with the software in a few minutes. Once you have the DMG file on your PC, proceed with the following steps to create a bootable USB installer for macOS Big Sur beta.
Step 1 : Download and install UUByte DMG Editor on Windows 10 using the official ISO installation file, which you can download from the UUByte website here.

Step 2 : Insert the USB drive into an available port on Windows 10 PC and launch UUByte DMG Editor. Select the 'Burn' option on the welcome page.

Step 3 : Select the DMG file using File Explorer and click 'Browse' button to 'import macOS Big Sur dmg file into the software. Make sure the correct drive (USB) is selected in the appropriate section.

Step 4 : Name the USB Drive volume label as 'Big Sur Installer' or something similar, then click on 'Burn' tab to format the drive and create a bootable macOS Big Sur USB installer.

Step 5 : Wait about 15 minutes and you will see the completion message on the screen. This means a bootable USB installer is ready and you can use that USB to install macOS on target computer.

Creating macOS Big Sur install USB on Windows 10 is simple with the help of UUByte DMG Editor. It is one of the best tools for managing DMG file on a Windows PC.
After the above steps, you already have a bootable macOS installer USB at hand. The next step is to install macOS Big Sur on that Mac in order to fix the system issue or upgrade the current OS to Big Sur. Fortunately, the process is super easy!
Please insert the macOS install media into the Mac and power on the Mac. At the same time, keep pressing the Option key for a few seconds. Once the graphics user interface appears, you will have the chance to select a temporary booting device from Start Manager. Now, click on the USB drive name and follow the screen prompt to get Big Sur installed on your Mac.

Troubleshooting Tips when Burning macOS DMG to USB
Occasionally, you may run into some errors while preparing to burn macOS DMG to a USB drive. Here is a list of the most common problems and how to fix them:
USB Drive Not Detected : If your USB stick isn't being detected, it's a system problem or an issue with the drive itself. Make sure USB drive is installed on the PC. You can also try another drive to see if it works, or switch it to a different port.
Insufficient Space : This is another common problem that's easily rectified. All you need to do is use a different flash drive with additional capacity. macOS Big Sur disk image files usually require about 16GB capacity on the USB drive.
Corrupted DMG File : In this case, you can either try to repair the corrupted file if you have the knowledge to do so, or go ahead and download the file again from Apple's servers via the Beta Program. This issue sometimes occurs when you get disk images from third-party websites, which is why we recommend the Beta Program.
USB Installer Not Working : In rare cases, the burning process might have had an error. If so, you can use UUByte DMG Editor to burn the DMG file again to the USB drive. However, make sure that there's no issue with the DMG file itself because the editor has a high burning accuracy rate and such problems should not occur frequently.
Once you have macOS Big Sur installer USB ready, you can insert it into any Mac and run the program to install Apple's latest desktop operating system . Big Sur is officially coming in the fall and has a ton of updated features on nearly all fronts, including the OS interface, Safari, Siri, Messages for desktop, etc. But you should also know that since the currently available DMG is only a public beta tester version , it is bound to have bugs and other issues. If you're on the beta program, you can use the feedback app to let Apple know what the issue is. Unfortunately, that also means that there's nothing you can do about it if you're not on the beta program.
By Petty Madison | Post to DMG Topic
Petty is editor in chief at UUByte and writes various topics about Windows and Mac to help people make the most of current technology.
Related Articles
- How to Burn DMG Image to USB Drive
- Create macOS Bootable USB on Windows 10
- How to Make Bootable USB from DMG on PC
- Make macOS Monterey Bootable USB
- Create Catalina Bootable USB on Windows 10
- Download macOS Catalina DMG File
- Create Big Sur Bootable USB on PC
- Create Mojave Bootable USB on Windows 10
- Install macOS Big Sur on Unsupported Mac
How to Build a Hackintosh - Install MacOS Big Sur on a PC Using OpenCore
A Hackintosh is a non-Mac computer system, made with PC parts, that runs the macOS operating system. In this tutorial, you will learn how to create a Hackintosh.
You will learn how to install macOS Big Sur (or any other version of macOS) using OpenCore.
The main benefit of a Hackintosh compared to an official Macintosh computer, is that it is WAY cheaper. I created a Hackintosh computer that matches the Mac Pro specs for about 1/3rd the price of a Mac Pro. Some people have been able to create a Hackintosh for under $100.
This tutorial will focus mainly on how to install macOS on your hardware. I also created a video version that shows how to build a complete machine and then install macOS on it.
The video shows how to use a computer with macOS to create a macOS installer for your Hackintosh. In this written tutorial, you will learn how to create the macOS installer using macOS or Windows.
You can watch the video here:
It is not illegal to create a Hackintosh for personal use but it does go against Apple's End User License Agreement. So don't plan on taking this into an Apple store for repair. And in many places it is illegal to sell a Hackintosh.
The Hardware
Many computer parts work for Hackintoshes. But some do not. Check this website to see what hardware is compatible with a Hackintosh.
In the video above I demonstrate step-by-step how to build a computer that will work as a Hackintosh. In the video description is a list of the specific parts I used.
If you want to be safe, you can use exact parts I used in my build but it is possible to install macOS on a wide variety of hardware.
Downloading MacOS and Creating a Bootable USB Installer
For this step, you will need a USB drive that is at least 16GB. The process is different depending on if you are setting up the bootable USB installer using macOS or Windows. The process is much simpler to do on macOS, but it still possible on Windows.
If you can, find a Mac machine to use to create the bootable USB installer. But I'll cover the steps for macOS and Windows.
Using MacOS to Create the MacOS Installer
There are a few programs you'll need during this process so start by downloading them. Here are links for what you will need followed by the download instructions.
- ProperTree - Click the "Code" button, then "Download Zip"
- MountEFI - Click the "Code" button, then "Download Zip"
- OC_GEN-X - Download the zip file for the most recent release.
Open up the App store on macOS. Search for "Big Sur". Click "Get", and then "Download".

Format your USB drive using Disk Utility. To get into Disk Utility, just click the magnifying glass and type "Disk Utility.
Once Disk Utility is open, make sure that the view is set to show all devices.

Click the USB drive, then click "Erase" in the top menu.
Name the drive "MyVolume". Make sure the format is Mac OS Extended (Journaled) and that the scheme is GUID Partition Map. Then click the "Erase" button.

After the USB drive is prepared, open the Terminal in MacOS. You will use a command in the terminal to make the USB drive into a bootable installer for macOS.
If you are installing macOS Big Sur, type the following command:
sudo /Applications/Install\ macOS\ Big\ Sur.app/Contents/Resources/createinstallmedia --volume /Volumes/MyVolume
If you are installing a different version of macOS, you can find the command for the version you are installing here .
You'll have to wait a bit for this to install. After this is done, open the OC_Gen-X program you downloaded earlier.
To open the program, you will have to right-click the icon, select "open", then select "open" again.
This is a software wizard that helps us easily prepare what we need to install MacOS on our particular hardware setup. It will go out and get everything we need except the SSDTs and put them in a folder for you.
You can also do this is a more manual method by following the OpenCore Install Guide . But this program simplifies things for us quite a bit and it is not available for Windows.

On this first screen under "System Type" choose the type of processor you have. Look in your processor's documentation to determine the name of the microarchitecture it uses. Getting this right is very important.
The type of processor I used is "Coffee Lake".
For most of the tabs in this program you can keep the default settings.
Under "Graphics" select "WhateverGreen" and under "Audio" select "AppleALC". Under "Ethernet" select "IntelMausi". These are very commonly used options but there is a small chance your settings will be different depending on your hardware and specific use case.

The SMBIOS is important and you will have to specify the correct System Model on that tab. For my setup I used "iMac19,1" but it could be different for you if you are using a different processor of a different operating system version.
To figure out what System Model to use, go to the Open Core Install Guide .
Select the section on the left side for your processor type (in my case it is "Coffee Lake"). Then find the heading "PlatformInfo". Scroll down a bit and you will see a table with the SMBIOS to use.

After selecting the appropriate System Model, click the "Generate EFI" button at the bottom.

An EFI folder has now been created on your desktop. We will now make some modifications to the contents.
You'll need to get the SSDT files. This is different depending on your processor.
You can find the list of the exact SSDT's you need at this link . Just select your processor type and download each of the required SSDTs.
Here are the links for the SSDTs needed for my Coffee Lake system.
- SSDT-PLUG-DRTNIA
- SSDT-EC-USBX-DESKTOP
Once all of those files are downloaded, move them into your EFI folder. They should be moved to this subfolder: EFI/ACPI/OC
Now you will will use the MountEFI program downloaded earlier to mount the hidden EFI partition on the USB drive.
Right-click on MountEFI.command and click "open", then "open" again.
Select your USB drive. It should have a name like "Install macOS Big Sur" since we made it into a bootable installer for MacOS. In the screenshot below, it is option 2.

You now have a mounted EFI partition and an EFI folder from OC Gen-X. Drag the EFI folder into the EFI partition.
Open ProperTree.command which you downloaded earlier. Like before you can open it by right-clicking and selecting "open".
Once ProperTree is running, go to "File -> Open". Select the EFI partition, then the "OC" folder, then open the "config.plist" file.
The first thing we need to do is to inject all of the files in the EFI folder into the "config.plist" file.
So go to "File", then select "OC Snapshot". Make sure you're on the EFI partition. Go to the "EFI" folder, then the "OC" folder. And click the "Choose" button.
A dialog box could pop up here about what version to use. If this happens, click "Yes".
Now go back to "File", then select "OC Clean Snapshot" and select "Choose".
The OC Gen-X program helped simplify all the required setup. At this point you should verify that everything is setup correctly according the the official install guide.
Here is the guide for Coffee Lake . If you are using a different type of processor, just select your type in the left menu.
You can verify the quirks are set correctly in the config.plist file. They should all be correct.

You need to do additional setup in the config.plist file to make sure the onboard graphics work. Find the "DeviceProperties" section, and then copy the following characters to add.
PciRoot(0x0)/Pci(0x2,0x0)
Note that this if you processor is not Coffee Lake, the exact thing you need to add under "DeviceProperties" could be different. Search for "Device Properties" in the OpenCore guide for your processor type to confirm what to add under "DeviceProperties" in the config.plist file.
Under "DeviceProperties", click on "Add". Then right click and choose "New child under 'Add' (+)".

Double-click where it says "New String" and just paste the text into the field and hit enter. Then select in the next column where it says "String" and make sure that it is set to "Dictionary".

Next, we need to add more children under it and it should eventually look like this:

Below is the text from the image above that you need to add (if you system is Cofee Lake).
Now in the config.plist file, find the NVRAM section.
Update the "boot-args" so the text is "-v keepsyms=1 debug=0x100 alcid=1".

Now we'll change the language to English. So next to where it says "prev-lang:kbd", change "data" to "String" and set the value to "en-US:0" and hit enter.

If you want a different language just go to this link to find what language code to use.
The config.plist file is now done. So go to "file", then "save". You are now completely done setting up the bootable drive. So just eject the drive, and then you can plug it in to your Hackintosh.
Skip the next Windows section and go to the heading "BIOS Setup".
Using Windows to create the macOS Installer
The first step to creating a macOS installer on Windows is to download OpenCore . Make sure to download the zip file for the most recent release.
Unzip OpenCore and then go to /Utilities/macrecovery/ . Next copy the folder path for the macrecovery folder:

Open a Command Prompt and change directories into the macrecovery folder that you just copied using the command cd [PASTE_FOLDER_NAME] .
It should look something like this:

Now in the Command Prompt, run one of the following commands depending on what version of macOS you want. If you don't already have Python, you will have to install it first .
This will take some time, however once you're finished you should get either BaseSystem or RecoveryImage files:

Now open up Disk Management and format the USB drive as FAT32. Follow these steps from the OpenCore Docs :
- Right click the Start Button on your task bar and select Disk Management.
- You should see all of your partitions and disks. On the bottom half, you'll see your devices. Find your USB.
- You'll want to format the USB to have a FAT32 partition.
- If you have multiple partitions on the USB, right click each partition and click Delete Volume for your USB.
- Right click the unallocated space and create a new simple volume. Make sure it is FAT32 and at least a gigabyte or two big. Name it "EFI".
- Otherwise, right click the partition on the USB and click Format and set it to FAT32.

Next, go to the root of this USB drive and create a folder called com.apple.recovery.boot . Then move the downloaded BaseSystem or RecoveryImage files. Please ensure you copy over both the .dmg and .chunklist files to this folder:

Now grab OpenCorePkg you downloaded earlier and open it:

Here we see both IA32(32 Bit CPUs) and X64(64 Bit CPUs) folders, choose the one that's most appropriate to your hardware and open it. Next grab the EFI folder inside and place this on the root of the USB drive along side com.apple.recovery.boot. Once done it should look like this:

At this point you will have to continue setting up your EFI folder. Because of the complexity of this step and all the different possible options depending on your setup, you should follow along with the official documentation for the next few steps.
Here are the links to the instructions for the next steps when using Windows to create the bootable USB installer. Note that the screenshots in the documentation show a mac but the steps apply to Windows as well. For setup using a mac, you don't have to go through these steps because there is a wizard that does all of them automatically.
Adding The Base OpenCore Files
Gathering Files
Getting started with ACPI
I'll show you how I setup my BIOS for my Hackintosh. The BIOS software is specific to my motherboard and yours may look a little different. If yours looks different, do you best to find equivalent setting in you software, if yours looks different. Note that BIOS setting are easy to experiment with and you don't have to have all the same settings as me to get everything working.
Boot the computer up and then hit the "Delete" key to get into the BIOS.
Most setting can be left as the default. Here are the settings that should be updated:

Under Advanced, "Above 4G Decoding" should be Enabled.

Under Advanced, and then under Serial Port Configuration, turn "Serial Port" to Off.

Under Advanced, and then under USB Configuration, set "XHCI Hand-off" to Enabled.

Under Boot, and then under Boot Configuration, set "Fast Boot" to Disabled

Under Boot, and then under Secure Boot, set "OS Type" to Windows UEFI mode.

The final thing you need to do is to go under Boot > Secure Boot > Key Management. Then select "Clear Secure Boot Keys".
Now go to Exit and select "Save Changes & Reset".
MacOS Setup
After the computer restarts, hit F12 to get into the boot menu. Choose "Install MacOS Big Sur (External).
The next few screenshots are a little blurry since I was videotaping my monitor and did not focus correctly. Sorry about that.

After it loads, the macOS Utilities screen should appear. Select "Disk Utility".

Click the dropdown menu toward the top and click "Show All Devices". Then select your hard drive and click "Erase" at the top.

You can name the drive anything you like. For Format, make sure to choose "Mac OS Extended (Journaled) and for Scheme choose "GUID Partition Map"
After the drive is erased, close Disk Utility and select "Install MacOS Big Sur". You will have to choose the hard drive you just formatted. And then you will have to wait as macOS is installed.
The computer should restart back into the boot menu. Select "MacOS Installer".
At this point you will set up the computer just like you would a brand new Mac computer. After the setup, macOS Big Sur will load.
There is one more thing left to do. You have to copy the EFI folder from the hidden EFI partition on the USB stick to the EFI partition on the hard drive you installed macOS on.
On the new Hackintosh, go to the web browser and download MountEFI . This is the same program you used before, if you created the installer on a mac. After clicking the link, click the "Code" button, then "Download ZIP".
Go to the downloads folder and and right click on MountEFI.command and open it.
Use the program to mount the EFI partitions from both the hard drive on your Hackintosh and the USB drive called "Install MacOS Big Sur". First select one, then the other.
After both partitions are mounted, you will need to copy the EFI folder from the USB EFI partition over to the hard drive EFI partition.

At this point you can restart the computer and take out the USB drive. The Hackintosh is complete!
I'm a teacher and developer with freeCodeCamp.org. I run the freeCodeCamp.org YouTube channel.
If you read this far, thank the author to show them you care. Say Thanks
Learn to code for free. freeCodeCamp's open source curriculum has helped more than 40,000 people get jobs as developers. Get started
Big Sur's Highway 1 to reopen after road collapse
Highway 1 through bur sur reopens friday.
Gov. Gavin Newsom announced on Tuesday that a shuttered portion of Highway 1 will reopen on Friday morning.
BIG SUR, Calif. - A closed portion of scenic Highway 1 in Big Sur is set to reopen on Friday, according to Gov. Gavin Newsom.
A section of Highway 1 near the Rocky Creek Bridge has been shut down for six weeks after a round of storms caused the pavement to collapse into the ocean.
Caltrans crews have been working to stabilize the damaged stretch of Highway 1 since the storms. Newsom said the restoration work is nearing completion, ahead of schedule. The shuttered portion is scheduled to reopen at 6:30 a.m. on Friday.
Drivers trapped by crumbling portion of Highway 1
Thousands of drivers were stranded on Highway 1 in Big Sur over the weekend after a section of the highway buckled.
"Crews have been working day and night to quickly repair the damage to Highway 1 caused by recent storms, which has disrupted the lives of individuals living in and around Big Sur – limiting access to the area and hampering tourism," said Newsom. "Thanks to the diligent efforts, traffic will resume eight days ahead of schedule – bringing relief and a sense of normalcy back to one of California’s most iconic coastal communities."
Earlier this month, Newsom declared a state of emergency to secure $100 million in federal funding for road repairs.
Big Sur is a 90-mile stretch of the state’s central coast where often misty, forested mountains descend to the ocean. Much of Highway 1 is perched on the edge of cliffs, presenting dramatic views that draw tourists. The route experiences frequent closures because of landslides stemming from severe weather.
The collapse left as many as 1,600 people stranded in Big Sur.
Home > News Tips
[Solved] Windows 10 ISO Download Error on Mac (Big Sur)
Updated on Monday, May 13, 2024

Approved by
English Français Deutsch やまと Español Português
Windows 10 ISO Download Error on Mac, Why & How to Fix?
If you are going to run both macOS and Windows 10 on your Mac device, you need to download Windows 10 ISO first and then use Boot Camp Assistant to install Windows on your Mac .
However, when you download Windows 10 on your Mac running macOS Big Sur (or public beta), it says "Windows 10 ISO is not recognized." Or, the downloading process just freezes.
The Windows 10 ISO download error on your Mac confuses you a lot. Don't be fret. This post comes to the rescue. It helps you analyze why you can't download Windows 10 ISO on your Mac and supplies the ways to fix the issue. Let's explore more details.

Why can't you download Windows 10 ISO on your Mac?
Downloading the Windows ISO file on a Mac is an easy job, but it isn't a 100% success for everyone. The following are the most common reasons that make you run into the Windows 10 ISO download error on your Mac .
- Unstable or down network.
- Insufficient space on your Mac or external hard drive where the ISO file is saved.
- Location or user limitation from Microsoft.
- Temporary system errors.

Don't be shy to tell others why they can't download Windows 10 ISO on the Mac.
How to fix Windows 10 ISO download error on your Mac?
Usually, you can directly download Windows 10 ISO onto your Mac from Microsoft , only if it is one of the following Intel-based Mac models using OS X El Capitan or later:
- MacBook (all models)
- MacBook Air (2017 or later)
- MacBook Pro( 2015 or later)
- iMac (2015 or later)
- iMac Pro (all models)
- Mac Pro (late 2013 or later)
If it is not on the above list, you need to download Windows 10 ISO to a USB flash drive with at least 16GB storage capacity
Whether you download a Windows 10 ISO file to a Mac or a USB drive, you can follow the fixes below to out the Windows 10 ISO download error on Mac problem.
Check your network condition
The most possible troublemaker is the unstable or broken Wi-Fi. You can check your Wi-Fi status. If the network is poor, you can change to a stronger one or relaunch the Router.
Then, resume the interrupted download process of the Windows 10 ISO file on your Mac.
Check available storage space on your Mac
If you are unable to download Windows 10 ISO on your Mac , check if there's enough free space to load the ISO media.
You can open Disk Utility from Launchpad > Other and select macOS (or Macintosh) to view how much free space is available on the startup disk.

If your Mac startup disk is almost full , clean up the useless files. Also, note that over 64 GB of free storage space on your Mac startup disk is required to install and run Windows 10.
However, manually tidying up files on a Mac, especially those with a heap of files, is very hard. You can use a Mac cleaner to help you.
iBoysoft DiskGeeker is an all-in-one disk management tool that supports one-click to clean the junk files on your Mac. With it, you can easily and quickly get much more free space on your Mac.
Download
iBoysoft DiskGeeker
Here's how:
- Download, install, and open iBoysoft DiskGeeker on your Mac.

Check the free storage space on the USB drive
If the Windows 10 ISO download error appears when downloading the ISO file to a USB flash drive on your Mac, you need to check the usable space on the drive.
More than 16GB capacity is needed to download and install Windows 10 ISO on the USB drive. If the USB drive is full of other files, you need to get rid of them or move them to another destination.
Re-download Windows 10 ISO
You get frozen on the Windows 10 ISO downloading process may be caused by the corrupted ISO file. To fix that, just end the current download and restart a new Windows 10 ISO download.

Check if your account or location is banned by Microsoft
Do you use a VPN or any other location-hiding software? Or, have you set it not to download files from the browser?
If yes, that's probably the causes why you can't download Windows 10 ISO on your Mac . You can try these tricks:
- Stop using the VPN or other location-hiding programs.
- Turning off "Hide IP address" in Safari's settings or any other hidden IP extension you use. (So does Chrome)
- Log into microsoft.com.
Then, download Windows 10 ISO again.
Restart or update the Mac
It can't be excluded that some temporary system errors or background programs prevent you from downloading Windows 10 ISO on your Mac. You can restart your Mac to verify that.
If the Windows 10 ISO download error still occurs on your Mac, go to update your Mac. From the survey, this issue mainly happens on macOS Big Sur or Big Sur public beta. It may be a result of the bugs in this macOS version.
If this is workable for fixing the Windows 10 ISO download error on your Mac, share it with others.
Connie Yang is the primary columnist in the computer field at iBoysoft. She is enthusiastic about sharing tech tutorials on data recovery and operating system-related problems resolution. Over the years, Connie has published many computer-related guides and introductory articles.
Jessica Shee is a senior tech editor at iBoysoft. Throughout her 4 years of experience, Jessica has written many informative and instructional articles in data recovery, data security, and disk management to help a lot of readers secure their important documents and take the best advantage of their devices.
No. 308, 3/F, Unit 1, Building 6, No. 1700, Tianfu Avenue North, High-tech Zone
Copyright© 2024 iBoysoft ® . All Rights Reserved.

Gov. Newsom says Big Sur slip-out area will open to public Friday
Gov. Gavin Newsom announced on Tuesday that Highway 1 south of Rocky Creek Bridge will be open to the public on Friday.
The area was closed since the end of March due to a slip-out that sent a chunk of the road into the ocean. The road will open to all travelers starting at 6:30 a.m.
Newsom said that Caltrans crews are working overtime to make reopening on Friday morning the goal. This is eight days faster than originally predicted
“Crews have been working day and night to quickly repair the damage to Highway 1 caused by recent storms, which has disrupted the lives of individuals living in and around Big Sur – limiting access to the area and hampering tourism. Thanks to the diligent efforts, traffic will resume eight days ahead of schedule – bringing relief and a sense of normalcy back to one of California's most iconic coastal communities," Newsom said.
Newsom previously announced on May 3 that state officials planned to reopen the portion of Highway 1 in Big Sur that collapsed in late March by Memorial Day weekend.
Newsom also announced back in early May signing an emergency proclamation that would add $100 million in federal funding for repairs of Highway 1 and 18 other California roadways impacted by recent storms, reported the San Francisco Chronicle.
“The state is working overtime to complete repairs as safely and as quickly as possible and I have signed a state of emergency proclamation, which will help ensure that we receive critical federal funding to help impacted communities bounce back from these devastating storms,” Newsom said in a statement.
The slip-out portion of Highway 1 will be under 24/7 signalized traffic control. This will give unrestricted public access with "one-way alternating traffic in both the north and southbound directions," per Newsom.
However, Newsom said that excessive winds, rain or any construction site condition changes could delay work.
Caltrans estimated that permanent repairs could exceed $25 million. Construction is currently being funded with a $1 million emergency contract.
The slip-out occurred on the morning of March 30, just half a mile north of Bixby Bridge, and Caltrans was forced to close the highway at Palo Colorado, 13 miles south of Carmel-by-the Sea. The County of Monterey said the slip-out has not moved since Saturday.
The cause is believed to be a recent rain event and saturated ground.
Work Progress
Caltrans crews drilled, installed and grouted 40 vertical and 75 sub-horizontal steel elements into the slope to stabilize the southbound lane. This forced Caltrans to close the area, minus two daily convoys.
"Now that Caltrans has stabilized the southbound lane and preserved the northbound lane, the site will continue to be monitored and visually inspected," said Newsom's office in a news release.
A project to construct a permanent repair for the slip-out area is in the design phase and work is estimated to be completed by spring 2025.
Highway 1 Closures
This slip-out is not the first natural disaster that has forced the closure of the Pacific Coast Highway this year.
Two separate slides and another slip-out closed the highway further south. Because of the work being done on these locations, the highway is closed at Paul Slide and Limekiln State Park to Lime Creek.
Although the slip-out area near Rocky Creek Bridge will be open to the public, the portions listed above are still closed.
Paul's Slide is expected to be cleared by the summer of 2024. Regent Slide will reopen by mid-September 2024.
Dolan Slide has no estimated clearance date, but they're in the final clearing phases, per Caltrans. Crews still need to install wire mesh along the rock wall on the side of the road
Closure Impacts
The California Department of Parks and Recreation announced that all state parks in Big Sur have been closed for day use and camping.
Read More | All state parks in Big Sur closed after Highway 1 slip-out
That includes Pfeiffer Big Sur State Park, Andrew Molera State Park, Limekiln State Park, Julia Pfeiffer Burns State Park and Point Sur State Historic Park.
See more coverage of top Central Coast stories here | Download our app .
TOP STORIES FROM KSBW:
Special edition Stanley tumblers are selling out, but these are still in stock
READ THE FULL STORY: Gov. Newsom says Big Sur slip-out area will open to public Friday
CHECK OUT KSBW: monterey news, salinas news, santa cruz news, monterey weather, salinas weather, santa cruz weather

IMAGES
VIDEO
COMMENTS
Connect the installer drive to the target Mac. Turn on the Mac by pressing the power button, and continue holdin the power button until you see the boot options menu. Choose the macOS Big Sur installer volume to boot from. Whether you boot an ARM Mac or Intel Mac, using the actual macOS Installer and boot disk is the same afterwards.
Step 2: After downloading macOS Big Sur, the installer will automatically launch. Close the installer. Step 3: Open Finder → Applications. Right-click on Install macOS Big Sur → Show Package ...
Table of Contents. What you need to make a bootable USB for Mac. Step 1: Get macOS installer files. Step 2: Create a bootable installer for macOS. Step 3: Use the USB installer to update your Mac ...
How to Boot macOS Big Sur from the USB Installer Drive. Once you created the bootable macOS Big Sur installer drive, you can boot your Mac from it with ease. We are now very close to downgrading from macOS 12 beta to macOS 11 Big Sur. Follow the steps below: Make sure the external drive is plugged in your Mac.
A bootable USB installer makes fresh installs of macOS Big Sur easy. → SUBSCRIBE FOR MORE VIDEOS: https://www.youtube.com/c/9to5mac?sub_confirmation=1DETAILE...
Plug in the USB flash drive or formatted volume you're using for the bootable install disk. For this article, I used a 2TB USB hard disk drive erased and formatted as Mac OS Extended and given the name Installer. Find the Terminal app in the Utilities folder of your Applications folder. Launch the app.
Connect the USB Flash Drive to your Mac, open the Disk Utility app, right click on the SanDisk USB Flash Drive then click Erase…. Give the disk a name of SanDisk, select MacOS Extended (Journaled) , GUID Partition Map then click Erase. When the Erase is complete, click Done. Click on the new SanDisk volume and you will see it has a mount ...
Use Terminal to create the bootable installer. Connect the USB flash drive directly to your Mac. Open Terminal, which is in the Utilities folder of your Applications folder. Type or paste one of the commands below Each command assumes that the installer is in your Applications folder and MyVolume is the name of the USB flash drive.
Turn off the Mac you want to install macOS Big Sur with the bootable installer drive. Connect the external drive to your Mac via the USB port. Turn on your Mac. Hold down the Option key when it starts up. Select the external drive with macOS Big Sur on it from the systems' list to start up your computer.
Mac Studio A: How to create Big Sur Boot Disk. The Easy Way on How To Create macOS Big Sur USB Installer. Official Release USB Boot Disk Installer. How To Cr...
Technology. To create a macOS Big Sur bootable USB installer, you will need a USB Flash Drive. Apple suggests at least 14GB of available storage so get a USB Flash Drive with at least 16GB of storage. Keep in mind all data on the USB Flash Drive will be erased so don't use one with data that you want to keep. Name the USB Flash Drive ...
Tutorial. Step 1. Connect your USB drive into your Mac's USB port. Step 2. Make sure the macOS Big Sur image file is in your Downloads folder. Go to the /Applications folder and drag it to ...
Making a bootable macOS Big Sur 11.6.2 USB drive is a quick way to install a fresh copy of macOS on your Mac! I will show you how to make a bootable Big Sur ...
What's needed for a clean install on a Mac A backup of the disk before it's erased. Two options are to use Duplicate (a free utility which can copy and paste an entire bootable volume), or Mac Backup Guru (a paid, fully featured backup utility with unique incremental backups capability) for that. Here is a detailed guide for the process. A Mac operating system installer. MacOS Big Sur can ...
Connect the USB flash drive to the Mac that you wish to turn into the bootable macOS Big Sur installer, naming the drive "UNTITLED" *. Open the "Terminal" application via Spotlight by hitting Command + Spacebar and typing Terminal and hitting the return key, through Launchpad, or via the Utilities folder in the Finder.
4. Choose Update Now to download the 12 GB installation Application. The Application Install macOS Big Sur Beta will appear in /Applications. STEP 2: Prepare Bootable USB Drive. This step extracts the Installer contents, then installs Clover bootloader to the USB stick. 1. Insert the USB drive. 2.
Step 2: Insert the USB drive and locate it in the left panel. Right-click the drive and choose 'Restore with Disk Image.'. Step 3: If you see a warning, dismiss it. Use the Browse button to navigate to and select your Big Sur DMG file. Confirm with OK to import it into TransMac for creating the bootable USB installer.
Step 1: Downloading necessary files to Create macOS Big Sur Bootable USB on Windows. Step 2: Install TransMac Tool on your Windows. Step 3: Open TransMac Tool. Step 4: Complete the installation. How To Create macOS Big Sur Bootable USB on Windows: Final Words. In our previous post, we shared an easy method to How To Create macOS Catalina ...
To Create bootable USB of the macOS big Sur, you need to drag the created Installer inside the Application directory. macOS Installer in Applications Once it is their attach the USB {at least 16 GB USB flash drive} and open disk Utility. you can hold the Windows or command + space to open spotlight, search for Disk Utility.
Step 4: Name the USB Drive volume label as 'Big Sur Installer' or something similar, then click on 'Burn' tab to format the drive and create a bootable macOS Big Sur USB installer. Step 5: Wait about 15 minutes and you will see the completion message on the screen. This means a bootable USB installer is ready and you can use that USB to install ...
Step-by-step instructions to Download MacOS from Applications store and create a bootable USB drive. A bootable USB drive is needed to reinstall MacOS on a c...
Search for "Big Sur". Click "Get", and then "Download". Format your USB drive using Disk Utility. To get into Disk Utility, just click the magnifying glass and type "Disk Utility. Once Disk Utility is open, make sure that the view is set to show all devices. Click the USB drive, then click "Erase" in the top menu.
Go to the Disk Utility, click File from the top app menu, and select New Image > Image from Folder. Select the new folder where you paste the Big Sur installer, and click Choose > Save. When it is created, eject the macOS Big Sur file. Create macOS Big Sur DMG file via Terminal. Launch Terminal from the Applications > Utilities.
Hover your mouse on the USB and right-click on the USB and select Format Disk for Mac. When the warning popped up, click on Yes. Note: Make sure you've backed up everything on your USB as all of the data will be erased. That done, name the drive like macOS Big Sur and when you've done that click on OK.
If you have a Mac, you can create a macOS 11 Big Sur ISO file with the following steps: Step 1: Download the macOS Big Sur full installer. Step 2: Make a new ISO disk image. Step 3: Create a bootable macOS Big Sur installer. Step 4: Convert the macOS Big Sur install media into the .iso format.
Big Sur is a 90-mile stretch of the state's central coast where often misty, forested mountains descend to the ocean. Much of Highway 1 is perched on the edge of cliffs, presenting dramatic ...
Whether you download a Windows 10 ISO file to a Mac or a USB drive, you can follow the fixes below to out the Windows 10 ISO download ... go to update your Mac. From the survey, this issue mainly happens on macOS Big Sur or Big Sur public beta. It may be a result of the bugs in this macOS version. If this is workable for fixing the Windows 10 ...
Read More | All state parks in Big Sur closed after Highway 1 slip-out. That includes Pfeiffer Big Sur State Park, Andrew Molera State Park, Limekiln State Park, Julia Pfeiffer Burns State Park ...
Prior to GPT-4o, you could use Voice Mode to talk to ChatGPT with latencies of 2.8 seconds (GPT-3.5) and 5.4 seconds (GPT-4) on average. To achieve this, Voice Mode is a pipeline of three separate models: one simple model transcribes audio to text, GPT-3.5 or GPT-4 takes in text and outputs text, and a third simple model converts that text back to audio.