
How to Give a Presentation on Zoom? [A Step-by-Step Guide!]
By: Author Shrot Katewa
![How to Give a Presentation on Zoom? [A Step-by-Step Guide!]](https://artofpresentations.com/wp-content/uploads/2021/03/Featured-Image-How-to-Give-a-Presentation-on-Zoom.jpg "giving a presentation over zoom")
If you’ve never used Zoom, giving a presentation on it might seem a bit challenging. But, that’s a challenge we will have to learn to overcome as the world moves digital more and more day by day. The key question really is how to give a presentation on Zoom!
To give a presentation on Zoom, first, start by joining a meeting. Now open the presentation file on your computer and share the slides on Zoom using its “Share Screen” feature. You should test your camera, mic, speaker, and internet connection before you start with your presentation.
As easy as it may seem, some of you may need further detailed instructions. So, in this article, I will provide a step-by-step guide on things that you need to do in order to deliver a presentation on Zoom successfully! Plus, I will also share some tips that can help you ace your presentation on Zoom!
So, without any further delay, let’s get started!
Understanding the Zoom Application Interface
Before we understand the steps to give a presentation using Zoom, it is perhaps a good idea to acquaint yourself with the Zoom user interface first. If you are well-versed with it, then perhaps you may want to skip this section and click here instead.
Logging into Zoom
Although you can login to your account using zoom website too, but it is best to download and use the zoom app .
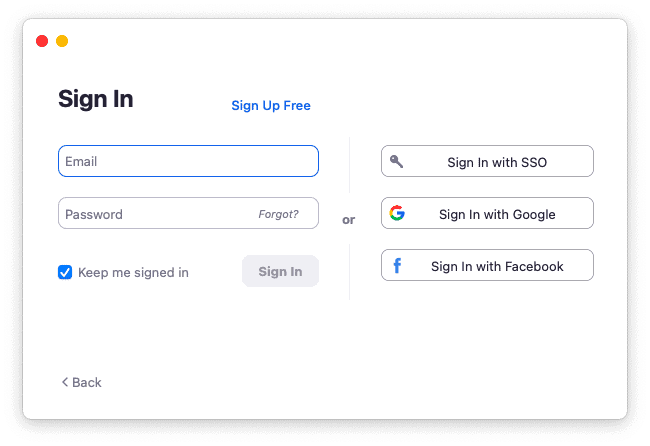
Once you have download the app, you will be prompted to login to your account. If you don’t have an existing account, you can either sign up or even login using your social account such as Google or Facebook. It’s actually quite simple.
If you feel that you don’t want to sign up or even use the social accounts for your meeting, you can choose to use “Sign In with SSO” option. SSO stands for single sign on and this allows you to sign in even when you don’t have an account with Zoom just once.
Zoom Home Screen
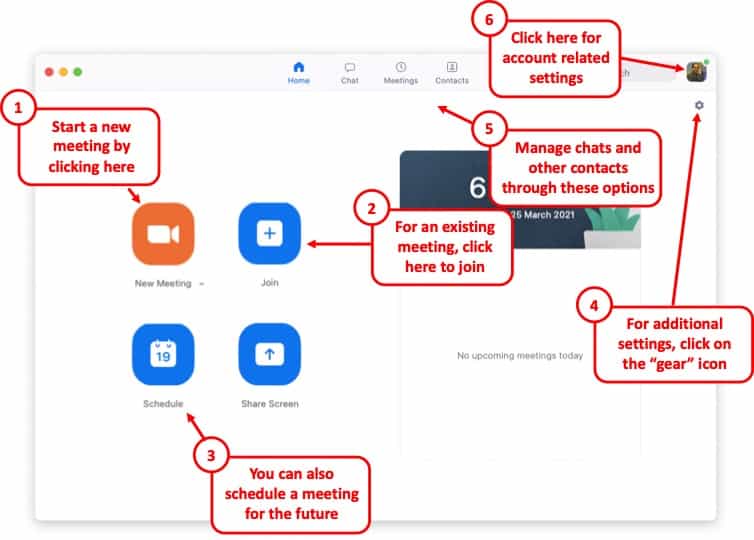
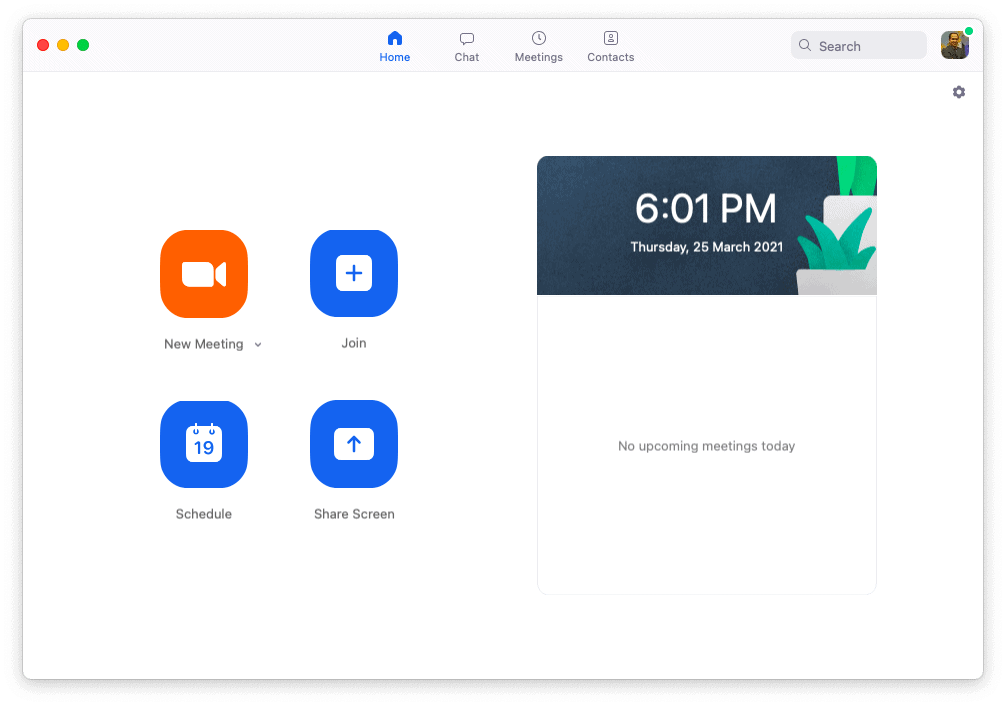
Once you’ve logged in, you will be taken to the home screen on Zoom.
There are a bunch of different things that you ca do with the home screen on Zoom. If you have been invited for a meeting, you will need to click on “ Join “. However, you will also need the meeting ID and the password for the meeting. If you don’t have the details, you will perhaps need to contact the person hosting the meeting.
You can also host the meeting yourself by using the “ New Meeting ” button. You can set a new meeting and invite others to join using this option.
Likewise, you can also schedule a meeting in the future using the “ Schedule ” option.
Furthermore, for changing the account related information, just click on your profile picture in the top-right corner of your window.
Lastly, there are several other detailed settings that you can tweak for your Zoom application. Almost all the other settings can be found in the “ Settings ” section by clicking on the “ Gear Icon “.
Zoom Virtual Meeting Window Interface
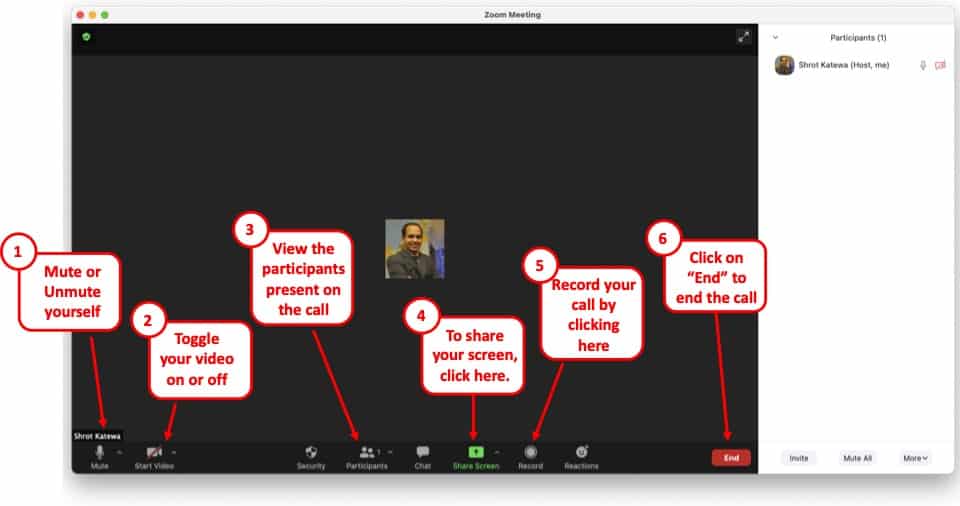
Once you are a participant in a virtual meeting, either by joining an existing meeting or by starting a new meeting, you will be greeted with an image similar to the one mentioned above.
On this screen, you will be presented with several different options. Some of the key functions that you will need to be aware of are as follows –
- Mute – Turning on the Mute or Unmute
- Video – Toggling between your Video
- Participants – Checking the names of the Participants
- Share Screen – to deliver a presentation (more on this later)
- Record – To record a meeting session
- End – Knowing how to end a meeting and exiting a call.
All the above functions will be visible on a small bar at the bottom of the window. If you are not able to see this option bar at the bottom, just hover over at the bottom part of your screen and all the options will appear .
Although there are other features that are also available for a zoom user or a participant, however, the aforementioned features should be good enough to deliver a presentation. These 6 features are at the very least something that you should be aware of.
How to Give a Presentation on Zoom (Step-by-Step)
Zoom has become a common tool for giving virtual presentations today. It is a widely used tool at conferences, meetings, and other events! If you are giving a presentation on Zoom for the first time, then perhaps you should be aware of a few things –
Here is a quick step-by-step guide on how you can give a presentation on Zoom:
Step 1: Install Zoom
Download and install the Zoom application to your desktop. To download the application, visit https://zoom.us/download and download the Zoom Client to your computer.
Step 2: Login to your Zoom Account
After installing the application, open it and log into your Zoom account. If you don’t have one, you can sign up for free using your email account.
Zoom also has options to sign in using SSO (Single Sign-On) or with your Facebook or Google account.
Step 3: Test Audio and Video Settings
Before you start or join a meeting, you will need to configure and test your audio and video settings.
To do that click on the gear icon on the Zoom application’s home screen. This will open the settings menu.
Now click on the “Audio” tab and select the microphone you are going to use. Try our different audio settings. After the microphone, select the speaker for audio output. If you can’t hear anything, try out another speaker source.
After configuring audio, click on the “Video” tab. From there, select the camera that is connected to your desktop. Tweak different video settings and find out what works best for you.
Step 4: Join or Schedule a Meeting
Now start a meeting by clicking on “New meeting”. You can also schedule a meeting on Zoom. To do that, click on “Schedule” and set up when you want to start the meeting. After completing the set-up, Zoom will give you a URL. Share it with the team members to join the meeting.
Or you can join a meeting by clicking “Join” on the Zoom client’s home screen. You can use a meeting ID or URL to join a meeting in Zoom.
Step 5: Open the Presentation
Once you have everything setup, you then need to prepare to show your presentation with your audience. To do that, open the presentation slides on your computer.
Step 6: Share Your Presentation
The last step in giving your presentation is to make sure that you share your presentation with your audience. To do that, click on “Share Screen” from the Zoom clients meeting window , select the screen where your presentation slides are open, and click “Share”. Now start presenting your slides to the audience.
Step 7: Stop Sharing to end the Presentation
One thing to know is how to end the presentation. To stop screen sharing, simply click on “Stop Share” located at the top of the screen . This option will only appear when you start sharing your screen.
How to Share a PowerPoint with Presenter View on Zoom?
To share your PowerPoint presentation slides with presenter view on Zoom, follow the steps given below:
Step 1: Open the Zoom App and Login
The first step really is to open the zoom app and login to your account.
Step 2: Join or Setup a Virtual Meeting on Zoom
Next, join the meeting. Remember, you need the meeting ID and password to join a meeting. Make sure you have requested for the details beforehand.
Step 3: Open Your PowerPoint Presentation
First step is really to open your presentation file that you want to present on the PowerPoint application.
Step 4: Put the Presentation in Presenter View
Now select the “Slide Show” tab from the top of the screen and click on either “From Beginning” or “From Current Slide” depending on your preference. This will open the slides in the “Presenter” view.
Step 5: Switch to the Zoom Application
Now, go to the Zoom application, start or join a meeting. While you are in the “Presenter” view on PowerPoint, press “ Alt+Tab ” to switch between applications in Microsoft Windows-powered computers. For iMac, use “Command+Tab” to move through open apps.
Step 6: Share Screen on Zoom’s Meeting Window
Once you are in Zoom’s meeting window, click on “Share Screen”, select the window where your PowerPoint slides are open in the presenter’s view, and click “Share”.
And that’s all you have to do in order to share PowerPoint with the presenter’s view in your Zoom meetings.
How to Share PowerPoint on Zoom Without Showing Notes?
There are two methods that you can use to share PowerPoint slides on Zoom without sharing your presenter notes. For the first method, you will need to have two monitors connected to your computer.
As for the second one, you can still share your PowerPoint slides on Zoom without sharing your notes (and you won’t need two monitors either). I’ve briefly explained both methods below.
Method 1 – Dual Monitor Method
In this method, you will be presenting your PowerPoint file on one monitor while looking at your presenter’s notes on the other one. Here’s how you can do that:
Step 1: First of all, open your slides on PowerPoint.
Step 2: Now join or start a Zoom meeting.
Step 3: Now click on “Share Screen” and select “Screen 1”. Then click “Share”. Here, “Screen 1” is your primary monitor.
Note: If you are not sure which one is your primary monitor, select where the PowerPoint file opened in.
Step 4: Now go to the PowerPoint application, click on the “Slide Show” tab, and from there click on “Monitor” and select “Primary Monitor”.
Step 5: Open the presentation file in the presenter’s view by clicking on the “Slide Show” tab and selecting “From Beginning” or “From Current Slide”.
If you have done everything correctly, participants will only be able to see the presentation slides while you have your presenter’s notes open on the second monitor.
In case you shared the wrong monitor on Zoom, click on “Screen Share” on Zoom’s meeting window, select “Screen 2” and click on share. This should fix your problem.
When you are sharing a screen on Zoom, you will notice a green border around that screen. This indicates which monitor you are currently sharing.
Method 2 – Sharing Portion of Your Screen
Follow the steps below if you have only a single monitor connected to your computer.
Step 1: Join or start a meeting on Zoom.
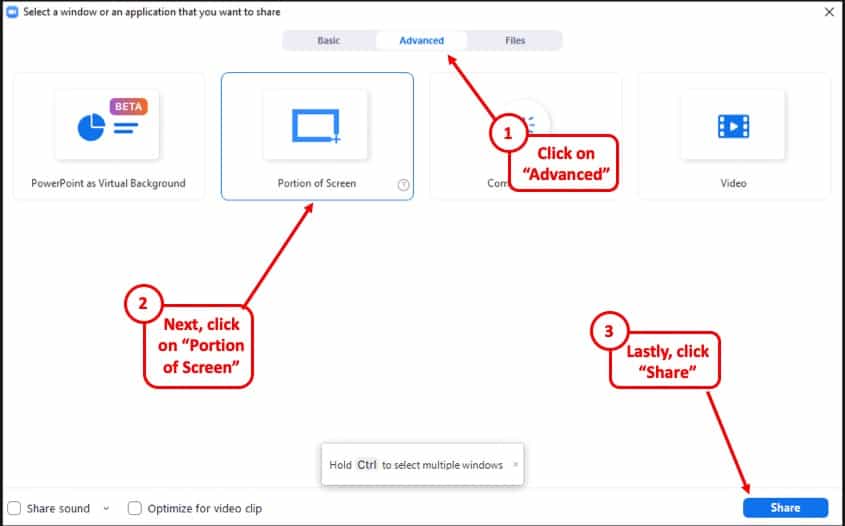
Step 2: Click on “Share Screen” and from the pop-up window select “Advanced”. From there select “Portion of Screen” and click on “Share”. This will give you a green border on your screen that you can adjust. Only the things that are inside this border will be shared on Zoom.
Step 3: Now open the presentation file in PowerPoint, and go to the presenter’s view by selecting “Slide Show> From Current Slide or From Beginning”.
Step 4: Adjust the size of the green border so that it only shows the presentation slides in the presenter’s view.
And that’s all you have to do. By doing so, your audience will only see the slides that you are presenting, but not your notes.
How to Show Yourself During a Zoom Presentation?
Ensuring that you are visible from time to time during a presentation can make it slightly more engaging and much more interactive. Here is how you can do that-
Step 1: First, start or join a Zoom meeting.
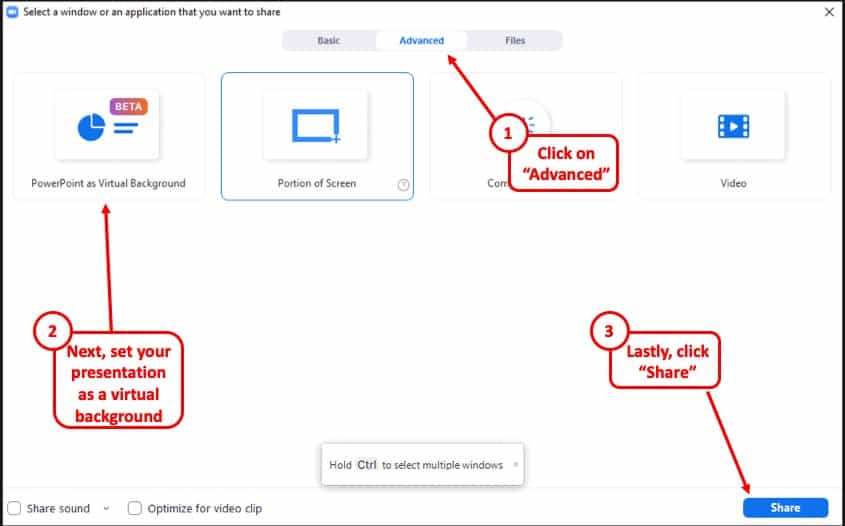
Step 2: Click on “ Share Screen ” and select the “ Advanced ” option. From there, select “ PowerPoint as Virtual Background ” and select the file you want for your presentation. Then click on “ Share ”.
Step 3: Make sure your video is switched on so that you are also visible to your audience. You can do that by clicking on “ Start Video ” on the Zoom Virtual Meeting Interface.
It will take some time for your slides to appear on the Zoom client. When it is done, participants will be able to see your face in front of the slides in Zoom. Make sure that your camera is connected to your computer and configured correctly.
This feature works best if you have a green screen behind you . If you have one, go to Zoom’s settings menu, select the “Background and Filter” tab and check “I have a green screen”. If you want to stop showing yourself during a zoom presentation, click on “Stop Video” on the meeting window and that will do the job.
Furthermore, you may sometimes want to show just yourself to the audience and not show the presentation at all. For that, all you need to do is simply click on “Start Video” in the Zoom Virtual Meeting Interface.
How to Record a Presentation on Zoom?
If you want to record your presentation on Zoom, you can do it easily. After joining or starting a meeting on Zoom, click on the “Record” icon located at the bottom of the meeting window. Once the recording starts, you can pause the recording or stop it whenever you like.
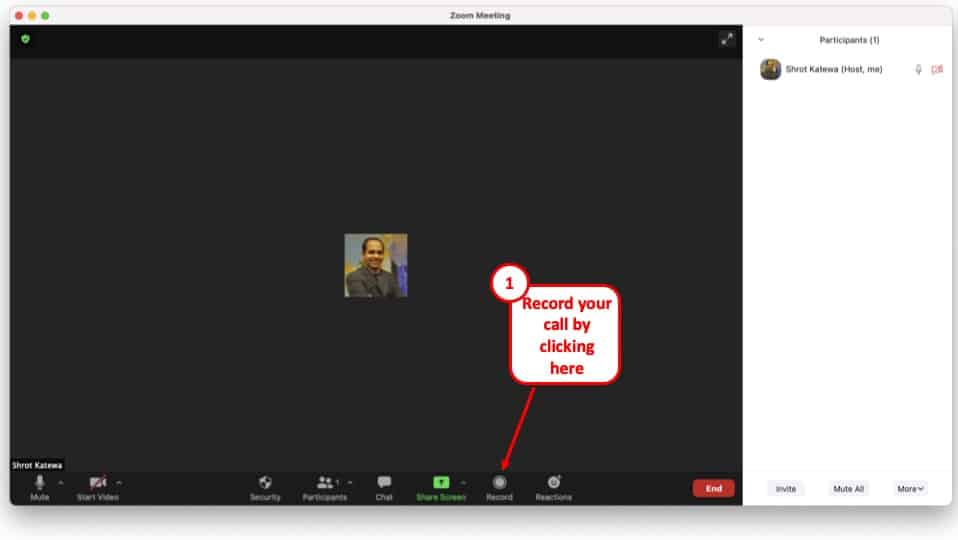
After the end of the meeting, the recorded video will be automatically converted into “.mp4” format and stored on your computer.
Tips for Giving an Awesome Presentation on Zoom
Giving a presentation in front of an audience is always a challenging task. Especially if it is online, many things can go wrong during your presentation. This is why I’m sharing some tips that can help you deliver an awesome presentation on Zoom. These are as follows –
1. Make a Professional Looking Presentation
There are several ways to make your presentation look really professional and high quality. One obvious method is to outsource your presentation to a specialised design agency! But, that can become really expensive depending on your budget.
Another (non-obvious) option is to use a PowerPoint Presentation Template! There are several high-quality and professional templates that you can get quite easily! In fact, using these Presentation Designs is quite inexpensive! You can download as many presentation templates as you want for as little as $16.5/month!
My favorite one is Agio PowerPoint Presentation template. It is perfectly suited to give a professional look to your presentation and yet it is quite quick and easy to use. Check out some of the images below –
Agio PowerPoint Presentation Template
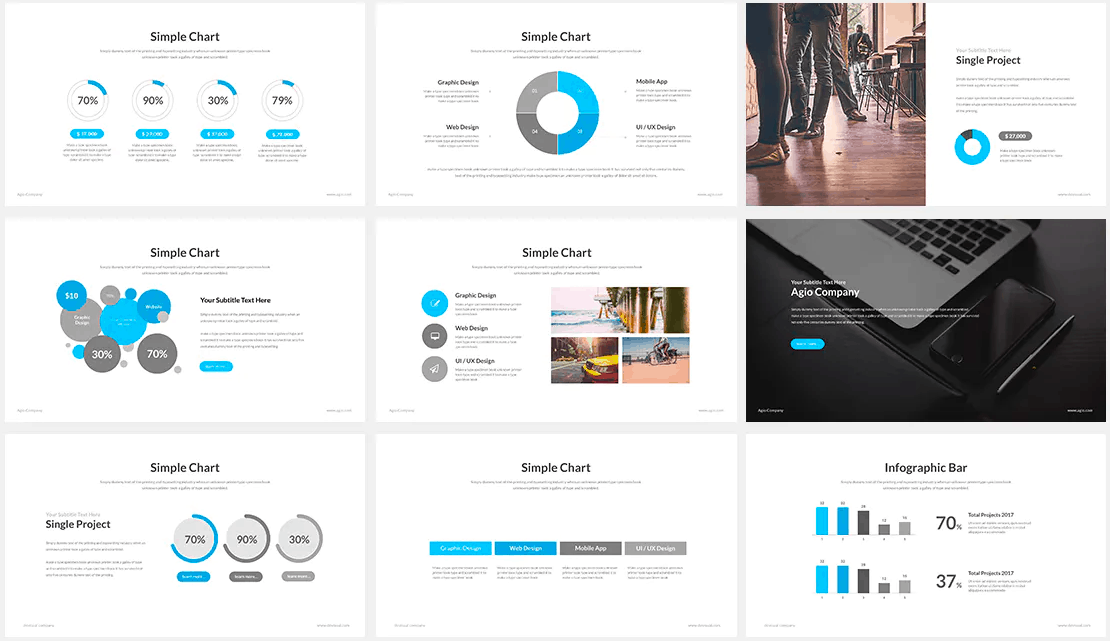
Furthermore, make the presentation as simple and straightforward as possible. Do not confuse your audience with a network of colorful texts, graphs, or other contents.
Only use data and graphs that are relevant to your presentation. Also, the clever use of transition animations can make the slide appear much more engaging.
2. Check Your Equipment Beforehand
Whenever you are giving your presentation online, many things can go wrong. For example, your camera or mic may not function properly. Such interruptions will only make you a laughing stock in front of the participants.
Check your mic, camera, and speakers to find out whether they are working properly or not. Also, check your internet connection and your laptop’s battery level. If everything is ok, then you are good to go on with your presentation.
More Related Topics
- Change the Style of Your Bullet Points and Stand-out from the Crowd!
- 7 EASY Tips to Always Make your Presentations Attractive! (Even if You are a Beginner)
- How to Reduce the Size of Your PowerPoint File? The Perfect Method!
- Auto Create Your PowerPoint Slides using Design Ideas Feature!
- Main Features of PowerPoint! [I bet You DIDN’T Know These]
Credit to Cookie_Studio for the featured image of this article
- Presentations
- Most Recent
- Infographics
- Data Visualizations
- Forms and Surveys
- Video & Animation
- Case Studies
- Design for Business
- Digital Marketing
- Design Inspiration
- Visual Thinking
- Product Updates
- Visme Webinars
- Artificial Intelligence
13 Zoom Presentation Tips to Ace Your Next Online Meeting

Written by: Mahnoor Sheikh
Now that more people are working from home, online presentations using tools like Zoom have started to become the norm.
But giving a Zoom presentation is very different from presenting in person. The lack of physical presence and body language can make it difficult to engage and inspire your audience.
If you’re still getting used to presenting on Zoom, this article has some great tips to help you succeed and make an impact in your next meeting.
Preparing Your Zoom Presentation
Getting ready for your Zoom presentation is just as important as giving the actual presentation. There are tons of potential issues you can face, like a faulty microphone or your dog walking in right in the middle of an important slide.
By preparing well, you ensure your presentation is as smooth and error-free as possible. After all, you only get one chance to make a great first impression and get a great ROI .
Here are some tips to help you get ready to deliver a powerful Zoom presentation.
1 Design a Great Online Presentation
The first thing you need to do is make sure your presentation is designed to look its best on your audiences’ tiny computer screens.
Follow these three rules to create an effective Zoom presentation.

Keep it simple.
The best online presentations are simple and straightforward.
You don’t want your audience to be squinting at their screens trying to navigate through a tangled web of text, colors, graphs and other content.
You need them to look at a slide and get the point at a single glance.
Use a plain background for your slides, preferably white, and focus each slide on only one point or idea. Don’t stuff too many bullet points or text into your slides.
Also, make sure you center your text in case the edges of the slides are cut off for some of the participants.
Lastly, use a large and bold font that doesn’t require participants to strain their eyes, even if they’re viewing your slides on their phone.
Use relevant visuals.
Visuals make information much easier to digest and retain than plain text. And let’s face it—they keep things entertaining.
Here are some types of visuals you can use to make your Zoom presentation more engaging:
- Charts and graphs. Visualizing data can bring the most boring numbers and statistics to life. If you’re using research findings to show a trend or back up your point, consider presenting them in the form of a bar graph or pie chart. Not only will it add some color to your slides, it will make it easier for your audience to interpret the data.
- Maps. If you're presenting geographic data, you can easily visualize it in the form of maps. In Visme, you can add interactive maps for a single country or the world.
- Icons and illustrations. Adding creative graphics like icons and illustrations can break up walls of text, make your information look more visual and interesting, and help explain your point better.
- Videos. Adding videos into your slides is a great way to make your presentation more engaging. Videos can help you explain a point more clearly, show a product in action or give some background information on your subject. You can embed YouTube or Vimeo videos into your slides or upload them directly.
- Stock photos. If used intelligently, stock photos can add value to your slides by helping you set the tone, tell a story or visualize an idea. You can also use relevant stock photos in the background with text overlay to add some color to your slides.
- GIFs and Memes. Make your online presentations fun and engaging by adding relevant memes and GIFs into slides that would otherwise look quite dry. Be careful not to overdo it, and only use humor if appropriate. You don’t want to risk looking unprofessional.
Here's a presentation template from Visme with just the right balance of visuals and text to help you get started. Simply customize it to use for your next Zoom presentation.

Using visuals in your online presentation is great, but this doesn’t mean you should stuff all your slides with images. Make sure the visuals you’re using add value to your content and emphasize your point instead of taking attention away from it.
Make it interactive.
It can be tough to keep your audience engaged when you’re not interacting with them face-to-face.
So, why not do the next best thing? Make your slides interactive!
If you’re creating your presentation in Visme, you can access a bunch of interactivity tools to spice up your slides:
- Animation. Add beautiful slide transitions, or animate objects separately. A good tip is to animate bullet points to appear one at a time to draw focus to each one. You can also choose from pre-animated illustrations, icons and characters to make your Zoom presentation more engaging.
- Links. In Visme, you can link any text or graphic element to a web page, or a slide or object inside your presentation. Get creative with this tool to add interactive quizzes, slides and more to your Zoom presentation. For example, you can link two text boxes together so when you click on the question, the answer appears.
- Hover effects. If you’re linking one object in your slide to another, you can enable it to show up on either click or hover. If you’re creating a quiz, for example, you can link two text boxes together so when you hover on the question, the answer appears.
A healthy dose of interactivity can make your audience feel more involved with your Zoom presentation.
2 Tidy Up Your Background
If you want your audience to take you seriously, clean up any clutter behind you.
A messy background can make you look unprofessional and distract people from focusing on your presentation. Ideally, your background should be a plain wall.
If you can’t manage to find a clean, empty background, consider using a virtual Zoom background. There are tons of different styles out there, so make sure to pick one that looks realistic and professional.
3 Draw Attention to Your Face
An online presentation can quickly start to feel distant and impersonal, like watching a pre-recorded video.
To remind your audience that they’re interacting with a real human, you need to draw focus to your face and expressions as you present.
Make sure you’re presenting in a well-lit room, where the source of light is in front of you. If the light source is directly behind you, you might end up looking like a dark blob.
4 Check Your Equipment
Make sure you check all your technical equipment to see if everything is working properly. This will help minimize issues like awkward camera angles or a malfunctioning microphone.
Here are a few things you should take care of before your presentation:
- Check internet connection. No one wants to listen to a presenter with laggy audio and video. Use a reliable, high-speed internet connection to ensure a smooth Zoom presentation.
- Test audio and video. Check if your camera and microphone are working properly by joining a Zoom test meeting . You can also test out your equipment from inside the Zoom app by clicking on Settings → Audio or Settings → Video .
- Ensure your laptop is plugged in. Imagine if your laptop dies out in the middle of your presentation just because you didn’t plug it in properly. Don’t let that happen.
- Adjust your camera level. Make sure your audience is looking at your face instead of the top of your head. Decide whether you want to sit or stand during your presentation, and adjust the webcam so it’s at eye level.
Keep in mind that technical issues can arise unexpectedly, even if you do everything right. Doing tech prep beforehand, though, keeps the chances at a minimum.
5 Minimize Potential Interruptions
Whether you’re giving your Zoom presentation at home or in a nearby cafe, there are tons of potential interruptions that can disrupt your flow and make you look unprofessional.
During your prep, your goal should be to minimize these interruptions as much as possible.
Find a quiet area to begin with, and lock the door so no one comes in unexpectedly. It’s a good idea to inform your family members or roommates that you’re going to be busy prior to the presentation.
Another tip is to close all other open applications and windows on your computer. Notifications and sounds can interrupt your meeting and distract you. You can also use the “Do Not Disturb” mode on MacOS or “Focus Assist” on Windows 10 to mute notifications.
6 Stick Your Notes in the Right Place
Just like when you’re presenting in person, you’d likely want to keep notes or pointers nearby in case you forget something important.
During a Zoom presentation, though, you need to be careful about where you place your notes. It can look very unprofessional and awkward if your eyes keep moving away from the camera when everyone is staring at your face.
Avoid keeping a notepad next to you or pasting them on the side of your monitor. A better alternative is to stick a post-it right below or next to your webcam. So, even if you take a peek, you will still be looking somewhat directly at your audience.
If you’re using Visme to create your Zoom presentation, you can simply use the presenter notes feature and skip all the hassle of keeping physical notes.

While you’re presenting, your presenter notes will open up in another window, so you can look at them while presenting without even letting your audience know.
7 Ditch the Pajamas
We get it. Nobody wants to get dressed when they’re at home.
But really, if you’re giving a professional presentation, it’s a good idea to ditch your PJs and wear something presentable .
Even if everyone knows you’re at home, you don’t want to look sloppy while sharing important information. This can prevent your audience from taking you seriously.
Plus, dressing up can help you feel more confident and motivated. Wear something that not only looks smart, but also makes you feel good about yourself.
8 Rehearse Before the Presentation
Never walk into a presentation unprepared. This is especially important for Zoom presentations, as it can be even more difficult to wing it when you’re not interacting in person.
Plus, rehearsing is a good idea if you want to overcome the fear of being on camera. Do a demo Zoom meeting with a friend or family member, or just practice alone before the presentation.
Delivering Your Zoom Presentation
Now that you’re all prepped up to give your Zoom presentation, here are some tips to help you make the most of your time while you’re presenting.
9 Start With a Bang
Did you know that people take as little as five seconds to judge how charismatic a speaker is?
Figuring out how to start your presentation is one of the most important parts of your Zoom presentation. It can either get your audience to sit up in their seats or prepare to doze off.
Here's an infographic on some tried-and-true ways to start a presentation that keeps your audience hooked . Keep reading for an explanation of all seven points below.

- Reveal a shocking statistic. A relevant and powerful statistic can set the tone for your presentation and show your audience the importance of your message.
- Tell a relevant joke. Humor is a great way to break the ice and keep your audience engaged. A boring presentation can quickly cause the listener to zone out.
- Ask a question. Get your audience involved by asking them a question relevant to your presentation topic. The more you interact with them, the more likely they’ll be to listen to what you’re saying.
- Quote an influential person. A powerful quote can often motivate or inspire your audience to sit up and listen to what you have to say.
- Tell a short story. Stories are personal and can evoke emotions. Telling a relatable story that also gets the audience curious to know more is a great way to start your presentation.
- Use an interesting prop. Using a prop can break the monotony of your presentation. Using motion and a visual object can also help attract your audience’s gaze.
- Show a captivating visual. Pictures speak louder than words, which is why using a powerful image that tells a story or shows the importance of your topic is an effective way to start your presentation.
Along with starting impressively, you should also try to end your presentation in a way that it drives your audience to take action or think about your message. A good idea is to end with a powerful statement or a thought-provoking question.
10 Make Eye Contact With the Audience
While you’re speaking, it’s just as important to make eye contact with your audience as it is during a face-to-face presentation.
The problem with Zoom presentations, though, is that you often end up looking at your own video or at the video of your audience.
To make eye contact online, however, you need to look directly at your camera. To make things easier, you can place the video boxes of your audience at the top of your screen, directly under your webcam.
11 Regularly Pause to Engage
Online presentations can get monotonous really quickly, and it’s common for people to zone out in the middle of it.
If you want to ensure your message hits home, take regular breaks throughout your Zoom presentation and engage your audience in conversation.
You could pause to ask them questions, or simply ask what they think about a certain topic. You could also try switching up the pace of your presentation, show a short video clip or tell an interesting or humorous story that helps bring wandering minds back.

12 Use the Chat Feature to Your Benefit
Zoom’s chat feature is a great way to get your audience involved without disrupting the flow of your presentation.
You can use Zoom chat to your advantage in several different ways:
- Questions. Ask your audience questions and let them answer through chat, or get them to ask you questions in the chat.
- Feedback. Let your audience know beforehand that they can leave their feedback and comments related to your presentation or topic in the chat. For example, if someone comments that they can’t hear you properly you can try fixing your mic or raising your voice.
Get creative with your use of the chat feature to keep your audience engaged. Ask them to send a hand emoji if they can relate to something, or ask what they want to see first in your presentation.
13 Record Your Presentation
The best way to improve your Zoom presentation skills is to learn from your past mistakes. Thankfully, Zoom lets you record your presentations so you can revisit them later and analyze your performance.

Are you using too many hand gestures? Are you walking around too much? Are you speaking at a reasonable pace? Understanding how you did can help you do even better in the future.
You can also send your Zoom presentation recordings to a friend or family member so they can review it for you. It always helps to get the opinion of someone you trust.
How to Share Your Visme Presentation on Zoom
Thinking of creating your Zoom presentation in Visme? Great choice!
The best part is that you can easily share your Visme slides with your audience without needing to download the presentation on your computer.
Of course, you can still download your presentation in PowerPoint or PDF format if you need to.
Follow the steps below to share your Visme presentation on Zoom without downloading anything.
Step 1: Publish your presentation.
When you’re finished designing your presentation in Visme, navigate over to the top right corner of your screen, and click on “Share”.
Next, click on “Publish for Web” on your left, type in a title and description for your presentation, and click on “Publish and get my link”.
Step 2: Click on the Present button.
Once you’ve published your presentation, you can go back and click on the “Present” button at the top right of your screen. This will open up the Presenter view.
If you want to access your presenter notes, click on the video camera icon at the bottom right corner of your screen, and your notes will appear in a new window.
Step 3: Share your screen on Zoom.
From your Zoom meeting window, click on “Share Screen” and select the window with the Presenter view of your presentation.

That’s it! You’ll now be able to look at the presenter notes on your screen while your audience views the slide open in your Presenter view window.
Alternatively, you can also download your presentation as a PowerPoint or PDF file, and share your screen in Zoom to present your slides.
Ready to Give a Memorable Zoom Presentation?
If you’re still getting used to the idea of presenting on Zoom, this article will help you prepare well and deliver an impactful presentation that people won’t be able to forget any time soon.
Remember, while Zoom presentations are different from presenting in person, you still need to be just as confident, dress to impress and make eye contact.
The only difference is that you need to put more effort into engaging your audience and keep them from dozing off in front of their computers.
Design a beautiful Zoom presentation and present online using Visme’s presentation maker. Sign up now for free and take it for a test drive!
Create beautiful presentations faster with Visme.

Trusted by leading brands
Recommended content for you:
![15 Best AI Presentation Makers in 2024 [Free & Paid]](https://visme.co/blog/wp-content/uploads/2023/11/Best-AI-Presentation-Makers-in-2024-Thumbnail-500x280.jpg "giving a presentation over zoom")
Create Stunning Content!
Design visual brand experiences for your business whether you are a seasoned designer or a total novice.
About the Author
Mahnoor Sheikh is the content marketing manager at Visme. She has years of experience in content strategy and execution, SEO copywriting and graphic design. She is also the founder of MASH Content and is passionate about tea, kittens and traveling with her husband. Get in touch with her on LinkedIn .
8 tips on how to present over Zoom like a pro

Today, Zoom is a central part of the remote workplace. It and other video conference platforms are widely used for meetings, job interviews, webinars, and presentations.
In-person presentations can be stressful enough, and having to conduct them virtually can seem even more daunting.
But it doesn't have to be that way. Our eight pro tips for presenting over Zoom may help you feel more prepared, comfortable, and confident. Read on to find out more.
1. Plan out your Zoom background/location ahead of time.
You can use a location in your home or a virtual Zoom background. If you select a place in your house, make sure it is uncluttered and clean. A plain wall or shelves with neatly arranged books provide a professional setting.
Consider lighting. Soft lighting placed in front of you illuminates you evenly; sitting in front of a window can cause glare and shadows.
Make sure your background doesn't distract from you and your presentation. You don't want your audience focusing on a family photo or the dishes in the sink.
2. Test your equipment before your presentation.
Your equipment can make or break your Zoom presentation.
To avoid surprises, check your internet connection, plug in your laptop, and ensure that your camera angle is correct and that the microphone works.
You can confirm your internet connection, audio, and visual with a Zoom test meeting . Using a hard-wired connection rather than wifi is the safer option. And closing any applications you won't need during the presentation can conserve bandwidth.
Taking precautions can avoid or minimize frozen screens, views of the top of your head, dead batteries, and sound problems.
3. Put notes in the right place on your screen(s).
Zdnet recommends, the best webcams for remote-working video calls.
The pandemic lockdown will leave a legacy of increased remote working, so it's a good time to upgrade your webcam. Here are ten leading contenders.
You need your notes where you can see them, but you don't want to keep looking down or off to the side during your presentation.
To combat this, you can use dual monitors . Position your presentation on one of them, visible to all, and your presenter's notes — plus the webcam you're using — on the other, visible only to you.
Or you can present your slide show in a window and put a private view of your notes in another window on the same screen. Zoom provides step-by-step instructions for single and dual screens.
4. Practice Zoom presenting as if it were the real thing.
Zoom allows you to practice in the precise environment where you will be presenting. Set up your background, lighting, and screens as you will on presentation day. You can schedule a webinar practice session on Zoom and run through your presentation exactly as you will on the day. You can invite a friend to join you and offer feedback.
Practicing can make the difference between a smooth presentation or an awkward one. Rehearse as often as you can, and visit our page of public speaking tips .
SEE: What tech jobs don't require public speaking?
5. Minimize clutter on your slides.
Slides are a key part of a virtual presentation and can help you and the audience stay on track.
Slides should be easy to read and navigate. Avoid brightly colored backgrounds, complicated fonts, and too many graphics.
Each slide should communicate one concept or idea. Avoid a long list of bullet points on a single slide.
While a slide with few words in readable, bolded font works fine, visuals like charts, maps, and illustrations or photos can be more effective and keep your audience engaged.
6. Use easy-to-understand visuals.
Visuals liven up your Zoom presentation in ways words don't. Instead of a long list of numbers explaining company statistics, try a graph or pie chart. Visuals aid understanding and keep your audience interested.
Explaining technical procedures with videos or illustrations rather than wordy descriptions alone enables you to show and tell. They also accommodate different learning styles within your audience.
Microsoft posts tutorials for incorporating visual elements into PowerPoint slides and inserting videos from the web or your computer .
7. Explain your agenda before you begin presenting.
Most people like to know what to expect when logging onto a meeting. Opening your presentation with a slide outlining your agenda sets the timeline for your meeting and reassures your audience. If you plan to allow audience interaction, make sure to highlight when and how in your agenda.
You can list the points you're going to cover in your presentation on your slide(s) and/or use graphics. You can pose a question on a slide, then show how you plan to answer it. Starting off with a funny (but work-appropriate) photograph or illustration can put you and your audience at ease.
8. If appropriate, encourage your audience to interact.
Unless you have a good reason not to, encourage your audience to interact during or after your presentation.
Some presenters ask participants to use Zoom's chat function for questions and pause the presentation periodically to answer them or wait until the end. Presenters can mute and unmute the audience and allow time for comments and questions that way. Zoom also allows for engagement through participant polls during the presentation
The size of your audience may dictate how you want to handle audience interaction.
Not allowing participant interaction risks losing your audience to their phones and other distractions.
In conclusion
The hardest part of presenting on Zoom may be the technology for some and the public speaking for others. We hope our tips help.
Online public speaking courses can help with anxiety and discomfort. Developing emotional intelligence skills can also benefit your Zoom presentations.
July 4th Sale: 60% off LivePlan Premium

0 results have been found for “”
Return to blog home
How to Be Effective and Keep Participants Engaged When Presenting Remotely
Posted august 23, 2021 by eleanor hecks.

Whether you’re doing a more traditional presentation via Zoom , giving a live interview, or conducting a webinar, the experience is very different from doing so in person. There won’t be a physical audience in front of you, and sometimes timing is extremely challenging to sync up — people often try to talk over others during conference calls. What’s more, it can be just as difficult to convey the appropriate emotions and body language, especially when just the top half of you — or sometimes even just your head — is visible.
It makes one wonder: What are some things you can do to prepare for the presentation or conference? Are there any tips you should keep in mind during the live event? What else should you know?
How to prepare your Zoom presentation
The planning phase is one of the most critical, as it’s where you’ll decide your topics, your major discussion beats, and where you’ll elaborate. You may not be using a teleprompter, but you will be creating a loose script. In addition, you’ll need to create the media that will go along with your presentation, which should be error-free, captivating, and on point.
Here are some tips to improve planning and design:
1. Design for everyone
While creating your media — the slides — understand that you are creating for a wide audience who will likely be tuning in from multiple devices and platforms. The media is going to look very different on a large, HD-ready computer monitor than it will on a smartphone or tablet. Design the content, images, and layouts so that they are compatible and friendly for all. Someone browsing on their phone should be able to see precisely the same information as someone on a laptop or computer.
Be sure to test out your presentation on different devices and resolutions. Also, try to remember that too much screen time can cause focus and stimulation problems in both children and adults. Try to limit the total presentation time, so that it’s accommodating for everyone.
2. Tone down the visuals
Yes, every presentation needs captivating visual content to go along with the text and audio. But you don’t want it to take away from the meat of the experience. It’s okay to use maps, charts, graphs, videos, photos, including stock images, GIFs, memes, and more.
Just don’t overdo it on a single slide. Try to keep it relatively confined so your audience doesn’t go into a stimulation overload. If they’re trying to read a ton of text, listen to you speak, and process several images — especially animated ones — things can get really hectic.
3. Get your area ready
On a live stream, everything around you is as much the star of the show as you. Figurines, pictures on the wall, and even clutter will all feature prominently unless you alter the background — which Zoom allows you to do. Be sure to tidy up your space before the event and remove anything from the frame that you don’t want your audience to see.
4. Brighten up the room
Webcams, even UHD cams, tend to work much better in bright conditions. If you haven’t already, open your blinds to let in some natural light. Test out the camera conditions beforehand to see whether it’s too bright, or not enough. If you’re using a laptop, you can move around your home to find the best spot.
Audiences should have a clear view of your face. Most importantly, they should be able to see when you’re speaking and what gestures you’re making.
Create a professional business plan
Using ai and step-by-step instructions.
Secure funding
Validate ideas
Build a strategy
5. Test your equipment
You can make a test call to a friend or family member, or just test out the equipment locally, but make sure everything is working. Check your audio and your microphone, be sure the video is clear and bright, check your internet signal and speeds, and ensure all equipment is plugged in and not running on battery power. You should be doing this as close to the conference or event as possible. It doesn’t help if you check out your equipment days in advance and then run into issues the day of.
People do not like to encounter technical errors. For instance, when a page’s load speed increases by just 1-3 seconds, the bounce rate also increases by 32% . A 5-second increase boosts that bounce rate to 90%. So, the longer it takes to set up your presentation and get things moving, the more likely it is that people will tune you out or leave altogether.
6. Rehearse
Practice in front of a mirror, or hop on a call with friends and family and allow them to provide feedback. Never go into a presentation unprepared, especially if you’ve never given one before via Zoom or anywhere.
7. Create a checklist
A checklist is always a good way to review what you need to get done before an event or activity. Professionals use them to avoid costly mistakes , and you should be taking inspiration from that.
Try to remember every small detail or requirement that you need to complete before the presentation. You can even create a multi-tier checklist that deals with before, during, and after the big event.
Hosting the Zoom presentation
So, you’re all ready for the big event? Now, it’s time to make sure everything goes smoothly during your presentation. Here are some helpful tips.
1. Speak plainly
It helps if you write the script or guidelines similar to how you will be presenting, however, you should speak plainly and enunciate as much as possible. Unless the subject matter explicitly calls for it, try to avoid industry or specialized jargon. That will also mitigate how much you need to explain or move off-topic. Furthermore, it ensures your entire audience can follow along, regardless of skill level or expertise.
2. Minimize potential interruptions
You can’t control what happens on the other end of that presentation, but you can certainly control things on your side. Try to mitigate potential distractions as much as possible. Put your phone on silent. Wear headphones so there’s no audio echo or distortion. Close your door or isolate yourself so no one comes in to interrupt. You might also consider turning on Do Not Disturb mode on your computer to pause notifications during the meeting.
3. Keep your materials handy
Two points. First, you want to keep your notes or script handy so that if you get stuck you can continue with little to no pause. Second, those materials should be in a place that has you facing the camera. If you have a document up on a monitor, for example, you don’t want to be glancing sideways all the time to read what’s next.
Situate the screen and camera so they’re at the same angle, so you’re constantly looking at the camera while you read. It’s a lot easier to do with a laptop because the camera is usually in the top bezel. With a desktop, you might have to move your display(s) around, or reposition your webcam. If you’re using a phone or tablet, you should have those propped up on a stand or tripod to keep them stable.
4. Dress to impress
Dress just as you would if you were paying a visit to the office or making a presentation in public. Put on the whole outfit too, and not just the shirt, because you never know what’s going to happen. If the camera falls, you don’t want it to expose that you’re just wearing underpants along with that collared shirt.
5. Have your media ready
It’s a simple tip, but a crucial one. Have your slides and other media ready to go and queued up for sharing. Don’t wait until the presentation to get things in order. You should be able to swap to the necessary screen, share the content, and go. Have all hyperlinks, videos, and interactive elements prepared beforehand, as well.
6. Pause for effect and questions
After each major beat, pause for a moment to allow your audience to ask questions, raise concerns, or ask for you to reiterate the message. This is much more difficult when you’re dealing with a large audience, but most Zoom meetings are relatively intimate with a local group.
7. Pay attention to chat
Alongside every Zoom event or meeting, there is a live chat window that can sometimes be forgotten if you’re busy focusing on your presentation. Don’t neglect it. Your audience may be asking more questions, providing valuable feedback, or even pointing out something wrong — like your mic cutting out.
8. Record your presentation
Make sure you’re recording the presentation to reference later, not just for everyone else but for yourself too. It allows you to rewatch the feed to review questions and commentary, and also to perceive your mannerisms and dynamic content. You can use that information to build a better presentation later.
9. Leverage the Zoom tools
There’s a host of tools you can use with Zoom , including screen sharing, annotations, live polling, and much more. Incorporate them into your presentation whenever possible, and don’t forget they exist! They can help make the experience more fun, engaging, and memorable.
10. Keep it interesting
It’s easy when you’re talking, especially about dull subjects, to lose your audience. One way to keep them invested and interested is to add the occasional “boom” moment. It’s an impactful instant, like a shocking statistic, joke, or alarming point, that ties together everything you’ve been talking about up until that moment.
The follow-up
After the presentation is completed, don’t make the mistake of thinking your work is all done. The first thing to do is make the media and the recording of the presentation available so that anyone who wants to can go back and review the experience.
Next, you need channels in place to collect feedback. People will have follow-up questions and concerns, and they may want you to clarify certain points. Also, you’ll want people to share their experiences. What did they enjoy? What did they dislike? How could you have improved as a presenter? Don’t be too scared to ask these questions, as they’ll help improve your Zoom presentation skills.
Finally, consider wrapping it all up with a nice bow by giving away free content or materials to those who attended the event, like a free e-book written by you or your colleagues, or a promo code to your storefront.
With these ideas in mind, you’ll be ready to knock your next Zoom presentation or remote meeting out of the park!
Like this post? Share with a friend!

Eleanor Hecks
Posted in management, join over 1 million entrepreneurs who found success with liveplan, like this content sign up to receive more.
Subscribe for tips and guidance to help you grow a better, smarter business.
You're all set!
Exciting business insights and growth strategies will be coming your way each month.
We care about your privacy. See our privacy policy .
👀 Turn any prompt into captivating visuals in seconds with our AI-powered design generator ✨ Try Piktochart AI!
15 Tips for Engaging Zoom Presentations + Examples

Your next Zoom presentation is a week away. And your mind is racing.
What presentation software should you use?
What if the other attendees can hear your neighbor’s loud music?
Will they find your presentation boring?
Relax and take a deep breath.
You don’t have to figure out the answers to these questions by yourself. This guide will cover everything you need to know about planning and delivering engaging Zoom presentations without stress and anxiety!
After reading this article, you’ll be brimming with confidence and competence on your next Zoom presentation.
Table of contents :
The science behind your Zoom presentation anxiety
- Downloadable Zoom presentation checklist
Part 1: Tips on how to plan and prepare for your Zoom presentation
Part 2: tips during your zoom presentation.
- How to share your Piktochart slide deck on Zoom
- Present with ease on Zoom using Piktochart presentations

Before we get into all the other Zoom presentation tips, perhaps the most important is to deal with your Zoom presentation anxiety. And you’re not alone – anxiety over Zoom presentations is more common than you think .
A 2021 paper on why students have difficulties learning during synchronous presentations over Zoom found that 80 percent of the students polled experienced anxiety and trouble focusing during their virtual classes. But what causes this worry? In a peer-reviewed article, Professor Jeremy Bailenson, founding director of the Stanford Virtual Human Interaction Lab , highlighted the results of their research and cited four primary reasons behind Zoom fatigue, stress, and anxiety:
- Your brain interprets excessive amounts of close-up eye contact during video chats as an “intense situation.”
- Like looking at the mirror, you become more critical of yourself as you see yourself on camera.
- Limited movements while you’re chained in your chair and table.
- Video chats require a higher cognitive load than face-to-face presentations.
“You’ve got to make sure that your head is framed within the center of the video. If you want to show someone that you agree with them, you have to do an exaggerated nod or put your thumbs up. That adds cognitive load as you’re using mental calories in order to communicate,” shares Bailenson.
Finally, you have to consider tech troubles and presentation software fiascos, as well as dealing with the pressure of public speaking.
15 Zoom presentation tips and tricks to help you own the room like a pro
Now that you understand why Zoom presentations give you sweaty palms, let’s go through 15 actionable steps to prepare for the slides.
We created a checklist of the Zoom presentation tips so you can cross off each task.

Prefer video learning instead? Watch the video below.
The success of your Zoom presentation is the result of thoughtful planning and preparation.
Get ready for your online class, product webinar, or job interview on Zoom with the following pre-presentation tips:
1. Decide on the scope of your Zoom presentation
Before presenting on Zoom, ask yourself — what one particular idea or insight would you want your audience to learn from you?
“Defining the scope is the most critical step. What are the boundaries, what are the deliverables, what is the topic that you are covering?”, recommends Linda Parry Murphy , CEO of Product Launchers, Inc.
Trying to cover every subject will only make you more nervous.
Remember the Stanford study earlier about too much cognitive load as one of the reasons behind Zoom presentation anxiety?
Limiting the scope of your presentation can significantly reduce your cognitive load while keeping your audience focused on the key points.
2. Plan for the structure of your online presentation
It’s important to master the sequence and structure of your presentation as part of your preparation. Creating a framework guides the meeting participants so they understand what the data means, why it’s important, and what the implications are in this situation.
A solid structure in place also makes it easier to go back to what you’re saying. As a result, you will feel more confident because you can keep track of your talking points with a quick glance at your outline if you lose your train of thought.
Matt Abrahams, a lecturer in Organizational Behavior and author of Speaking Up Without Freaking Out , recommends the following examples of presentation structures that you can use:
- Past-Present-Future – review a process or share a timeline
- Comparison-Contrast – show the benefits of a certain idea, insight, product, or service
- Cause-Effect – explain the rationale behind a decision
- Problem-Solution-Benefit – motivate or convince your audience
- What?-So What?-Now What? – convince people to do a specific action after your presentation
Another simple presentation structure you can work on is to start with an introduction, the meat of your presentation where you can highlight 3 points, and wrap up with the summary and call-to-action.
3. Prepare your presentation visuals
Plenty of research and evidence shows that including images is more effective in getting your message across than written text or oral communications alone.
For instance, a captivating visual is four times more effective in conveying information than words alone. People remember 80 percent of what they see and do, compared to 20 percent through reading and 10 percent through hearing, respectively.
If your goal is to convince your audience during your Zoom presentation, you’ll also be delighted to know that using visuals can help you become more persuasive.
A Wharton School of Business research found that around a third of the audiences they polled felt that presenters who used visuals were more persuasive.
So remember that well-chosen images, even stock photos, can do wonders to augment your slides.
When making visuals for your presentation, use these questions as your guide:
- Is there an icon, illustration, or image that could represent your point in a more meaningful way?
- What types of diagrams , such as a timeline, flowchart, pie chart, arrows, or graphs, will help get your point across to your audience?
- Who are my target audiences? When choosing visuals for my presentation, are there certain cultural taboos or inappropriate humor that I should be aware of?
One more thing – consider using bullet points if you find slides with walls of text. They’ll be easier to digest without taking the focus away from you.
4. Eliminate clutter in your surroundings

Staying in one place with no room to maneuver probably doesn’t spark joy for anyone. KonMari your environment by eliminating clutter on your desk and in the space around you. This means extra keyboards, unused notebooks, pens, food boxes, and books can go.
Eliminating clutter gives your brain the impression that there’s more room for you to move around during your Zoom event.
If the space you’re presenting in makes it difficult to clear off clutter, you could find a plain wall to present against. And if that’s not an option, you can use a clean virtual Zoom background . Keeping your surroundings out of sight means it’s out of mind for you and your audience; one less thing to worry about while presenting.
5. Do a tech prep
Presenting in Zoom while you’re at home or traveling is a technological wonder in itself. But technology can be frustrating at times too.
Spending some time optimizing your Zoom settings by clicking in the toolbar while you’re in a Zoom meeting. Under video settings, you’ll find a few options that can help with the visuals, such as focus assist.
Before your presentation, double-check the following:
- Make sure that your laptop, computer, lighting, headset, webcam, microphone, and internet connection are working. Have backup equipment if possible.
- Familiarize yourself with the Zoom app and other relevant software you’re going to use during the presentation.
- Close unnecessary browsers, applications, or software before the presentation. Turn off your laptop or desktop notifications. The goal is to optimize and speed up the device to have a smooth presentation.
- Prepare a PDF version of your presentation slides and have an extra copy of your presenter notes in case of technical mishaps with your slides. It also makes sense to have a short link to your presentation that you can share with the audience.
- Position your notes in the right spot so you know where to find them while presenting.
- Check Zoom settings and do a quick audio and video check.
6. Rehearse your presentation
After taking care of your surroundings and equipment, the next step is to prepare yourself.
Practicing your Zoom presentation in advance can help boost your confidence. Here are some tips to help you rehearse well for your presentation:
- Screen record yourself. Afterward, check your recorded video for technical issues, your body language, and whether or not your voice is audible or not.
- Practice with a family member or friend who can give feedback on any distracting nonverbal communication habits like too many hand gestures.
- Rehearse in the same room where you’ll be presenting. Use the same lighting, computer setup, and everything.
- Practice speaking to the camera, not your computer screen.
If you’re not used to face-to-face presentations, you could record your presentation and watch it back. I know, I know – it can feel so uncomfortable watching yourself. But a quick analysis will reveal if you use too many hand gestures, that can be distracting, and also if you need to reposition your camera so it shows your upper body while presenting.
The time has come for presentation day! You already know the ins and outs of your presentation, and you’ve practiced your Zoom presentation skills to a T. A couple of checks you can do before you start are:
- Make sure you’re in a quiet area to minimize any potential interruptions.
- Do a test call with a friend to check the internet connection and if you’ll stay connected.
Take note of the following tips and hacks to make your Zoom presentation engaging and anxiety-free during your webinar or talk:
7. Dress the part
Wear clothes that are appropriate for your presentation and audience. It also helps to be more mindful of your accessories and hairstyle. The outfits and accessories you wear during your Zoom meeting will speak volumes about you as a person.
For example, if you’re presenting to your coworkers, wear work clothes. If you’re pitching to a group of angel investors, wearing a tie can help convey that you’re serious and trustworthy. However, this may not be a good idea if you’re presenting to a group that is more open to change and tends to be more relaxed when it comes to conventional standards.
Another benefit of dressing the part is what you wear actually impacts how you think. Wearing formal clothes can improve abstract thinking and give you a broader sense of perspective, which is influential in helping you make better decisions.
8. Ditch the chair
Standing up when presenting in Zoom rather than sitting down helps you become more confident because you’re not hunched down on your chair.
Standing straight with your shoulders back also enables you to breathe easily, making your voice sound more powerful and confident. Finally, it allows you to move more and make explanatory gestures which is a charisma boost.
The more confident you appear in your presentation, the more confident you’re likely to feel.
“When your mind starts to feel more confident and powerful — it starts to see those challenging situations not as threats but as opportunities,” shares Harvard psychologist professor Amy Cuddy.
If you can’t stand up during your presentation, try to sit straight in your chair and back up your camera a little to show your upper body and not just your face.
9. Have a memorable introduction

National best-selling author and founder at Science of People Vanessa Van Edwards specifically recommends opening your presentation with IISSAAQQ to make it more memorable. IISSAAQQ stands for:
- I cebreaker
- I llustration
- S hort story
- S tatistic or surprising fact
- A nalogy or metaphor
Bonus points if you can weave in humor with some background information with a relevant fact. Research found that more popular talks used humor 12.92 times, whereas less popular talks used humor only 3.92 times on average.
You don’t have to force a joke – humor could just be a play on words or surprising the audience with a funny image or meme that contrasts with a statement. Nothing breaks the ice better than laughter.
10. Look your audience in the eye (or rather your webcam)
Looking your audience in the eye is easier during face-to presentations than Zoom presentations. It can be a little tricky during online meetings because we tend to look at people’s faces on the computer screen. Maintain eye contact by looking into your webcam.
“A good idea is to lower the monitor camera a little so that you don’t have to tilt your head back to gaze up at it. If you can’t help looking at someone’s face on the screen instead of their camera, it helps to move the Zoom window to the part of the screen nearest to the camera so at least you’re looking at approximately the right place when you’re looking at their face,” shares Carol Kinsey Goman , Ph.D., executive coach and international keynote speaker.
You could treat the camera as if you were doing a face-to-face presentation. This way, it’ll be a bit simpler to hold eye contact with your audience when you’re not looking at your notes.
11. Think happy thoughts
Find ways to boost your mood before your presentation. Aside from helping you feel good (which in turn can boost your confidence), you’re also likely to smile often with happy thoughts.
When you smile at your audience, they will also likely “mirror” your action and think happy thoughts.
“Mirroring is relevant to our tendency to be empathetic. When I see you smiling, my mirror neurons for smiling fire up, and I get your state of mind right away. I feel it as you feel it. We need that mirroring in order to create a full empathic response to other people,” describes Marco Iacoboni , author of Mirroring People and UCLA professor.
When you’re having a good time and sharing enthusiasm with your audience, they’ll reciprocate through their nonverbal communication. This means fewer folded arms and blank stares and more nodding along and smiles.
12. Delegate the chatbox
Have someone else take care of Zoom chat or manage the waiting room to keep you from being distracted. This person could be the meeting host, a colleague, or someone you trust who has your back during your presentation.
13. Engage your audience
A boring presentation is when there’s no interaction, and you’re being spoken at (hello, university lectures). You’ll be able to tell from everyone’s body language in the meeting room.
Make your presentation a two-way street. Here are some ways to encourage interaction and participation amongst your audience during your Zoom meetings:
- Ask questions. For example, if you’re presenting a team productivity software in Zoom, ask your audience about their top productivity problems at work. You can also use this time as an opportunity to transition to your next presentation slide.
- If you have a small audience, remember each person’s name and address them using their first names.
- Use visuals like illustrations, infographics, or a short video clip in your slide show. Tool recommendation : Use Piktochart Video to transform a long video into short clips.
- Use interactive quizzes while presenting online to change the pace and keep your audience engaged.
14. Talk like a human and avoid too much jargon
Alright, what does talking like a human mean in Zoom presentations?
For a start, avoid talking too much jargon and corporate speak. It makes you more relatable, keep your audience’s attention longer because your points will be easier to understand, and also helps you stand out from other presenters.
Just because you’re presenting in virtual meetings doesn’t mean you’re not talking to people. The only difference is you’re sharing your presentation in front of your camera instead of in front of the lecture room.
Next, improve your visual storytelling skills . Your presentation will be more memorable if you briefly share a story and pair it with visuals. Sign up for our free visual storytelling course . Check out the teaser video below.
15. Slow down
When you’re anxious and not too confident about your Zoom presentation, you’ll tend to speak fast, which in turn will make you more nervous. It’s a vicious cycle.
When presenting in Zoom, be mindful of your pace. Slowing down will not only take the edge off your nerves but also make you appear more confident.
Don’t be scared of pauses or gaps between your statements. Sometimes, you might need a sip of water to hydrate your throat. Other times, you could use the pauses as extra emphasis to drive key points.
Slowing down and changing up your talking pace will help you deliver an impactful presentation because you’ll have more control and be better able to drive the point home.
5 presentation examples and templates
To make presenting your Zoom presentation easy, here are some presentation templates and examples for inspiration.
Quarterly finance update
Have a big meeting coming up where you need to share sales performance and revenue figures? We’ve got you covered with this template.
It’s equipped with graphs where you can easily drop your revenue figures in and share performance with customizable graphs. There are also template slides for customer feedback and if your team is planning to introduce new processes.

Marketing strategy plan template
This marketing strategy slide deck is perfect if you’re onboarding a new client and want to walk them through your research, analysis, and proposed actions.

Group project
Presenting your collaborative project in a Zoom meeting to your classmates? Take the worry off so you can focus on sharing the results by using this science group project template .
Despite the name, you can use it for any kind of school or university project because the structure works for any type of research presentation. The template has slides for:
- Group introduction
- Your hypothesis/basis for the project
- Your theory
- How you tested the theory
- Key takeaways

Buyer persona template
The customer buying journey is always evolving, and you might need to present a case study to leadership or your team on recent findings. Our template makes it simple to share your customer’s story, as the template has slides for:
- The customer profile
- Motivations/goals
- Personal insights
- Responsibilities

Team update in the all-hands meeting
It’s common for managers, or project leads to update the company with their results in company meetings. In these cases, you might just need a single slide to share your progress.
This work breakdown structure template does the job, giving you space to share what your team’s objectives were, what the key results were, who was involved, and what the shipping date was for these goals.

How to share your Piktochart slide deck on Zoom
Step 1 : On the Piktochart editor, click Share to get the link to your presentation.
By default, your presentation is not publicly visible.
Step 2 : Copy and paste the link into your browser bar. Then, click the Show Presentation button. This will launch in fullscreen presentation mode, and now you’re ready to shine.
Step 3: Click Share Screen on your Zoom account and choose the browser with the Piktochart link.
For a visual demonstration, watch the short tutorial below with detailed instructions.
Ready to deliver your presentation?
That’s it for our Zoom presentation tips; now over to you.
You have a brilliant idea or insight to present, and you need to share them with your audience in your next Zoom presentation. It’s high time you nail it with the virtual presentation tips we outlined in this guide.
Take Piktochart for a test drive today and create your next presentation slide minus the stress using our free presentation maker .

Other Posts

75 Best Work Anniversary Wishes for Coworkers and Colleagues

9 Strategies for Effectively Communicating Change to Employees (With Examples)

What is Internal Communications?
Improve your practice.
Enhance your soft skills with a range of award-winning courses.
11 Essential Tips for Presenting on Zoom
January 24, 2022 - Dom Barnard
A boss unwittingly disguised as a potato during Zoom meetings, cries of “you’re on mute!” and guest appearances by kids and pets, are among the hilarious anecdotes attached to this hugely popular app.
However, it becomes serious when you need to make a good impression in a virtual meeting, job interview or presentation.
Zoom became a massively popular communications tool for business, education and social meetings during the Pandemic. In 2020, there were 485 million Zoom downloads , which is 30 times more than the year before!
Of course, some of the top Zoom presentations tips apply equally well to in-person or online delivery. Such as establishing your end goals, preparing a flowing framework and strong content, then practising your speech more than once. However, there are particular advantages and disadvantages to Zoom, to get the right results for presenting online.
These Zoom presentation tips will help grow your competence, confidence and success.
1. Put some trousers on!
One of the great things about Zoom presentations is there is a degree of informality and comfort.
You can dress just your top half smartly, have a hot beverage just off-screen, and do your best public speaking in familiar surroundings.
One of the worst things about Zoom presentations is …there is a degree of informality and comfort!
You can find yourself easily distracted, lacking in focus and slower in your responses.
The best way to present well on Zoom – when the stakes are high – is to create a wholly business-like environment and attitude. Use a space in your home or field location that’s as bland and clinical as possible, with no potential noise disturbance. Dress smartly from head to toe to create the best mindset.
Site your technology in front of you and imagine it’s a lectern and a set of multi-media tools in a meeting room or lecture theatre.
2. Use the superpower of data
While you’re using technology to communicate or collaborate, it’s common sense to optimise ways to enhance your presentations.
As part of your extensive preparation for important Zoom meetings, consider what documents, images and graphics to share, to add credibility and professionalism to your pitch. Or, simply to hold the attention of a Zoom audience from start to finish.
Familiarise yourself with the Share Screen option on Zoom, and the best ways of displaying videos during a Zoom call, including advanced share methods for online presentations.
There are good Zoom share screen tips here, including how to add a video to presentations on Zoom.
Zoom presentations with visual content are 43% more persuasive . Also, 90% of the information we process comes from visual input. So your Zoom presentation materials could be what gets you that job, funding or agreement.
3. Non-verbal communications tips for Zoom
Don’t assume that online presentations release you from many of the body language pitfalls and best practices. The opposite is true, as you need to focus on non-verbal cues even more.
If you deliver your Zoom presentation in a rigid, static and clinical way, you are missing out on some of the best ways to be successful in communications.
People respond to people. Effective communication requires warmth, authenticity and establishing a strong personal connection with your audience. Being robotic when presenting online won’t help you to succeed.
If this is an intense online meeting, then showing empathy can also increase the engagement and openness you achieve.
How do you communicate non-verbally on Zoom?
Without going over the top, be purposeful and slightly exaggerated in your body language. Sit straight and lean subtly towards the screen. Never away from it and certainly no slumping, crossed arms or chin/elbow leaning!
Smile, nod and keep strong eye contact, including showing your attention passing from person to person across a split-screen. Use hand gestures and show subtle movement in your upper body to add emphasis to key points.
4. Verbal communications skills
Zoom presentations also make it too easy to slip into a monotone voice or race through a presentation. You may even find the process of talking to technology – not live people – causes you to ramble, or get lost in your ad-libs or Q&A responses.
Make sure you articulate clearly, add emphasis when needed, and generally modify your tone regularly but logically.
Don’t be afraid to leave small pauses to drive a point home, or to take a deep breath while you construct your next point. If you look directly at the screen and hold eye contact, this ‘white space’ is perfectly acceptable.
5. Is everyone listening?
One of the most important presentation skills, in general, is reading the room. Is your potential boss or buyer looking bored? Are the panel of decision-makers getting confused? In contentious presentations, being able to spot your biggest dissenter from their non-verbal communication can help you shift your focus to winning them over.
It’s challenging to gain that sort of body language intel from online meetings. So, the best Zoom presentations compensate for that.
It can be as simple as adding more direct questions to your content and literally pausing regularly to ask your audience about queries or concerns. Make your questions open-ended, not a yes or no response.
“Let’s take a minute. What else do you need to know about that part of my presentation?”
Also, keep Zoom presentations succinct, flowing and animated. Your audience will drift away subconsciously if your delivery is pedestrian or you talk for too long without involving them.
Remember, attention spans are even shorter on technology!
Practice your video presentation and get feedback on your performance with VirtualSpeech .
6. Opening Zoom presentations with pizazz
No, this doesn’t refer to grabbing your audience’s attention with a juggling trick or wearing your most colourful or glamourous finery.
How you start a Zoom presentation sets the tone. If you instantly engage their interest with a compelling opening, the attention and engagement last.
This should primarily be 100% clarity on the purpose of your presentation and the desired outcome. As well as establishing your credibility and methods to achieve the end goal.
Vague introductions and slowly revealing your key points drains your time and your audience’s attention.
What makes a good opening for Zoom presentations?
7. Icebreakers
You can’t shake their hand, but you can issue a quick, warm greeting and a short, relevant fact about yourself that helps them to warm to you.
8. Storytelling techniques
These work for a myriad of business communication tasks. Give a short (that word again) anecdote or illustration, to give context to your Zoom presentation. That could be about you, your product or the outcome you are requesting, for example.
9. Meaningful quotes in presentations
“The single biggest problem in communication is the illusion that it has taken place.” – George Bernard Shaw.
Good quotes can work!
10. High impact fact
Another great opening for Zoom presentations is a little known fact or ‘behind the scenes’ secret that grabs attention. Did you know, one-third of adults still sleep with a ‘comforter’ like a soft toy or blanket? (Not relevant to many presentations but it’s a memorable statistic that caught OUR attention.)
Wake your audience up with something they want to remember – and share with others – and they will be alert and ready to listen.
11. End Zoom presentations correctly
One last piece of advice on Zoom presentations. Don’t get so relieved when you get to the end, that you forget your call to action.
All communication should include an invitation of some kind, in clear language. What would you like your audience to do, now your Zoom time is over? Tell them that and thank them for your attention, with one last warm smile.
Home Blog Business How to Ace Your Zoom Presentation: Tips for Successful Virtual Presenting
How to Ace Your Zoom Presentation: Tips for Successful Virtual Presenting
It’s your turn to speak during a Zoom social event in your company when your cat decides to make an impromptu appearance, climbing onto your keyboard and causing a flurry of emojis to flood the screen. Thankfully, everyone loved your feline co-worker and joked about the hilarious scene.
But what if it happens in a more meaningful setting, like a virtual sales pitch you’ve been looking forward to for weeks? You wouldn’t want to risk losing a client – and your job – just because a pet rains on your parade.
In this article, we will provide you with essential tips and tricks on how to ace your Zoom presentation like a pro. From preparing your visual aids and keeping your audience engaged to handling technical glitches with finesse, we’ve got you covered.
Table of Contents
Preparing Your Zoom Presentation
Tips for delivering a successful zoom presentation.
- How to Share PowerPoint on Zoom
Handling Technical Issues During a Zoom Presentation
Follow up after a zoom presentation.
Like in-person presentations, a successful Zoom presentation requires careful preparation to ensure you can send your audience the right message. Here are some tips to help you prepare presentations for Zoom.

Use Relevant Visuals
There are many ways you can present information besides plain boring texts. Sixty-five percent of humans are visual learners , so your audience might retain the information you share better if you present them in charts, graphs, images, or other visualizations.
You may use several types of visuals throughout your Zoom presentation, but make sure they are easy to understand in a virtual setting and are relevant to your subject.
For instance, if you present a new product, you may record a video demonstration highlighting its features. Using Zoom’s built-in video player, you can then embed the video into PowerPoint or play it during your presentation.
Use a Simple Presentation Template
A simple presentation template can help you create a cohesive and professional-looking presentation on Zoom. Choose a template that complements your content and aligns with your branding, but avoid overly complex designs that may distract your audience.
You may use a roadmap PowerPoint template or include an agenda slide to set the timeline of your presentation and provide an overview of the topics you will cover. Aside from it keeps the presentation flowing smoothly, it helps your audience orient their thoughts on what will happen in the meeting.
Make It Interactive
Just because you are the presenter doesn’t mean you have to do all the talking – you can let your audience speak too! One of the key aspects of delivering a successful Zoom presentation is to make it interactive and engage your audience.
Think of some icebreakers that will keep your audience involved. It can be a simple open-ended question or a poll to stimulate discussion. You can also use breakout rooms to facilitate small group interactions or collaborative activities.
Interactive presentations help to break the monotony of one-way communication and make your Zoom presentation more dynamic and engaging. Having no activities encouraging interaction makes losing your audience’s interest during virtual meetings easier.
Practice the Presentation and Timing
Aside from the content of your presentation, you also have to worry about the technicalities of presenting on Zoom, so having a dry run before the real thing is important to ensure a smooth delivery.
Practice your presentation multiple times before the event to ensure you are comfortable with the content, pacing, and timing. This will familiarize you with the Zoom platform and its features, such as screen sharing, chat, and breakout rooms.

You have a killer Zoom PowerPoint. Now it’s time to focus on delivering it effectively. Here are some Zoom presentation tips:
Use a Neutral Background
Your background in a Zoom presentation can impact how your audience perceives your professionalism and credibility. Choose a neutral background that is free from distractions and clutter.
If you have an office space at home, that will work even better. Pick from Zoom’s virtual backgrounds, preferably plain and clean. Make your background boring so your audience’s attention is drawn to you. Stay away from bed!
Dress Appropriately
Even though you may be presenting from the comfort of your home, it’s important to dress professionally for your Zoom presentation. It’s not bad to wear your usual duds when attending a casual game night with your team. But if it’s a formal setup, like a business proposal, you must suit up to invite success.
Dressing up smartly may improve your mood and confidence. In a 2014 study , two groups of male subjects were asked to put on business suits and sweatpants before engaging in a negotiation task. Those who dressed up obtained more profitable negotiations than the other group.
As a rule of thumb, avoid wearing loud colors or busy patterns that may distract your audience.
Keep an Eye Contact
Maintaining eye contact is essential in any presentation, whether in person or on Zoom. Making eye contact helps you connect with your audience and convey your message more effectively.
The common advice you’ll get to achieve this on Zoom is to look directly into the camera to create the impression of eye contact with your audience. We agree with these, but as the speaker, you also have to read the facial expressions of your audience and see how they react to what you are saying.
If you are using a desktop or laptop, the simplest solution to achieving these two is to reduce Zoom to a smaller window and place it directly below your webcam. This way, you can glance at their faces occasionally while keeping the illusion of eye contact.
Keep Your Notes Minimal
If you are an expert in the topic you are presenting, it would be best to ditch your notes during Zoom events. Constantly looking down at your notes can be distracting for your audience.
But if the need calls for it, make sure to keep your notes minimal and stick them in the right place. You can use a second screen or a tablet, or position your notes close to the camera to refer to them without breaking eye contact. This way, you can stay focused on engaging with your audience and delivering your presentation smoothly.
How to Share PowerPoint on Zoom (Step by Step)
How to present on Zoom? Once you understand what Zoom presentations are and the tips for Zoom presentations, it is time to give the presentation using Zoom. Let’s see this step by step:
Step 1. Open the PowerPoint file you want to present.
Step 2. Join the Zoom meeting and click on the Share Screen icon in the meeting control panel at the bottom of your screen.

[Optional] You can customize who can share their screen in the Zoom meeting. Click on the small arrow in the corner of the Share Screen icon and select Advanced Sharing Options.

Select Hosts Only or All Participants.

Step 3. Select the window you want to share – in this case, the one that contains the PowerPoint slide – and click on Share.
If you are playing audio or video within your presentation, make sure to tick Share sound and Optimize for video clip.

Step 4. Click on the Slide Show tab in the PowerPoint window and begin the presentation by selecting Play from Start or Play from Current Slide.

Step 5. To stop screen sharing of PowerPoint, hover over the meeting controls at the top of your screen and select Stop Share.

It’s not uncommon for technicalities to derail a live Zoom presentation – video, Wi-Fi, or audio may fail. But there are things you can do to prevent them, or at least minimize their impact on your presentation when they happen.
First, test your equipment before your presentation and make sure everything is in place. You can join a meeting test on Zoom to check your internet connection, camera, audio, and microphone.
You may also send a PDF copy of your presentation to the attendees before the meeting if sharing your screen won’t work. This will allow you to carry on as you or your technical team figures out the problem.
If the technical issues persist, you should have a good Plan B and be prepared to continue on a different platform like Google Meet. Send the alternative link with the meeting invitation and give clear action steps when technical difficulties happen.
Following up after a Zoom presentation is a crucial step in maintaining momentum and maximizing the impact of your presentation. For example, if you are selling a product, you can use a follow-up email to make the final push of your sales pitch.
Start your email by expressing appreciation for their participation and summarizing the key points of your presentation. Include any additional resources, such as presentation slides or a video presentation recording, to reinforce your message. Offer yourself as a resource for further questions or discussions, and encourage feedback or comments from your audience.
Here’s an example of a well-executed follow-up email for a Zoom workshop event:

Conducting a virtual presentation sounds overwhelming as you must consider technical aspects in addition to delivering your message and keeping it engaging.
Remember, there’s no such thing as overpreparing when you have bosses or potential clients to impress. Follow the tips in this article to nail your next Zoom presentation!

Like this article? Please share
Business Presentations, Video Filed under Business
Related Articles

Filed under Business • June 12th, 2024
How to Master Roadshow Presentations
Get to know a how to approach a roadshow presentation and deliver a winning speech. A guide for roadshow presentation slides, with recommended tools.

Filed under PowerPoint Tutorials • May 28th, 2024
How to Compress PowerPoint Presentations
You don’t need to end up with gigantic PowerPoint files you cannot email or distribute with ease. Instead, learn how to compress PowerPoint presentations by applying any of these 6 different methods.
Filed under PowerPoint Tutorials • May 22nd, 2024
How to Rotate a Picture in PowerPoint
Sometimes, one has the perfect picture for a presentation that seems to be crooked or needs to be rotated to correct its alignment. At other moments, one might want to rotate an image to present a different perspective before an audience. Luckily, it would be best not to waste time using an image editor to […]
Leave a Reply
The Ultimate Guide to Giving Virtual Presentations on Zoom
Part 2: creating the structure, flow, and slide designs for your virtual presentation.
PART I Introduction 1 – Cool Zoom Features 2 – Virtual Presentation Do’s 3 – Virtual Presentation Don’ts PART II 4 – Presentation Purpose 5 – Structure & Flow 6 – Slide Design PART III 7 – Connect with the audience 8 – Audience Participation 9 – Sharing Content PART IV 10 – Video & Audio Recordings 11 – Post-production 12 – Your Phone as a Webcam PART V 13 – When Things Go Wrong 14 – How to Ground Yourself PART VI 15 – Advanced Techniques 16 – Zoom Webinars vs Meetings 17 – 23 Essential Settings
A key trait of successful speakers is understanding their personal brand. They know what they represent, how they want to be perceived, and what success looks for them. It’s common for this knowledge to accrue with experience, but you don’t have to wait for your 10,000 hours in order to get to that point.
You’ll achieve success sooner if you follow the steps below.
- Define who you are as a speaker Are you a motivational speaker, an entertainer, a teacher, or a combination of all of them? Deciding on this highest level of goals will help you keep your talks on track, and remind you why you do what you do. For me, my goal is always to entertain, educate, and inspire—in that order. The vast majority of my energy comes from the energy of the audience, in the form of laughter.
- Know what you’re good at and what you’re not Not everyone is funny, and not everyone can speak for an hour without any slides while making people weep with joy. You need to be honest with yourself in order to optimize your presentation design. Bombing when you try to tell a joke is painful for everyone, and it will deflate your energy on stage. So if your key skill is data visualization? Wow people with that and leave the jokes to the comedians.
- Establish what you want the audience to experience Do you want them to laugh, or scribble copious notes, or enjoy a community experience interacting with their neighbours when you engage them in audience participation?
- What does success look like? When you know what you want the audience to experience, you can use it as your metric for success. If you want them to share photos of your slides on social media, you can measure that. If you want them to download your slide deck PDF from your landing page, you can measure that. Want them to laugh 15 times during your talk? You can measure that. Standing ovation? Well, we all want that. If you don’t have your success criteria defined you can’t gauge if you’re succeeding as a speaker. Optimization of your talks comes from observation. If that 11th joke fell flat, remove it or figure out why and change it.

But instead, I went to the supermarket with a friend (who was wielding my phone as a camera), and took a series of seven shots like this:

The result is content that nobody else in the world has. This is critical if you’re speaking about a topic that many others speak about (the psychology of shopping behaviour for example). You already have your own original take on the topic, but if you use the same photos/charts/data points as everyone else, your message is watered down by the sameness of the visuals—even if what you are saying is completely new.
- Develop a “Diverse Content” mindset Your audience will (hopefully) contain a broad and diverse cross-section of people. People respond best when your content is reflective of them. By developing a mindset of diversity, you can source different examples, use quotes from more varied sources, and recommend tools, businesses, and the advice of those who reflect more than just your own image. Not only is it the right thing to do, I guarantee it will make you stand out as a speaker people trust.
Presentations are unequal parts art, structure, story, design, interaction, flow, balance, emotion, and technical production. Sounds simple. It’s not. But it’s made much easier if you’ve defined the purpose of your talk (as described in the previous chapter).
Try these tips to get a head start:
- Reduce your big idea to a small one Can you recall a time when a colleague, stranger, or family member asked what you do, or what your latest talk is about? And you meandered for 2 minutes trying to explain it, only to leave them with a puzzled look on their face. Don’t worry, we all do it. How do you get past this problem? The best way I know—and this works equally well for an elevator pitch for a new startup—is to do a reduction exercise. It works like this: you write down a long series of bullet points that describes, in detail, everything you want to communicate in your talk. Dive deep into the minutiae and unpack it all. Once you’ve done it, start again, but this time, instead of 94 bullet points, you have to do it in 47, then 24, then 12, then 6, then 3, and finally 1. By the time you’ve completed this exercise you’ll have such a strong sense of your talk’s value proposition that you’ll be able to rattle it off without thinking. Not only will this help you describe it to someone, but you’ll be able to write better titles for your talk, and you’ll have a deeper understanding of all aspects of your content. It’s also a great dumping ground for all of your wildest ideas.
- First, when you really know a section, it gives you confidence when you get to that point when presenting because you know it! and your execution and delivery will be much tighter.
- Second, when you know a segment well, you can learn how to shorten or extend it depending on how much time you have. Sometimes you’re so short on time (you went slow or the previous speaker ran over their time) you have to cut pieces, and if you know them intimately you can whip off a quick summary of the whole point and tell the audience to check your slides afterwards. Conversely, if you have a lot of extra time all of a sudden, you can slow down and dig deeper into the topic than you thought you could.
- Third, it allows you to ad-lib. This is one of the highlights of every talk, and something that comes with experience. It’s always a really fun moment because you just let loose and find new points and angles to your message–which is often where the true brilliance in your talk will emerge.
- Fourth, aren’t you enjoying a break from standard bullet points in this section?
- Fifth, over time you will start to build what I call a “Greatest Hits Deck” (GHD) where you store your very best work. It’s much easier when you have your bits chunked to grab 15 slides and copy them into your GHD. GHD’s are really useful when you get invited to give a talk to an audience you know isn’t familiar with your work. And instead of giving a new talk that you might not have time to prepare, or a recent talk that didn’t go down well, you can whip out the GHD and be an absolute crowd favourite. Whenever I get to rock my GHD I’m over the moon and look forward to the event even more.
- Establish an opening hook The start of your talk is the only time you will have 100% of the audience’s attention. They are sitting in anticipation of what’s to come which makes it a really important moment to get right. Starting with “blah blah blah, hello, blah, blah, a little about me, blah blah” will send people straight to checking Facebook. See if you can find a dramatic or bold statement, or tease the outcome of your story without giving it away. Experiment saying things out loud and see what feels like it’s going to build excitement. The magic comes when you open with that statement—without saying anything, ANYTHING—before it.
- Visit your talk resources landing page to get your slides and all the other goodies you mentioned.
- Connect with you on whatever social platform you prefer, to ask any follow-up questions. This is a fantastic way to create a 1-1 engagement with someone.
- Promote your latest “thing” whatever that may be. You earned it. And if you did a good job of not being a salesy speaker, the audience won’t be against you doing it. If you pepper your talk full of sales however, they won’t like that.
The topic of slide design requires multiple intensive courses to cover all you need to know (I’ll be releasing those in due course), but you’re probably sick of scrolling in this guide so I’ll keep it short and sweet. By short I mean huge, and by sweet I mean sweet.
In this chapter I’ll cover:
- Slide design basics
- Finding content for your presentation
- Using media in your slides
- Animations and transitions
- How to show data in your slides
- Using paid presentation templates to accelerate your work
- A few cool design tricks
- Making your slides Tweetable and shareable
- Using master slides (Keynote has respectfully changed this term to be “Slide Layouts”, PowerPoint still uses “Slide Master”)
Told you it would be short.
Part 1 – Slide Design Basics
#1 use the 16:9 aspect ratio (not 4:3).
The old-school aspect ratio for slides was 4:3. This was established based on the shape of those projector pulldown screens common in classrooms. However, it’s more common—and significantly more modern and cinematic looking—to use a 16:9 aspect ratio. This is how most on-stage screen look, and it closely mirrors how laptop screens and computer monitors are designed.

#2 Don’t open your presentation software until you’ve outlined your talk
This is precisely why this chapter comes after defining your presentation’s purpose. By starting your work inside PowerPoint, staring at a blank slide, you’re going to work more slowly and will end up with spaghetti slides that don’t have a coherent structure.
A skeleton outline breaks down the sections and subsections of your talk into a simple list. This view makes it easy to re-order the sections to create the right story arc.
Once you have your outline, it’s time to open the software and work on your slide layouts to create the structural chapter/section slides. But don’t add your content until you’ve established a theme (if you want one) and your typography selection.

#3 How to choose a theme for your presentation
Themes can be good and bad. Having an overarching concept to follow can make things easier for you, but if you choose one based on a currently popular meme, you can end up looking like everyone else who also had this bright idea. Star Wars and Game of Thrones themes for example, are insanely overused.
If you know the makeup of your audience, and know they’ll be familiar with the theme it can work in your favour, but if it’s an atypical audience for you and they don’t recognize your inside jokes, GIFs, and topical references you risk falling flat.
It can, however, be a good tactic if it fits with your goal as a speaker (to be known for your themes).
Personally, I like to create my own theme from the talk concept. Sometimes based on a known theme but then expanded into my original style.
As an example, I did a talk called “The Conversion Equation” which was very mathematical in nature. I started by creating an opening slide, taking my own photo based on the movie A Beautiful Mind and then built out my own designs following that.

Yes, I used a known theme as the opening slide, but I used the original content mindset from the previous chapter to make the bulk of the content my own.
I used a chalkboard to channel Matt Damon in Good Will Hunting for other parts of the design. Slides like these can take a lot of time to create but they are well worth it because they will be memorable.
I’ll be doing design breakdown videos in the future, that show how I did this.
At the end of the day, you do you.
#4 Choosing and finding a typeface (font) that matches your presentation theme
When working with a theme, it will only work if the typeface you choose merges seamlessly with the concept. Fortunately, there are thousands of free fonts available to help you create the right aesthetic and avoid the standard selection of typefaces that’s bundled into your presentation software.
In the following example (the chalkboard background) I hunted through free font sites for a chalkboard style. You can see the search results from the font site DaFont.com.

To demonstrate the importance of choosing an appropriate font, consider the example below where I used Arial, one of the many bog standard default fonts. It looks pretty terrible, and the theme is diminished as a result.

#5 How and when to use agenda Slides
For some types of presentation you’ll be giving on Zoom, such as an internal corporate presentation, it can be really helpful to lay out in advance what will be covered. While this isn’t something I do personally—I like to keep it all a mystery—it can help set expectations.
The only thing I ask of you if you have an agenda slide, is to use the Progressive Reveal technique so that you’re not kicking off your talk with a giant wall of text.
Which brings me to my next point.
#6 Learn the progressive reveal technique to make your bullet points amazing
The Progressive Reveal technique is the best way to present a lot of information on your slides while keeping the attention and focus of your audience while you do it. It’s most commonly associated with bullet points but can also be used for:
- Famous quotes
- Slides that tell a story
You can read about the Progressive Reveal technique in detail here .
Or you can watch the Progressive Reveal video below.
Video powered & sponsored by Wistia
#7 Using section slides to keep your audience aware of your progress
Section slides help break down your talk visually for the audience. A consistent design provides a visual cue that you’ve reached a new chapter. It’s also helpful for you to find your way around a large slide deck. A nice bold solid colour is often a good way to go.
In the example below, see how the orange section slides stand out.

#8 Using recap slides to end each section with a takeaway
A slide at the end of each section that recaps the major takeaway(s) from that section can help the audience retain the information more easily before you move to the next section. Don’t do this for a really short talk as it’ll be overkill.
Without question, the top question (but you said without question?) of all virtual presentations is “Will you be sharing the recording/slides afterwards?” You can mitigate this question by including a reminder slide at the end of one or two sections. It helps attendees relax knowing that they can focus on enjoying the presentation without fear of forgetting any important details.
#9 When and why you should use appendix slides
Use cases for an appendix are likely limited to academia or research presentations, but they can be used to collect references, resources, and any of the finer print that you can’t communicate on your slides. By including an appendix loaded with useful information, attribution, and references, you are upping the value of the PDF you make from your slides.
Part 2 – Finding Content For Your Virtual Presentation
The core of your content is undoubtedly your big idea, but it still needs to be enriched by examples to bolster your premise, or expand on certain points. This includes photos, videos, quotes, data points etc.
Unless you’ve discovered a new dinosaur in your basement, chances are that there is probably someone, somewhere, doing a similar thing. You need to work a bit harder when finding and creating examples to make sure your talk is as unique as possible.
Here are a few tips for finding fresh content:
#10 Don’t use the first thing you come across in search results
This is what most people do, and it’s guaranteed to result in generic, overused content that doesn’t stand out as useful, original, or thoughtfully curated.
#11 Remember the original content mindset and create your own content
Create as much of your content yourself by taking photos, recording videos, running experiments and doing your own research. Unless you’re an academic or positioning yourself as sharing statistically/scientifically significant data, you can create a unique perspective with simple social media polls, or by interviewing a handful of people.
#12 Ask permission before you use anyone else’s work
If you find artwork, photography or other visual assets online that would be perfect for enhancing your slides, you must ask for permission to use it. Using other’s work without permission is theft, and not acceptable. The good news is that most people—when asked—will gladly let you use their content in your presentation.
To illustrate, I created a talk called Frankenpage and needed a good image of Frankenstein. The very best that I found was a fantastic piece of digitally rendered artwork, and fortunately the artist’s website was listed, so I reached out to ask for permission.
He said yes, which was wonderful.
Something that I find to be universally true, is that people really appreciate you asking for permission as there are a lot of bad people who rip things off.

#13 Localize your content for the country or city you are speaking to
Watching a rockstar walk out on an Edinburgh, Scotland stage in front of an audience of 50,000, and greet the crowd with “Hello England!!!!” is an immediate buzz kill. I’m talking about you, Dave Mustaine of Megadeth.
Conversely, if you’re giving a Zoom presentation to an audience in London, Paris, Tokyo, or Weed, California, if you can rock up with a ton of localized content, you’ll immediately be a hit. The audience will thank you for showing up thinking about them, and the content will be more easily relateable.
A really clever technique for finding localized content is to use a VPN.
A VPN effectively transports your Internet connection to another location where you’re more likely to get local results when using a search engine.
Read how to Use a VPN to Find Localized Content for Your Next Presentation for a deep dive into how to do this.
For even more bonus points, translate some of your slides if you are presenting to a foreign-language audience. Just make sure you double-check the translation.
Before delivering a talk to my biggest live audience (6,000), I translated 250 slides into Portuguese. The (intended) title of the talk was “The Internet is Broken and Marketers are to Blame”. Unfortunately Google translate wasn’t accurate enough leaving me with an opening slide which in Portuguese read “Someone Turned off the Internet, and it’s the Vegetable Marketer’s Fault.”
Part 3 – Using Media in Your Presentation Slides
#14 how big should an image be on your slides.
You know what I hate about most slides that have photos on them? This…

And no, I don’t hate parrots. Parrots are awesome. What I hate is all the wasted space around the photo. To be fair, this is almost always the fault of the presentation software (this example is from a Keynote template), but it results in tens of thousands of slide decks full of ineffectual imagery.
Then what to do, Oli? What to do? It’s reaaaaally easy. Use the whole slide.

It’s much more dramatic and when you see it on a big laptop, monitor—or even better IRL on a giant stage—it sets the screen alive. Impact is important in slide design.
If you took the photo yourself you should have a nice high-res version so you’re all set, but if you’re sourcing photos/GIFs from the search machines, you can use a simple technique to get images as big as possible.
Use the size tool in Google image search.

Similarly, if you’re taking a screenshot to use in your presentation—a great way to create original content btw—take a big one like I did there ^^.
I could have done it like the one below, but that would’ve left me with a lame screenshot.

#15 How to use video in your slides
It’s doubly important to use fullscreen videos in your slides. Think about how you watch TV, sacrificing 60% of the screen would make it unwatchable. A fullscreen video removes any distractions.
In terms of the audio in your videos (or just an audio clip), I’ve said it several times in this guide but it bares repeating. Make sure the volume levels on all of your A/V slides are the same, and as close as possible to the level of your mic. More on that in Chapter 10 – Video and Audio Recordings .
#16 Using animated GIFs in your slides
A presentation decision that afflicts most beginner speakers is the way they use the wonderful/hateful Graphics Interchange Format or GIF for short. I’ll leave you to debate among yourselves whether or not to call it GIF or JIF. Okay, I’ll step in actually. JIF is technically the correct to pronounce it, but it sounds really weird when you say it like that. Sorry, not sorry.
Mistakes presenters make with GIFs:
- Low res GIFs This is most often because GIFs get generated by—you guessed it—GIF generator software and they’re tiny, averaging around 500px on the long side.
- Overused meme GIFs EVERYONE is using them because they’re ridiculously popular. Don’t add to the problem.
- Not scrolling in the search results Because they’re ridiculously popular, you need to exercise your finger just a little more than the average person to find one that’s perhaps a little different.
- Leaving it on the screen too long (this is far too common) If your GIF didn’t make the audience laugh, having it on repeat in the background as you start your next point is even less funny. It’s almost worse if they did find it funny, because while you’re starting to talk about your next point they are paying absolutely no attention to you as they chuckle away like children.
#17 How to make your own high-resolution GIFs
You can use PowerPoint and Keynote to make your own higher-res GIFs, simply by choosing the “File>Export>Animated GIF” in PowerPoint or “File>Export To>Animated GIF” option in Keynote. Boom.
The parrot GIF below took me all of 60 seconds to make, it’s original content, uniquely mine, and it’s totally awesome. Because parrots are awesome. Am I creating a parrot theme? Not intentionally.

As I wrote the end of the previous paragraph, it sparked a very meta action, in that I wanted to check if there were actually parrot themed slide templates, cos that would be funny right? It would also mean I could inject some “original content mindset” content right here, right now.
I give you… PARROT PRESENTATION THEMES! Wow.

PowerPoint renders GIF as full HD 1920×1080 (amazing!) while Keynote is slightly smaller at 1080×680 (disappointing but still good). Both of them are significantly bigger than the average you’ll find in search.
Here’s the GGGGGGGGIF in action.

You’ll understand what I mean by leaving it on the screen too long if you’re reading the next section while this continues to annoy you.
Final point on GIFs. Please don’t use a “Winter is Coming” GOT GIF in your slides. Ever.
Part 4 – Using Slide Transitions and Animations in Your Zoom Presentations
#18 don’t use animations or transitions because you think they’re cool.
The goal isn’t to be cool, it’s to be useful. Slides animations should always be additive: your goal for the slide should be achieved to a greater degree with the animation versus without.
Don’t worry though, if you do it right it’ll still be cool.
#19 Don’t use animations and transitions because they’re there
Presentation software is as much the problem as it is the solution. They come loaded with effects that just don’t have a sensible use case. PowerPoint is significantly more guilty in this regard as it seems to favour quantity over quality.
#20 Try them all so you’re educated as to their potential (and potential lameness)
While you shouldn’t use many of them—and some not at all—it’s important that we understand our tools to as high a degree as possible. I encourage you to run through every effect, changing the settings and timing, using them on text, shapes, and images, until you have a solid grasp of what they can do.
When you are faced with a communication challenge, and need to add that certain something to improve your slide, you’ll know where to turn.
Turn to slide animations when you need them, not when you’re bored or as a default design strategy.
#21 Don’t use transitions on every slide
Some (most) transitions are jarring or annoying. You’ll get away with one or two, but if you abuse them you will really turn your audience off. If I’m being honest, there’s one transition I use in Keynote 90% of the time. It’s called Magic Move and I’ll demonstrate it a little further down the list.
#22 Don’t make animations so complex they slow down your computer
This can cause problems with excessive lag when presenting over Zoom.
#23 Be honest with yourself. Is that animation actually cool?
When you’ve made that super rad motion event of the century, ask yourself if it’s making the presentation better. Then duplicate the slide removing the animation and run through it again. Which do you actually prefer to watch? Simpler is almost always better.
#24 Test all animations and transitions on Zoom – and watch on a second machine
Set up a second laptop and watch them as the audience will see them. Sometimes they just won’t work over Zoom. However, if you are making own screen recording (not the Zoom recording) you will want to leave them in if they are genuinely additive, because your recording will be amazing even if the live stream wasn’t perfect.
#25 Examples of good and bad slide transitions in Keynote
The good, the bad, and the definitely ugly transitions in Keynote. Be warned, bad design inside.
#26 Examples of good and bad slide transitions in PowerPoint
Video coming soon.
#27 How to use transitions for section slides to show the information hierarchy of your talk
A presentation is for the most part a straight-line linear flow. You show one slide after another, until you’re done. You have seven sections or chapters, they come and they go, and it feels like a continuous delivery.
There’s a brilliant technique that breaks the horizontal flow by transitioning vertically whenever you get to a new chapter in your talk. It’s a technique I learned from friend and fellow speaker Mike King from NYC digital marketing agency iPullRank .
The traditional horizontal flow looks like this:

Whereas the vertical flow looks like this:

By using a transition to shift vertically down, it tells us visually that we have finished the last section and moved on to a new section. It’s a good example of an additive use of a transition to aid communication and clarity, versus trying to look fancy.
You can see how it works in the video below.
Watch how to use Grid and Push transitions in Keynote and PowerPoint to improve the perceived structure of long or complex presentations.
Part 5 – Showing Data in Your Slides
Good data visualization is not easy, but do it right and you set yourself up for having very sharable slides . On a basic level you need to consider the following points.
#28 Consider the format and scale of the data you’re sharing
Is it one number? A list of numbers? Do you make it big, or really small? Visuals or words?
Observe the stark difference in the examples below that demonstrate the nuances of slide design. Which of the slides below has more impact?
You might think the one on the right looks lame and boring, but from a design perspective, the stark white background and small typography creates a dramatic focus on the data point, forcing the audience to carefully lean in to read it.
Both approaches are good, but I’d recommend you try making things a little different throughout your talk to create a more varied experience.

#29 Allow the slide to stand alone with context and attribution
If you want your slides to be shared your goal should be to remove doubts and questions. Success is a reaction such as “Wow, such interesting data from Jane Doe!” vs. “Okay, but where’s the attribution? What’s the source? It’s hard to believe this is credible.”
Context is critical.
Most often it’s as simple as adding an asterisk with a source (ideally with a link) to show where the findings come from.
The first example (above) has an attribution link on the bottom-right corner, but the sparse white example doesn’t have one.
In this instance I opted for a different strategy because I felt having more text on the slide would hurt the design impact of the stark design. However, it does still need to be on there, so the way I achieved this was to duplicate the slide, with the second one having the attribution. This allowed me to lead with the design aesthetic I wanted, then after a brief moment I clicked through to the duplicate. A subtle slide design trick.
#30 Example of data visualization: Twitter Polls
Simple animations can be useful when exposing data. In the example below—results from a Twitter poll—the bars on the graph are animated to illustrate the votes actually happening. It’s not fancy, it’s just useful enough to give a brief timeline to the event.
To achieve the effect, I created four rounded rectangle shapes. On the first slide they had a width of 1px, on the second I stretched them to be as wide as they had appeared in the poll results, then I simply used the Magic Move transition to animate between them.

You can see how to achieve this effect in the video below.
#31 How to reveal the data on your slides to tell the right story
The manner in which you show your data is important. In the examples above, with a single data point, you’d show it all at once. But with a more complex slide that has a lot of information on it, the progressive reveal technique is a much smarter way to go.
By revealing the data piece by piece you are able to craft a more well-timed and engaging story s well as keeping your audience focused on whichever data point you are currently discussing.
Watch the video below for a full explanation of how this technique works—demonstrated primarily with bullet points).
Video caption
#32 Leave the audience with a solid takeaway
Just as context is crucial to making sense of your data’s origin, the relevance of the data to your audience is key to them taking something away that’s actually useful. Presenting Tokyo transport usage numbers to a UK transport association audience would feel like you’re not trying hard enough.
Relevance is key. Relevance with an actionable next step is a golden key of glory.
For instance, saying that “70% of B2B software companies plan to invest more in content marketing in 2021” is barely even interesting. But saying “In our research on ebook landing pages, when we asked for ‘business email address’ on your forms vs. ’email address’ we received 45% more branded company email addresses ([email protected] vs. [email protected]).”
I can take that back to my job and make real change having been informed of that insight.
p.s. that was a real email address experiment I ran for software company Unbounce, of which I’m a co-founder. Happy to share more if you find that interesting.
#33 Using charts for data visualization
Presentation software does a pretty good job of helping you with chart options, but it’s easy to make them look bad if you’re not much of a designer.
Keynote makes it easier to keep your charts looking good but has limited options. PowerPoint has many more options and superior control over the finer details, but the designs can get a bit cheesy if you’re not careful.
You don’t want impressive data only to represent it with the world’s lamest default-style 3D pie chart.
If you want to get a head start on your data visualization or you’re not a good designer, I would strongly suggest buying a template. It’s much easier to edit a design than it is to create one, so don’t be afraid to use a template in this instance.
There are many sites offering slide templates as one-time downloads or more commonly now on a subscription basis. Which leads me to my next point.
Part 6 – Using paid presentation templates to accelerate your work
#34 why you should consider buying a presentation template.
If you really want to accelerate your slide creation, you can purchase one that’s been professionally designed. Envato Elements has a massive collection. One aspect of this platform that I find most valuable is the fabulous data visualization slide designs. In the past they were available to purchase individually, but now it’s a monthly subscription that gives you access to all of them. Other sites like SlideQuest allow you to buy a complete collection at a on-off price—often on sale. An example infographic slide template with lots of data visualization is shown in the screenshot.

Part 7 – Two Quick Slide Design Tricks to Speed Up Your Workflow
Slide design is about a lot more than simple tips and tricks, but there are some that are so wonderfully simple you just need to know about them. Here are two slide design tricks you need to use.
#35 How to make a transparent background from your photos
This one is easy to find in PowerPoint, but quite buried in Keynote (and not at all possible in Google Slides).
In PowerPoint, select your image then choose “Picture Format > Remove Background” and it will highlight the areas it thinks are the background.
If it did a good job you can just accept it and the background is magically gone. However, if it didn’t select the background correctly you can manually add and remove areas to make transparent. Sadly, this is really clunky and not based on selecting areas of colour, instead you are drawing lines around areas.
How to remove the background from a photo in PowerPoint. Note, this is the Mac version of PowerPoint so there may be differences in the PC version which tends to have more features.
Keynote does a much better job of giving you smart controls—once you find the feature. It’s buried in the Image submenu when you’ve got an image selected. Simply click “Instant Alpha”, click on the portion of the image you want to make disappear, click the “Done” button, and poof, it’s gone.
If the colour isn’t as even as in the parrot example, click then drag your mouse to expand the selection and it’ll grow bigger, selecting more of the image. Just stop before it wipes out things you want to keep and you’re done (you may have to repeat it on different sides of the image if the colour doesn’t connect all the way around).
It’s not perfect and doesn’t work on everything, but when it does it’s a thing of beauty. Check out the video to see how powerful it is.

The video below shows how to use Keynote to remove backgrounds in three different types of image with increasing complexity.
How to remove the background from a photo in Keynote.
#36 How to use a crazy neon background colour for your unfinished slides
This is a productivity tip. When you start to have upwards of a hundred slides, it can be hard to keep track of ones you haven’t quite finished yet, or for when you want to add placeholders for some new slides.
To help visualize your TO-DO list, you can use hideous slides layouts with a neon background. The screenshot below shows the “Light Table” view in Keynote, which is really handy for taking a bird’s eye view of your slide deck.
For a quick demo I made a new deck with three slide layouts: blank, section, incomplete.
When the “incomplete” slide layout is used it becomes super obnoxious looking, but VERY effective at highlighting your outstanding work.

Part 8 – Making your slides Tweetable and Sharable
#37 learn the characteristics of a shareable slide.
Slides that get photographed and shared on social media tend to have a few specific content characteristics. The subject matter is usually data, results of original research, a chart outlining a new process, infographics, or something hilarious, to name a few.
But these slides still need a little help to optimize their chances, and the techniques for success sharable slide design can be applied to any interesting slide to make them more successful.
You can read an in-depth slide design tip on the topic here How to Design Massively Shareable and Tweetable Slides .
#38 How to encourage the audience to share your content when giving a virtual presentation
Sometimes you need to prompt people with things you’d like them to do, and there’s a technique you can use to help your slides be shared and exposed to new audiences. The trick is to choose a slide that your audience will have their own answer to, such as a poll, and have it tee’d up in advance.
It’s always a little risky to switch to a browser mid-presentation for an interactive segment (moreso IRL when you’re dealing with bad conference wifi), but your audience will probably appreciate the ability to take part.
I’ll use Twitter to illustrate how it works in a few steps:
- Prepare a Tweet that includes a poll.
- Add the hashtag of the event you are currently speaking at.
- Add a request for people to retweet to increase sample size.
- Add another Tweet to make it a Twitter thread.
- Add a screenshot of the slide in your talk that’s prompting this exercise (it could be results of the same poll that you ran at another time– for instance the last time you gave the talk, or just as part of your pre-talk research.
- Instruct the audience to go to Twitter and search for the hashtag to find your Tweet.
- Ask them to vote and retweet the poll.
This way you will have a group of people sharing your poll data with a new poll for people to answer and a request for others to further retweet. The effects can create a loop of interaction from fresh audiences.

Part 9 – How to Use Master Slides / Slide Layouts to Scale Your Slide Production
#39 what to do with the default template master slides.
All presentation software platforms allow you to create what are called “master slides” (Keynote has respectfully changed this term to be “Slide Layouts”, PowerPoint still uses “Master Slides”). These are global templates that you use to speed up your work and keep your slides consistent. By default the layouts and designs on them are largely useless. The screenshots below shows an example of starting a new slide deck in Keynote from a template and what you get in the master slides.
If you use what the default slides give you, you’ll have a slide deck that looks too similar to others who use the same template. The image below also shows the first default title slide in Keynote and PowerPoint.
The default master slides are so generic you’ll bore yourself to death by using them. Yes, they can help you get started quickly, but if you begin with this approach you’ll only slow yourself down over time—when you learn to develop your own layouts and designs.

#40 The 10 master slides / slide layouts you should create for your own presentation template
The first thing I do in the slide layouts is delete EVERYTHING except for the blank template. Then I use the slide design basics section from earlier to quickly set them up. Usually in this order:
- Opening slide
- Title slide
- Chapter slide
- Recap slide
- Typographic slide
- Fullscreen photo slide
- Bullet slide—with the Progressive Reveal technique set up
- Q&A slide
- Closing slide
You only need to do this once—with refinements over time—and you can start with it each time you have a new talk to give.
Again, if you start with a paid template you can whip this up in no time and customize it as you figure out your theme and typographic choices.
Intro Introduction to Virtual Presentations on Zoom
Chapter 1 18 Cool Zoom Features You Should Know About
Chapter 2 12 Things You Should Do in Your Zoom Presentation
Chapter 3 8 Things You Shouldn’t Do in Your Zoom Presentation
Chapter 4 Defining Your Presentation’s Purpose
Chapter 5 How to Define Your Talk’s Structure, Story, & Flow
Chapter 6 41 Slide Design Tips for Virtual Presentations
Chapter 7 6 Ways to Make Eye Contact With an Invisible Audience
Chapter 8 How to do Audience Participation in a Virtual Presentation
Chapter 9 How to Share Content during a Zoom Presentation
Chapter 10 How to Create a Stunning Video and Audio Recording
Chapter 11 Using Post-Production to Add Value to Your Zoom Recording
Chapter 12 How to Use Your Phone as a Beautiful Webcam
Chapter 13 What to Do When Things go Wrong in Your Presentation
Chapter 14 How to Ground Yourself and Get Ready to Present
Chapter 15 Advanced & Creative Zoom Presentation Techniques
Chapter 16 The Difference Between Zoom Meetings and Zoom Webinars
Chapter 17 23 Zoom Settings to Enable or Disable for a Smooth Presentation
How to Present on Zoom: Google Slides and Powerpoint Presentation Guide & Tips

Presenting in front of your peers and superiors has to be one of the most daunting tasks ever. You’re never quite sure about the feedback you’d be getting, which only adds to the tension. However, in this pandemic season, the task of presenting has somehow gotten even more challenging. There are a lot of technical hurdles to overcome, which can seriously take the winds out of someone’s sail — especially if they are not very experienced on the matter.
Zoom, of course, has been the most popular video conferencing application over the last few months and offers a plethora of tools to put our minds at ease. Today, we’ll take you through all of them and even give you a couple of pointers to improve your presentation in Zoom.
Related: Awesome Halloween Zoom Backgrounds To Download
What is Zoom Screen Share and why is it important?
Screen Share is one of the most used and most important features of Zoom. It allows you to demonstrate your thoughts, give your peers a glimpse of your ideas. You can either share an application window, your entire desktop, or even a whiteboard — the possibilities are limitless here.
You can also start a screen sharing session without jumping through hoops of creating a separate meeting. Simply click/tap on the ‘Share Screen’ button in the Zoom client — both PC and mobile — and you’re good to go.
Related: How to use Zoom Filters
Remember you’ll need a sharing key or meeting key for this to work. If you don’t have access to either, you must share your screen while you’re in a meeting.

To share your screen during a meeting, first, log in with the appropriate credentials and start a meeting. Then, hit the ‘Share Screen’ — ‘Share’ while on mobile — button right in the middle of the meeting options panel and what you want to share with the class.

We’ve covered the topic of screen sharing on Zoom quite extensively in a separate article. So, be sure to check that out .
Related: What Does Pin Video on Zoom Mean? Do They Know If You Pin a Video?
How to present a Powerpoint PPT in Zoom?
Microsoft Office suite is, without a doubt, the most widely-used presentation applications on the planet. It’s been on our computers for ages and it’s likely to stay put for a considerable amount of time.
With that said, Zoom doesn’t straight up give you the option to load the Microsoft Office component in the application. Still, there’s a pretty straightforward method of presenting in front of the class.
Related: 50+ Best Zoom Games
You can achieve the desired results with the help of Zoom’s Screen Sharing feature — yes, the bit we covered in the previous section. It simply allows you to pick a window of your choice and share it with the class.
What’s even more awesome is that the participants could even pitch in and share their thoughts if they see fit. Alternatively, you can also share your entire desktop screen, which is the best way to get more screen real estate.
With the basics out of the way, let’s see how you can present a slide on Zoom.
Related: Zoom Error Code 3113 Fix
1. Create a separate slideshow window
If you have a traditional single-screen setup, this is the only guide you need to concern yourself with. The methodology is split into two bits — one: PowerPoint and two: Zoom.
First, open up Microsoft PowerPoint and pick the slide you want to share. Now, click on the ‘Slide show’ tab and hit ‘Set Up Slide Show.’
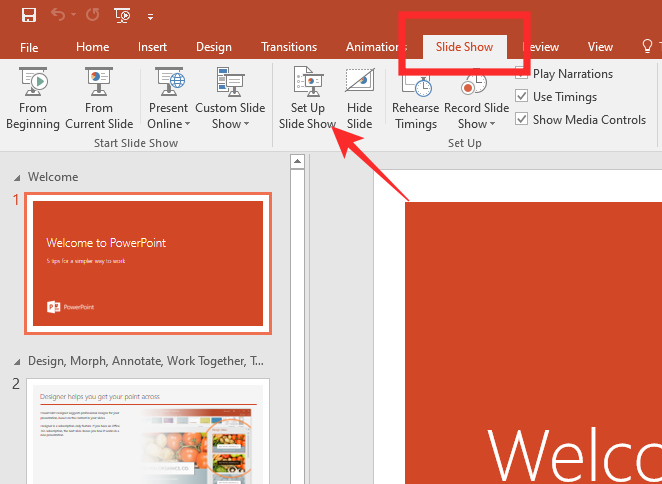
Then, select ‘Browsed by an individual (window)’ under ‘Show type.’ Hit ‘Ok’ to confirm.
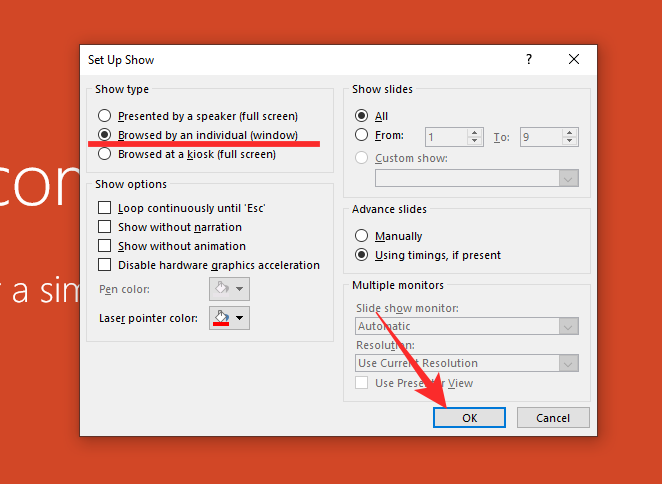
Finally, switch to slide show mode by clicking on the ‘Slide Show’ tab and selecting either ‘From Beginning’ or ‘From Next Slide.’
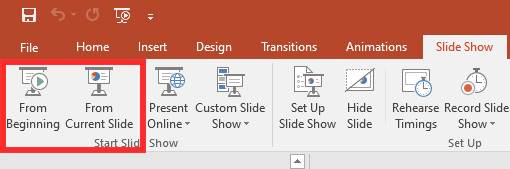
This would open a slide show window, separately. If you do not want to show the slideshow in a separate window, all you have to do is skip the previous step — ‘Browsed by an individual (window)’
2. Present PPT on Zoom
Now, go back to your Zoom meeting and click on the ‘Share Screen’ option.

Now that the PPT has been launched in a separate window, you can easily select that window on the next screen and commence the slideshow. Click on ‘Share’ to begin.
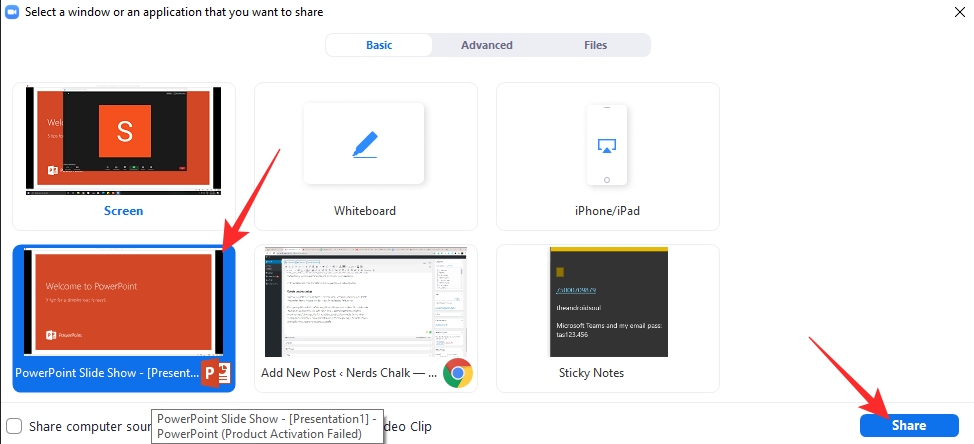
Here’s how it’d look:
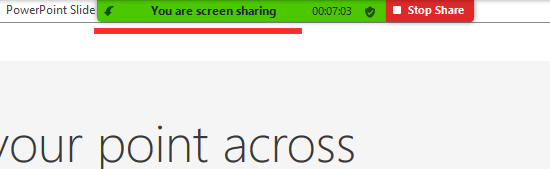
How to present using Google Slides on Zoom?
If Microsoft PowerPoint is a little too heavy for you, you could always opt for Google’s adequately powerful alternative called Slides. It allows you to create interesting yet simple presentations and share as you see fit. Of course, it also needs Zoom’s Screen Share feature to work as intended, which, at this point, should feel pretty natural to you.
Related: How to Mute on Zoom
1. Use Presenter View
Now, if you want a more immersive experience and also keep track of the notes you might have, we recommend using the ‘Presenter View.’ With the View enabled, Google Slides would create a separate window for all your notes, which only you’d be able to see. The main presentation window, on the other hand, would remain clutter-free and free from distractions.
To use the ‘Presenter View,’ first, you simply need to go to your presentation page, click on the little downward arrow right next to the ‘Present’ button at the top-right.
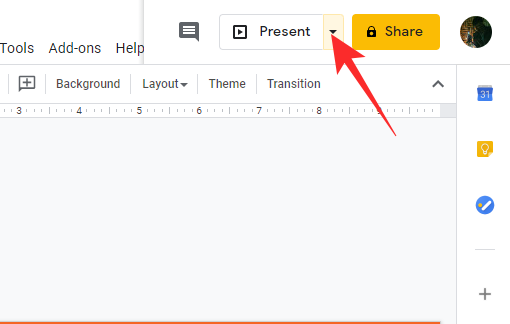
Now, hit ‘Presenter View.’
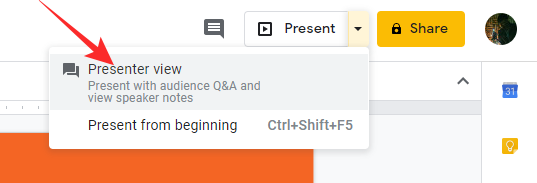
As soon as you click that button, you’ll get a separate space for all your notes, while another clean window would appear for slideshows.
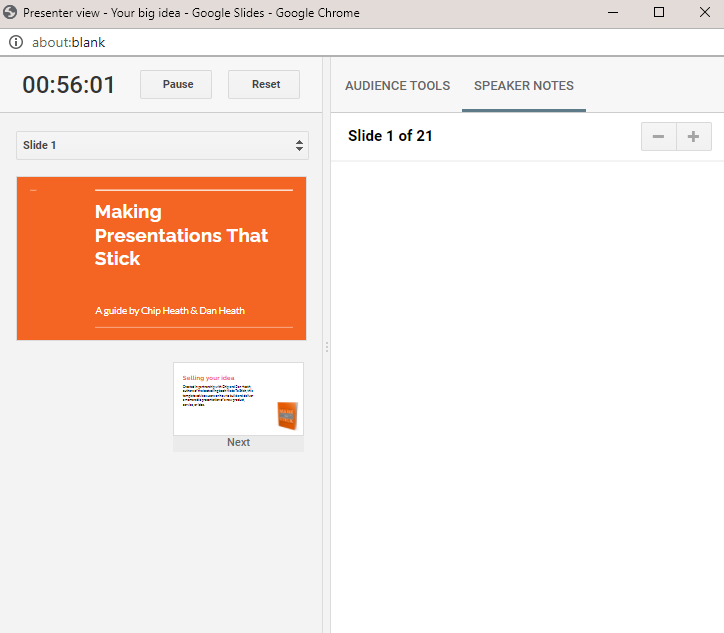
2. Use Zoom to present
Now that the windows have been separated, you can easily use Zoom to present the slideshow window. While in a meeting, click on the ‘Share Screen’ button and select the browser window with Google Slides on top.
Finally, hit ‘Share’ to start the screen-sharing session.
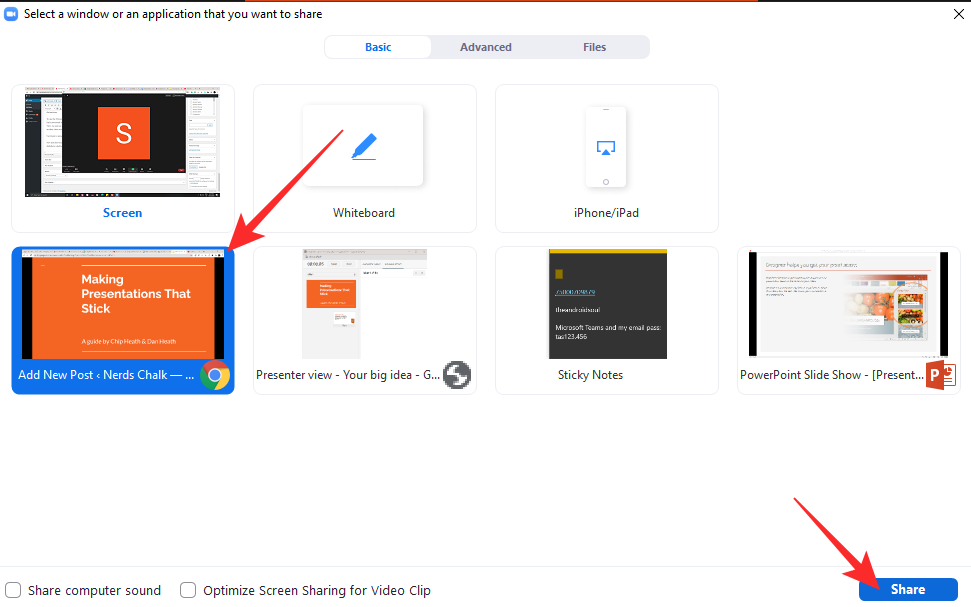
Some tips for a successful presentation
As we’ve discussed, presenting is one of the most daunting tasks in the world for most, even virtually. The techy jargon often only adds to the tension, making many people dread the sessions, even when they are completely prepared. Below are some basic handy tips for your next presentation.
Related: How to annotate on Zoom
1. Master your craft
Knowing the material is always the best way to prepare for a hectic presentation. If you know what you’re presenting and have complete faith in the report, you’re ought to do exceptionally well. However, when it comes to Zoom presentations, knowing just the material isn’t enough. You also need to make sure all your components are in order and you’re presenting with confidence.
Try a couple of dry runs, see if your presentation is working just as it’s supposed to. Practice the pitch if you have to. Checking all of these boxes would improve your chances of success, remarkably.
2. Dress for the occasion
When you’re not forced to present in a swanky conference room, it’s not difficult to lose track of the dressing etiquette. However, you must remember the scale of your presentation and try your best to look the part. Wearing a perfectly ironed shirt and fitted trousers would not only impress your peers and superiors, but it’ll also instill a sense of confidence in you.
Related: How to see everyone on Zoom
3. Create a quiet environment
Zoom is quite capable of filtering some noise out of video chats. However, it doesn’t have the quality to cancel out everything you throw at it. So, before you start a video conferencing session and go about your presentation, make sure you’re in a relatively quiet environment. There can be a bit of noise, here and there, but make sure your subtle points aren’t drowned by some rogue barks from the street below.
- How to Watch Netflix on Zoom With Your SO and Friends
- How to blur your background on Zoom
- Change Your Name on Zoom
- Zoom virtual background not working problem fixes
- How to record a Zoom meeting without host permission
- What Does Pin Video on Zoom Mean? Do They Know If You Pin a Video?
- How to Change Zoom Background on Chromebook: Step-By-Step Guide
- How to download poll reports during a Zoom meeting

A mediocre engineer hoping to do something extraordinary with his pen (well, keyboard). Loves Pink Floyd, lives football, and is always up for a cup of Americano.
You may also like
How to Run Microsoft Phi-3 AI on Windows Locally
How to Instantly Access Android Photos and Screenshots as Notifications on Windows 11
How to Turn Off Blue Alerts on iPhone and Android

Fable – A Social Media App for Book Lovers (And an Alternative to Goodreads)
This is scary
Comments are closed.
How-To Geek
How to screen share a powerpoint presentation in zoom.

Your changes have been saved
Email Is sent
Please verify your email address.
You’ve reached your account maximum for followed topics.
4 AI Search Engines I Use Every Day
Today's nyt connections hints and answer for june 30 (#385), the internet is not forever, so it's time to preserve what you can, quick links, grant access to share screens in zoom, screen share a powerpoint presentation in zoom.
No matter where you work, meetings all have one thing in common: PowerPoint presentations. If you use Zoom, you can easily present your slideshow to the participants by sharing your screen . Here's how it's done.
If you're the host of the Zoom meeting , you'll be able to share your screen without issue. However, if you're joining a meeting that you aren't the host of, you may need to request permission from the host to be able to share your screen.
As a general rule, we recommend that hosts disable the screen-share feature for participants by default for security reasons . If you aren't the host of the meeting, be sure to reach out to the host in advance to request permission to share your screen during the Zoom call. Hosts can always enable the feature during the call, but it's always good to be a step ahead.
If you're the host of the meeting and someone is requesting permission to share their screen during the meeting, click the up arrow next to "Share Screen" at the bottom of the window.
In the menu that appears, click "Advanced Sharing Options."

The "Advanced Sharing Options" window will appear. In the "Who Can Share" section, click the bubble next to "All Participants."

All participants in the meeting can now share their screen.
To screen share your PowerPoint presentation, go ahead and open the PowerPoint presentation that you would like to present. However, before you put the presentation in Slide Show view, you'll want to share your screen. At the bottom of the Zoom meeting window, click "Share Screen."

If you're using a single monitor, you will immediately start sharing your screen. If you're using dual monitors , you'll need to click the screen that your presentation will be shared on. In our case, that will be "Screen 2."

To begin sharing that screen, click "Share" at the bottom-right corner of the screen select window.

You're now sharing your screen. Now, in Microsoft PowerPoint, select the "Slide Show View" icon in the bottom-right corner of the application.
From here, deliver your presentation as though you were standing in front of a live audience.
If you are giving a big presentation through Zoom, you're not going to just jump straight into it. You may need to speak to the audience a bit before sharing your screen. If so, here are a few tips on how to look better on your Zoom call .
- Shop Early Amazon Prime Day Deals
- I Tried Both: Ring vs Nest Doorbell
How to Share a PowerPoint on Zoom
Share your screen, whether or not you're the presenter
:max_bytes(150000):strip_icc():format(webp)/DanSeitz-212239-b7461a6af1964919a88b89c04d193d8c.jpg "giving a presentation over zoom")
- University of Vermont, Emerson College
:max_bytes(150000):strip_icc():format(webp)/headshot-00415ba557444a8a9b6bb139498b97c5.jpg "giving a presentation over zoom")
- The Ultimate Guide to Shopping Online
- The Ultimate Guide to Online Learning at Home
- Two-Factor Authentication
- The Ultimate Guide to Skype
What to Know
- Anybody can share a PowerPoint on a Zoom call but may need permission from the call’s organizer.
- To see notes, you’ll need a second screen to divide the view or have your notes on a separate device.
In this article, we’ll discuss how to share a PowerPoint, or any presentation, on Zoom. You can do this in a few clicks for more straightforward presentations, but for more complex presentations, you may want some more tools.
How Do You Share a PowerPoint in a Zoom Meeting?
For a presentation where you don’t need to see your notes, sharing a PowerPoint is a quick process.
Open your presentation, and close any windows you won't need. This will limit clutter and distractions.
Log into your Zoom call and when you’re ready to present, click Share Screen at the bottom. Choose your presentation from the menu.
When using a single screen, you should always pick the specific program you want to share. Doing this will protect your data and prevent pop-ups and other interruptions.
Go to the Slide Show tab in PowerPoint and click From Beginning . For the smoothest presentation, do this before anyone else joins the call, where possible.
Use the controls in the lower left-hand corner or keyboard controls to move through your presentation as usual.
Be sure to click on the Presentation window if you’re going to use keyboard controls. PowerPoint won’t acknowledge inputs from the keyboard unless you’ve deliberately clicked on the window.
How Do You Share a PowerPoint With Zoom and Still See Notes?
The best way to see your notes is to use a second monitor and PowerPoint’s Presenter View tools. Then your notes and controls are on one screen, visible only to you, and your presentation is on the other.
Open your PowerPoint and go to Presenter View to see your notes . This mode opens two windows: The presentation and the control panel.
Drag the control panel to your primary screen and the presentation window to your second screen. You’ll be able to see and control your presentation while looking directly into your webcam if you’re using it, and you won’t have to hold your neck at an angle to use the controls.
Log into the Zoom call and click Share Screen at the bottom. Choose your presentation window.
If you’ll need to present other documents or materials in addition to your presentation, have them open and minimized on your screen and share your second monitor instead. Then you can quickly bring those materials up without disrupting your flow.
Tips for a Better Zoom Presentation
If you're not the call organizer, contact them and ask what permissions they've set up and whether you'll need permission to share your screen.
For meetings with multiple people sharing the same presentation, book a call a day before and practice "handing off" control of the slides in Zoom. Alternately, the person sharing their screen should prepare to move to the next slide when cued. Everyone should also have an up-to-date copy of the presentation, so it can continue if somebody drops out of the meeting.
Keeping Murphy's Law in mind, having your notes in one or two other places is a good idea. Consider using your phone and a printed copy to ensure that you can rely on one of the two additional sources for your notes if everything goes wrong.
To record yourself giving a PowerPoint presentation on Zoom, launch Zoom and PowerPoint; be sure to close all other applications. Create a new Zoom meeting, select Share Screen , select your PowerPoint presentation, and click Share . Launch your PowerPoint slideshow. In Zoom, choose Record > Record on This Computer . Your computer is now recording.
Join the Zoom meeting from your iPad using Zoom's mobile app for iOS. Open your PowerPoint presentation and tap Share Content from the meeting controls. You can use PowerPoint's annotation and drawing tools to make notations on your slides if you like.
Get the Latest Tech News Delivered Every Day
- Google Meet Screen Sharing Not Working? How to Fix the Problem
- How to Use Speaker Notes in PowerPoint
- How to Share a Screen on Zoom
- How to Share Audio on Zoom
- How to Create a Microsoft Sway Presentation
- How to Fix It When a Zoom Camera Is Not Working
- How to Share Screen on Zoom on an iPad
- How to Hide and Unhide a Slide in PowerPoint
- How to Share a Screen on Google Meet
- How to Add Animation to PowerPoint
- How to Share Your Screen on Microsoft Teams
- How to Merge PowerPoints
- How to Cast a Zoom Meeting to Your TV
- How to Make Someone a Presenter on Skype
- An Introduction to PowerPoint
- How to Screen Share on a Mac
How to Give Presentations and Demo Apps in Zoom
Presenting in Zoom—whether with presentation software, displaying an image slideshow, sharing a screen for a demonstration, or using a live video feed—can sometimes feel like juggling cats while reciting Shakespeare. As one of the most popular videoconferencing tools, Zoom is in use daily by hundreds of millions of people. But it’s a flexible and constantly changing tool, which can make it hard both to figure out and keep up with how to perform common tasks like screen sharing and presentation.
In researching and writing my book Take Control of Zoom , I developed some scenarios and strategies that should help you prepare presentations and screen-sharing sessions, and then deliver them. I’ll run you through the best ways to avoid frustration while getting the results you want.
What Are You Trying to Show?
Start by laying out what precisely you want to present and what options you want available:
- Slides alone vs. slides plus notes: If you’re using a slide deck within presentation software, as a PDF, or in another app, do you want to be able to see just the presentation, or do you need to view the presentation plus notes or other supplementary material? (I nearly always need notes for my presentations.) Do you need to see the next slide?
- Observe participants or monitor chat: While presenting, it can be beneficial to see people’s reactions, whether overt or subtle. This can let you spend more time on a topic that you can see has elicited confused expressions or call on people who have questions. You might also want a show of hands or other visual feedback in response to informal polls. You may even want to view questions or responses people type in Zoom’s in-meeting chat.
- Switch among apps: Do you need to bring in material from more than one app as you present?
- Additional video sources: If you want to show “real-world” objects, you may want to switch among video sources other than your presenter webcam and shared slides. The solution to that desire might be a document camera attached to the computer from which you’re presenting, or additional devices logged into Zoom.
Here’s the good news. If you need just your slides (no notes or ancillary items or other video), and you’re fine with how Zoom provides a floating window that shows a meeting’s participants, you have the greatest flexibility. You can use Zoom and another app without engaging workarounds or special modes, and with either one or two screens on your computer. It’s still worth reading on for suggestions for flow and simplicity when presenting or demonstrating, particularly in PowerPoint or Keynote.
However, if you need to consult notes, look at other slides, switch between apps, or pull in other video sources, read on! Each of the scenarios I present, particularly the deep dive into full-screen mode, will help reduce frustration so you can achieve your desired results.
In all cases with more than a few attendees, if you can get a helper in your meeting, do! Someone else can watch for attendee feedback, monitor chat, or give you backchannel feedback.
Let’s start by tackling full-screen mode. Because of how this mode remains somewhat tacked-on in both macOS and Windows, you may run into some workflow stumbling blocks. Here’s advice to help you avoid those obstacles when starting a presentation.
Work with Full-Screen Apps
Zoom and full-screen mode in macOS (and Windows) don’t always work well together, despite Zoom’s efforts to support it on single- and multi-monitor setups. There are three fundamental issues you should watch out for:
- Some apps don’t let you switch away from an app and keep it in full-screen mode when you switch back. If that’s the case for you, trying to switch to Zoom (instead of using floating options available from Zoom’s sharing toolbar) or other apps could stop Zoom’s screen sharing or show your app’s editing interface instead of its presentation format.
- Presentation software can be rigid in how it runs slideshows, whether slides are entirely static (text and images) or interactive, with builds, animation, audio, and video. By default, PowerPoint and Keynote display only their slideshow view on a single-monitor system. On a two-monitor setup, one screen displays the slideshow view and the other screen holds presentation tools.
- Some apps with a special full-screen presentation mode—notably Keynote—face one more difficulty. You must start your app in its regular view, switch to Zoom to share the app’s window, then return to the app to switch it to presentation mode. If you engage full-screen mode first, Zoom won’t offer the window as an available option for sharing. PowerPoint, interestingly, doesn’t have this limitation.
When using a full-screen app, if you can remain in that app, you’re good—you don’t need to worry that the app will drop out of full-screen mode. Zoom provides a strip overlay window of other participants’ video on both single- and multi-monitor systems, and I explain how that works next.

However, if you need to see your notes or access other presentation tools, or if you require more complicated video input arrangements, you may need to use multiple devices or enlist the help of another person.
Go Full-Screen with PowerPoint and Keynote on Two Screens
PowerPoint and Keynote both offer a two-display setup designed for a computer plus a projector: one screen handles the interactive slideshow, while the other provides presentation tools, like a timer and preview of the next slide, plus your notes on the slide.

To invoke your slideshow in PowerPoint, click Start from Beginning or any start option on PowerPoint’s toolbar; in Keynote, Click Play or choose Play > Play Slideshow. In both apps, you can move the mouse to reveal controls or use keyboard shortcuts for various actions.
In Zoom, you can start sharing a PowerPoint presentation immediately after starting the slideshow. Return to Zoom, select the full-screen slideshow window, and return to the presentation app. You can now present.
With Keynote… it’s a little harder. If you’ve started a Keynote slideshow and try to share it in Zoom, Zoom can’t “see” Keynote’s window because Apple made Keynote’s presentation mode neither a regular window or standard full-screen mode. Instead, follow these steps:
- Make sure Keynote is prepared to start and you’re on your desired slide.
- Switch to Zoom, but don’t hide the Keynote app—if you do, Zoom may not include it in its list of available app windows.
- In Zoom, click Share Screen and, on the Basic tab, select the Keynote slide screen and click Share. This shares the entire Keynote window but only for one unguarded moment.
- Zoom automatically switches to Keynote as the foreground app. In Keynote, click Play or choose Play > Play Slideshow. Keynote begins the normal dual-screen presentation mode.
If you want to return to Zoom or show off other apps during your presentation, press H. When you’re ready to resume advancing slides, use the app switcher in macOS (Command-Tab) to return to Keynote. It’s that “easy.”
Make Your Slideshow Appear in a Window in PowerPoint and Keynote
You might feel locked into a full-screen mode for presentations, whether you’re on a single- or multiple-monitor system. However, both PowerPoint and Keynote offer a way to get the advantage of a regular app window that doesn’t hijack the entire display and that you can share with Zoom.

In PowerPoint, choose Slide Show > Set Up Show. (You can also access additional options—such as the Set Up Slide Show button—in the toolbar when you switch to Slide Show view by clicking Slide Show at the top of the PowerPoint window.) Select “Browsed by an individual (window)” and click OK. Now, when you start the slideshow, the slides appear in a resizable, floating window.
In mid-2020, Apple released Keynote 10.1 with a new Play Slideshow in Window option. To invoke this view, choose Play > Play Slideshow in Window. (If you think you’ll use it regularly, Control-click the toolbar in Keynote, choose Customize Toolbar, drag Play in Window onto the toolbar, and click Done.)
In both apps, you can then use Zoom’s screen sharing to select the presentation window and share it. In this form, the window’s interface elements, such as the title bar, will show in Zoom.
Use a Portion of a Screen for Presentations
For apps that don’t have a dedicated presentation mode, Zoom’s option to select a portion of a screen helps you select just the portion of the app window you want everyone to see and lets you crop out the interface, title bar, and other elements.
With these sorts of apps, first carefully position the app’s window so that it won’t overlap with any other app you’re using—except Zoom, which automatically hides itself from itself. (You can override that if you want to share the Zoom app itself to a meeting: see Show a Zoom Window in Zoom Screen Sharing.)
Then, in Zoom, click the Share Screen button, click the Advanced tab, and select Portion of Screen. Click Share, after which you can position and resize a green rectangular outline that shares everything within it to feature just the portion of the app’s window you want to share.
This approach is a great way to leverage Preview, which can display PDFs and images. For showing a PDF, I carefully size and control Preview’s display, typically setting View > Single Page and then Option-clicking the green Zoom button in the upper-left corner of the window to size the page to the display. Then I drag the Zoom portion-sharing rectangle over just the visible page.
Present in Keynote with the Mobile Keynote Controller
Keynote’s addition of Play Slideshow in Window gives you an interesting—if slightly complicated—way to have both a full set of presenter’s tools and a standard macOS window. Just use Keynote for macOS and the Keynote iOS/iPadOS app’s remote control.
Here’s how to do this:
- Install Keynote on your iPhone or iPad and your Mac. Follow Apple’s instructions to pair the Keynote Remote option in the mobile app to your Mac.
- In Keynote for macOS, open the slide deck you want to present within Zoom, and choose Play > Play Slideshow in Window. Position the window as you like.
- In Zoom, click Share Screen and then select the Keynote window.
- Launch Keynote for iOS/iPadOS and tap the Keynote Remote icon. (If you have multiple computers paired, tap Devices, tap the correct Mac, and then tap Done.) You’ll see a large Play icon.
- In the Keynote Remote view, tap the side-by-side slides icon at the top right and tap Current and Notes, Next and Notes, or Notes Only to see your notes on the iPhone or iPad. (You can also control text size and invert colors for better legibility.)

You can now use the Keynote app on your mobile device to advance slides or go backward, as well as pick slides and other options. All the while, you can access Zoom and other apps in macOS without interfering with the Keynote for macOS presentation!

Present with Different Display and Device Combinations
Zoom offers many different ways to work simultaneously with multiple screens on a single computer or multiple devices connected to a single meeting. These can allow you to present from various apps and use video feeds for real-world demonstrations in any combination you need to. I’ve broken out the presentation styles by what you can do with different numbers of displays and devices.
Present with a Single Monitor
In the simplest example, you have joined the Zoom meeting from a single computer with a single screen. You manage what you’re sharing in its own window or portion of a window, while Zoom uses the floating window as with Active Speaker full-screen mode, as shown below.

With a single screen, the floating view of other participants sits on top of everything else, including full-screen presentations. Zoom’s sharing bar can give you access to Chat and other features, though some apps may render your pointer invisible, making it effectively impossible to click things!
For apps that don’t require full-screen mode, you can organize windows so that you can see digital notes in part of the screen while you present.
You can also help yourself out by using an iPad or other device to show your notes or even—I know, I know!—printing out your notes and using pieces of paper like an animal.
Present with Two Monitors
If one monitor is good, two are better—sort of. I recommend splitting up tasks among screens based on what you need to focus on:
- Position your slides, images, or app where you can see and easily get to them when you need to interact with them.
- Position digital notes where you can quickly glance back and forth from whatever you’re sharing.
- Unless watching participants’ reactions or hand motions is critical, put them in a secondary location that you can look at as needed but isn’t your main focus.
On a computer with two or more monitors, you can set Zoom to work entirely on a single monitor or distribute its windows across two monitors. In Settings > General, select or deselect “Use dual monitors.” (Your operating system, not Zoom, determines what your “main” screen is.)
In single-monitor mode, you can put the Zoom window wherever you like it on any display. If you have slides, notes, and other material on the main monitor, consider placing the Zoom window on your secondary monitor.
In dual-monitor mode, Zoom adds another resizable window that, during normal conversation, shows the latest active speaker on the secondary screen. When you’re sharing your screen, that second window switches to the full Active Speaker view and shows thumbnails of all speakers at the top.
That can be handy, or it can be distracting. If your webcam is on top of your primary display, and you’re looking at the secondary one when you speak, it will appear that you’re looking off to the side. (Consider rearranging the windows to make sure you’re looking straight into your camera.) While you’re sharing a screen for a presentation, however, no one will be looking at your video feed.
Present with Two People
As I mentioned earlier, having a helper can be extremely useful for managing slides, notes, and other apps or details, or so someone else can pay attention to attendees. In some cases, you might push the slide-presentation portion entirely to another person, so they control the slide while you talk.
That person can operate in full-screen mode and rely on your oral instructions to advance slides while you keep a watchful eye on meeting members. It’s a little old school, like a college lecturer pacing a stage as she delivers her talk, occasionally calling out, “Next!” You could also keep a direct chat session open with the person managing slides and type N or another signal to make your communication less audible.
Present with Multiple Devices
Presenting with multiple devices might seem ridiculous at first glance, but it’s an option I strongly recommend for people trying to balance some of the considerations I noted earlier:
- You want to see and interact with participants while presenting and still have access to your notes and potentially other apps.
- You are mixing digital and physical presentations, and you need to show things in different places or different kinds of items in your setup throughout the presentation, potentially switching back and forth.
Multiple devices let you have enough screen real estate and manage all the elements you need without dealing with operating-system or full-screen constraints. That’s particularly the case if you want to use the full Gallery view of participants, which isn’t available when you’re sharing a screen. I’ve used this setup on multiple occasions, and while it may be complicated, it’s actually quite easy to manage in practice.
One scenario would be to have a laptop and iPad next to a desktop system. Connect to Zoom from all three devices. Have the slides on the desktop, switch into slideshow mode, and share the slides in the Zoom session. On your laptop, use Zoom in Gallery mode. Use the conveniently placed iPad for your notes.

If you need to work across space and with physical items, using multiple devices is the ticket. A document camera or a phone or webcam set up in a similar position to capture flat or 3D objects beneath it can be a great addition to a presentation. Zoom lets you use screen sharing to select another video source, which lets you better control what participants see, and allows annotation to mark up the display.
Zoom can also share a USB-attached or AirPlay-streaming iPhone or iPad, but I think it’s usually better to have that device logged into the mobile Zoom app so that participants can switch to see it, or so you can spotlight it using host controls.
Secondary devices can be useful in any situation in which you need to move around and don’t want to set up a camera in each new location.

In a virtual workshop I attended on letterpress printing, the instructor had three Zoom apps running at once:
- A laptop for speaking to attendees and interacting, as well as reading from notes and showing slides
- An iPad mounted in an overhead position above a transparent plexiglass sheet, so she could work underneath it, demonstrating layout techniques
- An iPhone on a camera tripod mounted to point at her press, so we could watch her put the layout into the bed of the press and print
She carried the laptop around for mic input and to switch which video was spotlighted. She muted the audio in and out of the two mobile devices. (Zoom’s mobile apps have a separate tiny speaker icon at the top that mutes output: even if you have turned your iPhone volume down in Control Center, you still have to tap the speaker icon to mute it in the Zoom app!)
In my office setup, I installed a sub-$25 mobile swing-arm stand on the wall. I can clip an iPhone into it and use it to show overhead views of my 2D laser cutter when demonstrating projects on it and employ the laser cutter’s flat surface—with a piece of white foam core on top—as a document stand.

Glenn’s Take Control of Zoom was updated in November to cover all the most recent changes and improvements in Zoom. His free book Take Control of Zoom Essentials , which focuses on getting up and running in Zoom quickly and without frustration, was also updated in late 2020.
Subscribe today so you don’t miss any TidBITS articles!
Every week you’ll get tech tips, in-depth reviews, and insightful news analysis for discerning Apple users. For over 33 years, we’ve published professional, member-supported tech journalism that makes you smarter.
Registration confirmation will be emailed to you.
This site is protected by reCAPTCHA. The Google Privacy Policy and Terms of Service apply.
Comments About How to Give Presentations and Demo Apps in Zoom
Notable replies.
I use an iPad doing an Airplay to AirServer on my Mac. This creates a window on my Mac of the presentation on my iPad. I can switch from PowerPoint to GoodNotes to any other iPad app and the window on my Mac is the same window shared in Zoom. I see my speaker notes on the iPad but only the presentation shows up via Airplay/AirServer on the window on the Mac. Same with app controls, only what I want presented shows up in the window, not the controls. I basically work off my iPad and Zoom shares a more polished product.
When I really want to push the envelop, I use OBS, the AirServer window, and my webcam to create a composite image and share that as my “camera” in Zoom.
I’d love for Keynote to have an option to open a second window with presenter view whenever I choose Play Slideshow in a Window. That way I could have Zoom share the slideshow window while I could focus on the presenter view window which I’d have in front covering most of my screen except for audience and chat.
One thing I really don’t like with Zoom is that I can’t configure it’s audience/chat windows until I actually share. But I’d like to be able to set up their exact location, size, and settings before I start sharing so that as soon as the audience is ready to go I can start rather than first having to fiddle around with extra windows. Kind of like Keynote lets me set up presenter view well ahead of the actual presentation.
I am looking for a way to play an iPad software instrument in a Zoom (or FaceTime) call and have the internal instrument be heard along with my voice. When I try, I can hear everything, but the instrument’s audio is not transmitted.
What about using Keynote’s Keynote Live feature under the Share menu? Presumably you’d have to share the link with your Zoom participants, but then you could keep track of their reactions in the main Zoom window while you present in Keynote across the web.
I’ve never used it beyond testing. Maybe? It’s kind of a weird technology, requires viewing through a browser (or a copy of Keynote), and I don’t think it solves the problem. If you’ve tested it for this purpose, please share how you’re using it with pictures! Glad to expand options here.
I use Play Slideshow in Window in Keynote, and my iPad shows the presenter view. Unfortunately, the iPad can’t show the current and next slides and my notes all at once like the Mac’s presenter view does.
Another configuration I tried was using the iPad as a second monitor for the Mac. If I were just using Keynote, that would work great, but I occasionally need to use the iPad as a whiteboard so I can work out physics problems for my students. I found the process of switching back and forth between modes quite inconvenient.
I have the same complaint about Zoom as Simon. Every time you open a window, Zoom seems to stick it right back at its default location, which is typically in the way.
Things have moved on but it used to be so convenient to use iChat and Keynote in Macs for virtual meetings. That was in the days when they just worked! (Maybe because Steve used them for his presentations). My experience is that things went downhill when FaceTime replaced iChat and Keynote was dragged down to an iOS app.
Thanks everyone for advice on various ways to get things to work with Zoom.
Is there a reason you use the portion-of-the-screen-sharing with PDFs instead of setting Preview to display full screen and then share that? Seems like it would be more reliable as there’s no chance of other things encroaching on the portion is the screen being shared.
Another option would be to use Skim to view the PDF as it has a presentation view option (and you could share that window specifically).
Thank you for the article. Some helpful tips! One issue often neglected using presentations is video and audio quality. Apple’s built in camera is not something to write home about. If you present often and participate in zoom calls for business often (as I do) it would make sense to buy a higher quality camera connected to your Mac via a USB port. Same goes to a decent microphone. Either a dash mike, or a super cardioid “shotgun”, will eliminate external noise. One does not need studio quality as long as it picks up your voice and not that of your kids playing in the other room or the lawnmower across the road. And last - lighting. Make sure your face is evenly lit from both sides and that it is brighter than the background. No need for studio lights. Sometime the light coming from your screen is enough, but maybe a reading light (or two) positioned so they reflect light from the wall on your face will do a great job.
I have an idea for a Mac app that puts a bright white rectangle around the edge of the screen - like some make-up mirrors. Wish I knew how to create Mac apps! I will test the idea by creating a suitable background image. …

Nope … not bright enough!
Indeed! We’ve covered those topics in the past with a couple of articles:
Yes, to see the thumbnails and have more control. Full-screen mode for Preview with Zoom (or any app in full-screen mode with Zoom) interacts poorly.
My wife used the family iMac to do a zoom call a while back - her relatives are unfortunately Android and Windows users so FaceTime was out of the question. Unfortunately she didn’t quit the app (as is her forte) and later that night I received a notification that the family iMac was attempting to hack my own.
I reimaged the family iMac from a backup taken prior to the zoom call because I had no idea what the intruder may have done to that machine.
Long and the short … be careful what you do with Zoom and make sure it’s no longer active when you stop using it.
Can you share details about what happened? Zoom does have remote control capabilities, but they require some setup and permission on the part of the person whose Mac is being controlled. Or did you mean something else by “hack”? And how were you notified?
https://support.zoom.us/hc/en-us/articles/201362673-Requesting-or-giving-remote-control
How long ago?
About a month prior to Thanksgiving is the closest we can come.
I knew nothing of Zoom and we were using it in its default configuration. We needed to join a family videoconference and at the time I wasn’t even aware that an app had to be installed, so it was just get it installed and go. It was certainly not configured to allow remote control.
Since that time we use my MacBook Pro and I insure the application is immediately quit after the videoconference.
Notification was probably via BitDefender or Netgear Armor which we have on our Orbi RBK853 mesh. It was unreasonably late at night - I was the only one awake - and it was pure good fortune that I was at my computer to receive the alert.
Zoom is certainly not in my bag of trusted apps, and if I could get the half dozen or so members of my wife’s not-too-technically-adept family to use something I trusted more I would certainly do it.
Unfortunately the controling parameters seem to be not too hard to use , windows compatible , and free .
Seems quite unlikely that it was an attack via Zoom rather than Zoom doing something that the monitoring software didn’t like, as there are 100,000s of people pounding away on the app. If there had been an attack vector (particularly on Macs) I would think we would have heard about, since security researchers haven’t been shy about anything else.
Because of how meetings are configured, Zoom doesn’t maintain a connection after a session is completed. So in that scenario, there would have had to be a vulnerability in Zoom that allowed an arbitrary remote party to exploit it specifically for your wife’s machine in a way that didn’t alert a zillion other people, and then install malware that reached out over the network.
I do think it’s far more likely that Zoom engages in network activity for its LAN-based chat or other purposes that was identified as malicious because unknown. I’ll keep on it, though, as we’re about 90 days past November now, so if there were a serious exploit reported to the company around then that they silently fixed, now would be the time that a researcher would be allowed to disclose the flaw.
Didn’t say session was ended - does that require an explicit action or does it happen automatically? The conference exceeded an hour and I thought the free version wasn’t supposed to allow that long a session - there may be been changes made for the pandemic.
Only thing is is that was the one and only time it happened. That there was our first zoom conference that day would be an amazing coincidence if the two were unrelated.
Since that day, I no longer let my wife drive and I always quit the app immediately after the conference completes.
Not sure how many Mac users have anti-virus/anti-malware software installed, and really not sure how many run network intrusion software in their internet gateways. Netgear Armor runs both in the client (Mac) and in the router.
I use Camo with Zoom calls and I am usually the clearest looking person on the call these days. And I’m not even using the paid features which allows for 1080p and color adjustments. I do feel like buying some lighting since all of the lights in my room light up the walls, which are salmonberry, which in turn makes me look orange. On a sunny day the color is much better with light from the outside.
It’s great that Keynote Presentation in a Window now also opens a separate Presenter window. Another way to work with a presenter screen is also open Keynote on an iPad or iPhone and use the Keynote Remote option to display the Presenter window on the device. The only problems here is that while the computer version of the window shows the currents slide, next slide, and presenter notes, the Keynote Remote version only can show 2 of 3 (your choice).
I use my iPad as a remote so I can use the “laser pointer” feature to draw attention to what I’m talking about, and occasionally, I will write something on the slide as I talk. When you go into that mode, however, you lose the presenter display on the iPad, which is inconvenient if you want to see your notes.
This is tremendously good news! It solves a lingering problem (and puts Keynote a leg up on PowerPoint for Mac).
The one fly in the upgrade ointment: Keynote 11.0 is only available for macOS 10.15 and 11.x.
Nobody at Microsoft has! (Yet?)
Actually, you now have the best of both worlds. On your Mac, run the slide show in a window which will also open the Presenter window (with your notes). Use the Keynote Remote option on your phone with the same slide show in markup mode. Share the Slide Show window and adjust the Presenter Window to a reasonable size so that you can use your notes. Now you can see your notes but control the show (including pointing and marking up) from your phone.
That is a superb tip, Alan!
Join the discussion in the TidBITS Discourse forum
Participants.
Think Outside The Slide
4 Options for How to Present a PowerPoint Slide Show in a Zoom meeting
If you are using Zoom to meet with others who are working remotely, you may not realize that you have six choices when it comes to how you will present your PowerPoint slides to the group (I added two options I discovered after the article was first published). In this article I will share more details on these six options and you will get a link to that option in my video that shows you what your audience will see. In this article I am using the Zoom app in Windows 10. The six options are:
- Share your entire screen/desktop
- Share the Slide Show window
- Share the editing window with a clean look
- Run the Slide Show in a window and share that window
- Use Presenter View to show the audience your slides while you see Presenter View
- Present with your video beside your PowerPoint slides
Did you find this article using a Google search? Get more answers to your virtual presentation questions here and get updates of new articles and videos here .
Option 1: Share your entire screen/desktop
This is the default method that most people choose because it is the closest to what we would do if we were in a meeting room with the participants sitting around the table. In Zoom, you choose the sharing option called Screen. The audience sees everything that is on your screen, so if PowerPoint is not full screen, they will see any wallpaper you have and any other open applications with potentially confidential information displayed. They will not see the Teams controls at the top of the screen as those are always hidden from the audience when sharing your screen or a window.
You start your slide show in PowerPoint and all features will work, including animations and transitions. You can use a presentation remote to advance through your slides or use the arrow keys. Even though the slides take up the whole screen, you can still access the Zoom controls by moving your mouse to the top of the screen and selecting the controls you want. If you are concerned that you may miss any chat or questions from the audience, click on the Chat option in the Zoom controls and the chat window will be shown on top of your slides without the audience seeing it. Be careful as seeing comments in the chat window may distract you from your presentation.
Here is the section of my video that shows Option 1: Share your entire screen/desktop
Option 2: Share the Slide Show window
Because Zoom allows you to share any window that is open on your computer, another option you have is to share the window that has the Slide Show in it. Before you start sharing in Zoom, start the Slide Show in PowerPoint. This will display the slides on the entire screen. Use Alt+Tab to go back to the Zoom window. In the Zoom sharing options, choose the window that is displaying the slide show (make sure you select the slide show window, not the PowerPoint regular window).
Again, since you are using full PowerPoint, all features work and this is similar to presenting before an audience in a meeting room. Because you are only sharing a window, the audience won’t see anything else on your screen. Even though the slides take up the whole screen, you can still access the Zoom controls by moving your mouse to the top of the screen and selecting the controls you want.
Here is the section of my video that shows Option 2: Share the Slide Show window
Option 3: Share the editing window with a clean look
The first two options don’t allow you to see any other documents or notes that you may have on your screen because the slides cover the entire screen. If you don’t need any animation or transition features and are comfortable with the audience seeing the edit view of PowerPoint, you can choose to use a view that minimizes the PowerPoint interface so the slide is the focus.
In the normal editing view, minimize the slide thumbnails by dragging the vertical divider all the way to the left until it just shows the text indicating that thumbnails are available. Drag the horizontal divider at the bottom of the slide down to hide any notes that are below the slides. Third, collapse the ribbon by clicking on the collapse indicator (an upward arrow head) in the lower right corner of any ribbon. Finally, maximize the size of the slide in the editing window if it did not automatically resize itself. Now your slide is large in the editing window and PowerPoint has a cleaner look than the normal editing view.
In the Zoom sharing options, choose the window for this PowerPoint presentation. When you move through the slides, you are not using Slide Show mode so there are none of the animation or transition features available. Any embedded media will not run automatically and must be manually played. You can move through the slides using the down and up arrow keys or the PageDown and PageUp keys.
This is not as clean as Slide Show mode, but it allows you to see other open documents on your screen without the audience seeing them. You can still see and access the Zoom controls by moving your mouse to the top of the screen.
Here is the section of my video that shows Option 3: Share the editing window with a clean look
Option 4: Run the Slide Show in a window and share that window
Many presenters are not aware that PowerPoint has the option to run a slide show within the window it is in without taking up the entire screen. PowerPoint refers to this as the “Browsed by an individual” mode or Reading View. To use this mode, on the Slide Show ribbon, click on the Set Up Slide Show button. In the dialog box, in the Show type section in the to left corner, change the option by clicking on the radio button for “Browsed by an individual”. Click the OK button to save the change and exit the dialog box. Now whenever you enter Slide Show mode, the slides are run just in this PowerPoint window, not the full screen. You can change this back to the default of “Presented by a speaker” after the meeting is done.
Update Aug 11 2020: A recent Zoom update seems to have changed the order you need to do the steps. First start the Slide Show mode in PowerPoint. You will see the slide show with some additional controls at the top and bottom of the window and possibly black bars on the top/bottom or left/right depending on the size of the window relative to the size of the slides. This is a slightly different look for the audience if they are used to the full screen version of Slide Show mode. Then, in the Zoom sharing options, choose the window for this PowerPoint presentation. If you share the PowerPoint window first before entering Slide Show mode it confuses Zoom and it will stop sharing the window.
Because this is Slide Show mode, all animations and transitions work as expected. What is different than the full screen Slide Show mode is that the laser pointer, inking, and some other features are not available. Since you are only sharing this window, the audience does not see any other documents you may have open on the screen. You can still see and access the Zoom controls by moving your mouse to the top of the screen. This allows you to keep up with any chat discussion while presenting.
Since this option is only sharing one window, it uses less bandwidth than sharing a full screen which may help users on lower speed connections have a better experience with less lags or distortion. This option may give you the best combination of PowerPoint features and presenter controls and options.
Here is the section of my video that shows Option 4: Run the Slide Show in a window and share that window
Option 5: Use Presenter View to show the audience your slides while you see Presenter View
If you prefer to use Presenter View to see your speaking notes while the audience only sees your slides, I have instructions for using Presenter View in Zoom with 1 or 2 screens and in Windows or on a Mac in my Complete Guide to using PowerPoint Presenter View in Zoom .
Option 6: Present with your video beside your PowerPoint slides
You can present in a Microsoft Teams or Zoom meeting with your video beside your PowerPoint slides so your facial expressions can be easily seen along with the slides. The idea is to arrange our video and slides on our desktop and share the entire screen, so we control the size of both the video and the slides. This does not require you to install any software and uses the built-in features of the operating system and PowerPoint. For Windows 10 I explain the detailed steps in this article and show you how this is done in this video . For a Mac I explain the detailed steps in this article .
In my opinion, Option 5, using Presenter View, is the best option for most presenters because it allows you to see your notes and access all the expert features of Presenter View while the attendees see your full slides. It is what I use when I deliver my customized training courses .
( Get more articles on using Zoom effectively here )
Full video with all four options
Dave Paradi has over twenty-two years of experience delivering customized training workshops to help business professionals improve their presentations. He has written ten books and over 600 articles on the topic of effective presentations and his ideas have appeared in publications around the world . His focus is on helping corporate professionals visually communicate the messages in their data so they don’t overwhelm and confuse executives. Dave is one of fewer than ten people in North America recognized by Microsoft with the Most Valuable Professional Award for his contributions to the Excel, PowerPoint, and Teams communities. His articles and videos on virtual presenting have been viewed over 4.8 million times and liked over 17,000 times on YouTube.
By Dave Paradi
Dave Paradi has over twenty-two years of experience delivering customized training workshops to help business professionals improve their presentations. He has written ten books and over 600 articles on the topic of effective presentations and his ideas have appeared in publications around the world . His focus is on helping corporate professionals visually communicate the messages in their data so they don't overwhelm and confuse executives. Dave is one of fewer than ten people in North America recognized by Microsoft with the Most Valuable Professional Award for his contributions to the Excel, PowerPoint, and Teams communities. His articles and videos on virtual presenting have been viewed over 4.8 million times and liked over 17,000 times on YouTube.
How to Give Presentations Using Zoom
- No Comments
Home » How to Give Presentations Using Zoom
Over the past few months, we’ve witnessed the true capacity of modern technology to assist humankind in difficult times and unprecedented circumstances. Most notably, video conferencing tools have undergone a massive expansion and helped us conduct business on so many levels.
One of these tools, Zoom , has been extraordinarily successful in this. Their daily usage, as well as revenue, has skyrocketed, and during the February-April quarter, the company made $328 million , compared to $122 million in the same period last year.
Since the outbreak of COVID-19, we’ve seen Zoom’s incredible rise in usage for business, education, and personal matters. And those who choose to give presentations using Zoom can expect to benefit considerably from this choice. Let’s see why that is and what you can do to ensure your Zoom presentations leave a lasting impression.
Why use Zoom?
Simply put, it’s intuitive and handy. Surely, on the one hand, all the basic functionalities Zoom offers can also be found on other video conferencing platforms. These include sharing the screen, scheduling the meeting, recording the meeting, using whiteboards for brainstorming, access to meeting analytics, and much more.
However, there are several features that separate Zoom from other tools, such as:
- high call quality
- URL links to individual meetings
- the capability to add as much as 1000 participants
- virtual hand raising
Nevertheless, Zoom’s biggest strengths seem to be its straightforward interface, as well as its integrative potential, since it offers numerous easy integrations with a number of third-party vendors, tools, and services.
Use an Impressive Presentation Design
If you’re giving a presentation using Zoom or any other video conferencing tool, using visual aids is a must . People are visual creatures, and you should take advantage of the fact that you’re able to share images, videos, and even your entire screen.
Of course, employing visuals doesn’t mean trivializing your presentation. On the contrary, adding helpful diagrams or infographics will only enrich it and provide a deeper and more comprehensive insight into the topic of the talk. Also, it’s much easier to keep the audience engaged and entertained this way.
These visuals have to look appealing and professional. Luckily, you don’t have to be an artist to make this happen. It’s easy to find easy to use Presentation Templates , compatible with PowerPoint and Google Slides, to create your Presentation visuals in a flash for your Zoom Presentation .
Learn how to give Effective Presentations , whether that’s using Zoom or in person!

Prepare the tech
As it was already pointed out, Zoom is quite easy to use, and getting started with Zoom doesn’t demand advanced technological knowledge or skills. But this doesn’t mean you don’t need to double-check every piece of software and hardware that could cause troubles.
These are simple but important steps, like checking your network connection, checking if everything is plugged in (especially if there’s a secondary A/V system), or whether you’ve prepared the right files.
Moreover, don’t forget to close all unnecessary files or tabs that can slow down your software and connection. It would also be ideal if you could do a test run to make sure there are no unexpected technical obstacles for your presentation.
Make your ideas clear and comprehensible
We know we live in times of shrinking attention spans. And when people are listening to you from the comfort of their homes (even beds), with numerous distractions around them, it’s very easy to lose them.
Have in mind that other participants will be more inclined to misinterpret what you’re saying because they don’t see your full body language. And you will be more inclined to run through some points that are more difficult than they may seem to you. The trouble is that you may fail to notice that as you won’t be able to pick up any immediate feedback in the form of frowns, confused looks, and worried faces. Finally, potential technical issues that can interrupt the presentation won’t be of help either.
That’s why it’s more important than ever that you have clear thoughts and rock-solid argumentation. You have to be sure that your train of thought doesn’t lack steam and doesn’t have some of its wagons falling off. Double-check if all ideas you intend to present are relevant enough and whether your specific audience will be able to follow them. Sometimes, what seems to you as oversimplification may actually be a very helpful explanation for some of your colleagues.
Once you did all this, you should divide your presentation into meaningful sections, in order to make it even more comprehensible. That’s why the structure of your talk has to be coherent and intuitive.

Make your surroundings look professional
Many people feel uncomfortable participating in business video conferences from their homes. It’s not difficult to see why having a bunch of your colleagues and superiors intruding on the island of your privacy feels awkward to some.
Nevertheless, there’s really no need for this. Everyone knows that you’re not working from a luxurious penthouse office, but from your home. Just like everybody else does. So don’t worry about whether it looks small, cheap, or unimpressive.
What you should do, though, is keep it clean, tidy, and, if possible, quiet. Pick a place in your apartment that’s well-lit, preferably with no lights right behind you. Having an upright desk can also help you. If you choose to stand while giving a Zoom presentation, it’s likely to make you more alert and confident.
As for the noise, it’s obvious you should try to minimize it. But when you can’t really affect it, don’t worry about it too much. You’re not the only one with noisy kids, neighbors, or living on a noisy street, so others should understand. However, consider finding another working space for the sake of your own health and efficiency.
Don’t forget to rehearse
Finally, in order to look as competent and confident as possible, it’s important to go through your presentation a few times after you have the material fully prepared, no matter how familiar you are with the subject of the talk.
This goes especially for those who are susceptible to stage fright, but it’s also recommended to those who like to do things off the top of their heads sometimes. You don’t have to have your talk planned out word-for-word, but in order to successfully improvise, you need a flawless command of the field you’re talking about, as well as an excellent understanding of every single point you intend to make.
Furthermore, you can be almost sure that you’ll make some errors in the first draft of your presentation. It can be very risky to go with it without rehearsing or double-checking anything. If you want to get every detail right, you’ll have to carefully rehearse, rather than just run through the main points. And if you can do it on camera with a group of friends, that’d be even better.
Get some rest
Obviously, being well-rested is an important prerequisite for doing any kind of presentation, or any kind of work, for that matter. What’s different when you’re giving a Zoom presentation is that people are going to spend a certain amount of time looking at a close-up of your face.
This means that having enough sleep is not just a matter of being capable of giving a quality talk, but also a matter of appearance. And you don’t want to fail in either. Furthermore, you’ll have to care about technical details you wouldn’t care about in a real conference room, which means you’ll need better focus, and this is hard to achieve with insufficient sleep.
If you’re having issues with this, there are a lot of ways to fix them and get a good night’s sleep . There can be various reasons for your troubles, including diet, temperature, stress, or simply a bad mattress. It’s very important to devote some time to this problem, get to the bottom of it, and try to find a solution.
Final thoughts
Now you’re set to go.
Zoom-mania has been around for a few months now, and it may diminish a bit as soon as the world overcomes the epidemic. But this decline won’t be dramatic, as businesses are starting to see the benefits of letting their employees telecommute.
In other words, using video conferencing tools like Zoom to give presentations will become a standard for more and more businesses worldwide. It’s never too early to learn some useful new tricks that will help you adapt to new circumstances.
How to Give a Powerful Presentation
Comments are closed.
© 2024 Vexels Blog.
- How to Merch
- Browse T-Shirts Designs
- Merch Plans

Title: Five Ways to Look and Sound Better on Zoom

Because of the pandemic, the Georgetown community is attending classes, meetings and social gatherings over Zoom. Just as with in-person presentations and meetings, how you choose to present yourself on screen should vary depending on whether you’re speaking to a large audience or attending an informal meeting with co-workers. Of course, many of us are trying to work in close quarters with roommates, siblings, spouses and children of all ages, and finding a quiet spot for online meetings can be challenging.
No one expects perfection during these incredibly stressful times. But if you have options of where to set up for a meeting or presentation where you want to look and sound your best, here are a few tips that can help you look and sound your best from Barrinton Baynes, Beth Campolieto Marhanka (shown above) and Mike Matason from Georgetown’s Gelardin New Media Center.
Do a Test Run

- Always begin a new Zoom meeting ahead of time to make sure you’re happy with how you look and sound. Try not to make people wait too long for the meeting to start.
- If you aren’t the host of the meeting, you can still create a separate Zoom session in advance for a test run of the audio settings and to go through the checklist of all the tips offered in this article.
Use Adequate Lighting
- Natural, diffused lighting is the most flattering light. If possible, set up facing a big window, or even sit outside if it’s not too noisy. If natural light isn’t an option, place a lamp with a white lightbulb behind your computer screen to achieve a similar effect. If natural light isn’t an option, place a lamp with a white lightbulb behind your computer screen to achieve a similar effect.
- When possible, avoid harsh lighting coming from a single direction, especially from above, that will cast unflattering shadows on your face. Also try to avoid lighting from behind you, which will leave your face dark and silhouetted.

- Try your best not to mix different colored lights. Being consistent in using either a warm or cool light works best.
Framing Your Image

- Try to find a spot where your background isn’t too distracting. If your workspace isn’t ready for primetime or you’d like to keep your space private, the Zoom app on some smartphones and computers has the option to choose a virtual background by clicking on the up arrow next to the Start Video icon. Unfortunately, this function isn’t consistently effective on all devices, so it’s a good idea to test beforehand. You can use images or video on your computer or find something new from a royalty-free website like Pexels, Unsplash, Pixabayor Coverr. Keep the Peter Parker principle in mind and use this virtual power responsibly!
- In the Settings menu under the Video section, you can also choose the option to Touch Up My Appearance. This function retouches the video display with a softer focus, smoothes out the skin tone on your face and presents a more polished appearance. It’s like getting a free makeover.
Being Present
- Learn where the camera is and try to look into it the same way you maintain eye contact in person. This will make the audience feel like you’re speaking right to them.
- If you are presenting during the session and want to read from notes, create a makeshift teleprompter by positioning a Word or Google doc with your notes in a small window right below your camera.
- Solid color shirts are best when you’re on camera; busy patterns can look blurry on video.

Beware of Ambient Audio

- If you aren’t getting good sound from your computer, use a headset or a microphone. The Logitech USB Headset H390 is a simple and inexpensive option. If you already have headphones but need a better sounding mic, the Samson Meteor USB microphone is a small portable choice with its own stand.
- Be sure to mute your microphone when you’re not speaking and if you’re running a meeting, mute all the participants if ambient noise is causing a distraction.
We’d love to hear whether these tips are helpful and your funny Zoom mishaps. You can reach us at [email protected]
- COVID-19 Content
How to turn boring Zoom presentations into engaging virtual meetings
Heads up! This content is relevant for Clipchamp for personal accounts. Try this link If you're looking for information about Clipchamp for work accounts.
On this page
How to present on Zoom and keep your audience engaged in virtual meetings
Repurpose your zoom meetings, add webcam recorder footage, deliver a virtual meeting that will have an impact.

Do words like boring, slow and repetitive come to mind when thinking about your upcoming Zoom meetings?
Love them or not, Zoom presentations are here to stay. It’s a new form of communication in our virtual world. But if virtual meetings aren’t executed correctly, they can be extremely unproductive and painful to sit through.
If you’re delivering a virtual meeting and worried that your audience is yawning behind their turned off cameras, there’s a better way.
Explore how to improve your Zoom presentation abilities to suit a virtual audience below.
Fight the temptation to multitask during Zoom, Google hangouts and Microsoft teams presentations and keep your virtual meeting audience entertained and engaged by using the below tips.
1. Plan your presentation content in advance
The biggest part of running a successful virtual meeting is to prepare the presentation ahead of time. Why exactly are you hosting the Zoom meeting? What do your meeting participants need to know or do before the meeting starts? Are there any spreadsheets or documents that can be shared? Pre-asked questions?
Without proper planning , your virtual meeting might not be so effective. Make sure you keep your target audience in mind and develop a presentation that is directed to them. Plan your content to appeal to your audience and demographic. Do they enjoy the use of storytelling, GIFs or short videos?
2. Deliver a strong introduction about yourself, the topic of discussion and why it matters
Forget about holding “ice-breaker” sessions at the beginning of a Zoom presentation. They’re time consuming and overused. Instead, briefly introduce yourself and any important people who will be speaking or making an appearance during the meeting. This is especially important to external virtual meeting audiences as they may not have ever met you before.
Next, outline what you’ll be talking about to give participants a clear picture of what is going to be discussed. Keep your introduction short and sweet, but direct and to the point.
3. Make “eye contact” through your Zoom webcam
When hosting a Zoom virtual meeting, don’t let your attention wander elsewhere. Avoid looking at yourself on the screen or spotting something outside your window. Direct eye contact into the camera gives your participants the feeling that you’re engaged in the conversation. Make sure your video and audio are clear.
Webcam positioning is also a key element to consider when hosting a Zoom virtual meeting. Your camera and computer should be at eye level so you can simulate the eye-to-eye connection with participants. Avoid having your camera too high or too low. No one wants to see up your nose!
4. Add interactive Zoom polls to vote on topics
Adding in polls midway through your Zoom presentation is a great way to gauge topics of interest and add an element of engagement. Zoom’s poll feature allows you to create single or multiple-choice poll questions displayed during the virtual meeting and gather responses from your attendees. A downloadable report is also available, as well as the option for anonymous polls.
Polls are a great way to find insights and valuable information about your audience that will inform the rest of the presentation. They don’t require verbal participation, and they’re accessible on all devices.
5. Use branded or fun Zoom backgrounds
Add character to your virtual meeting by adding a customizable Zoom background. From themed videos to company branding, the options are endless.

Changing up your Zoom backgrounds can really enhance your Zoom presentation by keeping your audience engaged and focused on the call, rather than clicking onto another tab.
You can also play some fun online icebreaker games together like “guess that destination”. Replace your original virtual meeting background with a holiday destination of your choice.
Zoom offers a couple of virtual background options to get you started, but here at Clipchamp, we’ve gone one step further. Choose from thousands of different royalty-free Zoom presentation backgrounds and presentation templates . From under the sea to Christmas , sandy beaches, Halloween or professional offices, we have a Zoom background for every occasion.
6. Ask for participation in Q&As
Encourage virtual meeting participants to use the “Raise Hand” function on Zoom. Team members can ask questions or make a comment on the virtual meeting topic. Make sure your meeting is as interactive as possible so your audience understands the agender and raises any questions they might have.
Taking advantage of this interactive feature may even stop participants from zoning out when they don’t understand something.
7. Embed entertaining video content
Video can make your Zoom presentation go from boring to fun. It’s a key attention-grabbing element that can help keep your audience engaged and attentive throughout the meeting. Your attendees may even generate their own personal discussion after watching the clip.
Visuals are a great way to break up your speech and give you a moment to check your notes. Just like in Google Slides , embedding video within Zoom is easy and effective.
It’s always beneficial for team members to be able to re-watch past virtual meetings and Zoom presentations.
At Clipchamp, we’ve made it easy to elevate your video presentations and repurpose them for internal company calls or even sales. Zoom Pro, Business and United Business users can import Zoom cloud recordings for use in their Clipchamp video projects.
Upload, edit and export. It’s that easy. Cut out all the unnecessary chatter using our online video editor.
If you’ve completed your virtual meeting and forgot to share some important information with your team, don’t stress. Our webcam recorder tool allows you to webcam record a new clip while you’re editing your virtual meeting and add it to your video. All repurposed Zoom presentations will have the added webcam recorder footage included.
When you plan and deliver your next Zoom presentation, remember to refer to Clipchamp's top 7 tips to have a real impact on your audience. Stand out from all the other boring Zoom presentations and make yours memorable. Interact with your audience and ask questions to keep them engaged.
When you're ready, just drag, drop and edit your Zoom video in Clipchamp .
More from the Clipchamp blog

How to make an image transparent

How to change image background color
How to make a logo transparent
Start creating free videos with clipchamp.
- Newsletters
- Best Industries
- Business Plans
- Home-Based Business
- The UPS Store
- Customer Service
- Black in Business
- Your Next Move
- Female Founders
- Best Workplaces
- Company Culture
- Public Speaking
- HR/Benefits
- Productivity
- All the Hats
- Digital Transformation
- Artificial Intelligence
- Bringing Innovation to Market
- Cloud Computing
- Social Media
- Data Detectives
- Exit Interview
- Bootstrapping
- Crowdfunding
- Venture Capital
- Business Models
- Personal Finance
- Founder-Friendly Investors
- Upcoming Events
- Inc. 5000 Vision Conference
- Become a Sponsor
- Cox Business
- Verizon Business
- Branded Content
- Apply Inc. 5000 US
Inc. Premium

4 Foolproof Ways to Keep Your Zoom Audience Enthralled
Your virtual audience probably has zoom fatigue. here's how to keep them alert..

Giving a presentation over Zoom or another video platform? It's much harder to keep people's attention when they're watching you on their laptops and smartphones instead of onstage at a conference. But there are simple things you can do to keep even the most Zoom-fatigued audience engaged.
"So many of your audience members may be struggling because their internet is not that stable and they're sitting in a tiny box all day every day, sometimes with a spouse or partner, or their kids. But the biggest struggle is that people are more exhausted and more stressed these days," says Wendy Capland, executive coach to such companies as IBM and Bank of America. Capland is the author of the best-selling book Your Next Bold Move , and she's also my coach. For the past few years, she's been coaching me and I've been writing about it .
Capland is a frequent presenter who was experienced at giving talks and workshops online even before this past year, and she shared some of her secrets for doing it effectively and keeping a videoconference audience engaged and attentive all the way through your presentation. Try them next time you give a virtual presentation.
1. Ask what they hope to get from you.
"Ask lots of questions," Capland says. This is great advice for every presenter, whether virtual or in-person. But for virtual presentations, Capland recommends a couple of specific questions: "What do you hope to get from this presentation? What would make it worthwhile for you to be here today?"
Give them a few moments to think about this question and write down their answers, and then invite them to share those answers in chat. "You, as the person running the meeting, get to decide whether you're going to address what they want from the meeting -- which might mean pivoting on the spot," Capland says. "Or, if you're not going to include it, answer the person saying something like, 'That's great, we don't have time for it today, but I'd love to do another meeting about that or have a conversation with you about it.' That way, people's expectations are set."
Capland loves giving her audience questions to think about, write down their answers, and share over chat. Another one she asked in a recent keynote presentation: "Tell me one thing your are currently doing to increase your well-being."
2. Ask how they're doing -- really.
"Especially if you have a small meeting, start by asking people how they are -- like, really ," Capland says. "Because this period of time has got people feeling all sorts of feelings, most of them not happy ones. So take just five minutes to ask that question, or to ask, 'What's something that's going really well? What's something you've been struggling with?'"
This will help your audience feel connected to you throughout the rest of your talk, she says. "People like to be seen," she says. That may be even more true for people at a remote meeting who may be feeling isolated.
3. Use Zoom's meeting features.
Zoom and most other video chat software have a variety of built-in features that can help keep an audience engaged, and Capland recommends using them. "I do a lot of 'Raise your hand if ...' which works well, depending on your topic and content," Capland says.
She also uses breakout rooms, typically with six to nine participants, where they have something to work on or some topic to discuss for a few minutes. "I do these breakout rooms as much as I can, and when they come back we debrief them -- 'What did you think or feel about what you discussed?' We do a large group share so people get to see what they missed in other rooms. You can either set up breakout rooms ahead of time, or else just click the icon for breakout rooms, put in a number of participants per room, and it whisks people into groups."
Capland also makes frequent use of polls; she did seven different polls (all set up ahead of time) in a recent 90-minute presentation. "I think the secret is to use a variety, breakout rooms, chats, polls, raised hands," she says. "A variety helps keep people fresh and sharp."
3. Make sure you have help.
Most event organizers will assign someone to assist you during a virtual presentation, at least to watch out for technical glitches and help audience members who may be having technical trouble. But you should have more assistance than that, so either make sure the person assigned to you is willing and able to provide all the help you need, or bring along your own helper.
Capland works with a production manager who is the official meeting host at her Zoom presentations, with Capland as the co-host. This means the helper can do things like view and report on the results of a poll or raise-your-hand questions. The production manager is the one to share her screen to show a video, she mutes participants if there's background noise and unmutes them as needed, and she reads what participants post to chat, looking for patterns and themes. With a group of any size, Capland says, "there's no way one presenter can run the meeting look at people's answers, and integrate what they said."
4. Ask audience members to share their video.
Some people may be unwilling to do this. But, Capland says, it can make a big difference. So if the group isn't too huge, "I make a strong request that they turn their video on. I don't see them because I'm teaching, but they get to see each other."
In these isolated, socially distanced times, there's a lot of value in having members of your audience be able to see each other. It can make them feel just a little bet less alone. And that should be one big benefit of just about every virtual meeting.
A refreshed look at leadership from the desk of CEO and chief content officer Stephanie Mehta
Privacy Policy
More From Forbes
How to make your presentation sound more like a conversation.
- Share to Facebook
- Share to Twitter
- Share to Linkedin
The main difference between strong, confident speakers and speakers who seem nervous in front of the room is in how relaxed and conversational they appear. Here are some basic pointers that will help you create a conversational tone when speaking, regardless of the size of your audience.
1. Avoid using the word, “presentation.” Every time you say, “I’m here to give you a presentation on X,” or, “In this presentation, you’ll see…,” you are emphasizing the formal, structured, sometimes artificial nature of the interaction. No one wants to be “presented” to. Instead, use language that emphasizes a natural, conversational exchange. “We’re here today to talk about X,” or “Today I’ll be sharing some ideas regarding Y.” You can even go so far as to say, “I’m glad we have time together today to discuss Z.” Even if your talk is not going to truly be a dialogue, you can use language that suggests engagement with the audience.
2. If you are using PowerPoint, avoid using the word “slide.” Instead of talking about the medium, talk about the concepts. Swap out, “This slide shows you…,” for, “Here we see….” Instead of saying, “On that slide I showed you a moment ago,” say, “A moment ago we were discussing X. Here’s how that issue will impact Y and Z.” Casual conversations don’t usually involve slide decks. Just because your complicated presentation on tax exposure, supply chain issues, or new health care regulations requires you to use slides, doesn’t mean you have to draw attention to that fact that the setting is formal and structured.
3. For many large-group events, speakers are provided with what’s called a “confidence monitor,” a computer screen that sits on the floor at the speaker’s feet showing the slide that appears on the large screen above the speaker’s head. Avoid using confidence monitors. Our natural inclination when using a confidence monitor is to gesture at the bullet point we’re discussing at the moment. However, we are pointing to a bullet point on the screen at our feet, which the audience can’t see, so it creates a disconnect between us and the audience. Instead, stand to the side of the large screen and gesture at the bullet point you’re talking about so that the audience knows which point you are discussing at the moment.
4. Don’t tell your audience, “I want this to be interactive.” It’s your job to make it interactive. If you are delivering the type of presentation where your audience size allows you to create true engagement with your listeners, create that connecting in stages to “warm up” the audience. Stage One engagement is to ask the audience a question relevant to your topic that you know most of the audience members can respond to affirmatively. “Who here has ever bought a new car?” or, “How many of you have ever waited more than 5 minutes on hold on a customer service line?” Raise your hand as you ask the question to indicate to the audience how to respond. Whoever has raised their hand has now participated in the discussion. They have indicated a willingness to engage. Stage Two engagement is calling on one of the people who raised their hand and asking a specific, perfunctory question. Again, it needs to be a question they can answer easily. If your first questions is, “Who here has bought a new car?” you can then call on someone and ask, “How long ago,” or “What kind of car did you buy most recently?” If your first question was, “Have you ever waited on hold for more than 5 minutes,” you can’t ask, “What company were you calling at the time?” The people who raised their hands weren’t thinking of a specific instance; they were just thinking broadly about that type of experience. You could, however, call on someone and ask, “Do you prefer when they play music or ads for the company’s products?” Anyone can answer that question. At that point, you are in an actual dialogue with that person. Stage Three engagement is asking them a question where they need to reveal something more personal. “How does that make you feel when you hear those ads?” You’ve warmed up your audience and drawn them in with baby steps. Now you have actual, meaningful audience participation.
Best High-Yield Savings Accounts Of 2024
Best 5% interest savings accounts of 2024.
5. Use gestures. When we’re speaking in an informal setting, we all use hand gestures; some people use more than others, but we all use them. When we try to rein in our gestures, two things happen that diminish our speaking style. First, we look stiff and unnatural. We look like we are presenting a guarded or cautious version of ourselves; we look less genuine. Second, hand gestures burn up the nervous energy we all have when speaking in front of a large group. That’s good. When we try to minimize our hand gestures, we tie up that nervous energy and it starts to leak out on odd ways, where we start to tap our foot, fidget with our notes or microphone, or tilt our head side to side to emphasize key points. Just let the gestures fly. It’s unlikely they will be too large or distracting. I have coached people on their presentation skills for 26 years. In that time, I have met three people who gestured too much. Everyone else would benefit from using their gestures more freely.
The impact we have as communicators is based on the cumulative effect of many different elements of our delivery. These suggestions alone won’t make you a terrific presenter. They will, however, add to the overall package your present of yourself when speaking to large audiences.

- Editorial Standards
- Reprints & Permissions
Join The Conversation
One Community. Many Voices. Create a free account to share your thoughts.
Forbes Community Guidelines
Our community is about connecting people through open and thoughtful conversations. We want our readers to share their views and exchange ideas and facts in a safe space.
In order to do so, please follow the posting rules in our site's Terms of Service. We've summarized some of those key rules below. Simply put, keep it civil.
Your post will be rejected if we notice that it seems to contain:
- False or intentionally out-of-context or misleading information
- Insults, profanity, incoherent, obscene or inflammatory language or threats of any kind
- Attacks on the identity of other commenters or the article's author
- Content that otherwise violates our site's terms.
User accounts will be blocked if we notice or believe that users are engaged in:
- Continuous attempts to re-post comments that have been previously moderated/rejected
- Racist, sexist, homophobic or other discriminatory comments
- Attempts or tactics that put the site security at risk
- Actions that otherwise violate our site's terms.
So, how can you be a power user?
- Stay on topic and share your insights
- Feel free to be clear and thoughtful to get your point across
- ‘Like’ or ‘Dislike’ to show your point of view.
- Protect your community.
- Use the report tool to alert us when someone breaks the rules.
Thanks for reading our community guidelines. Please read the full list of posting rules found in our site's Terms of Service.
Watch CBS News
Trump and Biden's first presidential debate of 2024, fact checked
By Arden Farhi , Hunter Woodall , Jui Sarwate , Julia Ingram , Layla Ferris , Laura Doan , James LaPorta , Daniel Klaidman , Alexander Tin , Pete Villasmil, Sierra Sanders
Updated on: June 28, 2024 / 9:46 AM EDT / CBS News
Here's the fact check of some of the statements made by President Biden and former President Donald Trump during the first 2024 presidential debate , which took place in Atlanta on Thursday, June 27. The two tangled on topics including immigration, the economy, abortion and their respective records. Mr. Biden seemed to ramble during many of his responses.
CBS News covered the debate live as it happened .
Trump claims "we had the greatest economy in the history of our country": False
Trump : "We had the greatest economy in the history of our country. And we have never done so well. Every- everybody was amazed by it. Other countries were copying us."
Details : Trump's claim is false that during his presidency the U.S. had the greatest economy in the history of the country by many of the common metrics used to judge economic performance. The claim struggles when looking at GDP. If the 2020 pandemic is excluded, growth after inflation under Trump averaged 2.49%, according to figures from the World Bank . This is far from the GDP growth under Democratic President Bill Clinton of 3.88%, according to World Bank data . Including the time period after COVID spread, that average drops to 1.18%.
Trump's claim also falls short when compared to historical figures. Growth between 1962 to 1966 ranged from 4.4% to 6.6%. In 1950 and 1951, GDP ranged between 8.7% and 8%.
Under Mr. Biden, annual GDP growth is averaging 3.4%, according to the Associated Press .
*An earlier version of this fact check misstated World Bank figures for growth after inflation under Trump at 2.65%, rather than 2.49%, and 1.45%, instead of 1.18%, and also rounded the growth number for Clinton. This has been updated.
Unemployment
Trump's claim is also false even when evaluating the unemployment rate. In February 2020, a month before the COVID pandemic affected the economy, the unemployment rate stood at 3.5% — which was the lowest since December 1969 — but not the lowest ever. When Trump's term ended, the unemployment rate was 6.3%.
In 1953, the unemployment rate fell as low as 2.5%. Under Mr. Biden, the unemployment rate is 4%, according to the most recent data from May 2024.
In January 2023 and again in April 2023, the unemployment rate was 3.4%, lower than the best month during Trump's term.
Stock market performance
On Jan. 19, 2021, the S&P 500-stock average closed at 67.8% above where it had been the day before Trump was inaugurated in 2017.
According to Investopedia , at the end of President Barack Obama's first term in office, the S&P closed 84.5% higher. Additionally the S&P gained 79% during President Bill Clinton's first term, and 70% during President Dwight Eisenhower's first term. So far, under President Biden, the S&P 500 has increased almost 40% , according to calculations on June 13.
By Laura Doan and Hunter Woodall
Biden claims he's the only president this century that doesn't have troops dying anywhere in the world: False
Biden: "I'm the only president this century that doesn't have any — this decade — that doesn't have any troops dying anywhere in the world."
Details : At least 16 U.S. service members have died while serving overseas during Mr. Biden's presidency. Thirteen U.S. service members died in an attack at the Kabul airport in Afghanistan in August 2021. Three soldiers were killed in an attack in Jordan in January of this year.
By Layla Ferris
Trump claims he did not refer to U.S. soldiers who were killed as "suckers and losers": False
Trump: "First of all, that was a made-up quote. 'Suckers and losers,' they made it up."
Details : Current and former U.S. military service members have detailed to CBS News multiple instances when Trump made disparaging remarks about members of the U.S. military who were captured or killed, including referring to the American war dead at the Aisle-Marne American Cemetery in France in 2018 as "losers" and "suckers."
A senior Defense Department official and a former U.S. Marine Corps officer with direct knowledge of what was said detailed how Trump said he did not want to visit the cemetery because it was "filled with losers." These accounts were backed independently by two other officials — a former senior U.S. Army officer and a separate, former senior U.S. Marine Corps officer.
In another conversation on the trip, Trump referred to the 1,800 Marines who died in the World War I battle of Belleau Wood as "suckers" for getting killed. The Atlantic was first to report Trump's comments in 2020. His former chief of staff John Kelly later confirmed to CNN the essence of what Trump had said.
By James LaPorta and Sierra Sanders
Biden claims 40% fewer people are crossing border illegally, better than when Trump was in office: Partially true
Biden: "I've changed it in a way that now you're in a situation where there 40% fewer people coming across the border illegally; it's better than when he left office."
Details : Since Mr. Biden issued a proclamation banning most migrants from asylum at the U.S.-Mexico border in early June, illegal crossings there have dropped. In the past week, daily illegal border crossings have averaged roughly 2,000, according to internal Department of Homeland Security data obtained by CBS News. That's a 47% drop from the 3,800 daily average in May.
During the height of a spike in migration faced by the Trump administration in 2019, Border Patrol recorded an average of 4,300 daily illegal crossings, government data show. But there were months during the Covid-19 pandemic when the Trump administration averaged fewer than 2,000 illegal border crossings.
By Camilo Montoya-Galvez
Trump claims migrants coming to U.S. and "killing our citizens at a level...we've never seen before": Misleading
Trump: "People are coming in and killing our citizens at a level like we've never seen before."
Details : Some migrants who are believed to have entered the U.S. along the southern border in recent years have been charged with murder and other heinous crimes in different parts of the country. They include the suspect in the high-profile murder of Georgia nursing student Laken Riley .
But while the data on this question is not comprehensive, available studies have found that migrants living in the country illegally do not commit crimes at a higher rate than native-born Americans.
Government statistics also show a very small fraction of migrants processed by Border Patrol have criminal records in the U.S. or other countries that share information with American officials.
On COVID, Trump claims more people died under Biden administration than his: True, but needs context
Trump: "Remember, more people died under his administration — even though we had largely fixed it — more people died under his administration than our administration, and we were right in the middle of it, something which a lot of people don't like to talk about. But [Biden] had far more people dying in his administration."
Details : More than 460,000 people had died from COVID-19 by the end of the week that Biden was inaugurated in 2021, while more than 725,000 have died in the three years since then, according to data from the CDC . However, research has found that the counts of COVID-19 deaths, especially in the early days of the pandemic, were likely undercounted .
By Julia Ingram and Jui Sarwate
In discussing abortion, Trump claims former Virginia governor, a Democrat, supported killing babies: False
Trump: "If you look at the former governor of Virginia, he was willing to do this — he said 'we'll put the baby aside and we'll determine what we'll do with the baby'.. .meaning we'll kill the baby."
Details : In a 2019 radio interview then-governor of Virginia Ralph Northam, in discussing late-term abortions, addressed a hypothetical scenario in which a fetus was severely deformed or wasn't otherwise viable. He said, "the infant would be delivered, the infant would be kept comfortable, the infant would be resuscitated if that's what the mother and the family desired."
Northam did not say the fetus should be killed. Killing a newborn baby — or infanticide — is illegal in every state, and not a single state is trying to change that.
By Laura Doan and Daniel Klaidman
Trump claims Biden "went after" his political opponent in New York "hush money" case to damage him: False
Trump: "[Biden] basically went after his political opponent (Trump) because he thought it was going to damage me, but when the public found out about these cases, 'cause they understand it better than he does, he has no idea what these cases are, but when they found out about these cases, you know what they did? My poll numbers went up, way up."
Details : There is no federal jurisdiction over a state case. The Manhattan district attorney's office is a separate entity from the U.S. Department of Justice. The department does not supervise the work of the Manhattan D.A.'s office, does not approve its charging decisions, and it does not try the D.A.'s cases.
By Pete Villasmil
Trump claims he brought insulin prices down for seniors: Misleading
Trump: "I'm the one that got the insulin down for the seniors. I took care of the seniors."
Details : During Trump's time as president, Medicare created a voluntary program in 2020 between some plans and insulin manufacturers that agreed to cap out-of-pocket costs for insulin at $35 per month. Around half of Medicare Advantage or stand-alone prescription drug plans ended up participating by 2021.
David Ricks, CEO of insulin drugmaker Eli Lilly, has taken credit for pioneering the idea with Trump administration officials at a congressional hearing and in an interview . In the same interview with STAT, Seema Verma, former Medicare agency chief in the Trump administration, gave Ricks the credit for the cap: "He is an unsung hero. He was actually the mastermind of all of this."
Medicare ended the policy in 2023, after Mr. Biden signed into law the Inflation Reduction Act , which capped insulin costs for Medicare beneficiaries — not just for the portion of plans participating in the program. The law capped insulin costs at the same amount of $35 per month.
By Alexander Tin and Hunter Woodall
Trump claims Biden wants open borders: False
Trump: "He wants open borders. He wants our country to either be destroyed or he wants to pick up those people as voters."
Details : When he took office, Mr. Biden reversed numerous Trump-era immigration policies, including a program that required migrants to await their asylum hearings in Mexico. U.S. Border Patrol has also reported record numbers of migrant apprehensions along the southern border during Mr. Biden's presidency. But Mr. Biden has never endorsed or implemented an "open borders" policy.
In fact, Mr. Biden has embraced some restrictive border policies that mirror rules enacted by his predecessor. In 2023, his administration published a regulation that disqualified migrants from asylum if they crossed into the country illegally after not seeking protection in a third country.
Earlier this month, Mr. Biden enacted an even stricter policy: a proclamation that has partially shut down asylum processing along the border. His administration has also carried out over 4 million deportations, expulsions and returns of migrants since 2021, according to government data .
Only U.S. citizens can vote in federal elections. Most who cross into the U.S. illegally are not on a path to permanent legal status, let alone citizenship. Even those who apply and win asylum — a process that typically takes years to complete — have to wait five years as permanent U.S. residents before applying for American citizenship. There's no evidence to suggest that the Biden administration's border policy is based on a desire to convert migrants into voters.
Biden claims Trump wants to get rid of Social Security: False
Biden "[Trump] wants to get rid of Social Security. He thinks there's plenty to cut in social security. He's wanted to cut Social Security and Medicare, both times."
Details : Trump has repeatedly said he will try to protect Medicare and Social Security. Trump said in a March 21 Truth Social post that he would not "under any circumstance" allow Social Security to "be even touched" if he were president. Trump had said in a CNBC interview on March 11 that "there is a lot you can do" in terms of "cutting" spending under Social Security. Mr. Biden said the comments were proof Trump aimed to make cuts in the programs, but a Trump campaign spokesman said Trump was referring to "cutting waste and fraud," not Social Security entitlements.
Trump claims Biden has the "largest deficit" in history of U.S.: False
Trump: "But he's (Biden) got the largest deficit in the history of our country."
Details : The national deficit was the largest it had been in over two decades under Trump's administration, not Mr. Biden's, according to data from the U.S. Treasury . The deficit peaked in fiscal year 2020 at $3.13 trillion, and declined to $1.7 trillion by the end of fiscal year 2023.
By Julia Ingram
- Presidential Debate
- Donald Trump
Arden Farhi is the senior White House producer at CBS News. He has covered several presidential campaigns and the Obama, Trump and Biden administrations. He also produces "The Takeout with Major Garrett."
More from CBS News

Disappointed Democrats stick with Biden after rough debate performance

Election 2024 post-debate: The road ahead for Biden and Trump

The Biden-Trump debate was held. Now what?

Biden says he doesn't debate as well as before but knows "how to tell the truth"
IMAGES
VIDEO
COMMENTS
Here is how you can do that-. Step 1: First, start or join a Zoom meeting. Step 2: Click on " Share Screen " and select the " Advanced " option. From there, select " PowerPoint as Virtual Background " and select the file you want for your presentation. Then click on " Share ".
Step 1: Publish your presentation. When you're finished designing your presentation in Visme, navigate over to the top right corner of your screen, and click on "Share". Next, click on "Publish for Web" on your left, type in a title and description for your presentation, and click on "Publish and get my link".
Our eight pro tips for presenting over Zoom may help you feel more prepared, comfortable, and confident. Read on to find out more. 1. Plan out your Zoom background/location ahead of time. You can ...
Roughly speaking—and by that I mean super specific—the Ultimate Guide to Giving Virtual Presentations on Zoom contains six thematic parts, seventeen chapters, 29,584 words, eighty four precision-crafted interface screenshots to show you how to do cool things, high-production instructional videos full of fun, insights, marvellous techniques to marvel at, and did I mention that it's twenty ...
In this step-by-step tutorial, learn how to best present Microsoft PowerPoint slides in Zoom Video Conferencing.⌚ Timestamps0:00 Introduction1:19 Share entir...
6. Pause for effect and questions. After each major beat, pause for a moment to allow your audience to ask questions, raise concerns, or ask for you to reiterate the message. This is much more difficult when you're dealing with a large audience, but most Zoom meetings are relatively intimate with a local group. 7.
Make sure that your laptop, computer, lighting, headset, webcam, microphone, and internet connection are working. Have backup equipment if possible. Familiarize yourself with the Zoom app and other relevant software you're going to use during the presentation. Close unnecessary browsers, applications, or software before the presentation.
Kinda. To access the feature (beta at time of writing) click the "Advanced" tab in the "Share Screen" popup, and select "Slides as Virtual Background". This is what it looks like from the attendee's perspective. And yes, you appear twice on the screen. Once on top of your slides, and again beside them.
Practice your video presentation and get feedback on your performance with VirtualSpeech. 6. Opening Zoom presentations with pizazz. No, this doesn't refer to grabbing your audience's attention with a juggling trick or wearing your most colourful or glamourous finery. How you start a Zoom presentation sets the tone.
Step 4. Click on the Slide Show tab in the PowerPoint window and begin the presentation by selecting Play from Start or Play from Current Slide. Step 5. To stop screen sharing of PowerPoint, hover over the meeting controls at the top of your screen and select Stop Share.
Defining Your Presentation's Purpose. A key trait of successful speakers is understanding their personal brand. They know what they represent, how they want to be perceived, and what success looks for them. It's common for this knowledge to accrue with experience, but you don't have to wait for your 10,000 hours in order to get to that point.
2. Use Zoom to present. Now that the windows have been separated, you can easily use Zoom to present the slideshow window. While in a meeting, click on the 'Share Screen' button and select the browser window with Google Slides on top. Finally, hit 'Share' to start the screen-sharing session.
Make your start surprising, and your viewers will sit up from their slouch and take note. 2. Banish the bullet. If the slides you're presenting have more than 15 words on them (I challenge you ...
5 TIPS FOR DELIVERING GREAT ZOOM PRESENTATION / If you follow these 5 tips, you will ace your online presentation- and it'll be memorable too! Sometimes (lik...
Switch back to Powerpoint and click the Slide Show tab. Begin the presentation by selecting the Play from Start or Play from Current Slide options. PowerPoint will display the slide show in a window. In Zoom, start or join a meeting. Click Share Screen in the meeting controls. Select the PowerPoint window and then click Share.
At the bottom of the Zoom meeting window, click "Share Screen." If you're using a single monitor, you will immediately start sharing your screen. If you're using dual monitors, you'll need to click the screen that your presentation will be shared on. In our case, that will be "Screen 2." To begin sharing that screen, click "Share" at the bottom ...
To record yourself giving a PowerPoint presentation on Zoom, launch Zoom and PowerPoint; be sure to close all other applications. Create a new Zoom meeting, select Share Screen, select your PowerPoint presentation, and click Share. Launch your PowerPoint slideshow. In Zoom, choose Record > Record on This Computer.
In Zoom, click Share Screen and, on the Basic tab, select the Keynote slide screen and click Share. This shares the entire Keynote window but only for one unguarded moment. Zoom automatically switches to Keynote as the foreground app. In Keynote, click Play or choose Play > Play Slideshow. Keynote begins the normal dual-screen presentation mode.
In this article I am using the Zoom app in Windows 10. The six options are: Share your entire screen/desktop. Share the Slide Show window. Share the editing window with a clean look. Run the Slide Show in a window and share that window. Use Presenter View to show the audience your slides while you see Presenter View.
Pick a place in your apartment that's well-lit, preferably with no lights right behind you. Having an upright desk can also help you. If you choose to stand while giving a Zoom presentation, it's likely to make you more alert and confident. As for the noise, it's obvious you should try to minimize it.
Always begin a new Zoom meeting ahead of time to make sure you're happy with how you look and sound. Try not to make people wait too long for the meeting to start. If you aren't the host of the meeting, you can still create a separate Zoom session in advance for a test run of the audio settings and to go through the checklist of all the ...
7. Embed entertaining video content. Video can make your Zoom presentation go from boring to fun. It's a key attention-grabbing element that can help keep your audience engaged and attentive throughout the meeting. Your attendees may even generate their own personal discussion after watching the clip.
3. Use Zoom's meeting features. Zoom and most other video chat software have a variety of built-in features that can help keep an audience engaged, and Capland recommends using them. "I do a lot ...
1. Avoid using the word, "presentation." Every time you say, "I'm here to give you a presentation on X," or, "In this presentation, you'll see…," you are emphasizing the formal ...
Trump claims he did not refer to U.S. soldiers who were killed as "suckers and losers": False. Trump: "First of all, that was a made-up quote. 'Suckers and losers,' they made it up."
President Biden delivered an energetic North Carolina rally, and a campaign official said there were no plans to replace him on the ticket. Former President Donald J. Trump, in Virginia, called ...