

Save a slide as an image or as a separate presentation file
On a PC or a Mac, if you have a particular PowerPoint slide that you want to use in different presentations, you can save it separately from the rest of the presentation. This article describes how to quickly and easily to move your slide from one presentation to a new one.
You can also save a slide as a picture that you can use in other applications.
Save a slide as a new PowerPoint presentation
In the slide thumbnail tab, on the left side of the PowerPoint window, select the slide you want to save.

Note: If you don’t see the Slide tab, click View > Normal .

Click File > New . Click Blank Presentation .

On the Home tab select Paste to open the drop-down menu, and click the Keep Source Formatting button. This will paste the slide into your new presentation as the second slide.

Tip: You can hover over the Paste icons to see what each paste option does.
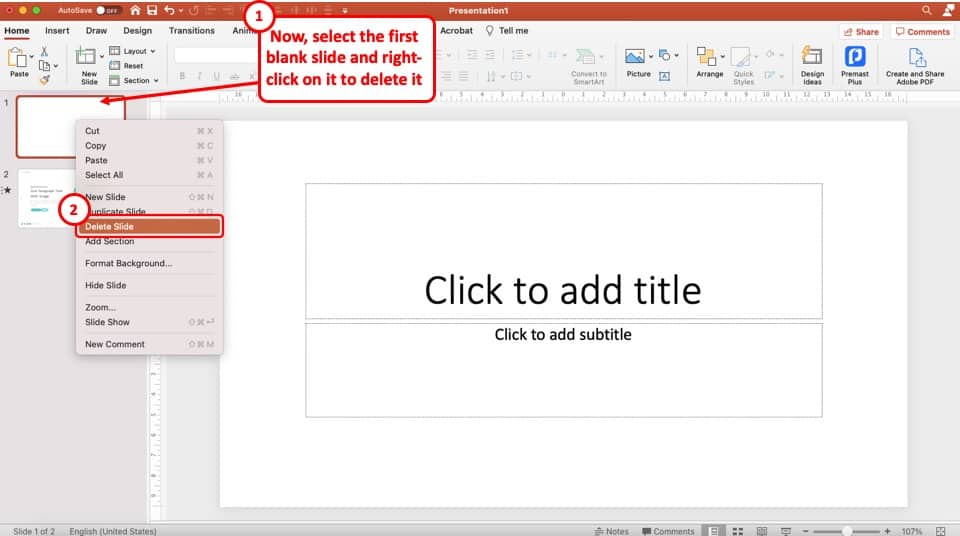
Select the blank slide in the new presentation. Press the Delete key.
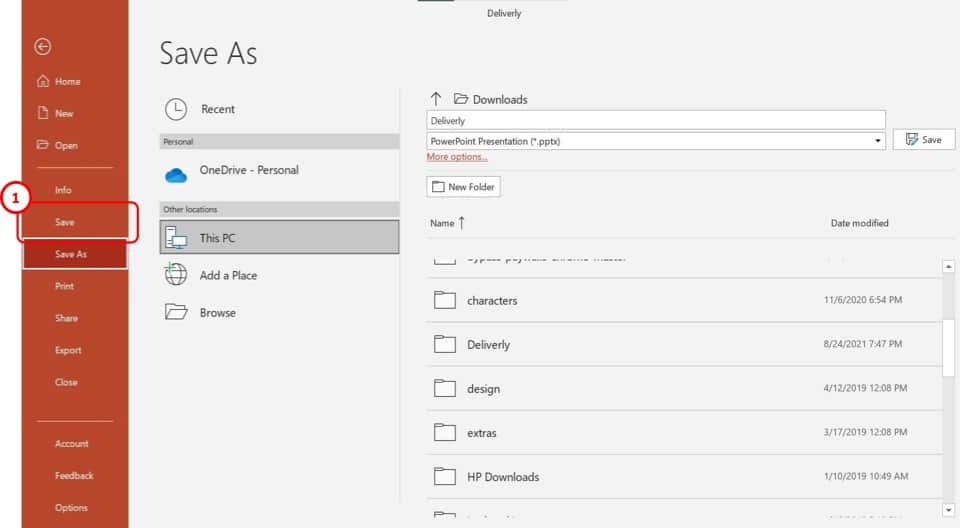
Click File > Save . Navigate to the folder where you want to save your slide.
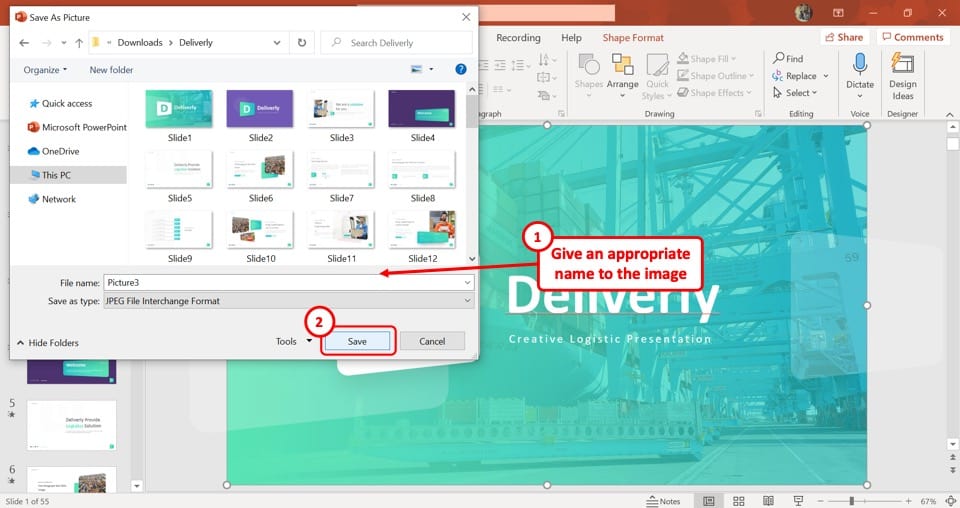
Type the name of your slide image in the File name text box. Click Save .
Save a single slide as an image
In the slide thumbnail pane, on the left side of the PowerPoint window, select the slide you want to save.
Click File > Save As (or Save a Copy if your presentation is saved on OneDrive or SharePoint). Navigate to the folder where you want to save your slide.
Type the name of your slide image in the File name text box.
Click to open the Save as Type drop-down menu. Select one of the following image formats for your slide.
JPEG File Interchange Format (.jpg)
PNG Portable Network Graphics Format (.png)
GIF Graphics Interchange Format (.gif)
Scalable Vector Graphics Format (.svg)

Click Save . Review the PowerPoint dialog box, and select Just This One to save your selected slide as an image.

Note: You can select All Slides to save each slide in your presentation as an image. Each slide will be saved as a separate file.

Click File > New Presentation .
A blank presentation opens.

Select the blank slide in your new presentation. Press the delete key.
Click File > Save . Select where you want to save your slide.
Type the name of your slide image in the Save As box. Click Save .
In Normal view, open the slide you want to save.
On the File menu, select Export .
Under File Format , select the image format you want ( JPEG , TIFF , PNG , or BMP ).
Select Save Current Slide Only . You may also enter a size for your slide image in the Width and Height boxes.
Select Export .
A message box appears that tells you where the image file has been saved on your system.

Need more help?
Want more options.
Explore subscription benefits, browse training courses, learn how to secure your device, and more.

Microsoft 365 subscription benefits

Microsoft 365 training

Microsoft security

Accessibility center
Communities help you ask and answer questions, give feedback, and hear from experts with rich knowledge.

Ask the Microsoft Community

Microsoft Tech Community

Windows Insiders
Microsoft 365 Insiders
Was this information helpful?
Thank you for your feedback.
How to Save a Powerpoint Slide as a Picture: A Step-by-Step Guide
Saving a PowerPoint slide as a picture is a handy trick for creating graphics, sharing information, or preserving a slide’s content. You can easily convert individual slides or an entire presentation into images, such as JPEGs or PNGs, to use elsewhere. Let’s dive into the simple steps to make this happen.
Step by Step Tutorial: Saving a PowerPoint Slide as a Picture
Before we start, remember that saving your PowerPoint slide as a picture allows you to use it in different ways, such as inserting it into other documents or sharing it on social media.
Step 1: Open the PowerPoint Presentation
Open the PowerPoint presentation that has the slide you want to save as a picture.
When you open your presentation, make sure you are on the slide that you want to save. If you have multiple slides to save as pictures, you’ll need to repeat the process for each one.
Step 2: Click on “File”
Click on the “File” tab located in the upper-left corner of the screen.
This will open a menu where you can see various options for managing your PowerPoint file.
Step 3: Choose “Save As”
From the “File” menu, choose “Save As” to open the dialog box for saving your file.
This step is essential because it takes you to the area where you can select different file formats for saving your slide.
Step 4: Select Save As Type
In the “Save As” dialog box, click on the “Save as type” dropdown menu and select the image format you want, such as JPEG or PNG.
Choosing the right format is important depending on how you plan to use your image. JPEG is great for smaller file sizes, while PNG offers higher quality with a transparent background option.
Step 5: Save
After selecting the file type, click “Save,” and a prompt will ask if you want to save all slides or just the current one. Make your choice, and the slide(s) will be saved as picture(s).
If you choose to save all slides, each slide will be saved as a separate image file, which can be useful for creating a series of graphics.
After completing these steps, your PowerPoint slide will be saved as an image file in the location you specified. You can now use this picture in various ways, like making it part of a document, using it in a video, or simply sharing it with colleagues or friends.
Tips: Saving a PowerPoint Slide as a Picture
- Always save your original PowerPoint file before converting slides to avoid any loss of content.
- Use the PNG format if you need a transparent background for your slide image.
- High-resolution slides make for better quality pictures, so consider your slide’s design and text size.
- If you’re saving multiple slides, organize them in a dedicated folder for easy access.
- You can also use the “Export” feature to save slides as images, which gives you additional options like resolution settings.
Frequently Asked Questions
Can i save multiple slides as one picture.
No, each slide is saved as a separate image file. If you need them in one picture, you’ll have to combine them using an image editor.
What resolution will my saved picture have?
The resolution of your saved picture will depend on the original slide’s quality and the image format you choose when saving.
Can I save my slides as pictures on a Mac?
Yes, the process is similar on a Mac. The menu options might be slightly different, but the functionality is the same.
Is it possible to save slides as pictures in bulk?
Yes, you can save all slides in a presentation as images by selecting “Save Every Slide” when prompted during the save process.
Can I edit the picture after saving it?
Yes, once saved as an image file, you can edit it with any image editing software.
- Open the PowerPoint presentation.
- Click on “File”.
- Choose “Save As”.
- Select Save As Type.
- Save the slide as a picture.
Converting PowerPoint slides into pictures is a piece of cake once you know how. Whether you’re looking to spice up your documents, create standout social media posts, or simply want to preserve your slides’ content, following the steps outlined above will get the job done quickly and efficiently. With the added tips and answers to common questions, you’ll be a pro at saving PowerPoint slides as pictures in no time.
Remember, the format you choose can impact the quality and size of your image, so choose wisely based on your needs. And, if you run into any trouble along the way, don’t hesitate to refer back to these steps or reach out to someone with a bit more PowerPoint savvy. Happy saving!

Matt Jacobs has been working as an IT consultant for small businesses since receiving his Master’s degree in 2003. While he still does some consulting work, his primary focus now is on creating technology support content for SupportYourTech.com.
His work can be found on many websites and focuses on topics such as Microsoft Office, Apple devices, Android devices, Photoshop, and more.
Share this:
- Click to share on Twitter (Opens in new window)
- Click to share on Facebook (Opens in new window)
Related Posts
- How to Download a Google Slides Presentation as a Powerpoint File
- How to Rotate a Powerpoint Slide Presentation
- How to Flip an Image in Google Docs
- How to Do a Powerpoint Google Slides Presentation Conversion
- How to Save a Slide from Google Slides as a Picture: A Step-by-Step Guide
- How to Make Google Slides Vertical (5 Quick Steps)
- How to Mirror Image in PPT Files (An Easy 6 Step Guide)
- How to Add a Hyperlink on Google Slides
- How to Delete a Slide in Powerpoint 2010: Step-by-Step Guide
- How to Delete Multiple Slides in Google Slides: A Step-by-Step Guide
- How to Save Powerpoint as PDF with Notes: A Step-by-Step Guide
- How to Add a New Slide in Google Slides: A Step-by-Step Guide
- Can You Save a Powerpoint as a Video in Powerpoint 2013? Find Out Here!
- How to Convert Powerpoint to Google Slides: A Tech Solution
- How to Hide a Slide in Powerpoint 2010: A Step-by-Step Guide
- How to Make a Powerpoint Slide Vertical in Powerpoint 2013: A Step-by-Step Guide
- How to Insert Slides from Another Presentation: Powerpoint 2024 Guide
- How to End Powerpoint on Last Slide in Powerpoint 2010: A Step-by-Step Guide
- How to Merge Files in Powerpoint: A Step-by-Step Guide
- How to Change Slide Size in Powerpoint 2016
Get Our Free Newsletter
How-to guides and tech deals
You may opt out at any time. Read our Privacy Policy
How to Save a Slide in PowerPoint Individually? [Quick Tip!]
By: Author Shrot Katewa
![How to Save a Slide in PowerPoint Individually? [Quick Tip!]](https://artofpresentations.com/wp-content/uploads/2021/09/Featured-Image-Save-Just-One-Slide-in-PowerPoint.jpg "powerpoint download slide as image")
There are times when we want to either just print or share just a single slide from our PowerPoint presentation. It might seem a bit difficult to do so initially, but the process is actually quite simple!
To save a slide in PowerPoint, select the slide from the slide preview panel on the left part of your screen. Press “Ctrl+C” to copy it. Now, click on the “File” tab, and open a “Blank PowerPoint Presentation”. Press “Ctrl+V” to paste the slide. Press “Ctrl+S” to save the single slide presentation.
In this article, I will share with you how you can save just one slide from an existing PowerPoint presentation.
Plus, I will also show you how to save a single slide as an image so that you can avoid the changes in the color and the look of the slide when you move it to a new presentation.
So, without further adieu, let’s get started!
1. How to Save a Single Slide in PowerPoint?
There are actually two different ways in which you can save a single slide in PowerPoint. The first method is where you copy the slide into a new presentation and save it separately. Another method is where you can save a single slide as an image!
Let’s take a look at both the methods below –
Method 1 – Save a Single Slide Using a New Presentation
If you want to extract and save a single slide from an existing PowerPoint presentation, the best thing for you to do is to copy the slide and paste it into a blank PowerPoint presentation.
Related Read – Check out my other article on How to Copy and Paste in PowerPoint that provides you with tips to help retain the design and formatting of your original slide.
Then, save the Powerpoint presentation that contains the single slide that you just pasted in it.
This method allows you retain editing capabilities to the single slide that you move into a new presentation.
Here are the steps that you need to follow –
Step 1 – Copy the Slide
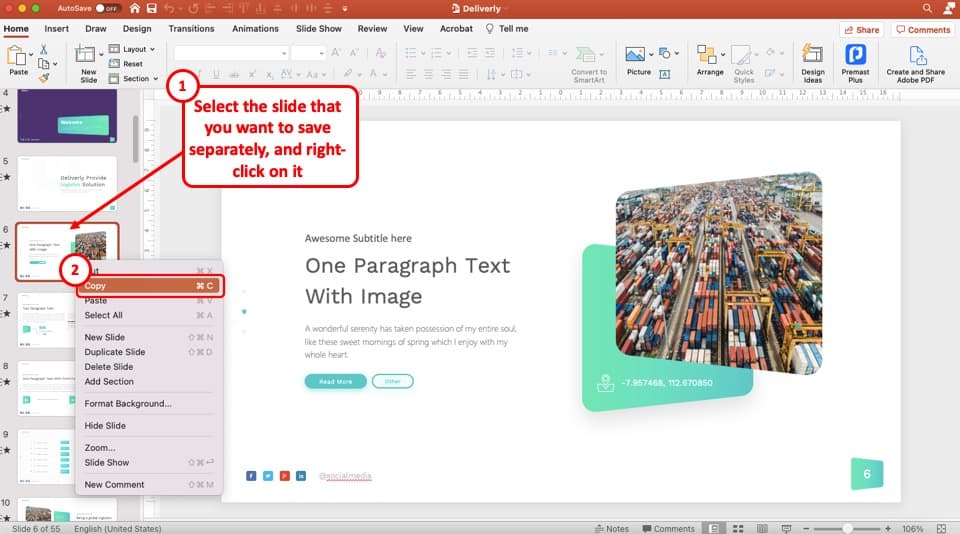
The first step is to copy the slide that you want to save as a presentation. To do that, first, select the slide from the “ Slide Thumbnail View ” on the left part of your PowerPoint window by clicking on it.
Then, “right-click” on the slide. From the options that are displayed in the menu, click on “ Copy “.
You can also use the keyboard shortcut “ Ctrl+C ” to copy the slide once it has been selected.
Step 2 – Open a Blank Presentation
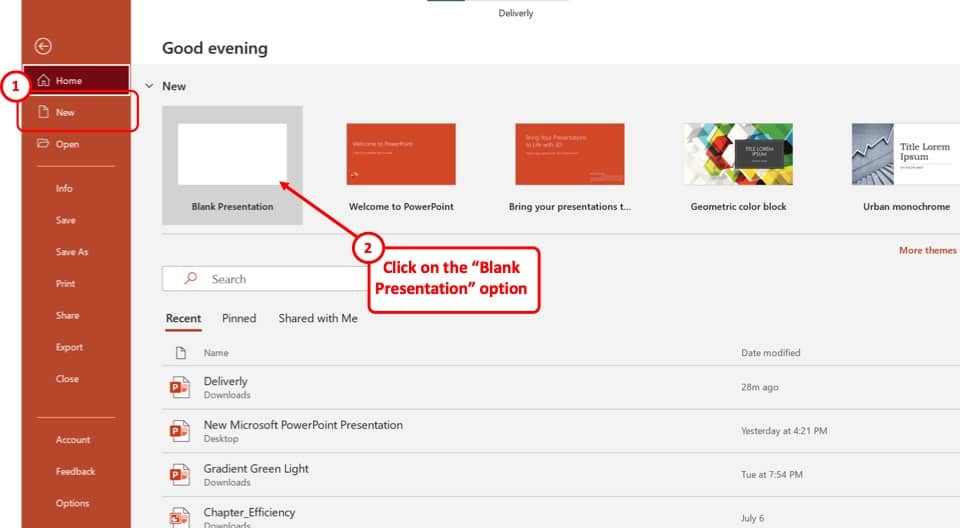
The next step is to move this slide into a new presentation. For that, first, we will need to open a blank presentation.
To open a blank presentation in PowerPoint, click on the “ File ” tab on the top. You will be taken to the backend view.
From the backend view, simply click on the “ New ” option on the left, and then select the “ Blank Presentation ” option.
This will open a new blank PowerPoint presentation.
You can also press “ Ctrl+N ” to open a new PowerPoint presentation and avoid all the above steps.
Step 3 – Paste the Copied Slide
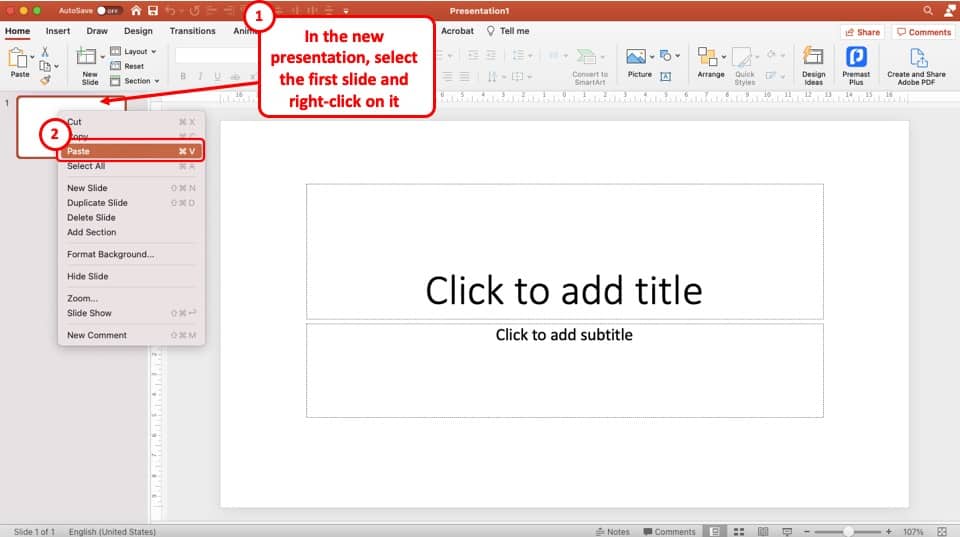
Once the new presentation is open, simply click on the first slide in the new presentation, and paste the slide that you have copied from the original presentation.
You can “ right-click ” on the first slide, and from the options that appear, click on “ Paste “.
Alternatively, you can also simply click on the first blank slide in the new presentation and press “ Ctrl+V ” to paste the copied slide.
Step 4 – Choose the “Keep Source Formatting” option
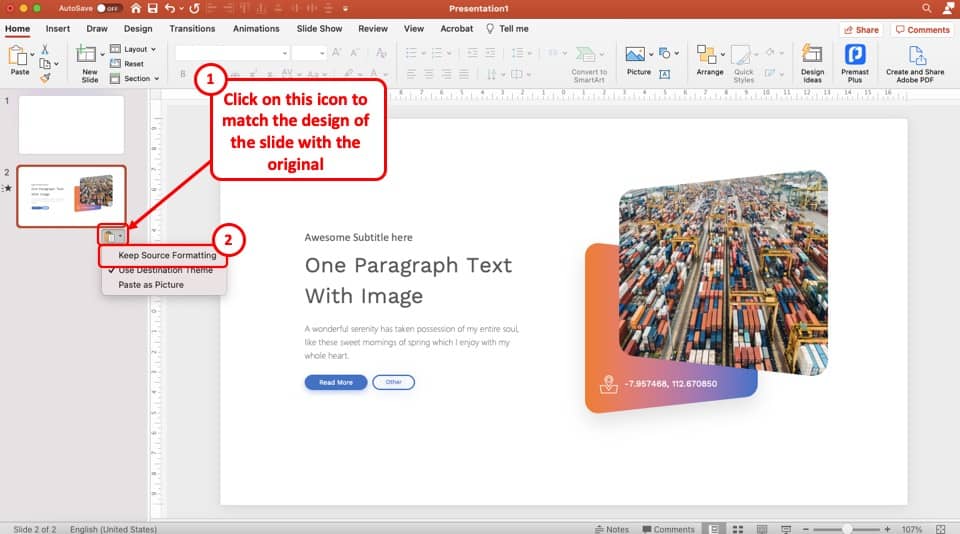
Once you’ve pasted the slide from the original presentation into a new blank presentation, you will notice that sometimes the formatting of the slide (meaning the color and font) doesn’t get carried over.
This can be annoying as you really don’t want to spend time recreating the slide!
To solve this problem, click on the small “clipboard” icon underneath the slide that you just pasted in the new presentation. A dropdown menu will appear.
Simply, choose the “ Keep Source Formatting ” option from the dropdown.
This option will basically retain the way text, image and other elements were formatted in the original presentation.
Step 5 – Delete Additional Slides
Now, all you are left to do is delete any additional slides that may be present in the new presentation.
To delete the slides from the presentation, select it by clicking on it. Then, right-click and choose the “ Delete Slides ” option.
You should be left with only a single slide that you copied from the original presentation.
Step 6 – Save the Presentation
The last step of the process is the make sure that you save the presentation.
To save a PowerPoint presentation, click on the “ File ” tab. Then, from the backend view, click on “ Save “.
You can also use the keyboard shortcut “ Ctrl+S ” to save a PowerPoint presentation.
You will be prompted with a new window asking you to choose a destination to save the file. Navigate to the specific folder where you want to save the file. Then, click “ Save “.
Method 2 – Save a Single Slide as an Image
If you are in a hurry and don’t really care about being able to edit the slide once it has been moved separately, then perhaps you should use this method.
Saving an individual slide as an image in Microsoft PowerPoint is quite an easy process.
It requires 4 easy steps as follows:
Step-1: “Right-click” on the slide
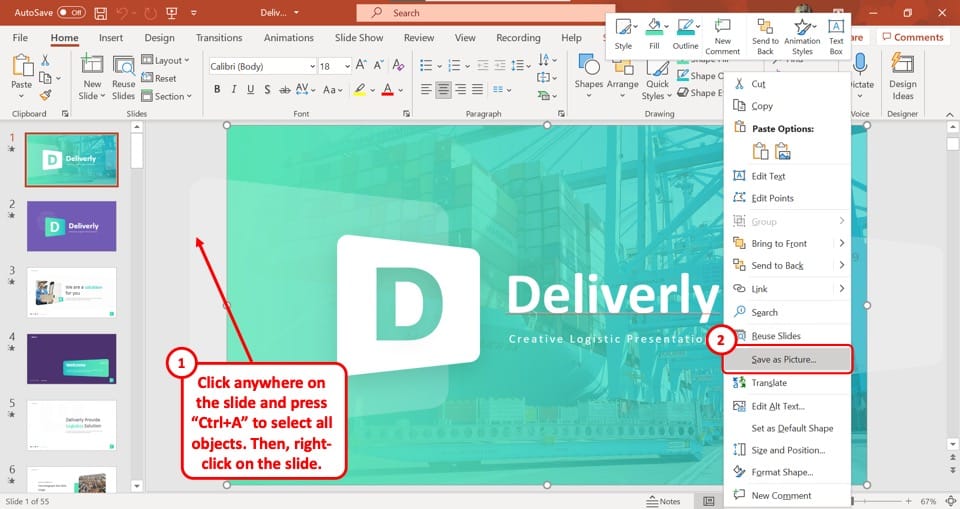
The first step is to go to the slide you want to save as an image and “Right Click” anywhere on the slide. This will open a drop-down menu.
Step-2: Select the “Save as Picture…” option
From the drop-down menu, click on the “Save as Picture…” option. This will open a new window.
In this window, you can select the folder you want to save the slide as a picture in. You can also rename the image by typing in the “File name” box.
Step-3: Select your preferred image format
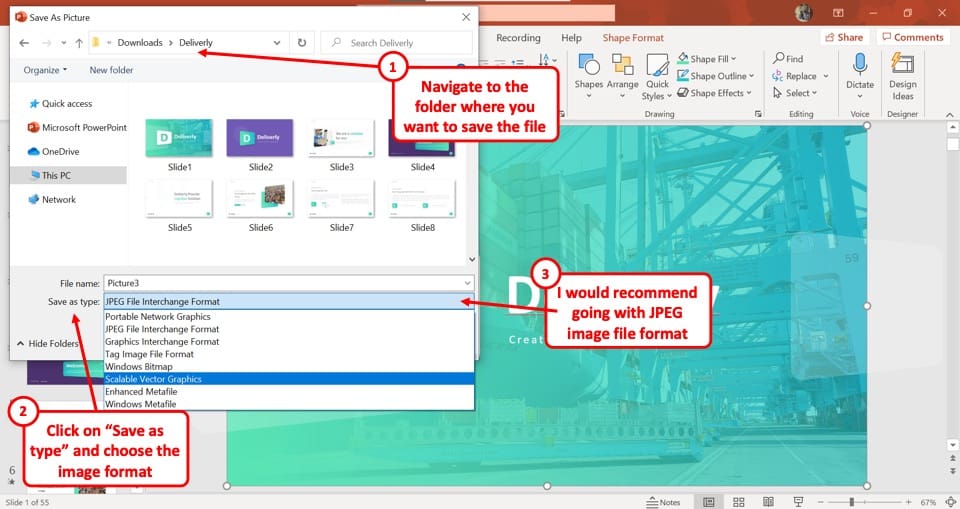
Below the “File name” box, click on the “Save as type” option. This will open a dropdown menu containing all the standard image format options. Click on your preferred format to select it.
I would recommend using the “ JPEG ” file format especially if you only plan to email this to a client or a team member.
If you plan to project it on a screen or print this slide on a huge paper, you would perhaps be better off going with the “PNG” file format.
Step-4: Click on the “Save” button
After naming your slide and selecting the image format, click on the “Save” button at the bottom of the new window. This will save the selected single slide as an image.
How to Save One Slide in PowerPoint as a Picture on Mac?
You can follow a similar process to the one mentioned in the previous section even on Mac. However, you can also use the export function and save just one slide as a picture in PowerPoint on Mac.
Here’s how to save just one slide as a Picture in PowerPoint on Mac –
Step-1: Select your preferred slide
First, click on the specific slide you want to save as a picture. Be sure to select the entire slide rather than a single element in the slide.
Step-2: Click on the “Export” option
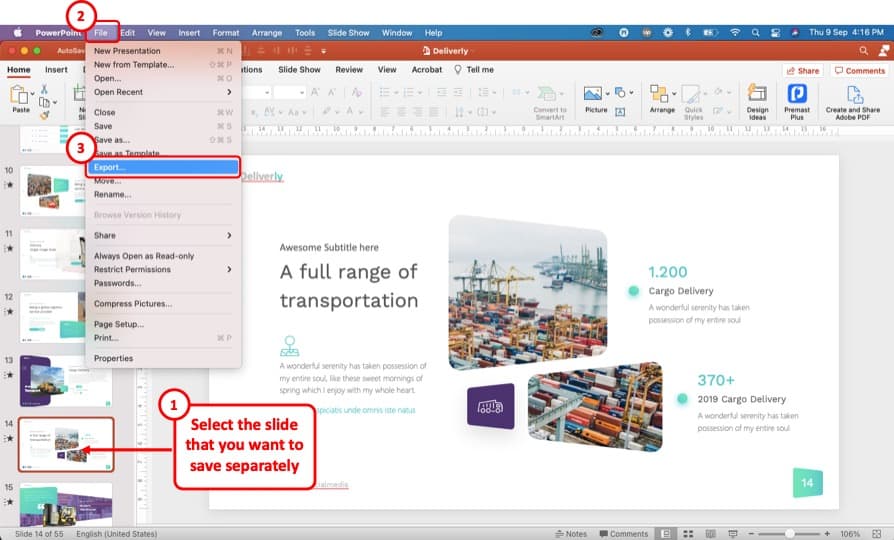
In the “Primary Menu” bar at the top of your screen, click on the “File” option, which will open a dropdown menu. From the dropdown menu, select the “Export” option.
Step-3: Click on the “File Format” box
Clicking on the “Export” option will open a pop-up menu. At the bottom of the pop-up menu, click on the “File Format” box. This will open a dropdown menu containing various file formats.
Step-4: Select the preferred file format
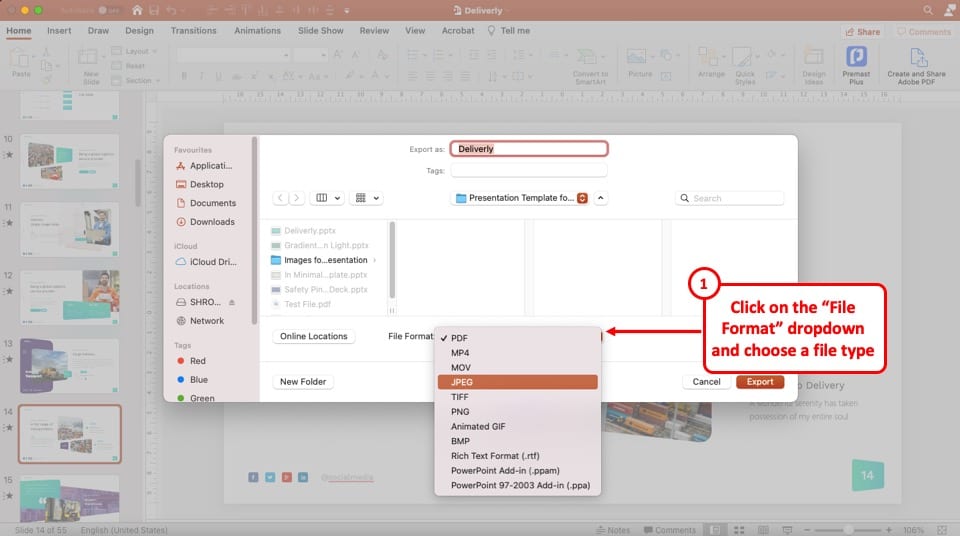
In the dropdown menu under the “File Format” box, there are three image formats which are “JPEG” , “TIFF” and “PNG.” Select your preferred image format.
My recommendation would be to choose the “JPEG” file format as that doesn’t significantly increase the size of the image and also maintains a decent quality for most purposes.
Step-5: Click on the “Save Current Slide Only” option
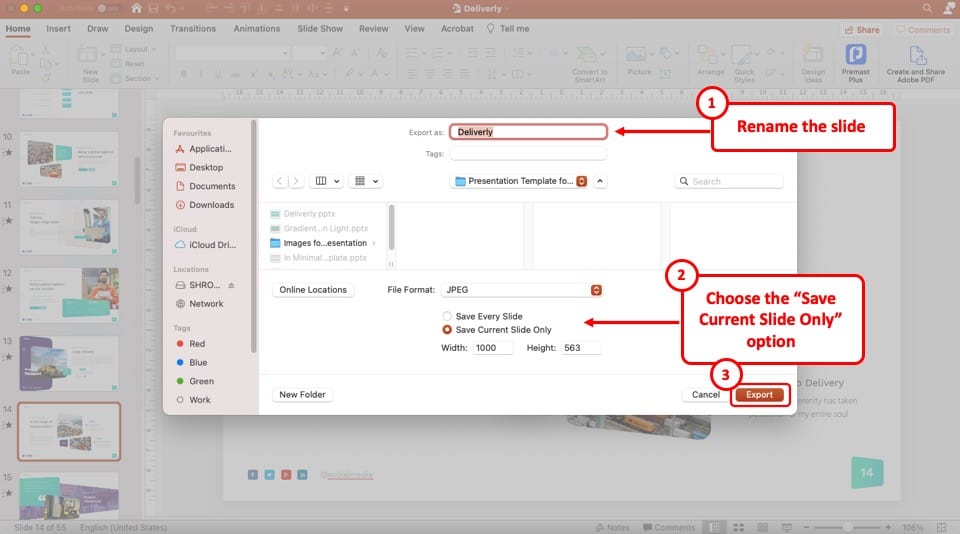
Once you select your desired file format, you will see two new options appear below the “File Format” box. Among the two options, click on “Save Current Slide Only.”
Step-6: Click on the “Export” button
To complete the process, click on the “Export” button which is located at the bottom of the pop-up window. Thus, the selected individual slide will be saved as a picture on your computer.
2. How to Save a Single Slide in PowerPoint as a PDF?
Another option is to save a single slide in PowerPoint as a PDF file. This is great especially when you want to send the slide to a client. Sending a file in a PDF format looks more professional.
Here’s what you need to do to save a single slide in PowerPoint as a PDF –
Step-1: Select the Slide
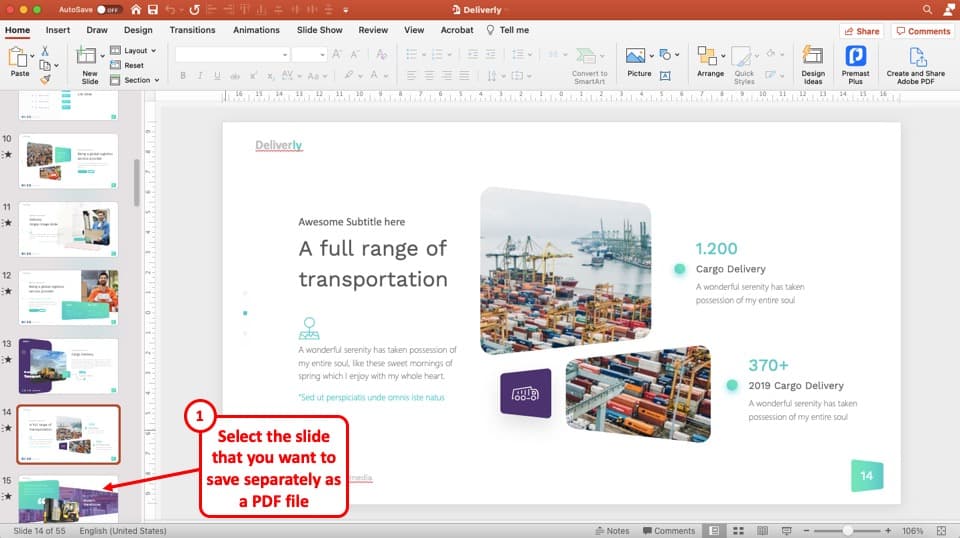
The first step is to select the slide that you want to save as a PDF file.
Step-2: Click on the “File” Tab and choose “Print”
At the top left corner of your screen, click on the “File” menu to open it. In the “File” menu, select the “Print” option from the sidebar at the right side of your screen.
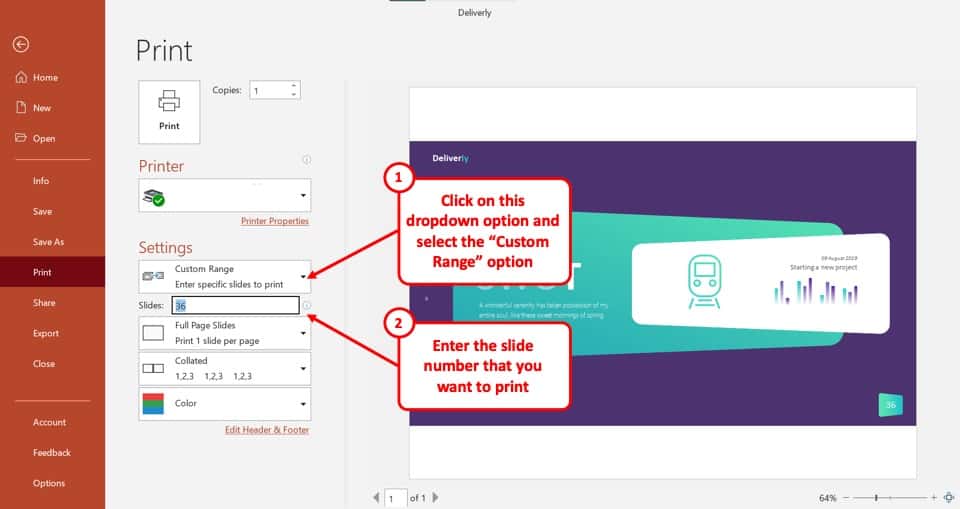
Step-3: Select the “Microsoft Print to PDF” option
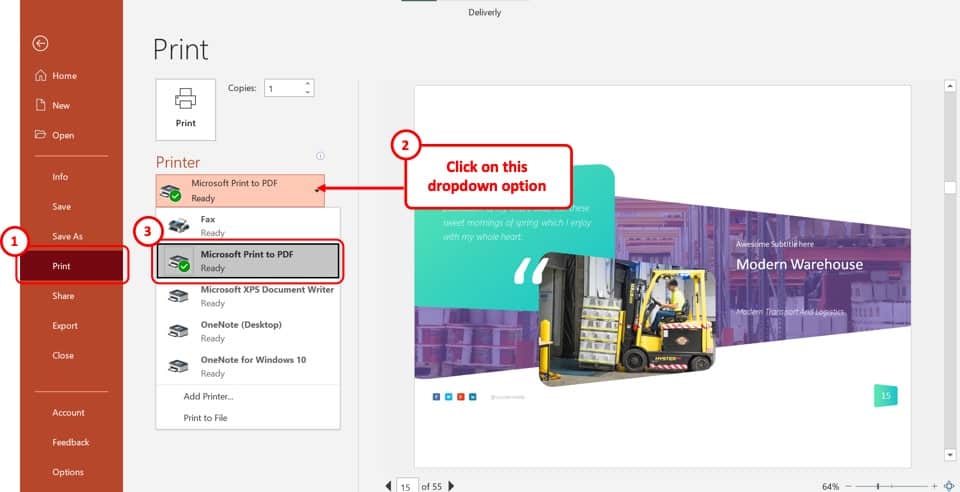
Once the “Print” option is open, click on “Printer” and select the “Microsoft Print to PDF” option from the dropdown menu.
Step-4: Click on the “Custom Range” button
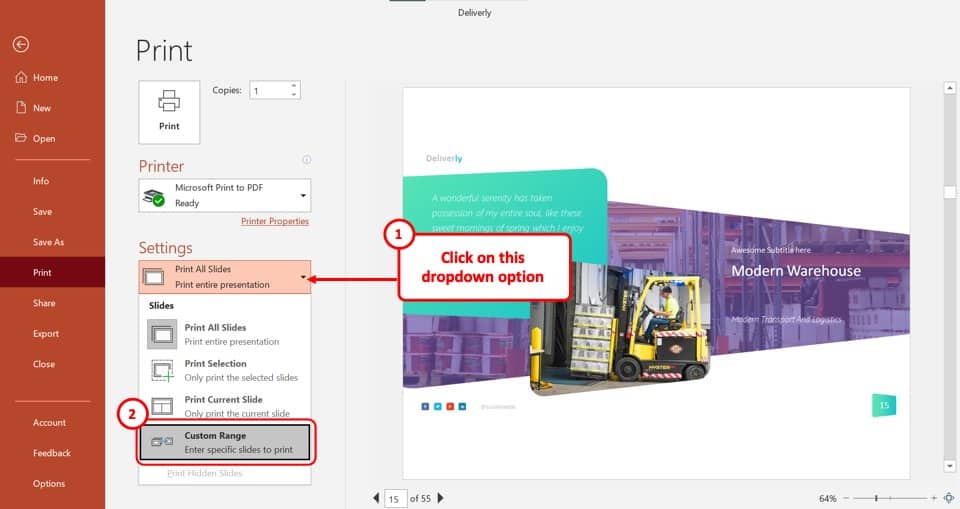
Now, under the “Settings” section, click on the top-most option which says “Print All Slides.” From the dropdown menu, click on the “Custom Range” button.
After that, click on the “Slides” box and type in the slide number of the slides that you want to save as PDF.
Step-5: Click on the “Print” button
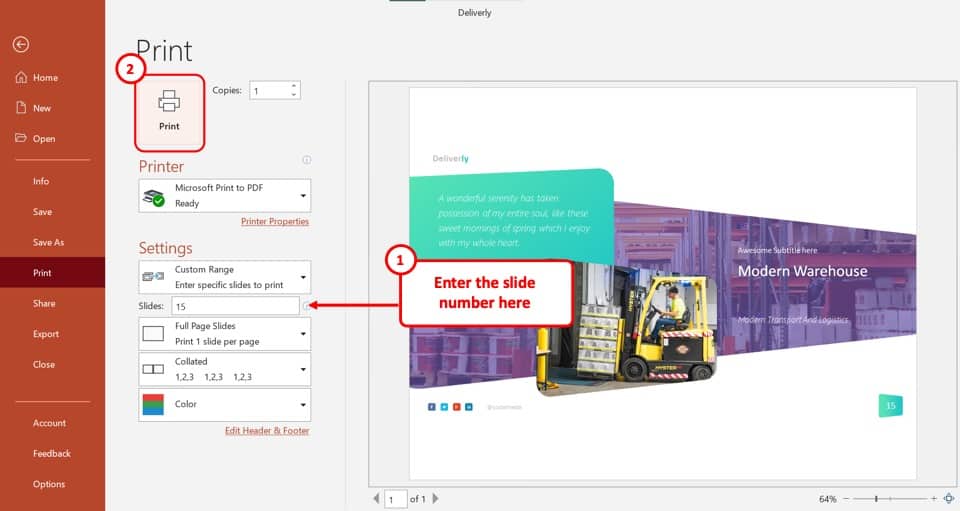
Now, click on the “Print” button to open a pop-up window. Type in the name of the PDF in the “File name” box and click on the “Save” button to save the selected slide as a PDF.
3. How to Save All Slides in PowerPoint as a Picture?
In Microsoft PowerPoint, you can save either an individual slide or an entire presentation as image files. Check out my other article where I’ve gone in-depth on how to save a PowerPoint as a picture . Make sure you check out the article for all the visual references and tips.
I’m also highlighting the process below but if you need to see the process with visual aids, check out the article linked above.
Step-1: Open the “File” menu
At the top-left corner of your PowerPoint window, you will find the “File” tab, which is the first option in the ribbon. Click on the “File” option to open a variety of options.
Step-2: Click on the “Save As” option
With the “File” menu opened, click on the “Save As” option from the sidebar located at the left side of your screen and select the folder where you want to save the pictures in.
To save the slides as pictures in a new folder, click on the “New Folder” button and type in the folder name.
Step-3: Click on “Save As Type”
The “Save As Type” drop-down menu is located in the text box that says “PowerPoint Presentation (*.pptx).”
Click on the text box to open a dropdown menu. Scroll down the menu and select your desired image format from “JPEG File Interchange Format (*.jpg)” , “PNG Portable Network Graphics Format (*.png)” , “TIFF Tag Image File Format (*.tif)” or “Scalable Vector Graphics Format (*.svg).”
After selecting your preferred image file format, click on the “Save” button beside the “Save As Type” box. This will open a new dialogue box.
Step-5: Click on the “All Sides” button
Now, all you have to do is click on the “All Slides” button from the dialogue box to save all the slides of your presentation as image files.
Please Note – Each slide will be saved as a separate image arranged serially by slide number in your selected folder when you save a complete PowerPoint presentation as an image.
4. How to Print a Single Slide in PowerPoint?
In Microsoft PowerPoint, the process of printing an individual slide is similar to the process of saving the slide as a PDF file. Open the “Print” option from the “File” tab and then follow the 3 basic steps:
Step-1: Select the “Add Printer…” option
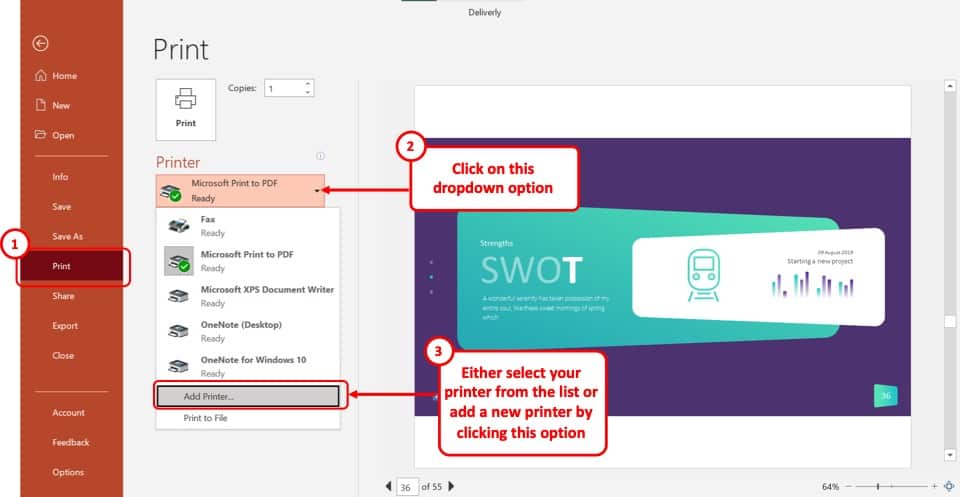
In the “Print” menu, click on the “Printer” box. From the dropdown menu, select the “Add Printer…” option.
This will prompt you to connect your printer to the computer. If your printer is already connected to your computer, click on it to select it.
Step-2: Select your preferred slide
Next, click on the “Settings” button and select the “Custom Range” option from the drop-down menu. In the “Slides” box below, type in the slide number of your preferred slide.
Step-3: Click on the “Print” button

Now, all you have to do is click on the “Print” button for your printer to print the single PowerPoint slide you have selected.
Credit to cookie_studio (on Freepik) for the featured image of this article (further edited)

< Go back to Login
Forgot Password
Please enter your registered email ID. You will receive an email message with instructions on how to reset your password.

How To Save PowerPoint Slide As Image? A Complete Guide
Powerpoint presentations consist of slides that match the content the presenters want to convey to their listeners. It may occasionally be necessary to save specific images from PowerPoint presentations to use them for the intended purpose. Using an application, you can swiftly process and create a PPT slide and save it as an image for a required presentation. While using such third-party applications, it is vital to ensure compatibility, as specific devices require the assistance of a third-party application, like PPTX viewer, to access PPTX files.

In this article, you will profit from learning how to save PowerPoint slide as image using the quick and easy techniques listed below.
Methods To Save Powerpoint Slide as Image In Windows
You can maintain the visual appeal of your presentation in many ways by exporting PowerPoint slides as photos. This section will walk you through a detailed procedure to ensure that every piece of your content is preserved in vivid clarity. These instructions will enable you to quickly produce excellent images from your PPT slides, regardless of whether your goal is to share individual slides or turn your entire presentation into a visual masterpiece:
Method 1: Save PowerPoint Slide as Image
- Open PowerPoint and go to the File tab. After selecting Export, click Change File Type. Then, click the Save As option.
- Now, select a location where you save the slide and give the file a name. Click Tools and select Compress Pictures to save up some space. Confirm that the option labeled “Delete cropped areas of pictures” is checked. Next, select Web Resolution to make those images smaller.
- It will save the images in a smaller format to prevent the final JPEG images from being excessively huge.
- Hit Save now. You can find a JPEG file for every slide in the presentation by going to the folder where we saved it.
- You can transmit these files to view the presentation on any device that supports JPEGs.
With this simple export option, you can get your presentation to function on any device or with any software.
Method 2: Export PowerPoint Slide to an Image
- Launch your PowerPoint presentation first. Select the slide that you want to export as a picture. Depending on your need, this could be one or a series of slides.
- Select the “File” tab by navigating to the upper-left corner of the screen. There will be a drop-down menu. From the options, pick the “Save As” option.
- A dropdown option labeled “Save as” is located beneath the location bar. To view a list of supported formats, click this dropdown menu. Select the file type for your images, such as PNG or JPEG.
- Different quality options are available in many formats. To balance file size and image clarity, select the option that best meets your requirements.
- After deciding on the format and quality options, click “Save” to store the high-quality image of your PowerPoint slide at the designated place.
These easy-to-follow instructions will help you turn your PowerPoint content into visually striking graphics that you can share, print, or use in various applications.
Visit SlideUpLift for the Best PowerPoint Presentation Templates.
Method 3: Save PowerPoint Slides as Images Using Google Slides
- Google Slides provides an alternative solution if you lack access to PowerPoint or a Microsoft account.
- Open your PowerPoint file within the Google Slides interface.
- Navigate to the “File” menu and select “Download” in the Google Slides application.
- Choose your preferred output format for the conversion process, including PNG, JPG, or SVG.
- Save the existing slide as an image through Google Slides.
Visit SlideUpLift for the Best Google Slides Templates.
Methods To Save Powerpoint Slide as Image In macOS
Below are the 2 methods with which you can easily save your PowerPoint slide as an image on MacOS:
Method 1: Save PowerPoint slide As Image
- Open your PowerPoint presentation.
- Open the slide you wish to save in Normal view.
- Click the File menu and choose Export.
- Choose your preferred image format (JPEG, TIFF, PNG, or BMP) under File Format.
- Select ‘Save Current Slide Only’. Additionally, you can specify the dimensions of your slide image in the Width and Height boxes.
- Choose the location where you want to save the image and click “Save”.
Method 2: Screenshot
- Display the PowerPoint slide you want to capture.
- Use the keyboard shortcut Command + Shift + 4. It will change the cursor to a crosshair.
- Press the Spacebar. The cursor will change to a camera icon.
- Move the camera icon over the PowerPoint window to highlight it.
- Click to capture the screenshot. The screenshot will be saved to your desktop by default.
Limitations :
While saving PowerPoint slides as images can be a convenient way to share or use specific visuals, there are some limitations associated with this process:
- You can’t alter individual elements like text, shapes, or charts once a PowerPoint slide has been saved as an image.
- File sizes for images can get huge, especially when they are high definition. It might be a problem because it can use more internet speed and disc space when sharing or storing several photos.
- For certain PowerPoint versions, there is a maximum DPI limit to consider when you specify the ExportBitmapResolution registry value. The slide size affects the maximum DPI. For example, for a standard 13.3″ x 7.5″ slide, the equation would be: sqrt(100,000,000 / (13.333 * 7.5) ) = 1000.
- The chosen image format and settings may cause a loss of resolution, which could lead to a decline in the image quality. Consider this if you want to print your images.

This ends our thorough tutorial on how to save a PowerPoint slide as an image. Regardless of your approach, remember to organize your stored slides and consider file size carefully.
How to export high-resolution images from PowerPoint?
To export high-resolution images from PowerPoint, open your presentation and go to the desired slide. Click on “File,” select “Export,” and choose an image format (such as PNG or JPEG) while ensuring a high resolution before saving.
Does it affect the resolution of the Image?
Yes, be mindful of file sizes and resolution, especially when saving multiple slides. Consider the resolution and compression settings to balance image quality and file size.
Can I export PowerPoint slide as image directly to a specific folder?
Yes, you can export ppt slide as image by specifying the destination folder where you want to save the images. This allows for easy organization and retrieval.
Can I convert slides into PDFs too?
Using PDF software, you can convert slides into PDF files. Many presentation tools, such as Microsoft PowerPoint, Google Slides, and Adobe Acrobat, can save or export presentations as PDF files. When saving or exporting, select the “Save As” or “Export” option, choose PDF from the file format list, and provide additional settings if necessary.
What are the different Image file types I can Save?
You can save your image file in multiple formats. The most common formats or file types used are JPEG, PNG, TIFF, BMP, and GIF.
Table Of Content
Related presentations.

Title Slides Template Collection For PowerPoint & Google Slides

PowerPoint Images For Presentations

Background Images
Related posts from the same category.

27 Mar, 2023 | SlideUpLift
How To Flip An Image In PowerPoint
Are you looking to add a creative touch to your PowerPoint design? Flipping an image can be a quick and easy way to achieve that. Whether you want to create

10 Mar, 2023 | SlideUpLift
How To Lock An Image In PowerPoint
Let's say you're making a PowerPoint presentation and want to design it in such a way that specific items can't be moved in the presentation, either by accident or by

8 Apr, 2020 | SlideUpLift
How To Embed A YouTube Video In PowerPoint
There may be many occasions where you'd like your audiences to watch a video to better understand your argument or notion. Adding a video to your presentation can help retain

1 Dec, 2022 | SlideUpLift
How to cite images in PowerPoint
Images can enhance the impact of your professional presentations. You may choose the ideal photos to assist in captivating your readers and giving meaning to your words, but it is

14 Dec, 2020 | SlideUpLift
Quick Tutorial To Remove The Background From An Image And To Make A Background Transparent
PowerPoint has many built-in features that can help you edit images, just like any other professional photo editing tool does. In this tutorial, we will discuss- How To Remove The

22 Dec, 2020 | SlideUpLift
How to make a poster in PowerPoint | PowerPoint Tutorial
Most of the time, we use PowerPoint to create presentations, but did you know you could use PowerPoint to build other elements such as posters? It is quite handy software

24 Oct, 2019 | SlideUpLift
How To Highlight Part Of An Image Using Focus Effect In PowerPoint : Step-By-Step Tutorial
This PowerPoint tutorial explains how to highlight any specific aspect of an image in PowerPoint. A presentation with pictures and infographics is better than a boring-looking textual presentation. Images make

25 Sep, 2020 | SlideUpLift
How To Add Pictures To PowerPoint Using Stock Images | PowerPoint Tutorial
This PowerPoint tutorial is a quick guide on how to add PowerPoint Images for Free to your presentation using PowerPoint's new feature - a collection of stock images. Microsoft PowerPoint

8 Sep, 2022 | SlideUpLift
How To Add Background Music In PowerPoint | PowerPoint Tutorial
You can make your PowerPoint presentation more attractive, engaging, and unique just by using the built-in features of Microsoft PowerPoint. Adding PowerPoint animations, slide transitions, and infographics, and using PowerPoint themes help in

15 Mar, 2024 | SlideUpLift
How To Add Animation To PowerPoint? Easy PowerPoint Animation Tutorial
Have you ever felt your audience needed to be more engaging even after delivering good presentations? Do you think there's something that you should have included in your presentation? You
Related Tags And Categories
Forgot Password?
Privacy Overview
Necessary cookies are absolutely essential for the website to function properly. This category only includes cookies that ensures basic functionalities and security features of the website. These cookies do not store any personal information
Any cookies that may not be particularly necessary for the website to function and is used specifically to collect user personal data via ads, other embedded contents are termed as non-necessary cookies. It is mandatory to procure user consent prior to running these cookies on your website.
Save Your PowerPoint Slides As Images

There may be occasions when you will want to export/save a particular PowerPoint slide(s) as an image file. A real world example of why you might need to do this could be to create a high-resolution thumbnail image for your YouTube videos (I do this all the time!).
In this article, we’ll take a look at the various file options we have access to via PowerPoint and how to save our slides to an image format.
Available Picture Types
You have four file types available to you when you are saving a PowerPoint slide:
- GIF (Graphics Interchange Format)
- BMP (Bitmap)
- EMF (Enhanced Windows Metafile)
I recommend using a PNG if your slide contains graphics and a JPEG if you slide contains real-life imagery from a camera.
Steps To Take
Here are the steps to saving a selected slide as an image:
- Select Save As in the left-hand pane
- Select your desired File Type from the Save As dialog box
- Select from the Prompt if you want to save All Slides or the Active Slide
How to Save As Images With VBA
After 10+ years of creating macros and developing add-ins, I've compiled all the hacks I wish I had known years ago!

Keep Learning

How To Run Animated GIF images in Outlook 2007, 2010, & 2013
Microsoft's more recent versions of Outlook (2007 and later) seem to not want to run GIF images inside email messages....

Chris Newman
Chris is a finance professional and Excel MVP recognized by Microsoft since 2016. With his expertise, he founded TheSpreadsheetGuru blog to help fellow Excel users, where he shares his vast creative solutions & expertise. In addition, he has developed over 7 widely-used Excel Add-ins that have been embraced by individuals and companies worldwide.
Home Blog PowerPoint Tutorials How To Save a PowerPoint Slide As a Picture
How To Save a PowerPoint Slide As a Picture
PowerPoint slides sometimes need to be saved in the form of images. This might be the case when you may be looking to extract content like maps, charts, diagrams, photos, etc. By converting PowerPoint slides to image format, you can also use them across other projects such as a blog post, research paper, official document and the like. In this post we will show you How To Save a PowerPoint Slide as a Picture .
Converting a Slide to Image Format in PowerPoint
For the purpose of this post, we will be using the Company Profile PowerPoint Template , where we have customized the slide with the SlideModel logo, title and sub-title.

Step 1: To save your slide(s) to image format, go to File-> Save As .

Step 2: You will be provided the option to pick a destination for your file. If you are using PowerPoint, you can choose to not only save your image to your computer but also to your OneDrive account.

Step 3: In the next step, choose an image format from the dialog box that pops-up. The most common image format you can pick is JPEG, however, you can also choose to save your slide in other image formats like PNG, TIFF or GIF. To save your image file, click Save to continue.

Step 4: in the prompt that follows, you can choose to either save the current slide as an image or save all slides in the presentation to your preferred image format.

The below screenshot shows a PowerPoint slide in JPEG image format. Needless to say, you can view and edit the converted images using a picture viewer and image manipulation tool.

SlideModel provides a range of Premium PowerPoint Templates which come with editable slide objects and layouts which don’t lose quality when slides are converted to image or video formats using PowerPoint. For more details, see plans and pricing.

Like this article? Please share
Image, PowerPoint 2013, PowerPoint Tips, Presentation Filed under PowerPoint Tutorials
Related Articles

Filed under PowerPoint Tutorials • May 17th, 2024
How to Add Fonts to PowerPoint
Create custom presentation slides by learning how to add new fonts in PowerPoint. Step-by-step guide.

How to Track Changes in PowerPoint
Just like with Google Slides, you can check who made adjustments to your files in collaborative work. Learn how to track changes in PowerPoint here!

Filed under PowerPoint Tutorials • March 26th, 2024
How to Translate in PowerPoint
Unlock the experience of PowerPoint translation! Learn methods, tools, and expert tips for smooth Spanish conversions. Make your presentations global.
2 Responses to “How To Save a PowerPoint Slide As a Picture”
When I save the files to JPEG the memory stick (following your instructions) it works fine on the TV Except I want the presentation to play in order Side one, two three etc But it plays them in random order
Any help? Thanks
Hi Jennifer. May I know what is the brand of your TV? It could be possible the app used in the TV have a configurable Sort by setting.
Leave a Reply
How-To Geek
How to save powerpoint objects as pictures.
If you've ever thought it would be useful to save objects or entire slides from your PowerPoint presentation as images to use in another program, then you’re in luck! You can do precisely that in a few simple steps.
Quick Links
Saving objects as images in powerpoint.
Saving an object, or even multiple objects, from your PowerPoint presentation is extremely handy. The thing that makes this trick so useful is that the objects are saved, by default, as a transparent PNG file, meaning that you won’t have the invasive background that you would otherwise have if you just took a simple screenshot.
We're going to use the following slide as an example over the next few sections. In this slide, we have a total of four objects.
- Image (“The Geek”)
- Text box (Title)
- Text box (Subtitle)
- Shape (Line)
Save a Single Object as an Image
To save an object as an image, we first need to select the object to be saved. In this example, we’ll select our title.
Right-click the object and select “Save as Picture” from the menu that appears.
Next, rename your file, select the file type you’d like to use, and then click “Save.”
Your object is now saved as an image! Pretty neat, right? Now, you may be wondering why you’d ever need to do this, and understandably so. As we mentioned before, the real benefit is when you want to save multiple objects from a slide as a single image.
Save Multiple Objects as a Single Image
Let’s head back to our example slide to see how it’s done.
First, we need to select the objects we want to save as an image. To select multiple objects in a slide, hold the Ctrl key while clicking each object. In this example slide, we have four objects, and we are going to select all four.
From here, the process of saving the objects as images is the same as before. Right-click any of the selected objects, select “Save as Picture” from the menu, give the file a name, select a file type, and then click “Save.” Now you have a single image of all the selected objects!
As an example, let’s see what the image looks like when it’s used in Word.
This works well if you don’t want the background of the PowerPoint slide in the image, but in the case that you do, you can simply save the entire slide as an image.
Save an Entire Slide as an Image
In “Normal View” mode, select the slide you want to save as an image from the left pane. We’ll select slide 1 in this example.
Now, select the “File” tab.
Click “Save As.”
Select the location you’d like to save the file, name your file, and then select the image file type. In this example, we’ll select .png format.
Once you’re ready, go ahead and click “Save” and a new window will appear. Here, you can choose to save all slides or just the one that you’ve selected as an image. We’ll choose “Just This One.”
Now your selected slide is saved as an image! Here’s an example of what it would look like if we were to insert it in Word.
Regardless of where you want to use the image, this method will keep your image looking clean and professional.
- I Tried Both: Apple Watch 9 vs Fitbit Charge 6
- Best Places to Print Photos Online
Create Pictures From PowerPoint Slides
Turn individual PowerPoint slides or entire decks into image files
- Brock University
:max_bytes(150000):strip_icc():format(webp)/jonfishersquare-93eb80e77a004035887f56816d3623c5.jpg "powerpoint download slide as image")
- Wichita Technical Institute
What to Know
- Select the slide you want to save as an image, then go to File > Save As (PC) or File > Export (Mac).
- Choose a location and file name, then select Save As Type and choose an image format (GIF, JPEG, PNG, TIFF, BMP, or WMF).
- Save the slide then export it.
This article explains how to save a PowerPoint slide as an image so you can view it in any image viewer or import it into your documents and spreadsheets. Instructions apply to PowerPoint 2019, 2016, 2013, 2010; PowerPoint for Microsoft 365, PowerPoint Online, and PowerPoint for Microsoft 365 for Mac, PowerPoint 2019 for Mac, and PowerPoint 2016 for Mac.
Choose an Image Format for the PowerPoint Slides
To export PowerPoint slides to images, all you have to do is select the slide and select an image format. Save just one slide to an image or make several images by saving each individual slide to a different image file.
To save PowerPoint slides as pictures:
Before you convert slides to images, save your PowerPoint presentation to the PPTX or PPT format so you don't lose your work.
Select the slide you want to save as an image. If you want to convert all the slides to images, select any slide.
Select File > Save As . In PowerPoint for Mac, select File > Export .
Choose the location where you want to save the file and enter a name for the image file.
Select the Save as type down arrow to display a list of file formats. By default, PowerPoint Presentation (*.pptx) appears in the text box. On Mac, use the menu next to File Format.
Select the image format you wish to save your presentation. Choose either GIF, JPEG, PNG, TIFF, BMP, or WMF.
Select Save . In PowerPoint for Mac, choose either Save Every Slide or Save Current Slide Only , then select Export .
Choose whether you want to export All Slides or Just This One .
The slide is saved in the selected file format.
If you convert more than one PowerPoint slide to separate image files, a new folder is created in the destination folder. This new folder uses the same name as the presentation. If you haven't saved the PowerPoint file, your exported slide images are saved in a folder with a default name, for example Presentation1.
To save a slide as an image in PowerPoint Online, select File > Download As > Download as Images . The image files are saved in a ZIP file that is downloaded to your computer.
Get the Latest Tech News Delivered Every Day
- How to Convert PowerPoint to Video
- How to Print PowerPoint Slides
- What Is a PPTX File?
- Create a Default Presentation Template in PowerPoint
- How to Save PowerPoint Presentations as PDF Files
- Insert a Picture Inside Text on a PowerPoint Slide
- How to Add PowerPoint Slides Into a Word Document
- How to Insert PDF Files Into PowerPoint Presentations
- How to Print PowerPoint Slides With Notes
- Add, Delete or Change the Order of PowerPoint Slides
- Print Slides From a PowerPoint Show File for PC
- How to Add Music to PowerPoint
- What Is a PPTM File?
- 10 Best Free Image Converter Software Programs
- How to Use Portrait and Landscape Slides in the Same Presentation
- How to Make a Slideshow on PowerPoint
How to save a PowerPoint slide as an image for sharing.

Learn how to export PPT files into easily shareable images with three simple methods.
Why learn how to save PowerPoint slides as image files? PowerPoint is a great tool for giving presentations, but its PPT files can be challenging to share. Since you need PowerPoint to open them, viewing PPT files on some devices can be difficult or impossible.
One way to share PowerPoint presentations is to turn the slides into image files. Read on to learn how to export PowerPoint slides as image files — and why you should share them as PDFs instead.
Why save as PDF instead of exporting a PowerPoint slide as an image file?
You may want to export a PowerPoint slide as a PDF rather than an image because PDF files are one of the most universally viewable and presentable file types. PDF files typically take up less storage space than image files as well. Depending on your needs, you may want to convert your PowerPoint slide to an image.
Options for how to save a PPT slide as an image.
There are a few different ways you can save a PowerPoint slide as an image. You can export a single slide, export the full presentation, or convert the PowerPoint to a PDF to export the slide as an image. Read on for instructions for each option.
Option 1: Export single slide to save slide as image.
Exporting single embedded images from a PPT file is easy. Follow these steps:
- Open the PPT file in PowerPoint.
- Right-click on an image and select Save As Picture.
- Set the image format and select Save.
- To save the original image, select the small arrow next to Save and then Save Original Picture.
Although this method works well, it can get cumbersome if you need to save multiple images — plus, you won’t have control over image dimensions.
Here is how to save a PowerPoint slide as a JPEG:
- Select File > Export and choose JPEG from the dropdown menu.
- Choose if you want to export the entire presentation or just the current selected slide, and then set your desired dimensions.
Option 2: Export full presentation to save PowerPoint slide as image.
You can also export entire slides as images directly from PowerPoint. Here’s what to do:
- Open the PPT file and select File > Save As.
- In the Save As window, select an image format from the Save As Type dropdown list.
- Select All Slides to export the entire PPT file or Just This One to export the selected slide.
Option 3: Convert PPT to PDF to export PowerPoint slide as image.
The easiest way to share a PPT file is to convert it to a PDF document. You can do it with Adobe Acrobat online services. Simply navigate to the Convert PPT to PDF tool , drag and drop a PPT file into the converter, and download the converted file.
PDF files work with all devices, so sharing them is easy. But you can also further convert the PDF to high-resolution images. If you’d like a quicker way, you can use our tool to convert PPT to PDF seamlessly.
How to save a PowerPoint slide as an image with notes.
What if you have notes on your PowerPoint slides? If you do it the correct way, you can save a slide as an image with the notes. Go to File, Print, then choose Show Details. From the dropdown menu, choose Notes. Choose Save as PDF, then click Save.
To learn more, visit our guide: How to save a PPT with notes as PDF .
Can I export high-resolution images from PowerPoint?
Unfortunately, PowerPoint exports slides as low-resolution images. Changing the resolution requires complex and potentially risky editing of PowerPoint registry values. By exporting to a PDF you can maintain the quality of the images in the PowerPoint.
Potential issues when you export a PowerPoint slide as an image.
When you export a PowerPoint slide as an image, the resolution is lowered. Not only do you lose image quality, but image files can take up more storage space on your computer, leaving less room for new projects.
Additional ways to work with presentation slides.
For all your document needs, use the Acrobat suite of tools to create and collaborate from anywhere on any device. If you have other presentation files or apps you need to work with after learning how to save an image from PowerPoint, these resources may be helpful:
- Delete a slide in PowerPoint .
- Insert a PDF into PowerPoint .
- Convert PowerPoint to Word .
- Also use Google Slides? Convert Slides to PPT .
Explore what more you can do with Acrobat online services to convert and edit PDFs.
How to Export High-Resolution Images from PowerPoint
Yousef "yoyo" abu ghaidah.
- July 16, 2019
- 65 Comments
So, you've designed some awesome slides. Now you want to see how to export those slides as images, and want to make sure that they come out looking great.
Don't worry, I got you covered.
Today, we're going to configure your PowerPoint software (no matter what version it is) so that we can only export high-resolution images (or, as they're most commonly known, 'high-quality images').
VIDEO TUTORIAL
How You Can Export HD Images in PowerPoint
Having trouble? Don't worry, I have a section in this post that'll help you !
Let's Explain This Just a Little More
By default, when you save your PowerPoint slides as an image , it comes out pretty crappy. There's a reason for this.
PowerPoint is configured to export images at 96 Dots Per Inch (or DPI). This forces your pictures to be exported at awful resolutions like 960×720 or 1280×720. And these awful resolutions are what lead to your ugly pictures.
But don't worry.
What we are going to do is configure PowerPoint to export images at 300 DPI instead. This way, PowerPoint will export only high-resolution images. We're talking resolutions like 3000×2250 or 4000×2250!
Why High-Resolution Images Matter
When it comes to image quality, you have to use high-resolution images. They're bright, crisp, and bursting with color.
On the other hand, a low-resolution image will lead to your slides turning out blurry, grainy and pixelated.
So, unless you want to look unprofessional , there's absolutely no reason for you to export low-resolution images.
The Drawback to Exporting HD Images
Keep in mind there is a caveat when you're exporting crystal clear images, and it's this: The higher an image's resolution is, the bulkier the total file size will be.
Therefore, It's important to be aware of how much space your pictures are taking up just in case you plan on doing something with them later (like sending them to somebody via email and going over the file size limit).
The Tutorial's Easy, but a Little Technical
Although this video tutorial is straightforward, you may run into a few issues if you're not technically savvy. As such, it's imperative that you follow every single step I make on the video shown above .
For convenience's sake, the file directory listed in the video tutorial is this:
HKEY_CURRENT_USER\Software\Microsoft\Office\[16.0 or 15.0 or 14.0 or 12.0 or 11.0 depending on the software you have]\PowerPoint\Options
Having Issues?
"i'm a mac user, so how can i do this on my device".
There's another technique you can follow if you're on a Mac, but you have to be using Mac's version of Office 365 (or at least PowerPoint 2016 and beyond). If you are, read on. If you're not, then I'm sorry, I think you're out of luck.
When using Office 365's version of PowerPoint on a Mac, you can set the size of the image file by typing in the image size -- say 1920x1080 -- in the export menu window. Do that and you're golden.
"I don't see an Office folder under Microsoft when I'm looking at my Registry Editor. What do I do now?"
Good question. I've done some research and found that this is usually the case when users bought a device with Microsoft Office already pre-installed, particularly with Office 365.
As far as I know, the only solution around this is to reset your registry settings. But don't worry, Microsoft has an easy guide and fix for that . Yes, it's a Word guide, but it still works.
Once you've done that, go back and do the same steps I did. It should work for you then.
"I've done everything you've done in the video and it doesn't work."
It's more than likely that you made a typo along the way. Just follow the instructions again and see if it works.
"I've redone everything and it STILL doesn't work"
If you feel you've done EVERYTHING right and still aren't seeing results, then try reinstalling your software.
If that doesn't work, then I encourage you to contact Microsoft because something's off.
Check out Microsoft's tutorial on how to do everything explained in this post right here .

This site is absolutely fabulous!
Keep up the great work guyz.
Thank you so much!
Thank you, Domingo!
Thank you so much for this. You are a lifesaver! 🙂
My pleasure, Nikki!
Hello, I can’t find the menu “options”. I use Office 365. PLEASE I need help right now to finish my thesis, THANKS
That’s strange – have you followed the video guide to the letter?
This is a life saver!! thank you so much!
Happy to help!
Muito obrigada ajudou muito!! From Brazil
You’re welcome!
Awesome! Thank you, Yoyo!
Hi, how do you “save as picture” at 300 dpi?
Howdy! Did you follow the video guide?
Great work! I didn’t know you could do this with PowerPoint. You just saved me from a lot of low-res aggravation!
Happy to help Jon!
thank you soooooooo much!!!!
Hi! I have a question…I have Windows 10 and the current version of Powerpoint, but once I got to the “Office” folder stage, I could not continue with your instructions–my “Office” folder only contains three folders: Common, Outlook, and Word…none of which contains numbered folders like yours does. There is actually NO Powerpoint folder anywhere in my “Microsoft” folder; it’s weird. Is there a reason for this or another way to continue with your instructions? Thanks!
Good question. It sounds like your registry settings need to be reset. I linked a guide towards the bottom of the post to help you do that. Did you check that out?
This only works when you save the entire slide as image but what if you want to save a group of elements as picture (after selecting all elements, right click and then “save as picture”)?
I’m not sure there’s a way PowerPoint can do that, to be honest. But you could try bringing those grouped elements into a new slide and take it from there?
I have Office 365. When I click on your link, “Microsoft has an easy guide and fix for that”, it opens a new tab that is the EXACT same article: “How to Export High-Resolution Images from PowerPoint”.
Please help.
Hey there and thanks for the heads up! The link’s been updated!
what should i do now that my powerpoint is 2019? which folder should i use?
Hey Amir, It should still be 16.0.
Awesome! Thanks!!
Ah this was an awesome help YO YO thank you!
Happy to help! 🙂
Thank you very much!
Brilliant! Thank you Yoyo!
thanks! you just made me trow PS to the recicle bin (im an architect and i love to edit my views on PP) the final quality of .jpg was my ultimate downside of PP till now
No problem!
how do i get an imaged saved at high res and not the slide or have the slide with no background?
I’m suffering the same issue: the regedit trick works for saving the whole presentation or slides as images, but not for a specific object or group of objects. I mean a part of the slide. In those cases, after digging deeply in the web, the only two options are: a) right click on your group, save image as, and the image will be 150 ppi. No way to fix this. b) with the regedit trick, save the whole slide as image, then you’ll get a large image at 300 ppi. Open this image with photoshop or other image editor and crop the slide to the dimmensions of your group. What you’ll get is an image with twice the resolution (i.e. 300 ppi), and consecuently twice the horizontal pixel number.
After over an hour arguing with Photoshop this was amazing!
I’m glad!
Just want to say thanks for this! I am not techy at all but was able to follow your instructions. Image looks worlds better!
I have a subscription to Office 365, so when I open the Office 16.0 folder, there is not PowerPoint folder. Help?
I just used folder 16.0 for Office 365 and it worked perfectly. Even tried to increase the resolution to 600dpi, since I had designed a photo collage I wanted to export and print – beautiful!
Thank you for the great how-to guide!
I believe I had preinstalled Microsoft as you described. I followed your link to Microsoft’s “easy fix” but the download link they provided at the start of the article does not work and comes up with an error. How can I reset the registry settings so that I can follow your method? Is there any other way?
Hey Hasan. Could you try getting in touch with Microsoft to see what’s going on?
Hi, I have tried this and I happen to not have the “Office” Folder. How do I go about it ?
Excellent, it worked just great and my pictures look so much better, thanks a lot man!
With PPT for Mac you can actually choose the outpt resolution in the save box, why the PC version doesn’t have this is beyond belief
Thank you for this awesome tutorial! now can you please show us how to do the same thing with saving a group of objects a picture in high resolution? Meaning.. when you rightclick on a group of objects and click “save as Picture”.. would like it to save HIGH RESOLUTION! Thanks so much!
Thank you so much! I am a teacher and digital content creator. This saved me so much time and frustration!
like your little under the rock joke buddy. Got me living in friggin buckingham palace now 😛
These instructions are wonderful, but I don’t have any numbered folders to choose from, even the reset guide you recommend shows the numbered folders – do you have any suggestions?
Very useful presentation. I need to convert my entire presentation to pdf to distribute to participants. Would this tip help or is there another way?
Unfortunately, I don’t think this tip would help with PDFs :(.
It’s fantastic! You’re a really good teacher! 🙂
Thanks a lot Yousef, your tutorial solve my problem
can you type bigger value other than 300 for more high quality ? lke 600 or 500 ?? is it possible?
Hi! Unfortunately, no. 300 is the cap.
hi trying to change the dpi , i dont have the option folder . i have power point 2019.
Hello, I followed the same path but I’m not able to see PowerPoint option after Microsoft >>Office >>16.0 What I’m supposed to do? I only see Outlook there. Please help! It’s urgent. Many thanks.
Thank you – I did it!!! (I’m not very good at this sort of thing and the calm, clear instructions were fab, thanks)
Hi, great tutorial. Not true for me, I typed 600 and I got an even better resolution. Thanks.
Yaaaay thank you for this super clear tutorial, I’d been pulling my hair out all afternoon about this 🙂
Thank you! That’s really helpful!
Wow. This worked. It looks better! Thanks for the clear, quick step-by-step and for showing me a corner of my computer I’d never been to. 🙂
Got a project for us?
© Slide Cow. All rights reserved.
Session expired
Please log in again. The login page will open in a new tab. After logging in you can close it and return to this page.
- PRO Courses Guides New Tech Help Pro Expert Videos About wikiHow Pro Upgrade Sign In
- EDIT Edit this Article
- EXPLORE Tech Help Pro About Us Random Article Quizzes Request a New Article Community Dashboard This Or That Game Popular Categories Arts and Entertainment Artwork Books Movies Computers and Electronics Computers Phone Skills Technology Hacks Health Men's Health Mental Health Women's Health Relationships Dating Love Relationship Issues Hobbies and Crafts Crafts Drawing Games Education & Communication Communication Skills Personal Development Studying Personal Care and Style Fashion Hair Care Personal Hygiene Youth Personal Care School Stuff Dating All Categories Arts and Entertainment Finance and Business Home and Garden Relationship Quizzes Cars & Other Vehicles Food and Entertaining Personal Care and Style Sports and Fitness Computers and Electronics Health Pets and Animals Travel Education & Communication Hobbies and Crafts Philosophy and Religion Work World Family Life Holidays and Traditions Relationships Youth
- Browse Articles
- Learn Something New
- Quizzes Hot
- This Or That Game
- Train Your Brain
- Explore More
- Support wikiHow
- About wikiHow
- Log in / Sign up
- Computers and Electronics
- Presentation Software
- PowerPoint Presentations
How to Save Your PowerPoint Slides As High Resolution Images
Last Updated: March 11, 2019
wikiHow is a “wiki,” similar to Wikipedia, which means that many of our articles are co-written by multiple authors. To create this article, 9 people, some anonymous, worked to edit and improve it over time. This article has been viewed 27,906 times. Learn more...
When saving the PowerPoint slides as regular images, you lose quality in both text and visuals and your slides will not look as good as before. This wikiHow will teach you how to reconfigure your PowerPoint settings to always save your slides as a high-resolution image.
Adjusting Your PowerPoint Settings

- Depending on the version of Office that you have installed (and are using), you have to open 14.0 for Microsoft Office version 2010, 15.0 for Microsoft Office version 2013 or 16.0 for Microsoft Office version 2016. Those are the internal version numbers as Microsoft have set them. This article uses Microsoft Office 2016, opening the 16.0 node or folder.

- 4 Name this new entry ExportBitmapResolution and hit ↵ Enter .

Saving the File

Expert Q&A
You might also like.

About This Article
- Send fan mail to authors
Is this article up to date?

Featured Articles

Trending Articles

Watch Articles

- Terms of Use
- Privacy Policy
- Do Not Sell or Share My Info
- Not Selling Info
wikiHow Tech Help Pro:
Level up your tech skills and stay ahead of the curve
Blog > How to export high resolution images from PowerPoint
How to export high resolution images from PowerPoint
07.10.20 • #powerpoint #tip #export.
Unfortunately PowerPoint can only save slides as images at 96dpi by default. This is too little if you want to print your slides (300dpi is required here) or share them in high quality. However, with this little trick, you can increase the export resolution in Microsoft PowerPoint and thus save images of your slides with up to 1000dpi.
The process consists of two parts:
- Using the system registry to change the default resolution setting for exported slides
- Save the slide as an image with the new resolution
The first step is a bit more complicated and dives deeper into the system registration, but we will help you and support you at every step with images!
Step 1: Change the export resolution setting
By default, the export resolution of a PowerPoint slide is 96 dots per inch (dpi) . To increase the resolution, follow these steps:
Note: Carry out the following steps carefully and calmly. If you change the registry incorrectly, you may experience problems!
- Right click on the Start button at the bottom left and then choose Run .

- Enter regedit in the text field, then click on OK .

- Now a control window appears, where you have to confirm that changes can be made. To do this, click on Yes .
Computer\HKEY_CURRENT_USER\Software\Microsoft\Office\16.0\PowerPoint\Options
Computer\HKEY_CURRENT_USER\Software\Microsoft\Office\15.0\PowerPoint\Options
Computer\HKEY_CURRENT_USER\Software\Microsoft\Office\14.0\PowerPoint\Options
Computer\HKEY_CURRENT_USER\Software\Microsoft\Office\12.0\PowerPoint\Options
Computer\HKEY_CURRENT_USER\Software\Microsoft\Office\11.0\PowerPoint\Options

- Now click on the folder Options , choose Edit > New in the menu bar and then click on DWORD value (32-bit) .

- Enter ExportBitmapResolution in the text field and press Enter.

- Make sure that ExportBitmapResolution entry is selected, then click on Modify in the Edit menu.

Search for the desired resolution, e.g. 3000x2250, from the following table and enter the corresponding decimal value (e.g. 300) in the opened window.

Theoretically you can enter even higher values up to 1000dpi (but only if you use PowerPoint 2013 or later).
- Save the setting with OK .
- Finally, close the window.
Step 2: Export slides as images
- In PowerPoint, open your presentation and then select the slide you want to export.

- Go to the File tab.
- Now select Save As .

- JPEG File Interchange Format (* .jpg)
- PNG Portable Network Graphics Format (* .png)
- GIF Graphics Interchange Format (.gif)
- Device Independent Bitmap (* .bmp)
- TIFF Tag Image File Format (* .tif)

- Select Save . The following dialog box appears:

You can now decide whether you want to export only a specific or all slides of your presentation. The slide will be saved in the selected format and resolution in the location you have just specified.
Can you change the DPI (resolution) of exported PowerPoint slides?
Yes you can. However, it's not possible within PowerPoint itself, you need to change a value in the Windows registry. Check this blog post to learn how to change the PowerPoint export resolution .
How to export PowerPoint slides as high resolution images?
You must first change a value in the Windows registry to change the export resolution. How you can do this you can read in our tutorial. Then go to "Save as" in the "File" tab and select a suitable image format in the file type field.
Related articles
About the author.

Philipp Angerer
Philipp is a creative supporter at SlideLizard in marketing and design. There he uses his imagination and provides creative freshness, also in blog articles.

Get 1 Month for free!
Do you want to make your presentations more interactive.
With SlideLizard you can engage your audience with live polls, questions and feedback . Directly within your PowerPoint Presentation. Learn more
Top blog articles More posts

15 Creative Ideas to make your virtual Christmas Party successful

Common mistakes in PowerPoint and what makes a bad presentation

Get started with Live Polls, Q&A and slides
for your PowerPoint Presentations
The big SlideLizard presentation glossary
Learning chunk.
Learning Chunk means, like Microlearning, learning in small quantities. The learning content is really small and can be absorbed quickly.
Flipped Classroom
Flipped Classroom means that students work out the subject matter themselves at home through tasks such as reading, videos, etc. Interactive learning activities and exercises then take place in class.
External Communication
External communication is the exchange of information between two organisations. For example, it can be an exchange with customers, clients or traders. Feedback from a customer also counts as external communication.
Be the first to know!
The latest SlideLizard news, articles, and resources, sent straight to your inbox.
- or follow us on -
We use cookies to personalize content and analyze traffic to our website. You can choose to accept only cookies that are necessary for the website to function or to also allow tracking cookies. For more information, please see our privacy policy .
Cookie Settings
Necessary cookies are required for the proper functioning of the website. These cookies ensure basic functionalities and security features of the website.
Analytical cookies are used to understand how visitors interact with the website. These cookies help provide information about the number of visitors, etc.
We explain and teach technology, solve tech problems and help you make gadget buying decisions.
3 Best Ways to Extract Images From a PowerPoint Presentation

Pankil is a Civil Engineer turned freelance writer. Since his arrival at Guiding Tech in 2021, he delves into the world of how-tos, and troubleshooting guides for Android, iOS, and Windows. Besides his new-found love for mechanical keyboards, he's a disciplined footfall fan and loves international travel with his wife.
When you create a PowerPoint presentation, you’re likely to add images to enhance the visual appeal and convey information effectively. But what if you want to save those carefully chosen images for later use? Fortunately, there are several ways to extract images from your PowerPoint presentation.

Whether you want to extract just one or two images from your PowerPoint file or all of them, saving images from your presentation is fairly straightforward. This guide will walk you through three different methods to achieve this. So, let’s get right to it.
1. Use the ‘Save as Picture’ Option
The ‘Save as Picture’ option is the quickest way to extract an image from a PowerPoint file. This method is useful if you only want to save one or two images from your PowerPoint presentation. Here are the steps for the same.
Step 1: Launch PowerPoint on your PC and open the PPT from which you want to save images.
Step 2: Locate and select the image you want to extract. Right-click on it and choose the ‘Save as Picture’ option from the context menu.

Step 3: In the Save As Picture dialog, specify where you want to save the image. Then, click the drop-down menu next to Save as type to select your preferred file format for the image.

Step 4: Click the arrow next to the Save button and select ‘Save Original Picture’ to export the high-resolution image.

You can repeat the above steps to extract more images if you like.
Alternatively, if you want to use the image in another program on your PC, right-click on the image in your presentation and select Copy. After that, move to the program where you want to use the file and press Control + V keyboard shortcut to paste the image.

2. Save the PowerPoint Slides as Images
While the ‘Save as Picture’ option makes it easy to save images from your PowerPoint file, it’s not the most efficient method if you are looking to extract all the images from your PowerPoint presentation. In that case, it’s better to save your PowerPoint slides as images (in JPEG or PNG format ) using the steps below.
Step 1: Open the PowerPoint file from which you want to save images.
Step 2: Click the File menu at the top-left corner.

Step 3: Select Save As from the left pane. Then, click the Browse button.

Step 4: Click the drop-down menu next to Save as type to select ‘JPEG File Interchangeable Format’ or ‘PNG Portable Network Graphics Format’ from the list.

Step 5: Click the Save button.

Step 6: Select All Slides when the prompt appears.

After you complete the above steps, all the images within your presentation will be saved separately in the specified location.
3. Add a ZIP Extension to the Presentation File and Extract It
Another way to save all the images from a PowerPoint file simultaneously involves converting the presentation into a ZIP file and then extracting the file on your computer . This method allows you to save all of the images in your presentation in their original format. Here are the steps you can follow.
Step 1: Press the Windows key + E keyboard shortcut to open File Explorer and locate the PowerPoint from which you want to save images.
Step 2: Right-click on your file and select the rename option.

Step 3: Replace the PPTX or PPTM extension with the ZIP extension. Select Yes when the confirmation prompt appears.

Step 4: Right-click on the renamed file and select Extract All.

Step 5: Use the Browse button to select a location where you want to extract the file and click on Extract.

Step 6: Navigate to the folder where you extracted the ZIP file and double-click the ‘ppt’ folder.

Step 7: Double-click the ‘media’ folder to view all the images extracted from your presentation in their original format.

Step 8: Once you have all the images, you can rename the ZIP file and add the PPTX or PPTM extension to recover your original presentation.

Saving the Heart of Your Presentation
PowerPoint presentations are excellent for sharing information and ideas. Sometimes, you only need the images from a presentation, not the entire thing. Fortunately, extracting images from your PowerPoint presentation is rather simple using the methods mentioned above.
Was this helpful?
Last updated on 04 August, 2023
The above article may contain affiliate links which help support Guiding Tech. However, it does not affect our editorial integrity. The content remains unbiased and authentic.
Leave a Reply Cancel reply
Your email address will not be published. Required fields are marked *
The article above may contain affiliate links which help support Guiding Tech. The content remains unbiased and authentic and will never affect our editorial integrity.
DID YOU KNOW

Pankil Shah
More in windows.

How to Add iCloud to File Explorer on Windows 10

Top 7 Ways to Fix Microsoft To Do App Not Syncing on Windows
Join the newsletter.
Get Guiding Tech articles delivered to your inbox.
How to Save Your PowerPoint Slides As High Resolution Images

Do you want to save your PowerPoint slides as high-quality images that you can print or use in other applications? By default, PowerPoint exports slides at only 96 dots per inch (dpi), resulting in low-resolution, pixelated images. However, with a few simple tweaks, you can configure PowerPoint to export your slides at up to 600 dpi for beautifully crisp images.
In this step-by-step guide, you’ll learn how to save your PowerPoint slides as high-resolution JPEG, PNG, TIFF, or other image formats on both Windows and Mac operating systems.
Prerequisites
Before we get started, make sure you have the following:
- The latest version of Microsoft PowerPoint installed on your Windows or Mac computer
- The PowerPoint presentation file containing the slides you want to export as images
- Administrator access to your computer (for editing registry settings on Windows)
Step 1: Change Export Resolution (Windows)
On Windows, you’ll need to modify the registry settings to increase the default export resolution.
🚨 Be very careful when editing the registry as errors can prevent PowerPoint or Windows from working properly. It’s a good idea to back up the registry first.
Here are the steps:
- Exit all Windows programs
- Type “regedit” into the Run prompt and click OK
- Navigate to HKEY_CURRENT_USER\Software\Microsoft\Office\16.0\PowerPoint\Options (version number may differ)
- Right click on empty space and create a new DWORD (32-bit) Value called ExportBitmapResolution
- Right click on the new value, select Modify, and enter 600 as the Value Data
- Click OK and close the Registry Editor
You have now configured PowerPoint to use 600 dpi for image exports.
Step 2: Change Export Options (Mac)
For Mac users, changing the registry is not required. You can set PowerPoint to use high fidelity images:
- Open PowerPoint and select File > Options
- Click Advanced in the left sidebar
- Under Image Size and Quality , check the box for Do not compress images in file
- For Default resolution , choose High fidelity from the dropdown menu
- Click OK to save the changes
Step 3: Export Slides as Images
Now when you save your slides as JPEG, PNG, or other image formats, they will export at high resolution instead of the default 96 dpi.
To export a slide:
- Open your PowerPoint presentation and select the slide you want to export
- Click File > Save As
- In the dropdown menu, pick an image format like JPEG, PNG, TIFF, etc.
- Change the Save as type dropdown to the desired image format
- Give the image file a name and export location
Repeat this process for all slides you want to export. The images will now have a high resolution of 600 dpi (Windows) or high fidelity (Mac).
Custom Image Size
When exporting slides, you can also customize the pixel dimensions of the exported images:
- In the Save As dialog box, click on Tools in the bottom right
- Choose custom Width and Height values in pixels
- Click OK to save the custom size
This allows you to export your PowerPoint slides at both high resolution AND precise pixel dimensions for use in printing or other software.
Step 4: Use High Resolution Exports
Your PowerPoint slides are now exported as beautiful high resolution JPEG, PNG, or TIFF images. Here are some ways you can use them:
- Print slides as large posters or banners without losing quality
- Extract slide images for use in Word documents, websites, photo albums, etc.
- Upload or share high res slide images with others
- Further edit images in graphic design and photo editing software
The high resolution exports maintain all the quality, clarity, and colors of your original PowerPoint slides. Text and shapes will be crisp instead of pixelated.
You now have the knowledge to export stunning high resolution versions of your PowerPoint slides!
Troubleshooting
Images still exporting low resolution? Double check that you followed each step correctly. On Windows, verify that the registry change was made properly. On Mac, confirm high fidelity is selected in PowerPoint export options.
Large file sizes? High resolution images come with larger file sizes. Use JPEG compression or reduce pixel dimensions if needed.
Text or shapes pixelated? Make sure you are working with high resolution source images and vectors within PowerPoint. Low quality elements will remain degraded.
Other issues? For additional troubleshooting, search for help articles on PowerPoint image export online or ask the community in forums.
Exporting PowerPoint slides as high quality images takes just a few simple tweaks to the export settings. By increasing the resolution and fidelity, your images will be crisp, clear, and ready for printing and editing.
Whether you want to create banners, enhance documents, share over the web, or work with design software, this guide has you covered to export slides properly. Supercharge your PowerPoint image exports today!
About The Author
Vegaslide staff, related posts.

How To Add Live Web Pages To A PowerPoint Slide

How to Convert an Image Background to Transparent in PowerPoint

How to Create a Mind Map With PowerPoint

Easy Ways to Export Canva to PowerPoint

Free All-in-One Office Suite with PDF Editor
Edit Word, Excel, and PPT for FREE.
Read, edit, and convert PDFs with the powerful PDF toolkit.
Microsoft-like interface, easy to use.
Windows • MacOS • Linux • iOS • Android

- Articles of PPT
How to Export PowerPoint Slide as a Picture [Step-by-Step Guideline]
Microsoft PowerPoint is renowned for its ability to craft captivating presentations. Sometimes, the need arises to extract slides as images. This guide addresses this concern and presents a definitive approach to exporting PowerPoint slides as pictures.
Part 1 How to Export PowerPoint Slide as Image
Exporting PowerPoint slides as images opens a world of possibilities for preserving your presentation's visual allure. In this section, we'll guide you through a step-by-step process that ensures your content is captured in vibrant detail. Whether you're looking to share specific slides or transform your entire presentation into a visual masterpiece, these instructions will empower you to create stunning images with ease.
Step 1: Select Your Desired Slide Begin by opening your PowerPoint presentation. Choose the slide you wish to export as an image. This could be a single slide or a range of slides, depending on your requirement.
Step 2: Access the "Save As" Option Navigate to the upper-left corner and click on the "File" tab. A drop-down menu will appear. Select the "Save As" option from the list.
Step 3: Choose the Image Format Upon selecting "Save As," a window will pop up. In this window, you can specify the location where you want to save the image. Below the location bar, you'll find a dropdown menu labeled "Save as type." Click on this dropdown menu to reveal a list of available formats. Choose your preferred image format, such as JPEG or PNG.
Step 4: Optimize Image Quality Before finalizing the export, take a moment to optimize the image quality. Many formats offer different quality options. Choose the option that best suits your needs, balancing image clarity and file size.
Step 5: Save Your Image Once you've selected the format and quality settings, click the "Save" button. Your PowerPoint slide will now be saved as a high-quality image at the specified location.
By following these straightforward steps, you can effortlessly transform your PowerPoint content into eye-catching images, perfect for sharing, printing, or incorporating into various projects.
Part 2. Steps to Save PowerPoint as Pictures
Unlock the art of extracting PowerPoint content as images in this comprehensive guide. Sometimes, isolating individual elements or entire slides is essential to communicate your message effectively. Discover how to seamlessly save single objects, multiple objects, or even entire slides as images. Our step-by-step instructions, accompanied by illustrative examples, will empower you to navigate this process effortlessly. Whether it's for archival purposes, sharing on social media, or enhancing your design portfolio, you'll emerge equipped with the skills to harness the visual potential of your PowerPoint presentations.
1. Save a Single Object
When working on your PowerPoint presentation, you might find a single element, be it an image or a shape, that deserves standalone attention. In this method, we'll show you how to extract and save that individual object as an image. By following these steps, you can highlight the essence of a specific element and use it effectively in various contexts.
Step 1: Select the Object Open your PowerPoint presentation and go to the slide containing the object you want to save.
Step 2: Right-Click and Save Right-click on the object, such as an image or shape. From the context menu, choose "Save as Picture."
Step 3: Choose Format A window will appear allowing you to choose the image format (JPEG, PNG, etc.). Select your preferred format.
Step 4: Specify Location Select the destination where you want to save the image, then click "Save."
2. Save Multiple Objects
Sometimes, a collection of objects on a slide is worth preserving as distinct images. This method allows you to select multiple elements and transform them into separate images. Whether it's a combination of graphics, icons, or charts, this technique ensures that each component shines on its own, offering versatility in your visual communication.
Step 1: Multi-Select Objects Hold down the Ctrl key and click on the various objects you want to save as images.
Step 2: Right-Click and Save Right-click on any of the selected objects and choose "Save as Picture."
Step 3: Format and Save Follow the same process as in Step 3 and 4 above to select the format and save your images.
3. Save an Entire Slide
Entire slides can encapsulate a complete concept or story within your presentation. Saving an entire slide as an image grants you the ability to share or showcase the entirety of your content effortlessly. This method is ideal when you want to maintain the overall design, layout, and context of a slide, preserving its visual integrity in a single image.
Step 1: Choose Slide Open your presentation and pick the slide you want to save.
Step 2: Save As Picture Go to the "File" menu, select "Save As," then choose "PNG" or another image format.
Step 3: Save Specify the location and save your slide as an image.
With these straightforward steps, you'll be able to save specific objects, multiple objects, or entire slides from your PowerPoint presentation as images. This flexibility empowers you to tailor your visuals for various needs and projects.
Use Word, Excel, and PPT for FREE, No Ads.
Microsoft-like interface. Easy to learn. 100% Compatibility.
Boost your professional productivity by 10x with WPS's abundant free PPT templates.
Part 3. Best Free Office Suite: WPS Office
WPS Office stands as a prominent player in the realm of office suites, offering a robust set of tools to elevate your document creation and presentation endeavors. With an emphasis on accessibility and innovation, WPS Office presents a compelling option for both individual users and collaborative teams.
At the core of WPS Office are its three main components: Writer, Presentation, and Spreadsheets. These components mirror the functionalities of Microsoft Word, PowerPoint, and Excel, respectively. With a user-friendly interface and a seamless learning curve, WPS Office empowers users to effortlessly draft documents, design presentations, and organize data.
AI Function: What sets WPS Office apart is its integration of artificial intelligence. This AI function enhances your workflow by providing real-time grammar and style suggestions, helping you refine your content with precision. This feature ensures that your documents not only convey your ideas effectively but also resonate with impeccable clarity and professionalism.
Emphasis on Free Features: A standout aspect of WPS Office is its commitment to offering a significant portion of its features for free. Users can access essential tools without the burden of subscription costs, making it an attractive option for budget-conscious individuals and organizations.
How to Export PPT to Image in WPS:
Exporting PowerPoint presentations as images within WPS Office is a simple and efficient process. Follow these steps to accomplish this task seamlessly:
Step 1: Open WPS Presentation Launch WPS Office and open the Presentation component.
Step 2: Select the Desired Presentation Choose the presentation file that you wish to export as images.
Step 3: Access Export Options Navigate to the menu and click on "Export to Picture."
Step 4: Choose Image Format In the export menu, select the image format of your choice (JPEG, PNG, etc.).
Step 5: Specify Export Location Indicate the destination folder where you want to save the exported images.
Step 6: Select Export Range Choose whether you want to export the entire presentation or specific slides.
Step 7: Initiate Export Click the "Export" button to begin the process. WPS Presentation will efficiently convert your slides into high-quality images.
With WPS Office, you have access to a powerhouse of features that enhance your productivity and streamline your creative endeavors. From document creation to AI-driven improvements and seamless image export, WPS Office offers a comprehensive solution to elevate your office experience.
1. How Do I Export High-Quality Images from PowerPoint?
Exporting high-quality images from PowerPoint is crucial for maintaining visual clarity and professionalism. Follow these steps to ensure your images retain their excellence:
Step 1: Open your PowerPoint presentation.
Step 2: Select the slide you want to export as an image.
Step 3: Go to the "File" menu and choose "Save As."
Step 4: Pick your preferred image format, like JPEG or PNG.
Step 5: Click "Save" and choose where to save your image.
Tip: If you need images for printing or detailed presentations, consider using formats like PNG or TIFF for lossless quality.
Remember, exporting high-quality images ensures your visual content looks professional and impactful, whether shared digitally or in print.
2. Can PowerPoint Be Saved as PNG?
Yes, PowerPoint presentations can be saved as PNG (Portable Network Graphics) images. This allows you to capture individual slides or elements in high-quality image format for various purposes.
3. Is PNG Higher Quality Than JPEG?
Yes, PNG is usually higher quality than JPEG. PNG keeps all the details and is great for images with clear lines or text. JPEG compresses the image and is better for photos with gradients. If you want top quality or need a transparent background, go for PNG. If you're okay with some quality loss and want smaller file sizes, choose JPEG.
In this article, we learned how to export PowerPoint slides as images, whether focusing on single objects, multiple elements, or entire slides. We also explored the capabilities of WPS Office, a free suite offering Writer, Presentation, and Spreadsheets components, along with an AI function. The emphasis on free features and user-friendly steps makes WPS Office a valuable tool. Overall, the article guides you in optimizing PowerPoint usage and utilizing WPS Office's strengths for efficient document creation and management.
- 1. How to Removing Excel Leading Spaces in WPS Office [2024 Step-by-Step Guideline]
- 2. How to Import PDF to Excel-A Complete Guideline
- 3. How to Export One Slide from PowerPoint: A Step-by-Step Guide
- 4. How to Convert Keynote to PowerPoint [Step-by-Step Guideline]
- 5. How to Export Visio to PowerPoint (Updated Guideline)
- 6. A Guideline for Merging PDF by Adobe Acrobat

15 years of office industry experience, tech lover and copywriter. Follow me for product reviews, comparisons, and recommendations for new apps and software.
This browser is no longer supported.
Upgrade to Microsoft Edge to take advantage of the latest features, security updates, and technical support.
How to export high-resolution (high-dpi) slides from PowerPoint
- 10 contributors
- Applies to: PowerPoint for Microsoft 365, PowerPoint 2019, PowerPoint 2016, PowerPoint 2013, PowerPoint 2010, Microsoft Office PowerPoint 2007, Microsoft Office PowerPoint 2003
You can change the export resolution in Microsoft PowerPoint by saving a slide in a picture format. There are two steps to this process: Use the system registry to change the default resolution setting for exported slides, and then save the slide as a picture at the new resolution.
Step 1: Change the export resolution setting
Follow the steps in this section carefully. Serious problems might occur if you modify the registry incorrectly. Before you modify it, back up the registry for restoration in case problems occur.
By default, the export resolution of a PowerPoint slide that you want to save as a picture is 96 dots per inch (dpi). To change the export resolution, follow these steps:
Exit all Windows-based programs.
Right-click Start , and then select Run . (In Windows 7, select Start , and then select Run .)
In the Open box, type regedit , and then select OK .
Locate one of the following registry subkeys, depending on the version of PowerPoint that you're using:
PowerPoint 2016, 2019, PowerPoint for Microsoft 365
HKEY_CURRENT_USER\Software\Microsoft\Office\16.0\PowerPoint\Options
PowerPoint 2013
HKEY_CURRENT_USER\Software\Microsoft\Office\15.0\PowerPoint\Options
PowerPoint 2010
HKEY_CURRENT_USER\Software\Microsoft\Office\14.0\PowerPoint\Options
PowerPoint 2007
HKEY_CURRENT_USER\Software\Microsoft\Office\12.0\PowerPoint\Options
PowerPoint 2003
HKEY_CURRENT_USER\Software\Microsoft\Office\11.0\PowerPoint\Options
Select the Options subkey, point to New on the Edit menu, and then select DWORD (32-bit) Value .
Enter ExportBitmapResolution , and then press Enter.
Make sure that ExportBitmapResolution is selected, and then select Modify on the Edit menu.
In the Edit DWORD Value dialog box, select Decimal .
In the Value data box, specify a resolution of 300 . Or, use the parameters from the following table.
See the Limitations section for more information when you set this value.
Select OK .
On the File menu, select Exit to exit Registry Editor.
Step 2: Export the slide as a picture
In PowerPoint, open your slide presentation, and then open the slide that you want to export.
On the File menu, select Save As .
In the Save as type box, select one of the following picture formats:
- GIF Graphics Interchange Format (.gif)
- JPEG File Interchange Format (*.jpg)
- PNG Portable Network Graphics Format (*.png)
- TIFF Tag Image File Format (*.tif)
- Device Independent Bitmap (*.bmp)
- Windows Metafile (*.wmf)
- Enhanced Windows Metafile (*.emf)
You may want to change the picture's save location in the Save in box. You may also want to change the name of the picture in the File name box.
Select Save . You will be prompted by the following dialog box:

Select Current Slide Only . The slide is saved in the new format and resolution in the location that you specified in the Save in box.
To verify that the slide is saved in the resolution that you specified, right-click the picture, and then select Properties .
Limitations
When you set the ExportBitmapResolution registry value in PowerPoint, there's a maximum DPI limitation to consider for some versions of PowerPoint.
Maximum DPI is dependent upon the slide size. The formula is as follows: maxdpi = (sqrt(100,000,000 / (slide with * slide height)), where slide width and height are in inches.
For example, for a standard 13.3" x 7.5" slide, the equation would be: sqrt(100,000,000 / (13.333 * 7.5) ) = 1000.
PowerPoint 2019, 2016, 2013, and 365
There is no fixed DPI limit. Slide export is limited only by how large the resulting bitmap gets. PowerPoint can support bitmaps up to 100,000,000 pixels (width x height). For standard widescreen slides (13.3" x 7.5"), this means a maximum DPI of 1,000. For the older style 10" x 7.5" slides, this typically means a maximum DPI of 1,155.
PowerPoint 2010 and older
The maximum resolution that PowerPoint can export is 3,072 pixels, based on the longest edge of the slide. For example, the standard 10" × 7.5" slide has a maximum effective DPI value of 307. The 3,070-pixel result (10 × 307 = 3070) falls within the 3,072-pixel limit. However, any DPI setting that's greater than 307 for a standard slide reverts to the limit of 3,072.
The 3,072-pixel limit also applies to saving the slide programmatically.
For example, the following code programmatically saves a picture that has the dimensions of 3072 × 2304 pixels:
More information
For information about changing the size of your slides, see Change the size of your slides .
Was this page helpful?
Coming soon: Throughout 2024 we will be phasing out GitHub Issues as the feedback mechanism for content and replacing it with a new feedback system. For more information see: https://aka.ms/ContentUserFeedback .
Submit and view feedback for
Additional resources
How To Download Images From Powerpoint

- How-To Guides
- Software Tutorials

Introduction
PowerPoint presentations are a popular tool for sharing information and ideas in a visually appealing format. However, there may be times when you come across a PowerPoint presentation that contains images you would like to download. Whether it’s for personal use, reference purposes, or to enhance your own presentations, being able to download these images can be a valuable skill.
In this article, we will explore various methods you can use to download images from a PowerPoint file. From saving individual images to extracting all images at once, we’ve got you covered. We’ll also discuss converting PowerPoint files to images and using screen capture tools as alternative options. By the end of this article, you’ll have a range of techniques at your disposal to easily download images from PowerPoint presentations.
Before we dive into the methods, it’s important to note that the ability to download images from a PowerPoint file relies on certain permissions. If the presentation has disabled image saving or has password protection, you may not be able to download the images. Additionally, ensure that you have the legal right to download and use the images, as copyright laws may apply.
Method 1: Saving Images from a PowerPoint Slide
If you’ve found a specific image within a PowerPoint slide that you want to save, you can easily do so by following these steps:
- Open the PowerPoint presentation that contains the slide with the image you wish to download.
- Navigate to the specific slide that contains the image.
- Zoom in on the image to ensure better clarity and visibility.
- Right-click on the image and select “Save as Picture” or “Save Image As” (depending on your version of PowerPoint).
- Choose a location on your computer where you want to save the image and provide a descriptive name.
- Select the appropriate file format for the image (such as JPEG or PNG) and click the “Save” button.
By following these steps, you can save the specific image from the PowerPoint slide and access it whenever you need it. Keep in mind that this method only allows you to save individual images, so if you want to extract multiple images from a PowerPoint presentation, you may need to explore additional methods.
Method 2: Extracting all Images from a PowerPoint File
If you need to extract multiple images from a PowerPoint presentation all at once, you can use the following steps:
- Open the PowerPoint file that contains the images you want to extract.
- Click on the File tab in the top menu and select “Save As” or “Save a Copy” (depending on your version of PowerPoint).
- Choose a location on your computer where you want to save the extracted images.
- In the Save As dialog box, select the “Save as type” dropdown menu and choose “JPEG” or “PNG” format to ensure compatibility.
- Click the “Save” button to save the PowerPoint file as images.
- In the saved location, you will find a new folder with the same name as your PowerPoint file. Open this folder.
- You will see that all the slides from your PowerPoint presentation have been converted into separate image files.
This method allows you to extract all the images present in the PowerPoint presentation in one go. It is a convenient option if you have a large number of images to extract or if you want to have all the images organized in a separate folder for easy access.
Keep in mind that the images extracted using this method will be in the format you selected (JPEG or PNG) and may not retain the same quality as the original images in the PowerPoint slides. You might need to adjust the image quality settings or use alternative methods if you require higher-quality images.
Method 3: Converting PowerPoint File to Images
If you want to convert an entire PowerPoint file into a series of images, you can utilize the following method:
- Open the PowerPoint presentation you wish to convert into images.
- Choose a location on your computer where you want to save the converted images.
- In the Save As dialog box, select the “Save as type” dropdown menu and choose “JPEG” or “PNG” format.
- A prompt will appear asking whether you want to save every slide as an image or just the current slide. Choose “Every Slide” to convert the entire presentation into images.
- The PowerPoint file will be saved as a series of images, with each slide corresponding to a separate image file.
This method is especially useful when you need to convert an entire PowerPoint presentation into a sequence of images. You can use these images for various purposes, such as creating image-based tutorials, showcasing a slideshow on a website, or sharing the presentation on platforms that support image formats.
Keep in mind that the images converted using this method will reflect the appearance of the slides, including any animations, transitions, or effects. However, note that this method may lead to large file sizes depending on the complexity of your PowerPoint presentation. If you require smaller file sizes or a different image format, you may need to explore other tools or software that provide more advanced conversion options.
Method 4: Using a Screen Capture Tool
If you’re unable to directly extract or save images from a PowerPoint file using the previous methods, you can resort to using a screen capture tool to capture the images you want. Follow these steps to use a screen capture tool:
- Open the PowerPoint presentation and navigate to the slide that contains the image you wish to capture.
- Launch a screen capture tool of your choice. This could be built-in software like Snipping Tool (for Windows) or Grab (for macOS), or you can use third-party screen capture software.
- Set the screen capture tool to capture a specific region or the entire screen, depending on your requirements.
- Capture the area of the slide where the image is located. Ensure that the image is captured in high resolution for better quality.
- Save the captured image to a location on your computer.
This method allows you to manually capture any image from a PowerPoint slide, regardless of any restrictions that may prevent direct saving or extraction. Using a screen capture tool gives you the flexibility to capture images from other sources as well, such as websites or applications.
Keep in mind that the image quality and resolution may vary depending on the settings of your screen capture tool. It’s also important to consider any copyright restrictions or permissions when using screen captures of images.
Downloading images from a PowerPoint presentation can be a useful skill, whether you need them for personal use, reference, or enhancing your own presentations. Throughout this article, we’ve explored various methods to help you download images from PowerPoint.
Method 1 allows you to save individual images by right-clicking on them and selecting “Save as Picture”. This straightforward approach is ideal when you only need to download a specific image from a slide.
If you want to extract multiple images from a PowerPoint file, Method 2 is your best choice. By saving the PowerPoint file in JPEG or PNG format, you can conveniently access all the images contained within it.
Method 3 involves converting the entire PowerPoint file into a series of images. This method is particularly useful if you want to share the entire presentation as a sequence of images or use them in image-based tutorials.
Lastly, if the previous methods are not suitable, Method 4 suggests using a screen capture tool to capture the desired images. This versatile approach allows you to capture images not only from PowerPoint but also from other sources.
Remember to respect intellectual property rights and ensure you have the proper permissions before downloading or using any images. Additionally, consider the quality and resolution of the images depending on your specific needs.
By utilizing these methods, you can easily download images from PowerPoint presentations and make the most out of the visual content they offer.
Leave a Reply Cancel reply
Your email address will not be published. Required fields are marked *
Save my name, email, and website in this browser for the next time I comment.
- Crowdfunding
- Cryptocurrency
- Digital Banking
- Digital Payments
- Investments
- Console Gaming
- Mobile Gaming
- VR/AR Gaming
- Gadget Usage
- Gaming Tips
- Online Safety
- Tech Setup & Troubleshooting
- Buyer’s Guides
- Comparative Analysis
- Gadget Reviews
- Service Reviews
- Software Reviews
- Mobile Devices
- PCs & Laptops
- Smart Home Gadgets
- Content Creation Tools
- Digital Photography
- Video & Music Streaming
- Online Security
- Online Services
- Web Hosting
- WiFi & Ethernet
- Browsers & Extensions
- Communication Platforms
- Operating Systems
- Productivity Tools
- AI & Machine Learning
- Cybersecurity
- Emerging Tech
- IoT & Smart Devices
- Virtual & Augmented Reality
- Latest News
- AI Developments
- Fintech Updates
- Gaming News
- New Product Launches
- What is Building Information Modelling
How to Use Email Blasts Marketing To Take Control of Your Market
Related post, how to extend c drive with unallocated space easily and quickly, how to update audio, graphics and wi-fi drivers on windows 10, related posts.

How To Download Slides From Google Slides

How To Download Canva Presentation As PPT

How To Make A Zoom Background

How To Download A Canva Presentation As A Powerpoint

How To Download A Powerpoint Presentation

How To Make A Powerpoint On A Tablet

How To Download Canva Slides To Google Slides

How To Download Google Slides With Speaker Notes
Recent stories.

What is Building Information Modelling?

Learn To Convert Scanned Documents Into Editable Text With OCR

Top Mini Split Air Conditioner For Summer

Comfortable and Luxurious Family Life | Zero Gravity Massage Chair

Fintechs and Traditional Banks: Navigating the Future of Financial Services

AI Writing: How It’s Changing the Way We Create Content

How to Find the Best Midjourney Alternative in 2024: A Guide to AI Anime Generators
- Privacy Overview
- Strictly Necessary Cookies
This website uses cookies so that we can provide you with the best user experience possible. Cookie information is stored in your browser and performs functions such as recognising you when you return to our website and helping our team to understand which sections of the website you find most interesting and useful.
Strictly Necessary Cookie should be enabled at all times so that we can save your preferences for cookie settings.
If you disable this cookie, we will not be able to save your preferences. This means that every time you visit this website you will need to enable or disable cookies again.
How to export background image from a PowerPoint file
Sometimes you are using your company presentation slides and you need to create a new presentation with the same look and feel, or maybe just the background. Learn How to export background image from a PowerPoint file.
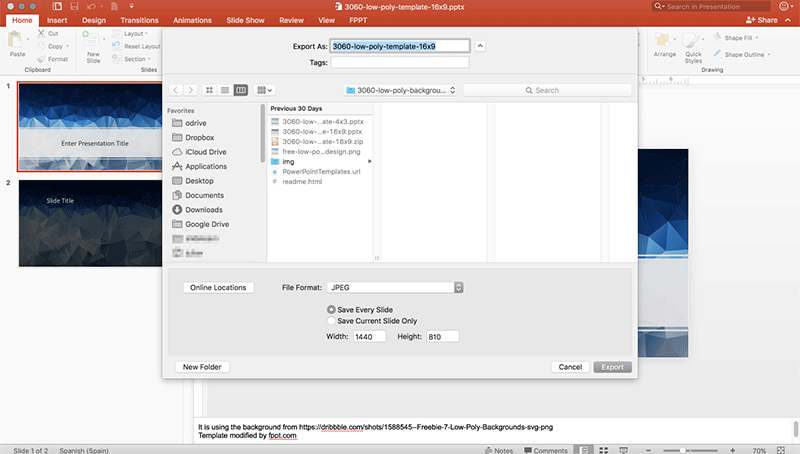
The easiest way is that you open a slide in PowerPoint and remove all the text or image content, so just leave the background in the slide.
Then, go to Save As and choose JPG or PNG (or any other image format). Then, specify an output directory and save.
You’ll be asked to choose to save a single slide or the entire document. Just choose Single Slide and then confirm.
The output file will contain the background image from your PowerPoint file.
In the image displayed above, we tried to export the background from our low-poly PowerPoint template 16:9 to images using JPG images as the export format.
You can try to export the images from any of our free templates, for example just download Financial Software PowerPoint template and try to reproduce these steps above.
Leave a Comment Cancel reply
Your email address will not be published. Required fields are marked *
Save my name, email, and website in this browser for the next time I comment.
Sign up to our newsletter
We will send you our curated collections to your email weekly. No spam, promise!
Got any suggestions?
We want to hear from you! Send us a message and help improve Slidesgo
Top searches
Trending searches

8 templates

memorial day
12 templates

ocean theme
44 templates

environmental science
36 templates

art portfolio
82 templates

49 templates
Business Presentation templates
Engage your audience in your business presentations with our free customizable ppt templates and google slides themes. they’re perfect for business plans, office meetings, pitch decks or project proposals., related collections.

Company Profile
573 templates

612 templates

Business Plan
835 templates

482 templates

507 templates

580 templates

377 templates

Project Proposal
621 templates

It seems that you like this template!
Premium template.
Unlock this template and gain unlimited access
Investment Company Business Plan
A business plan sets the strategy, resources, goals and plans for your company. If you focus on using money to fund new projects, get huge returns, make ideas possible and getting new forms of income, this template for investment companies is the one that best will reflect your ideals! With...

Caatinga Biome Conservation Project Proposal
Download the Caatinga Biome Conservation Project Proposal presentation for PowerPoint or Google Slides. Whether you're an entrepreneur looking for funding or a sales professional trying to close a deal, a great pitch deck can be the difference-maker that sets you apart from the competition. Let your talent shine out thanks...

Digital Banking App Business Plan
Download the Digital Banking App Business Plan presentation for PowerPoint or Google Slides. Conveying your business plan accurately and effectively is the cornerstone of any successful venture. This template allows you to pinpoint essential elements of your operation while your audience will appreciate the clear and concise presentation, eliminating any...

Monthly Strategy Review Meeting
The results from last month were great for the company, now we must keep it up! If you'll be discussing the strategy to follow during your next meeting, prepare a presentation and have the agenda and the different points to be talked about ready. We didn't want something too serious,...

Digital Accessibility Specialist CV
Download the Digital Accessibility Specialist CV presentation for PowerPoint or Google Slides. Having a good CV can make all the difference in landing your dream job. It's not just a piece of paper, it's your chance to showcase your skills, experience, and personality. If you want to stand out from...

Investment Business Plan
Rewards come after a great investment, and this applies especially to companies. You’ll need to attract potential investors and other people to put their trust in your project. With this free presentation template, you can explain your business plan, your market research and everything you need to strike a new...

Entrepreneurs Newsletter
Download the Entrepreneurs Newsletter presentation for PowerPoint or Google Slides. Attention all marketers! Are you looking for a way to make your newsletters more creative and eye-catching for your target audience? This amazing template is perfect for creating the perfect newsletter that will capture your audience's attention from the get-go....
.jpg "powerpoint download slide as image")
Public Consulting
Consulting services are essential for many businesses and organizations. Promote yours by showing your audience a presentation created out of this dynamic template. The illustrations are isometric, which is always a good innovation. All the layouts, graphs and infographics included are very helpful when it comes to defining your potential...

Macari Company Profile
Making your business known in all areas is not easy, but not impossible either. Clear, concise, direct and minimalist: this is the aesthetics of this presentation with which you can create your company profile department by department, down to the smallest detail. With only three colors (white, black and red)...

Technology Consulting
If you want to attract new clients to your technology company and to keep them satisfied, design your own consulting sales pitch with these minimalistic slides.

Colorful Candy Shop Company Profile
Do you like candies? It’s time to sweeten your presentation with a very fun template! The pastel colors and wavy abstract shapes will make your information stand out and frame your data into a cool candy-land. Present your candy shop to potential investors, clients or at an industry level and...

Simple Business Plan
Boosting sales, attracting new customers, expanding the market... All of these are goals that businesses want to achieve. Aim high in your next presentation for your business plan, especially if you put your trust in this free template by Slidesgo.

Law Consulting Sales Pitch
To ensure that people act according to what they’re allowed to do, law consulting firms offer their helpful legal services. When it comes to demonstrating your strong points and attracting new clients, there’s nothing like a sales pitch, and this new free business template is cut out for that job.

Cycle Diagrams Theme for a Business Meeting
Download the Cycle Diagrams Theme for a Business Meeting presentation for PowerPoint or Google Slides. Gone are the days of dreary, unproductive meetings. Check out this sophisticated solution that offers you an innovative approach to planning and implementing meetings! Detailed yet simplified, this template ensures everyone is on the same...

Internship Report
Download the "Internship Report" presentation for PowerPoint or Google Slides. The world of business encompasses a lot of things! From reports to customer profiles, from brainstorming sessions to sales—there's always something to do or something to analyze. This customizable design, available for Google Slides and PowerPoint, is what you were...

Optician Resume
Download the Optician Resume presentation for PowerPoint or Google Slides. Having a good CV can make all the difference in landing your dream job. It's not just a piece of paper, it's your chance to showcase your skills, experience, and personality. If you want to stand out from the crowd...

Design Inspiration Portfolio
Download the Design Inspiration Portfolio presentation for PowerPoint or Google Slides. When a potential client or employer flips through the pages of your portfolio, they're not just looking at your work; they're trying to get a sense of who you are as a person. That's why it's crucial to curate...

Co-operative Company Business Plan
Having a good business plan can open many doors. At Slidesgo we know that, and that’s why we have created this co-operative company business plan, to help you structure your information. Start with an overview of market trends and competitors. Then edit the graphs to talk about your potential clients...
- Page 1 of 332
Great presentations, faster
Slidesgo for Google Slides :
The easy way to wow

Register for free and start editing online
Free PowerPoint Templates for Outstanding Presentations That Engage
Unlock the full potential of your PowerPoint presentations with our professionally designed templates that will captivate your audience and elevate your content to the next level.
Free PowerPoint Templates

Get your classroom buzzing with excitement with our vibrant, bold illustrative PowerPoint and Google Slides template, perfect for teachers aiming ... Read more

Simple Professional Slides
This is a bold, colorful template design for all types of presentations. Suitable for professional or creative talks, adapt it to your corporate brand by simply changing the background colors. ... Read more

Simple Red Frame Slides
This simple and modern design will make your content shine. You can change the red color to adapt it to any brand or mood without effort. A great presentation template for professional talks. ... Read more

Simple Black Slides
This is a great template if you want your audience to focus on content without graphic distractions. Use it as is if you need an elegant design, or choose a vivid color to emphasize some words and graphs to make it bolder and modern. ... Read more

Black Wood Slides
With a bold combination of color and typography, this free template is perfect to keep the attention of your audience. The dark background design with a single highlight color makes it easy to adapt it to you brand with just a tint change. ... Read more

Simple Elegant Slides
A simple and elegant template, beautifully designed for functional presentations. Recommended for fashion or literature related talks, conferences or personal use. ... Read more

Blue & Yellow Corporate Slides
A bold, colorful and modern free presentation template for multi-purpose corporate decks. You can adapt it easily to your branding ... Read more
Professional designs for your presentations
SlidesCarnival templates have all the elements you need to effectively communicate your message and impress your audience.
Suitable for PowerPoint and Google Slides
Download your presentation as a PowerPoint template or use it online as a Google Slides theme. 100% free, no registration or download limits.
- Google Slides
- Editor’s Choice
- All Templates
- Frequently Asked Questions
- Google Slides Help
- PowerPoint help
- Who makes SlidesCarnival?
IMAGES
VIDEO
COMMENTS
First, open PowerPoint and, in the thumbnail pane, select the slide that you'd like to save as an image by clicking it. A box will appear around the slide once it's been selected. Next, click the "File" tab. In the left-hand pane, select "Save As." To the right of the screen, you'll see two text boxes.
Save a single slide as an image. In the slide thumbnail pane, on the left side of the PowerPoint window, select the slide you want to save. Click File > Save As (or Save a Copy if your presentation is saved on OneDrive or SharePoint). Navigate to the folder where you want to save your slide. Type the name of your slide image in the File name ...
Step 4: Select Save As Type. In the "Save As" dialog box, click on the "Save as type" dropdown menu and select the image format you want, such as JPEG or PNG. Choosing the right format is important depending on how you plan to use your image. JPEG is great for smaller file sizes, while PNG offers higher quality with a transparent ...
Save PowerPoint Slides As JPEG. I'm going to go to the File tab. I'll choose Export, and then I'll click on Change File Type. Now I'll click on Save As . Go to the File tab and choose the Export option. 2. Compress the File Size. Let's go ahead and pick out a destination to save those and give it a file name. To save some space, let's click on ...
To save an individual slide or your entire presentation in a supported image format, go to File > Save As and select a location to save the output image file (s). Save PowerPoint presentation as images. Name your file and use the drop-down menu to select an image format. The supported image formats to save slides include JPG, PNG, TIF, BMP, WMF ...
Step-1: "Right-click" on the slide. The first step is to go to the slide you want to save as an image and "Right Click" anywhere on the slide. This will open a drop-down menu. Step-2: Select the "Save as Picture…" option. From the drop-down menu, click on the "Save as Picture…" option. This will open a new window.
Method 1: Save PowerPoint Slide as Image. Open PowerPoint and go to the File tab. After selecting Export, click Change File Type. Then, click the Save As option. Now, select a location where you save the slide and give the file a name. Click Tools and select Compress Pictures to save up some space. Confirm that the option labeled "Delete ...
Here are the steps to saving a selected slide as an image: Go To File. Select Save As in the left-hand pane. Select your desired File Type from the Save As dialog box. Click Save. Select from the Prompt if you want to save All Slides or the Active Slide.
Step 1: To save your slide (s) to image format, go to File-> Save As. Step 2: You will be provided the option to pick a destination for your file. If you are using PowerPoint, you can choose to not only save your image to your computer but also to your OneDrive account. Step 3: In the next step, choose an image format from the dialog box that ...
In this PowerPoint tutorial you will learn how to easily save a PowerPoint slide as an image / picture, we will select a specific slide from a PowerPoint ppt...
To save an object as an image, we first need to select the object to be saved. In this example, we'll select our title. Right-click the object and select "Save as Picture" from the menu that appears. Next, rename your file, select the file type you'd like to use, and then click "Save.". Your object is now saved as an image!
Select the slide you want to save as an image. If you want to convert all the slides to images, select any slide. Select File > Save As. In PowerPoint for Mac, select File > Export . Choose the location where you want to save the file and enter a name for the image file. Select the Save as type down arrow to display a list of file formats.
Follow these steps: Open the PPT file in PowerPoint. Right-click on an image and select Save As Picture. Set the image format and select Save. To save the original image, select the small arrow next to Save and then Save Original Picture. Although this method works well, it can get cumbersome if you need to save multiple images — plus, you ...
For individual slides, right-click and select Save as Picture. To extract all slides or a batch of slides, go to File > Export and pick your format. Or print the entire presentation to a PDF file, then extract the slide images. Aim for PNG or PDF files to maintain image quality, especially for printing slides.
PowerPoint is configured to export images at 96 Dots Per Inch (or DPI). This forces your pictures to be exported at awful resolutions like 960×720 or 1280×720. And these awful resolutions are what lead to your ugly pictures. But don't worry. What we are going to do is configure PowerPoint to export images at 300 DPI instead.
Click File . 2. Click Save As. 3. Save as type as PNG, JPG, GIF or TIFF format. All of these are image format; it is suggested you select PNG format, since good quality of images can be expected with it, and the format is compatible with many other programs. Click Save finally.
Step 2: Export slides as images. In PowerPoint, open your presentation and then select the slide you want to export. Go to the File tab. Now select Save As. In the file type field, select one of the following image formats: JPEG File Interchange Format (* .jpg) PNG Portable Network Graphics Format (* .png)
Here are the steps for the same. Step 1: Launch PowerPoint on your PC and open the PPT from which you want to save images. Step 2: Locate and select the image you want to extract. Right-click on ...
To export a slide: Open your PowerPoint presentation and select the slide you want to export. Click File > Save As. In the dropdown menu, pick an image format like JPEG, PNG, TIFF, etc. Change the Save as type dropdown to the desired image format. Give the image file a name and export location. Click Save.
Step 1: Select Your Desired Slide Begin by opening your PowerPoint presentation. Choose the slide you wish to export as an image. This could be a single slide or a range of slides, depending on your requirement. Step 2: Access the "Save As" Option Navigate to the upper-left corner and click on the "File" tab.
Step 2: Export the slide as a picture. In PowerPoint, open your slide presentation, and then open the slide that you want to export. On the File menu, select Save As. In the Save as type box, select one of the following picture formats: GIF Graphics Interchange Format (.gif) JPEG File Interchange Format (*.jpg) PNG Portable Network Graphics ...
Method 1: Saving Images from a PowerPoint Slide. If you've found a specific image within a PowerPoint slide that you want to save, you can easily do so by following these steps: Open the PowerPoint presentation that contains the slide with the image you wish to download. Navigate to the specific slide that contains the image.
Then, go to Save As and choose JPG or PNG (or any other image format). Then, specify an output directory and save. You'll be asked to choose to save a single slide or the entire document. Just choose Single Slide and then confirm. The output file will contain the background image from your PowerPoint file. In the image displayed above, we ...
Step 3: Add Custom Animations to Your Animated PowerPoint. Your animated PowerPoint templates and all Visme presentation templates have plenty of different styles of animation possibilities. With Visme, add all these types of animations to any element in a slide. Enter Animations. Fade in.
The best Google Slides and Powerpoint presentation templates ... Download as a PowerPoint file ... Perhaps this cool image is what you'd like to project to your clients or audience. Present your agency with this editable template for Google Slides and PowerPoint! Maybe you operate in the field of travels and trips, or perhaps...
Download the Goat Farming Business Plan presentation for PowerPoint or Google Slides. Conveying your business plan accurately and effectively is the cornerstone of any successful venture. This template allows you to pinpoint essential elements of your operation while your audience will appreciate the clear and concise presentation, eliminating ...
Suitable for PowerPoint and Google Slides. Download your presentation as a PowerPoint template or use it online as a Google Slides theme. 100% free, no registration or download limits. Explore our Gray Floral Minimal theme for your funeral memorial slideshow. Easy to personalize, fully customizable and completely free to use.
Professional designs for your presentations. SlidesCarnival templates have all the elements you need to effectively communicate your message and impress your audience. Download your presentation as a PowerPoint template or use it online as a Google Slides theme. 100% free, no registration or download limits. Download our PowerPoint templates to ...