How-To Geek
How to add slide numbers in powerpoint.

Your changes have been saved
Email Is sent
Please verify your email address.
You’ve reached your account maximum for followed topics.

The Best Bluetooth Speakers of 2024
10 ways to get your money's worth out of youtube tv, here’s which motorola phones will get android 15, quick links, add slide numbers to a powerpoint presentation, remove slide numbers from a powerpoint presentation, format slide numbers in powerpoint.
When you're presenting a PowerPoint presentation, it can be easy to lose track of what slide you're currently on---especially if it's a large one. To help, you can add slide numbers in PowerPoint to know your position.
You could, of course, add slide numbers manually to each of your slides using text boxes. This isn't an option we'd recommend because any changes you make (for instance, by adding new slides) would require you to update your slide numbers manually, too.
Instead, you can add slide numbers that update automatically on all of your slides, including any hidden slides. By default, these slide numbers will appear in your slide footer, but you can move and format your slide numbers by editing the "Slide Master" for your presentation.
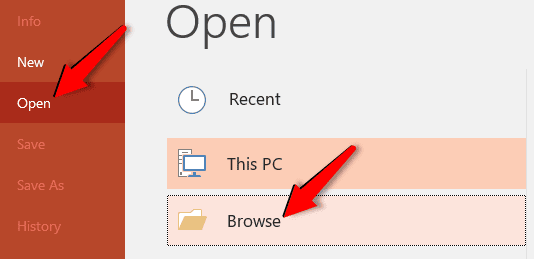
To add slide numbers, open a PowerPoint presentation with several slides added and then click the "Insert" tab.

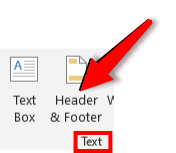
From here, you'll need to select the "Header & Footer" button in the "Text" section.

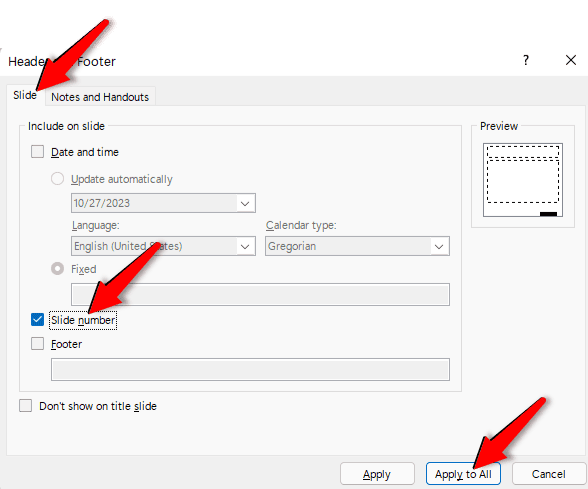
This will bring up the "Header and Footer" options box. To add slide numbers to your PowerPoint slides, click the "Slide Number" checkbox in the "Slides" tab.
Press the "Apply to All" button to add slide numbers to all of your slides.

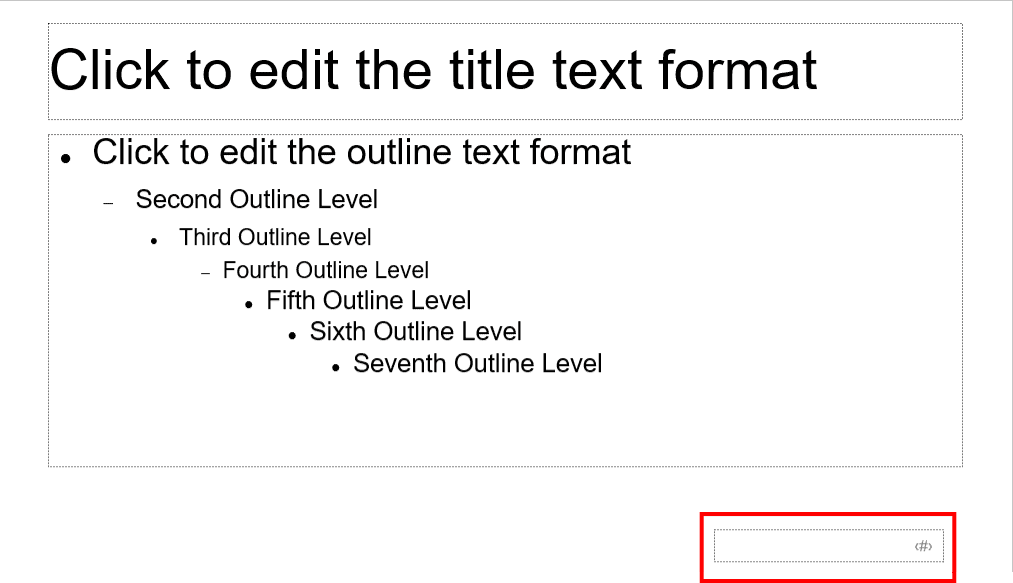
Once applied, your slide numbers will appear on each of your slides in the bottom-right corner. If you've split your PowerPoint presentation into sections, you'll need to repeat this action for each section.
To remove slide numbers from a PowerPoint presentation , you can follow similar steps to those shown above.
Related: How to Remove Slide Numbers from PowerPoint Slides
Press Insert > Header & Footer to bring up the PowerPoint header and footer options. In the "Header and Footer" box, uncheck the "Slide number" checkbox option.
You can remove the page number from only the currently selected slide by clicking "Apply" or to all of your slides by clicking the "Apply to All" button instead.

You can format your slide numbers using the PowerPoint Slide Master to make them appear in a different font, size, color, or position.
Related: How to Create a Slide Master in Microsoft PowerPoint
To do this, click View > Slide Master from the ribbon bar.

This will load the Slide Master editing screen. You'll see the current position of your page number as a text box in the bottom-right section of the slide.

You can move the text box to another position to move your slide number across all of your slides.
To edit the text formatting of the slide number, select the text box and then select the "Home" tab on the ribbon bar.
You can then edit the text formatting options using the available options in the "Font" and "Paragraph" sections.

For instance, pressing the "Bold" button will make the slide numbers appear in bold across all slides.
Once you've formatted your slide numbers, return to the "Slide Master" tab on the ribbon bar and then select the "Close Master View" button.

Your slide numbers will update with new formatting across all of your slides, depending on the changes you made.
- Microsoft Office
- Office 2016
How to Add & Fix Slides Numbers in PowerPoint? [An EASY Guide!]
By: Author Shrot Katewa
![How to Add & Fix Slides Numbers in PowerPoint? [An EASY Guide!]](https://artofpresentations.com/wp-content/uploads/2021/12/Featured-Image-Slide-Numbers-in-PowerPoint.webp "powerpoint page 1 of x")
Isn’t it annoying when you add a new slide within a sequence of slides in your PowerPoint presentation, and all your slide numbers go for a toss! If you are in this boat, then you’ve come to the right place!
Adding slide numbers can be confusing even after you’ve been using PowerPoint for quite some time. However, with the proper process of adding slides numbers in PowerPoint, you won’t go wrong. But, the question really is, what is the correct way to add slides numbers in PowerPoint?
To add slide numbers in PowerPoint, click on the “Insert” tab and click on the “Slide Number” option from the ribbon. Then, enable the “Slide Number” checkmark. Finally, click on the “Apply to All” option to apply slide numbers to all slides in your presentation.
This article will walk you through the complete details of adding slide numbers in PowerPoint in a step-by-step manner with visual references so that you can easily understand the process! You’ll also learn to add slide numbers in the “1 of X slides” format.
Furthermore, I’ll also show you how to exclude slide numbers from specific slides. In the end, I’ll help you troubleshoot some of the most common issues that you may be facing with slide numbers in PowerPoint. That, and much more!
So, let’s get started!
1. Adding Slide Numbers the Wrong Way! [Don’t Do This!]
First, let’s talk about what you shouldn’t do!
The easiest (and most common incorrect way) to add a slide number is by manually adding a text box on each slide, manually inputting the slide number, and placing it at the bottom of the slide. However, this is the wrong way to add slide numbers to your PowerPoint presentation.
If you add slide numbers this way, you have to add the slide number to each slide individually. Moreover, if you decide to place a new slide in the middle of your presentation, it messes up the sequence numbers for all the slides you just inserted slide numbers. Don’t do this!
The following part of this article discusses the different ways you can add slide numbers to your PowerPoint presentation efficiently.
2. How to Add Slides Numbers in PowerPoint? [Correct Way]
There are multiple ways to add slide numbers in PowerPoint. However, I’ll share the most straightforward method in this article with you.
A quick heads up – if you prefer watching the tutorial rather than reading about it, then check out my video below with the step-by-step instructions. However, if you prefer to read the instructions, continue with the article below.
Adding a Slide Number in PowerPoint Using the “Insert” Tab
Although you will see people talk about using the “Slide Master” to add slide numbers to your presentation, using slide layouts in PowerPoint can be confusing!
The easiest method is to use the “Insert” tab to add slide numbers to your slide. You can use this method even if you are a beginner!
So, what do you need to do? Let’s take a look –
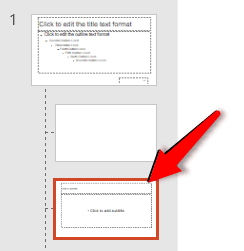
Step-1: Insert a Blank Slide Layout
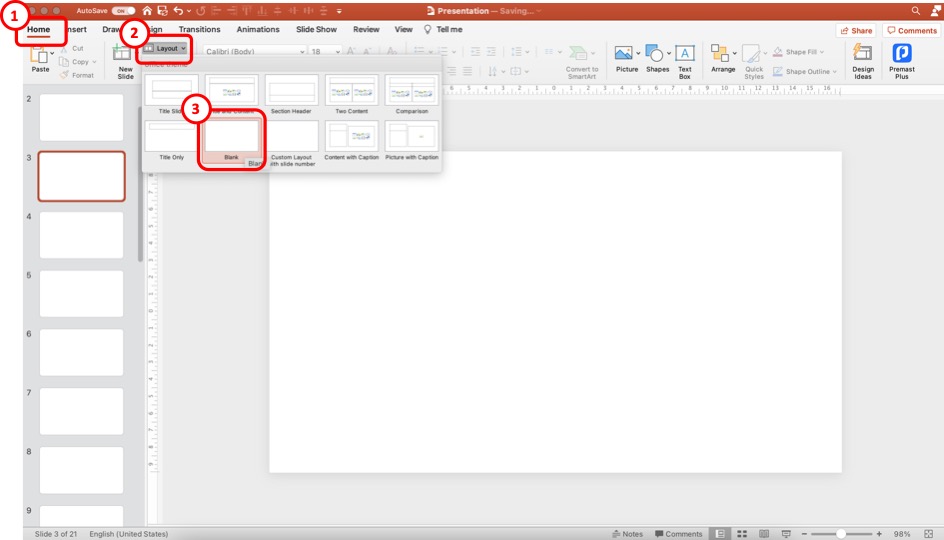
The first step of the process is to insert a blank slide in your presentation. This step is only optional. It is not necessary to do this every time. Don’t do this step, especially if you use a presentation template. But, for the sake of explanation and practice, this will be a helpful step.
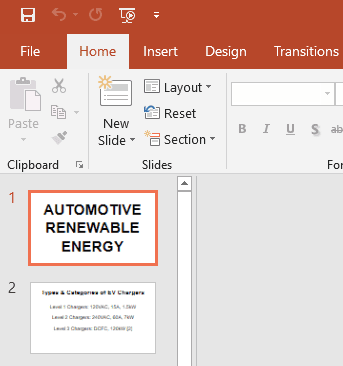
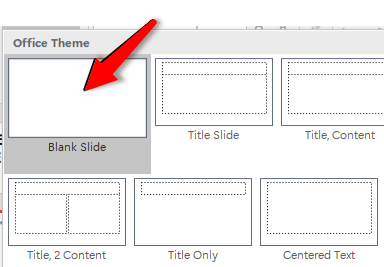
Click on the “Home” tab to add a blank slide layout. Then, click on “ Layout “, and from the options, click on the “ Blank ” slide option.
This will convert the slide layout of your current slide to a blank layout. You can also add a slide to your presentation and then convert it to a blank slide layout using the steps I just mentioned.
Step-2: Click on the “Slide Number” option
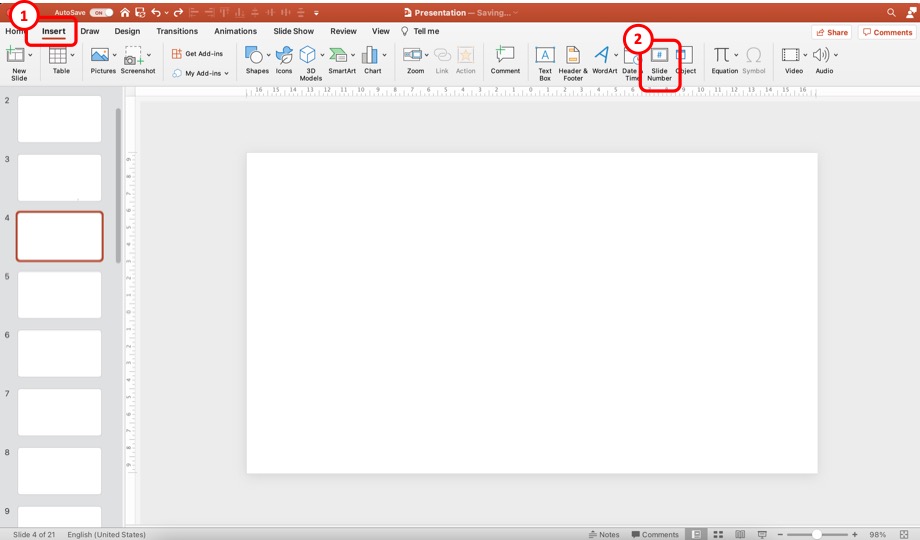
Now, click on the “ Insert ” tab. Then, from the options, click on the “ Slide Number “. This will open a new pop-up window with more options.
Step-3: Add the Slide Numbers to the Slides
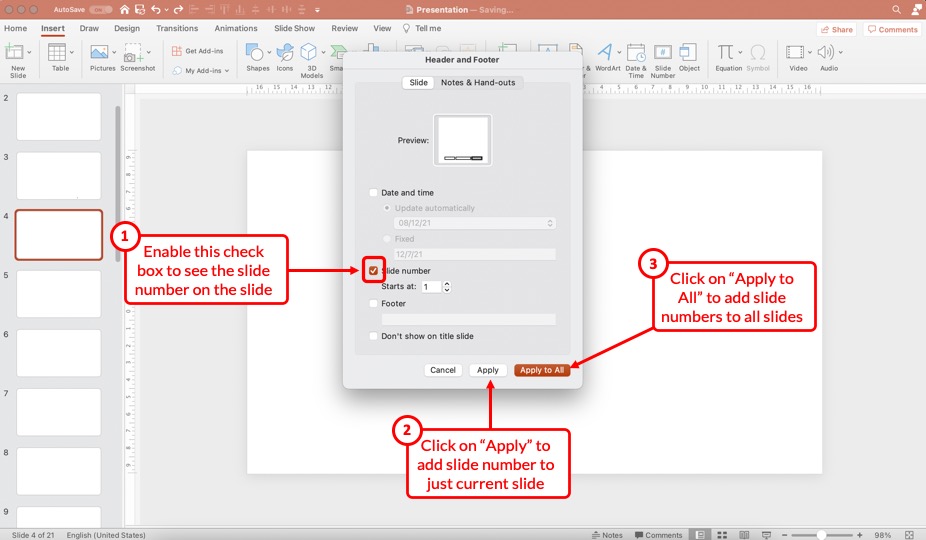
First, make sure that you enable the “Slide Number” option in the next step. Next, make sure that add a checkmark to the check box. You can choose to start the number at “ 1 “.
Then, click on the “ Apply ” option to add the slide number to just the current slide. However, if you wish to add slide numbers to all the slides, click on the “ Apply to All ” option.
Don’t worry. We’ll look at how to disable slide numbers for specific slides slightly later in the article.
Step-4: Duplicate the Slide with the Slide Number
This is, again, an optional step.
Once you have the slide number added by clicking on “Apply” in the previous step, you need to copy and paste the slide in PowerPoint .
Make sure that you format the slide number on this slide before you start duplicating this slide. (check the rest of the article to know how to format the slide number)
However, duplicating the slide with a slide number is only helpful when starting with a new presentation. If you already have a bunch of different slides that have been designed especially using a presentation template, this step 4 won’t work.
If you are in that situation, select the “Apply to All” option in step 3. Then, check the section below to format the slide number in PowerPoint.
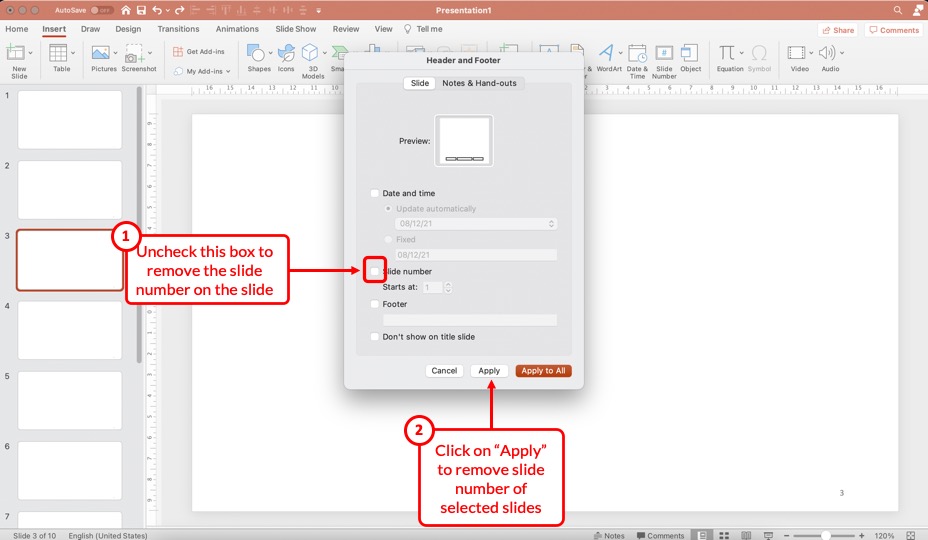
3. How to Remove Slide Number from Specific Slides
If you don’t want specific slides to show the slide number, you can easily toggle it off.
To remove slide numbers from specific slides in PowerPoint, first, select the slide. Then, click on the “Insert” tab, and click on the “Slide Number” button. Next, “Uncheck” the slide number option in the pop-up that appears, and click on “Apply” to remove the slide numbers from the selected slides.
I’m hopeful that the process mentioned above is self-explanatory. Nevertheless, here’s a step-by-step process to disable slide numbers for specific slides in your PowerPoint presentation.
Step 1 – Select the Slides to Remove the Slide Number
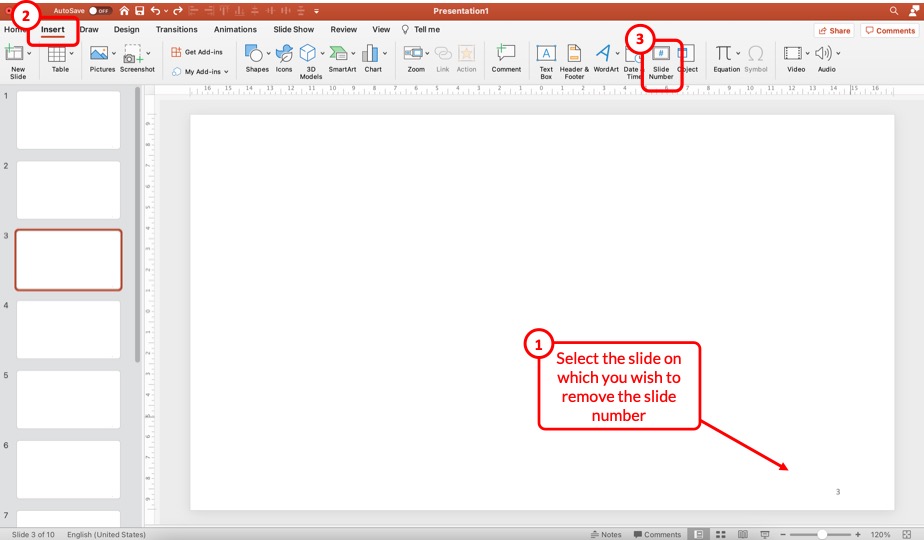
First, select the specific slides on which you wish to remove the slide numbers. You can use the “Ctrl” on your keyboard (or Cmd key for Mac) and click on the slides on the left part of the screen to select multiple slides at once.
Then, click on the “ Insert ” ribbon, and click on the “ Slide Number ” option from the ribbon. This will open a pop-up.
Step 2 – Uncheck the Slide Number Option

From the pop-up window that appears, uncheck the box for the “ Slide Number ” option and click on “ Apply “. This will remove the slide number just on the selected slides.
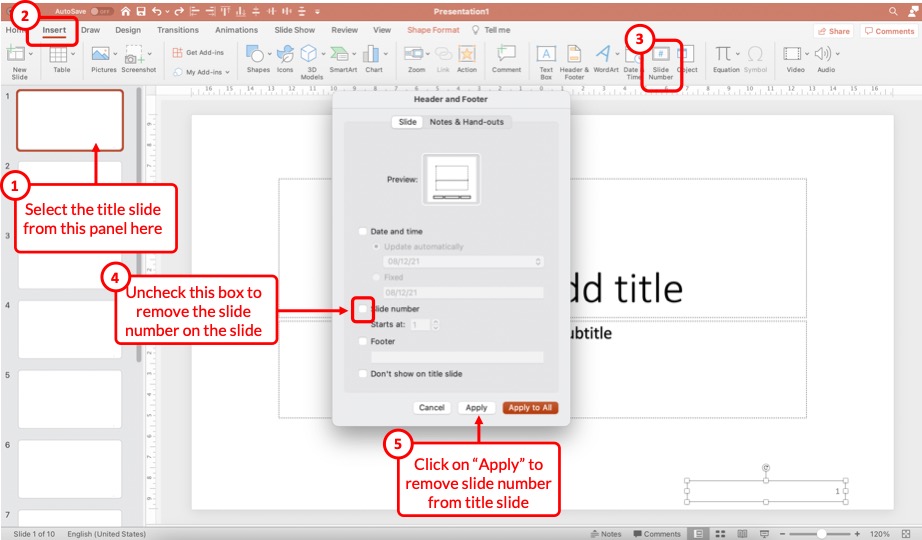
4. How to Remove Slide Number from Title Slide in PowerPoint?
One common problem that you may encounter once you add the slide numbers to all your slides is that the title slide of your presentation also now shows a slide number!
Most of us usually don’t want the slide number visible on the title slide. So, how do you remove the slide number from the title slide of your PowerPoint presentation?
Well, there are three different methods you can use. Let’s take a look at them one by one.
Method 1 – Manually Removing the Slide Number
The easiest way is to remove the slide number from the title slide manually. Simply select the slide number on the title slide and hit the “Delete” key on your keyboard, and the slide number will be deleted.
This method works well for the title slide only since the title slide will always remain as the first slide in the presentation and won’t change its position in the sequence.
If you use this method on other slides, chances are you may want to move the slides around and may want the slide numbers back on the slide later. And, that may just complicate things for you. Instead, just follow the steps mentioned in the previous section to delete slide numbers on other slides.
However, sometimes, PowerPoint just doesn’t allow you to select the slide number field on the slide! In such a scenario, you can’t just delete the slide number.
This is where the other two methods come in handy!
Method 2 – Uncheck the Slide Number Option on the Title Slide
This method works just the same way as per the steps described in the previous section (section 3 above) of the article that describes the process to remove slide numbers from specific slides.
All you need to do is select the title slide by clicking on it. Then, click on the “ Insert ” tab. Next, click on the “ Slide Number ” option. From the pop-up that appears, uncheck the box for “Slide Number”, and click on “ Apply “.
Just as before, this will remove the slide number from the selected slide.
Method 3 – Use the “Don’t Show on Title Slide” Option

You can also use the “Don’t show on title slide” option when adding the slide numbers to your presentation in order to avoid the slide number on the title slide!
To do so, repeat the steps of adding the slide number to your presentation. Then, enable the checkmark on the “Don’t show on title slide” option to remove the slide number from the title slide.
5. How to Remove Slide Numbers on All Slides in PowerPoint?
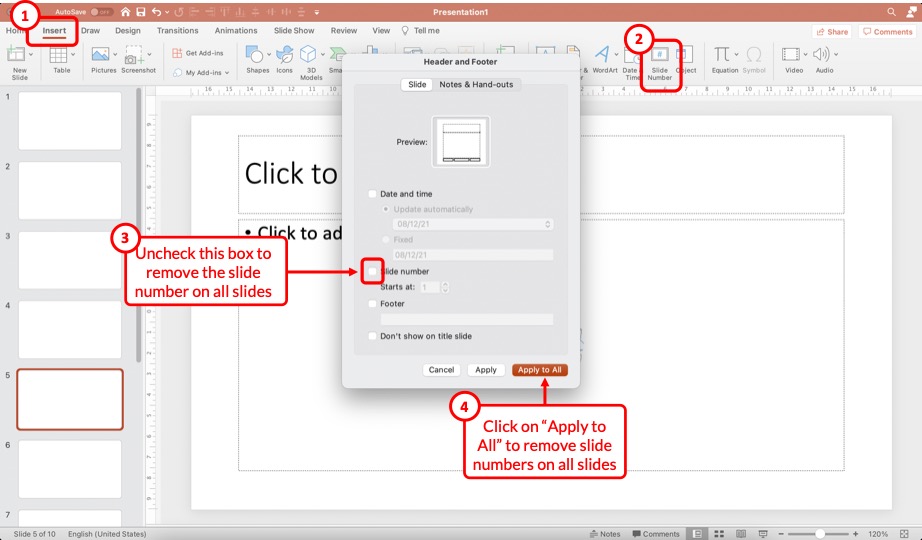
Removing slide numbers from all slides is just as easy as adding slide numbers to your slides!
To remove slide numbers from your PowerPoint presentation, click on the “Insert” tab. Then, click on the “Slide Number” option. From the pop-up that appears, uncheck the box for “Slide numbers”, and click on the “Apply to All” option.
Check the steps on the image shared above in case you need any further clarification.
Once all the steps are complete, you will notice that the slide number disappears from all slides!
6. How to Make Slide Numbers “1 of X Slides” in PowerPoint?
If you have a really long presentation that contains more than 50 slides, then you may want to use the “1 of X Slides” format! [Where “X” is the total number of slides that your presentation contains]
Doing so allows the audience to estimate the number of slides remaining in the presentation. So, how do you do that?
Let me share with you a ninja tip in this section! Here’s a step-by-step explanation of what you need to do!
Step 1 – Insert a Text Box on the Slide
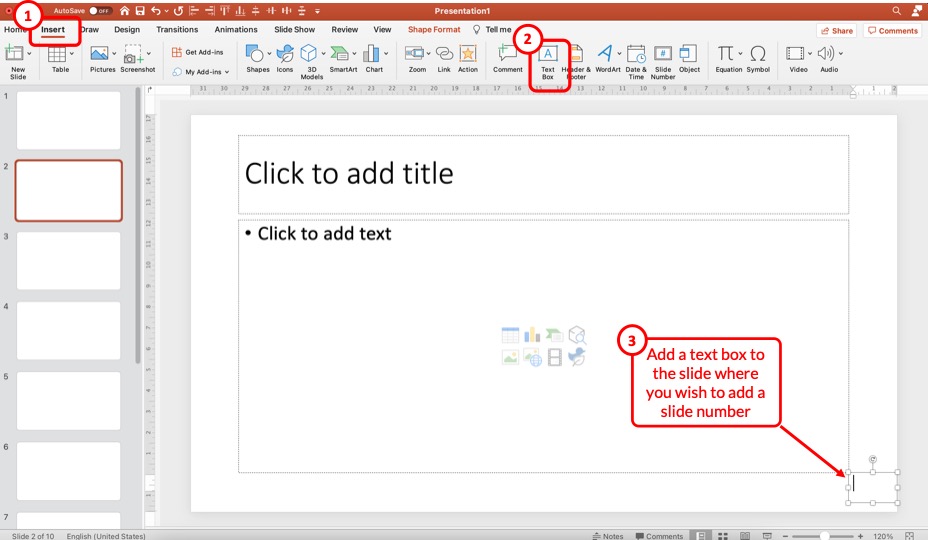
The first step is to insert a text box on the slide. To do that, click on the “ Insert ” tab. Then, click on the “ Text Box ” option from the ribbon. Next, just drag the cursor on the bottom right corner of your slide (or wherever you wish to have the slide number).
Step 2 – Insert the Slide Number
The next step is to insert the slide number. But, don’t add the slide number manually.
Instead, first, click inside the text box to make it active. Then, click on the “ Insert ” tab and click on the “ Slide Number ” option from the ribbon.
This will automatically insert the slide number inside the text box.
Step 3 – Add Text After the Slide Number
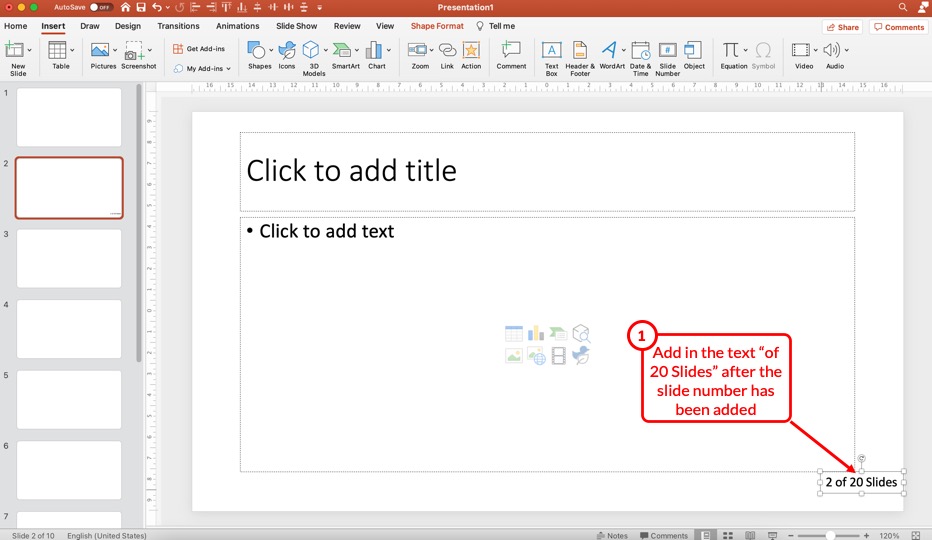
Now, simply add the text that you wish to appear after the slide number. In this case, I’ve added “of 20 Slides” after the slide number (as shown in the image above).
Step 4 – Copy and Paste the Text Box
Now, all you need to do is simply copy and paste this text box on all the slides!
Once you copy and paste the text box on other slides, you will notice that the slide number within the text box will change with the changing slide. However, “of 20 Slides” will remain constant!
Thus, it is advised to add such a slide number format to all slides once you’ve completed creating the presentation as it will provide you with a clear understanding of the exact number of slides in your presentation.
Don’t worry! Even if you move the slides around and change the sequence, the slide numbers will still change with the specific slide!
7. How to Format Slide Numbers in PowerPoint?
Formatting slides numbers is quite easy if you know what to do!
PowerPoint allows you to change the font color, font size, and even the font that is used for the slide numbers. Formatting a slide number works just like formatting text in PowerPoint .
There are two key processes to know when formatting a slide number in PowerPoint! Let’s take a look at both of them –
7.1 How to Format Slide Numbers for a Specific Slide Layout?
Formatting slide numbers of a specific slide layout will affect only those slides that use a particular type of slide layout. Here’s what you need to do –
Step 1 – Add Slide Numbers to the Slides
The first step is to add the slides numbers to your slide. Obviously, in order to edit the slide numbers and see the effect, the slide numbers need to be present on the slide.
So, if you haven’t added the slide numbers already, follow the steps mentioned earlier in the article and add the slide numbers first.
Step 2 – Check the Slide Layout
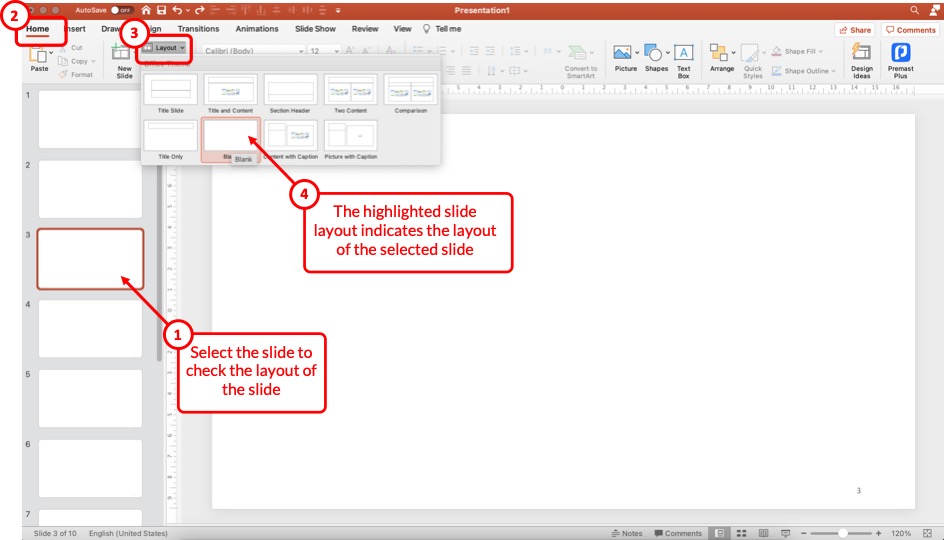
The next step that we need to take is to check the slide layout that is currently in use for the specific slide on which we intend to format the slide number.
To check the slide layout, first, select the slide. Then, click on the “ Home ” tab and click on the “ Slide Layout ” option from the ribbon.
The highlighted slide layout will indicate the layout the current slide uses.
Step 3 – Open the Slide Master View
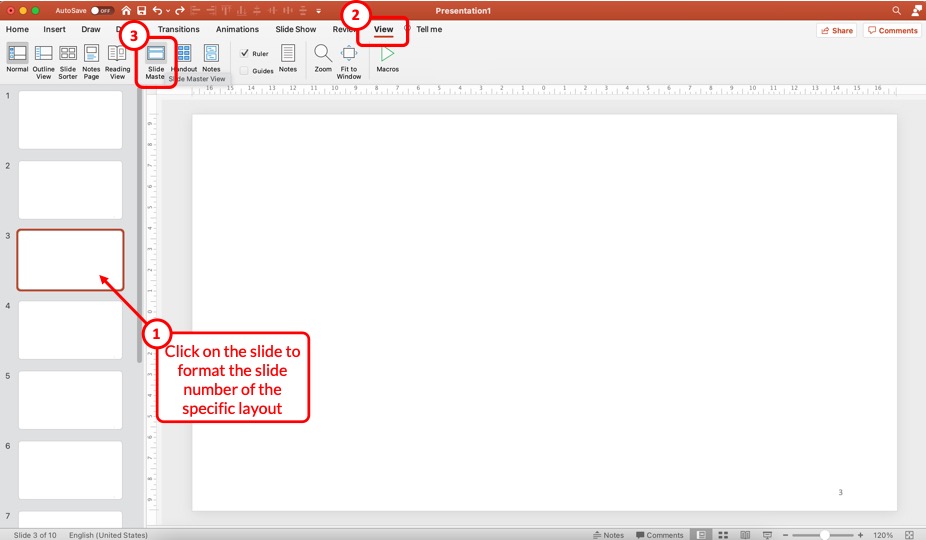
In the next step, we need to open the Slide Master View in PowerPoint .
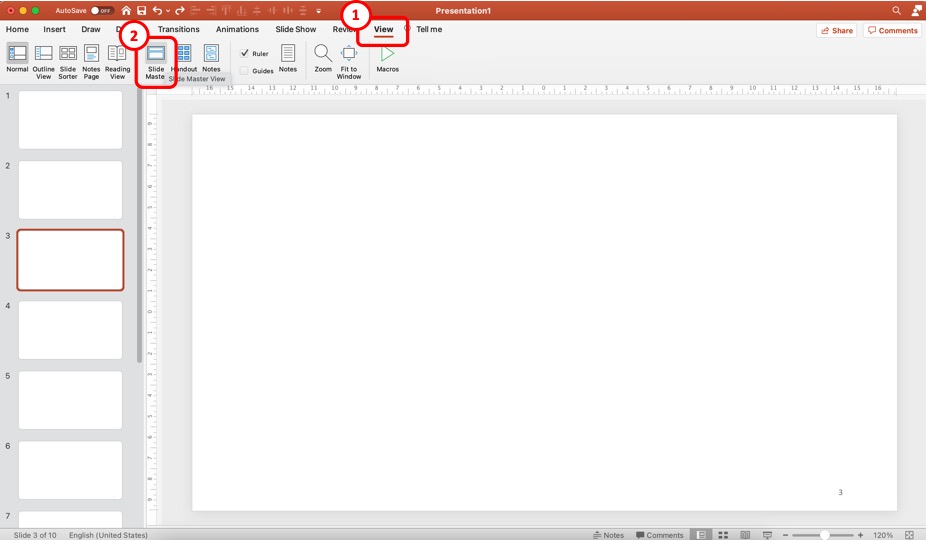
To do that, first, click on the slide for which you wish to change the slide number format. Then, click on the “ View ” tab, and click on the “ Slide Master ” option from the ribbon.
This will open the slide master view in PowerPoint.
Slide 4 – Format the Slide Number for the Specific Slide Layout
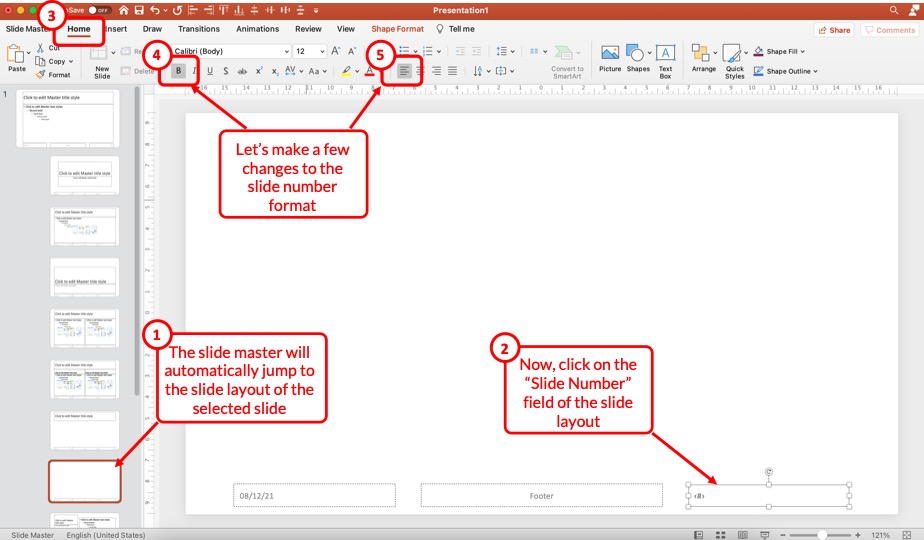
Now, first, make sure that you have the correct layout selected. By default, PowerPoint will open the slide layout of the slide that was selected before opening the slide master view.
Then, to make changes to the format of the slide number, select the slide number field present on the slide. Click on the “ Home ” tab, and make the changes as per your preference.
You can change the font, text alignment, text styles, font size, and much more! For the sake of this example, let’s change the alignment to left, and add a “Bold” style.
Slide 5 – Exit the Slide Master
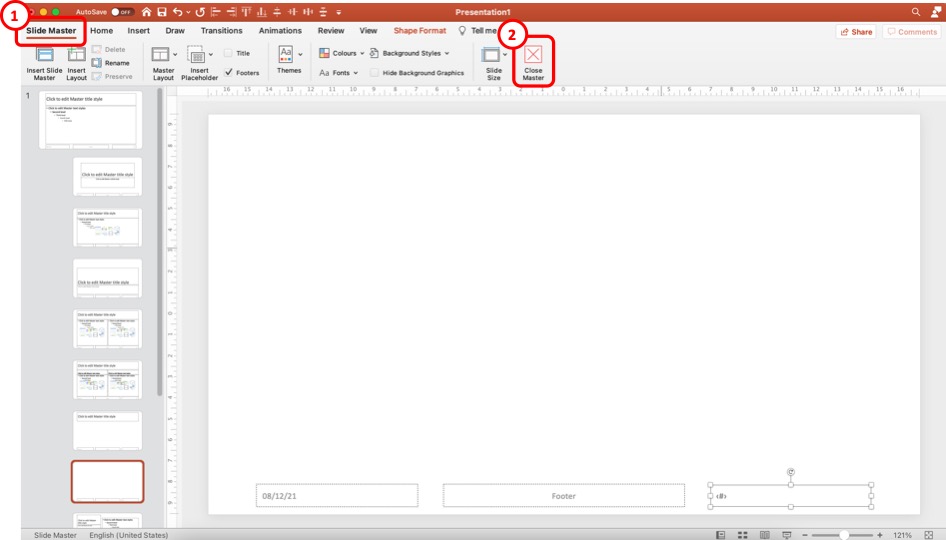
Once you’ve made the desired formatting changes, click on the “ Slide Master ” tab once again, and click on the “ Close Master ” option to exit the slide master.
Once you exit the slide master and open the normal view, you will notice that the formatting of the slide number on the current slide layout is different from other slides.
7.2 How to Format Slide Numbers on All Slides in PowerPoint?
If you wish to change the format of the slide number on all slides instead of specific slide layouts, you can do so just as easily. And, no! You don’t need to individually change the format of slide numbers on each slide!
Here’s what you need to do to change the slide numbers on all slides in PowerPoint –
Step 1 – Open the Slide Master View
First, you need to open the slide master view in PowerPoint. Just as before, click on the “ View ” tab. Then, click on the “ Slide Master ” option from the ribbon.
Step 2 – Format the Slide Number Field on the “Master Slide”
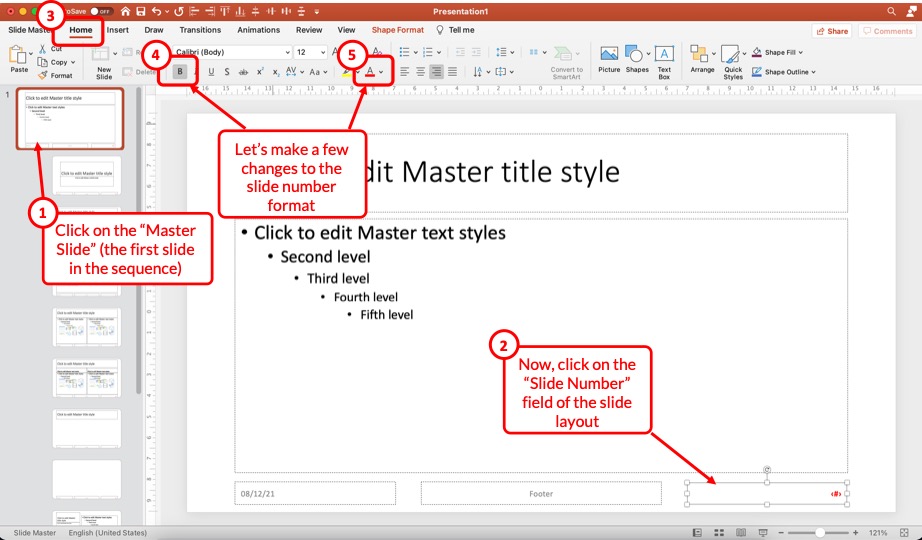
Once you open the slide master view, click on the “ Master Slide ” i.e. the first slide in the sequence (which is also larger in size than the other slides).
Next, make sure you select the slide number field on the bottom right of the slide. Then, click on the “ Home ” tab. Here you can make all the formatting changes that you need.
For the sake of this example, I’ll click on the “ Bold ” option and change the font color to red.
You can see the change taking place on the selected slide number field on the master slide.
Step 3 – Exit the Slide Master
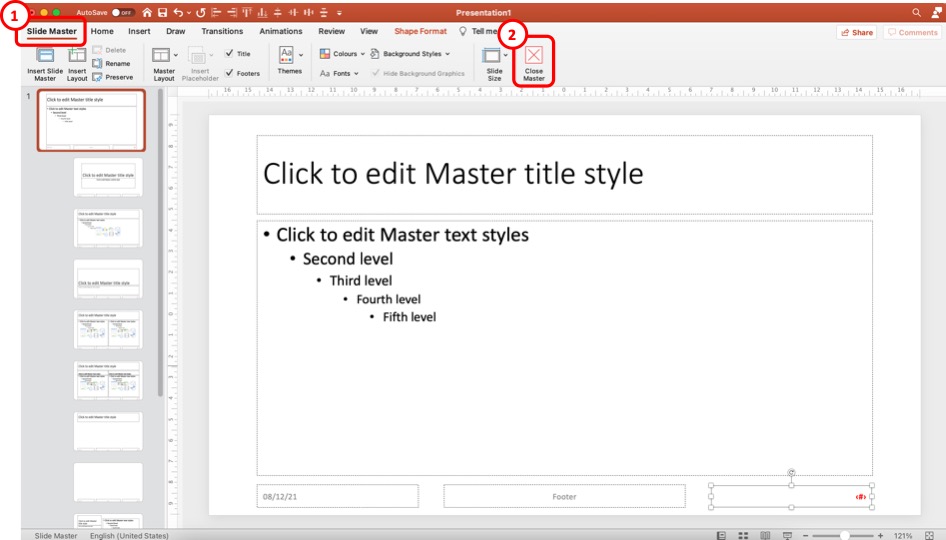
The last step is to exit the slide master.
Once you have made all the changes to the slide number formatting, click on the “ Slide Master “. Then, click on the “ Close Master ” options.
When you return to the normal view, you will notice that the formatting changes have been applied to all the slide numbers in your presentation.
Using the method described above, you can make changes to font color, font size, type of font, text alignment, and other formatting changes that you can normally make to text in PowerPoint!
8. How to Change the Position of Slide Numbers in PowerPoint?
To change the position of the slide numbers in your PowerPoint presentation, at first, select the text box of the slide number. After that click and hold the text box and drag it to your preferred position anywhere on the slide.
Once you’ve dragged it to where you want the slide numbers to be let go of the mouse button and the position of the slide number will change accordingly.
In order to change the position of slide number on all the slides, make sure that you use the method described in the previous section of the article (section 7.2)
9. Troubleshooting Slides Numbers in PowerPoint
While adding slide numbers to your PowerPoint presentation you may encounter some difficulties as some users of PowerPoint has.
There may be problems like the slide numbers not, showing the slide number may not be showing as “#”, you may have difficulty removing the slide number, or maybe you want the slide number to start from 0.
All these issues and possible reasons why you are encountering them are described in the following section.
9a. Slide Numbers Not Showing in PowerPoint
Sometimes you may find it difficult to add slide numbers to your PowerPoint presentation. Some of the reasons why you’re having this problem and possible ways to get around them are described below.
1. There may be a shape inserted over your slide number: Sometimes, there may be a shape or an image placed over the location where you inserted your slide number.
To solve this issue, click on the area where the slide number should be, and if there is a shape over it, “Right-click” on the shape and select the “Send to Back” option.
2. Make sure you have used the right layout: Some layouts don’t include the “ Slide Number ” placeholder in the slide. In that case, you won’t be able to see the slide number in slides using that layout.
To get around this issue, either insert a slide number placeholder in that layout or use a different layout that has a page number placeholder.
9b. Slide Number Showing as “#”
If the slide number is not showing as “#” in your PowerPoint presentation, then the presentation may be using multiple layouts.
To resolve this issue either use a different layout or manually insert a “ Footer ” in your PowerPoint presentation. After that that you should be able to see the “#” sign in the slide number placeholder.
9c. Can’t Remove Slide Number in PowerPoint?
You can’t remove slide numbers from your PowerPoint presentation by simply deleting them. This would only remove the slide number from the single slide where you deleted the slide number.
To remove slide number from all the slides in your PowerPoint, follow the instructions of excluding a slide from being number described earlier in this presentation, but instead of selecting the “ Apply ” button, select the “ Apply all ” button.
9d. Make Slide Number Start at 0
To make the slide number start from zero, follow the instructions given below.
Step-1: Select the “Customize Slide Size” option
The first step of the process is to select the “ Customize Slide Size ” option. To do that simply go to the “ Design ” tab from the ribbon of your presentation, click on the “ Slide Size ” button located in the “ Customize ” section of the “ Design ” tab.
After that, a dropdown menu will appear on your screen. From the dropdown menu, click on the “ Customize Slide Size ” option.
Step-2: Type in 0 in the “Number starts from” box
Finally, type in ‘0’ in the “ Number starts from ” box which is the last box in the “ Slide Size ” pop-up window, and then hit the “ Ok ” button. This will make the slide numbering start from zero.
Credit to drobotdean (on Freepik) for the featured image of this article (further edited)
Critical PowerPoint Shortcuts – Claim Your FREE Training Module and Get Your Time Back!
How to add slide numbers in PowerPoint (Step-by-Step)
- PowerPoint Tutorials
- Shortcuts & Hacks
- January 11, 2024
Adding slide numbers in PowerPoint should be an easy and straightforward task, but it is not. The way that PowerPoint manages your slide numbers is confusing.
While confusing and frustrating, the last thing you want to do – and I have done this before myself – is manually add the page numbers to the slides yourself.
Manually adding slide numbers is a classic 101 timewaster that you will instantly regret for two reasons.
The first reason is, manually doing anything in PowerPoint that PowerPoint can automatically do for you (even if it requires a little research), is never an effective use of your time. If you want to have a life outside of the office slaving away in PowerPoint, you will want to push as many of these types of tasks as possible back on to PowerPoint.
The second reason is, after you manually add your slide numbers in PowerPoint, you will have to manually update them again as you add or remove slides from your presentation. If you thought it was tedious to manually add the slide numbers in the first place, believe me when I say that it is ten times as tedious to have to manually update them again, and triple-check that all your slides are numbered correctly.
Follow along with me below and see the advanced trouble shooting video at the bottom of the page if you are still having issues.
NOTE: When printing your slides as handouts, be aware that it is your slide number (NOT the page number) that displays for each page of the speaker notes you print. To learn how to add speaker notes to PowerPoint (and some of the tricks to working with them), read my guide here .
Table of Contents
[watch] how to add slide numbers in powerpoint.
You are currently viewing a placeholder content from Youtube . To access the actual content, click the button below. Please note that doing so will share data with third-party providers.
Adding slide numbers in PowerPoint is one of those things that should be simple and easy (like it is in Microsoft Word) …but it’s not.
And just so we are on the same page, in this article you can use the term slide number and page number interchangeably. They are the same thing in this case.
While a lot of people can “properly” add them to the PowerPoint Slide Master , they still can’t get them to properly show up in the Normal View . And if you work in the professional services industry, this is something you’ll want to get right! The last thing you want to do is torpedo the overall quality of your presentation simply because you can’t get your slides properly numbered.
Take your PPT skills to the next level
Setting up your slide numbers in the slide master view.
When you are adding slide numbers to PowerPoint, or troubleshooting your slide numbers, the first place to check is your Slide Master.
That is because the Slide Number field is driven and controlled by your Slide Master.
Continue reading to see how this is done. If your Slide Numbers are already set up properly on your Slide Master, you move to the next section.
1. Navigate to your Slide Master
In all versions of Microsoft PowerPoint, the slide numbers (or page numbers) for your presentation are driven from the Slide Master View. As such, this is one of the best places to check first if you are having trouble adding slide numbers in PowerPoint, or if your slide numbers are not properly displaying.

To navigate to the Slide Master view in PowerPoint, simply:
- Navigate to the View tab in your Ribbon
- Select the Slide Master command
If you frequently need to use your Slide Master, you can use the Shift + Normal icon shortcut to jump to the slide master.
2. Navigate to your Parent Slide (the big slide)

In the Slide Master view, navigate to the Parent slide on the top left. This will be the first and largest the slide listed on the left side of your screen.
3. Open the Master Layout dialog box to find the Slide Number field

To open the Master Layout dialog box in PowerPoint, simply:
- Navigate to the Slide Master tab in your Ribbon
- Click Master Layout to open the dialog box
The Master Layout dialog box is where you set the Title, Text, Date, Slide number, and Footer for your PowerPoint presentation. To expand your knowledge and learn how to create a template in PowerPoint, read our guide here .
NOTE: PowerPoint is a contextual program, in that it only displays tabs for the views you are in, or the objects you have selected. If you do not see the Slide Master tab in the ribbon, that means that you have not properly navigated to your Slide Master yet. See step #1 above.
4. Select the Slide Number field
In the Master Layout dialog box, make sure you have a check mark next to Slide number . Selecting this option adds the slide number object to the Parent Slide, that you can then use to automatically add and update all the slides numbers in your presentation (instead of manually adding them yourself).
You can additionally add the Title, Text, Date and/or Footer objects if you don’t already have them on your Parent Slide. These are the fields you will want to set up and properly format if you are building a PowerPoint template for your team or company.
After you select which elements you want to appear on your slides, click OK .

5. Place and format your Slide Number
With the slide number added to your Master Slide , you can now format and/or place it wherever you want. In this case, I’ve placed mine in the upper right-hand corner of my slide.
Where you place it on your Parent Slide determines where the numbers show up (by default) on all of your Child Slides. In the below picture, you can see I placed my slide number in the upper right hand corner of my slide.

NOTE: By default, your slide numbers populate to all the Child Slides (the little slides in the Slide Master view) in your presentation. If they do not, you will need to cycle through the Child Slide layouts and delete the old page numbers individually, and then click the Footers icon in the Ribbon to add them back (another area where slide numbers in PowerPoint can be a pain).
To learn how to set up and format the Parent Slide and Child Slides for your PowerPoint template , read my guide here .
6. Close out of the Slide Master view

Before you exit out of the Slide Master view, I recommend double-checking that your slide numbers are properly set up both on the Parent Slide, and all the individual Child Slides. If you accidentally missed one, now is the time to catch it.
Once you are sure the slide numbers are all where they are supposed to be, you can click out of the Slide Master View:
- Click the Slide Master tab
- Select Close Master View
Applying your slide numbers in the Normal View
Once you’ve set up and formatted the Slide Number field in the Slide Master view, you are ready to move on and add them to your presentation.
As an analyst or associate who is in charge of the deck, it is important to keep in mind that just because the Slide Number field is properly set up in the Slide Master, DOES NOT mean they will automatically show up in your presentation.
Continue reading to see the next steps to make sure your slide numbers properly display in PowerPoint.
1. Open the Slide Number dialog box

Now that you have setup (or double-checked) that your slide numbers are set up properly in the Slide Master view, now we can add them here in the Normal View of PowerPoint (woo-hoo). Let’s start by opening the Header and Footer dialog box as follows:
- Navigate to the Insert tab
- Select the Slide Number command
You can alternatively use the Alt + Shift + D keyboard shortcut to open the Header and Footer dialog box. If you want to learn additional PowerPoint shortcuts like this that will save you time, read my shortcut guide here .
Regardless of how you get to the Header and Footer dialog box, this is the best and proper place to add, remove, and/or manage your presentations:
- Date and time
- Slide numbers
The goal again is to get PowerPoint to do the heavy lifting for you here. Even if this dialog box is new and a little confusing to you, it is worth getting this right as it will save you a ton of time in the future.
2. Apply your Slide Numbers

NOTE: The option to “Don’t show on title slide” can easily catch you off guard. That’s because the title slide in PowerPoint is NOT what you probably think it is. For more information, on what the title slide actually is in PowerPoint, read my guide here .
Within the Header and Footer dialog box, make sure there is a checkmark next to the Slide number .
With it selected, you get a preview of where your slide numbers will appear in the upper right-hand corner of the dialog box. After that, select either:
- Apply , applies your slide number to the individual slide you are working on.
- Apply to All , applies slide numbers to all of the slides within your presentation (assuming that each of the Child Slide layouts has your slid number on it).
Assuming you want to add slide numbers to all your slides in PowerPoint, click Apply to All . Clicking Apply to All, PowerPoint automatically adds the slide numbers to all your slides, based on the formatting and positioning you set up on the slide master.
As you can see in the picture below, the slide numbers now display (just as I set them up on the Slide Master).

Troubleshooting slide numbers that won't show up
If you followed along with me above and you still can’t get your slide numbers to properly display in PowerPoint, I have you covered.
In the following video, I highlight a few extra steps you can take to make sure your page numbers show up in PowerPoint.
If you still can’t figure out what is happening with your slide numbers, leave a comment or send me a note and I will do my best to help you out.
Final thoughts
You did the right thing by looking up how to add slide numbers in PowerPoint. The worst possible thing you can do is get so fed up with the PowerPoint page numbering system, that you manually add them yourself.
Another good point to remember is that you can use the Header and Footer dialog box to quickly remove all the slide numbers from your presentation. Simply unselect the Slide number option and click Apply to All and PowerPoint will automatically remove them all from your presentation.
While we all wish that adding page numbers in PowerPoint was as easy as it is in Word, that’s why you are paid the big PowerPoint bucks.
If you enjoyed this slide number tutorial and want to take your PowerPoint skills to the next level, check out our online training courses and other PowerPoint tutorials here .
🔒 Unlock the PowerPoint Shortcuts Trusted by Industry Leaders KKR, American Express, HSBC, and More!
Join over 114,880 professionals from diverse fields including consulting, investment banking, advertising, marketing, sales, and business development who have supercharged their PowerPoint game with our proven methods.
✅ Customize compelling presentations effortlessly.
✅ Master time-saving techniques for faster deck creation.
✅ Boost your career prospects with top-notch PowerPoint skills.
Get FREE access to the Critical PowerPoint Shortcuts module of our premium training course by entering your name and email below.
DISCLAIMER: PC Users Only!
We respect your privacy and will keep your info safe and confidential.
Related Articles
- What is a broken link chart in PowerPoint (and how to fix it)?
- Bar chart trick: Right aligning categories (PPT, Word, and Excel)
- PowerPoint settings: program level vs. presentation level
- What is a linked Excel chart in PowerPoint?
- Set Up Slide Show: Customize how your PPT presentations run
About The Author

This Post Has 9 Comments

Thanks for your guidance but it doesn’t completely work. I have one Master and two layouts. It will only add the page number to one of the layouts. No matter how many times I try to insert the slide number and apply to all, when ever I add a new slide, it only puts the slide number on one layout but not the other! Very frustrating because I followed all of your steps perfectly.

Thank you thank you thank you. Have been desperately trying to populate a submaster with slide numbers for a day now. The trick of RE-clicking on Title and Footers boxes up in the Maser Slide menu, while selecting my submaster slide, finally did the trick !

So happy to be able to help, Fran! Those little slide numbers can be tricky, despite appearances. Cheers!

Great vid. thanks.
Thanks for commenting, and happy this was a help to you! Cheers!

Thanks for the super-concise speed training on this – I was starting to pull my hair out! Again Microsoft prove they are the most clumsy legacy software developers on the planet!!
Hi Mathias! Glad to have been able to help. Yes, this is still a trickier issue than it should be, but luckily, there is a solution! Cheers

WOW! What an amazing and fast video. I will definitley bookmark this site!!
So happy to hear that, Anna! Thank you and let us know if there’s any other nagging problem we can solve for you. Cheers
Comments are closed.
Popular Tutorials
- How to Strikethrough Text (l̶i̶k̶e̶ ̶t̶h̶i̶s̶) in Word, Excel & PowerPoint
- How to Make Animated Fireworks in PowerPoint (Step-by-Step)
- Strikethrough Shortcut (l̶i̶k̶e̶ ̶t̶h̶i̶s̶) for Word, Excel & PowerPoint
- How to Create a Flash Card Memory Game in PowerPoint (Like Jeopardy)
- Keyboard Shortcuts Not Working: Solved
PowerPoint Tutorial Categories
- Strategies & Opinions
- Presentation Design
- Pictures, Icons, Videos, Etc.
- New Features
- Miscellaneous
- Charts & Data Viz
We help busy professionals save hours and gain peace of mind, with corporate workshops, self-paced courses and tutorials for PowerPoint and Word.
Work With Us
- Corporate Training
- Presentation & Template Design
- Courses & Downloads
- PowerPoint Articles
- Word Articles
- Productivity Resources
Find a Tutorial
- Free Training
- For Businesses
We help busy office workers save hours and gain peace of mind, with tips, training and tutorials for Microsoft PowerPoint and Word.
Master Critical PowerPoint Shortcuts – Secure Your FREE Training Module and Save Valuable Time!
⌛ Master time-saving expert techniques.
🔥 Create powerful presentations.
🚀 Propel your career to new heights.
We value your privacy – we keep your info safe.
Discover PowerPoint Hacks Loved by Industry Giants - KKR, AmEx, HSBC!
Over 114,880 professionals in finance, marketing and sales have revolutionized their PPT skills with our proven methods.
Gain FREE access to a full module of our premium PowerPoint training program – Get started today!
We hate spam too and promise to keep your information safe.
You are currently viewing a placeholder content from Facebook . To access the actual content, click the button below. Please note that doing so will share data with third-party providers.
Home » Microsoft Powerpoint » How to Insert Page Numbers in PowerPoint
How to Insert Page Numbers in PowerPoint
In PowerPoint, inserting page numbers on slides is the same as placing slide numbers on them. You can insert slide numbers on some of your slides or all, provided the layouts contain placeholders.
Note: If the slides have no placeholders, or you have deleted the placeholders, the slide numbers will not display.
Let us show you in simple steps how to insert slide numbers on slides in PowerPoint.
Step #1: Open PowerPoint Slide
Open PowerPoint.
Step #2: Ensure Slide Number Placeholder Appears in Slide Master
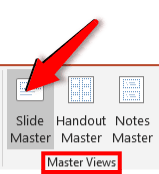
Click on the View tab in the top menu bar to change the ribbon.

In the section Master Views , click on the Slide Master icon.
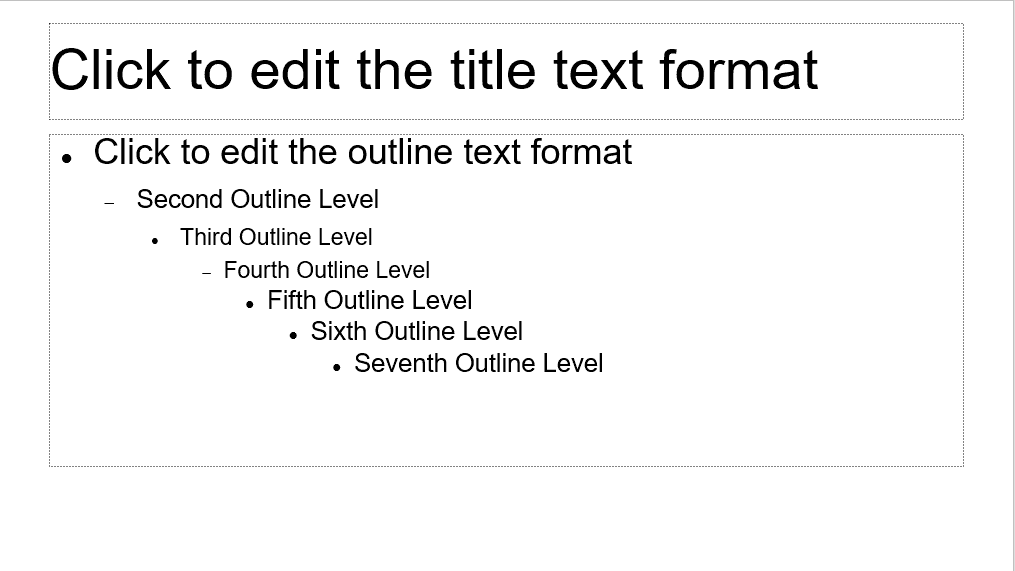
This will open the Slide Master view.
In the thumbnails on the left, click on the slide number 1 .
Note: Placeholders may not be present or visible.
Click on the Slide Master tab in the top menu bar to change the ribbon.

In the Master Layout section, click on the Master Layout icon.

A Master Layout dialog box will open.
Switch on the Slide number Placeholder.
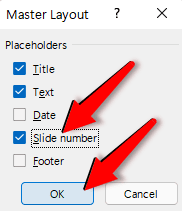
Click on the OK tab at the bottom to close the dialog box.
The Slide Master now has a slide number placeholder.
Step #3: Ensure Slide Number Placeholder Appears in Layouts

In the thumbnails on the left, click on the layout in which you want slide numbers to appear.
In the Master Layout section, click and select the Footers checkbox.

The layout now has a slide number placeholder.

Step #4: Insert Slide Number in Placeholders

Click on the Insert tab in the top menu bar to change the ribbon.

In the section Text , click on the Header & Footer icon.
This will open the Header and Footer dialog box.
Click on the Slide tab.
Click on and select the Slide number check box.
Click on the Apply tab if you want to apply slide number only on one slide.
Click on the Apply to All tab if you want to apply slide numbers to all slides.
Step #5: Return to Normal View

In the section Presentation Views , click on the Normal icon.
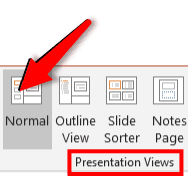
PowerPoint will display the regular presentation.

The slide number will be visible in its placeholder at the bottom right-hand corner of the slide.

Note: Slide number may not appear immediately. You may have to apply a slide layout to the slide.
Step #6: Apply a Slide Layout to a Slide
In the thumbnails on the left, select the slide where you want to display the slide number.
Click the Home tab in the top menu bar to change the ribbon.

In the section Slides , click on the Layouts icon.
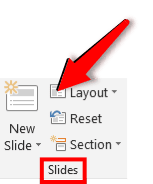
A drop-down menu will appear.
Click on the layout for the current slide to apply it.
Return to Normal view as in Step #5.
We have shown you in simple steps how to insert page/slide numbers in PowerPoint slides. If you have any questions, let us know in the comments section below.
1 thought on “How to Insert Page Numbers in PowerPoint”
good to hear and learn much from you
Leave a Comment Cancel reply
Save my name, email, and website in this browser for the next time I comment.
How to add page numbers to your PowerPoint slides to organize your presentation
- You can add page numbers to your PowerPoint slideshow through the "Slide Master" page, which lets you edit your entire slideshow at once.
- Once you add page numbers to your PowerPoint slideshow, you can edit where they appear on the slides.
- Page numbers are great for helping both you and your audience follow along during a long PowerPoint presentation.
- Visit Business Insider's Tech Reference library for more stories .
Putting page numbers in a PowerPoint presentation can help you keep track of where you are when you're presenting. It can also help if you're printing your presentation, or if you're dividing up the work between a few people and want each person to take a few specific slides.
Because it's such a useful detail, adding page numbers to your PowerPoint slides should be easy — however, it's a bit more complicated than it should be.
So, if you decide you want to add page numbers to your PowerPoint presentation, here's how to do it the right way. This works for PowerPoint on your Mac or PC.
Check out the products mentioned in this article:
Apple macbook pro (from $1,299.00 at apple), acer chromebook 15 (from $179.99 at walmart), how to add page numbers to powerpoint presentations.
1. In PowerPoint, click "View" in the list of options at the top of the window, and then click on "Slide Master."
2. Click on the parent slide at the very top of the slide menu.
3. In the "Slide Master" tab, click "Master layout" to bring up a dialog box.
4. In the "Master Layout" placeholders box, make sure you have "Slide Numbers" checked — it's the default setting, but it may be turned off for some templates.
5. Your slide number placeholder will appear with a # symbol in it. Use your cursor to move it to the position you'd like it in — it shows up on all of your slides in the same position by default.
6. Return to the Slide Master tab and click the red 'X' labeled "Close Master View." This will close the Slide Master so you can go back to editing slides individually.
7. Next, go to the "Insert" tab and click "Slide Number," under "Text," to bring up the Header and Footer dialog box.
8. In the Header and Footer box, check the box next to "Slide Number" to have your numbers show, in the spot you indicated, on your slide.
You can also check the "Don't Show On Title Slide" box if you don't want your title slide to be counted as a numbered page.
9. When you're finished, either click "Apply," to apply the slide number to only the slide you're currently working on, or "Apply to All" to apply slide numbers to all the slides in your presentation.
Note that even if you click Apply to All, slide numbers won't appear on slides for which you've manually removed the slide number placeholder.
Related coverage from Tech Reference :
How to add a border to slides in powerpoint, and give your slideshow a sleek design, how to embed a youtube video into your microsoft powerpoint presentations using a mac or pc, how to convert google slides to a powerpoint presentation in 4 easy steps, how to convert a powerpoint to google slides in 2 different ways, how to copy or duplicate a powerpoint slide and put it anywhere in your slideshow.
Insider Inc. receives a commission when you buy through our links.
Watch: These basement renovations hide slides and secret rooms
- Main content

- Tips and guides
- Microsoft 365
Insert page x of y page numbers in just one section
- The Microsoft 365 Marketing Team
- Personal and family
- Small business
A lot of people want to use different page numbering schemes in different parts of their documents. And a lot of people want to use “ page x of y pages ” page numbering in their documents.
Sometimes, people want to use “ page x of y pages ” page numbering in just a part of their documents.
It all gets down to linking–or unlinking .
If your sections are not linked, you can use a different numbering scheme in each section. You can use i, ii, iii in one section and page x of y pages in another section.

Microsoft Word
Put your best words forward with an Office 365 subscription.
The Header and Footer galleries include some page x of y pages numbering formats. Or you can use field codes to do it yourself.
But first, click where you want to begin the page x of y pages numbering.
Click the Page Layout tab, and then click Breaks and click Next Page under Section Breaks .
Now you have a new section. Double-click in the header or footer (wherever you want to put your page number), and then click Link to Previous to unlink your new section from all the preceding pages. If Link to Previous is not orange, you’re ready to go.

If Link to Previous is orange, you’re still linked, so be sure to click it.

Now, you can click Page Number , click Top of Page or Bottom of Page or Current Position , and then scroll down until you see Page X of Y .

Click the page number option that you want to use. It will look something like this:

Wait! There’s more
If you want one more thing in your header or footer, such as the document title or your name, skip the gallery and use field codes.
You still want a new section, and you still want to be sure that it isn’t linked to the previous pages in your document.
Now, if you’re still in the header or footer, press TAB until the cursor is where you want the page number.
Type the word page and a space, then click the Insert tab, click Quick Parts , and click Field . Use the Page and NumPages fields to get the page number and the total number of pages. You can also use the step-by-step instructions .
Now you have your page x of y pages numbering. It looks something like this:

(I turned on field code shading so that you can see where the field codes are.)
If you want to use a different numbering format later in the document, be sure to add another section break and to unlink that section.
And if you know right from the start that you want to use different numbering formats, insert those section breaks and unlink them first. That way, you can be sure to get the right numbers where you want them.
For all the details of page numbering and headers and footers, see Add or remove headers, footers, and page numbers .
— Joannie Stangeland
- Forgotten Your Password?
- Today's Posts
- Mark Forums Read
- Quick Links :
- What's New?
- Members List
Forum Rules
- Commercial Services
- Advanced Search

- Other Applications & Softwares
- PowerPoint Formatting & General
- [SOLVED] In PowerPoint 2010 How Can I Number the Slides "Slide 1 of 10"?
In PowerPoint 2010 How Can I Number the Slides "Slide 1 of 10"?
Thread tools.
- Show Printable Version
- Subscribe to this Thread…
Rate This Thread
- Current Rating
- Excellent
- Average
- Terrible
- Linear Mode
- Switch to Hybrid Mode
- Switch to Threaded Mode
That pretty much says it. I know how to number pages, but how does one add the " of total " part of "Slide 1 of total "? Preferably, this would be automatic. I'd rather not have to count the slides, then update it if the number of slides changes. Thank you. Phil Brown

Re: In PowerPoint 2010 How Can I Number the Slides "Slide 1 of 10"?
Hi Gnokrojam, Do u want this "Slide 1 of total" as the footer of the every slide or as the slide number?
I would take either. Actually, I thought the slide number was part of the footer. I would like it to appear at the bottom of every page. Thank you for the question. Phil
Hi Phil, click insert<<select slide number<<put a tick mark in slide number. Hope this helps Regards Kokila.S
Kokila, Thank you for the response. I had given up on it. Your suggest gets the slide number placed in the corner. If I have missed something, please educate me. What I am after is a way to get PowerPoint to display "Slide 1 of 10" automatically. How can I get PowerPoint to total the number of pages and include it in the slide number field? Thank you. Phil Brown
Hi Phil, you have to hard code the total slide number There is no automatic calculation of total slides, like in Word for total pages. So make a note of how many slides you have, and do the following: Step 1: Access the Slide Master 1.Choose the VIEW tab and from the PRESENTATION or MASTER VIEWS group [Click] the SLIDE MASTER button. 2.[Click] the appropriate master slide. In order to show your change on all slides except the title slide, use the Title and Content Master, typically the third slide from the top in the navigation panel. You can Hover over a Master to show its title and which slides it affects. Step 2: Add a text box 1.Choose the INSERT tab and from the TEXT group, [Click] the TEXT BOX button. 2.[Click] where you would like to display your count. Step 3: Add the text and slide numbers 1.Ensure that your cursor is in the text box you just created, then choose the INSERT tab and, in the TEXT group, [Click] the SLIDE NUMBER button. The placeholder for page numbers will appear, and is shown as ‹#›. 2.Now enter the text you want to add to the slide count, e.g., If you want the finished output to display in the format “Slide 2 of 20″, the contents of your text box should look like this: Slide ‹#› of 20. 3.Choose the SLIDE MASTER tab and [Click] CLOSE MASTER VIEW in the CLOSE group. Alternatively, [Click] the Normal button in the status bar. That’s it! You should now see an updating count of slide number with your extra text included, on each slide. Remember to update the total if it changes so you don’t wind up with “21 of 20″! (Applies to both 2010 & 2007 versions) Regards Kokila.S
Kokila.S, Thank you for spelling it out for me. The details you provided were very clear. I'd never have thought to insert a text box. I thought that the supplied box with <x> would have worked. I wasn't able to get it to though. And I didn't know what the page number icon was used for. Given that PowerPoint does not provide for an automatically updated page total, this is the next best thing. Thank you very much for the help. Phil B.
Thread Information
Users browsing this thread.
There are currently 1 users browsing this thread. (0 members and 1 guests)
Tags for this Thread
- page number ,
- page numbering ,
- powerpoint 2010 ,
- slide master
View Tag Cloud
Posting Permissions
- You may not post new threads
- You may not post replies
- You may not post attachments
- You may not edit your posts
- BB code is On
- Smilies are On
- [IMG] code is On
- HTML code is Off
- Trackbacks are Off
- Pingbacks are Off
- Refbacks are Off
- ExcelForum.com
- Slide Library
- Slide Library for PowerPoint
- Downloadable slides and shapes
- Slide Library search
- Search Library via shortcut keys
- Slide Library update alerts
- Rename or delete objects
- Share Slide Library
- Save slides or shapes to Slide Library
- Save presentation to Slide Library
- Manage Templates
- View all templates and set default
- Agenda Wizard
- Create Agenda Slides
- Update Agenda Slides
- Agenda Slide Numbering
- Navigate via Agenda
- Table of Contents
- Import Agenda Items
- Save Agenda Format
- Manage Colors
- Color Palette Toolbar
- Customize Color Toolbar
- Apply fill with outline color
- Recolor Charts
- View RGB color values & names
- Theme Color Tints and Shades
- Share Color Palette with team
- Insert Shapes
- Standard PowerPoint shapes
- Callouts / Speech Bubbles
- Hand Drawn Circles
- Harvey Balls
- Create Mini Slides
- Move to Multiple Slides
- Right Facing Centered Triangle
- Status Indicators
- Arrange and Align Shapes
- Select same color or size
- Select shapes by attribute
- Align shapes
- Align to first selected shape
- Choose Align anchor point
- Align using shortcut keys
- Copy paste position multiple shapes
- Straighten Lines
- Swap positions
- Distribute evenly
- Set Horizontal Gaps
- Set Vertical Gaps
- Squeeze or expand gaps
- Remove gaps
- Group Objects by Row
- Group Objects by Column
- Send to back, bring to front
- Send backward, bring forward
- Flip or rotate
- Group, ungroup and regroup
- Edit Shapes
- Same height, same width
- Copy paste position, size
- Resize shapes
- Slice shapes
- Multiply shapes
- Stretch shapes and fill gaps
- Toggle line weight and style
- Change margins toggle
- Chevrons same angle
- Paragraph Styles
- Save Paragraph Styles
- Apply Paragraph Styles
- Use PowerPoint Indent Increase/ Decrease to apply bullet styles
- Reset Paragraph Styles
- Ticks and Crosses bullets
- Paint Formatting
- Advanced Format Painter
- Position & Size Painter
- Table Format Painter
- Style Painter
- Text Format Painter
- Change Shape Painter
- Chart Format Painter
- Angles & Curves Painter
- Animation Painter
- Cycle Accent Colors
- Format Text
- Fit text to textboxes
- Wrap Text Toggle
- Merge Textboxes
- Split Textboxes
- Increase/ Decrease Font size
- Change Text Case
- Color Bold Text
- Delete Text or Replace
- Insert Superscript text
- Format Tables
- Create table from text boxes
- Convert table to text boxes
- Convert text to table
- Insert columns and rows
- Paste Excel data without source formatting
- Paste Excel data into text box tables
- Export Table or Box Table Data to Excel
- Set cell margins
- Express Table layout
- Table stripes
- Autofit columns
- Evenly space columns
- Align shapes over tables
- Harvey Balls for Tables
- Status Indicators for Tables
- Customizable PowerPoint Shortcuts
- Extra PowerPoint shortcuts
- Add PowerPoint shortcuts
- Search shortcut keys
- Reassign PowerPoint shortcuts
- Reset PowerPoint shortcuts
- McKinsey PowerPoint shortcuts
- F4 or Ctrl+Y redo or repeat
- Printable PowerPoint Shortcuts PDF
- How to Print a Custom Shortcuts list
- Search Shortcut Keys
- Searchable PowerPoint Shortcuts list
- Format Toolbar Overview
- Format Toolbar Layout Options
- Lock or Unlock Objects
- Lock objects
- Lock objects to the Slide Master
- Unlock objects
- Proofing Tools
- Fix Lines & Outlines
- Fix Layout, Transitions, Animations
- Fix Punctuation & Spacing
- Fix Margins, Bullets, Indents
- Check for Confidential items
- Reduce File Size
- Check Slide Master
- Set Proofing Language
- Change set language for PowerPoint presentations
- Flip PowerPoint Slides
- Flip Slides for Translation
- Slide Numbering
- Manage Slide Numbering
- Slide Numbers with totals
- Add words to Slide Numbers
- Change Starting Slide Number
- Skip Slide Numbers on Hidden Slides
- Slide Navigator
- Footers & Footnotes
- Filename Footer
- Enlarge Footnotes
- Refine Slides
- Add summary slide
- Format slide title
- Display No Fly Zone
- Send slide to appendix
- Camouflage mode
- Format Painter
- Set Grayscale
- Format Images
- Compress file size
- Format Charts
- Charts Toolbar
- Config Options
- Customize Settings
- Dark Mode Display
- Review Slides
- Customizable Status Stamps
- Sticky Notes
- Tag slides with filename and page number
- Share Slides
- Email selected slides in PPT or PDF format
- Print selected slides
- Save selected slides
- Slide Library for Teams
- Team Slide Library
- Create multiple Team Slide Libraries
- Synchronize Team Slide Libraries
- Synchronize Team Slide Library to your company Dropbox/ Box/ OneDrive folder
- Updating your Team Slide Library
- Import entire presentation to the Slide Library
- Share Slide Library with a colleague
- Share Custom Settings
- Share Custom Settings with Team
- Getting Started
- Getting started with PPT Productivity add-in for PowerPoint
- Downloadable PowerPoint Elements for Slide Library
- Tutorial - How to Create Custom Paragraph Styles for PowerPoint
- Can I use PPT Productivity on a Mac?
- PPT Productivity Basic Tools Tutorial
- PPT Productivity Plus Tools Tutorial
- New Features
- August 2023 update: Color Toolbar enhancement, new icons and more
- February 2023 update: New Slide Libraries available to download!
- January 2023 Update: Agenda Wizard, Format Painters + More
- How to copy and paste formatting in PowerPoint
- PowerPoint How To
- What are the most popular PowerPoint shortcuts?
- Where are PPT templates stored? Finding templates in PowerPoint
- Pasting data into a PowerPoint table without source formatting?
- Consulting Toolkit
- How to create effective consulting slides using Minto Principles
- Missing the McKinsey PowerPoint Shortcuts?
- Missing the Accenture QPT for PowerPoint?
- Missing the BCG PowerPoint Tools?
- Missing the Bain Toolbox for PowerPoint?
- How to add Stamps or Stickers to PowerPoint slides?
- Looking for a Consulting PowerPoint Toolbar?
- Top 10 PowerPoint Hacks / Shortcuts used by strategy consultants
- PowerPoint Tips
Can I change PowerPoint starting slide number?
- April 23, 2021
Do you want to start your PowerPoint Slide number / page numbers at zero or another number? By default, PowerPoint starts your presentation slide numbering at one. But setting your slide number to start from zero or any other number in PowerPoint is easy.
There’s a couple of ways to change your slide numbering in PowerPoint – from the Design Tab or using the PPT Productivity Slide Numbering feature.
Change Starting Page Number in PowerPoint from the Design Tab
To set your page numbers to start from a page other than one, navigate to the ‘Design’ tab in PowerPoint. Once on the ‘Design’ tab, use the following steps to update the slide numbering;
1. Open the ‘Slide Size’ dropdown menu 2. From the ‘Slide Size’ menu, select ‘custom slide size’

3. At the bottom of the ‘custom slide size’ dialogue box you will see the ‘Number slides from:’ dropdown box.

4. From the ‘slide numbers from:’ dropdown box, select or input the slide number you want to start your slide numbering from. For example, selecting zero will start your presentations slide numbering from slide 0 rather than slide 1 5. Click ‘OK’ for the slide numbering change to be applied to your presentation

Change Starting Page Number in PowerPoint with PPT Productivity
PPT Productivity has made it even easier to set your slide numbers to begin at zero, or any other number.
To change slide numbering with PPT Productivity, 1. From the top ribbon select the ‘Slide Numbers and Totals’ icon from the ‘Footer’ feature group.

2. In the ‘Slide Numbers and Slide Totals’ menu, select or input the slide number you want the presentation numbering to begin with. For example, changing the slide number to start at zero will make the first slide in the presentation number 0 rather than 1. 3. Click OK for the slide numbering change to be applied.

The PPT Productivity slide numbering tools are also accessible from the ‘Insert’ tab.

Visit our Slide Numbering feature page to learn more about Slide Numbers and Slide Totals

See our tools at work
Book a personal demo with our PPT professionals

Start 30 Day Free Trial
Start your 30 day free trial - Microsoft Office for Windows
Download and Install
Existing customers download to install on a new computer
Related productivity tips

Troubleshooting PowerPoint Slide Numbering: How to fix common issues
Looking for how to add slide numbers in PowerPoint? Trying to work out what to do when PowerPoint ...

Can I insert slide totals with slide numbers in PowerPoint? Yes!
PPT Productivity add-in recently released our Manage Slide Numbering feature for PowerPoint. ...

How to add a PowerPoint Table of Contents slide?
Adding a table of contents in PowerPoint is easy with the PPT Productivity PowerPoint add in. ...
- Search forums
- Board Rules
Follow along with the video below to see how to install our site as a web app on your home screen.
Note: This feature may not be available in some browsers.
- If you would like to post, please check out the MrExcel Message Board FAQ and register here . If you forgot your password, you can reset your password .
- Question Forums
- General Discussion & Other Applications
Add Page x of y in PPT( Powerpoint)
- Thread starter Yakuzaa
- Start date Mar 7, 2005
Board Regular
- Mar 7, 2005
Hello all, Houw can I add in the footer of my presentation page x / y ? I see the code fot the current pagenumber is <#>, but further on ... ?? Urgent ! Thanks in advce, Yakuzaa
Excel Facts
not even one person ?

- Mar 8, 2005
Hi Yakuzaa, I believe there is only way to accomplish this: typing manually after <#>: Page <#>/TotalSlides TotalSlides is the number of slides that you already know. So after final review of your presentation, you can change this field in Slide Master and make it show the Page x / y. I know I am probably repeating what you already know but this is the only way that I know. I hope it helps. Suat
- Feb 9, 2015
It's not possible in PowerPoint. You have to use the Add-In. Saved me a ton of time. PowerPoint X of Y Pages Add-In
Similar threads
- Jan 27, 2023
- Nov 15, 2022
- Jun 4, 2023
- Jul 29, 2022
- Oct 6, 2022
Forum statistics
Share this page.
We've detected that you are using an adblocker.
Which adblocker are you using.
Disable AdBlock

Disable AdBlock Plus

Disable uBlock Origin

Disable uBlock

Xbox Live Goes Down in Nearly Seven-Hour Outage
By Todd Spangler
Todd Spangler
NY Digital Editor
- Bob Iger, Willow Bay Near Deal to Acquire Control of Women’s Pro Soccer Team Angel City FC for More Than $50 Million: Reports 2 days ago
- Paramount Stock Rises on New Skydance Merger Offer 2 days ago
- Paramount Reportedly in Talks to Sell BET for $1.6 Billion in Buyout Led by CEO Scott Mills 2 days ago

UPDATE, 7/2, 9:01 p.m. ET: Microsoft said it resolved the technical problems that had knocked out Xbox Live for nearly seven hours. “Users should no longer be encountering issues signing in to Xbox Live and services,” the Xbox Support account on X posted at 8:49 p.m. ET. “Thank you for your patience, game on!”
Xbox Live, Microsoft’s multiplayer gaming and digital media network, was suffering a major outage Tuesday as thousands of users reported problems accessing it.
Popular on Variety
Related stories, why the academy museum’s antisemitism criticism is overblown, zach bryan brings in bruce springsteen for a feature on 'the great american bar scene,' a record steeped in the boss' quieter side: album review.
Other Microsoft-operated services, including Minecraft and the Microsoft Store, also had a high level of user error reports on Downdetector.
The official Xbox Support account on X posted at 2:55 pm. ET, “We are aware that some users have been disconnected from Xbox Live. We’re investigating!” The message directed users to the Xbox status page — which eventually was updated to say that a major outage of the “Account & profile” service was reported at 2:07 p.m. ET. “You may not be able to sign-in to your Xbox profile, may be disconnected while signed in, or have other related problems,” the message on the Xbox status page said. “Features that require sign-in like most games, apps and social activity won’t be available.”
Microsoft requires users to have an Xbox Live account (which is free to set up) to play games online and access other experiences on the Xbox console, Windows PC and Xbox mobile apps.
Xbox Live users took to social media to vent about the technical problems:
@XboxSupport what’s happening? Can’t log in. Can’t watch YT, can’t play games… whatsup xbox /microsoft 😭?? — keep swimming (@lostislander00) July 2, 2024
@XboxSupport Xbox Live is apparently so broken right now that I can’t even report that it’s down pic.twitter.com/38oRux850n — KirstenHeffron.bsky.social (@KirstenHeffron) July 2, 2024
@XboxSupport any reason why this is happening? It’s been 20 minutes and I still can’t log in. I logged in fine this morning. Also I can’t register the outage on the Microsoft website 🤬 pic.twitter.com/A0XuNaP6N6 — Chris Topher (@topbottom23) July 2, 2024
@XboxSupport is there a problem with Xbox live right now? I’ve reset my XSX a couple times and I keep getting this error. pic.twitter.com/GZGZeVxI5n — Jeff J (@MYTHODDIKAL) July 2, 2024
More from Variety
Russell crowe turned down aragorn in ‘lord of the rings’ after iffy peter jackson meeting: ‘i felt the studio was making that decision, not the film director’, with a data licensing framework in play, rights holders can embrace ai , social video vs. paid streaming: a report on the race to replace tv, more from our brands, watch fka twigs perform ‘cellophane’ at london charity show, wagyu steak, candy rooms and private clubs: inside the hidden world of vip perks at nba arenas, patrick bertoletti wins nathan’s annual hot dog eating contest, the best loofahs and body scrubbers, according to dermatologists, nathan’s famous hot dog eating contest: who won the annual fourth of july binge-a-thon (watch video), verify it's you, please log in.
Election results latest: Vans at Downing Street as Sunak moving out - Starmer will be PM with landslide majority
Sir Keir Starmer will be the new prime minister this lunchtime after his party won a landslide. Top Tories Liz Truss, Penny Mordaunt and Grant Shapps have been kicked out, with the Lib Dems gaining record seats and Nigel Farage becoming an MP for the first time - one of four for Reform.
Friday 5 July 2024 09:15, UK
- General Election 2024
Please use Chrome browser for a more accessible video player
- Labour win landslide - Sir Keir Starmer declares: 'Change begins now'
- Sam Coates analysis : This is 'loveless landslide'
- Tory wipeout: Rishi Sunak concedes | Liz Truss's shock loss | Hunt's great escape | 12 cabinet ministers cabinet booted out
- Record 70-plus seats for Lib Dems - as SNP collapse
- Nigel Farage becomes MP as Reform third in vote share and have four seats
- When does Starmer become PM? Key timings today
- Live reporting by Faith Ridler, Katie Williams and Brad Young, and (earlier) Ollie Cooper, Ben Bloch and Jess Sharp
- Labour's vote share declines in areas with large Muslim populations amid Gaza anger - with Jonathan Ashworth ousted
- Michael Thrasher analysis: Record-shattering election carries lessons for all parties
- How night unfolded in eight videos - from exit poll to defeated Rees-Mogg's film quote
- Ed Conway : The political geography has changed
- Politics At Jack And Sam's: Labour's landslide - can it get any worse for Tories?
- Results in every constituency as they come
Labour has performed better than predicted by the exit poll.
The party was forecast to win 410 seats, but has just gained their 411th.
There are five seats left to declare, meaning Sir Keir won't hit the heights forecast by YouGov's last poll before the election, 431 seats.
The Conservatives are set to fair worse than the exit poll suggested, with 119 seats as it stands.
Liberal Democrats have stormed ahead of their expected results, winning 71 seats - an increase of 63 - and their highest ever result.
We're nearly at the end of the results, with 645 out of 650 seats declared.
Here are the five seats left to go:
- Basildon South and East Thurrock
- Dumfries and Galloway
- Dumfries, Clydesdale, and Tweeddale
- Inverness, Skye, and West Ross
A second recount is taking place in Poole, where the Labour and Conservative candidates appear to be just a handful of votes apart.
A recount has also been ordered for the Inverness, Skye, and West Ross seat where the Liberal Democrat and SNP candidates are "neck and neck," according to The Inverness Courier.
The paper cited one count officer as saying it was "close, very close".
Counting was paused at Basildon South and East Thurrock earlier this morning and will resume at 2pm for a full recount.
You can check the result for every constituency on our 2024 General Election page here .
The UK is now a different colour - politically, that is.
Ed Conway , our economics and data editor, says the "political geography has changed".
Standing on a virtual map of the country, he takes us through the differences compared to when Boris Johnson won an 80-seat majority four-and-a-half years ago.
While the "red wall" turned blue in 2019, "now it's red all over again", he says.
He also notes Scotland "used to be painted almost completely yellow (SNP), and now there's a lot of red there" (Labour).
Despite Labour's huge majority, though, the number of votes cast for Sir Keir Starmer's incoming government is "far short" of the number cast for Tony Blair's in 1997, Conway says.
Watch his full analysis below:
It's 9am - here's the state of play as we look to confirm the last few constituency results:
Here's what else you need to know:
- Sir Keir Starmer will be prime minister before 12.20pm , when he will make his first speech as leader;
- Rishi Sunak is expected to make his final speech as PM at 10.30am;
- Moving vans have already arrived at Number 10 and 11, as Mr Sunak and outgoing chancellor Jeremy Hunt depart;
- The Liberal Democrats have beaten their previous record for number of seats in Westminster by nine, taking 71 seats;
- Sir Keir could be one of the most consequential PMs since the war, said our political editor Beth Rigby , but faces the rise of the "other" parties, like Lib Dems, Greens, and Reform UK;
- The Labour Party's share of the vote barely moved from its 2019 level, said Sky News' election analyst Professor Michael Thrasher , who pointed to the complete collapse of the Tory vote ;
- A total of 12 cabinet members have lost their seats , with the final one to be declared, Mel Stride, clinging on to Central Devon;
- Greg Hands, the former minister for London, lost his Chelsea and Fulham seat to Labour by fewer than 200 votes - and former PM Liz Truss has lost her seat in Norfolk .
It's been an extraordinary election night, with Sir Keir Starmer primed to become the UK's next prime minister after a Labour landslide.
The Tories have had a bruising time since the polls closed at 10pm, with several cabinet ministers including the now former defence secretary Grant Shapps and Commons leader Penny Mordaunt losing seats.
It all began with the much-awaited exit poll , which predicted that Labour would win a whopping 410 seats compared to just 131 for the Conservatives. Here's a reminder of that moment...
At around 3am, the news came through that Mr Shapps had lost his seat of Welwyn Hatfield to the Labour Party by a margin of 3,799 votes.
He was the second cabinet casualty of the night, after justice secretary Alex Chalk also lost his seat.
In his losing speech, Mr Shapps said it was "clear" Britain would "have a new government in the morning":
Not long after, Penny Mordaunt, the Conservative leader of the House of Commons, became one of seven cabinet members to lose their seat as Labour gained Portsmouth North by 780 votes.
She said her party had taken a "battering because it failed to honour the trust that people had placed in it":
The night was dominated by discussion of the historic win for Labour and the major losses for the Tories - but among the big stories was Reform UK leader Nigel Farage winning a Commons seat at his eighth attempt.
He said it had been "truly extraordinary" seeing how well his party had done in such a short time, as he gave his winning speech at around 3.30am:
Around an hour later, we learned that Rishi Sunak had comfortably held his seat in Richmond and Northallerton.
The prime minister looked solemn as the results were read aloud, and later conceded the election to Sir Keir Starmer and Labour.
"The Labour Party has won this general election, and I have called Sir Keir Starmer to congratulate him on his victory," he said:
As we reached early morning, senior Conservative Jacob Rees-Mogg become the latest big-name Tory casualty, losing his North East Somerset and Hanham seat to Labour.
The arch-Brexiteer lost to his rival by more than 5,000 votes.
During his speech, he congratulated Sir Keir Starmer and bade farewell by saying: "From the ashes of disaster grow the roses of success."
The quote came from Caractacus Potts, one of the characters from the film Chitty Chitty Bang Bang:
Shortly before 5am, the official news came through that the Labour Party had won a majority in the House of Commons and will form the next government.
Addressing crowds just minutes after a Labour majority was confirmed, Sir Keir said: "We did it."
"Change begins now," he said.
The Labour leader won his seat in Holborn and St Pancras in London earlier in the night by more than 11,000 votes.
One of the biggest shocks of the election came just before 7am, when former prime minister Liz Truss lost her seat in Norfolk South West - which was considered to be safe.
There were slow claps in the audience as the candidates awaited the arrival of Ms Truss - who was nowhere to be seen moments before the result.
Here's a reminder of the moment her defeat was announced:
Voters are "seeking to punish as much as they are seeking to reward" in this general election, says our deputy political editor Sam Coates .
His comments come as Labour lose Birmingham Perry Barr to an independent candidate .
Ayoub Khan won 13,303 votes while Khalid Mahmood, who had held the constituency since 2001, received 12,796.
It's the latest setback for Labour in some previously safe areas, particularly those with large Muslim populations.
"I think this reinforces the sense that in some ways this has been quite a negative election, and the things motivating voters in quite a lot of areas - whether it was getting out the Tories, whether it was punishing the SNP, or whether it was voting against what is perceived to be an establishment position on the Middle East," Sam says.
"Voters are seeking to punish as much as they are seeking to reward."
He says single issues are "motivating larger numbers" than any election since 2005.
Rishi Sunak has just left the Conservative Party headquarters, to shouts of "it can only get better" as he heads towards Downing Street.
Others were heard shouting "the party is over" and "pack your bags" as he got in a car outside the central London headquarters.
We are expecting to hear from him at around 10.30am, before Sir Keir Starmer - the incoming prime minister - enters Number 10.
Mr Sunak managed to keep hold of his seat in Richmond and Northallerton as his party was devastated in the polls, losing at least 249 seats.
A jubilant Liberal Democrat leader Sir Ed Davey is addressing supporters after taking the most seats the party has ever won.
"And I didn't even have to paraglide in!" says Mr Davey, referencing his stunt-filled campaign.
"The Liberal Democrats are winning again," he says, adding their number of seats - 71 so far - is their best result in over 100 years.
"Trust is a very precious commodity. It's hard-won, and sometimes you've lost it, and you'll have to work very hard to win it back, and I want to thank people for trusting us again. We will not let you down."
Lib Dems will put care 'at heart of agenda'
His words evoke the party's erosion of support following a number of U-turns it performed while joining the Conservatives in coalition in 2010, perhaps most infamously on tuition fees.
Health and care will be at the "heart of our agenda", he says, adding he will campaign for an emergency budget this month, says Sir Ed.
He tells Sky News he "jumped off the sofa" when the exit poll came in overnight.
Over the next parliament he says he will stand up for people on the sewage scandal, mental health crisis and health care system.
"It will take some time, but we are committed to transform our country."
This is the scene outside Number 10 at the moment, where the country's journalists are waiting with bated breath for the arrival of Rishi Sunak.
We're expecting him to arrive on Downing Street in the next few hours, before giving a statement at around 10.30am.
Sir Keir Starmer is expected to deliver a speech at around 12.30pm.
By Josephine Franks , news reporter
Lady Victoria Starmer will be preparing to move into Downing Street.
Her husband Sir Keir Starmer has reached the magic number of 326 seats and will become the country's next prime minister.
Lady Starmer has never done an interview - and according to Sir Keir, that's not about to change.
In his speech after holding the Holborn and St Pancras constituency, he thanked her for her support.
Here, we take a closer look at what we know about the UK's next "First Lady"...
Be the first to get Breaking News
Install the Sky News app for free

Change the size of your slides
Basic steps.
To change the slide size:
Select the Design tab of the toolbar ribbon.

Select Standard (4:3 aspect ratio) or Widescreen (16:9) or Custom Slide Size .

For more about the predefined sizes (including formats like Overhead, A3, A4, Banner, B4, and B5) or your own custom sizing, click a heading below to expand it and see the details .
Detailed steps
Choose the standard or widescreen slide size.
On the Design tab of the Ribbon, locate Slide Size in the Customize group, near the far right end of the toolbar.

Select Slide Size , and then select either Standard (4:3) or Widescreen (16:9) .

When PowerPoint is unable to automatically scale your content, it prompts you with two options:
Maximize : Select this option to increase the size of your slide content when you are scaling to a larger slide size. Choosing this option could result in your content not fitting on the slide.
Ensure Fit : Select this option to decrease the size of your content when scaling to a smaller slide size. This could make your content appear smaller, but you’ll be able to see all content on your slide.

The 16:9 widescreen setting is the default value for new presentations you create. When you change the slide size for a presentation, the size you choose only applies to that presentation. However, you can make it easy to create a new 4:3 presentation for yourself whenever you want—by defining a custom theme that uses the 4:3 aspect ratio. See the section below named "Make a default size to start from when creating new presentations."
Choose another size, such as A3, B4, or Overhead
Select Slide Size , and then select Custom Slide Size .

In the Slide Size box, click the down arrow next to Slides sized for and select an option. Their dimensions are listed below:
| Name | Width | Height |
|---|---|---|
| On-screen Show (4:3) | 10 in / 25.4 cm | 7.5 in / 19.05 cm |
| Letter Paper (8.5x11 in) | 10 in / 25.4 cm | 7.5 in / 19.05 cm |
| Ledger Paper (11x17 in) | 13.319 in / 33.831 cm | 9.99 in / 25.374 cm |
| A3 Paper (297x420 mm) | 14 in / 35.56 cm | 10.5 in / 26.67 cm |
| A4 Paper (210x297 mm) | 10.833 in / 27.517 cm | 7.5 in / 19.05 cm |
| B4 (ISO) Paper (250x353mm) | 11.84 in / 30.074 cm | 8.88 in / 22.556 cm |
| B5 (ISO) Paper (176x250mm) | 7.84 in / 19.914 cm | 5.88 in / 14.936 cm |
| 35 mm Slides | 11.25 in / 28.575 cm | 7.5 in / 19.05 cm |
| Overhead | 10 in / 25.4 cm | 7.5 in / 19.05 cm |
| Banner | 8 in / 20.32 cm | 1 in / 2.54 cm |
| On-screen Show (16:9) | 10 in / 25.4 cm | 5.625 in / 14.288 cm |
| On-screen Show (16:10) | 10 in / 25.4 cm | 6.25 in / 15.875 cm |
| Widescreen | 13.333 in / 33.867 cm | 7.5 in / 19.05 cm |
Overhead provides an aspect ratio very close to the standard 4:3 slide size.
There are two options for 16:9 aspect ratios:
On-screen Show (16:9) sets the slide dimensions to 10 in x 5.625 in.
Widescreen sets it to 13.333 in x 7.5 in.
Both of these options are the same aspect ratio so they will look the same in Normal View , since PowerPoint automatically adjusts the zoom level. Widescreen (13.333 in x 7.5 in.) provides more slide surface area for the content, so that is the best choice for presentations. Widescreen won’t fit on an 8.5" x 11" sheet of paper without you having to scale it down.

Select OK to accept the dimensions and close the Slide Size dialog box.
Choose custom dimensions (in inches, centimeters, or pixels)
The Slide Size dialog box opens.
In the Slide Size dialog box, ensure the orientation is set the way you want it.
In the Height and Width boxes, PowerPoint accepts measurements in inches , centimeters , or pixels . Type a number followed by a space and then the appropriate abbreviation: in , cm , or px .
| Width or Height | |
|---|---|
|
| 1 in 2.54 cm 120 px |
|
| 56 in 142.24 cm 720 px |
PowerPoint then converts measurements, if necessary, to the type of unit your operating system uses.
You can change the unit of measure that is shown in PowerPoint dialog boxes if you like.
Make a default size to start from when creating new presentations
This version of PowerPoint has a default size of 16:9 for new presentation, but you can create a different default for yourself.
Start PowerPoint.
On the File tab of the toolbar ribbon, select New . Then double-click the Blank Presentation to create a new, empty presentation.
Then on the Design tab, click Slide Size and choose the size you want for a default.
(If you want a different default slide size than what's listed there, select Custom Slide Size and then choose your size in the Slide Size dialog box, and then click OK .)

Select Save Current Theme .
Give your theme a name that you'll remember easily and click Save . Don't change the folder that the new theme is to be saved in.
On the Design tab, click the More arrow again in the bottom-right corner of the Themes group. You'll see your newly saved theme under a Custom heading.
Right-click that new custom theme under the Custom heading, and then select Set as Default Theme :

Close PowerPoint. Don't save any files if it prompts you.
Open PowerPoint again. On the File tab of the toolbar ribbon, select New .
The custom theme that you just saved is listed at the top left corner, named Default Theme . The thumbnail image looks like a widescreen slide, but in reality, when you create a new presentation based on that theme, the presentation has the aspect ratio that you've defined for this default theme.
The next time you open PowerPoint, you'll see your default theme in the upper-left of the theme gallery. When you select it, all the slides will be the custom size you chose by default.
Sizing applies to all slides in a presentation
PowerPoint isn't able to resize one slide within a presentation. All slides in a presentation are the same size.
If this is a feature you’d like to request, please send us your feedback to help us prioritize new features in future updates. See How do I give feedback on Microsoft 365 for more information.
Orientation applies to all slides in a presentation
PowerPoint isn't able to change the page orientation of certain slides. All slides in a presentation have the same page orientation.
Change the page orientation in PowerPoint between landscape and portrait
Use portrait and landscape slide orientation in the same presentation
Reduce the file size of a picture
On the File menu, select Page Setup .
In the Page Setup dialog box, under Slides sized for , select the predefined size you want, or choose Custom and specify the dimensions you want.

Select Slide Size .

Select Standard (4:3) or Widescreen (16:9) .

PowerPoint may prompt you about scaling your content. Choose one of the following options:
Scale: Select this option to decrease or increase the size of your slide content. When scaling to a smaller slide size, this could make your content appear smaller, but you’ll be able to see all content on your slide.
Don't Scale: Select this option to maintain the size of your slide content. Choosing this option could result in your content not fitting on the slide.

Choose Page Setup from the menu that appears.
Page Setup gives you an assortment of predefined slide/page size options. The options and their dimensions are listed below:
In the Slide Size box, click the down arrow next to Slides sized for and select an option.
Widescreen sets the dimensions to 13.333 in x 7.5 in.

Choose custom dimensions (in inches, centimers, or pixels)
Select Slide Size , and then click Page Setup .

The Page Setup dialog box opens.
In the Width and Height boxes, PowerPoint accepts measurements in inches , centimeters , or pixels . Type a number followed by a space and then the appropriate abbreviation: in (inches) or cm (centimeters) or px (pixels).
PowerPoint then converts the measurements, if necessary, to the unit of measurement your operating system uses.
Make a new slide size the default for new presentations
Select Slide Size , and then select Page Setup .
Follow the steps in the prior section to choose the slide size you want.
On the Design tab, click the More arrow below the standard themes.

Click Save Current Theme at the bottom of the window.

Give your theme a name that you'll remember easily and click Save .
On the Design tab, click the More arrow below the standard themes again. You'll see your newly saved theme under Custom .

Right-click your new custom theme, and then click Set as Default Theme .

The next time you open PowerPoint, you'll see your default theme in the upper-left of the theme gallery. When you select it, all the slides will be the size you chose for your default theme.
Some folks have asked about resizing one slide within a presentation. PowerPoint isn't able to do that. All slides in a presentation are the same size.
Some folks have also asked about changing the page orientation of certain slides. PowerPoint isn't able to do that. All slides in a presentation have the same page orientation.
On the Design tab of the toolbar ribbon, click Slide Size in the Customize group.

Click Standard (4:3) or Widescreen (16:9) .
When PowerPoint for the web is unable to automatically scale your content, it prompts you with two options:

The 16:9 widescreen setting is the default value for new presentations you create. When you change the slide size for a presentation, the size you choose only applies to that presentation.
You can also change the orientation of all the slides in your presentation. See Change the page orientation for instructions.

Choose custom dimensions
In the Width and Height boxes, type a measurement in inches . PowerPoint doesn't accept measurements outside the minimum and maximum shown below:
| Width or Height | |
|---|---|
|
| 1 inch (One inch is equal to 2.54 cm.) |
|
| 56 inches (Fifty-six inches is equal to 142.24 cm.) |

Need more help?
Want more options.
Explore subscription benefits, browse training courses, learn how to secure your device, and more.

Microsoft 365 subscription benefits

Microsoft 365 training

Microsoft security

Accessibility center
Communities help you ask and answer questions, give feedback, and hear from experts with rich knowledge.

Ask the Microsoft Community

Microsoft Tech Community

Windows Insiders
Microsoft 365 Insiders
Was this information helpful?
Thank you for your feedback.
IMAGES
COMMENTS
On the Insert tab, in the Text group, click Text Box, and then drag to draw the text box on the slide master where you want the slide number to appear all slides. With the cursor still in the text box, on the Insert tab, in the Text group, click Slide Number. In the text box, place your cursor before the <#>, and then type Slide. On the View ...
Add slide numbers or notes page numbers. On the View tab, in the Presentation Views group, click Normal. On the left of your screen, in the pane that contains the slide thumbnails, click the first slide thumbnail in your presentation. On the Insert tab, in the Text group, click Header & Footer. If you want to add slide numbers, click the Slide ...
To add slide numbers, open a PowerPoint presentation with several slides added and then click the "Insert" tab. From here, you'll need to select the "Header & Footer" button in the "Text" section. This will bring up the "Header and Footer" options box. To add slide numbers to your PowerPoint slides, click the "Slide Number" checkbox in the ...
In PowerPoint you can add or remove automatic slide numbers, hide numbering on the title slide, and move slide numbers. You can also add the date and time to slides. Windows macOS Web. If you'd like to suggest improvements to the slide numbering feature, you can do that by clicking Help > Feedback > I have a suggestion.
Step-2: Click on the "Slide Number" option. Now, click on the " Insert " tab. Then, from the options, click on the " Slide Number ". This will open a new pop-up window with more options. Step-3: Add the Slide Numbers to the Slides. First, make sure that you enable the "Slide Number" option in the next step.
1. Open the Slide Number dialog box. Now that you have setup (or double-checked) that your slide numbers are set up properly in the Slide Master view, now we can add them here in the Normal View of PowerPoint (woo-hoo). Let's start by opening the Header and Footer dialog box as follows: Navigate to the Insert tab.
Click on the Insert tab in the top menu bar to change the ribbon. In the section Text, click on the Header & Footer icon. This will open the Header and Footer dialog box. Click on the Slide tab. Click on and select the Slide number check box. Click on the Apply tab if you want to apply slide number only on one slide.
Microsoft PowerPoint: How To Set Up Page NumberingThis is a video tutorial on how to set up page numbering in Microsoft PowerPoint presentation.0:00 Intro0:1...
1. In PowerPoint, click "View" in the list of options at the top of the window, and then click on "Slide Master." Open up your Slide Master. Melanie Weir/Business Insider. 2. Click on the parent ...
Using the Slide Numbers and Totals feature on the PPT Productivity ribbon in PowerPoint, you can: Display the total number of slides in the presentation along with the slide number on each slide; Select your preferred display format for the slide totals e.g.: # of ## (example: 1 of 20) #/## (example: 1/20) # (of ##) (example: 1 (of 20) )
Clicked Reset under Home/Slide - no changes. Selected slide number 4. Clicked Layout under Home/Slide and selected the Title and content layout - no changes. Added a new slide (number 5); now that one has the words "Page No." before the Page number. All subsequently created slides will have it, too.
But first, click where you want to begin the page x of y pages numbering. Click the Page Layout tab, and then click Breaks and click Next Page under Section Breaks. Now you have a new section. Double-click in the header or footer (wherever you want to put your page number), and then click Link to Previous to unlink your new section from all the ...
How to Add Page/Slide numbers in PowerPoint - the right way. Most presenters just insert the numbers manually. This leads to issues when some slides are rem...
Add a text box to each slide and then add the page numbers to each text box. On the Insert tab, click Header & Footer . In the Header and Footer box, on the Slide tab, select the Slide number check box, and then in the Starts at box, type the page number that you want to start with on the first slide.
In the slide pane on the left, the slide number has a slash through it. What does this mean? It means the slide has been hidden and will not show in the presentation. One way to use them is if you have a slide you may or may not want to show. Normally when you click / spacebar etc on the previous slide it will be missed out, BUT if instead you ...
Step 3: Add the text and slide numbers. 1.Ensure that your cursor is in the text box you just created, then choose the INSERT tab and, in the TEXT group, [Click] the SLIDE NUMBER button. The placeholder for page numbers will appear, and is shown as ‹#›. 2.Now enter the text you want to add to the slide count, e.g.,
1. Open the 'Slide Size' dropdown menu. 2. From the 'Slide Size' menu, select 'custom slide size'. Set PowerPoint Slide Number from Slide Size menu. 3. At the bottom of the 'custom slide size' dialogue box you will see the 'Number slides from:' dropdown box. Change Slide Numbering to start from 0 or another number. 4.
I believe there is only way to accomplish this: typing manually after <#>: Page <#>/TotalSlides. TotalSlides is the number of slides that you already know. So after final review of your presentation, you can change this field in Slide Master and make it show the Page x / y. I know I am probably repeating what you already know but this is the ...
Add page number X of Y to your document. Check one checkbox to include the total number of pages with the page number in your document's header or footer in Word for the web. If you're not already in Editing view, click Edit Document > Edit in Word for the web. Click Insert > Page Numbers. You'll see a gallery of page number layout ...
1 County: Butte Last Updated 07/04/2024 9:52 PM. Date Started 07/02/2024 10:51 AM. Location Information Cherokee Road and Thompson Flat Road, Oroville . Latitude / Longitude [39.53793,-121.5467] Admin Unit CAL FIRE Butte Unit . Incident Management Team CAL FIRE Incident Management Team 6. Cause Under Investigation ...
This video demonstrates the method to apply if you wish to display Slide X of Y in a PowerPoint Presentation (X is the current slide number and Y is the tota...
Xbox Live, Microsoft's multiplayer gaming and digital media network, suffered technical problems with users reporting widespread access problems.
By Aoife Yourell, economics producer. It is the first big moment of election night. The exit poll is the moment millions tune in for a first sniff of the eventual result of the general election.
Widescreen sets it to 13.333 in x 7.5 in.. Both of these options are the same aspect ratio so they will look the same in Normal View, since PowerPoint automatically adjusts the zoom level.Widescreen (13.333 in x 7.5 in.) provides more slide surface area for the content, so that is the best choice for presentations. Widescreen won't fit on an 8.5" x 11" sheet of paper without you having to ...