How to Make a Copy of a Microsoft PowerPoint? (The Easy Way)
Microsoft PowerPoint is a popular presentation software used by millions of people around the world.
In this article, we’ll cover the benefits of making a copy of a PowerPoint presentation, a step-by-step guide to making a copy, tips for doing it successfully, how to access the copy, and different ways to store and access multiple versions.
We’ll also discuss some common mistakes to avoid when making a copy of a PowerPoint presentation.
So if you want to learn how to make a copy of a Microsoft PowerPoint presentation the easy way, read on!

Short Answer
To make a copy of a Microsoft PowerPoint presentation, open the file in PowerPoint and select “File” from the top menu.
Then choose “Save As” and enter a new filename for the copy.
What is a PowerPoint Presentation?
A PowerPoint presentation is a digital presentation created in Microsoft office using the PowerPoint program.
PowerPoint presentations are often used for educational purposes, business meetings, and other professional purposes, such as sales pitches and product launches.
PowerPoint is an effective way to communicate a message or idea in an engaging and visual way, and can be a great tool for delivering presentations in a variety of settings.
Benefits of Making a Copy of a PowerPoint Presentation
This can be especially useful when making changes to your presentation or when you need to keep track of different versions of the same presentation.
When making changes to a presentation, it can be easy to accidentally delete slides or make unwanted modifications.
By creating a copy of your presentation, you can easily revert back to the original version if needed.
This will help you keep track of the changes you make and easily access the version you need.
By making a copy of your presentation, you can easily share it with colleagues, friends, and family.
This can be especially useful if you need to collaborate on a presentation or send it to someone for review.
Step-by-Step Guide to Making a Copy of a PowerPoint Presentation
When you select the File tab, a menu will appear with a variety of options.
Once youve clicked Save As, youll be prompted to select a location to save the copy.
This file can be edited and used to create a new presentation.
This way, youll have a backup of the presentation in case something happens to the original.
Tips for Making a Copy of a PowerPoint Presentation
Creating a copy of a Microsoft PowerPoint presentation is an easy and efficient way to store and organize slides. It can be helpful to have multiple versions of a presentation on hand, and making a copy is an easy way to do that. Here are some tips to make the process even simpler:
3. Select Save As. Once youve opened the File tab, select the Save As option. This will open a window where you can choose a location to save the copy.
By following these simple steps, you can quickly and easily make a copy of your PowerPoint presentation.
How to Access the Copy of the PowerPoint Presentation
Creating a copy of a Microsoft PowerPoint presentation is a quick and easy process, and it can be a great way to store and organize your slides.
This will open a window where you can choose a location to save the copy.
With this method, you can easily store and access multiple versions of the same presentation.
This tab will show the most recent presentations you have opened, including the copy of the presentation.
By creating a copy of your PowerPoint presentation, you can easily store and access multiple versions of the same presentation.
Different Ways to Store and Access Multiple Versions of the PowerPoint Presentation
Creating a copy of a Microsoft PowerPoint presentation is an effective way to store and access multiple versions of the same presentation.
There are a few different ways to make a copy of a PowerPoint presentation.
This is the easiest and most straightforward method, but it does require that you have the original presentation open in order to make a copy of it.
This can be useful if you want to share the presentation with someone who does not have PowerPoint installed.
Once you have downloaded the file, you can then open it in PowerPoint and make a copy of it.
Common Mistakes to Avoid When Making a Copy of a PowerPoint Presentation
Making a copy of a Microsoft PowerPoint presentation is a simple task, but there are some potential pitfalls to avoid. To ensure you make a successful copy, here are some common mistakes to avoid:
3. Not Editing the Copy: When making a copy of a PowerPoint presentation, make sure you edit the copy to make sure its different from the original. If you simply make a copy and dont make any changes, then the original and the copy will be identical, and you wont be able to tell the difference.
Final Thoughts
With this guide, you now have the step-by-step instructions to make a copy, access the copy, and store multiple versions of the presentation.
Recent Posts

Save your presentation file
|
|
As with any software program, it is a good idea to name and save your presentation immediately, and save your changes frequently while you work.
In PowerPoint, you can save your desktop presentation to your local drive (such as your laptop), a network location, a CD, a DVD, or a flash drive. You can also save it as a different file format.
On the File tab, select Save .

Do of the following:
To save to your local drive, such as your laptop, a flash drive, CD or DVD drive, select Computer .
To save to a SharePoint Library, select SharePoint .
Under Save As > Recent Folders , select Browse , pick a path and file folder, and then name the file.
Select Save .
Save your presentation file in a different file format
Note: To save files in PDF (.pdf) or XPS (.xps) file formats, see Save or convert to PDF or XPS .
On the File tab, select Save As .
Under Save As , do one of the following:
Under Recent Folders , select Browse , pick a path and file folder, and then name the file.
In the Save as type list, pick the file format that you want.
Save your presentation in an earlier version of PowerPoint
In newer versions, you can save files to an earlier version of PowerPoint by selecting the version from the Save as type list in the Save As box. For example, you can save your PowerPoint presentation in the newest PowerPoint Presentation format (.pptx), or as a PowerPoint 97-2003 Presentation (.ppt).
Newer versions use an XML-based .pptx file format introduced in the 2007 Office release. These files can be opened in PowerPoint 2010 and PowerPoint 2007 without special add-ins or loss of functionality. For more information, see Open XML Formats and file name extensions .
Open Document format
Microsoft 365 supports the ability to save a presentation file in the OpenDocument Presentation format (.odp).
When you use the Save As or Save a Copy command, the option to save in .odp format is listed at the end of the Save as type list of options.

Need more help?
Want more options.
Explore subscription benefits, browse training courses, learn how to secure your device, and more.

Microsoft 365 subscription benefits

Microsoft 365 training

Microsoft security

Accessibility center
Communities help you ask and answer questions, give feedback, and hear from experts with rich knowledge.

Ask the Microsoft Community

Microsoft Tech Community

Windows Insiders
Microsoft 365 Insiders
Was this information helpful?
Thank you for your feedback.
- PRO Courses Guides New Tech Help Pro Expert Videos About wikiHow Pro Upgrade Sign In
- EXPLORE Tech Help Pro About Us Random Article Quizzes Request a New Article Community Dashboard This Or That Game Popular Categories Arts and Entertainment Artwork Books Movies Computers and Electronics Computers Phone Skills Technology Hacks Health Men's Health Mental Health Women's Health Relationships Dating Love Relationship Issues Hobbies and Crafts Crafts Drawing Games Education & Communication Communication Skills Personal Development Studying Personal Care and Style Fashion Hair Care Personal Hygiene Youth Personal Care School Stuff Dating All Categories Arts and Entertainment Finance and Business Home and Garden Relationship Quizzes Cars & Other Vehicles Food and Entertaining Personal Care and Style Sports and Fitness Computers and Electronics Health Pets and Animals Travel Education & Communication Hobbies and Crafts Philosophy and Religion Work World Family Life Holidays and Traditions Relationships Youth
- Browse Articles
- Learn Something New
- Quizzes Hot
- This Or That Game
- Train Your Brain
- Explore More
- Support wikiHow
- About wikiHow
- Log in / Sign up
- Computers and Electronics
- Presentation Software
- PowerPoint Presentations
How to Save a PowerPoint Presentation
Last Updated: May 26, 2022
wikiHow is a “wiki,” similar to Wikipedia, which means that many of our articles are co-written by multiple authors. To create this article, volunteer authors worked to edit and improve it over time. This article has been viewed 52,410 times. Learn more...
A PowerPoint presentation is an excellent way of presenting information or ideas to an audience. The software is easy to use and offers a lot of cool effects for your slideshows, too. But, what's all the use of this if you don't even know how to save your finished PowerPoint? This wikiHow will teach you how to save your file.
Design your PowerPoint presentation.

- You don't have to wait until you're totally finished to save your work. It can help to save along the way, too, to ensure you don't lose any progress.
Open the File menu when you're ready to save.

Choose the Save or Save As option.

Decide where to save the presentation.

Name and save your presentation.

Expert Q&A
You might also like.

About This Article
- Send fan mail to authors
Is this article up to date?

Featured Articles

Trending Articles

Watch Articles

- Terms of Use
- Privacy Policy
- Do Not Sell or Share My Info
- Not Selling Info
Keep up with the latest tech with wikiHow's free Tech Help Newsletter
- Slides and Organization
How to Make a Copy of a PowerPoint?
Written by: Bill Whitman
Last updated: April 9, 2024

How to Make a Copy of a PowerPoint
Making a copy of a PowerPoint presentation is a straightforward process that can be accomplished in a few simple steps. Whether you need a backup of your presentation or you want to create a version that you can edit without altering the original, duplicating a PowerPoint file is a skill worth having. Here, at LearnPowerpoint.io, we’re committed to providing you with trusted advice to simplify this process.
Quick Summary
- Save a copy through the “Save As” feature.
- Duplicate slides within the PowerPoint for specific slide copying.
- Use Microsoft Windows Explorer or Mac Finder for file duplication.
- Sharing a PowerPoint can also be done by sending a copy via email.
- Always ensure the final copied file is saved in the desired location and format.
Step-by-Step Guide to Make a Copy of a PowerPoint Presentation
To make a copy of your PowerPoint presentation, follow these easy steps:
- Open your PowerPoint presentation : Start by opening the PowerPoint presentation you wish to make a copy of.
- Click on “File” in the top menu : This will open a dropdown menu with various options.
- Select “Save As” : In the dropdown menu, find and click on the “Save As” option. This allows you to save your presentation as a new file.
- Choose the location for the copy : Decide where you want to save the copy on your computer or in the cloud.
- Enter a name for the copy : In the “File name” field, type a new name for your presentation to differentiate it from the original.
- Click “Save” : After naming your file, click “Save.” You now have a copy of your PowerPoint presentation.
Alternatively, you can make a copy of a PowerPoint file without opening PowerPoint by using File Explorer on Windows or Finder on Mac:
- Navigate to where your PowerPoint file is saved.
- Right-click on the file.
- Select “Copy” from the context menu.
- Right-click on your desired location.
- Select “Paste” to place a copy of the file there.
Duplicating Specific Slides Within a Presentation
If you’re looking to copy specific slides within a presentation:
- Open your PowerPoint presentation.
- Select the slide or slides you wish to copy in the slide sorter or slide pane.
- Right-click on the selected slides and choose “Copy.”
- Right-click in the area where you want to place the copies and choose “Paste.”
Remember, at LearnPowerpoint.io, our goal is to help you master PowerPoint with ease. Whether you’re duplicating an entire presentation or specific slides, doing so allows you to experiment with different versions without losing the original content.
Additional Tips for Managing PowerPoint Copies
Here are a few additional tips to manage your PowerPoint presentation copies effectively:
- Regular Backups : Make routine backups of important presentations to avoid data loss.
- Version Control : Keep track of different versions by including version numbers or dates in file names.
- Cloud Storage : Consider using cloud storage services like OneDrive for easy access and sharing.
- Emailing Presentations : If you need to share a copy with someone, you can attach it to an email directly from PowerPoint via the “Share” feature.
Copying a PowerPoint presentation is an essential task for anyone who uses PowerPoint regularly. By following these guidelines and steps, you can ensure that your presentations are safely duplicated and accessible whenever you need them.
Other Categories
- Advanced Features and Interactivity
- Basic Features and Usage
- Media and Design
- Text and Formatting

How to Merge Shapes in PowerPoint?

How to Use PowerPoint on iPad?

How to Use PowerPoint on a Mac?

How to Make a Good PowerPoint?

How to Insert Symbols in PowerPoint?

How to Superscript in PowerPoint?

How to Add a Border to a Slide in PowerPoint?

How to Change Slide Size in PowerPoint?

How to Use PowerPoint Viewer?
Featured posts.
- Amazon Prime Day Early Deals
- Summer Sales: Waterproof Bluetooth Speakers
Copy Slides to Another PowerPoint Presentation
- Brock University
What to Know
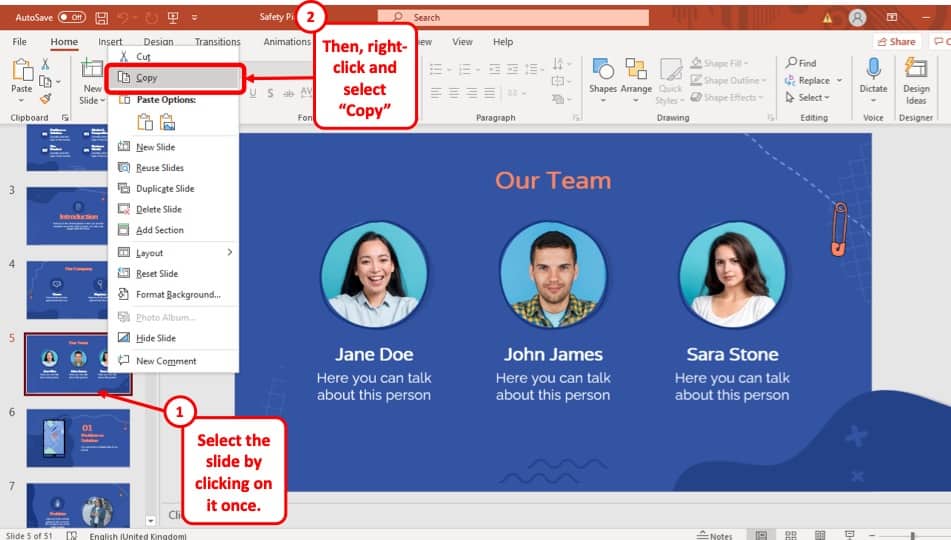
- Right-click the thumbnail of the slide to be copied, select Copy , then right-click a blank area of the Slides pane where you want to place it.
- Alternate method: Click-and-drag the thumbnail of the slide you want to copy to the Slides pane of the destination presentation.
- Note: When using the click-and-drag method, the copied slide takes on the design theme of the destination presentation.
This article explains how to copy a slide in PowerPoint from another PowerPoint presentation. Instructions in this article apply to PowerPoint 2019, 2016, 2013, 2010, 2007, 2003, and PowerPoint for Microsoft 365.
Copy and Paste Method in PowerPoint
A quick way to use slides from one presentation in another presentation is to copy the slides that you want to use and paste those slides into the new presentation.
Open both presentations to show them at the same time on the screen. The original presentation contains the slides you plan to copy , and the destination presentation is where they will go. The destination presentation may be an existing presentation or a new presentation.
On the ribbon , go to the View tab.
In the Window group, select Arrange All . In PowerPoint 2003, choose Window > Arrange All from the main menu.
In the Slides pane of the original presentation, right-click the thumbnail of the slide to be copied.
Choose Copy from the shortcut menu.
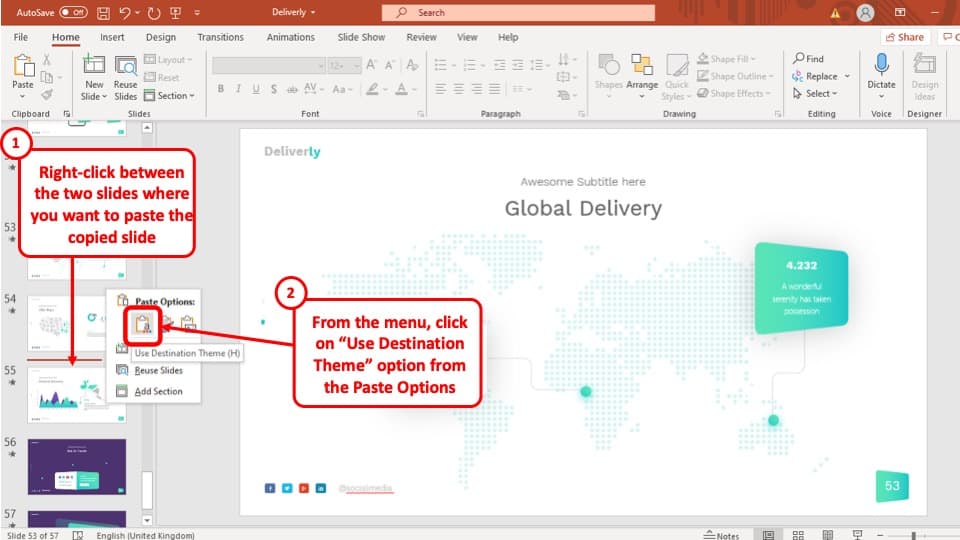
In the destination presentation, right-click a blank area of the Slides pane where you want to place the copied slide. It can be placed anywhere in the sequence of slides in the presentation.
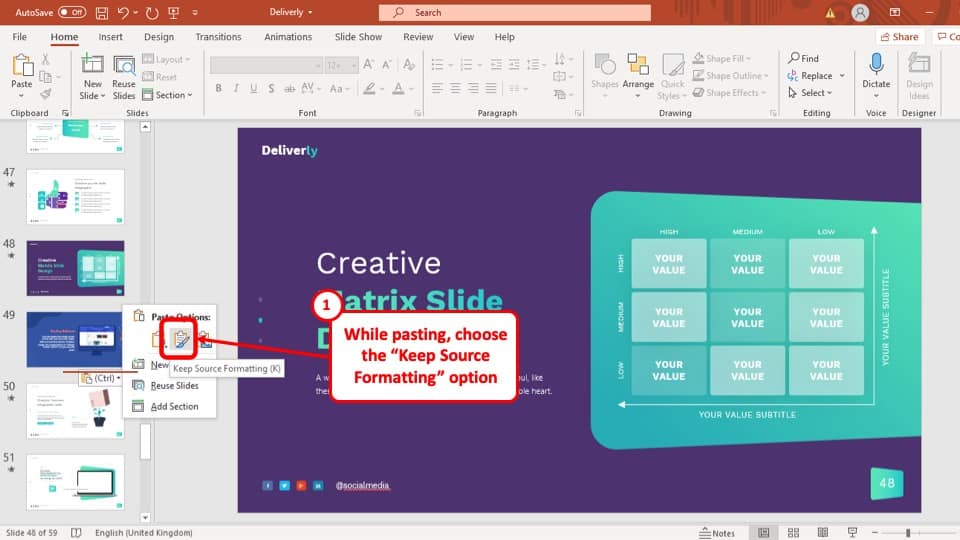
Choose a Paste option. In PowerPoint 2019, 2016, 2013, and 2010, you have three options:
- Use Destination Theme (H) : The copied slide will use the same theme as the PowerPoint presentation it is pasted into.
- Use Source Formatting (K) : The copied slide will keep the original theme and formatting as the original presentation.
- Picture (U) : The copied slide will be pasted as a graphic into the active slide.
For PowerPoint 2007 and 2003, choose Paste from the shortcut menu.
Click and Drag Method in PowerPoint
If you'd rather use the mouse to copy slides from one presentation to another, follow these steps:
In the Slides pane of the original presentation, select the thumbnail of the desired slide.
Drag the thumbnail to the Slides pane of the destination presentation in the preferred location for the slide.
The pointer changes to indicate the placement of the slide.
Place the slide between two slides or at the end of the presentation.
When you use this method, you don't have the option to choose which theme the newly copied slide will use. The newly copied slide takes on the design theme in PowerPoint (or design template in PowerPoint 2003) of the second presentation.
If you started a new presentation and haven't applied a design theme or design template, the newly copied slide appears on the white background of the default design template.
Get the Latest Tech News Delivered Every Day
- How to Copy a PowerPoint Design Template to Another Presentation
- Add, Delete or Change the Order of PowerPoint Slides
- How to Merge PowerPoints
- How to Use Speaker Notes in PowerPoint
- How to Use Copilot in Powerpoint
- Use PowerPoint Slide Finder
- How to Save Sounds From PowerPoint Slideshows
- How to Select More Than One Slide in PowerPoint
- Slide Layouts in PowerPoint
- How to Print PowerPoint Slides
- PowerPoint Master Slide
- How to Increase PowerPoint Slide Number Size
- How to Hide and Unhide a Slide in PowerPoint
- Use This PowerPoint Template for a Multiple Choice Quiz
- How to Make a PowerPoint Presentation
- PowerPoint for Beginners - How to Use PowerPoint
How-To Geek
How to automatically save powerpoint presentations to onedrive.

Your changes have been saved
Email Is sent
Please verify your email address.
You’ve reached your account maximum for followed topics.
Microsoft Office Now Plays Better With LibreOffice
Miss the old windows sounds here’s how to bring them back in windows 11, change these hidden settings to speed up your android phone, quick links, automatically save powerpoint presentations to onedrive, change where powerpoint presentations are saved in onedrive.
If you regularly work on Microsoft PowerPoint, you should consider enabling AutoSave for your presentations. Here's how you can directly save PowerPoint presentations to OneDrive if you have a Microsoft 365 subscription .
Remember that you'll have to enable this once every time you open a new PowerPoint presentation. After that, AutoSave will keep saving changes to the presentation when you make them.
Related: What Is Microsoft 365?
You should note that OneDrive needs to be set up separately, even if you've logged in to Microsoft Office on your computer. You just need to open the OneDrive app on your computer and sign in to your Microsoft account. Once you've done that, OneDrive will be set up and ready to use on your computer.
With OneDrive set up, open Microsoft PowerPoint and select the "File" menu at the top.

Click "New" on the left pane.

Select "Blank Presentation" or any template that you like.

Hit the toggle next to AutoSave and make sure that it's set to "On."

You'll see a pop-up message where you'll need to select "OneDrive."

Now, name your presentation, and then click "OK."

From this moment on, PowerPoint will keep saving your presentation automatically. You can find your saved presentations in the Documents folder in OneDrive by default. If you use OneDrive just to store your Office documents, you're unlikely to run out of storage anytime soon, because you get 1TB of storage along with your Microsoft 365 subscription.

Changing the location of your saved PowerPoint presentations is a good idea if you like to sort your work into neat folders. You can do this easily by opening any presentation in MicrosoftPowerPoint and clicking "File."
Now, select "Save a Copy."

Click "OneDrive," which is in the pane labeled Save a Copy.
Here, you can click "More options" to open a window.

Alternatively, you can click "New Folder" in PowerPoint and start organizing your presentations.
When you're done, select the folder that you just created.

Hit "Save."

This will save your presentation in a new folder in OneDrive. The next time you create a PowerPoint presentation, you can use this method to either save it in the same folder or to create a new one if you wish to.
To verify that your file is saved in the correct folder, click the file name at the top and check the directory under OneDrive.
Now that AutoSave is enabled on PowerPoint, you should try embedding a Microsoft PowerPoint slide in a Word Document. You can also try sharing your Word document using OneDrive.
Related: How to Share Your Microsoft Word Document Using OneDrive
- Microsoft Office
How to copy or duplicate a PowerPoint slide and put it anywhere in your slideshow
- You can copy a slide in the PowerPoint app or online version, and then paste it somewhere else in the slideshow.
- To copy a PowerPoint slide, you just need to right-click it, or open the "Home" menu.
- You can also use PowerPoint's "Duplicate" function, which will create a copy of a slide automatically, without having to paste anything.
- Visit Business Insider's Tech Reference library for more stories .
Copying a slide in PowerPoint takes only a few clicks, whether you choose to do so in a web browser or in the app.
Additionally, you can also choose to directly duplicate a slide, which eliminates the need to click again to paste. The "Duplicate" option will create a copy of the slide, right behind its original.
Here's how to do copy or duplicate in either version of PowerPoint on your Mac or PC.
Check out the products mentioned in this article:
Apple macbook pro (from $1,299.00 at apple), acer chromebook 15 (from $179.99 at walmart), how to copy a slide in powerpoint 's online app.
1. Open Office365 in any internet browser, and log into your account.
2. Open a PowerPoint presentation by selecting one from the "Recent" list or other tabs. You can also click "Start new" below the plus sign icon, followed by "Presentation." Additonally, you can click "PowerPoint" from the options at the top.
3. Once your presentation is open, you can right-click on any slide in the left sidebar, and then select "Copy." You can select multiple slides at once by holding Copy or Command on your keyboard as you click.
4. Right-click again in a different spot on the sidebar and click "Paste" to paste the slide you copied. Pasting in the gray space at the bottom will copy the slide to the end of your slideshow. If you right-click and click "Paste" in the space in between two slides, you can insert the copied slide there instead,
5. You can also select "Duplicate Slide" instead of "Copy." This eliminates the need to right-click again to paste, as it automatically creates a copy of the slide or slides selected. Slides will immediately appear in order, directly behind their originals.
You can also select slides, and then find the Copy, Paste, and Duplicate options by clicking the clipboard icon at the top of the screen. If you don't see it, make sure you're in the "Home" tab.
How to copy a slide in the PowerPoint desktop app
1. Open a PowerPoint presentation on your Mac or PC.
2. Right-click on a slide in the left sidebar to copy it. You can also press Command + C or Ctrl + C on your keyboard. If you hold down Command or Ctrl, you can click multiple slides to select them all at once.
3. Right-click in the space between slides or the blank area at the end of a presentation to paste. You can also use Command + V or Ctrl + V.
4. When you right-click on the original slide to be copied, you can also choose the "Duplicate Slide" option instead. The keyboard shortcut for this is Shift + Command + D, or Shift + Ctrl + D. This eliminates the need to right-click again to paste, and instead immediately creates a copy directly behind the selected slide.
5. You can also access any of these options on the far left side of the "Home" tab. Click the page icon to copy the selected slide, or click the small arrow next to it to choose between "Copy" or "Duplicate." The "Paste" clipboard icon appears next to these options.
Related coverage from Tech Reference :
How to download and access microsoft powerpoint on your mac computer, how to embed a youtube video into your microsoft powerpoint presentations using a mac or pc, how to convert google slides to a powerpoint presentation in 4 easy steps, how to convert a powerpoint to google slides in 2 different ways, how to change the background on your google slides presentation.
Insider Inc. receives a commission when you buy through our links.
Watch: We compared the $1,200 MacBook Air with the $500 Surface Go, and the results were a mess
- Main content
Byte Bite Bit
How to Copy a Slide from One PowerPoint to Another: A Step-by-Step Guide
Creating impactful PowerPoint presentations often means borrowing slides from previous decks or collaborating with colleagues. When faced with this task, it’s reassuring to know that copying a slide from one PowerPoint presentation to another is a simple process . This task can greatly streamline your workflow, saving you both time and effort.

In our experience, utilizing the built-in features of PowerPoint allows for seamless integration of slides. By using options like ‘Copy and Paste’ or ‘Reuse Slides’, you can transfer content without a hitch. One handy tip is that you can drag and drop slides, which feels almost as intuitive as shuffling a deck of cards. This approach is not only efficient but also keeps your formatting intact.
| Select slide → Ctrl+C → Ctrl+V in new presentation | A few seconds | |
| Insert tab → Reuse Slides → Select slides | A few minutes | |
| Drag slide thumbnail into new presentation | Instant |
By mastering these methods, we empower ourselves to craft polished and cohesive presentations swiftly. Whether you’re preparing for a crucial meeting or collaborating on a big project, knowing how to effectively copy slides will undoubtedly enhance your productivity. Let’s dig into these techniques and make your next PowerPoint project a breeze!
- 1.1 Choosing the Right Design Theme
- 1.2 Implementing Effective Source Formatting
- 2.1 Utilizing the Reuse Slides Feature
- 2.2 Mastering Slide Arrangement Techniques
- 3.1 Navigating Between Different Views
- 3.2 Optimizing Your Workflow with Shortcuts
- 4.1 Incorporating Multimedia Elements
- 4.2 Exploring PowerPoint Alternatives
Creating and Designing Professional Slides
Let’s explore practical steps to create and design eye-catching PowerPoint slides that make a lasting impact. From selecting a fitting design theme to ensuring consistent formatting, we’ve got you covered.
Choosing the Right Design Theme
Selecting the appropriate design theme sets the tone for a professional presentation. PowerPoint offers a wide variety of themes to choose from. We can find themes by navigating to Design > Themes in the PowerPoint desktop app.
We should consider the topic and audience when picking a theme. For instance, a business presentation might benefit from a clean, minimalist theme, while a more creative topic could use a vibrant, colorful one.
Also, it’s essential to maintain consistency throughout the presentation. Here’s a quick tip: Apply the chosen theme to all slides by selecting Design > Apply to All Slides .
Implementing Effective Source Formatting
Ensuring consistency in formatting across all slides enhances the overall look. We can copy and paste source formatting from one slide to another using tools like Format Painter . This tool is available under Home > Format Painter .
To copy slide formatting:
- Select the slide with the desired formatting.
- Click on Format Painter.
- Click on the slides to which you want to apply the formatting.
For copying entire slides from another presentation, open both presentations in the PowerPoint desktop app. In the source presentation, right-click on the slide thumbnail and select Copy Slide . Then, paste the slide in the destination presentation. This process ensures the formatting and design elements remain intact.
This consistency reinforces our message and keeps our audience focused.
Managing Slide Consistency and Reusability
Consistency and reusability are key to making effective presentations. We can achieve this by utilizing built-in PowerPoint features and mastering slide arrangement techniques.
Utilizing the Reuse Slides Feature
When we want to maintain consistent styling across presentations, the Reuse Slides feature comes in handy. We can open the destination presentation and navigate to the Home tab.
Select Reuse Slides from the New Slide dropdown menu.
The Reuse Slides Pane will open on the right. Here, we can browse for the source presentation. Clicking on a slide will insert it into our current presentation while preserving the original formatting.
This feature helps us save time and ensure all our slides look unified, whether we’re using Microsoft 365 or PowerPoint for the web . With it, we don’t have to worry about manually adjusting design elements every time we import a slide.
Mastering Slide Arrangement Techniques
Once we’ve imported slides, arranging them efficiently is crucial. Using the Slide Sorter view, accessible from the View tab, allows us to see all our slides at once. This visual overview helps in organizing the slides logically.
We can also use Normal View for a more detailed look at each slide. By selecting multiple slides with Shift+Click, we easily move entire sections around.
Another powerful tool is the Arrange All option in the View tab. This allows us to work on multiple presentations side-by-side, simplifying the process of transferring slides while maintaining the flow and consistency of our presentation.
Efficient Slide Handling and Navigation
Efficient handling and navigation of slides in PowerPoint significantly enhance productivity. This section will discuss key strategies for effectively moving, copying, and managing slides.
Navigating Between Different Views
When juggling multiple slides, navigating between different views is essential. In PowerPoint, the Normal view is highly functional as it displays the slides pane, offering a clear thumbnail view of each slide. This aids in quickly selecting the slides we need.
The Slide Sorter view provides a bird’s-eye view, making it easier to move and copy slides. To access Slide Sorter, click on the View tab on the ribbon and select Slide Sorter . This allows us to see all slides at once, facilitating efficient reorganization.
To toggle between these views quickly, use the shortcuts Alt + W, L for Normal view and Alt + W, I for Slide Sorter view on Windows. On a Mac, use Cmd + 1 for Normal view and Cmd + 2 for Slide Sorter view.
Optimizing Your Workflow with Shortcuts
Leveraging shortcuts can streamline our workflow significantly. For instance, to copy a slide, select the desired slide thumbnail and press Ctrl + C for Windows or Cmd + C for Mac. To paste the slide, use Ctrl + V or Cmd + V respectively.
We can also utilize the Duplicate Slide function. Right-click on the slide thumbnail and select Duplicate Slide , or use Ctrl + D (Cmd + D on Mac). This creates an exact copy instantly, saving time compared to traditional copy-paste.
Moreover, the Ribbon provides quick access to the New Slide and Paste Options buttons, enhancing our flexibility. The Paste Options menu even allows us to choose different formatting options for the pasted slides, maintaining consistency.
By mastering these shortcuts and navigation strategies, we can handle our slides more efficiently and create polished presentations with ease.
Advanced PowerPoint Techniques and Alternatives
When working with PowerPoint presentations, there are several advanced techniques to enhance your slides and also alternatives that provide unique capabilities.
Incorporating Multimedia Elements
We can elevate our PowerPoint slides by integrating multimedia components such as videos, pictures , and animations . Adding a video to a slide not only captivates the audience’s attention but also effectively communicates complex ideas. In PowerPoint 2019, inserting a video is straightforward—just go to the Insert tab , choose Video , and select the desired file.
Animations are another powerful tool. They can help emphasize points or make data flow logically on a single slide. When using animations, keep feedback in mind so they enhance, rather than distract from our message.
Interactive pictures can also make a presentation more engaging. Instead of static images, we can use animated GIFs or create clickable hotspots that link to detailed information slides or external resources. Using PowerPoint’s built-in editing tools , we can overlay text and shapes onto images, creating interactive and compelling visuals.
Exploring PowerPoint Alternatives
While PowerPoint 2013 and 2019 are robust tools, sometimes we need something different. Google Slides is a popular alternative, offering seamless collaboration and cloud-based accessibility. Its interface is intuitive, and it supports real-time feedback and edits from multiple users, making it ideal for team projects.
For those who need highly customizable and visually striking graphics, Prezi offers a unique approach with its zoomable canvas. This tool lets us create dynamic, flowing narratives that can stand out in a sea of linear slide presentations.
Additionally, Keynote is perfect for those integrated into the Apple ecosystem, providing powerful design tools and templates. Its smooth transitions and ease of use make it a strong contender.
Using different platforms, we can import slides from one to another, maintaining our design consistency. Embracing these alternatives gives us flexibility and the ability to choose the best tool for each project.
Related posts:
- How to Add Speaker Notes in PowerPoint for Effective Presentations
- How to Add Music to PowerPoint: A Step-by-Step Guide for Seamless Presentations
- How to Curve Text in PowerPoint: Step-by-Step Guide
- How to Add Slide Numbers in PowerPoint: A Step-by-Step Guide
- How to Insert GIF into PowerPoint: A Step-by-Step Guide
- How to Present PowerPoint with Notes: Master Speaker Tips
- How to Create a PowerPoint Template: Step-by-Step Guide for Beginners
- How to Add Notes to PowerPoint: Enhance Your Presentations with Ease
- How to Add Music to PowerPoint: Step-by-Step Guide for Seamless Presentations
- How to Create an Org Chart in PowerPoint: Step-by-Step Guide for Beginners
- How to Wrap Text in PowerPoint: A Step-by-Step Guide
- How to Insert a Slide from Another PowerPoint: A Step-by-Step Guide
Leave a Comment Cancel reply
Save my name, email, and website in this browser for the next time I comment.
Microsoft 365 Life Hacks > Presentations > Six tips for recording a presentation
Six tips for recording a presentation
Your latest presentation is filled with crucial information and key concepts your colleagues need to remember. Record and archive it for easy reference and absorption.

How to record your presentation
Whether you’re recording a presentation for work, a webinar or school, both you and your colleagues will greatly appreciate having it available to reference. You can absorb information at your pace, ensuring that you retain pertinent information, without having to rely solely on your notes. While the method of recording depends on the virtual meeting platform or whether its in person, here are some guidelines on how to record you presentation:

Tell your story with captivating presentations
Powerpoint empowers you to develop well-designed content across all your devices
1. Choose the right equipment
High-quality recording equipment is essential for producing professional-looking and sounding presentations. Laptops are equipped with microphone and a high-resolution webcam, but it’s always a good idea to consider investing in higher quality recording equipment.
2. Test Your equipment
Before starting your presentation, it’s crucial to test your recording equipment to ensure everything is working properly. Check the audio levels, video quality, and any additional accessories you may be using, such as lighting or a green screen. Conducting a test run will help identify any technical issues that need to be addressed. Review the virtual meeting platform you are using to ensure that the recording feature is enabled, so you won’t have to search for it when the presentation time rolls around.
3. Optimize your environment
Choose a quiet, well-lit environment for recording your presentation. Minimize background noise and distractions to ensure clear audio and video quality. Consider using a neutral background or a virtual background to maintain a professional appearance. Natural lighting is ideal, but if that’s not possible, invest in good quality lighting equipment to ensure your face is well-lit and visible.
4. Organize your presentation contents
Organize your presentation materials in a logical order to facilitate smooth delivery. Create an outline or script to guide your presentation, making sure to include key points, transitions, and visual aids. Practice your presentation multiple times to become familiar with the contents and ensure a confident delivery. If you have multiple presenters, solidify the speaking order and designate one person to facilitate the presentation.
5. Engage with Your Audience
Even though you’re recording your presentation, it’s essential to engage with your audience as if they were present in the room with you. Encourage interaction by asking questions, prompting viewers to think critically, and inviting them to share their thoughts or experiences in the comments section. Respond to comments and questions promptly to foster a sense of community and connection with your audience.
6. Monitor Your Time
Keep track of time during your presentation to ensure that you stay within the allotted timeframe. Plan your presentation carefully, allocating sufficient time to cover each topic or section. If you find yourself running out of time, prioritize the most critical points and consider saving less crucial information for a follow-up or supplementary material.
For more ways to improve presentation skills, like calming presentation anxiety and connecting with a virtual audience , learn more presentation tips .
Get started with Microsoft 365
It’s the Office you know, plus the tools to help you work better together, so you can get more done—anytime, anywhere.
Topics in this article
More articles like this one.

How to introduce yourself in a presentation
Gain your audience’s attention at the onset of a presentation. Craft an impressionable introduction to establish tone, presentation topic, and more.

How to add citations to your presentation
Conduct research and appropriately credit work for your presentation. Understand the importance of citing sources and how to add them to your presentation.

How to work on a group presentation
Group presentations can go smoothly with these essential tips on how to deliver a compelling one.

How to create a sales presentation
Engage your audience and get them interested in your product with this guide to creating a sales presentation.
Everything you need to achieve more in less time
Get powerful productivity and security apps with Microsoft 365

Explore Other Categories
How to Copy and Paste in PowerPoint? [With Shortcuts & Tips!]
By: Author Shrot Katewa
![How to Copy and Paste in PowerPoint? [With Shortcuts & Tips!]](https://artofpresentations.com/wp-content/uploads/2021/05/Featured-Image-How-to-Copy-and-Paste-in-PowerPoint.jpg "how to make a copy of powerpoint presentation to desktop")
Using Copy and Paste in PowerPoint is really one of the basic features. That said, it is also one of the most powerful and commonly used options in PowerPoint. So, how exactly does copy and paste work in PowerPoint?
Select the text or an object that you want to copy by clicking on it. Then, press Ctrl+C on your keyboard (Cmd+C on Mac) or right-click and select “Copy”. Go to the destination slide and press Ctrl+V (Cmd+V on Mac) or right-click and select “Paste” to paste the text or the object that you had copied.
As easy as the answer may seem, the copy and paste command can actually be used for more than just duplicating a line of text or creating another shape.
So, in this article, we will learn how to use the copy and paste command in PowerPoint for more than just a few basic things! Plus, you will get to know how to disable copy and paste for your audience. Additionally, I will also help you understand how to use copy and paste function correctly when working with images and charts!
That and much more! So, let’s get started!
[A Quick Note Before We Begin – for this article, I will be using one of the presentation templates from Envato Elements . With Envato Elements, you get access to thousands of presentation designs with unlimited downloads so you never run out of options again. Plus, you get free previews so you know exactly what you’re getting before buying! It is also very affordable. Check out their pricing here ]
1. How to Copy and Paste in PowerPoint?
In general, copying and pasting in PowerPoint is very straight forward. Here is how you do it in 6 simple steps:
Step-1: Select the object or text you want to copy
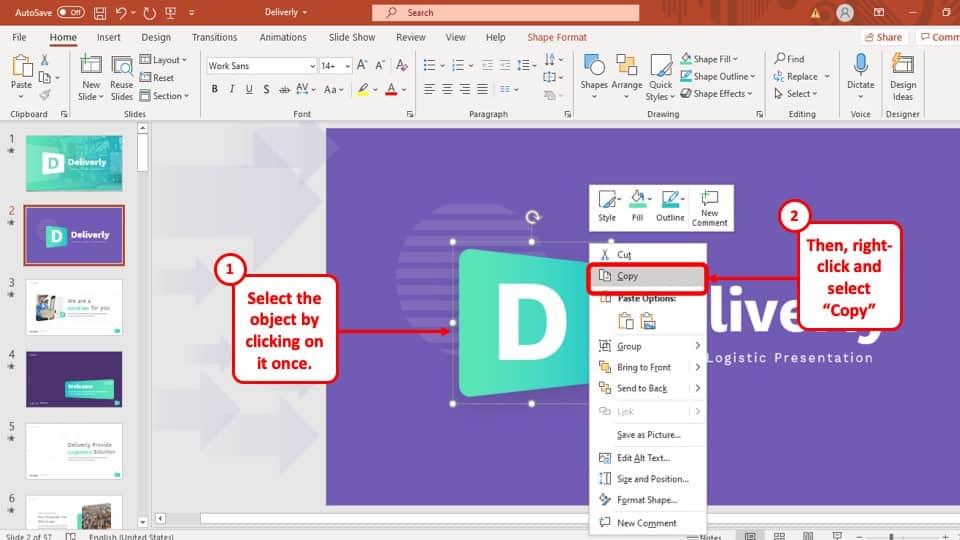
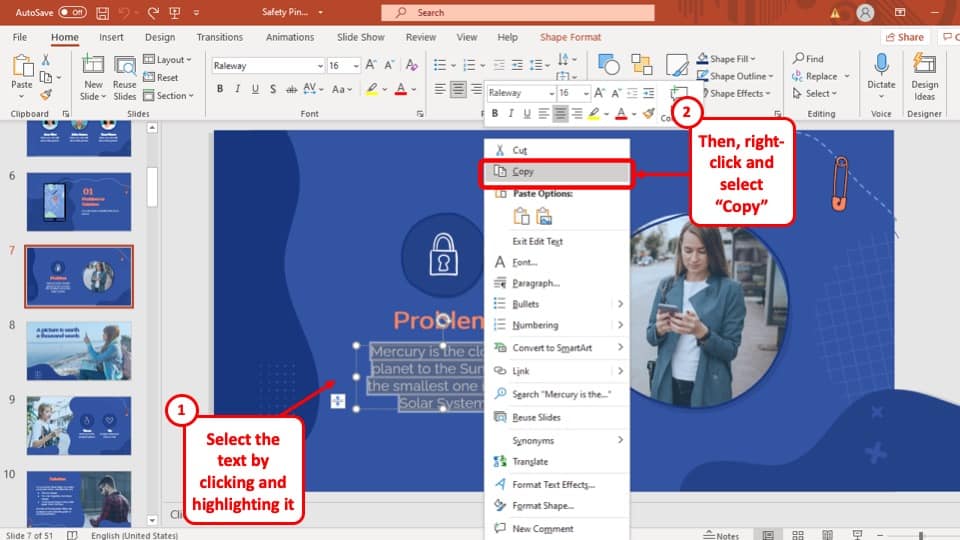
At first, you have to select the object or text you want to copy by clicking on the ‘ Left ’ mouse button and dragging the cursor over it.
Step-2: Click on the ‘Right’ mouse button on the selected object to open the drop-down menu
After you have selected the object that you want to copy, hit the ‘ Right ’ mouse button. A drop-down menu will appear with several options.
Step-3: Press the ‘Copy’ option
In the drop-down menu, select the ‘ Copy ’ option. This will make a copy of the object and temporarily save it in the ‘ Clipboard ’ menu ready to be pasted in your preferred location.
Step-4: Click on the ‘Right’ mouse button on the slide you want to paste your object or text.
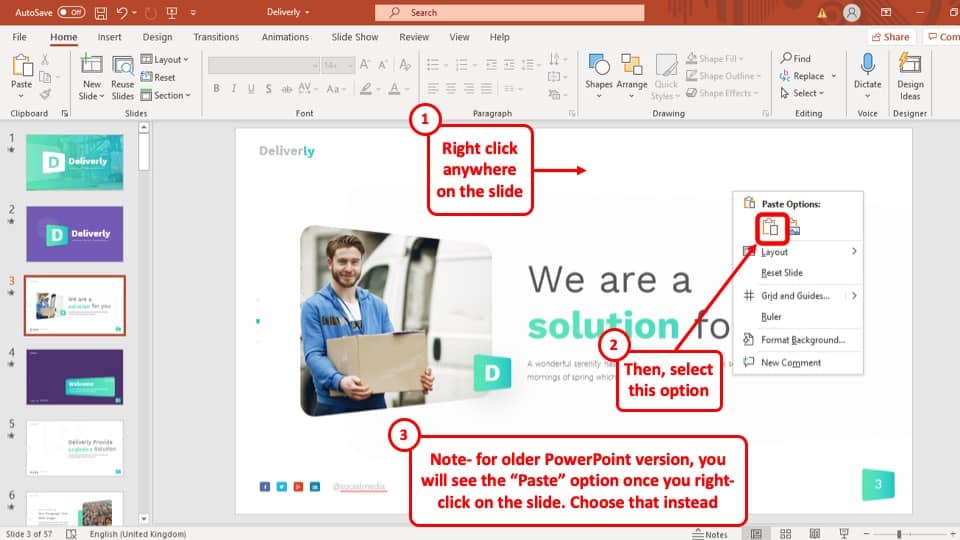
After you have copied the object, go to the slide where you want to paste the object, ‘ Right click ’ on your mouse anywhere in the slide to access the drop-down menu.
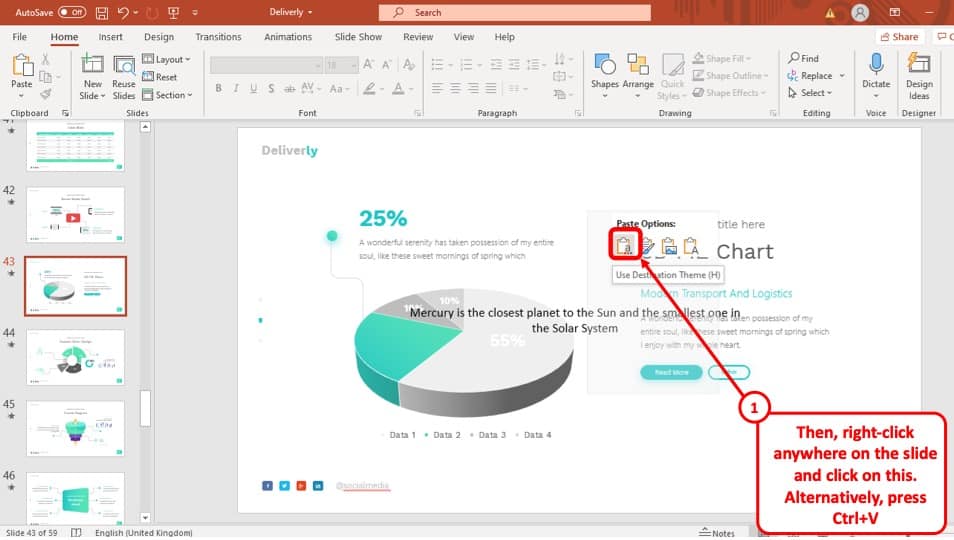
Step-5: Click on the ‘Use Destination Theme’ option.
Finally, after you have ‘ Right clicked ’ on the slide where you want to paste your object, select the ‘ Use Destination Theme’ option located under ‘ Paste Options ’ with an icon of a clipboard with a lower case ‘a’ on it. You can do the same for copied texts as well.
1a. How to Copy and Paste in PowerPoint on Mac?
Copy and pasting in PowerPoint on Mac is almost the same as it is on Windows . Follow these simple steps to copy and paste objects on your Mac computer:
Step-1: Select the object and click on the ‘Right’ mouse button
At first, go to the slide where the object or text you want to copy is located. Select it by clicking on the ‘ Left ’ mouse button. Then, press the ‘ Right ’ mouse button. This will give you access to a drop-down menu.
Step-2: Click on the ‘Copy’ button
Now click on the ‘ Copy ’ option from the drop-down menu. Similar to Windows operating systems, this will make a copy of the object and temporarily save it on the ‘ Clipboard ’ of your PowerPoint presentation.
Step-3: Go to the destination slide, and right-click on the slide
After you have copied the object, go to the destination slide where you want to paste the object and hit the ‘ Right ’ mouse button. This will again give you access to the drop-down menu.
Step-4: Click on “Paste” option
Finally, click on the ‘ Paste ’ option that is located on the menu. This will paste the copied object or text onto the destination slide.
1b. Keyboard Shortcuts for Copy and Paste in PowerPoint (For PC & Mac)
Microsoft PowerPoint has keyboard shortcuts to bypass the drop-down menu that makes the process much more efficient. To use your keyboard to copy and paste objects in your PowerPoint presentation, use the following keyboard shortcuts –
- To copy – Press Ctrl+C
- To paste – Press Ctrl+V
- To copy – Press Cmd+C
- To paste – Press Cmd+V
2. How to Copy and Paste a PowerPoint Slide?
While making your PowerPoint presentation, you might often need to copy an entire slide from one destination to another. The process is explained in 3 easy steps below:
Step-1: ‘Right Click’ using your mouse on the Slide you want to copy.
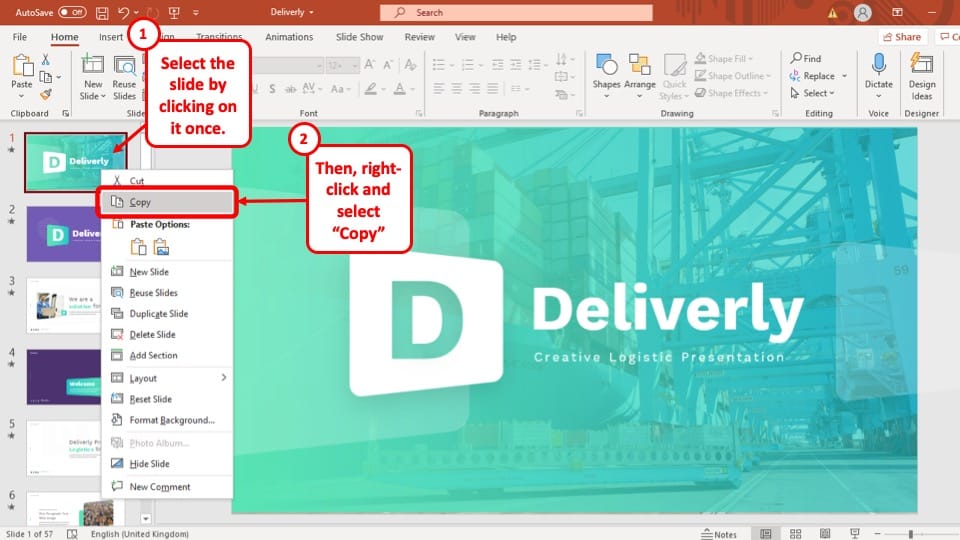
To begin, you have to move your cursor to the slide that you want to copy and click on the ‘ Right ’ mouse button to open the drop-down menu.
Step-2: Select ‘Copy’ option or press ‘Ctrl + C’
From the drop-down menu, Select the ‘ Copy ’ option. This will make a copy of the slide to your clipboard. Alternatively, you can skip ‘ Step-1 ’ by just selecting the slide and pressing ‘ Ctrl + C ’
Step-3: Right-click between the two slides and Paste the Copied Slide
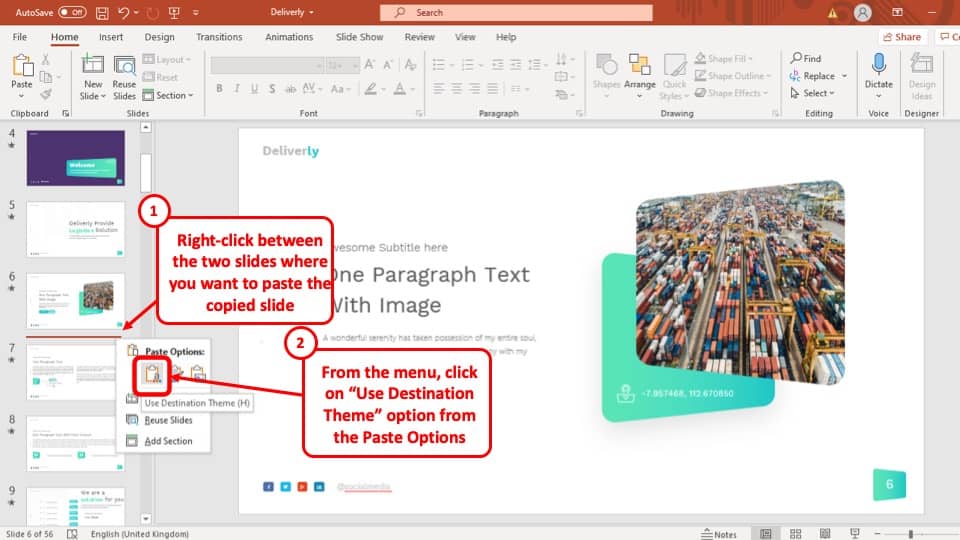
Finally, position your cursor on the slide bar where you want to paste the copied slide. Hit the ‘ Right ’ mouse button and select the ‘ Use Destination Format ’ option under ‘ Paste Options ’. Alternatively, you can also use the keyboard shortcuts ‘ Ctrl + V ’ to get the job done.
This will immediately paste your slide to your preferred position in the PowerPoint presentation.
2a. How to Copy and Paste a PowerPoint Slide in Another Presentation?
Copy and pasting a PowerPoint slide from another presentation is almost identical to copy and pasting a slide from the same presentation. The whole process is described below:
Step-1: Copy the Original Slide
At first, go to the PowerPoint presentation that has the slide that you want to copy into your presentation and then copy the slide.
Step-2: Paste the Slide in the Destination presentation
Now simply paste the slide you have copied from the other slide by positioning your cursor on the slide bar and clicking on the ‘ Right ’ mouse button and selecting ‘Use Destination Themes’ under the ‘Paste Options.’

This will paste the slide you have copied to your preferred location while matching the theme used in your PowerPoint presentation.
2b. How to Copy and Paste a PowerPoint Slide without Losing Formatting?
PowerPoint also has the option to paste slides from other presentations while maintaining the original format of the slide. Below is a step-by-step guide on how to do that.
Step-1: Copy the slide you want to paste from the source presentation
Go to the presentation that has your preferred slide and copy it by hitting the ‘ Right ’ mouse button and then selecting the ‘ Copy ’ option from the drop-down menu.
Step-2: Go back to your PowerPoint presentation and click on the ‘Right’ mouse button in your preferred location.
In the next step, you have to go back to your PowerPoint presentation and click on the ‘ Right ’ mouse button on the position where you want to paste the slide that you copied. This will open the drop-down menu.
Step-3: Click the ‘Keep Source Format’ option under ‘Paste Options’
After you have accessed the drop-down menu, instead of clicking on the ‘ Use Destination Format ’ option, click on the ‘ Keep Source Format ’ option, the icon looks like a paintbrush on a clipboard as shown in the screenshot.
After selecting the ‘ Keep Source Format ’ option, the slide had copied will be pasted on your PowerPoint presentation, but it will match the format of the presentation it was originally in.
3. How to Copy and Paste Text in PowerPoint?
Copy and pasting text in your PowerPoint presentation is an easy 2 step process. They are explained below:
Step-1: Select the text that you want to copy in your PowerPoint presentation
At first you have to copy the text that you want to paste in your PowerPoint presentation. Simply select the text, press the ‘ Right ’ mouse button and click on the ‘ Copy ’ option from the drop-down menu.
Step-2: Go to the slide in your PowerPoint presentation and paste the copied text
Once you have copied the text you want to paste on your presentation, go to the slide where you want to paste the text, press the ‘ Right ’ mouse button and click on the ‘ Use Destination Format ’ option.
Check out our article on How to Format Text in PowerPoint to edit the text the correct way in PowerPoint and save some time!
4. How to Copy and Paste Pictures in PowerPoint?
The process of copying and pasting pictures in PowerPoint is almost the same as copying and pasting texts in PowerPoint. Simply copy your preferred picture and paste it in your PowerPoint presentation.
It is important to note that you can also copy and paste an image from a folder into your PowerPoint presentation. You can also do it using the keyboard shortcuts ‘Ctrl + C’ to copy and ‘Ctrl + V’ to paste.
“Unable to Paste Image” Error in PowerPoint
In some cases, users are unable to paste pictures in their PowerPoint presentation if the image is copied from a folder. In such a case, you will have to insert the image into your PowerPoint slide, instead of pasting it. The process is described step-by-step below.
Step-1: Click on the “Insert” tab to add an Picture
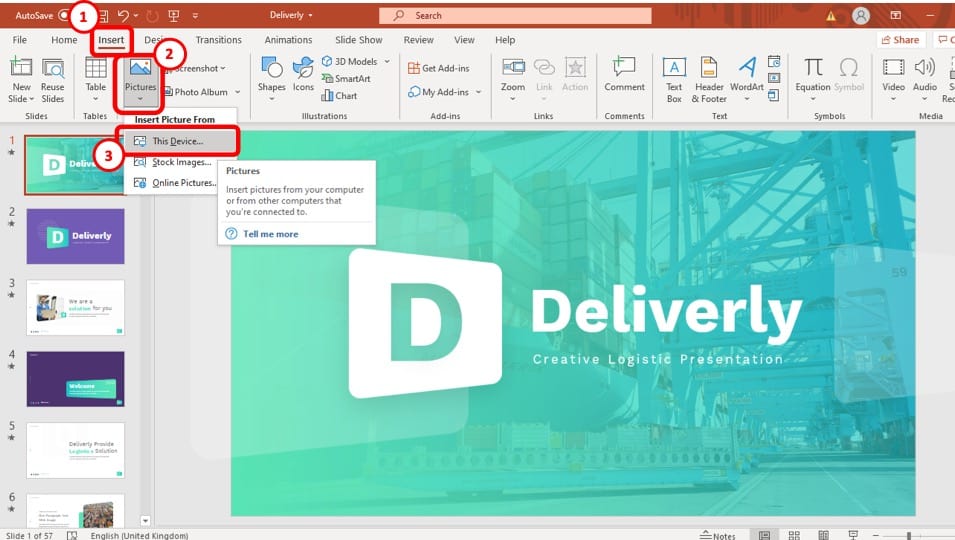
At first, you have to go to the slide where you want to insert the image and then go to the ‘ Insert ’ ribbon located in the upper left area of your PowerPoint window. Now click on the ‘ Pictures ’ option.
Step-2: Select the ‘This Device…’ option
After clicking on the ‘ Pictures ’ option, select ‘ This Device… ’ from the drop-down menu.
Step-3: Select the image click ‘Insert’
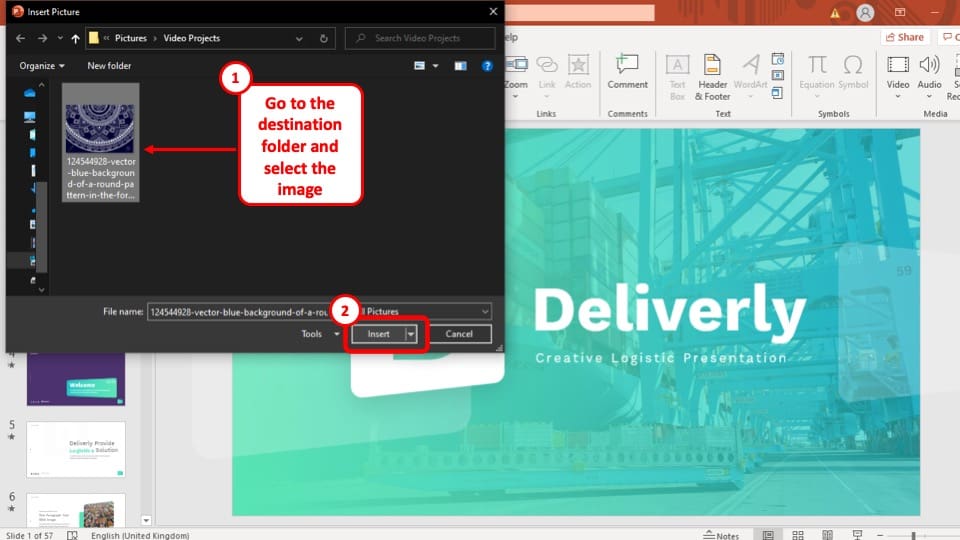
A pop-up window will appear, where you have to select the image, you want to add to your presentation. After selecting the image, click on the ‘ Insert ’ button at the bottom right corner of the pop-up window to successfully insert it to your presentation.
The image will be added to the slide in your PowerPoint presentation. Now all you have to do is resize it and place it in your preferred position.
5. How to Disable Copy and Paste in PowerPoint?
Although you cannot completely turn off the copy and paste option from your PowerPoint presentation file, you can, however, restrict the PowerPoint file to ‘ View Only ’ for permitted users.
This way only permitted users will be able to view the presentation file and they will not be able to edit or copy anything from it. A step-by-step guide to the whole process is given below.
Step-1: Go to the ‘Info’ section in the ‘File’ tab.
To restrict your PowerPoint presentation, at first you have to go to the ‘ Info ’ section which is located in the ‘ File ’ tab.
Step-2: Restrict the Access of the PowerPoint Presentation
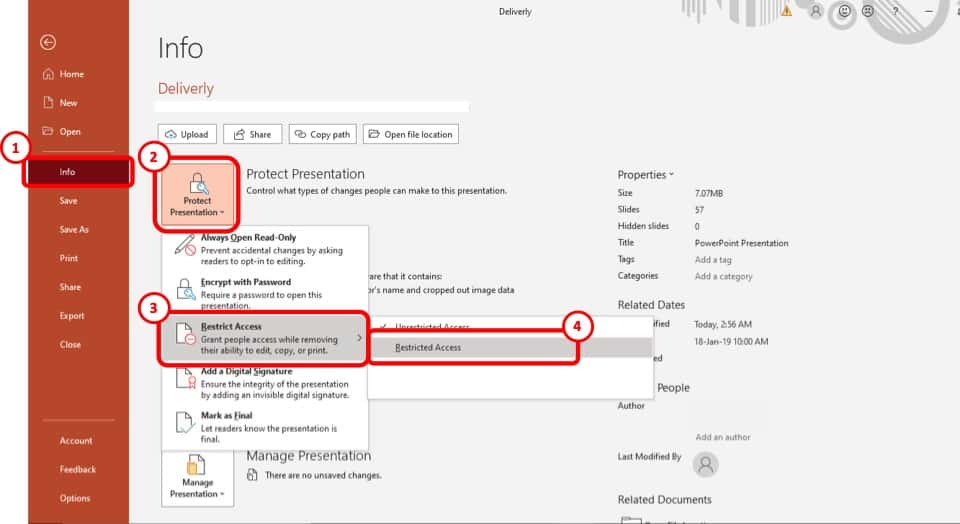
Now you have to go the ‘ Restrict Action ’ option under ‘ Protect Presentation ’ and select the ‘ Restricted Action ’ option.
Step-3: Tick the box that says, ‘Restrict permission to this presentation’
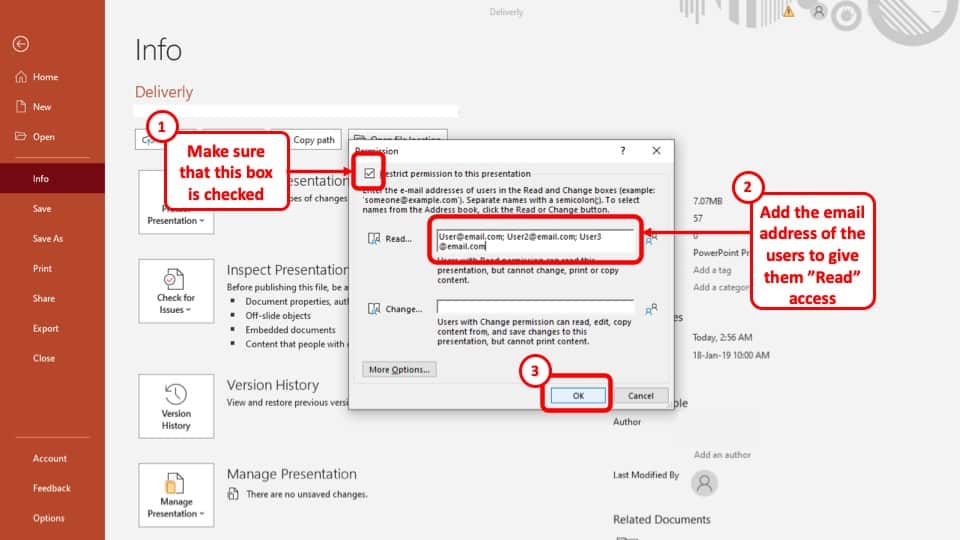
After you press the ‘ Restricted Action ’ option, a pop-up window will appear. Tick the box that says ‘ Restrict permission to this presentation ’ on the pop-up window to enable the restriction on your presentation. This will allow you to limit the viewership and use of your PowerPoint presentation file to selected users only.
Step-4: Add the email addresses of the users and press ‘Ok’
Add the email addresses of the users you want to show the presentation to in the first box that says ‘ Read… ’ and press the ‘ Ok ’ button at the bottom right corner of the pop-up window.
Now email the presentation to the users with access to your presentation. This way, only the users you added to the box will be able to see the presentation, without being able to edit or copy anything on it.
6. Troubleshooting Copy and Paste Issues in PowerPoint
There may be more than a few reasons why you cannot copy and paste in you PowerPoint presentation. In this section I will be discussing some of the reasons why that maybe and how to fix them.
6a. PowerPoint Won’t Copy and Paste? Here’s Why!
Although this is quite a rare occurrence, however, this can happen from time to time. Here’s what you can do to troubleshoot this problem –
- Restart Microsoft Office – Sometimes, the problem gets solved by simply restarting the PowerPoint or even Microsoft Office application. If it gets solved, then great! Else, move on to the next step.
- Restart your Computer – Restarting your computer will most definitely fix the problem. Perhaps your computer had an update or even the Microsoft Office application received an update and needed to restart. However, if the problem is still not fixed, then you need to check to see if any of the other common reasons have caused an issue! (mentioned below)
The 3 most common reasons why you might be having trouble copying and pasting in your PowerPoint Presentation are:
1. The latest update in you Microsoft Office may have a bug that needs fixing
2. The Microsoft Office installed in your computer maybe broken and needs to be repaired
3. One of the installed add-ins in your Microsoft PowerPoint might be causing this problem.
If you have managed to fix the above 3 errors, it is highly unlikely that you will have a copy and paste issue. If the issue still exists, you would be better off to check if this is a system-wide issue or just an issue in PowerPoint. Based on this, 2 scenario’s can emerge –
- Copy and paste issue is still seen only in PowerPoint – then, reach out to a customer support executive from Microsoft.
- You are unable to copy and paste anywhere on your computer – perhaps check to see if the “Control” key on your keyboard is functioning fine. Other than that, there isn’t any other solution apart from resetting your computer to factory default or replacing your computer altogether.
6b. Excel Chart Won’t Paste into PowerPoint!
Sometimes, the paste function just doesn’t work when trying to paste a chart from Excel to PowerPoint. This can be really annoying especially when you are in a hurry.
Below, I’ve shared 3 methods to fix the issue of an excel chart not pasting into your PowerPoint –
Method 1 – Using “Paste Special” Option
One of the solutions to not being able to paste your Excel Chart is to use the “ Paste Special ” option. Here is a step-by-step explanation of the process.
Step-1: Copy the chart from your Excel Workbook
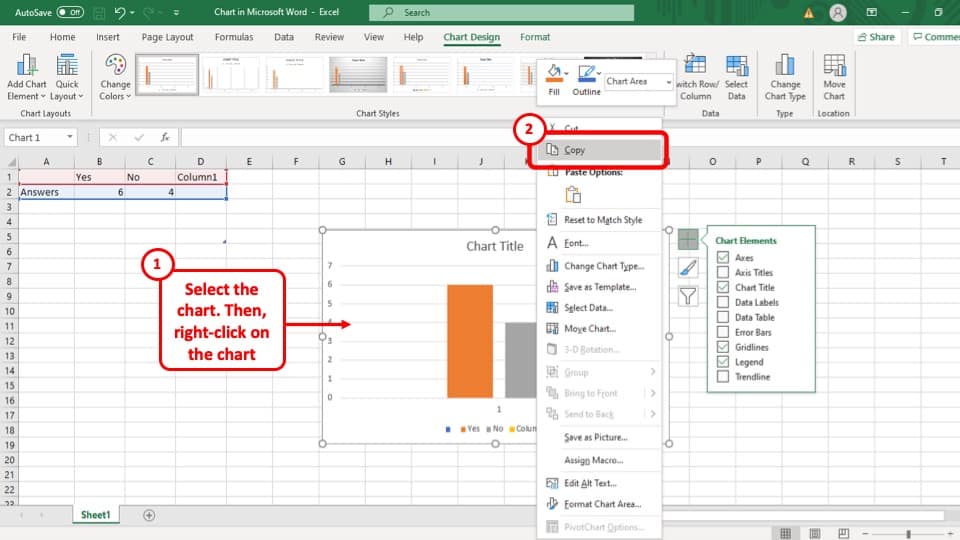
At first you have to copy the Chart by “ Right clicking ” on it and selecting the “ Copy ” option.
Step-2: Click on the arrow under the “Paste” option
After that, you have to go back to the slide you want to paste the chart. Click on the arrow under the “ Paste ” option in the “ Clipboard ” section of your “Home” tab . This will open a drop-down menu.
Step-3: Click on the “Paste Special” option
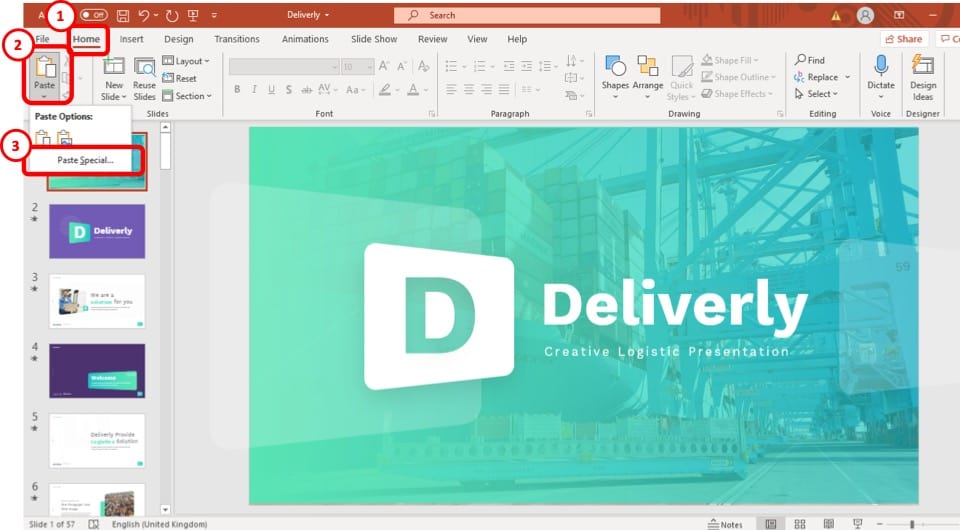
After opening the drop-down menu, click on the “ Paste Special ” option. This will open a pop-up window.
Step-4: Select “Microsoft Office Graphic Object” and press “Ok”
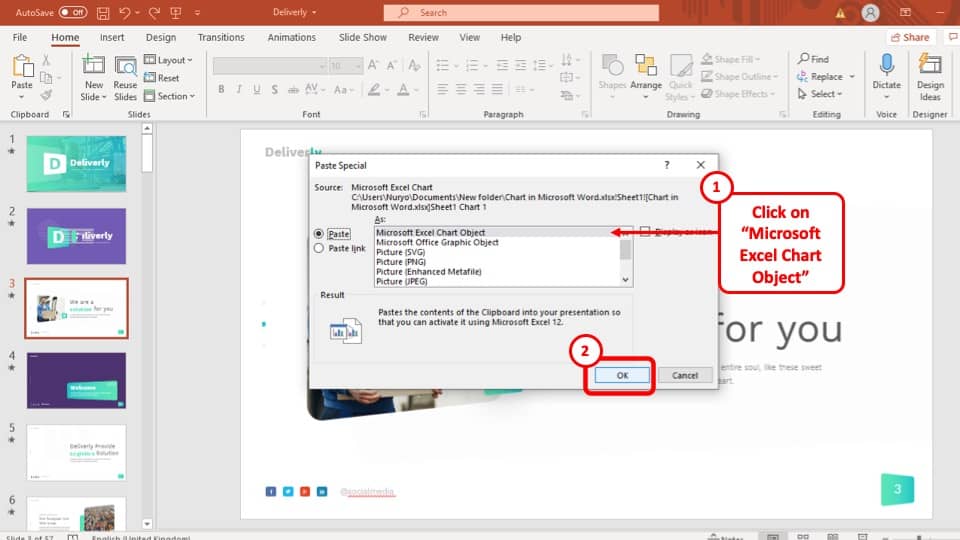
Once you have opened the “ Paste Special ” option, select “ Microsoft Office Graphic Object ” to past the chart in your PowerPoint presentation and then click on the “ Ok ” button.
Method 2 – Paste the Chart as an Image
Another solution to not being able to paste Excel Charts in your PowerPoint presentation can be to paste the chart as an image. That way, the chart will be saved to your presentation as an image instead of a chart.
The drawback to this method is that the edits that you make to your data in excel won’t automatically reflect in the chart in PowerPoint. That said, it is a temporary quick fix. If you don’t intend to update the source data for the chart, then this method will work just fine!
The process is described below.
Step-1: Save the chart as a picture from the Excel Workbook
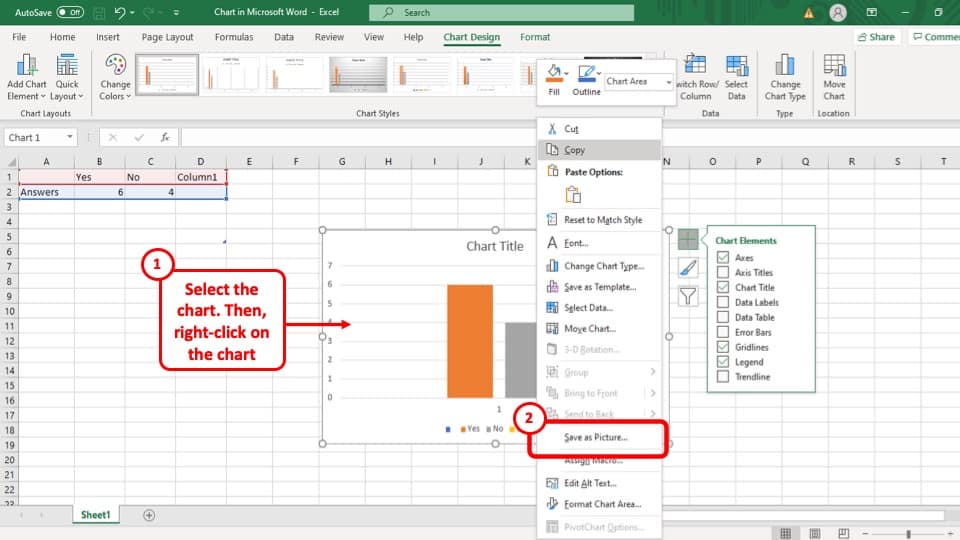
Go to the Excel Workbook with the chart that you want to add to your presentation, “ Right click ” on it and select the “ Save as Picture… ” option.
Step-2: Press “Save” on the pop-up window.
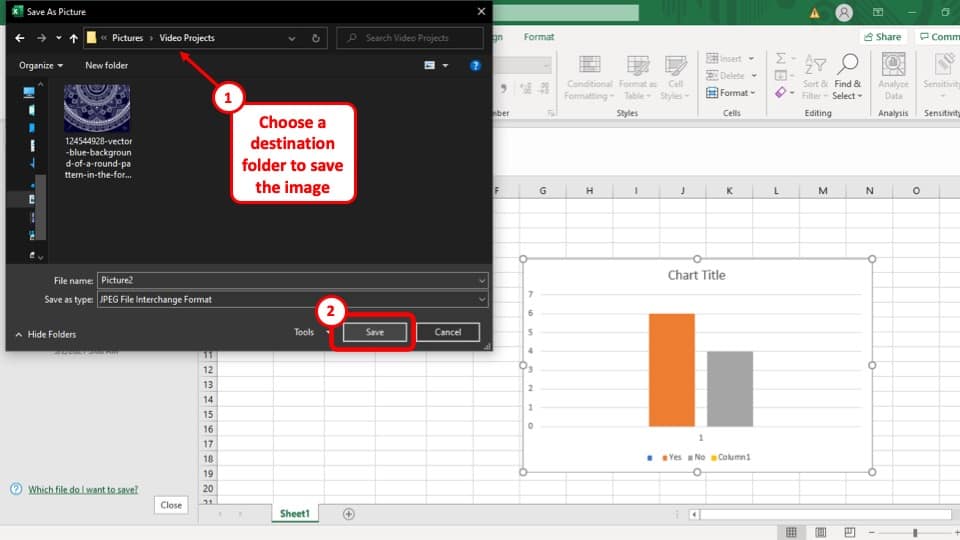
Once you have selected the “ Save as Picture… ” option, a pop-up window will appear on your screen. Save the image of the chart by clicking on the “ Save ” button at the bottom right corner of the pop-up window.
Step-3: Select the “This Device…” option
The next step is to select the “ This Device… ” option, under the “ Pictures ” drop-down menu which you can find in the “ Insert ” ribbon
Step-4: Select the chart and press “Insert”
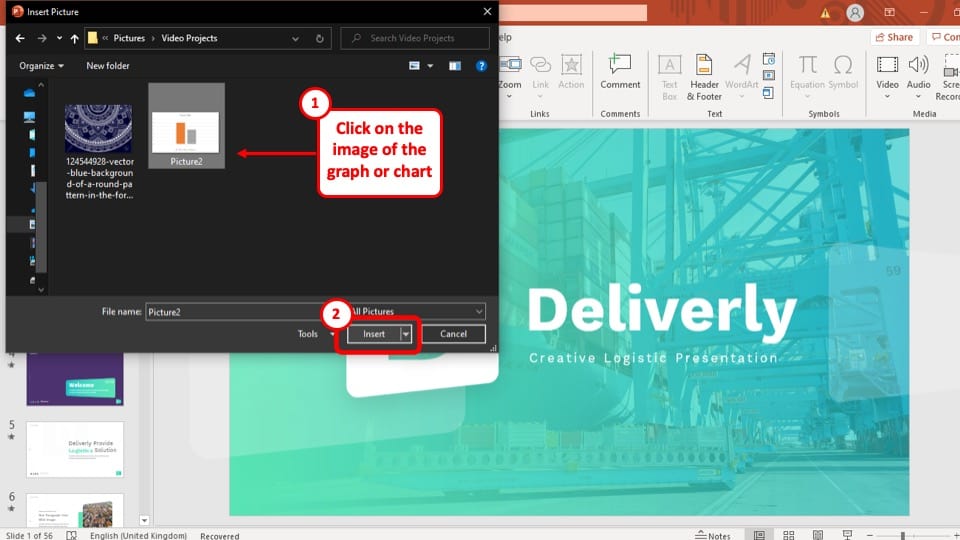
Finally, all you have to do is select the image of the chart and press the “ Insert ” button at the bottom right of the pop-up window.
Method 3 – Recreate the Chart in PowerPoint
If all else fails, you can still copy all the chart data from the Excel Workbook and create a new chart in your PowerPoint slide using those data. You can recreate an identical chart on your PowerPoint.
However, this may method may take time to recreate the chart exactly depending on how many customizations were done to the chart in Excel. Nevertheless, it is also an option that will work for you.
More PowerPoint Related Topics
- How to Crop a Picture in PowerPoint? [Complete Step-by-Step Tutorial!]
- How to Give a Presentation on Zoom? A Helpful Resource!
- What is a Presentation Clicker? [And How to Use it!]
- How to Convert a PowerPoint to PDF? [A Simple Guide!]
- PowerPoint vs Google Slides: Which is Better? [ULTIMATE Test!]
- How to Change Bullet Style in PowerPoint? A Complete Guide
Credit to diana.grytsku (via Freepik) for the featured image of this article
Copilot tutorial: Create a presentation with a prompt

Note: This feature is available to customers with a Copilot for Microsoft 365 (work) license.
Duration: 1 minute 14 seconds
Discover how Copilot in PowerPoint effortlessly creates captivating presentations in just a few prompts and access the full power of Microsoft Designer to bring your ideas to life with professional graphics.
Try in PowerPoint
See more videos

Kickstart a presentation

Create a branded presentation from a file

Summarize a presentation
Browse all Copilot videos

Need more help?
Want more options.
Explore subscription benefits, browse training courses, learn how to secure your device, and more.
Microsoft 365 subscription benefits
Microsoft 365 training
Microsoft security
Accessibility center
Communities help you ask and answer questions, give feedback, and hear from experts with rich knowledge.
Ask the Microsoft Community
Microsoft Tech Community
Windows Insiders
Microsoft 365 Insiders
Was this information helpful?
Thank you for your feedback.
IMAGES
VIDEO
COMMENTS
To save a copy of a PowerPoint presentation on your desktop, follow the 3 simple steps. Step-1: Click on the "File" tab. The first step is to click on the "File" tab. It is located on the left corner of the menu ribbon at the top of the screen. This will open the "File" menu. Step-2: Click on the "Save A Copy" option.
To get started, open the presentation you want to copy. Once youve opened the file, go to the File tab on the ribbon. When you select the File tab, a menu will appear with a variety of options. From this menu, select Save As. Once youve clicked Save As, youll be prompted to select a location to save the copy.
On the File tab, select Save. Do of the following: To save to your local drive, such as your laptop, a flash drive, CD or DVD drive, select Computer. To save to a SharePoint Library, select SharePoint. Under Save As > Recent Folders, select Browse, pick a path and file folder, and then name the file. Select Save.
Choose the Save or Save As option. Download Article. Click Save to save to the current file, or Save as to create a new file. If you've already saved the file at some point, you'll have the option to click Save, which simply saves your changes to that file. Otherwise, choose Save as to create a brand new file. 4.
Try-it! Transcript. Save your presentation, so you don't lose all your hard work. Then, print it to share it with others. Save your presentation. Click FILE > Save, pick or browse to a folder, type a name for your presentation in the File name box, and click Save. Save your work as you go. Hit Ctrl+S often.
To save the PowerPoint presentation as a PDF file, follow the 4 easy steps. Step-1: Click on the "File" Tab. First, click on the " File " tab in PowerPoint to open the back stage view of PowerPoint. Step 2 - Click on the "Save As" option. In the menu ribbon located at the top of the screen, click on the "File" tab.
Click View, and then in the Presentation Views group, click Normal. In the slide thumbnails on the left side, click the slide that you want to copy: To select multiple sequential slides, click the first slide, press Shift, and then click the last slide that you want. Alternatively, you can click on the first slide, press Shift and then press ...
Open your PowerPoint presentation: Start by opening the PowerPoint presentation you wish to make a copy of. Click on "File" in the top menu: This will open a dropdown menu with various options. Select "Save As": In the dropdown menu, find and click on the "Save As" option. This allows you to save your presentation as a new file.
To open a presentation as a folder, use Explorer to navigate to the folder containing the presentation that you want, and then do the following: Click the presentation that you want, right-click it, and then click Rename. Change the file extension ( .pptx) to .zip. Press Enter to set the name, then click Yes in the Rename dialog box.
This video explains how to move a PowerPoint presentation from one machine to another. This is a Microsoft PowerPoint tutorial covering, Package for CD, embe...
Copy Slides to Another PowerPoint Presentation. Right-click the thumbnail of the slide to be copied, select Copy, then right-click a blank area of the Slides pane where you want to place it. Alternate method: Click-and-drag the thumbnail of the slide you want to copy to the Slides pane of the destination presentation.
With OneDrive set up, open Microsoft PowerPoint and select the "File" menu at the top. Click "New" on the left pane. Select "Blank Presentation" or any template that you like. Hit the toggle next to AutoSave and make sure that it's set to "On." You'll see a pop-up message where you'll need to select "OneDrive."
2. Right-click on a slide in the left sidebar to copy it. You can also press Command + C or Ctrl + C on your keyboard. If you hold down Command or Ctrl, you can click multiple slides to select ...
Put a blank CD in your cd write drive, then select the "Pack and Go" option. Go thru the steps shown, and select "embed fonts" and "include viewer" (you may need to download and install the viewer) This way it won't matter what version of powerpoint, or what fonts the other computer has.
For copying entire slides from another presentation, open both presentations in the PowerPoint desktop app. In the source presentation, right-click on the slide thumbnail and select Copy Slide. Then, paste the slide in the destination presentation. This process ensures the formatting and design elements remain intact.
PowerPoint for the web automatically saves your work to OneDrive, in the cloud. (This kind of operation in Microsoft 365 is often called Save As, but in Microsoft 365 for the web apps it is Save a Copy or Download As.). To save to another location (such as your computer or a USB thumb drive), or to save a copy, click a procedure heading below and follow the steps.
Step-1: "Right-click" on the slide. The first step is to go to the slide you want to save as an image and "Right Click" anywhere on the slide. This will open a drop-down menu. Step-2: Select the "Save as Picture…" option. From the drop-down menu, click on the "Save as Picture…" option. This will open a new window.
Create an outline or script to guide your presentation, making sure to include key points, transitions, and visual aids. Practice your presentation multiple times to become familiar with the contents and ensure a confident delivery. If you have multiple presenters, solidify the speaking order and designate one person to facilitate the ...
To send your presentation as a copy or a PDF, select Share. Select Attach a Copy Instead in the Share dialog box. Select either PowerPoint Presentation or PDF. PowerPoint will open the email application and attach the file to a new message. Enter the recipients details and a short message, and click Send.
This will make a copy of the slide to your clipboard. Alternatively, you can skip ' Step-1 ' by just selecting the slide and pressing ' Ctrl + C '. Step-3: Right-click between the two slides and Paste the Copied Slide. Finally, position your cursor on the slide bar where you want to paste the copied slide.
Click on "Blank presentation" to create your presentation from scratch, or pick your preferred free PowerPoint template from the options at the top (there's also a host of editable templates you ...
Alternatively, you can choose Save As from within PowerPoint and save to the Flash drive. Since the moderator erroneously moved this, I don't know what version of PowerPoint you are using. If you are using PowerPoint 2011, you should be OK with just saving the file to the flash drive.
Right-click (or Control-click on macOS) the audio icon or video, and click Save Media as. Tip: Ensure your disk has enough space to save the media file, otherwise you'll have to free up space and try again. In the Save Media as dialog box, choose a folder and also enter a name for the media file. If the Save Media as option doesn't appear on ...
Discover trending videos and creators on TikTok, available both on the web and mobile devices.
Create compelling presentations easily with our video guide on Copilot in PowerPoint, powered by Microsoft Designer, to turn ideas into stunning visuals in a few prompts. ... Discover how Copilot in PowerPoint effortlessly creates captivating presentations in just a few prompts and access the full power of Microsoft Designer to bring your ideas ...