Are you seeking one-on-one college counseling and/or essay support? Limited spots are now available. Click here to learn more.

How to Write a Lab Report – with Example/Template
April 11, 2024
Perhaps you’re in the midst of your challenging AP chemistry class in high school, or perhaps college you’re enrolled in biology , chemistry , or physics at university. At some point, you will likely be asked to write a lab report. Sometimes, your teacher or professor will give you specific instructions for how to format and write your lab report, and if so, use that. In case you’re left to your own devices, here are some guidelines you might find useful. Continue reading for the main elements of a lab report, followed by a detailed description of the more writing-heavy parts (with a lab report example/lab report template). Lastly, we’ve included an outline that can help get you started.
What is a lab report?
A lab report is an overview of your experiment. Essentially, it explains what you did in the experiment and how it went. Most lab reports end up being 5-10 pages long (graphs or other images included), though the length depends on the experiment. Here are some brief explanations of the essential parts of a lab report:
Title : The title says, in the most straightforward way possible, what you did in the experiment. Often, the title looks something like, “Effects of ____ on _____.” Sometimes, a lab report also requires a title page, which includes your name (and the names of any lab partners), your instructor’s name, and the date of the experiment.
Abstract : This is a short description of key findings of the experiment so that a potential reader could get an idea of the experiment before even beginning.
Introduction : This is comprised of one or several paragraphs summarizing the purpose of the lab. The introduction usually includes the hypothesis, as well as some background information.
Lab Report Example (Continued)
Materials : Perhaps the simplest part of your lab report, this is where you list everything needed for the completion of your experiment.
Methods : This is where you describe your experimental procedure. The section provides necessary information for someone who would want to replicate your study. In paragraph form, write out your methods in chronological order, though avoid excessive detail.
Data : Here, you should document what happened in the experiment, step-by-step. This section often includes graphs and tables with data, as well as descriptions of patterns and trends. You do not need to interpret all of the data in this section, but you can describe trends or patterns, and state which findings are interesting and/or significant.
Discussion of results : This is the overview of your findings from the experiment, with an explanation of how they pertain to your hypothesis, as well as any anomalies or errors.
Conclusion : Your conclusion will sum up the results of your experiment, as well as their significance. Sometimes, conclusions also suggest future studies.
Sources : Often in APA style , you should list all texts that helped you with your experiment. Make sure to include course readings, outside sources, and other experiments that you may have used to design your own.
How to write the abstract
The abstract is the experiment stated “in a nutshell”: the procedure, results, and a few key words. The purpose of the academic abstract is to help a potential reader get an idea of the experiment so they can decide whether to read the full paper. So, make sure your abstract is as clear and direct as possible, and under 200 words (though word count varies).
When writing an abstract for a scientific lab report, we recommend covering the following points:
- Background : Why was this experiment conducted?
- Objectives : What problem is being addressed by this experiment?
- Methods : How was the study designed and conducted?
- Results : What results were found and what do they mean?
- Conclusion : Were the results expected? Is this problem better understood now than before? If so, how?
How to write the introduction
The introduction is another summary, of sorts, so it could be easy to confuse the introduction with the abstract. While the abstract tends to be around 200 words summarizing the entire study, the introduction can be longer if necessary, covering background information on the study, what you aim to accomplish, and your hypothesis. Unlike the abstract (or the conclusion), the introduction does not need to state the results of the experiment.
Here is a possible order with which you can organize your lab report introduction:
- Intro of the intro : Plainly state what your study is doing.
- Background : Provide a brief overview of the topic being studied. This could include key terms and definitions. This should not be an extensive literature review, but rather, a window into the most relevant topics a reader would need to understand in order to understand your research.
- Importance : Now, what are the gaps in existing research? Given the background you just provided, what questions do you still have that led you to conduct this experiment? Are you clarifying conflicting results? Are you undertaking a new area of research altogether?
- Prediction: The plants placed by the window will grow faster than plants placed in the dark corner.
- Hypothesis: Basil plants placed in direct sunlight for 2 hours per day grow at a higher rate than basil plants placed in direct sunlight for 30 minutes per day.
- How you test your hypothesis : This is an opportunity to briefly state how you go about your experiment, but this is not the time to get into specific details about your methods (save this for your results section). Keep this part down to one sentence, and voila! You have your introduction.
How to write a discussion section
Here, we’re skipping ahead to the next writing-heavy section, which will directly follow the numeric data of your experiment. The discussion includes any calculations and interpretations based on this data. In other words, it says, “Now that we have the data, why should we care?” This section asks, how does this data sit in relation to the hypothesis? Does it prove your hypothesis or disprove it? The discussion is also a good place to mention any mistakes that were made during the experiment, and ways you would improve the experiment if you were to repeat it. Like the other written sections, it should be as concise as possible.
Here is a list of points to cover in your lab report discussion:
- Weaker statement: These findings prove that basil plants grow more quickly in the sunlight.
- Stronger statement: These findings support the hypothesis that basil plants placed in direct sunlight grow at a higher rate than basil plants given less direct sunlight.
- Factors influencing results : This is also an opportunity to mention any anomalies, errors, or inconsistencies in your data. Perhaps when you tested the first round of basil plants, the days were sunnier than the others. Perhaps one of the basil pots broke mid-experiment so it needed to be replanted, which affected your results. If you were to repeat the study, how would you change it so that the results were more consistent?
- Implications : How do your results contribute to existing research? Here, refer back to the gaps in research that you mentioned in your introduction. Do these results fill these gaps as you hoped?
- Questions for future research : Based on this, how might your results contribute to future research? What are the next steps, or the next experiments on this topic? Make sure this does not become too broad—keep it to the scope of this project.
How to write a lab report conclusion
This is your opportunity to briefly remind the reader of your findings and finish strong. Your conclusion should be especially concise (avoid going into detail on findings or introducing new information).
Here are elements to include as you write your conclusion, in about 1-2 sentences each:
- Restate your goals : What was the main question of your experiment? Refer back to your introduction—similar language is okay.
- Restate your methods : In a sentence or so, how did you go about your experiment?
- Key findings : Briefly summarize your main results, but avoid going into detail.
- Limitations : What about your experiment was less-than-ideal, and how could you improve upon the experiment in future studies?
- Significance and future research : Why is your research important? What are the logical next-steps for studying this topic?
Template for beginning your lab report
Here is a compiled outline from the bullet points in these sections above, with some examples based on the (overly-simplistic) basil growth experiment. Hopefully this will be useful as you begin your lab report.
1) Title (ex: Effects of Sunlight on Basil Plant Growth )
2) Abstract (approx. 200 words)
- Background ( This experiment looks at… )
- Objectives ( It aims to contribute to research on…)
- Methods ( It does so through a process of…. )
- Results (Findings supported the hypothesis that… )
- Conclusion (These results contribute to a wider understanding about…)
3) Introduction (approx. 1-2 paragraphs)
- Intro ( This experiment looks at… )
- Background ( Past studies on basil plant growth and sunlight have found…)
- Importance ( This experiment will contribute to these past studies by…)
- Hypothesis ( Basil plants placed in direct sunlight for 2 hours per day grow at a higher rate than basil plants placed in direct sunlight for 30 minutes per day.)
- How you will test your hypothesis ( This hypothesis will be tested by a process of…)
4) Materials (list form) (ex: pots, soil, seeds, tables/stands, water, light source )
5) Methods (approx. 1-2 paragraphs) (ex: 10 basil plants were measured throughout a span of…)
6) Data (brief description and figures) (ex: These charts demonstrate a pattern that the basil plants placed in direct sunlight…)
7) Discussion (approx. 2-3 paragraphs)
- Support or reject hypothesis ( These findings support the hypothesis that basil plants placed in direct sunlight grow at a higher rate than basil plants given less direct sunlight.)
- Factors that influenced your results ( Outside factors that could have altered the results include…)
- Implications ( These results contribute to current research on basil plant growth and sunlight because…)
- Questions for further research ( Next steps for this research could include…)
- Restate your goals ( In summary, the goal of this experiment was to measure…)
- Restate your methods ( This hypothesis was tested by…)
- Key findings ( The findings supported the hypothesis because…)
- Limitations ( Although, certain elements were overlooked, including…)
- Significance and future research ( This experiment presents possibilities of future research contributions, such as…)
- Sources (approx. 1 page, usually in APA style)
Final thoughts – Lab Report Example
Hopefully, these descriptions have helped as you write your next lab report. Remember that different instructors may have different preferences for structure and format, so make sure to double-check when you receive your assignment. All in all, make sure to keep your scientific lab report concise, focused, honest, and organized. Good luck!
For more reading on coursework success, check out the following articles:
- How to Write the AP Lang Argument Essay (With Example)
- How to Write the AP Lang Rhetorical Analysis Essay (With Example)
- 49 Most Interesting Biology Research Topics
- 50 Best Environmental Science Research Topics
- High School Success
Sarah Mininsohn
With a BA from Wesleyan University and an MFA from the University of Illinois at Urbana-Champaign, Sarah is a writer, educator, and artist. She served as a graduate instructor at the University of Illinois, a tutor at St Peter’s School in Philadelphia, and an academic writing tutor and thesis mentor at Wesleyan’s Writing Workshop.
- 2-Year Colleges
- Application Strategies
- Best Colleges by Major
- Best Colleges by State
- Big Picture
- Career & Personality Assessment
- College Essay
- College Search/Knowledge
- College Success
- Costs & Financial Aid
- Data Visualizations
- Dental School Admissions
- Extracurricular Activities
- Graduate School Admissions
- High Schools
- Homeschool Resources
- Law School Admissions
- Medical School Admissions
- Navigating the Admissions Process
- Online Learning
- Outdoor Adventure
- Private High School Spotlight
- Summer Program Spotlight
- Summer Programs
- Teacher Tools
- Test Prep Provider Spotlight
“Innovative and invaluable…use this book as your college lifeline.”
— Lynn O'Shaughnessy
Nationally Recognized College Expert
College Planning in Your Inbox
Join our information-packed monthly newsletter.

Scientific Reports
What this handout is about.
This handout provides a general guide to writing reports about scientific research you’ve performed. In addition to describing the conventional rules about the format and content of a lab report, we’ll also attempt to convey why these rules exist, so you’ll get a clearer, more dependable idea of how to approach this writing situation. Readers of this handout may also find our handout on writing in the sciences useful.
Background and pre-writing
Why do we write research reports.
You did an experiment or study for your science class, and now you have to write it up for your teacher to review. You feel that you understood the background sufficiently, designed and completed the study effectively, obtained useful data, and can use those data to draw conclusions about a scientific process or principle. But how exactly do you write all that? What is your teacher expecting to see?
To take some of the guesswork out of answering these questions, try to think beyond the classroom setting. In fact, you and your teacher are both part of a scientific community, and the people who participate in this community tend to share the same values. As long as you understand and respect these values, your writing will likely meet the expectations of your audience—including your teacher.
So why are you writing this research report? The practical answer is “Because the teacher assigned it,” but that’s classroom thinking. Generally speaking, people investigating some scientific hypothesis have a responsibility to the rest of the scientific world to report their findings, particularly if these findings add to or contradict previous ideas. The people reading such reports have two primary goals:
- They want to gather the information presented.
- They want to know that the findings are legitimate.
Your job as a writer, then, is to fulfill these two goals.
How do I do that?
Good question. Here is the basic format scientists have designed for research reports:
- Introduction
Methods and Materials
This format, sometimes called “IMRAD,” may take slightly different shapes depending on the discipline or audience; some ask you to include an abstract or separate section for the hypothesis, or call the Discussion section “Conclusions,” or change the order of the sections (some professional and academic journals require the Methods section to appear last). Overall, however, the IMRAD format was devised to represent a textual version of the scientific method.
The scientific method, you’ll probably recall, involves developing a hypothesis, testing it, and deciding whether your findings support the hypothesis. In essence, the format for a research report in the sciences mirrors the scientific method but fleshes out the process a little. Below, you’ll find a table that shows how each written section fits into the scientific method and what additional information it offers the reader.
Thinking of your research report as based on the scientific method, but elaborated in the ways described above, may help you to meet your audience’s expectations successfully. We’re going to proceed by explicitly connecting each section of the lab report to the scientific method, then explaining why and how you need to elaborate that section.
Although this handout takes each section in the order in which it should be presented in the final report, you may for practical reasons decide to compose sections in another order. For example, many writers find that composing their Methods and Results before the other sections helps to clarify their idea of the experiment or study as a whole. You might consider using each assignment to practice different approaches to drafting the report, to find the order that works best for you.
What should I do before drafting the lab report?
The best way to prepare to write the lab report is to make sure that you fully understand everything you need to about the experiment. Obviously, if you don’t quite know what went on during the lab, you’re going to find it difficult to explain the lab satisfactorily to someone else. To make sure you know enough to write the report, complete the following steps:
- What are we going to do in this lab? (That is, what’s the procedure?)
- Why are we going to do it that way?
- What are we hoping to learn from this experiment?
- Why would we benefit from this knowledge?
- Consult your lab supervisor as you perform the lab. If you don’t know how to answer one of the questions above, for example, your lab supervisor will probably be able to explain it to you (or, at least, help you figure it out).
- Plan the steps of the experiment carefully with your lab partners. The less you rush, the more likely it is that you’ll perform the experiment correctly and record your findings accurately. Also, take some time to think about the best way to organize the data before you have to start putting numbers down. If you can design a table to account for the data, that will tend to work much better than jotting results down hurriedly on a scrap piece of paper.
- Record the data carefully so you get them right. You won’t be able to trust your conclusions if you have the wrong data, and your readers will know you messed up if the other three people in your group have “97 degrees” and you have “87.”
- Consult with your lab partners about everything you do. Lab groups often make one of two mistakes: two people do all the work while two have a nice chat, or everybody works together until the group finishes gathering the raw data, then scrams outta there. Collaborate with your partners, even when the experiment is “over.” What trends did you observe? Was the hypothesis supported? Did you all get the same results? What kind of figure should you use to represent your findings? The whole group can work together to answer these questions.
- Consider your audience. You may believe that audience is a non-issue: it’s your lab TA, right? Well, yes—but again, think beyond the classroom. If you write with only your lab instructor in mind, you may omit material that is crucial to a complete understanding of your experiment, because you assume the instructor knows all that stuff already. As a result, you may receive a lower grade, since your TA won’t be sure that you understand all the principles at work. Try to write towards a student in the same course but a different lab section. That student will have a fair degree of scientific expertise but won’t know much about your experiment particularly. Alternatively, you could envision yourself five years from now, after the reading and lectures for this course have faded a bit. What would you remember, and what would you need explained more clearly (as a refresher)?
Once you’ve completed these steps as you perform the experiment, you’ll be in a good position to draft an effective lab report.
Introductions
How do i write a strong introduction.
For the purposes of this handout, we’ll consider the Introduction to contain four basic elements: the purpose, the scientific literature relevant to the subject, the hypothesis, and the reasons you believed your hypothesis viable. Let’s start by going through each element of the Introduction to clarify what it covers and why it’s important. Then we can formulate a logical organizational strategy for the section.
The inclusion of the purpose (sometimes called the objective) of the experiment often confuses writers. The biggest misconception is that the purpose is the same as the hypothesis. Not quite. We’ll get to hypotheses in a minute, but basically they provide some indication of what you expect the experiment to show. The purpose is broader, and deals more with what you expect to gain through the experiment. In a professional setting, the hypothesis might have something to do with how cells react to a certain kind of genetic manipulation, but the purpose of the experiment is to learn more about potential cancer treatments. Undergraduate reports don’t often have this wide-ranging a goal, but you should still try to maintain the distinction between your hypothesis and your purpose. In a solubility experiment, for example, your hypothesis might talk about the relationship between temperature and the rate of solubility, but the purpose is probably to learn more about some specific scientific principle underlying the process of solubility.
For starters, most people say that you should write out your working hypothesis before you perform the experiment or study. Many beginning science students neglect to do so and find themselves struggling to remember precisely which variables were involved in the process or in what way the researchers felt that they were related. Write your hypothesis down as you develop it—you’ll be glad you did.
As for the form a hypothesis should take, it’s best not to be too fancy or complicated; an inventive style isn’t nearly so important as clarity here. There’s nothing wrong with beginning your hypothesis with the phrase, “It was hypothesized that . . .” Be as specific as you can about the relationship between the different objects of your study. In other words, explain that when term A changes, term B changes in this particular way. Readers of scientific writing are rarely content with the idea that a relationship between two terms exists—they want to know what that relationship entails.
Not a hypothesis:
“It was hypothesized that there is a significant relationship between the temperature of a solvent and the rate at which a solute dissolves.”
Hypothesis:
“It was hypothesized that as the temperature of a solvent increases, the rate at which a solute will dissolve in that solvent increases.”
Put more technically, most hypotheses contain both an independent and a dependent variable. The independent variable is what you manipulate to test the reaction; the dependent variable is what changes as a result of your manipulation. In the example above, the independent variable is the temperature of the solvent, and the dependent variable is the rate of solubility. Be sure that your hypothesis includes both variables.
Justify your hypothesis
You need to do more than tell your readers what your hypothesis is; you also need to assure them that this hypothesis was reasonable, given the circumstances. In other words, use the Introduction to explain that you didn’t just pluck your hypothesis out of thin air. (If you did pluck it out of thin air, your problems with your report will probably extend beyond using the appropriate format.) If you posit that a particular relationship exists between the independent and the dependent variable, what led you to believe your “guess” might be supported by evidence?
Scientists often refer to this type of justification as “motivating” the hypothesis, in the sense that something propelled them to make that prediction. Often, motivation includes what we already know—or rather, what scientists generally accept as true (see “Background/previous research” below). But you can also motivate your hypothesis by relying on logic or on your own observations. If you’re trying to decide which solutes will dissolve more rapidly in a solvent at increased temperatures, you might remember that some solids are meant to dissolve in hot water (e.g., bouillon cubes) and some are used for a function precisely because they withstand higher temperatures (they make saucepans out of something). Or you can think about whether you’ve noticed sugar dissolving more rapidly in your glass of iced tea or in your cup of coffee. Even such basic, outside-the-lab observations can help you justify your hypothesis as reasonable.
Background/previous research
This part of the Introduction demonstrates to the reader your awareness of how you’re building on other scientists’ work. If you think of the scientific community as engaging in a series of conversations about various topics, then you’ll recognize that the relevant background material will alert the reader to which conversation you want to enter.
Generally speaking, authors writing journal articles use the background for slightly different purposes than do students completing assignments. Because readers of academic journals tend to be professionals in the field, authors explain the background in order to permit readers to evaluate the study’s pertinence for their own work. You, on the other hand, write toward a much narrower audience—your peers in the course or your lab instructor—and so you must demonstrate that you understand the context for the (presumably assigned) experiment or study you’ve completed. For example, if your professor has been talking about polarity during lectures, and you’re doing a solubility experiment, you might try to connect the polarity of a solid to its relative solubility in certain solvents. In any event, both professional researchers and undergraduates need to connect the background material overtly to their own work.
Organization of this section
Most of the time, writers begin by stating the purpose or objectives of their own work, which establishes for the reader’s benefit the “nature and scope of the problem investigated” (Day 1994). Once you have expressed your purpose, you should then find it easier to move from the general purpose, to relevant material on the subject, to your hypothesis. In abbreviated form, an Introduction section might look like this:
“The purpose of the experiment was to test conventional ideas about solubility in the laboratory [purpose] . . . According to Whitecoat and Labrat (1999), at higher temperatures the molecules of solvents move more quickly . . . We know from the class lecture that molecules moving at higher rates of speed collide with one another more often and thus break down more easily [background material/motivation] . . . Thus, it was hypothesized that as the temperature of a solvent increases, the rate at which a solute will dissolve in that solvent increases [hypothesis].”
Again—these are guidelines, not commandments. Some writers and readers prefer different structures for the Introduction. The one above merely illustrates a common approach to organizing material.
How do I write a strong Materials and Methods section?
As with any piece of writing, your Methods section will succeed only if it fulfills its readers’ expectations, so you need to be clear in your own mind about the purpose of this section. Let’s review the purpose as we described it above: in this section, you want to describe in detail how you tested the hypothesis you developed and also to clarify the rationale for your procedure. In science, it’s not sufficient merely to design and carry out an experiment. Ultimately, others must be able to verify your findings, so your experiment must be reproducible, to the extent that other researchers can follow the same procedure and obtain the same (or similar) results.
Here’s a real-world example of the importance of reproducibility. In 1989, physicists Stanley Pons and Martin Fleischman announced that they had discovered “cold fusion,” a way of producing excess heat and power without the nuclear radiation that accompanies “hot fusion.” Such a discovery could have great ramifications for the industrial production of energy, so these findings created a great deal of interest. When other scientists tried to duplicate the experiment, however, they didn’t achieve the same results, and as a result many wrote off the conclusions as unjustified (or worse, a hoax). To this day, the viability of cold fusion is debated within the scientific community, even though an increasing number of researchers believe it possible. So when you write your Methods section, keep in mind that you need to describe your experiment well enough to allow others to replicate it exactly.
With these goals in mind, let’s consider how to write an effective Methods section in terms of content, structure, and style.
Sometimes the hardest thing about writing this section isn’t what you should talk about, but what you shouldn’t talk about. Writers often want to include the results of their experiment, because they measured and recorded the results during the course of the experiment. But such data should be reserved for the Results section. In the Methods section, you can write that you recorded the results, or how you recorded the results (e.g., in a table), but you shouldn’t write what the results were—not yet. Here, you’re merely stating exactly how you went about testing your hypothesis. As you draft your Methods section, ask yourself the following questions:
- How much detail? Be precise in providing details, but stay relevant. Ask yourself, “Would it make any difference if this piece were a different size or made from a different material?” If not, you probably don’t need to get too specific. If so, you should give as many details as necessary to prevent this experiment from going awry if someone else tries to carry it out. Probably the most crucial detail is measurement; you should always quantify anything you can, such as time elapsed, temperature, mass, volume, etc.
- Rationale: Be sure that as you’re relating your actions during the experiment, you explain your rationale for the protocol you developed. If you capped a test tube immediately after adding a solute to a solvent, why did you do that? (That’s really two questions: why did you cap it, and why did you cap it immediately?) In a professional setting, writers provide their rationale as a way to explain their thinking to potential critics. On one hand, of course, that’s your motivation for talking about protocol, too. On the other hand, since in practical terms you’re also writing to your teacher (who’s seeking to evaluate how well you comprehend the principles of the experiment), explaining the rationale indicates that you understand the reasons for conducting the experiment in that way, and that you’re not just following orders. Critical thinking is crucial—robots don’t make good scientists.
- Control: Most experiments will include a control, which is a means of comparing experimental results. (Sometimes you’ll need to have more than one control, depending on the number of hypotheses you want to test.) The control is exactly the same as the other items you’re testing, except that you don’t manipulate the independent variable-the condition you’re altering to check the effect on the dependent variable. For example, if you’re testing solubility rates at increased temperatures, your control would be a solution that you didn’t heat at all; that way, you’ll see how quickly the solute dissolves “naturally” (i.e., without manipulation), and you’ll have a point of reference against which to compare the solutions you did heat.
Describe the control in the Methods section. Two things are especially important in writing about the control: identify the control as a control, and explain what you’re controlling for. Here is an example:
“As a control for the temperature change, we placed the same amount of solute in the same amount of solvent, and let the solution stand for five minutes without heating it.”
Structure and style
Organization is especially important in the Methods section of a lab report because readers must understand your experimental procedure completely. Many writers are surprised by the difficulty of conveying what they did during the experiment, since after all they’re only reporting an event, but it’s often tricky to present this information in a coherent way. There’s a fairly standard structure you can use to guide you, and following the conventions for style can help clarify your points.
- Subsections: Occasionally, researchers use subsections to report their procedure when the following circumstances apply: 1) if they’ve used a great many materials; 2) if the procedure is unusually complicated; 3) if they’ve developed a procedure that won’t be familiar to many of their readers. Because these conditions rarely apply to the experiments you’ll perform in class, most undergraduate lab reports won’t require you to use subsections. In fact, many guides to writing lab reports suggest that you try to limit your Methods section to a single paragraph.
- Narrative structure: Think of this section as telling a story about a group of people and the experiment they performed. Describe what you did in the order in which you did it. You may have heard the old joke centered on the line, “Disconnect the red wire, but only after disconnecting the green wire,” where the person reading the directions blows everything to kingdom come because the directions weren’t in order. We’re used to reading about events chronologically, and so your readers will generally understand what you did if you present that information in the same way. Also, since the Methods section does generally appear as a narrative (story), you want to avoid the “recipe” approach: “First, take a clean, dry 100 ml test tube from the rack. Next, add 50 ml of distilled water.” You should be reporting what did happen, not telling the reader how to perform the experiment: “50 ml of distilled water was poured into a clean, dry 100 ml test tube.” Hint: most of the time, the recipe approach comes from copying down the steps of the procedure from your lab manual, so you may want to draft the Methods section initially without consulting your manual. Later, of course, you can go back and fill in any part of the procedure you inadvertently overlooked.
- Past tense: Remember that you’re describing what happened, so you should use past tense to refer to everything you did during the experiment. Writers are often tempted to use the imperative (“Add 5 g of the solid to the solution”) because that’s how their lab manuals are worded; less frequently, they use present tense (“5 g of the solid are added to the solution”). Instead, remember that you’re talking about an event which happened at a particular time in the past, and which has already ended by the time you start writing, so simple past tense will be appropriate in this section (“5 g of the solid were added to the solution” or “We added 5 g of the solid to the solution”).
- Active: We heated the solution to 80°C. (The subject, “we,” performs the action, heating.)
- Passive: The solution was heated to 80°C. (The subject, “solution,” doesn’t do the heating–it is acted upon, not acting.)
Increasingly, especially in the social sciences, using first person and active voice is acceptable in scientific reports. Most readers find that this style of writing conveys information more clearly and concisely. This rhetorical choice thus brings two scientific values into conflict: objectivity versus clarity. Since the scientific community hasn’t reached a consensus about which style it prefers, you may want to ask your lab instructor.
How do I write a strong Results section?
Here’s a paradox for you. The Results section is often both the shortest (yay!) and most important (uh-oh!) part of your report. Your Materials and Methods section shows how you obtained the results, and your Discussion section explores the significance of the results, so clearly the Results section forms the backbone of the lab report. This section provides the most critical information about your experiment: the data that allow you to discuss how your hypothesis was or wasn’t supported. But it doesn’t provide anything else, which explains why this section is generally shorter than the others.
Before you write this section, look at all the data you collected to figure out what relates significantly to your hypothesis. You’ll want to highlight this material in your Results section. Resist the urge to include every bit of data you collected, since perhaps not all are relevant. Also, don’t try to draw conclusions about the results—save them for the Discussion section. In this section, you’re reporting facts. Nothing your readers can dispute should appear in the Results section.
Most Results sections feature three distinct parts: text, tables, and figures. Let’s consider each part one at a time.
This should be a short paragraph, generally just a few lines, that describes the results you obtained from your experiment. In a relatively simple experiment, one that doesn’t produce a lot of data for you to repeat, the text can represent the entire Results section. Don’t feel that you need to include lots of extraneous detail to compensate for a short (but effective) text; your readers appreciate discrimination more than your ability to recite facts. In a more complex experiment, you may want to use tables and/or figures to help guide your readers toward the most important information you gathered. In that event, you’ll need to refer to each table or figure directly, where appropriate:
“Table 1 lists the rates of solubility for each substance”
“Solubility increased as the temperature of the solution increased (see Figure 1).”
If you do use tables or figures, make sure that you don’t present the same material in both the text and the tables/figures, since in essence you’ll just repeat yourself, probably annoying your readers with the redundancy of your statements.
Feel free to describe trends that emerge as you examine the data. Although identifying trends requires some judgment on your part and so may not feel like factual reporting, no one can deny that these trends do exist, and so they properly belong in the Results section. Example:
“Heating the solution increased the rate of solubility of polar solids by 45% but had no effect on the rate of solubility in solutions containing non-polar solids.”
This point isn’t debatable—you’re just pointing out what the data show.
As in the Materials and Methods section, you want to refer to your data in the past tense, because the events you recorded have already occurred and have finished occurring. In the example above, note the use of “increased” and “had,” rather than “increases” and “has.” (You don’t know from your experiment that heating always increases the solubility of polar solids, but it did that time.)
You shouldn’t put information in the table that also appears in the text. You also shouldn’t use a table to present irrelevant data, just to show you did collect these data during the experiment. Tables are good for some purposes and situations, but not others, so whether and how you’ll use tables depends upon what you need them to accomplish.
Tables are useful ways to show variation in data, but not to present a great deal of unchanging measurements. If you’re dealing with a scientific phenomenon that occurs only within a certain range of temperatures, for example, you don’t need to use a table to show that the phenomenon didn’t occur at any of the other temperatures. How useful is this table?

As you can probably see, no solubility was observed until the trial temperature reached 50°C, a fact that the text part of the Results section could easily convey. The table could then be limited to what happened at 50°C and higher, thus better illustrating the differences in solubility rates when solubility did occur.
As a rule, try not to use a table to describe any experimental event you can cover in one sentence of text. Here’s an example of an unnecessary table from How to Write and Publish a Scientific Paper , by Robert A. Day:

As Day notes, all the information in this table can be summarized in one sentence: “S. griseus, S. coelicolor, S. everycolor, and S. rainbowenski grew under aerobic conditions, whereas S. nocolor and S. greenicus required anaerobic conditions.” Most readers won’t find the table clearer than that one sentence.
When you do have reason to tabulate material, pay attention to the clarity and readability of the format you use. Here are a few tips:
- Number your table. Then, when you refer to the table in the text, use that number to tell your readers which table they can review to clarify the material.
- Give your table a title. This title should be descriptive enough to communicate the contents of the table, but not so long that it becomes difficult to follow. The titles in the sample tables above are acceptable.
- Arrange your table so that readers read vertically, not horizontally. For the most part, this rule means that you should construct your table so that like elements read down, not across. Think about what you want your readers to compare, and put that information in the column (up and down) rather than in the row (across). Usually, the point of comparison will be the numerical data you collect, so especially make sure you have columns of numbers, not rows.Here’s an example of how drastically this decision affects the readability of your table (from A Short Guide to Writing about Chemistry , by Herbert Beall and John Trimbur). Look at this table, which presents the relevant data in horizontal rows:

It’s a little tough to see the trends that the author presumably wants to present in this table. Compare this table, in which the data appear vertically:

The second table shows how putting like elements in a vertical column makes for easier reading. In this case, the like elements are the measurements of length and height, over five trials–not, as in the first table, the length and height measurements for each trial.
- Make sure to include units of measurement in the tables. Readers might be able to guess that you measured something in millimeters, but don’t make them try.
- Don’t use vertical lines as part of the format for your table. This convention exists because journals prefer not to have to reproduce these lines because the tables then become more expensive to print. Even though it’s fairly unlikely that you’ll be sending your Biology 11 lab report to Science for publication, your readers still have this expectation. Consequently, if you use the table-drawing option in your word-processing software, choose the option that doesn’t rely on a “grid” format (which includes vertical lines).
How do I include figures in my report?
Although tables can be useful ways of showing trends in the results you obtained, figures (i.e., illustrations) can do an even better job of emphasizing such trends. Lab report writers often use graphic representations of the data they collected to provide their readers with a literal picture of how the experiment went.
When should you use a figure?
Remember the circumstances under which you don’t need a table: when you don’t have a great deal of data or when the data you have don’t vary a lot. Under the same conditions, you would probably forgo the figure as well, since the figure would be unlikely to provide your readers with an additional perspective. Scientists really don’t like their time wasted, so they tend not to respond favorably to redundancy.
If you’re trying to decide between using a table and creating a figure to present your material, consider the following a rule of thumb. The strength of a table lies in its ability to supply large amounts of exact data, whereas the strength of a figure is its dramatic illustration of important trends within the experiment. If you feel that your readers won’t get the full impact of the results you obtained just by looking at the numbers, then a figure might be appropriate.
Of course, an undergraduate class may expect you to create a figure for your lab experiment, if only to make sure that you can do so effectively. If this is the case, then don’t worry about whether to use figures or not—concentrate instead on how best to accomplish your task.
Figures can include maps, photographs, pen-and-ink drawings, flow charts, bar graphs, and section graphs (“pie charts”). But the most common figure by far, especially for undergraduates, is the line graph, so we’ll focus on that type in this handout.
At the undergraduate level, you can often draw and label your graphs by hand, provided that the result is clear, legible, and drawn to scale. Computer technology has, however, made creating line graphs a lot easier. Most word-processing software has a number of functions for transferring data into graph form; many scientists have found Microsoft Excel, for example, a helpful tool in graphing results. If you plan on pursuing a career in the sciences, it may be well worth your while to learn to use a similar program.
Computers can’t, however, decide for you how your graph really works; you have to know how to design your graph to meet your readers’ expectations. Here are some of these expectations:
- Keep it as simple as possible. You may be tempted to signal the complexity of the information you gathered by trying to design a graph that accounts for that complexity. But remember the purpose of your graph: to dramatize your results in a manner that’s easy to see and grasp. Try not to make the reader stare at the graph for a half hour to find the important line among the mass of other lines. For maximum effectiveness, limit yourself to three to five lines per graph; if you have more data to demonstrate, use a set of graphs to account for it, rather than trying to cram it all into a single figure.
- Plot the independent variable on the horizontal (x) axis and the dependent variable on the vertical (y) axis. Remember that the independent variable is the condition that you manipulated during the experiment and the dependent variable is the condition that you measured to see if it changed along with the independent variable. Placing the variables along their respective axes is mostly just a convention, but since your readers are accustomed to viewing graphs in this way, you’re better off not challenging the convention in your report.
- Label each axis carefully, and be especially careful to include units of measure. You need to make sure that your readers understand perfectly well what your graph indicates.
- Number and title your graphs. As with tables, the title of the graph should be informative but concise, and you should refer to your graph by number in the text (e.g., “Figure 1 shows the increase in the solubility rate as a function of temperature”).
- Many editors of professional scientific journals prefer that writers distinguish the lines in their graphs by attaching a symbol to them, usually a geometric shape (triangle, square, etc.), and using that symbol throughout the curve of the line. Generally, readers have a hard time distinguishing dotted lines from dot-dash lines from straight lines, so you should consider staying away from this system. Editors don’t usually like different-colored lines within a graph because colors are difficult and expensive to reproduce; colors may, however, be great for your purposes, as long as you’re not planning to submit your paper to Nature. Use your discretion—try to employ whichever technique dramatizes the results most effectively.
- Try to gather data at regular intervals, so the plot points on your graph aren’t too far apart. You can’t be sure of the arc you should draw between the plot points if the points are located at the far corners of the graph; over a fifteen-minute interval, perhaps the change occurred in the first or last thirty seconds of that period (in which case your straight-line connection between the points is misleading).
- If you’re worried that you didn’t collect data at sufficiently regular intervals during your experiment, go ahead and connect the points with a straight line, but you may want to examine this problem as part of your Discussion section.
- Make your graph large enough so that everything is legible and clearly demarcated, but not so large that it either overwhelms the rest of the Results section or provides a far greater range than you need to illustrate your point. If, for example, the seedlings of your plant grew only 15 mm during the trial, you don’t need to construct a graph that accounts for 100 mm of growth. The lines in your graph should more or less fill the space created by the axes; if you see that your data is confined to the lower left portion of the graph, you should probably re-adjust your scale.
- If you create a set of graphs, make them the same size and format, including all the verbal and visual codes (captions, symbols, scale, etc.). You want to be as consistent as possible in your illustrations, so that your readers can easily make the comparisons you’re trying to get them to see.
How do I write a strong Discussion section?
The discussion section is probably the least formalized part of the report, in that you can’t really apply the same structure to every type of experiment. In simple terms, here you tell your readers what to make of the Results you obtained. If you have done the Results part well, your readers should already recognize the trends in the data and have a fairly clear idea of whether your hypothesis was supported. Because the Results can seem so self-explanatory, many students find it difficult to know what material to add in this last section.
Basically, the Discussion contains several parts, in no particular order, but roughly moving from specific (i.e., related to your experiment only) to general (how your findings fit in the larger scientific community). In this section, you will, as a rule, need to:
Explain whether the data support your hypothesis
- Acknowledge any anomalous data or deviations from what you expected
Derive conclusions, based on your findings, about the process you’re studying
- Relate your findings to earlier work in the same area (if you can)
Explore the theoretical and/or practical implications of your findings
Let’s look at some dos and don’ts for each of these objectives.
This statement is usually a good way to begin the Discussion, since you can’t effectively speak about the larger scientific value of your study until you’ve figured out the particulars of this experiment. You might begin this part of the Discussion by explicitly stating the relationships or correlations your data indicate between the independent and dependent variables. Then you can show more clearly why you believe your hypothesis was or was not supported. For example, if you tested solubility at various temperatures, you could start this section by noting that the rates of solubility increased as the temperature increased. If your initial hypothesis surmised that temperature change would not affect solubility, you would then say something like,
“The hypothesis that temperature change would not affect solubility was not supported by the data.”
Note: Students tend to view labs as practical tests of undeniable scientific truths. As a result, you may want to say that the hypothesis was “proved” or “disproved” or that it was “correct” or “incorrect.” These terms, however, reflect a degree of certainty that you as a scientist aren’t supposed to have. Remember, you’re testing a theory with a procedure that lasts only a few hours and relies on only a few trials, which severely compromises your ability to be sure about the “truth” you see. Words like “supported,” “indicated,” and “suggested” are more acceptable ways to evaluate your hypothesis.
Also, recognize that saying whether the data supported your hypothesis or not involves making a claim to be defended. As such, you need to show the readers that this claim is warranted by the evidence. Make sure that you’re very explicit about the relationship between the evidence and the conclusions you draw from it. This process is difficult for many writers because we don’t often justify conclusions in our regular lives. For example, you might nudge your friend at a party and whisper, “That guy’s drunk,” and once your friend lays eyes on the person in question, she might readily agree. In a scientific paper, by contrast, you would need to defend your claim more thoroughly by pointing to data such as slurred words, unsteady gait, and the lampshade-as-hat. In addition to pointing out these details, you would also need to show how (according to previous studies) these signs are consistent with inebriation, especially if they occur in conjunction with one another. To put it another way, tell your readers exactly how you got from point A (was the hypothesis supported?) to point B (yes/no).
Acknowledge any anomalous data, or deviations from what you expected
You need to take these exceptions and divergences into account, so that you qualify your conclusions sufficiently. For obvious reasons, your readers will doubt your authority if you (deliberately or inadvertently) overlook a key piece of data that doesn’t square with your perspective on what occurred. In a more philosophical sense, once you’ve ignored evidence that contradicts your claims, you’ve departed from the scientific method. The urge to “tidy up” the experiment is often strong, but if you give in to it you’re no longer performing good science.
Sometimes after you’ve performed a study or experiment, you realize that some part of the methods you used to test your hypothesis was flawed. In that case, it’s OK to suggest that if you had the chance to conduct your test again, you might change the design in this or that specific way in order to avoid such and such a problem. The key to making this approach work, though, is to be very precise about the weakness in your experiment, why and how you think that weakness might have affected your data, and how you would alter your protocol to eliminate—or limit the effects of—that weakness. Often, inexperienced researchers and writers feel the need to account for “wrong” data (remember, there’s no such animal), and so they speculate wildly about what might have screwed things up. These speculations include such factors as the unusually hot temperature in the room, or the possibility that their lab partners read the meters wrong, or the potentially defective equipment. These explanations are what scientists call “cop-outs,” or “lame”; don’t indicate that the experiment had a weakness unless you’re fairly certain that a) it really occurred and b) you can explain reasonably well how that weakness affected your results.
If, for example, your hypothesis dealt with the changes in solubility at different temperatures, then try to figure out what you can rationally say about the process of solubility more generally. If you’re doing an undergraduate lab, chances are that the lab will connect in some way to the material you’ve been covering either in lecture or in your reading, so you might choose to return to these resources as a way to help you think clearly about the process as a whole.
This part of the Discussion section is another place where you need to make sure that you’re not overreaching. Again, nothing you’ve found in one study would remotely allow you to claim that you now “know” something, or that something isn’t “true,” or that your experiment “confirmed” some principle or other. Hesitate before you go out on a limb—it’s dangerous! Use less absolutely conclusive language, including such words as “suggest,” “indicate,” “correspond,” “possibly,” “challenge,” etc.
Relate your findings to previous work in the field (if possible)
We’ve been talking about how to show that you belong in a particular community (such as biologists or anthropologists) by writing within conventions that they recognize and accept. Another is to try to identify a conversation going on among members of that community, and use your work to contribute to that conversation. In a larger philosophical sense, scientists can’t fully understand the value of their research unless they have some sense of the context that provoked and nourished it. That is, you have to recognize what’s new about your project (potentially, anyway) and how it benefits the wider body of scientific knowledge. On a more pragmatic level, especially for undergraduates, connecting your lab work to previous research will demonstrate to the TA that you see the big picture. You have an opportunity, in the Discussion section, to distinguish yourself from the students in your class who aren’t thinking beyond the barest facts of the study. Capitalize on this opportunity by putting your own work in context.
If you’re just beginning to work in the natural sciences (as a first-year biology or chemistry student, say), most likely the work you’ll be doing has already been performed and re-performed to a satisfactory degree. Hence, you could probably point to a similar experiment or study and compare/contrast your results and conclusions. More advanced work may deal with an issue that is somewhat less “resolved,” and so previous research may take the form of an ongoing debate, and you can use your own work to weigh in on that debate. If, for example, researchers are hotly disputing the value of herbal remedies for the common cold, and the results of your study suggest that Echinacea diminishes the symptoms but not the actual presence of the cold, then you might want to take some time in the Discussion section to recapitulate the specifics of the dispute as it relates to Echinacea as an herbal remedy. (Consider that you have probably already written in the Introduction about this debate as background research.)
This information is often the best way to end your Discussion (and, for all intents and purposes, the report). In argumentative writing generally, you want to use your closing words to convey the main point of your writing. This main point can be primarily theoretical (“Now that you understand this information, you’re in a better position to understand this larger issue”) or primarily practical (“You can use this information to take such and such an action”). In either case, the concluding statements help the reader to comprehend the significance of your project and your decision to write about it.
Since a lab report is argumentative—after all, you’re investigating a claim, and judging the legitimacy of that claim by generating and collecting evidence—it’s often a good idea to end your report with the same technique for establishing your main point. If you want to go the theoretical route, you might talk about the consequences your study has for the field or phenomenon you’re investigating. To return to the examples regarding solubility, you could end by reflecting on what your work on solubility as a function of temperature tells us (potentially) about solubility in general. (Some folks consider this type of exploration “pure” as opposed to “applied” science, although these labels can be problematic.) If you want to go the practical route, you could end by speculating about the medical, institutional, or commercial implications of your findings—in other words, answer the question, “What can this study help people to do?” In either case, you’re going to make your readers’ experience more satisfying, by helping them see why they spent their time learning what you had to teach them.
Works consulted
We consulted these works while writing this handout. This is not a comprehensive list of resources on the handout’s topic, and we encourage you to do your own research to find additional publications. Please do not use this list as a model for the format of your own reference list, as it may not match the citation style you are using. For guidance on formatting citations, please see the UNC Libraries citation tutorial . We revise these tips periodically and welcome feedback.
American Psychological Association. 2010. Publication Manual of the American Psychological Association . 6th ed. Washington, DC: American Psychological Association.
Beall, Herbert, and John Trimbur. 2001. A Short Guide to Writing About Chemistry , 2nd ed. New York: Longman.
Blum, Deborah, and Mary Knudson. 1997. A Field Guide for Science Writers: The Official Guide of the National Association of Science Writers . New York: Oxford University Press.
Booth, Wayne C., Gregory G. Colomb, Joseph M. Williams, Joseph Bizup, and William T. FitzGerald. 2016. The Craft of Research , 4th ed. Chicago: University of Chicago Press.
Briscoe, Mary Helen. 1996. Preparing Scientific Illustrations: A Guide to Better Posters, Presentations, and Publications , 2nd ed. New York: Springer-Verlag.
Council of Science Editors. 2014. Scientific Style and Format: The CSE Manual for Authors, Editors, and Publishers , 8th ed. Chicago & London: University of Chicago Press.
Davis, Martha. 2012. Scientific Papers and Presentations , 3rd ed. London: Academic Press.
Day, Robert A. 1994. How to Write and Publish a Scientific Paper , 4th ed. Phoenix: Oryx Press.
Porush, David. 1995. A Short Guide to Writing About Science . New York: Longman.
Williams, Joseph, and Joseph Bizup. 2017. Style: Lessons in Clarity and Grace , 12th ed. Boston: Pearson.
You may reproduce it for non-commercial use if you use the entire handout and attribute the source: The Writing Center, University of North Carolina at Chapel Hill
Make a Gift
How to Write a Lab Report
Lab Reports Describe Your Experiment
- Chemical Laws
- Periodic Table
- Projects & Experiments
- Scientific Method
- Biochemistry
- Physical Chemistry
- Medical Chemistry
- Chemistry In Everyday Life
- Famous Chemists
- Activities for Kids
- Abbreviations & Acronyms
- Weather & Climate
- Ph.D., Biomedical Sciences, University of Tennessee at Knoxville
- B.A., Physics and Mathematics, Hastings College
Lab reports are an essential part of all laboratory courses and usually a significant part of your grade. If your instructor gives you an outline for how to write a lab report, use that. Some instructors require a lab report to be included in a lab notebook , while others will request a separate report. Here's a format for a lab report you can use if you aren't sure what to write or need an explanation of what to include in the different parts of the report.
A lab report is how you explain what you did in your experiment, what you learned, and what the results meant.
Lab Report Essentials
Not all lab reports have title pages, but if your instructor wants one, it would be a single page that states:
- The title of the experiment.
- Your name and the names of any lab partners.
- Your instructor's name.
- The date the lab was performed or the date the report was submitted.
The title says what you did. It should be brief (aim for ten words or less) and describe the main point of the experiment or investigation. An example of a title would be: "Effects of Ultraviolet Light on Borax Crystal Growth Rate". If you can, begin your title using a keyword rather than an article like "The" or "A".
Introduction or Purpose
Usually, the introduction is one paragraph that explains the objectives or purpose of the lab. In one sentence, state the hypothesis. Sometimes an introduction may contain background information, briefly summarize how the experiment was performed, state the findings of the experiment, and list the conclusions of the investigation. Even if you don't write a whole introduction, you need to state the purpose of the experiment, or why you did it. This would be where you state your hypothesis .
List everything needed to complete your experiment.
Describe the steps you completed during your investigation. This is your procedure. Be sufficiently detailed that anyone could read this section and duplicate your experiment. Write it as if you were giving direction for someone else to do the lab. It may be helpful to provide a figure to diagram your experimental setup.
Numerical data obtained from your procedure usually presented as a table. Data encompasses what you recorded when you conducted the experiment. It's just the facts, not any interpretation of what they mean.
Describe in words what the data means. Sometimes the Results section is combined with the Discussion.
Discussion or Analysis
The Data section contains numbers; the Analysis section contains any calculations you made based on those numbers. This is where you interpret the data and determine whether or not a hypothesis was accepted. This is also where you would discuss any mistakes you might have made while conducting the investigation. You may wish to describe ways the study might have been improved.
Conclusions
Most of the time the conclusion is a single paragraph that sums up what happened in the experiment, whether your hypothesis was accepted or rejected, and what this means.
Figures and Graphs
Graphs and figures must both be labeled with a descriptive title. Label the axes on a graph, being sure to include units of measurement. The independent variable is on the X-axis, the dependent variable (the one you are measuring) is on the Y-axis. Be sure to refer to figures and graphs in the text of your report: the first figure is Figure 1, the second figure is Figure 2, etc.
If your research was based on someone else's work or if you cited facts that require documentation, then you should list these references.
- The 10 Most Important Lab Safety Rules
- Null Hypothesis Examples
- Examples of Independent and Dependent Variables
- How to Format a Biology Lab Report
- Science Lab Report Template - Fill in the Blanks
- How to Write a Science Fair Project Report
- How to Write an Abstract for a Scientific Paper
- Six Steps of the Scientific Method
- How To Design a Science Fair Experiment
- Understanding Simple vs Controlled Experiments
- Make a Science Fair Poster or Display
- Scientific Method Lesson Plan
- How to Organize Your Science Fair Poster
- What Is an Experiment? Definition and Design
- What Are the Elements of a Good Hypothesis?

- Science Notes Posts
- Contact Science Notes
- Todd Helmenstine Biography
- Anne Helmenstine Biography
- Free Printable Periodic Tables (PDF and PNG)
- Periodic Table Wallpapers
- Interactive Periodic Table
- Periodic Table Posters
- How to Grow Crystals
- Chemistry Projects
- Fire and Flames Projects
- Holiday Science
- Chemistry Problems With Answers
- Physics Problems
- Unit Conversion Example Problems
- Chemistry Worksheets
- Biology Worksheets
- Periodic Table Worksheets
- Physical Science Worksheets
- Science Lab Worksheets
- My Amazon Books
Lab Report Format – How to Write a Laboratory Report

A science laboratory experiment isn’t truly complete until you’ve written the lab report. You may have taken excellent notes in your laboratory notebook, but it isn’t the same as a lab report. The lab report format is designed to present experimental results so they can be shared with others. A well-written report explains what you did, why you did it, and what you learned. It should also generate reader interest, potentially leading to peer-reviewed publication and funding.
Sections of a Lab Report
There is no one lab report format. The format and sections might be specified by your instructor or employer. What really matters is covering all of the important information.
Label the sections (except the title). Use bold face type for the title and headings. The order is:
You may or may not be expected to provide a title page. If it is required, the title page includes the title of the experiment, the names of the researchers, the name of the institution, and the date.
The title describes the experiment. Don’t start it with an article (e.g., the, an, a) because it messes up databases and isn’t necessary. For example, a good title might be, “Effect of Increasing Glucose Concentration on Danio rerio Egg Hatching Rates.” Use title case and italicize the scientific names of any species.
Introduction
Sometimes the introduction is broken into separate sections. Otherwise, it’s written as a narrative that includes the following information:
- State the purpose of the experiment.
- State the hypothesis.
- Review earlier work on the subject. Refer to previous studies. Cover the background so a reader understands what is known about a subject and what you hope to learn that is new.
- Describe your approach to answering a question or solving a problem. Include a theory or equation, if appropriate.
This section describes experimental design. Identify the parameter you changed ( independent variable ) and the one you measured ( dependent variable ). Describe the equipment and set-up you used, materials, and methods. If a reader can’t picture the apparatus from your description, include a photograph or diagram. Sometimes this section is broken into “Materials” and “Methods.”
Your lab notebook contains all of the data you collected in the experiment. You aren’t expected to reproduce all of this in a lab report. Instead, provide labelled tables and graphs. The first figure is Figure 1, the second is Figure 2, etc. The first graph is Graph 1. Refer to figures and graphs by their figure number. For some experiments, you may need to include labelled photographs. Cite the results of any calculations you performed, such as slope and standard deviation. Discuss sources of error here, including instrument, standard, and random errors.
Discussion or Conclusions
While the “Results” section includes graphs and tables, the “Discussion” or “Conclusions” section focuses on what the results mean. This is where you state whether or not the objective of the experiment was met and what the outcome means. Propose reasons for discrepancies between expected and actual outcomes. Finally, describe the next logical step in your research and ways you might improve on the experiment.
References or Bibliography
Did you build upon work conducted by someone else? Cite the work. Did you consult a paper relating to the experiment? Credit the author. If you’re unsure whether to cite a reference or not, a good rule of thumb is to include a reference for any fact not known to your audience. For some reports, it’s only necessary to list publications directly relating to your procedure and conclusions.
The Tone of a Lab Report
Lab reports should be informative, not entertaining. This isn’t the place for humor, sarcasm, or flowery prose. A lab report should be:
- Concise : Cover all the key points without getting crazy with the details.
- Objective : In the “Conclusions” section, you can propose possible explanations for your results. Otherwise, keep your opinions out of the report. Instead, present facts and an analysis based on logic and math.
- Critical : After presenting what you did, the report focuses on what the data means. Be on the lookout for sources of error and identify them. Use your understanding of error to determine how reliable your results are and gauge confidence in your conclusions.
Related Posts
- How To Find Articles with Databases
- How To Evaluate Articles
- How To Read A Scientific Paper
- How To Interpret Data
- How To Write A Lab Report
- How To Write A Scientific Paper
- Get More Help
- Reference: Encyclopedia, Handbooks & Dictionaries
- Research Tools: Databases, Protocols & Citation Locators
- E-Journal Lists by Subject
- Scholarly vs Popular
- Search Tips
- Open Resources
- E-Journal lists by subject
- Develop a Research Question
Writing Lab Reports
Writing lab reports follows a straightforward and structured procedure. It is important to recognize that each part of a lab report is important, so take the time to complete each carefully. A lab report is broken down into eight sections: title, abstract, introduction, methods and materials, results, discussion, conclusion, and references.
- Ex: "Determining the Free Chlorine Content of Pool Water"
- Abstracts are a summary of the experiment as a whole and should familiarize the reader with the purpose of the research.
- Abstracts will always be written last, even though they are the first paragraph of a lab report.
- Not all lab reports will require an abstract. However, they are often included in upper-level lab reports and should be studied carefully.
- Why was the research done or experiment conducted?
- What problem is being addressed?
- What results were found?
- What are the meaning of the results?
- How is the problem better understood now than before, if at all?
Introduction
- The introduction of a lab report discusses the problem being studied and other theory that is relevant to understanding the findings.
- The hypothesis of the experiment and the motivation for the research are stated in this section.
- Write the introduction in your own words. Try not to copy from a lab manual or other guidelines. Instead, show comprehension of the experiment by briefly explaining the problem.
Methods and Materials
- Ex: pipette, graduated cylinder, 1.13mg of Na, 0.67mg Ag
- List the steps taken as they actually happened during the experiment, not as they were supposed to happen.
- If written correctly, another researcher should be able to duplicate the experiment and get the same or very similar results.
- The results show the data that was collected or found during the experiment.
- Explain in words the data that was collected.
- Tables should be labeled numerically, as "Table 1", "Table 2", etc. Other figures should be labeled numerically as "Figure 1", "Figure 2", etc.
- Calculations to understand the data can also be presented in the results.
- The discussion section is one of the most important parts of the lab report. It analyzes the results of the experiment and is a discussion of the data.
- If any results are unexpected, explain why they are unexpected and how they did or did not effect the data obtained.
- Analyze the strengths and weaknesses of the design of the experiment and compare your results to other similar experiments.
- If there are any experimental errors, analyze them.
- Explain your results and discuss them using relevant terms and theories.
- What do the results indicate?
- What is the significance of the results?
- Are there any gaps in knowledge?
- Are there any new questions that have been raised?
- The conclusion is a summation of the experiment. It should clearly and concisely state what was learned and its importance.
- If there is future work that needs to be done, it can be explained in the conclusion.
- If using any outside sources to support a claim or explain background information, those sources must be cited in the references section of the lab report.
- In the event that no outside sources are used, the references section may be left out.
Other Useful Sources
- The Lab Report
- Sample Laboratory Report #2
- Some Tips on Writing Lab Reports
- Writing a Science Lab Report
- << Previous: How To Interpret Data
- Next: How To Write A Scientific Paper >>
- Last Updated: Mar 8, 2024 2:26 PM
- URL: https://guides.libraries.indiana.edu/STEM
Social media
- Instagram for Herman B Wells Library
- Facebook for IU Libraries
Additional resources
Featured databases.
- Resource available to authorized IU Bloomington users (on or off campus) OneSearch@IU
- Resource available to authorized IU Bloomington users (on or off campus) Academic Search (EBSCO)
- Resource available to authorized IU Bloomington users (on or off campus) ERIC (EBSCO)
- Resource available to authorized IU Bloomington users (on or off campus) Nexis Uni
- Resource available without restriction HathiTrust Digital Library
- Databases A-Z
- Resource available to authorized IU Bloomington users (on or off campus) Google Scholar
- Resource available to authorized IU Bloomington users (on or off campus) JSTOR
- Resource available to authorized IU Bloomington users (on or off campus) Web of Science
- Resource available to authorized IU Bloomington users (on or off campus) Scopus
- Resource available to authorized IU Bloomington users (on or off campus) WorldCat
IU Libraries
- Diversity Resources
- About IU Libraries
- Alumni & Friends
- Departments & Staff
- Jobs & Libraries HR
- Intranet (Staff)
- IUL site admin
- Earth Science
- Physics & Engineering
- Science Kits
- Microscopes
- Science Curriculum and Kits
- About Home Science Tools
Teaching Resources & Guides > How to Teach Science Tips > Writing a Science Report
Writing a Science Report
With science fair season coming up as well as many end of the year projects, students are often required to write a research paper or a report on their project. Use this guide to help you in the process from finding a topic to revising and editing your final paper.
Brainstorming Topics
Sometimes one of the largest barriers to writing a research paper is trying to figure out what to write about. Many times the topic is supplied by the teacher, or the curriculum tells what the student should research and write about. However, this is not always the case. Sometimes the student is given a very broad concept to write a research paper on, for example, water. Within the category of water, there are many topics and subtopics that would be appropriate. Topics about water can include anything from the three states of water, different water sources, minerals found in water, how water is used by living organisms, the water cycle, or how to find water in the desert. The point is that “water” is a very large topic and would be too broad to be adequately covered in a typical 3-5 page research paper.
When given a broad category to write about, it is important to narrow it down to a topic that is much more manageable. Sometimes research needs to be done in order to find the best topic to write about. (Look for searching tips in “Finding and Gathering Information.”) Listed below are some tips and guidelines for picking a suitable research topic:
- Pick a topic within the category that you find interesting. It makes it that much easier to research and write about a topic if it interests you.
- You may find while researching a topic that the details of the topic are very boring to you. If this is the case, and you have the option to do this, change your topic.
- Pick a topic that you are already familiar with and research further into that area to build on your current knowledge.
- When researching topics to do your paper on, look at how much information you are finding. If you are finding very little information on your topic or you are finding an overwhelming amount, you may need to rethink your topic.
- If permissible, always leave yourself open to changing your topic. While researching for topics, you may come across one that you find really interesting and can use just as well as the previous topics you were searching for.
- Most importantly, does your research topic fit the guidelines set forth by your teacher or curriculum?
Finding and Gathering Information
There are numerous resources out there to help you find information on the topic selected for your research paper. One of the first places to begin research is at your local library. Use the Dewey Decimal System or ask the librarian to help you find books related to your topic. There are also a variety of reference materials, such as encyclopedias, available at the library.
A relatively new reference resource has become available with the power of technology – the Internet. While the Internet allows the user to access a wealth of information that is often more up-to-date than printed materials such as books and encyclopedias, there are certainly drawbacks to using it. It can be hard to tell whether or not a site contains factual information or just someone’s opinion. A site can also be dangerous or inappropriate for students to use.
You may find that certain science concepts and science terminology are not easy to find in regular dictionaries and encyclopedias. A science dictionary or science encyclopedia can help you find more in-depth and relevant information for your science report. If your topic is very technical or specific, reference materials such as medical dictionaries and chemistry encyclopedias may also be good resources to use.
If you are writing a report for your science fair project, not only will you be finding information from published sources, you will also be generating your own data, results, and conclusions. Keep a journal that tracks and records your experiments and results. When writing your report, you can either write out your findings from your experiments or display them using graphs or charts .
*As you are gathering information, keep a working bibliography of where you found your sources. Look under “Citing Sources” for more information. This will save you a lot of time in the long run!
Organizing Information
Most people find it hard to just take all the information they have gathered from their research and write it out in paper form. It is hard to get a starting point and go from the beginning to the end. You probably have several ideas you know you want to put in your paper, but you may be having trouble deciding where these ideas should go. Organizing your information in a way where new thoughts can be added to a subtopic at any time is a great way to organize the information you have about your topic. Here are two of the more popular ways to organize information so it can be used in a research paper:
- Graphic organizers such as a web or mind map . Mind maps are basically stating the main topic of your paper, then branching off into as many subtopics as possible about the main topic. Enchanted Learning has a list of several different types of mind maps as well as information on how to use them and what topics fit best for each type of mind map and graphic organizer.
- Sub-Subtopic: Low temperatures and adequate amounts of snow are needed to form glaciers.
- Sub-Subtopic: Glaciers move large amounts of earth and debris.
- Sub-Subtopic: Two basic types of glaciers: valley and continental.
- Subtopic: Icebergs – large masses of ice floating on liquid water
Different Formats For Your Paper
Depending on your topic and your writing preference, the layout of your paper can greatly enhance how well the information on your topic is displayed.
1. Process . This method is used to explain how something is done or how it works by listing the steps of the process. For most science fair projects and science experiments, this is the best format. Reports for science fairs need the entire project written out from start to finish. Your report should include a title page, statement of purpose, hypothesis, materials and procedures, results and conclusions, discussion, and credits and bibliography. If applicable, graphs, tables, or charts should be included with the results portion of your report.
2. Cause and effect . This is another common science experiment research paper format. The basic premise is that because event X happened, event Y happened.
3. Specific to general . This method works best when trying to draw conclusions about how little topics and details are connected to support one main topic or idea.
4. Climatic order . Similar to the “specific to general” category, here details are listed in order from least important to most important.
5. General to specific . Works in a similar fashion as the method for organizing your information. The main topic or subtopic is stated first, followed by supporting details that give more information about the topic.
6. Compare and contrast . This method works best when you wish to show the similarities and/or differences between two or more topics. A block pattern is used when you first write about one topic and all its details and then write about the second topic and all its details. An alternating pattern can be used to describe a detail about the first topic and then compare that to the related detail of the second topic. The block pattern and alternating pattern can also be combined to make a format that better fits your research paper.
Citing Sources
When writing a research paper, you must cite your sources! Otherwise you are plagiarizing (claiming someone else’s ideas as your own) which can cause severe penalties from failing your research paper assignment in primary and secondary grades to failing the entire course (most colleges and universities have this policy). To help you avoid plagiarism, follow these simple steps:
- Find out what format for citing your paper your teacher or curriculum wishes you to use. One of the most widely used and widely accepted citation formats by scholars and schools is the Modern Language Association (MLA) format. We recommended that you do an Internet search for the most recent format of the citation style you will be using in your paper.
- Keep a working bibliography when researching your topic. Have a document in your computer files or a page in your notebook where you write down every source that you found and may use in your paper. (You probably will not use every resource you find, but it is much easier to delete unused sources later rather than try to find them four weeks down the road.) To make this process even easier, write the source down in the citation format that will be used in your paper. No matter what citation format you use, you should always write down title, author, publisher, published date, page numbers used, and if applicable, the volume and issue number.
- When collecting ideas and information from your sources, write the author’s last name at the end of the idea. When revising and formatting your paper, keep the author’s last name attached to the end of the idea, no matter where you move that idea. This way, you won’t have to go back and try to remember where the ideas in your paper came from.
- There are two ways to use the information in your paper: paraphrasing and quotes. The majority of your paper will be paraphrasing the information you found. Paraphrasing is basically restating the idea being used in your own words. As a general rule of thumb, no more than two of the original words should be used in sequence when paraphrasing information, and similes should be used for as many of the words as possible in the original passage without changing the meaning of the main point. Sometimes, you may find something stated so well by the original author that it would be best to use the author’s original words in your paper. When using the author’s original words, use quotation marks only around the words being directly quoted and work the quote into the body of your paper so that it makes sense grammatically. Search the Internet for more rules on paraphrasing and quoting information.
Revising and Editing Your Paper
Revising your paper basically means you are fixing grammatical errors or changing the meaning of what you wrote. After you have written the rough draft of your paper, read through it again to make sure the ideas in your paper flow and are cohesive. You may need to add in information, delete extra information, use a thesaurus to find a better word to better express a concept, reword a sentence, or just make sure your ideas are stated in a logical and progressive order.
After revising your paper, go back and edit it, correcting the capitalization, punctuation, and spelling errors – the mechanics of writing. If you are not 100% positive a word is spelled correctly, look it up in a dictionary. Ask a parent or teacher for help on the proper usage of commas, hyphens, capitalization, and numbers. You may also be able to find the answers to these questions by doing an Internet search on writing mechanics or by checking you local library for a book on writing mechanics.
It is also always a good idea to have someone else read your paper. Because this person did not write the paper and is not familiar with the topic, he or she is more likely to catch mistakes or ideas that do not quite make sense. This person can also give you insights or suggestions on how to reword or format your paper to make it flow better or convey your ideas better.
More Information:
- Quick Science Fair Guide
- Science Fair Project Ideas
Teaching Homeschool
Welcome! After you finish this article, we invite you to read other articles to assist you in teaching science at home on the Resource Center, which consists of hundreds of free science articles!
Shop for Science Supplies!
Home Science Tools offers a wide variety of science products and kits. Find affordable beakers, dissection supplies, chemicals, microscopes, and everything else you need to teach science for all ages!
Related Articles

29 Creative Ways to Use a Home Science Tools Beaker Mug
Infuse a dash of experimentation into your daily routine with a Home Science Tools Beaker Mug! As we gear up for our 29th Anniversary, we've compiled a list of 29 exciting ways to use your beaker mug in everyday life. From brewing up creative concoctions to unleashing...

Next Generation Science Standards (NGSS)
What are the Next Generation Science Standards (NGSS)? These guidelines summarize what students “should” know and be able to do in different learning levels of science. The NGSS is based on research showing that students who are well-prepared for the future need...

The Beginners Guide to Choosing a Homeschool Science Curriculum
Get Started: Researching Homeschool Science Curriculums Teaching homeschool science is a great way for families to personalize their child's education while giving you the flexibility to teach it your way. There are many wonderful science curriculums...

Synthetic Frog Dissection Guide Project
Frog dissections are a great way to learn about the human body, as frogs have many organs and tissues similar to those of humans. It is important to determine which type of dissection is best for your student or child. Some individuals do not enjoy performing...

Snowstorm in a Boiling Flask Density Project
You know the mesmerizing feeling of watching the snow fall during a snowstorm? With this project, you can make your own snowstorm in a flask using an adaptation from the lava lamp science experiment! It’s a perfect project for any winter day.
JOIN OUR COMMUNITY
Get project ideas and special offers delivered to your inbox.
Writing Studio
Writing a lab report: introduction and discussion section guide.
In an effort to make our handouts more accessible, we have begun converting our PDF handouts to web pages. Download this page as a PDF: Writing a Lab Report Return to Writing Studio Handouts
Part 1 (of 2): Introducing a Lab Report
The introduction of a lab report states the objective of the experiment and provides the reader with background information. State the topic of your report clearly and concisely (in one or two sentences). Provide background theory, previous research, or formulas the reader should know. Usually, an instructor does not want you to repeat whatever the lab manual says, but to show your understanding of the problem.
Questions an Effective Lab Report Introduction Should Answer
What is the problem.
Describe the problem investigated. Summarize relevant research to provide context, key terms, and concepts so that your reader can understand the experiment.
Why is it important?
Review relevant research to provide a rationale for the investigation. What conflict, unanswered question, untested population, or untried method in existing research does your experiment address? How will you challenge or extend the findings of other researchers?
What solution (or step toward a solution) do you propose?
Briefly describe your experiment : hypothesis , research question , general experimental design or method , and a justification of your method (if alternatives exist).
Tips on Composing Your Lab Report’s Introduction
- Move from the general to the specific – from a problem in research literature to the specifics of your experiment.
- Engage your reader – answer the questions: “What did I do?” “Why should my reader care?”
- Clarify the links between problem and solution, between question asked and research design, and between prior research and the specifics of your experiment.
- Be selective, not exhaustive, in choosing studies to cite and the amount of detail to include. In general, the more relevant an article is to your study, the more space it deserves and the later in the introduction it appears.
- Ask your instructor whether or not you should summarize results and/or conclusions in the Introduction.
- “The objective of the experiment was …”
- “The purpose of this report is …”
- “Bragg’s Law for diffraction is …”
- “The scanning electron microscope produces micrographs …”
Part 2 (of 2): Writing the “Discussion” Section of a Lab Report
The discussion is the most important part of your lab report, because here you show that you have not merely completed the experiment, but that you also understand its wider implications. The discussion section is reserved for putting experimental results in the context of the larger theory. Ask yourself: “What is the significance or meaning of the results?”
Elements of an Effective Discussion Section
What do the results indicate clearly? Based on your results, explain what you know with certainty and draw conclusions.
Interpretation
What is the significance of your results? What ambiguities exist? What are logical explanations for problems in the data? What questions might you raise about the methods used or the validity of the experiment? What can be logically deduced from your analysis?
Tips on the Discussion Section
1. explain your results in terms of theoretical issues..
How well has the theory been illustrated? What are the theoretical implications and practical applications of your results?
For each major result:
- Describe the patterns, principles, and relationships that your results show.
- Explain how your results relate to expectations and to literature cited in your Introduction. Explain any agreements, contradictions, or exceptions.
- Describe what additional research might resolve contradictions or explain exceptions.
2. Relate results to your experimental objective(s).
If you set out to identify an unknown metal by finding its lattice parameter and its atomic structure, be sure that you have identified the metal and its attributes.
3. Compare expected results with those obtained.
If there were differences, how can you account for them? Were the instruments able to measure precisely? Was the sample contaminated? Did calculated values take account of friction?
4. Analyze experimental error along with the strengths and limitations of the experiment’s design.
Were any errors avoidable? Were they the result of equipment? If the flaws resulted from the experiment design, explain how the design might be improved. Consider, as well, the precision of the instruments that were used.
5. Compare your results to similar investigations.
In some cases, it is legitimate to compare outcomes with classmates, not in order to change your answer, but in order to look for and to account for or analyze any anomalies between the groups. Also, consider comparing your results to published scientific literature on the topic.
The “Introducing a Lab Report” guide was adapted from the University of Toronto Engineering Communications Centre and University of Wisconsin-Madison Writing Center.
The “Writing the Discussion Section of a Lab Report” resource was adapted from the University of Toronto Engineering Communications Centre and University of Wisconsin-Madison Writing Center.
Last revised: 07/2008 | Adapted for web delivery: 02/2021
In order to access certain content on this page, you may need to download Adobe Acrobat Reader or an equivalent PDF viewer software.
How to write a scientific report at university
David foster, professor in science and engineering at the university of manchester, explains the best way to write a successful scientific report.

David H Foster

At university, you might need to write scientific reports for laboratory experiments, computing and theoretical projects, and literature-based studies – and some eventually as research dissertations. All have a similar structure modelled on scientific journal articles. Their special format helps readers to navigate, understand and make comparisons across the research field.
Scientific report structure
The main components are similar for many subject areas, though some sections might be optional.
If you can choose a title, make it informative and not more than around 12 words. This is the average for scientific articles. Make every word count.
The abstract summarises your report’s content in a restricted word limit. It might be read separately from your full report, so it should contain a micro-report, without references or personalisation.
Usual elements you can include:
- Some background to the research area.
- Reason for the work.
- Main results.
- Any implications.
Ensure you omit empty statements such as “results are discussed”, as they usually are.
Introduction
The introduction should give enough background for readers to assess your work without consulting previous publications.
It can be organised along these lines:
- An opening statement to set the context.
- A summary of relevant published research.
- Your research question, hypothesis or other motivation.
- The purpose of your work.
- An indication of methodology.
- Your outcome.
Choose citations to any previous research carefully. They should reflect priority and importance, not necessarily recency. Your choices signal your grasp of the field.
Literature review
Dissertations and literature-based studies demand a more comprehensive review of published research than is summarised in the introduction. Fortunately, you don’t need to examine thousands of articles. Just proceed systematically.
- Use two to three published reviews to familiarise yourself with the field.
- Use authoritative databases such as Scopus or Web of Science to find the most frequently cited articles.
- Read these articles, noting key points. Experiment with their order and then turn them into sentences, in your own words.
- Get advice about expected review length and database usage from your individual programme.
Aims and objectives
Although the introduction describes the purpose of your work, dissertations might require something more accountable, with distinct aims and objectives.
The aim or aims represent the overall goal (for example, to land people on the moon). The objectives are the individual tasks that together achieve this goal (build rocket, recruit volunteers, launch rocket and so on).
The method section must give enough detail for a competent researcher to repeat your work. Technical descriptions should be accessible, so use generic names for equipment with proprietary names in parentheses (model, year, manufacturer, for example). Ensure that essential steps are clear, especially any affecting your conclusions.
The results section should contain mainly data and analysis. Start with a sentence or two to orient your reader. For numeric data, use graphs over tables and try to make graphs self-explanatory. Leave any interpretations for the discussion section.
The purpose of the discussion is to say what your results mean. Useful items to include:
- A reminder of the reason for the work.
- A review of the results. Ensure you are not repeating the results themselves; this should be more about your thoughts on them.
- The relationship between your results and the original objective.
- Their relationship to the literature, with citations.
- Any limitations of your results.
- Any knowledge you gained, new questions or longer-term implications.
The last item might form a concluding paragraph or be placed in a separate conclusion section. If your report is an internal document, ensure you only refer to your future research plans.
Try to finish with a “take-home” message complementing the opening of your introduction. For example: “This analysis has shown the process is feasible, but cost will decide its acceptability.”
Five common mistakes to avoid when writing your doctoral dissertation 9 tips to improve your academic writing Five resources to help students with academic writing
Acknowledgements
If appropriate, thank colleagues for advice, reading your report and technical support. Make sure that you secure their agreement first. Thank any funding agency. Avoid emotional declarations that you might later regret. That is all that is required in this section.
Referencing
Giving references ensures other authors’ ideas, procedures, results and inferences are credited. Use Web of Science or Scopus as mentioned earlier. Avoid databases giving online sources without journal publication details because they might be unreliable.
Don’t refer to Wikipedia. It isn’t a citable source.
Use one referencing style consistently and make sure it matches the required style of your degree or department. Choose either numbers or author and year to refer to the full references listed near the end of your report. Include all publication details, not just website links. Every reference should be cited in the text.
Figures and tables
Each figure should have a caption below with a label, such as “Fig. 1”, with a title and a sentence or two about what it shows. Similarly for tables, except that the title appears above. Every figure and table should be cited in the text.
Theoretical studies
More flexibility is possible with theoretical reports, but extra care is needed with logical development and mathematical presentation. An introduction and discussion are still needed, and possibly a literature review.
Final steps
Check that your report satisfies the formatting requirements of your department or degree programme. Check for grammatical errors, misspellings, informal language, punctuation, typos and repetition or omission.
Ask fellow students to read your report critically. Then rewrite it. Put it aside for a few days and read it afresh, making any new edits you’ve noticed. Keep up this process until you are happy with the final report.
You may also like

.css-185owts{overflow:hidden;max-height:54px;text-indent:0px;} How to write an undergraduate university dissertation
Grace McCabe

How to use digital advisers to improve academic writing

How to write a successful research piece at university
Maggie Tighe
Register free and enjoy extra benefits
- PRO Courses Guides New Tech Help Pro Expert Videos About wikiHow Pro Upgrade Sign In
- EDIT Edit this Article
- EXPLORE Tech Help Pro About Us Random Article Quizzes Request a New Article Community Dashboard This Or That Game Popular Categories Arts and Entertainment Artwork Books Movies Computers and Electronics Computers Phone Skills Technology Hacks Health Men's Health Mental Health Women's Health Relationships Dating Love Relationship Issues Hobbies and Crafts Crafts Drawing Games Education & Communication Communication Skills Personal Development Studying Personal Care and Style Fashion Hair Care Personal Hygiene Youth Personal Care School Stuff Dating All Categories Arts and Entertainment Finance and Business Home and Garden Relationship Quizzes Cars & Other Vehicles Food and Entertaining Personal Care and Style Sports and Fitness Computers and Electronics Health Pets and Animals Travel Education & Communication Hobbies and Crafts Philosophy and Religion Work World Family Life Holidays and Traditions Relationships Youth
- Browse Articles
- Learn Something New
- Quizzes Hot
- This Or That Game
- Train Your Brain
- Explore More
- Support wikiHow
- About wikiHow
- Log in / Sign up
- Education and Communications
- Science Writing
How to Write a Good Lab Conclusion in Science
Last Updated: May 31, 2024 Fact Checked
This article was co-authored by Bess Ruff, MA . Bess Ruff is a Geography PhD student at Florida State University. She received her MA in Environmental Science and Management from the University of California, Santa Barbara in 2016. She has conducted survey work for marine spatial planning projects in the Caribbean and provided research support as a graduate fellow for the Sustainable Fisheries Group. There are 11 references cited in this article, which can be found at the bottom of the page. This article has been fact-checked, ensuring the accuracy of any cited facts and confirming the authority of its sources. This article has been viewed 1,764,581 times.
A lab report describes an entire experiment from start to finish, outlining the procedures, reporting results, and analyzing data. The report is used to demonstrate what has been learned, and it will provide a way for other people to see your process for the experiment and understand how you arrived at your conclusions. The conclusion is an integral part of the report; this is the section that reiterates the experiment’s main findings and gives the reader an overview of the lab trial. Writing a solid conclusion to your lab report will demonstrate that you’ve effectively learned the objectives of your assignment.
Outlining Your Conclusion

- Restate : Restate the lab experiment by describing the assignment.
- Explain : Explain the purpose of the lab experiment. What were you trying to figure out or discover? Talk briefly about the procedure you followed to complete the lab.
- Results : Explain your results. Confirm whether or not your hypothesis was supported by the results.
- Uncertainties : Account for uncertainties and errors. Explain, for example, if there were other circumstances beyond your control that might have impacted the experiment’s results.
- New : Discuss new questions or discoveries that emerged from the experiment.

- Your assignment may also have specific questions that need to be answered. Make sure you answer these fully and coherently in your conclusion.
Discussing the Experiment and Hypothesis

- If you tried the experiment more than once, describe the reasons for doing so. Discuss changes that you made in your procedures.
- Brainstorm ways to explain your results in more depth. Go back through your lab notes, paying particular attention to the results you observed. [5] X Trustworthy Source University of North Carolina Writing Center UNC's on-campus and online instructional service that provides assistance to students, faculty, and others during the writing process Go to source

- Start this section with wording such as, “The results showed that…”
- You don’t need to give the raw data here. Just summarize the main points, calculate averages, or give a range of data to give an overall picture to the reader.
- Make sure to explain whether or not any statistical analyses were significant, and to what degree, such as 1%, 5%, or 10%.

- Use simple language such as, “The results supported the hypothesis,” or “The results did not support the hypothesis.”

Demonstrating What You Have Learned

- If it’s not clear in your conclusion what you learned from the lab, start off by writing, “In this lab, I learned…” This will give the reader a heads up that you will be describing exactly what you learned.
- Add details about what you learned and how you learned it. Adding dimension to your learning outcomes will convince your reader that you did, in fact, learn from the lab. Give specifics about how you learned that molecules will act in a particular environment, for example.
- Describe how what you learned in the lab could be applied to a future experiment.

- On a new line, write the question in italics. On the next line, write the answer to the question in regular text.

- If your experiment did not achieve the objectives, explain or speculate why not.
Wrapping Up Your Conclusion

- If your experiment raised questions that your collected data can’t answer, discuss this here.

- Describe what is new or innovative about your research.
- This can often set you apart from your classmates, many of whom will just write up the barest of discussion and conclusion.

Finalizing Your Lab Report

Community Q&A

- Ensure the language used is straightforward with specific details. Try not to drift off topic. Thanks Helpful 1 Not Helpful 0
- Once again, avoid using personal pronouns (I, myself, we, our group) in a lab report. The first-person point-of-view is often seen as subjective, whereas science is based on objectivity. Thanks Helpful 1 Not Helpful 0
- If you include figures or tables in your conclusion, be sure to include a brief caption or label so that the reader knows what the figures refer to. Also, discuss the figures briefly in the text of your report. Thanks Helpful 1 Not Helpful 0

- Take care with writing your lab report when working in a team setting. While the lab experiment may be a collaborative effort, your lab report is your own work. If you copy sections from someone else’s report, this will be considered plagiarism. Thanks Helpful 4 Not Helpful 0
You Might Also Like

- ↑ https://phoenixcollege.libguides.com/LabReportWriting/introduction
- ↑ https://www.hcs-k12.org/userfiles/354/Classes/18203/conclusionwriting.pdf
- ↑ https://www.education.vic.gov.au/school/teachers/teachingresources/discipline/english/literacy/Pages/puttingittogether.aspx
- ↑ https://writingcenter.unc.edu/tips-and-tools/brainstorming/
- ↑ https://advice.writing.utoronto.ca/types-of-writing/lab-report/
- ↑ http://www.socialresearchmethods.net/kb/hypothes.php
- ↑ https://libguides.usc.edu/writingguide/conclusion
- ↑ https://libguides.usc.edu/writingguide/introduction/researchproblem
- ↑ http://writingcenter.unc.edu/handouts/scientific-reports/
- ↑ https://phoenixcollege.libguides.com/LabReportWriting/labreportstyle
- ↑ https://writingcenter.unc.edu/tips-and-tools/editing-and-proofreading/
About This Article

To write a good lab conclusion in science, start with restating the lab experiment by describing the assignment. Next, explain what you were trying to discover or figure out by doing the experiment. Then, list your results and explain how they confirmed or did not confirm your hypothesis. Additionally, include any uncertainties, such as circumstances beyond your control that may have impacted the results. Finally, discuss any new questions or discoveries that emerged from the experiment. For more advice, including how to wrap up your lab report with a final statement, keep reading. Did this summary help you? Yes No
- Send fan mail to authors
Reader Success Stories
Maddie Briere
Oct 5, 2017
Did this article help you?

Jun 13, 2017
Saujash Barman
Sep 7, 2017
Cindy Zhang
Jan 16, 2017
Oct 29, 2017

Featured Articles

Trending Articles

Watch Articles

- Terms of Use
- Privacy Policy
- Do Not Sell or Share My Info
- Not Selling Info
Get all the best how-tos!
Sign up for wikiHow's weekly email newsletter
The Science Of Writing: A Dive Into Scientific Report
Explore new discoveries! Delve into a scientific report and uncover groundbreaking research explained simply.

Scientific reports offer a detailed narrative of research endeavors, guiding readers through the methodology employed, the data collected, the analysis conducted, and the conclusions drawn. These reports are not just about documenting findings but also about communicating them effectively to fellow researchers, policymakers, and the public. By adhering to established formats and standards, scientists ensure that their work is accessible, transparent, and reproducible. In this article, we’ll explore the details of scientific reporting, from structuring the report to interpreting its significance and highlighting its role in improving scientific knowledge and fostering innovation.
Understanding Scientific Report
A scientific report is a formal document that systematically presents the methods, results, and conclusions of a research study or experiment. It serves as a means of communicating scientific findings to a wider audience, including fellow researchers, academics, and professionals in the field. Structured in a specific format, typically including sections such as an abstract, introduction, methods, results, discussion, conclusion, and references , a scientific report aims to provide a clear and comprehensive account of the research process and outcomes. It embodies principles of objectivity, clarity, and adherence to established conventions of scientific writing, facilitating transparency, reproducibility, and the advancement of knowledge within a particular discipline or area of study.
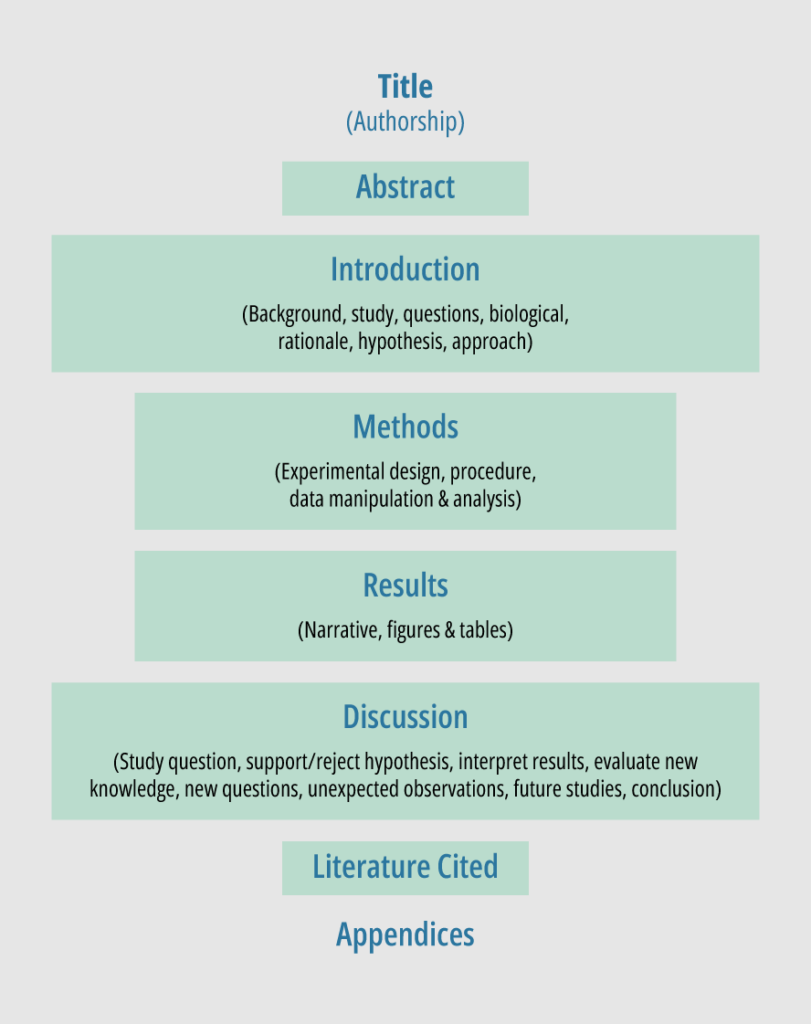
How To Write A Scientific Report
Crafting a precise and impactful scientific report is essential for effectively communicating research findings with clarity and accuracy. Such reports document the process, progress, and outcomes of technical or scientific research, offering insights into methodology, findings, and often, recommendations and conclusions. Serving as a vital communication tool within the scientific community and beyond, these reports facilitate knowledge dissemination across various fields.
To craft a scientific report, several key steps must be followed. Start by defining the research question and providing background information. Outline the research methodology, including materials, procedures, and data collection techniques. Present results using tables, figures, and graphs when necessary, and interpret findings in the discussion section, comparing them to existing literature and addressing limitations or implications. Conclude by summarizing key findings, their significance, and citing sources appropriately.
Writing Clear And Concise Prose
Clear and concise writing ensures that the message is easily understood without unnecessary complexity or ambiguity. When crafting prose for a scientific report, researchers should prioritize simplicity and clarity, avoiding overly technical language or convoluted sentences that may confuse or alienate readers. Simple language and concise statements are crucial for effectively communicating complex ideas within a scientific report.
Organizational Tips
Organizing information begins with creating a structured outline that includes all the necessary sections of a scientific report, such as the introduction, methods, results, discussion, and conclusion. Each section should be labeled and arranged logically to guide the reader through the research process.
Within each section, information should be presented coherently, with subheadings used to break down complex topics. Visual aids like tables, figures, and graphs can be used to illustrate data and make it easier to understand. It’s also important to maintain consistency in formatting and citation style throughout the report to ensure professionalism and adherence to academic standards.
Here are some organizational tips for crafting a scientific report:
Outline the Structure: Before starting writing, outline the structure of your report. Identify key sections such as introduction, methods, results, discussion, and conclusion.
Start with a Strong Introduction: Begin the report with a clear and concise introduction that outlines the research question, objectives, and the significance of the study.
Provide Detailed Methods: Describe the research methodology in detail, including the materials used, procedures followed, and data collection techniques employed.
Present Results Clearly: Organize your results logically and present them clearly and straightforwardly using tables, figures, and graphs where appropriate.
Discuss Findings: Interpret the results in the discussion section, comparing them to existing literature, addressing any limitations, and exploring the broader implications of your findings.
Conclude Succinctly: Summarize the main findings of your study in the conclusion, reiterating their significance and potential impact.
Use Subheadings and Transitions: Use subheadings to break up large sections of text and guide the reader through the report. Ensure smooth transitions between paragraphs and sections to maintain coherence.
Proofread and Edit: Before submitting your report, carefully proofread and edit for clarity, coherence, and accuracy. Check for any grammatical errors, inconsistencies, or typos.
Formatting And Citation Guidelines
In scientific reports, adherence to specific formatting styles, such as APA, MLA, or Chicago, is essential for maintaining uniformity and professionalism. These styles dictate the layout of the document, including font size, margins, spacing, and the presentation of tables, figures, and equations. Additionally, accurate and proper citation of sources is imperative to acknowledge the contributions of others and avoid plagiarism. Researchers must follow established citation formats when referencing sources within the text and compiling a list of references at the end of the report.
Related articles:
- Everything You Need To Know About APA Formatting
- Chicago Style Citation Made Easy: Formatting and Examples
- A Writer’s Guide to MLA Format: How to Get It Right
Scientific Report Elements
The title page of a scientific report typically includes the title of the report, the authors’ names and affiliations, and often the date of submission. The title should convey the main focus of the research while accurately representing its content. The authors’ names and affiliations provide credit and context to the research, while the date indicates the timeline of the report’s completion.
Table of Contents
The table of contents provides a roadmap for the reader, outlining the report’s structure and indicating where each section begins. It lists the major sections and subsections along with their corresponding page numbers, enabling readers to navigate the document efficiently and locate specific information of interest.
The abstract is a concise summary of the entire scientific report, typically ranging from 150 to 250 words. It briefly describes the research objectives, methods, results, and conclusions, providing readers with a quick overview of the study’s key findings and significance. The abstract serves as a crucial entry point for readers to determine whether the report aligns with their interests and information needs.
Introduction
The introduction sets the stage for the research by providing background information, contextualizing the study within existing literature, and stating the research objectives or hypotheses. It outlines the rationale for the research, identifies gaps or unresolved questions in the literature, and establishes the significance of the study. The introduction aims to capture the reader’s interest and provide a clear understanding of the research context and purpose.
Materials and Methods (Experimental)
The materials and methods section provides a detailed description of the experimental procedures and methodologies employed in the research. It includes information on the materials, equipment, and instruments used and the specific steps taken to conduct the experiments or observations. This section should be written in a clear and precise way, enabling other researchers to replicate the study if desired.
The results section presents the findings of the research clearly and systematically. It typically includes tables, figures, graphs, or other visual aids to illustrate the data collected during the study. The results are often organized according to the research objectives or hypotheses and are accompanied by descriptive text that highlights key findings and trends observed in the data.
The discussion section interprets and analyzes the results presented in the previous section, placing them in the context of existing literature and theoretical frameworks. It explores the implications of the findings, discusses possible explanations for observed patterns or discrepancies, and addresses the significance and limitations of the research. The discussion aims to provide a deeper understanding of the research outcomes and stimulate further inquiry in the field.
The conclusion summarizes the main findings of the research and their implications, reiterating the significance of the study in light of the research objectives or hypotheses. It may also offer suggestions for future research directions or practical applications based on the findings. The conclusion provides closure to the report and reinforces the key takeaways for the reader.
The references section lists all sources cited within the scientific report, following a specific citation style such as APA, MLA, or Chicago. It provides readers with the necessary information to locate and verify the sources used in the research, thereby ensuring transparency and credibility. The references are typically arranged alphabetically by the authors’ last names and include full bibliographic details such as author names, publication titles, journal names, publication dates, and page numbers.
Find more tips here: Formatting Science Reports .
Ethical Considerations
Within the framework of a scientific report, ethical considerations encompass a range of principles and practices aimed at ensuring the ethical conduct of research. These include upholding honesty and accuracy in reporting findings, avoiding plagiarism and data fabrication, disclosing conflicts of interest, obtaining informed consent from participants, respecting the welfare and rights of human subjects and animals, managing data responsibly, and adhering to publication ethics. By prioritizing ethical considerations, researchers uphold the trustworthiness and credibility of their work, safeguard the welfare of research participants, and contribute to the advancement of knowledge ethically and responsibly.
Integrity And Transparency
Ethical scientific reporting hinges on the principles of integrity and transparency. Researchers must conduct their studies with unwavering honesty, ensuring that their methodologies, data collection processes, and interpretations are transparently presented. Transparency extends to disclosing any potential biases, limitations, or conflicts of interest that could influence the research outcomes. By upholding integrity and transparency, scientists foster trust within the scientific community and promote the reliability of their findings.
Scientific Reporting Pitfalls
Plagiarism, data fabrication, and conflicts of interest are ethical pitfalls that researchers must vigilantly avoid in scientific reporting. Plagiarism involves using someone else’s work, ideas, or words without proper acknowledgment, which undermines the originality and integrity of the research. Data fabrication refers to the deliberate manipulation or falsification of research data to support desired conclusions, compromising the accuracy and validity of the findings.
Conflicts of interest arise when researchers have personal, financial, or professional interests that could unduly influence their research objectivity or reporting. Researchers must adhere to ethical guidelines and standards, actively preventing and addressing instances of plagiarism, data fabrication, and conflicts of interest. By upholding ethical principles, scientific reports maintain their credibility and contribute to the advancement of knowledge with integrity.
Navigating Data Analysis
Navigating data analysis in a scientific report involves the process of interpreting and making sense of the data collected during research. It encompasses various steps, including data cleaning, data exploration, statistical analysis, and drawing conclusions based on the findings. Researchers must choose appropriate statistical methods to analyze their data and ensure the accuracy and reliability of their results.
Navigating data analysis also involves effectively communicating the findings through clear and concise presentation in the scientific report, often using tables, figures, and graphs to illustrate key patterns and trends. Ultimately, the goal of navigating data analysis is to derive meaningful insights from the data collected, contributing to the overall objectives of the research study.
Data Cleaning
Data cleaning is a crucial process in research methodology that involves identifying and rectifying errors, inconsistencies, and missing values within a dataset. By meticulously addressing duplicate entries, correcting errors and outliers, filling in missing data points, and standardizing formats and units, researchers ensure the accuracy and integrity of the dataset. This meticulous attention to detail minimizes the risk of bias and inaccuracies in subsequent analysis, resulting in more reliable and robust research findings.
Data Exploration
Data exploration, a foundational step in the data analysis process, entails the systematic examination of a dataset to uncover patterns, trends, and relationships. Through visual and statistical techniques such as scatter plots, histograms, and correlation matrices, researchers gain valuable insights into the structure and characteristics of the data. By identifying outliers, anomalies, and potential data quality issues, researchers can refine their research questions, formulate hypotheses, and guide subsequent analysis. Data exploration facilitates a deeper understanding of the dataset, enabling researchers to make informed decisions and derive meaningful insights that contribute to the research objectives.
Common Statistical Analysis
Scientific reports often rely on various statistical methods to analyze data and draw meaningful conclusions. These methods may include descriptive statistics to summarize data, inferential statistics to make inferences about populations based on sample data, and hypothesis testing to assess the significance of research findings. Understanding and selecting appropriate statistical techniques based on the research design and data characteristics are crucial for conducting rigorous data analysis.
Data Interpretation And Presentation
Once data analysis is complete, the next step is to interpret the results and present them clearly and informally within the scientific report. This involves examining patterns, trends, and relationships in the data to draw meaningful conclusions that address the research objectives or hypotheses. Data interpretation should be guided by statistical findings and supported by evidence from the research. Additionally, presenting the results effectively using tables, figures, graphs, and charts enhances the clarity and accessibility of the findings for readers. By effectively navigating data analysis, researchers can elucidate the significance of their findings and contribute valuable insights to their field of study within the scientific report.
Communicating Findings
In a scientific report, communicating findings is the section where the researcher presents the results and conclusions drawn from the study. This section typically follows the methods and results sections and interprets the data collected and analyzed. Below are the typical components of a communicating findings section:
Presentation of Results: This involves presenting the key findings of the study, often in the form of tables, graphs, charts, or other visual aids. Data should be organized and clearly labeled to facilitate understanding.
Interpretation of Results: After presenting the data, the researcher explains the significance of the findings. This may involve discussing patterns, trends, relationships, or differences observed in the data. The interpretation should be objective and supported by evidence from the results.
Discussion of Implications: The researcher discusses the broader implications of the findings within the context of the research question or hypothesis. This may involve relating the results to existing theories, discussing practical applications, or considering implications for future research.
Comparison with Previous Studies: If relevant, the researcher may compare their findings with those of previous studies. This can help contextualize the results and identify areas of agreement or divergence with existing literature.
Limitations: It’s important to acknowledge any limitations or constraints of the study that may have influenced the findings. This could include issues such as sample size, methodology, or measurement error.
Conclusion: The section typically concludes with a summary of the main findings and their significance. This may also include suggestions for future research directions based on the current findings.
Strategies For Diverse Audiences
Effectively communicating findings in a Scientific Report is essential for ensuring the research’s understanding and impact across diverse audiences. Strategies for diverse audiences include tailoring communication to fellow researchers by balancing technical detail with clarity and context, presenting findings to policymakers in a relevant and actionable manner to inform policy decisions, and translating complex scientific information for the general public using relatable language, analogies, and visual aids. By employing these strategies, researchers can maximize the accessibility and relevance of their findings, fostering broader understanding and engagement with their work.
Importance Of Clarity And Accessibility
The importance of clarity and accessibility in scientific reporting is twofold: clear and straightforward presentation of findings ensures accurate interpretation by readers, achieved through logical structuring, concise language, and avoidance of ambiguity; additionally, accessibility is enhanced by employing visuals, formatting techniques, and plain language summaries, facilitating comprehension for a diverse audience. These elements collectively break down complex information, making the report more digestible and readable for all readers.
Peer Review Process
Understanding the peer review process and effectively responding to reviewer feedback are integral components of ensuring the quality and credibility of research findings.
Overview of Peer Review
The peer review process is a cornerstone of scientific publishing, where manuscripts undergo evaluation by independent experts in the field before publication. This rigorous evaluation ensures that the research meets high standards of quality, accuracy, and validity. Peer review typically involves several stages, including submission, assessment by reviewers, and revisions based on feedback. Reviewers evaluate the originality, significance, methodology, and clarity of the research, providing constructive feedback to authors to improve the manuscript.
Also read: Peer Review Process: Understanding The Pathway To Publication
Responding To Reviewer Feedback
Upon receiving feedback from reviewers, authors are tasked with addressing their comments and suggestions thoughtfully and thoroughly. This may involve revising the manuscript, clarifying methods or results, providing additional evidence or analysis, or addressing any concerns raised by reviewers. Authors should approach reviewer feedback with an open mind, considering each comment carefully and providing clear and detailed responses to demonstrate how they have addressed the reviewers’ concerns. Effective communication and collaboration between authors and reviewers are essential for ensuring that the final manuscript meets the standards of rigor and excellence expected in scientific publishing.
Science Figures, Graphical Abstracts, And Infographics For Your Research
Mind the Graph is a comprehensive platform that offers a range of tools and resources to assist scientists in effectively communicating their research findings. One of the key features of Mind the Graph is its provision of science figures, which allows researchers to create visually appealing and informative graphical representations of their data. These figures are essential for presenting complex scientific concepts and experimental results clearly and concisely. Mind the Graph offers graphical abstracts, enabling researchers to summarize their research findings in a visually engaging format that quickly captures the attention of readers. The platform provides access to a wide variety of customizable infographics, allowing scientists to visually communicate key information and concepts related to their research projects. Subscribe now and start using the tool for free for 7 days.

Subscribe to our newsletter
Exclusive high quality content about effective visual communication in science.
Unlock Your Creativity
Create infographics, presentations and other scientifically-accurate designs without hassle — absolutely free for 7 days!
Content tags
Writing an Introduction for a Scientific Paper
Dr. michelle harris, dr. janet batzli, biocore.
This section provides guidelines on how to construct a solid introduction to a scientific paper including background information, study question , biological rationale, hypothesis , and general approach . If the Introduction is done well, there should be no question in the reader’s mind why and on what basis you have posed a specific hypothesis.
Broad Question : based on an initial observation (e.g., “I see a lot of guppies close to the shore. Do guppies like living in shallow water?”). This observation of the natural world may inspire you to investigate background literature or your observation could be based on previous research by others or your own pilot study. Broad questions are not always included in your written text, but are essential for establishing the direction of your research.
Background Information : key issues, concepts, terminology, and definitions needed to understand the biological rationale for the experiment. It often includes a summary of findings from previous, relevant studies. Remember to cite references, be concise, and only include relevant information given your audience and your experimental design. Concisely summarized background information leads to the identification of specific scientific knowledge gaps that still exist. (e.g., “No studies to date have examined whether guppies do indeed spend more time in shallow water.”)
Testable Question : these questions are much more focused than the initial broad question, are specific to the knowledge gap identified, and can be addressed with data. (e.g., “Do guppies spend different amounts of time in water <1 meter deep as compared to their time in water that is >1 meter deep?”)
Biological Rationale : describes the purpose of your experiment distilling what is known and what is not known that defines the knowledge gap that you are addressing. The “BR” provides the logic for your hypothesis and experimental approach, describing the biological mechanism and assumptions that explain why your hypothesis should be true.
The biological rationale is based on your interpretation of the scientific literature, your personal observations, and the underlying assumptions you are making about how you think the system works. If you have written your biological rationale, your reader should see your hypothesis in your introduction section and say to themselves, “Of course, this hypothesis seems very logical based on the rationale presented.”
- A thorough rationale defines your assumptions about the system that have not been revealed in scientific literature or from previous systematic observation. These assumptions drive the direction of your specific hypothesis or general predictions.
- Defining the rationale is probably the most critical task for a writer, as it tells your reader why your research is biologically meaningful. It may help to think about the rationale as an answer to the questions— how is this investigation related to what we know, what assumptions am I making about what we don’t yet know, AND how will this experiment add to our knowledge? *There may or may not be broader implications for your study; be careful not to overstate these (see note on social justifications below).
- Expect to spend time and mental effort on this. You may have to do considerable digging into the scientific literature to define how your experiment fits into what is already known and why it is relevant to pursue.
- Be open to the possibility that as you work with and think about your data, you may develop a deeper, more accurate understanding of the experimental system. You may find the original rationale needs to be revised to reflect your new, more sophisticated understanding.
- As you progress through Biocore and upper level biology courses, your rationale should become more focused and matched with the level of study e ., cellular, biochemical, or physiological mechanisms that underlie the rationale. Achieving this type of understanding takes effort, but it will lead to better communication of your science.
***Special note on avoiding social justifications: You should not overemphasize the relevance of your experiment and the possible connections to large-scale processes. Be realistic and logical —do not overgeneralize or state grand implications that are not sensible given the structure of your experimental system. Not all science is easily applied to improving the human condition. Performing an investigation just for the sake of adding to our scientific knowledge (“pure or basic science”) is just as important as applied science. In fact, basic science often provides the foundation for applied studies.
Hypothesis / Predictions : specific prediction(s) that you will test during your experiment. For manipulative experiments, the hypothesis should include the independent variable (what you manipulate), the dependent variable(s) (what you measure), the organism or system , the direction of your results, and comparison to be made.
If you are doing a systematic observation , your hypothesis presents a variable or set of variables that you predict are important for helping you characterize the system as a whole, or predict differences between components/areas of the system that help you explain how the system functions or changes over time.
Experimental Approach : Briefly gives the reader a general sense of the experiment, the type of data it will yield, and the kind of conclusions you expect to obtain from the data. Do not confuse the experimental approach with the experimental protocol . The experimental protocol consists of the detailed step-by-step procedures and techniques used during the experiment that are to be reported in the Methods and Materials section.
Some Final Tips on Writing an Introduction
- As you progress through the Biocore sequence, for instance, from organismal level of Biocore 301/302 to the cellular level in Biocore 303/304, we expect the contents of your “Introduction” paragraphs to reflect the level of your coursework and previous writing experience. For example, in Biocore 304 (Cell Biology Lab) biological rationale should draw upon assumptions we are making about cellular and biochemical processes.
- Be Concise yet Specific: Remember to be concise and only include relevant information given your audience and your experimental design. As you write, keep asking, “Is this necessary information or is this irrelevant detail?” For example, if you are writing a paper claiming that a certain compound is a competitive inhibitor to the enzyme alkaline phosphatase and acts by binding to the active site, you need to explain (briefly) Michaelis-Menton kinetics and the meaning and significance of Km and Vmax. This explanation is not necessary if you are reporting the dependence of enzyme activity on pH because you do not need to measure Km and Vmax to get an estimate of enzyme activity.
- Another example: if you are writing a paper reporting an increase in Daphnia magna heart rate upon exposure to caffeine you need not describe the reproductive cycle of magna unless it is germane to your results and discussion. Be specific and concrete, especially when making introductory or summary statements.
Where Do You Discuss Pilot Studies? Many times it is important to do pilot studies to help you get familiar with your experimental system or to improve your experimental design. If your pilot study influences your biological rationale or hypothesis, you need to describe it in your Introduction. If your pilot study simply informs the logistics or techniques, but does not influence your rationale, then the description of your pilot study belongs in the Materials and Methods section.
How will introductions be evaluated? The following is part of the rubric we will be using to evaluate your papers.
Lab Reports

Please enable JavaScript
Science experiments are often casual and fun. Maybe you mixed baking soda and vinegar in a pop bottle in the backyard just to see what would happen. Or you rubbed a balloon against your head to learn about static electricity. At other times, though, your science experiments will be more formal. You need written results to share with others. A lab report is a written report describing your scientific method.
A lab report includes the following:
- Your question or problem
- Your hypothesis.
- Materials needed.
- The steps of the experiment
- Your results
- Your conclusions
Lab report: a written report detailing the scientific method
Hypothesis: an educated guess, based on observation and logic, but not experimentation
Results: the findings of your experiment
Conclusion: your beliefs based on the results of your experiment
Question: Where can I get a lab report?
Answer: You can make your own or find one online.
Question: Do I need to use a lab report every time I do an experiment?
Answer: No, but teachers often require lab reports for science experiments. And, if you enjoy science, you might want to make a science journal filled with the lab reports of all the experiments you conduct. Keeping a written record allows you to go back and review what you’ve learned.
Visit Teachers Pay Teachers for a free, downloadable lab report.

An official website of the United States government
Here's how you know
Official websites use .gov A .gov website belongs to an official government organization in the United States.
Secure .gov websites use HTTPS. A lock ( Lock Locked padlock ) or https:// means you've safely connected to the .gov website. Share sensitive information only on official, secure websites.

NSF 101: The Mentoring plan
The postdoctoral mentoring plan has been an NSF requirement since 2009, recognizing the important role that mentorship plays in the postdoctoral experience and their future career paths. As of 2024, the mentoring plan has been expanded to include postdoctoral researchers and graduate students. While you will find many templates online, NSF does not endorse a prescriptive format and encourages researchers to lead the way in creating unique strategies for supporting their mentees.
According to the NSF Proposal and Award Policies and Procedures Guide: "Examples of mentoring activities include, but are not limited to, career counseling; training in preparation of grant proposals, publications and presentations; guidance on ways to improve teaching and mentoring skills; guidance on how to effectively collaborate with researchers from diverse backgrounds and disciplinary areas; and training in responsible professional practices."
At the heart of mentoring are personal relationships that are unique to every mentor and mentee. In that spirit, consider the questions below as you create a mentoring plan to build the foundation for a fruitful working relationship between you and your mentee.
Set and communicate your expectations
- What are your expectations for your mentee, and how will you communicate these expectations for the mentoring relationship?
- How will you clearly communicate your mentoring philosophy, working environment and culture, policies and other important considerations to a mentee working with you and your team?
Convey your responsibilities as a mentor
- What can a mentee expect from you throughout the mentoring relationship?
- Can they expect timely feedback on their work, regularly scheduled meetings, assistance in making connections/networking or notifications about relevant opportunities?
Tailor your plan
- Can you personalize your mentoring plan if/when a mentee has been chosen?
- How will your plan be responsive to your mentee's needs, interests and goals?
- How does the plan recognize that there are multiple pathways to success and ensure the plan is tailored to what success would look like for the mentee?
Promote a supportive work environment
- What steps can you take to promote a work culture where mentees feel valued and supported and to foster a sense of belonging as an authentic member of the team?
- How will you create an environment where mentees feel comfortable taking calculated risks?
- How will mentees be empowered to learn from mistakes?
- How will conflict be managed and communicated, particularly among trainees with different personal and cultural identities?
- How will the contributions of all team members be recognized?
- How are the research teams' values and priorities decided upon and conveyed?
Strengthen a broader ecosystem of support
- How will you identify opportunities for your mentee that lie outside of your strengths as an individual mentor?
- Can you form mentoring teams that can advise on different disciplines, career or life paths, connect postdocs/graduate students excluded due to their ethnicity or race with mentors that have similar identities, further develop your knowledge and skills as a mentor?
Assess progress
- How will progress towards goals and mentorship quality be evaluated? Individual development plans can provide one route to goal setting that work well in some environments, or you and your mentee may find another method that is better suited to your goals, values and working styles.
- How will you plan to co-create, revisit and revise your mentoring plan over time with your mentee?
Intentionality in designing a mentoring plan can provide a foundation for the success of postdoctoral and graduate student researchers who are vital to the scientific enterprise. Mentoring is key in enabling postdocs and graduate students to bring forth their innovative ideas and reach their full potential while overcoming numerous barriers, particularly for those who have been excluded due to their ethnicity or race. Mentees may also be facing additional common challenges, such as separation from support systems, immigration challenges, caregiver responsibilities or financial difficulties.
Mentoring is a powerful opportunity to broaden your impact on the scientific community. If you are interested in learning more about strategies to improve mentoring, you can find the latest NSF-funded research on the topic through the NSF award search !
About the Authors
Stephanie Gage AAAS Science and Technology Policy Fellow
Stephanie Gage is an interdisciplinary neurobiologist working in science and technology policy. She earned a PhD in Neuroscience from the University of Arizona studying olfactory-guided behavior and applied this expertise at the USDA – ARS and at the Georgia Institute of Technology. As a AAAS Science and Technology Policy Fellow, Stephanie now works at the National Science Foundation in the Information and Intelligent Systems Division in the CISE directorate, and the Integrative Organismal Systems Division in the BIO directorate.
Julia Gerson AAAS Science and Technology Policy Fellow
After completing her Ph.D. in Neuroscience, Julia completed a post-doctoral fellowship at the University of Michigan. Afterward, she joined the National Science Foundation as an American Association for the Advancement of Science Science and Technology Policy Fellow in the Advancing Informal STEM Learning Program within the Division for Research on Learning in Formal and Informal Settings in the Directorate for STEM Education.
Xoco Shinbrot AAAS Science and Technology Policy Fellow
Xoco Shinbrot is a conservation social scientist by training, now working in national and international policy spaces. She earned a PhD in Ecology investigating how individuals and communities adapt to climate change, how to improve participation in public science, and the socio-economic impact of forest carbon offset programs. Following her post-doc at Cornell University, she now works in the Arctic Sciences Section in the Office of Polar Programs at the National Science Foundation as a Science and Technology Policy Fellow.
Related Stories

Concepts in quantum materials and computing: From dreams toward use

5 ways to make citizen science a year-round passion

5 NSF projects transforming how researchers understand plastic waste
Thank you for visiting nature.com. You are using a browser version with limited support for CSS. To obtain the best experience, we recommend you use a more up to date browser (or turn off compatibility mode in Internet Explorer). In the meantime, to ensure continued support, we are displaying the site without styles and JavaScript.
- View all journals
- Explore content
- About the journal
- Publish with us
- Sign up for alerts
- NATURE BRIEFING
- 09 May 2024
Daily briefing: ‘The ugly side of science’ — how to report negative results
- Katrina Krämer
You can also search for this author in PubMed Google Scholar
Hello Nature readers, would you like to get this Briefing in your inbox free every day? Sign up here .

In principle, a nuclear clock should be more precise and more stable than an optical clock (pictured). Credit: Andrew Brookes, National Physical Laboratory/Science Photo Library
Ultra-precise ‘nuclear’ clock in sight
Researchers have used a laser to prompt tiny energy shifts in an atomic nucleus — a major step towards building nuclear clocks. These could be around 10 times more accurate than the world’s current best timekeepers, known as optical clocks, and less sensitive to disturbances. “We will be able to probe scenarios of dark matter and of fundamental physics that are currently inaccessible to other methods,” says theoretical physicist Elina Fuchs. To turn the system into an actual clock, physicists will need to build higher-resolution lasers that nudge the nucleus with more precision.
Nature | 5 min read
Reference: Physical Review Letters paper
Hot super-Earth has atmosphere
Investigations using the James Webb Space Telescope have confirmed that the exoplanet 55 Cancri e has a carbon-based atmosphere — the first time an atmosphere has been detected surrounding a rocky planet similar to Earth outside the Solar System. The planet orbits very close to its Sun-like star and can’t support life as we know it, in part because it is probably covered by a magma ocean. “Earth probably went through at least one magma-ocean stage, maybe several,” says planetary geologist Laura Schaefer. “Having actual present-day examples of magma oceans can help us understand the early history of our Solar System.”
Nature | 3 min read
Reference: Nature paper

55 Cancri e is a little bigger than Earth, but much smaller than the Solar System’s giant planets, such as Neptune. Credit: NASA, ESA, CSA, Dani Player (STScI)
Brazilian universities hit by strikes
Academic workers at some Brazilian institutions are entering their fourth week of strikes for better wages and more university funding . They say the country’s president has come up short in his promise to boost science and education funding, in part because of opposition from legislators. “We are not against the government,” says botanist Thiago André. “We are in negotiation with the government.” The strikes have halted classes on many campuses, although many scientists are continuing their research. It’s unclear when the strike will end.
Features & opinion
The scientist who fled aleppo.
“If you’re passionate about research, about science, I think my advice is to never give up,'' says Syrian biochemist Aref Kyyaly. He recalls being close to abandoning his work when, in 2013, he decided to flee war-torn Aleppo with his family . The Council for At-Risk Academics helped Kyyaly secure a visa and job in the United Kingdom. “It was like a door was opened for me.” Kyyaly has been granted permission to stay in the country and has secured a permanent job as a biomedical science lecturer, but his immigration status has hindered his career: “I have friends who started four or five years after me and now they’re way ahead of me.”
Nature | 8 min read
‘Nanopore’ sequencing: now for proteins
By squeezing a protein through a nanopore — a tiny opening created by another protein — researchers are starting to decipher the string of amino acid building blocks that proteins are made of . This nanopore sequencing is mostly used for DNA whose building blocks can be ‘read out’ as it passes through the nanopore, driven by an electrical current. Proteins can’t be moved consistently by a current, so researchers have found ways to push or pull them through a pore using water, enzymes or molecular motors. “All the pieces are there to start with to do single-molecule proteomics and identify proteins and their modifications using nanopores,” says chemical biologist Giovanni Maglia.
Nature | 6 min read
How to illuminate the ‘ugly’ side of science
Data repositories, workshops and alternative journals allow scientists to share and discuss negative results, which could help to solve the reproducibility crisis and give machine learning a boost . Publishing negative results is often seen as not worth the time and effort, yet “understanding the reasons for null results can really test and expand our theoretical understanding”, says psychologist Wendy Ross. And highlighting negative results can help students to see that “you are not a bad researcher because you fail”, adds computer scientist Ella Peltonen.
Nature | 11 min read
Image of the week

Credit: Fabrizio Villa/Getty
A newly formed crater of Italy’s Etna volcano puffs out perfect 'smoke rings' . These volcanic vortex rings form when cold air above the volcano causes hot gases travelling up the walls of a round vent to condense. Such displays are rare: the vent must have a circular shape and sides of the same height for such well-defined rings to form.
See more of the month’s sharpest science shots , selected by Nature ’s photo team.
QUOTE OF THE DAY
“we’re living in the golden age of birding, and like any good cult member, i’m recruiting people to the cause.”.
Technology that makes it easier than ever to identify birds and become part of the bird-watching community played a big part in science writer Kate Wong picking up the hobby. ( Scientific American | 14 min read )
doi: https://doi.org/10.1038/d41586-024-01394-w
Today, I’m excited to discover that blasting coffee with ultrasound while it is brewing gives a surprisingly smooth taste similar to a cold brew — but taking only minutes rather than an entire day. “It’s now my favourite way to drink coffee,” says chemical engineer and study co-author Francisco Trujillo.
Please send me your coffee hacks (alongside any feedback on this newsletter) to [email protected] .
Thanks for reading,
Katrina Krämer, associate editor, Nature Briefing
With contributions by Flora Graham and Sarah Tomlin
Want more? Sign up to our other free Nature Briefing newsletters:
• Nature Briefing: Microbiology — the most abundant living entities on our planet — microorganisms — and the role they play in health, the environment and food systems.
• Nature Briefing: Anthropocene — climate change, biodiversity, sustainability and geoengineering
• Nature Briefing: AI & Robotics — 100% written by humans, of course
• Nature Briefing: Cancer — a weekly newsletter written with cancer researchers in mind
• Nature Briefing: Translational Research — covers biotechnology, drug discovery and pharma
Related Articles
Daily briefing: Grad students are going hungry on campus
Daily briefing: Navigating sex and gender in science
Daily briefing: How a ‘wall of death’ run could keep astronauts fit
Daily briefing: Rejuvenating the immune system could slow ageing
Nanjing Forestry University is globally seeking Metasequoia Scholars and Metasequoia Talents
Located next to Purple Mountain and Xuanwu Lake, Nanjing Forestry University (NJFU) is a key provincial university jointly built by Jiangsu Province
Nanjing, Jiangsu, China
Nanjing Forestry University (NFU)
Career Opportunities at the Yazhouwan National Laboratory, Hainan, China
YNL recruits leading scientists in agriculture: crop/animal genetics, biotech, photosynthesis, disease resistance, data analysis, and more.
Sanya, Hainan, China
Yazhouwan National Laboratory
Associate Editor, High-energy physics
As an Associate Editor, you will independently handle all phases of the peer review process and help decide what will be published.
Homeworking
American Physical Society
Postdoctoral Fellowships: Immuno-Oncology
We currently have multiple postdoctoral fellowship positions available within our multidisciplinary research teams based In Hong Kong.
Hong Kong (HK)
Centre for Oncology and Immunology
Chief Editor
Job Title: Chief Editor Organisation: Nature Ecology & Evolution Location: New York, Berlin or Heidelberg - Hybrid working Closing date: June 23rd...
New York City, New York (US)
Springer Nature Ltd
Sign up for the Nature Briefing newsletter — what matters in science, free to your inbox daily.
Quick links
- Explore articles by subject
- Guide to authors
- Editorial policies
Help | Advanced Search
Computer Science > Computation and Language
Title: aya 23: open weight releases to further multilingual progress.
Abstract: This technical report introduces Aya 23, a family of multilingual language models. Aya 23 builds on the recent release of the Aya model (Üstün et al., 2024), focusing on pairing a highly performant pre-trained model with the recently released Aya collection (Singh et al., 2024). The result is a powerful multilingual large language model serving 23 languages, expanding state-of-art language modeling capabilities to approximately half of the world's population. The Aya model covered 101 languages whereas Aya 23 is an experiment in depth vs breadth, exploring the impact of allocating more capacity to fewer languages that are included during pre-training. Aya 23 outperforms both previous massively multilingual models like Aya 101 for the languages it covers, as well as widely used models like Gemma, Mistral and Mixtral on an extensive range of discriminative and generative tasks. We release the open weights for both the 8B and 35B models as part of our continued commitment for expanding access to multilingual progress.
Submission history
Access paper:.
- HTML (experimental)
- Other Formats
References & Citations
- Google Scholar
- Semantic Scholar
BibTeX formatted citation
Bibliographic and Citation Tools
Code, data and media associated with this article, recommenders and search tools.
- Institution
arXivLabs: experimental projects with community collaborators
arXivLabs is a framework that allows collaborators to develop and share new arXiv features directly on our website.
Both individuals and organizations that work with arXivLabs have embraced and accepted our values of openness, community, excellence, and user data privacy. arXiv is committed to these values and only works with partners that adhere to them.
Have an idea for a project that will add value for arXiv's community? Learn more about arXivLabs .
IMAGES
VIDEO
COMMENTS
Here are some rules for drawing scientific diagrams: Always use a pencil to draw your scientific diagrams. Use simple, sharp, 2D lines and shapes to draw your diagram. Don't draw 3D shapes or use shading. Label everything in your diagram. Use thin, straight lines to label your diagram. Do not use arrows.
Introduction. Your lab report introduction should set the scene for your experiment. One way to write your introduction is with a funnel (an inverted triangle) structure: Start with the broad, general research topic. Narrow your topic down your specific study focus. End with a clear research question.
Hopefully this will be useful as you begin your lab report. 1) Title (ex: Effects of Sunlight on Basil Plant Growth) 2) Abstract (approx. 200 words) Background ( This experiment looks at…) Objectives ( It aims to contribute to research on…) Methods ( It does so through a process of….)
What this handout is about. This handout provides a general guide to writing reports about scientific research you've performed. In addition to describing the conventional rules about the format and content of a lab report, we'll also attempt to convey why these rules exist, so you'll get a clearer, more dependable idea of how to approach ...
Most lab reports are organized, first to last: background information, problem, hypothesis, materials, procedure, data, and your interpretation of what happened as a conclusion. 5. Break sections of your report into subsections, if necessary. Technical aspects of your paper might require significant explanation.
Title Page. Not all lab reports have title pages, but if your instructor wants one, it would be a single page that states: . The title of the experiment. Your name and the names of any lab partners. Your instructor's name. The date the lab was performed or the date the report was submitted.
A typical lab report format includes a title, introduction, procedure, results, discussion, and conclusions. A science laboratory experiment isn't truly complete until you've written the lab report. You may have taken excellent notes in your laboratory notebook, but it isn't the same as a lab report. The lab report format is designed to ...
1. Start with an abstract. The abstract is a very short summary of the paper, usually no more than 200 words. Base the structure of your abstract on the structure of your paper. This will allow the reader to see in short form the purpose, results, and significance of the experiment.
Writing lab reports follows a straightforward and structured procedure. It is important to recognize that each part of a lab report is important, so take the time to complete each carefully. A lab report is broken down into eight sections: title, abstract, introduction, methods and materials, results, discussion, conclusion, and references. Title.
This section describes an organizational structure commonly used to report experimental research in many scientific disciplines, the IMRAD format: Introduction, Methods, Results, And Discussion. Although the main headings are standard for many scientific fields, details may vary; check with your instructor, or, if submitting an article to a journal, refer to the instructions to authors.…
Your report should include a title page, statement of purpose, hypothesis, materials and procedures, results and conclusions, discussion, and credits and bibliography. If applicable, graphs, tables, or charts should be included with the results portion of your report. 2. Cause and effect. This is another common science experiment research paper ...
Generally, a report for a lab experiment comprises of a few essential sections that are common to all. However, depending on the type of experiment or the methodology used, there could be variations in the basic structure. Title Like any other formal document, the lab report should begin with a concise but insightful title for the experiment.
This guide was inspired by Joshua Schimel's Writing Science: How to Write Papers that Get Cited and Proposals that Get Funded—an excellent book about scientific writing for graduate students and professional scientists—but designed to address undergraduate students. While the guide was written by a group of ecologists and evolutionary ...
Download this page as a PDF: Writing a Lab Report. Return to Writing Studio Handouts. Part 1 (of 2): Introducing a Lab Report. The introduction of a lab report states the objective of the experiment and provides the reader with background information. State the topic of your report clearly and concisely (in one or two sentences).
1. Do not compile a complete lab report in the lab notebook. The lab notebook should include a record of what was done, how it was done, and what the results were. The records should be substantial enough that a knowledgeable person can read, comprehend, and repeat the experiment if needed. 2.
Step by step guide to writing a scientific report:- Title- Aim- Hypothesis- Materials- Procedure- Results- Discussion- ConclusionYou can use this as a genera...
A reminder of the reason for the work. A review of the results. Ensure you are not repeating the results themselves; this should be more about your thoughts on them. The relationship between your results and the original objective. Their relationship to the literature, with citations. Any limitations of your results.
1. Introduce the experiment in your conclusion. Start out the conclusion by providing a brief overview of the experiment. Describe the experiment in 1-2 sentences and discuss the objective of the experiment. Also, make sure to include your manipulated (independent), controlled and responding (dependent) variables. [3] 2.
How to Write a Practical/Laboratory Report Writing Centre Learning Guide The ability to report technical information clearly and concisely is fundamental to the sciences. As such, science students are often required to prepare formal reports about experiments or investigations undertaken in the practical components of their courses.
Write the abstract section last, even though it will be one of the first sections of your final report. Your final report will be several pages long, but don't be overwhelmed! Most of the sections are made up of information that you have already written. Gather up the information for each section and type it in a word processor if you haven't ...
Understanding Scientific Report . A scientific report is a formal document that systematically presents the methods, results, and conclusions of a research study or experiment. It serves as a means of communicating scientific findings to a wider audience, including fellow researchers, academics, and professionals in the field.
Experimental Approach: Briefly gives the reader a general sense of the experiment, the type of data it will yield, and the kind of conclusions you expect to obtain from the data. Do not confuse the experimental approach with the experimental protocol.The experimental protocol consists of the detailed step-by-step procedures and techniques used during the experiment that are to be reported in ...
Place the date the experiment is performed under this section, as well as the start and end times of the experiment. Take a temperature reading of the laboratory at the beginning and at the end of the observation phase, then write the temperature under this section also. Create a fourth sub-heading labeled "Procedure" under which you make brief ...
The steps of the experiment. Your results. Your conclusions. Vocabulary. Lab report: a written report detailing the scientific method. Hypothesis: an educated guess, based on observation and logic, but not experimentation. Results: the findings of your experiment. Conclusion: your beliefs based on the results of your experiment. Q and A.
Use this Science Investigation Write up Example for KS2 with your science class to help guide them as they write up a scientific report. The ideal accompaniment to science investigation and experiments, this sheet will teach your students what a good lab report will include. This worksheet outlines sections such as the introduction, conclusion ...
Misinformation is false or inaccurate information—getting the facts wrong. Disinformation is false information which is deliberately intended to mislead—intentionally misstating the facts. The spread of misinformation and disinformation has affected our ability to improve public health, address climate change, maintain a stable democracy ...
The postdoctoral mentoring plan has been an NSF requirement since 2009, recognizing the important role that mentorship plays in the postdoctoral experience and their future career paths. As of 2024, the mentoring plan has been expanded to include postdoctoral researchers and graduate students. While you will find many templates online, NSF does ...
Data repositories, workshops and alternative journals allow scientists to destigmatize and discuss negative results. Plus, a major step toward ultra-precise 'nuclear' clocks and the first ...
Scientific writing is a challenging task, particularly for novice researchers who often rely on feedback from experienced peers. Recent work has primarily focused on improving surface form and style rather than manuscript content. In this paper, we propose a novel task: automated focused feedback generation for scientific writing assistance.
This technical report introduces Aya 23, a family of multilingual language models. Aya 23 builds on the recent release of the Aya model (Üstün et al., 2024), focusing on pairing a highly performant pre-trained model with the recently released Aya collection (Singh et al., 2024). The result is a powerful multilingual large language model serving 23 languages, expanding state-of-art language ...