How-To Geek
How to change slide size in powerpoint.
PowerPoint allows you to change your presentation's slide sizes, which you may need to do to change how your slides are displayed or printed. Here's how.

Quick Links
Changing powerpoint slide sizes, changing to a custom powerpoint slide size.
PowerPoint allows you to format and present the content of your slides in different ways. If you want to print out or display your PowerPoint slides in a bigger or smaller-than-average size, you can change the slide sizes to match.
PowerPoint has two common slide sizes. The first, 4:3, is a good option if you're using older hardware to present your slides. If you're planning on presenting your PowerPoint presentation using a modern projector or display, then the 16:9 slide size should be your preferred choice.
By default, PowerPoint will default to the 16:9 side slide. To print your slides (full size, one per page), you'll likely need to use a custom slide size, rather than one of these options.
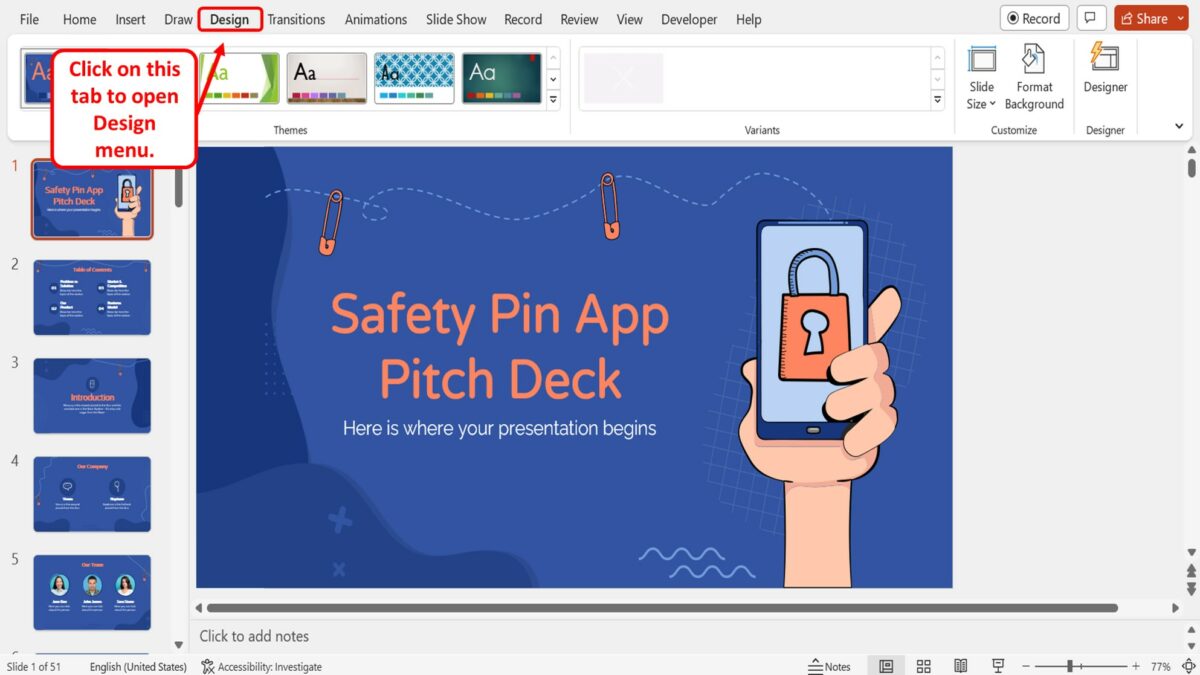
Switching to another size is thankfully an easy process---open your PowerPoint presentation to begin and then click the "Design" tab on the ribbon bar.
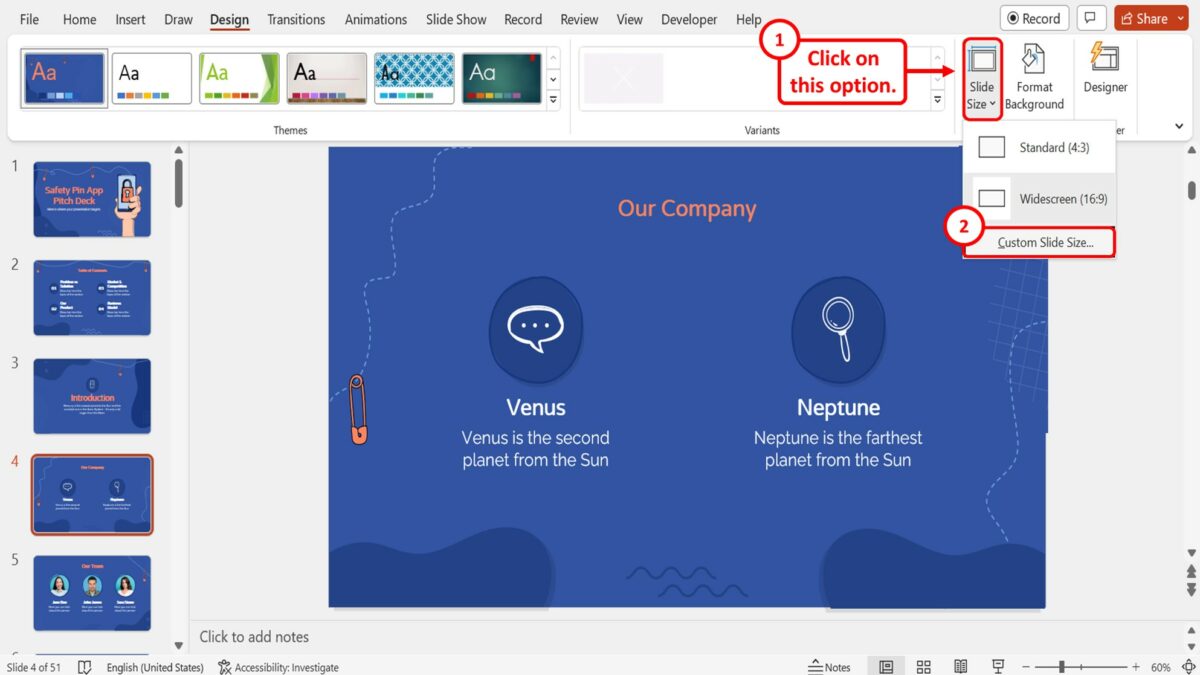
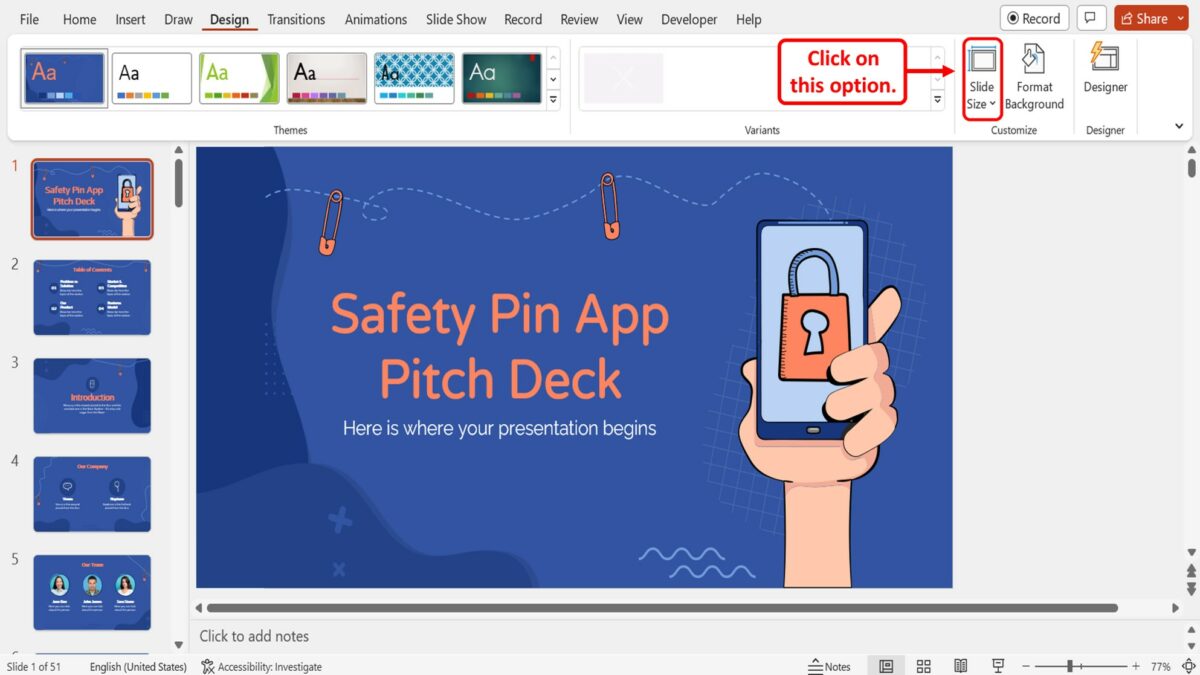
In the "Customize" section of the "Design" tab, select the "Slide Size" button. This will display the two common slide sizes in a drop-down menu.
Click either the "Standard (4:3)" or "Widescreen (16:9)" option to switch all of your PowerPoint slides to that size.
Unfortunately, it isn't possible to use multiple slide sizes in a PowerPoint presentation. Just as if you were making PowerPoint slides vertical , any changes you make to your PowerPoint slide sizes will apply to all slides.
Related: How to Make Slides Vertical in PowerPoint
It's possible to use a custom PowerPoint slide size if the default 4:3 or 16:9 options are unsuitable. You might choose to use a custom slide size if you're printing full-size PowerPoint slides using a custom page layout, for instance.
To do this, select Design > Slide Size > Custom Slide Size to display the "Slide Size" options menu.
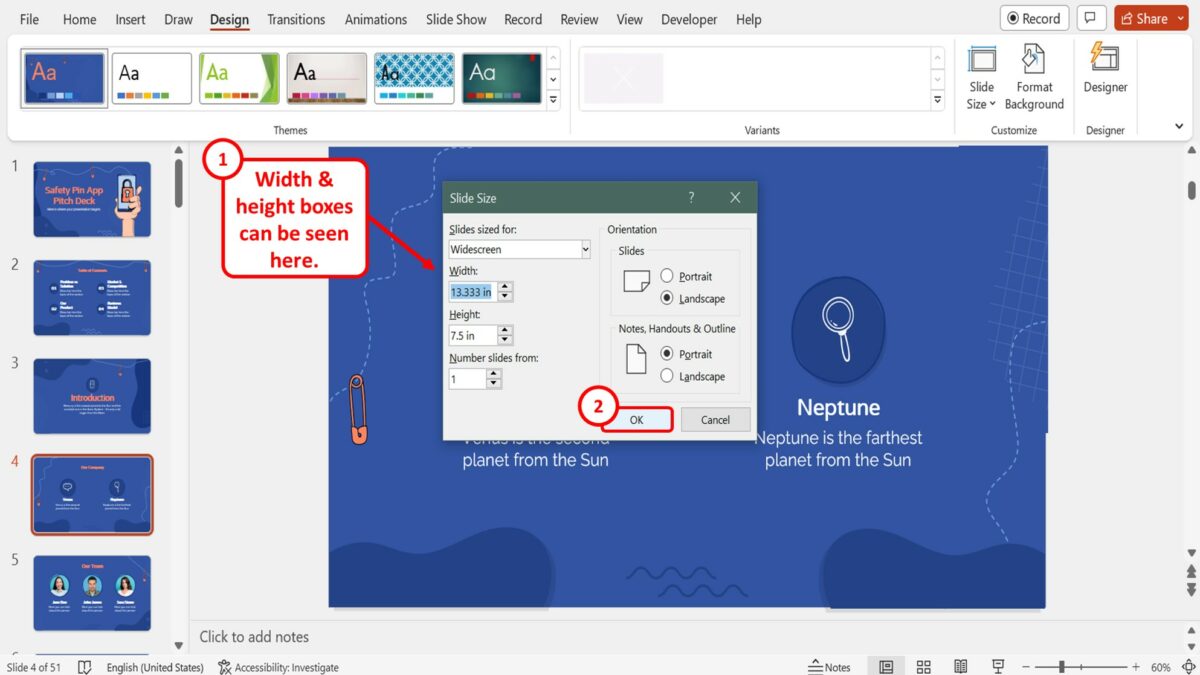
Various preset slide sizes, such as A3 or A4 paper sizes, are shown under the "Slides Sized For" drop-down menu.
Select one of these preset options, or set your slide dimensions manually using the "Width" and "Height" option boxes. From there, click the "OK" button to save.
If you're scaling down to a smaller size, PowerPoint will ask you how it should handle any slide content.
Choose "Maximize" if you want the slide contents to remain at a similar scale, but with the risk that some of the content may be cut. Alternatively, click "Ensure Fit" to scale the slide contents down in size to match the new slide size without losing any content.
Once saved, the custom slide size you selected will be immediately applied to all of your slides, with slide content being resized or cut to match.
Critical PowerPoint Shortcuts – Claim Your FREE Training Module and Get Your Time Back!
How to Change Your PowerPoint Slide Size (16:9 vs. 4:3)
- PowerPoint Tutorials
- March 10, 2019
In this tutorial, you’ll learn how to change your slide size in PowerPoint.
That way you can create slides for any situation including on-screen presentations, printed documents, posters, postcards, handouts, etc.
First off, the two most used PowerPoint slide sizes are:
- 16:9 ratio for onscreen presentations and new overhead projectors. This is the default setting for the latest versions of PowerPoint.
- 4:3 ratio for printing slides on standard 8.5 x 11 pieces of paper as handouts.
When starting with a blank PowerPoint presentation, changing your slide size is super easy and straightforward. If not, there are a few issues you’ll need to deal with, each covered below.
That’s why it’s worth figuring out what slide size you need BEFORE you build your presentation. If you later convert your presentation to a different size, it can be painful!
It’s just like the old carpenter saying, “measure twice and cut once.” In PowerPoint, you’ll want to “ask twice (to double confirm the required size) and build once.”
Changing your PowerPoint slide size does not make your PowerPoint presentation larger or smaller. To reduce your PowerPoint file size, you need to learn how to compress a PowerPoint presentation .
Table of Contents
How to change your powerpoint slide size.
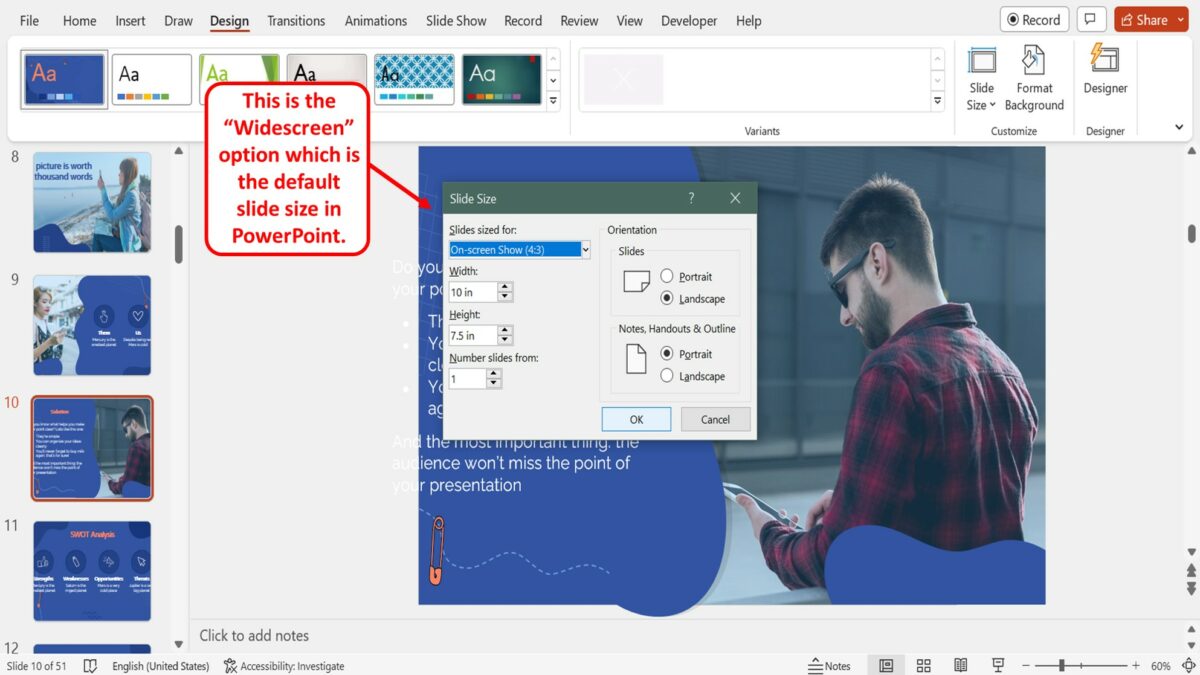
By default, new PowerPoint presentations start in the 16:9 slide size format.
This is the NEW standard for most modern overhead projects and monitors and is recommended for most presentations. That said, you can easily change your slide size to something else.

To change your slide size in PowerPoint, simply:
- Navigate to the Design tab
- Open the Slide Size drop down menu
- Select 4:3 , 16:9 or Custom Slide Size (see options below)
When starting with a blank presentation, you are now good to go. You will not have to worry about any of the conversion issues discussed below.
Notice too, how much wider the 16:9 slide size is versus the 4:3 slide size in the picture below. The new size gives you more room for the content on your slides.

When you are converting an existing presentation to a new slide size, you will additionally be given the following prompt:
“You are scaling to a new slide size. Would you like to maximize the size of your content, or scale it down to ensure it will fit on the new slide?
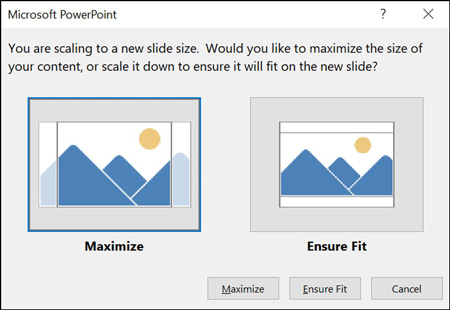
Maximize leaves all your content as is on your slide, even if it no longer fits on the new slide size that you selected.
Ensure Fit scales down your content in proportion to the new slide size you have selected. You will only see this option when moving from a larger slide size to a smaller one.
Custom PowerPoint slide sizes
Choosing Custom for your slide size gives you additional options to work with. Inside the dialog box you can choose your size on the left and your orientation on the right.
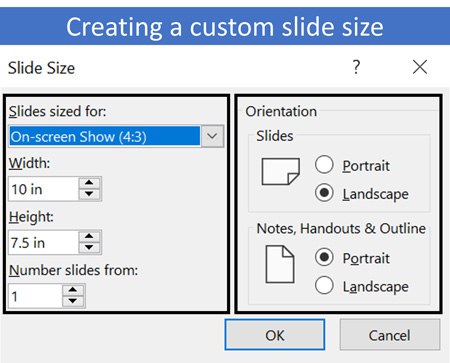
On top of that, you can also input your own custom slide size. However, I recommend using one of the preset PowerPoint dimension options.
- On-screen show (4:3)
- Letter Paper (8.5×11 in)
- A3 Paper (297×420 mm)
- B4 (ISO) Paper (250×353 mm)
- B5 (ISO) Paper (176×250 mm)
- 35mm Slides
- On-screen Show (16:9)
- On-screen show (16:10)
For your orientation options on the right-hand side of the dialog box, you can choose between Landscape and Portrait .
In most situations, you will want one of the default settings. Best practice is Landscape for your presentation slides and Portrait for your printed notes, handouts and outlines.

Issues when converting 4:3 to the 16:9 slide size in PowerPoint
When converting an existing 4:3 presentation with content into the 16:9 format, you are not given any conversion options. Instead, PowerPoint simply does the conversion for you, which can create several problems.
There are two issues you will face in the new 16:9 slide size.

The first issue is that all the images on your slide master (including company logos) will be stretched to fit the new, larger slide size.
To fix the stretched images, you will need to fix those images (or reinsert them) on your slide master, as if you were creating a PowerPoint template from scratch.

The second issue you will face in the larger 16:9 slide size is that you will have a lot of extra white space on your slides.
While you can leave the space blank, doing so will make your content look weird. Ideally you don’t want a lot of white empty space like that on your slides. Especially since all your font sizes will be so small.
That’s why if you have the time, I recommend resizing your content to fill in the white space. You can do this by either increasing the font size of your content, or adding additional visuals that support your message.
Issues when converting 16:9 to the 4:3 slide size in PowerPoint
When converting an existing 16:9 presentation to the 4:3 slide size, you are given the option to either Maximize or Ensure Fit (both covered below).
1. The Maximize option
This option means that the content on your slides will not be resized to fit the 4:3 slide size. The same is true if you move to any smaller slide size.

Maximize Issue #1: All the images on your slide master (including your company logo) will be distorted.
You might also have issues with other content placeholders, slide backgrounds or anything else that was built on your slide master. For these issues, you’ll first need to navigate to your Slide Master. Once you are there, you either adjust (or rebuild) your PowerPoint template so that everything fits properly.
Maximize Issue #2: Your content will not be scaled down to the smaller slide size. Instead, you’ll have overhanging content as pictured above.
For these kinds of spacing issues, you will need to work through your slides to adjust your content.
One recommendation as you move from the larger 16:9 slide size to 4:3, is to break up your slides. Take the contents from one larger slide and break it into two (or even three) separate slides.
Breaking up your content is preferable to just cramming more content on the smaller slide space. Doing so will make your content easier to read when presented on an overhead projector.
2. The Ensure Fit option
This option means that PowerPoint will scale down your content to fit the smaller slide size based on the size you selected.

Ensure Fit Issue #1: Distorted images, slide backgrounds and anything else that PowerPoint had to automatically resize on your slide master.
To fix these issues, you’ll need to navigate to your slide master and adjust (or rebuild) your template to make everything fit.
Ensure Fit Issue #2: Your content will be scaled down to fit your new slide size, leaving you with a lot of white space. In addition, all your font sizes will be smaller, making them hard to read.
For small content like this, you’ll need to work through your slides and resize your content accordingly. Keep in mind the people at the back of the room too when choosing a new font style and size.
Saving your custom slide size as a PowerPoint theme
If want to use your own custom slide size for all your future PowerPoint presentations, you can save and set it as a PowerPoint theme.
This is a two-step process as discussed below.
1. Save your custom slide size as a theme

To save your custom slide size (and settings) as your own custom PowerPoint theme, simply:
- Open the M ore options
- Click Save Current Theme
- Name your Theme (and don’t change the file location it saves to)
- Click Save
2. Set your custom theme as the default

To set a custom PowerPoint theme as the default for all your future presentations, simply:
- Open the More options
- Right-click your custom theme
- Select Set as Default Presentation
- Close out of PowerPoint (and do not save any presentations if it prompts you)
Once you’ve set your own custom theme as the Default Presentation, it will open every time you start PowerPoint. This saves you from always having to switch your slide sizes.
So that’s how you can change your PowerPoint slide size, either before or after you create your presentation.
And although you are given a lot of flexibility in the slide sizes you can choose from, I recommend using the default slide sizes as used by most people.
It’s also important to remember that switching slide sizes after you have built your presentation can be a total pain. So, to the extent possible, figure out your PowerPoint slide size first before you build out your presentation.
If you enjoyed the depth of this article, you’ll love our PowerPoint training courses and other free resources that you can learn more about here .
🔒 Unlock the PowerPoint Shortcuts Trusted by Industry Leaders KKR, American Express, HSBC, and More!
Join over 114,880 professionals from diverse fields including consulting, investment banking, advertising, marketing, sales, and business development who have supercharged their PowerPoint game with our proven methods.
✅ Customize compelling presentations effortlessly.
✅ Master time-saving techniques for faster deck creation.
✅ Boost your career prospects with top-notch PowerPoint skills.
Get FREE access to the Critical PowerPoint Shortcuts module of our premium training course by entering your name and email below.
DISCLAIMER: PC Users Only!
We respect your privacy and will keep your info safe and confidential.
Related Articles
About the author.

Popular Tutorials
- How to Strikethrough Text (l̶i̶k̶e̶ ̶t̶h̶i̶s̶) in Word, Excel & PowerPoint
- How to Make Animated Fireworks in PowerPoint (Step-by-Step)
- Strikethrough Shortcut (l̶i̶k̶e̶ ̶t̶h̶i̶s̶) for Word, Excel & PowerPoint
- How to Create a Flash Card Memory Game in PowerPoint (Like Jeopardy)
- Keyboard Shortcuts Not Working: Solved
PowerPoint Tutorial Categories
- Strategies & Opinions
- Shortcuts & Hacks
- Presentation Design
- Pictures, Icons, Videos, Etc.
- New Features
- Miscellaneous
- Charts & Data Viz
We help busy professionals save hours and gain peace of mind, with corporate workshops, self-paced courses and tutorials for PowerPoint and Word.
Work With Us
- Corporate Training
- Presentation & Template Design
- Courses & Downloads
- PowerPoint Articles
- Word Articles
- Productivity Resources
Find a Tutorial
- Free Training
- For Businesses
We help busy office workers save hours and gain peace of mind, with tips, training and tutorials for Microsoft PowerPoint and Word.
Master Critical PowerPoint Shortcuts – Secure Your FREE Training Module and Save Valuable Time!
⌛ Master time-saving expert techniques.
🔥 Create powerful presentations.
🚀 Propel your career to new heights.
We value your privacy – we keep your info safe.
Discover PowerPoint Hacks Loved by Industry Giants - KKR, AmEx, HSBC!
Over 114,880 professionals in finance, marketing and sales have revolutionized their PPT skills with our proven methods.
Gain FREE access to a full module of our premium PowerPoint training program – Get started today!
We hate spam too and promise to keep your information safe.
You are currently viewing a placeholder content from Facebook . To access the actual content, click the button below. Please note that doing so will share data with third-party providers.

How to Change Slide Size or Dimensions in PowerPoint

Change PowerPoint Slide Size (Widescreen, Standard or Custom)
by Avantix Learning Team | Updated September 7, 2023
Applies to: Microsoft ® PowerPoint ® 2016, 2019, 2021 and 365 (Windows)
You can change the slide size or aspect ratio of a PowerPoint presentation in all versions. The default slide size or dimensions in 2013, 2016, 2019, 2021 or 365 is widescreen (16:9 aspect ratio). You can also enter a custom slide size if you prefer (including entering slide size in pixels). The best time to set slide size is when you first set up your PowerPoint presentation before you add any content. If you change the size later in the process, you may have to deal with distorted pictures and you may also need to adjust the position and size of various objects on slides in Normal View and in the slide master(s) and layouts in Slide Master View.
The most common slide sizes or aspect ratios are typically used as follows:
- Widescreen or 16:9 aspect ratio is frequently used for onscreen presentations using a projector, monitor or a widescreen TV. Older projectors used the standard aspect ratio but most new projectors are designed for widescreen.
- Standard or 4:3 aspect ratio is often used if slides are intended to be printed on letter size paper.
Slide size changes affect the entire presentation. You cannot change slide size for single slides.
You should never change slide size just before running a presentation as you may not be satisfied with the results. If you already have a presentation with images and other content, it's also a good idea to change slide size on a copy of the presentation so you can keep the original deck and slide size.
Note: Some Ribbon tabs may appear with slightly different names if you are working with PowerPoint 365 and have a smaller screen or different display settings. Buttons on the Ribbon may appear as icons only and are also affected by screen size and display settings.
Recommended article: How to Reduce the Size of PowerPoint Presentations (10 Ways to Compress Your PowerPoint Decks)
Do you want to learn more about PowerPoint? Check out our virtual classroom or live classroom PowerPoint courses >
Regardless of the version of PowerPoint you use, you should go through your slides after you change slide size to be sure you are satisfied with the results. Be sure to check the slide master(s) and layouts in Slide Master View as well.
Change slide size to widescreen or standard
To change slide size to widescreen or standard size:
- In Normal View, click the Design tab in the Ribbon.
- Click Slide Size in the Customize group. A drop-down menu appears.
- Select Widescreen, Standard or another option from the drop-down menu. A dialog box appears with options to maximize content or scale to fit (this dialog appears only if you are moving from a larger to a smaller slide size).
- Select the desired option.
Slide Size appears on the Design tab in the Ribbon:

The following dialog box appears in PowerPoint to maximize content or scale to fit only when you change slide size to a smaller size (such as widescreen to standard):

If you select Maximize, the slide content will not be resized when you change to the smaller slide size.
If you select Ensure Fit, PowerPoint will scale your content to fit the smaller slide size.
Change slide size to a custom size
You can use custom slide sizes. Simply choose options from the Slides sized for drop-down menu in the dialog box (such as A4 paper size) or enter custom dimensions.
To change slide size to a custom size:
- Choose Custom Slide Size from the drop-down menu. A dialog box appears.
- Select an option from the Slides sized for drop-down menu or enter the desired slide size in the Height and Width boxes.
- A dialog box appears with options to maximize content or scale to fit (this dialog appears only if you are moving from a larger to a smaller slide size).
Note that the measurement system in PowerPoint dialog boxes is based on your system settings. If you would like to change the measurement system, check out our article on How to Change the Measurement System in PowerPoint.
The following dialog box appears when you select Slide Size and then Custom Slide Size:

You can create posters in PowerPoint by entering a custom slide size such as 36 inches wide by 56 inches high or 91.44 cm wide by 142.24 cm high. The maximum slide size in PowerPoint is 56 inches or 142.24 cm. As a best practice, set the slide size before adding content to the poster.
Many PowerPoint users are not aware that you can enter slide size in pixels (simply enter the measurement with px beside the number). This is useful in a number of situations such as using PowerPoint to create social media posts. If you enter slide size in pixels (such as 200px), when you tab to another box or close the dialog box, PowerPoint changes the pixels to the equivalent in the current measurement system.
Deal with issues when changing slide size
When changing slide size in existing presentations with content, 4 common issues occur:
- Pictures may be distorted as PowerPoint tries to adjust images to fit slide size. Images on slides in Normal View will be affected as well as images on the slide master(s) and layouts. If pictures are distorted, you will need to either manually resize each image or delete them and insert them again.
- Objects such as placeholders and shapes that have been created in PowerPoint are not in the position you'd like. You may need to move objects or reset one or more slides (on the Home tab in the Ribbon, click Reset in the Slides group).
- Extra space is created if you change to a larger slide size. You may need to move or resize objects and adjust the slide master(s) or layouts in Slide Master View.
- If you have changed to a smaller slide size, you may need to increase font size for placeholders and text boxes.
Dimension differences between different slide sizes
In PowerPoint 2013 and later versions, widescreen (16:9) format measurements are different and are set to 13.33 inches wide by 7.5 inches high or 33.867 cm wide by 19.05 cm high. This matches the height of the 4:3 format.
Avoid issues when changing slide size
To avoid issues in PowerPoint related to slide size, you should:
- Try to set slide size as a first step after you create a presentation and before you have entered any content. In 2013 and later versions, the default is widescreen (16:9 aspect ratio).
- If you have changed slide size in a presentation with content, review your slides to be sure you are satisfied with the results. You should also check the slide master(s) and layouts in Slide Master View.
- Never change slide size just before running a presentation as you may not be pleased with the results and you won't have time to fix your slide deck.
- If you have created a presentation with content, make a copy of the presentation first and change slide size on the copy.
Keep in mind that widescreen is normally used for on screen presentations and standard is often used for printed presentations.
This article was first published on October 6, 2019 and has been updated for clarity and content.
Subscribe to get more articles like this one
Did you find this article helpful? If you would like to receive new articles, JOIN our email list.
More resources
How to Blur Text on a PowerPoint Slide
How to Get Slide Design Ideas Using PowerPoint Designer
How to Change Picture Brightness or Contrast in PowerPoint
How to Insert Slide Numbers in PowerPoint Presentations (Step-by-Step)
Where to Find Free Images for Your PowerPoint Presentations (10 Great Stock Photo Sites)
Related courses
Microsoft PowerPoint: Intermediate / Advanced
Microsoft PowerPoint: Design for Non-Designers
Microsoft PowerPoint: Animations Bootcamp
Microsoft Excel: Intermediate / Advanced
VIEW MORE COURSES >
Our instructor-led courses are delivered in virtual classroom format or at our downtown Toronto location at 18 King Street East, Suite 1400, Toronto, Ontario, Canada (some in-person classroom courses may also be delivered at an alternate downtown Toronto location). Contact us at [email protected] if you'd like to arrange custom instructor-led virtual classroom or onsite training on a date that's convenient for you.
Copyright 2024 Avantix ® Learning
You may also like

10 Keyboard Shortcuts in PowerPoint's Outline View
The outline has been an integral part of Microsoft PowerPoint for many years. It is dynamically linked to slide placeholders and is organized in a hierarchical way.

How to Change the Thumbnail for a Video in PowerPoint (using the Poster Frame Tool)
If you have inserted a video on a PowerPoint slide, you can display a custom thumbnail (or Poster Frame) for the video during a slide show. The thumbnail will display when you run a PowerPoint slide show and disappears when you start the video. For most videos, the thumbnail that displays is the first frame of the video clip. You can use the Poster Frame command to display a different frame in the video clip or a picture from another source as a thumbnail. A picture thumbnail could be either an image or an icon.

How to Use the Built-in Laser Pointer in PowerPoint (with Shortcuts)
During a PowerPoint slide show, you can change your mouse into a laser pointer to focus attention on a specific area on your slide. You can show or hide the built-in laser pointer using keyboard shortcuts or by using the context menu.
Microsoft, the Microsoft logo, Microsoft Office and related Microsoft applications and logos are registered trademarks of Microsoft Corporation in Canada, US and other countries. All other trademarks are the property of the registered owners.
Avantix Learning |18 King Street East, Suite 1400, Toronto, Ontario, Canada M5C 1C4 | Contact us at [email protected]
Our Courses
Avantix Learning courses are offered online in virtual classroom format or as in-person classroom training. Our hands-on, instructor-led courses are available both as public scheduled courses or on demand as a custom training solution.
All Avantix Learning courses include a comprehensive course manual including tips, tricks and shortcuts as well as sample and exercise files.
VIEW COURSES >
Contact us at [email protected] for more information about any of our courses or to arrange custom training.
Privacy Overview
Pin it on pinterest.
- Print Friendly
How to Change the Page Size in Powerpoint: A Step-by-Step Guide
Changing the page size in PowerPoint is a simple task that can be done in just a few clicks. Whether you want to adjust the size for printing or for a specific presentation format, PowerPoint gives you the flexibility to customize the size to your liking. Just head to the Design tab, click on Slide Size, and choose your desired size or enter custom dimensions.
Step by Step Tutorial: Changing the Page Size in PowerPoint
When you’re creating a presentation in PowerPoint, you might find that the default page size doesn’t quite fit your needs. Luckily, changing the page size is an easy process that can enhance the visual appeal of your presentation.
Step 1: Open the Design Tab
Click on the ‘Design’ tab at the top of the PowerPoint window.
The ‘Design’ tab is where you can find all the tools you need to change the appearance of your slides, including the page size.
Step 2: Click on Slide Size
In the ‘Customize’ group, click on ‘Slide Size’.
You’ll see a drop-down menu with different options for slide sizes, including ‘Standard (4:3)’, ‘Widescreen (16:9)’, and ‘Custom Slide Size’.
Step 3: Choose a Preset or Custom Size
Select a preset size or click on ‘Custom Slide Size’ for more options.
If you choose ‘Custom Slide Size’, a dialog box will appear where you can enter the width and height for your slides.
After you’ve changed the page size, you’ll notice that your slides have a new look. This can make your presentation more visually appealing and ensure that it fits any specific requirements you may have for your presentation.
Tips for Changing the Page Size in PowerPoint
- If you’re planning to print your slides, make sure to choose a page size that matches the paper you will be using.
- For a more professional look, consider using the widescreen (16:9) size, which is the standard for most modern monitors and projectors.
- Keep in mind that changing the page size might affect the layout of your slides, so you may need to adjust your content accordingly.
- If you’re presenting on a non-standard screen, such as a square or vertical monitor, use the custom size option to ensure your slides fill the screen properly.
- Remember to save your presentation after changing the page size to avoid losing any changes.
Frequently Asked Questions
Will changing the page size affect my slide content.
Yes, changing the page size can affect the layout of your slide content, including text, images, and other elements.
Can I change the page size for just one slide in my presentation?
No, changing the page size will apply to all slides in your presentation.
What’s the difference between ‘Standard’ and ‘Widescreen’ slide size?
‘Standard’ (4:3) is the traditional size for slides, while ‘Widescreen’ (16:9) is the newer standard that matches most modern screens and projectors.
How do I know what page size to use for my presentation?
It depends on where you will be presenting and the equipment you’ll be using. If you’re unsure, ‘Widescreen’ is generally a safe choice.
Can I switch back to the original page size after changing it?
Yes, you can always go back to the Design tab and select a different size or revert to the original size you started with.
- Open the Design Tab
- Click on Slide Size
- Choose a Preset or Custom Size
PowerPoint is an incredibly versatile tool that allows users to tailor their presentations to any size and format they need. Changing the page size in PowerPoint is just one way to customize your presentation to fit your specific needs. Whether you’re looking to make a big impact on a widescreen projector or need to print slides that match a certain paper size, PowerPoint has got you covered. With a few simple clicks, you can transform the shape and size of your slides, potentially making your presentation more engaging and professional-looking. Remember to consider the tips we’ve shared and the answers to frequently asked questions when changing your slide size. Now that you know how to change the page size in PowerPoint, go ahead and give it a try! Your presentations will never be the same.

Matt Jacobs has been working as an IT consultant for small businesses since receiving his Master’s degree in 2003. While he still does some consulting work, his primary focus now is on creating technology support content for SupportYourTech.com.
His work can be found on many websites and focuses on topics such as Microsoft Office, Apple devices, Android devices, Photoshop, and more.
Share this:
- Click to share on Twitter (Opens in new window)
- Click to share on Facebook (Opens in new window)
Related Posts
- How to Rotate a Powerpoint Slide Presentation
- How to Download a Google Slides Presentation as a Powerpoint File
- How to Make Google Slides Vertical (5 Quick Steps)
- How to Do a Powerpoint Google Slides Presentation Conversion
- How to Make a Powerpoint Slide Vertical in Powerpoint 2013: A Step-by-Step Guide
- How to Add a New Slide in Google Slides: A Step-by-Step Guide
- How to Change Slide Size in Powerpoint 2016
- How to Delete a Slide in Powerpoint 2010: Step-by-Step Guide
- Determining the Size of a PowerPoint Slide in Pixels: A Guide
- How to Delete Multiple Slides in Google Slides: A Step-by-Step Guide
- How to Hide a Slide in Powerpoint 2010: A Step-by-Step Guide
- How to Remove Page Number from First Page of Google Docs and Google Sheets
- How to Insert Slides from Another Presentation: Powerpoint 2024 Guide
- How to Add a Hyperlink on Google Slides
- How to End Powerpoint on Last Slide in Powerpoint 2010: A Step-by-Step Guide
- How to Add Page Numbers in Powerpoint 2010: A Step-by-Step Guide
- How to Insert a Google Slides Page Number: Step-by-Step Guide
- How to Duplicate a Slide in Powerpoint: A Step-by-Step Guide
- How to Convert Powerpoint to Google Slides: A Tech Solution
- How to Print 4 Slides Per Page in Google Slides: A Step-by-Step Guide
Get Our Free Newsletter
How-to guides and tech deals
You may opt out at any time. Read our Privacy Policy
How to change the size of slides in Microsoft PowerPoint to match your customized presentation style or screen size
- You can change the size of a slide in your PowerPoint presentation through the "Design" menu.
- Microsoft PowerPoint allows you to change slide sizes on the Windows PC, Apple MacOS, and web-based apps.
- Visit Business Insider's Tech Reference library for more stories .
When it comes to designing your visual presentation, one size does not fit all.
That's doubly true for PowerPoint presentations, which may be viewed on several platforms and devices. Sometimes PowerPoint's default slide isn't the best option for your project, and the program has a built-in fix for that.
When you create a presentation in Microsoft PowerPoint, you can customize your slides' size and dimension. This allows you to choose a perfect canvass for your content.
Microsoft offers the ability to change the size of your slides on the Windows, Mac, and web-based apps. Here's how to do it.
Check out the products mentioned in this article:
Microsoft office (from $149.99 at best buy), apple macbook pro (from $1,299.00 at apple), acer chromebook 15 (from $179.99 at walmart), how to change slide size in powerpoint for pc.
1. Open an existing PowerPoint file, or start a new presentation.
2. Select "Design" from the top menu bar.
3. Toward the right, click "Slide Size."
4. In the drop-down menu, select Standard, Widescreen, or "Custom Slide Size…"
5. When you're done, click "OK."
How to change slide size in PowerPoint for Mac
1. Create a new presentation, or launch an existing file.
2. Click "Design" from the top-line row of options.
3. Toward the right, you'll see "Slide Size." Click it for a drop-down menu of options.
4. Select the included Standard or Widescreen options, or click "Page Setup…" for a custom size.
5. Choose "OK" when you're done.
How to change slide size in PowerPoint for web
1. Navigate to powerpoint.office.com and sign in to your Microsoft account.
2. Open a new or existing PowerPoint.
3. Select "Design" from the top row of options.
4. Click "Slide Size."
5. Select between Widescreen and Standard, or create custom dimensions with "Custom Slide Size…"
6. If selecting custom, enter the dimensions and then choose whether you want it in landscape or portrait mode.
7. Choose between maximizing your slide size or scaling it to fit the new dimensions.
8. Click "OK."
Related coverage from Tech Reference :
How to download and access microsoft powerpoint on your mac computer, how to add a border to slides in powerpoint, and give your slideshow a sleek design, how to change and format the background of your powerpoint slides to custom designs, how to change your language settings in microsoft powerpoint in 3 different ways, how to copy or duplicate a powerpoint slide and put it anywhere in your slideshow.
Insider Inc. receives a commission when you buy through our links.
Watch: We toured a $7 million NYC apartment that has a slide and zip line, and it's a kid's paradise
- Main content
How to change the size of slides in Microsoft PowerPoint
The actual size(s) of the slide is less important than the aspect ratio. By default, slides in presentations that you create from the Blank Presentation template are set to Widescreen size.
To change the size of your presentation slides, on the Design tab, in the Customize group, click the Slide Size button and then:
Notes : The Standard slide size:
- 1600 x 1200
- 2048 x 1536
- 2560 x 1920
- Matches the aspect ratio of standard tablet screens
- Exactly fills the screen in the Slide pane and when printed on a tablet.
Notes : The Widescreen slide size:
- 1920 x 1080
- 2048 x 1152
- 2560 x 1440
- Does not match the aspect ratio of standard tablet screens
- Has empty space above and below when printed on a 4:3 screen.
- Click Custom Slide Size... :

In the Slide Size dialog box:

- Choose the slide orientation in the Orientation group.
After choosing the necessary options, click OK . The Microsoft PowerPoint dialog box will show two options on how to scale the existing slides to a new slide size:

Maximize the content size or scale it down to Ensure Fit it on the new slide.
Note : It is impossible to change the size or orientation just for some slides.
Please, disable AdBlock and reload the page to continue
Today, 30% of our visitors use Ad-Block to block ads.We understand your pain with ads, but without ads, we won't be able to provide you with free content soon. If you need our content for work or study, please support our efforts and disable AdBlock for our site. As you will see, we have a lot of helpful information to share.

How to compress pictures in the presentation

SketchBubble Review - Engaging Presentations at Your Fingertips

Embed fonts to view presentation on different PCs
- Skill Assessments
- AI Course Builder
- Free Courses
- PowerPoint 2019 Basic
PowerPoint Slide Size

Start Free Trial
Or log in with:
How to Change Slide Size in PowerPoint

PowerPoint allows you to change the aspect ratio of your presentation. The widescreen slide size is best when presenting on modern displays with a 16:9 aspect ratio. If you’ll be presenting on an older display with a 4:3 aspect ratio, you’ll want to use the standard slide size instead.
Change the Slide Size
- Click the Design tab.
- Expand the Customize group.
To change the slide orientation, click the Slide Size button and select Custom Slide Size . Change the slide settings and click OK .
- Widescreen : 16:9 ratio is much wider than it is tall and works well for wide, high definition screens.
- Standard : 4:3 ratio is only slightly wider than it is tall and works best for traditional screens.

- Maximize : Crops your content and fills all the available space on the slide.
- Ensure Fit : Scales content down and leaves additional space at the top and bottom of the slide.

The entire presentation is resized to fit the new format.

FREE Quick Reference
Free to distribute with our compliments; we hope you will consider our paid training.
- LinkedIn-ready certificate
- Skill assessments
- Bite-sized, interactive lessons
- Saved progress
- All-Access Subscriptions
- Business Licensing
- Lightroom Classic
- Photoshop Elements
- Crystal Reports
- Interview Skills
- Resume Skills
- Excel for Lawyers
- Outlook for Lawyers
- QuickBooks for Lawyers
- Word for Lawyers
- Microsoft Office Suite
- Outlook on the Web
- Microsoft Project
- Microsoft Teams
- QuickBooks Online
- QuickBooks Pro
- Video Course Options
- SUBSCRIPTIONS
- Photoshop Elements 2024
- Photoshop Elements 2023
- Photoshop Elements 2022
- Photoshop Elements 2021
- Photoshop Elements 2020
- Photoshop Elements 2019
- Photoshop Elements 2018
- Photoshop Elements 15
- Google Classroom for Teachers
- Google Docs
- Google Drive
- Google Forms
- Google Sheets
- Google Slides
- Mac OS Keyboard Shortcuts
- Excel Formulas and Functions
- Excel Keyboard Shortcuts
- Excel Tables PivotTables and Charts
- Access for Microsoft 365
- Excel for Microsoft 365
- Microsoft Office 365
- Outlook for Microsoft 365
- PowerPoint for Microsoft 365
- Publisher for Microsoft 365
- Word for Microsoft 365
- Access 2021
- Microsoft Office 2021
- Outlook 2021
- PowerPoint 2021
- Publisher 2021
- Access 2019
- Microsoft Office 2019
- Outlook 2019
- PowerPoint 2019
- Publisher 2019
- Access 2016
- Microsoft Office 2016
- OneNote 2016
- Outlook 2016
- PowerPoint 2016
- Publisher 2016
- Microsoft Office 2013
- OneNote 2013
- Outlook 2013
- PowerPoint 2013
- Microsoft Office for iPad
- QuickBooks Pro 2024
- QuickBooks Pro 2023
- QuickBooks Pro 2022
- QuickBooks Pro 2021
- QuickBooks Pro 2020
- QuickBooks Pro 2019
- QuickBooks Pro 2018
- QuickBooks Pro 2017
- QuickBooks Pro 2016
- QuickBooks Pro 2015
- QuickBooks Pro 2014
- Sage 50 Accounting
- Windows 11 and 10 Keyboard Shortcuts
- Chrome OS for Chromebooks
- Word and Excel (Mac) 2022
- Word and Excel (PC/Windows) 2021-2016 and 365
- QuickBooks Desktop (PC/Windows) 2024
- QuickBooks Desktop (PC/Windows) 2023
- QuickBooks Desktop (PC/Windows) 2022-2015
- Windows 11 and 10
- Our History
- Customer Service
- Testimonials
- Lost Password
- Register a Product
- Manage My Account
- Member Login
Try the Complete PowerPoint Course for Free!
Change the size of slides in powerpoint – instructions, how to change the size of slides in powerpoint: video.
This video lesson, titled “ Learn How to Change Slide Size in Microsoft PowerPoint 2019 & 365: A Training Tutorial ,” shows you how to change the size of slides in PowerPoint. This video lesson is from our complete PowerPoint tutorial , titled “ Mastering PowerPoint Made Easy v.2019 and 365 .”
Change the Size of Slides in PowerPoint: Overview
You can easily change the size of slides in PowerPoint. To change the size of slides in PowerPoint, click the “Design” tab in the Ribbon. Then click the “Slide Size” drop-down button in the “Customize” button group. To change the slide size aspect ratio, select either “Standard (4:3)” or “Widescreen (16:9)” from the button’s drop-down menu. Alternatively, to use slides of a custom size or change other slide size properties, select the “Custom Slide Size…” command from the button’s drop-down menu to open the “Slide Size” dialog box.
To select a preset slide size, use the “Slides sized for:” drop-down in the “Slide Size” dialog box to select a preset slide size from the drop-down menu. Alternatively, to manually set the slide width and height, enter your own custom measurements into the “Width:” and “Height:” spinner boxes. To change the starting number for slide numbering, enter the starting number to use into the “Number slides from:” spinner box.

A picture showing how to change the size of slides in PowerPoint by using the “Slide Size” dialog box.
To set the slide orientation, select either the “Portrait” or “Landscape” option button in the “Orientation” section of the “Slide Size” dialog box. To set the orientation of notes, handouts, and the outline view, select either the “Portrait” or “Landscape” option button in the “Notes, Handouts & Outline” section. To apply your desired slide size settings in the “Slide Size” dialog box, click the “OK” button at the bottom of the dialog box.
Instructions on How to Change the Size of Slides in PowerPoint:
- To change the size of slides in PowerPoint , click the “Design” tab in the Ribbon.
- Then click the “Slide Size” drop-down button in the “Customize” button group.
- To change the slide size aspect ratio , select either “Standard (4:3)” or “Widescreen (16:9)” from the button’s drop-down menu.
- Alternatively, to use slides of a custom size or change other slide size properties , select the “Custom Slide Size…” command from the button’s drop-down menu to open the “Slide Size” dialog box.
- To select a preset slide size , use the “Slides sized for:” drop-down in the “Slide Size” dialog box to select a preset slide size from the drop-down menu.
- Alternatively, to manually set the slide width and height , enter your own custom measurements into the “Width:” and “Height:” spinner boxes.
- To change the starting number for slide numbering , enter the starting number to use into the “Number slides from:” spinner box.
- To set the slide orientation , select either the “Portrait” or “Landscape” option button in the “Orientation” section of the “Slide Size” dialog box.
- To set the orientation of notes, handouts, and the outline view , select either the “Portrait” or “Landscape” option button in the “Notes, Handouts & Outline” section.
- To apply your desired slide size settings in the “Slide Size” dialog box , click the “OK” button at the bottom of the dialog box.

About Joseph Brownell

- WordPress Tutorials
- Graphic Design
- Presentations
- Shopify Knowledge Base
- Theme Collections
PowerPoint Slide Sizes: General Information + Instructions for Resizing a Slide
The customization of standard powerpoint slide sizes.
- The customization PowerPoint slide dimensions
PowerPoint templates from TemplateMonster
Microsoft PowerPoint is a program that allows you to create unique and creative presentations. This product is perfect for beginners and professionals alike. Microsoft PowerPoint has all the editing tools you would expect from an Office product, as well as an impressive selection of options for presentation, such as transitions and animations. You can also add and edit many other non-text elements such as images, videos, audio, hypertext, and graphics. This guide is about powerpoint slide size.

Overall, PowerPoint is an amazing product. It is user-friendly and easy to use, but with advanced functions that are necessary to make truly professional presentations.
If you want to create a presentation as quickly as possible, without much effort and time spent, then pay attention to PowerPoint presentation templates from TemplateMonster. These are original and unique templates for different purposes and projects.
Now, let’s talk about PowerPoint slide dimensions.
The PowerPoint slides size depends on where and how you show this presentation. For example, it can be a PowerPoint presentation on:
- laptop screens (most laptop screens have an aspect ratio of 16:9, MacBook 16:10)
- projectors (many projectors have a 4:3 aspect ratio, while others imitate widescreen laptop monitors)
- large-format monitors (here the aspect ratio is usually 16:9)
The same PowerPoint file will be displayed differently on each device, as the aspect ratio may vary. Therefore, again, TemplateMonster offers templates that adapt to the size of the screen.
PowerPoint gives the possibility to change the size of the slides for any purpose. Most often, users change the current format to portrait or landscape. This is very easy to do. First, we will tell you how to change the standard PowerPoint slide size. So:
- Open the PowerPoint presentation, and among the various tabs ( Insert, Transitions, Animations, Slide Show, etc.) select the Design tab.
- Here you will see the themes, their variants, and Format Background . You should click Slide Size . In PowerPoint 2016, this button is located in the last field that is called Customize . In other versions of PowerPoint, Slide Size can be found in Page Settings .
- By clicking on Slide Size , you will see a menu with Standard (4:3) and Widescreen (16:9) options. The variant will be selected here depending on your presentation.
Here is the example:

Basically, this is all about changing the standard PowerPoint slide size.

The customization of PowerPoint slide dimensions
Next, we would like to share with you a quick guide on how to set up the exact dimensions for your slides. To do this, you need to take some similar actions that were specified above, namely:

- Open the PowerPoint presentation, and select the Design tab .
- Among the suggested options, click Slide Size .
- Next, you need to select the Custom Slide Size . This will bring up a special window where you can select Slide Size for Width, Height, Number Slides From, Orientation, Notes, handouts & outline.
- In the Slide Size for box, you can choose from a variety of predefined slide sizes. For example A3, A4, B5, Letter Paper, Overhead, Custom, Banner, etc.
- Next, in the Height and Width , you can customize the desired size for your presentation, or project.
- At the end, click OK , and the changes will be saved and applied to your slides.

After resizing PowerPoint slides, be sure to check everything, and make certain that the elements of the presentation are within its scope. Keep yourself out of trouble.
The PowerPoint slide is both a normal page (absolute values measured in centimeters) and a screen form (values measured in pixels). You can specify the height and width of the slide in inches, centimeters, and pixels. For PowerPoint slide size pixels, you need to specify the desired size and add “px” in the column with numbers. If you want to specify the size in inches you must add “in,” and if centimeters then “cm.” PowerPoint then converts the sizes (if it is necessary) into the type of units used by the operating system.
We would also like to clarify that the PowerPoint slide sizes in pixels can be 1366 x 768; 1280 x 720; 1024 x 600; 640 x 480. The larger the size - the better the quality.
Since we've already figured out the issue of PowerPoint slide sizes, we now offer you a list of the best PowerPoint templates from TemplateMonster.
2019 Pitch Deck PowerPoint Template

2019 Pitch Deck PowerPoint Template is truly one of the best templates that TemplateMonster offers. Among the most important features:
- over 200 unique, fresh and stylish slides
- 12 additional color schemes (you can customize the colors, and choose the appropriate scale for you)
- 16:9 HD aspect ratio, ideal for wide screens
- additional instructions that you can use to quickly and easily set up the template
- fully customizable and editable PowerPoint template elements
- 24/7 technical support
- bright and memorable slides with graphs, diagrams, tables, etc.
We advise you to consider this alternative!
Infographic PowerPoint Template

Infographic PowerPoint Template is a cool example of a powerful template for presenting any business project. Choosing this template you will get more than 600 unique, and professional templates, 2 aspect ratio (4:3 and 16:9), a huge number of vector icons, a wide variety of color schemes (you even have the opportunity to choose your favorite colors, and create schemes), additional and free fonts, calendars, maps, graphs, tables, various types of diagrams, schemes, and columns. There are also many available layouts. All elements are fully customizable. The quality of the slides is at the highest level, so you will not have any problems in working with this template.
Multipurpose Business Infographic Presentation - PowerPoint Template

Multipurpose Business Infographic Presentation is also one of the best PowerPoint templates available. It includes a huge number of unrealistically cool elements, such as:
- 30,000 slides, approximately 500 of which are unique and stylish
- more than 20 color schemes that can be easily edited
- the presence of a light and dark version of the template
- easily customizable elements
- unusual graphs, charts, tables
- a huge number of fonts and maps that can be used for free access
- different vector icons, and more
Albireo Powerpoint Template PowerPoint Template

Another variant of the best template is the Albireo PowerPoint Template . This is a huge collection of slides with different charts, maps, tables, schemes, and diagrams. This PowerPoint presentation template is perfect for presenting business projects or reports. This theme is available in light and dark formats. You will also receive more than 5 ready-made color schemes, free fonts, 24/7 technical support, additional instructions, and information about setting up and using the template.
Redline Creative PowerPoint Template

Redline Creative PowerPoint Template is also a great example of a template for any kind of presentation. Redline Creative has a fairly large number of bright, high-quality, and memorable templates. By choosing this template, you will get access to Google maps and fonts, additional bonus icons, unusual charts, schemes, and diagrams. In this template you can easily change the color, the position of the elements on the page, the size of these elements, etc. You can also use ready-made slide layouts. Redline Creative is an easy to use a theme to present any of your plans, ideas, and projects!
21 Easy Tips To Create A Powerful Presentation For Your Business [Free Ebook]
By clicking the button you agree to the Privacy Policy and Terms and Conditions .
100 Best Business Presentation Templates. Cool! Great! Awesome!
25 Business PowerPoint Presentation Templates
Featured PowerPoint Templates And Themes
The Best Fonts for PowerPoint Presentations

Hi there! I'm a freelance copywriter with a passion for languages. Loving to write useful posts, to be creative in any task, and to develop myself.
Get more to your email
Subscribe to our newsletter and access exclusive content and offers available only to MonsterPost subscribers.

Related Posts
Best digital products award 2023 – honored by templatemonster, making a successful presentation: how to print google slides with notes, 15 clever color combinations that make your presentation professional, leave a reply cancel reply.
You must be logged in to post a comment.
What is the Size of a PowerPoint Slide in Pixels?
By: Author Shrot Katewa

When creating a PowerPoint presentation, it is essential to determine the appropriate size for your slides. Understanding the size of a PowerPoint slide in pixels is crucial to ensure that your presentation looks great on all devices, from desktops to mobile devices.
The standard size of a PowerPoint slide is 1024×768 pixels and the widescreen PowerPoint slide is “1920×1080” pixels. It can also be adjusted based on your preferences or the requirements of the platform on which you plan to present your slides.
In this article, we will discuss the standard size of a PowerPoint slide in pixels or inches as well as how to adjust it to fit your needs. Let’s get started!
1. What is the Size of a PowerPoint Slide in Pixels?
In Microsoft PowerPoint, there are multiple preset slide sizes available. You can also customize the size of the slide using the “Custom Slide Size” feature available in the application. Depending on the slide size you select, the size of the slide in pixels will vary.
1.1 What is the Size of a PowerPoint Standard Slide in Pixels?
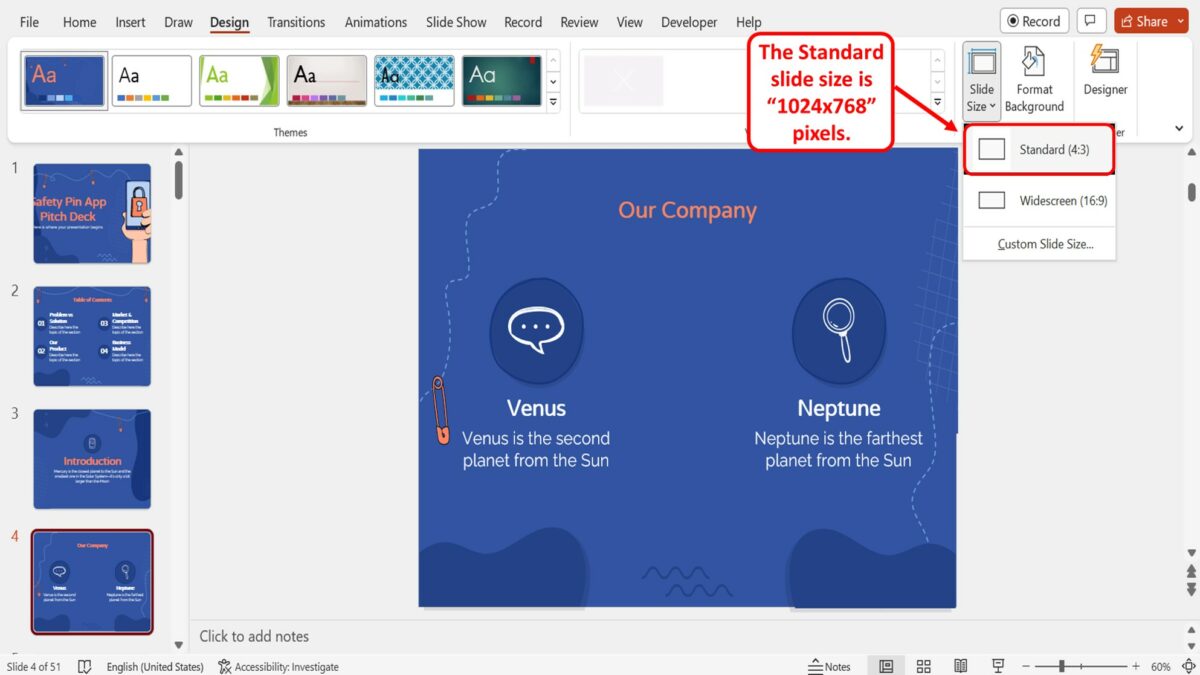
The “Standard (4:3)” option in Microsoft PowerPoint used to be the only size option in the beginning since most screens from 2010 and before were that size. The standard slide size in PowerPoint is “1024×768” pixels.
1.2 What is the Size of a PowerPoint Widescreen Slide in Pixels?
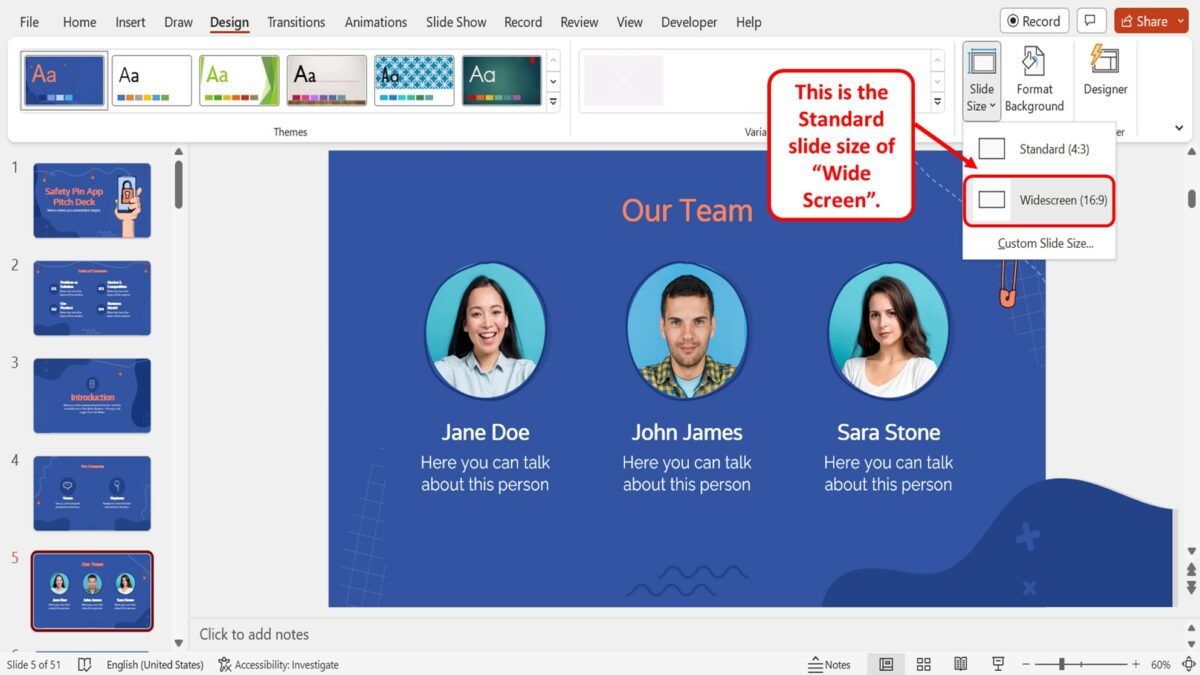
In Microsoft PowerPoint, the default size of the slides is the “Widescreen (16:9)” option. The widescreen PowerPoint slide is “1920×1080” pixels.
2. What is the Size of a PowerPoint On-Screen Show Slide in Inches?
In Microsoft PowerPoint, the size of the slides is mostly measured in inches. Using the “Slide Size” dialog box, you can check the dimension of a slide in inches. Depending on the type of the selected slide, the slide size varies. There are three different “On-Screen Show” slide sizes available in Microsoft PowerPoint.
2a On-Screen Show (4:3)
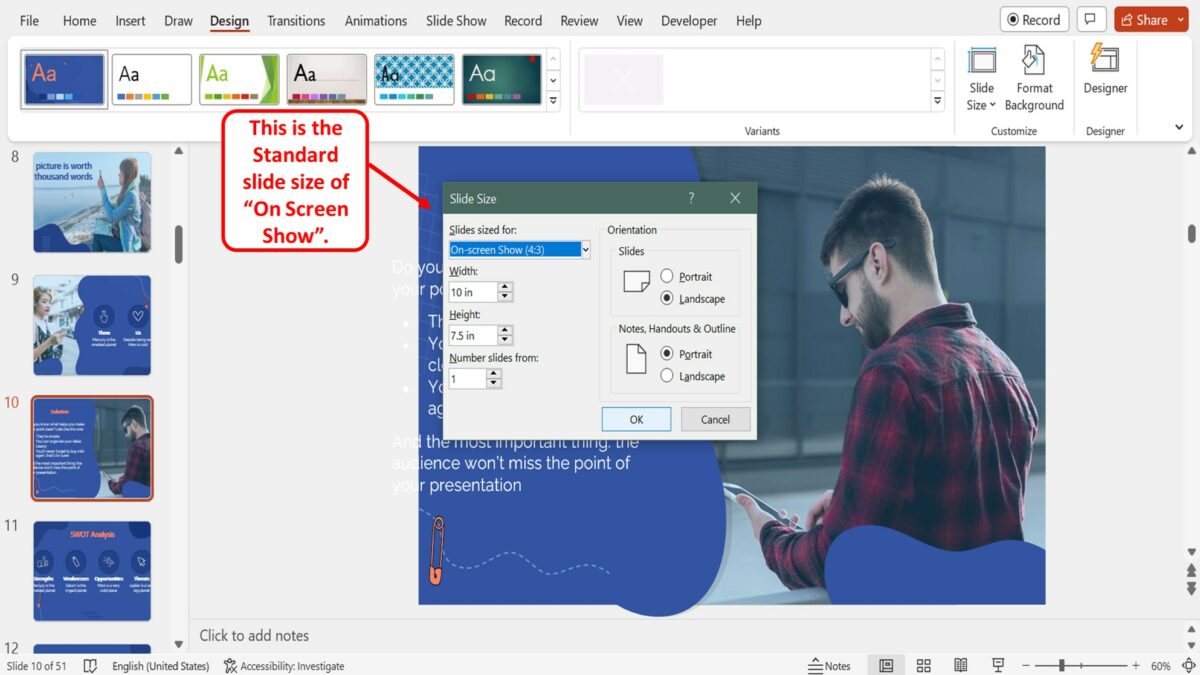
The “On-Screen Show (4:3)” slides are “10×7.5” inches in size. This is the “Standard” slide size.
2b On-Screen Show (16:9)
The “On-Screen Show (16:9)” slide size is “10 x 5.625” inches in dimension. This is the “Widescreen” option which is the default slide size in PowerPoint.
2c On-Screen Show (16:10)
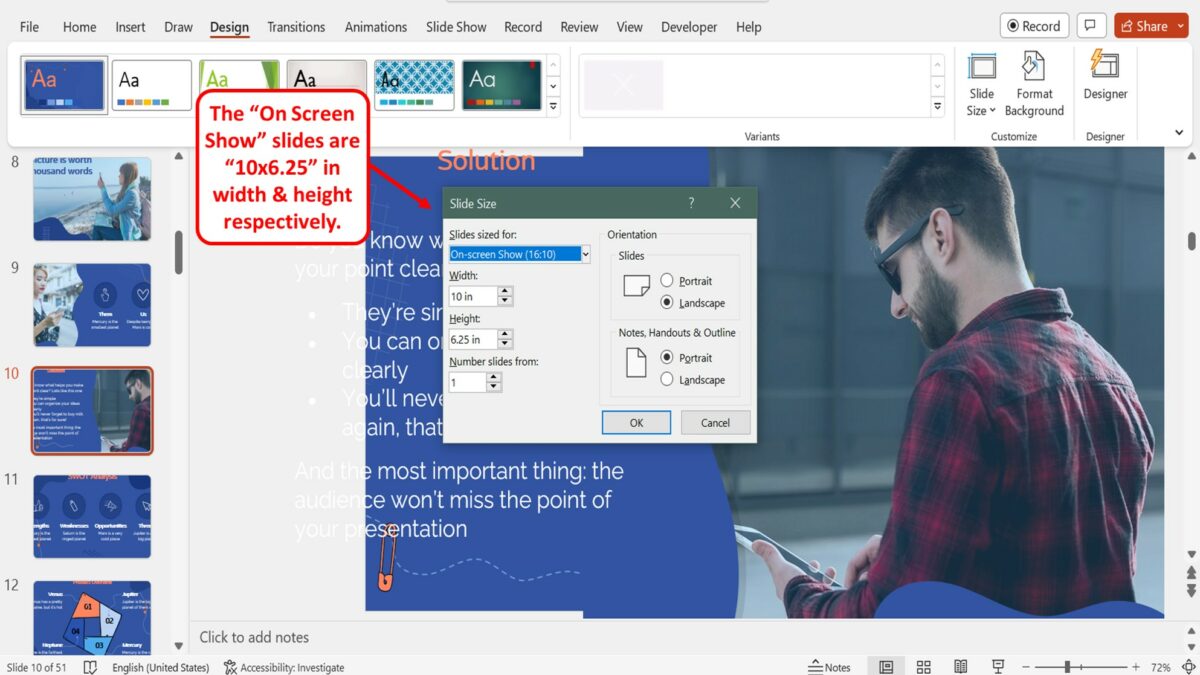
The “On-Screen Show (16:10)” slides are “10 x 6.25” inches in width and height respectively.
3. How to Find the Size of the Slide in Inches?
Using the “Slide Size” dialog box in Microsoft PowerPoint, you can find the size of the slides in your presentation in inches. To do so, follow the 3 quick steps.
Step-1: Click on the “Design” tab
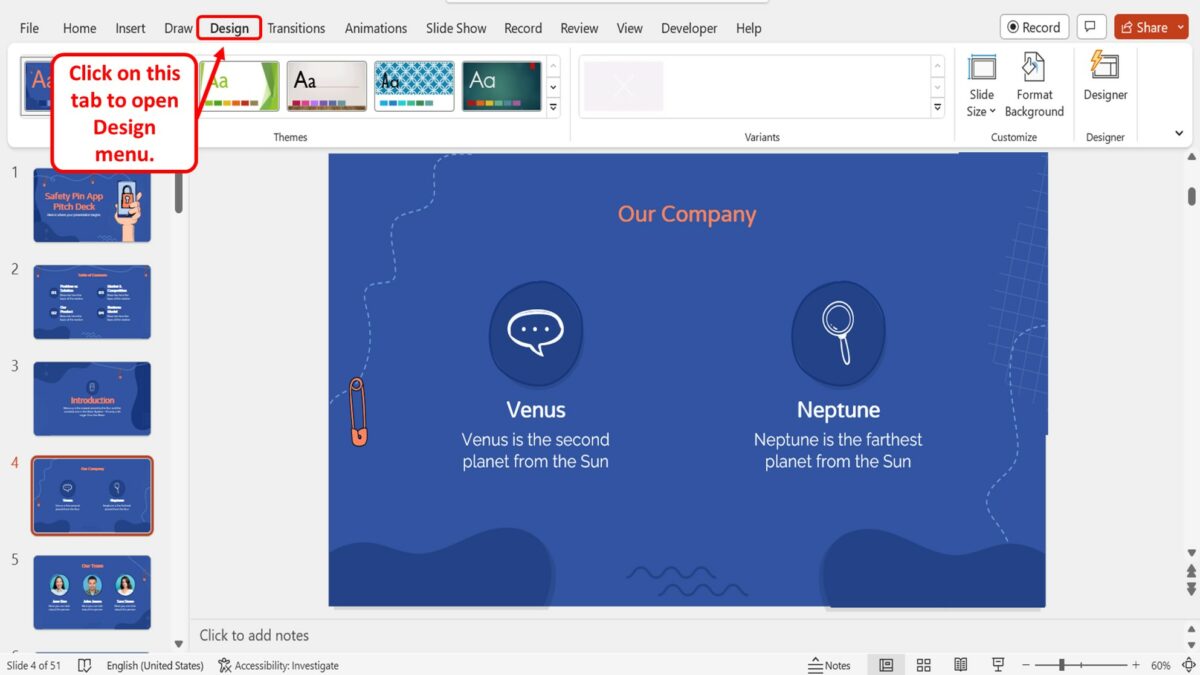
In the menu ribbon located at the top of the screen, click on the “Design” tab. This will open the “Design” menu.
Step-2: Click on the “Slide Size” option
In the “Customize” group of the “Design” menu, click on the “Slide Size” option. Then click on the “Custom Slide Size” option in the dropdown menu under the “Slide Size” option. This will open a dialog box.
Step-3: Click on the “OK” button
In the “Slide Size” dialog box, you can now see the size of the slide in inches in the “Width” and “Height” boxes. Then click on the “OK” button at the bottom of the dialog box to close it.
4. How to Change the Size of a PowerPoint Slide?
In Microsoft PowerPoint, you can change the side of the slides using the “Design” menu. However, you can only change the size of all the slides in a presentation at once. To change the size of the slide in PowerPoint, follow the 3 simple steps.
The first step is to open the “Design” menu. To do so, click on the “Design” tab in the menu ribbon located at the top of the screen.
In the “Customize” group of the “Design” menu, you have to now click on the “Slide Size” option. This will open a dropdown menu containing the preset slide size options available in PowerPoint.
Step-3: Click on your preferred slide size
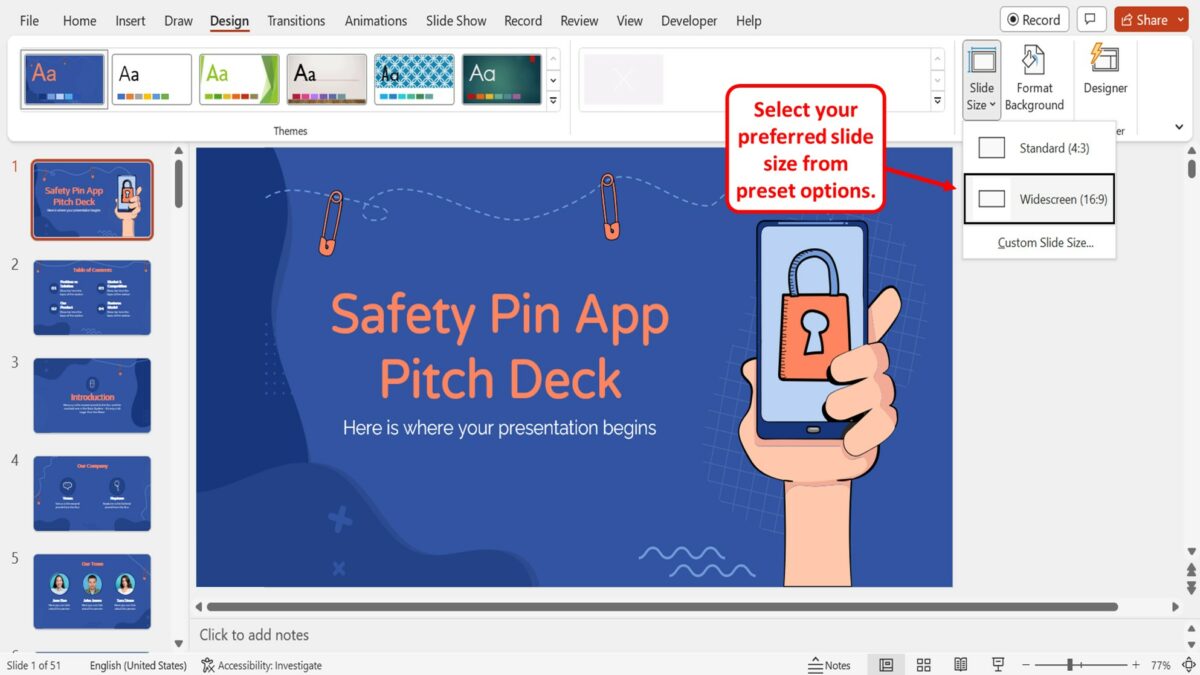
Finally, all you have to do is click on your preferred slide size option from the preset options available in the dropdown menu under the “Slide Size” option. The available slide sizes are “Standard” and “Widescreen” .
4.1 How to Customize the Size of a PowerPoint Slide?
The “Custom Slide Size” feature in Microsoft PowerPoint allows you to customize the size of all the slides in a presentation. Using the feature, you can set any dimension to the slides in your presentation. To customize the size of the slides in a presentation, follow the 7 easy steps.
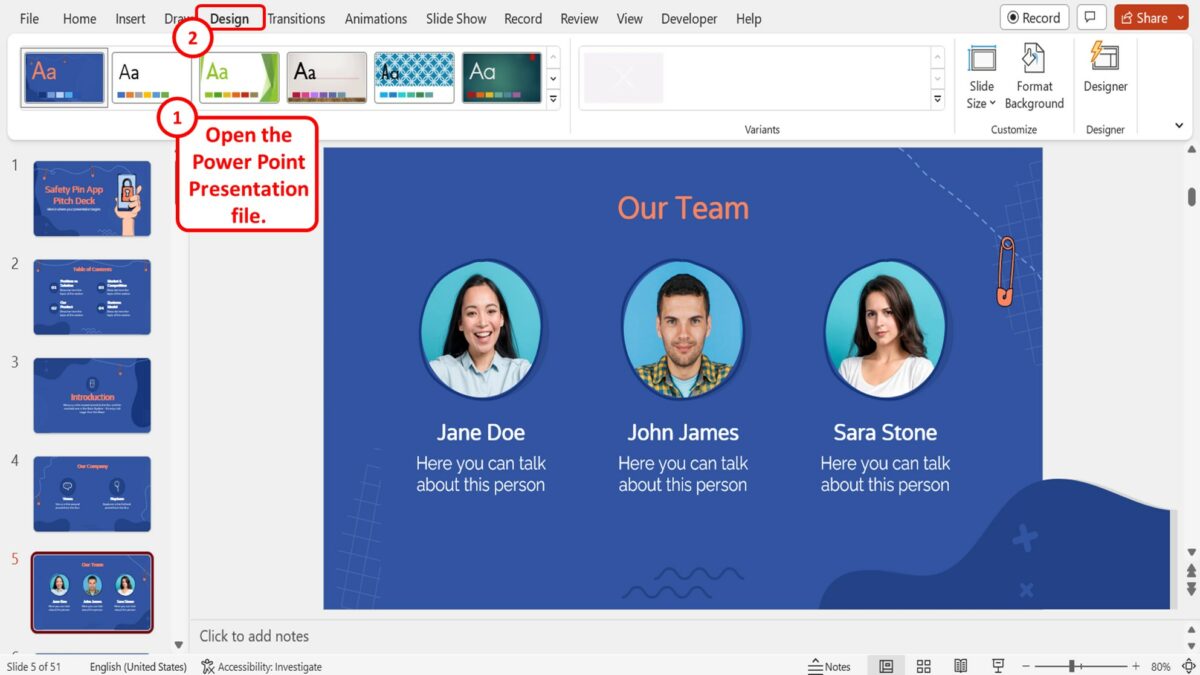
The first step is to open the PowerPoint presentation file where you want to customize the size of the presentation slides. Then click on the “Design” tab in the menu ribbon located at the top of the screen to open the “Design” menu.
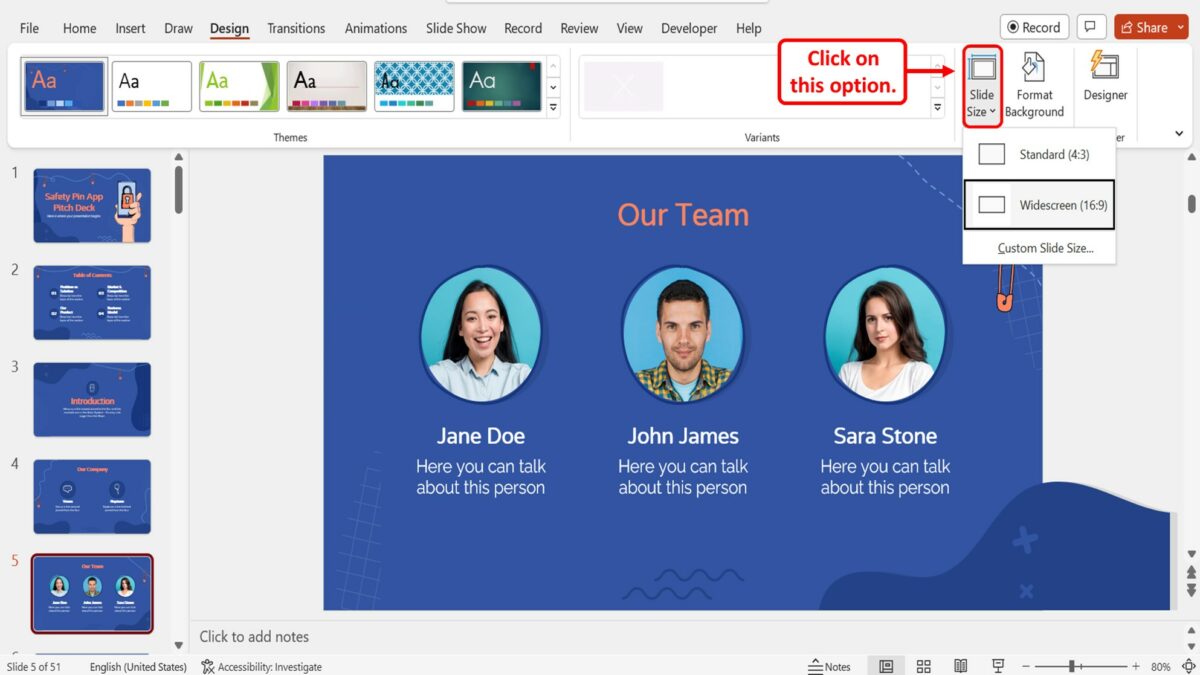
The next step is to click on the “Slide Size” option in the “Customize” group of the “Design” menu. In the dropdown menu, the default slide size is the “Widescreen (16:9)” option.
Step-3: Click on the “Custom Slide Size” option
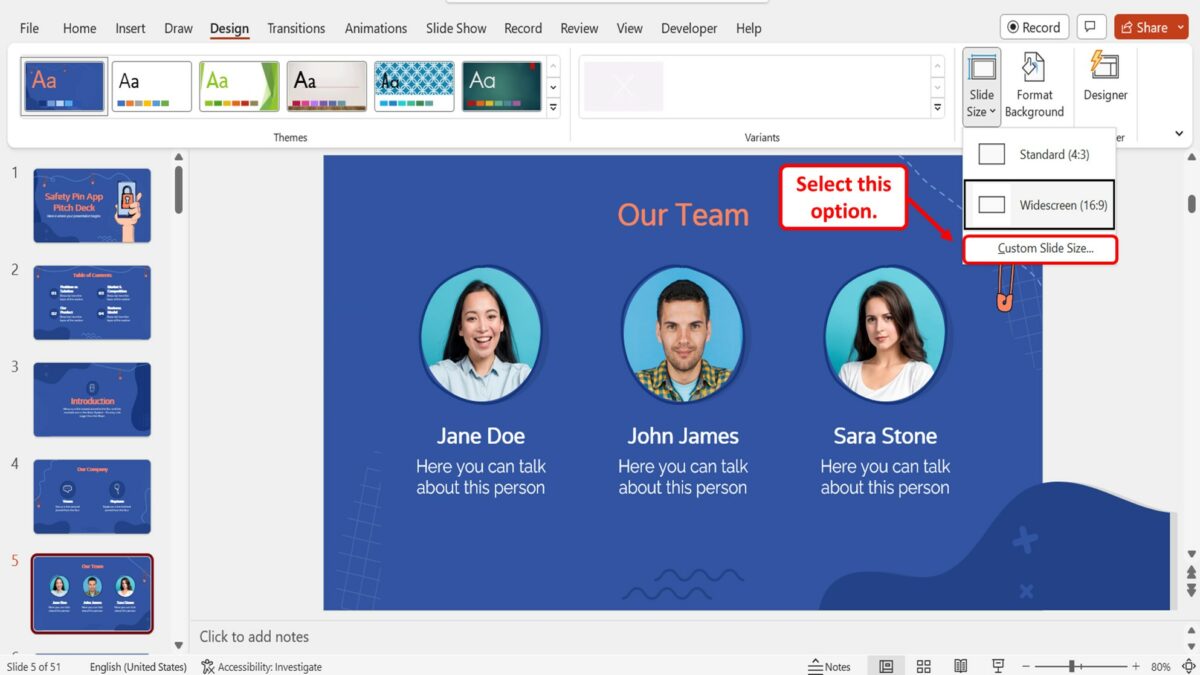
Now all you have to do is click on the “Custom Slide Size” option at the bottom of the dropdown menu under the “Slide Size” option in the “Design” menu. This will open a dialog box.
Step-4: Click on the “Slide sized for” option
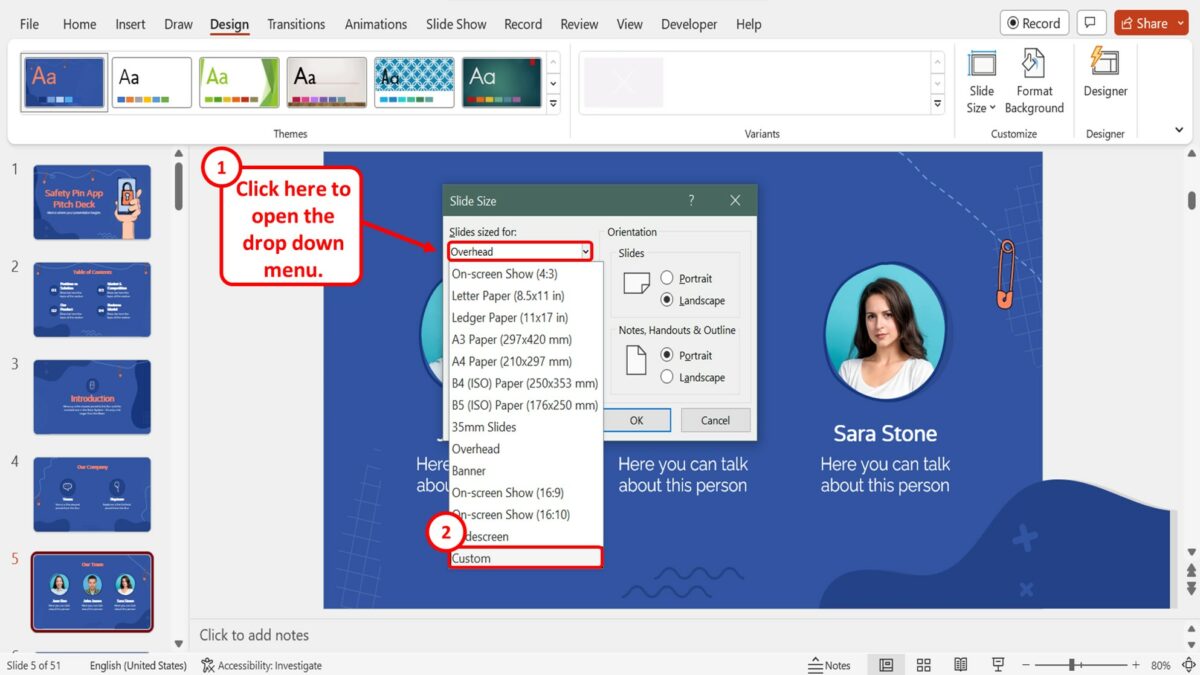
In the “Slide Size” dialog box, click on the “Slides sized for” option. Then click on the “Custom” option at the bottom of the dropdown menu under the “Slides sized for” box.
Step-5: Click on the “Width” box

In the “Slide Size” dialog box, the next step is to click on the “Width” box. Now you can type in your preferred width of the slides in inches. You can also use the up and down arrows in the “Width” box to increase or decrease the width of the slide respectively.
Step-6: Click on the “Height” box
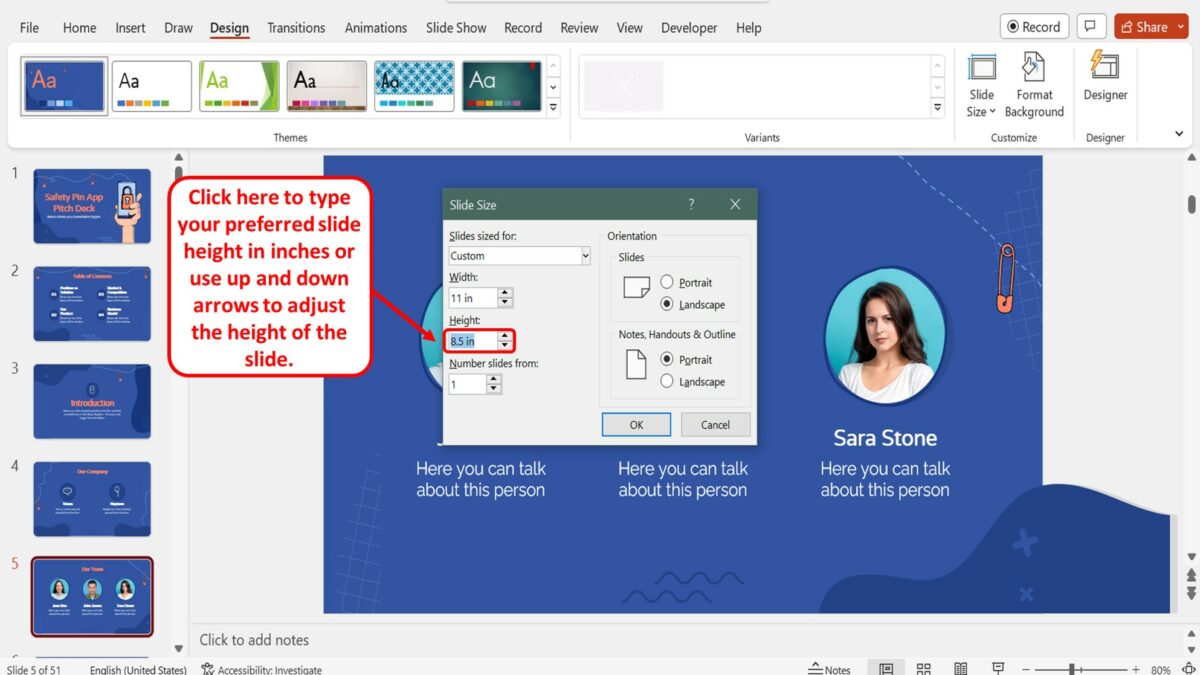
The next step is to customize the height of the slides. To do so, click on the “Height” box in the “Slide Size” dialog box and type in your preferred slide height in inches. You can also click on the up or down arrows in the “Height” box to adjust the height of the slides to your preference.
Step-7: Click on the “OK” button
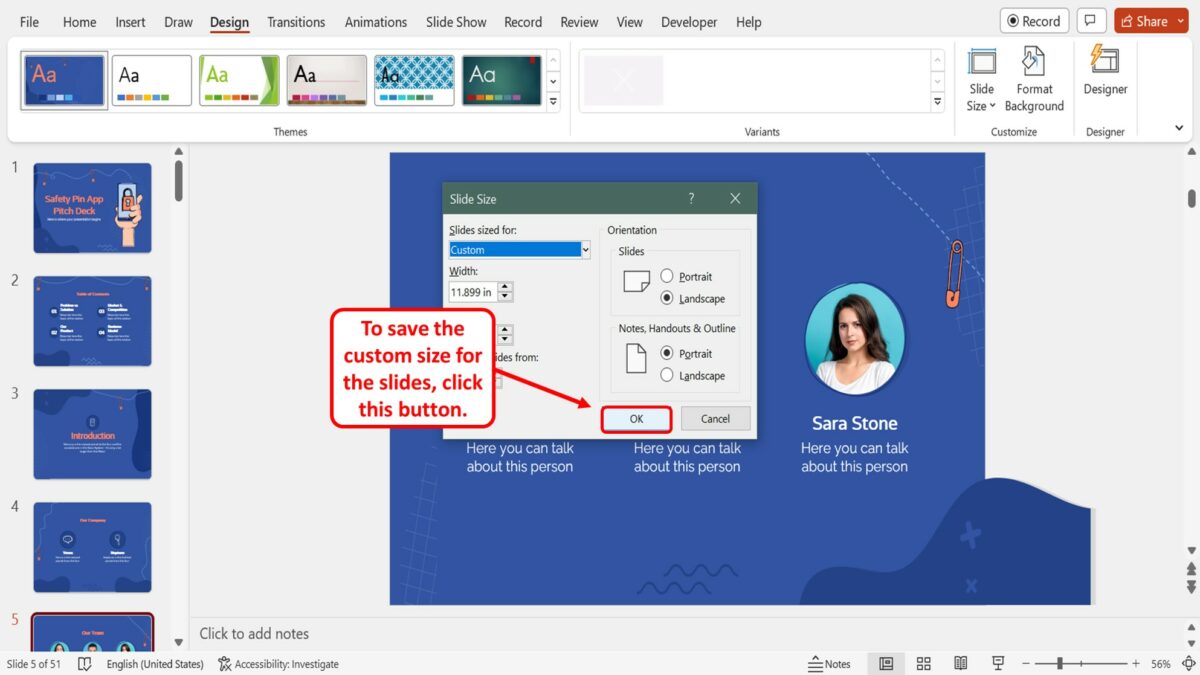
Finally, all you have to do is click on the “OK” button at the bottom of the “Slide Size” dialog box to save the custom size for the slides in the presentation file.

Contribute to the Microsoft 365 and Office forum! Click here to learn more 💡
April 9, 2024
Contribute to the Microsoft 365 and Office forum!
Click here to learn more 💡
PowerPoint Forum Top Contributors: Steve Rindsberg - John Korchok - Bob Jones AKA: CyberTaz ✅
May 10, 2024
PowerPoint Forum Top Contributors:
Steve Rindsberg - John Korchok - Bob Jones AKA: CyberTaz ✅
- Search the community and support articles
- Microsoft 365 and Office
- Search Community member
Ask a new question
How to create different slide sizes in the same presentation?
How, in PowerPoint 2013 can I have different slide sizes for multiple slides? I am working on a presentation where I am gathering slides from different people. They are using different slide sizes, some in the 16:9 size and most in the 4:3 size. How can I have a different slide size for each slide without changing all the slide sizes to be the same size in one presentation?
Thanks for any help you can provide.
Report abuse
Reported content has been submitted
You may refer to the following thread which discusses about the similar issue and check if it helps:
http://answers.microsoft.com/en-us/office/forum/officeversion_other-powerpoint/how-can-i-insert-an-a3-sheet-in-an-a4-powerpoint/96350f17-a144-4b69-915e-a007d0492a3f
I hope the above information helps. Let us know if you need further assistance.
2 people found this reply helpful
Was this reply helpful? Yes No
Sorry this didn't help.
Great! Thanks for your feedback.
How satisfied are you with this reply?
Thanks for your feedback, it helps us improve the site.
Thanks for your feedback.
Replies (3)
Question info.
- Norsk Bokmål
- Ελληνικά
- Русский
- עברית
- العربية
- ไทย
- 한국어
- 中文(简体)
- 中文(繁體)
- 日本語
- What is a slide master? Article
- Add, rearrange, duplicate, and delete slides in PowerPoint Article
- Apply a slide layout Article
- Add color and design to your slides with Themes Article
- Start with a template Article
- Get design ideas for slides Article
- Customize a slide master Article
- Change the page orientation in PowerPoint between landscape and portrait Article
- Organize your PowerPoint slides into sections Article
- Add a DRAFT watermark to the background of slides Article
- Create, merge, and group objects on a slide Article
- Guides for arranging things on a slide in PowerPoint Article
- Change the order in which stacked objects, placeholders, or shapes appear on a slide Article
- Rotate or flip an object Article
Change the page orientation in PowerPoint between landscape and portrait

Select the Design tab:

Near the right end, select Slide Size , and then click Custom Slide Size .

In the Slide Size dialog box, select Portrait , then select OK .

In the next dialog box, you can select Maximize to take full advantage of the space available, or you can select Ensure Fit to make sure that your content fits on the vertical page.
On the Design tab, click Slide Size .

Click Page Setup .

In the Page Setup dialog box, under Orientation , click the orientation that you want:

There are separate orientation settings for Slides (projected on-screen) and for Printed notes, handouts, and outlines .
Click the Design tab of the toolbar ribbon, and then, near the right end, click Slide Size .
On the Slide Size menu that appears, select Custom Slide Size .

The Slide Size dialog box opens.
In the Slide Size dialog box, select Portrait , and then select OK .

When PowerPoint for the web is unable to automatically scale your content, it prompts you with two options:
Maximize : Select this option to increase the size of your slide content when you are scaling to a larger slide size. Choosing this option could result in your content not fitting on the slide.
Ensure Fit : Select this option to decrease the size of your content when scaling to a smaller slide size. This could make your content appear smaller, but you’ll be able to see all content on your slide.

Use portrait and landscape orientation in the same presentation
Change the size of your slides
Rotate a text box, shape, WordArt, or picture

Need more help?
Want more options.
Explore subscription benefits, browse training courses, learn how to secure your device, and more.

Microsoft 365 subscription benefits

Microsoft 365 training

Microsoft security

Accessibility center
Communities help you ask and answer questions, give feedback, and hear from experts with rich knowledge.

Ask the Microsoft Community

Microsoft Tech Community

Windows Insiders
Microsoft 365 Insiders
Was this information helpful?
Thank you for your feedback.
IMAGES
VIDEO
COMMENTS
To change the slide size: Select the Design tab of the toolbar ribbon. Select Slide Size near the far right end of the toolbar. Select Standard (4:3 aspect ratio) or Widescreen (16:9) or Custom Slide Size. For more about the predefined sizes (including formats like Overhead, A3, A4, Banner, B4, and B5) or your own custom sizing, click a heading ...
In the "Customize" section of the "Design" tab, select the "Slide Size" button. This will display the two common slide sizes in a drop-down menu. Click either the "Standard (4:3)" or "Widescreen (16:9)" option to switch all of your PowerPoint slides to that size. Unfortunately, it isn't possible to use multiple slide sizes in a PowerPoint ...
Click on the Design tab on PowerPoint's ribbon. The available options will change on the ribbon. Find the Customize section on the ribbon and click on the Slide Size icon. A drop-down menu opens with several options. Click on Custom Slide Size to open the Slide size menu and change your presentation's dimensions.
If you can't see the button, press Customize to reveal it, and then click or tap on Slide Size. This opens a dropdown menu with three available options: Standard (4:3) - click or tap on this option to get slides of 10 x 7.5 inches or 25.4 x 19.05 cm. Widescreen (16:9) - press to get slides of 13.33 x 7.5 inches or 33.867 x 19.05 cm.
That said, you can easily change your slide size to something else. To change your slide size in PowerPoint, simply: Navigate to the Design tab. Open the Slide Size drop down menu. Select 4:3 , 16:9 or Custom Slide Size (see options below) When starting with a blank presentation, you are now good to go.
To change the slide size in PowerPoint, click on the "Design" tab. Then, click on "Slide Size". From the dropdown, choose "Standard" or "Widescreen". You can also click on "Custom Slide Size" to change the size of the slides in PowerPoint to A3, A4 or a completely custom size. In this article, I will walk you through the ...
Learn how to change the slide size or aspect ratio of a PowerPoint presentation in all versions, from widescreen (16:9) to custom (A4 paper size). Find out the best time to set slide size, how to avoid common issues, and the difference between slide size and measurement system.
Step 3: Choose a Preset or Custom Size. Select a preset size or click on 'Custom Slide Size' for more options. If you choose 'Custom Slide Size', a dialog box will appear where you can enter the width and height for your slides. After you've changed the page size, you'll notice that your slides have a new look.
How to change slide size in PowerPoint for Mac. 1. Create a new presentation, or launch an existing file. 2. Click "Design" from the top-line row of options. There are a few minor differences ...
Go to the Design tab. Click Slide Size in the Customize section of the ribbon. Choose Custom Slide Size on Windows or PowerPoint on the web or Page Setup on Mac. Use the Slides sized for a drop ...
Need to change slide sizes in PPT? In this beginner PowerPoint tutorial, we cover the Page Setup and how to change slide size and orientation in PowerPoint.M...
To change the size of your presentation slides, on the Design tab, in the Customize group, click the Slide Size button and then: Choose one of the pre-defined sizes: Standard (4:3) was the default slide size in older versions of Microsoft PowerPoint, like 2003 or 2007. Standard (4:3) slides have a size of 10 x 7.5 inches or 25.4 x 19.05 cm.
Change the Slide Size. Expand the Customize group. Click the Slide Size button. To change the slide orientation, click the Slide Size button and select Custom Slide Size. Change the slide settings and click OK. Select Widescreen or Standard . Widescreen: 16:9 ratio is much wider than it is tall and works well for wide, high definition screens.
PowerPoint Slide Sizes: How To Change & Manage Them Better
To change the size of slides in PowerPoint, click the "Design" tab in the Ribbon. Then click the "Slide Size" drop-down button in the "Customize" button group. To change the slide size aspect ratio, select either "Standard (4:3)" or "Widescreen (16:9)" from the button's drop-down menu.
Open the PowerPoint presentation, and among the various tabs ( Insert, Transitions, Animations, Slide Show, etc.) select the Design tab. Here you will see the themes, their variants, and Format Background. You should click Slide Size. In PowerPoint 2016, this button is located in the last field that is called Customize.
In the "Slide Size" dialog box, you can now see the size of the slide in inches in the "Width" and "Height" boxes. Then click on the "OK" button at the bottom of the dialog box to close it.. 4. How to Change the Size of a PowerPoint Slide? In Microsoft PowerPoint, you can change the side of the slides using the "Design" menu. However, you can only change the size of all the ...
This is a short video explaining how to make page size adjustments in PowerPoint, You can change the size of a page to A4, A3, Letter, or bigger if you are d...
They are using different slide sizes, some in the 16:9 size and most in the 4:3 size. How can I have a different slide size for each slide without changing all the slide sizes to be the same size in one presentation? Thanks for any help you can provide. ~IanWin8. I hope the above information helps. Let us know if you need further assistance.
PowerPoint slides are automatically set up in landscape (horizontal) layout , but you can change the slide orientation to portrait (vertical) layout . Windows macOS Web. Select the Design tab: Near the right end, select Slide Size, and then click Custom Slide Size. In the Slide Size dialog box, select Portrait, then select OK. In the next ...