

Edit and re-apply a slide layout
If you apply a slide layout to one or more slides in your presentation, and then go back and edit that layout by adding a placeholder, custom prompt text, or completing some other layout-altering action, you must reapply the layout to the slides so that the slides adhere to the updated layout.
Change an existing layout
On the View tab, click Slide Master .
In the thumbnail pane that contains the slide masters and layouts, pick the layout that has closest arrangement of placeholders to how you want your slide to look.
Note: The slide master is always the top thumbnail, and the other slide layouts are beneath it.

Tip: If you don't like any of the layouts, pick the Blank Layout and start over by adding placeholders to contain text, pictures, videos, etc.
To change an existing layout, do one or more of the following:
To add a placeholder, on the Slide Master tab, click Insert Placeholder , and then select a placeholder type from the list. Click a location on the layout, and then drag to draw the placeholder.
Add, edit, or remove a placeholder on a slide layout .
To rename the layout, in the thumbnail list of layouts, right-click the layout that you customized, and then click Rename Layout .
In the Rename Layout dialog box, type a new name that describes the layout you’ve just created, and then click Rename .
On the Slide Master tab, click Close Master View .
Apply the updates so that they appear on your slides
In Normal View, in the thumbnail pane, click the slide that you want to reapply the updated layout to.

Note: To select multiple slides, press and hold the Ctrl key, and then click each slide.
On the Home tab, in the Slides group, click Layout , and then select the layout that you updated in Slide Master View.

What is a slide layout?
What is a slide master?
Add placeholders to contain text, pictures, videos, etc.

Need more help?
Want more options.
Explore subscription benefits, browse training courses, learn how to secure your device, and more.

Microsoft 365 subscription benefits

Microsoft 365 training

Microsoft security

Accessibility center
Communities help you ask and answer questions, give feedback, and hear from experts with rich knowledge.

Ask the Microsoft Community

Microsoft Tech Community

Windows Insiders
Microsoft 365 Insiders
Was this information helpful?
Thank you for your feedback.
How can I apply the master to all slides in PowerPoint?
May 13, 2024 /
To apply the master to all slides in PowerPoint, follow these steps: 1. Open your PowerPoint presentation. 2. Go to the “View” tab in the top menu. 3. Click on “Slide Master” in the “Master Views” group. 4. The Slide Master view will open, displaying the master slide at the top. 5. Make any desired changes to the master slide, such as adding a logo or adjusting the font style. 6. Once you are done editing the master slide, go back to the “View” tab and click on “Normal” to return to the normal slide view. 7. The changes made to the master slide will now be applied to all slides in your presentation.
- How can I utilize artificial intelligence to create PowerPoint presentations efficiently?
- How can I use artificial intelligence to create PowerPoint presentations?
- Why do the lines in my PowerPoint presentation appear one at a time?
- How can I make objects in PowerPoint appear and disappear during my presentation?
- What are the alignment tools available in PowerPoint and how can they be used to enhance the design and layout of presentations?
Popular Posts

Common Challenges in Tailoring Presentations—and Solutions

Dos and Don’ts of Pre-Seed Pitch Deck Creation

How to Write a Teaser Pitch Deck that Captivates

Tips for a Persuasive How It Works Slide

What Not to Do When Presenting Funding History

Why Raising Funds Without a Pitch Deck Can Backfire
Slide Master in PowerPoint – A Complete Beginner’s Guide!
By: Author Shrot Katewa

When I first started using PowerPoint, I had no idea about the “Slide Master”. In fact, when I first learned about it, I was quite confused. I didn’t quite understand its purpose and how it worked. Furthermore, some of the changes I made to the slide master were scary at first simply because I didn’t understand how it worked!
Slide Master in PowerPoint allows you to have master control over all slides. It allows you to make changes to all slides at once. You can also use the slide master to create footers, add watermarks and slide numbers, generate custom presentation templates, edit placeholders, among other things.
Retrospectively thinking, having a “Slide Master” in PowerPoint is such an important feature! Knowing how to use the slide master properly can help you save a lot of time while creating a presentation!
So, in this article, I’ll share with you all the details you need to know about a Slide Master in PowerPoint. Without further adieu, let’s get started!
1. What is the Slide Master In PowerPoint and Why is it Used?
Slide Master is a Microsoft PowerPoint feature that allows you to easily edit all the slides at once or the individual slide layouts of a presentation.
1a. What is a Slide Master?
The slide master in Microsoft PowerPoint contains all the information on the slide layout as well as the theme of a presentation. This includes the fonts, color, effects, background, and the size and position of the placeholders.
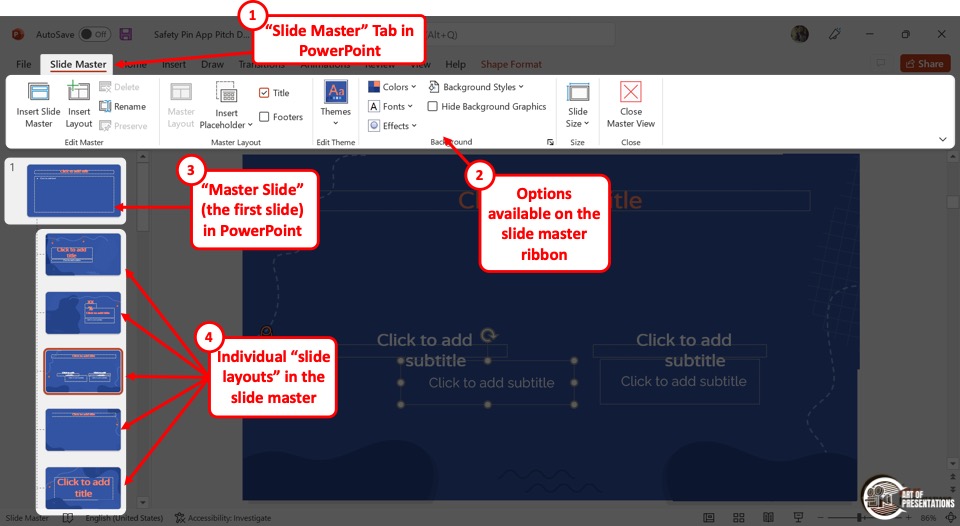
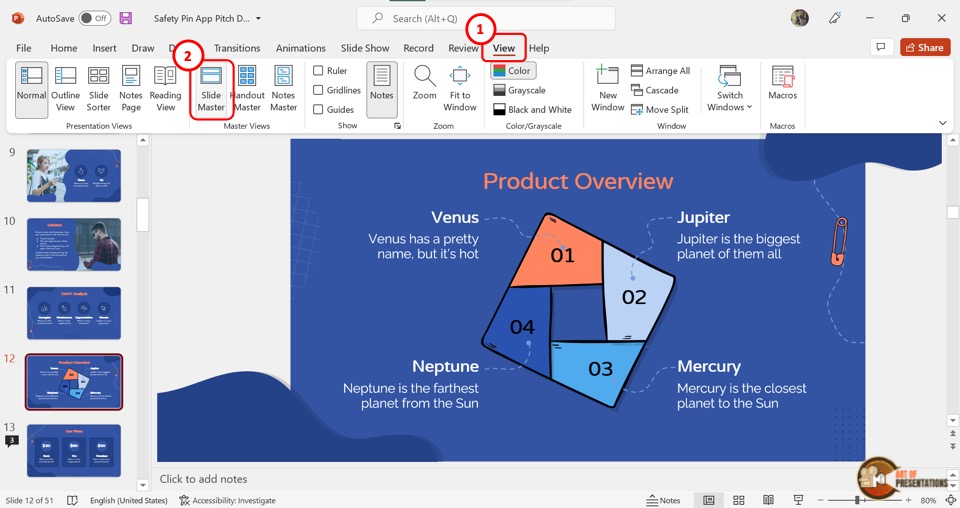
To access the slide master, first, click on the “View” tab in PowerPoint . Then, click on the “Slide Master” option. This will open the slide master view in PowerPoint.
The master slide is the top slide in a hierarchy of slides in a presentation (as shown in the image above). Changes that you make to the master slide impact all the slides in the slide master.
It is important to note that the actual design and content of the presentation must be added to the slides in the “Normal View”. Any images or content you add to the slide master will become uneditable in the normal view of the PowerPoint presentation.
The best way to use the slide master is by using “Placeholders”. I’ve written a detailed article on “Placeholders” in PowerPoint . Make sure to check out that article to learn more about them!
1b. Uses of Slide Master View in PowerPoint –
Since the slide master stores information about the theme and the layout of the slides in a PowerPoint presentation, you can use the “Slide Master” view to edit several elements in the presentation.
a. Change Slide Background
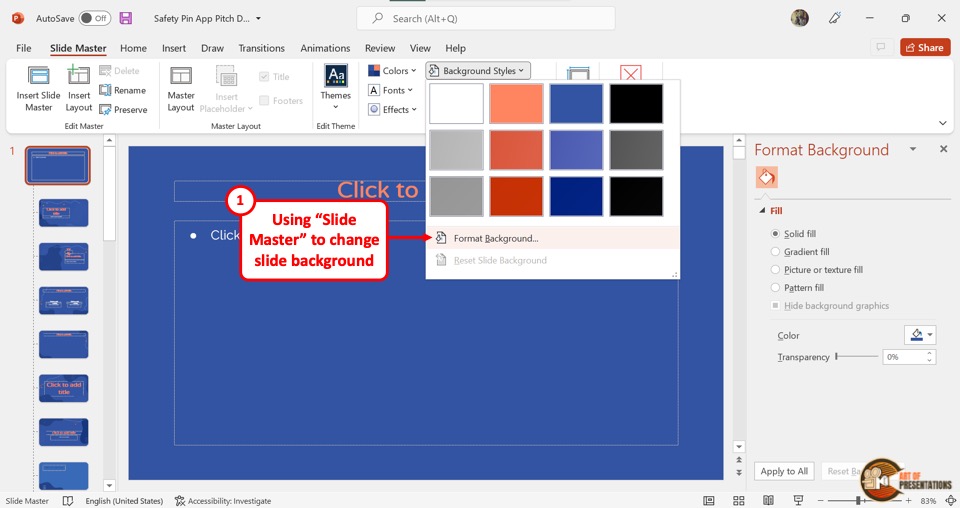
Using the “Slide Master” view, you can change the background of all the slides at once. The background editing features are available in the “Background” section of the “Slide Master” menu.
You can click on the “Colors” option to change the colors for the slides, the “Fonts” option to set a specific font for the presentation, and the “Effects” option for the background effects. Besides, you can click on the “Hide Background Graphics” option to remove all background graphics from the entire presentation.
Clicking on the “Format Background” option under the “Background Styles” button, you can access various customizable background colors and designs for the presentation.
b. Rearrange Placeholders in Slide Layout

In Microsoft PowerPoint “Slide Master” view, you can edit both the master slide and the slide layouts. By rearranging the placeholders in a slide layout, you will only create changes for the slides using that specific layout instead of the entire presentation.
To rearrange the placeholders, all you have to do is click on a placeholder and drag it to your preferred position on the slide.
c. Customize Overall Text Formatting
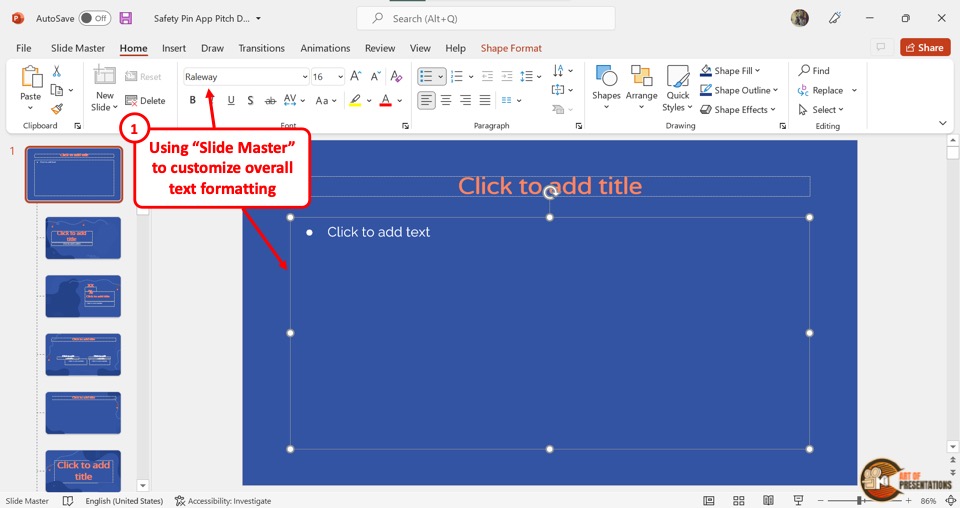
In the “Slide Master” view, you can easily change or customize the overall text formatting. You have to first click on the content placeholder in the master slide which is the top slide in the slide layout panel on the left side of the screen.
Then click on the “Home” tab from the menu ribbon. In the “Font” section of the “Home” menu, you can customize the fonts like the style, size, color, highlights, etc. This will customize the text of all the slides.
d. Customize Theme Fonts
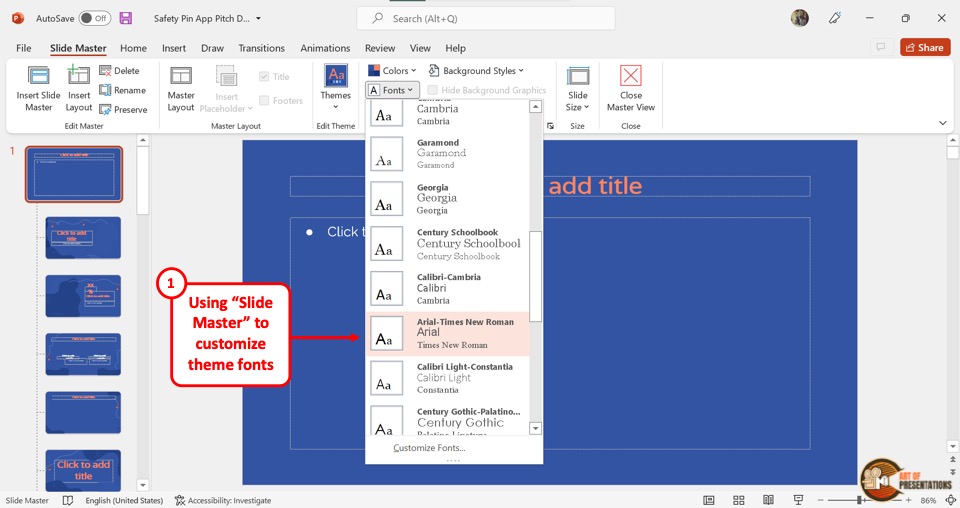
By customizing the theme fonts in the “Slide Master” , you can choose a set of fonts for various list levels of text in all the slides. To do so, click on the “Fonts” option in the “Background” section under the “Slide Master” tab. Then click on your preferred set of fonts from the dropdown menu.
e. Customize Theme Colors
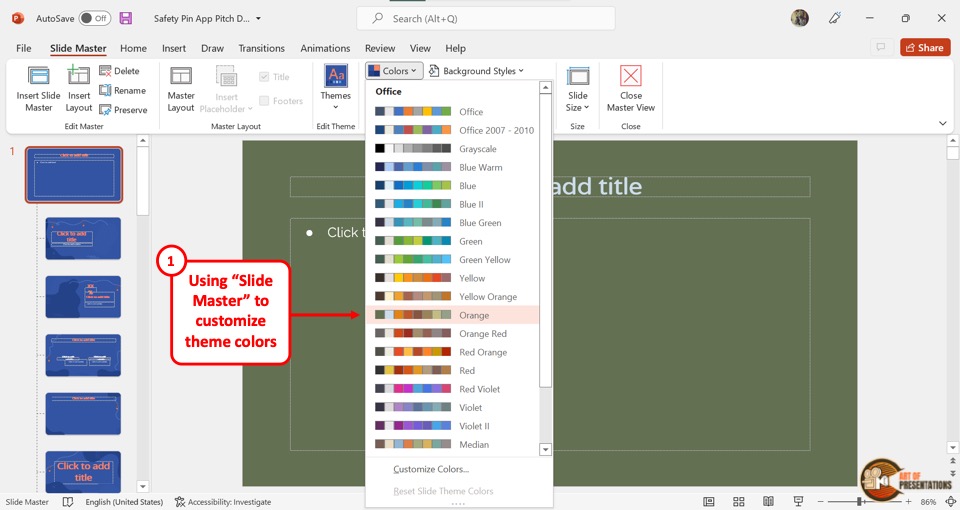
The theme color in a “Slide Master” contains a set of colors for various elements of the slides in a presentation like the background, heading, body text, etc. By customizing the theme color in “Slide Master” , you can customize the colors for the entire presentation.
All you have to do is click on the “Colors” option in the “Background” section of the “Slide Master” menu and select your preferred theme colors from the dropdown menu.
f. Create Unique Slide Layouts and Templates
Using the features in the “Slide Master” menu, you can edit any element and object in the presentation. You can change the color, font, arrangement, theme, etc. of the entire presentation.
You can also create and edit individual slide layouts. You can easily use the “Slide Master” view to create fully unique slide layouts and templates.
2. Difference Between Slide Master and a PowerPoint Template?
In Microsoft PowerPoint, a Slide Master contains information about the layout and the theme of the presentation.
A PowerPoint template, on the other hand, is a design or pattern of a slide or even a whole presentation. In short, a template is a copy of a presentation blueprint that can be edited to fit your needs, while the master slide stores the layout and theme of that template.
3. How to Access the Slide Master in PowerPoint?
In Microsoft PowerPoint, you can access the slide master in the “View” menu. You have to first click on the “View” tab in the menu ribbon located at the top of the screen. Then click on the “Slide Master” option in the “Master Views” section of the “View” menu. This will open the “Slide Master” view where you can edit the master slide and the slide layouts.
4. How to Edit a Slide Master in PowerPoint?
Microsoft PowerPoint allows you to edit the slide master using the “Slide Master” view. You can edit the master slide itself, and also the slide layouts separately. You can even add or remove master slides and slide layouts.
4a. Using the Master Slide to Apply Changes to All Slide Layouts in PowerPoint
Since the master slide contains all the information on the theme and layouts of the entire presentation, any change in the master slide will be automatically applied to all the slide layouts under the master slide.
To apply changes in the master slide, all you have to do is click on the master slide from the slide layout panel and use the features available in all the tabs in the menu ribbon.
4b. How to Change Slide Background in the Slide Master?

In the “Slide Master” view, click on “Background Styles” and select the “Format Background” option from the dropdown menu. This will open a sidebar on the right side of the screen.
In the “Format Background” sidebar, you can change the color, gradient, or pattern of the background. You can also add an image as the background.
4c. How to Customize Fonts and Text Formatting in the Slide Master in PowerPoint?
To customize fonts and text formatting in the “Slide Master” view, you have to follow the 2 simple steps.
Step-1: Click on the “Customize Fonts” option
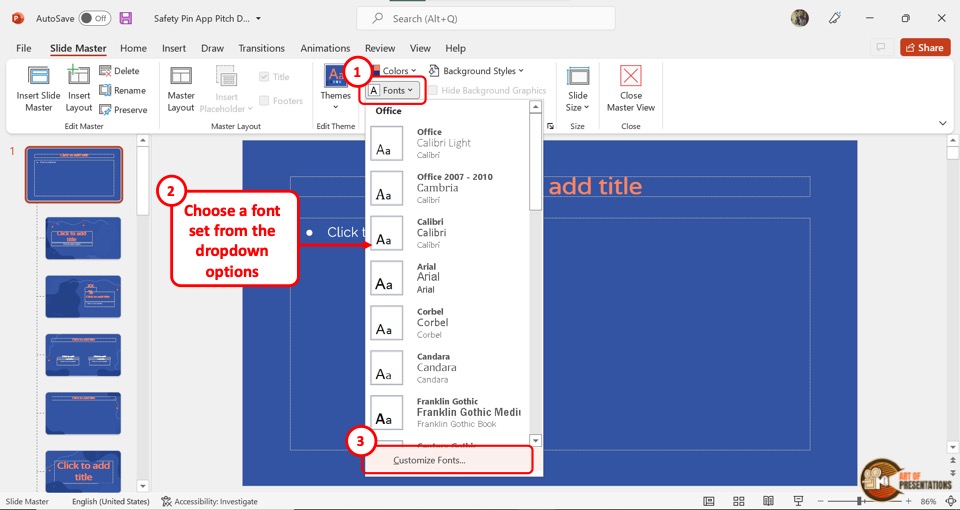
You have to first click on the master slide from the slide layout panel. Then click on the “Fonts” option from the “Background” section of the “Slide Master” menu. From the dropdown menu, click on the “Customize Fonts” option at the bottom.
Step-2: Click on the “Save” button

In the “Create New Theme Fonts” dialog box, click on the “Heading font” box to customize the heading and on the “Body font” box for the body text. Then click on the “Save” button at the bottom of the dialog box.
4d. How to Customize Theme Colors in Slide Master?
In the “Slide Master” view of Microsoft PowerPoint, you can customize the theme color by following the 2 easy steps.
Step-1: Click on “Customize Colors”
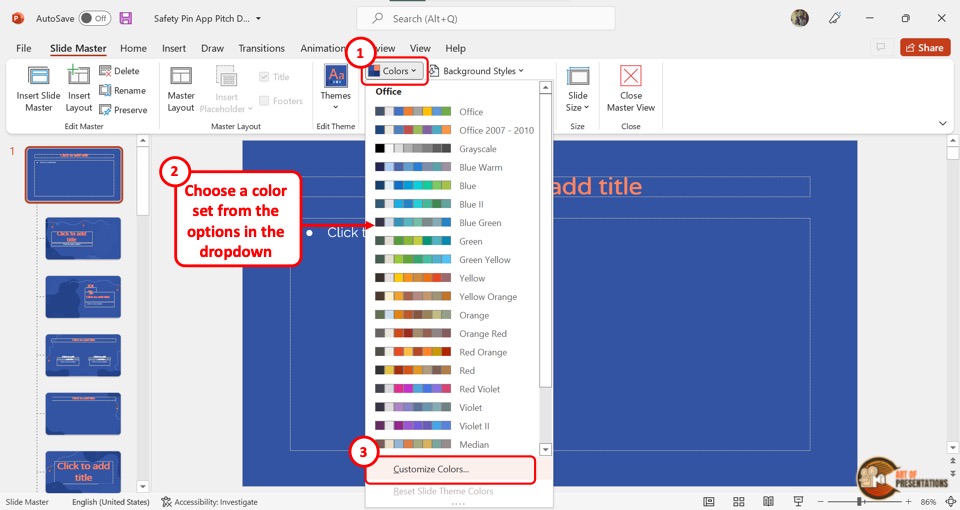
In the “Background” section of the “Slide Master” view, click on the “Colors” option. Then click on the “Customize Colors” option at the bottom of the dropdown menu.
Step-2: Click on “Save”
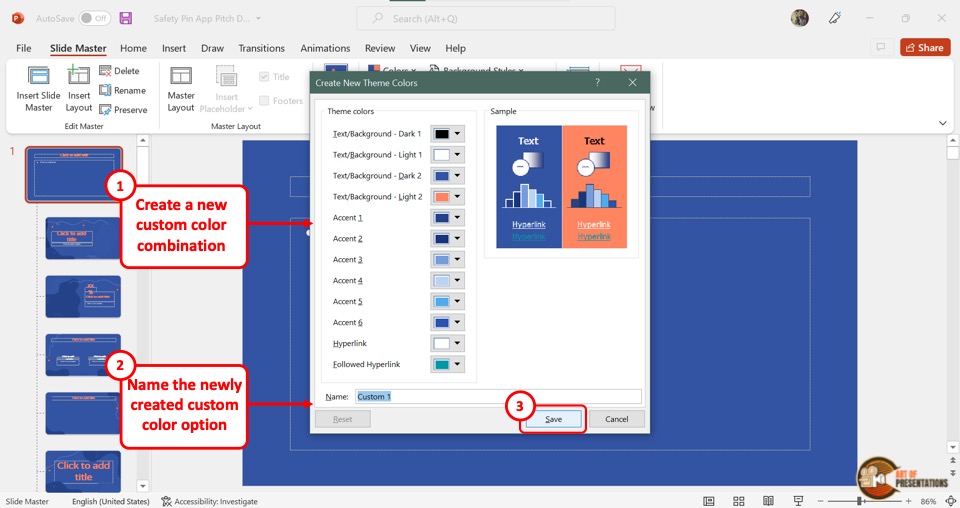
In the “Create New Theme Colors” dialog box, click on the box next to each option to select your preferred colors. Then all you have to do is click on the “Save” button at the bottom of the dialog box.
4e. How to Apply Effects in PowerPoint Slide Master?
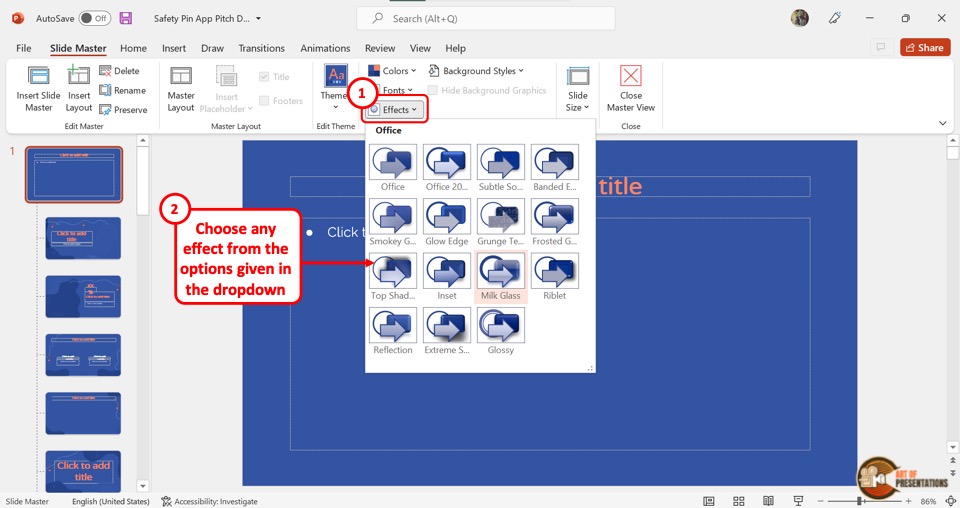
To apply effects in the “Slide Master” view of PowerPoint, click on the “Effects” option in the “Background” section. This will open a dropdown menu containing fifteen effect options to choose from. All you have to do is click on your preferred effect from the dropdown menu.
4f. How to Edit Footer in PowerPoint?
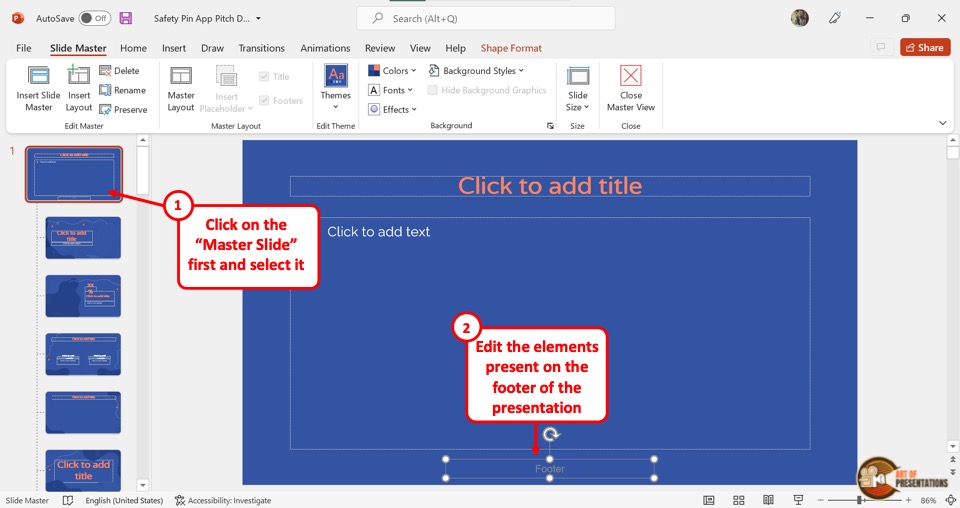
The footer in a PowerPoint presentation is a text that appears at the bottom of all slides. To edit the footer in the “Slide Master” view, all you have to do is click on the “Footer” box at the bottom of the master slide. Then type in the text you want in the footer.
Check out my other article on “How to Add a Footer in PowerPoint?” to learn more about editing, adding, and removing footers in PowerPoint.
4g. How to Add Logo to All Slides Using Slide Master in PowerPoint
Adding a logo to your Microsoft PowerPoint presentation can be a smart way of branding. It is quite easy if you know the correct steps.
In fact, I’ve written a detailed article on how to add a logo in PowerPoint . Do make sure to check out that article as well to get all the advanced tips and tricks and to know the correct way to do it!
Meanwhile, here are the key steps to add a logo to all slides using the “Slide Master” in PowerPoint –
Step-1: Click on the “Insert” tab
The first step is to click on the master slide from the slide layout panel on the left side of the screen in the “Slide Master” view. Then click on the “Insert” tab from the menu ribbon.
Step-2: Click on the “Pictures” button
The next step is to click on the “Pictures” button in the “Images” section of the “Insert” menu. Then click on the “This Device” option from the dropdown menu. This will open a dialog box.
Step-3: Click on the “Insert” option
In the “Insert Picture” dialog box, click on the logo you want to add to the presentation. Then click on the “Insert” button at the bottom of the dialog box to add the logo to the master slide. This will automatically add the logo to all the slides of the presentation.
4h. Use Slide Master to Add a Watermark in PowerPoint
A watermark is an identifying text or image that usually appears across a document and is semi-transparent. You can learn about how to add or remove watermarks in PowerPoint in my other article.
Meanwhile, I’ll share the key steps in a brief manner below –
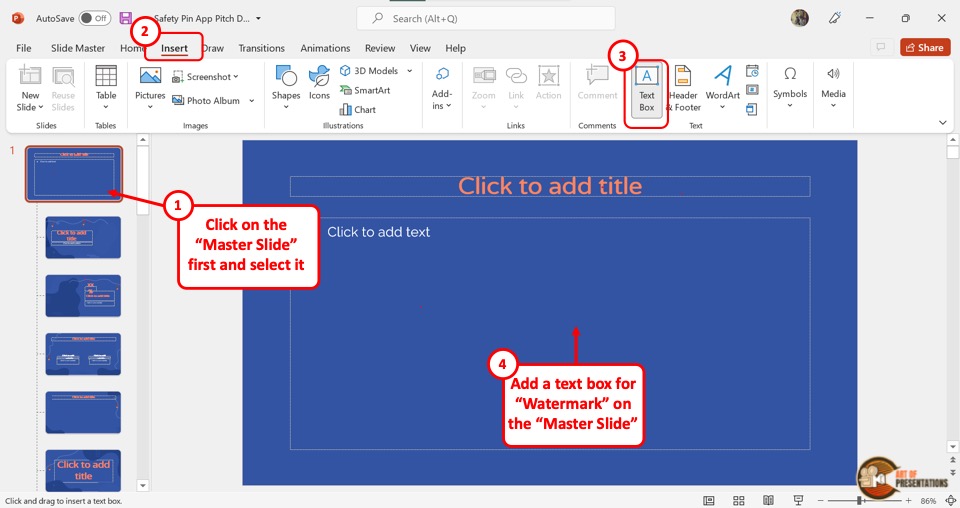
In the “Slide Master” view, click on the master slide which is the top slide in the slide layout panel. Then click on the “Insert” tab from the menu ribbon located at the top of the screen.
Step-2: Click on the “Text Box” option
In the “Insert” menu, click on the “Text Box” option from the “Text” section. Then draw the text box on the master slide. You can now type in the text you want as a watermark on all the slides.
Step-3: Click on the “Format Text Effects” option
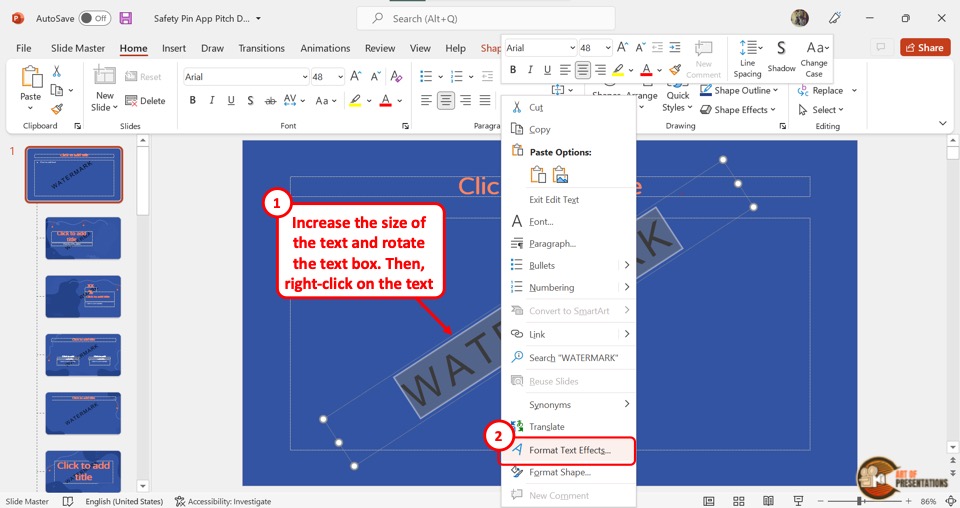
The next step is to select the text in the watermark text box. Then “Right Click” on the selected text and click on the “Format Text Effects” option. This will open the “Format Shape” sidebar on the right side of the screen.
Step-4: Increase the text transparency
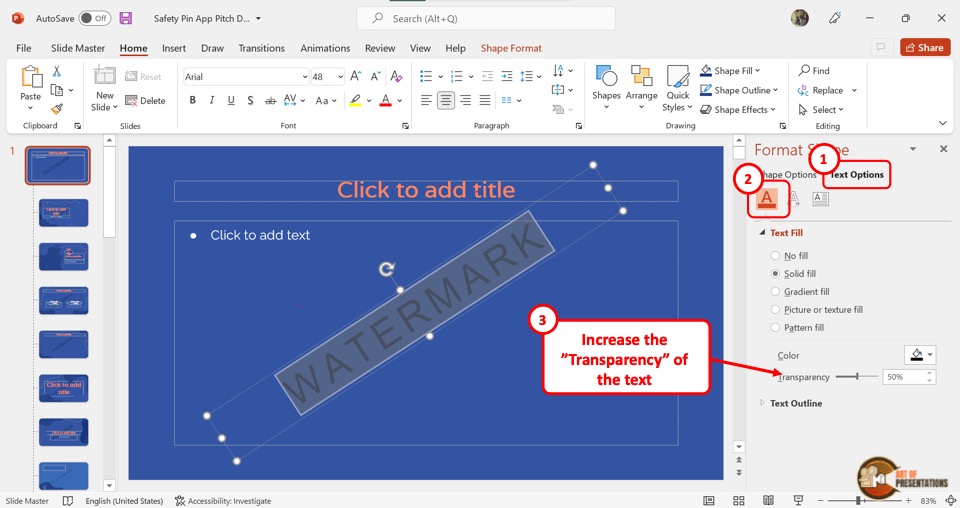
In the “Format Shape” sidebar, click on the “Text Fill and Outline” option which is the first icon. In the “Text Fill” section, click on the “Solid Fill” option. Then drag the slider next to the “Transparency” option to the right until the text reaches your preferred transparency.
5. Understanding Slide Layouts in PowerPoint Slide Master
Slide Layouts in Microsoft PowerPoint are slide designs that have pre-arranged placeholders that you can use to add your content quickly and easily. To understand the functions of slide layouts in PowerPoint and how to use them, you can read my article on slide layouts in PowerPoint .
5a. How to Know Which Slides Use What Slide Layouts
Using the “Normal” view in PowerPoint, you can see which slides are using what slide layouts. All you have to do is follow the 2 simple steps.
Step-1: Click on the “Normal View” option
In the menu ribbon located at the top of the screen, click on the “View” tab. In the “View” menu, click on the “Normal” option which is the first option in the “Presentation Views” section. This will return the screen to “Normal View” .
Step-2: Click on the “Layout” option
In the slide thumbnail panel at the left side of the screen, “Right Click” on a slide. Then click on the “Layout” option from the context menu. This will open a list of all the slide layouts available in the presentation. You will see the slide layout being used by the selected slide is highlighted in the list.
5b. How to Insert and Rename Slide Layouts
To insert or rename slide layouts, you have to first access the “Slide Master” menu from the “View” tab in the menu ribbon.
Inserting Slide Layouts
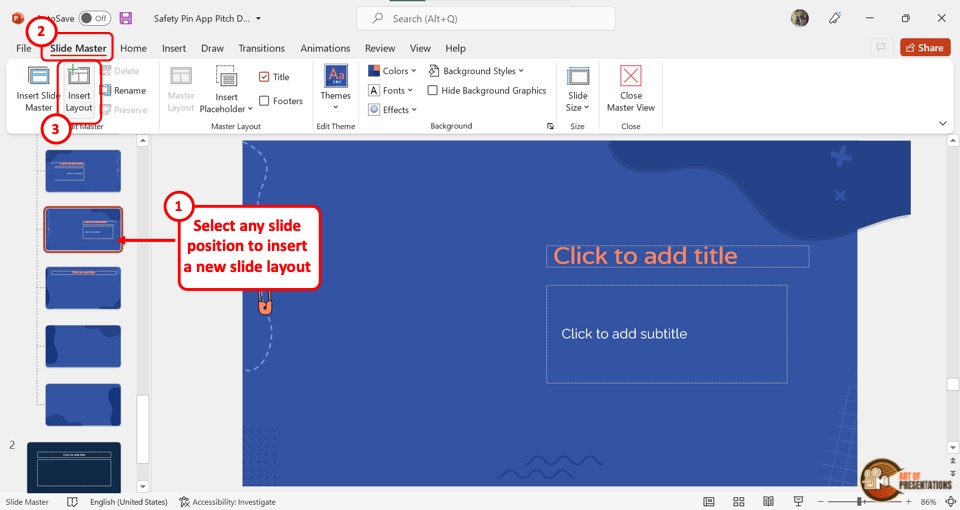
In the slide layout panel on the left side of the screen, you have to first click on the place where you want to insert a new slide layout. Then click on the “Insert Layout” button in the “Edit Master” section of the “Slide Master” menu.
Renaming Slide Layouts
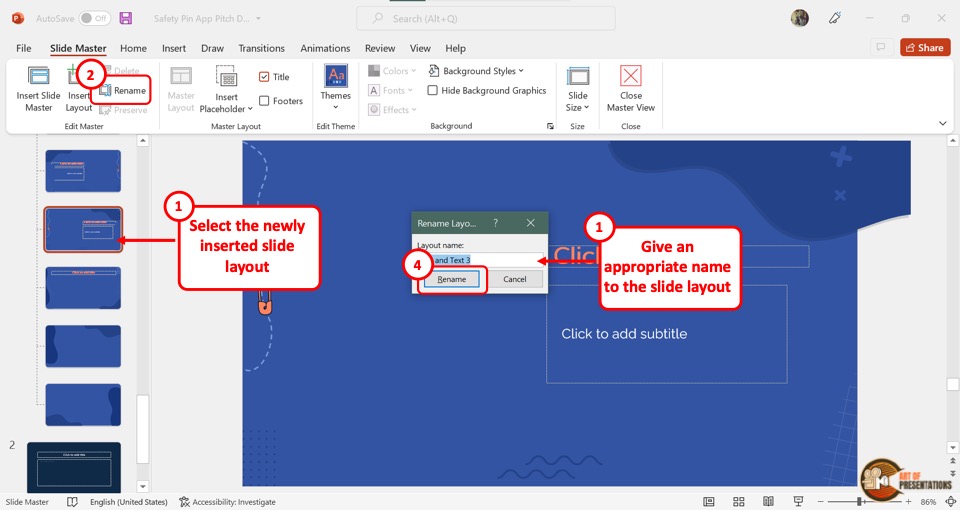
To rename a slide layout, you have to first click on the layout from the slide layout panel. Then click on the “Rename” option next to the “Insert Layout” button in the “Slide Master” menu. This will open the “Rename Layout” dialog box where you have to type in the new name for the slide layout.
Finally, you have to click on the “Rename” button in the dialog box to rename the slide layout.
6. Understanding Placeholders in Slide Master in PowerPoint
In Microsoft PowerPoint, a placeholder is a pre-formatted box on the slide where you can easily add content with a single click. You can learn more about placeholders in PowerPoint in my other article.
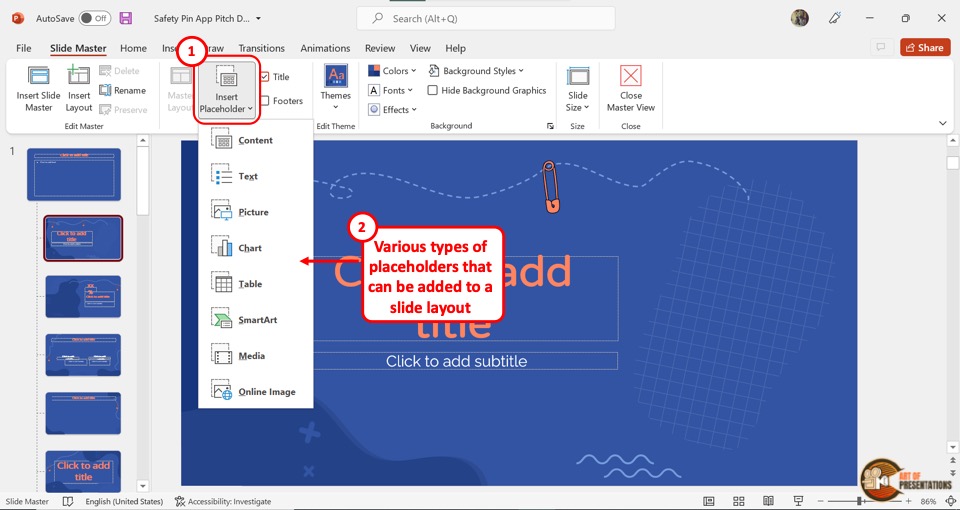
Using the “Slide Master” view, you can add, remove and edit the type and position of the placeholders in each slide layout. There are seven types of placeholders: “Text” , “Pictures” , “Chart” , “Table” , “SmartArt” , “Media” , and “Online Image” .
Besides, you can also use a “Content” placeholder which allows you to add any type of mentioned content.
7. How to Insert a Slide Master in PowerPoint?
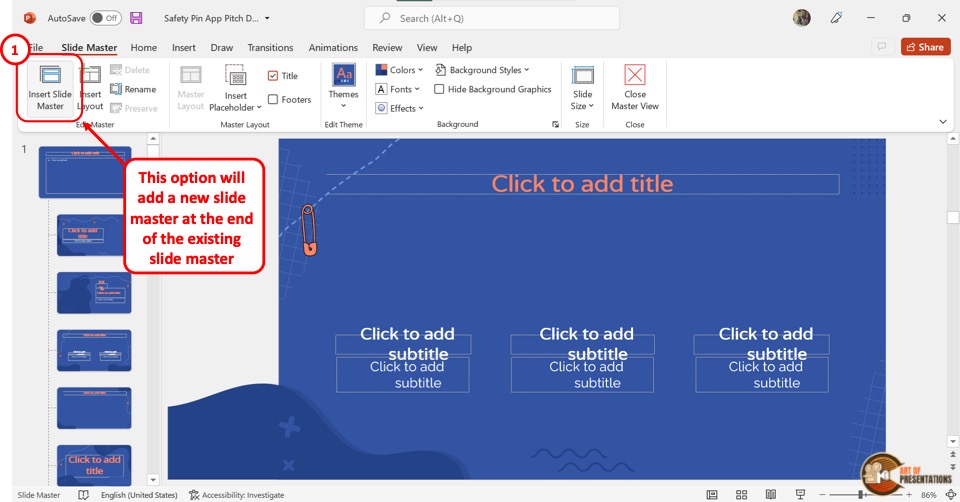
To insert a slide master in Microsoft PowerPoint, the first step is to open the “Slide Master” view from the “View” tab. In the “Slide Master” view, click on the “Insert Slide Master” button. It is the first button in the “Edit Master” section of the “Slide Master” menu.
Alternatively, you can press the “Ctrl+M” keys on your keyboard to insert a new slide master.
8. How to Delete a Slide Master in PowerPoint?
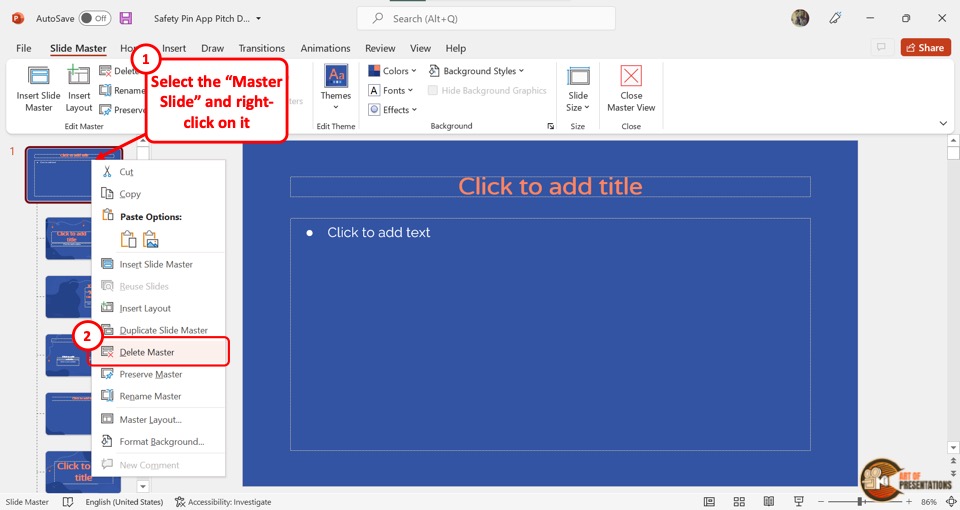
To delete an unused master slide in PowerPoint , you have to first “Right Click” on the master slide from the slide layout panel on the left side of the screen. Then click on the “Delete Master” option in the right-click menu. Alternatively, you can press the “delete” key on your keyboard.
9. How to Exit the Slide Master View in PowerPoint?
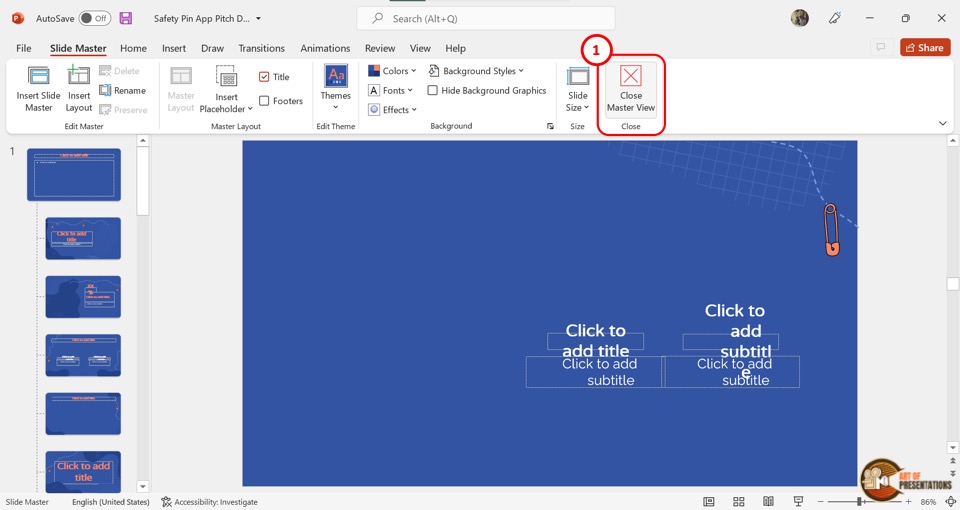
In Microsoft PowerPoint, you can exit the “Slide Master” view with one click. All you have to do is click on the “Close Master View” button. It is the last button under the “Slide Master” tab and is located in the “Close” section.
- Office Themes and PowerPoint Templates
Applying Slide Masters to Individual Slides in PowerPoint 2013 for Windows
Learn how to Apply Slide Masters to Individual Slides in PowerPoint 2013 for Windows.
Author: Geetesh Bajaj
Product/Version: PowerPoint 2013 for Windows
OS: Microsoft Windows 7 and higher
Date Created: June 22, 2015 Last Updated: June 22, 2015
Learn PowerPoint
Learn how to create Circle Illusion animation in PowerPoint.
Adding a new Slide Master to your presentation is easy -- and an even easier way is to possibly duplicate an existing Slide Master . You can then format it to change its look by applying a Background Style or by adding a custom background . You can also add new Slide Layouts , etc. But why would you do all these tasks in the first place? There needs to be a compelling reason to do so. This reason leads us to the next logical step -- that is to apply the new Slide Master you created to selected slides within your presentation.
Follow these steps to learn how to apply Slide Masters to individual slides in PowerPoint 2013 :
- Launch PowerPoint and open your presentation which has multiple Slide Masters. To find out whether your presentation has multiple masters, access the Home tab of the Ribbon , and click the Layout button -- this brings up the Layout drop-down gallery you see in Figure 1 , below. Notice that now there are two Slide Masters within the Layout drop-down gallery (names of both the Slide Masters are highlighted in red within Figure 1 , below).

- If you made no changes, all slides in your presentation will be based on one of the Slide Masters -- typically, the first one, as you can see in Figure 2 , below. To apply another Slide Master to one or more slides, first access the Slide Sorter view (see Figure 2 again).

- Now, select the slide(s) to which you want to apply the alternate Slide Master . Figure 2 above shows the first slide selected.
- Next, access the Home tab of the Ribbon , and click the Layout button -- to bring up a drop-down gallery, as shown in Figure 3 .

- Note that the selected slide has a specific layout applied -- the Layout gallery shows that the Blank layout (highlighted in red within Figure 3 , above) is active. So while changing to other Slide Master, make sure you select the same corresponding Blank layout (highlighted in blue within Figure 3 , above).
- Select the appropriate layout, Figure 4 shows the selected slide with the changed Slide Master .

- In the same way, change the Slide Master for any other slides.
- When done, get back to Normal View .
- Save your presentation often.
Applying Slide Masters to Individual Slides in PowerPoint 2011 for Mac Applying Slide Masters to Individual Slides in PowerPoint 2010 for Windows
You May Also Like: Preparing for Webinars: Conversation with Sharyn Fitzpatrick | Cashew Nuts PowerPoint Templates
Popular Posts

Polygon Center Circles for PowerPoint
These special circles have polygon centers: the centers are made of triangles, squares, pentagons, and hexagons! And based on the sides of the polygon, the rest of the circle has that many segments.
Download and use these Polygon Center Circles in your slides for just $4.99
Microsoft and the Office logo are trademarks or registered trademarks of Microsoft Corporation in the United States and/or other countries.
Home | PowerPoint | Photoshop | PowerPoint Templates | PowerPoint Tutorials | Blog | Notes | Ezine | Media Kit | Feedback | Site Map | About Us | Contact Us Link to Us | Privacy | Testimonials PowerPoint Backgrounds | Christian PowerPoint Backgrounds | Business PowerPoint Presentation Templates
Plagiarism will be detected by Copyscape

- Get started with computers
- Learn Microsoft Office
- Apply for a job
- Improve my work skills
- Design nice-looking docs
- Getting Started
- Smartphones & Tablets
- Typing Tutorial
- Online Learning
- Basic Internet Skills
- Online Safety
- Social Media
- Zoom Basics
- Google Docs
- Google Sheets
- Career Planning
- Resume Writing
- Cover Letters
- Job Search and Networking
- Business Communication
- Entrepreneurship 101
- Careers without College
- Job Hunt for Today
- 3D Printing
- Freelancing 101
- Personal Finance
- Sharing Economy
- Decision-Making
- Graphic Design
- Photography
- Image Editing
- Learning WordPress
- Language Learning
- Critical Thinking
- For Educators
- Translations
- Staff Picks
- English expand_more expand_less
PowerPoint 2016 - Slide Master View
Powerpoint 2016 -, slide master view, powerpoint 2016 slide master view.

PowerPoint 2016: Slide Master View
Lesson 29: slide master view.
/en/powerpoint2016/modifying-themes/content/
Introduction
You may have noticed that when you select a different theme in PowerPoint, it rearranges the text on your slides and adds shapes to the background. This is because each theme has built-in slide layouts and background graphics . You can edit these layouts with a feature called Slide Master view . Once you learn how to use Slide Master view, you'll be able to customize your entire slide show with just a few clicks.
Optional: Download our practice presentation .
Watch the video below to learn more about using Slide Master view.
What is Slide Master view?
Slide Master view is a special feature in PowerPoint that allows you to quickly modify the slides and slide layouts in your presentation. From there, you can edit the slide master , which will affect every slide in the presentation. You can also modify individual slide layouts , which will change any slides using those layouts.
For example, let's say you find a theme you like but you don't like a few of the slide layouts. You could use Slide Master view to customize the layouts to look exactly the way you want .

In Slide Master view, the Slide Master tab will appear first on the Ribbon, but you'll still be able to access commands on different tabs as normal.
Using Slide Master view
Whether you're making significant changes to your slides or just a few small tweaks , Slide Master view can help you create a consistent, professional presentation without a lot of effort. You could use Slide Master view to change just about anything in your presentation, but here are some of its most common uses.
- Modify backgrounds : Slide Master view makes it easy to customize the background for all of your slides at the same time. For example, you could add a watermark or logo to each slide in your presentation, or you could modify the background graphics of an existing PowerPoint theme.
- Rearrange placeholders : If you find that you often rearrange the placeholders on each slide, you can save time by rearranging them in Slide Master view instead. When you adjust one of the layouts in Slide Master view, all of the slides with that layout will change.
- Customize text formatting : Instead of changing the text color on each slide individually, you could use the Slide Master to change the text color on all slides at once.
- Create unique slide layouts : If you want to create a presentation that looks different from regular PowerPoint themes, you could use Slide Master view to create your own layouts. Custom layouts can include your own background graphics and placeholders .
Some overall presentation changes—like customizing the theme fonts and theme colors —can be made quickly from the Design tab. Review our lesson on Modifying Themes to learn more.
To make changes to all slides:
If you want to change something on all slides of your presentation, you can edit the Slide Master. In our example, we'll add a logo to every slide. If you'd like to work along with our example, right-click the image below and save it to your computer.
- The presentation will switch to Slide Master view , and the Slide Master tab will be selected on the Ribbon.

When you make a change to the slide master, it's a good idea to review your presentation to see how it affects each slide. You may find that some of your slides don't look exactly right. On the next page, we'll show you how to fix this by customizing individual slide layouts.
Customizing slide layouts
You can use Slide Master view to modify any slide layout in your presentation. It's easy to make small tweaks like adjusting background graphics and more significant changes like rearranging or deleting placeholders. Unlike the slide master, changes to a slide layout will only be applied to slides using that layout in your presentation.
To customize an existing slide layout:
In our example, our newly added logo is hidden behind the photo in the Picture with Caption Layout . We'll customize this layout to make room for the logo.

You can also move placeholders on the slide master , which will move the placeholders on multiple slide layouts at the same time. However, some slide layouts may still need to be adjusted manually.
Customizing text formatting
You can also customize the text formatting from Slide Master view, including the font , text size , color , and alignment . For example, if you wanted to change the font for every title placeholder in your presentation, you could modify the master title style on the slide master.

Each title placeholder is connected to the master title style on the slide master. For example, take a look at the slides before changing the title font.

Now look at the same slides after changing the title font.

Instead of customizing individual placeholders, you could change the theme fonts for a presentation. From the Slide Master tab, click the Fonts command in the Background group, then select the desired fonts.

Creating new slide layouts
One of the most powerful features of Slide Master view is the option to create new slide layouts . This is an easy way to add interesting and unique slide layouts to an existing theme. You could even use this feature to design an entirely new theme , as in the example below.

To insert a new slide layout:

To rename a custom layout:
When you're done designing your custom layout, you'll want to give it a unique name so it will be easy to find.

To use a custom layout:
Once you've created a custom slide layout, it's easy to add a new slide with that layout or apply it to an existing slide.
- If you're currently in Slide Master view, click the Close Master View command on the Slide Master tab.

PowerPoint also allows you to add new placeholders to existing slide layouts.
Using custom layouts in other presentations
When you modify the slide master or slide layouts in Slide Master view, you're actually creating a custom version of the current theme. If you want to apply the theme to other presentations, you'll need to save it .
To save a theme:
From the the Slide Master tab, click the Themes command, then select Save Current Theme from the drop-down menu.

If you're not in Slide Master view, you can save the theme from the Design tab. Just click the drop-down arrow in the Themes group, then select Save Current Theme .

- Open our practice presentation . If you already downloaded our presentation to follow along with the lesson, be sure to download a fresh copy.
- On the slide master, change the Background Style to Style 7.
- Delete the tall rectangle shape near the left of the slide master.

- Reopen Slide Master view. In the Picture with Caption layout, select the background shape on the left side of the slide behind the text,and change the color to Dark Aqua .

- Optional: Save your theme to your computer.
/en/powerpoint2016/hyperlinks/content/
How-To Geek
How to create a slide master in microsoft powerpoint.
Keep consistency throughout your entire presentation by creating a customized slide master.
Quick Links
Creating a slide master in powerpoint, save your customized slide master.
PowerPoint’s Slide Master lets you keep consistency throughout your presentation. If you want to customize a presentation’s fonts , headings, or colors in one place so that they apply to all your slides, then you’ll need to create a Slide Master.
Open your presentation, head over to the “View” tab, and then click the “Slide Master” button.
The Slide Master will appear in the left-hand pane. The Slide Master is the top thumbnail that appears in the pane, and each sub-thumbnail represents each slide layout available in your theme. Edits you make to the text of the Slide Master will affect the text in each slide layout. Alternatively, you can select and customize each slide layout.
Edit the Slide Master Theme
If you plan to use a specific theme with your presentation, it’s best to go ahead and select it now before making any other edits, as each theme will have its own unique text and image placeholders.
To edit the theme of the Slide Master, click “Themes” on the “Slide Master” tab.
A drop-down menu will appear, showing a large library of Office themes. Select the one you want to use.
Your Slide Master will now take on the selected theme.
Fine-Tune Your Slide Master
Now it’s time to customize the font, color, and background of the presentation. In the “Background” group of the “Slide Master” tab, you’ll have all of these options available to you. However, using the options provided here will affect all of the slide layouts in the presentation, as they are predefined schemes. You can hover your mouse over the available options for a live preview.
If you don't find a scheme you like, you can create your own or customize each slide the way you want by using the tools provided in the "Home" tab.
Also, note that any objects or text you place on the slide master will appear on all your slides. So, for example, it's a great way to put a company logo or disclaimer text that you might want to appear throughout your presentation.
Create Multiple Slide Masters
You can create multiple Slide Masters in a presentation. To do this, head over to the "Slide Master" tab and click "Insert Slide Master."
The additional Slide Master will now appear in the left-hand pane.
Edit the new Slide Master. Once you're finished, select "Close Master View" in the "Close" group.
In the "Slides" group of the "Home" tab, select "Layout."
A drop-down menu will appear. You'll now see both themes with your customized slide layouts!
You can save your customized Slide Master as a PowerPoint template for future use. To do so, head over to the "File" tab and select "Save As."
Next, click the "Browse" button in the "Other locations" section.
Navigate to the location of your Custom Office Templates folder, usually found here:
C:\Users\user\Documents\Custom Office Templates
Once there, select the arrow in the "Save as type" box.
In the menu that appears, select "PowerPoint Template."
Next, click "Save" at the bottom-right of the window.
Your template with your customized Slide Master is now saved!
How to Apply Layout to All Slides in PowerPoint

PowerPoint is a powerful tool that enables users to create effective presentations with ease. One of the key features that helps to streamline the design process is the ability to apply layout to all slides. This functionality ensures that all slides in a presentation have a consistent look and feel, which makes it easier to focus on the content and convey information effectively. Here’s how to do it:
Table of Contents
Customizing Slide Layouts in PowerPoint
Before you can apply layout to all slides, it’s essential to understand how to customize slide layouts. This feature allows you to choose pre-designed layouts that have placeholders for text, images, and other content. To customize a slide layout, go to the Home tab, and select the Layout option. A menu will appear, showing you the available layouts. Choose the one that suits your needs and customize it as required. You can add or remove placeholders and adjust the size and position of existing ones.
Additionally, you can also change the background of your slide layout. To do this, go to the Design tab and select the Background Styles option. From there, you can choose from a variety of pre-designed backgrounds or even add your own custom background. This can help to make your presentation more visually appealing and engaging for your audience.
Understanding the Importance of Consistency in Slide Design
Consistency is essential in slide design because it helps to reinforce the message, and makes it easier for the audience to understand and remember the key points. It’s also essential for branding purposes, as it ensures that the presentation aligns with the organization’s brand guidelines. Consistency can be achieved by using the same fonts, colors, and styles throughout the presentation, and by applying layout to all slides.
Another reason why consistency is important in slide design is that it helps to maintain the audience’s attention. When the design is consistent, the audience is less likely to be distracted by unnecessary elements or changes in the layout. This allows them to focus on the content and absorb the information more effectively.
Furthermore, consistency in slide design can also save time and effort. By establishing a consistent design template, you can easily create new slides and presentations without having to start from scratch each time. This can be especially helpful for organizations that frequently create presentations for various purposes, such as sales pitches, training sessions, or investor meetings.
Creating a Master Slide to Apply Layout to All Slides
Creating a master slide is key to applying layout to all slides. This feature enables you to design a slide that serves as a template for the rest of your presentation. To create a master slide, go to the View tab, and select Slide Master. You’ll see a slide that represents the master slide, and any changes you make to it will apply to all slides in the presentation.
One of the benefits of using a master slide is that it saves time and effort. Instead of manually formatting each slide, you can simply apply the master slide to all slides in the presentation. This ensures consistency in the design and layout of your presentation.
Another advantage of using a master slide is that it allows you to make global changes to your presentation. For example, if you decide to change the font or color scheme, you can do so on the master slide, and the changes will be reflected on all slides in the presentation. This saves you the hassle of going through each slide individually to make the same changes.
How to Modify and Customize Master Slide Layouts
Modifying and customizing the master slide is straightforward. You can change the background, add text placeholders, adjust the position of existing placeholders, and add graphics or images. To modify the master slide, select the slide in the Slide Master view, make the necessary changes, and save them.
One important thing to keep in mind when modifying the master slide is that any changes made will affect all slides that use that particular master slide. This can be a time-saver if you want to make a global change to your presentation, but it can also cause unintended consequences if you’re not careful.
Another useful feature of the Slide Master view is the ability to create multiple master slides. This can be helpful if you have different sections of your presentation that require different layouts or design elements. To create a new master slide, simply click on the “Insert Slide Master” button in the Slide Master tab and customize it as needed.
Applying Themes and Colors to All Slides in PowerPoint
Applying themes and colors to all slides is a fantastic way to create a unified design. You can access the themes and colors by going to the Design tab, where you’ll see a range of options to choose from. Select the one that aligns with your presentation’s theme, and the changes will apply to all slides.
Another benefit of applying themes and colors to all slides is that it saves time. Instead of manually changing the design of each slide, you can make the changes once and have them apply to all slides. This is especially useful for larger presentations with many slides.
It’s important to note that while applying themes and colors can enhance the overall look of your presentation, it’s also important to use them appropriately. Avoid using too many colors or a theme that doesn’t align with your presentation’s content. The design should complement and enhance the message you’re trying to convey, not distract from it.
Using the Slide Master to Save Time in Presentation Design
Using the Slide Master to apply layout to all slides saves significant time in presentation design. With just a few clicks, you can create a consistent look and feel throughout the entire presentation, which helps to convey your message more effectively. With time-saving tools like this, you can focus on the content and deliver a polished presentation.
Another advantage of using the Slide Master is that it allows you to make global changes to your presentation quickly. If you decide to change the font or color scheme, you can simply update the Slide Master, and all slides will be updated automatically. This saves you from having to manually update each slide, which can be time-consuming and prone to errors. By using the Slide Master, you can ensure that your presentation is not only consistent but also easy to update and maintain.
Tips for Streamlining Your PowerPoint Design Process
PowerPoint is a versatile tool that can be used to create a wide range of presentations. To streamline your design process, it’s essential to keep things simple and focus on the content. Use templates and pre-designed layouts where possible, and avoid excessive animations and effects that can distract the audience. Remember to use visual aids like charts and graphics to illustrate your points and keep the audience engaged.
Another important tip for streamlining your PowerPoint design process is to ensure that your presentation is accessible to all audiences. This means using high contrast colors and large fonts to make it easy to read, and avoiding the use of small fonts or complex backgrounds that can make it difficult for some people to follow along. Additionally, consider adding closed captions or transcripts for any videos or audio clips you include in your presentation, to ensure that everyone can understand the content.
How to Set Default Fonts and Styles for All Slides in PowerPoint
If you have a specific font or style that you want to use throughout the presentation, you can set it as the default for all slides. To do this, go to the Design tab, click on the Fonts option, and choose the one you want to use. You can also set the default color and style of your headings and text by going to the Home tab and selecting the Format Painter option.
Customizing the Header and Footer for All Slides at Once
If you need to add headers and footers to your slides, you can customize them for all slides at once. To do this, go to the Insert tab, select the Header & Footer option, and choose the elements you want to include. You can add the date and time, slide numbers, or custom text, and the changes will apply to all slides in the presentation.
Using Section Breaks to Organize Your Presentation
Section breaks are a useful tool for organizing your presentation and making it easier to navigate. By dividing your presentation into sections, you can create a more structured approach that helps the audience to follow the flow of the content. To add a section break, go to the Home tab, click on the Section option, and choose the location where you want to insert it. You can then add a title to the section, which will appear in the navigation menu.
Best Practices for Applying Layouts to Multiple Slides in PowerPoint
When applying layout to multiple slides, it’s essential to keep the design consistent and avoid making too many changes at once. Start by customizing the master slide and applying themes and colors to all slides. Then, modify individual slides as required, while keeping the overall design consistent. Remember to use whitespace effectively to create a clean and uncluttered look.
Troubleshooting Common Issues When Applying Layouts to All Slides
If you encounter issues when applying layout to all slides, there are a few things you can try to troubleshoot the problem. Check that you’re in the Slide Master view and that the changes you’re making are applying to the entire presentation. Ensure that you’ve applied the correct theme and that the placeholders are in the correct position. If you’re still having trouble, try starting again from scratch with a new presentation.
Enhancing Your Presentations with SmartArt, Charts, and Graphics
SmartArt, charts, and graphics are fantastic tools for enhancing your presentations and making them more engaging. Use them to illustrate your points, highlight key information, and break up the text. Ensure that the visuals you choose are relevant to your content and don’t detract from your message.
Saving Time with Quick Access Toolbar Customization Tips
The Quick Access Toolbar is a fantastic tool for saving time when designing your presentation. Customize it to include the tools you use most frequently, such as the Save, Undo, and Redo buttons. You can also add custom shortcuts to commands you use frequently, saving even more time.
Applying layout to all slides in PowerPoint is an essential feature that can help you create a polished and professional presentation. By following the steps outlined in this article, you can ensure that your presentation is consistent and easy to follow, while saving time in the design process. Remember to keep things simple, focus on the content, and use visuals and other tools to enhance your message.
By humans, for humans - Best rated articles:
Excel report templates: build better reports faster, top 9 power bi dashboard examples, excel waterfall charts: how to create one that doesn't suck, beyond ai - discover our handpicked bi resources.
Explore Zebra BI's expert-selected resources combining technology and insight for practical, in-depth BI strategies.

We’ve been experimenting with AI-generated content, and sometimes it gets carried away. Give us a feedback and help us learn and improve! 🤍
Note: This is an experimental AI-generated article. Your help is welcome. Share your feedback with us and help us improve.

- Video Tutorials
- Knowledge Base
- Group Licenses
- Why Choose Us?
- Certificates
- PowerPoint Tutorials
PowerPoint Slide Master: Full Tutorial, Video, and Sample Files
In this tutorial, you’ll learn how to use the Slide Master in PowerPoint, why it’s useful, and how to use it to create elements that appear on every slide in the presentation, such as company logos and slide numbers.
- Tutorial Summary
- Files & Resources
- Premium Course
The PowerPoint Slide Master is useful for creating templates in presentations and repeating specific elements on each slide .
For example, if you want to repeat your company logo, the date, or the client’s name in the bottom-left corner of each slide, you can do that with the Slide Master.
You can also use it to set the default colors, fonts, and other design elements and ensure that everything on your slides looks consistent.
In this tutorial (video above and written version below), you’ll learn why the Slide Master is useful, how to set it up, and how to use it to insert logos, headers, and footers in presentations.
Video Table of Contents:
0:52: Slide Master 101
11:24: Slide Master Setup
14:35: Exercise: Fix the First Layout Slide
24:31: Recap and Summary
[Click the “Files & Resources” tab to get all the PowerPoint files for this lesson.]
The PowerPoint Slide Master: Why It’s Useful
To understand the value of the Slide Master, consider several of the slides in the “Before” file here :

As shown above, these slides have common elements: the divider line next to the title at the top, the “Goldman Stanley” logo in the bottom left, and the “Project Jaguar” text in the top left.
However, we manually inserted these elements on each slide , which is not ideal.
For example, what happens if something changes in the design? What if we need to replace the logo everywhere? Or what if we swap the positions of the logo and the project name?
We would have to go through each slide and manually change the positions and formatting of these elements.
If there are only 5-10 slides, that’s not a big deal, but with 50 or 100 slides, it would be extremely time-consuming to do this.
A better solution is to open the Slide Master (Alt, W, M on PC or ⌘ + Opt + 1 on Mac) and insert these common elements on a “Layout ” (template) so they repeat across all the slides in the presentation that use this particular Layout:

When you insert a normal slide in the standard view of PowerPoint (Alt, H, I on PC), you can base the slide on one of these “Layouts”:

The PowerPoint Slide Master: Key Shortcuts
The key shortcuts are as follows:
Slide Master View: Alt, W, M (PC) / ⌘ + Opt + 1 (Mac)
Close Slide Master: Alt, M, C (PC) / ⌘ + 1 (Mac)
Normal Edit Mode: Alt, W, L (PC) / ⌘ + 1 (Mac)
Move to Next or Previous Layout: Arrow Keys (PC and Mac)
Change Slide Layout (outside of the Slide Master): Alt, H, L (PC) / N/A on Mac
Reset Slide Layout (outside of the Slide Master): Alt, H, Q (PC) / N/A on Mac
Header & Footer (outside of the Slide Master): Alt, N, H (PC) / N/A on Mac
NOTE: The “,” in these shortcuts means that you press and release each button sequentially. The “+” means that you press and hold down each button and then release them all at the end.
For example, with Alt, W, M, you press and release Alt, press and release W, and press and release M.
But with ⌘ + Opt + 1 (Mac), you press and hold ⌘, press and hold opt, and press and hold 1 and then release all 3 keys at once.
You will enter and exit the Slide Master all the time in longer presentations, so you should know at least the first few shortcuts above.
The PowerPoint Slide Master: Placeholders vs. Shapes
When you’re on a Layout in the Slide Master, you can insert shapes, lines, and textboxes .
However, if you insert these objects within the Slide Master, you will not be able to edit them on normal slides that use the Layout .
Let’s look at a simple example, where we add a rectangle shape to the default “Title and Content” Layout in the Slide Master:

If we now return to the normal slides with Alt, W, L (⌘ + 1 on Mac) and insert a new slide that uses this “Title and Content” layout, it’s impossible to select or edit the shape:

To edit this shape, we need to return to the Slide Master and insert a Placeholder on this layout, which is in the “Slide Master” tab under “Insert Placeholder”:

We can insert a “Content” Placeholder here and then format it with the same fill color, font color, and other attributes:

Then, when we return to the normal slide view and reset the Layout of the slide we just inserted, the blue shape is now editable:

In real life, you would not use Placeholders for something trivial like this – you would normally use them for slide titles or blocks of text that change on each slide:

You need to consider the Shape vs. Placeholder distinction before using the Slide Master, or your templates will not work correctly.
Finally, note that Placeholders are not allowed on “Layout #1” in the Slide Master – the one that looks like this:
")
This Layout determines the default font and paragraph styles for all the other slides and Layouts.
You can add normal shapes, lines, and textboxes to Layout #1, but not Placeholders; the option is greyed out:
")
In real life, you might add the company or client logo to Layout #1 – but it’s rare to repeat any other element in the same spot everywhere in the presentation .
A better approach is to create a few Layouts, such as 1-column and 2-column designs, and add “repeated elements” like the title/header/footer divider lines on each Layout.
The Problems with the PowerPoint Slide Master
The Slide Master is great for ensuring consistency, creating templates, and repeating common elements across the slides, but it does have some drawbacks.
First , not all formatting carries through to normal slides the way you necessarily want.
Similar to the copy/paste shape format commands, only the formats of the first line of text in a Placeholder are carried through to normal slides.
Second , many people do not know about the Slide Master or do not use it properly, and it is cumbersome to “convert” a long presentation with normal slides into one that uses Layouts consistently.
Third , an existing slide will not update even if you change the slide’s Layout within the Slide Master.
You can “reset” the slide to its base Layout using the Alt, H, Q shortcut, and this will update all the elements on the slide, including additions/deletions and edits you’ve made in the Slide Master.
However, you’ll also lose any additional formatting you have applied to the Placeholders on this normal slide.
Because of these downsides, it’s best to keep the Slide Master simple and use it for tasks like inserting logos, headers, footers, and slide numbers rather than complex layouts.
Setting Up the PowerPoint Slide Master Properly
If you’ve just created a new presentation and you want to use the Slide Master extensively, here’s what we recommend:
Step 1: First, go to the Slide Master with Alt, W, M (PC) or ⌘ + Opt + 1 (Mac) and delete the default Layouts you will not use.
We recommend keeping the “Title and Content” Layout – ignore the recommendation in the video – but everything else can go:

Step 2: We also recommend removing the Drawing Guides in the Slide Master because they’re separate from the Drawing Guides in the normal presentation, and you usually don’t need multiple sets of Guides.
To do this, enter the Slide Master and go to Layout #1 there (the “Office Theme Slide Master”).
Press Alt, W, S (PC) or ⌘ + Opt + Ctrl + G (Mac) to show the Drawing Guides, which should appear in red, and drag them off the slide to remove them.

Next, go to each Layout you plan to use and do the same thing.
These Drawing Guides will appear in orange , and by default, they’ll be single vertical and horizontal lines.
We recommend removing these unless you plan to customize them for a more complex Layout in which specific alignments would be helpful:

Step 3: Add the company logo, the slide number, and the header or footer elements that should appear on all slides on Layout #1.
The logo is straightforward: insert a normal shape or textbox, format it appropriately, and drag it to the bottom left or right corner:

To add the slide numbers, press Alt, N, H (Insert –> Header & Footer on Mac) and make sure “Slide Number” is checked:

If you want to add something else in the header or footer, such as the client’s name or the project name, you can also do that at this stage.
But in most cases, elements like lines for the header and footer areas should be added directly on the custom Layouts because you usually don’t want to show these on the title slide or “section divider” slides.
Step 4: Set the default themes, colors, fonts, and background styles.
Within the Slide Master view, click the “Slide Master” tab and go to “Edit Theme” and “Background” to set these:

If you go to the normal slides and set the fill/font color of a shape or textbox, you can access all these theme colors easily:

The main benefit of this feature is that it lets you change all the colors in the presentation from within the Slide Master .
You just need to ensure that each shape, textbox, and line uses one of the “Theme Colors” you’ve selected.
If it does, you can return to this area of the Slide Master and change the colors here, and everything that uses one of these colors will update automatically.
Many companies have their own themes and color schemes, so you should follow your internal standards when doing this.
Practice Exercise: Create a Custom Layout in the Slide Master
Your task in this practice exercise is to start with the “Before” version of the file and modify it to set up the Slide Master properly, which means:
1) Remove the unused layouts.
2) Delete the unnecessary Drawing Guides.
3) Add the “Goldman Stanley” logo and the slide numbers.
4) Set the text and bullet styles on the first Layout in the Slide Master.
To save time, remember that you can copy and paste shapes, lines, and textboxes from normal slides into Layouts within the Slide Master.
Start by pressing Alt, W, M to enter the Slide Master and delete the unnecessary Layouts:

Then, press Alt, W, S and remove the unnecessary red Drawing Guides by dragging them off the edges:

Next, go to one of the normal slides with the “Goldman Stanley” logo at the bottom, copy the logo from that normal slide, and paste it into the bottom left corner of Layout #1 in the Slide Master:

Once you’ve done this, the “Goldman Stanley” logo will repeat on each slide, but all the existing slides have “duplicate logos” – because each one also had this logo as a separate shape!
So, you should go to each slide individually and delete the logo in its bottom-left corner:

You can press Alt, N, H to add the slide numbers in the footer, and you can format them as you want.
Make sure the slide number textbox in the bottom right corner is aligned properly to the right edge of the “main content area” on each slide (demonstrated in the video using extra lines).
Finally, as we do in the sample video, you can adjust the font sizes, bullet styles, and indentations on Layout #1.
These are standard PowerPoint commands/shortcuts not specifically related to the Slide Master.
More Advanced Features in the PowerPoint Slide Master
In our full PowerPoint Pro course , you’ll set up many slides and Layouts within the Slide Master, including ones for company profiles and the Table of Contents.
You’ll also get practice “retrofitting” existing slides to use Layouts.
Finally, in the VBA and macro module of the course, you’ll learn how to use Drawing Guides in the Slide Master to align and distribute shapes, and you’ll learn how to automatically generate a Table of Contents based on Layouts for the section markers.
The PowerPoint Slide Master will not solve every problem, but it could help you create presentations more quickly with fewer errors if you use it properly.

About Brian DeChesare
Brian DeChesare is the Founder of Mergers & Inquisitions and Breaking Into Wall Street . In his spare time, he enjoys lifting weights, running, traveling, obsessively watching TV shows, and defeating Sauron.
Files And Resources
Premium Courses
Other biws courses include:.
Perfect Your PowerPoint Skills
The BIWS PowerPoint Pro course gives you everything you need to complete pitch books and presentations in half the time and move straight to the front of the "top tier bonus" line.
Home Blog PowerPoint Tutorials How to Work with Slide Master in PowerPoint
How to Work with Slide Master in PowerPoint

When editing PowerPoint templates or designing your own slides, you might need to repeat some slide elements in all slides, such as the company branding and tagline. Instead of manually adjusting each slide, such major changes can be made using the Master Slide in PowerPoint.
What is Slide Master in PowerPoint
PowerPoint Slide Master gives you control over how to display slides with uniformity based on your preferences. It is available via the View tab in PowerPoint and can be used to set logos, fonts, images, and other parts of your slides using a master view. The top slide or Master Slide in PowerPoint Slide Master is the primary slide, changes to which are reflected across the whole presentation. This is followed by other layouts available for your presentation that can also be adjusted in Slide Master.
How to Edit a Master Slide in PowerPoint
PowerPoint, by default, provides a Master Slide for every slide deck, even if you start with a blank presentation. For PowerPoint templates downloaded from the Microsoft Store or third-party sources, Master Slides are more refined than the default layout in PowerPoint. You can edit the Master Slide via View -> Slide Master .

The PowerPoint Master Slide is located at the top, and any changes made to it are reflected across all slides. For example, if you place a logo on the Master Slide, it will automatically appear on all slides in the presentation. Similarly, you can set the font style, font color, default image, and other elements for your slides by editing the Master Slide.

The below image shows how adding a logo to the Master Slide in PowerPoint reflected the changes across all slides in the PowerPoint template.

How to Create a Master Slide in PowerPoint
Creating a master slide that can be replicated across various presentations can help ensure that you can quickly apply the changes to new presentations while retaining your desired branding and theme style. To do this, you can create a PowerPoint Master Slide from scratch. To create a new Master Slide, open a blank PowerPoint presentation and go to View -> Slide Master .

From the Master Layout option in Slide Master, you can select the elements that you wish to single out for editing.

You can begin editing the master slide by adding a theme, logo, changing the font style, and adjusting other slide elements.

You can also add additional layouts and edit existing ones according to need. This is to edit not only the Master Slide but the overall design of your presentation. Once you are satisfied with the changes made to the Master Slide, click Close Master View from the Ribbon menu.

The changes you make to the Master Slide will be reflected on the presentation deck you are creating.

How to Apply Master Slides to an Already Existing PowerPoint Presentation
You can save and apply master slides to an existing PowerPoint presentation from one you might have saved earlier. To do this, you will require saving the original theme of your slides and then importing them to the presentation deck to which you intend to apply the master slides. Open the slide deck from where you wish to import the theme and go to View -> Slide Master .

From the Slide Maste r tab, go to Theme -> Save Current Theme .

Browse a location to save your theme from importing it to other PowerPoint presentations.

Open the PowerPoint presentation to import the theme style and go to View -> Slide Master .

From the Master Slide tab, go to Theme -> Browse for Themes .

Select the theme with the Master Slides to import to your PowerPoint presentation. Once the changes are applied, click Close Master View .

This will apply the changes to the existing presentation from the imported theme with your preferred Master Slide layouts.

Final Words
The Master Slide and associated layouts in Slide Master can help standardize various aspects of your slide design. Making it easier to manage branding, import slides for your preferred layouts, and help avoid manually editing slides in your presentation deck to apply specific layout changes.

Like this article? Please share
Design, PowerPoint Tools Filed under PowerPoint Tutorials
Related Articles

Filed under PowerPoint Tutorials • May 14th, 2024
How to Create a Roadmap in PowerPoint
Learn how to create effective roadmap presentations in PowerPoint with this step-by-step guide and recommended templates.

Filed under PowerPoint Tutorials • May 10th, 2024
How to Copy a Slide in PowerPoint
Optimize your slide deck creation process by learning how to copy a slide in PowerPoint. Detailed instructions with screenshots here.

Filed under Google Slides Tutorials • April 23rd, 2024
How to Align Objects in Google Slides
Optimize your layouts by learning how to align objects in Google Slides presentations. Step-by-step guide with screenshots.
Leave a Reply
PowerPoint Slide Masters: Save Time and Customize Your Presentations
Editing a PowerPoint presentation is not without risk: new images or text can ruin the layout, new slides from external sources aren’t visually cohesive. And when it comes to color design, it’s incredibly difficult to accurately reconstruct the original color scheme from sight.
To avoid these issues and a lot of headaches, consider using a slide master. With it, you can change or enhance presentations as often as you like without losing the plot. Here we’ll show you how to best use your PowerPoint slide master.
PowerPoint Slide Master: What is it?
The slide master (found in PowerPoint under > View > Slide Master ) is the basic framework and control center of any good presentation. Think of it as a kind of toolbox in the background of your presentation that encompasses all the rules of layout . It helps you maintain a uniform appearance and quickly create new slides at any time. And best of all? You won’t have to worry about annoying formatting.
In the slide master, you can preset the formatting and positioning of all principal elements in your presentation. This includes titles, subtitles, text and image placeholders, footers and logos. In short, the slide master in PowerPoint is nothing more than your individual design template .
Elements that are set in the master can’t be moved or deleted in the normal editing mode. This is a useful feature when you’re working in a team. Team members can create new individual slides or entire presentations in the company’s own design without running the risk of moving or removing essential elements.
When you open Microsoft PowerPoint in edit mode and create a new slide, you or your collaborators will no longer find blank, white surfaces, but will be able to choose the layout design you need right away.
You can make changes on the slide master at any time. These changes are directly applied to all slides . This saves you so much time! It also guarantees that all fonts and font sizes, color schemes and positions of logos or other elements remain identical on every slide.
The benefits of using a PowerPoint slide master
A master layout in PowerPoint allows you and your staff to focus more on content and not waste time formatting or modifying individual slide layouts . This means fewer formatting errors and more consistent presentations across your organization.
Your clients benefit from a PowerPoint slide master, too! Not only is it more enjoyable to watch a professionally designed presentation, but your presentation will also be more persuasive and inspiring.

Are you interested in an individually fitted slide master? Our agency is looking at a successful past in which we were able to help many satisfied customers . Don’t hesitate to contact us !
The master slide
The first slide of your slide master is the master slide , or mother slide. It contains all your fundamental formatting . Adjustments made to this slide will carry over to all your master’s subsequent layout slides, the children. That’s why it’s best to define the font and size of your titles, subtitles, footers and logos on the master slide.
Each layout slide can also be customized . Common layout slides include title slides, divider slides, comparison slides, slides with text-image combinations, image-only slides, slides with list formatting, chart slides and more.

Using a master template customized to your company’s requirements allows you to create a predefined standard for new presentations. This standard plays an important role in shaping your company’s corporate image.
How to use the PowerPoint slide master
The slide master allows you to create custom grids and align elements at specified distances. A well-defined slide master with slide layouts is by no means a set of slides with randomly selected placeholders. It is a well-thought-out construct of layouts and rules.
Defined margins provide the framework for your content. The spacing between the individual objects on the slide (e.g., images, headings), ensure a clean and professional design across all slides.
When our agency creates PowerPoint slide masters for clients, we also select a unique color scheme or adopt the client’s CI (corporate identity) color scheme. This means that you, as a client, can immediately access the predefined color palette to adjust font or object color.
Below you’ll find step-by-step instructions on how to use a PowerPoint slide master correctly.
Create and edit a PowerPoint slide master
1. Open your PowerPoint presentation.
2. Click on the View tab.

3. Click on Slide Master . In the Slide Master view, you’ll see all your presentation’s slide layouts in the thumbnail pane on the left.
4. Click on Insert Slide Master located above the thumbnail pane.

5. The new slide master will appear in the thumbnail pane below the existing slide master. It will be given the number 2 if there is already one slide master, or 3 if there are already two slide masters, etc. Now you can edit the new slide master in the master view.
Any changes made to the PowerPoint slide master are automatically applied to all other slide layouts . Changes to a single slide layout (e.g., title slides, comparison slides, image-only slides) will only affect that specific layout. All new slides with that layout will incorporate the changes you have just made.
The master layout
There are basically two levels to a PowerPoint slide master: the master slide and the subsequent slide layouts/master layouts . These layouts can differ greatly from each other.
Certain slide layouts work better than others, depending on what content you intend to include. Some are better for presenting images or graphs, while other layouts are more suitable for text-heavy content.
All layouts consist of coordinated text and/or object placeholders that are scaled and designed to match the purpose of the slide. These “objects” are, for example, photos, statistics, or animations. You can quickly add content to the placeholders and customize the different layouts as needed.

A change to the master slide applies to all slides in your presentation. A change to a particular slide layout applies to all slides with that specific layout. Do you want tighter spacing between individual text or image boxes on all comparison slides?
All you need to do is make this change on the comparison slide master layout in the Slide Master view. All comparison slides in your presentation will have the new layout.
Tip: Slide Master view vs. Normal view : Changes made in Slide Master view can’t be changed or accidentally deleted in Normal view. This makes editing mistakes to the layout almost impossible.
Rename a PowerPoint slide master
2. Click the View tab.
3. Click on Slide Master .
4. In the thumbnail pane, right-click the layout slide you want to rename and select Rename Layout .
5. In the dialog box, enter the new name for the layout and click Rename .
6. Click on Close Master View and switch to the Home tab. Click on Layout in the Slides group. You will now see the renamed slide layout in drop-down menu.
Use different PowerPoint slide masters
Can’t decide which design suits your content or personal preferences best? You can insert several design themes and combine them with each other. To do this, you’ll need several PowerPoint slide masters.
How to add multiple PowerPoint slide masters:
1. Go to View > Slide Master to switch to the master slide view mode.
2. Click Insert Slide Master in the Edit Master group.
3. Your new slide master will appear below the previous one. You can now edit the new slide master as you wish or use a theme template to customize it.
Shortcut : In Slide Master view, click on Themes to select a new design. You can then create a new slide master in the selected theme.
Editing headers & footers in the PowerPoint slide master
1. Go to View > Slide Master .
2. Select the master slide from the thumbnail panel on the left.
3. You’ll see placeholders for footer content at the bottom of the slide. Fill, customize and arrange these as desired. To create a header, place one of the boxes at the top of the screen.

4. In the Home tab, you can change elements such as font, font size and color scheme.
5. Go back to Slide Master and click Close Master View . All changes will be saved and automatically applied.
Other PowerPoint masters
In addition to the slide master, PowerPoint provides two other helpful masters: the PowerPoint handout master and the PowerPoint notes master .
Handouts are printouts of your presentation that you can pass out to your audience before or after your presentation. The handout master helps with the content and visual design of these handouts. As with the slide master, changes made in the handout master apply to all pages of the handout.
Go to View > Handout Master . Here you can define formatting, color design and how much content should be used on each page of the handout.

PowerPoint’s notes master helps you organize additional information or personal notes. During a presentation, your screen will display each slide’s notes. Best of all, the audience won’t see any of this.
The PowerPoint notes master allows you to customize the structure of your note pages across all slides. Just like the other masters, all changes are automatically applied to all note pages. Go to View > Notes Master to customize your personal note pages.
The PowerPoint slide master: organizer, time saver and designer for your PowerPoint presentation
The PowerPoint slide master functions as the control center of a presentation. In it, you can define design rules that affect every slide. PowerPoint also offers the handout master and the notes master. All three masters have children slides or pages.
All changes to a master are automatically applied to every slide. PowerPoint’s masters are the perfect tools for creating a professional and consistent layout and design for your presentation.
Are you interested in an individually fitted slide master? Our agency is looking at a successful past in which we were able to help many satisfied customers . Don’t hesitate to contact us ! We’d be happy to design a layout that suits your individual preferences and needs.
If you have questions about the slide master or other topics regarding powerpoint – please write us an email to [email protected] . We would be happy to help!
Share this post
- share
- save

Design Thinking: Problem Solving with a Difference

Why Corporate Mission Statements Are So Important

7 Tips & Learnings from the Apple Keynote
- Brand Control
- Chart Creation
- Content Enablement
- AI Assistant
- Suite for PowerPoint
- Template Management
- Integrations
- Webinars & Events
- Office Study Global
- Office Study USA
- PowerPoint Study
- Managed Service
- Microsoft Partnership
Quick Tip: Apply and Transfer PowerPoint Slide Master
In this article, we will show you step-by-step how to apply a PowerPoint slide master. A PowerPoint slide master allows you to apply a predefined design to all slides of a presentation. It can be designed for each presentation individually and can also be exported into other presentations so you can ensure a consistent design across all your presentations.
Apply a PowerPoint slide master - step by step
To apply a PowerPoint slide master, you must of course first create a slide master. We explain how to create a slide master here. After you have created your slide master, it is automatically applied to the current presentation. However, the slide master contains not only the master slide itself but also various layouts that you can define. If you edit a layout in the master, it automatically adjusts any slides where that layout has been applied. If you add new layouts, you have the option to apply them to existing slides. We will show you how in 2 simple steps:
- Select the thumbnail of the slide you want to reformat on the left side of the normal view. Highlighted: TIP: You can select multiple slides at once by holding down the CTRL key. This saves time.
- Select the Layout button on the “Home” tab and click the new layout you want. It will be applied to all selected slides.

Transfer a PowerPoint master to other presentations
Now that you know how to apply a slide master to an existing presentation, we will show you how to transfer that master to another slide. This is a simple process:
Open Source
First, open the presentation with the slide master you want to transfer and the presentation into which you want to paste the slide master.

Switch to the presentation you want to update and open the slide master.
Right-click the thumbnail on the right and select one of the two actions:
- Use target design: The design colors, fonts, and effects of the target presentation are retained.
- Keep original formatting: The design colors, fonts, and effects of the presentation you are copying from will be applied.

Now you know how to apply a slide master and how to transfer a slide master. Both processes take just a few steps.
Especially in large projects, manually copying slide masters can still lead to problems: old versions remain in circulation and the current version of the slide master is not necessarily applied to existing presentations. That leads to an inconsistent appearance to the outside world, looks unprofessional, and makes it difficult to enforce a corporate identity.
empower ® Content Enablement can help you manage your slide masters and ensure that your current slide design is used in all PowerPoint presentations. Are you looking to go one step further and want to implement a tool that ensures uniform and corporate design adherent documents among all Office applications? Then have a look at our Brand Control Solution !

You May Also Like
Related articles

How-to: Create and customize the PowerPoint slide master
Display your logo on the presentations title slide

Multilingual presentations with empower® Slides
Subscribe to our newsletter.
- I Tried Both: Apple Watch 9 vs Fitbit Charge 6
- Best Places to Print Photos Online
How to Use PowerPoint Slide Master Layouts
Use the Slide Master to effect a uniform appearance for your presentation
- Brock University
What to Know
- Go to View > Slide Master and select the top thumbnail in the Slide pane. Use the Slide Master tab to change colors, fonts, and more.
- Use the Slides pane to choose a slide layout thumbnail and make changes to the layout master.
- When you're done making changes, select Slide Master > Close Master View to return to your presentation.
To ensure that all the slides in your PowerPoint presentation have the same look, use the Slide Master. Apply fonts and styles, add multimedia, and insert footnotes. These instructions apply to PowerPoint 2019, 2016, and 2013; PowerPoint for Microsoft 365; and PowerPoint for Mac.
Access the PowerPoint Slide Master
The PowerPoint Slide Master is like a style sheet for your presentations. Changes made to the Slide Master apply to the slides that are created after you format the Slide Master.
To access the Slide Master in a PowerPoint presentation, select View > Slide Master .
Change the Layout in the Slide Master
The Slide Master view contains all the slide layouts used in PowerPoint. The Slides pane displays thumbnail images of the slide master (the top thumbnail image) and the related slide layouts (the smaller thumbnail images located below the slide master).
Changing the font on the slide master affects the text placeholders on all slides. However, not all placeholders are affected by changes made to the slide master. You may need to make additional changes to the different slide layouts.
Make changes to the Slide Master before you create a presentation. If you change the font style or color on a slide before you edit the slide master and slide layouts, the formatting is retained on those slides.
To make changes in the Slide Master:
Select the slide master. It's the top thumbnail in the Slide pane.
Go to the Slide Master tab to change the theme, theme colors, fonts, and background for the entire presentation.
In the Slides pane, select a slide layout thumbnail and make changes to the layout master, if needed.
Close the PowerPoint Slide Master
After you've made all your changes to the slide master, select Slide Master > Close Master View to return to the presentation slides.
Each new slide you add to the presentation takes on the changes you made. You'll save time by not having to make edits to every individual slide. Your presentation will have a uniform and professional look.
Get the Latest Tech News Delivered Every Day
- How to Copy a PowerPoint Design Template to Another Presentation
- What Is a PowerPoint Placeholder?
- How to Increase PowerPoint Slide Number Size
- PowerPoint Master Slide
- Use Multiple Design Themes in the Same Powerpoint Presentation
- Change the Default Font in PowerPoint Text Boxes
- Replacing All the Fonts in a Presentation at One Time
- Slide Layouts in PowerPoint
- Add, Delete or Change the Order of PowerPoint Slides
- How to Use the Slide Sorter View in PowerPoint
- The 10 Most Common PowerPoint Terms
- How to Use Speaker Notes in PowerPoint
- Use PowerPoint Slide Finder
- An Introduction to PowerPoint
- Change Font Colors and Styles on PowerPoint Slides
- Using Design Themes in PowerPoint
Stack Exchange Network
Stack Exchange network consists of 183 Q&A communities including Stack Overflow , the largest, most trusted online community for developers to learn, share their knowledge, and build their careers.
Q&A for work
Connect and share knowledge within a single location that is structured and easy to search.
Problems applying slide master to a presentation
I'm working on reformatting a badly formatted powerpoint using a master slide layout and am having issues. First off, I need to apply a custom bullet to all 80 or so slides. I changed a master slide to reflect that but it doesn't want to take on the regular slides.
Second, the master layout has images in the bottom of the slide (company logo). When I create a new slide with the master layout, it looks fine. However, I want to keep the image placement that is already in the slides that I'm reformatting so I need to apply the master layout to the already created slides. The company logo's will not show up when I apply the master slide.
- microsoft-powerpoint
4 Answers 4
The slide master and the slide master's layouts are two different things. If you're viewing a slide that needs changing and you choose View | Slide Master, it'll actually show you the slide's parent layout. That's what you need to change.
BUT changing the body text placeholder on the layout will only have effect if the slide's text is in a body text placeholder on the slide. Check Outline view. If the body text doesn't appear beneath the slide icon in Outline view, the text is not in a placeholder, so won't be affected by changes to the layout's body text placeholder formatting.
I think what you might be looking for is the "Reset Slide" option. After making changes to the Master Layout:
- Close the "Slide Master" view
- Make sure you are on the "Normal" view
- Select all your slides
- Right-click on one of them and select "Reset Slide"
The changes you made to the Master Slide should be applied
i had this issue specifically with the footer not appearing on the notes page. I got this to work in a really strange roundabout way. Had tried re-applying notes master unsuccesfully.
Go to print the slides and choose notes pages. Then click on header and footer. choose what you want on the notes pages, header, footer page number etc. Then choose apply to all slides

- Please do not post the same answer to multiple questions. If the same information really answers both questions, then one question (usually the newer one) should be closed as a duplicate of the other. You can indicate this by voting to close it as a duplicate or, if you don't have enough reputation for that, raise a flag to indicate that it's a duplicate. Otherwise tailor your answer to this question and don't just paste the same answer in multiple places. – DavidPostill ♦ May 5, 2022 at 14:54
- 1 Hi @DavidPostill - I shall tailor my answers - it appears though that you have deleted the posts? Were they unhelpful or not answering the question? The issue in both of the questions was the same, even though the presentation of the issue is different in the questions. Hence why the same answer can be applied to both. As far as I can see my answer is also unique so by deleting does the community not lose this solution? Thanks for taking the time to explain - as you can see from my profile, I am a long time lurker but only post solutions occasionally when the community hasn't managed to sort – Nicole Ahmed May 23, 2022 at 16:05
Check the background settings for the presentation!
- Right-click the slide and select "Format Background..."

This made the "Draft" watermark I made on the Master Slide appear throughout the whole presentation. Hope this helps!
Add a Background Picture to Slides
You must log in to answer this question.
Not the answer you're looking for browse other questions tagged microsoft-powerpoint ..
- The Overflow Blog
- OverflowAI and the holy grail of search
- Featured on Meta
- Our Partnership with OpenAI
- What deliverables would you like to see out of a working group?
Hot Network Questions
- How to draw Pascal's Triangle mod 3 with Tikz
- Gauss provided several proofs of the FTA. Are any of these proofs considered modern mathematically rigorous?
- Delta method vs actual expectation
- How to insert a pex segment with sharkbite/ push-to-fit connectors in an existing [copper] line
- How to store private keys on flashdrive
- Average energy in Boltzmann statistics
- Compute the degree of a string
- A coin game - is it a group?
- Movie where the only survivor from a space colony or expedition is found and recovered by a ship. He turns out to be infected and turns evil
- "the girl with the red dress on" — What licenses the preposition "on"? What does it function as?
- A game requires 2 players opposite 2 other players, with 6 people available, how many distinct games can take place?
- Counting consecutive units in nested lists
- Consolidate Data from Multiple Columns into One Column
- Arguments for vs against filtering Internet Access to legal Websites on University Campus
- Was the purported 1968 standard for encoding ASCII on punched cards ever used?
- How much does one American Airline frequent flier mile equal in US$?
- How does this ramp generator circuit work?
- Image recognition in air to air missiles
- Bimatrix Game: Nash Equilibrium and Safety Levels
- Why do some Proto-Germanic nouns end with *-az?
- Examples where a derived noun and a passive form in '-or' are unrelated
- Unable to change file ownership through find-exec
- Is Matthew 24:40 mistranslated in most English translations?
- Why do we want to normalize the solar abundance of elements to Si?
Contribute to the Microsoft 365 and Office forum! Click here to learn more 💡
April 9, 2024
Contribute to the Microsoft 365 and Office forum!
Click here to learn more 💡
PowerPoint Forum Top Contributors: Steve Rindsberg - John Korchok - Bob Jones AKA: CyberTaz ✅
May 10, 2024
PowerPoint Forum Top Contributors:
Steve Rindsberg - John Korchok - Bob Jones AKA: CyberTaz ✅
- Search the community and support articles
- Microsoft 365 and Office
- Search Community member
Ask a new question
How can I amend a PowerPoint Slide Master using .ppt for IOS? I know you couldn’t do this 10 years ago but surely it must have been fixed by now!!
How can I amend a PowerPoint Slide Master using .ppt for IOS? I know you couldn’t do this 10 years ago but surely it must have been fixed by now!!
- Subscribe to RSS feed
Report abuse
Reported content has been submitted
- Volunteer Moderator
You can only revise slide master in a desktop edition of PowerPoint (Windows or macOS). It's not possible in PowerPoint for the web or in any of the mobile versions.
Was this reply helpful? Yes No
Sorry this didn't help.
Great! Thanks for your feedback.
How satisfied are you with this reply?
Thanks for your feedback, it helps us improve the site.
Thanks for your feedback.
Replies (1)
Question info.
- iPhone or iPad
- Norsk Bokmål
- Ελληνικά
- Русский
- עברית
- العربية
- ไทย
- 한국어
- 中文(简体)
- 中文(繁體)
- 日本語
IMAGES
VIDEO
COMMENTS
Add, edit, or remove a placeholder on a slide layout. To rename the layout, in the thumbnail list of layouts, right-click the layout that you customized, and then click Rename Layout. In the Rename Layout dialog box, type a new name that describes the layout you've just created, and then click Rename. On the Slide Master tab, click Close ...
Open your PowerPoint presentation. 2. Go to the "View" tab in the top menu. 3. Click on "Slide Master" in the "Master Views" group. 4. The Slide Master view will open, displaying the master slide at the top. 5. Make any desired changes to the master slide, such as adding a logo or adjusting the font style.
Step-1: Click on the "Insert" tab. The first step is to click on the master slide from the slide layout panel on the left side of the screen in the "Slide Master" view. Then click on the "Insert" tab from the menu ribbon. Step-2: Click on the "Pictures" button.
To apply another Slide Master to one or more slides, first access the Slide Sorter view (see Figure 2 again). Figure 2: Slides within Slide Sorter view. Now, select the slide (s) to which you want to apply the alternate Slide Master. Figure 2 above shows the first slide selected.
In this video, I will show you how to update all of your PowerPoint slides at Once. Using Slide Master in PowerPoint lets you make quick changes like changi...
Select any of your layouts and click the option Insert Layout in the Edit Master group. It'll create a new type of slide you can edit and customize as you see fit. Use the option Insert Placeholder to add different kinds of elements to our new layout. #3. Adding a new Slide Master if necessary.
In PowerPoint Slide Master view lets you edit all slides at once. Use the Slide Master PowerPoint feature to ensure a consistent look. close search. search menu. Topics. ... you can insert a new slide with the custom layout or apply it to an existing slide. In our example, we'll select the Layout command and apply the new style to slide 6.
PowerPoint's Slide Master lets you keep consistency throughout your presentation. If you want to customize a presentation's fonts, headings, or colors in one place so that they apply to all your slides, then you'll need to create a Slide Master.. Creating a Slide Master in PowerPoint Open your presentation, head over to the "View" tab, and then click the "Slide Master" button.
To create a master slide, go to the View tab, and select Slide Master. You'll see a slide that represents the master slide, and any changes you make to it will apply to all slides in the presentation. One of the benefits of using a master slide is that it saves time and effort. Instead of manually formatting each slide, you can simply apply ...
If you want to add text that'll appear in the header and footer of your slide, you can edit the master slide in PPT. After you click on the Slide Master tab, click on the Slide Size button. A menu drops down. From the menu, click on the Page Setup… option. When you click on this option, a Page Setup window appears.
Learn the secrets to using PowerPoint Slide Master effectively and save a ton of time and headache. This video covers basic as well as advanced Tips and Tric...
Step 2: We also recommend removing the Drawing Guides in the Slide Master because they're separate from the Drawing Guides in the normal presentation, and you usually don't need multiple sets of Guides. To do this, enter the Slide Master and go to Layout #1 there (the "Office Theme Slide Master"). Press Alt, W, S (PC) or ⌘ + Opt + Ctrl + G (Mac) to show the Drawing Guides, which ...
Result: All slides changed their layouts to the corresponding layout of the first slide master (in the list of all slide masters) instead of keeping their slide master with the same name. I opened my old presentation. I copied all new slide masters from the template into the old presentation and then removed all old slide masters from it.
From the Master Slide tab, go to Theme -> Browse for Themes. Import an existing PowerPoint theme using Browse for Themes option. Select the theme with the Master Slides to import to your PowerPoint presentation. Once the changes are applied, click Close Master View. Choose and existing theme in PowerPoint.
Editing headers & footers in the PowerPoint slide master. 1. Go to View > Slide Master. 2. Select the master slide from the thumbnail panel on the left. 3. You'll see placeholders for footer content at the bottom of the slide. ... As with the slide master, changes made in the handout master apply to all pages of the handout. Go to View ...
A PowerPoint slide master allows you to apply a predefined design to all slides of a presentation. It can be designed for each presentation individually and can also be exported into other presentations so you can ensure a consistent design across all your presentations. Apply a PowerPoint slide master - step by step. To apply a PowerPoint ...
To ensure that all the slides in your PowerPoint presentation have the same look, use the Slide Master. Apply fonts and styles, add multimedia, and insert footnotes. These instructions apply to PowerPoint 2019, 2016, and 2013; PowerPoint for Microsoft 365; and PowerPoint for Mac.
I'm working on reformatting a badly formatted powerpoint using a master slide layout and am having issues. First off, I need to apply a custom bullet to all 80 or so slides. I changed a master slide to reflect that but it doesn't want to take on the regular slides. Second, the master layout has images in the bottom of the slide (company logo).
Harassment is any behavior intended to disturb or upset a person or group of people. Threats include any threat of suicide, violence, or harm to another.
1. Visme. Let's start with the best app for presentations you can use to design your presentation. Visme is a cloud-based graphic design software that allows designers and non-designers alike to create beautiful and professional presentations, infographics, social media graphics and more.