Stack Exchange Network
Stack Exchange network consists of 183 Q&A communities including Stack Overflow , the largest, most trusted online community for developers to learn, share their knowledge, and build their careers.
Q&A for work
Connect and share knowledge within a single location that is structured and easy to search.

page-specific bullets in openoffice impress
I need to switch the bullets in an openoffice impress slideshow. In one page I need the "normal" round ball, in another I need a check sign, in another I need the x sign.
What I do is select the list in which I want to make the change and then do a
Format -> Style & Formatting -> RightClick on Outline -> Modify
and I select what I want in the bullet tab.
The problem is that the change is applied to the whole presentation, which is very weird since I'm not doing this change in "Slide Master" but just on the slide I want. I RTFM'ed, Googled, etc, but with no luck.
How can I select different bullets for different lists?
In case this matter, I'm in Ubuntu 10.04, and OpenOffice is 3.2.0
- openoffice-impress
The right way to do this is
Format -> Bullet and Numbering
This way is applied only to the current slide.
You must log in to answer this question.
Not the answer you're looking for browse other questions tagged openoffice openoffice-impress ..
- The Overflow Blog
- Between hyper-focus and burnout: Developing with ADHD
- Why do only a small percentage of GenAI projects actually make it into...
- Featured on Meta
- Our Partnership with OpenAI
- Imgur image URL migration: Coming soon to a Stack Exchange site near you!
Hot Network Questions
- Is work done by a charged particle not gauge invariant?
- Can I cite the results from my unpublished manuscript which is included in my PhD thesis?
- A post-apocalyptic novella, where water disappears and earthquakes eventually finish mankind off. Probably originally in French
- meaning of "work itself out"
- Advisory locks: private to connected database or shared across cluster?
- What are natural units?
- How many rolls are sufficient to ensure, with probability 99%, that the sum is greater than 100?
- I want to know for a relay having different contacts some contacts are shown by dotted line and some by solid line. How dotted line contacts works?
- How should I pronounce words from Ancient Greek philosophy?
- Opening champagne on Shabbat - untwisting the metal
- A question about commutators in free groups
- Is there a sketch in French similar to Abbott and Costello's who's on first
- NRVO vs early return for types not benefitting from move semantics (GCC 14 -Wnrvo)
- My master's supervisor and paper co-author is not willing to give a letter of recommendation for PhD admissions?
- Math symbols in minted
- Golfing the complexity with subtraction
- Water in attic AC air handler pan
- How can I save a dating relationship when I am promoted and she will be in my vertical reporting chain?
- Can a piece of duct tape bring down a plane today (Flight 603, Perú)?
- Does Blender have a built-in basic material library?
- Does taking the title 'reader' have any connotations?
- Could a Thri-Kreen use its secondary arms to operate two-handed ranged weapons?
- Do good bridge players open one diamond and rebid two clubs when they are "weak?"
- Evolution of predatory elves
Creating bulleted and numbered lists
The procedure to create a bulleted or numbered list is quite different depending on the type of text box used, although the tools to manage the list and customize the appearance are the same.
In text boxes created automatically by Impress (called AutoLayout), the outline styles available are by default bulleted lists, while for normal text boxes an additional step is required to create a bulleted list.
Creating lists in AutoLayout text boxes
Every text box included in the available layouts is already formatted as a bulleted list, therefore to create a bulleted list the only necessary steps are:
From the Layout pane, choose a slide design that contains a text box. Those are easily recognizable from the thumbnail.
Click in the text box that reads Click to add an outline.
Type the text, then press Enter to start a new bulleted line.
The default list type is a bulleted list. The mechanisms to change the list from bulleted to numbered and vice versa are explained in “Changing the appearance of the list”.
Creating lists in other text boxes
To create a list in a text box, follow these steps:
Place the cursor in the text box.
Type the text and press Enter to start a new bulleted line.
The default list type is a bulleted list. The mechanisms to change the appearance of the list are explained on page 67.
Creating a new outline level
If necessary, press Enter to begin a new line.
Press Tab . Each time you press Tab the line indents to the next outline level. Pressing Enter creates a new line at the same level as the previous one. To return to the previous level, press Shift+Tab .
In the AutoLayout text boxes, promoting or demoting an item in the list corresponds to applying a different outline style, so the second outline level corresponds to Outline 2 style, the third to Outline 3 style and so on.
Changing the appearance of the list
Selecting the entries
For the entire list:
Select the entire list or click on the gray border of the text box so that just the green resizing handles are displayed.
The Bullets and Numbering dialog (Figure 46) contains five tabs: Bullets, Numbering type, Graphics, Position, and Customize.
If a bulleted list is needed, select the desired bullet style from the six default styles available on the Bullets page .
If a graphics style is needed, select one from those available on the Graphics page .
If a numbered list is needed, select one of the 6 default numbering styles on the Numbering type page .
Later in this section is an explanation on how to add further bullets and numbering styles to the existing ones.
For a single line in the list:
Click anywhere in the line to place the cursor in it.
Follow steps 2–4 of the previous instruction set.
If the list was created in an AutoLayout text box, then an alternative way to change the entire list is to modify the Outline styles. Changes made to the outline style will apply to all the slides using them. Sometimes this is what you want; sometimes it is not, so some care must be taken. Follow the procedure to change the Presentation style described in “Modifying a style” on page 56. The tabs related to list management in Figure 36 are the same ones described below.
Bullets, Numbering type and Graphics pages
These three tabs contain predefined formatting for either the bullet type (Bullets and Graphics tabs) or for the numbering. To apply a specific one, it is sufficient to click on the image. A thick border will indicate the selection.
Position page
Use the Position page, shown in Figure 47, to fine tune the indentation and spacing of the bullet point and its text. This page is particularly effective when used in combination with the Customize page .
To set up an outline level, first select it from the list on the left hand side of the page. Then set the Indent, which is the spacing between the bullet or number and the text. If you select the checkbox Relative next to the indent, the indent value will be measured relative to the previous level and not from the margin.
The numbering alignment is only useful when creating a numbered list; use it to specify the alignment of the numbers. For example, you may want to align them to the right to line up one- and two-digit numbers in a pleasing way.
The Position page is not available if you are modifying a presentation style or graphics style, however the same effects can be obtained by using the Indents and Spacing page of the dialog for creating or modifying a slide (see Figure 43).
Customize page
Use the Customize page, shown in Figure 48, to alter the style of all the outline levels. The options available on this page depend on the type of marker selected for the list. Select first the level you want to modify on the left hand side of the box. To modify all 9 levels at once, select 1 – 9 as the level. Because the levels are arranged in a hierarchical structure, changing for example the font attribute of one of the levels ripples through all the lower levels.
Depending on the numbering style selected in the Numbering box (bullet, graphic, numbering), some of the following options become available on the page :
Before : Enter any text to appear before the number (for example, Step ).
After : Enter any text to appear after the number (for example, a punctuation mark).
Color : Pick the color for the list marker (number or bullet character).
Relative size : Specify the size of the number relative to the size of the characters in the paragraph of the list.
Start at : Enter the first value of the list (for example, you might want the list to start at 4 instead of 1).
Character button : Click this button to select the character for the bullet.
Graphics selection button : Opens a list of available graphics (Gallery) or allows the selection of a file on the hard disk to be used as marker.
Width and Height : Specify the dimensions of the graphic marker.
Keep ratio checkbox : If selected, the ratio between the width and the height of the graphic marker is fixed.
The right hand side of the screen shows a preview of the modifications made.
To revert to the default values, click the Reset button in the bottom right corner.
Using the Customize page, you can create complex structured layouts, for example a nested list with numbering followed by bullets, as in Figure 49.
Changing the order or the outline level of bulleted or numbered lines
Click once in a line of text to place the cursor in it, then click on the Outline tab (to the right of the Normal tab) in the Workspace and use the Promote/Demote buttons in the Text Formatting toolbar to move the text to the appropriate position and give it the appropriate outline level.
The eLearning Coach
For designing effective learning experiences

6 Alternatives To Bullet Points in eLearning and Slides
Get rid of those text heavy slides.
by Connie Malamed

Learners and audiences need novelty to maintain and sustain attention. The trick for going beyond bullet points is to think visually. By sprinkling in bullet point alternatives here and there, your minimal use of bullets will be more effective.
Here are six bullet point alternatives you can create in any graphics program or in PowerPoint. If you’re interested in more visual design ideas, see my book, Visual Design Solutions .
Bullet Point Alternative 1: Use text boxes
A simple alternative to a list is to place each item into a a text box that is arranged in a suitable layout. With this approach, each point is more pronounced than in a list. It can also be accomplished easily with basic graphic tools and in PowerPoint. Below, what could have been a bullet list of eLearning design skills is placed in horizontally arranged text boxes with a 1 pixel border.
Bullet Point Alternative 2: Use icons to indicate the topic
Using the same text box idea as above, this approach adds icons to the mix. Not only does this add visual appeal, but it suggests what the topic is about. An image may also work as a mnemonic device to help a person retain information. If you need help finding suitable icons, see How to Use Icons in eLearning for more on this topic.
Here is a similar idea using long horizontal boxes. The text is longer than a phrase, but this could work with a shorter statement.

Bullet Point Alternative 3: Let People Speak Your List
If your learning design includes scenarios, you can use the characters to speak your bullets as shown below. This can work well as a summary of key points. When you use people cutouts to speak your points, no one will suspect this is a bullet list.

Bullet Point Alternative 4: Wrap the list around a muted picture
Another simple approach is to find a relevant silhouette or cutout of a person or object. Then wrap the bullet list around the silhouette or shape, gently following its contours. I prefer to use silhouettes when I want the text to be prominent. Silhouettes are a subtle way to add visual appeal without being too obtrusive.

Bullet Point Alternative 5: Draw a Diagram
Then there’s the diagram approach. Use a radial diagram when information is at the same level. Place the topic or category in a circle or ellipse in the center. Then place spokes around this shape in the form of arrows or pointers. Place what would have been a bullet list item at the end of each spoke.
For alternatives to the radial design, consider a hierarchical chart when there are key points and sub-points. Also experiment with PowerPoint’s predefined diagrams. Just remember to use grouping principles so learners will know which items are related to each other.

Bullet Point Alternative 6: Create a Table
If you analyze your content carefully, you might find that several bullet lists can be associated into one category. If so, you may be able to transform your bullet list into a table. The wondrous thing about a table format is that the values can be either words or numbers. In the media format example below, different multimedia file formats (on the right) are organized into a table by media type (on the left). This was able to replace four separate bullet lists.

July 15, 2021 at 11:16 pm
You’ve got some great ideas and I think they can work given the right context. The approaches in this article work for eLearning and many presentations, but his ideas would mostly work only for presentations. Spreading related points across multiple slides will often NOT work for eLearning but would be fine for a presentation. Also, much depends on the purpose of the presentation. If it’s to raise funds for a charity or to get volunteers, it might be completely different than if the the slides are for training on how to save a patient’s life or explaining scientific research. In some cases, the goal is to raise awareness and in others it’s for learning transfer.

July 14, 2021 at 6:32 pm
Thank you for this post, Connie! I’m new to your blog and so far have found it very insightful! You suggested some great ideas as alternatives to using bullets. A list of bullets might have worked in the past, but nowadays, you loose people’s attention in a matter of milliseconds, so the content has to be to-the-point and visually captivating. I was reading a post by Dirk Haun ( https://www.themobilepresenter.com/article.php/bullet-points ) and he suggests we use one idea per slide. He questions why presenters insist on cramming so much information in one slide if slides are free! He goes on to suggest using photos or visuals that emphasize the point you’re trying to make. Ned Potter also offered some interesting ideas on alternatives for bullet points ( https://www.ned-potter.com/blog/6-alternatives-to-bullet-points ). He mentioned some pretty persuasive reasons he found on the International Journal of Business Communication (2015), saying that “your audience engages less, remembers less, agrees less and likes you less when you use bullet points in your PowerPoint presentations.” Some of his ideas are similar to what you shared, but there are some different ones… worthy checking:) I kinda like the suggestion of using one idea per slide, but I’m just afraid people could loose the sense of grouping the information under one big umbrella or topic. My suggestion would be to introduce the main topic using one of your visual ideas with the “bullets” in the form of text boxes, icons, diagrams, or even a list wrapped around a picture, then present each idea in a separate slide with a short message and a picture, graphic, or visual that really captures the main idea, and at the end wrap up that point by sharing the first slide again and briefly reviewing the points that were touched. This way I feel that the audience would get a better sense of the categories under each main idea.

October 17, 2020 at 5:30 pm
Fabulous ideas for more creative bullet points. You must be a professional!
Thank you for the ideas.
February 8, 2019 at 2:08 pm
Yes, that’s a good approach. Glad you are sharing it.

February 1, 2019 at 7:48 am
Another top post, Connie. I’m relatively new to your site, and just catching up on “arrears” of your great ideas!
Like Craig Hadden, I favour displaying one item at a time in presentations and webinars – using “build ups”.
The easiest way to make this look seamless is to create the final slide in the series first – and then copy this as many times as necessary and delete text boxes from the earlier ones in the series as necessary.
So: create slide 6 with 6 text boxes and copy it so you have 6 copies. Then delete text boxes 2 to 5 from slide 1 (leaving box 1) – delete text boxes 3 to 5 from slide 2 (leaving boxes 1 and 2) – and so on until you build up to slide 6.
I find this works really well if I “highlight” the current point being discussed by the narrator. Usually, I keep the relevant text box in full colour, and fade the previous text boxes using transparencies.
Keep up the good work!

December 21, 2018 at 3:19 pm
Thank you. Very useful.

December 4, 2018 at 2:47 pm
I will be integrating this idea into my educational technology class at UVA Wise in the spring. Thank you
October 28, 2018 at 3:52 pm
You’re welcome, Shalini 🙂

October 26, 2018 at 8:51 pm
Great alternatives to the dreaded bullet list! Thanks for this insightful article and highly effective tips.

November 5, 2017 at 12:07 pm
Nicely done. More creative and visually attractive which is what we need.
June 28, 2016 at 11:18 am
Maybe five? People can process around 3-5 chunks of information at one time. Best, Connie

June 27, 2016 at 7:34 pm
I am a pastor and am trying to communicate more than 10 characteristics of God. I can just see the eyes glaze over. I imagined a graphic of some kind being a better approach than a list as long as your arm. I like the graphic you suggested above. How many satellite points can I use before they miss everything?
February 7, 2015 at 2:02 pm
Thanks, Aaron. Hope you enjoy the podcast.

February 7, 2015 at 11:30 am
These are awesome ideas. Thanks for sharing. I just found out recently you are doing a podcast. I been going through and listening to all of them. Great Stuff!
April 6, 2014 at 9:40 am
Thanks for the kind words, Belen. Glad it helps! Connie

April 3, 2014 at 3:25 am
Always a reference for me to get rid of bullets.
Belen Casado
August 19, 2013 at 11:52 am
Thanks for the excellent suggestion, Edward. This would work well with a professional narrator and with captions too.

August 18, 2013 at 11:07 pm
Use a blank slide (‘B’ ow ‘W’) and use your own voice, visibly counting on your fingers each point you make.

February 17, 2013 at 2:41 pm
I enjoyed reading your article, especially Alternative 3: Let People Speak Your List. While I have utilized the other techniques in my own PowerPoint presentations, this will be a useful addition to my slides.
August 3, 2012 at 10:04 am
Hi Craig, Thanks for all of your ideas and links. I love when readers share what they know. What a great community.
Best regards, Connie

August 3, 2012 at 9:57 am
Great post, Connie! This list is really accessible and useful because you’ve illustrated each idea and described them succinctly, yet also supplied links to more resources.
As for which alternative is best, I enjoy using icons (or even iconic photos), people and diagrams to replace bullet lists. (And to make diagrams, SmartArt’s a great help – you can even right-click a bullet list and choose Convert To SmartArt.)
To see what I mean by iconic photos, see this post: http://remotepossibilities.wordpress.com/2011/11/16/5-ways-to-be-a-top-presenter/#whats_in And a good use for a “list” of people is to create an audience-oriented agenda: http://remotepossibilities.wordpress.com/2011/12/01/intrigue-people-firstframework-part-1i/#structure_picture
Displaying a list of items one at a time works well, and you can do that with all 6 alternatives. That way, the audience is intrigued about what’s coming next. I blogged about that process (with illustrations) here: http://remotepossibilities.wordpress.com/2011/12/01/intrigue-people-firstframework-part-1i/#show_cues
Coming from a tech-writing background myself, I find tables really valuable, too, which might explain why I use them quite a lot in my posts!
Anyway, thanks for all the neat ideas here.
July 25, 2012 at 10:20 am
I’m glad you found it helpful, Tash. I’d love to hear other suggestions. I’m sure there could be many more. Connie

July 24, 2012 at 10:50 pm
What a great list of alternatives, Connie – thank you. I knew or could name all of thsoe but hadn’t really thought about using them more than bullet lists when I help clients with presentations. I do use tables a lot as well as lists with an image but you’ve reminded me to mix things up further.

March 30, 2012 at 12:13 pm
Very nice article, useful, succinct, to the point. Thanks for sharing!
February 26, 2012 at 9:28 pm
Hi Michaela, Thanks for your support. It’s not always easy to get around using bullet points, but it’s good to try (unless they are really needed). Best, Connie

February 26, 2012 at 4:57 pm
Connie, great article! I wish all the people read it and stop using bullets all the time..
I am glad to see your article as one of my readings in my EdTech course.

January 7, 2012 at 1:11 pm
Just saw this post via Scoop.it. Great ideas, thanks!

November 23, 2011 at 4:01 pm
I think it’s a good idea to mix things up, remembering what Chantelle (8/5/11 post) said, “need to make sure the graphic doesn’t pull away from or interfere with either the relevance of meaning of the information being presented.”
Also, bullets help to organize the information in a way the alternatives can’t do quite as well. Mixing it up keeps the participant “awake”…using styles appropriately helps them to retain the content. TX for the good ideas!

September 5, 2011 at 2:23 am
Such simple yet innovative and amazing tips….thank you. These will really bring substantial improvement to my presentations.

August 5, 2011 at 6:28 pm
I love these ideas and have used a few of them in my own design. However, I think we also should remember what I just learned in a statistics class, which is that you need to make sure the graphic doesn’t pull away from or interfere with either the relevance of meaning of the information being presented. For example, I love infographics, but if you look at some of them, the ratio of the pictures they use to display the information isn’t the least bit accurate. Obviously, it’s probably easier to confuse numerical data than it is when trying to simply display words to be interpreted, but still, at times a graphic might be interpreted to mean something with regard to the content that it is not meant to, so it’s good to keep that in mind.

August 3, 2011 at 12:05 pm
I just discovered your blog via School Library Media Activities Monthly. You have blown up my PPT presentations in my middle school library! I’m not a very creative person, so your suggestions made me see how dynamic a PPT can be.
I can’t wait to share these ideas with our 8th grade students, who do about 4 PPTs a year in history class. Their presentations fall into two camps–dry bullet pointed lists of information, or chaotic slides crammed with every transition and animation PowerPoint offers. Our teachers will be thanking you, too, as they wade through 150 PPTs each quarter.
I’m glad I am back at work 2 weeks before the students so I can work my way through your blog and website to educate myself on design! Thanks for sharing your insights.

July 29, 2011 at 11:03 am
I really like #4, which supports a list with items that contain more than a few words. I’ll try it out. Thanks!!

July 29, 2011 at 9:23 am
Thanks for posting! These look great, were very inspirational and got me thinking of more ways to do this!

July 29, 2011 at 5:10 am
Very good ideas. I usually use the nos 1, 2 and 5 ideas. Will now look for an opportunity to apply others. Bullet lists are quite cliched now-a-days, but at times, we can’t simply do away with them. This will help.

July 28, 2011 at 2:26 am
Great article – creative alternatives – love it!

July 27, 2011 at 7:17 pm
Excellent idea! Will share with all Trainers in Indonesia. Thank you!

July 27, 2011 at 10:32 am
Fantastic information and ideas – thank you!!
July 27, 2011 at 10:18 am
I agree, Jose. Icons can be leveraged so that they facilitate learning. Thanks for your comment.

July 27, 2011 at 9:54 am
I like your ideas. Specifically, I like the “Let the icons do the talking” since it takes advantage of the metacognitive study strategies of mnemonics and visual imagery.
Please keep bringing the good ideas, thanks for an excellent coaching.
July 24, 2011 at 4:07 pm
Nice video, Bruce. Thanks.

July 24, 2011 at 2:13 pm
This is a great set of options!
Here’s a video showing how to create your own set of icons so they look good together. http://speakingppt.com/2011/02/16/tip1-icons/
— Bruce Gabrielle Author, Speaking PowerPoint
July 17, 2011 at 1:46 pm
Thanks, Mark. So happy this is helpful. Teachers need all the help they can get. Best, Connie

July 17, 2011 at 10:25 am
Really like this post. As a teacher in school it is important to keep content fresh and engaging, and moving away from dry bullet points is a fast, easy and practical way to do that.
July 14, 2011 at 5:04 pm
Thanks. Really like the way you worded your comment. 🙂

July 14, 2011 at 4:46 pm
Really like the way you work around the dreaded list.
July 14, 2011 at 8:34 am
Hi Anne-Laure, Thanks for your comment. I’m sure it’s quite satisfying for you to improve your SMEs’ presentations. I’m guessing that their use of the word “NICE” means a lot more than that. It’s just a simple way to express the richness that you’re adding. 🙂 Keep up the good work! Best, Connie
July 14, 2011 at 8:30 am
Hi Scotty, What a great metaphor for information design–when food looks better, it tastes better. If you’re interested in information design, you may want to read these articles: – We Design Information Too – The Information Design Handbook: Book Review – Designing Text-based Information Thanks for your comment. Connie

July 14, 2011 at 8:06 am
This is a great message, reminded me to focus on the design of information. When food looks better, it tastes better, the same is true for information. My favorite use of this is the web 2.0 stick people… thanks for sharing

July 14, 2011 at 7:45 am
I am currently coaching SMEs in rewriting their marketing presentations into “elearning” material (as far as we can do with only PPT) so I show them like you do what alternatives can be much more engaging than dry bullet points (with endless sentences!) and no pictures. My only concern at the moment is that their comments after the work is done is “this is so NICE now”. I assume this means more engaging and will do the job… I will keep your examples also and put it in my best practices if you don’t mind (with mentioning you of course!). It will add credit to my speech if there is some English experts saying what i repeat every single day. Thanks for your always “just in time” posts.
July 14, 2011 at 6:54 am
Thanks, Bruce. Glad this helps. I still use bullets myself, but try to mix it up with these types of approaches.

July 14, 2011 at 2:56 am
Nice article. I have been trying to “ban the bullets” with clients recently, this is a nice set of alternatives – all simple and easy to explain. Nice one. Bruce
[…] Sometimes you can’t help but use a list of text. Instead of using a bullet list, disguise it through these simple text layouts, offered by Connie Malamed of “The eLearning Coach“– […]
[…] Thankfully, Connie Malamed of “The eLearning Coach” shares some wonderful text layouts, which will disguise a bulleted list for those times when the list is unavoidable. On her website, Malamed details 6 Alternatives To Bullet Lists1. […]
[…] 6 Alternatives To Bullet Lists […]
[…] way to meet their purpose visually, that would be great. Connie Malamed wrote a great article called “6 Alternatives To Bullet Lists” if you do have time. But the reality is there is not always the time or a graphic artist handy to […]
[…] Alternatives to Bullet Lists […]
[…] To get more ideas for replacing text with something far more engaging, see this great illustrated and succinct post by Connie Malamed on 6 Alternatives To Bullet Lists. […]
[…] like the before and after example shown below, is more engaging than plain text. Also, see Alternatives to Bullet Lists for more […]
[…] 6 Alternatives To Bullet Lists IEP GOAL BANK! </b></i>*} This IEP GOAL BANK is the place where you can "deposit" your own IEP goals/objectives and "withdraw" the goals/objectives contributed by others. […]
[…] blog The E-Learning Coach has some groovy tips for replacing bullet points. Go on…try it..I know you want to! 0 […]
[…] view the article in full, or for more great online training tips, visit the eLearning coach blog. This entry was posted in Uncategorized. Bookmark the permalink. ← Picking the Brain of […]
[…] To view the article in full, or for more great online training tips, visit the eLearning coach blog. […]
[…] 6 Alternatives To Bullet Lists About Michael M Grant Dr. Michael M. Grant is a passionate professor, researcher, and consultant. He works with faculty members, schools and universities, and districts to integrate technology meaningfully and improve teaching and learning. When 140 characters just won't work, then he blogs here at Viral-Notebook.com. He has a beautiful wife and three equally beautiful daughters, who will change the world. Visit Michael M's Website. View other posts by Michael M Grant –> No Comments Yet – be the First! Leave a Reply Click here to cancel reply. Name Required: […]
[…] Tips. Let’s all do this –> 6 Alternatives To Bullet Lists: The eLearning Coach theelearningcoach.com/media/graphics… (rt […]
[…] == 'yes') {document.getElementById('splittitletext').style.display = '';} } Bullet Points6 Alternatives To Bullet Lists: The eLearning Coach if (top!=self) { window.location = […]
[…] completare il quadro ecco oggi un’altra carrellata di alternative, proposte da Elearningcoach, […]
[…] Malamed zeigt Ihnen, wie Sie diese Bullet Points vermeiden können: 6 Alternatives To Bullet Lists. Diese sechs Alternativen […]
[…] on occasion. The presentation should enrich the classroom for the learners, not the presenters. The eLearning Coach, has 6 Alternatives to Bullet Lists to help us out. The suggestions not only help with the […]
[…] See full story.. […]
[…] to set out content in online courses to engage and motivate learners. Their latest post is about the alternatives to bullet points, which are a pet hate of mine. So i was pleased to read some of the alternative they came up with! […]
Leave a Reply
Your email address will not be published. Required fields are marked *
This site uses Akismet to reduce spam. Learn how your comment data is processed .
Bullet Point / Text Layouts
Discover our comprehensive selection of Bullet Point and Text Layout templates for PowerPoint and Google Slides. These templates are designed to help you present your content in an organized, clear, and visually appealing manner.
Bullet Point and Text Layout templates offer different layouts and styles to showcase your content effectively. From simple bullet points to more elaborate text designs, these templates help you convey your message clearly and keep your audience engaged.

Hexagon Checklist for PowerPoint and Google Slides
Google Slides , PPTX

Calculator List for PowerPoint and Google Slides

Check List Template for PowerPoint and Google Slides

Vertical Hierarchy List for PowerPoint and Google Slides

Infographic Numbered List for PowerPoint and Google Slides

Simple Table of Contents for PowerPoint and Google Slides

Horizontal Numbered List for PowerPoint

List with Folders for PowerPoint

4 Text Boxes for PowerPoint

Numbered List and 3 Banners for PowerPoint

6 Numbers List and Text Boxes for PowerPoint
Search templates by categories, search templates by colors.
Love our templates? Show your support with a coffee!
Thank you for fueling our creativity.
Charts & Diagrams
Text & Tables
Graphics & Metaphors
Timelines & Planning
Best-Ofs & Tips
Terms and Conditions
Privacy Statement
Cookie Policy
Digital Millennium Copyright Act (DMCA) Policy
© Copyright 2024 Ofeex | PRESENTATIONGO® is a registered trademark | All rights reserved.

To provide the best experiences, we and our partners use technologies like cookies to store and/or access device information. Consenting to these technologies will allow us and our partners to process personal data such as browsing behavior or unique IDs on this site and show (non-) personalized ads. Not consenting or withdrawing consent, may adversely affect certain features and functions.
Click below to consent to the above or make granular choices. Your choices will be applied to this site only. You can change your settings at any time, including withdrawing your consent, by using the toggles on the Cookie Policy, or by clicking on the manage consent button at the bottom of the screen.
Thank you for downloading this template!
Remember, you can use it for free but you have to attribute PresentationGO . For example, you can use the following text:
If you really like our free templates and want to thank/help us, you can:
Thank you for your support
Add Bullet Points in PowerPoint [A Complete Tutorial!]
By: Author Shrot Katewa
![Add Bullet Points in PowerPoint [A Complete Tutorial!]](https://artofpresentations.com/wp-content/uploads/2022/02/Featured-Image-How-to-Add-Bullet-Points-in-PowerPoint.webp "bullet points openoffice presentation")
Bullet points are critical to most presentations as they clearly and succinctly put across the key points of a particular slide. Thus, knowing how to add bullet points in PowerPoint is quite important to create clear, minimalistic presentations!
To add bullet points to text in PowerPoint, first, select the text (or the text box). Then, click on the “Home” tab. Next, click on the “Bullets” command from the “Paragraph” group. This will apply the bullet points to the selected text in PowerPoint.
In this article, we shall understand everything there is to know about bullet points. We will take a look at how to add bullet points in PowerPoint, how to customize them, how to add indent and adjust the bullet points, and much more!
So, let’s get started!
1. How to Add Bullet Points in PowerPoint?
Adding bullet points to your PowerPoint presentation can make the text on the slides easy to read. Furthermore, it is quite easy to add bullet points in PowerPoint!
Here’s what you need to do to add bullet points in PowerPoint
Step-1: Select the Text or the Text Box
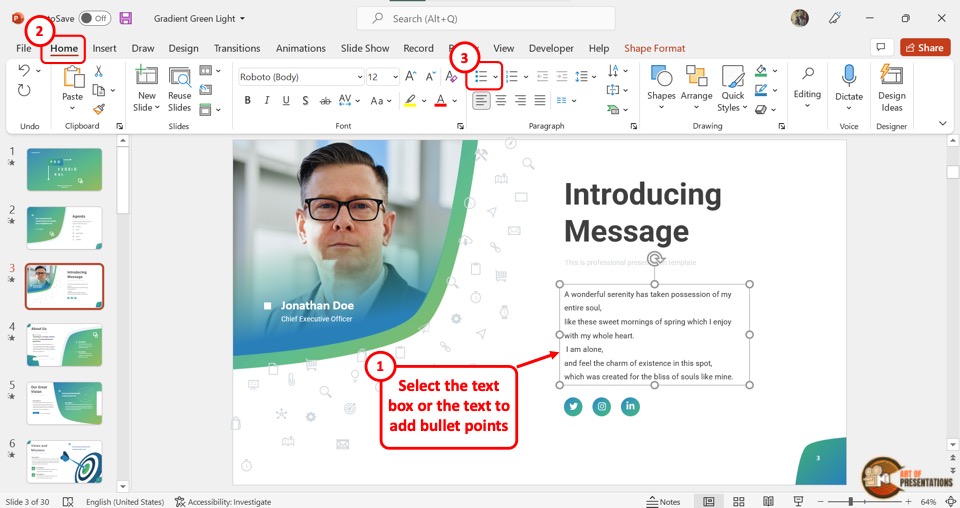
It is important to note that you can only add bullet points to text or a text box present on your PowerPoint slide as long as you first select it. So the first step is to click on the text box to select it.
If you don’t want to add bullet points to all the text within the text box, then simply select and highlight the specific text that you want to add bullet points.
Then, click on the “Home” tab in PowerPoint and click on the “Bullets” icon. The “Bullets” icon is the first icon in the first row and the first column of the “Paragraph” group on the “Home” tab and looks like a list.
Step-2: Click on the “Bullets” Command
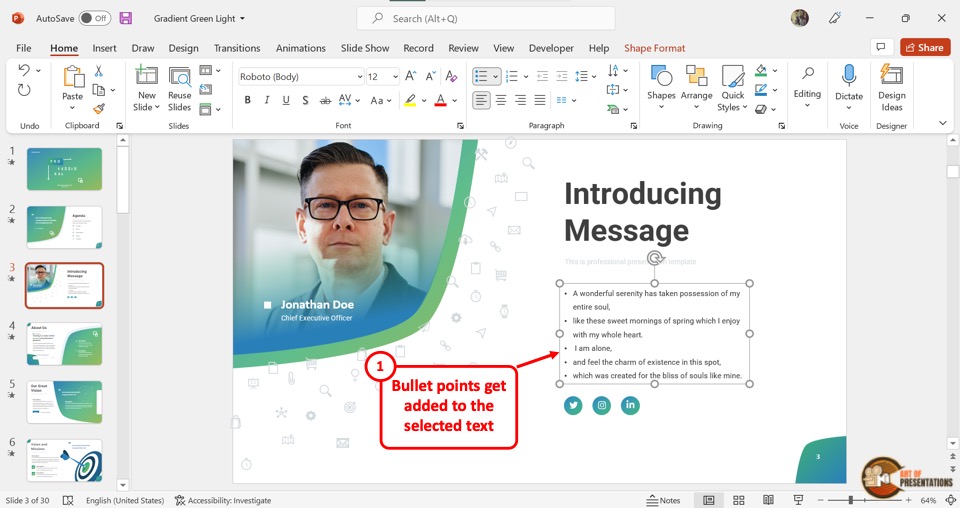
Clicking on the “Bullets” icon will add a bullet point before each paragraph in the text box as shown in the image above.
2. How to Add Second-Level Bullets (Sub-Bullets) in PowerPoint?
A second-level bullet or a sub-bullet allows you to move text one level down in the bullet points in PowerPoint. A second level bullet can help represent multiple pieces of information that is part of the main bullet point.
You can add second-level bullets to a text box in two different ways.
Method-1: Using the “Increase List Level” option
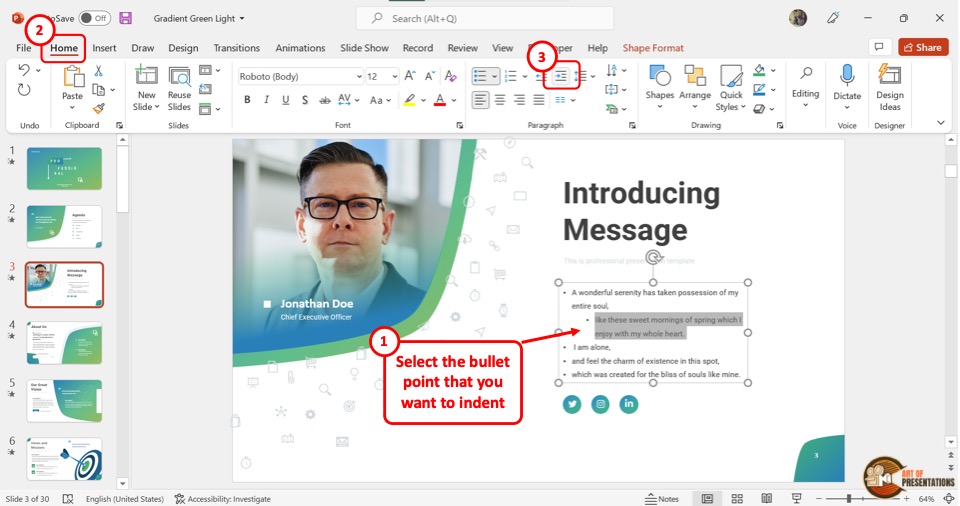
In the text box with a bullet list, select the bullet item which you want to convert to a sub-bullet. Then click on the “Increase Indent Level” icon.
It is usually the fourth icon in the first row of the “Paragraph” section in the “Home” menu. This will turn the selected text into a sub-bullet point.
Method-2: Using the keyboard shortcut
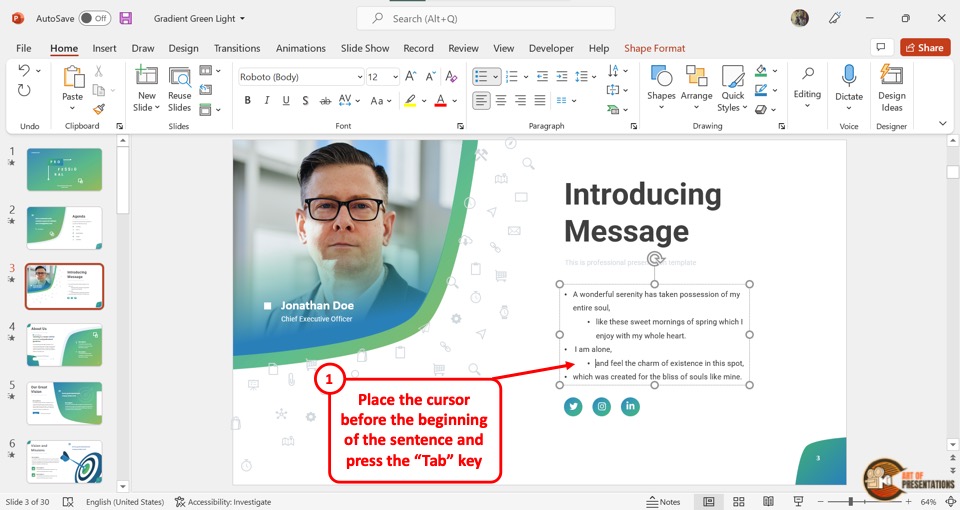
To use the keyboard shortcut, you have to first click on the main bullet point that you want to convert to a second-level bullet. Then all you have to do is press the “Tab” key on your keyboard.
Using both the aforementioned methods, you can keep adding more levels to the bullet points as per your requirement.
2.1 How to Convert a Sub-Bullet to a Main Bullet?
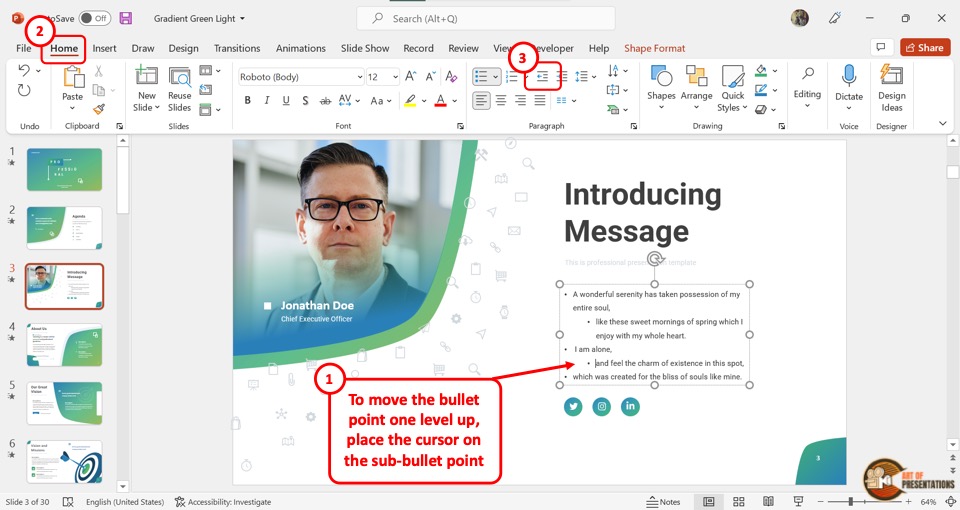
Sometimes, you may want to move the second-level bullet point one level up and make it the main bullet point.
To convert a sub-bullet to the main bullet, you have to first click on the sub-bullet item. Then click on the “Decrease List Level” icon which is the third icon in the first row of the “Paragraph” section in the “Home” menu.
You can alternatively press the “Shift+Tab” keys on your keyboard. This will turn the sub-bullet into the main bullet.
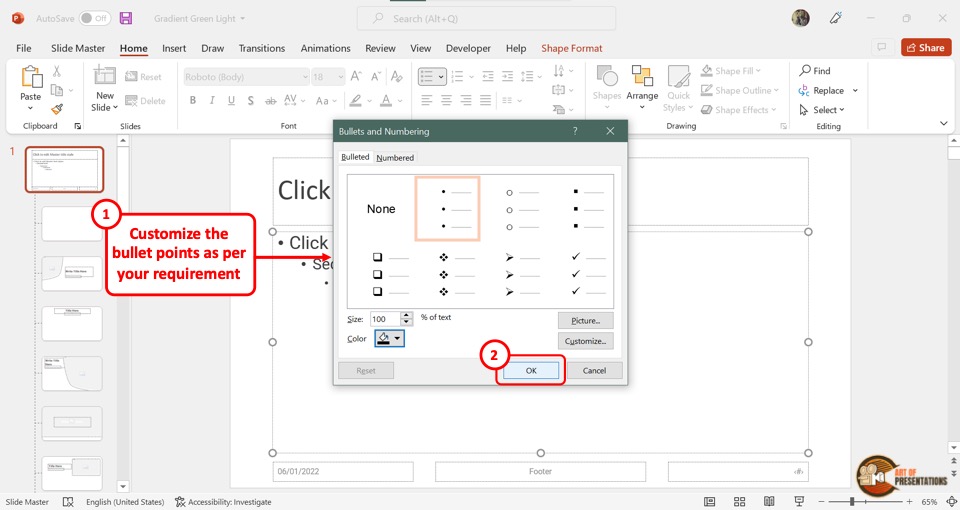
3. How to Customize Bullet Points in PowerPoint?
You can also choose to customize the bullet points in PowerPoint the way you want. Meaning, you can choose to change the way your bullet points look. You can go with a different design, adjust the size, color, or even use a picture as a bullet point!
Let’s take a look at these options to customize the bullet points in PowerPoint below –
Step-1: Click on the text box
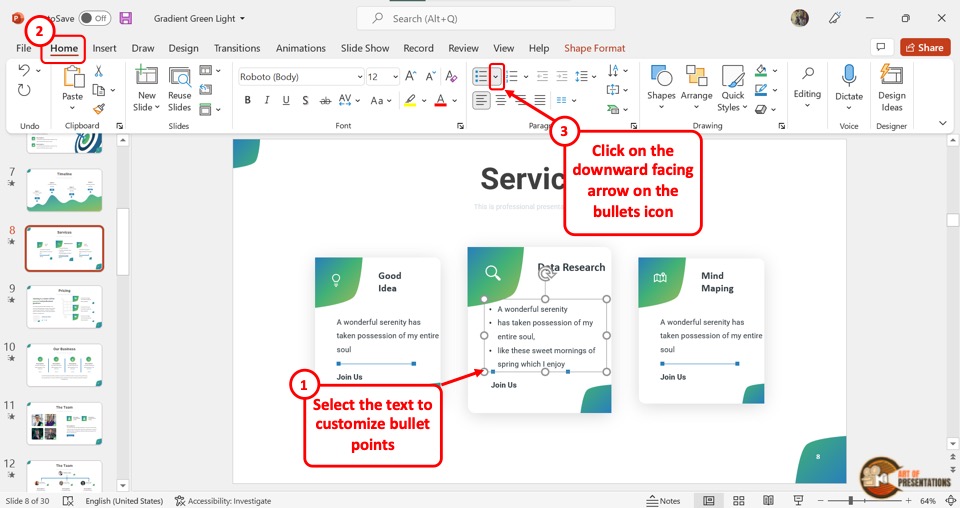
In the open PowerPoint slide, the first step is to click on the text box containing the bullet points. Then click on the “Home” tab in the menu ribbon.
Step-2: Click on the “Bullets and Numbering” option
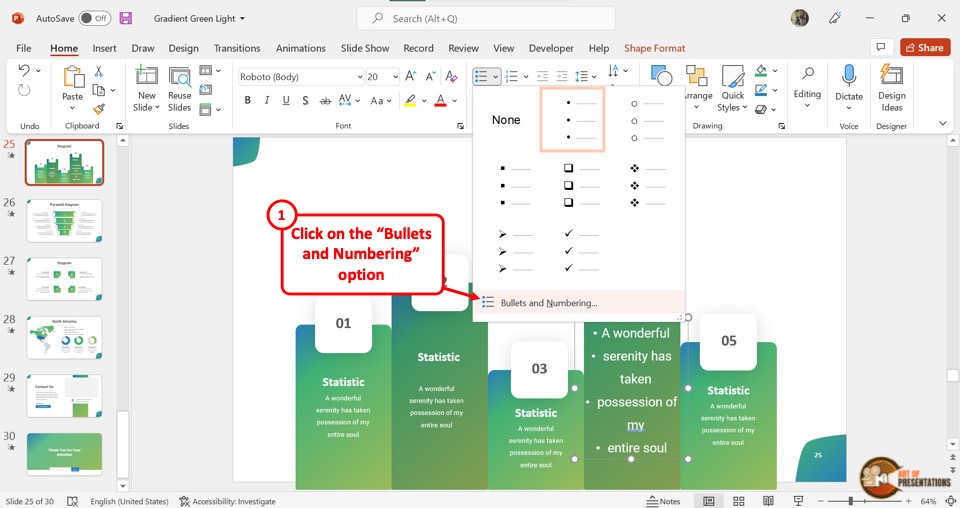
In the “Paragraph” group of the “Home” tab, click on the arrow next to the “Bullets” icon. This will open a dropdown menu where you have to click on the “Bullets and Numbering” option.
Step-3: Select your preferred design
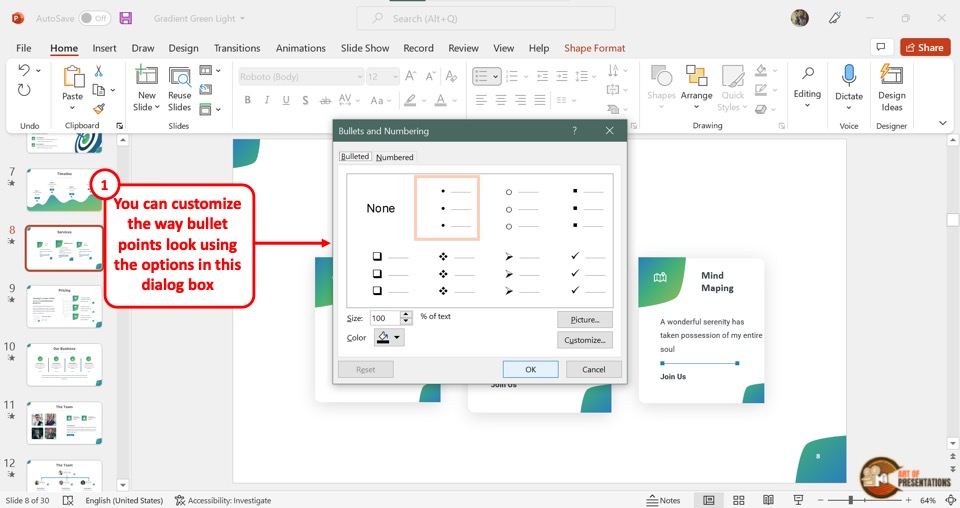
In the “Bullets and Numbering” dialog box, click on the “Bullet” option. You can now click on the “Size” option, “Color” option, and the “Picture” option to customize the bullet point.
Then click on the “OK” button at the bottom of the dialog box to save the custom bullet points.
“Color”
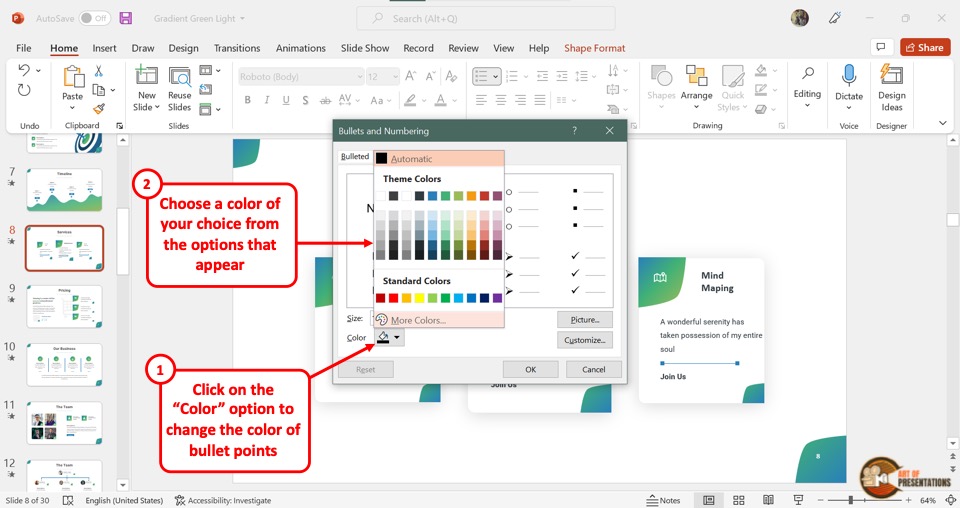
You can customize the color of the bullet point by clicking on the “Colors” option in the “Bullets and Numbering” dialog box. In the pop-up menu, click on your preferred color.
You can also click on the “More Colors” option if you want to pick a color that is not available under “Theme Colors” .
If you can’t see the color that you wish to use in the options provided, you can even use the “Eyedropper Tool” in PowerPoint to match any color on your screen.
“Size”
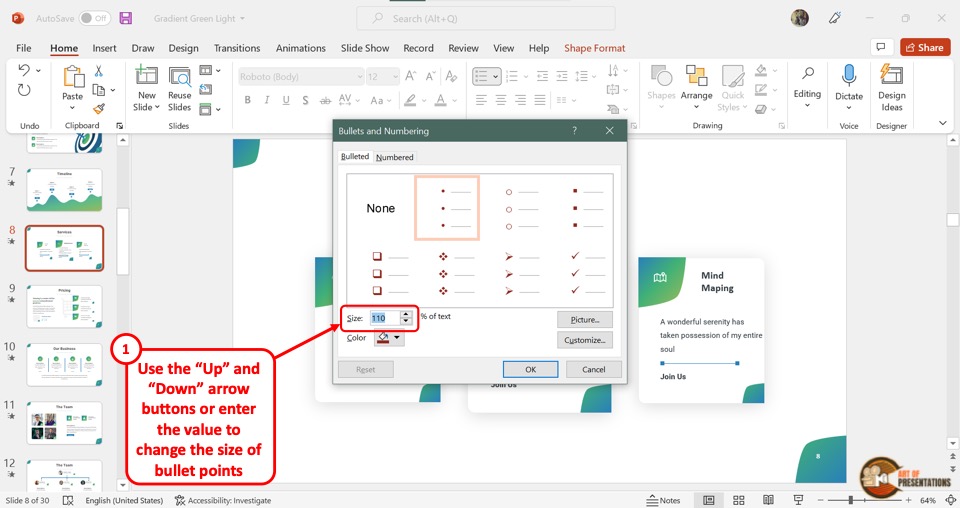
By clicking on the “Size” box, you can change the size of the bullet point. Type in a number in the “Size” box which will show the size of the bullet point proportional to the size of the text.
“Picture”
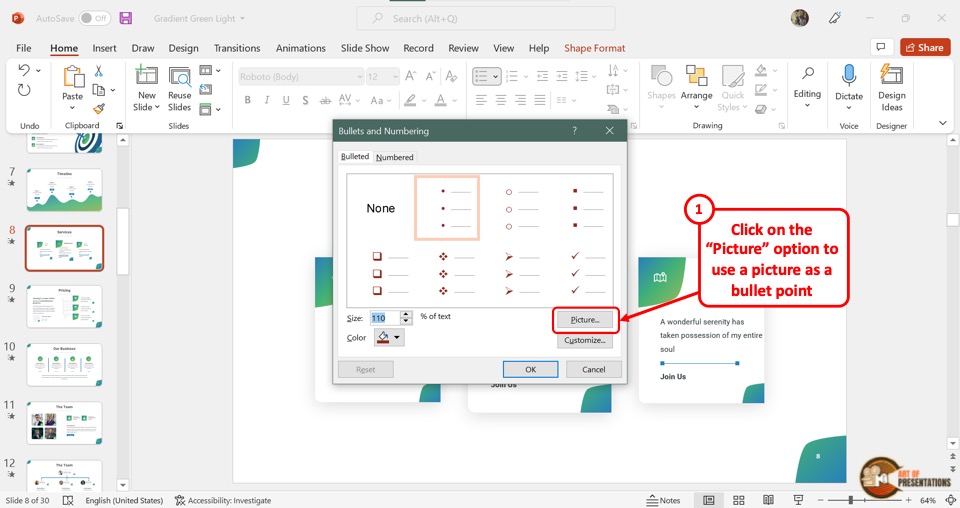
By clicking on the picture option, you can change the bullet points into pictures.
Step-1: Click on the “From a File” option
When you click on the “Pictures” option, it will open a dialog box. Click on the “From a File” option from the dialog box.
Step-2: Click on the “Insert” button
Now all you have to do is click on the picture that you want to add as the bullet point from the “Insert Picture” dialog box.
Then click on the “Insert” button at the bottom of the dialog box. This will replace the bullet points with the selected picture.
Using picture as a bullet point is an idea that works in very rare, well thought out situations. Thus, I’d recommend avoid using this option unless you know what you are doing!
4. How to Increase or Decrease Indent of Bullet Points?
In a text box in a Microsoft PowerPoint presentation, the indent of bullet points shows the list level. By increasing the indent, the bullet item is sent to a lower position in the list hierarchy.
Similarly, you can increase the hierarchy position by decreasing the indent of a bullet point.
Increasing and decreasing the indent also helps you to move a bullet point up or down a level in PowerPoint (as we saw earlier in the article).
4a. Increasing Indent of Bullet Points
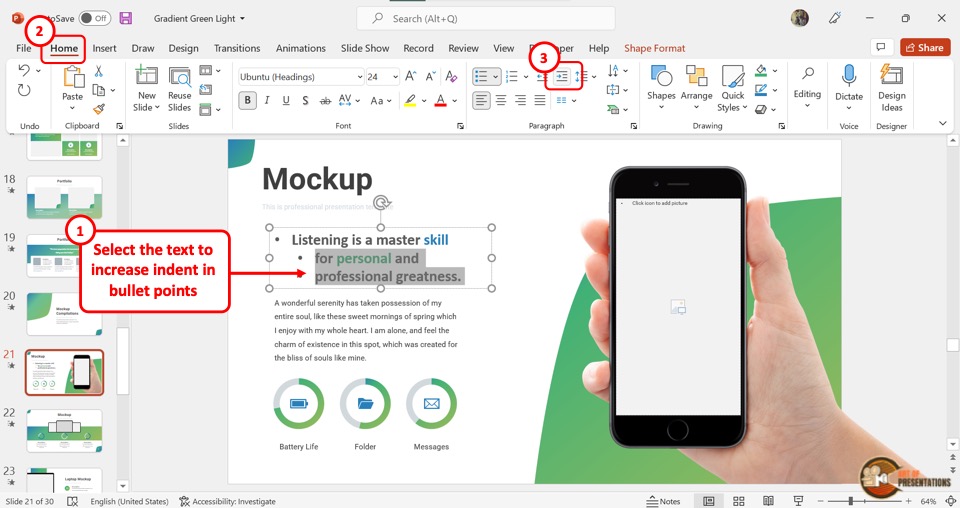
To increase the indent of the bullet point, select the bullet item or multiple bullets. Then click on the “Increase List Level” option in the “Paragraph” section of the “Home” menu.
The “Increase List Level” icon looks like a paragraph with an arrow pointed to the right. Alternatively, you can press the “Tab” key on your keyboard.
4b. Decreasing Indent of Bullet Points

You can only decrease the indent of a sub-bullet point but not the main bullet. To do so, select one or more sub-bullet items. In the “Paragraph” section of the “Home” menu, click on the “Decrease List Level” icon that looks like a paragraph with an arrow facing leftward.
Alternatively, you can press the “Shift+Tab” keys on your keyboard to decrease the indent of the bullet point.
5. How to Change the Style of Bullet Points in PowerPoint?
In addition to changing the color, size and using picture as a bullet point, you can also change the style of bullet point in PowerPoint .
Just as before, first, click on the arrow next to the “Bullets” option and select the “Bullets and Numbering” option from the dropdown menu.
Change bullet symbol
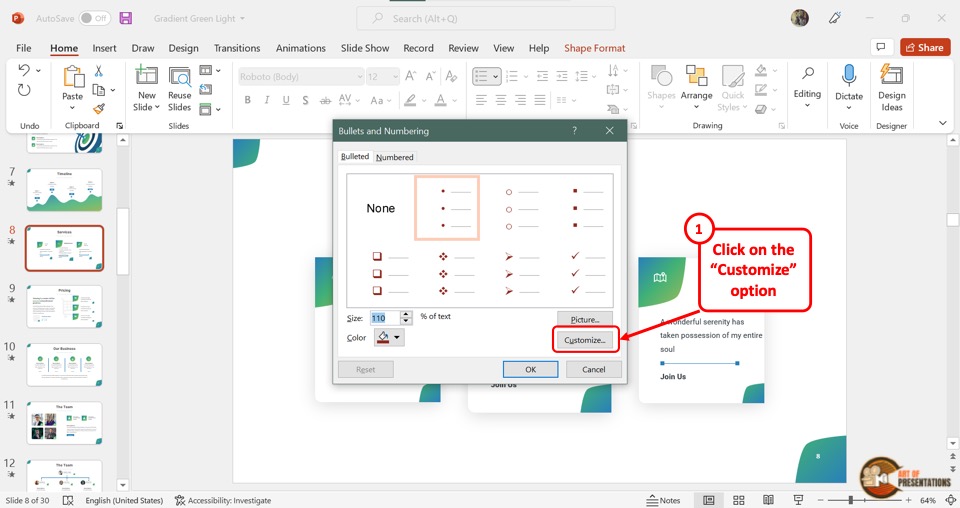
To change the bullet symbol, click on the “Customize” button in the “Bullets and Numbering” dialog box. This will open the “Symbol” dialog box.
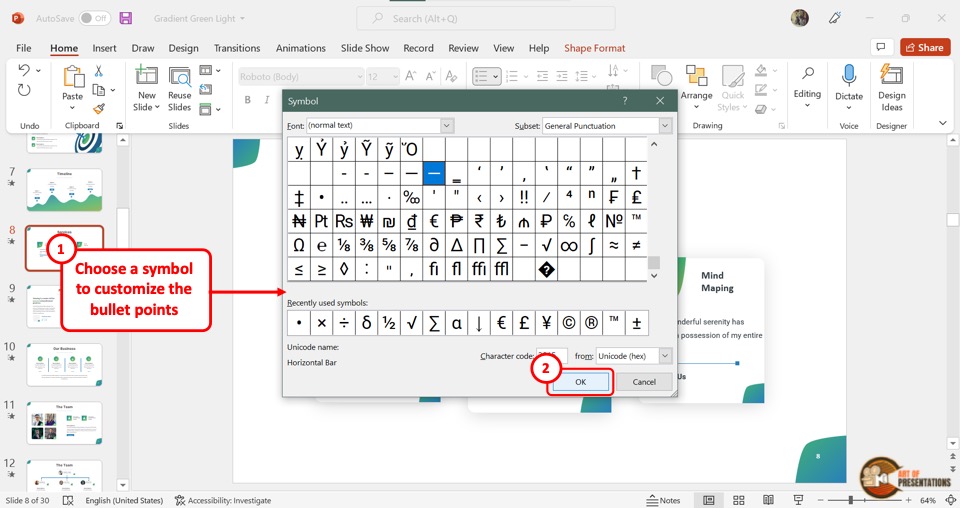
All you have to do is select your preferred symbol and then click on the “OK” button at the bottom.
Change bullet icon

To change the bullet icon, click on the “Pictures” option in the “Bullets and Numbering” dialog box. This will open the “Insert Picture” dialog box.
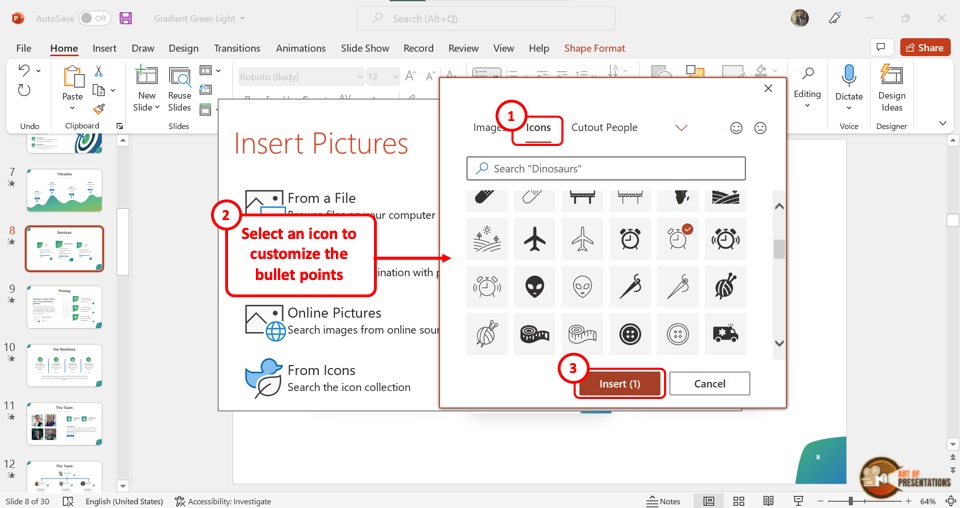
Click on the “From Icons” option and then select your preferred icon. Finally, click on the “Insert” button to change bullet point styles into icons.
6. How to Align Bullet Points Perfectly to the Left?
Within a text box in a PowerPoint slide, each paragraph can have different alignments. Thus, you can end up with bullet points that are not perfectly aligned. To align the bullet points to the left, follow the 2 quick steps.
Step-1: Select the text
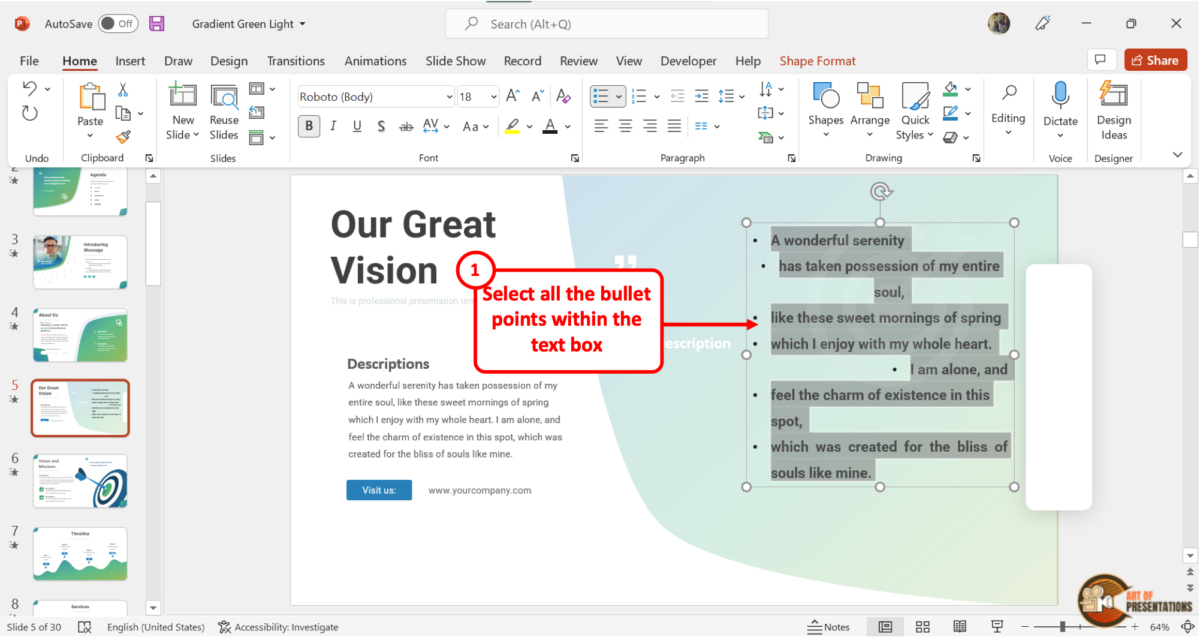
Since each bullet point is a separate paragraph, you have to select all the points in a text box to align them together. Click on the text box and then highlight all the bullet items inside the text box.
Step-2: Click on the “Align Left” option

The next step is to click on the “Align Left” option. The “Align Left” icon is the first icon in the second row of the “Paragraph” section in the “Home” menu.
Alternatively, you can press the “Ctrl+L” keys on your keyboard. This will align all the bullet points perfectly to the left.
7. How to Increase or Decrease Space between Bullet Points and Text?
In the Microsoft PowerPoint text box, there is no “Adjust List Indent” feature that is available in other Microsoft applications. So you cannot adjust the space between the bullet points by default.
However, you can use the “Ruler” to Indent Text in PowerPoint . This will allow you to increase or decrease the space between the bullet point and the text.
You may be tempted to use the space bar to create some space between the text and the bullet point. However, this is not the correct way to do it.
8. How to Animate Bullet Points?
You can easily add animation effects to bullet points in Microsoft PowerPoint.
All you have to do is select the text box and click on the “Animations” tab in the menu ribbon which is located at the top of the screen. Then select your preferred animation effect from the “Animations” menu.
8.1 How to Animate Bullet Points to Appear One-by-One?
To make bullet points appear one-by-one in PowerPoint, first, select the text box. Then, click on the “Animations” tab and apply any entrance animation. Next, click on the “Effect Options” button and select the “By Paragraph” option from the dropdown.
The detailed steps that you need to follow are mentioned below –
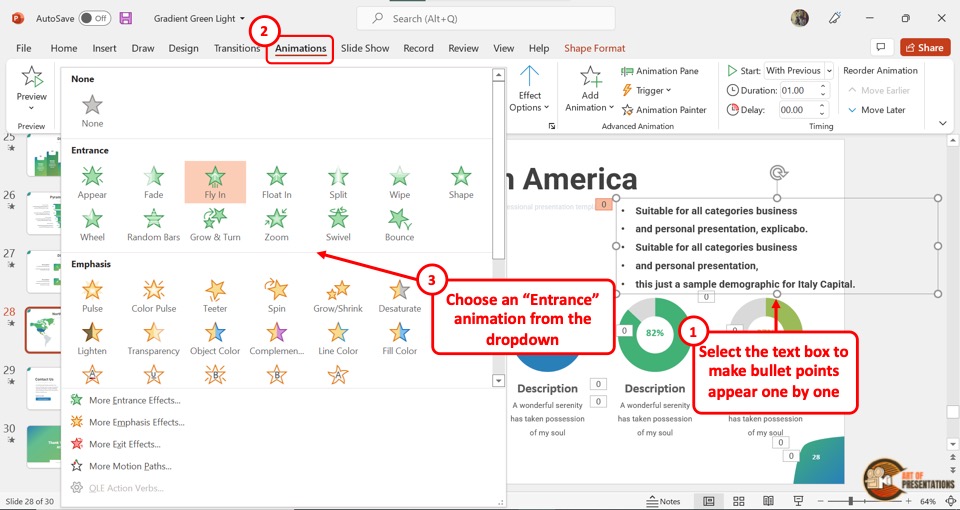
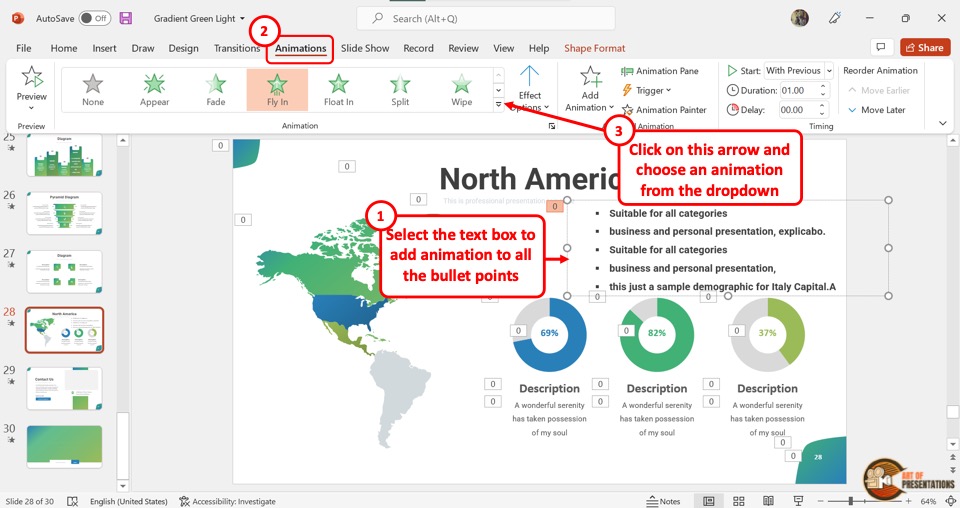
The first step is to click on the text box with the bullet points. Then click on the “Animations” tab in the menu ribbon.
Step-2: Click on your preferred “Entrance” effect
In the “Animations” menu, click on the “More” option to open a dropdown menu. Under the “Entrance” option, click on your preferred animation effect (as shown in image in step 1).
Step-3: Choose the “By Paragraph” Option

The next step is to click on the “Effect Options” button in the “Animations” menu. Then click on the “By Paragraph” option from the dropdown menu. This will make the bullet points within the text box appear one by one.
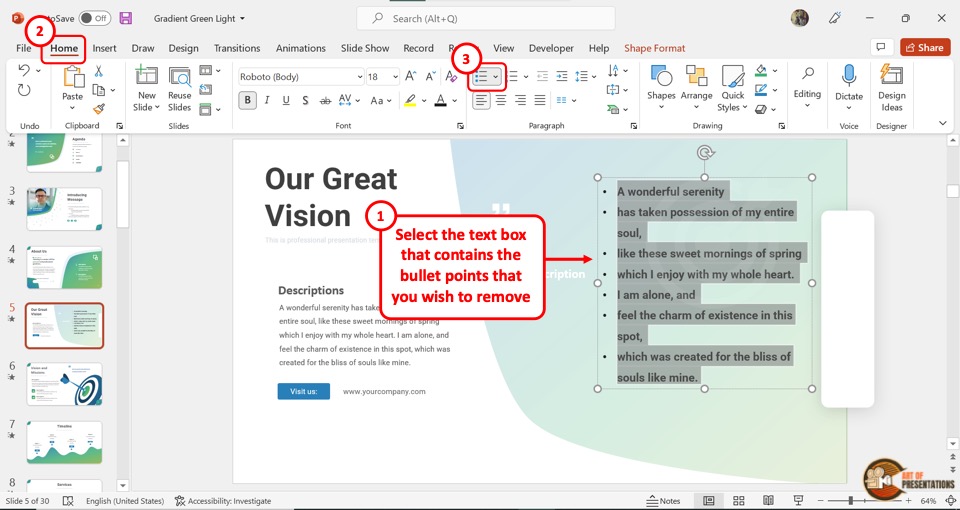
9. How to Remove Bullet Points from Text in PowerPoint?
To remove bullet points from a text box in PowerPoint, first, select the text box by clicking on it. Then click on the “Bullets” option from the “Paragraph” section of the “Home” menu. This will unselect the “Bullets” option and remove the bullet points from the text box.
10. Can You Put Bullet Points on the Right of the Text?
In the Microsoft PowerPoint toolbar, there is no option to put the bullet points on the right side of the text. However, you can customize the menu ribbon to add this option. Follow the 7 quick steps.
Step-1: Click on the “Customize the Ribbon” option
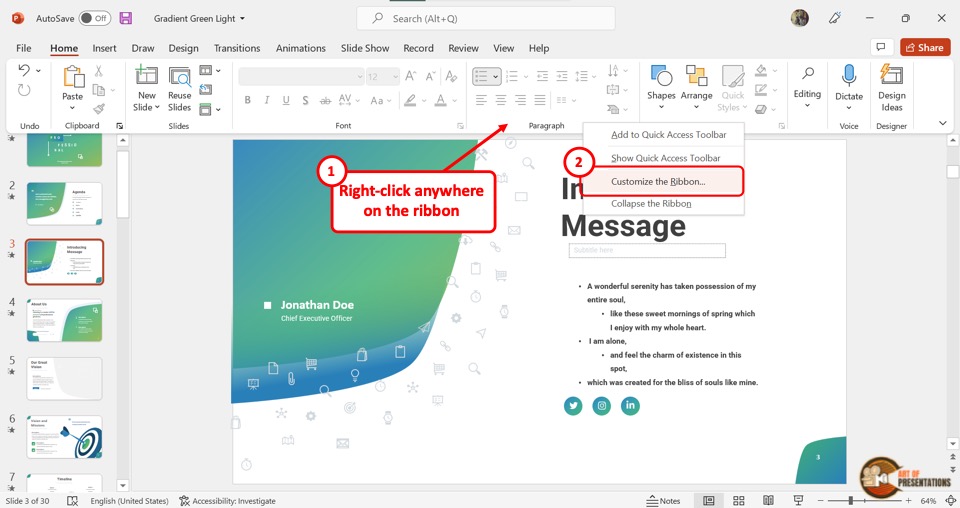
In order to put the bullets on the right of the text, we will need to customize the ribbon in PowerPoint !
In the quick access toolbar, “Right Click” to open the context menu. Then click on the “Customize the Ribbon” option from the menu. This will open a dialog box.
Step-2: Click on “All Commands”
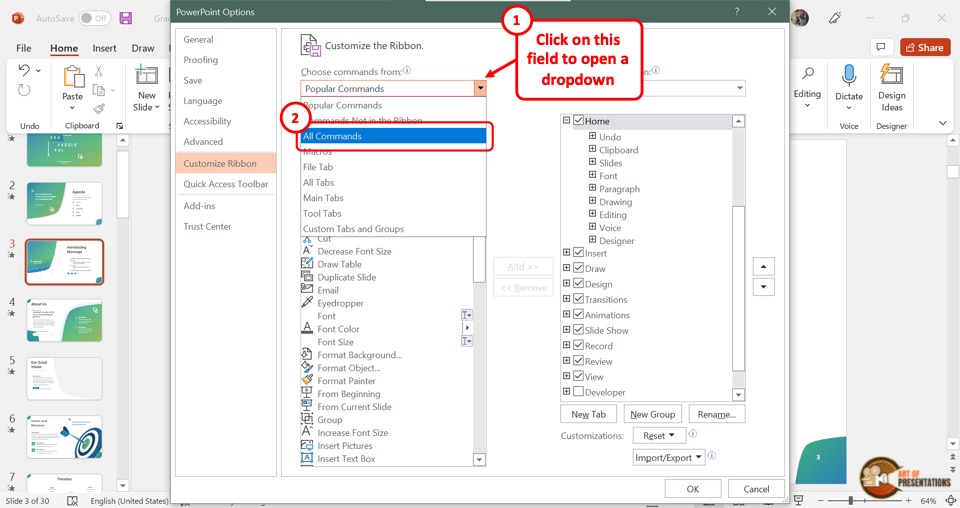
In the “PowerPoint Options” dialog box, click on the “Choose commands from” option which is on the left side. Then click on the “All Commands” option from the dropdown menu.
Step-3: Click on the “Right-to-Left” option
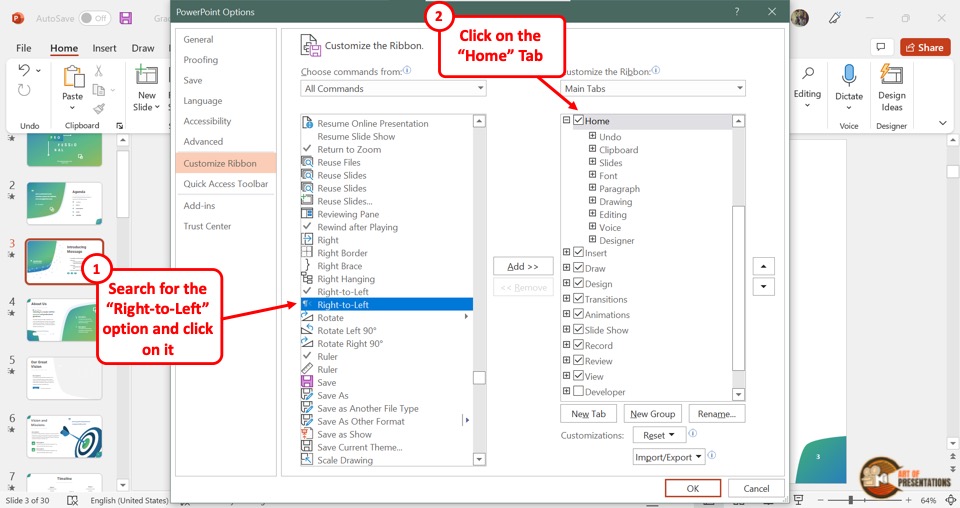
In the alphabetized list under “All Commands” , scroll down and click on the “Right-to-Left” option for text directions. It is the second “Right-to-Left” option with a paragraph icon beside it.
Step-4: Click on the “New Group” button
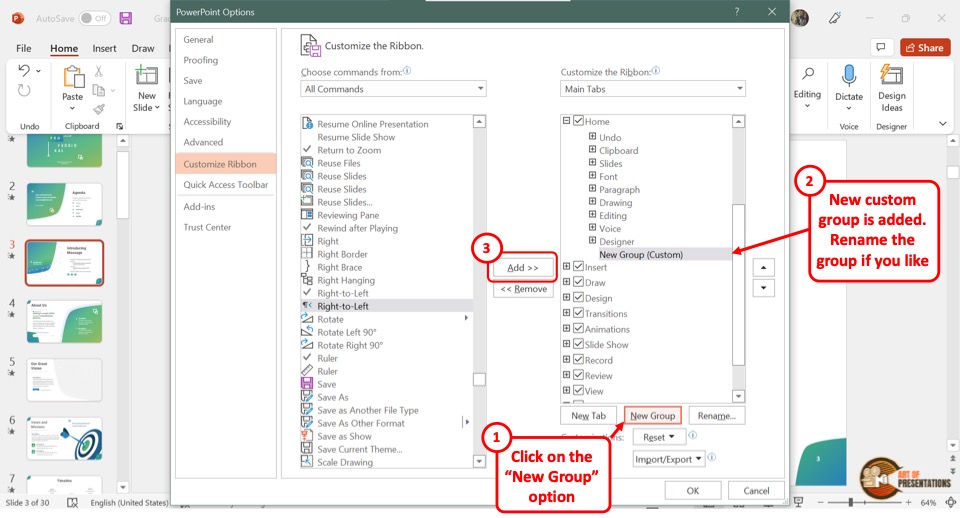
On the right side of the “PowerPoint Options” dialog box, click on the “Home” option under “Main Tabs” . Then click on the “New Group” button at the bottom to add a new group to the “Home” tab of the menu ribbon.
Step-5: Click on the “Add” button
Now you have to click on the “Add” button between the two columns in the “PowerPoint Options” dialog box (as shown in the image in the previous step).
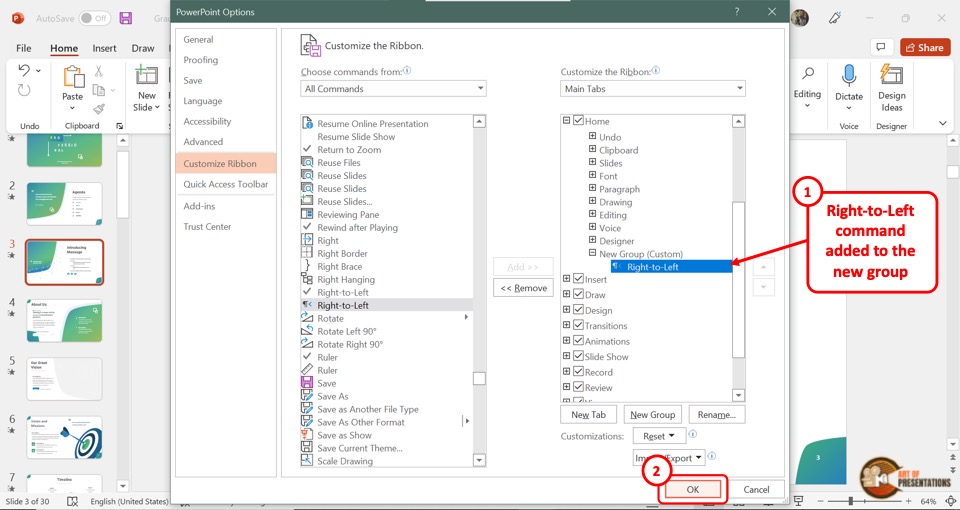
You will see the “Right-to-Left” option appear under the “New Group(Custom)” in the right column.
Step-6: Click on “OK”
Click on the “OK” button at the bottom of the dialog box. The “Right-to-Left” option will now be available in the quick access toolbar under the “Home” tab.
Step-7: Click on “Right-to-Left”
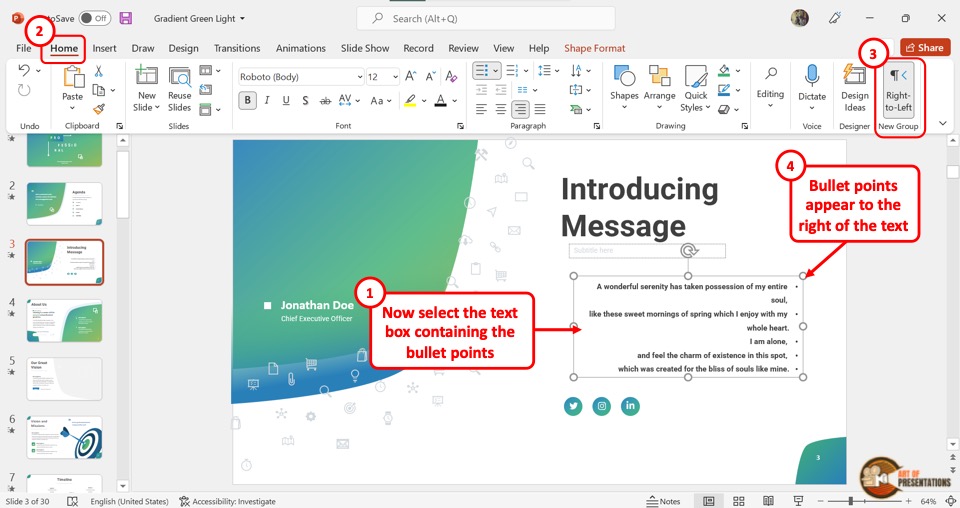
Now all you have to do is select the text box with the bullet points and then click on the “Right-to-Left” option in the “Home” menu. The bullet points will shift to the right side of the text.
11. Bullets Not Working in PowerPoint? Here’s What to Do!
In Microsoft PowerPoint, the “Bullets” feature may quit working if the slide layouts conflict with the master slide formats. This is likely to happen when you import a slide from a different presentation.
To fix this issue, follow the simple steps mentioned below –
Step-1: Click on the “Slide Master” option
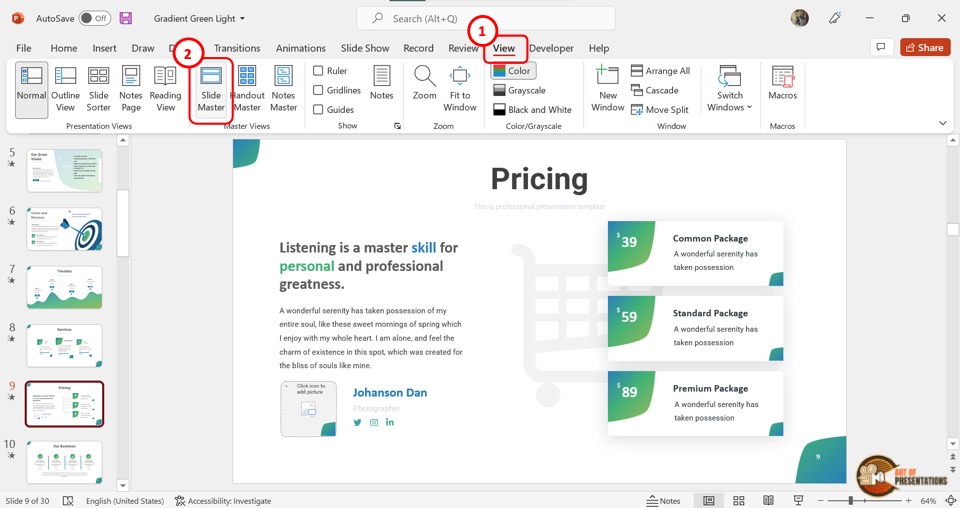
To fix the bullet points, you have to fix the bullet format in the master slide. First, click on the “View” tab in the menu ribbon which is located at the top of the screen.
Then click on the “Slide Master” option in the “Master Views” section of the “View” menu.
Step-2: Click on the “Home” tab
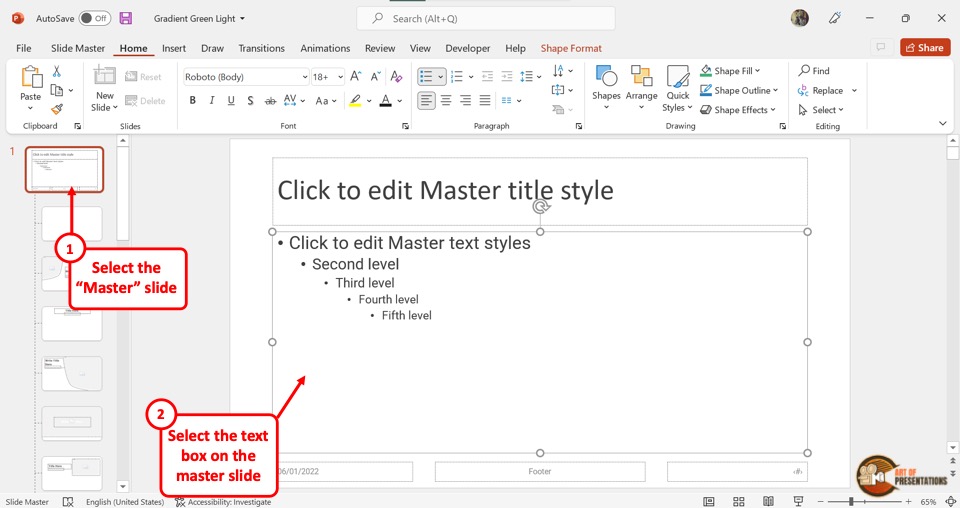
In the “Slide Master” view, click on the master slide. It is the first slide in the slide layout pane on the left side of the screen. In the master slide, click on the content placeholder that contains the body text.
Then click on the “Home” tab from the menu ribbon.
Step-3: Click on the “Bullets and Numbering” option
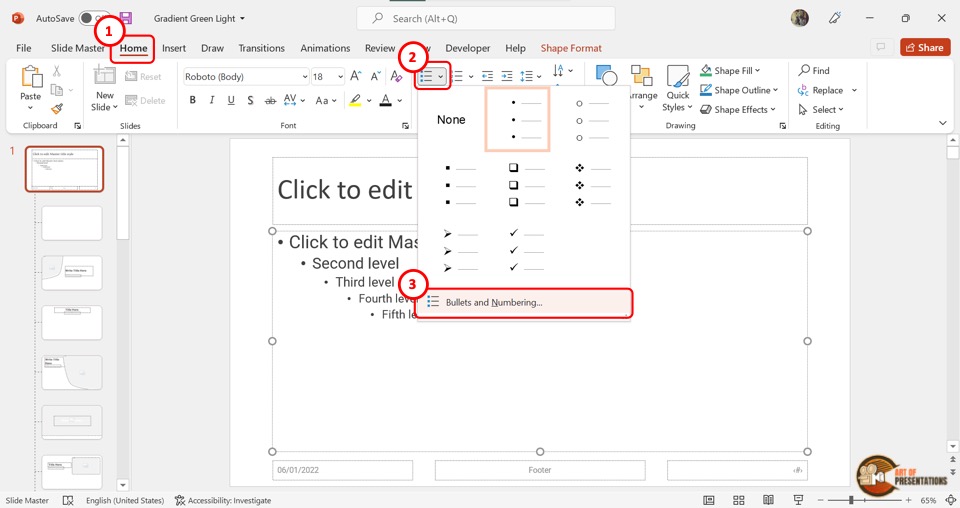
In the “Paragraph” section of the “Home” menu, click on the “Bullets” icon. Then click on the “Bullets and Numbering” option in the dropdown menu under the “Bullets” icon. This will open a dialog box.
Step-4: Customize the bullet point
In the “Bullets and Numbering” dialog box, you can customize the bullets and change the bullet styles. Follow the steps mentioned in section 3 and section 5 of this article to change the style of bullets and customize them.
Then click on the “OK” button at the bottom of the dialog box.
Step-5: Click on the “Close Master View” button

To save the bullet formatting in the master slide, all you have to do is click on the “Slide Master” tab. Then click on the “Close Master View” button. This will return the presentation to the “Normal” view.
Step-6: Select All the Slides in the Presentation
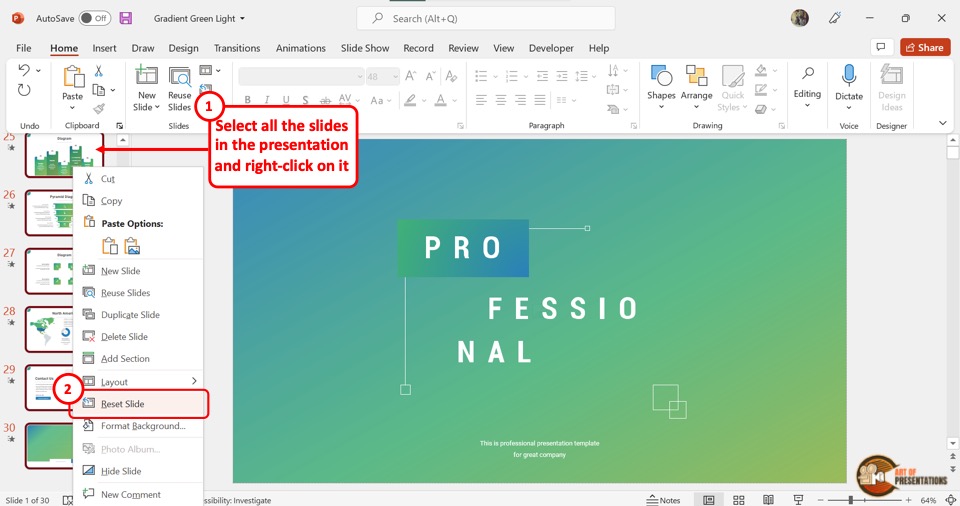
In the “Normal” view, you have to apply the changes in the master slide to all the slides in the presentation.
To do so, you have to first click anywhere in the slide thumbnail pane on the left side of the screen. Then press the “Ctrl+A” keys on your keyboard to select all the slides.
Step-7: Click on the “Reset Slide” option
Now all you have to do is “Right Click” in the slide thumbnail pane to open the context menu. Click on the “Reset Slide” option in the context menu (as shown in the image in the previous step).
This will apply the bullet format from the master slide to all the slides. The “Bullets” feature will now work perfectly.
Credit to drobotdean (on Freepik) for the featured image of this article (further edited).
User community support forum for Apache OpenOffice, LibreOffice and all the OpenOffice.org derivatives
Skip to content
- Board index Applications Writer
[Solved] Is there a way to alter the indent of a bullet?

Post by MissingBlink399 » Mon Jul 19, 2010 2:21 pm
Re: Is there a way to alter the indent of a bullet?
Post by exegete77 » Mon Jul 19, 2010 2:49 pm

Post by Robert Tucker » Mon Jul 19, 2010 2:58 pm

Post by acknak » Mon Jul 19, 2010 3:41 pm
Post by MissingBlink399 » Wed Jul 21, 2010 3:59 pm
acknak wrote: I would not recommend using the paragraph formatting to control bullet position. You may be able to get that to work, but the bullet position and the paragraph indents are both trying to control the left side of bulleted paragraphs, and sometimes they can't decide who should have the last word. You can get some very odd behavior when both are in effect. It's more predictable if the bulleted paragraph have indents all at zero, and any indenting is controlled through Format > Bullets & Numbering, even better, through a list style. For a short document like a resume, a style is probably not worth the effort. Here's what I would do: 1) Select one of the bulleted items; put the cursor at the beginning of the item. First, we remove any existing bullet or paragraph indenting: 2) Click the "Bullets On/Off" button once or twice, until there is no bullet. 3) Format > Paragraph > Indents & Spacing > Indent: Before text: 0, First line: 0 Add & configure the bullet. Don't use the rulers, they change the paragraph format. 4) Click the "Bullets On/Off" button on the toolbar. 5) Format > Bullets & Numbering > Position > Aligned at: ___, Indent at: ___ (whatever you want). Copy the formatting to the other list items: 6) Click on the "Format Paintbrush" in the toolbar 7) Click somewhere in any of the other paragraphs that need bullets. Repeat steps 4/5 for the other items. When you click the paintbrush button, it picks up formatting from the current paragraph, then that formatting is applied to the paragraph you click on with the paintbrush. If you double-click the painbrush button, you can apply the formatting to more than one paragraph. Press "Escape" ("Esc") to turn it off when you're done.
Post by WardXmodem » Sat Sep 18, 2021 6:59 pm
acknak wrote: ... 6) Click on the "Format Paintbrush" in the toolbar ...

Re: [Solved] Is there a way to alter the indent of a bullet?
Post by RoryOF » Sat Sep 18, 2021 7:08 pm
Return to “Writer”
- Getting started
- ↳ Survival guide
- ↳ Beginners
- ↳ Getting Started Guide for 4.x
- ↳ Getting Started Guide for 3.x
- ↳ Install, Setup and Troubleshooting
- ↳ Admin Guide
- ↳ MS Windows
- ↳ Linux
- ↳ Mac OSX
- ↳ LibreOffice
- ↳ Tablets
- ↳ Tutorials
- ↳ Writer
- ↳ Calc
- ↳ Base
- Applications
- ↳ Writer Guide for 4.x
- ↳ Writer Guide for 3.x
- ↳ Writer Tutorials
- ↳ Templates
- ↳ Advanced Uses
- ↳ Calc Guide for 4.x
- ↳ Calc Guide for 3.x
- ↳ Calc Functions
- ↳ Calc Tutorials
- ↳ Impress
- ↳ Impress Guide for 4.x
- ↳ Impress Guide for 3.x
- ↳ Draw
- ↳ Draw Guide for 4.x
- ↳ Draw Guide for 3.x
- ↳ Math
- ↳ Math Guide for 4.x
- ↳ Math Guide for 3.x
- ↳ Base Guide for 4.x
- ↳ Wiki
- ↳ Base Tutorials
- ↳ Tables & Queries
- ↳ Forms
- ↳ External Data Sources
- ↳ Reporting
- ↳ Database Examples
- Customizing and Extending
- ↳ Macros and UNO API
- ↳ Basic Guide
- ↳ Code Snippets
- ↳ Extension Repository
- ↳ Macro Repository
- ↳ External Programs
- ↳ Extensions
- ↳ Extensions page
- ↳ General Discussion
- ↳ Site Feedback
- ↳ Forum Governance
- ↳ User Experience (UX)
- ↳ Announcements
- ↳ Institutions & Educational
- ↳ Paid support
- ↳ Consultants Directory
- Board index
- All times are UTC
Powered by phpBB ® Forum Software © phpBB Limited
Privacy | Terms
BetterDefaults BulletsColorsShortcuts workout
1. bullet point lists: If one creates a text frame in Impress and clicks on the button "numbering and bullet points", the newly created bullet point list has terrible standard defaults:
- Almost no space between the bullet point and the text.
- No ident for the second line of text under a bullet point. The second line appears left-justified directly under the bullet point. Instead, there should be a ident of the second line. It should begin exactly there where the first letter in the first line starts.

- Change default bullet symbols for numbering bullets in text (not inside shapes).
2. hide empty bullets: After starting a presentation also empty bullet points are shown .. this make no sense and look strange and ugly in a presentation - ms office hide them too, so a lot of people are already used to this more suggestiv behavior.
3. serial effect as default: if you have a set of bullet points and you want the single points to f.e. 'fly in' you should have the possibility to take the whole box and give it the effect that they serial fly in. solution => mark object and define custom annimation (f.e. Fly in) - doubleclick the animation 1 (or click the '...' button 2 ) -> 'Effect Options' dialog appear: on tabpage 'Text Animation' choose listboxentrie 'By 1st level paragraphs' then you have the single fly in effect which is rather unconfortable.

- set the default to serial effect (better defaults)
- make the effect options more visuable (feature enhancement)
4. Default Color of drawing objects: Inserting any drawing object, the default color is "Blue8" which is quite odd and ugly; especially compared to the default color(s) of the new color palette of the Chart module.
Therefore, I would please for either a changed default color for drawing objects or even an entire changed color palette for all drawing objects (e.g. the same as used in the Chart module).

6. Change default pen color: the neon green color of the pen used to draw on a presentation is very difficult to see and the color is hard coded into OOo. I would like to see the default changed to perhaps black or red, as they are much easier colors to see. (menue: slide show / slide show settings & check 'mouse pointer as pen' & starting a presentation)

7. Eyedropper improved: after opening the Eyedropper dialog, you can choose a color from your bitmap graphic in your current presentation document for further manipulations. This color is not available outside of this dialog, but it should be. At least you should have the chance to recreate this color by knowing it's rgb values, but better would be to have the possibility to further use it in the 'color bar' if you want it.
- show the rgb value to the dropped color
- let overtake the choosen color into the color bar
- change name in f.e. 'Color Replacer'

=> deferred because of new colorpicker concept that will follow in near future and solve this problem from root cause on; except the name change in Color Replacer.
8. d&d of colors in 'Color Bar': from example the color dialog .. to create user defined palettes. at the moment you have only the possibility to add single colors from the Area/Color dialog in the color bar (pretty hidden) and they are append at the end. to configure it by yourselfe f.e. by d&d would improve the current default color palette a lot.

=> deferred because of new color management concept that will follow in near future and solve this problem from root cause on.
9. Color dialog in toolbar: make the color dialog better available (at the moment pretty hidden: format/area/colors/modify) f.e. over an icon in the 'Line & Filling' toolbar and/or directly in the color bar for easier choosing own colors or change of the default color palette etc..

10. Common shortcut for Comments: Inserting comments in OOo programmes is inconsistent. 1st: since the name has changed from "notes" to "comments", the keyboard short-cut in Writer is still Ctrl-Alt-N, but should be Ctrl-Alt-C now. 2nd: None of these short-cuts works in Impress or Calc.
11. Shortcut for insert Slides: I know I can right click on the preview panel and select the pop-up menu, also from menu Insert\Slide, but this shortcut is so frequently used and should not leave for user's customization. It will also make lives a lot easier for users who do not want to move hands frequent to grab mouse during their slide-making. It would be nice to set it to Ctrl+M, as consistent to Powerpoint's settings.
=> alt+i+e fix that problem .. a better solution like ctrl+m, ctrl+i or ctrl+s etc. (for insert slide) are already in use; and to add an unintuitive shortcut to replace an other unintuitive shortcut by limitating shortcut possibilities for future needs make less sense.
specifications
spec bullets/colors/shortcuts
community feedback
.. above issues mainly results from Better Defaults
Autor: Christoph Lukasiak ( Clu ) 8 June 2010
- User Experience
- View source
Personal tools
- Recent changes
- Download AOO
- Documentation
- What links here
- Related changes
- Special pages
- Permanent link
- Page information
- This page was last modified on 14 December 2010, at 16:13.
- Content is available under ALv2 unless otherwise noted.
- Privacy policy
- About Apache OpenOffice Wiki
- Disclaimers
IMAGES
VIDEO
COMMENTS
There are several ways to create numbered or bulleted lists: Use autoformatting . Use list styles, as described in Chapter 7 (Working with Styles). Use the Numbering and Bullets icons on the paragraph formatting toolbar. This last method is described here. To produce a numbered or bulleted list, select the paragraphs in the list and then click ...
Click in the text box that reads Click to add an outline. Type the text, then press Enter to start a new bulleted line. The default list type is a bulleted list. The mechanisms to change the list from bulleted to numbered and vice versa are explained in Changing the appearance of the list . Press Shift + Enter to start a new line without ...
Notice that all of the items on the animations list (except for the two "Point one" items) are set to start at the same time as the previous item. However, we want the second "Point two" animation and the second "Point three" animation to also occur On click. Select these items, and then choose On click from the Start list. The ...
7. Found answer: Add custom animation. Go to Effect Options. Under Text Animation set Group text to By 1st level paragraphs. Answer found on Ubuntu forums. Couldn't find anything up-to-date on the OOo support site. Share. Improve this answer.
Here are the steps--try it with a new presentation first, just to make sure things are working. File > New > Presentation ... Click "Create" (all defaults) Choose a standard slide layout (use the sidebar or the layout palette on the right side of the main toolbar): "Title, Content". You should see a bullet appear in the slide content area.
Re: Make bulleted items appear on click. by Nick N, » Tue Jan 16, 2024 1:25 am. Hello, To make your phrases appear line by line: - select Format>Dotted List - drop your lines - highlight the slide (when your hower-on becomes a hand, click!) - click on the + sign under animation box on top right of the screen - right click on the highlighted ...
2. Ensure Your Bullets Use Parallelism Parallelism is a grammatical style in which sentences are constructed using matching styles. It also helps ensure that your bullet points are grammatically correct. However, parallelism doesn't really add to making your presentation memorable.
capitalize each bullet point the same way - usually the first letter of the first word is capitalized and the rest of the words are in lower case unless it is a proper name. Observe the 6 by 6 Guideline. In order to keep the amount of information in each bullet point concise and to keep the slide from looking cluttered, you should keep the ...
Episode 21 of 27-episode course, "OpenOffice Writer for College Students." This episode covers formatting bullet points and bulleted lists.
The problem is that the change is applied to the whole presentation, which is very weird since I'm not doing this change in "Slide Master" but just on the slide I want. I RTFM'ed, Googled, etc, but with no luck. How can I select different bullets for different lists? In case this matter, I'm in Ubuntu 10.04, and OpenOffice is 3.2.0
Place the cursor in the text box. Click the Bullets On/Off button on the text formatting toolbar. If the text formatting toolbar is not showing, enable it by selecting View > Toolbar > Formatting from the menu bar. Type the text and press Enter to start a new bulleted line. The default list type is a bulleted list.
Bullet Point Alternative 1: Use text boxes. A simple alternative to a list is to place each item into a a text box that is arranged in a suitable layout. With this approach, each point is more pronounced than in a list. It can also be accomplished easily with basic graphic tools and in PowerPoint. Below, what could have been a bullet list of ...
User community support forum for Apache OpenOffice, LibreOffice and all the OpenOffice.org derivatives ... Applications. Impress. Search [Solved] Reveal bullet points one line at a time. Discuss the presentation application. Post Reply. Print view; ... Post by shilliard » Fri Jan 20, 2023 1:58 am. How can I, with v4.1.13 of Impress, make a ...
There are several ways to create numbered or bulleted lists: Use autoformatting . Use list styles, as described in Chapter 7 (Working with Styles). Use the Numbering and Bullets icons on the paragraph formatting toolbar. To produce a numbered or bulleted list, select the paragraphs in the list and then click on the appropriate icon on the ...
User community support forum for Apache OpenOffice, LibreOffice and all the OpenOffice.org derivatives. Skip to content
Bullet Point / Text Layouts. Discover our comprehensive selection of Bullet Point and Text Layout templates for PowerPoint and Google Slides. These templates are designed to help you present your content in an organized, clear, and visually appealing manner. Bullet Point and Text Layout templates offer different layouts and styles to showcase ...
Place the cursor in the text box. Click the Bullets On/Off button on the text formatting toolbar. If the text formatting toolbar is not showing, enable it by selecting View > Toolbar > Formatting from the menu bar. Type the text and press Enter to start a new bulleted line. The default list type is a bulleted list.
The first step is to click on the text box with the bullet points. Then click on the "Animations" tab in the menu ribbon. Step-2: Click on your preferred "Entrance" effect. In the "Animations" menu, click on the "More" option to open a dropdown menu.
On your second slide a new point appears. Place your mouse pointer behind the title of your second slide and press the Return key. A new slide (number 3) appears. The bullet points will be moved to slide 3. With the Backspace key you can take back the changes. The bullet points are on slide 2 again. Repeat the creation of a new slide.
Re: [Solved] OpenOffice bullet points. by Hagar Delest » Tue Jul 04, 2017 10:21 pm. You may be able to do that but directly in the content.xml file. Make a copy of your file, open it with an archive manager and do the substitution in the content.xml file. LibreOffice 7.6.2.1 on Xubuntu 23.10 and 7.6.4.1 portable on Windows 10.
On the Bullets and Numbering dialog window, click on the Bullets tab to see some pre-defined bullet options, including larger bullets. For complete DIY control over the bullet character, click on the Options tab, then click the Character button and select any character or symbol you like. AOO4/LO5 • Linux • Fedora 23.
2) Click the "Bullets On/Off" button once or twice, until there is no bullet. 3) Format > Paragraph > Indents & Spacing > Indent: Before text: 0, First line: 0 Add & configure the bullet. Don't use the rulers, they change the paragraph format. 4) Click the "Bullets On/Off" button on the toolbar.
1. bullet point lists: If one creates a text frame in Impress and clicks on the button "numbering and bullet points", the newly created bullet point list has terrible standard defaults: Almost no space between the bullet point and the text. No ident for the second line of text under a bullet point. The second line appears left-justified directly under the bullet point.