
Choose Your Test
Sat / act prep online guides and tips, how to address an envelope (photos included).
General Education

Addressing an envelope to mail a letter isn’t really a common task anymore. (Thanks, email!) But there’s always a chance a situation might pop up where you need to know how to properly address a letter envelope. Everything from sending out wedding invitations to paying bills requires you to know how to address envelopes.
If you don’t know how to address an envelope, you’re in the right place! This article will tell you everything you need to know about addressing an envelope if you’re sending letters in the United States . In this article, we’re going to cover the following info:
- A full explanation of how to address a letter envelope
- A detailed example of how to write address on letter envelopes (photo example included!)
- Descriptions of how to address letters in specific circumstances, including PO boxes, apartment addresses, and overseas letters to the U.S.
Are you ready to learn how to address an envelope? Then let’s get started!
How to Properly Address an Envelope: The Basics
Addressing an envelope is pretty simple once you understand the overall format. Let’s start with the most basic thing you need to know about how to address an envelope: which part of the envelope you write on !
An envelope has a front and back side. The front of an envelope is blank, and the back of an envelope has a flap and seal. You write and place your stamps on the front of an envelope.
Once you’ve checked to make sure your envelope is in the right position, you’re ready to start addressing it. So what is the proper address format for a letter? There are three components to addressing an envelope: the recipient’s address, the return address, and the postage. We’ll start with explaining how to address letters to recipients in the U.S. and cover how to address letters to Canada later.

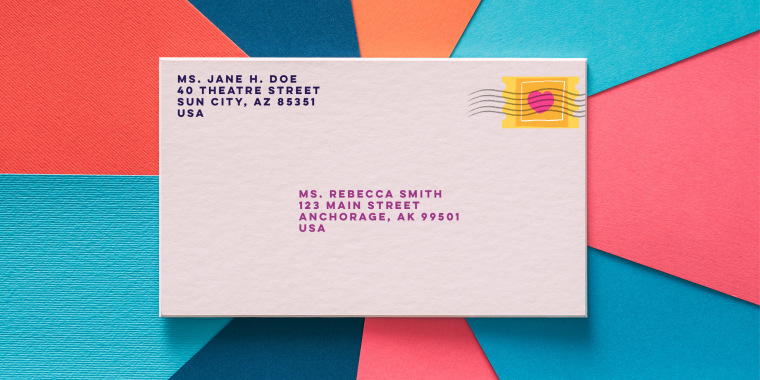
The recipient's address goes in the center of your envelope, right in the red square. (FYI: there won't be a red square on your actual envelope.)
Writing the Recipient’s Address
The recipient’s address is the address that you want your letter to be sent to. You write the recipient’s address horizontally and vertically centered, or right in the middle of the front side of the envelope. To write the recipient’s address properly, you need the following information:
- The recipient’s full name
- The recipient’s street address
- The recipient’s city, state, and zip code
When you write the three parts of the recipient’s address, each part listed above gets its own line. A properly formatted recipient’s address will look like this on an envelope:
Mortimer Smith 1234 Street Name St. City, State Zip Code
In the example address above, you see that the recipient’s name appears on the first line of the address. Below that, you write the recipient’s street address. On the bottom line, you write the recipient’s city and state, separated by a comma, and the recipient’s zip code at the end.
This is how you write the recipient’s address on an envelope when the recipient just has a basic residential address. We’ll talk more about how to write more complicated addresses (like apartment buildings and PO boxes) a bit later.

The return address on your envelope should be in the top left corner. (Basically it should end up where the red square is on this example!)
Writing the Return Address
The return address is the other main piece of a properly addressed letter . The return address is typically the same as the sender’s address. It’s called the return address because if the recipient can’t receive the letter for some reason, it will be returned to the sender. That way your letter--or your bill!--doesn’t just disappear.
Most of the time, the return address will be your home address. The return address should be written in the upper left hand corner of the front of the envelope. Like the recipient’s address, the sender’s address is broken down into three pieces that are written on separate lines. The sender’s address should usually look like this:
Mickey Mouse 90 Main Street Orlando, Florida 32825
So, just like the recipient’s address, the return address should include your name or the sender’s name on the first line, the sender’s street address on the second line, and the sender’s city, state, and zip code on the third line.

The stamp on your envelope should go in the same spot as the stamp on this one. Just make sure you're using the correct postage!
Adding Postage
You probably already know that sending letters costs money in the form of stamps or other postage. If you’re mailing a letter from home, you’ll need to purchase stamps to add to your letter to cover the cost of mailing it. Most of the time, you can purchase stamps when checking out at the grocery store or from your local post office.
When mailing standard letters within the United States, you usually only need to include one Forever stamp . Bigger envelopes or packages may require additional postage.
So where do you place stamps on an envelope? Stamps should be placed in the upper right hand corner of the front of an envelope . People usually try to place the stamp pretty close to the edges of the envelope.
Some people prefer to mail letters directly through the post office. If you choose to do this, you can take your letter to the post office and have them handle the postage. When the post office adds postage to your letter and mails it for you, you’ll just pay the post office instead of buying stamps.
Keep in mind that the number and type of stamps you’ll need depend on what you’re mailing. An average letter will require a different number of stamps than a manila envelope full of heavy documents. If you’re ever unsure about how many stamps you should put on your envelope or what the best way to mail your letter is, you can always call and ask your local post office or check the USPS website .

Sending a letter to Canada? Follow the special instructions below.
How to Address a Letter to Canada
You may have a situation where you need to address a letter to Canada. Addressing a letter to Canada is very similar to addressing one to a U.S. recipient, but there are a couple of differences you need to know.
There are four lines that you need to include in the recipient’s address for a letter to Canada :
- The street address
- The city, province, and postal code
- The name of the country
So a letter envelope addressed to a recipient in Canada would look like this:
David Rose 567 Walnut Street Toronto ON MSV 1J2 Canada
Now, let’s talk about how this Canadian address is different from a U.S. address. First, Canada has provinces instead of states. This means you’ll need to know the Canadian province that the recipient lives in. In the example address above, “Toronto” is the city in Canada where the recipient lives, and “Ontario” is the province.
Postal codes also look a little bit different in Canadian addresses. In this example, the postal code, “MSV 1J2” appears at the end of the third line of the address. Unlike U.S. postal codes, Canadian postal codes include both letters and numbers. Be sure to pay close attention when writing the postal code to ensure the letters and numbers are in the correct order. If you aren’t sure which province the recipient lives in or what their postal code is, you can look it up on the USPS website or the Canada Post website .
Finally, the name of the country should be written on the fourth and last line of the recipient’s address. If you’re sending a letter to Canada, just write “Canada” on the fourth line! That’s the last step to writing the recipient’s address on a letter to Canada.
You’ll also need to include a return address in the upper left hand corner of your envelope. It should be formatted just like the return address on any other letter: your name appears in the first line, your street address in the second line, and your city, state, and zip code in the third line.
The only major difference in writing the return address on a letter to Canada is that you will also need to include your country on the fourth and last line . So if you’re writing from the U.S., you will simply write, “United States” on the fourth line.
The last thing you’ll need is postage . Postage rates from the U.S. to Canada can vary based on the size and weight of the letter and the location you’re mailing to and from. To find out the correct number of stamps or cost of postage, use the Canada Post Rate Calculator .
How to Write Address on Envelopes: Picture Example
When it comes to how to address an envelope, having a visual example can help you know you’re getting it right. Here’s an example of what a correctly addressed envelope looks like:

This example includes the recipient’s address, return address, and location of postage. You can use the spatial layout of this example as a guide too. The return address and recipient’s address on your envelope should be in about the same place as the ones you see in this example.

4 Other Examples of How to Fill Out an Envelope
Now that you know the basics of how to address an envelope, let’s look at some specific types of addresses. Formatting addresses for mailing can differ depending on the type of residence of your recipient and where you’re mailing from. We’ll cover the basics of how to write an envelope address for PO boxes, apartment buildings, businesses, and U.S. recipients from overseas senders below.
How to Address a Letter to a PO Box
When it comes to how to write an address on an envelope for a PO box, there are a few things you need to know. A PO box, or post office box, is a lockable box that’s located in a post office . Some people choose to receive their mail at PO boxes, and some countries only use PO boxes to deliver local mail. If your recipient has a PO box, you have to include that info in the address on the envelope.
To address an envelope to a PO box, you’ll replace the street address information with the PO box number . If you’re writing the address with a PO box on an envelope, it should look like this:
Lara Jean Covey PO Box 123 Portland, OR 97214
In the example above, the PO box and the box number replace a normal street address. Including the correct PO box number ensures that your letter gets to the right place!
How to Address a Letter to an Apartment Building
To properly address an envelope to an apartment building, you need to include the street address, the building number, and the recipient’s unit number.
When addressing an envelope to a recipient who lives in an apartment, the address should look like this:
Rachel Green 90 Bedford St, Building A, Apartment 2 New York, New York 10014
In this example, the street address appears on the second line, followed by the apartment building number and the number of the recipient’s apartment unit.
With all of that information, addresses for apartments can sometimes be a little long. If you can, try to fit all of the information about the street address, building, and apartment number on the second line. If it gets too long, move the building and apartment number to the third line.
If you aren’t sure about how to write the recipient’s address, you can always call their apartment complex to get this information, or check with the U.S. Postal Service.
How to Address a Letter to Someone in an Office Building
Correctly addressing an envelope to a person at a company ensures it will end up in the right hands. When addressing an envelope to someone who works in an office building, you need to include a couple of extra elements on your envelope.
When writing out the recipient’s name and address, you should include the abbreviation “Attn” followed by a colon before the recipient’s name, like this:
Attn: Michael Scott
“Attn” stands for “attention,” which means that the letter should be brought to that person’s attention within the company!
Below the company name, include the name of the recipient on the next line. The company’s address goes on the line below that. The company’s delivery address will most likely include the company’s street address and the suite number of the recipient. On the fourth and final line, write the city, state, and zip code.
The full recipient address on a business envelope should look like this:
Dunder-Mifflin Paper Company, Inc. Attn: Michael Scott 1725 Slough Avenue, Suite 4 Scranton, Pennsylvania 18505
You may see something like “C/O" in front of the recipient’s name instead of “Attn” in some examples. That’s okay: the “C/O" means “care of,” and it works exactly the same way as “Attn.” Both “C/O" and “Attn” will ensure your letter goes to the right recipient when you’re sending a letter to a business address.
The return address on a business envelope should read exactly like the return address on regular mail. And when it comes to postage, check with the U.S. Postal Service. If you’re mailing larger envelopes, you might need multiple stamps or postage.
How to Address a Letter to Someone in the U.S. From Overseas
If you’re mailing a letter to the U.S. from another country, you have to include a couple of extra elements on your envelope. The main things you need to include on an envelope to someone in the U.S. from overseas are the name of the country and international postage.
An address on an envelope to someone in the U.S. from overseas should look something like this:
Olivia Pope 1111 Pennsylvania Avenue Washington, D.C. 20500 U.S.A
So when you write a letter to a U.S. recipient if you’re out of the country, you include the recipient’s name in the first line, the street address in the second line, and the city, state, and zip code in the third line. The one additional thing you must include is the name of the country in the fourth line of the address.
What about if you need to mail a letter from the U.S. to another country? Depending on the mailing service you’re using, there may be additional forms you need to fill out in order to send your letter. You can find out the requirements for mailing to different countries by checking the USPS Global Express website . You might consider using a service that assigns tracking numbers to letters and packages. That way you can ensure your letter arrives at its destination successfully.
You also need to include the right kind of postage for international mailing. You can purchase international stamps from your post office. These are the kind you will need to send international mail to the U.S. You can find out the correct postage for your letter by checking the USPS postage rates and prices website . Global Forever international postage stamps currently cost $1.20 apiece.

What’s Next?
One type of letter you may have to address during your college application process is a letter of recommendation . You can learn all about letters of recommendation in this article !
Not all letters of recommendation are equal, though . Here’s an example of what a great letter of recommendation should look like .
Did you know you may need letters of recommendation for your job search, too? Here’s a rundown of what a professional letter of recommendation looks like ...and helpful tips about asking for them.

Ashley Sufflé Robinson has a Ph.D. in 19th Century English Literature. As a content writer for PrepScholar, Ashley is passionate about giving college-bound students the in-depth information they need to get into the school of their dreams.
Ask a Question Below
Have any questions about this article or other topics? Ask below and we'll reply!
Improve With Our Famous Guides
- For All Students
The 5 Strategies You Must Be Using to Improve 160+ SAT Points
How to Get a Perfect 1600, by a Perfect Scorer
Series: How to Get 800 on Each SAT Section:
Score 800 on SAT Math
Score 800 on SAT Reading
Score 800 on SAT Writing
Series: How to Get to 600 on Each SAT Section:
Score 600 on SAT Math
Score 600 on SAT Reading
Score 600 on SAT Writing
Free Complete Official SAT Practice Tests
What SAT Target Score Should You Be Aiming For?
15 Strategies to Improve Your SAT Essay
The 5 Strategies You Must Be Using to Improve 4+ ACT Points
How to Get a Perfect 36 ACT, by a Perfect Scorer
Series: How to Get 36 on Each ACT Section:
36 on ACT English
36 on ACT Math
36 on ACT Reading
36 on ACT Science
Series: How to Get to 24 on Each ACT Section:
24 on ACT English
24 on ACT Math
24 on ACT Reading
24 on ACT Science
What ACT target score should you be aiming for?
ACT Vocabulary You Must Know
ACT Writing: 15 Tips to Raise Your Essay Score
How to Get Into Harvard and the Ivy League
How to Get a Perfect 4.0 GPA
How to Write an Amazing College Essay
What Exactly Are Colleges Looking For?
Is the ACT easier than the SAT? A Comprehensive Guide
Should you retake your SAT or ACT?
When should you take the SAT or ACT?
Stay Informed
Get the latest articles and test prep tips!
Looking for Graduate School Test Prep?
Check out our top-rated graduate blogs here:
GRE Online Prep Blog
GMAT Online Prep Blog
TOEFL Online Prep Blog
Holly R. "I am absolutely overjoyed and cannot thank you enough for helping me!”
Bobbie’s Bests for Less: 50% off handbags, skin care, more
- TODAY Plaza
- Share this —

- Watch Full Episodes
- Read With Jenna
- Inspirational
- Relationships
- TODAY Table
- Newsletters
- Start TODAY
- Shop TODAY Awards
- Citi Concert Series
- Listen All Day
Follow today
More Brands
- On The Show
How to address an envelope to friends, family and everyone else
We might be living in an age of text messages and emails , but there’s still no substitute for sending snail mail.
For example, while an evite to a party or event might be convenient, it wouldn’t be the same to request someone's presence at a wedding through an electronic message.
Same goes for a thank-you note or sympathy card .
So, even though it may seem old-school, knowing how to address an envelope properly is a skill everyone should have, especially if you’re sending a formal invitation or professional letter.
Even if you’re addressing an envelope to family member, friend or neighbor, getting it right matters.
“Addressing an envelope takes some thought to do it properly,” Diane Gottsman , a national etiquette expert at the Protocol School of Texas, tells TODAY.com.
“I always use the name of the person, including an honorific when appropriate,” Gottsman says. “Do not abbreviate the city and state for a formal envelope and make sure and include a return address.”
And if you’re sending out formal invitations, holiday or Christmas cards , Gottsman says to avoid using labels.
Want more pointers? Keep scrolling for a helpful guide on proper mailing etiquette.
How to address an envelope

- Write the return address in the top left corner.
- Write the recipient's address slightly centered on the bottom half of the envelope.
- Place the stamp in the top right corner.
There are two addresses that are typically seen on the envelope, but only one is technically required: the recipient's. The sender's address isn't necessary, but it is recommended. If there are any mistakes that prevent the delivery of the letter, the lack of a return address means the post office will be unable to send it back in order to fix any problems.
How to write the sender's (return) address

- Start with your full name.
- Write your street address on the next line. Use two lines, if needed.
- Follow that line with the city, state and ZIP code of your address.
How to write the recipient's address

- For informal letters, follow the same format as the sender's address.
- If sending a letter to someone at a specific business, the first line should be the company's name.
- In the next line, follow "ATTN:" or "c/o" with the individual's name. If the letter is not to someone at a specific business, the first line should simply be their name.
- The next lines two should be the street address, city, state and ZIP code.
How to format military addresses (APO, FPO, DPO)

Even though they follow the same format as regular addresses, military addresses don't use the city and state names that many are used to.
- The city name will be either APO (Air/Army Post Office), FPO (Fleet Post Office) or DPO (Diplomatic Post Office).
- For the state, AA (Armed Forces America), AE (Armed Forces Europe) and AP (Armed Forces Pacific) are used, depending on the duty station.
- The ZIP code is the same, but sometimes the extra four number code is required for delivery.
How to write an international shipping address

If sending a letter to an overseas address that isn't military, the address format typically stays the same — just with the addition of the country name as the last line.
Some countries place the ZIP code in front of the city and country but it varies from country to country, so just check to be sure.
How to find the "ZIP+4" code
If you're unsure of the extra four-number code, USPS has a ZIP code lookup tool on their website .
- Choose to look up the ZIP code by address and enter all the required information.
- Press "Find" and USPS will give you the ZIP+4 code.
How many stamps should you use

Placing the stamp is easy, but knowing which stamps and how many to use is the hard part.
For a standard 1-ounce letter being shipped anywhere in America, Forever stamps are recommended because you'll always be able to use them regardless of future stamp price changes.
Every ounce over one costs 15 cents, so you'll have to use Additional Ounce stamps for every extra ounce. Two-ounce stamps are also an option.
If you're sending a postcard, don't cheat yourself with the Forever stamps. Postcards have their own stamps that are normally cheaper.
For international addresses, Global Forever stamps are used and just like the Forever stamps, you can use them whenever, regardless of price adjustments.
Irregular-shaped envelopes that may be used for square wedding invitations or graduation announcements require different stamps called non-machinable stamps. Because the square envelope can't fit the machine for automatic processing, the stamp costs a little extra to account for the non-machinable surcharge.
With the appropriate stamp, accurate addresses for both the sender and the recipient, and the right placement of all three on the envelope, your letter is ready to be sent!
Sarah is a lifestyle and entertainment reporter for TODAY who covers holidays, celebrities and everything in between.
Subscribe to get notified about product launches, special offers and news.
Free shipping on orders over $9.99 within the continental US
Login to my account
Enter your e-mail and password:
New customer? Create your account Lost password? Forgot your password
Forgot Password
Enter the email address associated with your account.
Remembered your password? Back to login
Create my account
Please fill in the information below:
Already have an account? Login here
Located in Huntsville/Madison, AL? Request a Business account here
Your cart is empty
How To Address An Envelope: What To Write On An Envelope

We all know the basics of what to write on an envelope, and you’ve probably addressed hundreds of envelopes. But unless you’ve read through the US Postal Service requirements meticulously, it’s very likely you’ve been missing some little-known facts about addressing envelopes. Unknown to many, the US Postal Service has very detailed requirements for how they want their mail addressed. To help you learnwhat to write on an envelopeand fulfill those requirements, we’ve listed the most commonly missed USPS requirements .
- Addresses cannot be written in pencil. An address should be in ink – either written in pen or typed.
- Everything should be in capital letters. Whatever is written on the face of the envelope should be written in all capitals. While most mail is sent and carried without capitalized letters, it’s preferred for every line of the address to be capitalized.
- There should be no punctuation. When you were taught what to write on an envelope,chances are you learned to write “Mr. and Mrs.” or “New York City, NY.” By USPS standards, this is incorrect. Regardless of numbers, titles, or abbreviations, there shouldn’t technically be any form of punctuation on your envelope.
- Only list the recipient’s full legal name. The USPS prefers no other form of name, whether it be a nickname or initials, listed on the face of the envelope.
- Abbreviations should be used for streets, apartments, states, etc . For the full list of abbreviations acceptable to the USPS, try the links below:
- State abbreviations
- Secondary Unit Abbreviations
- Street Abbreviations
Here is an example letter address template to show you how to sign an envelope:

Don’t worry! Just because these are the technical requirements of the postal service doesn’t mean you can’t make your address more exciting. Your mail will still be processed and delivered even if it doesn’t match this formatting.
Where To Write Return Address?
How to write a return address on an envelopeis generally a question of placement. The format of a return address should be the same as the main address on the envelope. The traditional placement of the return address is in the top left corner of the envelope . However, it may also be placed on the back flap of the envelope. If you’re sending private mail, this is a great placement because it keeps the front of the envelope looking clean.
If you’re sending a formal or professional letter, it’s wise to stick with the traditional placement in the upper left corner. The recipient can quickly see where this letter is coming from and it keeps all contact information in one general area.

While these basic addressing formats are extremely important, there are even more occasions, titles, and countries that can make envelope addressing a little confusing. We’ve compiled a list of helpful guidelines for when you’re addressing in unique situations.
How To Write an Address To A Business
If you’re addressing an envelope to a business, write the company name on the first line where you would normally put the name of an individual. Since the letter is to a business, you can replace the individual’s name with the name of the business.

If you’re addressing an envelope to an individual at a business, you need to add an additional line. To avoid any confusion, begin the first line with ‘Attn’ (the abbreviation for ‘Attention’) followed by the individual’s name. Below this should be the business’ name, and the rest of the address should follow traditional guidelines below.

How To Write A Military Address
Addressing envelopes to people in the military can be a little complex. We’ve broken it down to clear up any confusion.
Once again, the recipient’s name should go on the first line and always be preceded by their rank. While abbreviations are acceptable, try to write out their whole rank if possible.
If the recipient is single , the first line should include their rank and name only:

If the recipient is married , the husband’s rank and name should precede his wife’s. Even if both are in the service or if the wife outranks her husband, the name layout should still appear the same:

If a wife chooses to retain her maiden name , then her name should be listed separately from her husband’s along with her own appropriate title:

Once you have the recipient’s full name and rank on the first line, the next address lines should include their unit, box, and number .

The last line should indicate whether it’s Air/Army post office, Fleet post office, or Diplomatic post office . These indicate which base the letter should be mailed t o .
- APO – Army Post Office, associated with Army or Air Force installations
- FPO – Fleet Post Office, associated with the Navy
- DPO – Diplomatic Post Office, association with U.S. diplomatic locations
- On the same line, indicate to which region this piece of mail is being sent.
- AE if it’s being send to Armed forces in Europe, Middle East, Africa, and Canada
- AP for Armed Forces in the pacific
- AA for Armed forces in American

Lastly, complete the address with the appropriate zip code .

How To Address An Envelope For International Mailing
How to label an envelopefor international mail can be a bit tricky because names and numbers might look a little different. However, sending international mail doesn’t have to be a headache. All you need to do is add the country below the last line.
Although writing the country below the address will ensure your mail’s safe arrival, there are more detailed and specific instructions you can incorporate into your international mail.
When addressing a letter to Canada, the formatting will mostly look the same. The only difference is a double space between the province and the ending zip code .

Sending a letter to France should follow the same US postal standards. However, on the third line the postal code should come before the city and state .

There are a couple different options for writing an address when you are sending a letter to China. First, choose between addressing your envelope in Chinese characters or pinyin.
Pinyin romanization was created to teach the Chinese language to Westerners. Instead of using traditional Chinese characters, they used English letters. This makes addressing mail much easier for those of us who haven’t brushed up on our Chinese characters. The formatting will look similar to mail sent through the US postal service, but there are a few differences to note.
Be sure to specify whether this letter is going to Taiwan or the mainland China . If the letter is going to Taiwan, it should be listed as “ROC” with a three-digit code on the preceding line.
Mail to mainland China should be listed as “PRC” with a six-digit code. After these abbreviations, include “China” or “Taiwan” for extra care.

How To Address A Postcard
Addressing a postcard is fairly straight forward. Most postcards will have a middle line dividing the card into two different sections. The section on the left is for writing the message and the section on the right is for writing the address. Some postcards don’t have a dividing line so it’s just a blank side. In this case, keep the address on the right side.

A return address is not required but if you choose to add one, place it in the top left corner. Since a postcard is usually sent from abroad, a return address is not necessary but it’s also perfectly acceptable. Just remember: writing a return address will cut into the space designated for writing your message.
Helpful Tip
To make your address stand out, try putting a border around your postcard. Maybe draw a box or add a decorative touch. This isn’t necessary and your letter will still be delivered without it. But this will help the postal service find the address easier, and it also adds a touch of personality to your mail.
For more details on how to address different collateral, check out our Ultimate Guide to Envelopes. This source compiles a variety of potential recipients and how to address them.
Envelope Addressing Stencil
When you’re addressing an envelope, it’s hard to keep your address centered and the lines straight. A letter addressing stencilis a great fix for this problem. Using an envelope stencil helps you address your envelopes neatly. Here are a few links to some great envelope addressing stencils:
- Envelope and Address Stencil Ruler Guide
- Lettering Envelope Addressing Stencil
- Lettermate Addressing Guide

How to Make a DIY Envelope Stencil
If you don’t want to buy an envelope addressing stencil, you can make your own.

Step 1: Use a pencil to trace around your envelope onto a sheet of cardstock.

Step 2: Use scissors to cut out the traced envelope shape from cardstock.

Step 3: Determine the approximate size and location of your address area. Depending on how much space you want the address to take up, determine approximately where you’d like the top line of the address to fall.

Step 4: Use a ruler and pencil to draw a line across the template where the first line of the address will go, as determined in step 3.

Step 5: Draw a second line across the template that measures 3/8” above the first line. This will create the space where you’ll write the top address line.

Step 6: Next, draw a third line across the template that measures 1/8” below the first line. This will create the space between the first address line and the second address line.

Step 7: Continue drawing lines across the template to create 3/8” spaces for each address line, alternating distances of 3/8” and 1/8” apart to create a 1/8” space between each address line. (The sample shown includes space for 4 address lines, so there are four 3/8” spaces, plus three 1/8” spaces between each.)

Step 8: Taking into account the approximate address area you determined in step 3, draw vertical lines across the template to cordon off the left and right edges of your address spaces. Make sure you have left enough horizontal space for writing longer names and addresses.

Step 9: Using a metal ruler and an X-ACTO knife, cut away the rectangular 3/8” spaces from the center of the template.

Step 10: Your template is now complete! If desired, erase any remaining pencil lines for a neat and tidy template you can use over and over again.

Step 11: To use your new DIY envelope addressing template, align the template on top of an envelope that is the same size as your template, and inscribe your address in the blank spaces.
Address Labels
Envelope addressing stencils are great but sometimes you may send out more mail than you’re comfortable hand addressing. Thankfully, you have address labeling options.
Using Word and Excel, you can create your own address labels.

Step 1: In an Excel spreadsheet, list the names and addresses of your recipients. Be sure to divide each piece of information by category, e.g. first name, last name, street address, city, etc. Don’t forget to label each column as well.

Step 2: Next, open a new Word document. In this document, select the “Mailings” heading. Under this tab, click the option that says,“Start Mail Merge” and then click “Labels.”

Step 3: T he drop-down menu should be on “Manual.” If it isn’t, make sure you change it. Select the product number that fits your needs and then hit “Ok.”

Step 4: U nder the "Mailings" tab, click "Select Recipients" and "Use an Existing List." Select the excel list and hit "Ok."

Step 5: W ith the first record selected, click the option on the tool bar “Insert Merge Field.” You will want to individually select each option on the dropdown bar. As you select them, they will appear on your document. Add line breaks wherever is necessary.

Step 6: N ext, select “Update Labels.” This will duplicate your text across your page.

Step 7: Click “Preview Results” in the tool bar. This will add all the names and addresses from your Excel spreadsheet to your document.

Step 8: I f this preview looks okay, go ahead and select “Finish and Merge” and “Edit Individual Documents.” Once you have done this, all your addresses should pop up on this new document and you’re set to print your labels.
You can also try envelope addressing services . There are printing or copy shops which print addresses directly on your envelopes. There are also online options for printing addresses. This will mainly be helpful if you plan to send a large quantity of mail. Choosing a local print shop is a great option, but online services save time. You don’t have to make phones calls or pick up orders; instead, just place an order online. Here are some services we recommend:
- Envelopes.com
- Vistaprint.com
- Simplytoimpress.com
Some of these services also provide r eturn address labeling. You have the option of getting your return address printed directly on the envelope, or getting labels made separately.
If you want to go the extra mile, try spicing up your envelope just a little bit with handwritten addressing services. These not only make your envelope more beautiful but add a personal touch. Check out these sites to for hand addressed envelopes:
- Early Express
- Elegant Scribbles
Creative Ways To Address Envelopes
Now you know how to head an envelope properly, keep in mind the postal service will still accept and deliver mail that doesn’t follow these rules perfectly. It’s good to think of these rules more like guidelines, so feel free to try some more creative ways of addressing an envelope.
Here are some fun ways to address an envelope.
- Refine your handwriting. Addressing envelopes in calligraphy adds an elegant touch to your correspondence. However, calligraphy is not the only option you have for changing your writing style. Google has a service with hundreds of fonts listed and you can mimic the font of your choice to add a personal touch, or there are other smaller independent sites that offer more professional fonts.

Also, don’t forget to use a stencil for your calligraphy envelope addressing template. We have a few resources to help you keep your writing clean and orderly:
- A6 envelope stencil . This is a free printable template just for addressing envelopes. However, it’s designed specifically for A6 sized envelopes. These envelopes are often used for invitations.
- Downloadable addressing template . Etsy offers a really great envelope addressing template. You can purchase this downloadable template to your computer. All you’ve got to do is insert every address into each line, and you can have beautiful text printed right on your envelope.
Anytime you change up your handwriting, it will be a challenge to keep your writing straight and even. Be sure to use an envelope addressing stencilso your fun font won’t leave you with a sloppy envelope.
- Write the address differently . Instead of the traditional three lines aligned on the left-hand side, try something different. Maybe write out the address lines centered on the envelope, or align the address along the right, or even address the envelope in a circular format. For unique, step-by-step addressing processes, check out these sites:
7 Ways to Address an Envelope 5 Unique Ways to Address an Envelope How to Hand-Letter an Envelope

- Decorate your envelope. There are so many options for decorating mail. You can draw on your envelope , washi tape it , or even watercolor your envelope . Just try anything (as long as the address is legible!) and see if it works.

For more informative articles about office supplies, subscribe to our email newsletter!
Never fear, you won't begin receiving daily sales emails that belong in a spam folder. Instead, we promise a fun weekly roundup of our latest blog posts and great finds from across the web. And if you lose interest, it's always easy to unsubscribe with a single click.
Whether you’re addressing an envelope to a business or a friend, we hope this post has been informative and helpful. Please reach out and let us know if you have any questions. Connect with us on social media, on Twitter , Facebook , or Instagram . We’d love to hear from you!

ABOUT THE AUTHOR
Calais Eledui is Blue Summit Supplies’ Content Writer. She is a full-time student studying writing at the University of Alabama in Huntsville. Writing is not just a job for her, but a way of life. While writing is a huge part of her life, coffee is huger. Coffee shop hanging, family-time talking, and Sunday afternoon napping are the only ways to get the best out of life.
Hello Steve, thank you for your question! It’s not a requirement to label an envelope containing documents, so it would be up to you on whether or not you’d like to include a notation on you envelope. A notation of ‘Documents Enclosed’ below your return address would be fine.
Steve martin
IF I MAIL DOCUMENTS SHOULD I RIGHT SOMETHING ON THE ENVELOPE ?
Leave a comment
All comments are moderated before being published
Subscribe to our newsletter
Subscribe for more informative articles about office supplies & resources for the everyday professional!
Popular posts

Featured products

Free shipping for most
On orders $10 or more within the continental US
Customer Service
Check our FAQs or send us a message
Send us a message
We are available Monday through Friday, 8am - 5pm CST
Safe & secure payments
Our store is PCI compliant to keep your info safe
- Opens in a new window.
Etiquette Articles
The world of Emily Post etiquette advice is at your fingertips. Please, search or browse our comprehensive online etiquette articles.
- Trending Topics
- Table Setting Guides
- Lizzie Post's Recipes for All Occasions
- Avoid Political Pitfalls
- Featured Articles
- General Tipping Guide
- Official Forms of Address
- Addressing a Former President of the United States
- Dining Etiquette
- Top 10 Must Know Table Manners
- Lipstick at the Table
- Texting at the Dinner Table
- Business Etiquette
- Tips on Preparing for a Job Interview
- Professional Email Etiquette for Work
- Beyond the Handshake: Hugs and the Social Kiss
Wedding Etiquette
- Wedding Planning Series
- Wedding Thank Yous
- Wedding Invitations
- Children's Etiquette
- Can You Teach a Toddler Etiquette? Yes!
- What to Do About Bullies
- The Golden Rule of Parenting
- Invitations & Correspondence
Complete Guide to Writing Thank You Notes
- Writing Personal Letters
- Invitation Etiquette
- Image & Attire
- Attire Guide: Dress Codes from Casual to White Tie
- Five Tips for Looking Crisp and Keeping Cool in the Workplace
- Good Grooming and Wardrobe Care
- Everyday Etiquette
- Etiquette for Volunteering
- How to Choose Luggage
- Before You Travel: Acquaint Yourself with Your Destination
- Digital Manners
- Email Etiquette Dos & Don’ts
- Netiquette: The Rules of the Internet
- Smart Use of Smartphones and Tablets
- Hosts & Guests
- General Entertaining
- Celebration Parties
- Hosting a Baby Shower
- What to Say to Someone Who Is Grieving
- Manners Matter Even More in Hard Times
- How to Help When Someone is in the Hospital
Training & Services
Emily Post training and services are available for groups, businesses, and individuals. Choose from trainer training, seminars, live and pre-recorded webinars, self-paced eLearning courses, and consultation services to best meet your etiquette training needs. Every live session is customized for the client and built from our extensive menu of training topics.
Training Options
- Live Online Seminars
- Author Led Seminars
Online Courses
- Online Course: Dining Etiquette - CreativeLive
- Online Course: Manners at Work, The Ultimate Guide - Creative Live
- Online Course: Business Etiquette for Professionals
Trainer Training
- Business Train the Trainer
- Children's Train the Trainer
- Wedding Professionals Training
Training Topics
- Etiquette Defined/Why Etiquette?
- Problem Solving
Brand Partnership with Emily Post
- Speakers Bureau
- Brand Partnerships
- Spokesperson
Find the right Emily Post book, game, or learning tool for you. We have the perfect wedding, graduation, or housewarming gift for someone special in your life.
Best Sellers
Emily post's etiquette, the centennial edition, the etiquette advantage in business, 3rd edition personal skills for professional success, table manners for kids, the unwritten rules of golf, higher etiquette, our favorites, emily post’s wedding etiquette, 6th edition, emily’s magic words, digital stationery for texts, emily post's - host a bridesmaids' luncheon digital planner, awesome etiquette podcast.
The Awesome Etiquette podcast is a weekly Q&A show where hosts, (cousins, and co-presidents of the Emily Post Institute,) Lizzie Post and Dan Post Senning answer audience questions, tackle etiquette topics in detail and salute good etiquette witnessed by the Awesome Etiquette audience.
Listen on your favorite platform!
- Support the Show
- Episode 501 - Total Eclipse
- Episode 500 - Yes, 500
- Episode 499 - Etiquette vs. Protocol
The Emily Post Institute Inc. is a fifth generation family business that has been promoting etiquette based on consideration, respect and honesty since Emily Post wrote her first book ETIQUETTE in 1922. Today we offer a wide range of books, online resources, training programs for all ages and topics, a weekly podcast and a selection of greeting cards and paper products.
The Emily Post Institute
- Timeline History
- Definition of Etiquette - Consideration, Respect and Honesty
- Emily's First Novel
- Emily Post: Daughter of Bruce Price
- Emily Post: In The Garden
Get a signed copy of our latest book, Emily Post's Etiquette - The Centennial Edition , for yourself or to give as a gift, and support Vermont's independent bookstore Bridgeside Books.
Join our Substack newsletter for more from Emily Post.
- Guide to Addressing Correspondence

Address book, cup of tea and stationery at the ready, you start addressing invitations for your husband’s fortieth birthday party. All of a sudden you realize you are in a potential etiquette minefield. Jane and John are married, but she does not want to be addressed as “and Mrs. John Kelly;” Sam and Sue are not married, but live together; and Tanya is separated but not yet divorced. What are the correct forms of address for each of these invitations? Simply refer to our handy list and take the mystery out of addressing your social correspondence correctly.
Mx. Is the universal title that can be used by anyone. It is gender non-identifying. Even if you identify specifically with a gender you may still use Mx. and you may see Mx. used when the sender is unaware of your title.
Addressing a Man
Mr. is the title designated for an adult man age 16 or older. Short for Mister or Monsieur in french.
The abbreviated plural for Messieurs is Messrs. While some are under the assumption that Messrs. is used for brothers, it is actually used to indicated multiple gentleman (or also multiple companies ie Messrs. Sotheby) Messers. could also be used to indicate two married men. We suggest that you ask male couples if they prefer to be Mr. and Mr. Smith or the Messrs. Smith.
Addressing a Woman
Maiden name.
Ms. Jane Johnson
Miss Jane Johnson*
*Usually ‘Miss’ is for girls under 18
Married, keeping maiden name
Married, uses husband’s name socially.
Mrs. John Kelly Mrs. Jane Kelly* *Nowadays this is acceptable Ms. Jane Kelly
Separated, not divorced
Mrs. John Kelly Mrs. Jane Kelly Ms. Jane Kelly
Mrs. Jane Kelly Ms. Jane Kelly Ms. Jane Johnson (maiden name)
Mrs. John Kelly* *If you don’t know the widow’s preference, this is the traditional and preferred form Mrs. Jane Kelly Ms. Jane Kelly
Addressing a Couple
Married, she uses her husband’s name socially.
Mr. and Mrs. John Kelly
NOTE: Traditionally, a woman’s name preceded a man’s on an envelope address, and his first and surname were not separated (Jane and John Kelly). Nowadays, the order of the names—whether his name or hers comes first—does not matter and either way is acceptable. The exception is when one member of the couple ‘outranks’ the other—the one with the higher rank is always listed first.
Married, she prefers Ms.
Mr. John Kelly and Ms. Jane Kelly Ms. Jane Kelly and Mr. John Kelly *Do not link Ms. to the husband’s name: Mr. and Ms. John Kelly is incorrect
Married, informal address
Jane and John Kelly John and Jane Kelly
Married, she uses maiden name
Mr. John Kelly and Ms. Jane Johnson Ms. Jane Johnson and Mr. John Kelly
If you can’t fit the names on one line: Mr. John Kelly and Ms. Jane Johnson *Note the indent, either name may be used first
Unmarried, living together
Mr. John Kelly & Ms. Jane Johnson Note: Use one line
A woman who outranks her husband: elected office, military rank
The Honorable Jane Kelly and Mr. John Kelly
If you can’t fit both names on one line (note indent): The Honorable Jane Kelly and Mr. John Kelly
A woman who outranks her husband: professional or educational degree
Dr. Jane Kelly and Mr. John Kelly
Both are doctors (PhD or medical) and use the same last name
The Doctors Kelly (omit first names) Drs. Jane and John Kelly / Drs. John and Jane Kelly Dr. John Kelly and Dr. Jane Kelly / Dr. Jane Kelly and Dr. John Kelly
Both are doctors (PhD or medical), she uses her maiden name
Dr. Jane Johnson and Dr. John Kelly Dr. John Kelly and Dr. Jane Johnson
Ms. is the default form of address, unless you know positively that a woman wishes to be addressed as Mrs.
Professional designations—use only for business
Jane Kelly, CPA
Note: Do not use Ms. or Mr. if using a professional designation. Socially, drop the professional designation and use Mr., Ms., or Mrs.: Ms. Jane Kelly
Esquire: Attorneys and some court officials
Jane Kelly, Esquire
Note: If using Esquire, do not use Ms. or Mr. In conversation or socially, ‘Esquire’ is not used; use Mr. or Ms.: Ms. Jane Kelly
Attorney at Law
Ms. Jane Kelly Attorney at Law
Note: This is an alternative to ‘Esquire’ for attorneys. Use Mr. or Ms. and use two lines with no indent.
- Wedding Etiquette 101: Everything You Need to Know
Recommended Articles
- How to Write a Thank-You Note
- View all articles

Essential Manners For Men, 2nd Edition

How Do You Work This Life Thing?

Emily Post's Etiquette, 19th Edition

Essential Manners for Couples
Related articles, women's names and titles, group restaurant invitations, follow this personal letter format to sound more sincere.
Find a store
How to address an envelope.

Not long ago, dropping a note in the mail was part of everyday life. Now we communicate instantly with texts, emails, and social media—but when you want to send a tangible, lasting, meaningful message, there’s nothing like a card. Here’s how to address an envelope and send your card out into the world.
Inspired? Create and share by tagging @HallmarkStores .
How to address the envelope
It’s important to get the addresses in the right spots, or you risk your mail landing on your own doorstep instead of the intended recipient’s.
Add Your Return Address Write your own address (the “return address”) on the top left corner of the front of the envelope. It’s also acceptable to put it on the back of the envelope in the middle of the flap.

Line 1: Your full name ( and title, if appropriate ) Line 2: Business name, building name (if a college dorm, for instance), apartment or suite number, if applicable Line 3: Street address Line 4: City State Zip Code
The return address is there in case your mail has the wrong amount of postage or the recipient’s address is inaccurate. The card will be returned to you to fix and resend.
Add the Mailing Address Next, write the recipient’s name and address in the center of the front of the envelope.

Line 1: Recipient’s full name ( and title, if appropriate ) Line 2: Business name, building name (if a college dorm, for instance), apartment or suite number, if applicable Line 3: Street address Line 4: City State Zip Code
Bonus points If you want to make things easy on the Post Office: • Print neatly in all capital letters. • Don’t use commas or periods. • Use the Zip Code ™. • Leave about a half-inch of blank space across the bottom, because the post office will put a bar code there.
But also… We’re big fans of mail art . Just make sure the address is legible and the stamps are visible. And know it will confuse the scanners and computers, so your card may take a teeny bit longer to arrive at its destination.
Pro tip: If your mail is going outside of the country, follow the format of that country’s addresses and include your own country under the standard return address.
How to find a mailing address
Did you get to that last step and go “Oh, right…the address. That’s a thing I need”? If the contact list on your phone doesn’t include addresses, you’re not alone.
Here are the easiest ways to get a mailing address:
- Ask the person you’re sending the card to. Unless you want it to be a surprise, then…
- Check the map app on your phone. If you’ve ever driven to their house, you might have it there.
- If it’s a family member, ask your mom. If it’s a pal, ask your most organized mutual friend. If it’s a co-worker, ask your administrative assistant.
- Try searching their first and last name with their city and state and the word “address.”
How to mail a card
Add the Stamp The stamp goes in the upper right corner of the front of your envelope.

The stamp you’ll need depends on a few things:
- Where you’re sending your card
- The size and shape of the envelope
- How fast you want your mail to arrive
For most domestic (meaning U.S. only) deliveries with a standard-size envelope, you can use a Forever® stamp (currently 55 cents) and the mail will arrive in 1-3 business days. (Forever stamps have the benefit of holding their value no matter how long you have them, even if postage rates change.)
Non-standard-size envelopes—square, oversized, or unusual envelopes—start at about 70 cents. Really big, funky, bulky, or complicated envelopes—or letters going to other countries—will cost more. And then there are all sorts of options—next day delivery, certified mail, etc.
The US Postal Service is your best source for information about postage , including where to buy stamps .
Fun fact: You can mail just about anything—like a shoe, a coconut, or a rubber ball—with enough postage. Just consult with your local Post Office for the best way to get it to your destination.

Mail the Card Mailing your card is the easiest part: Simply leave it in your mailbox for your mail carrier to pick up. If you’re worried about speed or security, you can also drop it off at your local Post Office or into any blue USPS box. Find your nearest location .
You may also like
Gift wrapping giftology: how to wrap a mother's day gift.
Make Mom’s day with these simply stunning Mother’s Day gift-wrapping ideas. Watch our video tutorials ...
Fall How to make a Day of the Dead altar: A personal story
Understand the traditions of Day of the Dead through one Hallmarker's story
Gift Wrapping Giftology: how to make a bow out of ribbon
Adding a bow on top is the classic finishing touch to any gift. Watch the fun gift-wrapping video tutorials below ...
Gift Wrapping Giftology: how to put tissue paper in a gift bag
Gift bag + tissue paper = a quick gift-wrap solution. Sure, it’s easy enough, but there are a couple of tricks to ...
Gift Wrapping Giftology: how to make a gift tower
Want a present that will stand out on any gift table? Watch our fun gift-wrapping video tutorial below to see just...
Gift Wrapping Giftology: how to wrap a birthday gift
Giving the best-wrapped birthday gift at the party is a piece of cake. Just watch our 3 gift-wrapping video tutori...
Gift Wrapping Giftology: how to wrap a present
Want to wrap a gift and have it look not just OK, but flawless? It’s easy. From wrapping a simple box to simply st...
Gift Wrapping Giftology: how to make tissue paper flowers
Who doesn’t like to get flowers? A tissue paper flower can brighten any gift. All you need is five pieces of tissu...
Gift Wrapping Giftology: how to wrap a graduation gift
Cap off your graduation gifts with a little creativity. Watch our video tutorials to find simple gift-wrapping tri...
Christmas Bake up Christmas cheer with a homemade gingerbread house
Whisk off to a snow-covered chalet this holiday season with a homemade gingerbread house fresh from your oven. Car...
Wedding How to write wedding vows that wow
Wedding vows can be particularly meaningful when you write them yourself, but sometimes it’s hard to know where to...
Thank You How to write a thank-you note
Since the dawn of time, people have struggled with the right way to say thank ...
Gift Wrapping Giftology: how to wrap a Father's Day gift
This Father’s Day, surprise him by making his gift a true presentation. Watch our gift-wrapping video tutorials fo...
Added to your cart
We're sorry.
There was an error adding this product to your cart. Please close this window and try again.
- Search Please fill out this field.
- Manage Your Subscription
- Give a Gift Subscription
- Newsletters
- Sweepstakes
- Culture and Lifestyle
- Etiquette And Manners
How to Properly Address an Envelope: Tips and Etiquette
Ever been unsure of when to use Ms. or Mrs., or how to include professional titles? Consider this your ultimate etiquette guide.
Maggie Burch is a digital media professional with a decade of experience creating, editing, and managing multimedia content for national brands, including Glamour, Southern Living, House Beautiful, and The Everygirl. A homes enthusiast, Maggie writes about decor and real estate trends, designer-approved tips and tricks, and even her own DIY projects. Follow her on Instagram.
:max_bytes(150000):strip_icc():format(webp)/maggieburch-2d2bf48d3be34c4d91c665f77f5f0784.jpg "how to write to and from on envelope")
Using Abbreviations
Using the right titles, addressing women, addressing couples, addressing families, using professional titles, frequently asked questions.
We may live in an increasingly digital world, but there are certain things that should always be done the "old-fashioned way," if you ask us—one being sending formal (as well as informal) correspondence in the mail. If sending handwritten thank-you notes, holiday cards , and wedding invitations in the mail are traditions you intend to continue, it's important to make sure you're adhering to proper etiquette guidelines each step of the way, especially if you've gotten out of the habit.
Once you've written that lovely thank-you note on your personal stationery or picked up your party invitations from the printer, the next step is addressing envelopes. It may seem straightforward, but when it comes to addressing people by name—whether they're friends or barely acquaintances—it can be a sensitive subject. It's also an important logistical one: After all, the names on the envelope inform the recipients whom the invitation, thank-you, or gift inside is intended for. You don't want to unintentionally exclude (or include) anyone.
WATCH: How to Address Wedding Invitations
Thankfully, there are some tried-and-true rules and etiquette guidelines that are easy to follow. Here, we've rounded up all the intricacies of envelope-addressing in this go-to etiquette resource for getting it right every time.
For formal correspondence, use the recipients' full names ( Rebecca vs. Becca ), including their middle name if you know it. Don't use any initials or abbreviations in names or street addresses ( Avenue vs. Ave. or Apartment vs. Apt. ). For less formal correspondence (personal thank-you notes, holiday cards, etc.), using informal names (if that's what the person goes by) and abbreviations is certainly acceptable.
This can be one of the trickiest parts of addressing envelopes because there are so many options and variables. (Note: For informal notes to close friends and family, omitting titles is okay, but it's never wrong to add them if you're unsure.) If you're working on formal wedding invitations , check out our thorough guide here . We've included the general rules below.
- Girls under 18 should be Miss ( Miss Rachel Harris ).
- Single women over 18 or married women who use their maiden name should be Ms. ( Ms. Anna Smith ).
- Addressing divorced and separated women with the correct title can be tricky, but Ms. is usually the safest option if you're unsure of their preference. If they've returned to their maiden name, Ms. is definitely correct. When using Ms., don't use the husband's first name ( Ms. Anna Smith (maiden name) or Ms. Anna Jones (married name)).
- For widowed women, the above rule also applies, but it's most traditional to use Mrs. and her late husband's first and last names ( Mrs. Henry Jones ).
- If addressing a married woman who uses her husband's last name (but his name is not included on the envelope), it's traditional to use Mrs. followed by her husband's first name, but using her first name is also correct and may feel more appropriate depending on the scenario ( Mrs. Henry Jones or Mrs. Anna Jones ).
- Married couples who both use the husband's last name should be Mr. and Mrs. followed by his first and last name ( Mr. and Mrs. Henry Jones ).
- Married couples who use different last names should use Ms. and Mr. with full names, joined by "and" ( Ms. Anna Smith and Mr. Henry Jones ), however, the order is not strict.
- Unmarried couples and same-gender couples who live together should follow the above rule as well. In all instances, if both names cannot fit on one line, write them on two separate lines without the "and" (whomever you're closer to can be listed first, or it's common to list same-gender couples alphabetically by last name). ( Ms. Emily Wood and Mr. George Swan or Ms. Nancy Hall (followed on the next line:) Ms. Elizabeth Sams ).
For invitations, it's important to be explicit about what members of a household are invited via the names on the envelope (especially when it comes to children and weddings).
- Any children under 18 should be listed on the line below their parents' names, in age order, without titles or last names ( Mr. and Mrs. Henry Jones (followed on the next line:) Emma, James, and Stephen ).
- For less formal correspondence intended for the whole family, the above method is perfectly fine, or you can address the family as a whole using the father's first and last name ( The Henry Jones Family ).
- A helpful reminder for making last names plural: You shouldn't address a family this way, but you may use it in the return address on your envelope (or certainly when signing your holiday card). Simply add s or -es to the last name—don't add any apostrophes!
For doctors, judges, members of the clergy, or military officers, titles should be included when addressing both formal and informal correspondence to the best of your knowledge.
- For couples, whoever has the higher ranking title should be listed first ( The Honorable Anna Jones and Mr. Henry Jones ).
- If both have the same title and share a last name, most titles can be made plural ( The Doctors Jones or Drs. Anna and Henry Jones ).
- If both have different titles or the same title but different last names, distinguish each full name with a relevant title, joined by "and" ( The Reverend Henry Jones and Dr. Anna Jones or Dr. Henry Jones and Dr. Anna Smith ).
When addressing a couple, use their names joined by "and" or an ampersand on the same line. Use this format even if the married couple does not share the same last name or if you are addressing a couple who share the same address but are not married.
Conventional etiquette for signing cards is the man's name first, followed by the woman's and the children's names from oldest to youngest. However, placing the woman's name first is also acceptable if the woman is closer to the recipient.
Related Articles
- Introduction
- What Are You Mailing? Domestic
- What Are You Mailing? International
- Choosing a Service for Mailing
- Adding Extra Services
- Examples of Smart Choices
Addressing Your Mail
- Preparing Packages
- Tips and Tools for Measuring Letters and Large Envelopes
- Tips and Tools for Measuring Packages
- Flat Rate Quick Reference
- Sending and Receiving Mail
- Other Products and Services
- Tips for Frequent Mailers and Small Businesses
The accuracy of the address affects the speed and handling of your mail.
Return Address
Print or type your address in the upper left corner on the front of the envelope.
Extra Services
Place labels for extra services above the delivery address and to the right of the return address, or to the left of the postage.
Use stamps, a postage meter, or a PC Postage system to affix the correct amount. You can calculate postage online at pe.usps.com .
Recipient Name
Name of organization, street address.
Use a Post Office box or street address, but not both. If the address also has a directional (for instance, NW for Northwest), be sure to use it. There may be more than one Main Street.
Apartment or Suite Number
The correct apartment or suite number helps to ensure delivery to the right location.
City, State, and ZIP Code
To find the correct spelling of a city name or to find a ZIP Code, visit www.usps.com or call 1·800·ASK·USPS. Using the correct ZIP Code helps to direct your mail more efficiently and accurately.
Letters, bills, greeting cards, and other documents can be sent in standard white, manila, or recycled paper envelopes. Items needing extra protection can be sent in bubble-lined, padded paper, or waterproof envelopes. These envelopes, along with stationery and prepaid First-Class Mail postcards and envelopes, can be purchased at the Post Office.
Priority Mail Express and Priority Mail envelopes are available at your Post Office or visit www.usps.com/store . You must use the USPS-produced address label for Priority Mail Express.
Online Shipping Labels
You can print and pay for your Priority Mail Express and Priority Mail postage labels online using Click-N-Ship. USPS Tracking is provided free for domestic Priority Mail. International labels with postage may be purchased online for Global Express Guaranteed, Priority Mail Express International, Priority Mail International, and First-Class Package International Service using Click-N-Ship. You can arrange for free Package Pickup online. Learn more about Click-N-Ship at cns.usps.com .
Print the delivery and return addresses on the same side of your envelope or card. The addresses should be written parallel to the longest side.
Type or print clearly with a pen or permanent marker so the address is legible from an arm’s length away. Do not use commas or periods.
A return address is required on most mail.
Priority Mail Express
For Priority Mail Express, you must use a USPS-produced address label provided by the Post Office.
Military Mail
Military addresses must show the full name with middle name or initial and the PSC number, unit number, or ship name. Replace the city name with APO, FPO or DPO, and the state with AA, AE, or AP, and include the ZIP+4 Code.
Abbreviations
A list of commonly used state, street, and other abbreviations is available online.
Capital One Main Navigation
- Learn & Grow
- Life Events
- Money Management
- More Than Money
- Privacy & Security
- Business Resources
How to address an envelope
May 2, 2023 | 7 min read
Most communication these days is digital, whether it’s via text message, email or video chat. But there may be times when you want to send someone something—like a handwritten thank-you note, check , birthday card, invitation or letter—through the mail.
If you’re going to send something via snail mail, you’ll want to make sure it gets to the right person at the correct address. That’s why it’s a good idea to know how to properly address an envelope.
Key takeaways
- When sending an envelope, it’s important to include the sender’s full name and address, the recipient’s full name and address and any postage.
- The sender’s name and address generally go in the top left corner of the envelope.
- The recipient’s name and address should be in the lower center of the envelope.
- Any postage goes in the top right corner of the envelope.
- Addresses are written a bit differently when sending mail to someone in the military or internationally.
See if you’re pre-approved
Check for pre-approval offers with no risk to your credit score.
How to fill out an envelope, step by step
There are just a few steps to fill out an envelope. You’ll put the sender’s name and return address on the top left corner and the recipient’s name and mailing address in the lower center. And you’ll typically place a stamp on it in the top right corner. All these generally go on the same flat side of the envelope. The order of the steps doesn’t really matter—as long as you complete them.
1. Add the sender’s return address on the envelope
You’ll typically write, type or add a label with the sender’s return address in the top left corner of the envelope. This may have your information or the information for someone you’re helping to send the envelope.
Here’s the order in which you’ll add the sender’s information, line by line:
- Business or organization’s name, if applicable
- Street address or P.O. Box number, including apartment or condo number, if applicable
- City, state and zip code
2. Add the recipient’s mailing address
You’ll also want to make sure the recipient’s mailing address is on the envelope. The format is similar to the sender’s address, but you’ll put the recipient’s information in the lower center of the envelope.
Here’s the order in which you’ll add the recipient’s information:
- Full name, possibly including a title such as “Dr.” or “Mrs.” before their name if it’s a formal piece of mail. You may also want to add “Attn:” or “c/o" to direct the mail to a certain person.
3. Add a stamp
You’ll typically need to add a stamp on the envelope to make sure it goes through the mail. If you’re wondering, how much is a postage stamp? It’s currently 63 cents for a standard-sized, rectangular envelope, but it may change.
If the envelope is heavier, it might require more than one stamp. The U.S. Postal Service has information on its site to help calculate the amount of postage you’ll need.
What to do after addressing an envelope
Once you’ve addressed your envelope, you have a few options for sending it:
- Leave it in your mailbox and indicate it’s ready to be sent by raising the flag, if you have one.
- Take it to your local post office.
- Drop it in an official blue collection box.
How to write a military address on an envelope
A military address is a bit different from a standard address, but the format and placement for the recipient address are similar.
You’ll want to include the recipient’s information in this order:
- Full name, including their rank
- Postal service center (PSC) number, unit number or ship name
- Army and Air Force Post Office (APO), U.S. Navy Fleet Post Office (FPO) or Diplomatic Post Office (DPO) designation; two-letter abbreviation: AA for Armed Forces of the Americas, AE for Armed Forces of Europe or AP for Armed Forces of the Pacific; and nine-digit zip code
How to address an envelope for international mail
The format and placement for sending an envelope internationally are the same, but you’ll add the sender’s and recipient’s countries in a separate last line for each. In the top left corner, you’ll add your or the sender’s name and address as normal, but you’ll put the sender’s country in a line below the city, state and zip code.
For the recipient, you’ll still put their name and address in the lower center of the envelope, but you’ll add their country on the last line. The Postal Service also requires that the recipient’s address be written in English. If the address is in another language, the English translation should be after each line.
Addressing envelopes for other purposes
Addressing an envelope can be pretty standard, but there are some situations where the format can vary. Here are a few examples.
How to write an address for an apartment
If you’re sending mail to an apartment, it’s important to include the apartment number, in addition to the full street address.
The Postal Service recommends putting the apartment number at the end of the street address line. For example, an address might be: 100 Main St., Apt. 2. But if all the information can’t fit on the address line above the city, state and zip code, the Postal Service advises putting the apartment number on a line above the street address.
How to write a P.O. Box address
When sending mail to a P.O. Box , it’s important to designate that by putting “P.O. Box” and the correct number in the address line. The recipient’s name and address will still be in the lower center part of the envelope, but it’ll have a P.O. Box number, instead of a street address.
How to address an envelope to a couple
When it comes to addressing an envelope to a couple, the placement of the recipient address is the same. But it’ll be addressed to two people. How you write or print the couple’s names can depend on their relationship status and the formality of what’s in the envelope.
For any informal address, you might just have the couples’ names. For a formal address, it’s a good idea to add their titles before their names. And if, for example, one has a doctorate or military title, their name would typically go before their partner’s.
How to address an envelope to a family
Addressing an envelope to a family is similar to a couple’s address. The placement of the recipient address on the envelope is the same, but the first line will be addressed to several people.
You might address the envelope with the family name, like “The Smith Family,” or you might have the parents’ names with “and Family” added. Keep in mind, if you’re sending an invitation, it’s helpful to make it clear which members of the family are invited.
How to address a postcard
A postcard looks a little different from an envelope. You won’t typically include a sender name and address. Instead, you can add a message and sign it. You’ll still need to include a recipient name and address, as well as postage, though. If you purchase a postcard, there will typically be several lines for the recipient name and address on the right side and a rectangle at the top right corner for the postage.
Other tips for addressing an envelope
Besides how and where to address an envelope, there are some other tips that can help ensure your envelope reaches the correct recipient.
The Postal Service recommends:
- Writing or typing addresses clearly in capital letters
- Writing with a pen or permanent marker
- Including the nine-digit zip code , if possible
Addressing an envelope in a nutshell
Whether you’re sending a loved one a letter, mailing a bill or inviting someone to a birthday party , it’s a good idea to know how to properly address an envelope to make sure it’s received. If your envelope includes a check, you might want to be familiar with how to write a check before sealing the envelope. And if you’ll be sending out cards with your new home address, double-check that you’ve completed all the steps for changing your address .
Related Content
How to change your address: a complete checklist.
article | November 29, 2022 | 5 min read
How to write a check in 6 easy steps
article | December 7, 2023 | 8 min read
How to get a P.O. Box
article | April 25, 2023 | 5 min read
English Use arrow key to access related widget.
- Customer Service
- My USPS ›
- Español
Top Searches
Alert: USPS.com is undergoing routine maintenance from 10 PM ET, Saturday, May 18 through 4 AM ET, Sunday, May 19, 2024. During this time, you may not be able to sign in to your account and payment transactions on some applications may be temporarily unavailable. We apologize for any inconvenience.
Alert: Some of our applications may be unavailable during routine maintenance from Saturday, May 11 through Sunday, May 12. We apologize for any inconvenience.
Alert: Severe weather in the South, Southeast, and Midwest may impact package delivery. Read More ›
Alert: The online Postal Store is currently unavailable. We are working to resolve the issue and apologize for the inconvenience.
Alert: We are currently experiencing issues with some of our applications. We are working to resolve the issues and apologize for the inconvenience.
Alert: USPS.com is undergoing routine maintenance from 10 PM ET, Saturday, March 9 through 4 AM ET, Sunday, March 10, 2024. During this time, you may not be able to sign-in to your account and payment transactions on some applications may be temporarily unavailable. We apologize for any inconvenience.
Alert: Severe weather conditions across the U.S. may delay final delivery of your mail and packages. Read more ›
Alert: USPS.com is undergoing routine maintenance from 11 PM ET, Saturday, March 2 through 4 AM ET, March 3, 2024. During this time, payment transactions on some applications will be temporarily unavailable. We apologize for any inconvenience.
Alert: We are currently experiencing issues with some of our applications. We apologize for the inconvenience.
Alert: Payment transactions on some applications will be temporarily unavailable from 11 PM ET, Saturday, January 6 through 3 AM ET, Sunday, January 7, 2024. We apologize for any inconvenience.
Alert: Some of our applications are undergoing routine maintenance on Monday, October 30 from 10-11 PM ET and may be unavailable. We apologize for any inconvenience.
Alert: Some of our applications are undergoing routine maintenance from Saturday, August 26 through Sunday, August 27 and may be unavailable. We apologize for any inconvenience.
Image of play button
Find out how to send mail. 1:53
Video Description: How to Send a Letter or Postcard (TXT 4 KB)
How to Send a Letter or Postcard: Domestic
Sending mail with USPS is easy! Our video will help you with most letters, cards, and postcards you send domestically (inside the U.S.), including U.S. territories and military bases in the U.S. and abroad.
For how to ship a package, see How to Send a Package: Domestic .
Send Mail: Step-by-Step Instructions

Step 1: Choose Envelope or Postcard
Envelopes are for sending flat, flexible things, like letters, cards, checks, forms, and other paper goods. For just 1 $0.68 First-Class Mail ® Forever ® stamp , you can send 1 oz (about 4 sheets of regular, 8-1/2" x 11" paper in a rectangular envelope) to anywhere in the U.S.!

Envelopes must be rectangular and made of paper to qualify for letter prices. Your envelope can be a maximum of 11-1/2" long x 6-1/8" high. (A standard No. 10 envelope is 9-1/2" long x 4-1/8" high.) You can fold what you put in your envelope, but it needs to stay flat—no more than 1/4" thick.
If you want to send letter-sized papers without folding them, you can use a large envelope (called a "flat"); the postage for flats starts at $1.39 . If your large envelope is nonrectangular, rigid (can't bend), or lumpy (not uniformly thick), you'll have to pay the package price.
TIP: If your envelope can't fit through USPS mail processing machines, or is rigid, lumpy or has clasps, string, or buttons, it's "nonmachinable" and you'll have to pay $0.44 more to send it. ( See additional postage in Step 3 .) You'll also have to pay more if your envelopes are square or vertical (taller than they are wide).
Postcards are for short messages that you don't need to put in an envelope. Save money using a $0.53 postcard stamp to send a standard-sized postcard anywhere in the U.S. Standard postcards are usually made of paper, are between 5" to 6" long and 3-1/2" to 4-1/4" high, and are between 0.007" and 0.016" thick.

Step 2: Address Your Mail
Envelopes: Write your address (the "return" or "sender" address) in the top left corner. Write the delivery address (the "recipient" address) in the bottom center.
Postcards: Postcards come in different formats, so write the delivery address in the space it gives you (on the same side you write your message and put the stamp).
Print your return address and the delivery address clearly, in the correct spots, to make sure your mail is delivered on time.
Address Format Tips
- Use a pen or permanent marker.
- Do not use commas or periods.
- Include the ZIP+4 ® Code whenever possible.
Write Sender Address
Write your address (the "return address") in the top-left corner. Include the following on separate lines:
- Your full name or company name
- Apartment or suite number
- Full street address
- City, State, and ZIP+4 Code
Write Delivery Address
Write the delivery address (the "recipient" address) in the bottom center of the envelope. Include the following on separate lines:
- Recipient's full name or company name
If the apartment or suite number cannot fit on the delivery address line above the city, state, and ZIP+4 Code, place it on a separate line immediately above the delivery address line.
Write the sender's address in the top-left corner. Include the following on separate lines:
- Full street address and apartment or suite number, if applicable
Special U.S. Addresses
Puerto rico.
Some Puerto Rico addresses include an urbanization or community code for a specific area or development. Addresses with an urbanization code, abbreviated URB, should be written on 4 lines:
MS MARIA SUAREZ URB LAS GLADIOLAS 150 CALLE A SAN JUAN PR 00926-3232
More Puerto Rico Address Examples
U.S. Virgin Islands
Virgin Islands addresses have the same format as standard addresses. The right abbreviation for this territory is "VI," not "US VI" or "USA VI":
MS JOAN SMITH RR 1 BOX 6601 KINGSHILL VI 00850-9802
Military and Diplomatic Mail (APO/FPO/DPO)
Mail to military and diplomatic addresses is treated differently:
- Do not include the city or country name when you send something to an APO/FDO/DPO address in another country. This keeps your mail out of foreign mail networks.
- Do include unit and box numbers if they're assigned:
SEAMAN JOSEPH SMITH UNIT 100100 BOX 4120 FPO AP 96691
More Details on Military Addresses
When you're done addressing your envelope, put what you're sending inside the envelope, then close and seal it (using the envelope's glue or tape).

Step 3: Calculate Postage (& Add Insurance or Extra Services)
A First-Class Mail ® Forever stamp costs $0.68 and goes in the upper right corner of the envelope. (You can also use any combination of stamps that adds up to $0.68.)
If your letter is heavier or bigger, or if you want to add insurance or extra services like Certified Mail ® service, you'll pay more.
A standard postcard stamp costs $0.53 . (Large or square postcards will cost more.) Put the postcard stamp in the space provided near the delivery address.

Postage for letters mostly depends on weight and size/shape. You can weigh your letter with a kitchen scale, postal scale , at a self-service kiosk, or at the Post Office ™ counter.
TIP: As a rule of thumb, you can send 1 oz (4 sheets of printer paper and a business-sized envelope) for 1 First-Class Mail ® Forever ® stamp (currently $0.68).
The postage for a large envelope (or flat) starts at $1.39 for 1 oz.
Where Can I Buy Postage?
- The Postal Store ® Shop online for all stamps and add-on postage for oversized or heavier envelopes.
- Post Office Locations Buy stamps at Post Office locations , self-service kiosks , or at National Retailers such as grocery and drug stores.
TIP: If you're sending larger envelopes (flats) using Priority Mail ® or Priority Mail Express ® service, you can use Click-N-Ship ® service to pay for and print your own postage online.
Additional Postage
If your envelope weighs over 1 oz, you can buy additional postage in the amount you need:
- Each additional 1 oz is $0.24, for letters up to 3.5 oz and large envelopes up to 13 oz.
- Nonmachinable items, including envelopes that are lumpy or rigid, or have clasps, string, or buttons will cost $0.44 more to send. You'll also have to pay more if your envelopes are square or vertical (taller than they are wide).
- You can also buy 1¢, 2¢, 3¢, 4¢, 5¢, and 10¢ stamps at The Postal Store .
TIP: Put the stamp on last; that way, if you make a mistake at any other point, you won't waste a stamp.
Calculate a Price
Add-On Services
If you want insurance, proof of delivery, signature services, or other optional services, you'll have to pay extra.
Our Insurance & Extra Services page has more details; some of the more common add-on services for letters include:
- Certified Mail ® : Get proof that you mailed your item and that the recipient signed for it.
- Registered Mail ® : USPS's most secure mail service–mail is processed manually, handled separately and securely, and signed for along every step of its journey. The recipient must sign for the mail to confirm delivery (or attempted delivery).
- Return Receipt: You'll get a printed or emailed delivery record showing the recipient's signature. You can combine Return Receipt with other services, including Certified Mail, Registered Mail, Priority Mail Express ® service, and more.
- Adult Signature Required: Only an adult (age 21+) can sign for the mail after showing a valid government ID .
Postage Options
There are several ways to get postage for your envelope.
- The Postal Store ® --> ® and Priority Mail Express ® envelopes.
- Post Office ™ Locations --> ® such as grocery and drug stores.

Step 4: Send Your Mail
Once your envelope or postcard has the correct addresses and postage, you can send it several ways, including putting it in your mailbox or dropping it in a blue collection box or at a Post Office ™ location.

- Put your letter inside your mailbox and raise the flag (if you have one).
- If you have a cluster mailbox, drop it in the outgoing mail slot.
- Drop it off in a blue collection box.
- Take it to a Post Office lobby drop.
Important Note: If your envelope has postage stamps and weighs more than 10 oz or is thicker than 1/2", you can't put it in a collection box; you have to give it to an employee at a Post Office location. See more details on What Can and Cannot be Deposited in a Collection Box?
Bonus: Sending Mail Pro Tips
The Postal Service uses high-speed sorting machines to help process and deliver 425.3 million mail pieces each day. Here are some extra tips to improve your mail sending experience:
- Stay flexible : Don't send rigid (hard) objects in paper envelopes.
- Sending embellished invitations (for weddings, graduations, etc.)? Get them hand-canceled or put them inside another envelope.
- Need tracking? Learn about your options.

Stay Flexible
Postcards, letter envelopes, and large envelopes (flats) all need to bend to fit through USPS ® high-speed sorting machines.
- OK: Flexible, flat things like stickers, photos, trading cards, etc. should be okay—as long as your envelope stays flat, not lumpy, and less than 1/4" thick.
- Not OK: Don't put rigid objects (like flash drives, coins, keys, hard plastic card cases, etc.) loose in unpadded paper envelopes: They could get torn out of the envelope, jam the sorting machines, cause a delay, or even get lost.
Instead, for rigid and odd-shaped objects (or things you don't want to get bent), we recommend using a padded envelope or small box and sending it as a package .
Sending Embellished Invitations (for Weddings, Graduations, etc.)
If you want to send a specially decorated envelope (like some wedding invitations):
- You can pay the extra fee for nonmachinable First-Class Mail ® items, bring your mail to the Post Office™ counter, and ask the retail associate to hand-cancel your embellished invitations.
- For externally decorated invitations: If you use wax seals, strings, ribbons, etc. on your envelopes, don't try to send them exposed. Instead, to make sure your envelopes arrive looking the way your designer intended, put them inside another envelope .
Need Tracking?
Tracking is not available for First-Class Mail items. If you'd like to get tracking information for your letter:
- You can pay extra to send your letter using Priority Mail Express ® or Priority Mail ® service.
- You can get delivery confirmation by adding Certified Mail ® or Registered Mail ® service. (You can even combine it with Return Receipt if you want the recipient's signature.)
- Anniversaries
- Baby Showers
- Cards and Stationery
- Father's Day
Photo Books
Wedding invitations, how to write on an envelope.
Written by Shutterfly Community Last Updated: Jul 16, 2020
It seems like a simple task, but how to write on an envelope can prove to be confusing. Is addressing a business letter the same as addressing a letter to a friend? Are there shortcuts to writing your return address, or do you have to write it on every envelope you address? Is there a comma at some point when writing the address? These are just some of the many questions that come to mind when you realize you need to address an envelope. Although it may be confusing, writing on an envelope is a lot simpler than it seems!
Shop Trending Categories
Canvas Prints

Graduation Announcements
Jump to a specific section to answer your question:
Inside the Envelope
How to write sender’s address on an envelope, how to write return address on an envelope, how to write mr. and mrs. on an envelope, how to address a professional envelope, postage stamps, how to seal an envelope.

Whether you are sending out your annual Christmas cards, or you are writing a letter to someone’s business, it is important to write on the envelope correctly. Before you are ready to address an envelope, you start with the contents of the envelope. Make sure you are using the appropriate stationery depending on who you are sending to. For example, don’t use paper with a floral print when sending something to a business.
The prices of stationery can vary depending on what is being printed on it, and if you are getting it personalized. If you are looking for something very simple it can cost as little as $20. Some stationery with a lot of design or made out of nicer material can cost up to $50.
Along with using the correct stationery, it is important to use the correct ink. Only hand write letters when appropriate. When addressing the envelope, write in black ink. If you are worried about making a mistake, remember that you can always get another envelope. It is important to use black ink, especially if you are trying to look professional. To learn more about what to include in a letter, you can reference our simple tips for letters.
Once you have decided that you are going to send something in the mail, you need to address it. So, what comes first? Make sure that the sender’s name and address are in the center of the envelope.This information is also normally aligned to the left. When writing the address there is also no need to write “To” before putting the address. It is self-explanatory that the centered address is who is receiving the mail. The following are steps you should take when you start writing.
- Write out the name of the recipient.
- Underneath the name, write out the street address.
- On the third line there should be the city, state, and zip code. The city and state should be separated by a comma.
Addressing multiple envelopes can be a tiring task, but don’t get lazy with how you write the address! Avoid abbreviations when addressing the envelope. Make sure to spell out “street” or “lane” instead of writing “st” and “ln”. This not only looks more professional, but it also make the address clearer for whoever is delivering the envelope.
Now that you know how to write the sender’s address on an envelope, writing the return address should be easy. The return address is written in the same way that the sender’s address is. The only difference is where it is located. Instead of being in the center of the envelope, the return address is placed in the upper lefthand corner of the envelope.
- Write name of person sending out the envelope.
- Put street address of the person sending out the envelope.
- Write City, state, and zip code separated by a comma.
If you don’t want to always write out your address, you can buy a personalized rubber stamp or personalized address labels as a shortcut. Personalized rubber stamps are around $50, while address labels are $10 for a roll. Pick whichever fits your budget, and it will end up saving you lots of time and energy.
Who knew that writing the recipient’s name and title could cause so many questions? Typically, when writing a couple’s names on an envelope, the man’s name comes first. However, it still can go either way. When writing their name, feel free to put either recipient first. The titles, such as Mrs. and Mr., should be followed by their first and last names.
Addressing a professional envelope sounds like it would be much more complex than a regular envelope. However, there are only a few differences.
- Put the name of the recipient.
- Write honorifics for with their name.
- Write their individual title and what their functional title if need.
- Put the department they are in.
- Write the name of their company.
- Put the address 1 and if applicable the address 2. This means that you put the address, street name, and the building number.
- Put the city and zip code, with the zip+4 if you know it. The zip+4 is simply the second part of the entire 9 digit zip code.
- The city and zip code should be separated by a comma.
Postage may seem like a small detail, but it is a small detail that goes a long way. Make sure that your stamp is neatly placed in the top right corner of the envelope. If you place it and it is crooked, the envelope may look less professional. Stamps also can be fun! If you are sending a birthday card or a Christmas card, you can personalize festive postage stamps.

Along with addressing an envelope and placing your postage, you also have to seal an envelope before sending it out. There are many ways to go about this. Some people do it the old-fashioned way and lick the envelope itself. However, if you would rather not have a bad taste in your mouth, you can buy envelopes that seal themselves. Many envelopes that are sold today have an adhesive on them that is covered by paper. You pull off that paper and you have a sticky edge that can easily close!
Other sealing techniques involve using a decorative sticker to seal the envelope. This also requires little work and no weird taste in your mouth. It is perfect for holidays or birthdays to add a little something to your envelope. These tips allow you to conquer normal and business envelopes. However, not all envelopes follow these rules. If you are planning a wedding you may want to look at how to address wedding invitations . If you are on vacation or trying to address a postcard those guidelines may also be different.
Explore Categories

Graduation Invitations

Custom Photo Blankets

Save the Dates

Coffee Table Books

Written by Shutterfly Community | View all posts
★ Lifestyle Expert
Shutterfly Community is here to help capture and share life's most important moments. Discover thoughtful gifts, creative ideas and endless inspiration to create meaningful memories with family and friends.
Visit their Website . You can follow on Instagram and Pinterest .
How to address an envelope: format and writing

In an age where we’re being taught how to compose electronic communication such as email, SMS or Skype, the art of addressing envelopes is being lost. Whilst writing letters is far from a forgotten skill, anyone inexperienced in envelope formatting may run into some issues.
Why is it important to address an envelope correctly?
Questions such as ‘where to write an address on envelopes’ or ‘how to format your return address’ are important questions to ask. Blindly writing on an envelope without prior knowledge is only going to cause you problems. Don’t believe it’s that important? Here are the scenarios you’re avoiding by following this guide:
- Your mail delivery company will go to great lengths to deliver all mail, even if it’s poorly addressed or formatted. Even so, it’s likely you’d experience a delay in delivery and there’s still the risk of it getting lost.
- Want your mail to arrive where you intended it do? Of course you do. Avoid confusing the mail staff or making the postman's job difficult and you’ll be rewarded with prompt delivery.
- Are you sending your mail to a lover? Potential business partner? Penpal? Just like we make judgements and impressions in person, you can bet your mail receiver is going to look at your envelope in the same way. In the simplest terms, what would your reaction be if you received mail and the envelope was a scribbled mess?
- You took the time to learn how an envelope should look but, through no fault of your own, it couldn’t be delivered. Including your return address on the back of an envelope ensures that you can be reunited with your mail, should it need to find its way back home.
Writing an envelope checklist
Ensure that your envelope features the following information, displayed in this order, before finding your nearest postbox.
- Postal stamp
- Which stamp should you use?
- Business name (business recipients only)
- Writing the businesses name is important to include when sending mail to offices. Many businesses work out of the same building, so including their organisation’s name will help your mail find them quickly.
- Department (business recipients only)
- Similarly to including the businesses name, detailing the receivers department within their organisation will get your mail to them faster. Large companies will have sorting offices to aid this process, but failure to include this information may lead to your letter being passed around before finding its desired recipient.
- Full name of the receiver
- Ensure that you provide both the forename and surname of the recipient.
- Consider using the title of the recipient, depending on your relationship with them. For business letters, it’s best practice to include Mr or Ms.
- In some cases, your recipient may have an appointed peerage title such as Duke or Baroness, should that be the case, ensure that you include this on all correspondence.
- Building name (optional)
- If the mail receiver's address includes a building name, it’s good practice to include it on the envelope, it may help to locate them.
- Full Street address (number and road)
- Ensure the postcode is fully capitalised.
- Return address
- On the reverse of your envelope, ensure you include all of the necessary information so that your mail can be returned if needed. Unsure of what to include? Follow this checklist as if you were sending the mail to yourself, or check out reverse envelope format example below.
Personal envelope format example

Business envelope format example

Reverse envelope format example

You may also like...

Knowing how to start a formal email will help you stand a chance of making the right impression. Learn how to write a formal email in our new article.

Character references are often in support of applications, so it’s important you know how to write a character reference in the right way.

It’s important that formal letters are formatted correctly. If you’re unsure or want to double check, we’ve made a checklist & templates for you to follow.
- PRO Courses Guides New Tech Help Pro Expert Videos About wikiHow Pro Upgrade Sign In
- EDIT Edit this Article
- EXPLORE Tech Help Pro About Us Random Article Quizzes Request a New Article Community Dashboard This Or That Game Popular Categories Arts and Entertainment Artwork Books Movies Computers and Electronics Computers Phone Skills Technology Hacks Health Men's Health Mental Health Women's Health Relationships Dating Love Relationship Issues Hobbies and Crafts Crafts Drawing Games Education & Communication Communication Skills Personal Development Studying Personal Care and Style Fashion Hair Care Personal Hygiene Youth Personal Care School Stuff Dating All Categories Arts and Entertainment Finance and Business Home and Garden Relationship Quizzes Cars & Other Vehicles Food and Entertaining Personal Care and Style Sports and Fitness Computers and Electronics Health Pets and Animals Travel Education & Communication Hobbies and Crafts Philosophy and Religion Work World Family Life Holidays and Traditions Relationships Youth
- Browse Articles
- Learn Something New
- Quizzes Hot
- This Or That Game
- Train Your Brain
- Explore More
- Support wikiHow
- About wikiHow
- Log in / Sign up
- Education and Communications
- Addressing Envelopes
How to Address a Large Envelope
Last Updated: April 4, 2024 Fact Checked
Recipient’s Address
Return address, sending the envelope.
This article was reviewed by Tami Claytor . Tami Claytor is an Etiquette Coach, Image Consultant, and the Owner of Always Appropriate Image and Etiquette Consulting in New York, New York. With over 20 years of experience, Tami specializes in teaching etiquette classes to individuals, students, companies, and community organizations. Tami has spent decades studying cultures through her extensive travels across five continents and has created cultural diversity workshops to promote social justice and cross-cultural awareness. She holds a BA in Economics with a concentration in International Relations from Clark University. Tami studied at the Ophelia DeVore School of Charm and the Fashion Institute of Technology, where she earned her Image Consultant Certification. This article has been fact-checked, ensuring the accuracy of any cited facts and confirming the authority of its sources. This article has been viewed 57,306 times.
Addressing a large envelope (also known as a “flat”) is the same as addressing a typical letter. Put the recipient’s address in the center of the envelope and the return address in the top left corner. Be sure all your information is accurate and list it in the correct order to make your mail arrive safely at its destination. You’ll also want to follow the measurement requirements for large envelopes to pay the correct amount in postage.

- This first line would look something like, “Jenna Martinez.”
- If you’d like, you can include the recipient’s title (Mr., Mrs., Ms., Dr., etc.) before their name.
- It’s best to avoid writing in cursive when addressing mail. Printed block letters are easier for postal workers to read.

- For example, if you were sending your large envelope to the University of Oregon’s English Department, the second line would look like this, “Department of English,” and the third line would be, “University of Oregon.”

- For example, you might write, “125 East Main St.” or “P.O. Box 8795.”
- Don’t forget to add a direction if the street name includes one. You can use abbreviations (N, W, S, E, NW, etc.).

- You can abbreviate “apartment” to “apt” and “suite” to “ste.” So this line might look like, “Apt. 4D” or “Ste. 45.”

- This line might look something like, “Easton, CT 06612.”
- It’s very important that you use the correct zip code, so double check this information online before you write it down.

- When in doubt, include both your first name and a middle or nickname. You might write, “Mr. John “Jimmy” Reynolds,” for example.
- So, for example, you could write, “Human Relations Dept.” on 1 line and “General Electric” on the next line.

- Expect a typical house number and street address to look something like, “6100 Cortaderia St. NW.” Be aware that the direction may come before or after the street name. Consult your local post office if you’re unsure where to place the direction.
- If you have a P.O. Box, write this down instead.

- This last line should look something like, “Valdosta, GA 31602.”
- If your envelope can’t make it to the recipient for some reason, it’ll be returned to you. To ensure this happens, it’s important for your address to be accurate. Don’t rush through writing your own address just because you know it so well!

- So long as your large envelope weighs less than 13 ounces (370 g), you can send it by dropping it in a blue USPS mailbox or by leaving it in your home mailbox with the red flag raised.

Expert Q&A
- These measurement specifications are for large envelopes sent through USPS. Most countries’ postal services have a similar classification of “large envelope” or “large letter,” but their maximum weight, thickness, and length/height specifications may be slightly different. Check with your local post office to be sure you’re following the rules. [10] X Research source Thanks Helpful 0 Not Helpful 0
- Consider addressing your large envelope in pencil first, then writing over the address black ink once you’re sure your information is correct. Thanks Helpful 0 Not Helpful 0
- Visit your local post office if you’re concerned you’re not addressing your large envelope correctly. They’ll be able to help you get your envelope to where it needs to go! Thanks Helpful 0 Not Helpful 0

- If your envelope is non-rectangular or if it parts of it are thicker than others, it qualifies as a “parcel” and you’ll be charged more to send it. It also qualifies as a parcel if the envelope material is “rigid” (something like cardboard). Thanks Helpful 0 Not Helpful 0
You Might Also Like

- ↑ https://www2.luther.edu/mail-center/envelope-package-addressing/
- ↑ https://pe.usps.com/text/dmm100/addressing-mail.htm
- ↑ https://pe.usps.com/businessmail101?ViewName=Flats
- ↑ https://pe.usps.com/cpim/ftp/manuals/dmm300/Notice123.pdf
- ↑ https://www.uregina.ca/is/printing/assets/docs/pdf/envelops-and-paper-sizes.pdf
About This Article

- Send fan mail to authors
Did this article help you?

Featured Articles

Trending Articles

Watch Articles

- Terms of Use
- Privacy Policy
- Do Not Sell or Share My Info
- Not Selling Info
Don’t miss out! Sign up for
wikiHow’s newsletter
- Skip navigation
- Find a branch
- Help and support
Popular searches
- Track a parcel
- Travel money
- Travel insurance
- Drop and Go
Log into your account
- Credit cards
- International money transfer
- Junior ISAs
Travel and Insurance
- Car and van insurance
- Gadget insurance
- Home insurance
- Pet insurance
- Travel Money Card
- Parcels Online
For further information about the Horizon IT Scandal, please visit our corporate website
- UK and International Post
- How To Address Mail
How to address UK and international mail
Make sure your post gets exactly where it needs to go
Addressing guides:
Posting in the UK
When posting something to someone in the UK, write the address like this:
Addressees' name House number and street name Locality name (if needed) TOWN (please print in capitals) FULL POSTCODE (please print in capitals)
- Don’t use full stops or commas
- Start each line on the left (don’t centre the lines)
- You don’t need to write the name of the county if you’ve included the town and postcode
Return address
If you want to make sure your post can get back to you, don’t forget to include your UK return address on each item. Items that cannot be delivered will be returned to you
Posting internationally
The way you write international postal addresses may vary between countries, but here's a good guideline:
Addressee's name House number and street name City or town Province, state or department and postal code COUNTRY (please print in capitals & use English name) Handy tips
- Include the right international postcode
- If your item’s going to Europe, put the postcode to the left of the town – eg 11780 ATHENS
- Always write the town and country in capital letters, with the full country name appearing last in the address (no abbreviations)
- Don’t forget the Air Mail sticker – unless you’re using International Economy
- Remember to include your return address
If you want to make sure your post can get back to you if undelivered, don't forget to include your UK return address on each item
Just remember that your return address needs to be in the UK. If you include a return address that’s in the destination country, it won’t be accepted
If you’re sending a package outside the UK, you’ll need a customs label. Find more information and all the customs forms you need at your local Post Office branch or on our Customs forms page
Find your nearest Post Office branch
Ready to post? Pop in with your item
Need some help?
Posting help and support.
Find answers to common questions about posting services:
Visit our posting support page
More about sending mail
IMAGES
VIDEO
COMMENTS
You write the recipient's address horizontally and vertically centered, or right in the middle of the front side of the envelope. To write the recipient's address properly, you need the following information: The recipient's full name. The recipient's street address. The recipient's city, state, and zip code.
TODAY / TODAY. Write the return address in the top left corner. Write the recipient's address slightly centered on the bottom half of the envelope. Place the stamp in the top right corner. There ...
If you don't want to buy an envelope addressing stencil, you can make your own. Step 1: Use a pencil to trace around your envelope onto a sheet of cardstock. Step 2: Use scissors to cut out the traced envelope shape from cardstock. Step 3: Determine the approximate size and location of your address area.
2. Place the letter in the care of someone else (optional). If you're sending someone a letter to an address where that person does not regularly reside, it might be wise to include a "care of" or "courtesy of" line below the name. Write "c/o" before the name of the person who does live there, the hotel, the hostel, etc.
Mr. and Mrs. John Kelly. NOTE: Traditionally, a woman's name preceded a man's on an envelope address, and his first and surname were not separated (Jane and John Kelly). Nowadays, the order of the names—whether his name or hers comes first—does not matter and either way is acceptable. The exception is when one member of the couple ...
Step #1: You will want to put the recipient's name and address on the largest side of the package. If shipping to a business, then you should list the business name on the first line. The second line should contain "ATTN:" followed by the recipient's name. Step #2: After the name comes the mailing address.
Next, write the recipient's name and address in the center of the front of the envelope. Line 1: Recipient's full name ( and title, if appropriate) Line 2: Business name, building name (if a college dorm, for instance), apartment or suite number, if applicable. Line 3: Street address. Line 4: City State Zip Code.
3. Third Line: City, state and zip code. The person you are addressing the envelope to goes in the middle of the envelope, centered. Use the same format for the recipient as with the return ...
You can write an address for a package with the following steps: 1. Write your return address in the upper left corner. Similar to writing an envelope for a letter, you may include your return address on a package. Include your full name and address in the top left corner of the package's upright position.
Pick the template that matches the labels you bought, then type out the address for both the sending address and return address. Alternatively, pick the template that matches your envelope, then type in the addresses and print it. 2. Consider using a full-sized envelope.
Addressing Couples. Married couples who both use the husband's last name should be Mr. and Mrs. followed by his first and last name ( Mr. and Mrs. Henry Jones ). Married couples who use different last names should use Ms. and Mr. with full names, joined by "and" ( Ms. Anna Smith and Mr. Henry Jones ), however, the order is not strict.
1. Print the name of the person you're sending the mail to. Write out the first and last name of the person receiving the envelope in the center of the envelope. If they have a legal or professional title, like Mr., Mrs., Dr., or General, make sure to include that too. [6]
Step 1: Include the return address in the upper left corner of the envelope, with your full name and address. Step 2: Indicate the recipient's address as you would for a letter. Use a large font to make the address more legible on a large package, regardless of the shape.
Print or type your address in the upper left corner on the front of the envelope. Extra Services. Place labels for extra services above the delivery address and to the right of the return address, or to the left of the postage. Postage. Use stamps, a postage meter, or a PC Postage system to affix the correct amount.
There are just a few steps to fill out an envelope. You'll put the sender's name and return address on the top left corner and the recipient's name and mailing address in the lower center. And you'll typically place a stamp on it in the top right corner. All these generally go on the same flat side of the envelope.
Envelopes: Write your address (the "return" or "sender" address) in the top left corner. Write the delivery address (the "recipient" address) in the bottom center. Postcards: Postcards come in different formats, so write the delivery address in the space it gives you (on the same side you write your message and put the stamp). Show More
Put the address 1 and if applicable the address 2. This means that you put the address, street name, and the building number. Put the city and zip code, with the zip+4 if you know it. The zip+4 is simply the second part of the entire 9 digit zip code. The city and zip code should be separated by a comma.
Building name (optional) If the mail receiver's address includes a building name, it's good practice to include it on the envelope, it may help to locate them. Full Street address (number and road) Town. County. Postcode. Ensure the postcode is fully capitalised. Return address. On the reverse of your envelope, ensure you include all of the ...
Here are some steps to address on an envelope for a package: 1. State your return address in the upper left corner. Similar to addressing an envelope for a letter, you can add your return address. This step can follow the same guidelines as those for an envelope.
Recipient's Address. Download Article. 1. Put the envelope flap-side down. Your envelope probably has a long flap that clasps or seals the contents inside. You don't want your address to be written on the same side as this flap. 2. Position the address in the center of the envelope.
1. Make your guidelines. I did mine from an extra white envelopes and I cut them slightly smaller than the envelopes. This should have evenly spaced lines for the name(s) and addresses (I trace mine from my Bienfang pad guidelines). I also add a center guidelines so it's easier to center everything.
Standard envelope. Graphic placement guidelines. On a large envelope. Correct address formats. To avoid unnecessary delays or surcharges, follow these addressing guidelines (visual examples follow): Write STREET ADDRESS in uppercase letters. Write POSTAL CODES in uppercase letters and separate the first 3 characters from the last 3 characters ...
Include the right international postcode. If your item's going to Europe, put the postcode to the left of the town - eg 11780 ATHENS. Always write the town and country in capital letters, with the full country name appearing last in the address (no abbreviations) Don't forget the Air Mail sticker - unless you're using International ...
In addition to his partner of over 25 years, Smith named a few other "ride-or-die" friends. Like his eponymous fictional television character, Smith considers "Fresh Prince of Bel-Air" co ...
Nobel laureate Alice Munro, the Canadian literary giant who became one of the world's most esteemed contemporary authors and one of history's most honored short story writers, has died at age 92.