

How to Use the Built-in Laser Pointer in PowerPoint (with Shortcuts)

Display a Laser Pointer During a PowerPoint Slide Show (and Choose Red, Green or Blue Pointers)
by Avantix Learning Team | Updated September 14, 2023
Applies to: Microsoft ® PowerPoint ® 2010, 2013, 2016, 2019, 2021 and 365 (Windows)
During a PowerPoint slide show, you can change your mouse into a laser pointer to focus attention on a specific area on your slide. You can show or hide the built-in laser pointer using keyboard shortcuts or by using the context menu.
Recommended article: 10 PowerPoint Slide Show Tips and Tricks
Do you want to learn more about PowerPoint? Check out our virtual classroom or in-person classroom PowerPoint courses >
There are 4 common ways to start a slide show in PowerPoint:
- Click the Slide Show button on the bottom right of the screen
- Click the Slide Show tab in the Ribbon and click From Beginning or From Current Slide
- Press F5 to start a slide show from the beginning
- Press Shift + F5 to start a slide show from the current slide
Change the mouse into a laser pointer using a keyboard shortcut
To change the mouse pointer into a laser pointer using a keyboard shortcut:
- Start a slide show.
- To display the laser pointer, press Ctrl + L. Press ESC to hide it.
Change the mouse into a laser pointer by dragging
To change the mouse pointer into a laser pointer by dragging:
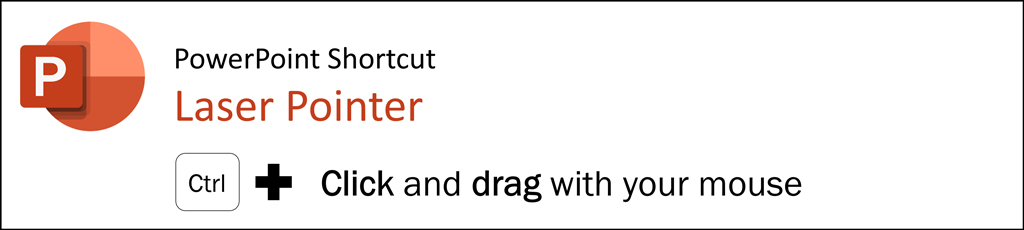
- Press and hold Ctrl and then click and drag the left mouse button to point to the contents on the slide that you want to focus on.
Change the mouse into a laser pointer using the context menu
To change the mouse pointer into a laser pointer using the context menu:
- Right-click on the slide. A drop-down menu appears.
- Select Pointer Options and then Laser Pointer.
- Press ESC to hide the laser pointer.
The context menu appears as follows when you right-click during a slide show:

Change the color of the laser pointer
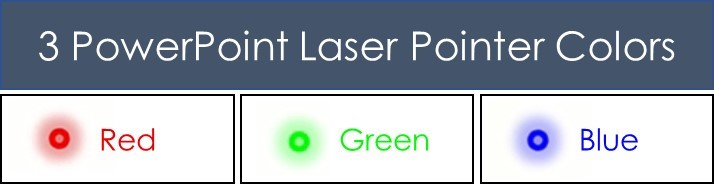
By default, the laser pointer is red. However, you can change it to green or blue.
To change the color of the laser pointer:
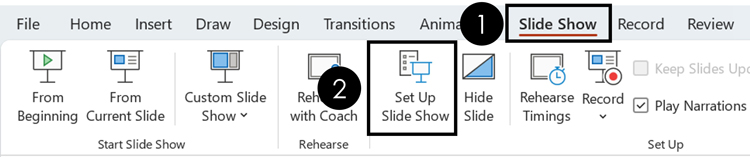
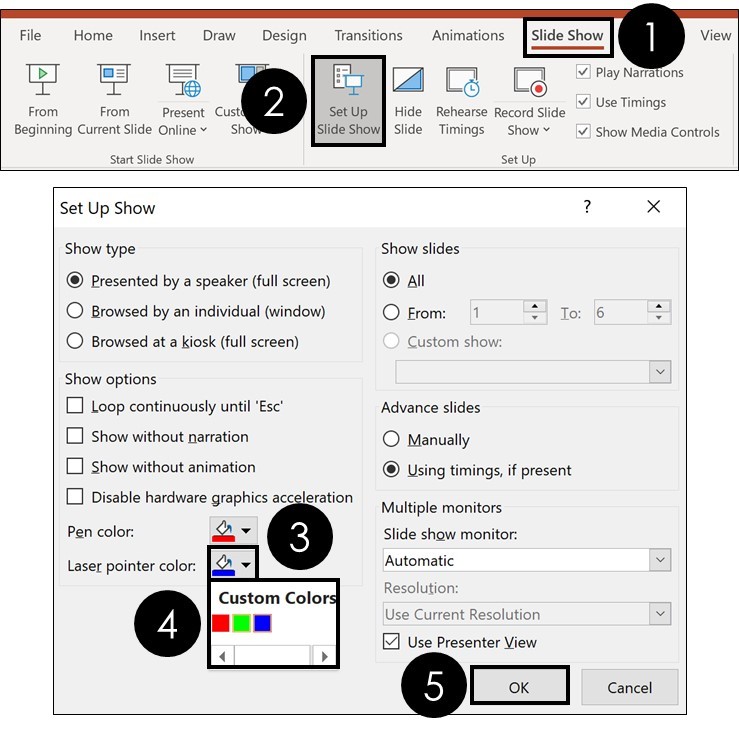
- In Normal View or Slide Sorter View, click the Slide Show tab in the Ribbon.
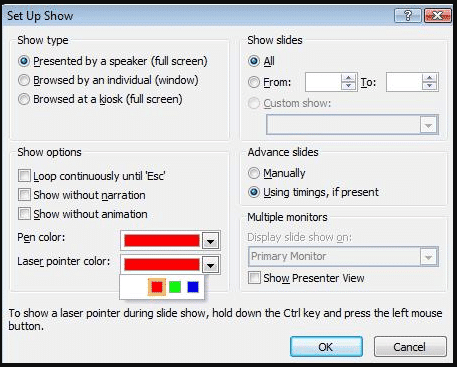
- In the Set Up group, click Set Up Slide Show. A dialog box appears.
- Under Show options, select the color that you want from the Laser pointer color drop-won menu.
The Set Up Show dialog box appears as follows:

Record laser pointer movements
To record your laser pointer movements for a self-running slide show:
- Click the Slide Show tab in the Ribbon.
- In the Set Up group, click the arrow beside or below Record Slide Show. A drop-down menu appears.
- Click either Start Recording from Beginning or Start Recording from Current Slide. If a dialog box appears, select the Narrations and laser pointer check box.
- Click Start Recording or Record. To pause the narration, in the recording controls, click Pause. To resume, click Resume.
- Display the mouse pointer using the methods outlined above. Press ESC to hide the pointer.
- Click the right arrow to move to the next slide.
- Move through the presentation and show and hide the laser pointer when needed.
- To end the slide show recording, right-click the slide and then click End Show. The recorded slide show timings are automatically saved and the slide show appears in Slide Sorter view with timings below each slide.
- To view the slide show with the pointer movements and timings you recorded, on the Slide Show tab, in the Start Slide Show group, click From Beginning or From Current Slide.
- To redo the laser pointer movements or slide timings, repeat the steps above.
You can also display a pen or highlighter during a slide show. Check out the article How to Highlight or Draw on PowerPoint Slides During a Slide Show.
Subscribe to get more articles like this one
Did you find this article helpful? If you would like to receive new articles, JOIN our email list
More resources
How to Change the Font on All Slides in PowerPoint
How to Hide or Unhide Slides in PowerPoint (with Shortcuts)
How to Insert a Video in PowerPoint (from a File or Your PC or Shared Drive)
Where to Find Free Pictures for PowerPoint Presentations (10 Great Stock Image Sites)
How to Add Animation in PowerPoint (Animate Images, Text and Other Objects in PowerPoint)
Related courses
Microsoft PowerPoint: Introduction
Microsoft PowerPoint: Intermediate / Advanced
Microsoft PowerPoint: Design for Non-Designers
Microsoft PowerPoint: Animations Bootcamp
VIEW MORE COURSES >
Our instructor-led courses are delivered in virtual classroom format or at our downtown Toronto location at 18 King Street East, Suite 1400, Toronto, Ontario, Canada (some in-person classroom courses may also be delivered at an alternate downtown Toronto location). Contact us at [email protected] if you'd like to arrange custom instructor-led virtual classroom or onsite training on a date that's convenient for you.
Copyright 2024 Avantix ® Learning
You may also like

How to Insert or Type E with an Accent Mark in PowerPoint (È, É, Ê, Ë, è, é, ê, or ë)
You can insert or type e with an accent mark in PowerPoint using built-in tools or keyboard shortcuts (including Alt code shortcuts). The letter e can be inserted with an accent in both upper or lower case in text boxes or placeholders on slides, the slide master or layouts. The following are common accents in upper or lower case – È, É, Ê, Ë, è, é, ê, or ë.

How to Fade a Picture or Part of a Picture in PowerPoint (Using a Gradient)
You can fade a picture in PowerPoint by drawing a rectangle shape on top of the picture and then filling the rectangle with a gradient from opaque to transparent. This technique is often used to fade an image into the background of a slide. Since the rectangle is placed on top of the image and then text may be placed on top of the rectangle, you may need to reorder the objects.

How to Lock an Image, Shape or Other Object in PowerPoint
You can now lock an image, shape or other object in PowerPoint. Objects can be locked in Normal View or Slide Master View. Only PowerPoint 365 users can lock objects to prevent moving and resizing. This is helpful if you want to select and move other objects on the slide or prevent others from moving or resizing an object. You can lock items using the context menu or the Selection Pane.
Microsoft, the Microsoft logo, Microsoft Office and related Microsoft applications and logos are registered trademarks of Microsoft Corporation in Canada, US and other countries. All other trademarks are the property of the registered owners.
Avantix Learning |18 King Street East, Suite 1400, Toronto, Ontario, Canada M5C 1C4 | Contact us at [email protected]
Our Courses
Avantix Learning courses are offered online in virtual classroom format or as in-person classroom training. Our hands-on, instructor-led courses are available both as public scheduled courses or on demand as a custom training solution.
All Avantix Learning courses include a comprehensive course manual including tips, tricks and shortcuts as well as sample and exercise files.
VIEW COURSES >
Contact us at [email protected] for more information about any of our courses or to arrange custom training.
Privacy Overview
Pin it on pinterest.
- Print Friendly
Critical PowerPoint Shortcuts – Claim Your FREE Training Module and Get Your Time Back!
PowerPoint’s hidden laser pointer (and how to use it)
- PowerPoint Tutorials
- Shortcuts & Hacks
- January 19, 2024
Did you know that PowerPoint includes a free (hidden) laser pointer option that you can use without having to buy one? Even if you have a differetn pointer you like to use, this built in pointer is a great backup whenever you need it. It also comes in three colors too (red, green, and blue).

Table of Contents
[watch] the powerpoint laser pointer in action.
You are currently viewing a placeholder content from Youtube . To access the actual content, click the button below. Please note that doing so will share data with third-party providers.
Take your PPT skills to the next level
Why is a pointer useful during a powerpoint presentation.
A laser pointer is useful for highlighting or pointing out exactly what you want your audience to focus during your presentation. In other words, instead of trying to verbally tell somewhere where to look on your slide, you use your pointer to point it out.
For example, if you want to bring attention to the 100% year-on-year growth on your slide, you can simply use PowerPoint’s laser pointer to point it out on your slide.

The more content you have on your slide, the more useful it is to point out what you are talking about with your laser pointer.
In the same way, you could use it to highlight:
- Different rows in a table
- The different people on your team (as you talk about them)
- Ideas for a marketing campaign as you highlight them
In short, a laser pointer allows you to better control the ebb and flow of your presentation, by pointing things out on screen while you talk about them.
While there are probably a million different laser pointers you can use, the one I use most is the hidden laser pointer in PowerPoint. Read on to see how to use it.
How to change your cursor into a laser pointer
There are two different ways to turn your cursor into a laser pointer in PowerPoint. The first is using your mouse, the second is the laser pointer shortcut. Let’s start with your mouse first.
The advantage of this first technique is it locks the laser pointer, so you don’t have to hold any keys down on your computer. On top of that, once you turn it on using your mouse like this, the laser pointer remains on as you advance through your presentation. So you don’t have to turn it on for every slide.

To turn your mouse cursor into a laser pointer during your PowerPoint presentation, simply:
- Hit F5 to start your Slide Show ( see my guide here for other slide show shortcuts )
- Right-click your slide
- Open the Pointer Options
- Select Laser pointer
Doing so, your mouse cursor becomes a colored pointer that you can drag around on your screen to highlight things in your presentation as pictured below.
NOTE: You cannot change the color of the pointer while giving a presentation. If you want a different color, you need to change its color before you run your presentation

Turning off the laser pointer

There are two ways to turn the laser pointer off in PowerPoint. The first is simply to hit the Esc key on your keyboard. Hitting Esc, the laser pointer reverts back to the normal mouse cursor.

An alternative way to turn the laser pointer off, is simply to change it into something else. You can do that as follows:
- Right-click your slide in Slide Show view
- Select Pointer Options
- Select Arrow Options (or choose Pen or Highlighter)
- Select Visible
Selecting Visible turns your mouse cursor back into the normal PowerPoint arrow cursor.
Laser pointer shortcuts
My favorite way to use the laser pen is simply to use its shortcut. That’s becuase using shortcuts make everything easier in PowerPoint AND saves you a ton of time.
NOTE: If you want to learn all the best PowerPoint shortcuts and tricks, they are all inside our PowerPoint Pro Membership here .
To use this shortcut, simply hold the Ctrl key on your keyboard, then click and drag with your mouse. Doing so turns your cursor into the laser pointer color you have selected (red is the default).
When you are done, simply let go of the Ctrl key and the pointer disappears. This is a fast and easy way to highlight things in your presentation on the fly and impress your clients and colleagues.
I personally find this to be the fastest way to turn the laser pointer on and off. In the picture below, you can see what the blue laser pointer looks like in PowerPoint.

You can alternatively lock the laser pointer by hitting Ctrl + L on your keyboard. This locks the laser pointer, so you don’t have to hold down anything on your keyboard (like with the previous shortcut).

To unlock the pointer when you are done with it, simply hit the Esc key to return to the normal mouse cursor.
How to change the laser pointer color
PowerPoint has three different laser pointer colors you can choose from in PowerPoint. Red is the default color, but you can easily change its color to green or blue.
By default, the the PowerPoint pointer is red, but you can easily it to green or blue if you want to, through the Set Up Slide Show dialog box.
Just be aware that you need to set the color before you run your presentation.
- Click the Slide Show tab
- Select the Set Up Slide Show command
- Open the Laser Pointer Color options
- Choose a color (red, green, or blue)
QUESTION: Does changing the laser pointer color change it’s color for all my presentations?
The color you choose for your pointer is saved in the PowerPoint presentation you changed it for. It is not set as the new default color for all your PowerPoint presentations. So, feel free to change your pointer color to best match the template / presentation you are working with.
By default, PowerPoint always starts with a red laser pointer. So unless you need a color other than red, you do not need to worry about changing it.
Does the pointer work when presenting two presentations at the same time?

The answer is yes (as you can see pictured above).
For example, if you are running an English and Chinese version version of your presentation at the same time for two different audiences (which is what we did all the time when I was living in China), the laser pointer still works in each presentation.
The catch is, you need to use the laser pointer shortcut (discussed above), and make sure you click into each presentation before you use it. To see how to set up two presentations to run at the same time as pictured above, see my guide here .
Why bother changing the pointer color?
The most important reason to change the color of your pointer, is so that it stands out against your slide background.
Notice in the picture below, how much clearer the green laser pointer is against the red slide background, than the red one is. If your audience cannot see the color against your slide background, then using the laser pointer is meaningless.

The same would be true if you were using a blue or green presentation background.
In short, you want a high contrast between your pointer color and the PowerPoint background color you are using for your presentation. That way your audience can clearly see what you are trying show them.
So that’s how to use PowerPoint’s built-in laser pointer and change its color between red, green and blue to have high contrast against your presentation.
This is one of those cool PowerPoint features that few people know how to use. And now that you know how to use it, you can take advantage of it during your presentations.
If you enjoyed the depth of this PowerPoint tutorial and want to learn more about our PowerPoint training courses and free resources, visit us here .
🔒 Unlock the PowerPoint Shortcuts Trusted by Industry Leaders KKR, American Express, HSBC, and More!
Join over 114,880 professionals from diverse fields including consulting, investment banking, advertising, marketing, sales, and business development who have supercharged their PowerPoint game with our proven methods.
✅ Customize compelling presentations effortlessly.
✅ Master time-saving techniques for faster deck creation.
✅ Boost your career prospects with top-notch PowerPoint skills.
Get FREE access to the Critical PowerPoint Shortcuts module of our premium training course by entering your name and email below.
DISCLAIMER: PC Users Only!
We respect your privacy and will keep your info safe and confidential.
Related Articles
About the author.

Popular Tutorials
- How to Strikethrough Text (l̶i̶k̶e̶ ̶t̶h̶i̶s̶) in Word, Excel & PowerPoint
- How to Make Animated Fireworks in PowerPoint (Step-by-Step)
- Strikethrough Shortcut (l̶i̶k̶e̶ ̶t̶h̶i̶s̶) for Word, Excel & PowerPoint
- How to Create a Flash Card Memory Game in PowerPoint (Like Jeopardy)
- Keyboard Shortcuts Not Working: Solved
PowerPoint Tutorial Categories
- Strategies & Opinions
- Presentation Design
- Pictures, Icons, Videos, Etc.
- New Features
- Miscellaneous
- Charts & Data Viz
We help busy professionals save hours and gain peace of mind, with corporate workshops, self-paced courses and tutorials for PowerPoint and Word.
Work With Us
- Corporate Training
- Presentation & Template Design
- Courses & Downloads
- PowerPoint Articles
- Word Articles
- Productivity Resources
Find a Tutorial
- Free Training
- For Businesses
We help busy office workers save hours and gain peace of mind, with tips, training and tutorials for Microsoft PowerPoint and Word.
Master Critical PowerPoint Shortcuts – Secure Your FREE Training Module and Save Valuable Time!
⌛ Master time-saving expert techniques.
🔥 Create powerful presentations.
🚀 Propel your career to new heights.
We value your privacy – we keep your info safe.
Discover PowerPoint Hacks Loved by Industry Giants - KKR, AmEx, HSBC!
Over 114,880 professionals in finance, marketing and sales have revolutionized their PPT skills with our proven methods.
Gain FREE access to a full module of our premium PowerPoint training program – Get started today!
We hate spam too and promise to keep your information safe.
You are currently viewing a placeholder content from Facebook . To access the actual content, click the button below. Please note that doing so will share data with third-party providers.
Byte Bite Bit
How to Use the Laser Pointer in PowerPoint: A Step-by-Step Guide
When we give presentations, engaging the audience is as crucial as the information we’re presenting. PowerPoint is a valuable tool for this, and its built-in laser pointer feature is a simple yet effective way to keep your audience focused. Unlike a physical laser pointer that can be misplaced or run out of batteries, PowerPoint’s laser pointer is always at your fingertips. It’s ideal for highlighting key areas of your slides without the hassle of additional hardware.

We’ve encountered situations in presentations where pointing out specific data or guiding the audience through images and graphs becomes imperative. The laser pointer in PowerPoint allows us to do just that, with the flexibility to change pointer colors. This feature can be especially useful when presenting in well-lit rooms where traditional laser pointers might not be visible. Engaging an audience effectively means leveraging every feature at our disposal, and the laser pointer function is a straightforward yet powerful tool to enhance our presentation.
- 1.1 Accessing Pointer Options
- 1.2 Choosing the Laser Pointer Color
- 2.1 Using the Laser Pointer During a Presentation
- 2.2 Converting Mouse Pointer to Laser Pointer
- 2.3 Keyboard Shortcuts for Laser Pointer Use
- 3.1 Highlighting Key Points
- 3.2 Maintaining Audience Engagement
- 4.1 Customization and Settings
- 4.2 Using Laser Pointer in Different Views
Setting Up Your Laser Pointer in PowerPoint
Before we dive into the details, remember that setting up your laser pointer in PowerPoint is a two-step process. First, we’ll need to access the pointer options, and then we choose the color that best suits our presentation.

Accessing Pointer Options
To begin, we navigate to the “Slide Show” tab on the PowerPoint ribbon. Here we find the “Set Up Slide Show” button. When we click this, we are presented with various options for how our presentation will display. To activate the laser pointer function, we press and hold the Ctrl key, then click and drag the left mouse button during our slide show.
Choosing the Laser Pointer Color
The default laser pointer color in PowerPoint is red. However, we can customize this to suit our preferences or to contrast well with our slides. This adjustment is made under the “Slide Show” tab, clicking on “Set Up Slide Show”, and then opening the “Laser Pointer Color” options.
We simply choose the color that works best for our needs—red, green, or blue—by clicking on our choice. The color we select remains the default until we decide to change it for that specific presentation. It’s worth noting that altering the laser pointer color in one presentation does not affect the colors in other PowerPoint files.
Navigating Slides with the Laser Pointer
When presenting, it’s crucial to maintain the focus and highlight specific content on your slides. The built-in laser pointer feature in PowerPoint aids in achieving this with ease.
Using the Laser Pointer During a Presentation
To engage your audience effectively, you can use the laser pointer to draw attention to specific areas of your slides during a presentation. In slide show mode, simply right-click on the slide you wish to emphasize and navigate to ‘Pointer Options,’ then select ‘Laser Pointer’. Your audience’s attention follows the red, green, or blue light as you move across different points, allowing for a dynamic interaction with your slides.
- Press F5 key to start from the beginning.
- Press Shift+F5 to start from the current slide.
Converting Mouse Pointer to Laser Pointer
We often use a mouse during presentations, but did you know it can become a laser pointer? This is particularly handy when you need to highlight without breaking the flow of your talk. If you’re on Windows, hold the CTRL key and click the left mouse button. For Mac users, use the Command key instead. Your cursor turns into a laser pointer for as long as you keep the buttons pressed.
Keyboard Shortcuts for Laser Pointer Use
We understand that efficient navigation is key to a seamless presentation. That’s why using keyboard shortcuts to activate the laser pointer can be a game changer. Although PowerPoint does not have a dedicated shortcut for the laser pointer, starting the slide show and right-clicking to select the laser pointer can be done swiftly with keyboard inputs.
Enhancing Your Presentation
In our presentations, leveraging the laser pointer feature in PowerPoint can significantly improve audience understanding and retention. Let’s focus on how we can use this tool effectively.
Highlighting Key Points
Using a laser pointer, we can draw the audience’s attention directly to the most important aspects of our slides. It’s crucial to use this tool wisely:
- Use the red laser pointer to stand out against dark backgrounds, or a green or blue pointer for lighter or varied hues.
- Highlight data points, graphs, and key phrases to keep everyone on the same page.
Remember to move the pointer deliberately to avoid distracting the audience. It’s also beneficial to alternate between using the pointer and allowing the slide to speak for itself without additional highlighting.
Maintaining Audience Engagement
Our goal is to keep our audience locked in from start to finish. The laser pointer plays a pivotal role here:
- Shift the attention of the audience between the screen and speaker by toggling the pointer on and off.
- Use the pointer as a visual cue to signal transitions between topics or slides.
We must engage with our audience both visually and verbally, using the laser pointer as a means to an end, not the main event. By highlighting information selectively and interacting confidently, we can create a memorable and impactful presentation experience.
Advanced Laser Pointer Features
In Microsoft PowerPoint, advanced laser pointer features vastly enhance presentations in both Slide Show and Reading views. Let’s explore how to effectively utilize these capabilities for more engaging and professional presentations.
Customization and Settings
Adapting the Laser Pointer to Your Needs
In our presentations, it’s often beneficial to match the virtual laser pen’s color to the background or theme for maximum visibility. Below you’ll find how to tailor these settings:
Remember that these changes stick only for the current presentation. For consistency across multiple PowerPoint presentations or training courses, we’ll need to adjust these settings individually.
Using Laser Pointer in Different Views
For various presentation scenarios such as live sessions, recording, or self-running demonstrations, PowerPoint facilitates the laser pointer’s use across different views.
Slide Show View Start by entering Slide Show view from the beginning or the current slide. Pressing the Ctrl key and clicking the left mouse button or (using Command on Mac) activates the laser pointer. We can proceed to guide our audience through the presentation.
Reading View In Reading view, there’s also the convenience of highlighting points with the laser pointer. Though less common, it’s advantageous for running through our content swiftly or during personal review sessions.
Record Slide Show When recording a slide show, the laser pointer can be an invaluable tool. It allows us to create dynamic and engaging content that draws attention exactly where we want it as the recording captures all laser pointer movements and clicks.
Embracing these advanced features elevates our PowerPoint presentations, making them not only more visually appealing but also more effective in conveying information.
Related posts:
- Microsoft Teams Integration with Cisco Video Conferencing: Seamless Collaboration for Enterprises
- Move a Window That is Off Screen on Windows 11: Quick Recovery Guide
- Nvidia Control Panel Keeps Closing: Quick Fixes for Stability Issues
- Pin in Microsoft Teams: Essential Guide to Personalizing Your Experience
- How to Fix PSVR Keeps Turning Off: Troubleshooting and Solutions
- Roku Screen Mirroring Not Working in Windows 11: Quick Fixes and Troubleshooting Tips
- Set Up Delegate in Microsoft Teams: A Step-by-Step Guide
- Spatial Audio Not Working on AirPods: Quick Fixes and Troubleshooting Tips
- How to Stream Origin Games Over Steam: A Seamless Integration Guide
- How to Turn Off Outlook’s Junk Email Filter: Disabling Unwanted Filtering with Ease
- How to Uninstall Xbox Game Bar on Windows PC: A Step-by-Step Guide
- How to Use TikTok Without Creating Account: Viewing Content with No Signup Needed
Leave a Comment Cancel reply
Save my name, email, and website in this browser for the next time I comment.
How-To Geek
Turn your mouse into a laser pointer in powerpoint.
Using a laser pointer is a great way to focus the audience on a specific part of your presentation.
Quick Links
Turning your mouse into a laser pointer, changing the color of your laser.
Using a laser pointer is a great way to focus the audience on a specific part of your presentation. If you don’t happen to have one on hand at the time of your presentation, then you can use PowerPoint’s neat little setting to turn your mouse into a laser pointer. Here’s how.
Microsoft came to the rescue with its PowerPoint 2010 release, getting presenters who forgot their laser pointer out of a pinch by providing a feature that converts the mouse into a laser pointer.
Enabling this feature is quite simple. In fact, you can do it during the actual presentation.
Once you’ve started your presentation and you want to change your cursor into a laser, press and hold the “Ctrl” key while clicking and holding the left mouse button.
As you can see in this GIF, we want to draw attention to “How-To Geek” in the question, then show the correct answer. You can also see that the cursor converts back to a pointer when you let go of the left mouse button, so be careful.
The default laser color is red, which might not work well depending on the color of your slides. To change the color of your laser, switch to the "Slide Show" tab in your presentation and then click the “Set Up Slide Show” button.
In the Set Up Show window, click the button next to “Laser pointer color” in the “Show options” section.
A menu with three colors will appear. Here, you can select either red, green, or blue. Once you’ve chosen your color, click “OK.”
These are the only available options, so choose the background color of your slides carefully if you plan on using the laser pointer feature.
Home Blog PowerPoint Tutorials How to use Laser Pointer in PowerPoint
How to use Laser Pointer in PowerPoint

The laser pointer tool in PowerPoint can help highlight key areas on a slide without buying additional hardware to present your information or spending time making parts of your PowerPoint templates more eye-popping. This virtual laser pen can be activated in Slide Show mode in different colors to provide the laser pointer effect for your slideshow instantly.
How to Activate PowerPoint Laser Pointer
To activate the laser pointer tool, switch to Slide Show mode via the viewing modes at the bottom, via the Slide Show tab, or by using the F5 hotkey. Right-click on the slideshow and go to Pointer Options -> Laser Pointer . You can also turn your mouse pointer into a laser pointer by holding the CTRL (Windows) key or Command (Mac) key with the left mouse click.

This will activate the PowerPoint laser pointer you can now use by moving the mouse or touchpad.

How to Deactivate Laser Pointer
You can deactivate the laser pointer by hitting Esc on your computer or via the right-click menu by going to Pointer Options -> Laser Pointer .

How to Change Laser Pointer Color in PowerPoint
To change the color of the laser pointer, go to Slide Show -> Set Up Slide Show.

Select a color from the Laser pointer color menu. The available colors include red, blue, and green. Red, by default, is the color used for the laser pointer in PowerPoint unless it is changed from the Laser pointer color menu via Set Up Slide Show from the Slide Show tab.

Final Words
Instead of investing in a laser pointer, you can instantly convert your mouse pointer into a laser pointer in different colors. This can help highlight parts of your slide and keep your audience engaged towards the most important bits of your content.

Like this article? Please share
Microsoft PowerPoint, PowerPoint Tips Filed under PowerPoint Tutorials
Related Articles

Filed under PowerPoint Tutorials • June 3rd, 2024
How to Align Text Boxes in PowerPoint
Organize your presentation slides layout in seconds by mastering how to align text boxes in PowerPoint. Step-by-step instructions with images here.

Filed under PowerPoint Tutorials • May 31st, 2024
How to See Notes in PowerPoint
Optimize your presentation slides by knowing how to see notes in PowerPoint. Instructions for slide design and Presenter View modes.

Filed under PowerPoint Tutorials • May 28th, 2024
How to Circle Something in PowerPoint
Mark important areas in your presentation slides by learning how to circle something in PowerPoint. Instructions with shapes, handmade, and slideshow.
Leave a Reply
Use the Laser Pointer in PowerPoint [Increase Engagement]

While presenting your slide show in front of a large crowd, it is challenging to keep the audience engaged.

Without wasting more time, let’s get started!
How to Turn On the Laser Pointer in PowerPoint
How to turn off the laser pointer in powerpoint, how to change the color of the laser pointer, frequently asked questions, concluding words.
You can use several methods to turn on the laser pointer in your PowerPoint slide show. The most accessible way to start a laser pointer is to use keyboard shortcuts. You can also use the Pointer Options to change the mouse cursor to a laser pointer.
To switch the default PowerPoint cursor arrow into a laser pointer using keyboard shortcuts, open your presentation file, start Slide Show View (press F5), and then press Ctrl + L keys . It will immediately change the cursor to a laser pointer.
You can also press Ctrl Key , then hold the left mouse button and drag the cursor to accomplish the same. Keyboard shortcuts work on most PowerPoint versions excluding PowerPoint 2007 and 2010.
If you are using a Mac for PowerPoint, press the Option key, then click and drag the left mouse button to turn on the laser pointer.
Besides, you can use the context menu to turn on the built-in laser pointer for your presentation. For a step-by-step guide, consider the following instructions.
Here are the steps to turn on the laser pointer:
- Launch PowerPoint on your computer.
- Open your PowerPoint file .
- Press F5 to start the Slide Show.
- Right-click on the slide to open the context menu .
- Place your mouse cursor on the Pointer Options .

Following the above steps will instantly change your mouse cursor to a red laser pointer. You can simply drag your mouse to highlight any particular part of your presentation.
Fortunately, you can use the laser pointer in Slide Show View (F5) and Presenter View (Shift + F5).
By default, the laser pointer color is red. However, you can change the color to blue and green. I will discuss it later in this article.
Follow our guide on how to add or load a PowerPoint Add-in .
Turning off the laser pointer is straightforward. While the laser pointer is on, just press the Esc key to remove the laser pointer. Besides, you can use the Pointer Options to turn off the feature. Right-click on the Slide show and navigate to Pointer Options > Arrow Options > Visible.
Consider the subsequent instructions to turn off the laser pointer in PowerPoint Slide Show.
Follow the procedure below to turn off the laser pointer:
- Right-click on the Slide Show .
- Place the mouse cursor on Pointer Options .
- Click on the Arrow Options .
You can also choose the Pen or Highlighter from the Pointer Options to accomplish the same. Changing the Arrow Options to Visible will change the cursor to the normal PowerPoint arrow cursor.
Check out our separate post on can’t group objects in PowerPoint .
The laser pointer color is red by default. However, you can change the color of the laser pointer to blue, green, or red using the Set Up Slide Show menu. To do so, navigate to Slide Show > Set Up Slide Show > Laser Pointer Color, and change the color to the suitable one.
Are you wondering why you need to change the color of the laser pointer? Because it helps to stand out against the background color of your slide show.
Suppose your slide background is red; hence you can’t use the red laser pointer for this slide show. Instead, you can change the color to blue or green to make it more visible.
Now, let’s have a look at how to change the laser pointer color for a particular PowerPoint Slide Show.
Check the following instructions to change the laser pointer color:
- Open your presentation file and switch to the Slide Show tab.
- Click on Set Up Slide Show in the Set Up group.
- Locate Laser Pointer Color under Show options.
- Click on the down arrow and choose Green, Red, or Blue.

Changing the laser pointer color only applies to the specific slide. The slide will show the laser pointer as the changed color until you change it again.
This change will not apply to other presentation files. You need to change the color for those files using the Setup Up Slide Show dialog box.
Here’s a complete guide on how to add Grammarly to PowerPoint .
Why should you use the laser pointer during a presentation?
Using the laser pointer during a presentation helps to focus the audience on a specific part of your slide and increases engagement.
How do you always show a laser pointer in PowerPoint?
Open the PowerPoint slide and start presenting the slide show once you are in Slide Show mode. Right-click on the slide and navigate to Pointer Options > Laser Pointer to show a laser pointer.
What is the shortcut key for the laser pointer in PowerPoint?
You can use shortcuts to start the laser pointer in PowerPoint. Press Ctrl + L, and it will instantly change the mouse cursor to a laser pointer. Press Esc to remove the laser pointer.
Choosing the correct color laser pointer is essential to stand out and increase visibility while presenting your Slide Show.
You can effortlessly enable or disable the laser pointer using the keyboard shortcuts. Besides, I have covered the process of adding or removing the laser pointer using the context menu.
I hope you find this article engaging and stress-relieving for accessing the laser pointer feature in PowerPoint. Don’t forget to leave a comment below for further assistance.
Search for: Search Button
Powerpoint: make your mouse like a Laser Pointer
One of the eye-catching features since PowerPoint 2010 right up to PowerPoint 365 is turning your mouse into a virtual laser pointer. A ‘laser pointer’ transforms the boring mouse pointer to something striking and easier to see on the screen.
This is especially useful while delivering presentations as it eliminates the need to carry additional hardware which many presenters use to point at specific items in the presentation.
A virtual laser pointer doesn’t have the risk of shining in the eyes of audience members like real laser devices can do.
You can turn your mouse into laser pointer either in slide show view or in reading view. To do this in slide show view open a presentation and click on “Slide Show” tab in the ribbon. Here depending on which slide you want to add the laser pointer i.e. current slide or from the beginning click on the option from “Start Slide Show” menu.
Here when you click on “From Beginning” the slideshow begins. Now press and hold the CTRL key and left mouse button at required place on the slide. You will see the laser pointer as a red dot.
You might see the mouse pointer along with the laser pointer. To remove the mouse pointer press and hold the CTRL key before taking the mouse pointer onto the slide. In other words move the mouse off the edge of the slide/screen, then press CTRL and move the pointer onto the slide. Sometimes the mouse pointer automatically disappears once the laser pointer appears on the screen.
To add laser pointer in Reading view click on View | Presentation Views | Reading View.
In Reading view, press and hold the CTRL key and click the left mouse button anywhere on the screen. The laser pointer will appear on the screen.
Customize Laser Pointer
By default the laser pointer will appear in red. You can modify its color. Three options are available for this, Red, Green and Blue. To change the laser pointer color click on Slide Show | Set Up Slide Show. Here in the “Set Up Show” window that pops open under “Show options” select from the given three colors, Red, Green and Blue. After making the selection, click on OK button for the change to take effect.
Sadly, there’s no way to make the ‘laser pointer’ the permanent pointer in a slide show. You have to keep your finger on the Ctrl button all the time.
Add Laser Pointer while Recording
You can also add laser pointer while recording a slide show which can be converted to video as well. Laser pointer used in video will make it more effective. For this click on Slide Show | Set Up | Record Slide Show. Here either select “Start recording from Beginning” i.e. from the first slide or “Start Recording from Current Slide” option.
In the “Record Slide Show” dialog box select the checkbox “Narrations and laser pointer” and if you want to record the slide and animation timings then select that checkbox as well.
Click on “Start Recording” button. Press and hold the CTRL key and click on the left mouse button on any required place on the screen. The laser pointer will appear. Move wherever you require the laser pointer and then stop the recording process.
To view the recorded laser pointer movements click on Slide show | Start Slidehsow | click on either of the two option i.e. From the beginning of the slide or from the current slide. The slideshow with recorded laser pointer movements will appear.
- Incomprehensible PowerPoint advice
- Record Narration and Timings to PowerPoint
About this author

Office-Watch.com
Office 2021 - all you need to know . Facts & prices for the new Microsoft Office. Do you need it? Office LTSC is the enterprise licence version of Office 2021.
Office 2024 what's known so far plus educated guesses. Microsoft Office upcoming support end date checklist.
Latest from Office Watch
- HUGE news - Excel gets Regular Expression functions
- Surprise! Microsoft recommends Windows 11
- Goggles 🥽 emoji in Word, Excel, PowerPoint and Outlook
- Beware the unexpected when copying an image from Word/Office
- How to make a Gantt Chart in Excel
- A $125 Billion lesson in why cloud backups are vital
- How Word pastes into your document
- Make monsters and pipes with the Terantopia font
- Avoid the traps when adding Excel info into a Word document
- Circle & Sphere calculations in Excel using Pi 𝜋
- How to list all fonts in a Word document
- Face with rolling eyes 🙄 emoji in Word, Outlook, Office
- Glasses 👓 emoji in Word, Excel, PowerPoint and Outlook
- Calendar extras added to new Outlook
- Changes to PDFs made by Microsoft Office
- It's official - Calibri beats Aptos in font poll
- Vmware Workstation Pro is now free
- A quiet month of security fixes for Microsoft Office
- How Mark of the Web stops bad document infections
- Introducing Reading Coach to enhance Reading Fluency with AI
- How to Login
- Use Teams on the web
- Join a meeting in Teams
- Join without a Teams account
- Join on a second device
- Join as a view-only attendee
- Join a breakout room
- Join from Google
- Schedule a meeting in Teams
- Schedule from Outlook
- Schedule from Google
- Schedule with registration
- Instant meeting
- Add a dial-in number
- See all your meetings
- Invite people
- Meeting roles
- Add co-organizers
- Hide attendee names
- Tips for large Teams meeting
- Lock a meeting
- End a meeting
- Manage your calendar
- Meeting controls
- Prepare in a green room
- Share content
- Share slides
- Share sound
- Apply video filters
- Mute and unmute
- Spotlight a video
- Multitasking
- Raise your hand
- Live reactions
- Take meeting notes
- Customize your view
- Laser pointer
- Cast from a desktop
- Use a green screen
- Join as an avatar
- Customize your avatar
- Use emotes, gestures, and more
- Get started with immersive spaces
- Use in-meeting controls
- Spatial audio
- Overview of Microsoft Teams Premium
- Intelligent productivity
- Advanced meeting protection
- Engaging event experiences
- Change your background
- Meeting themes
- Audio settings
- Manage attendee audio and video
- Reduce background noise
- Voice isolation in Teams
- Mute notifications
- Use breakout rooms
- Live transcription
- Language interpretation
- Live captions
- End-to-end encryption
- Presenter modes
- Call and meeting quality
- Meeting attendance reports
- Using the lobby
- Meeting options
- Record a meeting
- Meeting recap
- Play and share a meeting recording
- Delete a recording
- Edit or delete a transcript
- Switch to town halls
- Get started
- Schedule a live event
- Invite attendees
- organizer checklist
- For tier 1 events
- Produce a live event
- Produce a live event with Teams Encoder
- Best practices
- Moderate a Q&A
- Allow anonymous presenters
- Attendee engagement report
- Recording and reports
- Attend a live event in Teams
- Participate in a Q&A
- Use live captions
- Schedule a webinar
- Customize a webinar
- Publicize a webinar
- Manage webinar registration
- Manage what attendees see
- Change webinar details
- Manage webinar emails
- Cancel a webinar
- Manage webinar recordings
- Webinar attendance report
- Get started with town hall
- Attend a town hall
- Schedule a town hall
- Customize a town hall
- Host a town hall
- Use RTMP-In
- Town hall insights
- Manage town hall recordings
- Cancel a town hall
- Can't join a meeting
- Camera isn't working
- Microphone isn't working
- My speaker isn’t working
- Breakout rooms issues
- Immersive spaces issues
- Meetings keep dropping

Laser point or draw on PowerPoint slides in Microsoft Teams meetings
When using PowerPoint Live to share content in a Teams meeting, emphasize your points and engage viewers with the colorful laser pointer and drawing tools. Your “ink” will be visible to everyone in the meeting.
Only the presenter can point and draw on the slides.

Focus viewer attention with the laser pointer

To create a short line simply move the mouse around. To create a longer line, press and hold the mouse button as you draw.
Tip: If you quickly make several marks, they will all be visible at the same time and then fade away together.
Highlight and connect ideas with the drawing tools
These markings will last throughout the meeting.

Press and hold the mouse button as you draw.
Erase your ink marks

Stop drawing

Need more help?
Want more options.
Explore subscription benefits, browse training courses, learn how to secure your device, and more.

Microsoft 365 subscription benefits

Microsoft 365 training

Microsoft security

Accessibility center
Communities help you ask and answer questions, give feedback, and hear from experts with rich knowledge.

Ask the Microsoft Community

Microsoft Tech Community

Windows Insiders
Microsoft 365 Insiders
Was this information helpful?
Thank you for your feedback.
- Skill Assessments
- AI Course Builder
- Free Courses
- PowerPoint 2019 Basic
Use PowerPoint's Laser Pointer

Start Free Trial
Or log in with:
How to Use PowerPoint's Laser Pointer

Once you have started a presentation, PowerPoint has tools that you can use to enhance your viewers’ experience.
Laser Pointer
The Laser Pointer tool will display a red dot on the screen that you can use to direct the attention of your viewers.
- While presenting, click the Pointer Tools button.
The pointer turns to a red dot.

- Press Esc to turn off the Laser Pointer.
To control whether the cursor is always hidden, always visible, or automatically appears and disappears, click the Options button and then select Arrow Options .
Annotations
There are two tools—a Pen and a Highlighter—that you can use to annotate the slides from within the presentation.
- Click the Pointer Tools button.
No matter which pen tool you select, you can change its color at the bottom of the menu.

The arrow pointer changes shape, depending on the type of pen you selected.

- Press Esc to turn off the annotation tool.
Although you should make sure everything on your slide is big enough to see, there may be times when you want to zoom in on something.

Some of the screen is washed out. What's still visible is the zoom area.

The area in the zoom box now fills the screen.
- Press Esc to zoom out and view the entire slide once again.
Options Menu
The Options menu contains more settings that you can use to control how the presentation plays.
- While presenting, click the Options button.
- Last Viewed : Jumps to the last viewed slide.
- Show Presenter View : Turns on Presenter View and gives you additional views and controls for presenting content.
- Screen : Hide presentation content by temporarily showing a black or white screen, or display the taskbar on screen.
- Arrow Options : Choose whether the cursor is visible, hidden, or automatically hidden after a given amount of time.
- Help : Opens the Slide Show Help dialog box where you see options for navigating the presentation.
- End Show : Stop presenting and return to PowerPoint.

FREE Quick Reference
Free to distribute with our compliments; we hope you will consider our paid training.
- LinkedIn-ready certificate
- Skill assessments
- Bite-sized, interactive lessons
- Saved progress
- Presentation Hacks
5 PowerPoint Shortcuts Every Presenter Should Know
- By: Camille Holden
We all know there’s no easy button for becoming a successful public speaker. It takes hard work, lots of practice, and a unique blend of science and artistry.
That’s why it’s all the more heartbreaking when you see a good presenter get derailed by their technology. There’s nothing more embarrassing than having to apologize for your missed cues and misfires.
But it doesn’t have to be that way.
Presentation technology can be a blessing, rather than a curse, as long as you know how to use it to your benefit. And while there is no easy button for that either, there are certain buttons that can make your presentations more seamless and make your delivery a lot smoother.
To make sure you’re not letting technology get in your way, here are the 5 PowerPoint shortcuts* every presenter needs to know.
*I’m omitting the truly basic ones that work across all of your applications, like copy/paste and save.
Key PowerPoint Shortcut #1 – Blacking / White-ing the Screen Sometimes you may need to pause the presentation for a lunch break or to answer a question unrelated to the presentation. In these situations, you can use shortcut keys to display a blank screen and keep your audience’s attention focused on you.
Here are the shortcuts you need to know: W or comma (while in Slide Show Mode) will turn the screen completely white. Hit either shortcut once more, and you will return to your slide.
B or period (while in Slide Show Mode) will turn the screen completely black. Hit either shortcut once more, and you will return to your slide.
Key PowerPoint Shortcut #2 – Activating the Laser Pointer When giving your talk, you may have specific elements on your slide that you want to point out to your audience. One great way to do that is to use a laser pointer – and PowerPoint provides one directly within the software.
While in Slide Show Mode, hold down the CTRL key on your keyboard and click and drag with your mouse. Doing so turns on the laser pointer, allowing you to point out things on your slide and focus your audience’s attention.
Here are the shortcuts you need to know: Hold the Ctrl key and click with your mouse (in Slide Show Mode).
Key PowerPoint Shortcut #3 – Inking Your Slides Some of the best tools native to PowerPoint when presenting in front of an audience – whether on a webinar or in a room – are the inking tools.
You can use these tools to highlight parts of the slide, add notes, diagram elements in, etc.
The inking tools include the pen and the highlighter.
Here are the shortcuts you need to know: Ctrl + P (while in Slide Show Mode) will activate the pen, allowing you to write / draw on your slides. Hitting CTRL + P a second time will turn the Pen off.
Ctrl + I (while in Slide Show Mode) will activate the highlighter, allowing you to highlight / draw on your slides.
Ctrl + M (while in Slide Show Mode) will hide all the ink on your slide. If you use the shortcut a second time, you will make the ink re-appear.
E (while in Slide Show Mode) will erase all the ink on your slide.
Pro Tip: Be careful when erasing the Ink on screen as there is no way to un-erase that ink. If you typically want to save the ink on yours, memorize the CTRL + M shortcut instead as it merely hides the ink.
Key PowerPoint Shortcut #4 – Launching Presenter View Presenter View is a great alternative to Slide Show Mode, allowing you to play your presentation for an audience.
I love using Presenter View, because it allows you to do several things: 1. See the slide that your audience is viewing so that you can address that slide, 2. See the notes you have for that slide, 3. Preview the next slide to prepare you for what’s to come, 4. View the time and duration of your presentation, and 5. Use the laser pointer and ink features to mark up your presentation.
Knowing how to jump straight to Presenter View from a shortcut allows you to launch it on the fly and be ready to start your talk at any point.
Here are the shortcuts you need to know: Alt + F5 to launch Presenter View from the first slide.
Additional Pro Tips: 1. This is a great view for reviewing your slides before a presentation to spot check them for errors. 2. Best practice is not to overly rely on this view, as you want to be looking at your audience – not looking at your screen, which is just as bad as reading your slides.
Key PowerPoint Shortcut #5 – Jumping to a Slide in Your Presentation When you give a presentation, your talk doesn’t always end up going according to plan. And you want to be prepared in case that happens.
There are some situations when you will need to jump around in your presentation. For instance, say you are on slide 50, and your audience puts a question that requires you to jump back to slide 20.
Pressing Page Up 30 times is time-consuming and looks unprofessional. That’s why PowerPoint has two handy methods for doing so efficiently.
The first method is to simply type the slide number in, and then hit Enter (Ex. “20 Enter”).
The second method is to use the All Slides dialog box. This feature allows you to visually see all the slides within your presentation so you can immediately jump to the correct one. This is handy when you want to move forward or backward quickly within your presentation and you don’t know what the slide number is.
Here are the shortcuts you need to know: Slide number + Enter (while in Slide Show Mode) will jump you to that slide.
Ctrl + S (while in Slide Show Mode) will launch the All Slide dialog box.
Why Shortcuts Matter Creating a PowerPoint presentation is no small task! It requires juggling all sorts of PowerPoint stuff like charts, tables, pictures, object formatting, text, and shapes, and then there is the delivery of the presentation itself. On top of that, you’re expected to have it all done yesterday!
It’s all about trying to get more done in less time. And that’s where PowerPoint keyboard shortcuts come in handy.
With a little bit of practice, PowerPoint shortcuts will seriously cut down your build time, make your slides look more polished and professional, and get you to Happy Hour faster.
For more of the top PowerPoint keyboard shortcuts, check out my in-depth Favorite 80 PowerPoint Shortcuts article.
About the Author: Camille Holden is the Co-Founder and CEO of Nuts & Bolts Speed Training , where she helps busy professionals save PowerPoint hours and gain peace of mind. As an expert trainer and coach, she is passionate about empowering people who are short on time but big on ideas with the tools to truly master PowerPoint and create presentations that work.

Camille Holden
Join our newsletter today.
© 2006-2024 Ethos3 – An Award Winning Presentation Design and Training Company ALL RIGHTS RESERVED
- Terms & Conditions
- Privacy Policy
- Diversity and Inclusion
- FBRI Help Center
- Information Technology
- Tips and Tricks
Using the Laser Pointer in PowerPoint
In this article, you will learn now to use your mouse pointer as PowerPoint’s built-in laser pointer (or laser pen) which comes in three different colors: red, green and blue.

This laser pen feature is a built-in Microsoft PowerPoint feature (you don’t need to buy or download anything extra) that you can use to highlight things during your presentations and webinars.
Why is a laser pointer useful during a presentation?
The reason a laser pointer is useful during a presentation, is that it allows you to focus your audience’s attention on a specific aspect of your slide.
Turning on the Laser Pointer in PowerPoint
There are two different ways you can use PowerPoint’s built-in pointer.
Let’s start with just using your mouse, then I’ll show you the PowerPoint shortcut.

To turn your mouse cursor into a laser pointer during your PowerPoint presentation, simply:
- Hit F5 to run start your slide show
- Right-click a slide to open the Right-Click Menu
- Open the Pointer Options
- Select Laser pointer
Doing so, your mouse cursor becomes a colored pointer that you can drag around on your screen to highlight things in your presentation.
This works in both the Slide Show View (F5) and the Presenter View (Shift + F5).
Note: The default color for the PowerPoint pointer is red, but you can turn it into a blue or green laser pointer as discussed below.
Turning off the Laser Pointer in PowerPoint
Once you turn the pointer on using the technique described above, your mouse cursor will remain in the laser pointer mode until you turn it off (see below).
There are two ways to turn it off.
First off, if you are sitting at your computer, the fastest way to turn it off is to hit Esc on your keyboard.
Doing so, your cursor turns back into the standard PowerPoint arrow cursor.
An alternate way to turn it off (or change the mouse cursor into something else) is to simply:
- Right-click your slide in Slide Show view
- Select Pointer Options
- Click Arrow Options ( or choose Pen or Highlighter)
- Select Visible
Selecting Visible turns your mouse cursor back into the normal PowerPoint arrow cursor.
How to change the laser pointer color
PowerPoint has 3 different laser pointer colors you can choose from: green, red and blue.
Out of the box, PowerPoint always starts with the red color, but you can easily change it to green or blue if you want to, through the Set Up Slide Show dialog box.
To change the color of the laser pointer in PowerPoint, simply:
- Navigate to the Slide Show tab
- Select the Set Up Slide Show command
- Open the Laser Pointer Color drop down
- Choose your color (Green, Red or Blue)

Once you change the pointer color, it will remain that color (red, green or blue) for that specific presentation until you change it again.
All of your other PowerPoint presentations will continue to have the red default color, until you change it to green or blue in the Setup Up Slide Show dialog box.

One Minute Office Magic
Learning new Microsoft Office tricks in "just a minute"
Using the electronic laser pointer in PowerPoint

I found this really cool tip as part of the BetterCloud Monitor newsletter I get on a daily basis. Did you know that there’s a built-in laser pointer in PowerPoint that you can use when you’re giving a presentation from your keyboard? Here’s how it works…
Start your presentation by using either the start icons in the Ribbon Bar or the Slide Show icon in the lower-right corner of the screen:

This is the screen that shows you what the audience will see. To turn on the laser pointer, click on the Pen icon under the slides:

Select the Laser Pointer option:

Now whenever your icon is over the slide, you’ll see a red dot similar to what a physical laser pointer would look like if you were presenting live in front of a projection screen:

If you find that having the red dot on your screen continuously is distracting, you can skip setting the option via the Pen icon. Just hold down the CTRL key on your keyboard and click the left mouse button . That will show the red dot as long as you hold those two keys down.
You don’t like the red dot, and would like a different color? Use the Set Up Slide Show option to change the Laser Pointer Color :

Finally… if you’re recording your slide show and want the laser point to appear (or not appear) in the finished recording), you can set that under the Record Slide Show options:

Share this:

Published by oneminuteofficemagic
View all posts by oneminuteofficemagic
Leave a comment Cancel reply
- Already have a WordPress.com account? Log in now.
- Subscribe Subscribed
- Copy shortlink
- Report this content
- View post in Reader
- Manage subscriptions
- Collapse this bar
Turn Your Mouse into a Laser Pointer in PowerPoint

Giving presentations can be nerve-wracking. You want to keep your audience engaged and guide their attention to key elements on each slide. A laser pointer is an excellent tool for accomplishing this, allowing you to highlight specific text, charts, or images as you present.
Fortunately, if you use PowerPoint, you already have a built-in laser pointer at your fingertips – your mouse! By following a few simple steps, you can turn your ordinary mouse cursor into a powerful, colorful laser pointer tool in PowerPoint.
Benefits of Using the Laser Pointer
Before jumping into the how-to, let’s look at some of the benefits of using PowerPoint’s laser pointer during your presentations:
- Draws audience focus – The bright, moving laser pointer immediately catches viewers’ eyes, directing their gaze where you want it.
- Enhances engagement – As you highlight key data and talk through your slides, the audience stays actively engaged, focused on each element you emphasize.
- Adds energy and interest – The laser pointer brings movement and vitality to your presentation, making it more dynamic and interesting to watch.
- Interacts with slides – Unlike a physical laser device, PowerPoint’s integrated pointer lets you directly interact with elements on your slides.
Step-by-Step Guide: Turning on the Laser Pointer
Ready to turn your mouse into a laser pointer for your next PowerPoint presentation? Follow these simple steps:
1. Start the Slide Show
First, open your PowerPoint deck and initiate the slide show by clicking “Slide Show” > “From Beginning” or hitting F5. The slide show opens in full-screen mode, hiding the cursor.
2. Reveal and Hold the Pointer
To make the mouse pointer visible, press and hold the CTRL key on your keyboard. While holding CTRL, left-click and drag the mouse. This turns the cursor into a bright red laser pointer.
3. Release to Hide the Pointer
When you release the left mouse button and CTRL key, the laser pointer will disappear, hiding the mouse cursor once again.
4. Repeat as Needed
Repeat steps 2-3 to temporarily reveal the laser pointer whenever you want to highlight a part of your slide. Each time, simply hold CTRL, click-drag, then release.
Customizing and Enhancing the Laser Pointer
Once you get the basics down, try customizing the laser pointer to suit your presentation needs:
Change the color – By default, the pointer displays as red, but you can adjust it to green or blue for more variety. On the “Slide Show” tab click “Set Up Slide Show” and pick a new color.
Add effects – For extra flair, set the pointer to sparkle, glow in the dark, or leave a trail. Access options under “Set Up Slide Show”.
Use the built-in pen – Alternatively, toggle the mouse to act as a pen for circling or underlining text on your slides.
Try different modes – Turn on the pointer in Reading View to draw attention to slides as you design them.
Keyboard shortcuts – Once in slide show view, press CTRL+L to activate the pointer instantly, no clicking required.
Present with Confidence!
With your new laser pointer skills, you can guide your audience, interact with key data, and present your PowerPoint slides with greater confidence and clarity. The built-in tool helps simplify and enhance all your hard work preparing presentation materials.
Try out these pointers for incorporating PowerPoint’s helpful laser into your next on-screen presentation. Within minutes, you can be highlighting key ideas and engaging viewers like a pro!
About The Author
Vegaslide staff, related posts.

How to Add Microsoft PowerPoint Image Captions

5 Online Alternative to PowerPoint That Work

How to Insert a Countdown Timer in a PowerPoint Presentation

How to Insert a PDF into Microsoft PowerPoint


PowerPoint Presentation Shortcut Keys
Do you have a list of the best Microsoft PowerPoint Shortcut keys? I didn’t think so, most people that use PowerPoint only use a few of it’s functions and many people don’t know about the fantastic time saving range of shortcut keys that are built into all Microsoft Office tools. These shortcuts are particularly useful with PowerPoint In this guide, I will list the best PowerPoint shortcut keys to help you work more efficiently, whether you’re a novice or an experienced user. There are literally 1’000s but these are my favorites and the ones I find the most useful.
PowerPoint Shortcut Keys for Creating Presentations
There are a range of general shortcuts that can be used across most Microsoft Office tools

- Ctrl + N: Create a new presentation.
- Ctrl + O: Open an existing presentation – this will open a screen with a list of all your recent presentations
- Ctrl + S: Save the current presentation.
- Ctrl + P: Print the current presentation.
- Ctrl + Z: Undo the last action – This is my favourite
- Ctrl + Y: Redo the last action.
- Ctrl + F: Find text within your presentation.
- Ctrl + H: Replace text in your presentation
Shortcut keys for editing text
- Ctrl + X: Cut selected text.
- Ctrl + C: Copy selected text.
- Ctrl + V: Paste copied/cut text.
- Ctrl + B: Bold text.
- Ctrl + I: Italicize text.
- Ctrl + U: Underline text.
- Ctrl + E: Center align text.
- Ctrl + L: Left align text.
- F7: Start spell check
- Ctrl + R: Right align text.
Shortcut keys for formatting text
- Ctrl + Shift + >: Increase font size.
- Ctrl + Shift + <: Decrease font size.
- Ctrl + ]: Increase font size by 1 point.
- Ctrl + [: Decrease font size by 1 point.
- Shift + F3: Toggle between Upper case, Lower case or Sentence case
- Ctrl + Shift + K: Insert a hyperlink.
- Ctrl + M: Insert a new slide.
- Alt + Shift + Arrow Up/Arrow Down: Move selected text or object up/down in the order.
Shortcut Keys For Working With Objects
Selecting objects on your slides
- Tab: Cycle through objects on a slide.
- Shift + Tab: Cycle backward through objects.
- Ctrl + A: Select all objects on a slide.

Working with Objects on your slides
- Ctrl + D: Duplicate selected object(s).
- Ctrl + T: Open the Format Text dialog box.
- Ctrl + G: Group selected objects.
- Ctrl + Shift + G: Ungroup selected objects.
- Ctrl + ]: Bring selected object forward.
- Ctrl + [: Send selected object backward.
Shortcut Keys for Slide Design
Formatting your Master slide
- Shift + Slide Sorter View button: Access Slide Master view.
- Ctrl + Shift + C: Copy formatting from one object to another.
- Ctrl + Shift + V: Paste formatting to another object.
Changing your design
- Alt + Shift + Left Arrow/Right Arrow: Navigate between design elements.
- Alt + A: Open the Animations tab
- Alt + G: Open the Design tab
- Alt + H: Open the Home tab
- Alt + K: Open the Transitions tab
- Alt + N: Open the Insert tab
- Alt + R: Open the Review tab
- Alt + S: Open the Slide Show tab
- Alt + W: Open the View tab
- Alt + Shift + T: Open the Header & Footer screen
Shortcut Keys for Presenting
These shortcuts are great for using when you are presenting
- F5: Start the slideshow from the beginning.
- Shift + F5: Start the slideshow from the current slide.
- Space bar or Enter: Advance to the next slide.
- Backspace or P: Go back to the previous slide.
- B: Turn the screen black (press any key to return to the slide).
- W: Turn the screen white (press any key to return to the slide).
- Ctrl + L: Turn your mouse into a laser pointer – only works in presentation mode. Pressing it again turns the laser pointer off
As mentioned there are 1’000s of different shortcuts and some of them only work on older or newer versions of PowerPoint so don’t get frustrated if one doesn’t work on your PC, you can even create your own shortcuts by using the Alt function and following the letters that appear. For example if you press “Alt” the letters will all appear over the functions, if you type the relevant number or letter it will open that function and will then display letters over each function there. you can keep doing this to select what you need simply using your keyboard. So pressing “Alt”, “H” & “U” would open the bullet point function. If at anytime you want to escape simply press “Alt” again

If you don’t create or use PowerPoint very often I find the biggest issue is remembering the shortcuts, I used to use a printed page that went everywhere with me in my laptop bag but then I discovered these fantastic desk mats that have loads of my favourite shortcuts for PowerPoint, Word, Excel and general Windows too. I find these are a great tool for referring to whenever I need to remember a shortcut.

Mastering these PowerPoint keyboard shortcuts will significantly enhance your productivity and efficiency when creating presentations. Whether you’re a student, business professional, educator or just creating a presentation at home these shortcuts will help you navigate PowerPoint with ease.They are not difficult and just require a little practice, the desk mats are a fantastic way to have them in front of you at all times and the ALT method is a really easy way to navigate quickly through almost any function. So, start practicing today, and take your PowerPoint skills to the next level.
I really enjoy learning new tips and tricks so if you have any you would like to share please let me know in the comments below what your favourite PowerPoint tips are
4 thoughts on “PowerPoint Presentation Shortcut Keys”
Currently, I am in college studying to be a paralegal. I always have to make a lot of PowerPoint Presentations. I was looking for ways to make this easier. Your blog post really helped with that! I am definitely going to use the PWP Shortcut Keys for creating presentations, I am so happy I can now save time while working on school projects!
Really glad that the post helped, I was always looking for PowerPoint shortcuts as I knew they existed but could never find them when I needed them.I initially just pulled them together for my own work but was convinced there must be other people in the same boat so just figured I should share it too. Thanks for the feedback and feel free to let me know if you find any that I haven’t included
Hi,that’s crazy there is 1000s of shortcut keys. I would have thought 20 or 30. Max 50.
it just shows how customizable these presentations can be.
but it makes sense because technology is getting so good so fast. Maybe when there is quantum computers there will be millions of shortcuts. Just imagine trying to memorize those for your upcoming speech.
But you did a great job of listing these so I can just bookmark this.
Thanks for your feedback, I put my list together initially as I could never find them when I needed them but I have to admit that I never thought to just bookmark it. That is why I ended up buying the desk mat with the shortcuts shown as I find it really useful. It is perfect for people like me with a bad memory 🙂
Thanks again Jake
Leave a Comment Cancel reply
Save my name, email, and website in this browser for the next time I comment.
- Managed IT Services
- Cybersecurity Services
- Virtual CTO
- Microsoft Azure Services
- IT Help Desk Services
- IT Staff Augmentation
- Business VoIP
- Engineering Firms
- Real Estate Firms
- Non Profits and Associations
- CMMC Compliance 101
- CMMC Gap Analysis
- Does CMMC Apply?
- CMMC Level 3 Requirements
- CMMC Non-compliance Penalties
- Start A Conversation
- (571) 513-7655
- Why Orion Networks
- Our Skills & Partners
- Client Testimonials
- Computer Help
- Dedicated IT Support
- IT Consulting
- IT Engineering
- IT Infrastructure Services
- IT Product Sales
- IT Project Management
- Network Administration
- New Office setup
- Legal Firms
- Bethesda, MD
- Columbia, MD
- Rockville, MD
- Tysons Corner, VA
- Richmond, VA
- Washington, DC
- Submit a Ticket
- Get Remote Support
- (571) 281-0370
- [email protected]
We're Social Too!
How to Change Your Mouse into a Laser Pointer for Effective PowerPoint Presentations
Learn how to enhance your PowerPoint presentations by transforming your mouse into a laser pointer. Discover tips for effective communication, audience engagement, and utilizing presentation tools like never before.
Engaging your audience during a Microsoft PowerPoint presentation hinges on clear communication and effectively highlighting critical points on your slides. One tool at your disposal is the hidden laser pointer feature, which can be activated easily to draw attention precisely where you need it on the slide. Forget the physical laser devices; PowerPoint has you covered with a built-in feature that transforms your mouse into a laser pointer at the press of a button. By simply pressing and holding the ‘Ctrl’ key and then left-clicking, your cursor becomes a vivid red dot that everyone can see in the room.
The advantage of using PowerPoint’s virtual laser pointer is its simplicity and convenience. There’s no longer a need to search for the laser pointer you misplaced, and you won’t have to deal with the finite range of a physical device. With this feature, a quick keyboard command is required to keep your audience focused and engaged whenever you need to highlight a specific piece of information during your presentation. Whether operating in Slide Show mode or Reading view, the laser pointer can be a critical tool to enhance your delivery.
Key Takeaways
- PowerPoint lets you convert your mouse into a laser pointer to highlight key presentation points.
- The laser pointer is activated with a simple Ctrl key and mouse click combination.
- The feature works in both Slide Show and Reading views, offering visual guidance for your audience.
Understanding Laser Pointer Functionality in PowerPoint
In Microsoft PowerPoint, the laser pointer functionality allows you to highlight and point to specific content during presentations, emulating a physical laser pointer. This feature is handy when you want to draw the audience’s attention to a critical point without physically being in the room or pointing at the screen.
Activating the Laser Pointer:
- Start your PowerPoint presentation by pressing F5 or selecting Slide Show > From Beginning or Current Slide .
- Press and hold the Ctrl key, then click and drag the left mouse button across the area you wish to highlight.
- If you prefer, you can right-click on a slide to bring up a menu. Navigate to Pointer Options and then choose the Laser Pointer option.
Changing Pointer Color:
- PowerPoint offers the ability to change the color of the laser pointer. To do this:
- Navigate to the Slide Show tab.
- Click on Set Up Slide Show .
- Locate Show Options , and select your preferred pointer color.
To hide the laser pointer and return to the regular cursor, release the Ctrl key and the left mouse button or press the ESC key.
PowerPoint’s laser pointer is a digital tool designed to enhance your presentations by providing a clear visual cue to guide your audience through the content. Following these steps, you can effectively utilize the laser pointer to emphasize points without additional equipment.

Activating Laser Pointer in Slide Show Mode
Turning your mouse cursor into a laser pointer can enhance your presentation by allowing you to highlight and draw attention to specific information during your PowerPoint slide show.
Using Shortcuts
To quickly activate the laser pointer feature:
- Initiate Slide Show : Press F5 (from the beginning) or Shift + F5 (from the current slide) to start your presentation.
- Activate Laser Pointer : Hold the Ctrl key and click and hold the left mouse button to turn your cursor into a red laser pointer.
Using these shortcuts allows you to seamlessly switch to laser pointer mode without disrupting the flow of your presentation.
Accessing the Pointer Options Menu
Alternatively, you can access the laser pointer through the Pointer Options menu:
- Start Slide Show : To begin your slide show, use the Slide Show tab or press F5 for the full presentation or Shift + F5 for the current slide.
- Open Context Menu : Right-click on the current slide to bring up the slide show context menu.
- Select Pointer Options from the context menu.
- Choose Laser Pointer from the subsequent submenu.
This method provides additional pointer options and settings that can be customized according to your preferences during the presentation.
Customizing Laser Pointer Color and Effects
In Microsoft PowerPoint, you can customize the color and add effects to the laser pointer, enhancing your presentation’s visual appeal and audience engagement.
Changing Laser Pointer Color
To change the laser pointer color:
- Start your PowerPoint presentation in Slide Show mode by pressing F5 or selecting Slide Show > From Beginning or Current Slide .
- Right-click on the current slide, then navigate to Pointer Options .
- Select Laser Pointer .
- Choose your preferred color: Red , Green , or Blue .
Adding Special Effects
While PowerPoint does not offer built-in effects for the laser pointer, you can complement the laser pointer with other effects, such as animations or slide transitions, for added emphasis. To add animations:
- Go to the slide to which you wish to add animations.
- Select the object you want to animate.
- Click on the Animations tab.
- Choose from various animation options, such as Appear, Fade, or Wipe, to emphasize an object’s entry or exit during your presentation.

Want to Hire A New MSP?
Download our FREE Insightful Guide to Managed IT Services to guide you make the sound decision.
Using Laser Pointer in Reading View
You can use your mouse as a laser pointer when presenting with Microsoft PowerPoint. This feature can benefit Reading View, giving you a full-screen preview of your slides. Here’s how to enable and use the laser pointer in Reading View:
- Open your PowerPoint presentation.
- Navigate to the View tab on the ribbon.
- Select Reading View to enter the full-screen mode.Once you’re in Reading View:
- Press and hold the Ctrl key on your keyboard.
- While holding the Ctrl key, click and hold the left mouse button .
- Drag the mouse to point to the red beam on the slide’s desired location.
Release the Ctrl key and the left mouse button to deactivate the laser pointer. Here is a summary table of the steps:
Remember that the laser pointer can be a great tool for drawing your audience’s attention to specific points without obscuring the view. It’s a straightforward feature, but it can greatly enhance the effectiveness of your presentation in Reading View.
Leveraging Custom Shows for Laser Pointer Presentations
When preparing to deliver a Microsoft PowerPoint presentation, incorporating a laser pointer can be a powerful way to highlight and focus attention on critical points. While PowerPoint does not have a distinct feature labeled “Custom Shows for Laser Pointer,” you can utilize the presentation’s custom show features combined with the laser pointer for a more effective presentation.
Creating a Custom Show
- Go to the Slide Show tab.
- Select Custom Slide Show .
- Choose New .
- Name your show and select the slides you want to include.
- Click Add , then OK to save.
During Your Presentation
- Start your custom show from the Slide Show tab.
- To activate the laser pointer, press and hold the Ctrl key and click and drag the left mouse button.
- If you need to switch off the laser pointer, release the Ctrl key and the mouse button.
Advantages of the Laser Pointer:
- Direct attention : Audience focus is drawn to where the laser point lands.
- Emphasize information : Use the pointer to underline or circle essential details.
- Interactive : Seamlessly transition between laser pointing and the normal cursor for interactivity.
Remember, the effectiveness of using a laser pointer in custom shows is grounded in its strategic use. Do not overuse it, as this can distract from your presentation instead of enhancing it. Aim for precision and relevance when directing the laser pointer to encourage a polished and professional delivery.

Does Your Organization Have An AI Use Policy?
Get your FREE copy of our AI Use Policy Acknowledgment that you can implement in your organization.
Keyboard and Mouse Shortcuts for Laser Pointer Control
When giving a presentation in Microsoft PowerPoint, utilizing the built-in laser pointer can enhance your audience’s focus on specific content. Below is a straightforward guide to the keyboard and mouse shortcuts that you’ll find invaluable for this feature:
Activating the Laser Pointer
- Start your slide show (F5 key).
- Right-click on your slide to open the context menu .
- Navigate to Pointer Options and select Laser Pointer .
Alternatively:
- Press and hold the Ctrl key, then click and drag the left mouse button.
Laser Pointer Shortcuts in Slide Show View
- Start the presentation from the beginning: F5 key
- Start from the current slide: Shift + F5 key
Disabling the Laser Pointer
- To hide the laser pointer at any time, press the Esc key.
Additional Pointer Options
- Change the pointer to a pen: Ctrl + P
- Change the pointer back to an arrow: Ctrl + A
- Hide the pointer or pen: Ctrl + H
- Display the pointer when you move the mouse: Ctrl + U
Troubleshooting Common Laser Pointer Issues
If you encounter issues with the laser pointer feature in Microsoft PowerPoint presentations, consider the following potential solutions:
Laser Pointer Not Working
- Make sure PowerPoint is up to date. Outdated versions may have compatibility issues.
- Check that your computer’s system requirements meet the needs for running PowerPoint smoothly.
Laser Pointer Not Visible
- Confirm that you are in either Slide Show or Reading View mode, as the laser pointer feature only works in these views.
- Press and hold the Ctrl key, then click and drag the left mouse button. Simply clicking will not activate the laser pointer.
Incorrect Laser Pointer Color
- Right-click on the slide, select Pointer Options , then Laser Pointer , and choose your preferred color.
Unable to Control the Laser Pointer Smoothly
- Make sure other software or hardware isn’t causing erratic pointer movements.
- Try a different mouse or touchpad to rule out device-specific issues.
Laser Pointer Disappears Too Quickly
- The laser pointer disappears when the mouse button is released. Therefore, while using the mouse, maintain pressure on the button.
Best Practices for Laser Pointer Use in Presentations
When using a laser pointer in your Microsoft PowerPoint presentations, follow best practices to ensure your audience’s attention is effectively guided without distraction.
- Be Precise : Use the laser pointer only to highlight key points. Aim to keep the pointer’s movement deliberate and controlled.
- Minimize Movements : Excessive motion can be distracting. Highlight with purpose, and then quickly turn off the pointer.
- Brief Usage : Use the laser pointer in short bursts to avoid distracting attention from the overall content.
- Complement, Don’t Distract : Ensure that using a laser pointer complements your presentation rather than overpowering it.
To help manage these practices, familiarize yourself with the controls:
Additionally, you should:
- Integrate Pointer Use : Practice your presentation integrating the laser pointer to ensure smooth transitions.
- Rehearse : This will help you become comfortable with when and how to use the pointer effectively.
Alternatives to Built-in Laser Pointer Functionality
You might find the built-in laser pointer insufficient for your presentation needs when using Microsoft PowerPoint. In such cases, you have several alternatives that can enhance your presentation.
Use Physical Laser Pointers: A traditional, physical laser pointer can be an effective tool, offering high visibility and ease of use.
Wireless Presenter Remotes: These devices often include a physical laser that can be used with slide navigation buttons.
Presentation Software with Enhanced Pointer Options: Some software allows for more creative or functional pointer options, such as spotlighting or magnification features.
Mobile Apps: Your smartphone can be turned into a remote control and laser pointer for your slides. Apps like PowerPoint Remote or Unified Remote often include this functionality.
These alternatives each have their benefits and limitations. Your choice should depend on your specific presentation context, such as the size of the audience or the room, available technology, and personal preference.
“Orion has been great to work with.”
“Very quick response times to tickets, friendly and knowledgeable staff, all while having reasonable prices. I have been thrilled ever since we switched from our last IT company.”

“We are very impressed with the quality of your work and happy to encourage others to consider using your services.”
“We discovered your company at an important point in our business and solved all of our technology issues. We look forward to many successful years in the future with your support.”

“I have been using the team at Orion Networks for over the past several years and have always found them to be highly knowledgeable, reliable, courteous and dependable.”

“I feel their engineers are gifted with deep skills”
across a broad spectrum of technologies. We love them and will continue to hire their services
“We had to constantly restart our server which caused major disruptions.”
Orion Network Solutions helped stabilize our network since they took over! Now our employees can focus on serving our customers instead of dealing with IT issues
“Orion Network’s engineers are knowledgeable, resourceful & have great technical skill.”
They have always provided us with the best technical support in a timely manner. They have continued to exceed our expectations & we trust them for all our IT needs
Orionnetworks always stays on top of our IT infrastructure – be it procurement of computers, network devices or safe guarding our environment with the latest security updates and patches. We are very happy with them & stay confident that our network is in safe hands
Orion is very prompt in their service
Comments are closed.

orionnetworks.net (703) 891-9535
- Outsourced IT Services
- Help Desk Services
- Information Systems Management
- IT Advisory Services
- Cybersecurity Solutions
- Digital Transformation Systems
- Data Backup & Recovery
- Cloud Technologies

Find Out The Truth About Orion Networks IT Services In Washington DC, Virginia and Maryland
Lewis burke associates llc trust orion networks for all managed it services in washington dc, orion networks and kaiser associates: a match made in cybersecurity heaven, orion networks supports studio theatre with wonderful and reliable it services, orion technologies tips & articles.

The Orion team will help you in complete IT solution. We are a one stop IT solution, and will serve as your collaborative partner to ensure the managed Tech Support we provide align with your business objectives, improve productivity, and lead your organization forward. We can help you in IT support for either small businesses or big enterprise organization. We deliver a customer experience built on integrity, open communication, and an uncompromising commitment to help you turn your IT into an unfair competitive advantage.
Industries served
- Setting Up New Office
Maryland Office
6701 Democracy Blvd Suite 300 Bethesda, MD 20817
(301) 200-9975
Virginia Office
1810 Michael Faraday Drive, Ste 204 Reston VA 20190
(571) 210-4035 [email protected]
Washington DC Office
1300 I St NW Suite 400E Washington, DC 20005
(202) 505-6157 [email protected]
We`re Social Too! Connect With Us!
© 2024 Orion Network Solutions. All Rights Reserved. Web Management By Ulistic -->
- Privacy Policy
- Website Accessibility
Have Concerns With What Your DC Tech Support Company Is Actually Doing For You?
Get A Second Opinion Right Now.
Orion Networks provides…
- A detailed analysis of your current IT company and the work they are doing for you
- An action plan to address operational any or all issues
- A detailed budget and project plan
Get the clarity your DC organization needs to get your IT back on track. Completely risk-free, with no-obligation.

PowerPoint presentation shortcut keys
Use keyboard shortcuts to deliver PowerPoint presentations for good audience experience
Pranab Bala • March 14, 2020
Preparing good PowerPoint slides is the first thing for delivering an excellent presentation. Keyboard shortcuts comes very handy while delivering Presentations without stumbling or worrying about whats next. This article will cover the Keyboard Shortcuts to make presenter's life at ease. These are very easy to memorize if you practice once or twice. You may bookmark the page and use for quick reference before you start a new presentation
You may wish to Jump to:
Start presentation from current slide, start presentation from beginning, exit presentation mode, go to the first slide, go to the last slide, go to a specific slide, view all slides dialog showing list of titles, show context menu to choose action from, hide pointers, laser pointer, change pointer to arrow, change pointer to pen for annotation or freehand, hide annotation markup, change pointer to annotation eraser, delete or clear all on-screen annotation, display a blank black slide and back.
- Display a blank white slide and back
- Summary of Curated list of PowerPoint Keyboard shortcuts
Switch between Presentation and Normal Mode
Normal mode is the where we do all the editing. Sometime, we may need to come out of the presentation mode, quickly update it and jump back to the presentation mode.
Shift + F5 - If you are in editing mode (Normal Mode), you can start presenting right from that slide by pressing Shift and F5 key together. You may need to switch between the modes during preparation of the slides or to make some adjustment while presenting
F5 - Irrespective of what slide you are currently in, pressing F5 will start the presentation from the beginning
Esc - Anytime during presentation, pressing Esc key will stop presentation and take you to the Normal mode. It will show the slide that you were just before Esc. If you are using previous versions of PowerPoint, please try hyphen ( - )
Moving between slides while presenting
While presenting the slides, sometime, we need to jump around slides instead of sequences. This section covers most of the keyboard shortcuts used in navigation in slide show mode
Home - While presenting, if you need to start-over, pressing Home Button takes you to the very first slide
End - pressing End button anytime during the presentation, takes you to the last slide of the PowerPoint, while in presentation mode
Type the number and Press Enter - Sometimes you need to navigate to backup slides or appendixes. If you remember the slide number, you just need to type that number and press enter. You will not see the numbers on screen, while you type. But the trick will happen when you press enter. To come back to the current slide, you need to type the current slide number and press Enter or you can use Ctrl +S to see "Last Slide Viewed" as mentioned in View All Slides Dialog showing list of titles
Ctrl + S - While in presentation mode if you want to jump forward or backward and do not know the slide number then simply press Ctrl and S . This will show a list of slides that you can choose from. Alternatively, you can select a slide and click on Go To. Remembering this shortcut will save you in difficult times, when you forget any other shortcuts.

Shift+F10 - All actions on slides can be done using mouse after you see the context menu using this keyboard shortcut. This one is my favorite keyboard shortcut . When you forget all the shortcuts, remembering this one will stop you from failing. Though the pop-up on the screen might feel little less intuitive. But, it helps you to get back to your previous slide, start annotating on screen or make it blank

Annotations and pointers (arrow, Pen or Laser)
Pointers play an important role in presentation to glue audiences to the section of the slide where you need their attention. There various option to suit your need. You can also hide any pointers
Ctrl + H - This will hide pointer from the slide show. To bring back pointer you can use Ctrl + A or any of the keyboard shortcuts mentioned in the following sections
Ctrl + L - Pressing Ctrl and L change the pointer to Laser.

This is how it looks.
This tiny little Laser is the right pointer to draw attention of the audiences to particular part of screen
💡 Remember L for L aser
Ctrl + A - Arrow is the default pointer. Anytime, you want to change it back to Arrow use Ctrl + A
💡 Remember A for Arrow
Ctrl + P - This change the pointer to Pen with default color. You can start annotating or write on top of the presentation. When you stop presenting, you will get a popup on whether you want to save your scribble in the PPT. It saves the annotation as image objects and can be adjusted or deleted afterwards
💡 Remember P for P en

If you want to change pen color one option is to hover your mouse at the bottom left corner of the screen and you will notice very light panel floating. Click on the pen sign and it will pop-up the color panel. You can change color from there.
Sometimes, you might prefer a blank screen to draw or illustrate, rather than on the present slide. You can make your screen blank
You may Jump to the section for Black or white for annotation
Ctrl +M - This keyboard shortcut simply hide the the annotation that you have made. but do not delete those. anytime during presentation you can un-hide them again by pressing same Ctrl + M for the same slide
Ctrl + E - Pressing this keyboard shortcut sequences changes the pointer to Eraser. Please note that the eraser erases annotation when you press on top of the annotation one at a time.
💡 Remember E for E raser
E - Pressing E erases all annotations. This is irreversible. You cannot get back the annotation that you have erased
💡 Remember E for E rasing
Making screen Blank for Annotation
Sometimes, during presentation, you might need audience's attention and do not want them to look at the screen or you want to do annotation on a white or Black board. you can blank your screen
B - Pressing B in presentation mode makes the screen Black.
. or Period can be used to get back your slide on screen
💡 B for B lack slide
Display a blank White slide and back
W - Pressing W in presentation mode makes the screen Black.
, or comma can be used to return to the presentation from a blank white slide.
💡 W for W hite slide
Summary of Curated list of PowerPoint Keyboard shortcuts for presentation

Contribute to the Microsoft 365 and Office forum! Click here to learn more 💡
April 9, 2024
Contribute to the Microsoft 365 and Office forum!
Click here to learn more 💡
PowerPoint Forum Top Contributors: Steve Rindsberg - John Korchok - Bob Jones AKA: CyberTaz ✅
May 10, 2024
PowerPoint Forum Top Contributors:
Steve Rindsberg - John Korchok - Bob Jones AKA: CyberTaz ✅
- Search the community and support articles
- Microsoft 365 and Office
- Search Community member
Ask a new question
How to Disable or Change 'CTRL + Click' Shortcut in PowerPoint Presentation Mode When Using Power BI Add-In?
Hello. I am using the Power BI add-in in my PowerPoint presentation. Everything works well except in presentation mode (F5). In this mode, when using the 'CTRL + Click' shortcut to select more than one item in the visual filter of Power BI, PowerPoint natively selects the Laser pointer, thus preventing me from selecting more than one item in my Power BI visual filters. Does anyone know how to disable or change this shortcut? Thank you in advance.
- Subscribe to RSS feed
Report abuse
Reported content has been submitted
Replies (1)
- Microsoft Agent |
Thank you for posting to Microsoft Community. We are glad to assist. We are looking into your situation and we will update the thread shortly.
Appreciate your patience and understanding and thank for your time and cooperation.
Was this reply helpful? Yes No
Sorry this didn't help.
Great! Thanks for your feedback.
How satisfied are you with this reply?
Thanks for your feedback, it helps us improve the site.
Thanks for your feedback.
Question Info
- For business
- Norsk Bokmål
- Ελληνικά
- Русский
- עברית
- العربية
- ไทย
- 한국어
- 中文(简体)
- 中文(繁體)
- 日本語
IMAGES
VIDEO
COMMENTS
To change the mouse pointer into a laser pointer using the context menu: Start a slide show. Right-click on the slide. A drop-down menu appears. Select Pointer Options and then Laser Pointer. Press ESC to hide the laser pointer. The context menu appears as follows when you right-click during a slide show:
Turn on the laser pointer. Do one of the following: To use the laser pointer in Slide Show view: On the Slide Show tab, click either From Beginning or From Current Slide to start your slide show. To use the laser pointer in Reading view: On the View tab, click Reading View. Press and hold the Ctrl key, and then click and drag the left mouse ...
To do this. Press. Start a presentation from the beginning. F5. Start a presentation from the current slide. Shift+F5. Start the presentation in Presenter View. Alt+F5. Perform the next animation or advance to the next slide.
To turn your mouse cursor into a laser pointer during your PowerPoint presentation, simply: Hit F5 to start your Slide Show ( see my guide here for other slide show shortcuts) Right-click your slide. Open the Pointer Options. Select Laser pointer.
To begin, we navigate to the "Slide Show" tab on the PowerPoint ribbon. Here we find the "Set Up Slide Show" button. When we click this, we are presented with various options for how our presentation will display. To activate the laser pointer function, we press and hold the Ctrl key, then click and drag the left mouse button during our ...
Once you've started your presentation and you want to change your cursor into a laser, press and hold the "Ctrl" key while clicking and holding the left mouse button. As you can see in this GIF, we want to draw attention to "How-To Geek" in the question, then show the correct answer. You can also see that the cursor converts back to a ...
To activate the laser pointer tool, switch to Slide Show mode via the viewing modes at the bottom, via the Slide Show tab, or by using the F5 hotkey. Right-click on the slideshow and go to Pointer Options -> Laser Pointer. You can also turn your mouse pointer into a laser pointer by holding the CTRL (Windows) key or Command (Mac) key with the ...
To use the PowerPoint laser pointer in the Reading view, click on the View tab and select the Reading view button. To turn on the laser pointer feature, hold the Ctrl Key and then click left mouse ...
Here are the steps to turn on the laser pointer: Launch PowerPoint on your computer. Open your PowerPoint file. Press F5 to start the Slide Show. Right-click on the slide to open the context menu. Place your mouse cursor on the Pointer Options. Select Laser pointer.
In the "Record Slide Show" dialog box select the checkbox "Narrations and laser pointer" and if you want to record the slide and animation timings then select that checkbox as well. Click on "Start Recording" button. Press and hold the CTRL key and click on the left mouse button on any required place on the screen. The laser pointer ...
Only the presenter can point and draw on the slides. To begin sharing, see Share PowerPoint slides. You'll see the laser pointer and drawing tools beneath the current slide. Focus viewer attention with the laser pointer. Select the laser pointer and a color to make temporary marks on the current slide.
From the "Record Slide Show" dialog box, check the Narrations and laser pointer check box and click "Start Recording" to begin recording the presentation. You can click the "Pause" button if you want to pause it. Finish your recording. To navigate to each subsequent slide, release the "Ctrl" button and right-click.
While presenting, click the Pointer Tools button. Select Laser Pointer . The pointer turns to a red dot. Point to a specific area of the screen. Press Esc to turn off the Laser Pointer. To control whether the cursor is always hidden, always visible, or automatically appears and disappears, click the Options button and then select Arrow Options.
Here are the shortcuts you need to know: Hold the Ctrl key and click with your mouse (in Slide Show Mode). Key PowerPoint Shortcut #3 - Inking Your Slides. Some of the best tools native to PowerPoint when presenting in front of an audience - whether on a webinar or in a room - are the inking tools.
The keyboard shortcut to activate the laser pointer is CTRL + left mouse click. As soon as you release the CTRL key, the mouse cursor returns to normal. This allows you to easily turn the laser pointer effect on and off as needed just by holding or releasing the CTRL key.![Laser pointer cursor in PowerPoint 2010]
To turn your mouse cursor into a laser pointer during your PowerPoint presentation, simply: Hit F5 to run start your slide show. Right-click a slide to open the Right-Click Menu. Open the Pointer Options. Select Laser pointer. Doing so, your mouse cursor becomes a colored pointer that you can drag around on your screen to highlight things in ...
Start your presentation by using either the start icons in the Ribbon Bar or the Slide Show icon in the lower-right corner of the screen: This is the screen that shows you what the audience will see. To turn on the laser pointer, click on the Pen icon under the slides: Select the Laser Pointer option: Now whenever your icon is over the slide ...
1. Open your Slide Show tab from the PowerPoint ribbon. 2. Click the Set Up Slide Show option from the range of options that load after clicking the Slide Show tab. Click on Set Up Slide show to adjust the color of the laser pointer in PowerPoint. 3.
Customizing and Enhancing the Laser Pointer. Once you get the basics down, try customizing the laser pointer to suit your presentation needs: Change the color - By default, the pointer displays as red, but you can adjust it to green or blue for more variety. On the "Slide Show" tab click "Set Up Slide Show" and pick a new color.
Ctrl + L: Turn your mouse into a laser pointer - only works in presentation mode. Pressing it again turns the laser pointer off As mentioned there are 1'000s of different shortcuts and some of them only work on older or newer versions of PowerPoint so don't get frustrated if one doesn't work on your PC, you can even create your own ...
To change the laser pointer color: Start your PowerPoint presentation in Slide Show mode by pressing F5 or selecting Slide Show > From Beginning or Current Slide. Right-click on the current slide, then navigate to Pointer Options. Select Laser Pointer. Choose your preferred color: Red, Green, or Blue.
Shift+F10 - All actions on slides can be done using mouse after you see the context menu using this keyboard shortcut. This one is my favorite keyboard shortcut. When you forget all the shortcuts, remembering this one will stop you from failing. Though the pop-up on the screen might feel little less intuitive.
Hello. I am using the Power BI add-in in my PowerPoint presentation. Everything works well except in presentation mode (F5). In this mode, when using the 'CTRL + Click' shortcut to select more than one item in the visual filter of Power BI, PowerPoint natively selects the Laser pointer, thus preventing me from selecting more than one item in my Power BI visual filters.
The best feature of using an iPad to control a PowerPoint presentation is that the current slide can show on the projector while the iPad shows the current and next slide along with any speaker notes that you included for the slide. ... There's also a virtual laser pointer built into the TrialPad app. The TrialPad app is easy to learn and ...