Critical PowerPoint Shortcuts – Claim Your FREE Training Module and Get Your Time Back!

PowerPoint Templates: What They Are and Why You Need One
- PowerPoint Tutorials
- March 6, 2018
In this post you’ll learn everything you need to know about PowerPoint templates.
Properly built templates are a great way to make building and editing your PowerPoint presentations easy and effortless. That said, if your template is not built correctly, it can make working in PowerPoint extremely difficult.

Time Saving Tip: If you are building a template, you can save yourself a TON of time by first buying a professional template online, and then tweaking it to meet your needs. To see the 4 best places I recommend finding professional PowerPoint templates (and why I like them), read my template guide here .
What are PowerPoint templates?
According to Microsoft Office, a PowerPoint template “is a pattern or blueprint of a slide or group of slides that you save as a .potx file. Templates can contain layouts, theme colors, theme fonts, theme effects, background styles, and even content.”

In simpler terms, it’s the formatting backbone of your PowerPoint presentation. It’s what ensures formatting consistency across your entire presentation as you build your slides.
The key is, making sure that your template is set up correctly, which a lot of templates don’t have. They are instead what we call fake PowerPoint template.
To learn more about what a template is and isn’t (and how to spot fake ones), click here .
The benefits of PowerPoint templates
PowerPoint templates are a shortcut to more engaging, colorful, and creative presentations.
They are the very bedrock of your presentations – whether you use a custom one or generic one – and they influence absolutely EVERYTHING:
- How your fonts, colors, and branding displays…
- Whether the slides you copy and paste into your presentation convert properly…
- How your content displays on screen (and prints
- Can you edit content without detonating hidden landmines that derail your workflow
A well-designed template makes your slides and overall presentation look good. On top of that, it makes the process of building and editing your slides MUCH easier.
That’s because it pre-populates all your company information, corporate formatting, default slides, etc. This ensures that everything stays consistent in your presentation, regardless of how much stuff you add to your presentation.

Note: If you use PowerPoint on a daily basis, and want to create your own PowerPoint template from scratch, read my step-by-step guide here .
What can you use a template for?
You can use templates to jump-start your presentation and start building slides that are consistent in appearance and easy to replicate.
PowerPoint templates can be used by anyone, anywhere and for multiple purposes.
From the educator to the sales team, the project manager and the executive assistants, a PowerPoint template can be built to fit just about any scenario.
Here are a few situations you could use PowerPoint templates for:
- Board meetings
- Education settings and class lessons
- Creating a document for printing
Here is an example of a custom-built template that would be good for a webinar or a printed document:

Just keep in mind that while PowerPoint templates can be flexible, they still have limitations. You will never be able to please all people for all situations with your template (that’s just life).
Microsoft PowerPoint templates
As we just mentioned, Microsoft has a library of ready-made PowerPoint templates and PowerPoint themes you can choose from.
When you open PowerPoint, click ‘New’ and you’ll see the search bar, suggested search topics, plus a number of template options.

How to choose the right PowerPoint template
The first step is to know what you’re talking about and do brainstorm how you will need to put that into slides.
We recommend sketching out some slide layouts onto a piece of paper to get a sense of the overall design.
You should also consider brainstorming on the look & feel you want your presentation to have. That would include things like the fonts, colors and backgrounds.
The key things to consider are:
- Was the template built properly in the Slide Master (otherwise, it’s a ‘fake template’)?
- Is the template using the proper theme elements (fonts, colors, etc.)?
- Does it have suitable slides for your titles, content sections, a mix of image slides, text-only and mixed media slides?
- Is the branding, theme, or topic consistent with your company branding?
Whether you choose from ready-made ones or build your own, you’ll want to set the template’s theme up with your own company fonts and theme colors. You can learn more about PowerPoint themes here .
Note: To see my 4 favorite places for finding professional PowerPoint templates online, read my template guide here .
Here are a few of the default Microsoft PowerPoint templates we like:

And here are a few great professional PowerPoint template options from sites that we trust:

To see my full review of the Reem PowerPoint template by SlideCow, read my review here .

To see my full review of the Business Casual template by SlideCow (and why I like it), read my review here .

To see my full review of the Corporate template by inspiradesign, read my review here .
Where to download PowerPoint templates online
If you’re not creating your own templates or using the ready-made Office templates, you can always consider downloading some from the web.
When you download a template, make sure it’s in the .potx file format. If it is not a .potx file format, then it’s not really a template. It’s just similar looking slides.
There are several places where you can find and download templates online. Most of them are paid, but there are a few decent websites that offer free PowerPoint templates.
The Best PowerPoint Templates: To read more about my 4 favorite places for finding templates online (and why I like them so much), read my article here .
How to customize your template
If you use a ready-made PowerPoint template, there is a chance that it won’t be 100% exactly what you need. That means that even if you buy one, you’ll still need to customize it.
To customize your template, you’ll want to start by adjusting the theme, including the colors and fonts. You can change those easily under the Design tab and Variants .
If you want to create your own custom colors and font combinations (rather than choosing from the pre-built ones) you can learn about creating your own custom PowerPoint theme here .

Next, you’ll want to go into the Slide Master and make changes first to the Parent Layout, so that they reflect in all the Child Layouts. To open your slide master, simply:
- Click the View tab
- Select Slide Master

And once those are formatted, you’ll want to make sure you look at the Handout Master and the Notes Master too.
- View tab, select Handout Master
- View tab, select Notes Master
Customizing your template the right way is a lot trickier than it seems and requires the same amount of effort to build one. So, make sure that you’re careful as just one or two mistakes can ruin your template for good.
To expand your knowledge and learn how to format and use the Notes Page view for your speaker notes in PowerPoint, read our guide here .
Practical tips for your templates
Whether you use a default Microsoft template, or buy one online, there are a few not so intuitive things you’ll want to nail down.
This is especially true if you get a template from a third party site as most of them are not real templates. That’s why it’s important to know what you’re looking for before you buy one.
Once you know what you are looking for, you can then download and work with the free templates you find online, or build your own from scratch ( details here if you need help ).
Keep in mind that when building your own custom template, not only is there a recommended order for building it, but there are also critical steps to take when sharing your template with others.
Make sure you don’t skip these steps and end up shooting yourself in the foot.
Common template problems and how to fix them
Now once you’ve got your template, you may find that it’s behaving strangely or that some things in your PowerPoint template aren’t working like they should.
There are a few key tricks to solving nagging issues that inevitably come up when working with templates in PowerPoint.
A few of these tricks include making your default titles All Caps and understanding why you should not delete the default layouts from your slide master ( click here to learn more ).
Another thing to note about working with templates is that they are often confused with the PowerPoint themes and PowerPoint slide masters.
These three elements of a presentation are connected, they are all different and were designed with slightly different purposes in mind.
A PowerPoint template is simply a set of guidelines for the design of your slides. Basically, where text, charts, and images should go on each slide.
On top of that, a properly built template includes a properly set up Slide Master and a PowerPoint theme (they are not one in the same thing).
Simply understanding this will put you light years ahead of most PowerPoint users.
To learn more about our training courses and other PowerPoint resources, visit us here .
Related Articles
About the author.

Popular Tutorials
- How to Strikethrough Text (l̶i̶k̶e̶ ̶t̶h̶i̶s̶) in Word, Excel & PowerPoint
- How to Make Animated Fireworks in PowerPoint (Step-by-Step)
- Strikethrough Shortcut (l̶i̶k̶e̶ ̶t̶h̶i̶s̶) for Word, Excel & PowerPoint
- How to Create a Flash Card Memory Game in PowerPoint (Like Jeopardy)
- Keyboard Shortcuts Not Working: Solved
PowerPoint Tutorial Categories
- Strategies & Opinions
- Shortcuts & Hacks
- Presentation Design
- Pictures, Icons, Videos, Etc.
- New Features
- Miscellaneous
- Charts & Data Viz
We help busy professionals save hours and gain peace of mind, with corporate workshops, self-paced courses and tutorials for PowerPoint and Word.
Work With Us
- Corporate Training
- Presentation & Template Design
- Courses & Downloads
- PowerPoint Articles
- Word Articles
- Productivity Resources
Find a Tutorial
- Free Training
- For Businesses
We help busy office workers save hours and gain peace of mind, with tips, training and tutorials for Microsoft PowerPoint and Word.
Master Critical PowerPoint Shortcuts – Secure Your FREE Training Module and Save Valuable Time!
⌛ Master time-saving expert techniques.
🔥 Create powerful presentations.
🚀 Propel your career to new heights.
We value your privacy – we keep your info safe.
Discover PowerPoint Hacks Loved by Industry Giants - KKR, AmEx, HSBC!
Over 114,880 professionals in finance, marketing and sales have revolutionized their PPT skills with our proven methods.
Gain FREE access to a full module of our premium PowerPoint training program – Get started today!
We hate spam too and promise to keep your information safe.
You are currently viewing a placeholder content from Facebook . To access the actual content, click the button below. Please note that doing so will share data with third-party providers.
How to Use Design Themes in PowerPoint

Design themes are a powerful way to quickly style your PowerPoint presentations. Themes provide complete slide designs including colors, fonts, effects, and layouts to give your slides a professional, coordinated look.
Using themes can save you a lot of time compared to formatting slides individually. With just a few clicks, you can apply a theme to instantly transform the appearance of your presentation.
In this article, we’ll cover everything you need to know about using design themes in PowerPoint, including:
- What PowerPoint themes are
- Benefits of using themes
- How to apply, customize, and save themes
- Differences between themes, templates and layouts
- Best practices for working with themes
After reading, you’ll have the knowledge to use themes effectively for creating professional PowerPoint decks faster.
What Are PowerPoint Themes?
A PowerPoint theme is a set of pre-designed slide elements including:
- Color scheme – coordinated colors used across slide backgrounds, text, shapes etc.
- Font scheme – heading and body text fonts
- Effects – graphical effects like shadows, glows and 3D
- Background styles – slide background designs
Themes provide cohesive formatting to give your presentation a uniform, designer-quality look.
When you apply a new theme, PowerPoint automatically updates all the theme elements across your slides. This instantly transforms colors, fonts, effects and backgrounds while keeping your content in place.
Themes are accessed from the Design tab in PowerPoint. There you’ll find a gallery of built-in themes from Microsoft along with any custom themes you’ve created.
Benefits of Using Themes
There are lots of advantages to styling presentations with themes rather than formatting slides individually:
Themes can instantly restyle an entire presentation in just clicks. This saves all the time needed to color slides, choose fonts and apply effects manually.
Provides Consistency
As themes update all slides at once, your presentation maintains consistent formatting throughout. This polished, coordinated look enhances your professional image.
Makes Revisions Easier
Updating themes is much simpler than updating individual slide elements. To make presentation-wide changes, just apply a new theme.
Enables Customization
While themes produce coordinated designs, you can still customize exactly how you want. Change theme colors, fonts, effects and background styles.
Works Across Office Apps
Custom themes you create in PowerPoint can also be used to format documents consistently across Word, Excel and other Office apps.
How to Apply Themes in PowerPoint
Applying a theme is an easy way to instantly change the look and feel of your entire presentation. Here is the process:
- Open your PowerPoint presentation
- On the Design tab click on the Themes button
- Hover over a theme thumbnail to preview it on the current slide
- Click on a theme to apply it to all slides
The new theme will update the colors, fonts, effects and background styles across your entire presentation.
To view more themes, click the More button at the bottom of the Themes gallery. Here the themes are organized into sections:
- Office Themes – Default built-in themes from Microsoft
- Custom Themes – Any themes you have customized and saved yourself
- Browse for Themes – Lets you browse your computer for theme files
If you want to apply a theme to only certain slides rather than the entire presentation, select them first before choosing the theme.
How to Customize Themes
While built-in themes provide great designs, you may want to tailor a theme further to your exact preferences. Fortunately PowerPoint makes customizing themes easy.
To modify theme elements:
- On the Design tab, click the More button in Themes
- Click Colors, Fonts or Effects to expand menus
- Select options to update theme colors, fonts or effects
You can mix and match different choices for colors, fonts and effects to create a unique theme.
Other customization options include:
- Changing background styles
- Modifying theme’s slide master
- Creating completely new custom themes
If you want to save your customized theme to reuse later, click “Save Current Theme” at the bottom of the theme menu. Give it a name and your theme will appear in the Custom Themes section going forward.
Differences Between Themes, Templates and Layouts
There is some confusion between themes, templates and layouts in PowerPoint. Here are the key differences:
Themes – A set of coordinated design elements including color schemes, font schemes, effects and background styles.
Templates – A presentation file with existing content including theme formatting and placeholder slides with layouts. Templates serve as a starting point when creating new slides.
Layouts – Pre-designed slide formats that determine the placement of elements like titles, text, images, charts etc.
While related in function, understanding these definitions helps use them properly. Templates can include themes, and layouts are incorporated into themes and templates.
Best Practices for Working With Themes
Follow these tips for getting the most out of themes:
- Apply themes first – Set the theme at the start before adding other content so everything matches
- Use theme colors/fonts – Stick to theme colors and fonts for cohesion rather than custom colors/fonts
- Customize thoughtfully – Carefully consider any theme customization for overall harmony
- Be consistent – Try to use the same theme across multiple presentations and documents for consistency
Themes provide an easy way to make your PowerPoint slides look professionally designed. By applying a theme you can instantly introduce coordinated colors, fonts, effects and backgrounds.
Understanding how to use themes saves time in formatting your presentations. Customizing themes enables you to adapt their designs to meet your exact needs and preferences.
With this knowledge of effectively working with themes, you can create presentations faster with better style and consistency. Your professional image will shine through with designer-quality decks.
So explore PowerPoint’s built-in themes and try creating some custom themes of your own. Use this guide’s tips to get your presentations looking their best with minimal effort.
About The Author
Vegaslide staff, related posts.

PowerPoint 2016: Presenting Your Slide Show

PowerPoint 2016: Applying Transitions

How to Use PowerPoint Designer in Microsoft Office 365

How to Insert Page Numbers in PowerPoint


- Get started with computers
- Learn Microsoft Office
- Apply for a job
- Improve my work skills
- Design nice-looking docs
- Getting Started
- Smartphones & Tablets
- Typing Tutorial
- Online Learning
- Basic Internet Skills
- Online Safety
- Social Media
- Zoom Basics
- Google Docs
- Google Sheets
- Career Planning
- Resume Writing
- Cover Letters
- Job Search and Networking
- Business Communication
- Entrepreneurship 101
- Careers without College
- Job Hunt for Today
- 3D Printing
- Freelancing 101
- Personal Finance
- Sharing Economy
- Decision-Making
- Graphic Design
- Photography
- Image Editing
- Learning WordPress
- Language Learning
- Critical Thinking
- For Educators
- Translations
- Staff Picks
- English expand_more expand_less
PowerPoint 2007 - Themes and Background Styles
Powerpoint 2007 -, themes and background styles, powerpoint 2007 themes and background styles.

PowerPoint 2007: Themes and Background Styles
Lesson 4: themes and background styles.
/en/powerpoint2007/text-basics/content/
Introduction
Download the example to work along with the video.
About themes
A theme is automatically applied when you create a new presentation in PowerPoint, even though the slide background is white. This default theme is called the Office Theme . The Office Theme consists of a white background and Calibri font of various sizes for titles and body text.
You can apply a different theme to your slides before adding text or making changes to the default slide. An advantage of doing this is that the location of the text will not move. If you apply the theme after entering text on the slides, the text boxes and placeholders may move, depending on the theme you choose. An advantage of entering some of your text before applying a new theme is that the live preview feature allows you to see how the themes will affect your specific text. The example below is the Aspect theme.
You will need to know how to apply a theme and switch to a different theme if you want to use this feature to create presentations. All of the themes that come included in PowerPoint are located in the Themes group on the Design tab.
To apply a theme:
- Select the Design tab.
- Locate the Themes group. Each image represents a theme.
- Click the drop-down arrow to access more themes.
- Hover over a theme to see a live preview of it in the presentation. The name of the theme will appear as you hover over it.
- Click a theme to apply it to the slides.
You can access additional themes on Microsoft Office Online or create your own.
Fonts that are changed with the font size and style menus will not change when you apply a new theme.
Modifying themes
You can also modify the current theme colors , fonts , and effects . For example, if you like the Urban theme but would prefer to use more red in your presentation, you can change the colors of the theme and create a new custom theme . If you would prefer to use the Verdana font style so your presentation font will match your company logo and materials, you can modify the font combination and save it. PowerPoint themes are powerful because they allow you to create professional-looking slides easily. The option to modify these themes makes it an even more robust and powerful tool because you can customize themes based on your needs and preferences.
To switch to a different theme color option:
- Select the Colors command in the Themes group on the Design tab.
- Hover over a color group to display a live preview of the color combination on the selected slide.
- Click a color option to select it.
To change the current theme colors:
- Click Create New Theme Colors from the menu. A dialog box will appear.
- Click a color option to display a color menu. Choose a color to change the option.
- Enter a name for the new theme color combination.
- Click Save .
To switch to a different theme font option:
- Select the Fonts command in the Themes group on the Design tab.
- Hover over a font group to display a live preview of the font combination on the selected slide.
- Click a font option to select it.
To change the current theme fonts:
- Click Create New Theme Fonts . A dialog box will appear.
- Select new fonts using the drop-down menus.
- Enter a name for the new theme font combination.
- Click Save.
To switch to a different theme effects option:
- Select the Effects command in the Themes group on the Design tab. A menu will appear.
- Select an effect option from the menu.
Background styles
Background styles can be added to your slides after a theme is applied. The styles are fill variations based on theme colors. When you switch to a different theme , the background styles are updated based on the new theme colors. The background style options for the Urban theme are different from the background style options for the Apex theme. The colors are different based on the theme colors.
To apply a background style:
- Click the Background Styles command in the Background group on the Design tab.
- Click a style to select it. The new background will appear in the slides.
You can select Format Background from the menu to open a dialog box and make changes to the background color.
Use the Workshop presentation or any other PowerPoint presentation you choose to complete this challenge.
- Apply the Urban theme to your slides.
- Change at least one of the theme color options.
- Change to a new theme font.
/en/powerpoint2007/pictures-and-clip-art/content/

Create your own theme in PowerPoint
To make a custom theme, start with a built-in Office theme and modify it by changing any of the colors, fonts, or effects:
Change the theme's color, font, and effect settings.
Save the settings as a new theme in your theme gallery.
These steps are described below.
Customizing theme elements
Edit a theme to modify the colors, fonts, or effects.
Select a heading below to open it and see the detailed instructions.
Change theme colors
Theme colors contain four text and background colors, six accent colors, and two hyperlink colors. Under Sample , you can see how the text font styles and colors look before you settle on your color combination.
On the Design tab, in the Variants group, select the down arrow that opens the gallery of color variants:

Select Colors , and then click Customize Colors .
The Create New Theme Colors dialog box opens.
In the Create New Theme Colors dialog box, under Theme colors , do one of the following:

Select the button next to the name of the theme color element (for example, Accent 1 or Hyperlink ) that you want to change, and then choose a color under Theme Colors .
Select More Colors , and do one of the following:
On the Standard tab, select a color.
On the Custom tab, enter a color formula number for the exact color that you want.
Repeat for all of the theme color elements that you want to change.
In the Name box, type an appropriate name for the new combination of theme colors, and then select Save .
Tip: If you want to return all theme color elements to their original theme colors, select Reset before you select Save .
After you've defined a custom color scheme, it's available on the Colors drop-down menu:

Change theme fonts
Changing the theme fonts updates all of the title and bullet text in your presentation.

In the Create New Theme Fonts dialog box, under the Heading font and Body font boxes, select the fonts that you want to use.
In the Name box, type an appropriate name for the new theme fonts, and then select Save .
Choose a set of theme effects
Theme effects include shadows, reflections, lines, fills, and more. While you cannot create your own set of theme effects, you can choose a set of effects that work for your presentation.

Select the set of effects that you want to use.

Save a theme
You’ll want to save the changes that you make to the colors, fonts, and effects as a theme (.thmx file). That way, you can apply this new theme to your other presentations.
On the View tab, select Slide Master . Then on the Slide Master tab, select Themes .
Click Save Current Theme .
In the File name box, type an appropriate name for the theme, and click Save .
Note: The revised theme is saved as a .thmx file in the Document Themes folder on your local drive, and it's automatically added to the list of custom themes on the
Customize your theme
To find a theme to use in your presentation, click the Design tab, click a theme, and see how it previews on the slide.

You can further customize the theme by changing the fonts, colors, and background colors on the Design tab.
To change the fonts and colors, click the down arrow in the Variants gallery, and then click Fonts , Colors , or Background Styles .

For more finely tuned customization, you can edit the slide master .
Save your customized theme
On the Design tab, hover over any theme, and click the down arrow button that shows below the themes panel.
When you save your theme to the Themes folder, it'll automatically show in the gallery under Custom Themes. If your theme isn't in the Themes folder, click Browse for Themes to look for your theme in its saved location.

Related information
What is a slide master?
Create or change slide layouts in PowerPoint for Mac
Create or delete a custom theme color
Overview of themes
A theme is a design scheme of colors, fonts, and background that you apply to your slides.
Using a theme gives your presentation a harmonious appearance with minimal effort. Text and graphics automatically take on the size, colors, and placement defined by the theme, which means less manual work as you create individual slides.
After you create a theme, it's located on the Design tab in the Themes gallery. To try out a theme, rest your mouse pointer over a thumbnail in the Themes gallery and notice how the look of your slide changes.
Here are four different themes applied to the same slide:

Understand the difference between PowerPoint templates and themes
Remove or change the current theme
Format the background color of slides
Download pre-designed themes from create.microsoft.com

Need more help?
Want more options.
Explore subscription benefits, browse training courses, learn how to secure your device, and more.

Microsoft 365 subscription benefits

Microsoft 365 training

Microsoft security

Accessibility center
Communities help you ask and answer questions, give feedback, and hear from experts with rich knowledge.

Ask the Microsoft Community

Microsoft Tech Community

Windows Insiders
Microsoft 365 Insiders
Was this information helpful?
Thank you for your feedback.
6.2 Designing a Presentation in Microsoft PowerPoint
Learning objectives.
By the end of this section, you will be able to:
- Create a new slideshow from a blank presentation
- Create a presentation from a theme or template
- Understand the functions of the Home tab
- Understand the functions of the Design tab
- Understand the functions of the View tab
At WorldCorp, Microsoft PowerPoint presentations are used company-wide for a variety of purposes, such as presenting quarterly sales data or providing training for new sales personnel. As part of the Microsoft 365 suite, PowerPoint has characteristics similar to those of other programs such as Microsoft Word and Microsoft Excel . PowerPoint is divided into various tabs, which appear across a ribbon that helps you organize your actions.
In general, creating a storyboard or outline of a presentation , as outlined in the previous section, is a great starting point, and this is the approach we will use to build My Life in a Snapshot . To get started, this section provides an overview of the PowerPoint program, with a review of several tabs within the ribbon that you will use to develop your first slideshow from scratch. As we start using the primary elements of PowerPoint, you will begin to develop an understanding of how the program works with examples to provide context.
The vast capabilities of PowerPoint enable WorldCorp employees to present complex ideas, facts, and figures in the form of easily digestible visuals. Allowing users to create visual representations of information on the blank canvas slides can allow viewers to interpret, engage with, and expound on what they’re seeing.
Let’s begin by using the blank canvas approach to crafting a presentation.
Getting Started
Open PowerPoint and choose a blank presentation (the first option). You should see a screen that looks like Figure 6.5 , with an arrow highlighting the desired choice. If you want to open an existing presentation, select Open from the left sidebar and search for the file. Another option is to start with a PowerPoint template —a predesigned set of slides that you can use as a starting point for creating a new PowerPoint presentation. Templates include a defined layout and color scheme, and they often include sample text and images that you can replace with your own content. Using template s is a way to save time and ensure consistency in the design of your presentation. Like many organizations, WorldCorp has a preset template that is often used for external communications, such as presentations for clients. However, for the My Life in a Snapshot presentation, you are not restricted to using the template, as this is an internal presentation and is more informal.
In this example, you will start with a blank presentation. After opening this blank document (by double-clicking on Blank Presentation ), you should save it to your computer or to the cloud using a file name that is identifiable to the content of the presentation. As seen in Figure 6.5 , select the Blank Presentation option on the Home screen indicated by the arrow.
In a blank presentation, the initial slide PowerPoint provides is blank except for two placeholders: one for the title and one for the subtitle. When you choose a blank presentation, none of the design elements are defined in advance. The Title Slide layout that is provided by PowerPoint can quickly be altered. Most presentations should have a title. Additionally, the program opens to the Home tab found within the ribbon, as seen in Figure 6.6 . Now, the blank canvas is ready for you to craft My Life in a Snapshot for your team at WorldCorp.
Creating a Presentation with Themes and Templates
Many companies tend to already have a theme developed for use with company presentations. A presentation’s theme refers to the overall design and layout of the slides, including elements such as color scheme, font choices, and graphic elements. Themes are useful because they give you an easy way to create a consistent presentation by using preset fonts and color schemes. If you had chosen a theme instead of a blank presentation, the initial slide would show the same elements, but with the design features of the theme applied. A theme can also include predesigned slide layouts, which can be used to create a cohesive and consistent look throughout the presentation.
Within the New tab, as seen in Figure 6.7 , selecting a theme allows the designer to set the tone and style of the presentation, which can help to engage the audience and convey the message more effectively. Themes can be either built-in or custom-made, depending on the software you are using. PowerPoint offers numerous themes that you can apply and search for in the search window.
Another option that users have is to select a template instead of just a theme. Unlike a theme, a template is a blueprint of a group of slides that can help meet the topic of a presentation. Templates can contain layouts, fonts, colors, and background styles much like a theme. Much like a résumé template in Word, for instance, a template in PowerPoint prompts the user, suggesting sections and topics to include. As an example, a classic conference presentation might have a specific cadence and style. Slides will be arranged to meet the needs of a conference with suggested slides and topics to include. Theme and template options are worth considering and searching for, especially if a theme matches the overall type of presentation you plan to create.
There are benefits to creating a PowerPoint presentation from a theme. First, this approach provides consistency . The program will offer multiple slides with various concepts, all using the same color pattern, style, and texture. A theme allows users to focus on the presentation message without distraction from differing designs, although it does not necessarily guarantee that they will understand the message. Additionally, starting with a theme ensures that all the slides in the presentation will have a professional aesthetic design and layout, making it look polished. Aesthetics is the study of how things look and how we perceive and respond to them. It can also refer to the overall look and feel of something—for example, the aesthetics of a website or a building.
PowerPoint themes often include a multitude of predesigned slide layouts, which can save time and effort in creating your presentation. You can click into the various text boxes or image boxes to provide the required content, copying the desired layouts that work best for you and deleting those that don’t.
Real-World Application
Marketing toolkits.
Most companies now offer their internal stakeholders Marketing Toolkits to use. Marketing Toolkits provide users with the logos, color schemes, outlines, photo depositories, and ideas on what the company is looking for when designing marketing materials. Digital presentation information is almost always included in the toolkit.
With advances in cell phone technology and social media’s growing presence in our lives, companies can now maximize their marketing reach by enlisting their entire workforce into marketing. By providing accessible content for creators and guidelines, any employee can now be a part of promoting their employer.
Not all employees will embrace a Marketing Toolkit. It is only as effective as leadership and the culture of the company allow. See if any companies you know have a Marketing Toolkit online. Does the company toolkit offer guidelines for PowerPoint presentations? Presentations to external stakeholders can be a valuable marketing opportunity.
The themes that PowerPoint provides can be customized to reinforce your company’s image and message by matching the company’s branding and style. The visual design and layout of themes can be chosen to convey the message or tone of the presentation in a more effective way, which can make it more engaging for the audience. These themes can also be easily modified to include different colors, fonts, and graphics, allowing you to personalize the presentation while still maintaining a consistent design.
Themes are helpful, but to learn PowerPoint more deeply, you will also need to learn how to create a presentation from scratch. Start by getting to know the Home tab . The tools found on the Home tab are used to create the general structure of the slideshow, as seen in Figure 6.8 . As an introduction to this group of tools, we will review five key commands, which are circled in the figure: New Slide , Layout tab , the tools in the Font command group, the tools in the Paragraph command group, and Design Ideas .
Using the outline laid out in Figure 6.9 , you can create a slideshow from a blank document to present to the team. From here, you can see how a well-planned presentation of ideas can be created in the form of a PowerPoint slideshow.
Following the outline in Figure 6.9 , the presentation requires five distinct groups of information arranged in numerical order with subtopics. In PowerPoint, you will want to add five slides, each of which will represent one of these groups. To do this, go to the New Slide command group and, with your mouse, select the green button on New Slide four times. (Reminder: PowerPoint provides the first slide by default.) Note that you can change the layout at any time after creating a slide. For this exercise, any layout will do to get started. The default layout provided is fine.
Once complete, there should be five slides listed in the thumbnail pane on the left side of the screen. ( Figure 6.10 shows the first two of five.) You can then use the thumbnail feature to click in and out of individual slides as we develop and edit content that meets the storyboard criteria.
Now that you have created five new slides, you can edit and format them. It’s a good idea to use the same steps to edit and format each. For example, you might create a step called “adding text,” ensuring that every slide that needs text will receive text. The first slide, which is similar to a cover page for the presentation, requires a standard title and subtitle, and these are provided by default.
The next command in the Home tab (see Figure 6.8 ) is Layout tab . When you open the drop-down menu in Layout, you will see that PowerPoint offers nine basic layout options, which are designed to provide variety, balance, and consistency to each presentation design. (One of the options is “blank.” This layout gives you a blank, white canvas to build from, enabling you to design an infinite number of layouts.) For your WorldCorp presentation example, use the default layout Title Slide for the first slide. A title slide is a slide layout that provides space for a title and a subtitle. (Note that you are not using a template here.)
To add your content, click into each text box provided (it says “Click to add title” and “Click to add subtitle”). Start by typing “My Life in a Snapshot” in the first text box. In the second text box, type your name, followed by your title at WorldCorp and your geographic location, as seen in Figure 6.11 .
Next, in the thumbnail panel, select each slide and change the layout for the rest of the slides. Depending on the content of your presentation, it can be helpful to have different layouts on different slides. This presentation will use three different layouts to accommodate different types of information. Follow along by selecting each slide from the thumbnails, then selecting the Home tab, followed by selecting the layout option from the ribbon. You can choose to have information on the slide presented in a different way by changing the slide layout. For example, you could have two groupings of text side by side, as is shown in Figure 6.12 , or have the content on the slide grouped all in one area. Make sure to change the layout setting so it accurately reflects the recommendations found in Figure 6.12 .
Font choice plays a big role in PowerPoint presentations. Each letter, number, or symbol on a slide can be adjusted to a specific design. Using these options allows you to make your text more visually appealing. The process for selecting or changing a font is similar to the way you change a font’s details in Word. In PowerPoint, however, you will often have much less text to manipulate than in a Word file, and the text is usually much larger so an audience can easily view the information from a distance.
When you change font characteristics, be sure to choose what will best meet the audience’s needs. There are a few easy rules of thumb to follow when you create text for a presentation to a large audience. One of them is what’s known as the seven-seven rule —that each slide should have no more than seven lines of text and each line of text should have no more than seven words. This will help prevent you from relying on punctuation or sentence structure to convey your message. When it’s necessary to communicate via paragraphs of text, Word may be a better tool to distribute those types of communication either as handouts along with the presentation or in lieu of the presentation altogether. But, remember, this is only a rule of thumb. It is acceptable to deviate by a few words or lines based on the message and content of the presentation. The point is to keep the slides clear and simple and not to distract from the presenters themselves. Best practices can be a great help in keeping the audience front and center in your mind and staying focused on the purpose of your presentation.
Fill in the required text as displayed in Figure 6.13 . As with changing the layouts, click on each thumbnail, select the required text box, change the font to meet your needs (including the type and color of the font), and adjust the font size as needed. Type the required information (this will be your chance to start explaining who you are to your team), and then make sure to review your work for any errors. Take your time. Word choice can be a challenging task. Make sure that every slide is accounted for. Then, you’re ready to move on to the next step of designing My Life in a Snapshot .
A variety of presentation styles are available, so be sure to take note of the things you like and dislike in the presentations you attend as you develop your own style preferences. Consider the contrast between the text and the background. How easy is it to read the text while listening to a presenter? Does the text work both compressed on a laptop screen (as in a Zoom call) and displayed on a 176-inch projector screen designed for a room full of people? You will notice that the font size and choice are large and easy to read in this project. Later, as you explore the many available options, you are likely to find that the text font needs to match the theme of the presentation.
Next, consider the text. Is this the appropriate content to display? As an example, in Figure 6.14 , you can compare the options for our closing slide choice. Is the use of a graphic image of a question mark the best option, or would a written question, as in the center image, be more effective? In some cases, a combination of pictures and text may work best. There is no perfect answer—PowerPoint gives you many options. But at some point, you will need to make decisions. No matter how creative the formatting of the text, a combination of content may be a better option when deciding what layout and kinds of content to use.
Both the font and the paragraph options have functionality only when a text box has been selected. As with the paragraph options, Office offers a helpful array of choices for line spacing, adding bullets, numbering, aligning text, and adding or removing columns. If the default bullet points or line spacing options provided in the text box layouts are incorrect or missing, this can be a place to add or change the required element. You can make changes within a text box either by selecting the entire text box or by selecting only the location you want to change.
Design Ideas/Designer
The latest option group Microsoft has built into the newest PowerPoint versions is the Design Ideas tab (also called the Designer tab in different versions of PowerPoint). (Refer again to Figure 6.8 .) This is an on/off button that provides advanced slide layouts and “smart” options when turned on. The Design Ideas feature increases the options available to you as the content creator of My Life in a Snapshot —or any presentation you may be called on to create.
Select the first slide in your presentation, which is typically the title slide , and type in the title of the presentation. As the title is added, you can see how quickly a few words can shape an entire slide. Turn on the Design Ideas option in the Home tab . You will notice several options to the right of the screen. These options are often unique to the words and layout you provide. In this step, select an option that fits your personality, and the transformation will occur. An example is provided in the comparison Figure 6.15 from an employee who started not too long ago in WorldCorp’s South Asian Marketing division. The image on the left was the general text the WorldCorp team member typed into the default Title Slide layout. The image on the right is the option they chose that best matched their personality, which was created and offered by the designer in PowerPoint. Keep in mind that the Design Ideas option is available for only one slide at a time.
Because the Design Ideas option was turned on, it reviewed the text within the text boxes and considered several complete design options that could apply. Starting with a very limited bit of information, the Design Ideas option could add multimedia content (3D models, pictures, background themes); alter the text alignment, color, size, and formatting; change the layout; and create an entire theme representing the keywords on the page. It could even add simple animations, such as a snowflake background with snowflakes gently falling. Having these action components is like having an entire production team on call to quickly merge your ideas with existing collaborative content to make exquisite slides.
Instead of using the Design Ideas feature, you may want to design your PowerPoint yourself. The wide range of design options in PowerPoint allows you to change the overall look and feel of your presentation, quickly and easily. By using the built-in template s, color schemes, and slide layouts, you can transform the roughed-out text that you added earlier to polished, professional-looking presentation slides without spending much time and effort on design. (You will learn more about this process in the chapter on Giving Presentations ). Rather than using the Design Ideas feature, which only formats a single slide at a time, the Design tab provides a collection of tools for altering color schemes and layout designs for all of the slides at once. For example, you could change your entire color palette with just a few clicks of the mouse, applying the design to all the slides according to their predefined layout. Additionally, the option to change the slide layout makes it easy to organize the information in a way that is easy for the audience to follow and understand.
In summary, the Design tab in PowerPoint will help to make the process of creating a presentation faster, easier, and more professional-looking, by allowing you to communicate your message in the best possible way for your audience. Building new content for presentations is like building anything else: To do a professional job, you need professional tools, and you need to know how to use them.
Now it’s time to select the design and variation recommended in Figure 6.16 . The first command group on the Design tab focuses on themes. Each theme is unique and modifiable. We have a particular theme we want you to use for the remainder of your slides. Hold down the Control key on your keyboard (Ctrl). With your mouse, select slides 2, 3, 4, and 5 from the thumbnails. Go to the top of the screen and choose the theme circled in Figure 6.16 . The theme will be applied to only the slides you selected. Your uniquely designed title slide will remain. Remember to save your work. You will quickly notice how themes and variations can elevate your design.
For more ideas, you can turn to the Design Ideas pane at the right of the slide area, as shown in Figure 6.16 . (Note that in this figure, the Design Ideas option is called Designer.) For even more ideas, click on See More Design Ideas at the bottom of the pane. This can be accomplished by selecting a particular slide. On the ribbon on the Design tab, the Designer/Design Ideas option will illuminate on the far-right side. Click on the icon and then scroll down, and you can click again on See More Design Ideas. If you have Microsoft 365, your app will be updated as designers add new themes.
The next command group on the Design tab is titled Variants. Variants are essentially modifications you can make within a single theme. These provide a way to add a different overall look. This group initially displays four different color schemes to use with your theme. It lets you change the color combinations, font, or background, or add special effects. For every theme you choose, you can alter the color scheme and font combination (title and regular text). Make sure in your slideshow for My Life in a Snapshot that you have selected both the theme and the corresponding variation of the theme.
Figure 6.17 displays other variant settings that you can customize, including fonts, effects, and background styles. These options can be accessed in the Design tab, within the Variants ribbon, using the down arrow option. Colors, Fonts, Effects, and Background Styles all become options with a multitude of choices.
Selecting the arrow to the right for Colors extends a drop-down list that displays many preset color scheme possibilities, plus a Customize Colors option that allows you to change all of the colors in a scheme. The Font variant lets you pick different fonts for title text and body text. The Effects variant, or Artistic Effects, applies a graphic effect or filter to your slides, such as making them look like a sketch or a painting. Effects can be applied to a single slide or to all slides within the presentation.
The last command group on the Design tab is Customize , which gives options to change the slide size and format the background appearance. You won’t need to use this option for your first presentation, but it is a helpful tool to learn for your future presentations. The slide size command offers two principal choices of aspect ratio , which is the relationship of the slide’s width to its height: standard (compatible with older screen sizes), with an aspect ratio of 4:3, and widescreen (for today’s HD environment), with an aspect ratio of 16:9 ( Figure 6.18 ).
Also found in the Customize group of commands is the Format Background command. Click on it and you will see the menu as shown in Figure 6.19 . This command lets you change the background of a slide by changing the fill to a solid color, gradient fill, pattern fill, and so on. Select fill and then hover over each of the circles to see the available color and background options.
Format Background contains all the options for changing the background: Solid fill, Gradient fill, Picture or texture fill, and Pattern fill. Each option has its own set of elements to adjust. Solid fill is just that—choose a solid color for your background. Gradient fill lets you choose the way the color is spread across the slide, the intensity or transparency of the color, and the shape the background effect follows as it moves across the slide. Finally, you can fill the background with a pattern or a photo.
There are many ways to customize a theme to meet your specific needs. Different color combinations, fonts, effects, and background styles are all elements you can use to customize your presentation. Even small changes may be transformative.
The next tab to review is the View tab. To have a basic understanding of PowerPoint , you will need to know the general purpose of several view options. Within the View ribbon, there are seven command groups. The first three are circled in Figure 6.20 , starting with Presentation Views .
When creating slides, you will typically work with the Normal View , the default view that PowerPoint opens within a new presentation ( Figure 6.21 ). The large window shows the current slide, and the other slides are shown as thumbnails down the left side of the window. The large window gives you plenty of room to focus on developing content and layout for each slide while you can also jump in and out of each slide through the thumbnails.
Outline View shows a list of the slides on the left, highlighting the text rather than the actual slides as pictures. In Outline View, you can scroll through the text of each slide rather than having to jump in and out of individual slides. This can be a great aid when reviewing or organizing text, as seen in Figure 6.22 . (You may have noticed that we changed our title slide to match the theme of the rest of the slides. Now the presentation has a more consistent design.)
Slide Sorter is an option that lays out slides in order, allowing you to move them around with a drag-and-drop of the mouse. This view is useful when you want to add or delete a slide or change their order.
For example, suppose a team member creates a photo album to introduce themselves, with each slide consisting of a single photo. If they select thirty photos, creating an album with thirty slides, Slide Sorter View can help them edit the album by adding or deleting a photo and by arranging the photos in the desired order. In My Life in a Snapshot, with only five slides to edit, this view would be overkill. But with a larger presentation with many more slides, a Slide Sorter View can be a helpful option.
Notes view (or Notes Page ) displays a single slide with the notes below the text or image. These notes are typically designed for the speaker. They may be reminders, citations, or any various notes that the presenter wants to have at their fingertips. This can be handy when a user wants to add or edit a large amount of text. If, for example, they have a lot of text on a slide but are not sure yet which words might be best to highlight for the audience, this area of notes can provide a collection place for content.
The Reading View displays slides one at a time, as they would appear in a slideshow. Utilizing the View option allows you to take any one of the five slides and adjust the size of text boxes and change alignments—all while seeing most of the screen.
The Master Views option group may be a bit advanced for this introductory review, but we will provide a brief example. Within this group, the Slide Master is simply a template of the slide, breaking apart the individual components of the slide layout. This is a time-saving method for creating professional and consistent presentations. You can start with one of the PowerPoint themes or a blank slide, add or change the colors, add borders, change the font, and change or create a layout of your own. You can insert text boxes and object placeholders. When you do this on a master slide, you create a template that unifies the slides in a slideshow. When you have completed a slide that you want to keep as a master slide, select File, Save As, choose a location, and, in file type, choose PowerPoint Template. This is now a Master Slide template that you can use repeatedly.
Handouts Master and Notes Master are specialized viewing modes for specific tasks. The Handouts Master options allow developers to create a template for the PowerPoint printed handout for audience members. Slides can be arranged; titles, dates, and notes can be laid out. Within the Notes Master option group, the view of the slides and printable notes can be arranged as you desire.
This book may not be used in the training of large language models or otherwise be ingested into large language models or generative AI offerings without OpenStax's permission.
Want to cite, share, or modify this book? This book uses the Creative Commons Attribution License and you must attribute OpenStax.
Access for free at https://openstax.org/books/workplace-software-skills/pages/1-chapter-scenario
- Authors: Tammie Bolling, Angela Mitchell, Tanya Scott, Nyrobi Wheeler
- Publisher/website: OpenStax
- Book title: Workplace Software and Skills
- Publication date: Nov 29, 2023
- Location: Houston, Texas
- Book URL: https://openstax.org/books/workplace-software-skills/pages/1-chapter-scenario
- Section URL: https://openstax.org/books/workplace-software-skills/pages/6-2-designing-a-presentation-in-microsoft-powerpoint
© Jan 3, 2024 OpenStax. Textbook content produced by OpenStax is licensed under a Creative Commons Attribution License . The OpenStax name, OpenStax logo, OpenStax book covers, OpenStax CNX name, and OpenStax CNX logo are not subject to the Creative Commons license and may not be reproduced without the prior and express written consent of Rice University.
- How to: Create a Custom PowerPoint Template
How do you create a custom PowerPoint template that looks good, and helps your client create effective presentations? Keep reading for tips and best practices for constructing templates that work as expected, and avoid PowerPoint pitfalls.
Most designers dislike PowerPoint because of its irritating design limitations. But, most companies use tools such as Word and PowerPoint on a daily basis for reports, presentations, white papers, and other documents meant to be emailed to their prospects and/or customers. So for your client companies, it’s important to develop Office templates that extend their branding into the tools used for creating everyday communication.
Therefore, you have to embrace the design limitations of PowerPoint, and plan accordingly. Below are some considerations for designing PowerPoint slide layouts:
- You will need to design to a landscape (horizontal) orientation; find out whether the client needs a widescreen (16:9) and/or a 4:3 version before getting started with design. Depending on the world region(s) in which they will give presentations, they may need both.
- Example: does your client need a “Team” slide with placeholders for staff photos, with department and title below?
- Does your client use the pre-built SmartArt diagrams and charts already available in PowerPoint? Consider creating slide layouts that will better showcase these elements to tell the story.
- When developing the color scheme, consider whether there will be sufficient contrast for elements to be legible viewed from a distance. This leads directly to the next point…
- Keep it simple: less is more when it comes to presentations. Effective presentations showcase one primary point per slide. Simple layouts will also be easier for non-designers to maintain .
- Keep in mind that most clients will need to stick with typefaces that are system fonts. Use a system font that makes visual sense with your client’s brand from the start.
- For layouts, think in terms of one-column, two-column, and a maximum of three-columns. Three-column grids are also ideal for layouts with a one-third width column of text left or right and an image or chart that fits the remaining two-thirds of the slide width.
- Object positioning in PowerPoint is not as precise as in design software. In other words, an object placed at 1.125″ from an edge in InDesign is going to be at 1.13″ in PowerPoint. Design accordingly!
- Use high quality images: we strongly recommend to clients that they license quality stock images and/or schedule a photoshoot. Low quality images look worse when projected onto a large screen.
Tip: Before developing layouts using a design application, take a look at some of the pre-built templates that come with the application to see how the developers of PowerPoint approach various design elements. This step will help you avoid design that cannot easily be replicated in PowerPoint.
Once you have client sign off on the layouts, you are ready to construct the PowerPoint template.
There is a best practice: first create a Theme , then apply that theme to a Master , then build Master Slide Layouts . Last, add Slides that use the layouts you just built.
What is a PowerPoint Theme?
A theme includes the color palette for text, slide background colors and the default colors of charts or diagrams. Themes also include the fonts to be used in the presentation. PowerPoint has built-in color themes that you can customize. You will find the Colors in Slide Master view. From the application menu, View > Master > Slide Master. Then click Colors to customize them for your client.
Tip: remember to save your custom colors with a name that is more specific than the default “Custom 1” name.
You can also save effects such as drop shadows or glossy effects. Once saved, these effects will become the default effect for all shapes that are inserted into a presentation that uses your theme, so use effects sparingly or not at all!
Tip: first create a custom color palette and select fonts for the theme before adding any shapes or text boxes, because added text placeholders and/or shapes will automatically use the colors and fonts you just specified.
You will want to save the changes you made to the default colors, fonts and effects as a theme (.thmx file) so that you can apply the same look to other presentations. Make sure you are in Slide Master view once you’re done making changes. Then, on the Slide Master tab, select Themes and click Save Current Theme.

The link to “Save Current Theme” is at the bottom of the pop-up window, indicated above with the cursor arrow.
In the file name dialog box, type a name that will help you find this theme easily, and click Save. The next time you open PowerPoint, this theme will be added to the list of custom themes on the Design tab of the ribbon. Details here: https://support.office.com/en-us/article/use-or-create-themes-in-powerpoint-83e68627-2c17-454a-9fd8-62deb81951a6
Once you have created a theme, building the template is next.
What is a PowerPoint Template?
A PowerPoint template (.potx file) is a set of slide layouts; it serves as a pattern or blueprint for creating a presentation. PowerPoint has built-in templates that you could customize but for maximum flexibility, you will want to start with a blank presentation.
Open a blank presentation, select the View tab on the ribbon, then choose Slide Master in the Master Views group.
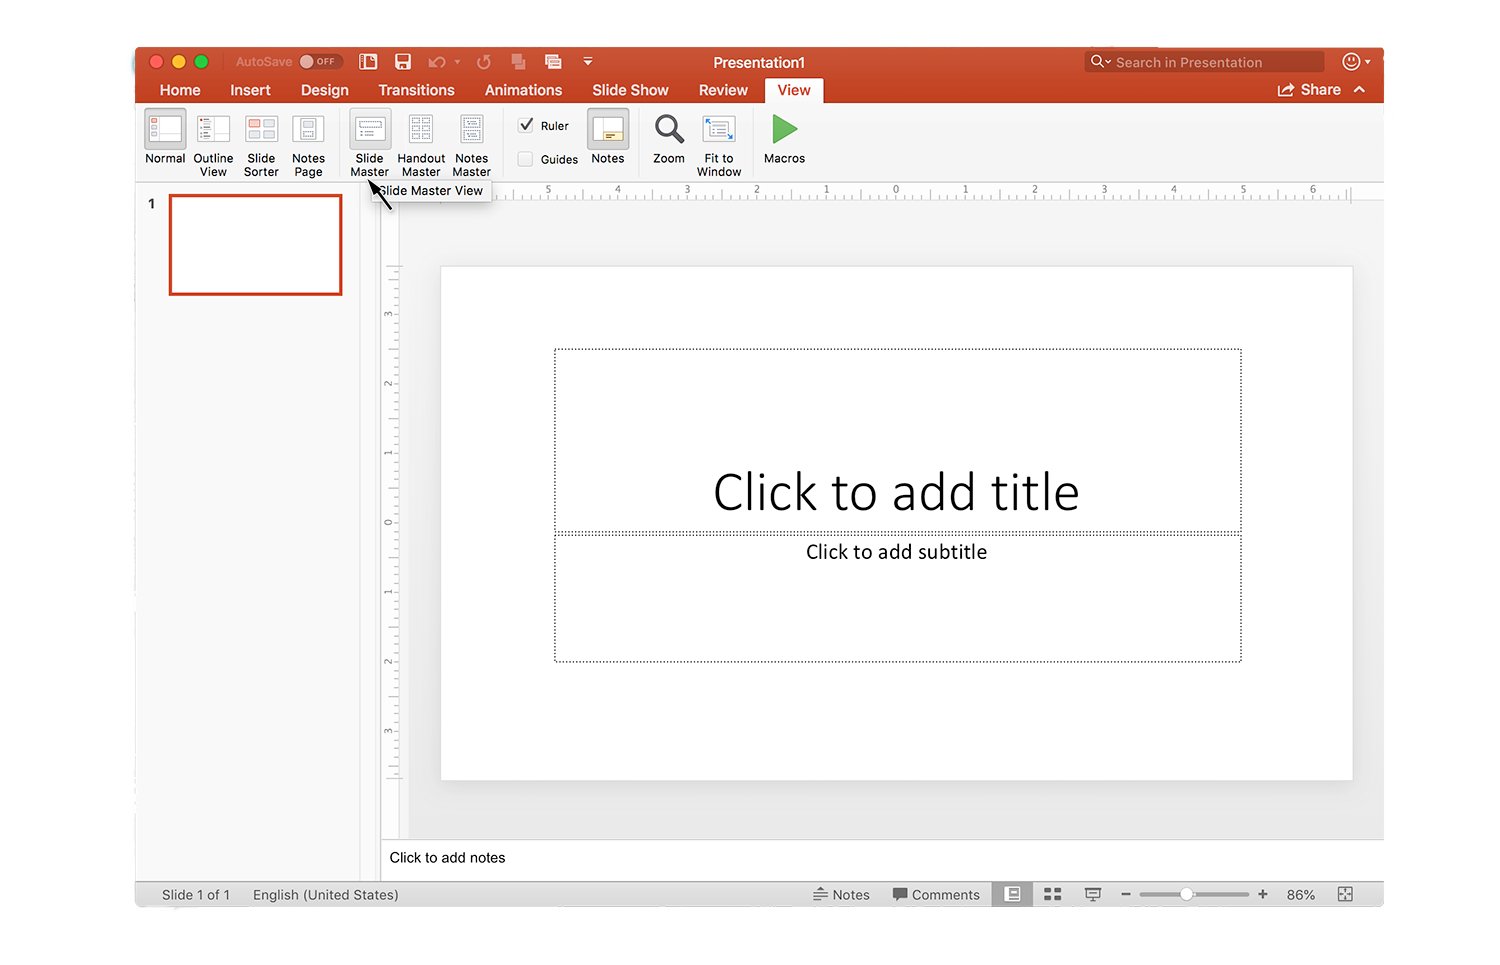
Select the “View” tab on the ribbon, then select “Slide Master”
The slide master is the largest slide at the top of the thumbnail list at left of your window. Associated slide layouts are below the slide master.
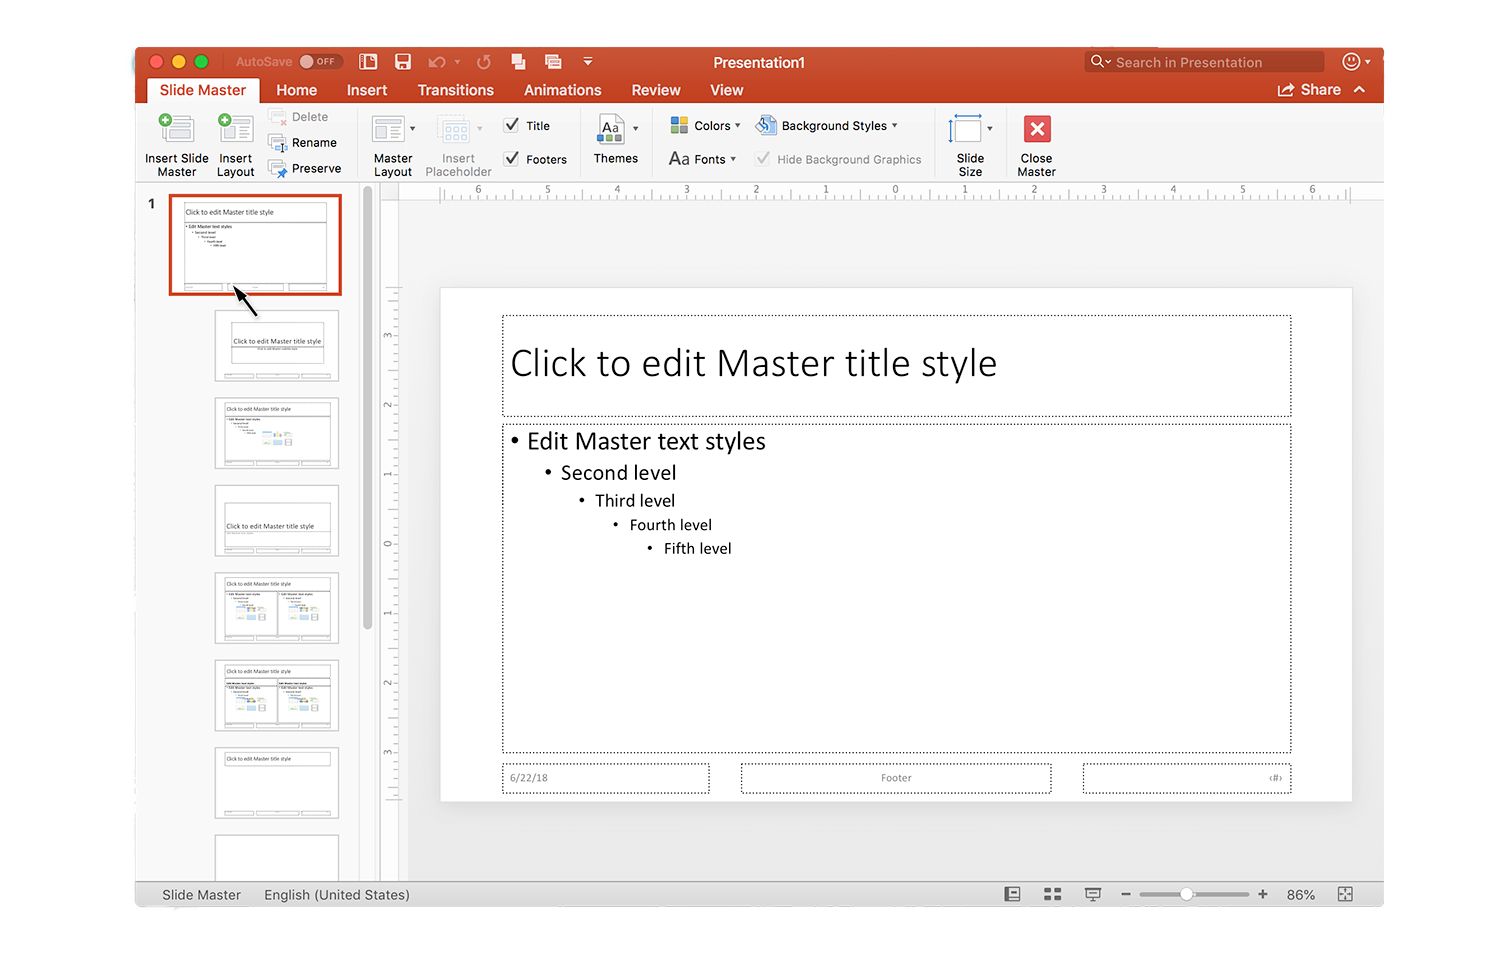
In Slide Master View, the top-level master is the large slide thumbnail at the top of its associated slide layouts.
You will want to apply the theme you just saved. To find the theme, click the Themes button and scroll to find your new theme in the Custom section. Tip: if you hover your mouse over the thumbnails in this list, the theme name appears. Click the thumbnail for the theme you want to apply.

If you created a Custom theme, you may need to scroll down the pop up window to find the new theme (they are listed in alphabetical order)
Now it’s time to customize the basic layouts contained in the blank theme.
First modify items that will be present on all of the slides: set the appearance and position of elements such as the title, the main content area, body fonts and the appearance of lists on the top-level Master slide. Customizations made on this top-level Master will carry through all of the other associated Master Slide Layouts.
- You may also want to modify the appearance of elements in the footer, such as the slide number, and date.
- If you need to include a copyright statement or other disclaimer that can go in the text box labeled “Footer” in the screenshot above.
- These footer area text boxes do not have to remain where they are; you can move them as wanted.
Remember to save your file regularly.
Once you are finished with modifications to the top-level Master, then make changes to the other associated layouts.
- It’s a good idea to keep titles and a primary content/text box in the same position throughout the Master Layouts, except on the cover slide, the closing slide and section divider slide layouts. With this approach, the title and most prominent text content won’t seem to “jump around” as slides are presented.
- If you do not want to have the footer information on a cover slide or any other Master Layout, simply uncheck the box beside “Footers” in the ribbon on the “Slide Master” tab.
Once you have finished modifying the slide layouts and/or adding new Master Slide Layouts and customizing them it’s time to save your template. Once you have saved the template, you can test how things are working by creating a new presentation based on that template.

After you are finished modifying all the layouts, remember to save your presentation as a template.
PowerPoint will save that template in the default location on your computer unless you specify another location. It’s best to allow PowerPoint to save the template in the default location so the template is available on the launch screen when you want to start a new presentation.

PowerPoint has “Featured” (i.e. their pre-built templates), and “Personal” tabs. When you create a new template it will be listed under the personal tab.
If you do not see your new template listed in PowerPoint’s launch screen options, close PowerPoint and then reopen it. Your new template will be listed in alphabetical order, and may be under the “Personal” list rather than PowerPoint’s “Featured” list.
You might also like

- Privacy Policy
Recent Posts
- How to: Social Media Image Templates
- Illustrating Sustainable Energy Systems

This site uses cookies. By continuing to browse the site, you are agreeing to our use of cookies. You can read about our cookies and privacy settings in detail on our Privacy Policy Page .
Cookie and Privacy Settings
We may request cookies to be set on your device. We use cookies to let us know when you visit our websites, how you interact with us, to enrich your user experience, and to customize your relationship with our website.
Click on the different category headings to find out more. You can also change some of your preferences. Note that blocking some types of cookies may impact your experience on our websites and the services we are able to offer.
These cookies are strictly necessary to provide you with services available through our website and to use some of its features.
Because these cookies are strictly necessary to deliver the website, refusing them will have impact how our site functions. You always can block or delete cookies by changing your browser settings and force blocking all cookies on this website. But this will always prompt you to accept/refuse cookies when revisiting our site.
We fully respect if you want to refuse cookies but to avoid asking you again and again kindly allow us to store a cookie for that. You are free to opt out any time or opt in for other cookies to get a better experience. If you refuse cookies we will remove all set cookies in our domain.
We provide you with a list of stored cookies on your computer in our domain so you can check what we stored. Due to security reasons we are not able to show or modify cookies from other domains. You can check these in your browser security settings.
These cookies collect information that is used either in aggregate form to help us understand how our website is being used or how effective our marketing campaigns are, or to help us customize our website and application for you in order to enhance your experience.
If you do not want that we track your visit to our site you can disable tracking in your browser here:
We also use different external services like Google Webfonts, Google Maps, and external Video providers. Since these providers may collect personal data like your IP address we allow you to block them here. Please be aware that this might heavily reduce the functionality and appearance of our site. Changes will take effect once you reload the page.
Google Webfont Settings:
Google Map Settings:
Google reCaptcha Settings:
Vimeo and Youtube video embeds:
The following cookies are also needed - You can choose if you want to allow them:
You can read about our cookies and privacy settings in detail on our Privacy Policy Page.
How to Change Layout in PowerPoint

Microsoft PowerPoint is an incredibly versatile tool that is used by millions of professionals, students, and educators around the world to create engaging presentations. One of the key features of PowerPoint is the ability to change the layout of your presentation slides to convey your message in a more effective way. In this article, we will dive deep into the different aspects of changing the layout of PowerPoint slides. From understanding the basics of PowerPoint layouts to customizing and modifying them, we’ve got you covered. So, let’s get started!
Table of Contents
Understanding the Basics of PowerPoint Layouts
Before we dive into the details of changing the layout in PowerPoint, let’s take a moment to understand what layout actually means in PowerPoint. In simple terms, the layout of a slide refers to the way in which different content elements are arranged on the slide to create a unified design. In PowerPoint, each slide has a specific layout, which determines the position and size of content placeholders, such as text boxes, picture holders, and other elements. A typical PowerPoint presentation will have multiple slides, each with its own unique layout, which can be edited and customized to create an engaging and informative presentation.
One important thing to keep in mind when working with PowerPoint layouts is that they are not set in stone. You can always change the layout of a slide to better suit your needs or to create a more visually appealing presentation. This can be done by selecting the slide you want to modify, clicking on the “Layout” option in the “Home” tab, and choosing a new layout from the available options.
Another key aspect of PowerPoint layouts is that they can be customized to fit your specific needs. For example, you can add or remove content placeholders, adjust the size and position of existing placeholders, and even create your own custom layouts from scratch. This level of flexibility allows you to create presentations that are truly unique and tailored to your audience and message.
Overview of PowerPoint Slide Masters
Slide Masters are one of the most powerful features of PowerPoint and can help you to create a consistent design across all slides. A slide master is essentially a template that contains the overall formatting and layout of a presentation. The elements you change in the slide master will be reflected in all the slides of the presentation that use that particular slide master. This can be a huge time-saver when you need to make global changes to your presentation. You can create, edit and customize slide masters to suit your specific needs, and use them to apply the changes to all your presentation slides in one go.
Another advantage of using slide masters is that they allow you to easily apply a consistent design to your presentation. By using the same fonts, colors, and backgrounds throughout your slides, you can create a professional and polished look. Additionally, slide masters can be used to add placeholders for text, images, and other content, making it easier to create new slides that follow the same design principles. Overall, slide masters are an essential tool for anyone looking to create a visually appealing and cohesive PowerPoint presentation.
The Different Types of PowerPoint Layouts
Microsoft PowerPoint offers a wide range of layout options to suit different presentation needs. The most commonly used layout options include title slide, title and content, section header, two-content, comparison, and blank. Each of these layouts has its own unique design and characteristics that can be customized according to your requirements. As you gain experience with PowerPoint, you will become more familiar with the different types of layouts and when to use them for maximum impact.
It is important to note that the layout you choose can greatly affect the overall message and impact of your presentation. For example, the title slide layout is ideal for introducing the topic of your presentation, while the comparison layout is great for highlighting the differences between two or more items. Additionally, the section header layout can be used to break up your presentation into different sections, making it easier for your audience to follow along. By understanding the different types of layouts and their purposes, you can create a more effective and engaging presentation.
Step-by-Step Guide to Changing PowerPoint Layouts
Changing the layout of a presentation slide in PowerPoint is a straightforward process. Simply follow these steps:
- Select the slide you want to modify.
- Click on the ‘Layout’ button in the ‘Slides’ group on the ‘Home’ tab.
- Select the desired layout from the drop-down list of available layouts.
- All the content on the slide will be automatically arranged according to the new layout settings.
- You can then customize individual elements on the slide as needed.
It’s important to note that changing the layout of a slide can affect the overall design and flow of your presentation. It’s recommended to preview the changes and make any necessary adjustments before presenting. Additionally, if you have multiple slides with the same content, you can apply the new layout to all of them at once by selecting ‘Apply to All Slides’ in the ‘Layout’ dropdown menu.
Customizing and Modifying PowerPoint Layouts
If the predefined layouts in PowerPoint do not meet your specific needs, you can customize and modify them to create a unique design that suits your presentation’s specific requirements. You can move and resize placeholders, change fonts and colors, add or remove content placeholders, and more. The possibilities are virtually limitless, and it all comes down to your creativity and preferences. PowerPoint also allows you to save your custom layout as a new slide master and reuse it as needed in other presentations.
One of the benefits of customizing and modifying PowerPoint layouts is that it can help you to better convey your message to your audience. By tailoring the design to your specific content, you can create a more cohesive and visually appealing presentation that captures your audience’s attention and keeps them engaged.
Another advantage of customizing PowerPoint layouts is that it can save you time in the long run. By creating a custom slide master, you can easily apply your preferred design to multiple slides in your presentation, rather than having to manually adjust each slide individually. This can be especially helpful if you frequently create presentations for your job or business.
Using Themes to Change the Layout in PowerPoint
Themes in PowerPoint allow you to apply a consistent look and feel across all the slides in your presentation. A theme typically includes a color scheme, a set of fonts, and various design elements that can be applied to create a unified design across different slides. You can choose from the various pre-built themes in PowerPoint, or create your own custom theme to suit your specific requirements. A theme can be a great way to add a professional and polished touch to your presentation.
Tips and Tricks for Changing Layouts in PowerPoint
Here are a few tips and tricks to help you get started with changing the layout in PowerPoint:
- Take the time to understand the different types of layout and when to use them.
- Start with a good base template or create a custom slide master to streamline your presentation design.
- Use themes and color schemes to create a consistent look and feel for your presentation.
- Keep your design simple and easy to understand, avoiding clutter and unnecessary content.
- Experiment with different design elements and layout options to create a slide that is engaging and visually appealing.
Best Practices for Choosing the Right Layout for Your Presentation
Choosing the right layout for your presentation can make a significant difference in how effective it is in conveying your message. Here are a few best practices to keep in mind:
- Think about the purpose of your presentation and the main message you want to convey.
- Use a layout that enhances your key message and makes it easy to understand.
- Avoid clutter and keep your layout simple and clear.
- Choose a layout that complements your presentation style and personality.
- Consider your audience and what will resonate with them the most.
Examples of Effective Use of Different PowerPoint Layouts
Here are some examples of how different layout options can be used to create effective presentations:
- The title slide layout can be used to create a strong first impression and set the tone for the presentation.
- The title and content layout is ideal for presenting complex information in a clear and concise way.
- The section header layout can be used to break up your presentation into manageable sections and highlight key points.
- The comparison layout can be used to present pros and cons, differences between two items, or to compare alternatives.
How to Save Time with Prebuilt Layout Templates
If you’re short on time, prebuilt templates can be a lifesaver. PowerPoint offers a wide range of prebuilt templates that can be customized to suit your specific needs. These templates include a variety of layouts with different color schemes, fonts, and design elements that can be edited to create a professional-looking presentation in no time. You can also find templates online, which can be downloaded and used in your presentation with ease.
Troubleshooting Common Issues When Changing PowerPoint Layouts
Changing the layout of a presentation in PowerPoint is usually a seamless process, but there can be some issues that arise. Here are a few common issues and how to address them:
- If the layout change is not applied to all slides, ensure that the selected slide follows the same master layout as the rest of the presentation.
- If placeholders are not aligned correctly, you can use the ‘Align’ feature to ensure that they are properly aligned.
- If placeholders disappear, they may have been deleted accidentally. Check the layout master to see if they can be added back.
Advanced Techniques for Creating Your Own Customized Layouts
If you’re looking to take your presentation to the next level, you can create your own customized layouts. This requires some advanced knowledge of PowerPoint and design principles, but the results can be truly impressive. You can use graphic design tools such as Adobe Illustrator or Sketch to create custom graphics and import them into PowerPoint. You can also use the ‘Arrange’ and ‘Layer’ tools in PowerPoint to create more complex and intricate designs. The possibilities are endless!
Collaborating on a Presentation with Co-Authors Using Different Layouts
If you’re working on a presentation with co-authors who are using different layouts, it can be challenging to maintain consistency across different slides. One way to address this is to create a slide master that everyone can use. You can also agree on a set of design elements and color schemes that everyone can use across their slides. It’s also a good idea to communicate regularly with your co-authors to ensure that everyone is on the same page and working towards a common goal.
That’s it! We hope this article has provided you with the information you need to change the layout in PowerPoint with ease. Remember to keep it simple, engage your audience, and have fun!
By humans, for humans - Best rated articles:
Excel report templates: build better reports faster, top 9 power bi dashboard examples, excel waterfall charts: how to create one that doesn't suck, beyond ai - discover our handpicked bi resources.
Explore Zebra BI's expert-selected resources combining technology and insight for practical, in-depth BI strategies.

We’ve been experimenting with AI-generated content, and sometimes it gets carried away. Give us a feedback and help us learn and improve! 🤍
Note: This is an experimental AI-generated article. Your help is welcome. Share your feedback with us and help us improve.

Create your own theme in PowerPoint
To make a custom theme, start with a built-in Office theme and modify it by changing any of the colors, fonts, or effects:
Change the theme's color, font, and effect settings.
Save the settings as a new theme in your theme gallery.
These steps are described below.
Customizing theme elements
Edit a theme to modify the colors, fonts, or effects.
Select a heading below to open it and see the detailed instructions.
Change theme colors
Theme colors contain four text and background colors, six accent colors, and two hyperlink colors. Under Sample , you can see how the text font styles and colors look before you settle on your color combination.
On the Design tab, in the Variants group, select the down arrow that opens the gallery of color variants:
Select Colors , and then click Customize Colors .
The Create New Theme Colors dialog box opens.
In the Create New Theme Colors dialog box, under Theme colors , do one of the following:
Select the button next to the name of the theme color element (for example, Accent 1 or Hyperlink ) that you want to change, and then choose a color under Theme Colors .
Select More Colors , and do one of the following:
On the Standard tab, select a color.
On the Custom tab, enter a color formula number for the exact color that you want.
Repeat for all of the theme color elements that you want to change.
In the Name box, type an appropriate name for the new combination of theme colors, and then select Save .
Tip: If you want to return all theme color elements to their original theme colors, select Reset before you select Save .
After you've defined a custom color scheme, it's available on the Colors drop-down menu:
Change theme fonts
Changing the theme fonts updates all of the title and bullet text in your presentation.
In the Create New Theme Fonts dialog box, under the Heading font and Body font boxes, select the fonts that you want to use.
In the Name box, type an appropriate name for the new theme fonts, and then select Save .
Choose a set of theme effects
Theme effects include shadows, reflections, lines, fills, and more. While you cannot create your own set of theme effects, you can choose a set of effects that work for your presentation.
Select the set of effects that you want to use.
Save a theme
You’ll want to save the changes that you make to the colors, fonts, and effects as a theme (.thmx file). That way, you can apply this new theme to your other presentations.
On the View tab, select Slide Master . Then on the Slide Master tab, select Themes .
Click Save Current Theme .
In the File name box, type an appropriate name for the theme, and click Save .
Note: The revised theme is saved as a .thmx file in the Document Themes folder on your local drive, and it's automatically added to the list of custom themes on the
Customize your theme
To find a theme to use in your presentation, click the Design tab, click a theme, and see how it previews on the slide.
You can further customize the theme by changing the fonts, colors, and background colors on the Design tab.
To change the fonts and colors, click the down arrow in the Variants gallery, and then click Fonts , Colors , or Background Styles .
For more finely tuned customization, you can edit the slide master .
Save your customized theme
On the Design tab, hover over any theme, and click the down arrow button that shows below the themes panel.
When you save your theme to the Themes folder, it'll automatically show in the gallery under Custom Themes. If your theme isn't in the Themes folder, click Browse for Themes to look for your theme in its saved location.
Related information
What is a slide master?
Create or change slide layouts in PowerPoint for Mac
Create or delete a custom theme color
Overview of themes
A theme is a design scheme of colors, fonts, and background that you apply to your slides.
Using a theme gives your presentation a harmonious appearance with minimal effort. Text and graphics automatically take on the size, colors, and placement defined by the theme, which means less manual work as you create individual slides.
After you create a theme, it's located on the Design tab in the Themes gallery. To try out a theme, rest your mouse pointer over a thumbnail in the Themes gallery and notice how the look of your slide changes.
Here are four different themes applied to the same slide:
Understand the difference between PowerPoint templates and themes
Remove or change the current theme
Format the background color of slides
Download pre-designed themes from create.microsoft.com

Need more help?
Want more options.
Explore subscription benefits, browse training courses, learn how to secure your device, and more.
Microsoft 365 subscription benefits
Microsoft 365 training
Microsoft security
Accessibility center
Communities help you ask and answer questions, give feedback, and hear from experts with rich knowledge.
Ask the Microsoft Community
Microsoft Tech Community
Windows Insiders
Microsoft 365 Insiders
Was this information helpful?
Thank you for your feedback.
What lets you to create new presentation by selecting ready-made font...

What lets you to create new presentation by selecting ready-made font color and graphics effects?
A. Presentation Template
B. Master Slide
C. Design Template
D. Animation Scheme
Answer: Option C
Solution(By Examveda Team)
Source : office.com
This Question Belongs to Computer Fundamentals >> Power Point
Join The Discussion
Related Questions on Power Point
Which tab is not available on left panel when you open a presentation?
D. All of above are available
Which of the following statements is not true?
A. You can type text directly into a PowerPoint slide but typing in text box is more convenient.
B. From Insert menu choose Picture and then File to insert your images into slides.
C. You can view a PowerPoint presentation in Normal, Slide Sorter or Slide Show view.
D. You can show or hide task pane from View >> Toolbars.
To start Microsoft PowerPoint application
A. Click on Start > Programs > All Programs > Microsoft PowerPoint
B. Hit Ctrl + R then type ppoint.exe and Enter
C. Click Start > Run then type powerpnt then press Enter
D. All of above
Which of the following section does not exist in a slide layout?
D. Animations
More Related Questions on Power Point
Read More: MCQ Type Questions and Answers
- Arithmetic Ability
- Competitive Reasoning
- Competitive English
- Data Interpretation
- General Knowledge
- State GK
- History
- Geography
- Current Affairs
- Banking Awareness
- Computer Fundamentals
- Networking
- C Program
- Java Program
- Database
- HTML
- Javascript
- Computer Science
- Electronics and Communications Engineering
- Electrical Engineering
- Mechanical Engineering
- Civil Engineering
- Chemical Engineering
- Automobile Engineering
- Biotechnology Engineering
- Mining Engineering
- Commerce
- Management
- Philosophy
- Agriculture
- Sociology
- Political Science
- Pharmacy
.POTX File Extension: Understanding the Type of PowerPoint File Created When Saving a Presentation
- Recent Posts
- How to Color Code Folders in Outlook 365: A Step-by-Step Guide - May 23, 2024
- Tech Tips: How to Quickly Locate Folders for Emails in Outlook - May 23, 2024
- How to Easily Delete Templates in Outlook - May 23, 2024
When saving a presentation in Microsoft PowerPoint, you have the option to save it with a .potx file extension. But what exactly does this mean? Well, a .potx file is a PowerPoint template file that can be used to maintain the same layout, text, styles, and formatting across multiple .pptx files. Essentially, it’s a way to save a custom design or theme that you’ve created so that you can easily apply it to other presentations in the future.

To create a .potx file, you’ll need to modify a slide master and a set of slide layouts. This allows you to create a consistent look and feel throughout your presentation. Once you’ve created your custom design, you can save it as a template by selecting “Save As” and choosing “PowerPoint Template” from the list of file types. The template will then be saved to your computer and can be accessed from the “Custom” tab in the “New Presentation” window.
Using a .potx file can save you time and effort when creating new presentations, as you won’t have to recreate the same design elements each time. Additionally, it can help ensure consistency and professionalism in your presentations, as all of your slides will have a cohesive look and feel. So next time you’re working on a presentation in PowerPoint, consider saving it as a .potx file to make your life a little easier.
JUMP TO TOPIC
Choosing the Right Template
Understanding file extensions and formats, utilizing placeholders and slide design, working with fonts and colors, applying custom themes and effects, using save as for different formats, exporting to pdf and other file types, leveraging training courses and communities, exploring subscription benefits, creating a powerpoint presentation.

When creating a PowerPoint presentation, it is essential to choose the right template that fits your content. A template is a pre-designed set of slides that you can use as a starting point for your presentation. PowerPoint offers a wide variety of templates that you can choose from, or you can create your own custom template.
When choosing a template, it is important to consider the type of presentation you are creating. For example, if you are creating a business presentation, you might want to choose a template that has a professional look and feel. On the other hand, if you are creating a presentation for a school project, you might want to choose a template that is more fun and colorful.
When you save a presentation with a .potx file extension, you are creating a PowerPoint template. A template is a special type of PowerPoint file that is used as a starting point for creating new presentations. When you double-click a template, it creates a new, unsaved presentation based on the template. If you want to edit the template itself, you need to open it separately and make your changes.
PowerPoint supports several different presentation-file formats, including .ppt, .pptx, and .potx. Each file format has its own unique properties and uses. For example, .pptx is the default file format for PowerPoint 2007 and later versions, while .ppt is the default file format for earlier versions of PowerPoint.
Placeholders are pre-formatted areas on a slide where you can insert text, graphics, or other objects. They are an essential part of creating a PowerPoint presentation because they help you organize your content and make your slides look more professional.
Slide design is also an important aspect of creating a PowerPoint presentation. A well-designed slide can help you convey your message more effectively and keep your audience engaged. You can use a variety of design elements, including colors, fonts, and graphics, to create a visually appealing presentation.
In conclusion, creating a PowerPoint presentation involves choosing the right template, understanding file extensions and formats, and utilizing placeholders and slide design. By following these tips, you can create a professional-looking presentation that effectively conveys your message to your audience.
Customizing Your PowerPoint
Customizing your PowerPoint presentation is a great way to make it unique and stand out from the crowd. One of the best ways to do this is by working with fonts and colors. By customizing your fonts and colors, you can create a presentation that looks professional and is easy to read.
When it comes to working with fonts and colors, PowerPoint 2016, PowerPoint 2019, and PowerPoint 2021 all offer a range of options. You can choose from a variety of font styles and sizes, as well as a range of colors and color schemes. Additionally, you can create your own custom color schemes by selecting colors from the color picker or by creating your own color swatches.
To customize your fonts, simply select the text you want to change and then choose the font and size you want from the font menu. You can also adjust the font color and style, as well as add effects like shadows and reflections.
When it comes to customizing your colors, you can choose from a range of built-in color schemes or create your own custom color scheme. To create a custom color scheme, simply select the colors you want from the color picker and then save them as a new color swatch.
Another way to customize your PowerPoint presentation is by applying custom themes and effects. PowerPoint 2016, PowerPoint 2019, and PowerPoint 2021 all offer a range of built-in themes and effects, as well as the ability to create your own custom themes and effects.
To apply a custom theme or effect, simply select the slide or object you want to apply it to and then choose the theme or effect from the appropriate menu. You can also create your own custom themes and effects by selecting the appropriate options from the menu and then saving your changes.
Overall, customizing your PowerPoint presentation is a great way to make it stand out and look professional. By working with fonts and colors, as well as applying custom themes and effects, you can create a presentation that is unique and memorable. So why not give it a try and see what you can come up with?
Saving and Sharing Presentations
When it comes to creating and sharing presentations, it’s essential to have the right tools and knowledge. One of the most important aspects of sharing presentations is saving them in the right format. In this section, I’ll discuss how to save presentations with a .potx file extension and what type of PowerPoint file is created.
The Save As feature in PowerPoint allows you to save your presentation in different formats. When you save a presentation with a .potx file extension, you’re creating a PowerPoint template. Templates are pre-designed presentations that can be reused and customized. They are especially useful for businesses and organizations that need to create presentations with a consistent look and feel.
To save a presentation as a .potx file, you need to use the Save As dialog box. In the File name box, type a name for your template, and then select PowerPoint Template from the Save as type list. Once you’ve saved your template, you can share it with others and reuse it whenever you need to create a new presentation.
In addition to saving presentations as templates, you can also export them to other file types. For example, you can export a presentation to a PDF file, which is useful for sharing presentations with people who don’t have PowerPoint installed on their computers.
To export a presentation to a PDF file, go to the File tab and select Export. Then, select Create PDF/XPS Document and click Create PDF/XPS. In the Publish as PDF or XPS dialog box, select the options you want, and then click Publish.
PowerPoint also allows you to export presentations to other file types, such as PPTX, PPSX, XML, and ZIP. These file types are useful for sharing presentations with people who have different versions of PowerPoint or other presentation software.
In conclusion, saving presentations with a .potx file extension creates a PowerPoint template that can be reused and customized. Using the Save As feature in PowerPoint allows you to save presentations in different formats, including PDF and other file types. By understanding how to save and share presentations, you can create professional-looking presentations that are easily accessible and shareable.
Resources and Support
When it comes to creating PowerPoint presentations, there are many resources and support options available to help users get the most out of their software. One of the best ways to improve your skills is by taking training courses. Microsoft offers a variety of courses on their website, ranging from beginner to advanced levels. These courses are designed to help users learn the ins and outs of PowerPoint, from creating basic slides to incorporating multimedia and animations.
In addition to training courses, there are also online communities where users can connect with experts and other users to ask questions, share tips and tricks, and get advice on how to improve their presentations. These communities are a great resource for anyone looking to improve their skills and learn from others.
For those who have a Microsoft 365 subscription, there are additional benefits available. Microsoft 365 includes access to the latest version of PowerPoint, as well as other Office applications. This means users can take advantage of the newest features and tools available, which can help to streamline the presentation creation process.
In addition to access to the latest software, Microsoft 365 subscribers also have access to support from Microsoft experts. This can be invaluable for users who run into issues or need help troubleshooting problems.
Overall, there are many resources and support options available to help users get the most out of their PowerPoint software. Whether you’re looking to improve your skills through training courses or connect with other users through online communities, there are many options available to help you create engaging and effective presentations.
Related posts:
- Unfortunately, PowerPoint Cannot Read: Troubleshooting Tips
- How to Highlight Important Slides in PowerPoint: A Step-by-Step Guide
- Free Online Solution to Repair Damaged PowerPoint Files
- Error Occurred When PowerPoint Was Saving the File: How to Fix It
- Convert Text to SmartArt in PowerPoint: A Step-by-Step Guide
- Add Sound to PowerPoint Animation: A Step-by-Step Guide
- Vielen Dank für Ihre Aufmerksamkeit PowerPoint: Tips for an Engaging Presentation
- PowerPoint Error: File Not Saving – Troubleshooting Tips
- How to Easily Add Annotations in PowerPoint
- How to Easily Delete Comments in PowerPoint: A Step-by-Step Guide
- Create a Timeline in PowerPoint 2010: Step-by-Step Guide
- Add a Slide to an Existing PowerPoint Presentation: A Step-by-Step Guide
Leave a Comment Cancel reply
Save my name, email, and website in this browser for the next time I comment.
IMAGES
VIDEO
COMMENTS
Click on "Customize Fonts" to open a dialog box. There, you can set up your new Heading and Body fonts. Create a name for this font set and click on "Save." Here you can see how the Layout Slides change when employing the Slide Master functionality in PowerPoint: PRO TIP: If you want a more eye-catching result, install your own fonts in ...
1. Navigate to Slide Master View. Enter Slide Master View to create your own PowerPoint custom layout. Click on the View tab on PowerPoint's ribbon and choose Slide Master from the Master Views section on the ribbon. Choose View > Slide Master on PowerPoint's ribbon to edit the Slide Master and create your own layouts.
A template is a theme plus some content for a specific purpose—such as a sales presentation, a business plan, or a classroom lesson. So a template has design elements that work together (colors, fonts, backgrounds, effects) along with sample slides and boilerplate content that you augment to tell your story.
Select the Date and time placeholder and hit Ctrl + R on your keyboard to align the text to the right. Go up to the Insert tab and in the Text group, select Header & Footer. Click on Date and time so that there is a checkmark next to it. Click on the Date dropdown and select the option as required.
According to Microsoft Office, a PowerPoint template "is a pattern or blueprint of a slide or group of slides that you save as a .potx file. Templates can contain layouts, theme colors, theme fonts, theme effects, background styles, and even content.". In simpler terms, it's the formatting backbone of your PowerPoint presentation.
Select any of your layouts and click the option Insert Layout in the Edit Master group. It'll create a new type of slide you can edit and customize as you see fit. Use the option Insert Placeholder to add different kinds of elements to our new layout. #3. Adding a new Slide Master if necessary.
You can create a custom theme by modifying an existing theme or by starting from scratch with a blank presentation. Select your first slide, and then on the Design tab, select the down arrow in the Variants group. Select Colors, Fonts, Effects, or Background Styles and choose from built-in options or customize your own.
Choose a theme. The first step to create a consistent look for your presentation is to choose a theme that suits your purpose, content, and style. A theme is a set of predefined colors, fonts ...
Here is the process: Open your PowerPoint presentation. On the Design tab click on the Themes button. Hover over a theme thumbnail to preview it on the current slide. Click on a theme to apply it to all slides. The new theme will update the colors, fonts, effects and background styles across your entire presentation.
Select the slide that you want to change the layout for. Select Home > Layout. Select the layout that you want. The layouts contain placeholders for text, videos, pictures, charts, shapes, clip art, a background, and more. The layouts also contain the formatting for those objects, like theme colors, fonts, and effects.
To apply a background style: Click the Background Styles command in the Background group on the Design tab. Click a style to select it. The new background will appear in the slides. You can select Format Background from the menu to open a dialog box and make changes to the background color.
To make a custom theme, start with a built-in Office theme and modify it by changing any of the colors, fonts, or effects: Change the theme's color, font, and effect settings. Save the settings as a new theme in your theme gallery. These steps are described below.
Unlike a theme, a template is a blueprint of a group of slides that can help meet the topic of a presentation. Templates can contain layouts, fonts, colors, and background styles much like a theme. Much like a résumé template in Word, for instance, a template in PowerPoint prompts the user, suggesting sections and topics to include. As an ...
Here are five reasons to take advantage of presentation templates right now. 1. Create professional presentations quicker than ever. Sitting down to create a new presentation might feel daunting and even stressful when you're confronted by that blank slide. You have ideas. You have things you want to say.
This can be done by creating a new presentation with the desired theme, formatting, and layout, and then saving it as a custom theme. To do this, go to the File tab, click Save As, and select Office Theme (*.thmx) from the Save as type drop-down menu. Give your theme a name and click Save.
A theme includes the color palette for text, slide background colors and the default colors of charts or diagrams. Themes also include the fonts to be used in the presentation. PowerPoint has built-in color themes that you can customize. You will find the Colors in Slide Master view. From the application menu, View > Master > Slide Master.
Simply follow these steps: Select the slide you want to modify. Click on the 'Layout' button in the 'Slides' group on the 'Home' tab. Select the desired layout from the drop-down list of available layouts. All the content on the slide will be automatically arranged according to the new layout settings.
Start with a presentation template. Use the 20/30 rule when designing presentations. Prioritize visual appeal in design. The importance of organization. Form a brand identity. The power of color in brand identity. Emphasize data with charts, graphics and infographics. Utilize icons to add dynamics to your presentation.
Tool #4: Color Themes. While many of the presentation themes and templates come with an already established color scheme, absolutely nothing is set in stone. You can switch out the color of every item in your presentation to match your company or your topic. One great presentation tool that Visme has is color themes.
This brings up the Create New Theme Fonts dialog box, as shown in Figure 6.Here you can see the Heading (highlighted in red within Figure 6) and Body (highlighted in blue within Figure 6) fonts used for active theme.For now, press the Cancel button; we will revisit this dialog box soon.; Figure 6: Create New Theme Fonts dialog box To change the theme font just hover your cursor over any of the ...
set of unified design elements, such as backgrounds, effects, colors, fonts, and graphics. ... Slide layouts contain placeholders that position and hold _____ such as text, tables, videos, and pictures. ... with the Title Slide layout, following the general rules of having a title page for the presentation. By default, when you create a new ...
If your slides contain colors other than black and white, you cannot print them in grayscale or black and white. ... 18 of 25. Term. You can create a new presentation when PowerPoint is running. True. False. 19 of 25. Term. You must select the text or the text box before you change the font. True. False. 20 of 25. Term. You can choose the ...
To make a custom theme, start with a built-in Office theme and modify it by changing any of the colors, fonts, or effects: Change the theme's color, font, and effect settings. Save the settings as a new theme in your theme gallery. These steps are described below.
Phase 2: Onboarding and Welcoming New Employees. On their first day, you welcome new employees, introduce them to the team and give them a tour of the workplace. Phase 3: Training. During this phase, new hires learn the skills and knowledge needed through training sessions, workshops and mentorship.
A PowerPoint template is a pattern or blueprint of a slide or group of slides that you save as a .potx file. Templates can contain layouts, theme colors, theme fonts, theme effects, background styles, and even content. You can create your own custom templates and store them, reuse them, and share them with others.
With a template, all you need to do is customize the existing design and add your own content to create a stunning one-pager. You can get a head start with Visme's many pre-made, beautiful one-page designs. After selecting a template, take advantage of the graphs, diagrams, and figures available in the Visme editor. 4.
You can use a variety of design elements, including colors, fonts, and graphics, to create a visually appealing presentation. In conclusion, creating a PowerPoint presentation involves choosing the right template, understanding file extensions and formats, and utilizing placeholders and slide design.
Free online map maker. Make a custom map. Easy to create and customize. Professionally designed and formatted. Millions of photos, icons and illustrations. Easily download or share. Design stunning custom maps with ease. No art background or design software necessary. Use Canva's free online map maker and create your maps you can add to ...
Making multiple versions of the same design that only require small tweaks would normally be a manual and tedious effort. Now, you can speed up your marketing workflow with Bulk create. By uploading a CSV or Excel file you can quickly update images, text, and graphics across various designs in just a few clicks, saving you hours of time.
SquarePress and GoDaddy let you make adjustments, but they do it differently. Squarespace's Themes and Customization. Squarespace offers more than 100 themes to choose from. These templates allow for extensive customization. You can adjust colors, fonts, and buttons and even add custom CSS and custom 404 pages.